MEAN Machine - A beginner's practical guide to the JavaScript stack (2015)
Starting Angular
Let’s take a step back for a second. So far, we’ve worked our way through building an awesome backend, server-side service. We’ve learned how to create a RESTful API, how to use MongoDB to handle CRUD operations, and become fluent in Node.
Now we have to handle the other side of the coin: the frontend. We have to become familiar with Angular applications, how they are set up, and how we will access our Node API and data that we’ve built.
The State of JavaScript Applications
If you’ve built JavaScript applications before without a framework (let’s use jQuery as an example), a lot of times you are grabbing and placing data within your application using $('#divname').html() or $('#divname').append(variable). This causes problems since there isn’t a true source of data. You’re busy grabbing and placing numbers and elements here and there and sometimes you aren’t fully sure which is the latest and most valid piece of data.
In MVC applications, the true source of data comes from the model which is facilitated to the view by the controller. This means there is a solid workflow for grabbing data. The view is built to just display data and be as logic free as possible. The model and controller are really where data manipulation need to take place.
Angular helps solve these problems by treating front-end applications more like the back-end applications we’re used to. We like having data coming from a consistent place and just being injected into views. This keeps us sane since every part of our application has a true (singular) source of data.
Introduction
Angular calls itself “what HTML would have been, had it been designed for building web-apps”. It allows you as the developer to build out an MVC (model-view-controller) architecture for the frontend of your application. Since client-side applications are becoming more than just showing a static HTML page, new tools needed to be built to accommodate the growing JavaScript applications.
Angular allows you to extend HTML so you are building on standards and what you already know, not learning a whole new framework and starting your skills from scratch.
To beginners of Angular, building out their first application can truly seem like magic. That’s because it is… Okay not really, but it is an amazing tool for building incredible applications. Here are two big reasons why it can seem like magic.
Important Angular Concepts
Some awesome concepts about Angular that will carry over to all of the things we build are data-binding, dependency injection, and directives.
Data-Binding
Data-binding allows us to have a centralized source of data. We’ll be talking a lot on the single true source of data. Forget about injecting data into your views using the jQuery ways of append, val, html, or whatever else jQuery provides. We will use Angular’s amazing data-binding to handle all of that for us.
Let’s just imagine a scenario where you would create a variable in a controller. Then you would display that variable in your view. If you change the variable in your controller, it would automatically (automagically?) change in your view without you needing to inject it there (Angular does the injection for you by binding the variables in both places).
The Angular docs provide a good explanation of this feature: “The compilation step produces a live view. Any changes to the view are immediately reflected in the model, and any changes in the model are propagated to the view. The model is the single-source-of-truth for the application state, greatly simplifying the programming model for the developer. You can think of the view as simply an instant projection of your model.”
We’ll demo this in the starter Angular application for this chapter.
Dependency Injection
An Angular application is a collection of a lot of different modules like a controller to handle passing data to our views, a service (seen as a model) that interacts with an API, a directive that will help us manipulate our views further, and so much more. When building our applications, we will take the modular approach since that let’s us build testable, modular, and scalable applications.
Each module we build will be injected into our main application module to create the final product. Our main application will inherit the dependencies of the modules we inject into it and this is one of those times where you can use the saying: “the sum of its parts is greater than the whole”.
Directives
Directives are built into Angular and you’ll be dealing with them a ton. They are how we extend our HTML templates to tell Angular where and when to apply features to our views. Directives will let Angular know that certain HTML elements should be data-bound to Angular variables or functions we define. They can also help Angular manipulate our DOM.
jQuery teaches us to grab and inject into the DOM. Angular teaches us to manipulate data, which in turn, changes the DOM.
Let’s get to building out the application and talk more about concepts as we go along.
Setting Up An Angular Application
This demo won’t have any dynamic data from our Node API just yet. We’ll be hard-coding our data right into our Angular controllers. This will let us get a feel for Angular specific features first.
Here is the file structure for our Angular application. Notice that we won’t need any package.json or server.js file like our Node applications. This is a purely front-end application with just HTML/CSS/JS!
· js/
o app.js
· index.html
Super simple stuff! 2 files will get us everything we need for our first Angular application.
The things we are looking to accomplish with this application are:
1. setup an Angular frontend application
2. display data (message and a list) from our Angular controller to the view
3. show off data-binding by updating the message using an input box
Creating Your Angular App (app.js)
We will start by creating the main module for our application. Let’s go into that app.js file and see how Angular modules are made:
1 // name our angular app
2 angular.module('firstApp', [])
3
4 .controller('mainController', function() {
5
6 // bind this to vm (view-model)
7 var vm = this;
8
9 // define variables and objects on this
10 // this lets them be available to our views
11
12 // define a basic variable
13 vm.message = 'Hey there! Come and see how good I look!';
14
15 // define a list of items
16 vm.computers = [
17 { name: 'Macbook Pro', color: 'Silver', nerdness: 7 },
18 { name: 'Yoga 2 Pro', color: 'Gray', nerdness: 6 },
19 { name: 'Chromebook', color: 'Black', nerdness: 5 }
20 ];
21
22 });
You can see that the only thing necessary for an Angular module is to declare angular.module. We can then add a controller onto this module. When building out these applications, we’ll try to keep one feature on each application. This means we won’t be mixing controllers and services onto the same module. This goes back to the idea of having a compartmentalized application.
So far we have:
· created our main module called firstApp
· created a controller called mainController
· information in this controller will be bound to itself using vm
· created a variable called message
· created a list of items called computers
Notice how we defined the variable and our list on the vm variable. It is a good practice to bind the parent this in the controller to vm. This helps when referencing the controller since the word this can be used within JavaScript callbacks like success().
Controllers have properties defined on them and this is how we will be able to use them in our views with the controller as syntax. We’ll soon see exactly how this works.
That’s it! You just made your first Angular app! Now it doesn’t do much so let’s give it a pretty look by making our HTML file and applying this module to it.
Applying the Angular App (index.html)
Let’s start our basic HTML site. We’ll bring in Bootstrap and Angular via a CDN to keep things simple. Here’s the very beginnings of our index.html file:
1 <!DOCTYPE html>
2 <html lang="en">
3 <head>
4 <meta charset="UTF-8">
5 <title>My First Angular Application!</title>
6
7 <!-- CSS -->
8 <!-- load bootstrap and our stylesheet -->
9 <link rel="stylesheet" href="http://maxcdn.bootstrapcdn.com/bootstrap/3.2.0/\
10 css/bootstrap.min.css">
11 <style>
12 body { padding-top:50px; }
13 </style>
14
15 <!-- JS -->
16 <!-- load angular and our custom application -->
17 <script src="http://ajax.googleapis.com/ajax/libs/angularjs/1.3.8/angular.mi\
18 n.js"></script>
19 <script src="js/app.js"></script>
20 </head>
21 <body class="container">
22
23 </body>
24 </html>
This index.html file is barebones right now. We have loaded Bootstrap, adding a little CSS for spacing, and loaded Angular itself and our custom app.js. Nothing will happen if we view this in our browser yet since we haven’t applied our Angular app that we made to this view.
We talked about Angular directives earlier and this will be your first use of them. Angular provides directives to apply your application to your HTML. These are called ng-app and ng-controller. Let’s add the following to our <body> tag:
1 <!-- declare our angular application and angular controller -->
2 <body class="container" ng-app="firstApp" ng-controller="mainController as main">
We are using the controller as syntax and naming this controller as main. We can now call variables and functions from our controller by prefixing with the word main.
Now we have our application applied to the body of our HTML. You can also place controllers to specific sections of your site so that you have a controller for let’s say a sidebar and a controller for the main content. This even further compartmentalizes your site, but for this example, we’ll just apply one controller to everything.
Let’s do the next easiest step and display the message variable we created earlier.
Add the following inside of your <body> tag:
1 <div class="jumbotron">
2
3 <!-- display the message -->
4 <h2>This is my message:</h2>
5 {{ main.message }}
6
7 </div>
Now we can see the message in our browser! Notice how we defined this variable on the main keyword. Angular uses the curly brackets ({{ }}) to display items to the view and will look for variables and functions that were defined in our controller.
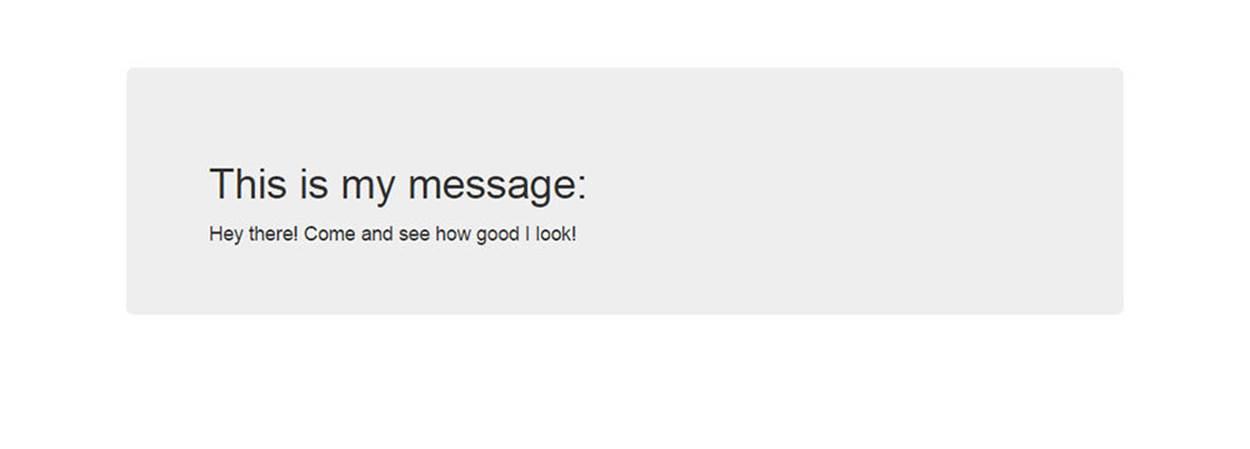
Show Message Variable
You just displayed your first variable to your view! Now let’s handle the list of computers. This will use another Angular directive called ng-repeat. You’ll be using this a lot in your views since it acts as a foreach for showing off data.
Add the following below the message section:
1 <!-- display the list using ng-repeat -->
2 <h2>This is my list:</h2>
3 <table class="table table-bordered">
4 <thead>
5 <tr>
6 <td>Name</td>
7 <td>Color</td>
8 <td>Nerd Level</td>
9 </tr>
10 </thead>
11 <tbody>
12 <tr ng-repeat="computer in main.computers">
13 <td>{{ computer.name }}</td>
14 <td>{{ computer.color }}</td>
15 <td>{{ computer.nerdness }}</td>
16 </tr>
17 </tbody>
18 </table>
Pretty neat right? Angular will know to loop over the computers and display each in its own table row.
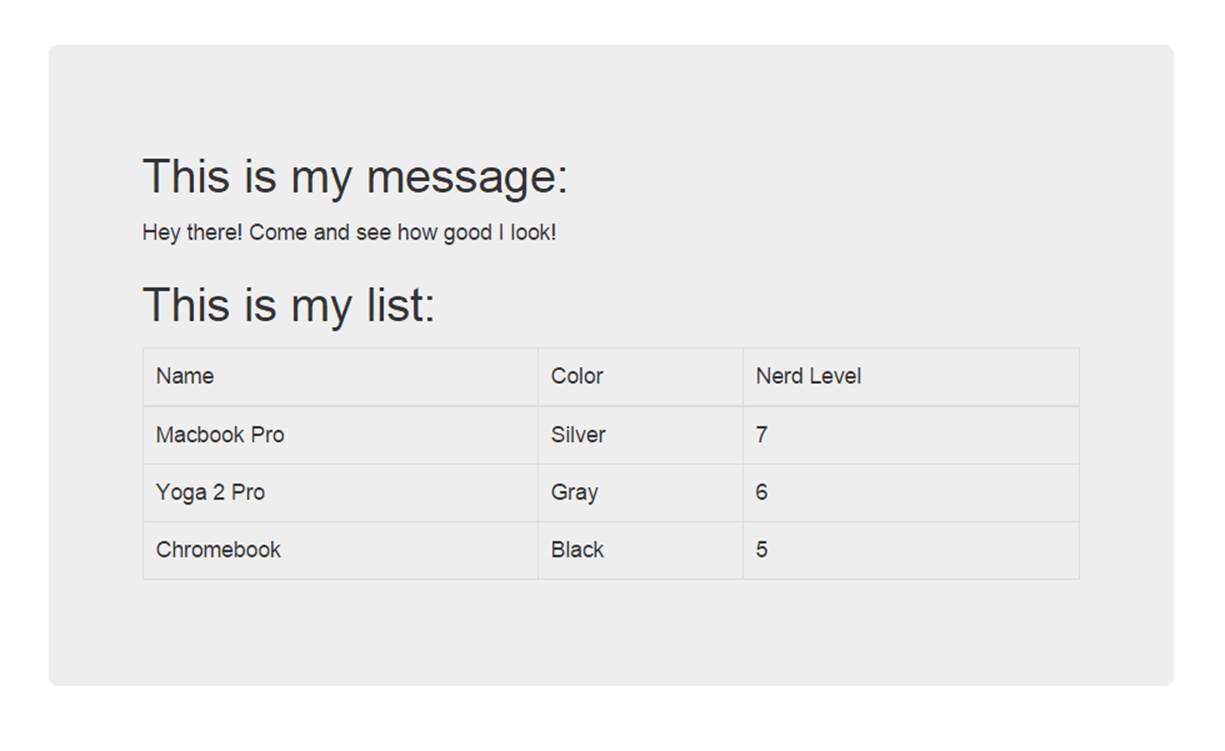
Show List
We’ll do one more thing for this demo. This is the magic part where we get to see data-binding in action.
We’ll place an input field on this site and use yet another Angular directive (see the trend?) called ng-model to bind an input to a variable. This will immediately change the message. You’ll see the change happen right before your eyes! Let’s add the input box above the message section:
1 <!-- form to update the message variable using ng-model -->
2 <div class="form-group">
3 <label>Message</label>
4 <input type="text" class="form-control" ng-model="main.message">
5 </div>
Now view the site in your browser and start typing into the input box. The message variable immediately changes thanks to the magic of Angular and its directives.
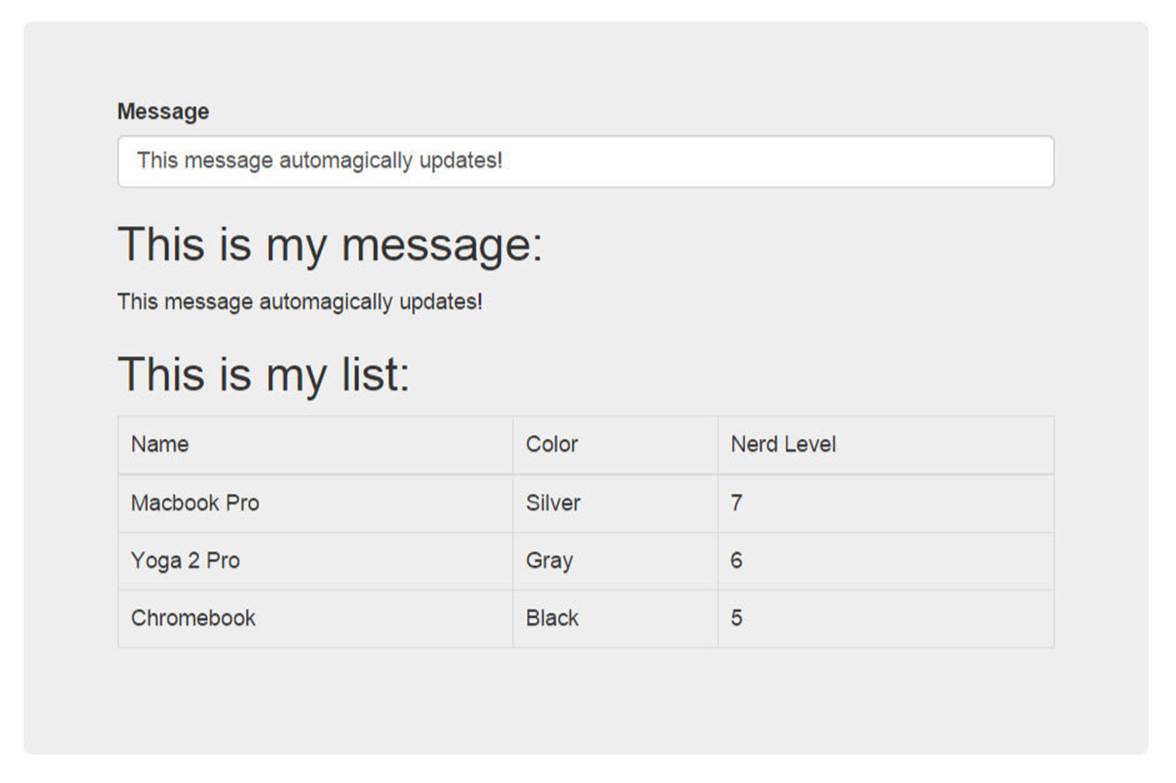
Show Data Binding
Here is a CodePen so that you can see all of this in action quickly. The full code is also available in the code repository for this book.

Tip
$scope vs. this
In other Angular tutorials around the web, you may have seen $scope as a way to bind information from the controller to the view. As of Angular 1.3, this method still exists, but it is encouraged to use controller as syntax.
There are many benefits to this approach since it keeps our code cleaner and more organized. It is even easier to read in our views how our controllers are used.
Here are two quick comparisons of using $scope and not using $scope.
1 <!-- with $scope -->
2 <div ng-app="myApp" ng-controller="mainController">
3 <p>{{ myVariable }}</p>
4 </div>
5
6 <!-- without $scope - controller as -->
7 <div ng-app="myApp" ng-controller="mainController as main">
8 <p>{{ main.myVariable }}</p>
9 </div>
This has many benefits, especially when we start nesting controllers. It will be easier to see which variables and functions live within each controller.
This also has the benefit that it will force you to prepare for the new Angular 2.0 syntax, which is expected in about a year. The Angular team has already declared that $scope will be killed off in favor of a syntax closer to controller as.
Don’t worry about Angular 2.0 though. If you build your Angular applications now using this syntax, migrating to the new version won’t be too painful.
Creating and Processing a Form
Now let’s move onto something more advanced. We will often want a form on our site and Angular makes processing forms incredibly easy. Let’s create a form that will add to our list of computers.
This will be done in two different parts:
1. Create an Angular function to handle processing the form and adding to our list
2. Add the HTML form and wire it up to work with the Angular function
Angular Function to Process a Form
Let’s add this Angular function to our controller.
1 // name our angular app
2 angular.module('firstApp', [])
3
4 .controller('mainController', function() {
5
6 ...
7
8 // information that comes from our form
9 vm.computerData = {};
10
11 vm.addComputer = function() {
12
13 // add a computer to the list
14 vm.computers.push({
15 name: vm.computerData.name,
16 color: vm.computerData.color,
17 nerdness: vm.computerData.nerdness
18 });
19
20 // after our computer has been added, clear the form
21 vm.computerData = {};
22 };
23
24 });
We will create an object to hold the data of our form called vm.computerData. This step isn’t necessary since Angular will automatically create it when it is needed, but we’ll define it for clarity.
We are also creating a function that will take the information out of vm.computerData and push it into our array of computers. When this is added, it should automatically add the computer to our table without the need to refresh the page (almost like magic).
After the computer has been added to the list, we will clear the form by clearing the object that contains the data. In jQuery applications, clearing a form could be accomplished with:
$('input').val('');
Not in Angular! We know all about data-binding now and since we clear the object on the Angular side of things, which will automatically clear the form on the view side.
With that out of the way, let’s create the HTML form and wire it to the function we just created.
The HTML Form
In our index.html file, under the HTML table of computers, add the following form:
1 <!-- form to add computer to the list -->
2 <form class="form-inline" ng-submit="main.addComputer()">
3
4 <input type="text" class="form-control" placeholder="Macbook" ng-model="main\
5 .computerData.name">
6 <input type="text" class="form-control" placeholder="Silver" ng-model="main.\
7 computerData.color">
8 <input type="number" class="form-control" placeholder="8" ng-model="main.com\
9 puterData.nerdness">
10
11 <button type="submit" class="btn btn-success">Add</button>
12 </form>
We have 3 different inputs here and one submit button. We have used ng-model to bind each input to a specific field in the computerData object we created in our Angular controller.
The new Angular directive we see here is ng-submit. This is used on forms and tells Angular what to do when the form is submitted. We are telling Angular to submit the form and use the function called addComputer() that we created in our controller.
Here is our form:

HTML Form
Go ahead and fill in some data and click Add. Watch as your table is automatically updated and the new computer is added immediately without a page refresh!
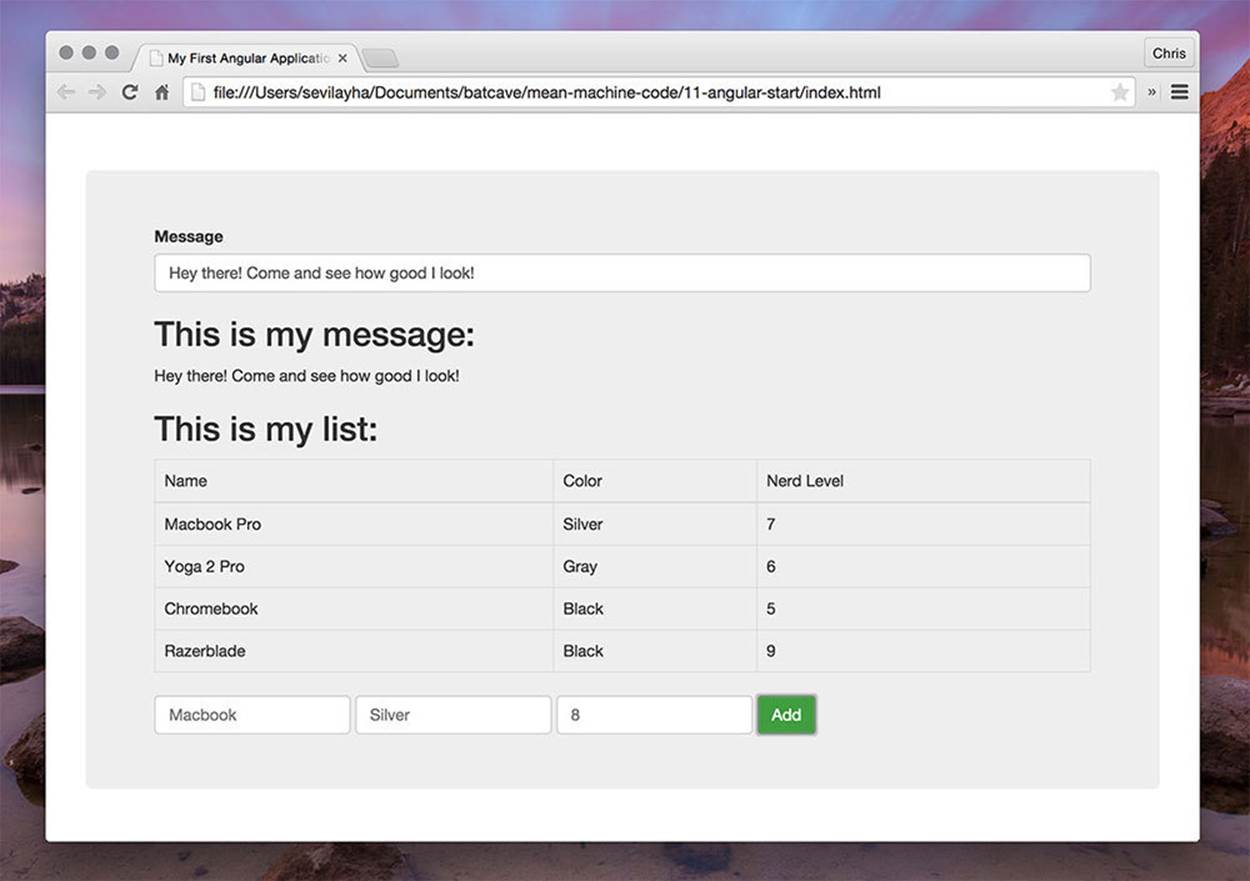
Computer Created
Conclusion
This chapter introduced you to quite a few Angular concepts all at once. They are all tools to help you build out amazing applications and we’ll be expanding on these even further in more advanced implementations. Data-binding, dependency injection, and directives are the foundation of Angular applications and you’ll use them all in every app you build.
Next up, we’ll explore routing our Angular applications so that we have more fully featured sites/applications with multiple pages.
# Routing Angular Applications
We’ll demonstrate Angular routing with a brand new Angular app/site. It will be good to create a few apps from scratch so that the process becomes familiar.
Before we start that new application, however, let’s talk about the different routing techniques Angular has. There are two main modules for providing routing features: ngRoute and AngularUI Router.