Microsoft Press Programming Windows Store Apps with HTML, CSS and JavaScript (2014)
Chapter 12 Input and Sensors
Touch is clearly one of the most exciting means of interacting with a computer and one that has finally come of age. Sure, we’ve had touch-sensitive devices for many years: I remember working with a touch-enabled screen in my college days, which I have to admit is almost an embarrassingly long time ago now! In that case, the touch sensor was a series of transparent wires embedded in a plastic sheet over the screen, with an overall touch resolution of around 60 wide by 40 high…and, to really date myself, the monitor itself was only a text terminal!
Now, touch screens are responsive enough for general purpose use (you don’t have to stab them to register a point), built into high-resolution displays, relatively inexpensive, and capable of doing something more than replicating the mouse, such as supporting multitouch and sophisticated gestures.
Because great touch interaction is a fundamental feature of great apps, designing for touch means in many ways thinking through UI concerns anew. In your layout, for example, it means making hit targets a size that’s suitable for a variety of fingers. In your content navigation, it means utilizing direct gestures such as swipes and pinches rather than relying on only item selection and navigation controls. Designing for touch also means thinking through how gestures might enrich the user experience—how to make most content directly interactive, and also how to provide for discoverability and user feedback that has generally relied on mouse-only events like hover.
All in all, approach your design as if touch is the only means of interaction your users will have. At the same time, it’s important to remember that new methods of input seldom obsolete existing ones. Sure, punch cards did eventually disappear, but the introduction of the mouse did not make keyboards obsolete. The availability of speech and handwriting recognition has obsoleted neither mouse nor keyboard. And I think the same is true for touch: it’s a complementary input method that has its own particular virtues but is unlikely to wholly supplant the others. As Bill Buxton of Microsoft Research has said, “Every modality, including touch, is best for something and worst for something else.” I expect, in time, most consumers will find themselves using keyboard, mouse, and touch together, just as we learned to integrate the mouse in what was once a keyboard-only reality.
Windows is designed to work well with all forms of input—to work great with touch, to work great with mice, to work great with keyboards, and, well, to just work great on diverse hardware. (And Windows Store certification essentially requires this for apps as well.) For this reason, Windows provides a unified pointer-based input model with which you can distinguish the different types of input if you really need to, but otherwise it treats them equally. You can also focus more on higher-level gestures as well, which might arise from any input source, and not worry about raw pointer events. Indeed, the fact that we haven’t even brought this subject up until now, midway through this book, gives testimony to just how transparently you work with all kinds of pointer input, especially when using controls that do the work for us. Handling such events ourselves thus arises primarily with custom controls and direct manipulation of noncontrol objects.
The keyboard also remains an important consideration, and this means both hardware keyboards and the on-screen “soft” keyboard. The latter has gotten more attention in recent years for touch-only devices but actually has been around for some time for accessibility purposes. In Windows, too, the soft keyboard includes a handwriting recognizer—something apps get for free. And when an app wants to work more closely with raw handwriting input—known as inking—those capabilities are present as well.
The other topic we’ll cover in this chapter is sensors. It might seem an incongruous subject to place alongside input until you come to see that sensors, like touch screens themselves, are another form of input! Sensors tell an app what’s happening to the device in its relationship to the physical world: how it’s positioned in space (relative to a number of reference points), how it’s moving through space, how it’s being held relative to its “normal” orientation, and even how much light is shining on it. Thinking of sensors in this light (pun intended), we begin to see opportunities for apps to directly integrate with the world around a device rather than requiring users to tell the app about those relationships in some abstract way. And just to warn you, once you see just how easy it is to use the WinRT APIs for sensors, you might be shopping for a new piece of well-equipped hardware!
Let me also mention that the sensors we’ll cover in this chapter are those for which specific WinRT APIs exist. There might be other peripherals that can also act as input devices, but we’ll come back to those generally in Chapter 17, “Devices and Printing.”
Touch, Mouse, and Stylus Input
Where pointer-based input is concerned—which includes touch, mouse, and pen/stylus input—the singular message from Microsoft has been and remains, “Design for touch and get mouse and stylus for free.” This is very much the case, as we shall see, but I’ve heard that a phrase like “touch-first design,” which sounds great to a consumer, can be a terrifying proposition for developers! With all the attention around touch, consumer expectations are often demanding, and meeting such expectations seems like it will take a lot of work.
Fortunately, Windows provides a unified framework for handling pointer input—from all sources—such that you don’t actually need to think about the differences until there’s a specific reason to do so. In this way, touch-first design is a design issue more than an implementation issue.
We’ll talk more about designing for touch soon. What I wanted to discuss first is how you as a developer should approach implementing those designs once you have them:
• First, use templates and standard controls and you get lots of touch support for free, along with mouse, pen, stylus, and accessibility-ready keyboard support. If you build your UI with standard controls, set appropriate tabindex attributes for keyboard users, and handle standard DOM events like click, you’re pretty much covered. Controls like Semantic Zoom already handle different kinds of input (as we saw in Chapter 7, “Collection Controls”), and other CSS styles like snap points and content zooming automatically handle various interaction gestures.
• Second, when you need to handle gestures yourself, as with custom controls or other elements with which the user will interact directly, use the gesture events like MSGestureTap and MSGestureHold along with event sequences for inertial gestures (MSGestureStart, MSGestureChange, andMSGestureEnd). Gestures are essentially higher-order interpretations of lower-level pointer events, meaning that you don’t have to do such interpretation yourself. For example, a pointer down followed by a pointer up within a certain movement threshold (to account for wiggling fingers) becomes a single tap gesture. A pointer down followed by a short drag followed by a pointer up becomes a swipe that triggers a series of events, possibly including inertial events (ones that continue to fire even after the pointer, like a touch point, is physically released).
• Third, if you need to handle pointer events directly, use the unified pointer events like pointerdown, pointermove, and so forth. These are lower-level events than gestures, and they are primarily appropriate for apps that don’t necessarily need gesture interpretation. For example, a drawing or inking app simply needs to trace different pointers with on-screen feedback, where concepts like swipe and inertia aren’t meaningful. Pointer events also provide more specialized device data such as pressure, rotation, and tilt, which is surfaced through the pointer events. Still, it is possible to implement gestures directly with pointer events, as a number of the built-in controls do.
• Finally, an app can work directly with the gesture recognizer to provide its own interpretations of pointer events into gestures.
So, what about legacy DOM events that we already know and love, beyond click? Can you still work with the likes of mousedown, mouseup, mouseover, mousemove, mouseout, and mousewheel? The answer is yes, because pointer events from all input sources will be automatically translated into these legacy events. This translation takes a little extra processing time, however, so for new code you’ll generally realize better responsiveness by using the gesture and pointer events directly. Legacy mouse events also assume a single pointer and will be generated only for the primary touch point (the one with the isPrimary property). As much as possible, use the gesture and pointer events in your code.
The Touch Language and Mouse/Keyboard Equivalents
On the Windows Developer Center, the rather extensive article on Touch interaction design is helpful for designers and developers alike. It discusses various ergonomic considerations, has some great diagrams on the sizes of human fingers, provides clear guidance on the proper size for touch targets given that human reality (falling between 30px and 50px), and outlines key design principles such as providing direct feedback for touch interaction (animation) and having content follow your finger.
Most importantly, the design guidance also describes the Windows Touch Language, which contains the eight core gestures that are baked into the system and the controls. The table below shows and describes the gestures and indicates what events appear in the app for them. The Touch interaction designtopic also has videos of these gestures. And for design guidelines around this touch language, see Gestures, manipulations, and interactions.

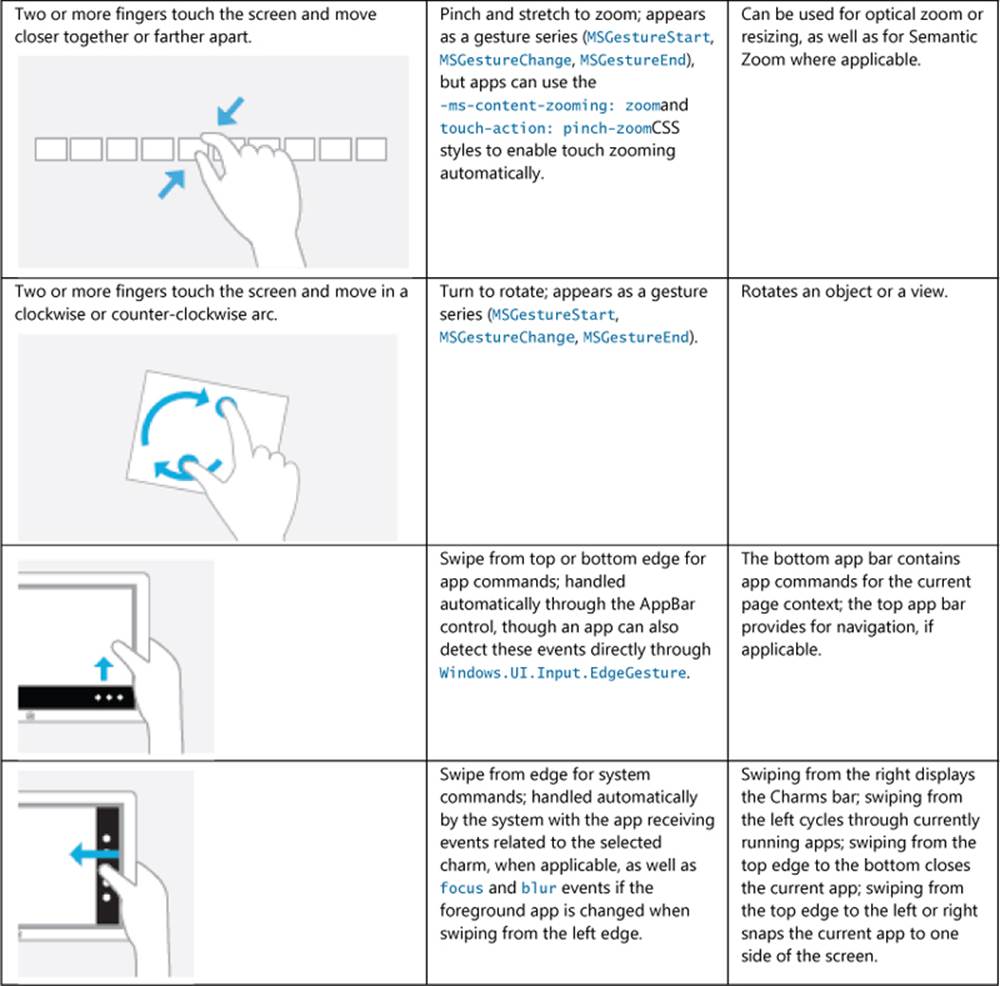
You might notice in the table above that many of the gestures in the touch language, like pinch and rotate, don’t have a single event associated with them but are instead represented by a series of gesture or pointer events. The reason for this is that these gestures, when used with touch, typically involve animation of the affected content while the gesture is happening. Swipes, for example, show linear movement of the object being panned or selected. A pinch or stretch movement will often be actively zooming the content. (Semantic Zoom is an exception, but then you just let the control handle the details.) And a rotate gesture should definitely give visual feedback. In short, handling these gestures with touch, in particular, means dealing with a series of events rather than just a single one.
This is one reason that it’s so helpful (and time-saving!) to use the built-in controls as much as possible, because they already handle all the gesture details for you. The ListView control, for example, contains all the pointer/gesture logic to handling pans and swipes, along with taps. The Semantic Zoom control, like I said, implements pinch and stretch by watching pointer* events. If you look at the source code for these controls within WinJS, you’ll start to appreciate just how much they do for you (and what it will look like to implement a rich custom control of your own, using the gesture recognizer!).
You can also save yourself a lot of trouble with the touch-action CSS properties described later under “CSS Styles That Affect Input.” Using this has the added benefit of processing the touch input on a non-UI thread, thereby providing much smoother manipulation than could be achieved by handling pointer or gesture events.
On the theme of “write for touch and get other input for free,” all of these gestures also have mouse and keyboard equivalents, which the built-in controls also implement for you. It’s also helpful to know what those equivalents are, as shown in the table below. “Standard Keystrokes” later in this chapter also lists many other command-related keystrokes.
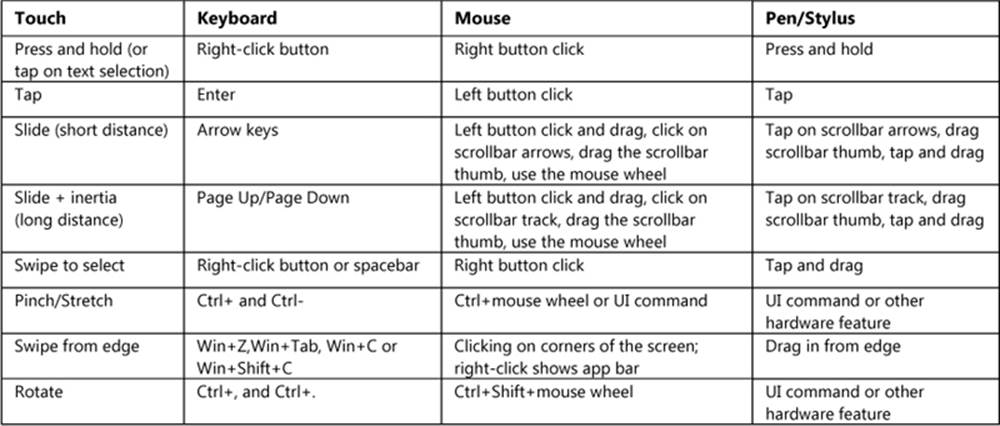
You might notice a conspicuous absence of double-click and/or double-tap gestures in this list. Does that surprise you? In early builds of Windows 8 we actually did have a double-tap gesture, but it turned out to not be all that useful, it conflicted with the zoom gesture, and it was sometimes very difficult for users to perform. I can say from watching friends over the years that double-clicking with the mouse isn’t even all it’s cracked up to be. People with not-entirely-stable hands will often move the mouse quite a ways between clicks, just as they might move their finger between taps. As a result, the reliability of a double-tap ends up being pretty low, and because it wasn’t really needed in the touch language, it was simply dropped altogether.
Sidebar: Creating Completely New Gestures?
While the Windows touch language provides a simple yet fairly comprehensive set of gestures, it’s not too hard to imagine other possibilities. The question is, when is it appropriate to introduce a new kind of gesture or manipulation?
First, avoid introducing new ways to do the same things, such as additional gestures that just swipe, zoom, etc. It’s better to get more creative in how the app interprets an existing gesture. For example, a swipe gesture might pan a scrollable region but can also just move an object on the screen—no need to invent a new gesture.
Second, if you have controls placed on the screen where you want the user to give input, there’s no need to think in terms of gestures at all: just apply the input from those controls appropriately.
Third, even when you do think a custom gesture is needed, the bottom-line recommendation is to make those interactions feel natural, rather than something you just invent for the sake of invention. Microsoft also recommends that gestures behave consistently with the number of pointers, velocity/time, and so on. For example, separating an element into three pieces with a three-finger stretch and into two pieces with a two-finger stretch is fine; having a three-finger stretch enlarge an element while a two-finger stretch zooms the canvas is a bad idea, because it’s not very discoverable. Similarly, the speed of a horizontal or vertical flick can affect the velocity of an element’s movement, but having a fast flick switch to another page and a slow flick highlight text is a bad idea. In this case, having different functions based on speed creates a difficult UI for your customers because they’ll all have different ideas about what “fast” and “slow” mean and might also be limited by their physical abilities.
Finally, with any custom gesture, recognize that you are potentially introducing an inconsistency between apps. When a user starts interacting with a certain kind of app in a new way, he or she might start to expect the same from other apps and might become confused (or upset) when those apps don’t behave identically, especially if the apps use a similar gesture for completely different purposes! Complex gestures, too, might be difficult for some, if not many, people to perform; might be limited by the kind of hardware in the device (number of touch points, responsiveness, etc.); and are generally not very discoverable. In most cases it’s simpler to add an appbar command or a button on your app canvas to achieve the same goal.
Edge Gestures
As we saw in Chapter 9, “Commanding UI,” you don’t need to do anything special for commands on the app bar or navigation bar to appear: Windows automatically handles the edge swipe from the top and bottom of your app, along with right-click, Win+Z, and the context menu key on the keyboard. That said, you can detect when these events happen directly by listening for the starting, completed, and canceled events on the Windows.UI.Input.EdgeGesture object (which are all WinRT events, these are subject to the considerations in “WinRT Events and removeEventListener” in Chapter 3, “App Anatomy and Performance Fundamentals”):
var edgeGesture = Windows.UI.Input.EdgeGesture.getForCurrentView();
edgeGesture.addEventListener("starting", onStarting);
edgeGesture.addEventListener("completed", onCompleted);
edgeGesture.addEventListener("canceled", onCanceled);
The completedevent fires for all input types; starting and canceled occur only for touch. Within these events, the eventArgs.kind property contains a value from the EdgeGestureKind enumeration that indicates the kind of input that invoked the event. The starting and canceled events will always have the kind of touch, obviously, whereas completed can be any touch, keyboard, or mouse:
function onCompleted(e) {
// Determine whether it was touch, mouse, or keyboard invocation
if (e.kind === Windows.UI.Input.EdgeGestureKind.touch) {
id(“ScenarioOutput”).innerText = “Invoked with touch.”;
}
else if (e.kind === Windows.UI.Input.EdgeGestureKind.mouse) {
id(“ScenarioOutput”).innerText = “Invoked with right-click.”;
}
else if (e.kind === Windows.UI.Input.EdgeGestureKind.keyboard) {
id(“ScenarioOutput”).innerText = “Invoked with keyboard.”;
}
}
The code above is taken from scenario 1 of the Edge gesture invocation sample(js/edgeGestureEvents.js). In scenario 2, the sample also shows that you can prevent the edge gesture event from occurring for a particular element by handling its contextmenu event and callingeventArgs.preventDefault in your handler. It does this for one element on the screen such that right-clicking that element with the mouse or pressing the context menu key when that element has the focus will prevent the edge gesture events:
document.getElementById("handleContextMenuDiv").addEventListener("contextmenu", onContextMenu);
function onContextMenu(e) {
e.preventDefault();
id("ScenarioOutput").innerText =
"The ContextMenu event was handled. The EdgeGesture event will not fire.";
}
Note that this method has no effect on edge gestures via touch and does not affect the Win+Z key combination that normally invokes the app bar. It’s primarily to show that if you need to handle the contextmenu event specifically, you usually want to prevent the edge gesture.
CSS Styles That Affect Input
While we’re on the subject of input, it’s a good time to mention a number of CSS styles that affect the input an app might receive. One style is –ms-user-select, which we’ve encountered a few times in Chapter 3 and Chapter 5, “Controls and Control Styling.” This style can be set to one of the following:
• none Disables direct selection, though the element as a whole can be selected if its parent is selectable.
• inherit Sets the selection behavior of an element to match its parent.
• text Enables selection for text even if the parent is set to none.
• element Enables selection for an arbitrary element.
• auto (the default) May or may not enable selection depending on the control type and the styling of the parent. For a nontext element that does not have contenteditable="true", it won’t be selectable unless it’s contained within a selectable parent.
If you want to play around with the variations, refer to the Unselectable content areas with -ms-user-select CSS attribute sample, which has the third longest JavaScript sample name in the entire Windows SDK!
A related style, but one not shown in the sample, is -ms-touch-select, which can be either none or grippers, the latter being the style that enables the selection control circles for touch:

Selectable text elements automatically get this style, as do other textual elements with contenteditable="true"—-ms-touch-select turns them off. To see the effect, try this with some of the elements in scenario 1 of the aforementioned sample with the really long name!
Tip The document.onselectionchange event will fire if the user changes the gripper positions.
In Chapter 8, “Layout and Views,” we introduced the idea of snap points for panning, with the -ms-scroll-snap* styles, and those for zooming, namely -ms-content-zooming and the -ms-content-zoom* (refer to the Touch: Zooming and Panning styles reference). The important thing is that -ms-content-zooming:zoom (as opposed to the default, none) enables automatic zooming with touch and the mouse wheel, provided that the element in question allows for overflow in both x and y dimensions. There are quite a number of variations here for panning and zooming and for how those gestures interact with WinJS controls. The HTML scrolling, panning, and zooming sampleexplains the details.
Finally, the touch-action style provides for a number of options on an element:89
• none Disables default touch behaviors like pan and zoom on the element. You often set this on an element when you want to control the touch behavior directly.
• auto Enables usual touch behaviors.
• pan-x/pan-y The element permits horizontal/vertical touchpanning, which is performed on the nearest ancestor that is horizontally/vertically scrollable, such as a parent div.
• pinch-zoom Enables pinch-zoom on the element, performed on the nearest ancestor that has -ms-content-zooming:zoom and overflow capability. For example, an img element by itself won’t respond to the gesture with this style, but it will if you place it in a parent div with overflow set.
• manipulation Shorthand equivalent of pan-x pan-y pinch-zoom.
For an example of panning and zooming, try creating a simple app with markup like this (use whatever image you’d like):
<div id="imageContainer">
<img id="image1" src="/images/flowers.jpg"/>
</div>
and style the container as follows:
#imageContainer {
overflow: auto;
-ms-content-zooming: zoom;
touch-action: manipulation;
}
What Input Capabilities Are Present?
The WinRT API in the Windows.Devices.Input namespace provides all the information you need about the capabilities that are available on the current device, specifically through these three objects:
• MouseCapabilities Properties are mousePresent (0 or 1), horizontalWheelPresent (0 or 1), verticalWheelPresent (0 or 1), numberOfButtons (a number), and swapButtons (0 or 1).
• KeyboardCapabilities Contains only a single property, keyboardPresent (0 or 1), to indicate the presence of a physical keyboard. It does not indicate the presence of the on-screen keyboard, which is always available.
• TouchCapabilities Properties are touchPresent (0 or 1) and contacts (a number). Where touch is concerned, you might also be interested in the Windows.UI.ViewManagement.UI-Settings.handPreference property, whichindicates the user’s right- or left-handedness.
To check whether touch is available, then, you can use a bit of code like this:
var tc = new Windows.Devices.Input.TouchCapabilities();
var touchPoints = 0;
if (tc.touchPresent) {
touchPoints = tc.contacts;
}
Note In the web context where WinRT is not available, some information about capabilities can be obtained through the msPointerEnabled, msManipulationViewsEnabled, and msMaxTouchPointsproperties that are hanging off DOM elements. These also work in the local context. ThemsPointerEnabled flag, in particular, tells you whether pointer* events are available for whatever hardware is available in the system. If those events are not supported, you’d use standard mouse events as an alternative.
You’ll notice that the capabilities above don’t say anything about a stylus or pen. For these and for more extensive information about all pointer devices, including touch and mouse, we have the Windows.Devices.Input.PointerDevice.getPointerDevices method. This returns an array ofPointerDevice objects, each of which has these properties:
• pointerDeviceType A value from PointerDeviceType that can be touch, pen, or mouse.
• maxContacts The maximum number of contact points that the device can support—typically 1 for mouse and stylus and any other number for touch.
• isIntegrated true indicates that the device is built into the machine so that its presence can be depended upon; false indicates a peripheral that the user could disconnect.
• physicalDeviceRect This Windows.Foundation.Rect object provides the bounding rectangle as the device sees itself. Oftentimes, a touch screen’s input resolution won’t actually match the screen pixels, meaning that the input device isn’t capable of hitting exactly one pixel. On one of my touch-capable laptops, for example, this resolution is reported as 968x548 for a 1366x768 pixel screen (as reported in screenRect below). A mouse, on the other hand, typically does match screen pixels one-for-one. This could be important for a drawing app that works with a stylus, where an input resolution smaller than the screen would mean there will be some inaccuracy when translating input coordinates to screen pixels.
• screenRect This Windows.Foundation.Rect object provides the bounding rectangle for the device on the screen, which is to say, the minimum and maximum coordinates that you should encounter with events from the device. This rectangle will take multimonitor systems into account, and it’s adjusted for resolution scaling.
• supportedUsages An array of PointerDeviceUsage structures that supply what’s called HID (human interface device) usage information. This subject is beyond the scope of this book, so I’ll refer you to the HID Usages page on MSDN for starters.
The Input Device capabilities sample in the Windows SDK retrieves this information and displays it to the screen through the code in js/pointer.js. I won’t show that code here because it’s just a matter of iterating through the array and building a big HTML string to dump into the DOM. In the simulator, the output appears as follows—notice that the simulator reports the presence of touch and mouse both in this case:
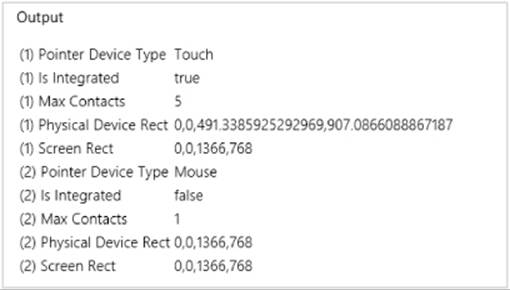
Curious Forge? Interestingly, I ran this same sample in Visual Studio’s Local Machine debugger on a laptop that is definitely not touch-enabled and yet a touch device was still reported as in the image above! Why was that? It’s because I still had the Visual Studio simulator running, which adds a virtual touch device to the hardware profile. After closing the simulator completely (not just minimizing it), I got an accurate report for my laptop’s capabilities. Be mindful of this if you’re writing code to test for specific capabilities.
Tried remote debugging yet? Speaking of debugging, testing an app against different device capabilities is a great opportunity to use remote debugging in Visual Studio. If you haven’t done so already, it takes only a few minutes to set up and makes it far easier to test apps on multiple machines. For details, see Running Windows Store apps on a remote machine.
Unified Pointer Events
For any situation where you want to work directly with touch, mouse, and stylus input, perhaps to implement parts of the touch language in this way, use the standard pointer* events as adopted by the app host and most browsers. Art/drawing apps, for example, will use these events to track and respond to screen interaction. Remember again that pointers are a lower-level way of looking at input than gestures, which we’ll see coming up. Which input model you use depends on the kind of events you’re looking to work with.
Tip Pointer events won’t fire if the system is trying to do a manipulation like panning or zooming. To disable manipulations on an element, set the -ms-content-zooming:none or -ms-touch-action:none, and avoid using -ms-touch-action styles of pan-x,pan-y, pinch-zoom, andmanipulation.
As with other events, you can listen to pointer* events90 on whatever elements are relevant to you, remembering again that these are translated into legacy mouse events, so you should not listen to both. The specific events are described as follows, given in the order of their typical sequencing:
• pointerover, pointerenter Pointer moved into the bounds of the element from outside; pointerover precedes pointerenter.
• pointerdown Pointer down occurred on the element.
• pointermove Pointer moved across the element, where a positive button state indicates pen hover (this replaces the Windows 8 MSPointerHover event). This will precede both pointerover and pointerenter when a pointer moves into an element.
• pointerup Pointer was released over the element. (If an element previously captured the touch, msReleasePointerCaptureis called automatically.) Note that if a pointer is moved outside of an element and released, it will receive pointerout but not pointerup.
• pointercancel The system canceled a pointer event.
• pointerout Pointer moved out of the bounds of the element, which also occurs with an up or cancel event.
• pointerleave Pointer moved out of the bounds of the element or one of its descendants, including as a result of a down event from a device that doesn’t support hover. This will follow pointerout.
• gotpointercapture The pointer is captured by the element.
• lostpointercapture The pointer capture has been lost for the element.
These are the names you use with addEventListener; the equivalent property names are of the form onpointerdown, as usual. It should be obvious that some of these events might not occur with all pointer types—touch screens, for instance, generally don’t provide hover events, though some that can detect the proximity of a finger are so capable.
Tip If for some reason you want to prevent the translation of a pointer* event into a legacy mouse event, call the eventArgs.preventDefault method within the appropriate event handler.
Tip Be mindful that the same pointer events are fired for all mouse buttons: the button property of the event args (as we'll see shortly) is what differentiates the left, middle, and right buttons.
The PointerEvents example provided with this chapter’s companion content and shown in Figure 12-1 lets you see what’s going on with all the mouse, pointer, and gesture events, selectively showing groups of events in the display.

FIGURE 12-1 The PointerEvents example display (screenshot cropped a bit to show detail).
Within the handlers for all of the pointer* events, the eventArgs object contains a whole roster of properties. One of them, pointerType, identifies the type of input: "touch", "pen", or "mouse". This property lets you implement different behaviors for different input methods, if desired (and note that these changed from integer values in Windows 8 to strings in Windows 8.1). Each event object also contains a unique pointerId value that identifies a stroke or a path for a specific contact point, allowing you to correlate an initial pointerdown event with subsequent events. When we look at gestures, we’ll also see how we use the pointerId of pointerdown to associate a gesture with a pointer.
The complete roster of properties that come with the event is actually far too much to show here, as it contains many of the usual DOM properties along with many pointer-related ones from an object type called PointerEvent (which is also what you get for click, dblclick, andcontextmenu events starting with Windows 8.1). The best way to see what shows up is to run some code like the Input DOM pointer event handling sample (a canvas drawing app), set a breakpoint within a handler for one of the events, and examine the event object. The table below describes some of the properties (and a few methods) relevant to our discussion here.
Performance tips Pointer events are best for quick responses to input, especially to touch, because they perform more quickly than gesture events. Also, avoid using an input event to render UI directly, because input events can come in much more quickly than screen refresh rates. Instead, use requestAnimationFrame to call your rendering function in alignment with screen refresh.
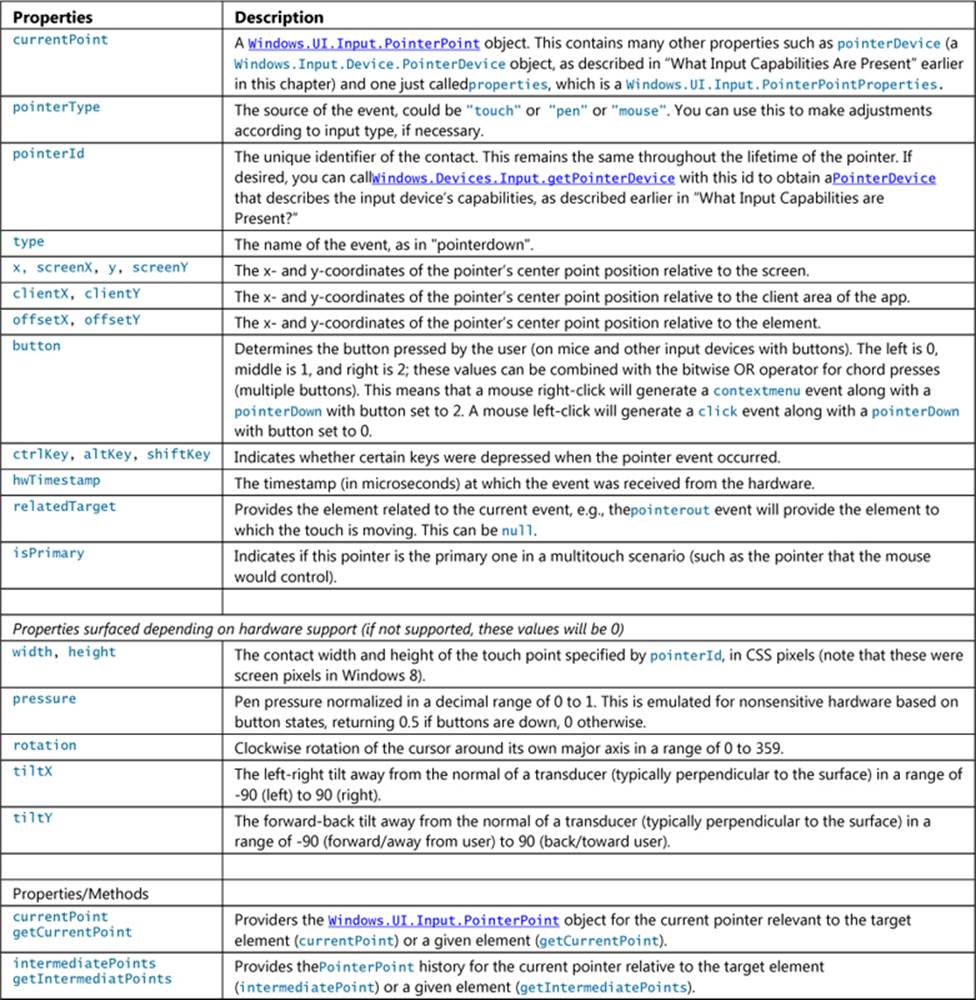
It’s very instructive to run the Input DOM pointer event handling sample on a multitouch device because it tracks each pointerId separately, allowing you to draw with multiple fingers simultaneously.
Pointer Capture
It’s common with down and up events for an element to set and release a capture on the pointer. To support these operations, the following methods are available on each element in the DOM and apply to each pointerId separately:

We see this in the Input DOM pointer event handling sample, where it sets capture within its pointerdown handler and releases it in pointerup (hs/canvaspaint.js):
this.pointerdown = function (evt) {
canvas.setPointerCapture(evt.pointerId);
// ...
};
this.pointerup = function (evt) {
canvas.releasePointerCapture(evt.pointerId);
// ...
};
Gesture Events
The first thing to know about all MSGesture* events is that they don’t fire automatically like click and pointer* events, so you don’t just add a listener and be done with it (that’s what click is for!). Instead, you need to do a little bit of configuration to tell the system how exactly you want gestures to occur, and you need to use pointerdown to associate the gesture configurations with a particular pointerId. This small added bit of complexity (and a small cost in overall performance) makes it possible for apps to work with multiple concurrent gestures and keep them all independent, just as you can do with pointer events. Imagine, for example, a jigsaw puzzle app that allows multiple people sitting around a table-size touch screen to work with individual pieces as they will. (The sample described in “The Input Instantiable Gesture Sample” later on is a bit like this.) Using gestures, each person can be manipulating an individual piece (or two!), moving it around, rotating it, perhaps zooming in to see a larger view, and, of course, testing out placement. For Windows Store apps written in JavaScript, it’s also helpful that manipulation deltas for configured elements—which include translation, rotation, and scaling—are given in the coordinate space of the parent element, meaning that it’s fairly straightforward to translate the manipulation into CSS transforms and such to animate the element with the manipulation. In short, there is a great deal of flexibility here when you need it; if you don’t, you can use gestures in a simple manner as well. Let’s see how it all works.
Tip If you’re observant, you’ll notice that everything described here has no dependency on WinRT APIs. As a result, these gesture events work in both the local and web contexts.
The first step to receiving gesture events is to create an MSGesture object and associate it with the element for which you’re interested in receiving events. In the PointerEvents example, that element is named divElement; you need to store that element in the gesture’s target property and store the gesture object in the element’s gestureObject property for use by pointerdown:
var gestureObject = new MSGesture();
gestureObject.target = divElement;
divElement.gestureObject = gestureObject;
With this association, you can then just add event listeners as usual. The example shows the full roster of the six gesture events:
divElement.addEventListener("MSGestureTap", gestureTap);
divElement.addEventListener("MSGestureHold", gestureHold);
divElement.addEventListener("MSGestureStart", gestureStart);
divElement.addEventListener("MSGestureChange", gestureChange);
divElement.addEventListener("MSGestureEnd", gestureEnd);
divElement.addEventListener("MSInertiaStart", inertiaStart);
We’re not quite done yet, however. If this is all you do in your code, you still won’t receive any of the events because each gesture has to be associated with a pointer. You do this within the pointerdown event handler:
function pointerDown(e) {
//Associate this pointer with the target's gesture
e.target.gestureObject.addPointer(e.pointerId);
}
To enable rotation and pinch-stretch gestures with the mouse wheel (which you should do), add an event handler for the wheel event, set the pointerId for that event to 1 (a fixed value for the mouse wheel), and send it on to your pointerdown handler:
divElement.addEventListener("wheel", function (e) {
e.pointerId = 1; // Fixed pointerId for MouseWheel
pointerDown(e);
});
Now gesture events will start to come in for that element. (Remember that the mouse wheel by itself means translate, Ctrl+wheel means zoom, and Shift+Ctrl+wheel means rotate.) What’s more, if additional pointerdown events occur for the same element with different pointerId values, the addPointer method will include that new pointer in the gesture. This automatically enables pinch-stretch and rotation gestures that rely on multiple points.
If you run the PointerEvents example (checking Ignore Mouse Events and Ignore Pointer Events) and start doing taps, tap-holds, and short drags (with touch or mouse), you’ll see output like that shown in Figure 12-2. The dynamic effect is shown in Video 12-1.
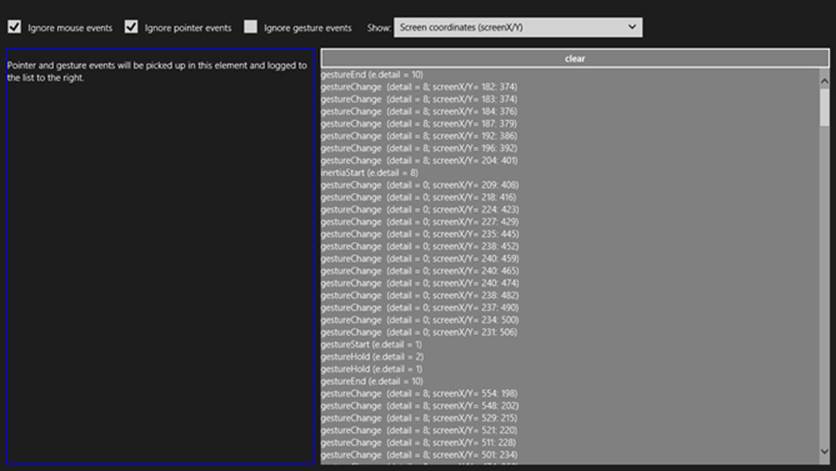
FIGURE 12-2 The PointerEvents example output for gesture events (screen shot cropped a bit to emphasize detail).
Again, gesture events are fired in response to a series of pointer events, offering higher-level interpretations of the lower-level pointer events. It’s the process of interpretation that differentiates the tap/hold events from the start/change/end events, how and when the MSInertiaStart event kicks off, and what the gesture recognizer does when the MSGesture object is given multiple points.
Starting with a single pointer gesture, the first aspect of differentiation is a pointer movement threshold. When the gesture recognizer sees a pointerdown event, it starts to watch the pointermove events to see whether they stay inside that threshold, which is the effective boundary for tap and hold events. This accounts for and effectively ignores small amounts of jiggle in a mouse or a touch point as illustrated (or shall I say, exaggerated!) below, where a pointer down, a little movement, and a pointer up generates an MSGestureTap:
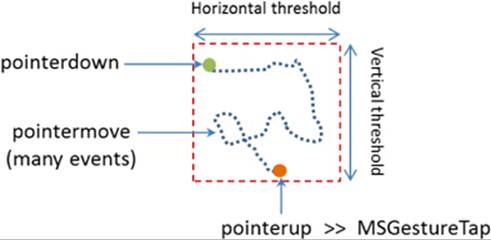
What then differentiates MSGestureTap and MSGestureHold is a time threshold:
• MSGestureTap occurs when pointerdown is followed by pointerup within the time threshold.
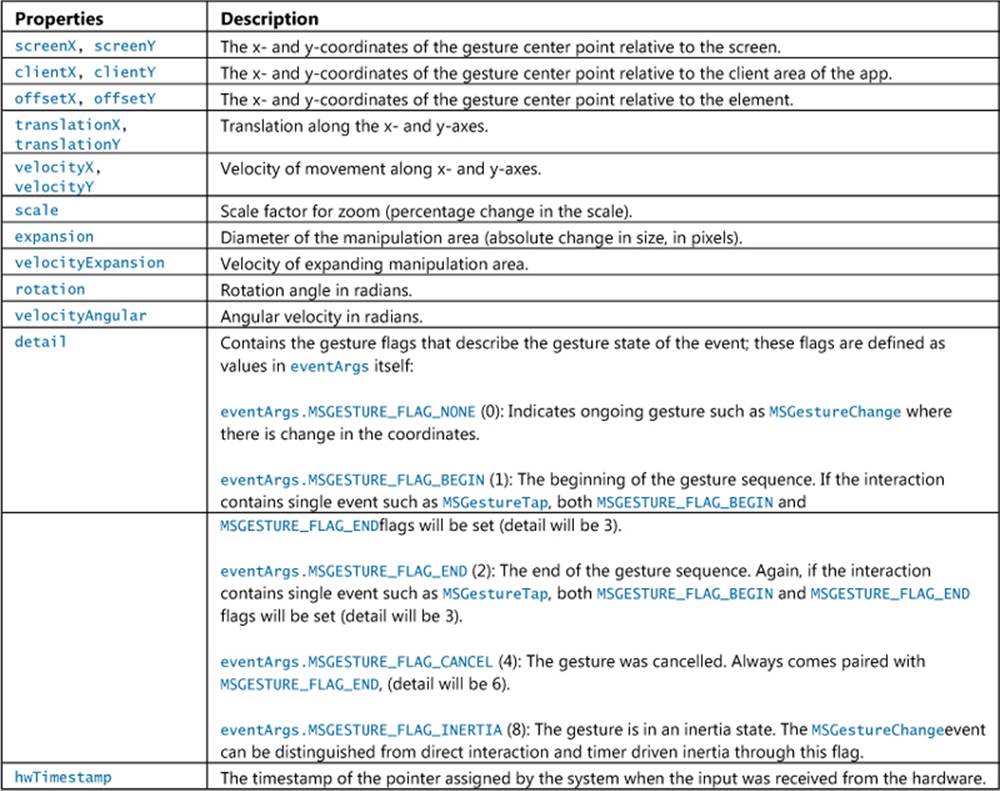
• MSGestureHold occurs when pointerdown is followed by pointerup outside the time threshold. MSGestureHold then fires once when the time threshold is passed with eventArgs.detail set to 1 (MSGESTURE_FLAG_BEGIN). Provided that the pointer is still within the movement threshold, MSGestureHold fires then again when pointerup occurs, with eventArgs.detail set to 2 (MSGESTURE_FLAG_END). You can see this detail included in the first two events of Figure 12-2 above.
The gesture flags in eventArgs.detail value is accompanied by many other positional and movement properties in the eventArgs object:
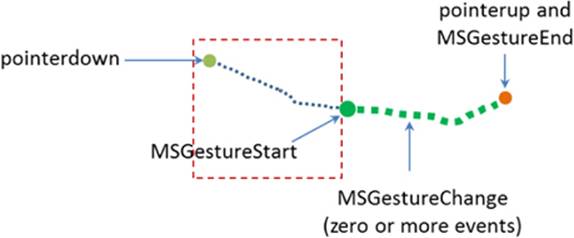
Many of these properties become much more interesting when a pointer moves outside the movement threshold, after which time you’ll no longer see the tap or hold events. Instead, as soon as the pointer leaves the threshold area, MSGestureStart is fired, followed by zero or moreMSGestureChange events (typically many more!), and completed with a single MSGestureEnd event:
Note that if a pointer has been held within the movement threshold long enough for the first MSGestureHold to fire with MSGESTURE_FLAG_BEGIN, but then the pointer is moved out of the threshold area, MSGestureHold will be fired a second time with MSGESTURE_FLAG_CANCEL | MSGESTURE_FLAG_END in eventArgs.detail (a value of 6), followed by MSGestureStart with MSGESTURE_FLAG_BEGIN. This series is how you differentiate a hold from a slide or drag gesture even if the user holds the item in place for a while.
Together, the MSGestureStart, MSGestureChange, and MSGestureEnd events define a manipulation of the element to which the gesture is attached, where the pointer remains in contact with the element throughout the manipulation. Technically, this means that the pointer was no longer moving when it was released.
If the pointer was moving when released, we switch from a manipulation to an inertial motion. In this case, an MSInertiaStart event gets fired to indicate that the pointer effectively continuesto move even though contact was released or lifted. That is, you’ll continue to receiveMSGestureChangeevents until the movement is complete:

Conceptually, you can see the difference between a manipulation and an inertial motion, as illustrated in Figure 12-3. The curves shown here are not necessarily representative of actual changes between messages. If the pointer is moved along the green line such that it’s no longer moving when released, we see the series of gesture that define a manipulation. If the pointer is released while moving, we see MSInertiaStart in the midst of MSGestureChange events and the event sequence follows the orange line.
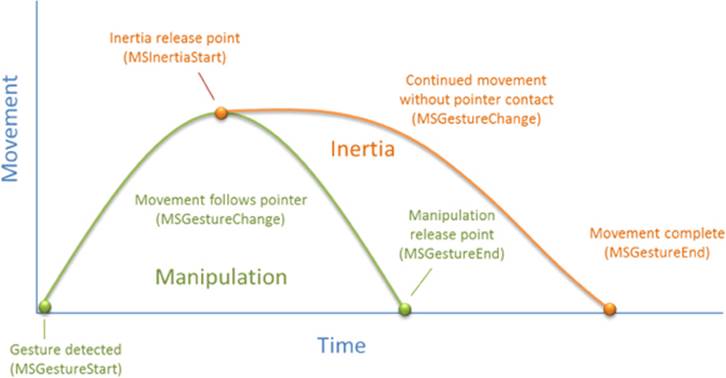
FIGURE 12-3 A conceptual representation of manipulation (green) and inertial (orange) motions.
Referring back to Figure 12-2, when the Show drop-down list (as shown!) is set to Velocity, the output for MSGestureChange events includes the eventArgs.velocity* values. During a manipulation, the velocity can change at any rate depending on how the pointer is moving. Once an inertial motion begins, however, the velocity will gradually diminish down to zero at which point MSGestureEnd occurs. The number of change events depends on how long it takes for the movement to slow down and come to a stop, of course, but if you’re just moving an element on the display with these change events, the user will see a nice fluid animation. You can play with this in the PointerEvents example, using the Show drop-down list to also look at how the other positional properties are affected by different manipulations and inertial gestures.
Multipoint Gestures
What we’ve discussed so far has focused on a single point gesture, but the same is also true for multi-point gestures. When an MSGesture object is given multiple pointers through its addPointer event, it will also fire MSGestureStart, MSGestureChange, MSGestureEnd for rotations and pinch-stretch gestures, along with MSInertiaStart. In these cases, the scale, rotation, velocityAngular, expansion, and velocityExpansion properties in the eventArgs object become meaningful.
You can selectively view these properties for MSGestureChange events through the upper-right drop-down list in the PointerEvents example. You might notice is that if you do multipoint gestures in the Visual Studio simulator, you’ll never see MSGestureTap events for the individual points. This is because the gesture recognizer can see that multiple pointerdown events are happening almost simultaneously (which is where the hwTimestamp property comes into play) and combines them into an MSGestureStart right away (for example, starting a pinch-stretch or rotation gesture).
Now I’m sure you’re asking some important questions. While I’ve been speaking of pinch-stretch, rotation, and translation gestures as different things, how does one, in fact, differentiate these gestures when they’re all coming into the app through the same MSGestureChange event? Doesn’t that just make everything confusing? What’s the strategy for translation, rotation, and scaling gestures?
Well, the answer is, you don’t have to separate them! If you think about it for a moment, how you handle MSGestureChange events and the data each one contains depends on the kinds of manipulations you actually support in your UI:
• If you’re supporting only translation of an element, you’ll simply never pay any attention to properties like scale and rotation and apply only those like translationX and translationY. This would be the expected behavior for selecting an item in a collection control, for example (or a control that allowed drag-and-drop of items to rearrange them).
• If you support only zooming, you’ll ignore all the positional properties and work with scale, expansion, and/or velocityExpansion. This would be the sort of behavior you’d expect for a control that supported optical or Semantic Zoom.
• If you’re interested in only rotation, the rotation and velocityAngular properties are your friends.
Of course, if you want to support multiple kinds of manipulations, you can simply apply all of these properties together, feeding them into combined CSS transforms. This would be expected of an app that allowed arbitrary manipulation of on-screen objects, and it’s exactly what one of the gesture samples of the Windows SDK demonstrates.
The Input Instantiable Gesture Sample
While the PointerEvents example included with this chapter gives us a raw view of pointer and gesture events, what really matters to apps is how to apply these events to real manipulation of on-screen objects, which is to say, implementing parts of touch language such as pinch/stretch and rotation. For these we can turn to the Input Instantiable gestures sample.
This sample primarily demonstrates how to use gesture events on multiple elements simultaneously. In scenarios 1 and 2, the app simulates a simple example of a puzzle app, as mentioned earlier. Each colored box can be manipulated separately, using drag to move (with or without inertia), pinch-stretch gestures to zoom, and rotation gestures to rotate, as shown in Figure 12-4 and demonstrated in Video 12-2.
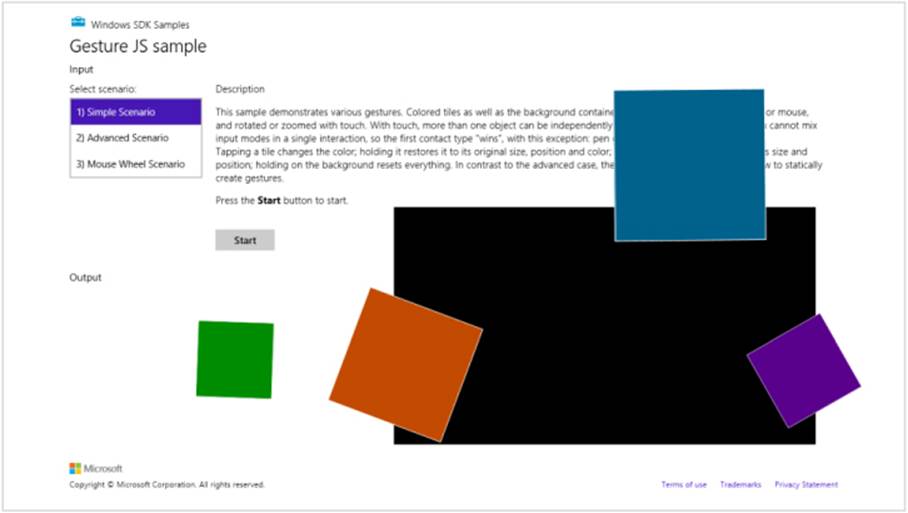
FIGURE 12-4 The Input Instantiable Gestures Sample after playing around a bit. The “instantiable” word comes from the need to instantiate an MSGesture object to receive gesture events.
In scenario 1 (js/instantiableGesture.js), an MSGesture object is created for each screen element along with one for the black background “table top” element during initialization (the initialize function). This is the same as we’ve already seen. Similarly, the pointerdown handler (onPointerDown) adds pointers to the gesture object for each element, adding a little more processing to manage z-index. This avoids having simultaneous touch, mouse, and stylus pointers working on the same element (which would be odd!):
function onPointerDown(e) {
if (e.target.gesture.pointerType === null) { // First contact
e.target.gesture.addPointer(e.pointerId); // Attaches pointer to element
e.target.gesture.pointerType = e.pointerType;
}
elseif (e.target.gesture.pointerType === e.pointerType) { // Contacts of similar type
e.target.gesture.addPointer(e.pointerId); // Attaches pointer to element
}
// ZIndex Changes on pointer down. Element on which pointer comes down becomes topmost
var zOrderCurr = e.target.style.zIndex;
var elts = document.getElementsByClassName("GestureElement");
for (var i = 0; i < elts.length; i++) {
if (elts[i].style.zIndex === 3) {
elts[i].style.zIndex = zOrderCurr;
}
e.target.style.zIndex = 3;
}
}
The MSGestureChange handler for each individual piece (onGestureChange) then takes all the translation, rotation, and scaling data in the eventArgs object and applies them with CSS. This shows how convenient it is that all those properties are already reported in the coordinate space we need:
function onGestureChange(e) {
var elt = e.target;
var m = new MSCSSMatrix (elt.style.msTransform);
elt.style.msTransform = m.
translate(e.offsetX, e.offsetY).
translate(e.translationX, e.translationY).
rotate(e.rotation * 180 / Math.PI).
scale(e.scale).
translate(-e.offsetX, -e.offsetY);
}
There’s a little more going on in the sample, but what we’ve shown here are the important parts. Clearly, if you didn’t want to support certain kinds of manipulations, you’d again simply ignore certain properties in the event args object.
Scenario 2 of this sample has the same output but is implemented a little differently. As you can see in its initialize function (js/gesture.js), the only events that are initially registered apply to the entire “table top” that contains the black background and a surrounding border. Gesture objects for the individual pieces are created and attached to a pointer within the pointerdown event (onTableTopPointerDown). This approach is much more efficient and scalable to a puzzle app that has hundreds or even thousands of pieces, because gesture objects are held only for as long as a particular piece is being manipulated. Those manipulations are also like those of scenario 1, where all the MSGestureChange properties are applied through a CSS transform. For further details, refer to the code comments in js/gesture.js, as they are quite extensive.
Scenario 3 of this sample provides another demonstration of performing translate, pinch-stretch, and rotate gestures using the mouse wheel. As shown in the PointerEvents example, the only thing you need to do here is process the wheel event, set eventArgs.pointerId to 1, and pass that on to your pointerdown handler that then adds the pointer to the gesture object:
elt.addEventListener("wheel", onMouseWheel, false);
function onMouseWheel(e) {
e.pointerId = 1; // Fixed pointerId for MouseWheel
onPointerDown(e);
}
Again, that’s all there is to it. (I love it when it’s so simple!) As an exercise, you might try adding this little bit of code to scenarios 1 and 2 as well.
The Gesture Recognizer
With inertial gestures, which continue to send some number of MSGestureChange events after pointers are released, you might be asking this question: What, exactly, controls those events? That is, there is obviously a specific deceleration model built into those events, namely the one around which the look and feel of Windows is built. But what if you want a different behavior? And what if you want to interpret pointer events in different way altogether?
The agent that interprets pointer events into gesture events is called the gesture recognizer, which you can get to directly through the Windows.UI.Input.GestureRecognizer object. After instantiating this object with new, you set its gestureSettings properties for the kinds of manipulations and gestures you’re interested in. The documentation for GestureSettings gives all the options here, which include tap, doubleTap, hold, holdWithMouse, rightTap, drag, translations, rotations, scaling, inertia motions, and crossSlide (swipe). For example, in the Input Gestures and manipulations with GestureRecognizer sample (js/dynamic-gestures.js) we can see how it configures a recognizer for tap, rotate, translate, and scale (with inertia):
gr = new Windows.UI.Input.GestureRecognizer();
// Configuring GestureRecognizer to detect manipulation rotation, translation, scaling,
// + inertia for those three components of manipulation + the tap gesture
gr.gestureSettings =
Windows.UI.Input.GestureSettings.manipulationRotate |
Windows.UI.Input.GestureSettings.manipulationTranslateX |
Windows.UI.Input.GestureSettings.manipulationTranslateY |
Windows.UI.Input.GestureSettings.manipulationScale |
Windows.UI.Input.GestureSettings.manipulationRotateInertia |
Windows.UI.Input.GestureSettings.manipulationScaleInertia |
Windows.UI.Input.GestureSettings.manipulationTranslateInertia |
Windows.UI.Input.GestureSettings.tap;
// Turn off UI feedback for gestures (we'll still see UI feedback for PointerPoints)
gr.showGestureFeedback = false;
The GestureRecognizer also has a number of properties to configure those specific events. With cross-slides, for example, you can set the crossSlideThresholds, crossSlideExact, and crossSlideHorizontally properties. You can set the deceleration rates (in pixels/ms2) throughinertiaExpansionDeceleration, inertiaRotationDeceleration, and inertiaTranslation-Deceleration.
Once configured, you then start passing pointer* events to the recognizer object, specific to its methods named processDownEvent, processMoveEvents, and processUpEvent (also processMouseWheelEvent, and processInertia, if needed). In response, depending on the configuration, the recognizer will then fire a number of its own events. First, there are discrete events like crossSliding, dragging, holding, rightTapped, and tapped. For all others it will fire a series of manipulationStarted, manipulationUpdated, manipulationInertiaStarting, and manipulationCompletedevents. Note that all of these come from WinRT, so be sure to call removeEventListener as needed.
When you’re using the recognizer directly, in other words, you’ll be listening for pointer* events, feeding them to the recognizer, and then listening for and acting on the recognizer’s specific events (as above) rather than the MSGesture* events that come out of the default recognizer configured by the MSGesture object.
Again, refer to the documentation on GestureRecognizer for all the details and refer to the sample for some bits of code. As one extra example, here’s a snippet to capture a small horizontal motion by using the manipulationTranslateX setting:
var recognizer = new Windows.UI.Input.GestureRecognizer();
recognizer.gestureSettings = Windows.UI.Input.GestureSettings.manipulationTranslateX;
var DELTA = 10;
myElement.addEventListener('pointerdown', function (e) {
recognizer.processDownEvent(e.getCurrentPoint(e.pointerId));
});
myElement.addEventListener('pointerup', function (e) {
recognizer.processUpEvent(e.getCurrentPoint(e.pointerId));
});
myElement.addEventListener('pointermove', function (e) {
recognizer.processMoveEvents(e.getIntermediatePoints(e.pointerId));
});
// Remember removeEventListener as needed for this event
recognizer.addEventListener('manipulationcompleted', function (args) {
var pt = args.cumulative.translation;
if (pt.x < -DELTA) {
// move right
}
elseif (pt.x > DELTA) {
// move left
}
});
Beyond the recognizer, do note that you can always go the low-level route and do your own processing of pointer* events however you want, completely bypassing the gesture recognizer. This would be necessary if the configurations allowed by the recognizer object don’t accommodate your specific need. At the same time, now is a good opportunity to re-read “Sidebar: Creating Completely New Gestures?” at the end of “The Touch Language and Mouse/Keyboard Equivalents” earlier. It addresses a few of the questions about when and whether custom gestures are needed.
Keyboard Input and the Soft Keyboard
After everything to do with touch and other forms of input, it seems almost anticlimactic to consider the humble keyboard, yet the keyboard remains utterly important for textual input, whether it’s a physical key-board or the on-screen “soft” keyboard. It’s especially important for accessibility as well, because some users are physically unable to use a mouse or other devices. In fact, the App certification requirements (section 6.13.4) requires that you disclose anything short of full keyboard support.
Fortunately, there is nothing special about handling keyboard input in a Windows Store app and a little goes a long way. Drawing from Implementing keyboard accessibility, here’s a summary:
• Process keydown, keyup, and keypress events as you already know how to do, especially for implementing special key combinations. See “Standard Keystrokes” later for a quick run-down of typical mappings.
• Have tabindex attributes on interactive elements that should be tab stops. Avoid adding tabindex to noninteractive elements because this will interfere with screen readers.
• Have accesskey attributes on those elements that should have keyboard shortcuts. Try to keep these simple so that they’re easier to use with the Sticky Keys accessibility feature.
• Call the DOM focus API on whatever element should be the default.
• Take advantage of the keyboard support that exists in built-in controls, such as the App Bar.
As an example, the Here My Am! app we’ve been working with in this book (in this chapter’s companion content) now has full keyboard support. This was mostly a matter of adding tabindex to a few elements, setting focus to the image area, and picking up keydown events on the imgelements for the Enter key and spacebar where we’ve already been handling click. Within those keydown events, note that it’s helpful to use the WinJS.Utilities.Key enumeration for comparing key codes:
var Key = WinJS.Utilities.Key;
var image = document.getElementById("photo");
image.addEventListener("keydown", function (e) {
if (e.keyCode == Key.enter || e.keyCode==Key.space) {
image.click();
}
});
All this works for both the physical keyboard as well as the soft keyboard. Case closed? Well, not entirely. Two special concerns with the soft keyboard exist: how to make it appear, and the effect of its appearance on app layout. After covering those, I’ll also provide a quick run-down of standard keystrokes for app commands.
Soft Keyboard Appearance and Configuration
The appearance of the soft keyboard happens for one reason and one reason only: the user touches a text input element or an element with the contenteditable="true" attribute (such as a div or canvas). There isn’t an API to make the keyboard appear, nor will it appear when you click in such an element with the mouse or a stylus or tab to it with a physical keyboard.
The configuration of the keyboard is also sensitive to the type of input control. We can see this through scenario 2 of the Input Touch keyboard text input sample, where html/ScopedViews.html contains a bunch of input controls (surrounding table markup omitted), which appear as shown in Figure 12-5:
<input type="url" name="url" id="url" size="50"/>
<input type="email" name="email" id="email" size="50"/>
<input type="password" name="password" id="password" size="50"/>
<input type="text" name="text" id="text" size="50"/>
<input type="number" name="number" id="number"/>
<input type="search" name="search" id="search" size="50"/>
<input type="tel" name="tel" id="tel" size="50"/>
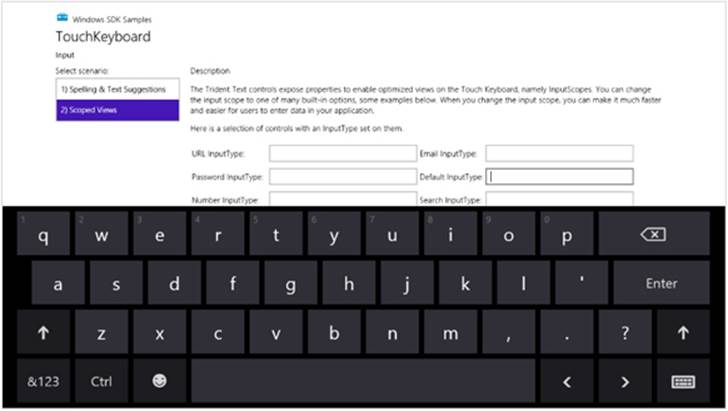
FIGURE 12-5 The soft keyboard appears when you touch an input field, as shown in the Input Touch keyboard text input sample (scenario 2). The exact layout of the keyboard changes with the type of input field.
What’s shown in Figure 12-5 is the default keyboard. If you tap in the Search field, you get pretty much the same view as Figure 12-5 except the Enter key turns into Search . For the Email field, it’s much like the default view except you get @ and .com keys near the spacebar:

The URL keyboard is the same except a few keys change and Enter turns into Go:

For passwords you get a key to hide keypresses (below, to the left of the spacebar), which prevents a visible animation from happening on the screen—a very important feature if you’re recording videos!

And finally, the Number and Telephone fields bring up a number-oriented view:

In all of these cases, the key on the lower right (whose icon looks a bit like a keyboard) lets you switch to other keyboard layouts:
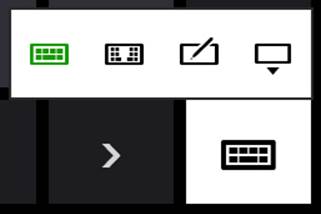
The options here are the normal (wide) keyboard, the split keyboard, a handwriting recognition panel, and a key to dismiss the soft keyboard entirely. Here’s what the default split keyboard and handwriting panels look like:


This handwriting panel for input is simply another mode of the soft keyboard: you can switch between the two, and your selection sticks across invocations. (For this reason, Windows does not automatically invoke the handwriting panel for a pen pointer, because the user may prefer to use the soft keyboard even with the stylus.)
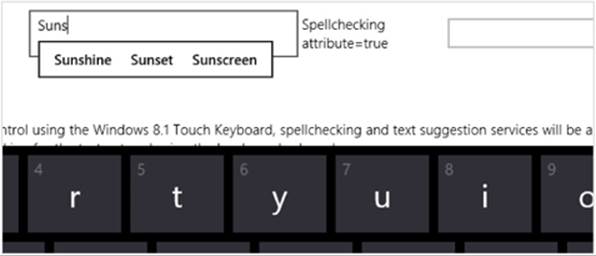
And although the default keyboard appears for text input controls, those controls also provide text suggestions for touch users. This is demonstrated in scenario 1 of the sample and shown below:
Adjusting Layout for the Soft Keyboard
The second concern with the soft keyboard (no, I didn’t forget!) is handling layout when the keyboard might obscure the input field with the focus.
When the soft keyboard or handwriting panel appears, the system tries to make sure the input field is visible by scrolling the page content if it can. This means that it just sets a negative vertical offset to your entire page equal to the height of the soft keyboard. For example, on a 1366x768 display (as in the simulator), touching the Telephone Input Type field in scenario 2 of the Input Touch keyboard text input sample will slide the whole page upward, as shown in Figure 12-6 and also Video 12-3.

FIGURE 12-6 When the soft keyboard appears, Windows will automatically slide the app page up to make sure the input field isn’t obscured.
Although this can be the easiest solution for this particular concern, it’s not always ideal. Fortunately, you can do something more intelligent if you’d like by listening to the hiding and showing events of the Windows.UI.ViewManagement.InputPane object and adjust your layout directly. Code for doing this can be found in the—are you ready for this one?—Responding to the appearance of the on-screen keyboard sample.91 Adding listeners for these events is simple (see the bottom of js/keyboardPage.js, which also removes the listeners properly):
var inputPane = Windows.UI.ViewManagement.InputPane.getForCurrentView();
inputPane.addEventListener("showing", showingHandler, false);
inputPane.addEventListener("hiding", hidingHandler, false);
Within the showing event handler, the eventArgs.occludedRect object (a Windows.-Foundation.Rect) gives you the coordinates and dimensions of the area that the soft keyboard is covering. In response, you can adjust whatever layout properties are applicable and set theeventArgs.ensuredFocusedElementInView property to true . This tells Windows to bypass its automatic offset 'margin-top:12.0pt;margin-right:0cm;margin-bottom:12.0pt;margin-left: 0cm'>function showingHandler(e) {
if (document.activeElement.id === "customHandling") {
keyboardShowing(e.occludedRect);
// Be careful with this property. Once it has been set, the framework will
// do nothing to help you keep the focused element in view.
e.ensuredFocusedElementInView = true;
}
}
The sample shows both cases. If you tap on the aqua-colored defaultHandling element on the bottom left of the app, as shown in Figure 12-7, this showingHandler does nothing, so the default behavior occurs. See the dynamic effect in Video 12-4.

FIGURE 12-7 Tapping on the left defaultHanding element at the bottom shows the default behavior when the keyboard appears, which offsets other page content vertically.
If you tap the customHandling element (on the right), it calls its keyboardShowing routine to do layout adjustment:
function keyboardShowing(keyboardRect) {
// Some code omitted...
var elementToAnimate = document.getElementById("middleContainer");
var elementToResize = document.getElementById("appView");
var elementToScroll = document.getElementById("middleList");
// Cache the amount things are moved by. It makes the math easier
displacement = keyboardRect.height;
var displacementString = -displacement + "px";
// Figure out what the last visible things in the list are
var bottomOfList = elementToScroll.scrollTop + elementToScroll.clientHeight;
// Animate
showingAnimation = KeyboardEventsSample.Animations.inputPaneShowing(elementToAnimate,
{ top: displacementString, left: "0px" }).then(function () {
// After animation, layout in a smaller viewport above the keyboard
elementToResize.style.height = keyboardRect.y + "px";
// Scroll the list into the right spot so that the list does not appear to scroll
elementToScroll.scrollTop = bottomOfList - elementToScroll.clientHeight;
showingAnimation = null;
});
}
The code here is a little involved because it’s animating the movement of the various page elements. The layout of affected elements—namely the one that is tapped—is adjusted to make space for the keyboard. Other elements on the page are otherwise unaffected. The result is shown inFigure 12-8. Again, the dynamic effect is shown in Video 12-4 in contrast to the default effect.
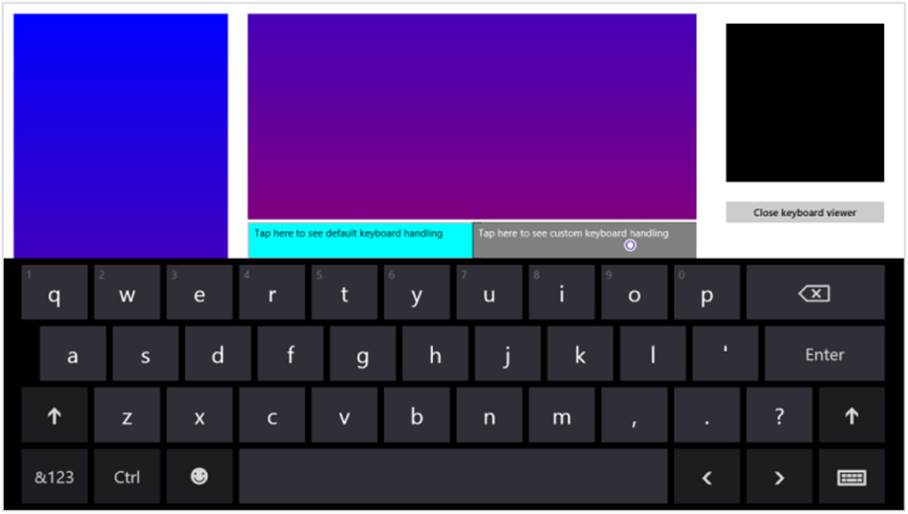
FIGURE 12-8 Tapping the gray customHandling element on the right shows custom handling for the keyboard’s appearance.
Standard Keystrokes
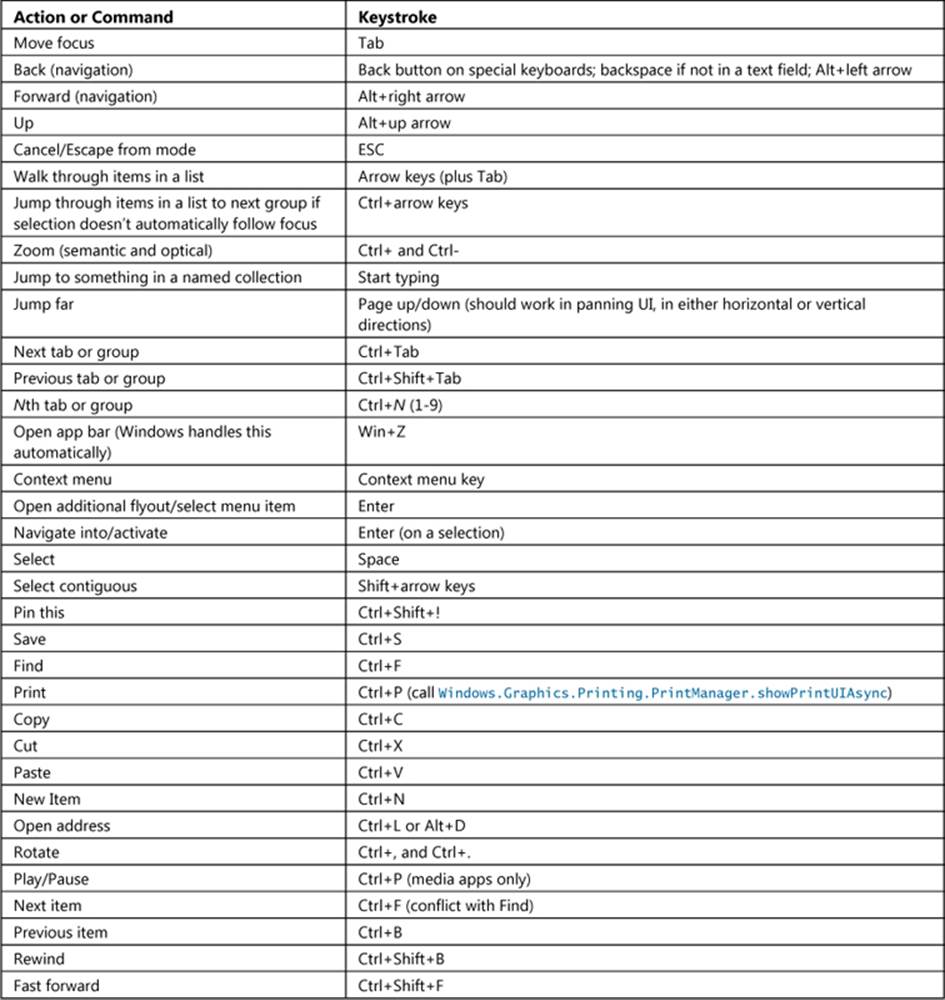
The last piece I wanted to include on the subject of the keyboard is a table of command keystrokes you might support in your app. These are in addition to the touch language equivalents, and you’re probably accustomed to using many of them already. They’re good to review because, again, apps should be fully usable with just the keyboard and implementing keystrokes like these goes a long way toward fulfilling that requirement and enabling more efficient use of your app by keyboard users.
Inking
Beyond the built-in soft keyboard/handwriting pane, an app might also want to provide a surface on which it can directly accept pointer input as ink. By this I mean more than just having a canvas element and processing pointer* events to draw on it to produce a raster bitmap. Ink is a data structure that maintains the complete input stream—including pressure, angle, and velocity if the hardware supports it—which allows for handwriting recognition and other higher-level processing that isn’t possible with raw pixel data. In other words, ink remembers how an image was drawn, not just the final image itself, and it works with all types of pointer input.
Ink support in WinRT is found in the Windows.UI.Input.Inking namespace. This API doesn’t depend on any particular presentation framework, nor does it provide for rendering: it deals only with managing the data structures that an app can process however it wants or simply render to a drawing surface such as a canvas. Here’s how inking works:
• Create an instance of the manager object with new Windows.UI.Input.Inking.-InkManager().
• Assign any drawing attributes by creating an InkDrawingAttributes object and settings attributes like the ink color, fitToCurve (as opposed to the default straight lines), ignorePressure, penTip (PenTipShape.circle or rectangle), and size (a Windows.Foundation.Size object with heightand width).
• For the input element, listen for the pointerdown, pointermove, and pointerup events, which you generally need to handle for display purposes anyway. The eventArgs.currentPoint is a Windows.UI.Input.PointerPoint object that contains a pointer id, point coordinates, and properties like pressure, tilt, and twist.
• Pass that PointerPoint object to the ink manager’s processPointerDown, processPointer-Update, and processPointerUp methods, respectively.
• After processPointerUp, the ink manager will create an InkStroke object for that path. Those strokes can then be obtained through the ink manager’s getStrokes method and rendered as desired.
• Higher-order gestures can be also converted into InkStroke objects directly and given to the manager through its addStroke method. Stroke objects can also be deleted with deleteStroke.
The ink manager also provides methods for performing handwriting recognition with its contained strokes, saving and loading the data, and handling different modes like draw and erase. For a complete demonstration, check out the Input Ink sample that is shown in Figure 12-9. This sample lets you see the full extent of inking capabilities, including handwriting recognition.
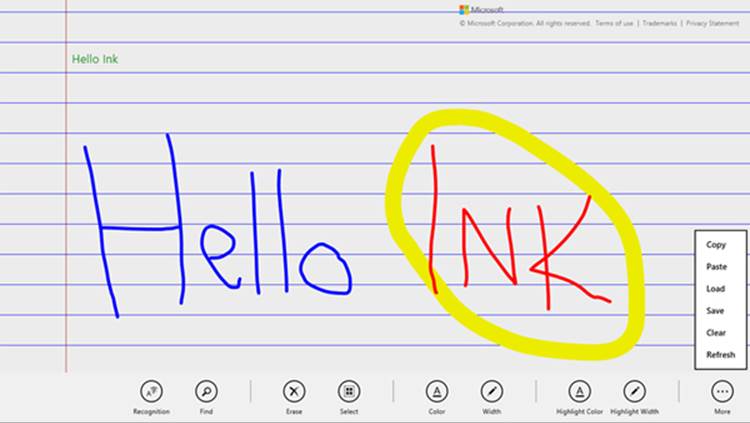
FIGURE 12-9 The Input Ink sample with many commands on its app bar. The small, green “Hello Ink” text in the upper left was generated by tapping the Recognition command.
The SDK also includes the Input Simplified ink sample to demonstrate a more focused handwriting recognition scenario, as shown in Figure 12-10. You should know that this is one sample that doesn’t support touch at all—it’s strictly for mouse or stylus, and it uses keystrokes for various commands instead of an app bar. Look at the keydown function in simpleink.js for a list of the Ctrl+key commands; the spacebar performs recognition of your strokes, and the backspace key clears the canvas. As you can see in the figure, I think the handwriting recognition is quite good! (It tells me that the handwriting samples I gave to an engineering team at Microsoft somewhere in the early 1990s must have made a valuable contribution.)
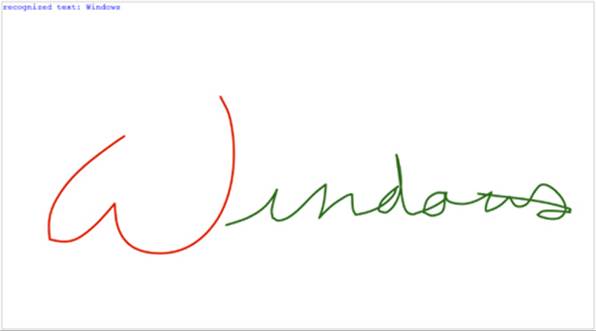
FIGURE 12-10 The Input Simplified Ink sample doing a great job recognizing my sloppy mouse-based handwriting.
Geolocation
Before we explore sensors more generally, I want to separately call out the geolocation capabilities for Windows Store apps because its API is structured differently from other sensors. We’ve already used this since Chapter 2, “Quickstart,” in the Here My Am! app, but we need the more complete story of this highly useful capability.
Unlike all other sensors, in fact, geolocation is the only one that has an associated capability you must declare in the manifest. Where you are on the earth is an absolute measure, if you will, and is therefore classified as a piece of personal information. So, users must give their consent before an app can obtain that information, and to pass Windows Store certification your app must also provide a Privacy Statement about how it will use that information. Other sensor data, in contrast, is relative—you cannot, for example, really know anything about a person from how a device is tilted, how it’s moving, or how much light is shining on it. Accordingly, you can use those others sensors without declaring any specific capabilities.
As you might know, geolocation can be obtained in two different ways. The primary and most precise way, of course, is to get a reading from an actual GPS radio that is talking to geosynchronous satellites some hundreds of miles up in orbit. The other reasonably useful means, though not always accurate, is to attempt to find one’s position through the IP address of a wired network connection or to triangulate from the position of available Wi-Fi hotspots. Whatever the case, WinRT will do its best to give you a decent reading.
To access geolocation readings, you must first create an instance of the WinRT geolocator, Windows.Devices.Geolocation.Geolocator. With that in hand, you can then call its getGeopositionAsync method, whose result, delivered to your completed handler, is a Geoposition object (in the same Windows.Devices.Geolocation namespace, as everything here is unless noted). Here’s the code as it appears in Here My Am!:
//Make sure this variable stays in scope while getGeopositionAsync is happening.
varlocator = new Windows.Devices.Geolocation.Geolocator();
locator.getGeopositionAsync().done(function (position) {
varposition = geocoord.coordinate.point.position;
//Save for share
app.sessionState.lastPosition =
{ latitude: position.latitude, longitude: position.longitude };
}
Tip As suggested by the code comment here, the variable that holds the Geolocator object must presently stay in scope while the getGeopositionAsync call is in process, otherwise that call is canceled. For this reason, the locator variable in Here My Am! (the first line of code above) is declared outside the function that calls getGeopositionAsync.
The getGeopositionAsync method also has a variation where you can specify two parameters: a maximum age for a cached reading (which is to say, how stale you can allow a reading to be) and a timeout value for how long you’re willing to wait for a response. Both values are in milliseconds.
A Geoposition contains two properties:
• coordinate A Geocoodinate object that provides accuracy (meters), altitudeAccuracy (meters), heading (degrees relative to true north), point (a Geopoint that contains the coordinates, altitude, and some other detailed data), positionSource (a value from PositionSource identifying how the location was obtained, e.g. cellular, satellite, wiFi, ipAddress, and unknown), satelliteData (a GeocoordinateSatelliteData object), speed (meters/sec), and a timestamp (a Date).
• civicAddress A CivicAddress object, which might contain city (string), country (string, a two-letter ISO-3166 country code), postalCode (string), state (string), and timestamp (Date) properties, if the geolocation provider supplies such data.92
You can indicate the accuracy you’re looking for through the Geolocator’s desiredAccuracy property, which is either PositionAccuracy.default or PositionAccuracy.high. The latter, mind you, will be much more radio- or network-intensive. This might incur higher costs on metered broadband connections and can shorten battery life, so set this to high only if it’s essential to your user experience. You can also be more specific by using Geolocator.desiredAccuracyInMeters, which will override desiredAccuracy.
The Geolocator also provides a locationStatus property, which is a value from the PositionStatus enumeration: ready, initializing, noData, disabled, notInitialized, or notAvailable. It should be obvious that you can’t get data from a Geolocator that’s in any state other than ready. To track this, listen to the Geolocator’s statuschanged event, where eventArgs.status in your handler contains the new PositionStatus; this is helpful when you find that a GPS device might take a couple seconds to provide a reading. For an example of using this event, see scenario 1 of theGeolocation sample in the Windows SDK (js/scenario1.js):
geolocator = new Windows.Devices.Geolocation.Geolocator();
geolocator.addEventListener("statuschanged", onStatusChanged); //Remember to remove later
function onStatusChanged(e) {
switch (e.status) {
// ...
}
}
PositionStatus and statuschanged reflect both the readiness of the GPS device as well as the Location permission for the app, as set through the Settings charm or through PC Settings > Privacy > Location (status is disabled if permission is denied). You can use this event, therefore, to detect changes to permissions while the app is running and to respond accordingly. Of course, it’s possible for the user to change permission in PC Settings while your app is suspended, so you’ll typically want to check Geolocator status in your resuming event handler as well.
The other two interesting properties of the Geolocator are movementThreshold, a distance in meters that the device can move before another reading is triggered (which can be used for geo-fencing scenarios), and reportInterval, which is the number of milliseconds between attempted readings. Be conservative with the latter, setting it to what you really need, again to minimize network or radio activity. In any case, when the Geolocator takes another reading and finds that the device has moved beyond the movementThreshold, it will fire a positionchanged event, where theeventArgs.position property is a new Geoposition object. This is also shown in scenario 1 of the Geolocation sample (js/scneario2.js):
geolocator.addEventListener("positionchanged", onPositionChanged);
function onPositionChanged(e) {
var coord = e.position.coordinate;
document.getElementById("latitude").innerHTML = coord.point.position.latitude;
document.getElementById("longitude").innerHTML = coord.point.position.longitude;
document.getElementById("accuracy").innerHTML = coord.accuracy;
}
With movementThreshhold and reportInterval, really think through what your app needs based on the accuracy and/or refresh intervals of the data you’re using in relation to the location. For example, weather data is regional and might be updated only hourly. Therefore,movementThreshold might be set on the scale of miles or kilometers and reportInterval at 15, 30, or 60 minutes, or longer. A mapping or real-time traffic app, on the other hand, works with data that is very location-sensitive and will thus have a much smaller threshold and a much shorter interval.
For similar purposes you can also use the more power-efficient geofencing capabilities, which we’ll talk about very soon.
Where battery life is concerned, it’s best to simply take a reading when the user wants one, rather than following the position at regular intervals. But this again depends on the app scenario, and you could also provide a setting that lets the user control geolocation activity.
It’s also very important to note that apps won’t get positionchanged or statuschanged events while suspended unless you register a time trigger background task for this purpose and the user adds the app to the lock screen. We’ll talk more of this in Chapter 16, “Alive with Activity,” and you can also see how this works in scenario 3 of the Geolocation sample. If, however, you don’t use a background task or the user doesn’t place you on the lock screen and you still want to track the user’s position, be sure to handle the resuming event and refresh the position there.
On the flip side, some geolocation scenarios, such as providing navigation, need to also keep the display active (preventing automatic screen shutoff) even when there’s no user activity. For this purpose you can use the Windows.System.Display.DisplayRequest class, namely itsrequestActive and releaseRelease methods that you would call when starting and ending a navigation session. Of course, because keeping the display active consumes more battery power, only use this capability when necessary—as when specifically providing navigation—and avoid simply making the request when your app starts. Otherwise your app will probably gain a reputation in the Windows Store as being power-hungry!
Sidebar: HTML5 Geolocation
An experienced HTML/JavaScript developer might wonder why WinRT provides a Geolocation API when HTML5 already has one: window.navigator.geolocation and its getCurrent-Position method that returns an object with coordinates. The reason for the overlap is that other languages like C#, Visual Basic, and C++ don’t have another API to draw from, which leaves HTML/JavaScript developers a choice. Under the covers, the HTML5 API hooks into the same data as the WinRT API, requires the same manifest capability (Location), and is subject to the same user consent, so for the most part the two APIs are almost equivalent in basic usage. The WinRT API, however, also supports the movementThreshold option, which helps the app cooperate with power management, along with geofencing. Like all other WinRT APIs, however,Windows.Devices.Geolocation is available only in local context pages in a Windows Store app. In web context pages you can use the HTML5 API.
Geofencing
A geofence is defined as a virtual perimeter around a real-world geographic location, such that entering into or leaving that perimeter will trigger events. Perimeters can be established anywhere and can be static or dynamic—it doesn’t matter. And you can really do anything with geofencing events, such as providing guidebook information for the present location, coupons for nearby merchants, reminders for bus/train stops, shopping lists for the store you just walked into, automatic check-ins to social media, and so on. In short, although geolocation tells you where the device is located on the earth, simple positions in terms of latitude and longitude are not all that meaningful to human beings. Geofencing lets you define zones that do have meaning to an individual user, and it lets you know exactly when the device—presumably with that user!—has crossed into or out of those zones so that your app can take equally meaningful action.
The Geolocator's movementThreshhold and reportInterval properties can help you implement some basic types of geofencing. The drawbacks, however, are many. For one, you’d have to constantly calculate the difference between the current location and the coordinates of your geofencing zones, which can be cumbersome. The app and/or its background tasks would also need to be running quite a lot, which drains battery power. It would also need to be watching for changes in the Geolocator’s status, especially when a device switches the underlying provider.
Fortunately, the APIs in Windows.Devices.Geolocation.Geofencing encapsulates all of this to spare you such details. After all, what you want to do in an app is concentrate on helping the user set up their meaningful zones and then on bringing up appropriate content, rather than messing with geospatial mathematics! And because the WinRT API can provide these services to multiple apps simultaneously, it can do so more efficiently and thus conserve power.
The Geofencing API provides the means to dynamically create geofences (zones) and fires events on entry and exit from a geofence. It also lets you set up time windows during which those geofences are active, set dwell times for those geofences (how long the device must be in or out of a zone before raising an event), and set up background tasks with a location trigger to specifically watch for geofence events when the app isn’t active.
Each geofence you want to monitor is based on a Geocircle object, whose center property is a BasicGeoposition containing latitude and longitude and whose radius property defines a circle around that center (the units depend on the altitudeReferenceSystem property, nominally in meters). Clearly, then, only circular zones are supported at present.
Taking the Geocircle, you create a Geofence object from it along with an identity key, a mask that defines the events of interest (MonitoredGeofenceStates), the dwell time, the start time, and the duration. Here’s how it’s done in the Geolocation sample (js/scenario4UIHandlers.js):
Function generateGeofence() {
var geofence = null;
try {
var fenceKey = nameElement.value;
var position = {
latitude: decimalFormatter.parseDouble(latitude.value),
longitude: decimalFormatter.parseDouble(longitude.value),
altitude: 0
};
var radiusValue = decimalFormatter.parseDouble(radius.value);
// the geofence is a circular region
var geocircle = new Windows.Devices.Geolocation.Geocircle(position, radiusValue);
var singleUse = false;
if (geofenceSingleUse.checked) {
singleUse = true;
}
// want to listen for enter geofence, exit geofence and remove geofence events
var mask = 0;
mask = mask | Windows.Devices.Geolocation.Geofencing.MonitoredGeofenceStates.entered;
mask = mask | Windows.Devices.Geolocation.Geofencing.MonitoredGeofenceStates.exited;
mask = mask | Windows.Devices.Geolocation.Geofencing.MonitoredGeofenceStates.removed;
var dwellTimeSpan = new Number(parseTimeSpan(dwellTimeField, defaultDwellTimeSeconds));
var durationTimeSpan = null;
if (durationField.value.length) {
durationTimeSpan = new Number(parseTimeSpan(durationField, 0));
} else {
durationTimeSpan = new Number(0); // duration required if start time is set
}
var startDateTime = null;
if (startTimeField.value.length) {
startDateTime = new Date(startTimeField.value);
} else {
startDateTime = new Date(); // default is 1/1/1601
}
geofence = new Windows.Devices.Geolocation.Geofencing.Geofence(fenceKey, geocircle,
mask, singleUse, dwellTimeSpan, startDateTime, durationTimeSpan);
} catch (ex) {
WinJS.log && WinJS.log(ex.toString(), "sample", "error");
}
return geofence;
}
What you now do with the Geofence object depends on whether you want foreground or background monitoring. The best way to think about this is that background monitoring should be your default choice. The reasons for this are twofold. First, background monitoring also works when the app is running, thereby allowing you to have just one piece of code to handle monitoring events. Second, if you set up event handlers for the running app alongside a background task, both will pick up geofencing events but the order isn’t guaranteed. Thus, you’d choose foreground monitoring only for specific scenarios that would not need background monitoring at all.
Either way, the first step is to add your Geofence object to the GeofenceMonitor (in Windows.Devices.Geolocation.Geofencing), specifically through its geofences vector. To end monitoring of that geofence, just remove that instance from the vector. Be mindful that the GeofenceMonitor is a system object that you access directly (not using new). So, if you have a Geofence in the variable geofence, you start monitoring like so:
var monitor = Windows.Devices.Geolocation.Geofencing.GeofenceMonitor.current;
monitor.geofences.push(geofence);
This is demonstrated again in scenario 4 of the sample (see js/scenario4.js), but there’s a bunch more code going around to manage the UI, so what I’m showing above is the simplest form. Note also that scenario 5 of the sample, which sets up the background task, requires you to first create a geofence in scenario 4. What’s different between the two scenarios is how we pick up geofencing events.
For background monitoring, you don’t assign any explicit event handlers. Instead, the running app must create and register a background task with the location trigger, the general pattern for which we’ll be talking about in Chapter 16, and you can refer to scenario 5 in the sample again for details. Background monitoring requires Location background task declaration in the manifest, and setting up the task means that the app has to be run at least once. Registration of the background task on first run will prompt the user for consent, because background tasks like this affect battery life.
Here’s the short version of the code that registers the task (js/scenario5.js):
var sampleBackgroundTaskName = "SampleGeofencingBackgroundTask";
var sampleBackgroundTaskEntryPoint = "js\\geofencebackgroundtask.js";
var builder = new Windows.ApplicationModel.Background.BackgroundTaskBuilder();
builder.name = sampleBackgroundTaskName;
builder.taskEntryPoint = sampleBackgroundTaskEntryPoint;
builder.setTrigger(new Windows.ApplicationModel.Background.LocationTrigger(
Windows.ApplicationModel.Background.LocationTriggerType.geofence));
Once registered, the trigger essentially acts like the event and the background task as a whole is the handler: when the trigger occurs, the JavaScript code file that you assign to the task gets executed (as a web worker). For details on how to simulate the trigger for testing, see Testing and debugging your geofencing apps on the Windows App Builder’s blog. The process involves using the Visual Studio simulator, in which you can set the position returned by the Geolocator. The trick is that you need to locally deploy and run the app once to add it to the lock screen, because doing so isn’t supported through the simulator.
In that task (refer to js/geofencebackgroundtask.js) you then obtain the GeofenceMonitor object (as shown earlier) and call its readReports method. This returns a vector view of GeofenceState-ChangeReport objects, which can be empty if nothing has changed since the last call. Each report contains a geofence property (the Geofence that changed), the geoposition of that geofence, and the newState of that geofence. There is also a removalReason property if the state change is because monitoring ended.
What you’re most interested in is the value of newState, which is a value from the GeofenceStateenumeration: none, entered, exited, and removed. You can then take the appropriate action. (The sample just takes this information and outputs it to the display; see thegetGeofenceStateChanged-Reports function in js/geofencebackgroundtask.js. I hope your apps will do something much more interesting!) And if you want to communicate any information to the running app, remember that you can use local app data for this purpose.
If the app is running when all this happens, it will probably want to know that the background task completes its work and exits. To do this, you assign a handler for the background task’s completed event after registering that task. In that handler you can check for whatever app data the background task saved and then take any further actions desired. For an additional example of this, refer to the Creating smarter apps with geofencing post also on the Windows App Builder blog.
If you really want to do only foreground monitoring, you can listen to the GeofenceMonitor.-ongeofencestatuschanged event:
monitor.addEventListener("geofencestatechanged", onGeofenceStateChanged);
In your handler, the eventArgs.target will contain the GeofenceMonitor object, on which you can call readReports and process as needed. The sample does it this way in scenario 4 (js/scenario4.js):
function onGeofenceStateChanged(args) {
args.target.readReports().forEach(processReport);
}
Additional information on this can be found on Guidelines for geofencing apps, but be aware that no JavaScript-specific version of this topic exists at present.
Sensors
As I wrote in this chapter’s introduction, I like to think of sensors as another form of input. It makes a lot of sense because every device that is now wholly integrated into our computer systems—such that we take them for granted—was at one point a kind of human-interface peripheral. In time, I suspect that many of the sensors that are new to us today will be standard equipment just about everywhere.
Sensors, again, are a way of understanding the relationship of a device to the physical world around it, and this constitutes input because you, as a human being, can affect that relationship primarily by moving the device around in physical space or otherwise changing its environment. Sensors can also be used as direct input to cause motion on the screen rather than relying on some form of abstract input like the keyboard or mouse. For example, instead of using keystrokes to abstractly tilt a game board, you can, with sensors, just tilt the device. Shaking, in fact, is becoming a well-known physical gesture that can be wired to a command of some kind like Retry Now, darn you! Why aren’t you doing what I want? Haven’t we for years been shaking or smacking our computers when they aren’t behaving properly? Well, with sensors the computer can now actually respond!
Here, then, is what the various sensors tell us:
• Location The device’s position on the earth (as we covered earlier in “Geolocation”).
• Compass and orientation The direction the device is pointing, relative to the earth’s magnetic poles or relative to the device’s inherent sense of position (both simple and complex orientation).
• Inclinometer The static pitch, roll, and yaw of the device in 3D space.
• Gyrometer The angular velocity/rotational motion of the device in 3D space.
• Accelerometer The linear G-force acceleration of the device within 3D space (x, y, z).
• Ambient light The amount of light shining on the surface of the device with the sensor.
These are the sensors that are represented in the WinRT API,93 some of which are created in software through sensor fusion. This means taking raw data from one or more hardware sensors and combining, interpreting, and presenting it all in a form that’s more directly useful to apps. Just as with pointers, you can still get to raw data if you want it, but oftentimes it’s unnecessary. For example, the Simple Orientation sensor provides a simple interpretation of how the device is oriented in relation to its default position, rounding everything off, as it were, to the nearest 90-degree quadrant. The full Orientation sensor combines gyrometer, accelerometer, and compass data to provide an exact 3D orientation matrix that is much more precise but much more oriented (if I might make the pun!) to advanced scenarios than simply needing to know whether the device is upside down or right-side up.
Because all of these sensors are very similar in how they work (which is intentional, with the exception of the Simple Orientation sensor, which is intentionally dissimilar!), I want to show the general pattern of the sensor APIs rather than explicit examples for each. Such demonstrations are readily available in these SDK samples: Accelerometer, Compass, Gyrometer, Inclinometer, Light Sensor, and OrientationSensor. A device like the Microsoft Surface Pro is a good one for all of these, because it is fully equipped and capable of running Visual Studio directly.
The usage pattern is as follows, with the particulars summarized in the table that follows:
• Obtain a sensor object via Windows.Devices.Sensors.<sensor>.getDefault().
• Call that object’s getCurrentReading to obtain a one-time reading.
• For ongoing readings, configure the object’s minimumReportInterval and reportInterval properties (both in milliseconds) and listen to the object’s readingchanged event. Your handler will receive a reading object of an appropriate type in response. As with geolocation, setting these values wisely will help optimize battery life by avoiding excess electrons flying through the sensors!
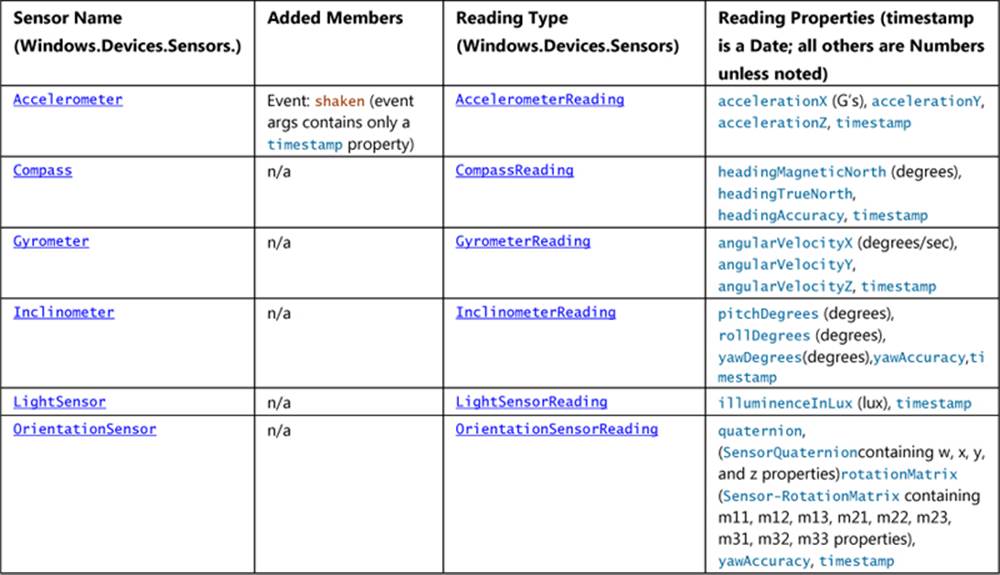
Here’s an example of such code from the Gyrometer sample (js/scenario1.js):
gyrometer = Windows.Devices.Sensors.Gyrometer.getDefault();
var minimumReportInterval = gyrometer.minimumReportInterval;
var reportInterval = minimumReportInterval > 16 ? minimumReportInterval : 16;
gyrometer.reportInterval = reportInterval;
gyrometer.addEventListener("readingchanged", onDataChanged); // Remember to remove as needed
function onDataChanged(e) {
var reading = e.reading;
document.getElementById("eventOutputX").innerHTML = reading.angularVelocityX.toFixed(2);
document.getElementById("eventOutputY").innerHTML = reading.angularVelocityY.toFixed(2);
document.getElementById("eventOutputZ").innerHTML = reading.angularVelocityZ.toFixed(2);
}
The samples for the compass, inclinometer, and orientation sensor also have scenarios for calibration because each one has a limited degree of accuracy.
Relative axes With all the directional sensors, the values they report through their readings are relative to the device orientation (portrait or landscape), rather than being absolute. If you allow different rotations, you’ll need to take these into account, which is especially important forportrait-first devices like smaller 7” or 8” tablets. The specific mathematics for these cases is beyond the scope of this book, however, so refer to Aligning sensors with your app’s orientation on the Windows App Builder blog for more details.
With the Orientation Sensor, aquaternion can be most easily understood as a rotation of a point [x,y,z] about a single arbitrary axis. This is different from a rotation matrix, which represents rotations around three axes. The mathematics behind quaternions is fairly exotic because it involves the geometric properties of complex numbers and mathematical properties of imaginary numbers, but working with them is simple and frameworks like DirectX support them. See the OrientationSensor sample for more.
Speaking of orientation, I mentioned that the SimpleOrientationSensor works a little differently. Its purpose is to supply quadrant orientation rather than exact orientation, which is perhaps all you need. For example, a star chart app would need to know if a slate device is upside down so that it can adjust its display (along with a compass reading) to match the sky itself.
To summarize this sensor’s usage:
• Call Windows.Devices.Sensors.SimpleOrientation.getDefault to obtain the object.
• Call the getCurrentOrientationto obtain a reading.
• The orientationChanged event provides for ongoing readings, where eventArgs contains orientation (a reading) and timestampproperties.
• The reading is a SimpleOrientationvaluewhose meaning is relative to the native device orientation:
○ notRotated, rotated90DegreesCounterclockwise, rotated90DegreesCounter-clockwise, rotated270DegreesCounterclockwise. Note that these are entirely different from view orientations like landscape and portrait that you’d pick up in media queries and so forth. A portrait-first device in its native state, for example, will report a portrait view orientation but notRotated as its SimpleOrientation.
○ faceup, facedown (tablet devices only).
For a demonstration, see the SimpleOrientationSensor sample.
What We’ve Just Learned
• “Design for touch, get mouse and stylus for free” is a message that holds true, because working with pointer and gesture input from a variety of input devices doesn’t require you to differentiate between the forms of input.
• Using built-in controls is the easiest way to handle input, but you can also handle pointer* events and MSGesture* events directly, when needed. You can also feed pointer* events into a custom gesture recognizer that then issues its own events.
• The Windows touch language includes tap, press and hold, slide/pan, cross-slide (to select), pinch-stretch, rotate, and edge gestures (from top/bottom and from the sides). A tap is typically handled with a clickevent, whereas the others require the creation of an MSGesture object, association of that object with a pointer, and handling of MSGesture* event sequences, which provide for manipulations and inertial motions together.
• The touch language also has mouse, stylus, and keyboard equivalents. For mouse and stylus, there is very little work an app needs to do (such as sending mouse wheel events to the gesture object). Keyboard support must be implemented separately but simply uses the standard HTML/JavaScript events.
• Keyboard support also includes accommodating the soft (on-screen) keyboard, which appears automatically for text input fields and other content-editable elements. It automatically adjusts its appearance according to input type, and it will slide the app contents up if necessary to avoid having the keyboard overlap the input control. An app can also handle visibility events directly to provide a better experience than the default.
• The Inking API provides apps with the means to record, save, and render an entire series of pointer activities, where the strokes can also be fed into a handwriting recognizer.
• The Geolocation API in WinRT provides apps with access to GPS data as well as events when the device has moved past a specified threshold, including support for geofencing.
• The WinRT API represents a number of sensors that can also be used as input to an app. In addition to geolocation, the sensors are compass, orientation, simple orientation (quadrant-based), inclinometer, gyrometer, accelerometer, and ambient light.
• Most sensors follow the same usage pattern: acquire the sensor object, get a current reading, and possibly listen to the readingchanged event. They are very easy to work with, leaving much of your energy to apply them creatively!
89double-tap-zoomis not supported for Windows Store apps. Note also that the earlier vendor-prefixed variant of this style, -ms-touch-action, is deprecated in favor of touch-action.
90 The vendor-prefixed MSPointer* events still work in Windows 8.1 but are deprecated.
91 And although you might think this is a strong contender for the longest JavaScript sample name in the Windows SDK, it runs a mere sixth. The top three are the Unselectable content areas with -ms-user-select CSS attribute sample, which wins the bronze; AppContainer, mobile broadband pin, connection, and device management sample(Appendix C), which grabs the silver; and, in first place,Windows Runtime in-process component authoring with proxy\stub generation sample (Chapter 18, “WinRT Components”)! I don’t mind such long names, however—I’m delighted that we have such an extensive set of great samples to draw from.
92 That is, the civicAddressproperty might not be available or might be empty. An alternate means to obtain it is to use the Bing Maps API, specifically the MapAddress class, to convert coordinates into an address.
93 There is also the proximity sensor for near-field communications (NFC) that tells us when devices are near one another or make contact, but this is more a networking handshake than a sensor like the others. We’ll see this in Chapter 17.