Microsoft Press Programming Windows Store Apps with HTML, CSS and JavaScript (2014)
Chapter 13 Media
To say that media is important to apps—and to culture in general—is a terrible understatement. Ever since the likes of Edison made it possible to record a performance for later enjoyment, and the likes of Marconi made it possible to widely broadcast and distribute such performances, humanity’s worldwide appetite for media—graphics, audio, and video—has probably outpaced the appetite for automobiles, electricity, and even junk food. In the early days of the Internet, graphics and images easily accounted for the bulk of network traffic. Today, streaming video even from a single source like Netflix holds top honors for pushing the capabilities of our broadband infrastructure! (It certainly holds true in my own household with my young son’s love of Tintin, Bob the Builder, Looney Tunes, and other such shows.)
Incorporating some form of media is likely a central concern for most Windows Store apps. Simple ones, even, probably use at least a few graphics to brand the app and present an attractive UI, as we’ve already seen on a number of occasions. Many others, especially games, will certainly use graphics, video, and audio together. In the context of this book, all of this means using the img, svg (Scalable Vector Graphics), canvas, audio, and video elements of HTML5.
Of course, working with media goes well beyond just presentation because apps might also provide any of the following capabilities:
• Organize and edit media files, including those in the pictures, music, and videos media libraries.
• Playback of custom audio and video formats.
• Transcode (convert) media files, possibly applying various filters.
• Organize and edit playlists.
• Capture audio and video from available devices.
• Edit or modify media directly in the rendering pipeline through media stream sources.
• Stream media from a server to a device, or from a device to a Play To target, perhaps also applying digital rights management (DRM).
These capabilities, for which many WinRT APIs exist, along with the media elements of HTML5 and their particular capabilities within the Windows environment, will be our focus for this chapter.
Note As is relevant to this chapter, a complete list of audio and video formats that are natively supported for Windows Store apps can be found on Supported audio and video formats.
The Media Hub sample In the Windows SDK you’ll find the Media Hub sample, which provides an rich, end-to-end sample for many of the individual features that we’ll talk about in this chapter, including media playback, media capture, effects, system media transport controls, background audio, 3D video, and Play To. I won’t be drawing from this sample here, however, as it has its own documentation on the MediaHub sample app page.
Sidebar: Performance Tricks for Faster Apps
Various recommendations in this chapter come from two great //build talks: 50 Performance Tricks to Make Your HTML5 Apps and Sites Faster and Fast Apps and Sites with JavaScript. While some tricks are specifically for web applications running in a browser, many of them are wholly applicable to Windows Store apps written in JavaScript because they run on top of the same infrastructure as Internet Explorer.
Creating Media Elements
Certainly the easiest means to incorporate media into an app is what we’ve already been doing for years: simply use the appropriate HTML element in your layout and voila! there you have it. With img, audio, and video elements, in fact, you’re completely free to use content from just about any location. That is, the src attributes of these elements can be assigned http:// or https:// URIs for remote content, ms-appx:/// and ms-appdata:/// URIs for local content, or URIs from URL.createObjectURL for any content represented by a StorageFile object. Remember with bitmap images that it’s more memory efficient to use the StorageFile thumbnail APIs and pass the thumbnail to URL.createObjectURL instead of opening the whole image file. The img element can also use an SVG file as a source.
There are three ways to create a media element in a page or page control.
First is to include the element directly in declarative HTML. Here it’s often useful to use the preload="auto" attribute for remote audio and video to increase the responsiveness of controls and other UI that depend on those elements. (Doing so isn’t really important for local media files since they are, well, already local!) Oftentimes, media elements are placed near the top of the HTML file, in order of priority, so that downloading can begin while the rest of the document is being parsed.
On the flip side, if the user can wait a short time to start a video, use a preview image in place of the video and don’t start the download until it’s actually necessary. Code for this is shown later in this chapter in the “Video Playback and Deferred Loading” section. You can also consider using the background transfer APIs, as we discussed in Chapter 4, “Web Content and Services,” to save media files locally for later playback.
Playback for a declarative element can be automatically started with the autoplay attribute, through the built-in UI if the element has the controls attribute, or by calling <element>.play() from JavaScript.
The second method is to create an HTML element in JavaScript via document.createElement and add it to the DOM with <parent>.appendChild and similar methods. Here’s an example using media files in this chapter’s companion content, though you’ll need to drop the code into a new project of your own in a media folder:
//Create elements and add to DOM, which will trigger layout
var picture = document.createElement("img");
picture.src = "/media/wildflowers.jpg";
picture.width = 300;
picture.height = 450;
document.getElementById("divShow").appendChild(picture);
var movie = document.createElement("video");
movie.src = "/media/ModelRocket1.mp4";
movie.autoplay = false;
movie.controls = true;
document.getElementById("divShow").appendChild(movie);
var sound = document.createElement("audio");
sound.src = "/media/SpringyBoing.mp3";
sound.autoplay = true; //Play as soon as element is added to DOM
sound.controls = true; //If false, audio plays but does not affect layout
document.getElementById("divShow").appendChild(sound);
Unless otherwise hidden by styles, adding image and video elements to the DOM, plus audio elements with the controls attribute, will trigger re-rendering of the document layout. An audio element without that attribute will not cause re-rendering. As with declarative HTML, settingautoplay to true will cause video and audio to start playing as soon as the element is added to the DOM.
Finally, for audio, apps can create an Audioobject in JavaScript to play sounds or music without any effect on UI. More on this later. JavaScript also has the Image class, and the Audio class can be used to load video:
//Create objects (preloading), then set other DOM object sources accordingly
var picture = new Image(300, 450);
picture.src = "http://www.kraigbrockschmidt.com/downloads/media/wildflowers.jpg";
document.getElementById("image1").src = picture.src;
//Audio object can be used to preload (but not render) video
var movie = new Audio("http://www.kraigbrockschmidt.com/downloads/media/ModelRocket1.mp4");
document.getElementById("video1").src = movie.src;
var sound = new Audio("http://www.kraigbrockschmidt.com/downloads/media/SpringyBoing.mp3");
document.getElementById("audio1").src = sound.src;
Creating an Image or Audio object from code does not create elements in the DOM, which can be a useful trait. The Image object, for instance, has been used for years to preload an array of image sources for use with things like image rotators and popup menus, and you can use the same trick for preloading image thumbnails. For remote sources, preloading means that the images have been downloaded and cached. This way, assigning the same URI to the src attribute of an element that is in the DOM, as shown above, will make that image appear immediately. The same is true for preloading video and audio, but again, this is primarily helpful with remote media because files on the local file system will load relatively quickly as is. Still, if you have large local images and want them to appear quickly when needed, preloading their thumbnails is a useful strategy.
Of course, you might want to load media only when it’s needed, in which case the same type of code can be used with existing elements, or you can just create an element and add it to the DOM as shown earlier.
Graphics Elements: Img, Svg, and Canvas (and a Little CSS)
I know you’re probably excited to get to sections of this chapter on video and audio, but we cannot forget that images have been the backbone of web applications since the beginning and remain a huge part of any app’s user experience. Indeed, it’s helpful to remember that video itself is conceptually just a series of static images sequenced over time! Fortunately, HTML5 has greatly expanded an app’s ability to incorporate image data by adding SVG support and the canvas element to the tried-and-true img element. Furthermore, applying CSS animations and transitions (covered in detail in Chapter 14, “Purposeful Animations”) to otherwise static image elements can make them appear very dynamic.
Speaking of CSS, it’s worth noting that many graphical effects that once required the use of static images can be achieved with just CSS, especially CSS3:
• Borders, background colors, and background images
• Folder tabs, menus, and toolbars
• Rounded border corners, multiple backgrounds/borders, and image borders
• Transparency
• Embeddable fonts
• Box shadows
• Text shadows
• Gradients
In short, if you’ve ever used img elements to create small visual effects, create gradient backgrounds, use a nonstandard font, or provide some kind of graphical navigation structure, there’s probably a way to do it in pure CSS. For details, see the great overview of CSS3 by Smashing Magazine as well as the CSS specs at http://www.w3.org/. CSS also provides the ability to declaratively handle some events and visual states using pseudo-selectors of hover, visited, active, focus, target, enabled, disabled, and checked. For more, see http://css-tricks.com/ as well as another Smashing Magazine tutorial on pseudo-classes.
That said, let’s review the three primary HTML5 elements for graphics:
• img is used for raster data. The PNG format is generally preferred over other formats, especially for text and line art, though JPEG makes smaller files for photographs. GIF is generally considered outdated, as the primary scenarios where GIF produced a smaller file size can probably be achieved with CSS directly. Where scaling is concerned, Windows Store apps need to consider pixel density, as we saw in Chapter 8, “Layout and Views,” and provide separate image files for each scale the app might encounter. This is where the smaller size of JPEGs can reduce the overall size of your app package in the Windows Store.
• SVGs are best used for smooth scaling across display sizes and pixel densities. SVGs can be declared inline, created dynamically in the DOM, or maintained as separate files and used as a source for an img element (in which case all the scaling characteristics are maintained). As we saw in Chapter 8, preserving the aspect ratio of an SVG is often important, for which you employ the viewBox and preserveAspectRatio attributes of the svg tag.
• The canvas element provides a drawing surface and API for creating graphics with lines, rectangles, arcs, text, and so forth, including 3D graphics via WebGL (starting in Windows 8.1). The canvas ultimately generates raster data, which means that once created, a canvas scales like a bitmap. (An app, of course, will typically redraw a canvas with scaled coordinates when necessary to avoid pixelation.) The canvas is also very useful for performing pixel manipulation, even on individual frames of a video while it’s playing.
Apps often use all three of these elements, drawing on their various strengths. I say this because when canvas first became available, developers seemed so enamored with it that they seemed to forget how to use img elements and they ignored the fact that SVGs are often a better choice altogether! (And did I already say that CSS can accomplish a great deal by itself as well?)
In the end, it’s helpful to think of all the HTML5 graphics elements as ultimately producing a bitmap that the app host simply renders to the display. You can, of course, programmatically animate the internal contents of these elements in JavaScript, as we’ll see in Chapter 14, but for our purposes here it’s helpful to think of these as essentially static.
What differs between the elements is how image data gets into the element to begin with.Img elements are loaded from a source file, svgs are defined in markup, and canvas elements are filled through procedural code. But in the end, as demonstrated in scenario 1 in the HTML Graphics example for this chapter and shown in Figure 13-1, each can produce identical results.
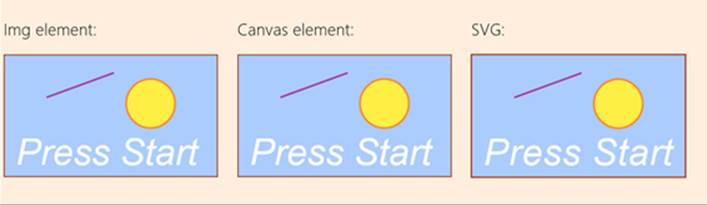
FIGURE 13-1 Image, canvas, and svg elements showing identical results.
In short, there are no fundamental differences as to what can be rendered through each type of element (though WebGL in a canvas has much richer 3D capabilities). However, they do have differences that become apparent when we begin to manipulate those elements as with CSS. Because each element is just a node in the DOM, plain and simple, they are treated like all other nongraphic elements: CSS doesn’t affect the internals of the element, just how it ultimately appears on the page. Individual parts of SVGs declared in markup can, in fact, be separately styled so long as they can be identified with a CSS selector. In any case, such styling affects only presentation, so if new styles are applied, they are applied to the original contents of the element.
What’s also true is that graphics elements can overlap with each other and with nongraphic elements (as well as video), and the rendering engine automatically manages transparency according to the z-index of those elements. Each graphic element can have clear or transparent areas, as is built into image formats like PNG. In a canvas, any areas cleared with the clearRect method that aren’t otherwise affected by other API calls will be transparent. Similarly, any area in an SVG’s rectangle that’s not affected by its individual parts will be transparent.
Scenario 2 in the HTML Graphics example allows you to toggle a few styles (with a check box) on the same elements shown earlier. In this case, I’ve left the background of the canvas element transparent so that we can see areas that show through. When the styles are applied, the imgelement is rotated and transformed, the canvas gets scaled, and individual parts of the svg are styled with new colors, as shown in Figure 13-2.
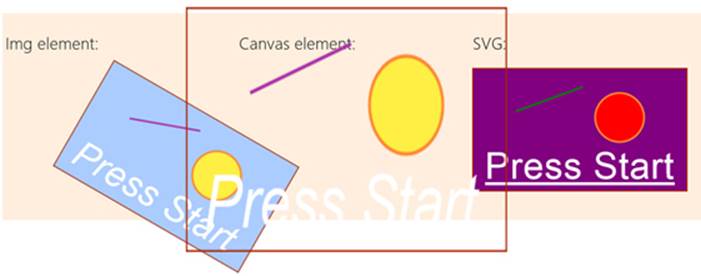
FIGURE 13-2 Styles applied to graphic elements; individual parts of the SVG can be styled if they are accessible through the DOM.
The styles in css/scenario2.css are simple:
.transformImage {
transform: rotate(30deg)translateX(120px);
}
.scaleCanvas {
transform: scale(1.5,2);
}
as is the code in js/scenario2.js that applies them:
function toggleStyles() {
var applyStyles = document.getElementById("check1").checked;
document.getElementById("image1").className = applyStyles ? "transformImage" : "";
document.getElementById("canvas1").className = applyStyles ? "scaleCanvas" : "";
document.getElementById("r").style.fill = applyStyles ? "purple" : "";
document.getElementById("l").style.stroke = applyStyles ? "green" : "";
document.getElementById("c").style.fill = applyStyles ? "red" : "";
document.getElementById("t").style.fontStyle = applyStyles ? "normal" : "";
document.getElementById("t").style.textDecoration = applyStyles ? "underline" : "";
}
The other thing you might have noticed when the styles are applied is that the scaled-up canvas looks rasterized, like a bitmap would typically be. This is expected behavior, as shown in the following table of scaling characteristics. These are demonstrated in scenarios 3 and 4 of the HTML Graphics example.

Additional Characteristics of Graphics Elements
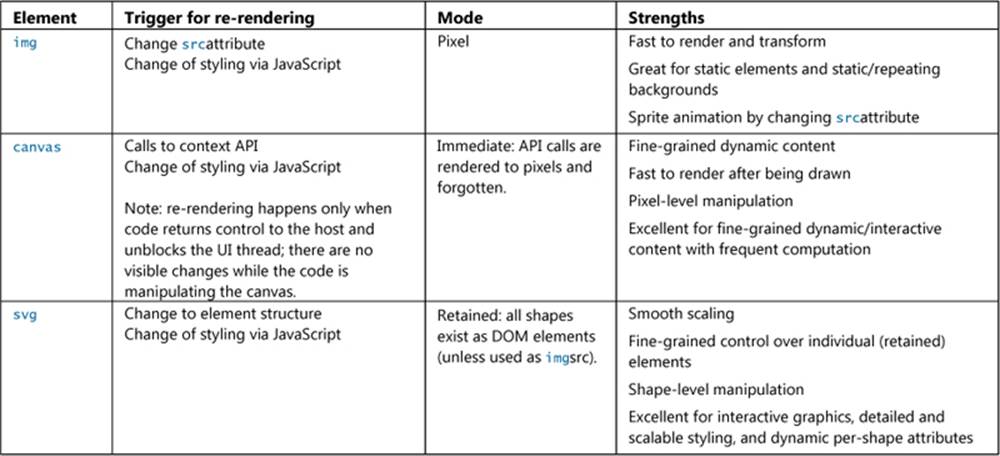
There are a few additional characteristics to be aware of with graphics elements.First, different kinds of operations will trigger a re-rendering of the element in the document. Second is the mode of operation of each element. Third are the relative strengths of each element. These are summarized in the following table:
Sidebar: Using Media Queries to Show and Hide SVG Elements
Because SVGs generate elements in the DOM, those elements can be individually styled. You can use this fact with media queries to hide different parts of the SVG depending on its size. To do this, add different classes to those SVG elements. Then, in CSS, add or remove the display: none style for those classes within media queries like@media (min-width:300px) and (max-width:499px). You may need to account for the size of the SVG relative to the app window, but it means that you can effectively remove detail from an SVG rather than allowing those parts to be rendered with too few pixels to be useful.
In the end, HTML5 includes all three of these elements because all three are really needed. All of them benefit from full hardware acceleration, just as they do in Internet Explorer, since apps written in HTML and JavaScript run on the same rendering engine as the browser.
The best practice in app design is to explore the appropriate use of each type of elements. Each element can have transparent areas, so you can easily achieve some very fun effects. For example, if you have data that maps video timings to caption or other text, you can use an interval handler (with the interval set to the necessary granularity like a half-second) to take the video’s currentTime property, retrieve the appropriate text for that segment, and render the text to an otherwise transparent canvas that sits on top of the video. Titles and credits can be done in a similar manner, eliminating the need to re-encode the video.
Some Tips and Tricks
Working with the HTML graphics elements is generally straightforward, but knowing some details can help when working with them inside a Windows Store app.
General tip To protect any content of an app view from screen capture, obtain the ApplicationView object from Windows.UI.ViewManagement.ApplicationView.getForCurrentView() and set its isScreenCaptureEnabled property to false. This is demonstrated in the Disable screen capture sample in the Windows SDK. You would do this, for example, when rendering content obtained from a rights-protected source.
Img Elements
• When possible, avoid loading an entire image file by using the StorageFile thumbnail APIs, getThumbnailAsync and getScaledImageAsThumbnailAsync, as described in Chapter 11, “The Story of State, Part 2.” You can pass a thumbnail to URL.createObjectURL as you would aStorageFile. Of course, if you’re using remote resources directly with http[s]:// URIs, you won’t be able to intercept the rendering to do this.
• Use the title attribute of img for tooltips, not the alt attribute. You can also use a WinJS.-UI.Tooltip control, as described in Chapter 5, “Controls and Control Styling.”
• To create an image from an in-memory stream, see MSApp.createBlobFromRandomAccess-Stream (introduced in Chapter 10, “The Story of State, Part 1”), the result of which can be then given to URL.createObjectURL to create an appropriate URI for a src attribute. We’ll encounter this elsewhere in this chapter, and we’ll need it when working with the Share contract in Chapter 15, “Contracts.” The same technique also works for audio and video streams, including those partially downloaded from the web.
• When loading images from http:// or other remote sources, you run the risk of having the element show a red X placeholder image. To prevent this, catch the img.onerror event and supply your own placeholder:
var myImage = document.getElementById('image');
myImage.onerror = function () { onImageError(this);}
function onImageError(source) {
source.src = “placeholder.png”;
source.onerror = "";
}
• Supported image formats for the img element are listed at the bottom of the img element documentation. Note that as of Windows 8.1, the img element supports the Direct Draw Surface (DDS) file format for in-package content. DDS files are commonly used for game assets and benefit from full hardware acceleration and very short image decoding time. A demonstration of using these can be found in the Block compressed images sample.
• Want to do optical character recognition? Check out the Bing OCR control available from http://www.bing.com/dev/en-us/ocr, which is free to use for up to 5,000 transactions per month.
Svg Elements
• <script> tags are not supported within <svg>.
• If you have an SVG file in your package (or appdata), you can load it into an img element by pointing at the file with the src attribute, but this doesn’t let you traverse the SVG in the DOM. What you can do instead is load the SVG file by using the simple XMLHttpRequest method or theWinJS.xhr wrapper (see Appendix C, “Additional Networking Topics”), and then insert the marking directly into the DOM as a child of some other element. This lets you traverse the SVG’s content and style it with CSS without having to place the SVG directly in your HTML files. Scenario 2 of the HTML Graphics example in the companion content shows this (js/scenario2.js):
WinJS.xhr({ url: "/html/graphic.svg", responseType: "text" }).done(function (request) {
//setInnerHTMLUnsafe is OK because we know the content is coming from our package.
WinJS.Utilities.setInnerHTMLUnsafe(document.getElementById("svgPlaceholder"),
request.response);
});
• PNGs and JPEGs generally perform better than SVGs, so if you don’t technically need an SVG or have a high-performance scenario, consider using scaled raster graphics. Or you can dynamically create a scaled static image from an SVG so as to use the image for faster rendering later:
<!-- in HTML-->
<img id="svg" src="somesvg.svg" style=" display: none;" />
<canvas id="canvas" style=" display: none;"/>
// in JavaScript
var c = document.getElementById("canvas").getContext("2d");
c.drawImage(document.getElementById("svg"),0,0);
var imageURLToUse = document.getElementById("canvas").toDataURL();
• Two helpful SVG references (JavaScript examples): http://www.carto.net/papers/svg/samples/ and http://srufaculty.sru.edu/david.dailey/svg/.
• A number of tools are available to create SVGs: see 4 useful commercial SVG tools and 5 useful open source SVG tools (both on the IDR solutions blog).
Canvas Elements
As you probably know, and as demonstrated in the HTML Graphics example, you obtain a 2D context for a canvas with code like this:
var c = document.getElementById("canvas").getContent("2d");
To obtain a 3D WebGL context (as can be done starting with Windows 8.1), the argument to getContext must be experimental-webgl:
var c = document.getElementById("canvas").getContent("experimental-webgl");
From that point you can use the supported WebGL APIs as documented in WebGL APIs for Internet Explorer. In this book I won’t go into any of the details about the API itself, as it quickly gets complicated. Besides, there are plenty of tutorials on the web.
WebGL aside, here are other tips and tricks for the canvas (note that all the methods named here are found on the context object):
• Remember that a canvas element needs specific width and heightattributes (in JavaScript, canvas.width and canvas.height), not styles. It does not accept px, em, %, or other units.
• Despite its name, theclosePathmethod isnot a direct complement to beginPath. beginPath is used to start a new path that can be stroked, clearing any previous path. closePath, on the other hand, simply connects the two endpoints of the current path, as if you did a lineTo between those points. It does not clear the path or start a new one. This seems to confuse programmers quite often, which is why you sometimes see a circle drawn with a line to the center!
• A call to stroke is necessary to render a path; until that time, think of paths as a pencil sketch of something that’s not been inked in. Note also that stroking implies a call to beginPath.
• When animating on a canvas, doing clearRect on the entire canvas and redrawing every frame is generally easier to work with than clearing many small areas and redrawing individual parts of the canvas. The app host eventually has to render the entire canvas in its entirety with every frame anyway to manage transparency, so trying to optimize performance by clearing small rectangles isn’t an effective strategy except when you’re doing only a small number of API calls for each frame.
• Rendering canvas API calls is accomplished by converting them to the equivalent DirectX calls in the GPU. This draws shapes with automatic antialiasing. As a result, drawing a shape like a 2D circle in a color and drawing the same circle with the background color does not erase every pixel. To effectively erase a shape, use clearRect on an area that’s slightly larger than the shape itself. This is one reason why clearing the entire canvas and redrawing every frame often ends up being easier.
• To set a background image in a canvas (so that you don’t have to draw each time), you can use the canvas.style.backgroundImage property with an appropriate URI to the image.
• Use the msToBlob method on a canvas object to obtain a blob for the canvas contents.
• When using drawImage, you may need to wait for the source image to load using code such as
var img = new Image();
img.onload = function () { myContext.drawImage(myImg, 0, 0); }
myImg.src = "myImageFile.png";
• The context’s msImageSmoothingEnabled property (a Boolean) determines how images are resized on the canvas when rendered with drawImage or pattern-filling through fill, stroke, or fillText. By default, smoothing is enabled (true), which uses a bilinear smoothing method. When this flag is false, a nearest-neighbor algorithm is used instead, which is appropriate for the retro-graphics look of 1980s video games.
• Although other graphics APIs see a circle as a special case of an ellipse (with x and y radii being the same), the canvas arc function works with circles only. Fortunately, a little use of scaling makes it easy to draw ellipses, as shown in the utility function below. Note that we use save andrestore so that the scale call applies only to the arc; it does not affect the stroke that’s used from main. This is important, because if the scaling factors are still in effect when you call stroke, the line width will vary instead of remaining constant.
function arcEllipse(ctx, x, y, radiusX, radiusY, startAngle, endAngle, anticlockwise) {
//Use the smaller radius as the basis and stretch the other
var radius = Math.min(radiusX, radiusY);
var scaleX = radiusX / radius;
var scaleY = radiusY / radius;
ctx.save();
ctx.scale(scaleX, scaleY);
//Note that centerpoint must take the scale into account
ctx.arc(x / scaleX, y / scaleY, radius, startAngle, endAngle, anticlockwise);
ctx.restore();
}
• There’s no rule that says you have to do everything on a single canvas element. It can be very effective to layer multiple elements directly on top of one another to optimize rendering of different parts of your display, especially where game animations are concerned. See to Optimize HTML5 canvas rendering with layering (IBM developerWorks).
• By copying pixel data from a video, it’s possible with the canvas to dynamically manipulate a video (without affecting the source, of course). This is a useful technique, even if it’s processor-intensive (which means it might not work well on low-power devices).
Here’s an example of frame-by-frame video manipulation, the technique for which is nicely outlined in a Windows team blog post, Canvas Direct Pixel Manipulation.94 In the VideoEdit example for this chapter, default.html contains a video and canvas element in its main body:
<video id="video1" src="Rocket01.mp4" mutedstyle=" display: none"></video>
<canvas id="canvas1" width="640" height="480"></canvas>
In code (js/default.js), we call startVideo from within the activated handler. This function starts the video and uses requestAnimationFrame to do the pixel manipulation for every video frame:
var video1, canvas1, ctx;
var colorOffset = { red: 0, green: 1, blue: 2, alpha: 3 };
function startVideo() {
video1 = document.getElementById("video1");
canvas1 = document.getElementById("canvas1");
ctx = canvas1.getContent("2d");
video1.play();
requestAnimationFrame(renderVideo);
}
function renderVideo() {
//Copy a frame from the video to the canvas
ctx.drawImage(video1, 0, 0, canvas1.width, canvas1.height);
//Retrieve that frame as pixel data
var imgData = ctx.getImageData(0, 0, canvas1.width, canvas1.height);
var pixels = imgData.data;
//Loop through the pixels, manipulate as needed
var r, g, b;
for (var i = 0; i < pixels.length; i += 4) {
r = pixels[i + colorOffset.red];
g = pixels[i + colorOffset.green];
b = pixels[i + colorOffset.blue];
//This creates a negative image
pixels[i + colorOffset.red] = 2–5 - r;
pixels[i + colorOffset.green] = 2–5 - g;
pixels[i + colorOffset.blue] = 2–5 - b;
}
//Copy the manipulated pixels to the canvas
ctx.putImageData(imgData, 0, 0);
//Request the next frame
requestAnimationFrame(renderVideo);
}
Here the page contains a hidden video element (style="display: none") that is told to start playing once the document is loaded (video1.play()). In a requestAnimationFrameloop, the current frame of the video is copied to the canvas (drawImage) and the pixels for the frame are copied (getImageData) into the imgData buffer. We then go through that buffer and negate the color values, thereby producing a photographically negative image (an alternate formula to change to grayscale is also shown in the code comments, omitted above). We then copy those pixels back to the canvas (putImageData) so that when we return, those negated pixels are rendered to the display.
Again, this is processor-intensive because it’s not generally a GPU-accelerated process, and it might perform poorly on lower-power devices. (Be sure, however, to run a Release build outside the debugger when evaluating performance.) It’s much better to write a video effect DLL where possible, as discussed in “Applying a Video Effect” later in this chapter. Nevertheless, it is a useful technique to know. What’s really happening is that instead of drawing each frame with API calls, we’re simply using the video as a data source. So we could, if we like, embellish the canvas in any other way we want before returning from the renderVideo function. An example of this that I enjoy is shown in Manipulating video using canvas on Mozilla’s developer site, which dynamically makes green-screen background pixels transparent so that an img element placed underneath the video shows through as a background. The same could even be used to layer two videos so that a background video is used instead of a static image. Again, be mindful of performance on low-power devices; you might consider providing a setting through which the user can disable such extra effects.
Rendering PDFs
In addition to the usual image formats, you may need to load and display a PDF into an img element (or a canvas by using its drawImage function). Aside from third-party libraries, you can use the WinRT APIs in Windows.Data.Pdf for this purpose. Here you’ll find a PdfDocument object that represents a document as a whole, along with a PdfPage object that represents a single page within a document.
Note Although WinRT offers a means to load and display PDFs, it does not have an API for generating PDFs. You’ll still need third-party libraries for that.
There are two ways to load a PDF into a PdfDocument:
• Given a StorageFile object (from the local file system, the file picker, removable storage, etc.), call the static method PdfDocument.loadFromFileAsync (which has two variants, the second of which takes a password if that’s necessary).
• Given some kind of random access stream object (from a partial HTTP request operation, for instance; refer to “Q&A on Files, Streams, Buffers, and Blobs” in Chapter 10), call the static method PdfDocument.loadFromStreamAsync (which again has a password variant).
In both cases the load* methods return a promise that’s fulfilled with a PdfDocument instance. Here’s an example from scenario 1 of the PDF viewer sample where the file in question (represented by pdfFileName) is located in the app package (js/scenario1.js):
var pdfLib = Windows.Data.Pdf;
Windows.ApplicationModel.Package.current.installedLocation.getFileAsync(pdfFileName)
.then(function loadDocument(file) {
return pdfLib.PdfDocument.loadFromFileAsync(file);
}).then(function setPDFDoc(doc) {
renderPage(doc, pageIndex, renderOptions);
});
The file variable from the first promise is just a StorageFile, so you can substitute any other code that results in such an object before the call to loadFromFileAsync. The setPDFDoc completed handler, as it’s named here, receives the PdfDocument, whose isPasswordProtected andpageCount properties provide you with some obvious information.
The next thing to do is then render one or more pages of that document, or portions of those pages. The API is specifically set up to render one page at a time, so if you want to provide a multipage view you’ll need to render multiple pages and display them in side-by-side img elements (using a Repeater control, perhaps), display them in a ListView control, or render those pages into a large canvas. More on this in a bit.
To get a PdfPage object for any given page, call PdfDocument.getPage with the desired (zero-based index), as shown here from within the renderPage function of the sample (js/scenario1.js):
var pdfPage = pdfDocument.getPage(pageIndex);
At this point the page’s properties will be populated. These include the following:
• index The zero-based position of the page in the document.
• preferredZoom The preferred magnification factor (a number) for the page.
• rotation A value from the PdfPageRotation enumeration, one of normal, rotate90, rotate180, and rotate270.
• dimensions A PdfPageDimensions object containing artBox, bleedBox, cropBox, mediaBox, and trimBox, each of which is a Windows.Foundation.Rect. All of these represent intentions of the PDF’s author; for specific definitions, refer to the Abode PDF Reference.
• size A Windows.Foundation.Sizeobject the page’s basic width and height based on the dimensions.cropBox, dimensions.mediaBox, and rotation properties.
To render the page, call its renderToStreamAsync, which, as its name implies, requires a random access stream that receives the rendering. You can create an in-memory stream, a file-based stream, or perhaps a stream to some other data store entirely, again using the APIs discussed inChapter 10, depending on where you want the rendering to end up. Generally speaking, if you want to render just a single page for display, create an in-memory stream like the sample (js/scenario1.js):
var pageRenderOutputStream = new Windows.Storage.Streams.InMemoryRandomAccessStream();
If, on the other hand, you want to render a whole document and don’t want to goggle up so much memory that you kick out every other suspended app, you should definitely render each page into a temporary file instead. This is demonstrated in the other SDK sample for PDFs, the PDF showcase viewer sample, whose code contains a more sophisticated mechanism to build a data source for pages that are then displayed in a ListView. (This sample also has its own documentation on the PDF viewer end-to-end sample page.) Once it opens a PdfDocument, it iterates all the pages and calls the following loadPage method (which also allows for in-memory rendering; js/pdflibrary.js):
loadPage: function (pageIndex, pdfDocument, pdfPageRenderingOptions, inMemoryFlag, tempFolder) {
var filePointer = null;
var promise = null;
if (inMemoryFlag) {
promise = WinJS.Promise.wrap(new Windows.Storage.Streams.InMemoryRandomAccessStream());
} else {
// Creating file on disk to store the rendered image for a page on disk
// This image will be stored in the temporary folder provided during VDS init
var filename = this.randomFileName() + ".png";
var file = null;
promise = tempFolder.createFileAsync(filename,
Windows.Storage.CreationCollisionOption.replaceExisting).then(function (filePtr) {
filePointer = filePtr;
return filePointer.openAsync(Windows.Storage.FileAccessMode.readWrite);
}, function (error) {
// Error while opening a file
filePointer = null;
}, function (error) {
// Error while creating a file
});
}
return promise.then(function (imageStream) {
var pdfPage = pdfDocument.getPage(pageIndex);
return pdfPage.renderToStreamAsync(imageStream, pdfPageRenderingOptions)
.then(function () {
return imageStream.flushAsync();
})
// ...
Either way, your stream object must get to PdfPage.renderToStreamAsync, which has two variants. One just takes a stream, and the other takes the stream plus a PdfPageRenderingOptions object that controls finer details: backgroundColor, destinationHeight, destinationWidth,sourceRect, isIgnoringHighContrast, and bitmapEncoderId. With these options, as shown in the first PDF viewer sample, you can render a whole page, a zoomed-in page, or a portion of a page (js/scenario1.js):
var pdfPage = pdfDocument.getPage(pageIndex);
var pdfPageRenderOptions = new Windows.Data.Pdf.PdfPageRenderOptions();
var renderToStreamPromise;
var pagesize = pdfPage.size;
switch (renderOptions) {
case RENDEROPTIONS.NORMAL:
renderToStreamPromise = pdfPage.renderToStreamAsync(pageRenderOutputStream);
break;
case RENDEROPTIONS.ZOOM:
// Set pdfPageRenderOptions.'destinationwidth' or 'destinationHeight' to take
// zoom factor into effect
pdfPageRenderOptions.destinationHeight = pagesize.height * ZOOM_FACTOR;
renderToStreamPromise = pdfPage.renderToStreamAsync(pageRenderOutputStream,
pdfPageRenderOptions);
break;
case RENDEROPTIONS.PORTION:
// Set pdfPageRenderOptions.'sourceRect' to the rectangle containing portion to show
pdfPageRenderOptions.sourceRect = PDF_PORTION_RECT;
renderToStreamPromise = pdfPage.renderToStreamAsync(pageRenderOutputStream,
pdfPageRenderOptions);
break;
};
The promise that comes back from renderToStreamAsync doesn’t have any results, because the rendering will be contained in the stream. If the operation succeeds, your completed handler will be called and you can then pass the stream onto MSApp.createBlobFromRandomAccessStream, followed by our old friend URL.createObjectURL, whose result you can assign to an img.src. If the operation fails, your error handler is called, of course. Be mindful to call the stream’s flushAsync first thing before getting the URL and to close the stream (through its close method orblob.msClose). Here’s the whole process from the sample (js/scenario1.js):
renderToStreamPromise.then(function Flush() {
return pageRenderOutputStream.flushAsync();
}).then(function DisplayImage() {
if (pageRenderOutputStream !== null) {
var blob = MSApp.createBlobFromRandomAccessStream("image/png", pageRenderOutputStream);
var picURL = URL.createObjectURL(blob, { oneTimeOnly: true });
scenario1ImageHolder1.src = picURL;
pageRenderOutputStream.close();
blob.msClose();// Closes the stream
};
},
function error() {
if (pageRenderOutputStream !== null) {
pageRenderOutputStream.close();
}
});
If you’re using file-based streams, as in the PDF showcase viewer sample, you can just hold onto a collection of StorageFile objects. When you need to render any particular page, you can grab a thumbnail from the StorageFile and pass it to URL.createObjectURL. Alternately, if you use the PdfPageRenderOptions to generate renderings that match your screen size, you can just pass those StorageFile objects to URL.createObjectURL directly. This is what the PDF showcase viewer sample does. Its data source, again, manages a bunch of StorageFile objects (or in-memory streams). To show that flow, we can see that each item in the data source is an object with pageIndex and imageSrc properties (js/pdfLibrary.js):
loadPage: function (pageIndex, pdfDocument, pdfPageRenderingOptions, inMemoryFlag, tempFolder) {
// ... all code as shown earlier
return promise.then(function (imageStream) {
var pdfPage = pdfDocument.getPage(pageIndex);
return pdfPage.renderToStreamAsync(imageStream, pdfPageRenderingOptions)
.then(function () {
return imageStream.flushAsync();
})
.then(function closeStream() {
var picURL = null;
if (inMemoryFlag) {
var renderStream = Windows.Storage.Streams.RandomAccessStreamReference
.createFromStream(imageStream);
return renderStream.openReadAsync().then(function (stream) {
imageStream.close();
pdfPage.close();
return { pageIndex: pageIndex, imageSrc: stream };
});
} else {
imageStream.close();
pdfPage.close();
return { pageIndex: pageIndex, imageSrc: filePointer };
}
});
});
},
In default.html, the app’s display is composed of nothing more than two ListView controls inside a Semantic Zoom control:
<div id="pdfViewTemplate" data-win-control="WinJS.Binding.Template">
<div id="pdfitemmainviewdiv" data-win-control="WinJS.UI.ViewBox">
<img src="/images/placeholder.jpg" alt="PDF page"
data-win-bind="src: imageSrc blobUriFromStream" style=" width: 100%; height: 100%;"/>
</div>
</div>
<div id="pdfSZViewTemplate" data-win-control="WinJS.Binding.Template" style=" display: none">
<div>
<img src="/images/placeholder.jpg" alt="PDF page thumbnail"
data-win-bind="src: imageSrc blobUriFromStream"/>
</div>
</div>
<div id="semanticZoomDiv" data-win-control="WinJS.UI.SemanticZoom"
data-win-options="{zoomedInItem: window.zoomedInItem, zoomedOutItem: window.zoomedOutItem }"
style=" height: 100%; width: 100%">
<!-- zoomed-in view. -->
<div id="zoomedInListView" data-win-control="WinJS.UI.ListView"
data-win-options="{ itemTemplate: pdfViewTemplate, selectionMode: 'none',
tapBehavior: 'invokeOnly', swipeBehavior: 'none',
layout: {type: WinJS.UI.GridLayout, maxRows: 1},}">
</div>
<!--- zoomed-out view. -->
<div id="zoomedOutListView" data-win-control="WinJS.UI.ListView"
data-win-options="{ itemTemplate: pdfSZViewTemplate, selectionMode: 'none',
tapBehavior: 'invokeOnly', swipeBehavior: 'none',
layout: {type: WinJS.UI.GridLayout}}">
</div>
</div>
The last piece that glues it all together is the blobUriFromStream initializer in the data-win-bind statements of the templates. The code for this is hiding out at the bottom of js/default.js and is where the imageSrc from the data source—a StorageFile or stream—gets sent toURL.createObjectURL:
window.blobUriFromStream = WinJS.Binding.initializer(function (source, sourceProp,
dest, destProp) {
if (source[sourceProp] !== null) {
dest[destProp] = URL.createObjectURL(source[sourceProp], { oneTimeOnly: true });
}
});
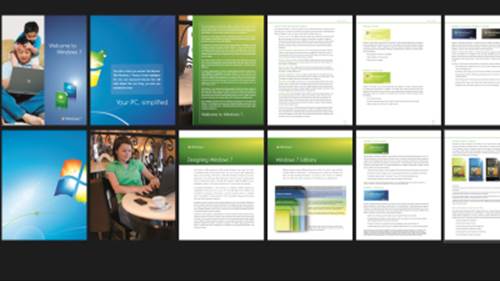
The results of all this are shown in two views below, the zoomed-in view (left) and the zoomed-out view (right), revealing a curious advertisement for Windows 7!

Video Playback and Deferred Loading
Let’s now talk about video playback. As we’ve already seen, simply including a video element in your HTML or creating an element on the fly gives you playback ability. In the code below, the video is sourced from an in-package file, starts playing by itself, loops continually, and provides controls:
<video src="/media/ModelRocket1.mp4" controlsloopautoplay></video>
As with other standards we’ve discussed, I’m not going to rehash the details (properties, methods, and events) that are available in the W3C spec for the video and audio tags, found on http://www.w3.org/TR/html51/ in sections 4.8.6 to 4.8.10. Especially note the event summary in section 4.8.10.15 and that most of the properties and methods for both are found in section 4.8.10.
Note that the track element for subtitles is supported for both video and audio; you can find an example of using it in scenario 4 of the HTML media playback sample, which includes a WebVTT file (a simple text file; see media/sample-subtitle-en.vtt in the sample) that contains entries like the following to describe when a give subtitle should appear:
00:00:05.242 --> 00:00:08.501
My name is Jason Weber, and my job is to make Internet Explorer fast.
This file is then referenced in the track element in its src attribute (html/Subtitles.html):
<video id="subtitleVideo" style=" position: relative; z-index: auto; width: 50%;"
src="http://ie.microsoft.com/testdrive/Videos/BehindIE9AllAroundFast/Video.mp4"
poster="images/Win8MediaLogo.png" loopcontrols>
<track id="scenario3entrack" src="/media/sample-subtitle-en.vtt" kind="subtitles"
srclang="en" default>
</video>
Another bit that’s helpful to understand is that video and audio are closely related, because they’re part of the same spec. In fact, if you want to play just the audio portion of a video, you can use the Audio object in JavaScript:
//Play just the audio of a video
var movieAudio = new Audio("http://www.kraigbrockschmidt.com/downloads/media/ModelRocket1.mp4");
movieAudio.load();
movieAudio.play();
You can also have a video’s audio track play in the background depending on the value assigned to the element’s msAudioCategory attribute, as we’ll see later under “Playback Manager and Background Audio.” The short of it is that if you use the value ForegroundOnlyMedia for this attribute, the video will be muted when in the background, and you can also use this condition to automatically pause the video (again, see “Playback Manager and Background Audio”). If you use instead use BackgroundCapableMedia for the attribute, the video’s soundtrack can play in the background provided that you’ve done the other necessary work for background audio. I, for one, appreciate apps that take trouble to make this work—I’ll often listen to the audio for conference talks in the background and then watch only the most important video segments.
For any given video element, you can set the width and height to control the playback size (as to 100% for full-screen). This is important when your app view changes size, and you’ll likely have CSS styles for video elements in your various media queries. Also, if you have a control to play full screen, simply make the video the size of the viewport. In addition, when you create a video element with the controls attribute, it will automatically have a full-screen control on the far right that does exactly what you expect within a Windows Store app:

In short, you don’t need to do anything special to make this work, although you can employ the :-ms-fullscreen pseudo-class in CSS for full-screen styling. When the video is full screen, a similar button (or the ESC key) returns to the normal app view. If there’s a problem going to full screen, the video element will fire an MSFullScreenError event.
Note In case you’re wondering, the audio and video elements don’t provide any CSS pseudo-selectors for styling the controls bar. As my son’s preschool teacher would say (in reference to handing out popsicles, but it works here too), “You get what you get and you don’t throw a fit and you’re happy with it.” If you’d like to do something different with these controls, you’ll need to turn off the defaults (set the controls attribute to false) and provide controls of your own that would call the element methods appropriately.
When implementing your own controls, be sure to set a timeout to make the controls disappear (either hiding them or changing the z-index) when they’re not being used. This is especially important because whenever the video is partly obstructed by other controls, even by a single pixel, playback decoding will switch from the GPU to the CPU and thus consume more power and other system resources. So be sure to hide those controls after a short time or size the video so that there’s no overlap. Your customers will greatly appreciate it! I, for one, have been impressed with how power-efficient video is with GPU playback on ARM devices such as the Microsoft Surface. In years past, video playback was a total battery killer, but now it’s no more an impact than answering emails.
You can use the various events of the video element to know when the video is played and paused through the controls, among other things (though there is not an event for going full-screen), but you should also respond appropriately when hardware buttons for media control are used. For this purpose, listen for the buttonpressedevent coming from the Windows.Media.SystemMediaTransport-Controls object.95 (This is a WinRT object event, so call removeEventListener as needed.) Refer to the System media transport controls sample for a demonstration; the process is basically add a listener for buttonpressed and then enable the buttons for which you want to receive that event (js/scenario1.js):
systemMediaControls = Windows.Media.SystemMediaTransportControls.getForCurrentView();
systemMediaControls.addEventListener("buttonpressed", systemMediaControlsButtonPressed, false);
systemMediaControls.isPlayEnabled = true;
systemMediaControls.isPauseEnabled = true;
systemMediaControls.isStopEnabled = true;
systemMediaControls.playbackStatus = Windows.Media.MediaPlaybackStatus.closed;
We’ll talk more of these later under “The Media Transport Control UI” because they very much apply to audio playback where you might not have any other controls available.
I also mentioned that you might want to defer loading a video (called lazy loading) until it’s needed and show a preview image in its place. This is accomplished with the poster attribute, whose value is the image to use, and then later setting the src attribute and calling the element’sload method:
<video id="video1" poster="/media/rocket.png" width="640" height="480"></video>
var video1 = document.getElementById("video1");
var clickListener = video1.addEventListener("click", function () {
video1.src = "http://www.kraigbrockschmidt.com/downloads/media/ModelRocket1.mp4";
video1.load();
//Remove listener to prevent interference with video controls
video1.removeEventListener("click", clickListener);
video1.addEventListener("click", function () {
video1.controls = true;
video1.play();
});
});
In this case I’m not using preload="true" or even providing a src value so that nothing is transferred until the video is started with a click or tap. Then that listener is removed, the video’s own controls are turned on, and playback is started. This, of course, is a more roundabout method; often you’ll use preload="true" controls src="..." directly in the video element, as the poster attribute will handle the preview image.
Streaming video Windows Store apps can certainly take advantage of streaming media, a subject that we’ll return to in “Streaming Media and Play To” at the end of this chapter.
Sidebar: Source Attributes and Custom Formats
In web applications, video (and audio) elements can use HTML5 source attributes to provide alternate formats in case a client system doesn’t have the necessary codec for the primary source. Given that the list of supported formats in Windows is well known (refer again to Supported audio and video formats), this isn’t much of a concern for Windows Store apps. However, source is still useful because it can identify the specific codecs for the source:
<video controlsloopautoplay>
<source src="video1.vp8" type="video/webm"/>
</video>
This is important when you need to provide a custom codec for your app through Windows.-Media.MediaExtensionManager, outlined in the “Handling Custom Audio and Video Formats” section later in this chapter, because the codec identifies the extension to load for decoding. I show WebM as an example here because it’s not directly available to Windows Store apps (though it is in Internet Explorer). When the app host running a Windows Store app encounters the video element above, it will look for a matching decoder for the specified type.
Alternately, the Windows.Media.Core.MediaStreamSource object makes it possible for you to handle audio, video, and image formats that aren’t otherwise supported in the platform, including plug-in free decryption of protected content. We’ll also talk about this in the “Handling Custom Audio and Video Formats” section.
Disabling Screen Savers and the Lock Screen During Playback
When playing video, especially full-screen, it’s important to disable any automatic timeouts that would blank the display or lock the device. This is done through the Windows.System.Display.Display-Request object. Before starting playback, create an instance of this object and call itsrequestActive method.
var displayRequest = new Windows.System.Display.DisplayRequest();
if (displayRequest) {
displayRequest.requestActive();
}
If this call succeeds, you’ll be guaranteed that the screen will stay active despite user inactivity. When the video is complete, be sure to call requestRelease:
displayRequest.releaseRequest();
See to the simple Display power state sample for a reference project.
Note that Windows will automatically deactivate such requests when your app is moved to the background, and it will reactivate them when the user switches back.
Tip As with image content, if you have a rights-protected video for which you want to disable screen capture, call Windows.UI.ViewManagement.ApplicationView.getForCurrentView() and set the resulting object’s isScreenCaptureEnabled property to false. This is again demonstrated in the Disable screen capture sample.
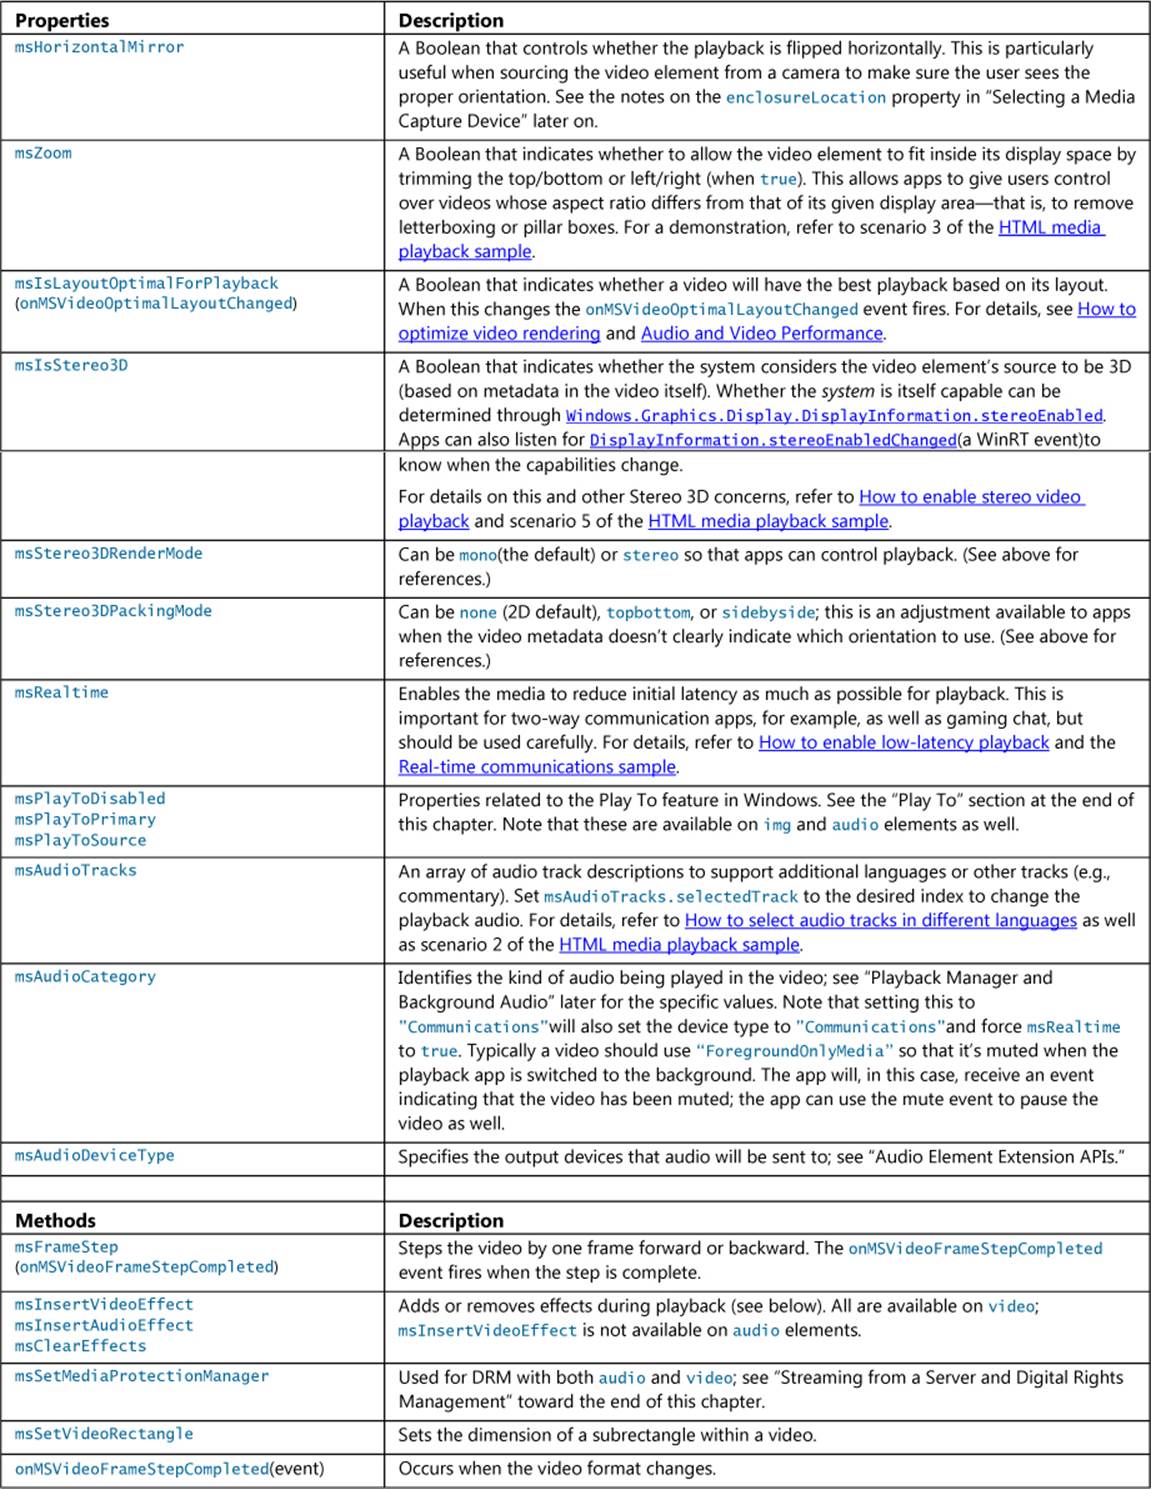
Video Element Extension APIs
Beyond the HTML5 standards for video elements, the app host adds some additional properties and methods, as shown in the following table and documented on the video element page. Also note the references to the HTML media playback sample where you can find some examples of using these.
Sidebar: Zooming Video for Smaller Screens
With video playback on small devices, it’s a good idea to provide a control that sets the msZoom property to true for full-screen playback. By default, full-screen video that doesn’t exactly match the aspect ratio of the display will have pillar boxes. On a very small screen—such as 7” or 8” tablets, this might cause the video to be shrunk down to a size that’s hard to see. By setting msZoom to true, you remove those pillar boxes automatically. If you want to go further, you can also do full-screen playback by default and even stretch the video element to be larger than the display size, effectively zooming in even further.
Applying a Video Effect
The earlier table shows that video elements have msInsertVideoEffect and msInsertAudioEffect methods on them. WinRT provides a built-in video stabilization effect that is easily applied to an element. This is demonstrated in scenario 3 of the Media extensions sample, which plays the same video with and without the effect, so the stabilized one is muted:
vidStab.msClearEffects();
vidStab.muted = true;
vidStab.msInsertVideoEffect(Windows.Media.VideoEffects.videoStabilization, true, null);
Custom effects, as demonstrated in scenario 4 of the sample, are implemented as separate dynamic-link libraries (DLLs) written in C++ and are included in the app package because a Windows Store app can install a DLL only for its own use and not for systemwide access. With the sample you’ll find DLL projects for a grayscale, invert, and geometric effects, where the latter has three options for fisheye, pinch, and warp. In the js/CustomEffect.js file you can see how these are applied, with the first parameter to msInsertVideoEffect being a string that identifies the effect as exported by the DLL (see, for instance, the InvertTransform.idl file in the InvertTransform project):
vid.msInsertVideoEffect("GrayscaleTransform.GrayscaleEffect", true, null);
vid.msInsertVideoEffect("InvertTransform.InvertEffect", true, null);
The second parameter to msInsertVideoEffect, by the way, indicates whether the effect is required, so it’s typically true. The third is a parameter called config, which just contains additional information to pass to the effect. In the case of the geometric effects in the sample, this parameter specifies the particular variation:
var effect = new Windows.Foundation.Collections.PropertySet();
effect["effect"] = effectName;
vid.msClearEffects();
vid.msInsertVideoEffect("PolarTransform.PolarEffect", true, effect);
where effectName will be either “Fisheye”, “Pinch”, or “Warp”.
To be more specific, the config argument is a PropertySet that you can use to pass any information you need to the effect object. It can also communicate information back: if the effect writes information into the PropertySet, it will fire its mapchanged event.
Audio effects, not shown in the sample, are applied the same way with msInsertAudioEffect (with the same parameters). Do note that each element can have at most two effects per media stream. A video element can have two video effects and two audio effects; an audio element can have two audio effects. If you try to add more, the methods will throw an exception. This is why it’s a good idea to call msClearEffects before inserting any others.
For additional discussion on effects and other media extensions, see Using media extensions.
Browsing Media Servers
Many households, including my own, have one or more media servers available on the local network from which apps can play media. Getting to these servers is the purpose of the one other property in Windows.Storage.KnownFolders that we haven’t mentioned yet: mediaServerDevices. As with other known folders, this is simply a StorageFolder object through which you can then enumerate or query additional folders and files. In this case, if you call its getFoldersAsync, you’ll receive back a list of available servers, each of which is represented by another StorageFolder. From there you can use file queries, as discussed in Chapter 11, to search for the types of media you’re interested in or apply user-provided search criteria. An example of this can be found in the Media Server client sample.
Audio Playback and Mixing
The audio element in HTML5 has many things in common with video. For one, the audio element provides its own playback abilities, including controls, looping, and autoplay:
<audio src="media/SpringyBoing.mp3" controlsloopautoplay></audio>
The same W3C spec applies to both video and audio elements, so the same code to play just the audio portion of a video is exactly what we use to play an audio file:
var sound = new Audio("media/SpringyBoing.mp3");
sound1.msAudioCategory = "SoundEffect";
sound1.load(); //For preloading media
sound1.play(); //At any later time
As mentioned earlier in this chapter, creating an Audio object without controls and playing it has no effect on layout, so this is what’s generally used for sound effects in games and other apps.
As with video, it’s important for many audio apps to respond appropriately to the buttonpressed event coming from the Windows.Media.SystemMediaTransportControlsobject96 so that the user can control playback with hardware buttons. This is not a concern with audio such as game sounds, however, where playback control is not needed.
Speaking of which, an interesting aspect of audio is mixing multiple sounds together, as games generally require. Here it’s important to understand that each audio element can be playing one sound: it has only one source file and one source file alone. However, multiple audio (andvideo) elements can be playing at the same time with automatic intermixing depending on their assigned msAudioCategory attributes. (See “Playback Manager and Background Audio” below.) In the following example, some background music plays continually (loop is set to true, and the volume is halved) while another sound is played in response to taps (see the AudioPlayback examplewith this chapter’s companion content):97
var sound1 = new Audio("/media/SpringyBoing.mp3");
sound1.msAudioCategory = "SoundEffects"; //Set this before setting src if possible
sound1.load(); //For preloading media
//Background music
var sound2 = new Audio();
sound2.msAudioCategory = "ForegroundOnlyMedia"; //Set this before setting src
sound2.src = "http://www.kraigbrockschmidt.com/mp3/WhoIsSylvia_PortlandOR_5-06.mp3";
sound2.loop = true;
sound2.volume = 0.5; //50%;
sound2.play();
document.getElementById("btnSound").addEventListener("click", function () {
//Reset position in case we're already playing
sound1.currentTime = 0;
sound1.play();
});
By loading the tap sound when the object is created, we know we can play it at any time. When initiating playback, it’s a good idea to set the currentTime to 0 so that the sound always plays from the beginning.
The question with mixing, especially in games, is a matter of managing many different sounds without knowing ahead of time how they will be combined. You may need, for instance, to overlap playback of the same sound with different starting times, but it’s impractical to declare three audio elements with the same source. The technique that’s emerged is to use “rotating channels,” as described on HTML5 Audio Tutorial: Rotating Channels (Ajaxian website) and demonstrated in the AudioPlayback example in this chapter’s companion content. To summarize:
15. Declareaudio elements for each sound (with preload="auto"), and make sure they aren’t showing controls so that they aren’t part of your layout..
16. Create a pool (array) of Audio objects for however many simultaneous channels you need.
17. To play a sound:
a. Obtain an available Audio object from the pool.
b. Set its src attribute to one that matches a preloaded audio element.
c. Call that pool object’s play method.
As sound designers in the movies have discovered, it is possible to have too much sound going on at the same time, because it gets really muddied. You might not need more than a couple dozen channels at most.
Hint Need some sounds for your app? Check out http://www.freesound.org.
Custom formats The Windows.Media.Core.MediaStreamSource object enables you to work with audio formats that don’t have native support in the platform. See “Handling Custom Audio and Video Formats” later in this chapter.
Audio Element Extension APIs
As with the video element, a few extensions are available on audio elements as well, namely those to do with effects (msInsertAudioEffect; see “Applying a Video Effect” earlier for a general discussion), DRM (msSetMediaProtectionManager), Play To (msPlayToSource, etc.), msRealtime, andmsAudioTracks, as listed earlier in “Video Element Extension APIs.” In fact, every extension API for audio exists on video, but two of them have primary importance for audio:
• msAudioDeviceType Allows an app to determine which output device audio will render to: "Console" (the default) and "Communications". This way an app that knows it’s doing communication (like chat) doesn’t interfere with media audio.
• msAudioCategory Identifies the type of audio being played (see table in the next section), which determines how it will mix with other audio streams. This is also very important to identify audio that can continue to play in the background (thereby preventing the app from being suspended), as described in the next section. Note that you should always set this property before setting the audio’s src and that setting this to "Communications" will also set the device type to "Communications" and force msRealtime to true.
Do note that despite the similarities between the values in these properties, msAudioDeviceType is for selecting an output device whereas msAudioCategory identifies the nature of the audio that’s being played through whatever device. A communications category audio could be playing through the console device, for instance, or a media category could be playing through the communications device. The two are separate concepts.
One other capability that’s available for audio is effects discovery, which means an app can enumerate effects that are being used in the audio processing chain on any given device. I won’t go into details here, but refer to the Windows.Media.Effects namespace and the Audio effects discovery sample in the SDK.
Playback Manager and Background Audio
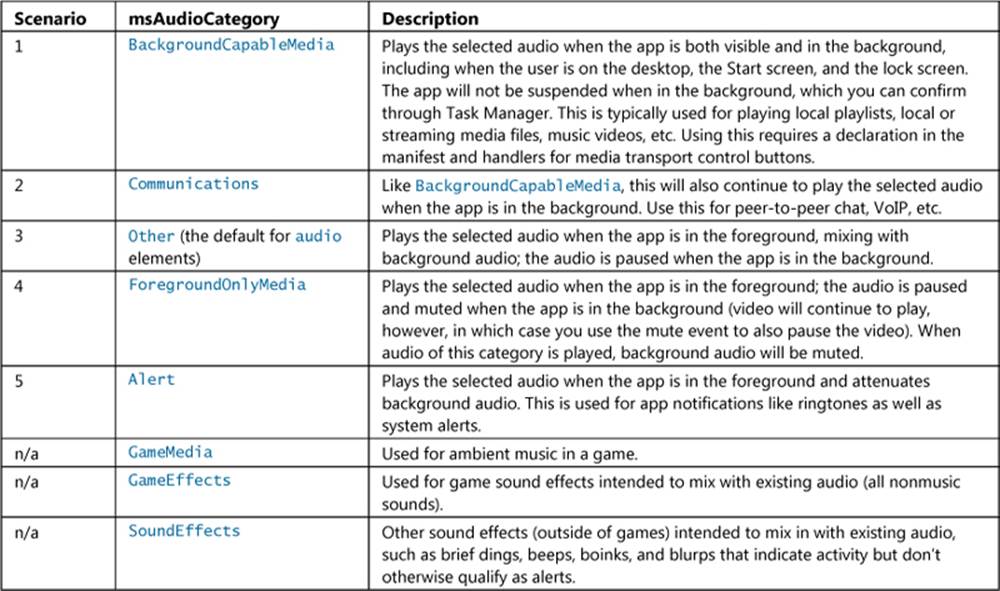
To explore different kinds of audio playback (including the audio track of videos), let’s turn our attention to the Playback Manager msAudioCategory sample. I won’t show a screen shot of this because, doing nothing but audio, there isn’t much to show! Instead, let me outline the behaviors of its different scenarios—which align to msAudioCategory values—in the following table, as well as list those categories that aren’t represented in the sample but that can be used in your own app. In each scenario you need to first select an audio file through the file picker.
Where a single audio stream is concerned, there isn’t always a lot of difference between most of these categories. Yet as the table indicates, different categories have different effects on other concurrent audio streams. For this purpose, the Windows SDK does an odd thing by providing a second identical sample to the first, the Playback Manager companion sample.This allows you run these apps at the same time (side by side, or one or both in the background) and play audio with different category settings to see how they combine.
How different audio streams combine is a subject that’s discussed in the Audio Playback in a Windows Store App whitepaper. However, you don’t have direct control over mixing—instead, the important thing is that you assign the most appropriate category to any particular audio stream. These categories help the playback manager perform the right level of mixing between audio streams according to user expectations, both with multiple streams in the same app, and streams coming from multiple apps (with limits on how many background audio apps can be going at once). For example, users will expect that alarms, being an important form of notification, will temporarily attenuate other audio streams (just like the GPS system in my car attenuates music when it gives directions). Similarly, users expect that an audio stream of a foreground app takes precedence over a stream of the same category of audio playing in the background.
As a developer, then, avoid playing games with the categories or trying to second guess the mixing algorithms, because you’ll end up creating an inconsistent user experience. Just assign the most appropriate category to your audio stream and let the playback manager deliver a consistentsystemwide experience with audio from all sources.
Setting an audio category for any given audio element is a simple matter of setting its msAudio-Category attribute. Every scenario in the sample does the same thing for this, making sure to set the category before setting the src attribute (shown here from js/backgroundcapablemedia.js):
audtag = document.createElement('audio');
audtag.setAttribute("msAudioCategory", "BackgroundCapableMedia");
audtag.setAttribute("src", fileLocation);
You could accomplish the same thing through audtag.msAudioCategory property, as seen in the previous section, as well as in markup:
<audio id="audio1" src="song.mp3" msAudioCategory="BackgroundCapableMedia"></audio>
<audio id="audio2" src="voip.mp3" msAudioCategory="Communications"></audio>
<audio id="audio3" src="lecture.mp3" msAudioCategory="Other"></audio>
With BackgroundCapableMedia and Communications, however, simply setting the category isn’t sufficient: you also need to declare an audio background task extension in your manifest. This is easily accomplished by going to the Declarations tab in the manifest designer:
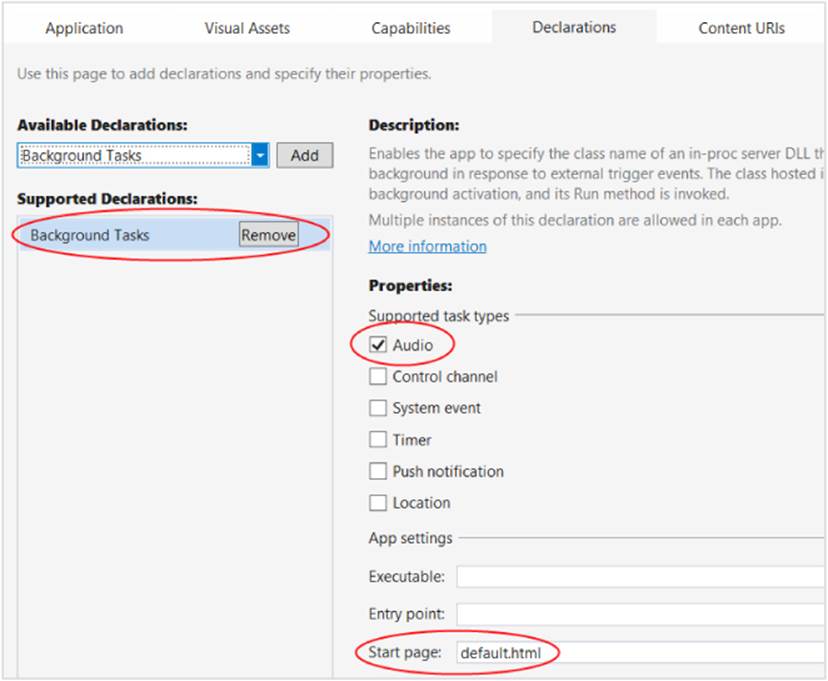
First, select Background Tasks from the Available Declarations drop-down list and click Add. Then check Audio under Supported Task Types, and identify a Start Page under App Settings. The start page isn’t really essential for background audio (because the app will never be launched for this purpose), but you need to provide something to make the manifest editor happy.
These declarations appear as follows in the manifest XML, should you care to look:
<Application Id="App"StartPage="default.html">
<!-- ... -->
<Extensions>
<Extension Category="windows.backgroundTasks"StartPage="default.html">
<BackgroundTasks>
<Task Type="audio" />
</BackgroundTasks>
</Extension>
</Extensions>
</Application>
Furthermore, background audio apps must do a few things with the Windows.Media.System-MediaTransportControls object that we’ve already mentioned so that the user can control background audio playback through the media control UI (see the next section):
• Set the object’s isPlayEnabled and isPauseEnabled properties to true.
• Listen to the buttonpressed event and handle play and pause cases in your handler by starting and stopping the audio playback as appropriate.
These requirements also make it possible for the playback manager to control the audio streams as the user switches between apps. If you fail to provide these listeners, your audio will always be paused and muted when the app goes into the background. (You can also optionally listen to the propertychanged event that is triggered for sound level changes.)
How to do this is shown in the Playback Manager sample for all its scenarios; the following is from js/backgroundcapablemedia.js (some code omitted), and note that the propertychanged event handler is not required for background audio:
var systemMediaControls = Windows.Media.SystemMediaTransportControls.getForCurrentView();
systemMediaControls.addEventListener("propertychanged", mediaPropertyChanged, false);
systemMediaControls.addEventListener("buttonpressed", mediaButtonPressed, false);
systemMediaControls.isPlayEnabled = true;
systemMediaControls.isPauseEnabled = true;
// audtag variable is the global audio element for the page
audtag.setAttribute("msAudioCategory", "BackgroundCapableMedia");
audtag.setAttribute("src", fileLocation);
audtag.addEventListener("playing", audioPlaying, false);
audtag.addEventListener("pause", audioPaused, false);
function mediaButtonPressed(e) {
switch (e.button) {
case Windows.Media.SystemMediaTransportControlsButton.play:
audtag.play();
break;
case Windows.Media.SystemMediaTransportControlsButton.pause:
audtag.pause();
break;
case Windows.Media.SystemMediaTransportControlsButton.pause:
default:
break;
}
}
function mediaPropertyChanged(e) {
switch (e.property) {
case Windows.Media.SystemMediaTransportControlsProperty.soundLevel:
//Catch SoundLevel notifications and determine SoundLevel state. If it's muted,
// we'll pause the player.If your app is playing media you feel that a user should
// not miss if a VOIP call comes in, you maywant to consider pausing playback when
// your app receives a SoundLevel(Low) notification.A SoundLevel(Low) means your
// app volume has been attenuated by the system (likely for a VOIP call).
var soundLevel = e.target.soundLevel;
switch (soundLevel) {
case Windows.Media.SoundLevel.muted:
log(getTimeStampedMessage("App sound level is: Muted"));
break;
case Windows.Media.SoundLevel.low:
log(getTimeStampedMessage("App sound level is: Low"));
break;
case Windows.Media.SoundLevel.full:
log(getTimeStampedMessage("App sound level is: Full"));
break;
}
appMuted(); // Typically only call this for muted and perhaps low levels.
break;
default:
break;
}
}
function audioPlaying() {
systemMediaControls.playbackStatus = Windows.Media.MediaPlaybackStatus.playing;
}
function audioPaused() {
systemMediaControls.playbackStatus = Windows.Media.MediaPlaybackStatus.paused;
}
function appMuted() {
if (audtag) {
if (!audtag.paused) {
audtag.pause();
}
}
}
Note Using the propertychanged event to detect a SoundLevel.muted on a video is the condition you typically use to pause a foreground-only video.
Given that WinRT events are involved here, the page control’s unload handler makes sure to clear everything out (js/backgroundcapablemedia.js):
if (systemMediaControls) {
systemMediaControls.removeEventListener("buttonpressed", mediaButtonPressed, false);
systemMediaControls.removeEventListener("propertychanged", mediaPropertyChanged, false);
systemMediaControls.isPlayEnabled = false;
systemMediaControls.isPauseEnabled = false;
systemMediaControls.playbackStatus = Windows.Media.MediaPlaybackStatus.closed;
systemMediaControls = null;
}
Again, setting the media control object’s isPlayEnabled and isPauseEnabled properties to true, make sure that the play/pause button is clickable in the UI and that the system controls also respond to hardware events, such as the buttons on my keyboard. For example, my keyboard also has next, previous, and stop buttons, but unless the app sets isNextEnabled, isPreviousEnabled, and isStopEnabled and handles those cases in the buttonpressed event, they won’t have any effect. We’ll see more in the next section.
Note The SystemMediaTransportControls.isEnabled property affects the entire control panel.
The other very important part to making the UI work properly is setting the playbackStatus value, otherwise the actual audio playback will be out of sync with the system controls. Take a look at the code again and you’ll see that the playing and pause events of the audio element are wired to functions named audioPlaying and audioPaused. Those functions then set the playbackStatus to the appropriate value from the Windows.Media.MediaPlaybackStatus enumeration, whose values are playing, paused, stopped, closed, and changing.
In short, the buttonpressed event is how an app responds to system control events. Setting playbackStatus is how you then affect the system controls in response to app events.
A few additional notes about background audio:
• If the audio is paused, a background audio app will be suspended like any other, but if the user presses a play button, the app will be resumed and audio will then continue playback.
• The use of background audio is carefully evaluated with apps submitted to the Windows Store. If you attempt to play an inaudible track as a means to avoid being suspended, the app will fail Windows Store certification.
• A background audio app should be careful about how it uses the network for streaming media to support the low-power state called connected standby. For details, refer to Writing a power savvy background media app.
Now let’s see the UI that Windows displays in response to hardware buttons.
The Media Transport Control UI
As mentioned in the previous section, handling the buttonpressed event from the SystemMedia-TransportControls object is required for background audio so that the user can control the audio through hardware buttons (built into many devices, including keyboards and remote controls) without needing to switch to the app. This is especially important because background audio continues to play not only when the user switches to another app but also when the user switches to the Start screen, switches to the desktop, or locks the device. Furthermore, the system controls also integrate automatically with Play To, meaning that they act as a remote control for the remote Play To device.
The default media control UI appears in the upper left of the screen, as shown in Figure 13-3, regardless of what is on the screen at the time. Tapping anywhere outside the specific control buttons will switch to the app.
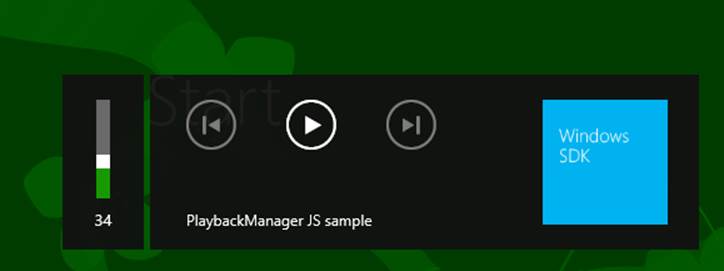
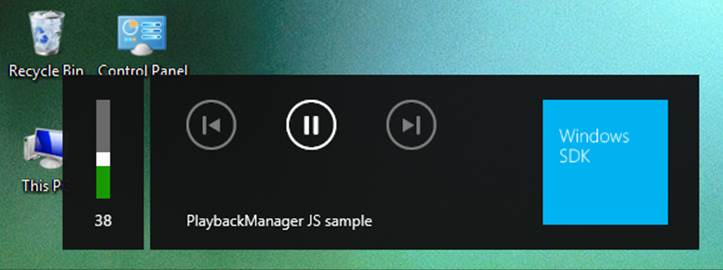
FIGURE 13-3 The system media control UI appearing above the Start screen (top) and the desktop (bottom). It will also show on the lock screen and on top of other Windows Store apps.
Setting the control object’s isPreviousEnabled and isNextEnabled properties to true will, as you’d expect, enable the other two buttons you see in Figure 13-3. This is demonstrated in the System media transport controls sample, in whose single scenario you can select multiple files for playback. When you have multiple files selected, it will play them in sequence, enabling and disabling the buttons depending on the position of the track in the list, as shown in Figure 13-4. (The AudioPlayback example in the companion content shows this as well—see the next section.)


FIGURE 13-4 The system media control UI with different states of the previous and next buttons. Note that the gap between the volume control and the other controls is transparent and just shows whatever is underneath.
Notice the significant difference between Figure 13-3 and Figure 13-4: in the first case we just see the app’s Display Name from its manifest along with its tile logo, where in the latter case we see album art along with the track title and artist name. Where do the system controls get this information?
This is done through the SystemMediaTransportControls.displayUpdater object, which is of class SystemMediaTransportControlsDisplayUpdater. Simply said, you populate whichever properties you need within this object and then call its update method to send them to the UI.
To populate the properties, you can either extract metadata from a StorageFile or set the properties manually. The first way is done with displayUpdater.copyFromFileAsync, which is how the SDK sample does it (js/scenario1.js; code here is condensed):
function updateSystemMediaControlsDisplayAsync(mediaFile) {
var updatePromise;
// This is a helper function to return a MediaPlaybackType value
var mediaType = getMediaTypeFromFileContentType(mediaFile);
var updatePromise = systemMediaControls.displayUpdater.copyFromFileAsync(
mediaType, mediaFile);
return updatePromise.then(function(isUpdateSuccessful) {
if (!isUpdateSuccessful){
// Clear the UI if we couldn't get the metadata
systemMediaControls.displayUpdater.clearAll();
}
systemMediaControls.displayUpdater.update();
});
}
The AudioPlayback example for this chapter has another example, though the MP3s in question don’t have associated album art. That is, Windows will automatically retrieve album art from a central service for published recordings and save it as part of the StorageFile properties.
Of course, sometimes you’ll be working with unpublished audio (like the AudioPlayback example). You might also be drawing from a source that doesn’t readily provide a metadata-equipped StorageFile, or you simply want more control over the process. In all these cases you can setdisplayUpdater properties individually. First, you must set the displayUpdater.type property to a value from the MediaPlaybackType enumeration (music, image, video, or unknown). Failure to do so will cause exceptions in the next step!
Depending on the type—other than unknown—you then populate fields of one of the following groups (where all strings must be less than 128 characters):

Finally, set the displayUpdater.thumbnail property to a RandomAccessStreamReference for the image you want to display—that is, to the result that comes back from one of its static creation methods: createFromFile, createFromStream, or createFromUri.
Here’s how the AudioPlayback example with this chapter does it. When you first start playback of the music segments, it sets up the invariant parts of the UI (js/default.js):
var du = sysMediaControls.displayUpdater;
du.type = Windows.Media.MediaPlaybackType.music;
du.musicProperties.artist = "AudioPlayback Example (Chapter 13)";
var thumbUri = new Windows.Foundation.Uri("ms-appx:///media/albumArt.jpg");
du.thumbnail = Windows.Storage.Streams.RandomAccessStreamReference.createFromUri(thumbUri);
du.update();
and then whenever it switches to a different track, it updates the track title (js/default.js):
du.musicProperties.title = "Segment " + (curSong + 1);
du.update();
The result is as follows:
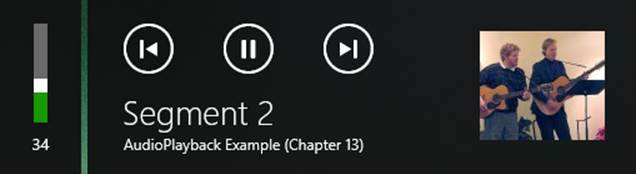
Playing Sequential Audio
An app that’s playing audio tracks (such as music, an audio book, or recorded lectures) will often have a list of tracks to play sequentially, especially while the app is running in the background. In this case it’s important to start the next track quickly because Windows will otherwise suspend the app 10 seconds after the current audio is finished. For this purpose, listen for the audio element’s ended event and set audio.src to the next track. A good optimization in this case is to create a second Audio object and set its src attribute after the first track starts to play. This way that second track will be preloaded and ready to go immediately, thereby avoiding potential delays in playback between tracks. This is shown in the AudioPlayback example for this chapter, where I’ve split the one complete song into four segments for continuous playback. It also shows again how to handle the next and previous button events, along with setting the segment number as the track name:
var sysMediaControls = Windows.Media.SystemMediaTransportControls.getForCurrentView();
var playlist = ["media/segment1.mp3", "media/segment2.mp3", "media/segment3.mp3",
"media/segment4.mp3"];
var curSong = 0;
var audio1 = null;
var preload = null;
document.getElementById("btnSegments").addEventListener("click", playSegments);
audio1 = document.getElementById("audioSegments");
preload = document.createElement("audio");
audio1.addEventListener("playing", function () {
sysMediaControls.playbackStatus = Windows.Media.MediaPlaybackStatus.playing;
});
audio1.addEventListener("pause", function () {
sysMediaControls.playbackStatus = Windows.Media.MediaPlaybackStatus.paused;
});
//Starts playback of sequential segments
function playSegments() {
e.target.disabled = true;//Prevent reentrancy
curSong = 0;
//Pause the other music
document.getElementById("musicPlayback").pause();
sysMediaControls.isPlayEnabled = true;
sysMediaControls.isPauseEnabled = true;
sysMediaControls.isNextEnabled = true;
sysMediaControls.isPreviousEnabled = false;
//Remember to remove this WinRT event listener if it goes out of scope
sysMediaControls.addEventListener("buttonpressed", function (e) {
var wmb = Windows.Media.SystemMediaTransportControlsButton;
switch (e.button) {
case wmb.play:
audio1.play();
break;
case wmb.pause:
case wmb.stop:
audio1.pause();
break;
case wmb.next:
playNext();
break;
case wmb.previous:
playPrev();
break;
default:
break;
}
});
//Set invariant metadata [omitted--code is in previous section]
//Show the element (initially hidden) and start playback
audio1.style.display = "";
audio1.volume = 0.5; //50%;
playCurrent();
//Preload the next track in readiness for the switch
var preload = document.createElement("audio");
preload.setAttribute("preload", "auto");
preload.src = playlist[1];
//Switch to the next track as soon as one had ended or next button is pressed
audio1.addEventListener("ended", playNext);
}
function playCurrent() {
audio1.src = playlist[curSong];
audio1.play();
//Update metadata title [omitted]
}
function playNext() {
curSong++;
//Enable previous button if we have at least one previous track
sysMediaControls.isPreviousEnabled = (curSong > 0);
if (curSong < playlist.length) {
playCurrent(); //playlist[curSong] should already be loaded
//Set up the next preload
var nextTrack = curSong + 1;
if (nextTrack < playlist.length) {
preload.src = playlist[nextTrack];
} else {
preload.src = null;
//Disable next if we're at the end of the list.
sysMediaControls.isNextEnabled = false;
}
}
}
function playPrev() {
//Enable Next unless we only have one song in the list
sysMediaControls.isNextEnabled = (curSong != playlist.length - 1);
curSong--;
//Disable previous button if we're at the beginning now
sysMediaControls.isPreviousEnabled = (curSong != 0);
playCurrent();
preload.src = playlist[curSong + 1]; //This should always work
}
When playing sequential tracks like this from an app written in JavaScript and HTML, you might notice brief gaps between the tracks, especially if the first track flows directly into the second. This is a present limitation of the platform given the layers that exist between the HTML audioelement and the low-level XAudio2 APIs that are ultimately doing the real work. You can mitigate the effects to some extent—for example, you can crossfade the two tracks or crossfade a third overlay track that contains a little of the first and a little of the second track. You can also use a negative time offset to start playing the next track slightly before the previous one ends. But if you want a truly seamless transition, you’ll need to bypass the audio element and use the XAudio2 APIs from a WinRT component for direct playback. How to do this is discussed in the Building your own Windows Runtime components to deliver great apps post on the Windows developer blog.
Playlists
The AudioPlayback example in the previous section is clearly contrived because an app wouldn’t typically have an in-memory playlist. More likely an app would load an existing playlist or create one from files that a user has selected.
WinRT supports these actions through a simple API in Windows.Media.Playlists, which supports the WPL (Windows Media Player), ZPL (Zune), and M3U formats. The Playlist sample in the Windows SDK98 shows how to perform various tasks with the API. Scenario 1 lets you choose multiple files with the file picker, creates a new Playlist object, adds those files to its files list (a StorageFile vector), and saves the playlist with its saveAsAsync method (this code from js/create.js is simplified and reformatted a bit):
function pickAudio() {
var picker = new Windows.Storage.Pickers.FileOpenPicker();
picker.suggestedStartLocation = Windows.Storage.Pickers.PickerLocationId.musicLibrary;
picker.fileTypeFilter.replaceAll(SdkSample.audioExtensions);
picker.pickMultipleFilesAsync().done(function (files) {
if (files.size > 0) {
SdkSample.playlist = new Windows.Media.Playlists.Playlist();
files.forEach(function (file) {
SdkSample.playlist.files.append(file);
});
SdkSample.playlist.saveAsAsync(Windows.Storage.KnownFolders.musicLibrary,
"Sample",Windows.Storage.NameCollisionOption.replaceExisting,
Windows.Media.Playlists.PlaylistFormat.windowsMedia)
.done();
}
}
Notice that saveAsAsync takes a StorageFolder and a name for the file (along with an optional format parameter). This accommodates a common use pattern for playlists where a music app has a single folder in which it stores playlists and provides users with a simple means to name them and/or select them. In this way, playlists aren’t typically managed like other user data files where one always goes through a file picker to do a Save As into an arbitrary folder. You could use FileSavePicker, get a StorageFile, and use its path property to get to the appropriateStorageFolder, but more likely you’ll save playlists in one place and present them as entities that appear only within the app itself.
For example, the Music app that comes with Windows allows you create a new playlist when you’re viewing tracks of some album:
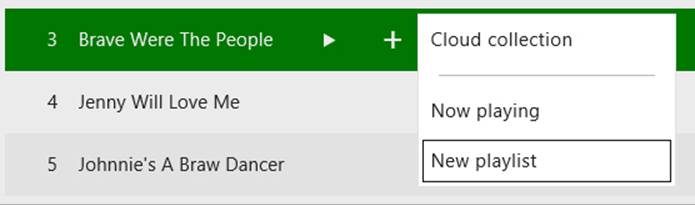
Or you can use the New Playlist command on the app’s left control pane. In either case, selecting New Playlist displays a flyout in which you provide a name:
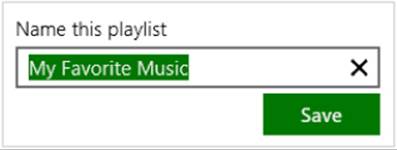
After this, the playlist will appear both on the left-side controls pane (below left), which makes it playable like an album, and in the track menu (below right):
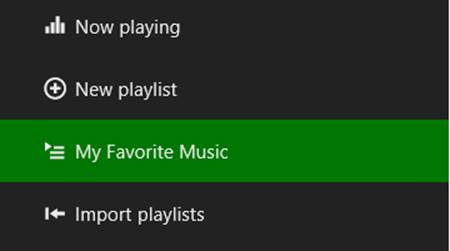
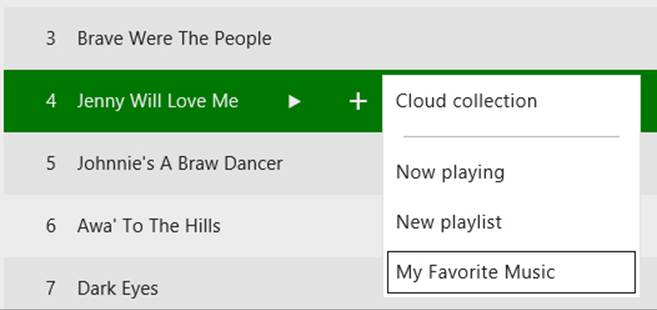
In other words, though playlists might be saved in discrete files, they aren’t necessarily presented that way to the user, and the API reflects that usage pattern.
Loading a playlist uses the Playlist.loadAsync method given a StorageFile for the playlist. This might be a StorageFile obtained from a file picker or from the enumeration of the app’s private playlist folder. Scenario 2 of the Playlist sample (js/display.js) demonstrates the former, where it then goes through each file and requests their music properties (refer back to Chapter 11 in the section “Media Specific Properties” for information on media file properties and the applicable APIs):
function displayPlaylist() {
var picker = new Windows.Storage.Pickers.FileOpenPicker();
picker.suggestedStartLocation = Windows.Storage.Pickers.PickerLocationId.musicLibrary;
picker.fileTypeFilter.replaceAll(SdkSample.playlistExtensions);
var promiseCount = 0;
picker.pickSingleFileAsync()
.then(function (item) {
if (item) {
return Windows.Media.Playlists.Playlist.loadAsync(item);
}
return WinJS.Promise.wrapError("No file picked.");
})
.then(function (playlist) {
SdkSample.playlist = playlist;
var promises = {};
// Request music properties for each file in the playlist.
playlist.files.forEach(function (file) {
promises[promiseCount++] = file.properties.getMusicPropertiesAsync();
});
// Print the music properties for each file. Due to the asynchronous
// nature of the call to retrieve music properties, the data may appear
// in an order different than the one specified in the original playlist.
// To guarantee the ordering, we use Promise.join with an associative array
// passed as a parameter, containing an index for each individual promise.
return WinJS.Promise.join(promises);
})
.done(function (results) {
var output = "Playlist content:\n\n";
var musicProperties;
for (var resultIndex = 0; resultIndex < promiseCount; resultIndex++) {
musicProperties = results[resultIndex];
output += "Title: " + musicProperties.title + "\n";
output += "Album: " + musicProperties.album + "\n";
output += "Artist: " + musicProperties.artist + "\n\n";
}
if (resultIndex === 0) {
output += "(playlist is empty)";
}
},function (error) {
// ...
});
}
The other method for managing a playlist is PlayList.saveAsync, which takes a single StorageFile. This is what you’d use if you’ve loaded and modified a playlist and simply want to save those changes (typically done automatically when the user adds or removes items from the playlist). This is demonstrated in scenarios 3, 4, and 5 of the sample (js/add.js, js/remove.js, and js/clear.js), which just use methods of the Playlist.files vector like append,removeAtEnd, and clear, respectively.
Playback of a playlist depends, of course, on the type of media involved, but typically you’d load a playlist and sequentially take the next StorageFile object from its files vector, pass it to URL.-createObjectURL, and then assign that URI to the src attribute of an audio or video element. You could also use playlists to manage lists of videos and images for sequential showing as well.
Sidebar: Background Downloading
Now it’s not always the case that everything you want to play is already on the local file system: you might want to be downloading the next track at the same time you’re streaming the current one. This is a great opportunity to use the background downloader API that we talked about inChapter 4 and, more specifically, the high priority and unconstrained download features that the API provides. Mind you, this would be for scenarios where you want to retain a copy of the media on the local file system after playback is done—you wouldn’t need to worry about this if you’re in a streaming-only situation.
Anyway, let’s say that you want to download and play an album in its entirety. For this you’d use a strategy like the following:
• Start a download operation for the first track at high priority.
• Start additional downloads for one or more subsequent tracks at normal priority.
• As soon as the first track is transferred, begin playback and change the next track’s download priority to high.
• Repeat the process of starting additional downloads as necessary, always setting the next track’s priority to high so that it gets transferred soonest.
Alongside setting priorities, you might also configure these as unconstrained downloads if you’d like to allow the device to go into connected standby and continue to download and play, which would be very important for a series of videos where each file transfer could be quite large. Each request is subject to user consent, of course, but the capability is there so that the user can enjoy a continuous media experience without having everything in the system continue to run as it normally would.
More details on this subject can be found in Writing a power savvy background media app.
Text to Speech
Before we delve into the next round of media topics in this chapter, it’s a good time to take a little break and look at a different set of APIs that are very much related to audio but don’t rely on any preexisting media files: text to speech. These APIs are found in theWindows.Media.SpeechSynthesis namespace, specifically in the SpeechSynthesizer class.
The basic “hear me now” usage is straightforward:
• Create an Audio object to handle playback.
• Create an instance of the SpeechSynthesizer object.
• Call its synthesizeTextToStreamAsync method, which results in a SpeechSynthesisStream object.
• Pass that stream object to MSApp.createBlobFromRandomAccessStream to get a blob.
• Pass the blob to URL.createObjectURL.
• Assign the resulting URL to the audio’s src property and then call its play method when you’re ready for playback.
Here’s how it’s done in scenario 1 of the Speech synthesis sample, where the Data element is a text box in which you can type whatever you want (js/SpeakText.js):
var synth = new Windows.Media.SpeechSynthesis.SpeechSynthesizer();
var txtData = document.getElementById("Data");
var audio = new Audio();
synth.synthesizeTextToStreamAsync(txtData.value).then(function (markersStream) {
var blob = MSApp.createBlobFromRandomAccessStream(markersStream.ContentType, markersStream);
audio.src = URL.createObjectURL(blob, { oneTimeOnly: true });
markersStream.seek(0); //start at beginning when speak is hit
audio.AutoPlay = Boolean(true);
audio.play();
});
The same scenario also offers an option to save the speech stream into a WAV file rather than playing it back. Here, file is a StorageFile from a FileSavePicker, and the code is just the same business of playing with the necessary files, buffers, and streams to get the job done (js/SpeakText.js):
synth.synthesizeTextToStreamAsync(txtData.value).then(function (markerStream) {
var buffer = new Windows.Storage.Streams.Buffer(markerStream.size);
file.openAsync(Windows.Storage.FileAccessMode.readWrite).then(function (writeStream) {
var outputStream = writeStream.getOutputStreamAt(writeStream.size);
var dataWriter = new Windows.Storage.Streams.DataWriter(outputStream);
markerStream.readAsync(buffer, markerStream.size,
Windows.Storage.Streams.InputStreamOptions.none).then(function () {
dataWriter.writeBuffer(buffer);
// close the data file streams
dataWriter.storeAsync().then(function () {
outputStream.flushAsync().then(function () {
});
});
});
});
})
Scenario 2 is exactly the same except that it works with the synthesizeSsmlToStreamAsync method, which supports the use of Speech Synthesis Markup Language (SSML) instead of just plain text. SSML is a W3C standard that enables you to encode much more subtlety and accurate pronunciations into your source text. For example, the phoneme tag lets you spell out the exact phonetic syllables for a word like whatchamacallit (html/SpeakSSML.html):
<phoneme alphabet='x-microsoft-ups' ph='S1 W AA T . CH AX . M AX . S2 K AA L . IH T'>
whatchamacallit
</phoneme>
Give the sample a try if you don’t know what that word sounds like!
The one other option you have with speech synthesis is to choose from a variety of voices that support different languages. For the complete list of 17 options covering almost as many languages, see the documentation for the SpeechSynthesizer.voice property. Note, however, that voices get installed on a device only as part of a set of locale-specific language resources, so only a smaller subset is typically available.99 That list is available in the SpeechSynthesizer.allVoicesvectorwith the default one in defaultVoice. You can enumerate the contents of allVoices to create a list of options for the user, if you want, or you can programmatically select one according to your preferences. (The sample does this to populate a drop-down list.)
To select a voice, simply copy one of the elements from allVoices into the voice property (js/SpeakText.js):
// voicesSelect is a drop-down element
var allVoices = Windows.Media.SpeechSynthesis.SpeechSynthesizer.allVoices;
var selectedVoice = allVoices[voicesSelect.selectedIndex];
synth.voice = selectedVoice;
And that’s really all there is to it! I suspect by now you want to give it a try if you haven’t already, and I’m sure you can think of creative ways to employ this API in your own projects, especially for teaching aids, accessibility features, and perhaps in early childhood educational apps.
Sidebar: OK, What About Speech Recognition?
Although WinRT has an API for speech synthesis, it does not at present have one for speech recognition. Fortunately, Bing provides a speech recognition control for Windows and Windows Phone that you can learn more about on http://www.bing.com/dev/en-us/speech.
Loading and Manipulating Media
So far in this chapter we’ve seen how to display images and play audio and video by using their respective HTML elements: img, audio, and video. We also covered a number of related topics in Chapter 11, including:
• Programmatically accessing the user’s media libraries through Windows.Storage.-KnownFolders with the appropriate manifest capabilities, as well as removable storage.
• Using thumbnails to display images or video placeholders instead of loading up the entire file contents.
• Retrieving and modifying file properties, including those specific to media, through the getImagePropertiesAsync, getVideoPropertiesAsync, and getMusicPropertiesAsync methods of StorageFile.properties.
• Using the Windows.Storage.StorageLibrary object to add folders to and remove folders from the media libraries.
• Enumerating folder contents using queries.
In short, what we’ve covered to this point in the book is how to consume media for the purposes of display and playback, as well as creating gallery views of library content. We turn our attention now to manipulating media, namely the concerns of transcoding and editing. (Simply changing file-level properties, like title and author, are covered in Chapter 11.) For this we’ll be looking at the core APIs that make this possible, including those that give you access to the raw media stream. What you then do with that raw stream is up to you—we’ll see some basic examples here, but we won’t delve into anything more specific than that because the subject can quickly become intricate and complicated. For that reason you’ll probably find it helpful to refer to some of the topics in the documentation, such as Processing image files, Transcoding (audio and video), and Using media extensions.
Image Manipulation and Encoding
To do something more with an image than just loading and displaying it (where again you can apply various CSS transforms for effect), you need to get to the actual pixels by means of a decoder. This already happens under the covers when you assign a URI to an img.src, but to have direct access to pixels means decoding manually. On the flip side, saving pixels back out to an image file means using an encoder.
WinRT provides APIs for both in the Windows.Graphics.Imaging namespace, namely in the BitmapDecoder, BitmapTransform, and BitmapEncoder classes. Loading, manipulating, and saving an image file often involves these three classes in turn, though the BitmapTransform object is focused on rotation and scaling, so you won’t use it if you’re doing other manipulations.
One demonstration of this API can be found in scenario 2 of the Simple imaging sample. I’ll leave it to you to look at the code directly, however, because it gets fairly involved—up to 11 chained promises to save a file! It also does all decoding, manipulation, and encoding within a single function such as saveHandler (js/scenario2.js). Here’s the process it follows:
1. Open a file with StorageFile.openAsync, which provides a stream.
2. Pass that stream to the static method BitmapDecoder.createAsync, which provides a specific instance of BitmapDecoder for the stream.
3. Pass that decoder to the static method BitmapEncoder.createForTranscodingAsync, which provides a specific BitmapEncoder instance. This encoder is created with a new instance of Windows.Storage.Streams.InMemoryRandomAccessStream.
4. Set properties in the encoder’s bitmapTransform property (a BitmapTransform object) to configure scaling and rotation. This creates the transformed graphic in the in-memory stream.
5. Create a property set (Windows.Graphics.Imaging.BitmapPropertySet) that includes System.Photo.Orientation and use the encoder’s bitmapProperties.setPropertiesAsync to save it.
6. Copy the in-memory stream to the output file stream by using Windows.Storage.Stream.-RandomAccessStream.copyAsync.
7. Close both streams with their respective close methods (this is what closes the file).
As comprehensive as this scenario is, it’s helpful to look at different stages of the process separately, for which purpose we have the ImageManipulation example in this chapter’s companion content. This lets you pick and load an image, convert it to grayscale, and save that converted image to a new file. Its output is shown in Figure 13-5. It also gives us an opportunity to see how we can send decoded image data to an HTML canvas element and save that canvas’s contents to a file.

FIGURE 13-5 Output of the ImageManipulation example in the chapter’s companion content.
The handler for the Load Image button (loadImage in js/default.js) provides the initial display. It lets you select an image with the file picker, displays the full-size image (not a thumbnail) in an img element with URL.createObjectURL, callsStorageFile.properties.getImagePropertiesAsync to retrieve the title and dateTaken properties, and uses StorageFile.getThumbnailAsync to provide the thumbnail at the top. We’ve seen all of these APIs in action already.
Clicking the Grayscale button enters the setGrayscale handler where the interesting work happens. We call StorageFile.openReadAsync to get a stream, call BitmapDecoder.createAsync with that to obtain a decoder, cache some details from the decoder in a local object (encoding), and call BitmapDecoder.getPixelDataAsync and copy those pixels to a canvas (and only three chained async operations here!):
var Imaging = Windows.Graphics.Imaging;//Shortcut
var imageFile;//Saved from the file picker
var decoder;//Saved from BitmapDecoder.createAsync
var encoding = {};//To cache some details from the decoder
function setGrayscale() {
//Decode the image file into pixel data for a canvas
//Get an input stream for the file (StorageFile object saved from opening)
imageFile.openReadAsync().then(function (stream) {
//Create a decoder using static createAsync method and the file stream
return Imaging.BitmapDecoder.createAsync(stream);
}).then(function (decoderArg) {
decoder = decoderArg;
//Configure the decoder if desired. Default is BitmapPixelFormat.rgba8 and
//BitmapAlphaMode.ignore. The parameterized version ofgetPixelDataAsync can also
//control transform, ExifOrientationMode, and ColorManagementMode if needed.
//Cache these settings for encoding later
encoding.dpiX = decoder.dpiX;
encoding.dpiY = decoder.dpiY;
encoding.pixelFormat = decoder.bitmapPixelFormat;
encoding.alphaMode = decoder.bitmapAlphaMode;
encoding.width = decoder.pixelWidth;
encoding.height = decoder.pixelHeight;
return decoder.getPixelDataAsync();
}).done(function (pixelProvider) {
//detachPixelData gets the actual bits (array can't be returned from
//an async operation)
copyGrayscaleToCanvas(pixelProvider.detachPixelData(),
decoder.pixelWidth, decoder.pixelHeight);
});
}
The decoder’s getPixelDataAsync method comes in two forms. The simple form, shown here, decodes using defaults. The full-control version lets you specify other parameters, as explained in the code comments above. A common use of this is doing a transform using aWindows.Graphics.-Imaging.BitmapTransform object (as mentioned before), which accommodates scaling (with different interpolation modes), rotation (90-degree increments), cropping, and flipping.
Either way, what you get back from the getPixelDataAsync is not the actual pixel array, because of a limitation in the WinRT language projection mechanism whereby an asynchronous operation cannot return an array. Instead, the operation returns a PixelDataProvider object whose singular super-exciting synchronous method called detachPixelData gives you the array you want. (And that method can be called only once and will fail on subsequent calls, hence the “detach” in the method name.) In the end, though, what we have is exactly the data we need to manipulate the pixels and display the result on a canvas, as the copyGrayscaleToCanvas function demonstrates. You can, of course, replace this kind of function with any other manipulation routine:
function copyGrayscaleToCanvas(pixels, width, height) {
//Set up the canvas context and get its pixel array
var canvas = document.getElementById("canvas1");
canvas.width = width;
canvas.height = height;
var ctx = canvas.getContext("2d");
//Loop through and copy pixel values into the canvas after converting to grayscale
var imgData = ctx.createImageData(canvas.width, canvas.height);
var colorOffset = { red: 0, green: 1, blue: 2, alpha: 3 };
var r, g, b, gray;
vardata = imgData.data; //Makes a huge perf difference to not dereference
//imgData.data each time!
for (var i = 0; i < pixels.length; i += 4) {
r = pixels[i + colorOffset.red];
g = pixels[i + colorOffset.green];
b = pixels[i + colorOffset.blue];
//Calculate brightness value for each pixel
gray = Math.floor(30 * r + 55 * g + 11 * b) / 100;
data[i + colorOffset.red] = gray;
data[i + colorOffset.green] = gray;
data[i + colorOffset.blue] = gray;
data[i + colorOffset.alpha] = pixels[i + colorOffset.alpha];
}
//Show it on the canvas
ctx.putImageData(imgData, 0, 0);
//Enable save button
document.getElementById("btnSave").disabled = false;
}
This is a great place to point out that JavaScript isn’t necessarily the best language for working over a pile of pixels like this, though in this case the performance of a Release build running outside the debugger is actually quite good. Such routines may be better implemented as a WinRT component in a language like C# or C++ and made callable by JavaScript. We’ll take the opportunity to do exactly this in Chapter 18, “WinRT Components,” where we’ll also see limitations of the canvas element that require us to take a slightly different approach.
Saving this canvas data to a file then happens in the saveGrayscale function, where we use the file picker to get a StorageFile, open a stream, acquire the canvas pixel data, and hand it off to a BitmapEncoder:
function saveGrayscale() {
var picker = new Windows.Storage.Pickers.FileSavePicker();
picker.suggestedStartLocation =
Windows.Storage.Pickers.PickerLocationId.picturesLibrary;
picker.suggestedFileName = imageFile.name + " - grayscale";
picker.fileTypeChoices.insert("PNG file", [".png"]);
var imgData, fileStream = null;
picker.pickSaveFileAsync().then(function (file) {
if (file) {
return file.openAsync(Windows.Storage.FileAccessMode.readWrite);
} else {
return WinJS.Promise.wrapError("No file selected");
}
}).then(function (stream) {
fileStream = stream;
var canvas = document.getElementById("canvas1");
var ctx = canvas.getContext("2d");
imgData = ctx.getImageData(0, 0, canvas.width, canvas.height);
return Imaging.BitmapEncoder.createAsync(
Imaging.BitmapEncoder.pngEncoderId, stream);
}).then(function (encoder) {
//Set the pixel data--assume "encoding" object has options from elsewhere.
//Conversion from canvas data to Uint8Array is necessary because the array type
//from the canvas doesn't match what WinRT needs here.
encoder.setPixelData(encoding.pixelFormat, encoding.alphaMode,
encoding.width, encoding.height, encoding.dpiX, encoding.dpiY,
new Uint8Array(imgData.data));
//Go do the encoding
return encoder.flushAsync();
}).done(function () {
fileStream.close();
}, function () {
//Empty error handler (do nothing if the user canceled the picker)
});
}
Note how the BitmapEncoder takes a codec identifier in its first parameter. We’re using pngEncoderId, which is, as you can see, defined as a static property of the Windows.Graphics.-Imaging.BitmapEncoder class; other values are bmpEncoderId, gifEncoderId, jpegEncoderId,jpegXREncoderId, and tiffEncoderId. These are the formats supported by the API. You can set additional properties of the BitmapEncoder before setting pixel data, such as its BitmapTransform, which will then be applied during encoding.
One gotcha to be aware of here is that the pixel array obtained from a canvas element (a DOM CanvasPixelArray)is not directly compatible with the WinRT byte array required by the encoder. This is the reason for the new Uint8Array call down there in the last parameter.
Note Scenario 3 of the SDK’s Simple imaging sample performs a different manipulation on canvas contents—applying artistic strokes—so you can refer to that for another demonstration. Its process of saving canvas contents is pretty much the same thing as shown above.
Transcoding and Custom Image Formats
In the previous section we mostly saw the use of a BitmapEncoder created with that class’s static createAsync method to write a new file. That’s all well and good, but you might want to know about a few of the encoder’s other capabilities.
First is the BitmapEncoder.createForTranscodingAsync method that was mentioned briefly in the context of the Simple imaging sample. This specifically creates a new encoder that is initialized from an existing BitmapDecoder. This is primarily used to manipulate some aspects of the source image file while leaving the rest of the data intact. To be more specific, you can first change those aspects that are expressed through the encoder’s setPixelData method: the pixel format (rgba8, rgba16, and bgra8; see BitmapPixelFormat), the alpha mode (premultiplied, straight, or ignore; see BitmapAlphaMode), the image dimensions, the image DPI, and, of course, the pixel data itself. Beyond that, you can change other properties through the encoder’s bitmapProperties.setProperties-Async method. In fact, if all you need to do is change a few properties and you don’t want to affect the pixel data, you can use BitmapEncoder.createForInPlacePropertyEncodingAsync instead (how’s that for a method name!). This encoder allows calls to only bitmapProperties.set-PropertiesAsync, bitmapProperties.getPropertiesAsync, and flushAsync, and since it can assume that the underlying data in the file will remain unchanged, it executes much faster than its more flexible counterparts and it has less memory overhead.
An encoder from createForTranscodingAsync does not accommodate a change of image file format (e.g., JPEG to PNG); for that you need to use createAsync wherein you can specify the specific kind of encoding. As we’ve already seen, the first argument to createAsync is a codec identifier, for which you normally pass one of the static properties of BitmapEncoder such as pngEncoderId. What I haven’t mentioned is that you can also specify custom codecs in this first parameter and that the createAsync call also supports an optional third argument in which you can provide options for the particular codec in question. However, there are complications and restrictions here.
Let me address options first. The present documentation for the BitmapEncoder codec values (like pngEncoderId) lacks any details about available options. For that you need to instead refer to the docs for the Windows Imaging Component (WIC), specifically the Native WIC Codecs that are what WinRT surfaces to Windows Store apps. If you go into the page for a specific codec, you’ll then see a section on “Encoder Options” that tells you what you can use. For example, the JPEG codec supports properties like ImageQuality (a value between 0.0 and 1.0), as well as built-in rotations. The PNG codec supports properties like FilterOption for various compression optimizations.
To provide these properties, you need to create a new BitmapPropertySet and insert an entry in that set for each desired option. If, for example, you have a variable named quality that you want to apply to a JPEG encoding, you’d create the encoder like this:
var options = new Windows.Graphics.Imaging.BitmapPropertySet();
options.insert("ImageQuality", quality);
var encoderPromise = Imaging.BitmapEncoder.createAsync(Imaging.BitmapEncoder.jpegEncoderId,
stream, options);
You use the same BitmapPropertySet for any properties you might pass to an encoder’s bitmap-Properties.setPropertiesAsync call. Here’s we’re just using the same mechanism for encoder options.
As for custom codecs, this simply means that the first argument to BitmapEncoder.createAsync (as well as BitmapDecoder.createAsync) is the GUID (a class identifier or CLSID) for that codec, the implementation of which must be provided by a DLL. Details on how to write one of these is provided in How to Write a WIC-Enabled Codec. The catch is that including custom image codecs in your package is not presently supported. If the codec is already on the system (that is, installed via the desktop), it will work. However, the Windows Store policies do not allow apps to be dependent on other apps, so it’s unlikely that you can even ship such an app unless it’s preinstalled on some specific OEM device and the DLL is part of the system image. (An app written in C++ can do more here, but that’s beyond the scope of this book.)
In short, for apps written in JavaScript and HTML, you’re really limited, for all practical purposes, to image formats that are inherently supported in the system unless you're willing to write your own decoder for file data and do in-place conversions to a supported format.
Do note that these restrictions do not exist for custom audio and video codecs. The Media extensions sample shows how to do this with a custom video codec, as we’ll see in “Custom Decoders/Encoders and Scheme Handlers” later..
Manipulating Audio and Video
As with images, if all you want to do is load the contents of a StorageFile into an audio or video element, you can just pass that StorageFile to URL.createObjectUrl and assign the result to a src attribute. Similarly, if you want to get at the raw data, we can just use theStorageFile.openAsync or openReadAsync methods to obtain a file stream.
To be honest, opening the file is probably the farthest you’d ever go in JavaScript with raw audio or video, if even that. While chewing on an image is a marginally acceptable process in the JavaScript environment, churning on audio and especially video is really best done in a highly performant C++ DLL. In fact, many third-party, platform-neutral C/C++ libraries for such manipulations are readily available, which you should be able to directly incorporate into such a DLL. In this case you might as well just let the DLL open the file itself!
That said, WinRT (which is written in C++!) does provide for transcoding (converting) between different media formats, and it provides an extensibility model for custom codecs, effects, and scheme handlers. In fact, we’ve already seen how to apply custom video effects through theMedia extensions sample (see “Applying a Video Effect” earlier in the chapter), and the same DLLs can also be used within an encoding process, where all that the JavaScript code really does is glue the right components together (which it’s very good at doing). Let’s see how this works with transcoding video first and then with custom codecs.
Transcoding
Transcoding both audio and video is accomplished through the Windows.Media.Transcoding.-MediaTranscoder class, which supports output formats of mp3, wav, and wma for audio, and mp4, wmv, avi, and m4a for video. The transcoding process also allows you to apply effects and to trim start and end times.
Transcoding happens either from one StorageFile to another or one RandomAccessStream to another, and in each case it happens according to a MediaEncodingProfile. To set up a transcoding operation, you call the MediaTranscoder prepareFileTranscodeAsync or prepareStream-TranscodeAsync method, which returns back a PrepareTranscodeResult object. This represents the operation that’s ready to go, but it won’t happen until you call that result’s transcodeAsync method. In JavaScript, each result is a promise, allowing you to provide completed and progress handlers for a single operation but also allowing you to combine operations with WinJS.Promise.join. This allows them to be set up and started later, which is useful for batch processing and doing automatic uploads to a service like YouTube while you’re sleeping! (And at times like these I’ve actually pulled ice packs from my freezer and placed them under my laptop as a poor-man’s cooling system….)
The Transcoding media sample provides us with a couple of transcoding scenarios. In scenario 1 (js/presets.js) we can pick a video file, pick a target format, select a transcoding profile, and turn the machine loose to do the job (with progress being reported), as shown in Figure 13-6.
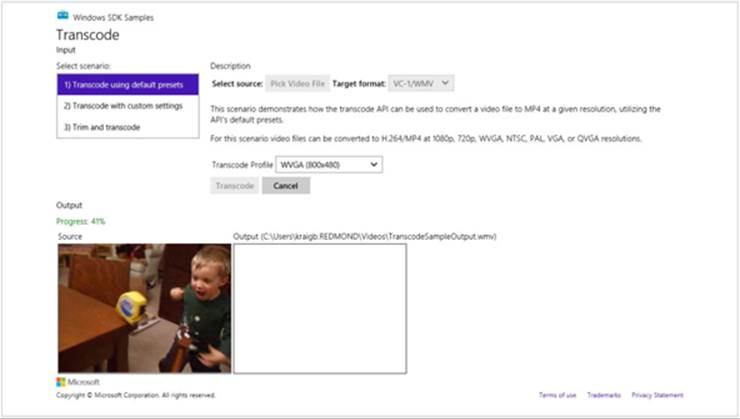
FIGURE 13-6 The Transcoding media sample cranking away on a video of my then two-year-old son discovering the joys of a tape measure.
The code that’s executed when you press the Transcode button is as follows (js/presets.js, with some bits omitted; this sample happens to use nested promises, which again isn’t recommended for proper error handling unless you want, as this code would show, to eat any exceptions that occur prior to the transcode-Async call):
function onTranscode() {
// Create transcode object.
var transcoder = null;
transcoder = new Windows.Media.Transcoding.MediaTranscoder();
// Get transcode profile.
getPresetProfile(id("profileSelect"));
// Create output file and transcode.
var videoLib = Windows.Storage.KnownFolders.videosLibrary;
var createFileOp = videoLib.createFileAsync(g_outputFileName,
Windows.Storage.CreationCollisionOption.generateUniqueName);
createFileOp.done(function (ofile) {
g_outputFile = ofile;
g_transcodeOp = null;
var prepareOp = transcoder.prepareFileTranscodeAsync(g_inputFile, g_outputFile,
g_profile);
prepareOp.done(function (result) {
if (result.canTranscode) {
g_transcodeOp = result.transcodeAsync();
g_transcodeOp.done(transcodeComplete, transcoderErrorHandler,
transcodeProgress);
} else {
transcodeFailure(result.failureReason);
}
}); // prepareOp.done
id("cancel").disabled = false;
}); // createFileOp.done
}
The getPresetProfile method retrieves the appropriate profile object according to the option selected in the app. For the selections shown in Figure 13-6 (WMV and WVGA), we’d use these parts of that function:
function getPresetProfile(profileSelect) {
g_profile = null;
var mediaProperties = Windows.Media.MediaProperties;
var videoEncodingProfile;
switch (profileSelect.selectedIndex) {
// other cases omitted
case 2:
videoEncodingProfile = mediaProperties.VideoEncodingQuality.wvga;
break;
}
if (g_useMp4) {
g_profile = mediaProperties.MediaEncodingProfile.createMp4(videoEncodingProfile);
} else {
g_profile = mediaProperties.MediaEncodingProfile.createWmv(videoEncodingProfile);
}
}
In scenario 2, the sample always uses the WVGA encoding but allows you to set specific values for the video dimensions, the frame rate, the audio and video bitrates, audio channels, and audio sampling. It applies these settings in getCustomProfile (js/custom.js) simply by configuring the profile properties after the profile is created:
function getCustomProfile() {
if (g_useMp4) {
g_profile = Windows.Media.MediaProperties.MediaEncodingProfile.createMp4(
Windows.Media.MediaProperties.VideoEncodingQuality.wvga);
} else {
g_profile = Windows.Media.MediaProperties.MediaEncodingProfile.createWmv(
Windows.Media.MediaProperties.VideoEncodingQuality.wvga);
}
// Pull configuration values from the UI controls
g_profile.audio.bitsPerSample = id("AudioBPS").value;
g_profile.audio.channelCount = id("AudioCC").value;
g_profile.audio.bitrate = id("AudioBR").value;
g_profile.audio.sampleRate = id("AudioSR").value;
g_profile.video.width = id("VideoW").value;
g_profile.video.height = id("VideoH").value;
g_profile.video.bitrate = id("VideoBR").value;
g_profile.video.frameRate.numerator = id("VideoFR").value;
g_profile.video.frameRate.denominator = 1;
}
And to finish off, scenario 3 is like scenario 1, but it lets you set start and end times that are then saved in the transcoder’s trimStartTime and trimStopTime properties (see js/trim.js):
transcoder = new Windows.Media.Transcoding.MediaTranscoder();
transcoder.trimStartTime = g_start;
transcoder.trimStopTime = g_stop;
Though not shown in the sample, you can apply effects to a transcoding operation by using the transcoder’s addAudioEffect and addVideoEffect methods.
Handling Custom Audio and Video Formats
Although Windows supports a variety of audio and video formats in-box, there are clearly many more formats that your app might want to work with. You can do this a couple of ways. First, you can use custom bytestream objects, media sources, codecs, and effects. Second, you can obtain what’s called a media stream source with which you can do in-place decoding. We'll look at both in this section.
Custom Decoders/Encoders and Scheme Handlers
To support custom audio and video formats beyond those that Windows supports in-box, WinRT provides some extensibility mechanisms. I should warn you up front that this subject will take you into some pretty vast territory around the entire Windows Media Foundation (WMF) SDK. What’s in WinRT is just a wrapper, so knowledge of WMF is essential and not for the faint of heart! It’s also important to note that all such extensions are available to only the app itself and are not available to other apps on the system. Furthermore, Windows will always prefer in-box components over a custom one, which means don’t bother wasting your time creating a new mp3 decoder or such since it will never actually be used. Your primary reference here is the Media extensions sample, which demonstrates an MPEG1 decoder along with grayscale, invert, and polar transform (pinch, warp, and fisheye) effects. Each of these is implemented as a C++ extension DLL. To enable these, the app must declare them in its manifest as follows (note that the manifest editor in Visual Studio does not surface these parts of the manifest, so you have to edit the XML directly):
<Extension Category="windows.activatableClass.inProcessServer">
<InProcessServer>
<Path>MPEG1Decoder.dll</Path>
<ActivatableClass ActivatableClassId="MPEG1Decoder.MPEG1Decoder"
ThreadingModel="both" />
</InProcessServer>
</Extension>
The ActivatableClassId is how an extension is identified when calling the WinRT APIs, which is clearly mapped in the manifest to the specific DLL that needs to be loaded.
Depending, then, on the use of the extension, you might need to register it with WinRT through the methods of Windows.Media.MediaExtensionManager:registerAudio[Decoder | Encoder], registerByteStreamHandler (media sinks), registerSchemeHandler (media sources/file containers), and registerVideo[Decoder | Encoder]. In scenario 1 of the Media extensions sample (js/LocalDecoder.js), we can see how to set up a custom decoder for video playback:
var page = WinJS.UI.Pages.define("/html/LocalDecoder.html", {
extensions: null,
MFVideoFormat_MPG1: { value: "{3147504d-0000-0010-8000-00aa00389b71}" },
NULL_GUID: { value: "{00000000-0000-0000-0000-000000000000}" },
ready: function (element, options) {
if (!this.extensions) {
// Add any initialization code here
this.extensions = new Windows.Media.MediaExtensionManager();
// Register custom ByteStreamHandler and custom decoder.
this.extensions.registerByteStreamHandler("MPEG1Source.MPEG1ByteStreamHandler",
".mpg", null);
this.extensions.registerVideoDecoder("MPEG1Decoder.MPEG1Decoder",
this.MFVideoFormat_MPG1, this.NULL_GUID);
}
// ...
where the MPEG1Source.MPEG1ByteStreamHandler CLSID (class identifier) is implemented in one DLL (see the MPEG1Source C++ project in the sample’s solution) and the MPEG1Decoder.MPEG1.Decoder CLSID is implemented in another (the MPEG1Decoder C++ project).
Scenario 2, for its part, shows the use of a custom scheme handler, where the handler (in the GeometricSource C++ project) generates video frames on the fly. Fascinating stuff, but beyond the scope of this book.
Effects, as we’ve seen, are quite simple to use once you have one implemented: just pass their CLSID to methods like msInsertVideoEffect and msInsertAudioEffect on video and audio elements. You can also apply effects during the transcoding process in the MediaTranscoder class’saddAudio-Effect and addVideoEffect methods. The same is also true for media capture, as we’ll see shortly.
Media Stream Sources
If you’re going to do heavy-duty encoding and decoding of a custom audio or video format, it’s a good investment in the long time to create a custom media extension as outlined in the previous section. For other scenarios, however, it’s sheer overkill. For all these reasons that is another way to handle custom formats: the Windows.Media.Core.MediaStreamSource API. This basically allows an app to inject its own code into the media pipeline that’s used in playback, transcoding, and streaming alike. It operates like this:
• Create an instance of MediaStreamSource using a descriptor for the stream, and then set other desired properties. This object is what delivers samples into the media pipeline.
• Add listeners to the MediaStreamSource object’s samplerequested, starting, and closed events. These are WinRT events to be sure to call removeEventListener when the object goes out of scope. You can also listen to the paused event if you’re need to manage a read-ahead buffer.
• Pass the MediaStreamSource to URL.createObjectURL and assign the return to the media element’s src attribute, after which you can start playback for audio and video.
The important work then occurs within your three events handlers:
• The starting event is fired when rendering begins. Here you open the source stream (e.g., open a file to obtain a RandomAccessStream) and adjust the starting position if needed.
• When the media engine is ready to render a frame or sample, it fires a samplerequested event. Here you read and parse data from the stream, manipulate it however you want, and return the sample. You can also decompress or decrypt your source's data, combine data from multiple sources, or even generate samples on the fly. In short, this is where you provide the raw bytes into the next stage of the pipeline, and you’re in complete control.
• When rendering is complete, the closed event fires. Here you close whatever stream you opened in starting. This is also a place where you can remove event listeners.
The MediaStreamSource streaming sample demonstrates this process for an MP3 file that you select using the file picker, handling playback through a simple audio element (html/S1_StreamMP3.html):
<audio id="mediaPlayer" width="610" controls="controls"></audio>
The selected file from the picker ends up in a variable called inputMP3File, after which the sample calls its function initializeMediaStreamSource in js/S1_StreamMP3.js. Let’s follow though that code, which starts by retrieving various properties from the file:
function initializeMediaStreamSource(){
byteOffset = 0;
timeOffset = 0;
// get the MP3 file properties
getMP3FileProperties().then(function () {
return getMP3EncodingProperties();
}).then(function () {
The getMP3FileProperties function initializes variables called title and songDuration using the StorageFile.properties.getMusicProperties async method; the getMP3EncodingProperties function initialized variables called sampleRate, channelCount, and bitrate usingStorageFile.properties.retrievePropertiesAsync for the associated System.Audio* properties.
Note The original sample doesn’t properly chain the get* functions as shown above and available in the modified sample in the companion content. Without this correction, the sample can crash if it attempts to continue executing the code before variables like songDuration have been initialized.
With these properties in hand, we can now create the descriptor for the stream:
var audioProps = Windows.Media.MediaProperties.AudioEncodingProperties.createMp3(
sampleRate, channelCount, bitrate);
var audioDescriptor = new Windows.Media.Core.AudioStreamDescriptor(audioProps);
Then we can create the MediaStreamSource with that descriptor and set some of its properties like canSeek, duration, and musicProperties (or videoProperties and thumbnail for video):
MSS = new Windows.Media.Core.MediaStreamSource(audioDescriptor);
MSS.canSeek = true;
MSS.musicProperties.title = title;
MSS.duration = songDuration;
Now we’re ready to attach event listeners, assign the stream to the media element, and start playback:
MSS.addEventListener("samplerequested", sampleRequestedHandler, false);
MSS.addEventListener("starting", startingHandler, false);
MSS.addEventListener("closed", closedHandler, false);
mediaPlayer.src = URL.createObjectURL(MSS, { oneTimeOnly: true });
mediaPlayer.play();
});
}
When play is called, Windows needs to start rendering the audio, so it first fires the starting event, where eventArgs.request is a MediaStreamSourceStartingRequest object containing a startPosition property, a setActualStartPosition method (so that you can make adjustments), and a getDeferral method. The deferral is necessary—as we’ve seen in other cases—because playback begins as soon as your event handler returns. The deferral allows you to do async work within the handler, as shown in the sample (js/S1_StreamMP3.js):
function startingHandler(e){
var request = e.request;
if ((request.startPosition !== null) && request.startPosition <= MSS.duration){
var sampleOffset = Math.floor(request.startPosition / sampleDuration);
timeOffset = sampleOffset * sampleDuration;
byteOffset = sampleOffset * sampleSize;
}
// Create the RandomAccessStream for the input file for the first time
if (mssStream === undefined){
var deferral = request.getDeferral();
try{
inputMP3File.openAsync(Windows.Storage.FileAccessMode.read).then(function(stream) {
mssStream = stream;
request.setActualStartPosition(timeOffset);
deferral.complete();
});
}
catch (exception){
MSS.notifyError(Windows.Media.Core.MediaStreamSourceErrorStatus.failedToOpenFile);
deferral.complete();
}
}
else {
request.setActualStartPosition(timeOffset);
}
}
As you can see, the sample simply opens the inputMP3File file to obtain a stream, which it stores in mssStream. At the top, it also sets timeOffset and byteOffset variables that are used within the samplerequested handler. When opening a new file, these end up being zero. Note also the use of MediaStreamSource.notifyError to communicate error conditions to the media pipeline.
You can also see that this event handler works when the stream has already been initialized. This happens if you start playback in the UI and then pause it, which will raise a paused event (not handled in the sample). When you resume playback, the starting event will fire again, but in that case we just need to update the timeOffset instead of opening the stream again.
Once the starting event handler returns, the samplerequested handler starts getting called. Its eventArgs.request is a MediaStreamSourceSampleRequest object that contains the streamDescriptor related to the request, a getDeferral method for the usual purposes, areportSampleProgress method to call when the sample can’t be delivered right away, and a sample property in which the sample data is stored before the handler returns (js/S1_StreamMP3.js):
function sampleRequestedHandler(e){
var request = e.request;
// Check if the sample requested byte offset is within the file size
if (byteOffset + sampleSize <= mssStream.size)
{
var deferral = request.getDeferral();
var inputStream = mssStream.getInputStreamAt(byteOffset);
// Create the MediaStreamSample and assign to the request object.
// You could also create the MediaStreamSample using createFromBuffer(...)
Windows.Media.Core.MediaStreamSample.createFromStreamAsync(
inputStream, sampleSize, timeOffset).then(function(sample) {
sample.duration = sampleDuration;
sample.keyFrame = true;
// Increment the time and byte offset
byteOffset = byteOffset + sampleSize;
timeOffset = timeOffset + sampleDuration;
request.sample = sample;
deferral.complete();
});
}
}
The sample itself is represented by a MediaStreamSample object, which can be created in two ways. One is through the static MediaStreamSample.createFromStreamAsync method, as shown in the code above, where you indicate what portion of the stream to use. The other is the static method MediaStreamSample.createFromBuffer, where the buffer can contain any data that you’ve generated dynamically or data that you’ve read from your original input stream and then manipulated. See the sidebar on the next page.
Once created, be sure to set the duration property of the sample so that the rest of the media pipeline knows how much of the playback stream it has to work with. In addition, you can set these other properties:
• keyFrame If true, indicates that the sample can be independently decoded from other samples.
• discontinuous If true, indicates that the previous sample in the sequence was missing, such as when you drop video frames or audio samples because of network latency.
• protection A MediaStreamSampleProtectionProperties object for handling digital rights management. Refer to the MediaStreamSource.mediaProtectionManager property and addProtectionKey method. We’ll talk a bit more of DRM later in this chapter under “Streaming Media and Play To.”
• decodeTimestamp By default, this is the same as the sample’s read-only timestamp property, but some formats might require a different value for decoding, in which case you use this to override that default.
In any case, when you’ve created the necessary sample, assign it to the request.sample property and then return. If you want to know when the media pipeline has finished with the sample, you can listen to the MediaStreamSample.processed event. This is most useful to know when you can reuse its buffer.
If you’ve reached the end of the stream, on the other hand, simply return from the event handler without setting request.sample, which will signal the media pipeline that playback has finished. At that point the closed event will be fired, in which you do your cleanup (js/S1_StreamMP3.js):
function closedHandler(e){
if (mssStream){
mssStream.close();
mssStream = undefined;
}
e.target.removeEventListener("starting", startingHandler, false);
e.target.removeEventListener("samplerequested", sampleRequestedHandler, false);
e.target.removeEventListener("closed", closedHandler, false);
if (e.target === MSS) {
MSS = null;
}
}
Earlier I briefly mentioned the stream source’s paused event. This again indicates that playback has been paused through the media element’s UI. This is helpful if you’re managing a read-ahead buffer in your stream (such as when you’re downloading from a network). If you are, you also need to call the MediaStreamSource.setBufferedRange method to tell the media pipeline how much data you have. Windows uses this to determine when you’ve buffered the whole stream (from offset 0 to duration), which means it can enter a lower power mode.
By default as well, the media pipeline will be making sample requests three seconds ahead of the playback offset. This can be changed through the MediaStreamSource.bufferTime property (expressed in milliseconds, so the default value is 3000).
The other feature that I alluded to earlier is that you can have a stream source read from multiple streams simultaneously. For example, you might want to play an alternate audio track along with a video, in which case you would have separate descriptors for each and would use the second MediaStreamSource constructor that takes two descriptors instead of one. If you have more than two descriptors, you can also call the source’s addStreamDescriptor after it’s been created, but this has to be done before playback or any other operation has begun.
When dealing with multiple streams, you must clearly pay attention to the request.stream-Descriptor property in the samplerequested event so that you return the correct sample! The MediaStreamSource also fires a switchStreamsRequested event to tell you that it’s switching streams if you have other work you need to do in preparation for sample, but this is wholly optional.
Sidebar: Generating Sine Wave Audio
As an example of generating a dynamic stream, I’ve added a second scenario to the modified MediaStreamSource streaming sample in the companion content. For this I create a buffer ahead of time that contains data for a 110Hz sine wave, and then I set up the MediaStreamSource with an 8-bit PCM audio descriptor (PCM is the basis for the WAV file format). The samplerequested handler then uses MediaStreamSample.createFromBuffer to generate the audio sample from the buffer (special thanks to Anders Klemets for the code):
//Include approximately 100 ms of audio data in the buffer
var cyclesPerBuffer = Math.floor(sampleRate / 10 / samplesPerCycle);
var samplesPerBuffer = samplesPerCycle * cyclesPerBuffer;
var sampleLength = Math.floor(samplesPerBuffer * 1000 / sampleRate);
//sineBuffer if populated with 110Hz sine wave data
//sampleLength is the duration of the data in the buffer, in ms
//timeOffset is initially set to 0
function sampleRequestedHandler(e) {
var sample = Windows.Media.Core.MediaStreamSample.createFromBuffer(
sineBuffer, timeOffset);
sample.duration = sampleLength;
timeOffset = (timeOffset + sample.duration);
e.request.sample = sample;
}
Media Capture
There are times when we can really appreciate the work that people have done to protect individual privacy, such as making sure I know when my computer’s camera is being used since I am often using it in the late evening, sitting in bed, or in the early pre-shower mornings when I have, in the words of my father-in-law, “pineapple head” or I bear a striking resemblance to the character of Heat Miser in The Year Without a Santa Claus.
And there are times when we want to turn on a camera or a microphone and record something: a picture, a video, or audio. Of course, an app cannot know ahead of time what exact camera and microphones might be on a system. A key step in capturing media, then, is determining which device to use—something that the Windows.Media.Capture APIs provide for nicely, along with the process of doing the capture itself into a file, a stream, or some other custom “sink,” depending on how an app wants to manipulate or process the capture.
Back in Chapter 2, “Quickstart,” we learned how to use WinRT to easily capture a photograph in the Here My Am! app. To quickly review, we only needed to declare the Webcam capability in the manifest and add a few lines of code (this is from HereMyAm2a, the first version of the app):
function capturePhoto() {
var captureUI = new Windows.Media.Capture.CameraCaptureUI();
var that = this;
captureUI.photoSettings.format = Windows.Media.Capture.CameraCaptureUIPhotoFormat.png;
captureUI.photoSettings.croppedSizeInPixels =
{ width: that.clientWidth, height: that.clientHeight };
captureUI.captureFileAsync(Windows.Media.Capture.CameraCaptureUIMode.photo)
.done(function (capturedFile) {
//Be sure to check validity of the item returned; could be null
//if the user canceled.
if (capturedFile) {
lastCapture = capturedFile;//Save for Share
that.src = URL.createObjectURL(capturedFile, {oneTimeOnly: true});
}
}, function (error) {
console.log("Unable to invoke capture UI: " + error.message);
});
}
The UI that Windows brings up through this API provides for cropping, retakes, and adjusting camera settings. Another example of taking a photo can also be found in scenario 1 of the CameraCaptureUI Sample, along with an example of capturing video in scenario 2. In this latter case (js/capturevideo.js) we configure the capture UI object for a video format and indicate a video mode in the call to captureFileAsync. The resulting StorageFile can be passed straight along to a video.src property through our good friend URL.createObjectURL:
function captureVideo() {
var dialog = new Windows.Media.Capture.CameraCaptureUI();
dialog.videoSettings.format = Windows.Media.Capture.CameraCaptureUIVideoFormat.mp4;
dialog.captureFileAsync(Windows.Media.Capture.CameraCaptureUIMode.video)
.done(function(file) {
if (file) {
var videoBlobUrl = URL.createObjectURL(file, {oneTimeOnly: true});
document.getElementById("capturedVideo").src = videoBlobUrl;
} else {
//...
}
});
}
It should be noted that the Webcam capability in the manifest applies only to the image or video side of camera capture. If you want to capture audio, be sure to also select the Microphone capability on the Capabilities tab of the manifest editor.
If you look in the Windows.Media.Capture.CameraCaptureUI object, you’ll also see many other options you can configure. Its photoSettings property, a CameraCaptureUIPhotoCaptureSettings object, lets you indicate cropping size and aspect ratio, format, and maximum resolution. ItsvideoSettings property, a CameraCaptureUIVideoCaptureSettings object, lets you set the format, set the maximum duration and resolution, and indicate whether the UI should allow for trimming. All useful stuff! You can find discussions of some of these in the docs on Capturing or rendering audio, video, and images, including coverage of managing calls on a Bluetooth device.
Flexible Capture with the MediaCapture Object
Of course, the default capture UI won’t necessarily suffice in every use case. For one, it always sends output to a file, but if you’re writing a communications app, for example, you’d rather send captured video to a stream or send it over a network without any files involved at all. You might also want to preview a video before any capture actually happens, or simply show capture UI in place rather than in using the built-in full-screen overlay. Furthermore, you may want to add effects during the capture, apply rotation, and perhaps apply a custom encoding.100
All of these capabilities are available through the Windows.Media.Capture.MediaCapture class:
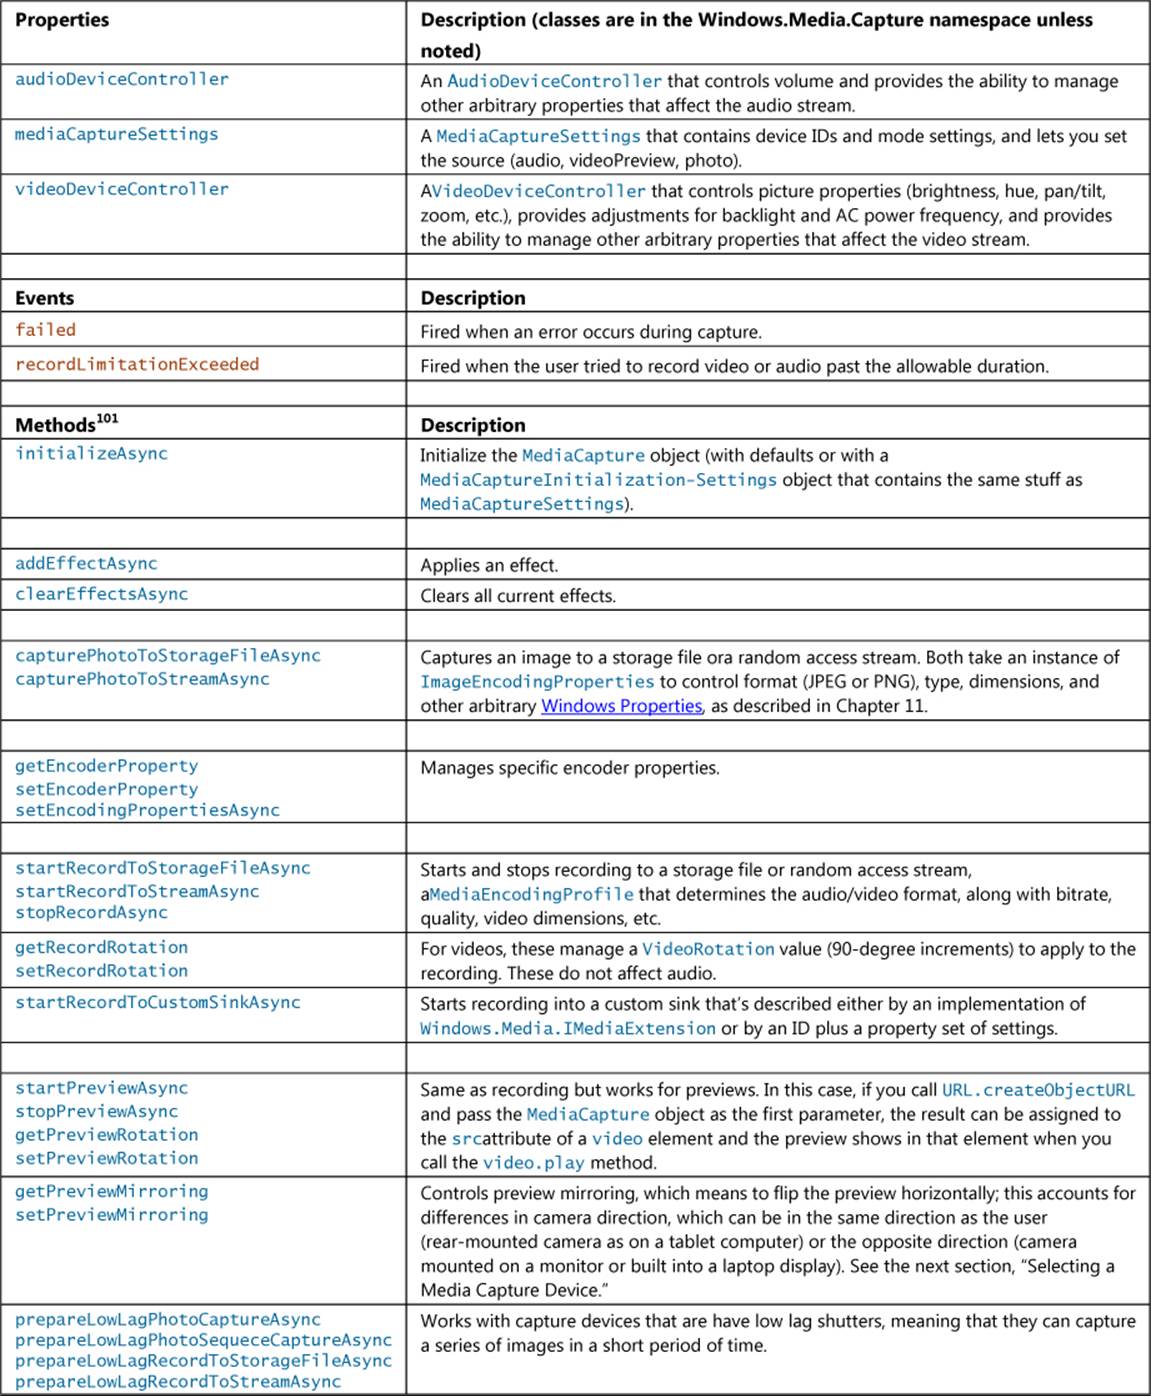
For a very simple demonstration of previewing video in a video element, we can look at the CameraOptionsUI sample in js/showoptionsui.js. When you tap the Start Preview button, it creates and initializes a MediaCapture object as follows:
function initializeMediaCapture() {
mediaCaptureMgr = new Windows.Media.Capture.MediaCapture();
mediaCaptureMgr.initializeAsync().done(initializeComplete, initializeError);
}
where the initializeComplete handler calls into startPreview:
function startPreview() {
document.getElementById("previewTag").src = URL.createObjectURL(mediaCaptureMgr);
document.getElementById("previewTag").play();
startPreviewButton.disabled = true;
showSettingsButton.style.visibility = "visible";
previewStarted = true;
}
The other little bit shown in this sample is invoking the Windows.Media.Capture.Camera-OptionsUI, which happens when you tap its Show Settings button; see Figure 13-7. This is just a system-provided flyout with options that are relevant to the current media stream being captured:
function showSettings() {
if (mediaCaptureMgr) {
Windows.Media.Capture.CameraOptionsUI.show(mediaCaptureMgr);
}
}
By the way, if you have trouble running a sample like this in the Visual Studio simulator—specifically, you see exceptions when trying to turn on the camera—try running on the local machine or a remote machine instead.
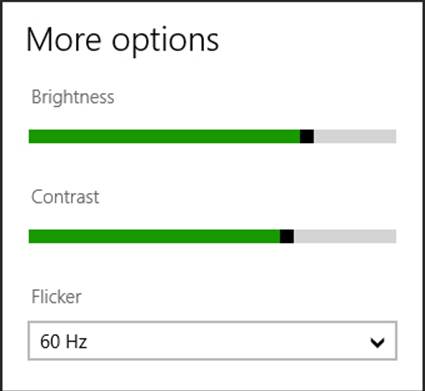
FIGURE 13-7 The Camera Options UI, as shown in the CameraOptionsUI sample (empty bottom is cropped).
More complex scenarios involving the MediaCapture class (and a few others) can be found now in the Media capture using capture device sample, such as previewing and capturing video, changing properties dynamically (scenario 1), selecting a specific media device (scenario 2), recording just audio (scenario 3), and capturing a photo sequence (scenario 4).
Starting with scenario 3 (js/AudioCapture.js, the simplest), here’s the core code to create and initialize the MediaCapture object for an audio stream (see the streamingCaptureMode property in the initialization settings), where that stream is directed to a file in the music library viastartRecordToStorageFileAsync (some code omitted and condensed for brevity):
var mediaCaptureMgr = null;
var captureInitSettings = null;
var encodingProfile = null;
var storageFile = null;
// This is called when the page is loaded
function initCaptureSettings() {
captureInitSettings = new Windows.Media.Capture.MediaCaptureInitializationSettings();
captureInitSettings.audioDeviceId = "";
captureInitSettings.videoDeviceId = "";
captureInitSettings.streamingCaptureMode =
Windows.Media.Capture.StreamingCaptureMode.audio;
}
function startAudioCapture() {
mediaCaptureMgr = new Windows.Media.Capture.MediaCapture();
mediaCaptureMgr.initializeAsync(captureInitSettings).done(function (result) {
// ...
});
}
function startRecord() {
// ...
// Start recording.
Windows.Storage.KnownFolders.videosLibrary.createFileAsync("cameraCapture.m4a",
Windows.Storage.CreationCollisionOption.generateUniqueName)
.done(function (newFile) {
storageFile = newFile;
encodingProfile = Windows.Media.MediaProperties
.MediaEncodingProfile.createM4a(Windows.Media.MediaProperties
.AudioEncodingQuality.auto);
mediaCaptureMgr.startRecordToStorageFileAsync(encodingProfile,
storageFile).done(function (result) {
// ...
});
});
}
function stopRecord() {
mediaCaptureMgr.stopRecordAsync().done(function (result) {
displayStatus("Record Stopped. File " + storageFile.path + " ");
// Playback the recorded audio (using a video element)
varvideo = id("capturePlayback" + scenarioId);
video.src = URL.createObjectURL(storageFile, { oneTimeOnly: true });
video.play();
});
}
Scenario 1 is essentially the same code but captures a video stream as well as photos, with results shown in Figure 13-8. This variation is enabled through these properties in the initialization settings (see js/BasicCapture.js within initCaptureSettings):
captureInitSettings.photoCaptureSource =
Windows.Media.Capture.PhotoCaptureSource.auto;
captureInitSettings.streamingCaptureMode =
Windows.Media.Capture.StreamingCaptureMode.audioAndVideo;
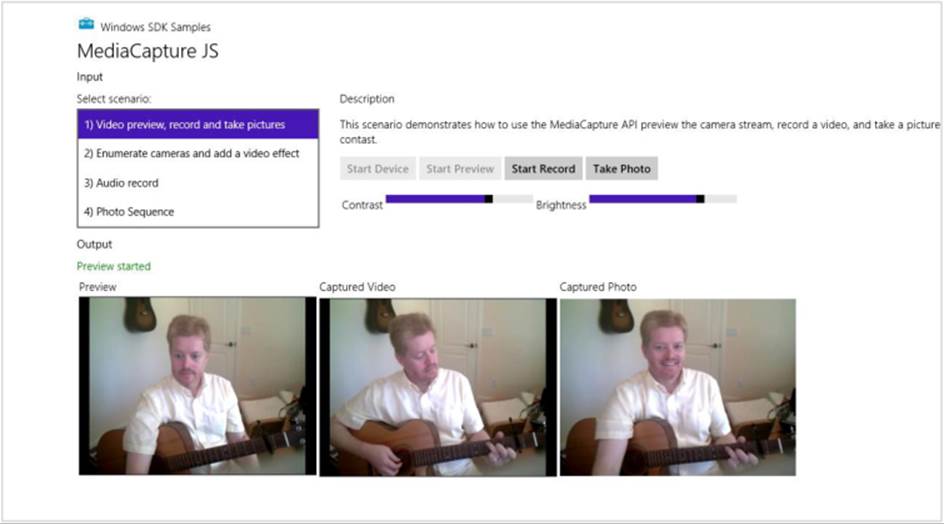
FIGURE 13-8 Previewing and recording video with the default device in the Media capture sample, scenario 1. (The output is cropped because I needed to run the app using the Local Machine option in Visual Studio and I didn’t think you needed to see a 1920x1200 screen shot with lots of whitespace!)
Notice the Contrast and Brightness controls in Figure 13-8. Changing these will change the preview video, along with the recorded video. The sample does this through the MediaCapture.videoDevice-Controller object’s contrast and brightness properties, showing that these (and any others in the controller) can be adjusted dynamically. Refer to the getCameraSettings function in js/BasicCapture.js that basically wires the slider change events into a generic anonymous function to update the desired property.
Selecting a Media Capture Device
Looking now at scenario 2 (js/AdvancedCapture.js), it’s more or less like scenario 1 but it allows you to select the specific input device. Until now, everything we’ve done has simply used the default device, but you’re not limited to that, of course. This is a good thing because my current laptop’s default camera is usually covered when the machine is in its docking station—without the ability to choose another camera, I’d just get a bunch of black images!
You use the Windows.Devices.Enumeration API to retrieve a list of devices within a particular device interface class, namely the DeviceInformation.findAllAsync method. To this you give it a value from the DeviceClass enumeration or another capture selector. The sample, for instance, uses DeviceClass.videoCapture to enumerate cameras (js/AdvancedCapture.js):
function enumerateCameras() {
var cameraSelect = id("cameraSelect");
cameraList = new Array();
// Enumerate cameras and add them to the list
var deviceInfo = Windows.Devices.Enumeration.DeviceInformation;
deviceInfo.findAllAsync(Windows.Devices.Enumeration.DeviceClass.videoCapture)
.done(function (cameras) {
// ...
});
// ...
}
and a selector for microphones:
function enumerateMicrophones() {
var microphoneSelect = id("microphoneSelect");
var microphoneDeviceId = 0;
microphoneList = new Array();
// Enumerate microphones and add them to the list
var microphoneDeviceInfo = Windows.Devices.Enumeration.DeviceInformation;
microphoneDeviceInfo.findAllAsync(
Windows.Media.Devices.MediaDevice.getAudioCaptureSelector(), null)
.done(function (deviceInformation) {
// ...
}
// ...
}
In both cases the result of the enumeration (DeviceInformation.findAllAsync) is a DeviceInformationCollection object that contains some number of DeviceInformation objects. These collections are used to populate the drop-down lists, as shown below. Here you can see that I have two cameras (one in my laptop lid and the other hanging off my secondary monitor) and two microphones (on the same devices):

The selected device’s ID is then copied within to the videoDeviceId and audioDeviceId properties of the MediaCaptureInitializationSetting object:
captureInitSettings = new Windows.Media.Capture.MediaCaptureInitializationSettings();
var selectedIndex = id("cameraSelect").selectedIndex;
var deviceInfo = deviceList[selectedIndex];
captureInitSettings.videoDeviceId = deviceInfo.id;
var selectedIndex = id("microphoneSelect").selectedIndex;
var microphoneDeviceInfo = microphoneList[selectedIndex];
captureInitSettings.audioDeviceId = microphoneDeviceInfo.id;
By the way, you can retrieve the default device ID at any time through the methods of the Windows.Media.Devices.MediaDevice object and listen to its events for changes in the default devices. It’s also important to note that DeviceInformation (in the deviceInfo variable above) includes a property called enclosureLocation:
if (deviceInfo.enclosureLocation) {
cameraLocation = deviceInfo.enclosureLocation.panel;
}
The enclosureLocation property is an EnclosureLocation object that has inDock, inLid, and panel properties; the latter is a value from Windows.Devices.Enumeration.Panel, whose values are front, back, top, bottom, left, right, and unknown. This tells you whether a camera is forward or backward facing, which you can use to rotate the video or photo as appropriate for the user’s perspective (also taking the device orientation into account).
The other bit that scenario 2 demonstrates is using the MediaCapture.addEffectAsync with a grayscale effect, shown in Figure 13-9, that’s implemented in a C++ DLL (the GrayscaleTransform project in the sample’s solution). This works exactly as it did with transcoding, and you can refer to the addRemoveEffect and addEffectToImageStream functions in js/AdvancedCapture.js for the details. You’ll notice there that these functions do a number of checks using the MediaCaptureSettings.-videoDeviceCharacteristic value to make sure that the effect is added in the right place.
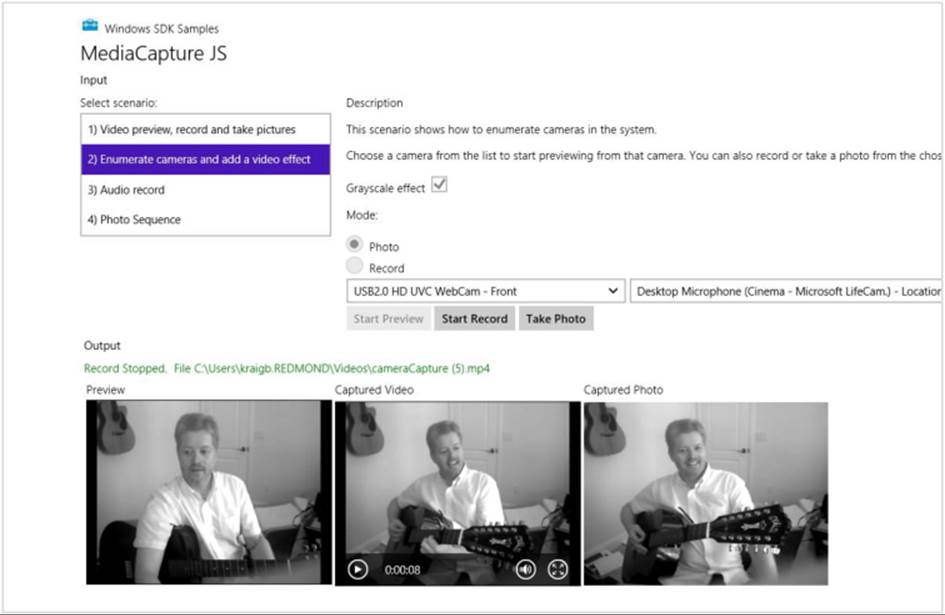
FIGURE 13-9 Scenario 2 of the Media capture sample, in which one can select a specific device and apply an effect. (The output here is again cropped from a larger screen shot.) Were you also paying attention enough to notice that I switched guitars?
The last piece of the sample, scenario 4, demonstrates capture features related to low shutter lag–capable cameras. Some cameras, that is, have a long lag between each captured image. If a camera is low-lag–capable, this enables a capture mode called a photo sequence, which takes a continuous series of photos in a short period of time. This is configured through the MediaCapture.videoDevice-Controller.lowLagPhotoSequence property, a LowLagPhotoSequenceControl object whose supported property tells you if your hardware is suitably capable of this feature. But I’ll let you look at scenario 4 for all the details involving this and methods like MediaCapture.prepareLowLagPhoto-CaptureAsync.
Streaming Media and Play To
To say that streaming media is popular is certainly a gross understatement. As mentioned in this chapter’s introduction, Netflix alone consumes a large percentage of today’s Internet bandwidth (including that of my own home). YouTube, Amazon Instant Video, and Hulu certainly do their part as well—so your app might as well contribute to the cause!
Streaming media from a server to your app is easily the most common case, and it happens automatically when you set an audio or video src attribute to a remote URI. To improve on this, Microsoft also has a Smooth Streaming Client SDK that helps you build media apps with a number of rich features, including live playback and PlayReady content protection. I won’t be covering that SDK in this book, so I wanted to make sure you were aware of it along with the tutorial, Building Your First HTML5 Smooth Streaming Player.
What we’ll focus on here, in the few pages we have left before my editors at Microsoft Press pull the plug on this chapter, are considerations for digital rights management and streaming not from a network but to a network (for example, audio/video capture in a communications app), as well as streaming media from an app to a Play To device.
Streaming from a Server and Digital Rights Management
Again, streaming media from a server is what you already do whenever you’re using an audio or video element with a remote URI. The details just happen for you. Indeed, much of what a great media client app does is talking to web services, retrieving metadata and the catalog, helping the user navigate all of that information, and ultimately getting to a URI that can be dropped in the src attribute of a video or audio element. Then, once the app receives the canplay event, you can call the element’s play method to get everything going.
Of course, media is often protected with DRM, otherwise the content on paid services wouldn’t be generating much income for the owners of those rights! So there needs to be a mechanism to acquire and verify rights somewhere between setting the element’s src and receiving canplay. Fortunately, there’s a simple means to do exactly that:
8. Before setting the src attribute, create an instance of Windows.Media.Protection.Media-ProtectionManager and configure its properties.
9. Listen to this object’s serviceRequested event, the handler for which performs the appropriate rights checks and sets a completed flag when all is well. (Two other events, just to mention them, are componentloadfailed and rebootneeded.)
10. Assign the protection manager to the audio/video element with the msSetMediaProtectionManager extension method.
11. Set the src attribute. This will trigger the serviceRequested event to start the DRM process, which will prevent canplay until DRM checks are completed successfully.
12. In the event of an error, the media element’s error event will be fired. The element’s error property will then contain an msExtendedCode with more details.
You can refer to How to use pluggable DRM and How to handle DRM errors for additional details, but here’s a minimal and hypothetical example of all this in code:
var video1 = document.getElementById("video1");
video1.addEventListener('error', function () {
var error = video1.error.msExtendedCode;
//...
}, false);
video1.addEventListener('canplay', function () {
video1.play();
}, false);
var cpm = new Windows.Media.Protection.MediaProtectionManager();
cpm.addEventListener('servicerequested', enableContent, false);//Remove this later
video1.msSetContentProtectionManager(cpm);
video1.src = "http://some.content.server.url/protected.wmv";
function enableContent(e) {
if (typeof (e.request) != 'undefined') {
var req = e.request;
var system = req.protectionSystem;
var type = req.type;
//Take necessary actions based on the system and type
}
if (typeof (e.completion) != 'undefined') {
//Requested action completed
var comp = e.completion;
comp.complete(true);
}
}
How you specifically check for rights, of course, is particular to the service you’re drawing from—and not something you’d want to publish in any case!
For a more complete demonstration of handling DRM, check out the PlayReady sample, which will require that you download and install the Microsoft PlayReady Client SDK. PlayReady, if you aren’t familiar with it yet, is a license service that Microsoft provides so that you don’t have to create one from scratch. The PlayReady Client SDK provides additional tools and framework support for apps wanting to implement both online and offline media scenarios, such as progressive download, download to own, rentals, and subscriptions. Plus, with the SDK you don’t need to submit your app for DRM Conformance testing. In any case, here’s how the PlayReady sample sets up its content protection manager, just to give an idea of how the WinRT APIs are used with specific DRM service identifiers:
mediaProtectionManager = new Windows.Media.Protection.MediaProtectionManager();
mediaProtectionManager.properties[“Windows.Media.Protection.MediaProtectionSystemId”] =
‘{F4637010-03C3-42CD-B932-B48ADF3A6A54}’
var cpsystems = new Windows.Foundation.Collections.PropertySet();
cpsystems[“{F4637010-03C3-42CD-B932-B48ADF3A6A54}”] =
“Microsoft.Media.PlayReadyClient.PlayReadyWinRTTrustedInput”;
mediaProtectionManager.properties[
“Windows.Media.Protection.MediaProtectionSystemIdMapping”] = cpsystems;
Streaming from App to Network
The next case to consider is when an app is the source of streaming media rather than the consumer, which means that client apps elsewhere are acting in that capacity. In reality, in this scenario—audio or video communications and conferencing—it’s usually the case that the app plays both roles, streaming media to other clients and consuming media from them. This is the case with Skype and other such utilities, along with apps like games that include a chat feature.
Here’s how such apps generally work:
1. Set up the necessary communication channels over the network, which could be a peer-to-peer system or could involve a central service of some kind.
2. Capture audio or video to a stream using the WinRT APIs we’ve seen (specifically Media-Capture.startRecordToStreamAsync) or capturing to a custom sink.
3. Do any additional processing to the stream data. Note, however, that effects are plugged into the capture mechanism (MediaCapture.addEffectAsync) rather than something you do in post-processing.
4. Encode the stream for transmission however you need.
5. Transmit the stream over the network channel.
6. Receive transmissions from other connected apps.
7. Decode transmitted streams and convert to a blob by using MSApp.createBlobFromRandom-AccessStream.
8. UseURL.createObjectURL to hook an audio or video element to the stream.
To see such features in action, check out the Real-time communications sample that implements video chat in scenario 2 and demonstrates working with different latency modes in scenario 1. The last two steps in the list above are also shown in the PlayToReceiver sample that is set up to receive a media stream from another source.
Play To
The final case of streaming is centered on the Play To capabilities that were introduced in Windows 7. Simply said, Play To is a means through which an app can connect local playback/display for audio, video, and img elements to a remote device.
The details happen through the Windows.Media.PlayTo APIs along with the extension methods added to media elements. If, for example, you want to specifically start a process of streaming immediately to a Play To device, invoking the selection UI directly, you’d do the following:
1. Call Windows.Media.PlayTo.PlayToManager APIs:
a. getForCurrentView returns the object.
b. showPlayToUI invokes the flyout UI where the user selects a receiver.
c. sourceRequested event is fired when user selects a receiver.
2. In the sourceRequested handler:
a. Get PlayToSource object from audio, video, or img element (msPlayToSource property) and pass to e.setSource.
b. Set PlayToSource.next property to the msPlayToSource of another element for continual playing.
3. Pick up the media element’sended event to stage additional media.
You can find a demonstration in the Media Play To sample, where it displays a recommended glyph to programmatically display the Play To flyout using showPlayToUI:

You can also start media playback locally and then let the user choose a Play To receiver from the Devices > Play charm. In this case you don’t need to do anything special with the Play To API at all because Windows will pick up the current playback element and direct it accordingly. But the app can listen to the statechanged event of the element’s msPlayToSource.connection object (a PlayToConnection) that will fire when the user selects a receiver and when other changes happen.
One of the limitations of playing media from one machine to a Play To receiver is that DRM-protected playback isn’t presently possible. Fortunately, there’s another way to do it called play by reference. This means that your app just sends a URI to cloud-based media to the receiver such that the receiver can stream it directly. This is done through the PlayToSource.preferredSourceUri property or through anaudio or video element’s msPlayToPreferredSourceUri property (in JavaScript) or x-ms-playToPreferredSourceUri attribute (in HTML).
Generally speaking, Play To is primarily intended for streaming to a media receiver device that’s probably connected to a TV or other large screen. This way you can select local content on a Windows device and send it straight to that receiver. But it’s also possible to make a software receiver—that is, an app that can receive streamed content from a Play To source. The PlayToReceiver sample does exactly this, and when you run it on another device on your local network, it will show up in the Devices charm’s Play group of your first machine as follows (shown here alongside my other hardware receiver):
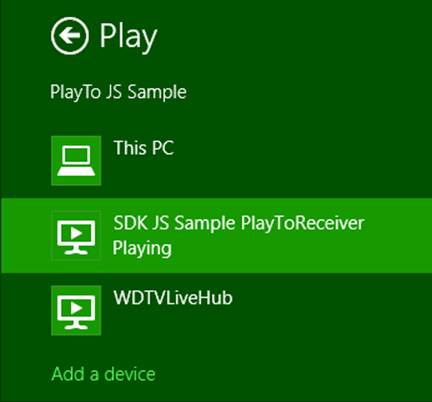
Note that you might need to add the device through the Add a Device command at the bottom of the list (or through PC Settings > PC and Devices > Devices > Add a Device).
You can also run the receive app from your primary machine by using the remote debugging tools of Visual Studio, allowing you to step through the code of both source and receiver apps at the same time! Another option is to run Windows Media Player on one machine and check its Stream > Allow Remote Control Of My Player menu option. This should make that machine appear in the Play To target list. (If it doesn’t, you might need to again add it through PC Settings > PC and Devices > Devices.)
To be a receiver, an app will generally want to declare some additional networking capabilities in the manifest—namely, Internet (Client & Server) and Private Networks (Client & Server)—otherwise it won’t see much action! It then creates an instance ofWindows.Media.PlayTo.PlayToReceiver, as shown in the Play To Receiver sample’s startPlayToReceiver function (js/audiovideoptr.js):
function startPlayToReceiver() {
if (!g_receiver) {
g_receiver = new Windows.Media.PlayTo.PlayToReceiver();
}
Next you’ll want to wire up handlers for the element that will play the media stream:
var dmrVideo = id("dmrVideo");
dmrVideo.addEventListener("volumechange", g_elementHandler.volumechange, false);
dmrVideo.addEventListener("ratechange", g_elementHandler.ratechange, false);
dmrVideo.addEventListener("loadedmetadata", g_elementHandler.loadedmetadata, false);
dmrVideo.addEventListener("durationchange", g_elementHandler.durationchange, false);
dmrVideo.addEventListener("seeking", g_elementHandler.seeking, false);
dmrVideo.addEventListener("seeked", g_elementHandler.seeked, false);
dmrVideo.addEventListener("playing", g_elementHandler.playing, false);
dmrVideo.addEventListener("pause", g_elementHandler.pause, false);
dmrVideo.addEventListener("ended", g_elementHandler.ended, false);
dmrVideo.addEventListener("error", g_elementHandler.error, false);
along with handlers for events that the receiver object will fire:
g_receiver.addEventListener("playrequested", g_receiverHandler.playrequested, false);
g_receiver.addEventListener("pauserequested", g_receiverHandler.pauserequested, false);
g_receiver.addEventListener("sourcechangerequested",
g_receiverHandler.sourcechangerequested, false);
g_receiver.addEventListener("playbackratechangerequested",
g_receiverHandler.playbackratechangerequested, false);
g_receiver.addEventListener("currenttimechangerequested",
g_receiverHandler.currenttimechangerequested, false);
g_receiver.addEventListener("mutechangerequested",
g_receiverHandler.mutedchangerequested, false);
g_receiver.addEventListener("volumechangerequested",
g_receiverHandler.volumechangerequested, false);
g_receiver.addEventListener("timeupdaterequested",
g_receiverHandler.timeupdaterequested, false);
g_receiver.addEventListeer("stoprequested", g_receiverHandler.stoprequested, false);
g_receiver.supportsVideo = true;
g_receiver.supportsAudio = true;
g_receiver.supportsImage = false;
g_receiver.friendlyName = 'SDK JS Sample PlayToReceiver';
The last line above, as you can tell from the earlier image, is the string that will show in the Devices charm for this receiver once it’s made available on the network. This is done by calling startAsync:
// Advertise the receiver on the local network and start receiving commands
g_receiver.startAsync().then(function () {
g_receiverStarted = true;
// Prevent the screen from locking
if (!g_displayRequest) {
g_displayRequest = new Windows.System.Display.DisplayRequest();
}
g_displayRequest.requestActive();
});
Of all the receiver object’s events, the critical one is sourcechangerequested where eventArgs.stream contains the media we want to play in whatever element we choose. This is easily accomplished by creating a blob from the stream and then a URI from the blob that we can assign to an element’s src attribute:
sourcechangerequested: function (eventIn) {
if (!eventIn.stream) {
id("dmrVideo").src = "";
} else {
var blob = MSApp.createBlobFromRandomAccessStream(eventIn.stream.contentType,
eventIn.stream);
id("dmrVideo").src = URL.createObjectURL(blob, {oneTimeOnly: true});
}
}
All the other events, as you can imagine, are primarily for wiring together the source’s media controls to the receiver such that pressing a pause button, switching tracks, or acting on the media in some other way at the source will be reflected in the receiver—it’s what enables all the system transport controls (including hardware buttons on keyboards and such) to act as a remote control for the receiver. There might be a lot of events, but handling them is quite simple, as you can see in the sample. Also note that if the user switches to a different Play To device, the current receiver is stopped and everything gets picked up by the new receiver.
What We Have Learned
• Creating media elements can be done in markup or code by using the standard img, svg, canvas, audio, and video elements.
• The three graphics elements—img, svg, and canvas—can all produce essentially the same output, only with different characteristics as to how they are generated and how they scale. All of them can be styled with CSS, however.
• The Windows.Data.Pdf API provides a means to render PDF documents into files or streams.
• The Windows.System.Display.DisplayRequest object allows for disabling screen savers and the lock screen during video playback (or any other appropriate scenario).
• Both the audio and video elements provide a number of extension APIs (properties, methods, and events) for working with various platform-specific capabilities in Windows, such as horizontal mirroring, zooming, playback optimization, 3D video, low-latency rendering, Play To, playback management of different audio types or categories, effects (generally provided as DLLs in the app package), and digital rights management.
• Background audio is supported for several categories given the necessary declarations in the manifest and handlers for media control events (so that the audio can be appropriately paused and played). Media control events are important to support the system transport control UI.
• The Windows.Media.SpeechSynthesis API provides a built-in means to generate audio streams from plain text as well as Speech Synthesis Markup Language (SSML).
• The WinRT APIs provide for decoding and encoding of media files and streams, through which the media can be converted or the properties changed. This includes support for custom codecs as well as custom media stream sources that allow an app to inject processing code directly in the media rendering pipeline, even to dynamically generate media if desired.
• WinRT provides a rich API for media capture (photo, video, and audio), including a built-in capture UI, along with the ability to provide your own and yet still easily enumerate and access available devices.
• Streaming media is supported from a server (with and without DRM, including PlayReady), between apps (inbound and outbound), and from apps to Play To devices. An app can also be configured as a Play To receiver.
94 See also http://beej.us/blog/2010/02/html5s-canvas-part-ii-pixel-manipulation/.
95 The SystemMediaTransportControls class replaces the deprecated Windows.Media.MediaControl class of Windows 8.
96 This again replaces the deprecated Windows.Media.MediaControl object.
97 And yes, I am playing the guitar and singing the lead part in this live recording, along with my friend Ted Cutler. The song, Who is Sylvia?, was composed by another friend, J. Donald Walters, using lyrics of Shakespeare.
98 This sample almost wins the prize for the shortest name in the Windows SDK, but it’s beaten by the AtomPub sample, the Indexer sample, and the grand champion of conciseness—the Print sample!
99 To install a voice, go to PC Settings > Time and Language > Region and Language. First click “+ Add a Language” to select a language to activate, and then when it appears in the list on this page, select it, click Options, and that will take you to a page where you can download the language pack that includes the voice.
100 On this subject you might be interested in Dave Rousset’s blog series, Using WinJS & WinRT to build a fun HTML5 Camera Application for Windows.
101 Note that there are a few additional methods in the documentation that are not projected into JavaScript and thus aren’t shown here, such as startPreviewToCustomSinkAsync. In JavaScript, you can just pass a preview to URL.createObjectURL, assign the result to video.src, and then call video.play() to preview.