Microsoft Press Programming Windows Store Apps with HTML, CSS and JavaScript (2014)
Chapter 15 Contracts
Some time ago I discovered a delightfully quirky comedy called Interstate 60 that is full of delightfully quirky characters. One of them, played by Chris Cooper, is a former advertising executive who, having discovered he was terminally ill with lung cancer, decided to make up for a career built on lies by encouraging others to be more truthful. As such, he was very particular about agreements and contracts, especially those in writing.
We really get to see the character’s quirkiness in a scene at a gas station. He’s approached by a beggar with a sign, “Will work for food.” Seeing this, he offers the man an apple in exchange for cleaning his car’s windshield. But when the man refuses to honor the written contract on his sign, Cooper’s character gets increasingly upset over the breach…to the point where he announces his terminal illness, rips open his shirt, and reveals the dynamite wrapped around his body and the 10-second timer that’s already counting down!
In the end, he drives away with a clean windshield and the satisfaction of having helped someone—in his delightfully quirky way—to fulfill their part of a written contract. And he reappears later in the movie in a town that’s 100% populated with lawyers; I’ll leave it to you to imagine the result, or at least enjoy the film!
Setting the dynamite and impending threats of bodily harm aside—which have absolutely nothing to do with this chapter—agreements between two parties are exceptionally important in a well-running computer system just as they are in a civil society. Agreements are especially important where apps provide extensions to the system and where apps written by different people at different points in time cooperate to fulfill certain tasks.
Such is the nature of various contracts within Windows, which as a collection constitute perhaps one of the most powerful features of the entire system. The overarching purpose of contracts has been described as “launching apps for a purpose and with context.” That is, instead of just starting apps in isolation, contracts make it possible to start them in relationship to other apps and in the context of those other apps. Information can then be shared seamlessly between those apps for a real purpose, rather than through the generic intermediary of the file system where such context is lost.
With any given contract, one party is the consumer or receiver of information involved in the contract. The other party is the source or provider of that information. The contract itself is generic: neither party needs any specific knowledge of the other, just knowledge of their side of the contract. It might not sound like much, but what this allows is a degree of extensibility that gets richer and richer as more apps that support contracts are added to the system. When users really start to experience what these contracts provide, they’ll more and more look for and choose apps from the Windows Store that use contracts to enrich their system and create increasingly powerful user experiences.
Within the apps themselves, consuming contracts typically happens through an API call, such as the file pickers we've already see in Chapter 11, "The Story of State, Part 2," or is already built into the system through UI like the Charms bar. Providing information for a contract is often the more interesting part, because an app needs to respond to specific events (when running), or announce the capability through its manifest and then handle different contract activations.
The table below summarizes all the contracts and other extensions in Windows (in alphabetical order), some of which serve to allow apps to work together while others serve to allow apps to extend system functionality. Full descriptions for most of these can be found on App contracts and extensions. Those that are covered in this chapter are colored in green, namely share, search, URI scheme associations, contacts (people), and appointments—contracts that many apps will rely upon. We've also seen a number of contracts in previous chapters, and a few more will come along later. Also, the provider side of certain contracts, which are somewhat uncommon for apps to implement, can be found in Appendix D, "Provider-Side Contracts." The docs and samples picks up a couple of others that aren't covered in this book.
Tip For a comparison of the different options for exchanging data—the share contract, the clipboard, and the file save picker contract—refer to Sharing and exchanging data. This topic outlines different scenarios for each option and when you might implement more than one in the same app.
Also note that there are many WinRT events involved in these different contracts, so be mindful of the need to call removeEventListener as described in Chapter 3, “App Anatomy and Performance Fundamentals,” in the section “WinRT Events and removeEventListener.”
Share
Though Search appears at the top of the Charms bar, the first contract I want to look at in depth is Share—after all, it’s one of the first things you learn as a child! In truth, I’m starting with Share because we’ve already seen the source side of the story starting back in Chapter 2, “Quickstart,” with the Here My Am! app, and our coverage here will also include a brief look at the age-old clipboard at the end of this section.
Let's review the basic process of Share and its user experience. Note that all object classes referred to here come from the Windows.ApplicationModel.DataTransfer namespace unless noted.
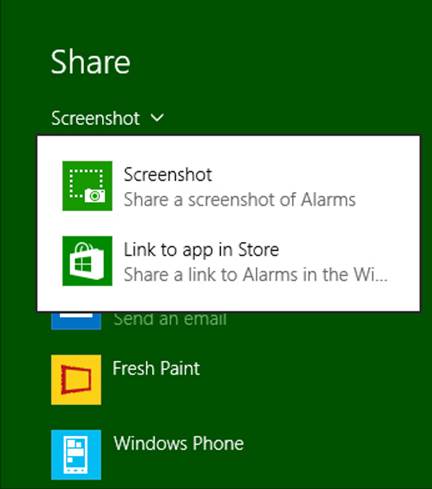
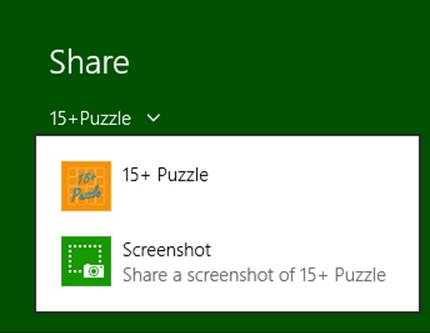
• First, if the Share charm is invoked for an app that doesn't participate in the contract at all, the charm provides options to share a screenshot or a link to the app’s page in the Store (if it’s published), as shown below left. Screenshots can be disabled for protected content—see "Sidebar: Disabling Screen Capture" at the end of this section. If an app is not yet published and doesn’t yet have Share features, such as my game called 15+Puzzle that I’ve been working on while writing this book, it appears as shown below right:

• To share content, an app listens for thedatarequested event from the object returned by DataTransferManager.getForCurrentView(). This WinRT event (for which you should be mindful of using removeEventListener) is fired whenever the user invokes the Share charm.
• In its datarequested handler, the app determines whether it has anything to share at the moment. If it doesn't—for example, the app shares selected content but currently has no selection—it just returns from the handler:
var dtm =
Windows.ApplicationModel.DataTransfer.DataTransferManager.getForCurrentView();
dtm.addEventListener("datarequested", shareHandler); //Remove this later!
function shareHandler (e) {
//Nothing to share right now
}

You can customize the message by calling the eventArgs.request.failWithDisplayTextmethod:
function shareHandler (e) {
e.request.failWithDisplayText(
"Your score is embarrassing. I don't think you want to share it.");
}

(And no, my real app in the Store doesn't do this, but it was worth a little laugh!)
• If the source app does have data to share, it populates the DataPackage object provided in the event args (a DataRequestedEventArgs object whose request.data property is the package). It specifically uses the package's set* methods, like setHtmlFormat, to provide whatever formats are applicable. You’ll typically want to share as many formats as you can, to increase the number of potential targets. In the Here My Am! app, for example, we share text and images together (see pages/home/home.js at the end of the file):
function provideData(e) {
var request = e.request;
var data = request.data;
if (!lastPosition || !lastCapture) {
return;//Nothing to share, so exit
}
data.properties.title = "Here My Am!";
data.properties.description = "At ("
+ app.sessionState.lastPosition.latitude +
", " + app.sessionState.lastPosition.longitude + ")";
//When sharing an image, include a thumbnail
var streamReference =
Windows.Storage.Streams.RandomAccessStreamReference.createFromFile(lastCapture);
data.properties.thumbnail = streamReference;
data.setStorageItems([lastCapture]);
data.setBitmap(streamReference);
}
• Based on the data formats in the package, Windows—that is, the share broker that manages the contract—determines the share target apps to display to the user (as in the first image above). The user can also control which apps are shown via PC Settings > Search and Apps > Share.
• When the user picks a target, the associated app is activated in a partial overlay and receives the data package to process however it wants. Because the target is activated in an overlay, the source app remains on the screen so that the user always remains aware of that original context.
The more complete sequence of events between the source app, the share broker, and the target app is shown in Figure 15-1.
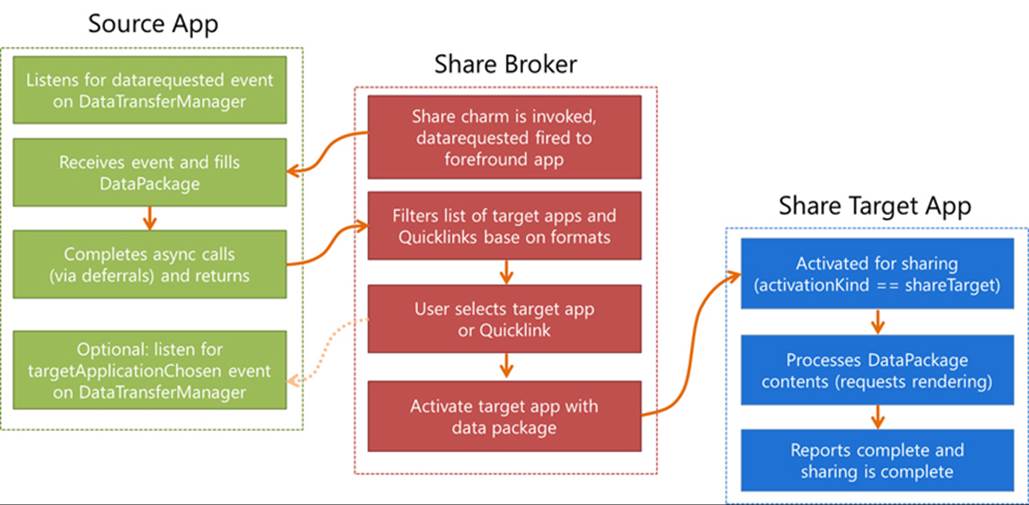
FIGURE 15-1 Processing the Share contract as initiated by the user’s selection of the Share charm.
This whole process provides a very convenient shortcut for users to take something they love in one app and get it into another app with a simple edge gesture and target app selection, without leaving the context of the source app. It’s like a semantically rich clipboard in which you don’t have to figure out how to get connected to other apps. What’s very cool about the Share contract, in other words, is that the source doesn’t have to care what happens to the data—its only role is to provide whatever data is appropriate for sharing at the moment the user invokes the Share charm (if, in fact, there is appropriate data—sometimes there isn’t). This liberates source apps from the burden of having to predict, anticipate, or second-guess what users might want to do with the data (though there's nothing wrong with providing dedicated controls for specific scenarios). Perhaps they want to email it, share it via social networking, drop it into a content management app…who knows?
Well, only the user knows, so what the share broker does with that data is let the user decide! Given the data package from the source, the broker matches the formats in that package to target apps that have indicated support for those formats in their manifests. The broker then displays that list to the user. That list can contain apps, for one, but also something called a quicklink (a ShareTarget.-Quicklink object, to be precise), which is serviced by some app but is much more specific. For instance, when an email app is shown as an option for sharing, the best it can do is create a new message with no particular recipients. A quicklink, however, can identify specific email addresses, say, for a person or persons you email frequently. The quicklink, then, is essentially an app plus specific configuration information.
Whatever the case, some app is launched when the user selects a target. With the Share contract, the app is launched with an activation kind of shareTarget. This tells it to not bring up its default UI but to rather show a specific share pane (with light-dismiss behavior) in which the user can refine exactly what is being shared and how. A share target for a social network, for instance, will often provide a place to add a comment on the shared data before posting it. An email app would provide a means to edit the message before sending it. A front-end app for a photo service could allow for adding a caption, specifying a location, identifying people, and so on. You get the idea. All of this combines together to provide a smooth flow from having something to share to an app that facilitates the sharing and allows the user to add customizations.
Overall, then, the Share contract gets apps connected to one another for this common purpose without any of them having to know anything about the others. This creates a very extensible and scalable experience: because all the potential target choices appear only in the Share charm pane, they never need to clutter a source app as we see happening on many web pages. This is the “content before chrome” design principle in action. (Though you might still implement specific sharing scenarios directly within the app for purposes other than general sharing, such as a share-to-Facebook function that rewards the user with some in-app currency.)
Source apps also don’t need to update themselves when a new target becomes popular (e.g., a new kind of social network): all that’s needed is a single target app. As for those target apps, they don’t have to evangelize themselves to the world: through the contract, source apps are automatically able to use any target apps that come along in the future. And from the end user’s point of view, their experience of the Share charm gets better and better as they acquire more Share-capable apps.
At the same time, it is possible for the source app to know something about how its shared data is being used. Alongside the datarequested event, the DataTransferManager also fires a targetApplicationChosen event to those sources who are listening. The eventArgs in this case contain only a single property: applicationName. This isn’t really useful for any other WinRT APIs, mind you, but is something you can tally within your own telemetry. Such data can help you understand whether you’d provide a better user experience by sharing richer data formats, for example, or, if common target apps also support custom formats that you can support in future updates.
Sidebar: Disabling Screen Capture
Some apps, to protect sensitive or rights-managed information, for example, need to disable screen capture both through the default Share charm and through the Alt+Print Screen and Windows+Print Screen keyboard combinations.
Screen capture is controlled through the ApplicationView.isScreenCaptureEnabled property. Setting this to false will disable screen capture, as you'd do when a rights-protected email message is visible:
Windows.UI.ViewManagement.ApplicationView.getForCurrentView().isScreenCaptureEnabled
= false;
If you invoke the Share charm with capture disabled, you'll see this message:
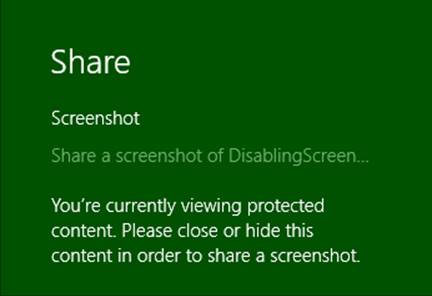
Setting isScreenCaptureEnabled to true will reenable capture, as you'd do when protected content is no longer visible. Both scenarios—which constitute only a single line of code each!—can be found in the Disabling screen capture sample.
Share Source Apps
Let’s complete our understanding of source apps by looking at a number of details we haven’t fully explored yet, primarily around how the source populates the data package and the options it has for handling the request. For this purpose, I suggest you obtain and run the Sharing content source app sample and the Sharing content target app sample. We’ll be looking at both of these, and the latter provides a helpful way to see how a target app consumes the data package created in the source.
The source app sample provides a number of scenarios that demonstrate how to share different types of data. It also shows how to programmatically invoke the Share charm—this isn’t typically recommended, but it is possible:
Windows.ApplicationModel.DataTransfer.DataTransferManager.showShareUI();
Calling this will, as when the user invokes the charm, trigger the datarequested event where eventArgs.request object is again a DataRequest object, which contains two properties and two methods:
• data is the DataPackage to populate. It contains methods to make various data formats available, though it’s important to note that not all formats will be immediately rendered. Instead, they’re rendered only when a share target asks for them. Equally important is the metadata that you configure for the package through data.properties.
• deadline is a Date property indicating the time in the future when the data you’re making available will no longer be valid (that is, will not render). This recognizes that there might be an indeterminate amount of time between when the source app is asked for data and when the target actually tries to use it. With delayed rendering, as noted above for the data property, it’s possible that some transient source data might disappear after some time, such as when it’s just part of a cache that the source is managing. By indicating that time in deadline, rendering requests that occur past the deadline will be ignored.
• failWithDisplayText, as mentioned earlier, is a method to tell the share broker that sharing isn’t possible right now, along with a string that will tell the user why (perhaps the lack of a usable selection). You call this when you don’t have appropriate data formats or an appropriate selection to share, or if there’s an error in populating the data package for whatever reason. The text you provide will then be displayed in the Share charm (and thus should be localized). Scenario 8 of the source app sample shows the use of this in the simple case when the app doesn't provide data in response to the datarequested event.
• getDeferral provides for async operations you might need to perform while populating the data package (just like other deferrals elsewhere in the WinRT API). That is, once you return from datarequested, the Share charm assumes you've populated the package; by retrieving the deferral object, the charm will wait until you call the deferral's complete method. During this time it will display a progress ring:

Tip Be mindful to always complete the deferral if you use it and to thoroughly test your sharing code to ensure that your handler always returns. If your datarequested handler crashes, does not return, or fails to complete a deferral, this Share charm message turns into a spinning donut of death (that is, the graphic above will last forever!), which your users will likely report in your ratings.
The basic structure of a datarequested handler, then, attempts to populate data formats through request.data.set*, populates the necessary metadata fields of request.data.properties, and calls eventArgs.request.failWithDisplayText when errors occur. We see this structure in most of the scenarios in the sample, which I've generalized here:
var dataTransferManager =
Windows.ApplicationModel.DataTransfer.DataTransferManager.getForCurrentView();
// Remove this listener as required
dataTransferManager.addEventListener("datarequested", dataRequested);
function dataRequested(e) {
var request = e.request;
// Assume variables like shareTitle, shareDescription, etc., are defined elsewhere.
"" if ( /* Check if there is appropriate data to share */ ) {
// Populate desired metadata. title is required.
request.data.properties.title = shareTitle;
"" request.data.properties.description = shareDescription;
// Highly recommended to set app links
request.data.properties.contentSourceApplicationLink =
new Windows.Foundation.Uri(scenario.applink);
});
// Call request.data.setText, setUri, setBitmap, setData, etc.
// Request a deferral if async work is necessary.
request.data.setText(shareText);
} else {
request.failWithDisplayText(/* Error message */ );
}
}
The following sections explore the details of the different aspects of the handler: metadata, populating data formats, and deferrals.
Populating Metadata
Even though the real "goods" in a Share operation are stored in a data package through the set* methods, how you describe that information through metadata is very important for how the data is consumed, how it appears in the system UI, and how that data refers back to the source app. The latter is especially important because it can help you acquire new users when the shared data ultimately goes out beyond the local device via email, via sharing to social networks, and so forth.
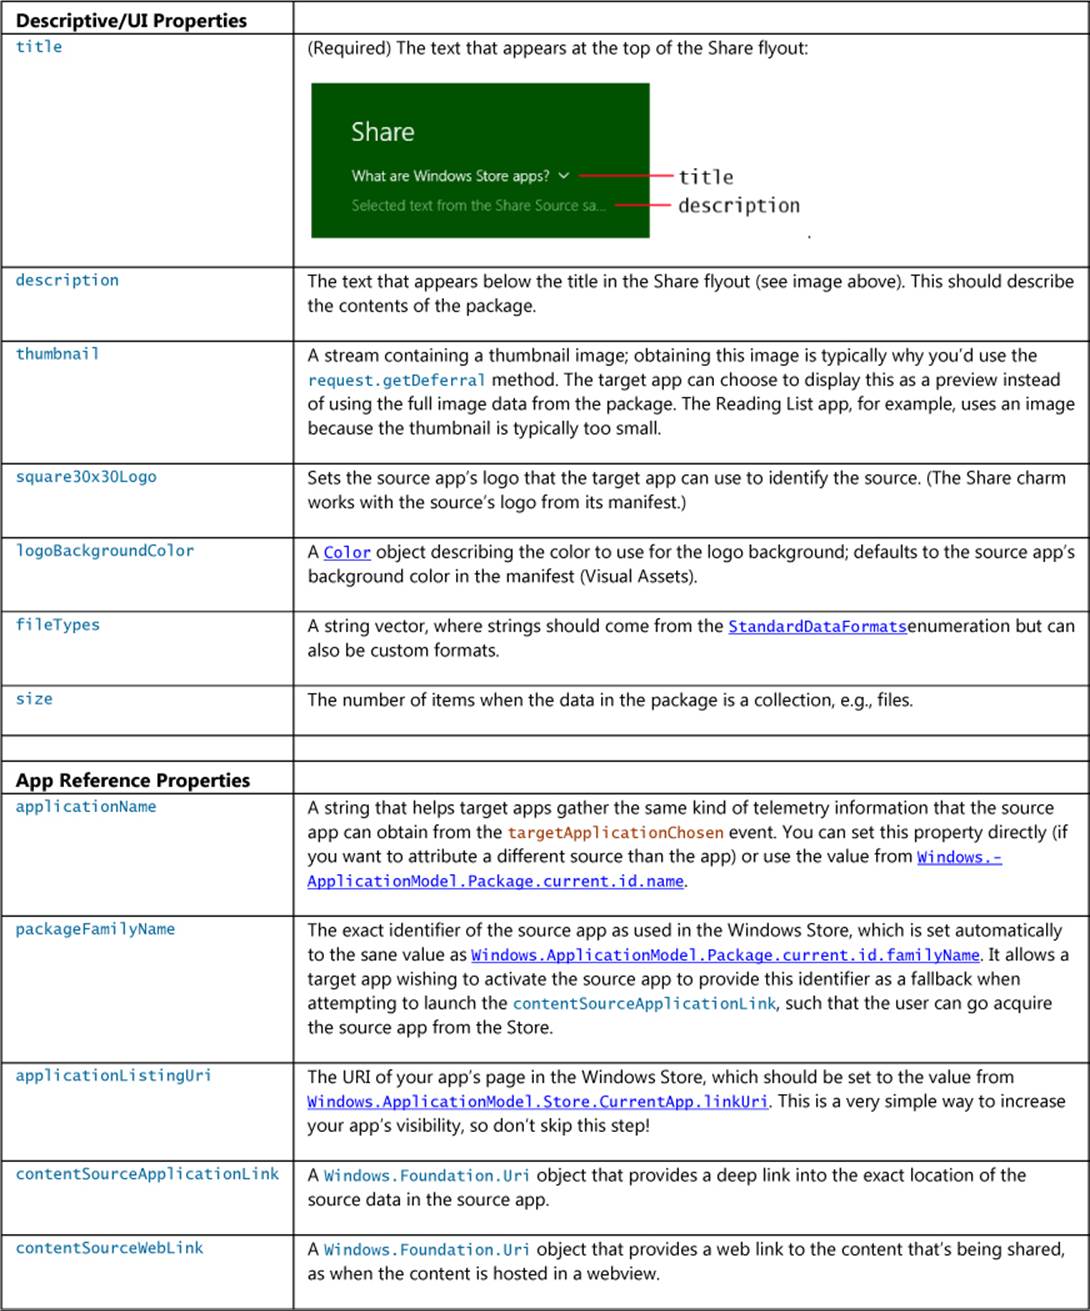
All metadata for Share is populated through fields of the request.data.properties object, which is a DataPackagePropertySet. This object is technically a PropertySet and thus has methods like first, lookup, and remove to support custom properties (when using custom formats) and allows for future extensibility. We'll talk about custom formats a little later. What's important first are the named fields in request.data.properties. These fall into two groups—descriptive/UI properties and app reference properties—as detailed in the following table.
The relationships and uses of the reference properties deserve a little more explanation. In the past, sharing through mechanisms like the clipboard has been a one-way process: once data leaves the source app, it loses its relationship with that source (with the exception of sharing a URI with a custom scheme). The overall purpose of these reference properties is to maintain that connection between the data and its source, even though the data might go far afield even beyond the immediate target app. For example, a target that shares to a social network can post the shared data and provide one of the links back to the source app or the web content that the source app was hosting. This invites consumers of that data, wherever they encounter it, to navigate back to the source app, possibly acquiring the app from the Store along the way.
The applicationListingUri, then, clearly provides a link to the source app in the Store. Truly, you should always set this, because it's one line of code that can very much help you acquire new users. Of course, until you upload an app to the Store for the first time, you won't know this URI, which is why you should just assign the value from Windows.ApplicationModel.Store.CurrentApp.linkUri:
e.request.data.properties.applicationListingUri =
Windows.ApplicationModel.Store.CurrentApp.linkUri;
Tip If you're using the CurrentAppSimulator during development, use that object in place of CurrentApp in this code snippet. It's best, actually, to have a single app variable that contains either CurrentApp or CurrentAppSimulator so that you can change it in one place prior to onboarding to the Store. In any case, when using the CurrentAppSimulator (see Chapter 20, "Apps for Everyone, Part 2,"), the linkUri property will return whatever is in the <LinkUri>element of your WindowsStoreProxy.xml file.
The contentSourceApplicationLink and contentSourceWebLink properties are more specific. Their purpose is to provide direct links to where the content originally came from, be it a section of an app or a website, respectively.
For example, if you share from an RSS reader app, set contentSourceApplicationLink to a URI that will activate the app to navigate directly back to that page at a later time. Navigating to an app, of course, means that the URI is something other than http[s], typically a custom scheme. As a result, this requires that the app implements protocol activation, as we'll discuss later in this chapter under "Protocol Activation." The Sharing content source app sample uses the code below to create deep links to the specific scenario page from which data is shared (this example is from js/text.js):
SdkSample.scenarios.forEach(function (scenario) {
if (scenario.url === "/html/text.html") {
request.data.properties.contentSourceApplicationLink =
new Windows.Foundation.Uri(scenario.applink);
}
});
Whatever app ultimate consumes this link will likely want to activate it using Windows.System.-Launcher.launchUriAsync. In that call, the LauncherOptions argument can contain a preferredApplicationPackageFamilyName, which would be set to the packageFamilyName property from the source app. As a result, if there's no other app handling the URI scheme already, the user will be invited to install that original source app.
If your app hosts and shares web content in a webview element, things are a little different. Here you set the contentSourceWebLink to the appropriate http[s] URI. If you remember from Chapter 4, "Web Content and Services," in the section "Capturing Webview Content," the webview element allows you to retrieve a DataPackage for whatever content is selected within it (using the captureSelected-ContentToDataPackageAsync method. You can assign this package directly to request.data within the datarequested event if you want to share straight through, or you can copy data from this package to the one provided in request.data. (And of course, if you use an async API like this within the event handler, you'll need to use the deferral object as well.)
I'd refer you to scenario 7 of the HTML webview control sample in the SDK to see a bit of this, but unfortunately it doesn't share the selection within a webview (just its URI and a bitmap), and it does two other things incorrectly. It fails to use the deferral when making an async call, and it uses the package's deprecated setUri method to set a data type instead of setting the metadata field contentSourceWebLink. To address these shortcomings, scenario 4 of the Webview extras example in Chapter 4's companion content provides a more complete and accurate demonstration, specifically sharing the selected content from the webview, or a bitmap if there is no selection (js/scenario4.js):
//Wrap the webview's capture methods promises.
function getWebviewSelectionAsync(webview) {
returnnew WinJS.Promise(function (cd, ed) {
var op = webview.captureSelectedContentToDataPackageAsync();
op.oncomplete = function (args) { cd(args.target.result); };
op.onerror = function (e) { ed(e); };
op.start();
});
}
function getWebviewBitmapAsync(webview) {
returnnew WinJS.Promise(function (cd, ed) {
var op = webview.capturePreviewToBlobAsync();
op.oncomplete = function (args) {
var ras = Windows.Storage.Streams.RandomAccessStreamReference;
var bitmapStream = ras.createFromStream(args.target.result.msDetachStream());
cd(bitmapStream);
};
op.onerror = function (e) { ed(e); };
op.start();
});
}
function dataRequested(e) {
var webview = document.getElementById("webview");
var dataPackage = e.request.data;
//Obtain a deferral
var deferral = e.request.getDeferral();
//Set the data package's properties. These are displayed within the Share UI
//to give the user an indication of what is being shared. They can also be
//used by target apps to determine the source of the data.
dataPackage.properties.title = webview.documentTitle;
dataPackage.properties.description = "Content shared from Webview";
dataPackage.properties.applicationName = "Webview Extras Example";
//Web link is the same as the webview's source URI.
dataPackage.properties.contentSourceWebLink = new Windows.Foundation.Uri(webview.src);
//To support app links in Share, the app typically uses protocol activation with
//a custom protocol.
var applink = "progwin-js-webviewextras:navigate?page=ShareWebview";
dataPackage.properties.contentSourceApplicationLink = new Windows.Foundation.Uri(applink);
// Set the data being shared from the webview's selection, or else use the whole webview.
getWebviewSelectionAsync(webview).then(function (selectionPackage) {
if (selectionPackage != null) {
//There's a selection, so use that as the data package. First copy the key
//properties from the original package to the new one.
var props = ["title", "description", "applicationName", "contentSourceWebLink",
"contentSourceApplicationLink"];
for (var i = 0; i < props.length; i++ ) {
selectionPackage.properties[props[i]] = dataPackage.properties[props[i]];
}
//Now provide the webview's package as a whole for the data
e.request.data = selectionPackage;
//We return a promise to make a chain; in this case we just return a Boolean
//indicating what was rendered (true for selection).
return WinJS.Promise.as(true);
} else {
//With no selection, render the whole webview and provide its URI as text.
dataPackage.setText(webview.src);
dataPackage.setUri(new Windows.Foundation.Uri(webview.src));
return getWebviewBitmapAsync(webview).then(function (bitmapStream) {
dataPackage.setBitmap(bitmapStream);
returnfalse;
});
}
}).done(function (selectionRendered) {
//Be sure to complete the deferral on success or error either way
WinJS.log && WinJS.log("Selection rendered: " + selectionRendered, "app");
deferral.complete();
}, function (e) {
deferral.complete();
});
}
Note Setting the contentSourceApplicationLink and contentSourceWebLink properties have different semantics than populating the data package with the ApplicationLink or WebLink data formats, which we'll meet in the next section. Specifically, when the only data you're sharing is a link itself, that's when you use the link formats. If you're sharing other content from an app page or a webview, that's when you use formats like text and HTML and set the contentSource*Link properties accordingly, as the code above demonstrates.
Populating Data Formats
Populating metadata to describe the shared content is all well and good, but then we cannot forget about placing content in the data package itself! This is done in your datarequested handler by calling the various set* methods in the DataPackage object for as many formats as you can provide. Supporting more formats will enable more potential targets and thus the likelihood that data from your app will be shared. This includes calling setData for custom formats and setDataProvider for deferred rendering, which are described in the two sections that follow this one.
For standard formats identified by values in the StandardDataFormats enumeration, there are discrete methods: setText, setHtmlFormat, setApplicationLink, setWebLink, setBitmap, and setStorageItems (for files and folders), and setRtf.107 All of these except for setRtf are represented in the Sharing content source app sample as follows.
Sharing text—scenario 1 (js/text.js):
var dataPackageText = document.getElementById("textInputBox").value;
request.data.setText(dataPackageText);
Sharing links—scenarios 2 and 3 (js/weblink.js and js/applicationlink.js), used for remote content and deep linking into the app, respectively:
request.data.setWebLink(
new Windows.Foundation.Uri(document.getElementById("weblinkInputBox").value));
var dataPackageApplicationLink = document.getElementById("selectionList").value;
request.data.setApplicationLink(new Windows.Foundation.Uri(dataPackageApplicationLink));
Be mindful that when using WebLink or ApplicationLink formats, you're saying that the link itself is the whole content. This is different from using the package's contentSourceApplicationLink and contentSourceWebLink properties to indicate the source (app page or web page, respectively) of the content being shared. In other words, the link formats are generally mutually exclusive with their associated contentSource*Link properties. It is, however, certainly possible to share a WebLink format and set a contentSourceApplicationLink to enable deep linking back to the page in the app (or share both WebLink and ApplicationLink formats).
Sharing an image and a storage item—scenario 4 (js/image.js):
var imageFile; // A StorageFile obtained through the file picker
// In the data requested event
var streamReference =
Windows.Storage.Streams.RandomAccessStreamReference.createFromFile(imageFile);
request.data.properties.thumbnail = streamReference;
// It's recommended to always use both setBitmap and setStorageItems for sharing a
// single image since the Target app may only support one or the other
// Put the image file in an array and pass it to setStorageItems
request.data.setStorageItems([imageFile]);
// The setBitmap method requires a RandomAccessStreamReference
request.data.setBitmap(streamReference);
Sharing files—scenario 5 (js/file.js):
var selectedFiles; // A collection of StorageFile objects obtained through the file picker
// In the data requested event
request.data.setStorageItems(selectedFiles);
As for sharing HTML, this isn't quite as simple as calling setHtmlFormat with a bit of HTML. The string must be formatted to include a few extra headers that a target app (or the clipboard) requires. (Refer back to Figure 4-3 in Chapter 4 to see what those headers look like.)
For this purpose you might find the DataTransfer.HtmlFormatHelper object, well, helpful—it provides methods to build such properly formatted markup. Specifically, its createHtmlFormat method takes whatever bit of HTML you want to share and gives it the necessary headers:
var htmlString = "<p>A big hi hello to all <em>intelligent</em> life out there...</p>"
var shareString =
Windows.ApplicationModel.DataTransfer.HtmlFormatHelper.createHtmlFormat(htmlString);
request.data.setHtmlFormat(shareString);
What’s also true with HTML is that it often refers to other content like images that aren’t directly contained in the markup. So how do you handle that? Fortunately, the designers of this API thought through this need: you employ the data package’s resourceMap property to associate relative URIs in the HTML with an image stream. We see this in scenario 7 of the sample (js/html.js):
var path = document.getElementById("htmlFragmentImage").getAttribute("src");
var imageUri = new Windows.Foundation.Uri(path);
var streamReference =
Windows.Storage.Streams.RandomAccessStreamReference.createFromUri(imageUri);
request.data.resourceMap[path] = streamReference;
The other interesting part of scenario 7 is that it replaces the data package in the eventArgs with a new one that it creates as follows:
var range = document.createRange();
range.selectNode(document.getElementById("htmlFragment"));
request.data = MSApp.createDataPackage(range);
As you can see, the MSApp.createDataPackage method takes a DOM range (in this case a portion of the current page) and creates a data package from it, where the package’s setHtmlFormat method is called in the process (which is why you don’t see that method called explicitly in scenario 7). For what it’s worth, there is also MSApp.createDataPackageFromSelection, which does the same job with whatever is currently selected in the DOM. You would obviously use this if you have editable elements on your page from which you’d like to share.
Also, as noted in the previous section, the webview element's captureSelectedContentToData-PackageAsync method makes it simple to extract content from a webview for use with the Share contract. In this case, any HTML format that's contained in the package from the webview already has the necessary headers, which is what's shown in Figure 4-3 of Chapter 4.
Custom Data Formats: schema.org
Long ago, I imagine, API designers decided it was an exercise in futility to try to predict every data format that apps might want to exchange in the future. The WinRT API is no different, so alongside the format-specific set* methods of the DataPackage we find the generic setData method. This takes a format identifier (a string) and the data to share. This is illustrated in scenario 8 of the Sharing content source app sampleusing the format “http://schema.org/Book” and data in a JSON string (js/custom.js):
request.data.setData(dataFormat, JSON.stringify(book));
Because the custom format identifier is just a string, you can literally use anything you want here; a very specific format string might be useful, for example, in a sharing scenario where you want to target a very specific app, perhaps one that you authored yourself. However, unless you’re very good at evangelizing your custom formats to the rest of the developer community (and have a budget for such!), chances are that other share targets won’t have any clue what you’re talking about.
Fortunately, there is a growing body of conventions for custom data formats maintained by http://schema.org. This site is the point of agreement where custom formats are concerned, so we highly recommend that you draw formats from it. See http://schema.org/docs/schemas.html for a complete list.
Here’s the JSON book data used in the sample:
var book = {
type: "http://schema.org/Book",
properties: {
image: "http://sourceuri.com/catcher-in-the-rye-book-cover.jpg",
name: "The Catcher in the Rye",
bookFormat: "http://schema.org/Paperback",
author: "http://sourceuri.com/author/jd_salinger.html",
numberOfPages: 224,
publisher: "Little, Brown, and Company",
datePublished: "1991-05-01",
inLanguage: "English",
isbn: "0316769487"
}
};
You can easily express this same data as plain text, as HTML (or RTF), as a link (perhaps to a page with this information), and an image (of the book cover). This way you can populate the data package with all the standard formats alongside specific custom formats.
Deferrals and Delayed Rendering
Deferrals, as mentioned before, are a simple mechanism to delay completion of the datarequested event until the deferral’s complete method is called within an async operation’s completed handler. The documentation for DataRequest.getDeferral shows an example of using this when loading an image file:
var deferral = request.getDeferral();
Windows.ApplicationModel.Package.current.installedLocation.getFileAsync(
"images\\smalllogo.png")
.then(function (thumbnailFile) {
request.data.properties.thumbnail = Windows.Storage.Streams.
RandomAccessStreamReference.createFromFile(thumbnailFile);
return Windows.ApplicationModel.Package.current.installedLocation.getFileAsync(
"images\\logo.png");
})
.done(function (imageFile) {
request.data.setBitmap(
Windows.Storage.Streams.RandomAccessStreamReference.createFromFile(imageFile));
deferral.complete();
});
Another example was shown with the webview example in the "Populating Metadata" section earlier.
Delayed rendering is a different matter, though the process typically employs the deferral. The purpose here is to avoid rendering the shared data until a target actually requires it, referred to as a pull operation. The set* methods that we’ve seen so far all copy the full data into the package. Delayed rendering means calling the data package’s setDataProvider method with a data format identifier and a function to call when and if the data is needed. Here’s how it’s done in scenario 6 of the Sharing content source app sample where imageFile is selected with a file picker (js/delay-render.js):
// When sharing an image, don't forget to set the thumbnail for the DataPackage
var streamReference =
Windows.Storage.Streams.RandomAccessStreamReference.createFromFile(imageFile);
request.data.properties.thumbnail = streamReference;
request.data.setDataProvider(
Windows.ApplicationModel.DataTransfer.StandardDataFormats.bitmap,
onDeferredImageRequested);
As indicated in the comments, it’s a really good idea to provide a thumbnail with delayed rendering so that the target app has something to show the user. Then, when the target needs the full data, the data provider function gets called—in this case, onDeferredImageRequsted—where we see a good flashback to the encoding processes we learned about in Chapter 13, "Media":
function onDeferredImageRequested(request) {
if (imageFile) {
// Here we provide updated Bitmap data using delayed rendering
var deferral = request.getDeferral();
var imageDecoder, inMemoryStream;
imageFile.openAsync(Windows.Storage.FileAccessMode.read).then(function (stream) {
// Decode the image
return Windows.Graphics.Imaging.BitmapDecoder.createAsync(stream);
}).then(function (decoder) {
// Re-encode the image at 50% width and height
inMemoryStream = new Windows.Storage.Streams.InMemoryRandomAccessStream();
imageDecoder = decoder;
return Windows.Graphics.Imaging.BitmapEncoder.createForTranscodingAsync(
inMemoryStream, decoder);
}).then(function (encoder) {
encoder.bitmapTransform.scaledWidth = imageDecoder.orientedPixelWidth * 0.5;
encoder.bitmapTransform.scaledHeight = imageDecoder.orientedPixelHeight * 0.5;
return encoder.flushAsync();
}).done(function () {
var streamReference = Windows.Storage.Streams.RandomAccessStreamReference
.createFromStream(inMemoryStream);
request.setData(streamReference);
deferral.complete();
}, function (e) {
// didn't succeed, but we still need to release the deferral to avoid
//a hang in the target app
deferral.complete();
});
}
}
The request argument passed to this function is a simplified hybrid of the DataRequest and DataPackage objects called a DataProviderRequest. This contains a deadline property (with the same meaning as in DataRequest), a formatId property, a getDeferral method, and a setData method through which you provide the data that matches formatId.
Note that the sample here doesn't actually check request.formatId before proceeding because it calls setDataProvider only once for a single format. If you make multiple calls to setDataProvider with different formats and use the same handler, be sure to check formatId and render the proper data. Of course, you can use discrete handlers for each format.
Share Target Apps
Looking back to Figure 15-1, we can see that while the interaction between a source app and the share broker is driven by the single datarequested event, the interaction between the broker and a target app is a little more involved. For one, the broker needs to determine which apps can potentially handle a particular data package, for which purpose each target app includes appropriate details in its manifest. When an app is selected, it gets launched with an activation kind of shareTarget, in response to which it should show a specific share UI rather than the full app experience.
Let’s see how all this works with the Sharing content target app sample, whose appearance is shown in Figure 15-2 (borrowing from Figure 2-20 we saw ages ago). Be sure to load this app in Visual Studio and run it once so that it’s effectively installed and it will appear on the list of apps when we invoke the Share charm.
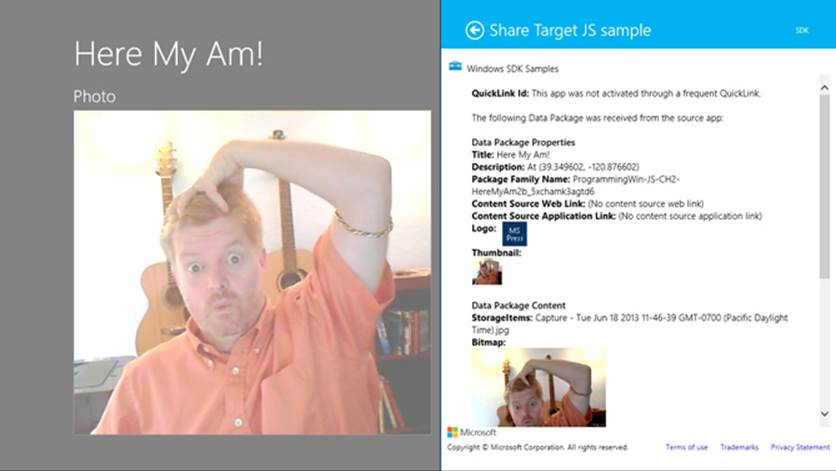
FIGURE 15-2 The appearance of the Sharing content target app sample (the right-hand nonfaded part).
The first step for a share target is to declare the data formats it can accept in the Declarations section of its manifest, along with the page that will be invoked when the app is selected as a target. As shown in Figure 15-3, the target app sample declares it can handle text, URI, bitmap, html, and the http://schema.org/Book formats, and it also declares it can handle whatever files might be in a data package (you can indicate specific file types here). Way down at the bottom it then points to target.html as its Share target page.
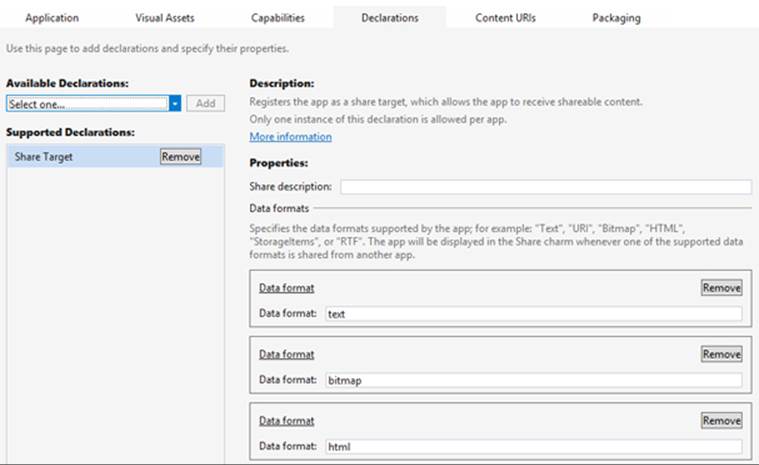
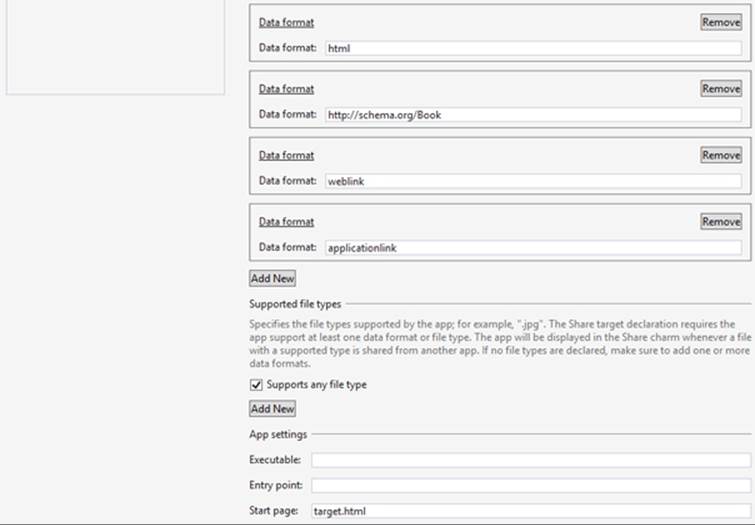
FIGURE 15-3 The Share content target app sample’s manifest declarations.
Tip The Share Description field on the Share Target Declarations page in the manifest determines the subtext below the app name in the share charm. That is, if this field is left empty, only the target app's logo and name appears in the charm:

Here's how it looks with "Examine the shared data" in the Share Description field:

The Share start page, target.html, is just a typical HTML page with whatever layout you require for performing the share task. This page typically operates independently of your main app: when your app is chosen through Share, this page is loaded and activated by itself and thus has an entirely separate script context. This page should not provide navigation to other parts of the app and should thus load only whatever code is necessary for the sharing task. (The Executable and Entry Point options are not used for apps written in HTML and JavaScript; those exist for apps written in other languages.)
Tip Because the Share start page is activated separately from the main app, you can use the document.onbeforeunload event to detect when the user dismisses it.
Much of this structure is built for you automatically through the Share Target Contract item template provided by Visual Studio and Blend, as shown in Figure 15-4; the dialog appears when you right-click your project and select Add > New Item or select the Project > Add New Item menu command.
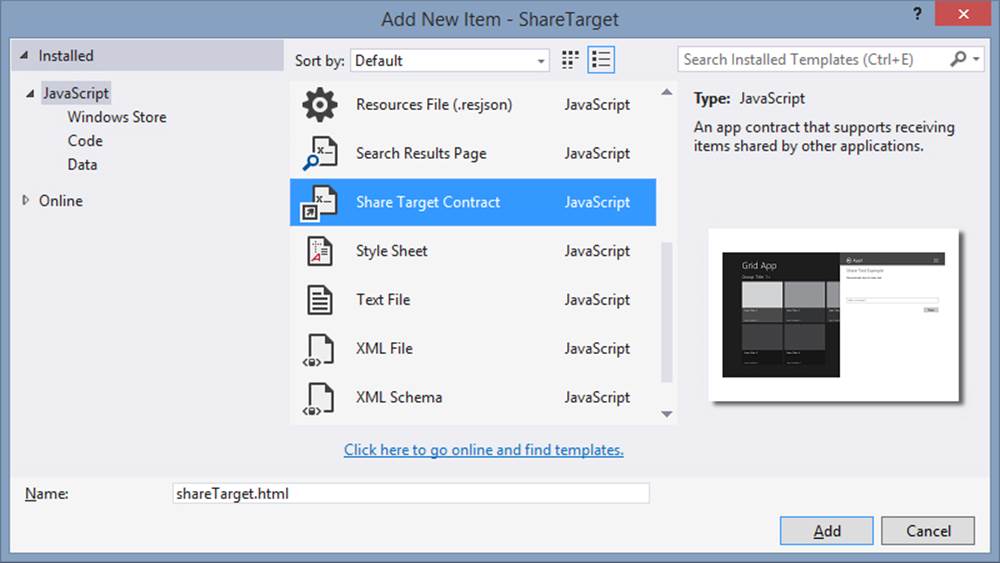
FIGURE 15-4 The Share Target Contract item template in Visual Studio and Blend.
This item template will give you HTML, JS, and CSS files for the share target page and will add that page to your manifest declarations along with text and URI formats. So you’ll want to update those declarations as appropriate.
Before we jump into the code, a few notes about the design of a share target page, summarized from Guidelines for sharing content:
• Maintain the app’s identity and its look and feel, consistent with the primary app experience.
• Keep interactions simple to quickly complete the share flow: avoid text formatting, tagging, and setup tasks, but do consider providing editing capabilities especially if posting to social networks or sending a message. (See Figure 15-5 from the Mail app for an example.) A social networking target app would generally want to include the ability to add comment; a photo-sharing target would probably include the ability to add captions.
• Avoid navigation: sharing is a specific task flow, so use inline controls and inline errors instead of switching to other pages. Another reason to avoid this is that the share page of the target app runs in its own script context, so being able to navigate elsewhere in the app within a separate context could be very confusing to users.
• Keep sign-in and configuration interactions simple—that is, have one step to sign in instead of a multistep process. If more steps are necessary, encourage the user to open the full app to perform them.
• Avoid links that would distract from or take the user away from the sharing experience. Remember that sharing is a way to shortcut the oft-tedious process of getting data from one app to another, so keep the target app focused on that purpose.
• Avoid light-dismiss flyouts because the Share charm already works that way.
• Acknowledge user actions when you start sending the data off (to an online service, for example) so that users know something is actually happening.
• Put important buttons within reach of the thumbs on a touch device; refer to Windows 8 Touch Posturetopic in the documentation for placement guidance.
• Make previews match the actual content—in other words, don’t play tricks on the user!
With this page design, it’s good to know that you do not need to worry about different views—this page really just has one view as a flyout. It does need to adapt itself well to varying dimensions, mind you, but not to random widths. Basing the layout on a CSS grid with fractional rows and columns is a good approach here.
Caution Because a target app can receive data from any source app, it should treat all such content as untrusted and potentially malicious, especially with HTML, URIs, and files. The target app should avoid adding such HTML or file contents to the DOM, executing code from URIs, navigating to the URI or some other page based on the URI, modifying database records, using eval with the data, and so on.
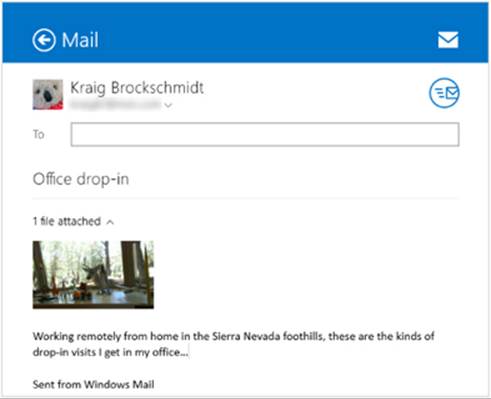
FIGURE 15-5 The sharing UI of the Windows Mail app (the bottom blank portion has been cropped); this UI allows editing of the recipient, subject, and message body, and managing attachments.
Let’s now look at the contents of the template’s JavaScript file as a whole, because it shows us the basics of being a target. First, as you can see, we have the same structure as a typical default.js for the app, using the WinJS.Application object’s methods and events.
(function () {
"use strict";
var app = WinJS.Application;
var share;
function onShareSubmit() {
document.querySelector(".progressindicators").style.visibility = "visible";
document.querySelector(".commentbox").disabled = true;
document.querySelector(".submitbutton").disabled = true;
// TODO: Do something with the shared data stored in the 'share' var.
share.reportCompleted();
}
// This function responds to all application activations.
app.onactivated = function (args) {
var thumbnail;
if (args.detail.kind ===
Windows.ApplicationModel.Activation.ActivationKind.shareTarget) {
document.querySelector(".submitbutton").onclick = onShareSubmit;
share = args.detail.shareOperation;
document.querySelector(".shared-title").textContent =
share.data.properties.title;
document.querySelector(".shared-description").textContent =
share.data.properties.description;
thumbnail = share.data.properties.thumbnail;
if (thumbnail) {
// If the share data includes a thumbnail, display it.
args.setPromise(thumbnail.openReadAsync().then(
function displayThumbnail(stream) {
document.querySelector(".shared-thumbnail").src =
window.URL.createObjectURL(stream);
}));
} else {
// If no thumbnail is present, expand the description and
// title elements to fill the unused space.
document.querySelector("section[role=main] header").style
.setProperty("-ms-grid-columns", "0px 0px 1fr");
document.querySelector(".shared-thumbnail").style.visibility = "hidden";
}
}
};
app.start();
})();
When this page is loaded and activated, during which time the app’s splash screen will appear in the flyout, its WinJS.Application.onactivated event will fire—again independently of your app’s main activated handler that’s typically in default.js. As a share target you just want to make sure that the activation kind is shareTarget, after which your primary responsibility is to provide a preview of the data you’ll be sharing along with whatever UI you have to edit it, comment on it, and so forth. Typically, you’ll also have a button to complete or submit the sharing, on which you tell the share broker that you’ve completed the process.
The key here is the args.detail.shareOperation object provided to the activated handler. This is a ShareTarget.ShareOperation object, whose data property contains a read-only package called a DataPackageViewfrom which you obtain all the goods:
• To check whether the package has formats you can consume, use the contains method or the availableFormats collection.
• To obtain data from the package, use its get* methods such as getTextAsync, getBitmap-Async, and getDataAsync (for custom formats), among others (and note that getUriAsync is deprecated). When pasting HTML you can also use the getResourceMapAsync method to get relative resource URIs. The view’s properties like the thumbnail are also useful to provide a preview of the data.
As you can see, the Share target item template code above doesn’t do anything with shared data other than display the title, description, and thumbnail; clearly your app will do something more by requesting data from the package, like the examples we see in the share target sample. Its js/target.js file contains an activated handler for the target.html page (in the project root), and it also displays the thumbnail in the data package by default. It then looks for different data formats and displays those contents if they exist:
if (shareOperation.data.contains(
Windows.ApplicationModel.DataTransfer.StandardDataFormats.text)) {
shareOperation.data.getTextAsync().done(function (text) {
displayContent("Text: ", text, false);
});
}
The same kind of code appears for the simpler formats. Consuming a bitmap is a little more work but straightforward:
if (shareOperation.data.contains(
Windows.ApplicationModel.DataTransfer.StandardDataFormats.bitmap)) {
shareOperation.data.getBitmapAsync().done(function (bitmapStreamReference) {
bitmapStreamReference.openReadAsync().done(function (bitmapStream) {
if (bitmapStream) {
var blob = MSApp.createBlobFromRandomAccessStream(bitmapStream.contentType,
bitmapStream);
document.getElementById("imageHolder").src = URL.createObjectURL(blob,
{ oneTimeOnly: true });
document.getElementById("imageArea").className = "unhidden";
}
});
});
}
For HTML, it looks through the markup for img elements and then sets up their src attributes from the resource map. The iframe used to display the content (which could also be a webview) already has the HTML content from thepackage by this time:
var images = iFrame.contentDocument.documentElement.getElementsByTagName("img");
if (images.length > 0) {
shareOperation.data.getResourceMapAsync().done(function (resourceMap) {
if (resourceMap.size > 0) {
for (var i = 0, len = images.length; i < len; i++) {
var streamReference = resourceMap[images[i].getAttribute("src")];
if (streamReference) {
// Call a helper function to map the image element's src
// to a corresponding blob URL generated from the streamReference
setResourceMapURL(streamReference, images[i]);
}
}
}
});
}
The setResourceMapURL helper function does pretty much what the bitmap-specific code did, which is call openReadAsync on the stream, call MSApp.createBlobFromRandomAccessStream, pass that blob to URL.createObjectURL, set the img.src with the result, and close the stream.
After the target app has completed a sharing operation, it calls the ShareOperation.report-Completed method, as shown earlier with the template code. This lets the system know that the data package has been consumed, the share flow is complete, and all related resources can be released. The share target sample does this when you explicitly click a button for this purpose, but normally you automatically call the method whenever you’ve completed the share. Do be aware that calling reportCompleted will close the target app’s sharing UI, so avoid calling it as soon as the target activates: you want the user to feel confident that the operation was carried out.
Long-Running Operations
To provide a fast and fluid user experience, a target app can dismiss the Share pane when it wants by calling the ShareOperation.dismissUI method. After this, the target app has 10 seconds to complete its processes or else it will be terminated.
If you need more time, it’s necessary to tell Windows that you have a long-running operation. When you run the Sharing content target app sample and invoke the Share charm from a suitable source app, there’s a little expansion control near the bottom labeled “Long-running Share support.” If you expand that, you’ll see some additional controls and a bunch of descriptive text, as shown in Figure 15-6. The buttons shown here tie into a number of other methods on the ShareOperation object alongside reportCompleted. These help Windows understand exactly how the share operation is happening within the target: reportStarted, reportDataRetrieved, reportSubmitted-BackgroundTask, and reportError. As you can see from the descriptions in Figure 15-6, these generally relate to telling Windows when the target app has finished cooking its meal, so to speak, and the system can clean the dishes and put away the utensils:
• reportStarted informs Windows that your sharing operation might take a while, as if you’re uploading the data from the package to another place or sending an email attachment with what ends up being large images and such. This specific method indicates that you’ve obtained all necessary user input and that the share pane can be dismissed.
• reportDataRetrieved informs Windows that you’ve extracted what you need from the data package such that it can be released. If you’ve called MSApp.createBlobFromRandomAccess-Stream for an image stream, for example, the blob now contains a copy of the image that’s local to the target app. If you’re using images from the package’s resourceMap, on the other hand, don't call reportDataRetrieved unless you explicitly make a copy of those references whose URIs refer to bits inside the data package. In any case, if you need to hold on to the package throughout the operation, you don’t need to call this method because you’ll later call reportCompleted to release the package.
• reportSubmittedBackgroundTask tells Windows that you’ve started a background transfer using the Windows.Networking.BackgroundTransfer.BackgroundUploader class (see Chapter 4). As the sample description in Figure 15-6 indicates, this lets Windows know that it can suspend the target app and not disturb the sharing operation. If you call this method with a local copy of the data being uploaded, go ahead and call reportCompleted method so that Windows can clean up the package; otherwise wait until the transfer is complete.
• reportError lets Windows know if there’s been an error during the sharing operation.
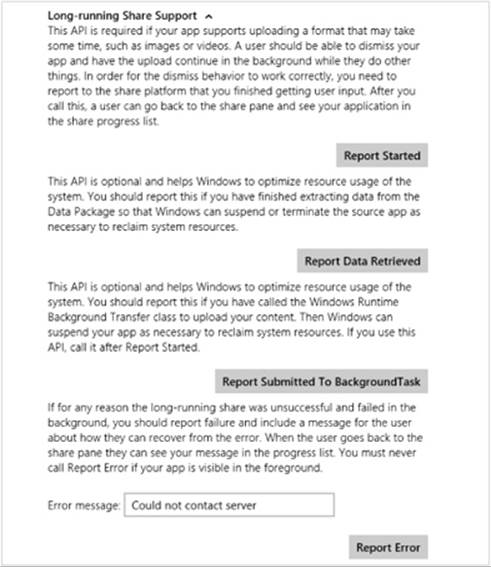
FIGURE 15-6 Expanded controls in the Sharing content target app sample for Long-Running Share Support. The Report Completed button is always shown and isn’t specific to long-running tasks despite its placement in the sample’s UI. Don’t let that confuse you!
Quicklinks
The last aspect of the Share contract for us to explore is something we mentioned early on in this section: quicklinks. These serve to streamline the Share process such that users don’t need to re-enter information in a target app. For example, if a user commonly shares data with particular people through email, each contact can be a quicklink for the email app. If a user commonly shares with different people or groups through a social networking app, those people and/or groups can be represented with quicklinks. And as these targets are much more user-specific than target apps in general, the Share charm UI shows these at the top of its list (see Figure 15-7 below).
Each quicklink is associated with and serviced by a particular target app and simply provides an identifier to that target. When the target is invoked through a quicklink, it then uses that identifier to retrieve whatever data is associated with that quicklink and prepopulates or otherwise configures its UI. It’s important to understand that quicklinks contain only an identifier, so the target app must store and retrieve the associated data from some other source, typically local app data where the identifier is a filename, the name of a settings container, etc. The target app could also use roaming app data or the cloud for this purpose, but quicklinks themselves do not roam to another device—they are strictly local. Thus, it makes the most sense to store the associated data locally.
A quicklink itself is just an instance of the Quicklink class. You create one with the new operator and then populate its title, thumbnail, supportedDataFormats, supportedFileTypes, and id properties. The data formats and file types are what Windows uses to determine if this quicklink should be shown in the list of targets for whatever data is being shared from a source app (independent of the app’s manifest declarations). The title and thumbnail are used to display that choice in the Share charm, and the id is what gets passed to the target app when the quicklink is chosen.
Tip For the thumbnail, use an image that’s more specifically representative of the quicklink (such as a contact photo) rather than just the target app. This helps distinguish the quicklink from the general use of the target app.
An app then registers a quicklink with the system by passing it to the ShareOperation.report-Completed method. As this is the only way in which a quicklink is registered, it tells us that creating a quicklink always happens as part of another sharing operation. It’s a way to create a specific target that might save the user some time and encourage her to choose your target app again in the future.
Let’s follow the process within the Sharing content target app sample to see how this all works. First, when you invoke the Share charm and choose the sample, you’ll see that it provides a check box for creating a quicklink (Figure 15-7). When you check this, it provide fields in which you can enter an id and a title (the thumbnail just uses a default image). When you press the Report Completed button, it calls reportCompleted and the quicklink is registered. On subsequent invocations of the Share charm with the appropriate data formats from the source app, this quicklink will then appear in the list, as shown in Figure 15-8 where the app servicing the quicklink is always indicated under the provided title.

FIGURE 15-7 Controls to create a quicklink in the Sharing content target app sample.
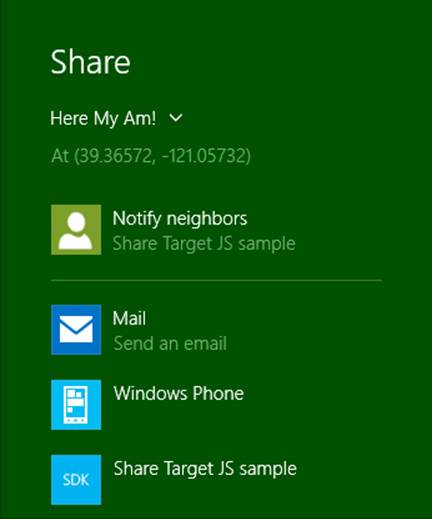
FIGURE 15-8 A quicklink from the Sharing content target app sample as it appears in the Share charm target list.
Here’s how the share target sample creates the quicklink within the function reportCompleted (js/target.js) that’s attached to the Report Completed button (some error checking omitted):
if (addQuickLink) {
var quickLink = new Windows.ApplicationModel.DataTransfer.ShareTarget.QuickLink();
var quickLinkId = document.getElementById("quickLinkId").value;
quickLink.id = quickLinkId;
var quickLinkTitle = document.getElementById("quickLinkTitle").value;
quickLink.title = quickLinkTitle;
// For quicklinks, the supported FileTypes and DataFormats are set independently
// from the manifest
var dataFormats = Windows.ApplicationModel.DataTransfer.StandardDataFormats;
quickLink.supportedFileTypes.replaceAll(["*"]);
quickLink.supportedDataFormats.replaceAll([dataFormats.text, dataFormats.uri,
dataFormats.bitmap,
dataFormats.storageItems, dataFormats.html, customFormatName]);
// Prepare the icon for a QuickLink
Windows.ApplicationModel.Package.current.installedLocation.getFileAsync(
"images\\user.png").done(function (iconFile) {
quickLink.thumbnail = Windows.Storage.Streams.RandomAccessStreamReference
.createFromFile(iconFile);
shareOperation.reportCompleted(quickLink);
});
Again, the process just creates the Quicklink object, sets its properties (perhaps settings a more specific thumbnail such as a contact’s picture), and passes it to reportCompleted. In the share target sample, you can see that it doesn’t actually store any other local app data; for its purposes the properties in the quicklink are sufficient. Most target apps, however, will likely save some app data for the quicklink that’s associated with the quicklink.id property and reload that data when activated later on through the quicklink.
When the app (that is, the target page) is activated in this way, the eventArgs.detail.-shareOperation object within the activated event handler will contain the quicklinkId. The sample simply displays this id, but you would certainly use it to load app data and prepopulate your share UI:
// If this app was activated via a QuickLink, display the QuickLinkId
if (shareOperation.quickLinkId !== "") {
document.getElementById("selectedQuickLinkId").innerText = shareOperation.quickLinkId;
document.getElementById("quickLinkArea").className = "hidden";
}
Note that when the target app is invoked through a quicklink, it doesn’t display the same UI to create a quicklink, because doing so would be redundant. However, if the user edited the information related to the quicklink, you might provide the ability to update the quicklink, which means to update the data you save related to the id, or to create a new quicklink with a new id.
You should also provide a means through which a user can delete a quicklink. This is done by calling the ShareOperation.removeThisQuickLink method, which deletes the one identified in the quickLinkId property.
The Clipboard
Before the Share contract was ever conceived, the mechanism we know as the Clipboard was once the poster child of app-to-app cooperation. And while it may not garner any media attention nowadays, it’s still a tried-and-true means for apps to share and consume data, including data coming from any kind of source, including the browser, desktop apps, and other Windows Store apps. Any necessary translation work between these layers is handled automatically.
For Windows Store apps, clipboard interactions build on the same DataPackage mechanisms we’ve already seen for sharing, so everything we’ve learned about populating that package, using custom formats, and using delayed rendering still applies. Indeed, if you make data available on the clipboard, you should make sure the same data is available for the Share contract!
The question is how to wire up commands like copy, cut, and paste—from the app bar, a context menu, or keystrokes—if an app provides them for its own content (many controls handle the clipboard automatically). In the web context, you can use the window.clipboardData object like you would in a browser, but attempting to access it will throw an Access Denied exception in the local context. There we must instead turn to the Windows.ApplicationModel.DataTransfer.Clipboard class.
As shown in the Clipboard app sample, the processes here are straightforward. For copy and cut:
• Create a new DataPackage (or use MSApp.createDataPackage or MSApp.createData-PackageFromSelection), and populate it with the desired data.
var dataPackage = new Windows.ApplicationModel.DataTransfer.DataPackage();
dataPackage.setText(textValue);
//...
• (Optional) Set the package’s requestedOperation property to values from DataPackageOperation: copy, move, link, or none (the latter is used with delayed rendering). Note that these values can be combined using the bitwise OR operator, as in:
var dpo = Windows.ApplicationModel.DataTransfer.DataPackageOperation;
dataPackage.requestedOperation = dpo.copy | dpo.move | dpo.link;
• Pass the data package to Clipboard.setContent:
Windows.ApplicationModel.DataTransfer.Clipboard.setContent(dataPackage);
To perform a paste:
• Call Clipboard.getContent to obtain a read-only data package called a DataPackageView:
var dataView = Windows.ApplicationModel.DataTransfer.Clipboard.getContent();
• Check whether it contains formats you can consume with the contains method (alternately, you can check the contents of the availableFormats vector):
if (dataView.contains(
Windows.ApplicationModel.DataTransfer.StandardDataFormats.text)) {
//...
}
• Obtain data using the view’s get* methods such as getTextAsync, getBitmapAsync, and getDataAsync (for custom formats), among others. When pasting HTML, you can also use the getResourceMapAsync method to get relative resource URIs. The view’s properties like the thumbnail are also useful, along with the requestedOperation value or values.
dataView.getTextAsync().done(function (text) {
// Consume the data
}
If at any time you want to clear the clipboard contents, call the Clipboard class’s clear method. You can also make sure data is available to other apps even if yours is shut down by calling the flush method (which will trigger any deferred rendering you might have set up).
Apps that use the clipboard also need to know when to enable or disable a paste command depending on available formats. At any time you can get the data package view from the clipboard (Clipboard.getContent) and use its contains method or availableFormats property and decide accordingly. You should also then listen to the Clipboard object’s contentChanged event (a WinRT event), which will be fired when you or some other app calls the clipboard’s setContent method. At that time you’d again enable or disable the commands. You won’t receive this event when your app is suspended, so you should refresh the state of those commands within your resuming handler.
Again, the Clipboard app sample provides examples of these various scenarios, including copy/paste of text and HTML (scenario 1); copy and paste of an image (scenario 2); copy and paste of files (scenario 3); and clearing the clipboard, enumerating formats, clearing the content (scenario 4), and handling contentChanged (also scenario 4).
Note, finally, that pasted data can come from anywhere. Apps that consume data from the clipboard should, like a share target, treat the content they receive as potentially malicious and take appropriate precautions.
Launching Apps with URI Scheme Associations
Back in Chapter 11, in the section "File Association and Launching," we learned about the Windows.System.Launcher API and the launchFileAsync method that allows one app to start another through a file association. It's time now to complete that story with the other launcher method:launchUriAsync. This launches another app through a protocol (URI scheme) association and supports variations through a LauncherOptions argument just like launchFileAsync.
Note With both launchFileAsync and launchUriAsync, Windows specifically blocks apps from launching any file or URI scheme that is handled by a system component and for which there is no legitimate scenario for a Windows Store app to insert itself into that process. The How to handle file activation and How to handle protocol activation topics generally list the specific file types and URI schemes in question, though these are specifically those you cannot implement as an association (the exact list of blocked associations is not published). Also, the file:// URI scheme is allowed in launchUriAsync but only for intranet URIs when you have declared the Private Networks (Client & Server) capability in the manifest. Furthermore, launchUriAsync does not recognize ms-appx, ms-appx-web, or ms-appdataURIs, because these already map to the current app and that app should just display those pages directly.
The result of the launchUriAsync call, as passed to your completed handler, is a Boolean: true if the launch succeeded, false if not. That is, barring a catastrophic failure, such as a low memory condition where the async operation will outright fail, launchUriAsync normally reports success to your completed handler with a Boolean indicating the outcome. You’ll get a false result, for example, if you try to launch a URI that's blocked for security reasons.
However, you cannot know ahead of time what the result will be. This is the reason for the LauncherOptions parameter, through which you can provide fallback mechanisms:
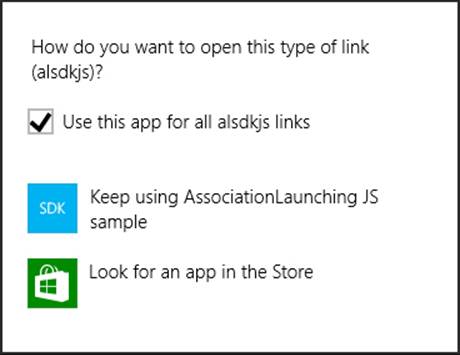
• treatAsUntrusted (a Boolean, default is false) displays a warning to the user that they’ll be switching apps if they proceed (see image below). This is good to use when you’re unsure about the source of the association, such as launching a URI found inside a PDF or other document, and want to prevent the user from experiencing a classic bait-and-switch!

• displayApplicationPicker (a Boolean, default is false) lets the use choose which app to launch as part of the process (see image below, which is using the protocol from the SDK sample). Note that the UI allows the user to change the default app for subsequent invocations. Also, theLauncherOptions.ui property (a LauncherUIOptions object) can be used to control the placement of the app picker through its invocationPoint, selectionRect, and preferredPlacement properties. Beyond this, however, the picker cannot be customized.
• desiredRemainingView A value from Windows.UI.ViewManagement.ViewSizePreference (see Chapter 8, "Layout and Views"), indicating how the calling app should appear after the launch: default, useLess, useHalf, useMore, useMinimum, or useNone. This helps when implementing cross-app scenarios, although the choice is not guaranteed.
• preferredApplicationDisplayName and preferredApplicationPackageFamilyName provide a suggestion to the user to acquire a specific app from the Windows Store if no other app is available to service the request (similar to what a Share source app uses, as described earlier under "Populating Metadata"). This is very useful with a particular URI scheme for which you provide an app yourself.
• Similarly, fallbackUri specifies a URI to which the user will be taken if no app can be found to handle the request and you don’t have a specific suggestion in the Windows Store.
• Finally, the contentType option identifies the content type associated with a URI that controls which app is launched. This is primarily useful when the URI doesn’t contain a specific scheme but simply refers to a file on a network using a scheme such as http or file that would normally launch a browser for file download. With contentType, the default app that’s registered for that type, rather than the scheme, will be launched. That app, of course, must be able to them use the URI to access the file. In other words, this option is a way to pass a URI, rather than a whole file, to a handler app that you know can work with that URI.
Scenarios 2 of the Association launching sample provides a basic demonstration of using launchUriAsync (js/launch-uri.js):
var uri = new Windows.Foundation.Uri(document.getElementById("uriToLaunch").value);
// Launch the URI.
Windows.System.Launcher.launchUriAsync(uri).done(function (success) {
// success indicates whether the URI was launched.
});
Scenario 2 also shows how to use options to launch with a warning, display the Open With dialog, and to control the view, through the following functions (js/launch-uri.js):
function launchUriWithWarning() {
var uri = new Windows.Foundation.Uri(document.getElementById("uriToLaunch").value);
var options = new Windows.System.LauncherOptions();// Set the show warning option.
options.treatAsUntrusted = true;
Windows.System.Launcher.launchUriAsync(uri, options).done(function (success) {
// success indicates whether the URI was launched.
});
}
function launchUriOpenWith() {
var uri = new Windows.Foundation.Uri(document.getElementById("uriToLaunch").value);
var options = new Windows.System.LauncherOptions(); // Set the show picker option.
options.displayApplicationPicker = true;
// Position the Open With dialog so that it aligns with the button.
// An alternative to using the rect is to set a point indicating where
// the dialog is supposed to be shown.
options.ui.selectionRect = getSelectionRect(
document.getElementById("launchUriOpenWithButton"));
options.ui.preferredPlacement = Windows.UI.Popups.Placement.below;
Windows.System.Launcher.launchUriAsync(uri, options).done(function (success) {
// success indicates whether the URI was launched.
});
}
function launchUriSplitScreen() {
var uri = new Windows.Foundation.Uri(document.getElementById("uriToLaunch").value);
// Request to share the screen.
var options = new Windows.System.LauncherOptions();
// code omitted: Set options.desiredRemainingView from a drop-down list selection, e.g.:
options.desiredRemainingView = Windows.UI.ViewManagement.ViewSizePreference.useHalf;
Windows.System.Launcher.launchUriAsync(uri, options).done(function (success) {
// success indicates whether the URI was launched.
});
}
Scenario 4 then demonstrates handling protocol activation—that is, implementing the Protocol Activation contract (scenarios 2 and 4 deal with file type associations, which are covered in Chapter 11).
In comparison to file type associations, custom URI schemes are somewhat likely to launch your particular app. That is, a custom URI scheme offers the best route to have one app specifically launch another, as when you want to delegate certain tasks. The Maps app in Windows, for example, supports a bingmaps scheme for accomplishing mapping tasks. You can imagine the same for a stocks app, an email app (beyond mailto), line-of-business apps, and so forth. If you create such a scheme and want other apps to use it, you’ll certainly need to provide documentation for its usage details, which means that another app can implement the same scheme and thus offer itself as another choice in the Windows Store. So there’s no guarantee even with a very specific scheme that you can know for certain that you’ll be launching another known app, but this is about as close as you can get to that capability.108
As with file types, the target app declares the URI schemes it wishes to service in the Declarations section of manifest. Here you add a Protocol declaration as shown in Figure 15-9.
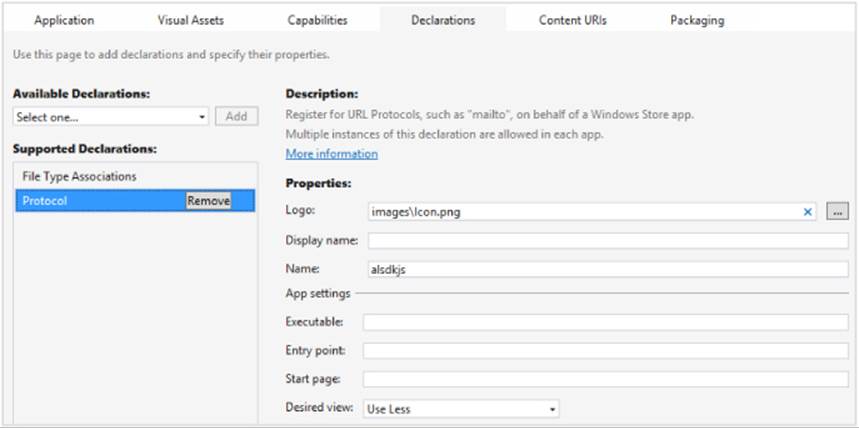
FIGURE 15-9 The Declarations > Protocol UI in the Visual Studio manifest designer.
Under Properties, the Logo, Display Name, and Name all have the same meaning as with file type associations (see Chapter 11). Similarly, while you can specify a discrete start page, you’ll typically handle activation in your main activation handler, as demonstrated in js/default.js of the Association launching sample (where the code path leads into js/scenario4.js). The last field is then the view in which you’d like the app to be launched (useLess in this case).
In the main activation handler you’ll receive the activation kind of protocol, in which case eventArgs.detail is a WebUIProtocolActivatedEventArgs: its uri property contains the URI that the launching app passed to launchUriAsync. The sample doesn't make use of this itself, but just opens the page for scenario 4 passing the launching URI as an argument:
var url = null;
var arg = null;
// [Other activation kind checks omitted]
if (e.detail.kind === Windows.ApplicationModel.Activation.ActivationKind.protocol) {
url = scenarios[3].url;// Maps to /html/receive-uri.html
arg = e.detail.uri;
}
if (url !== null) {
e.setPromise(WinJS.UI.processAll().then(function () {
return WinJS.Navigation.navigate(url, arg);
}));
}
The receiving page—/html/receive-uri.html in this case—just outputs the URI to the console, but a real app will, of course, take other actions. Be warned, though, that URIs with some unique scheme can come from anywhere, including potentially malicious sources. Be wary of any data or queries in the URI, and avoid taking permanent actions with it. For instance, you can perhaps navigate to a new page, but don’t modify database records or try to eval anything in the URI.
The last thing you'll need to know is how to debug protocol activation when the app isn't running, which means getting the app into the debugger when it's activated through a protocol. To do this, open the project’s properties (Project > Properties menu command in Visual Studio) and then, under Configuration Properties > Debugging, set Launch Application to No:
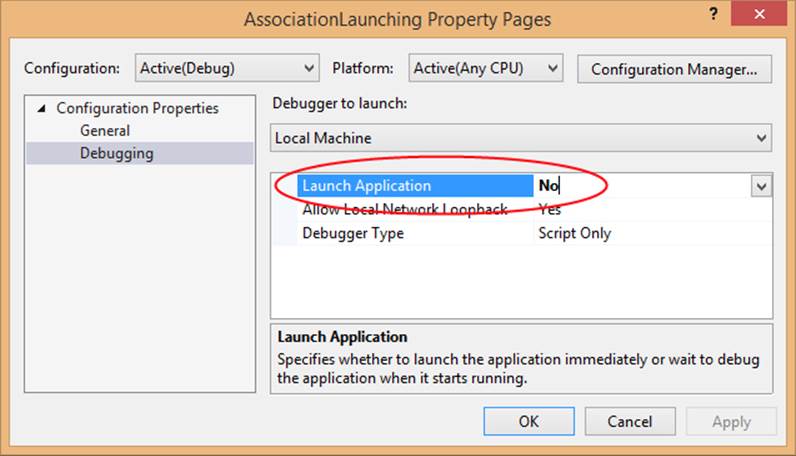
Then set a breakpoint within your app's activated event handler; in the Association launching sample, you can do this within the function called activated. Then start the debugger in Visual Studio, which then waits until the app is launched some other way. To launch a protocol, then, you can just enter an appropriate URI like alsdkjs://HelloWorld into the Windows Run dialog (Win+R), and you'll see the app start up and hit your breakpoint in the debugger.
You can also just use scenario 2 of the Association launching sample, which allows you to try out the different launcher options. Do note that if you run this sample in the debugger with a breakpoint in the activated handler, you can observe how protocol activation will trigger that event when the app is already running.
Search
It hardly needs saying that Search is one of the most, if not the most, important capability in a world where the amount of data available to us continues to grows significantly faster than our ability to consume it. It's almost quaint, in fact, that we still refer to web browsers when most of the time they're really acting as viewports onto search. Sure, we still do some browsing here and there, but search is clearly where most of us begin because we typically know at the outset what it is we're seeking.
Recognizing this, user experience designers at Microsoft started, with Windows 8, to build a search paradigm directly into the fabric of the operating system that could quickly and efficiently get you to whatever it is you're looking for. In Windows 8 we first saw the idea that universal search was always available through the Search charm, shown in Figure 15-10, which is easily accessible alongside Share, Devices, and Settings.
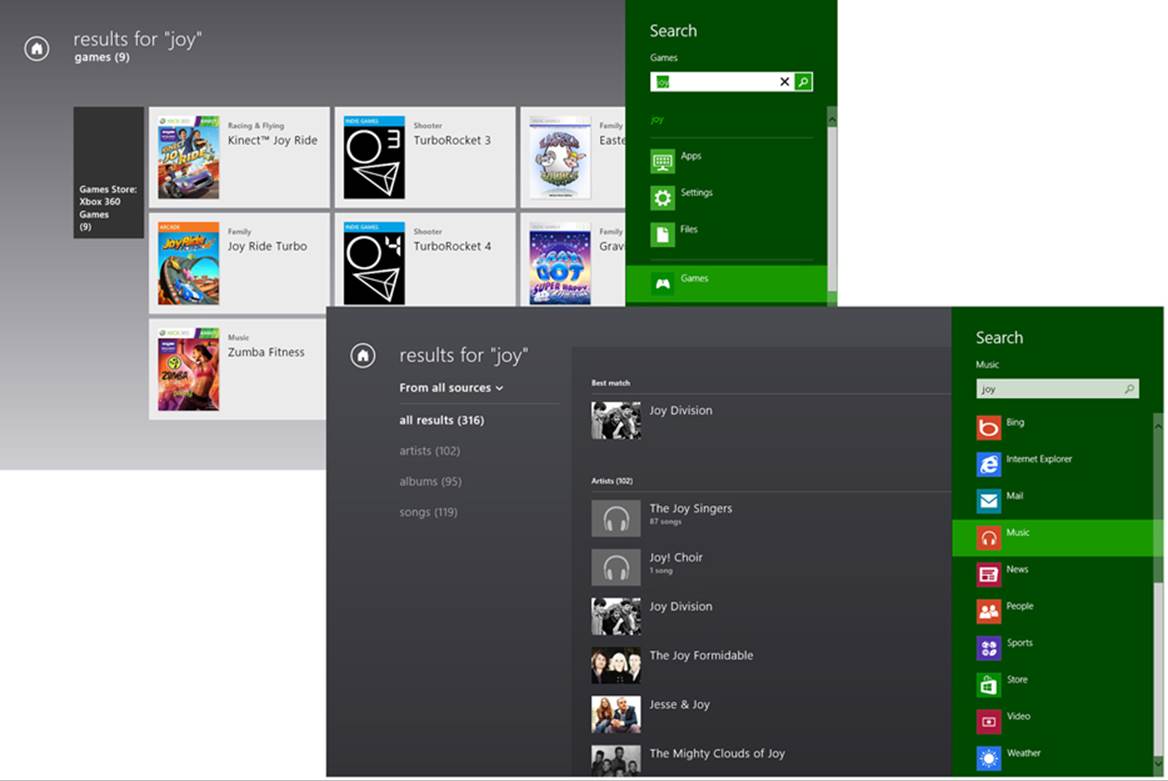
FIGURE 15-10 The Search charm experience of Windows 8, with results shown in the Games and Photos apps.
Tip In both Windows 8 and Windows 8.1, you can determine which side of the screen the Search pane appears on through the Windows.UI.ApplicationSettings.SettingsPane.edge property. This can be used to lay out your results page if you don't want certain results obscured.
This design created a single go-to place to search for (and launch) apps on the Start screen with the keyboard, search settings (which are often hard to find), search files (whether local or cloud-based), and search within an app. And because you could use a browser like Internet Explorer as a target app, you also had the ability to search the web as well.
The Search charm meant that apps whose primary function wasn't oriented around search didn't need to provide their own UI controls but could simply implement whatever extent of the search contract was appropriate. And if a user didn't find what they were looking for in the app, the Search charm made it very quick and easy to search elsewhere by simply selecting a different search target. Users did not need to switch to a different app first before searching on the same term there—the current search is automatically applied as soon as a new target is selected. This again made search both quick and efficient.
When work began on Windows 8.1, the designers had lots of user feedback, telemetry, and experience to draw from to make search even better. The key, they realized, was to continue to improve efficiency by removing extra steps.
User telemetry also revealed the most common search targets: the foreground app, Internet Explorer, the Windows Store, and Settings. Very rarely did users actually select a different app target—I suspect this is because doing a generic search in different apps doesn’t typically produce meaningful results, so users learned to not even bother. Thus search was revamped for Windows 8.1 with several key characteristics:
• Searching everywhere—files, apps, settings, and the web—is now the default when the Search charm is invoked, which saves the step of switching targets.
• For in-app search, the recommendation is to implement a search control directly on the app canvas. The WinJS.UI.SearchBox control is included in WinJS for this purpose. Be sure to refer to Guidelines for search for the full UI recommendations for in-app search.
• For apps that want to provide a search capability but aren't yet prepared to provide a full in-app experience, you can also have a simple button that invokes the Search charm directly and work with the Search contract from there. In this case the Search charm will be scoped to the app by default instead of “everywhere.”
We'll look at all of these options in this section, but first let's do what we've done for other aspects of Windows by exploring the user experience of the Search charm as well as in-app search.
The Search Charm UI
When you invoke the search charm in Windows 8.1 (which is done quickly by pressing Win+Q or Win+S), under most circumstances you see a Search Everywhere UI:

The exception is when the foreground app implements the Search contract and invokes the search charm programmatically, in which case the search is scoped to that app by default. In either case, you can tap the header with the down arrow to quickly change the scope, as shown here with the Search contract sample that we'll be seeing later:

For our present purposes, though, let's assume a search scoped to Everywhere. As soon as you start typing a search phrase, results begin to immediately appear from all targets thanks to the file system indexer and the Bing search engine—something called "Smart Search." The idea with Smart Search is that it surfaces the most likely result suggestions at the top, results that include apps, settings, files, and high-confidence web results as they are available. This is what appears above the separator (see below left). Below the separator (below right) are then query suggestionsbased on what you've entered so far:
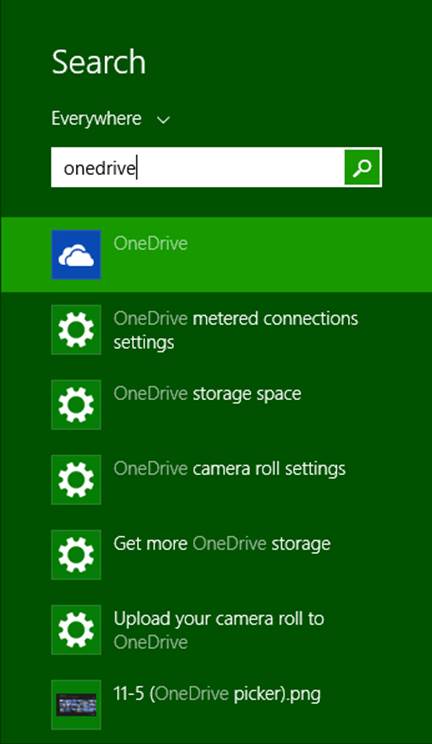
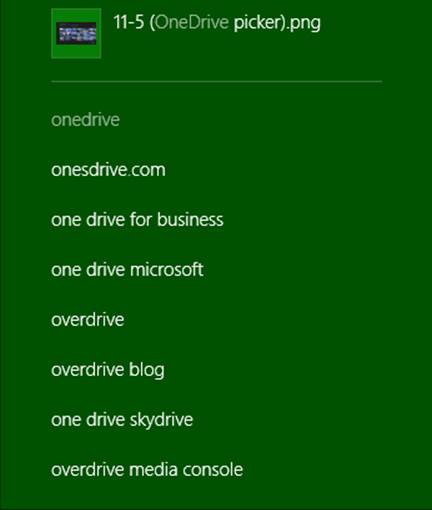
Results suggestions save you the trouble of going to a separate results page and selecting a result there: these suggestions take you straight to that result. Each one might activate an app for that result (if the app fits the query), launch an app through file association, open PC Settings to a specific page, and so on. What's also very cool with certain results like music tracks or albums is that the system adds specific one-click actions in the Search charm, such as playing that track or album. These actions invoke a target app appropriately, such as starting playback (as the system media controls indicate) through the default media player without having to switch to that app at all, as shown below. That is, the app is launched directly to the background. At present, however, such actions are not extensible by apps.
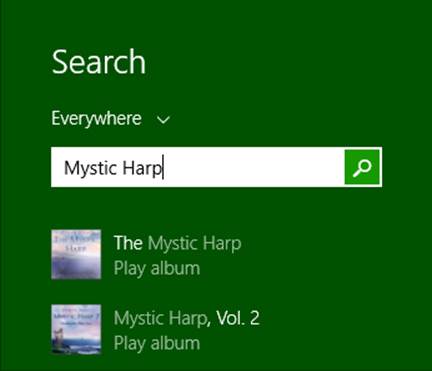

Selecting a query suggestion below the separator, pressing Enter in the text box, or tapping the search icon next to the text box takes you to a larger view of results, as shown in Figure 15-11 and in Figure 15-12, which includes local and web content together (this view is part of the Windows shell; it's not a separate app even though it appears as such). Depending on the search in question, you might see a large hero result (Figure 15-11) after local files and before specific web results. Also, if any web result can be serviced by an app—such as the Amazon result highlighted in Figure 15-12—invoking that result will launch the app. (You can swipe-select or right-click that item, as shown in the figure, for other options, such as opening a browser or copying the appropriate link.) These app-mapped web results (also known as Smart Search), provide an appcentric experience for web content. In Chapter 20 we'll see how to create this linkage between your website and your app.
The web results as shown in Figure 15-12 are curated over time based on real usage data so that the most common results that people use are shown first. Other results, if you pan to the right, are shown in a more condensed view, and more results will keep appearing as you continue to pan.
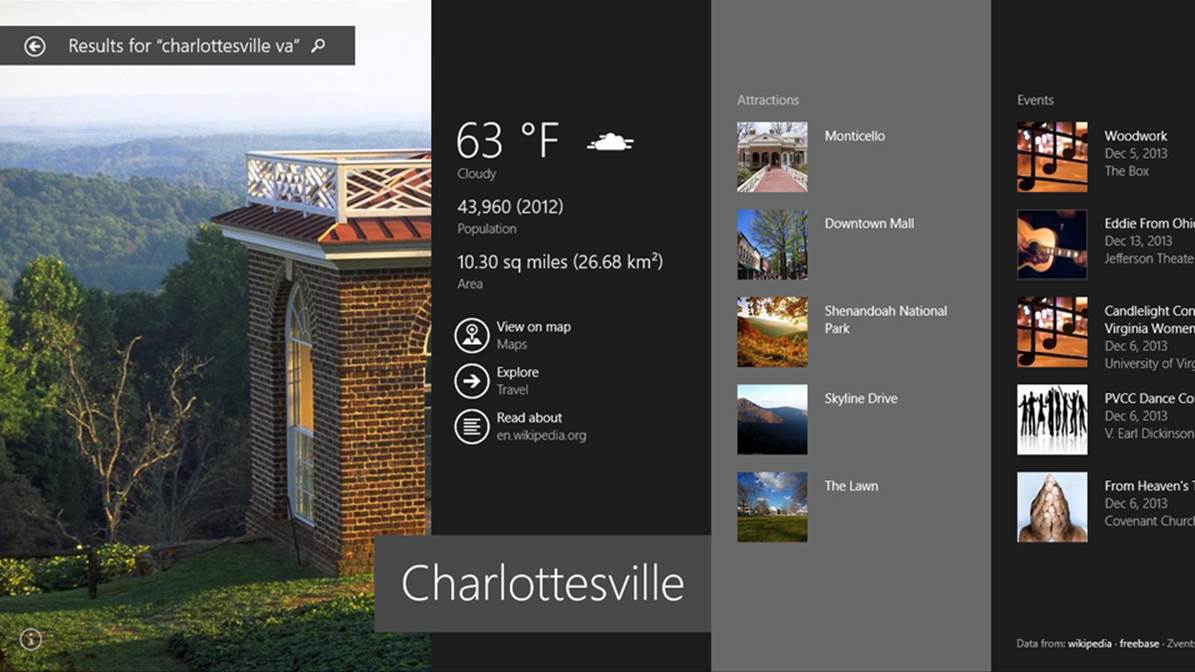
FIGURE 15-11 A large hero result in the search results view, showing in beautiful fashion the most common results that people typically look for. These are followed by additional web results if you pan to the right.
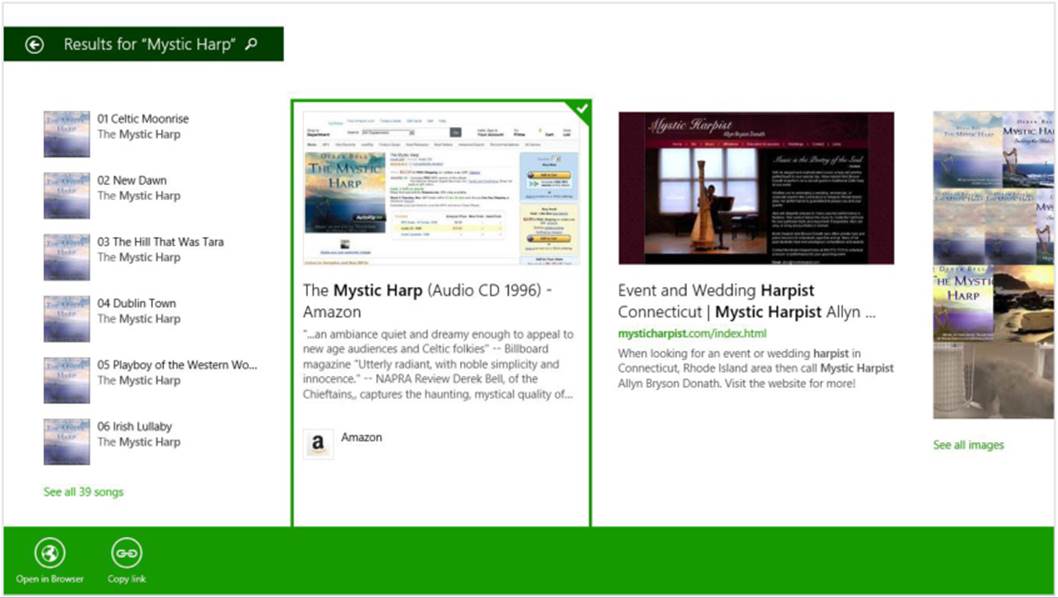
FIGURE 15-12 Search results without a large hero, also showing files on left. The first Amazon result will open the Amazon app by default, but you can also open in the browser or copy a link by selecting the item and using the app bar commands, as shown here.
You can see that the Search charm itself is much richer and more powerful than it was in Windows 8. And because it defaults to a universal search, the UI guidance for in-app search changed as well. Whereas Windows 8 recommended that an app did not have its own search control in favor of the charm (which you can still do in Windows 8.1 as shown in the image above), it's now recommended that apps do have their own search controls for in-app content.
Having a search control on the app canvas—especially where search is a key feature for the app—keeps the user immersed in that app's content all the time, without going to the Search charm at all. That is, the app can show results (often filtered content) for the search term immediately right alongside the search control, rather than having the user go to the charm, enter a search term there, and have the app navigate to a separate results page. In other words, the recommended approach for Windows 8.1 keeps everything about search directly in the app.
For this purpose, WinJS provides the powerful WinJS.UI.SearchBox control with support for search history, type to search, suggested results, query suggestions, and filtering suggestions as a search term is being typed. As this is what most search-capable apps are expected to use, we'll be looking at it first in the sections that follow.109
Then we'll take a look at a few matters of content indexing, which is applicable in this context, and we’ll explore the Search contract in finer detail as you'd use when implementing your own search controls or participating in the contract directly.
Note Because the SearchBox API and the search contract employ the same events and concepts, be sure to read the SearchBox sections even if you're planning to implement the contract, as the contact section at the end is fairly short and relies on the SearchBox material.
The WinJS.UI.SearchBox Control
The WinJS.UI.SearchBox control is the last control in all of WinJS that we haven't discussed so far in this book, so let's remedy that situation!
You typically place the SearchBox on the upper right of your app pages (or left with right to left languages), unless it should be nearer to the content that you can search. In the Mail app, for example, it’s placed directly above the messages, thus indicating that messages are what’s specifically being searched. Also, make sure the SearchBox is available in all views of a page; you can reduce it down to a button that then expands to show the full control, but don’t make it disappear altogether.
In its most basic usage, the SearchBox is an edit field with a search button that fires a querysubmitted event (as does pressing Enter). That is, with this minimal markup:
<div id="searchBoxId" data-win-control="WinJS.UI.SearchBox"></div>
and a little event code:
var searchBox = document.getElementById("searchBoxId").winControl;
searchBox.addEventListener("querysubmitted", querySubmittedHandler);
function querySubmittedHandler(eventObject) {
var queryText = eventObject.detail.queryText;
}
you'll get the entered text (up to 2048 characters) in the queryText variable110 at which point you can do anything you want with it. Whatever the case, here's how the control will appear with default styling (which includes its size):
![]()
The magnifying glass icon is specifically set in the WinJS stylesheets as follows, so you can override it with the same selector:
.win-searchbox-button.win-searchbox-button:before {
content: "\E094";
}
For all the other win-searchbox* styles, see the ”SearchBox Styling” section later in this chapter.
Sidebar: The Search Results Page Item Template
Obtaining a query from a SearchBox is one thing, but displaying the results of a query is another. As this typically involves showing results in a ListView control, Visual Studio and Blend provide a Search Results Page item template. Right-click your project and select Add > New Item, or use the Project > Add New Item… menu command and choose Search Results Page from the list of templates. This adds page control files (.html, .js. and .css) for a search results page. There’s not much exciting to show here visually because the template code very much relies on there being some real data to work with. Nevertheless, the template gives you a great structure to start from, including a filtering mechanism, and it’s wholly expected that you then rework the layout and use styling that integrates with the rest of your app’s experience. Some further details can be found on Adding a Search results item template.
Beyond a text box with a button, the SearchBox has a number of other features:
• As the user types, the SearchBox raises querychanged events, indicating that the search term in its queryText property has changed. Handling this is appropriate if you have logic you need to run outside of providing suggestions, such as previewing results (that is, immediate filtering) directly in the app itself. Typically, if you do active filtering or previewing, submitting the query (and the querysubmitted event, see below) is a moot point because it has already been processed.
• When the control receives focus and as the user types, the control also raises suggestionsrequested events. In response to this you populate a collection of suggested search terms (query suggestions), including default suggestions before the user has entered anything. You can use existing in-app content for this or make an HTTP request, if you like, because the SearchBox supports providing suggestions asynchronously.
• You can also tell the SearchBox to produce query suggestions from an Advanced Query Syntax (AQS) query on the file system through its setLocalContentSuggestionSettings method.
• When the user presses Enter in the SearchBox, taps the magnifying glass button, or selects a query suggestion, the SearchBox fires a querysubmitted event—this tells you to take the user to a results page. Also, if you set the chooseSuggestionOnEnter property to true, pressing Enter in theSearchBox automatically chooses the first query suggestion and sends that string with the querysubmitted event.
• If, on the other hand, the user selects a result suggestion, the control fires a resultsuggestionschosen event (note the "suggestions" in the middle is plural), which is intended to take the user directly to that content rather than a results page.
• By setting its focusOnKeyboardInput flag to true, you instruct the SearchBox to automatically take the focus on keyboard input. This makes it easy to implement type-to-search behavior as you have on the Windows Start screen. When this happens, the control raises areceivingfocusonkeyboardinput event in response to which you can do things like make other UI visible. Be mindful to enable this on a page-by-page basis: disable the feature on pages where you have any other text input controls. Typically, type-to-search is enabled on an app's main page, a search results page, and gallery pages. See Guidelines for search in the section "Enabling type-to-search."
• The SearchBox automatically tracks automatic search history, which can be turned off by setting the searchHistoryDisabled property to true. You can have a single SearchBox manage different histories by changing the searchHistoryContext property. Note, however, that the history itself isn't accessible, and if an app wants to clear the history (a capability you should ideally offer through Settings), call the Windows.ApplicationModel.Search.Core.-SearchSuggestionManager.clearHistory method.
• The placeholderText property lets you assign text that appears in the SearchBox when there is no user-entered text. Always set placeholder text to something that describes what kind of data can be searched—this immediately tells the user the applicable scope for searches. For example, as described in Guidelines for search, a music app might use "Album, artist, or song name" here. The Sports app uses "Enter a team name or player name." Having good placeholder text goes a long way to helping your users understand and have appropriate expectations of your search feature (saving them time and frustration).
• The SearchBox fully supports IME input for east-Asian languages.
Let's now take a look at the details of working with query suggestions and result suggestions in the next two sections. Then we'll check out the APIs for indexing your own content, which can very much help improve the performance of your searches.
Providing Query Suggestions
Handling the SearchBox control's suggestionsrequested event is how you provide the kind of auto-complete feature that many users have come to expect (beyond matching search terms in the control's history). It's not required, of course, because sometimes there just isn't space in your app's UI to show those suggestions, or your content is so varied that you really can't make suggestions in the first place. That is, if you're essentially doing a full-text search, like the Mail app does over email messages, then making guesses at what the user is looking for doesn't make sense. But for a general topic search, making topic suggestions can shortcut the user’s path between searching and enjoying your content.
The SearchBox control is set up to handle two types of suggestions: those coming directly from the app, and those coming from the local file system.
To supply the first type, in your handler for the suggestionsrequested event you populate the eventArgs.detail.searchSuggestionCollection with your suggested strings using the collection's methods named appendQuerySuggestion (for a single string) or appendQuerySuggestions (plural, which takes an array). Each string can be up to 512 characters.
Supporting multiple or east-Asian languages? Here you want to pay attention to the BCP-47 tag in the eventArgs.detail.language property if you support multiple languages and also to the linguisticDetails property that provides more information about text entered through an Input Method Editor (IME), specifically linguistic alternatives. If you expect to have Japanese or Chinese users, it’s highly recommended to also search for these alternatives.
Here’s how it’s done in scenario 1 of the SearchBox control sample, where suggestionList is just a hard-coded list of city names and this handler is wired up to suggestionsrequested (js/S1-SearchBoxWithSuggestions.js):
function suggestionsRequestedHandler(eventObject) {
var queryText = eventObject.detail.queryText,
query = queryText.toLowerCase(),
suggestionCollection = eventObject.detail.searchSuggestionCollection;
if (queryText.length > 0) {
for (var i = 0, len = suggestionList.length; i < len; i++) {
if (suggestionList[i].substr(0, query.length).toLowerCase() === query) {
suggestionCollection.appendQuerySuggestion(suggestionList[i]);
}
}
}
}
So if query contains “ba”, the first 5 names in suggestionList will be Bangkok, Baghdad, Baltimore, Bakersfield, and Baton Rouge:
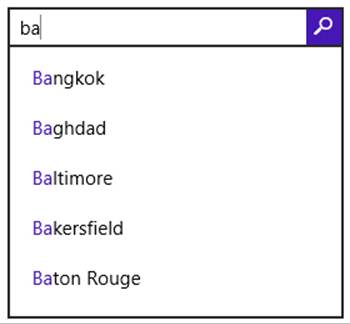
Ideally, your event handler returns in half a second or less, and it’s important to know that all the suggestions must be in the collection when your handler returns. Of course, a real app will be often drawing suggestions from its own database or from a service. In the process you might need to do some asynchronous work—to plug into the control's deferral mechanism, obtain a promise for your async work and pass it to eventArgs.detail.setPromise. Scenario 4 of the sample, for instance, calls an OpenSearch service via WinJS.xhr to provide suggestions (js/S4-SuggestionsOpenSearch.js):
xhrRequest = WinJS.xhr({ url: suggestionUri });
eventObject.detail.setPromise(xhrRequest.then(
function (request) {
if (request.responseText) {
var parsedResponse = JSON.parse(request.responseText);
if (parsedResponse && parsedResponse instanceof Array
&& parsedResponse.length >= 2) {
var suggestions = parsedResponse[1];
if (suggestions) {
suggestionCollection.appendQuerySuggestions(suggestions);
}
}
}
}));
OpenSearch, in case you're unfamiliar with it, is a standard JSON format for search suggestions. See the OpenSearch Suggestions specification. The advantage of this, as we see in the code above, is that the JSON response can be directly parsed into an array and passed in one call toappendQuery-Suggestions. There is also an XML format for search suggestions that's documented in the XML Search Suggestions Format Specification and demonstrated in scenario 5 of the sample. In this case, a function named generateSuggestions provides a generic parser routine for such a response, sending them onto appendQuerySuggestion[s] as well as appendResultSuggestion, which we’ll see shortly.
In some cases you might want to group query suggestions together and divide those groups by separators (or divide result suggestions from query suggestions). For this, call the collection's appendSearchSeparator method with a label for the group, which is done in scenario 5 of the sample. Or, as a simpler demonstration, if you insert the following line before the for loop in the sample's scenario 1 (in js/S1-SearchBoxWithSuggestions.js):
suggestionCollection.appendSearchSeparator("Group 1");
you'll see the following in the SearchBox suggestions:
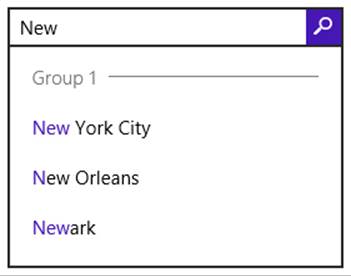
Now the other source for query suggestions is the local file system, as defined by one or more StorageFolder objects. Here you can have the SearchBox automatically provide suggestions by calling its setLocalContentSuggestionsSettings method. You need only do this once for any particular configuration, so you typically make the call when initializing the page or changing the page's data context, rather than from inside an event handler.
Here, you first create a new LocalContentSuggestionSettings object (in the Windows.-ApplicationModel.Search namespace), set its enabled flag to true, populate its locations vector with the StorageFile objects you want to search, and then provide an Advanced Query Syntax filter string and/or an array of Windows Properties (like System.Title) that defines the scope of the search (in the aqsFilter and propertiesToMatch properties).
For example, scenario 3 of the SDK sample looks for music files in the Music library (js/S3-SuggestionsWindows.js, in the page control's ready method):
var localSuggestionSettings = new
Windows.ApplicationModel.Search.LocalContentSuggestionSettings();
localSuggestionSettings.enabled = true;
localSuggestionSettings.locations.append(Windows.Storage.KnownFolders.musicLibrary);
localSuggestionSettings.aqsFilter = "kind:=music";
searchBox.winControl.setLocalContentSuggestionSettings(localSuggestionSettings);
Because enumerating files in the locations folders requires programmatic access to those folders, you need to make sure your app has the appropriate capabilities set in its manifest, retrieves the folder from the Windows.Storage.AccessCache, or has obtained programmatic access through the folder picker. In the latter case, the app would provide UI elsewhere to configure the search locations (through the Settings pane, for instance).
The aqsFilter property determines which files in the folders vector will be searched. If you leave this blank, all files will be searched. The propertiesToMatch property (a string vector) then determines which file properties are involved. If you leave this blank, all properties will be searched; by setting this you can limit the scope however specifically you want. For details on AQS and Windows properties, refer to Chapter 11 in the section "Custom Queries."
Providing Result Suggestions
Providing query suggestions, as described in the previous section, is just a matter of providing possible search strings that will ultimately be passed to the app through to the SearchBox control's querysubmitted event. Typically this is used to give the user a list of possible search results.
Result suggestions are different in that they pinpoint a specific result right away, such that selecting one of those results goes immediately to that item, bypassing any search results page and streamlining the whole process. For example, when searching for a team name or player name in the Sports app, specific results can be identified from the underlying data set:
To provide result suggestions, you still handle the SearchBox.onsuggestionsrequested event as before but now take the extra step of calling the appendResultSuggestion method of the eventArgs.detail.searchSuggestionCollection. In fact, you'll typically want to populate result suggestions first, add a separator, and then populate query suggestions.
Caveat If you're using the search box's setLocalContentSuggestionSetting method to provide automatic query suggestions, any result suggestions you add will end up at the bottom of the list and won't be visible unless there are only a couple of query suggestions.
The appendResultSuggestion method takes five arguments in the following order, which fully describe the result. Be mindful of any necessary localization here:
• text The first line of text for the suggestion, such as "San Francisco 49ers" in the earlier graphic.
• detailText The second line of text for the suggestion, as with "NFL" in the graphic.
• tag The string you want to receive in the resultSuggestionChosen event (see below).
• image A RandomAccessStreamReferencefor the image to display (see below).
• imageAlternateText The alt attribute for the image.
For the image argument, you can easily obtain the necessary object through the static createFromFile, createFromUri, and createFromStream methods that you'll find on the RandomAccessStreamReference class, depending on your image source (a StorageFile, a Windows.Foundation.Uri, orRandomAccessStream, respectively). The base size of this image is 40x40 for 100% scale, 56x56 for 140%, and 72x72 for 180%. Take these sizes into account if you dynamically generate images for the result suggestions or request them from a service, but the SearchBox will scale whatever image you provide.
Tip createFromUri accepts ms-appx:/// and ms-appdata:/// URIs along with http[s]://. Be sure to have a default image in your package in case you can't obtain a more specific one; there is no built-in default.
Here's a simple example to add a single suggestion that just reflects the query text and uses the app's store logo as a hack, but it shows the code you need:
var searchBox = document.getElementById("mainSearchBox").winControl;
searchBox.addEventListener("suggestionsrequested", suggestResults);
function suggestResults(e) {
var uri = new Windows.Foundation.Uri("ms-appx:///images/storelogo.png")
var stream = Windows.Storage.Streams.RandomAccessStreamReference.createFromUri(uri);
e.detail.searchSuggestionCollection.appendResultSuggestion(
"Result for " + e.detail.queryText, "Detail text", "result1", stream, "A suggestion");
}
This will produce the following result:
As noted in the previous section, the generateSuggestions function found in scenario 5 the SearchBox control sample provides a generic parser that turns XML search suggestions into the appropriate appendResultSuggestion calls. (You just have to follow through all the code.)
Providing a result suggestion, of course, is valuable only if the user can tap on it and get to that result immediately. For this you must also handle the resultsuggestionchosen event. For example, if you have a page called resultItem.html in which you'll show the result, you might handle the event as follows, where the eventArgs.detail.tag property is the same as the tag argument passed to appendResultSuggestion:
searchBox.addEventListener("resultsuggestionchosen", navToResult);
function navToResult(e) {
WinJS.Navigation.navigate("/pages/resultItem.html", { item: e.detail.tag });
}
To summarize, handling the querysubmitted event means that you’re taking the query text and populating a list of results in your own page. Each of those items will then navigate to an appropriate detail page. The resultSuggestionChosen event tells you that the same thing has happened directly within the SearchBox with a result that you placed there. For the most part, the detail pages to which you'll navigate are likely the same from either part of your UI.
SearchBox Styling
As we've done with other controls in this book, the following annotated images identify which win-searchbox-* style classes are attached to which parts of the control. First of all, it's helpful to understand that the control as a whole (which is given the win-searchbox style as well as win-searchbox-disabled), is made up of three child elements:
• An <input> element where you type the query, which has the win-searchbox-input style class and win-searchbox-input-focus if it has the focus.
• A <button>, with the magnifying glass, which has the win-searchbox-button style class and win-searchbox-button-focus when it has the focus.
• A flyout containing the suggestions, tagged with win-searchbox-flyout.
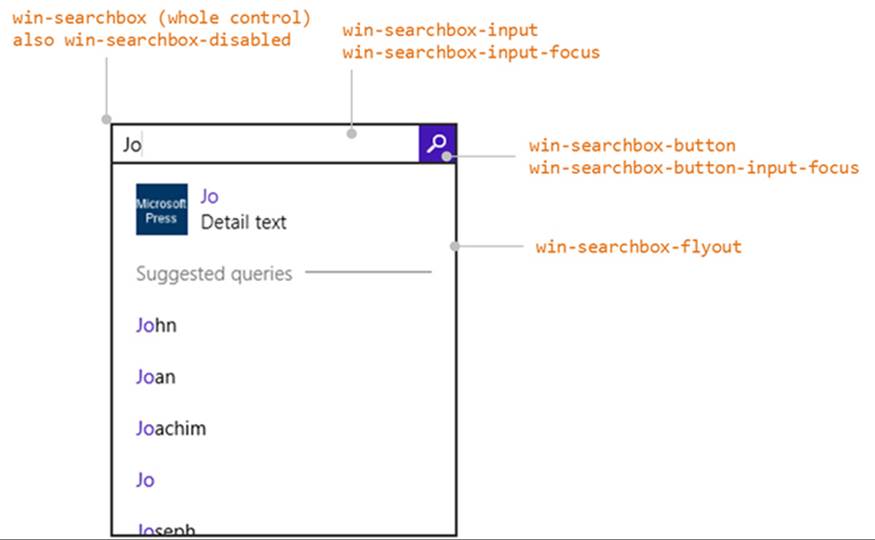
With a few styles of our own, then, we can change the overall appearance like so:
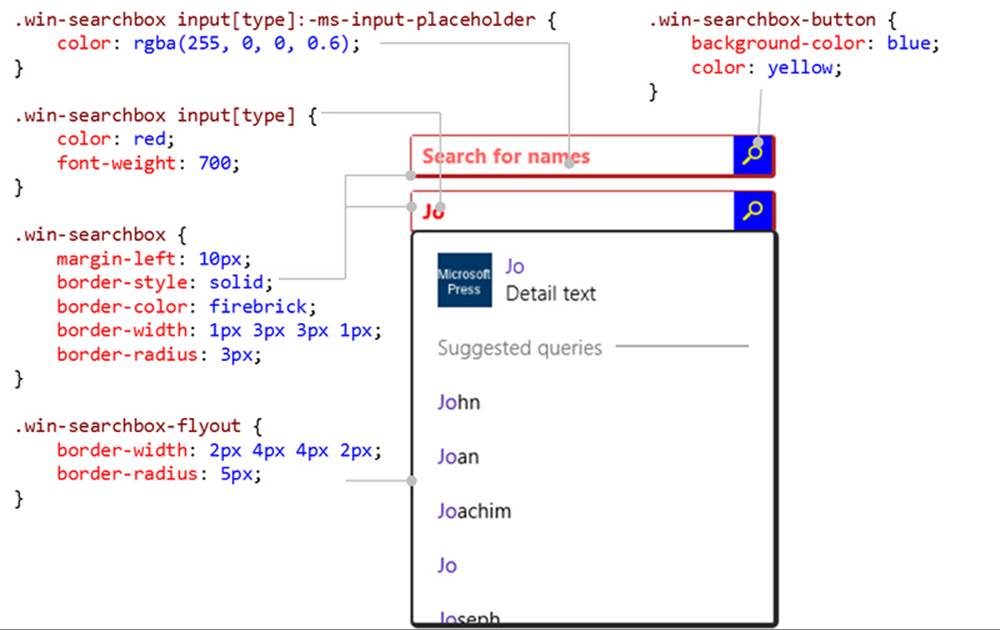
Note that it's necessary to use the .win-searchbox input[type] selector to style the <input> element rather than .win-searchbox-input because of CSS specificity. That is, although the latter class does identify this particular element, the WinJS stylesheet rules that affect it have a higher specificity and thus take precedence over any win-searchbox-input styles you assign yourself. So you have to use .win-searchbox input[type] to match that specificity. Note also the use of the –ms-input-placeholder pseudo-class for the placeholder text.
Tip You can see all this in Visual Studio's DOM Explorer. If you add styles for win-searchbox-input, the DOM Explorer will show that they're generally being overruled by styles from WinJS. Fortunately, that tool also shows the exact selectors that are involved, allowing you to write rules with the necessary specificity as I'm showing here.
Now let's look at the content in the flyout, namely the sections that contain the result suggestions, separator, and query suggestions. I've used atrocious styles here so that we can clearly see what's going on—I hope you and your designers don't follow such a terrible example!
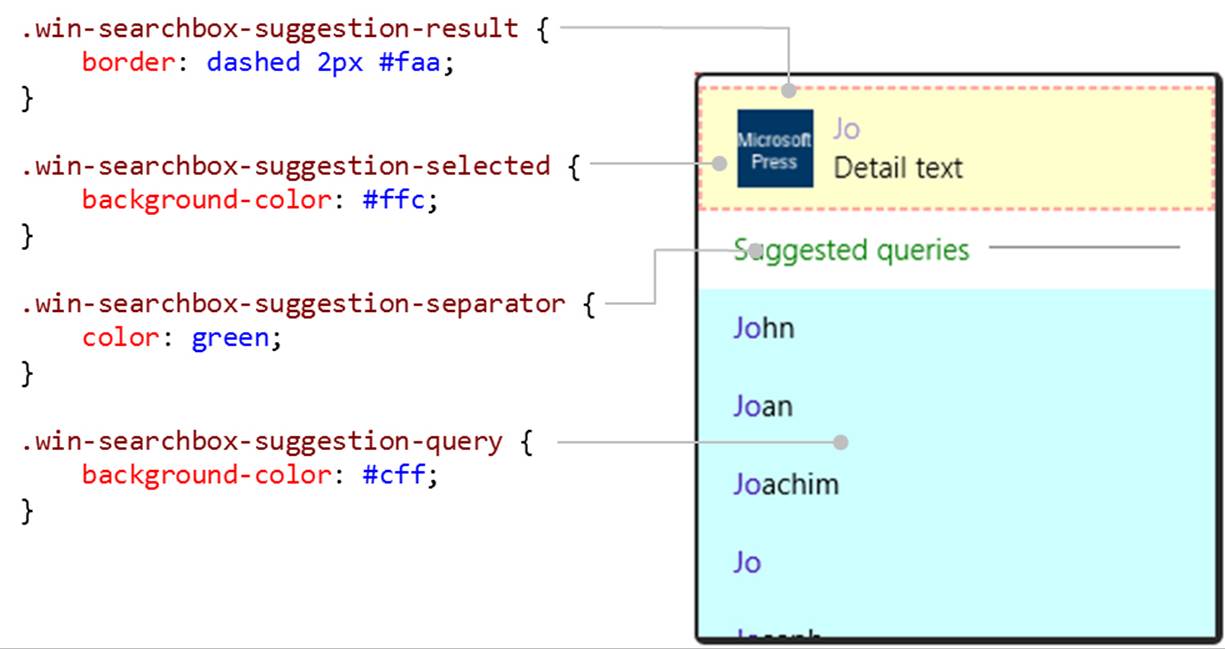
Each suggestion, as well as the separator, have their own component elements. For example, you can style the <hr> element of the separator specifically:
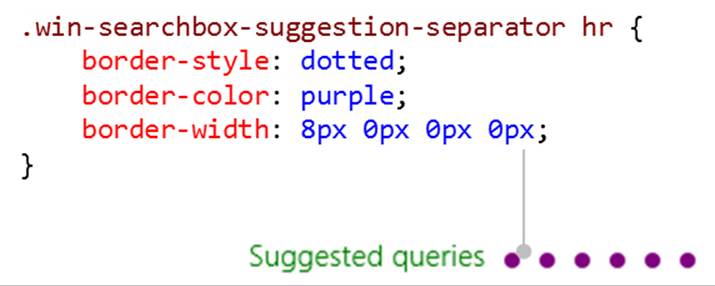
The query suggestions are made up of a <span> for the whole string, with a child <span> for the highlighted letters:
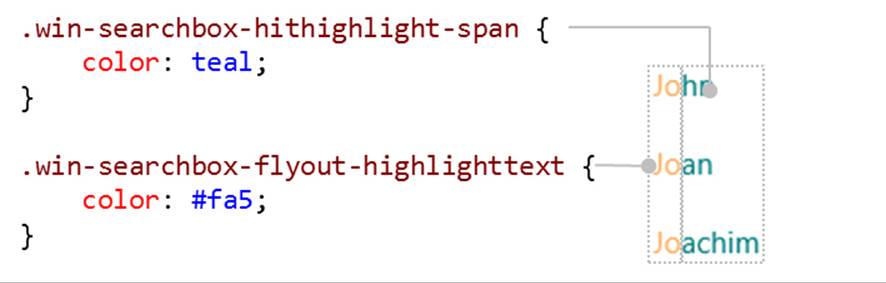
Finally, a result suggestion consists of a div, an img, the main result text, and the detail text. Here I'm still showing a styled separator so that you can see how the result div overlaps a bit, but it's where you'd adjust the margins between the image and the result text or otherwise set styles that affect the whole text area:
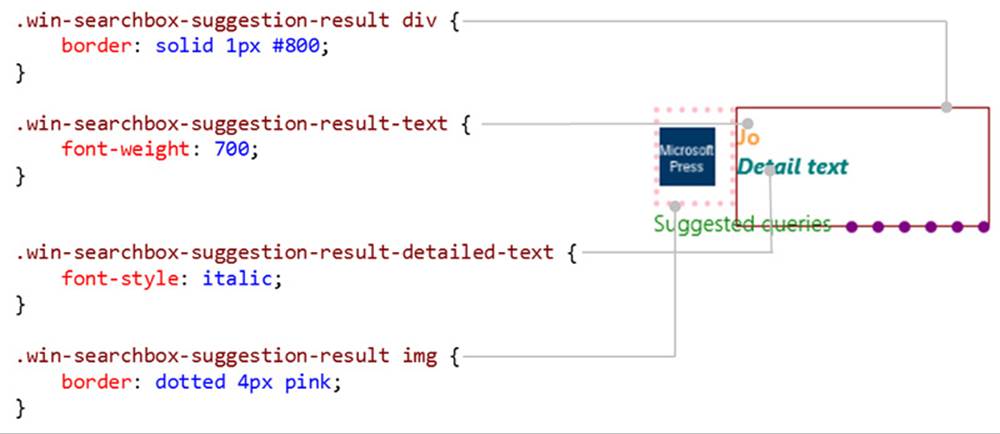
Indexing and Searching Content
A big part of implementing search capabilities in your app is not so much integrating the SearchBox UI as it is actually performing a search over your data for the querysubmitted event, as well as suggesting queries and results for that data. You can, of course, use the local content suggestions API of the SearchBox to easily search over the local file system, but how do you approach doing the same for your own local content, such as what exists in your app data? (For online data on a back-end service, you'll want to have that service implement search capabilities so that you can just submit a URI query string and get back the appropriate results.)
If you're using some kind of query-capable database for your storage, you'll simply perform your searches that way and translate the query results into the appropriate forms for your SearchBox suggestions and your results page. We talked about some of the options back in Chapter 10, "The Story of State, Part 1," in the section "IndexedDB, SQLite, and Other Database Options." (IndexedDB is not an inherently queryable database, by the way—to make it work like that, you have to build keyword indexes manually.)
Proper databases aside, there are two other options in the WinRT APIs: using indexed app data files and using the Content Indexer API for nonfile data, as the following sections describe.
Sidebar: Semantic Text Queries, Text Segmentation, and Unicode
For searching in-memory text, you can of course use any facilities that JavaScript provides, such as regular expressions. WinRT also provides an API in Windows.Data.Text that helps you identify segments in text that match a specific Advanced Query Syntax string, such that you can highlight those segments and so forth. This is very handy if you want to take content that the indexer APIs in this section identify as part of a result set and show the exact locations of search terms within those results. For a simple demonstration, refer to the Semantic text query sample.
Similarly, Windows.Data.Text has APIs to delineate individual words (the WordsSegmenter class) or selection ranges (SelectableWordsSegmenter) within a piece of text, with sensitivity to the user’s language. These can be useful if you want to do your own segment highlighting and are demonstrated in the Text segmentation API sample.
A third sample of interest here is the Unicode string processing API sample, which shows using the Windows.Data.Text.UnicodeCharacters class “to tokenize lexical identifiers within a string…[detecting] surrogate pairs and [delimiting] the identifiers....” This class also works with different languages.
Using Indexed AppData Folders
If your content is file-based, store those files in a folder called Indexed (not case-sensitive) within your local or roaming app data (also mentioned in Chapter 10). By doing so, the system indexer will automatically process those files such that queries using StorageFolder.createFileQueryand createFileQueryWithOptions will return very quickly, as is essential when providing suggestions.
For more about these APIs, refer to Chapter 11 in the sections "Simple Enumeration and Common File Queries" and "Custom Queries." The short of it is that you use Advanced Query Syntax strings to write the query, as we'll see in a moment.
Any term in the AQS string that doesn't identify a particular Windows property is used in a full-text search, which is again very fast because the file contents are fully indexed (to whatever extent they can be indexed, of course, because some files are purely binary and/or do not support metadata). Those terms that do identify a Windows property (such as System.Author: Jo) will perform a search against file metadata. In the latter case you want to make sure to populate that metadata. If you're generating files in the Indexed folder programmatically, perhaps saving responses from HTTP requests into a cache, you can set each StorageFile object's properties directly by using its properties object and its getBasicPropertiesAsync method. Refer back to Chapter 11 in the section "File Properties" for all the details.
Alternately, you can generate what are called appcontent-ms files (with that extension, as in datafile.appcontent-ms) and place them in the Indexed folder. The appcontent-ms format is an XML format in which you can specify both properties and content together in text, which is typically a simpler way to go about it than writing file metadata through the StorageFile API. It also allows for indexing metadata with files whose formats don’t support open metadata (like a .txt file). The Windows Reading List app takes advantage of this, for instance, generating an appcontent-ms file every time you add something to the list. To create some example files, then, just share content to the Reading List app through the Share charm, and then go to %localappdata%\packages\Microsoft.WindowsReadingList_<hash>\RoamingState\indexed and you'll see a file with content like the following, which I’ve annotated with comments to explain the schema:
<?xml version="1.0"encoding="utf-8"?>
<!--Root element can have any name-->
<ReadingListData>
<Version>1.2</Version>
<!--Properties can contain Name, Keywords, Comment, and AdditionalProperties elements.-->
<Properties xmlns="http://schemas.microsoft.com/Search/2013/ApplicationContent">
<!-- Name corresponds to System.ItemName and System.ItemNameDisplay -->
<Name>{00000000-0000-0000-7E31- 86D9A26AE4F}.appcontent-ms</Name>
<!-- Keywords corresponds to System.Keywords and contains one or more Keyword children -->
<Keywords>
<Keyword>{69851795-6131-4b39-9079-3f592b6bd585}</Keyword>
</Keywords>
<!-- Comment corresponds to System.Comment -->
<Comment>
<!-- Any string -->
</Comment>
<!-- Name, Keywords, and Comment are the only strongly-typed properties; any others
can be specified under AdditionalProperties with specific property names in
the Key attribute. -->
<AdditionalProperties>
<Property xml:lang="en-US"Key="System.Title">
Specs for built-in animations (animation metrics)
</Property>
<Property xml:lang="en-US"Key="System.Author">Internet Explorer</Property>
<Property xml:lang="en-US"Key="System.Comment">The question occasionally comes up about
the exact specifications for the built-in Windows animations that express the Windows
look and feel. Often this is because someone wants to replicate the ef...</Property>
<!-- Dates are ISO 8601 format-->
<Property Key="System.DateAcquired">2013-12-12T15:32:18.6350000-08:00</Property>
<Property Key="System.IsDeleted">false</Property>
<Property Key="System.IsFlagged">false</Property>
</AdditionalProperties>
</Properties>
<!-- Adjacent to the Properties elements, apps can include any other children for its
own use. The Reading List app include an ItemData element, but this is not part
of the appcontent-ms format)-->
<ItemData>
<!-- Other data -->
</ItemData>
</ReadingListData>
In some cases a property might allow for multiple values, such as System.Contact.EmailAddresses, in which case each value is specified with a <Value> child element:
<Property xml:lang="en-US"Key="System.Contact.EmailAddresses">
<Value>bryan@contoso.com</Value>
<Value>vincent@contoso.com</Value>
</Property>
You can find additional examples in the Indexer sample, where scenarios 5, 6, and 7 demonstrate use of the Indexed folder and appcontent-ms files. The files here show that you can include any other custom elements in the XML (outside <Properties>) with the IndexableContent="true"attribute to include it in the indexing process (appcontent-ms/sample1.appcontent-ms):
<IndexerSampleSpecificElement sc:IndexableContent="true"
xmlns:sc="http://schemas.microsoft.com/Search/2013/ApplicationContent">
The text included here will be indexed, enabling full-text search.
</IndexerSampleSpecificElement>
To query the contents of an Indexed folder, you again use the StorageFolder.createQuery* methods and an AQS string. The query produces an array of StorageFile objects. You then use the metadata and contents of each individual file to generate your result suggestions and/or results page. If you want to display any kind of preview of each result, you could use this data if you like parsing XML, but it’s generally easier to use the Windows.Data.Text APIs, which also have locale-sensitive support for word breaking, as noted earlier in “Sidebar: Semantic Text Queries, Text Segmentation, and Unicode.”
Scenario 6 of the Indexer sample demonstrates querying, though nothing is different from what we saw in Chapter 11: the query will just complete quickly because the content is indexed. And this kind of query will work whether or not you’re using appcontent-ms files (js/retrieveWithAppContent.js):
function retrieveAllItems() {
var applicationData = Windows.Storage.ApplicationData.current,
localFolder = applicationData.localFolder;
var output;
localFolder.createFolderAsync("Indexed",
Windows.Storage.CreationCollisionOption.openIfExists).then(function (indexedFolder) {
// Queries for all files in the "LocalState\Indexed" folder and sorts the
// results by name
var queryAll =
indexedFolder.createFileQuery(Windows.Storage.Search.CommonFileQuery.orderByName);
return queryAll.getFilesAsync();
}).then(function (indexedItems) {
var promiseArray = [];
output = "";
for (var i = 0, len = indexedItems.length; i < len; i++) {
promiseArray[i] = indexedItems[i].properties.retrievePropertiesAsync(
[Windows.Storage.SystemProperties.itemNameDisplay,
Windows.Storage.SystemProperties.comment,
Windows.Storage.SystemProperties.keywords,
Windows.Storage.SystemProperties.title])
.then(function (map) {
// Retrieves the ItemNameDisplay, Comment, Keywords, and Title
// properties for the item
output += "Name: " + map[Windows.Storage.SystemProperties.itemNameDisplay];
output += "\nKeywords: " + IndexerHelpers.createKeywordString(
map[Windows.Storage.SystemProperties.keywords]);
output += "\nComment: " + map[Windows.Storage.SystemProperties.comment];
output += "\nTitle: " + map[Windows.Storage.SystemProperties.title] + "\n\n";
});
}
return WinJS.Promise.join(promiseArray);
}).done(function () {
});
}
Scenario 7 then shows how to apply a custom search term in a query—as you’d get from a SearchBox—where we employ a QueryOptions object and its applicationSearchFilter or userSearchFilter AQS strings (simplified from js/retrieveWithAppContent.js):
function retrieveMatchedItems() {
var applicationData = Windows.Storage.ApplicationData.current,
localFolder = applicationData.localFolder,
queryOptions = new Windows.Storage.Search.QueryOptions();
queryOptions.indexerOption = Windows.Storage.Search.IndexerOption.onlyUseIndexer;
// Create an AQS (Advanced Query Syntax) query which will look for ItemNameDisplay
properties which contain "Sample 1"
queryOptions.applicationSearchFilter =
Windows.Storage.SystemProperties.itemNameDisplay + ":\"Sample 1\"";
var output;
localFolder.createFolderAsync("Indexed",
Windows.Storage.CreationCollisionOption.openIfExists).then(function (indexedFolder) {
var query = indexedFolder.createFileQueryWithOptions(queryOptions);
return query.getFilesAsync();
}).done(function (indexedItems) {
// Process the results
});
}
Again, you don’t have to query against any specific properties. If you set queryOptions.user-SearchFilter to something without any property names, such as "CSS styling", you’ll use that term in a full text search against the file contents.
To remove files from the index, simply remove them from the Indexed folder by using methods like StorageFile.deleteAsync or moveAsync.
Using the ContentIndexer API
The second option for using the system indexer applies to nonfile content or content that cannot live in an Indexed folder. Here you employ the Windows.Storage.Search.ContentIndexer API, which allows you to do per-app indexing of just about any content you want (including language-specific content) using Windows Properties and full text. Once indexed, you can then query that content using AQS. This is convenient for many scenarios, and the index persists across app sessions so it's not necessary to re-create it every time the app is launched. Note, however, that because the index can be reset at any time, and because you cannot retrieve the indexed content itself, treat the index as just a durable cache and not as storage mechanism in itself.
You start with a call to the static method ContentIndexer.getIndexer, which takes an optional name argument that lets you maintain multiple independent indexes within the same app. To just use the default index, use this code:
var indexer = Windows.Storage.Search.ContentIndexer.getIndexer();
The object you get back is a ContentIndexer instance, whose sole property, revision, is automatically incremented with each add, update, or delete operation. We’ll look at how to use this in a moment, because it won’t mean anything until we add some content to the indexer through itsaddAsync method. To this you pass an instance of the Windows.Storage.Search.IndexableContent class that has the following properties:
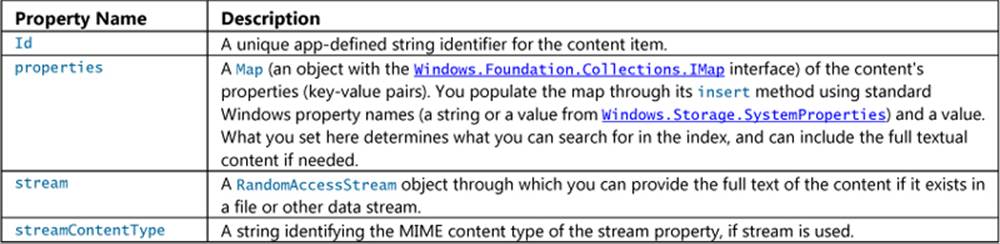
Examples of this are found in the SDK’s Indexer sample, specifically scenarios 1, 2, 3, and 4. First, here's a bit of code from js/helperFunctions.js (in a routine called _addItemsToIndex, slightly simplified for clarity). This just adds three basic items to the default index and maintains a local appdata setting against which to match the revision property:
// Initialize the value used to track the expected index revision number.
var localSettings = Windows.Storage.ApplicationData.current.localSettings;
if (!localSettings.values["expectedIndexRevision"]) {
localSettings.values["expectedIndexRevision"] = 0;
}
var indexer = Windows.Storage.Search.ContentIndexer.getIndexer();
var content = new Windows.Storage.Search.IndexableContent();
var numberOfItemsToIndex = 3;
var promiseArray = [];
for (var i = 0; i < numberOfItemsToIndex; i++) {
var itemKeyValue = "SampleKey" + i.toString(),
itemNameValue = "Sample Item Name " + i.toString(),
itemKeywordsValue = "Sample keyword " + i.toString(),
itemCommentValue = "Sample comment " + i.toString();
content.properties.insert(Windows.Storage.SystemProperties.itemNameDisplay, itemNameValue);
content.properties.insert(Windows.Storage.SystemProperties.keywords, itemKeywordsValue);
content.properties.insert(Windows.Storage.SystemProperties.comment, itemCommentValue);
content.id = itemKeyValue;
promiseArray[i] = indexer.addAsync(content);
}
WinJS.Promise.join(promiseArray).then(function (resultArray) {
// We can now query the index
if (localSettings.values["expectedIndexRevision"] !== indexer.revision) {
// There is a mismatch between the expected and reported index revision numbers
if (indexer.revision === 0) {
// The index has been reset, so code would be added here to re-push all data
} else {
// The index hasn't been reset, but it doesn't contain all expected updates, so
// add code to get the index back into the expected state.
}
// After doing the necessary work to get back to a synchronized state, set the expected
// index revision number to match the reported revision number
localSettings.values["expectedIndexRevision"] = indexer.revision;
}
});
Each item in the index here has three properties—a display name, keywords, and a comment—but you can add properties with any other Windows property key.
The addAsync method returns a promise, so all the promises are joined together so that we can take further action once we know all the items have been processed. Notice that the IndexableContent object can be reused after each addAsync call.
Important If you use the IndexableContent.stream property to index content, rather than a specific property, the objects you get back from queries will not include that content, only the properties. That is, whatever stream content exists in the IndexableContent object when you add it will be indexed, yes, and will be included in searches but will not be accessible through the search results. If you want to display that content in your results UI, make sure that the IndexableContent.id property is sufficient to retrieve the full content from wherever it’s stored.
To remove content from the ContentIndexer, use its deleteAsync (passing an id), deleteMultipleAsync (passing an array of id’s), and deleteAllAsync methods (see scenario 2 in the sample). To update an item (also in scenario 2), use the updateAsync method passing the updatedIndexableContent object. Note that updateAsync will throw an exception if the index doesn’t contain an item with the given id.
Tip To remove a property from an indexed item, use the properties.insert method for the same property name with a value of null, then callupdateAsync.
Now that we understand how we manage the indexed content, we can talk about using the ContentIndexer.revision property. This specifically tells you about the state of the index itself:
• The revision value always starts at zero when you first obtain the ContextIndexer.
• Each successful add, remove, and update operation increments revision.
• If the index is cleared out—which should be a rare occurrence but can happen if the index becomes corrupted or the user manually rebuilds the index—then revision is reset to zero.
In most cases, you want to check revision anytime your app is activated or resumed—that is, whenever the app becomes active again after an indeterminate amount of time since it was last running. If the index was reset during that time, revision will be zero and you should repopulate all of your items. If revision is not zero and doesn’t match your expectations, you have the very rare situation where some but not all of your items are in the index, perhaps due to an app crash or loss of power while the indexing was going on. At this point, if your number of items is small, you could just repopulate them all again. If you have a larger number of items, it makes sense to track (in your app data) which batches of items fall within which range of the revision count so that you can then just repopulate the affected batch.
As shown in the earlier code, you can take similar steps after a given batch if updates are complete. It’s again possible that the index was reset during that time or that for some reason one or more items didn’t make it in. Either way, you should you should attempt to repopulate the necessary items to get the index into the expected state. And then, of course, be sure that your expected count local setting matches the value of revision once you’re all done so that the two don’t get out of sync with later changes to the index.
Once you have content in the indexer, the next step is to use it for searches. In scenario 2 of the sample you’ll also see calls to ContentIndexer.retrievePropertiesAsync. This is how you do a lookup of item properties in the indexer, because there isn’t a method to retrieve the originalIndexableContent object. That is, this method, given an item id and an array of property names, results in a map of property names and values:
indexer.retrievePropertiesAsync(itemKeyValue,
[Windows.Storage.SystemProperties.keywords]).then(function (map) {
var originalRetrievedKeywords = map[Windows.Storage.SystemProperties.keywords];
// ...
}
The last step with the indexer is querying its content (scenario 3 in the sample) through the ContentIndexer.createQuery method. The first two required arguments are searchFilter, the AQS string to apply, and propertiesToRetrieve, an array of Windows property names that you want returned. Optional arguments are sortOrder, an array of SortEntry objects (each of which indicates a property to sort by and the order, and multiple SortEntry objects are applied in the order they appear in the array), and searchFilterLanguage, a BCP-47 language tag (e.g., en-US) that indicates what language should be used to parse searchFilter. Here’s a simple example that looks for any item with “0” in any of its properties (js/retrieveWithAPI.js):
var query = indexer.createQuery("0", [Windows.Storage.SystemProperties.itemNameDisplay,
Windows.Storage.SystemProperties.keywords, Windows.Storage.SystemProperties.comment]);
The result of createQuery is a ContentIndexerQuery object through which you run the query and access the results:
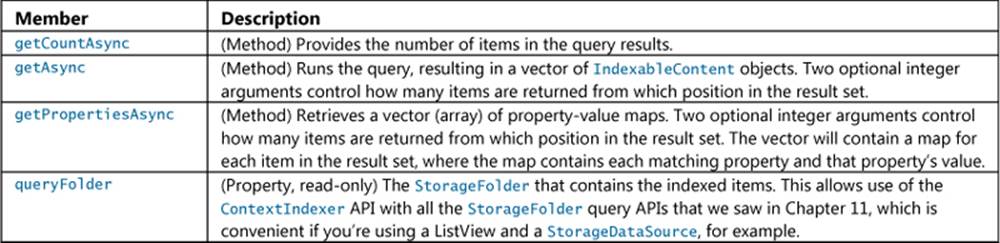
Using the query created in the previous bit of code (in scenario 3 again), here’s the code to retrieve and process the results (js/retrieveWithAPI.js, slightly modified):111
var output;
query.getAsync().done(function (indexedItems) {
output = createItemString(indexedItems);
WinJS.log && WinJS.log(output, "sample", "status");
});
function createItemString(indexedItemArray) {
var output;
varwsp = Windows.Storage.SystemProperties;
if (indexedItemArray) {
output = "";
for (var i = 0, len = indexedItemArray.length; i < len; i++) {
var retrievedItemName = indexedItemArray[i].properties[wsp.itemNameDisplay],
retrievedItemComment = indexedItemArray[i].properties[wsp.comment],
retrievedItemKey = indexedItemArray[i].id,
retrievedItemKeywords = indexedItemArray[i].properties[wsp.keywords];
output += "Key: " + retrievedItemKey;
output += "\nName: " + retrievedItemName;
output += "\nKeywords: " +
IndexerHelpers.createKeywordString(retrievedItemKeywords);
output += "\nComment: " + retrievedItemComment;
if (i < len - 1) {
output += "\n\n";
}
}
}
return output;
}
The Search Contract
Although the SearchBox is the preferred way for an app to provide search capabilities, you can also implement the search contract directly to interact with the Search charm. In addition, if you register your app with Bing for Smart Search, this contract also comes into play (see Chapter 20).
In many ways, the interaction between the app and the Search pane is very similar to the SearchBox, with the same event names and other classes. I won't be going into details about those; I’ll be referring to the previous sections instead.
Implementing the contract is demonstrated in the Search contract sample and begins with the Search target declaration in the app manifest. All you need here in Windows 8.1 is the declaration itself; you can leave the Start Page field blank because you’ll search the app from the charm only when the app is in the foreground.
Next, instead of working with a SearchBox control for search-related events, you instead obtain the Windows.ApplicationModel.Search.SearchPane object. For example:
var searchPane = Windows.ApplicationModel.Search.SearchPane.getForCurrentView();
searchPane.onquerysubmitted = function (eventArgs) {
WinJS.Navigation.navigate(searchPageURI, eventArgs);
};
Note The SearchBox control will interact with the Search charm and contract on your behalf, so you should not attempt to implement the contract directly. Doing so will throw an Access Denied exception when you try to obtain the SearchPane object.
The SearchPane object has many of the same features as the SearchBox, including placeholderText, setLocalContentSuggestionsSettings, searchHistoryEnabled, and searchHistoryContext. For type-to-search, the property is called showOnKeyboardInput because this involves showing the Search pane as a whole and not just changing focus.
The SearchPane has a few unique features. Its show method allows you to show the pane programmatically, its visible property and visibilitychanged event will tell you its status, and the trySetQueryText is what you use to update the search term instead of just settings its queryTextproperty directly.
Like the SearchBox, the SearchPane also has querychanged, querySubmitted, suggestionsrequested, and resultsuggestionchosen events that are identical to those of the SearchBox except for the fact that these are WinRT events, so you must call removeEventListener appropriately to avoid memory leaks.
The other difference with events is that the eventArgs.request.getDeferral for suggestionsrequested provides a deferral mechanism like other WinRT events, rather than the WinJS-style setPromise mechanism that we have with the SearchBox.
The piece you need to be aware of with the Search contract in a Windows 8.1 app is that it will again be used only for in-app searches and to invoke apps that have registered with Bing to have their content appear as web-powered search results. In the latter case, the app can be activated with ActivationKind.search through the search contract from the Smart Search results pane, and this is the only place where such activation will occur. The Search contract sample implements code for this activation path, but it won't ever be called through using the Search charm.
Contacts
When you first played around with a Windows 8 or Windows 8.1 device, you probably fired up the People app and added a few accounts such as Outlook (Live), Facebook, Twitter, Google+, LinkedIn, Skype, and so on. In doing so you could see that the People app nicely aggregates all those contacts into a single collection, combining whatever phone numbers, email addresses, and IM user names it can find from those sources.
What you probably didn’t know is that the People app also serves as the systemwide, indexed repository of all those contacts, and that it provides contact-related features to all other apps. It’s a glorified address book, in other words! But this means that as you implement people-related capabilities into your own app, you can save yourself a lot of time and trouble by working with those features instead of trying to manage contact information directly.
There are two ways to do this. The first is through a Windows 8.1 feature called contact cards, which have the significant benefit of keeping contact information isolated from the app (for security and privacy) and still provides many different actions for that contact. What’s more, it’s simple to use, and it’s expected that most apps that simply want to display contact information and actions, and otherwise have no need to process contact information directly, will use contact cards.
The second, which is available in both Windows 8 and Windows 8.1, is to invoke the Contact Picker. This brings up a contact provider app (which is the People app by default) through which the user can select one or more contacts, the information for which is then returned to the app directly. The app is responsible for protecting that information, of course, but can otherwise do whatever it needs with it.
We’ll dive into each in turn in the following sections. For the provider/target side of each story—apps that handle contact card actions and/or serve as contact picker providers—see Appendix D.
Contact Cards
A contact card is a bit of system-provided UI that you invoke with whatever bits of contact information you have, which at minimum requires an email address or a phone number. Windows then does its best to find a matching contact and displays its contact card, drawing information from the system database and ignoring whatever you passed in. If no match is found, however, the contact card provides the option to add the contact to the database using the information you provide. Generally speaking, you want to give as much information as you can when invoking a contact card, which helps Windows find an existing contact and makes it easy for the user to add that contact if needed.
A few examples of contact cards are shown below:
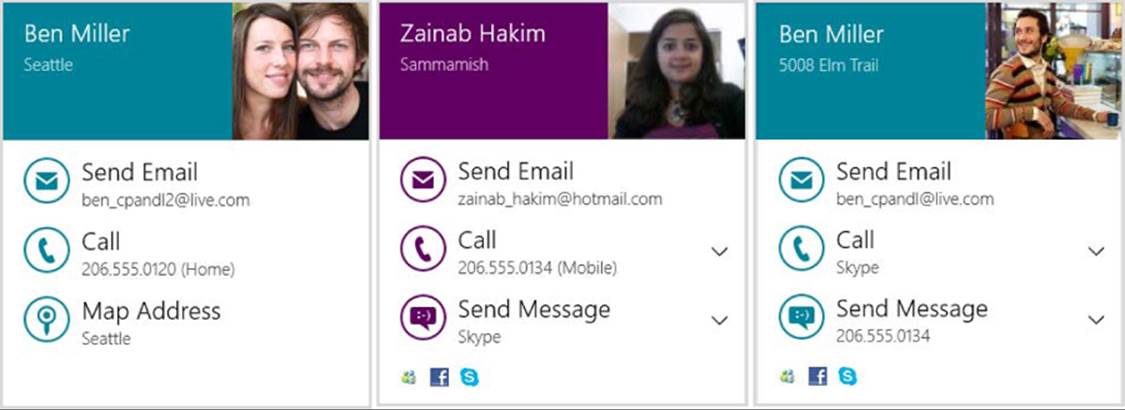
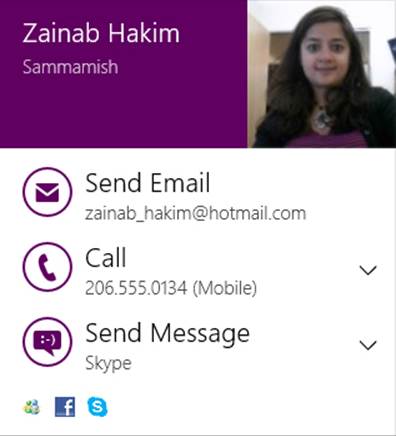

Tip The contact card’s color scheme uses the app’s tile background color setting in the manifest. However, if Windows determines that there’s not enough contrast between this color and a black or white font color, it will revert to a black font on a white background to ensure legibility. Also note that if you change colors in the manifest and run the app from Visual Studio, you might not immediately see the proper change. Try running the app again, or, if needs be, uninstall first and then run again.
In addition to displaying contact information along with icons indicating the source of the contact’s information, the user can take a number of actions directly from the card depending on what information is available (these have the same UI as the People app). The down arrows that appear on the right side of an action let you choose from different emails, phone numbers, messaging transports if available.
In general, contact card actions are handled by provider apps that implement that side of the contract, as discussed in Appendix D. The user can control the associations here through PC Settings > Search and Apps > Defaults. The Email action is an exception; it’s handled by launching amailto: URI. Phone numbers can also be handled through the tel: URI, but it’s better for provider apps to implement the contract for that purpose.
What actions appear also depend on the contact information. In the above left image, for example, the contact isn’t IM-capable, so a mapping option appears instead. More actions might be possible, of course, but the card displays up to the three most common ones. The rest are accessed through a More Details command that can appear on the lower right of the card and that opens the contact in the People app.
Again, there are two ways to invoke a contact card, which uses the API in the Windows.-ApplicationModel.Contacts namespace. The first way is to provide minimal information and let Windows fill in the rest:
• Create an instance of the Contact class.
• Populate whatever properties of that object you can, at minimum either an emailAddress (a ContactEmail object) or phoneNumber (a ContactPhone object). This guarantees that something will appear in the contact card if no other information is found.
• Call ContactManager.showContactCard with the Contact object and placement information (to position the flyout in your UI).
These steps are shown in scenario 1 of the Contact manager API sample in the SDK. It starts by defining a few constants (js/ScenarioShowContactCard.js):
var ContactsNS = Windows.ApplicationModel.Contacts;
// Length limits allowed by the API
var MAX_EMAIL_ADDRESS_LENGTH = 321;
var MAX_PHONE_NUMBER_LENGTH = 50;
Then we create the Contact:
var contact = new ContactsNS.Contact();
The sample provides an input field for an email address and another for a phone number. Whichever ones aren’t blank are added to the contact (code slightly simplified):
var emailAddress = document.getElementById("inputEmailAddress").value;
var phoneNumber = document.getElementById("inputPhoneNumber").value;
if (emailAddress.length > 0&&emailAddress.length <= MAX_EMAIL_ADDRESS_LENGTH) {
var email = new ContactsNS.ContactEmail();
email.address = emailAddress;
contact.emails.append(email);
}
if (phoneNumber.length > 0&&phoneNumber.length <= MAX_PHONE_NUMBER_LENGTH) {
var phone = new ContactsNS.ContactPhone();
phone.number = phoneNumber;
contact.phones.append(phone);
}
Tip As noted earlier, you can supply as much other information as you want when invoking the card, such as names (first and/or last), an address, job information, alternate phone numbers, a website URI, a thumbnail, and so on. However, all of this is ignored if Windows finds a match in the People app’s aggregated data, which it will use for the contact card. If no data exists for the contact, however, the information you supply is what’s shown in the card and the user will have an option to add the contact to the People app’s database, as we’ll see shortly.
Contact pictures To provide a picture for the contact, set the Contact.thumbnail property to a RandomAccessStreamReference, as obtained from that class’s static methods createFromFile, createFromUri, and createFromStream. We’ve seen this for thumbnails elsewhere in this chapter.
Next we create an object describing where the information exists in our UI that was used to invoke the contact card. This could be an email address in a message header, a phone number in an IM, an address on a map, and so forth. In this case, evt.srcElement is a button, so we use its rectangle:
var boundingRect = evt.srcElement.getBoundingClientRect();
var selectionRect = { x: boundingRect.left, y: boundingRect.top,
width: boundingRect.width, height: boundingRect.height };
Lastly, we invoke the contact card with the Contact and selection rectangle, along with an optional value from Windows.UI.Popups.Placement to indicate where the contact card should appear relative to that rectangle:
ContactsNS.ContactManager.showContactCard(contact, selectionRect,
Windows.UI.Popups.Placement.default);
The placement values are default, above, below, left, or right. Unless you have a reason to do otherwise, though, use default so that Windows can place the flyout where it’s fully visible.
At the same time, there are cases when you do want to specify a placement directly, especially with the second means to invoke a contact card: ContactManager.showDelayLoadedContactCard. This method allows the app to go out and get its data asynchronously, perhaps through a database lookup or HTTP request.
To call this method, as demonstrated in scenario 2 of the Contact manager API sample, we create a Contact instance as before with whatever information we’d like to initially appear in the contact card (js/ScenarioShowContactCardDelayLoad.js):
var contact = new ContactsNS.Contact();
contact.firstName = "Kim";
contact.lastName = "Abercrombie";
var email = new ContactsNS.ContactEmail();
email.address = "kim@contoso.com";
contact.emails.append(email);
var boundingRect = evt.srcElement.getBoundingClientRect();
var selectionRect = { x: boundingRect.left, y: boundingRect.top,
width: boundingRect.width, height: boundingRect.height };
var delayedDataLoader = ContactsNS.ContactManager.showDelayLoadedContactCard(
contact,selectionRect,Windows.UI.Popups.Placement.below);
This displays a small contact card with just a name and a progress control (if you don’t set the firstName/lastName properties, the email address will appear instead):

Note the use of Placement.below in this example rather than default. By default, a small contact card like this will likely be placed above the given rectangle, but once the rest of the data is populated, the contact card will likely become larger. As a result, the automatic placement could move the contact card to appear below the rectangle. To prevent that visual switch, the sample here is just forcing placement below the rectangle to begin with.
As before, you must provide either an email address or a phone number initially so that there’s at least one action that can be taken from the contact card, especially if the app provides no other additional information.
The return value of showDelayLoadedContact card is an object of type ContactCardDelayed-DataLoader. It has two methods of concern for apps written in JavaScript:
• setData Supplies a fully populated Contact object to the card and instruction Windows to show it.
• close Tells Windows that you don’t have any more data and thus won’t be calling setData. Windows will then just display the card with what you provided to showDelayLoadedContact.
Tip You have four seconds to call setData, otherwise the contact card will time out and call close.
To demonstrate, scenario 2 of the sample uses setTimeout inside a promise to simulate making an async call to retrieve the contact data, transferring it into the contact object created earlier (js/ScenarioShowContentCardDelayLoad.js):
function downLoadContactDataAsync(contact) {
returnnew WinJS.Promise(function (comp) {
// Simulate the download latency by delaying the execution by 2 seconds.
setTimeout(function () {
// Add more data to the contact object.
var workEmail = new ContactsNS.ContactEmail();
workEmail.address = "kim@adatum.com";
workEmail.kind = ContactsNS.ContactEmailKind.work;
contact.emails.append(workEmail);
var homePhone = new ContactsNS.ContactPhone();
homePhone.number = "(444) 555-0001";
homePhone.kind = ContactsNS.ContactPhoneKind.home;
contact.phones.append(homePhone);
var workPhone = new ContactsNS.ContactPhone();
workPhone.number = "(245) 555-0123";
workPhone.kind = ContactsNS.ContactPhoneKind.work;
contact.phones.append(workPhone);
var mobilePhone = new ContactsNS.ContactPhone();
mobilePhone.number = "(921) 555-0187";
mobilePhone.kind = ContactsNS.ContactPhoneKind.mobile;
contact.phones.append(mobilePhone);
var address = new ContactsNS.ContactAddress();
address.streetAddress = "123 Main St";
address.locality = "Redmond";
address.region = "WA";
address.country = "USA";
address.postalCode = "23456";
address.kind = ContactsNS.ContactAddressKind.home;
contact.addresses.append(address);
comp({ fullContact: contact, hasMoreData: true });
},
2000);
});
}
Here’s how it’s used with the ContactCardDelayedDataLoader (code simplified):
downLoadContactDataAsync(contact).then(
function complete(result) {
if (result.hasMoreData) {
delayedDataLoader.setData(result.fullContact);
}
else {
delayedDataLoader.close();
}
}
}
Assuming all goes well and result gets the object from the promise that contains the updated Contact, you’ll see a fuller contact card:
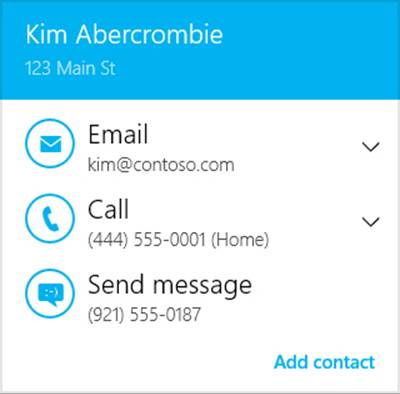
Here, the “Add contact” command at the bottom right—which appears also with showContactCard if the contact isn’t found in the People app’s data—will take the user to a page in the People app where all the information is prepopulated in a new contact form. The user just has to save that contact, and it’ll be added to the system database.
If the app doesn’t call setData within the four-second timeout or if it calls close instead of setData, you’ll see a card with only the initial data:

You can simulate this either by setting the interval in setTimeout to something greater than 4000 (simulating a timeout) or by changing the app’s hasMoreData property in the promise’s result (simulating a case where the app didn’t retrieve any further data).
Using the Contact Picker
Contact cards, as we saw in the previous section, provide a convenient way to display information about a contact that appears somewhere in the app’s UI. But how does such a contact get into the app’s UI in the first place?
A user can, of course, just enter contact information into an app form of some kind, but this is terribly inconvenient for contacts that already exist in the system database. For this reason Windows provides the Contact Picker UI much along the same lines as the File Pickers we’ve already seen. Here the user can just select one or more contacts and have that information returned to the app.
An obvious place you’d need a contact is when composing an email, as shown in Figure 15-13 with the Mail app. Here, tapping the To or Cc controls will open the contact picker, which defaults to the Windows People app, as shown in Figure 15-14 (its splash screen) and Figure 15-15(its multiselect picker view, where I have blurred my friends’ identities so that they don’t start blaming me for unwanted attention!). As we saw with the File Picker UI, the provider app supplies the UI for the middle portion of the screen while Windows supplies the top and bottom bars, the header, and the down-arrow menu control using information from the provider app’s manifest. Figure 15-16 shows the appearance of the Contact Picker app sample in its provider mode (which we’ll talk about more in Appendix D), as well as the menu that allows you to select a different provider (those who have declared themselves as a contact provider).
When I select one or more contacts in any provider app and press the Select button along the bottom of the screen, those contacts are then brought directly back to the first app—Mail in this case. Just as the file picker contract allows the user to navigate into data surfaced as files by any other app, the contact contract (say that ten times fast!) lets the user easily navigate to people you might select from any other source.
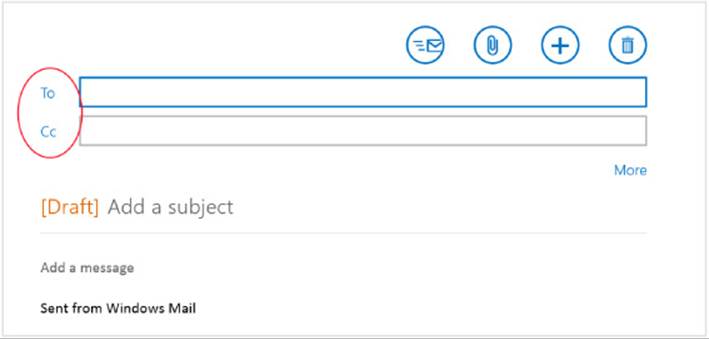
FIGURE 15-13 The Mail app uses the contact picker to choose a recipient.

FIGURE 15-14 The People app on startup when launched as a contact provider.
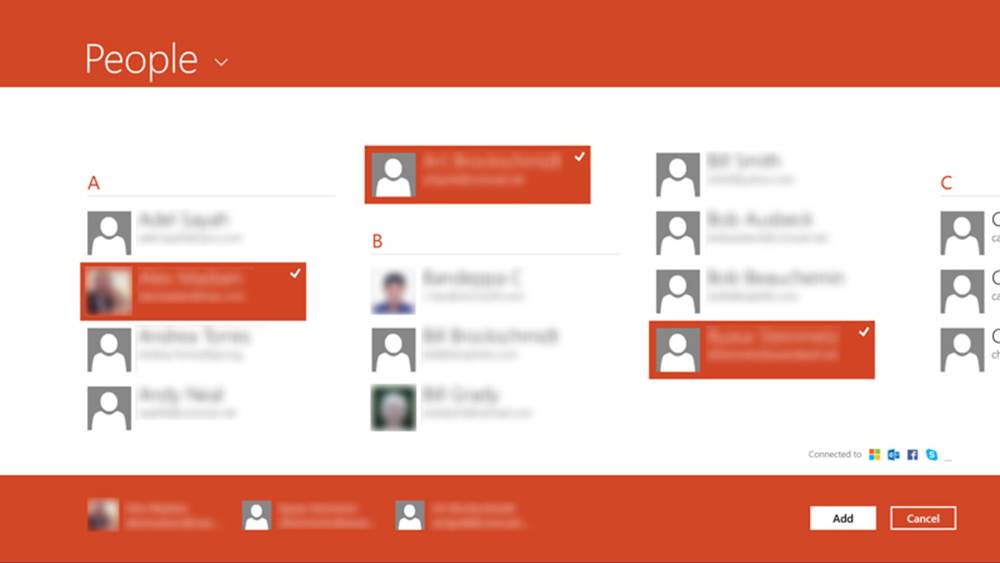
FIGURE 15-15 The picker UI within the People app, shown for multiple selection (with my friends blurred because they’re generally not looking for fame amongst developers). The selections are gathered along the bottom in the basket.
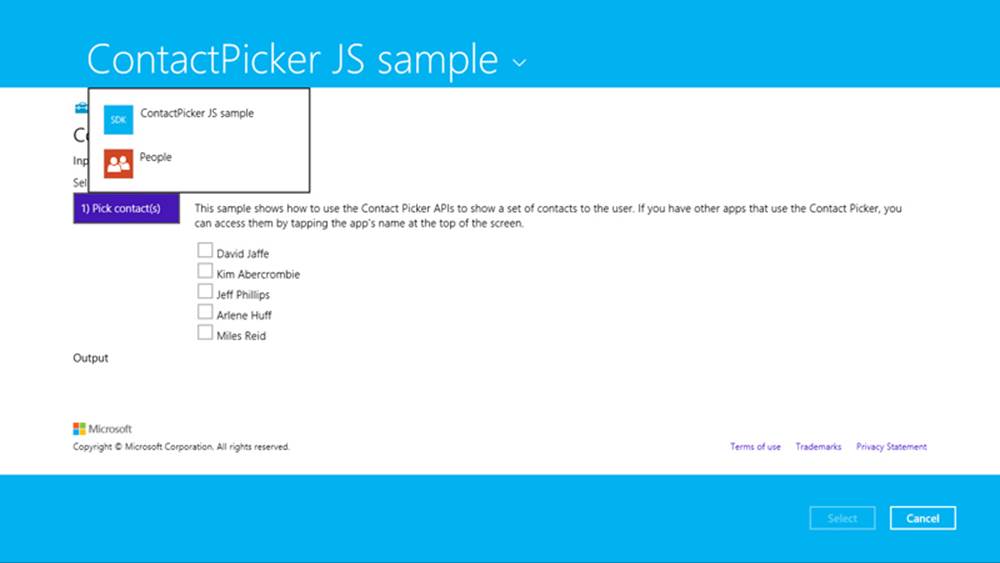
FIGURE 15-16 The Contact Picker sample’s UI when used as a provider, along with the header flyout menu allowing selection of a picker provider.
Invoking the contact picker happens through the ContactPicker object (in Windows.Applica-tionModel.Contacts). After creating an instance of this object, you can set the commitButtonText for the first (left) button in the picker UI (as with “Select” in the earlier figures). You can also set the selectionMode property to a value from the ContactSelectionMode enumeration: either contact (the default) or fields. In the former case, the whole contact information is returned; in the latter, the picker works against the contents of the picker’s desiredFields. Refer to the documentation on that property for details.
When you’re ready to show the UI, call the picker’s pickSingleContactAsync or pickMultiple-ContactsAsync methods. These provide your completed handler with a single Contact object or a vector of them, respectively, at which point you can work with whatever information in that object or objects you need.
Picking a single contact and displaying its information is demonstrated in scenario 1 of the Contact Picker app sample (js/scenarioSingle.js):
var picker = new Windows.ApplicationModel.Contacts.ContactPicker();
picker.commitButtonText = "Select";
// Open the picker for the user to select a contact
picker.pickSingleContactAsync().done(function (contact) {
if (contact !== null) {
// Consume the contact information...
}
});
Choosing multiple contacts (scenario 2, js/scenarioMultiple.js) works the same way, just using pickMultipleContactsAsync. In either case, the calling app then applies the Contact data however it sees fit, such as populating a To or Cc field like the Mail app. Be mindful that a number of properties, such as addresses, emails, and phones (among others), are themselves vectors of other object types, such as ContactAddress, ContactEmail, and ContactPhone, with their own set of properties. I don’t want to bore you by going into the details, so look through the documentation for the Contactclass as appropriate. Scenario 1 of the sample has some code that shows how to consume these vector properties by iterating them with their forEach methods.
Appointments
Working with the user’s calendar is very similar to working with their address book through contact cards. Every user has some kind of calendar (typically associated with their Microsoft account), for which the built-in Calendar app is the default provider. Most apps, however, don’t need to own or manage the entire calendar—they just need to create and manage individual appointments on that calendar, as with booking travel, making restaurant reservations, or arranging meetings with friends over other communication channels.
That said, it’d be sheer lunacy to just let any arbitrary app create and remove appointments programmatically without some kind of user consent—some creative soul, if we’re generous enough to refer to them that way, would surely delight themselves by subjecting your calendar to outrageous spamming experiments!
The Windows.ApplicationModel.Appointments API serves as a broker between apps and the user’s calendar (managed by whatever app is serving as the provider), giving users control over the process. As with contact cards, an app populates the suitable object instance, in this case anAppointment, and then asks the AppointmentManager to add, remove, or update that entry. In response, the API launches the appointments provider and gives it a space in which to display appropriate UI for the operation. For details on writing an appointment provider app, refer to Appendix D.
An Appointment is a rather detailed object whose properties are described in the following table:
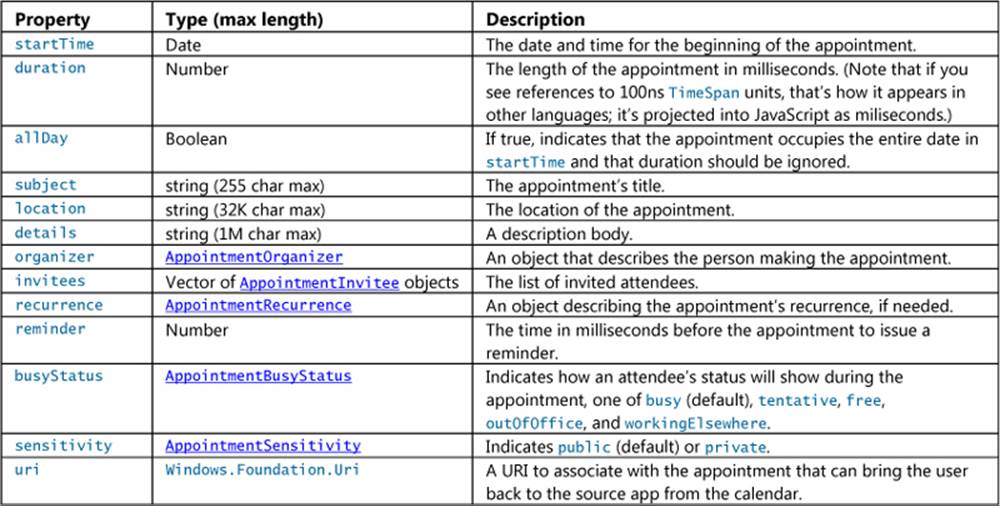
For a demonstration of creating and populating an Appointment object, refer to scenario 1 of the Appointments API sample (about 200 lines of code in js/AppointmentProperties.js), as there are additional details for populating objects like AppointmentInvitee. Scenario 6 is there you’ll find code to set up a recurring appointment.
Note that scenario 1 here, although it’s described as “Create an Appointment,” only creates an Appointment object; it does not add it to the user’s calendar. To take that step, look at scenario 2, or better still, copy the following bit of code from scenario 2 into scenario 1 at the end of thecreate-Appointment function. Note that I’ve added the e argument to the function so that we get the bounding rectangle of the invoking button):
function createAppointment(e) {
var boundingRect = e.srcElement.getBoundingClientRect();
var selectionRect = { x: boundingRect.left, y: boundingRect.top,
width: boundingRect.width, height: boundingRect.height };
Windows.ApplicationModel.Appointments.AppointmentManager.showAddAppointmentAsync(
appointment, selectionRect, Windows.UI.Popups.Placement.default)
.done(function (appointmentId) {
// appointmentId is non-null if the appointment was added
});
}
As you can see here, the AppointmentManager.showAddAppointmentAsync method is what you call to add the appointment, where the Placement value is optional. This displays a piece of UI from the appointments provider app, shown below, in which the user confirms the addition by tapping Add or rejects it by tapping outside the popup:
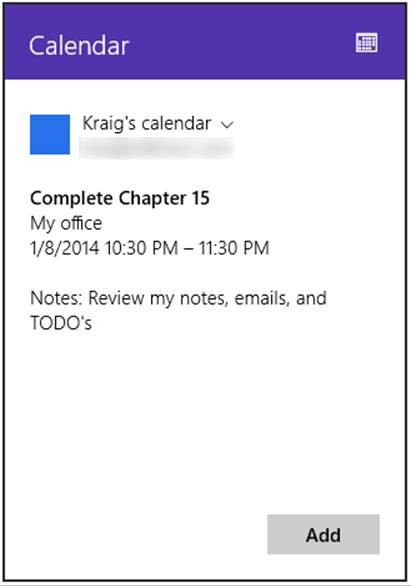
Again, this bit of UI comes from the appointments provider app, not Windows specifically—in fact, you’ll see the app’s splash screen appear in the popup at first. The title bar of the popup also reflects the provider app’s branding of course.
If the appointment is added successfully, the completed handler you give to showAddAppointment-Async will receive a unique appointment id that you can save in your local or roaming app data for later reference on any of the user’s devices (as they will all be tied to the same user’s calendar).
If you will later want to manage the appointments you’ve created, be sure to save their ids. To remove an appointment, pass its id to the showRemoveAppointmentAsync method, in which case another bit of provider-supplied UI will appear, asking the user to confirm:
Similarly, you can update an appointment by passing its id and the new Appointment object to the showReplaceAppointmentAsync method, which will again show a little provider UI through which the user confirms the action.
The one other method of the AppointmentManager object, showTimeFrame, lets you conveniently invoke the appointments provider app for a particular date and time range. Scenario 5 of the sample uses the current date with a range of one hour (js/ShowTimeFrame.js):
var dateToShow = new Date();
Windows.ApplicationModel.Appointments.AppointmentManager.showTimeFrameAsync(
dateToShow, (60 * 60 * 1000)).done(function () {
// ...
});
In this case, the API launches the provider app separately in a side-by-side view and not in a flyout. How the provider then displays that particular time frame is up to it—the built-in Calendar app, for its part, shows the current day and the next day together. Other implementations could show just the current day. What’s important, though, is that you’d use this API from an app to let the user see what other appointments are near to one they’re trying to create, so the exact details aren’t important.
What We’ve Just Learned
• Contracts provide the ability for any number of apps to extend system functionality as well as extend the functionality of other apps. Through contracts, installing more apps that support them creates a richer overall environment for users.
• The Share contract provides a shortcut means through which data from one app can be sent to another, eliminating many intermediate steps and keeping the user in the context of the same app. A source app packages data it can share when the Share charm is invoked; target apps consume that data, often copying it elsewhere (in an email message, text message, social networking service, and so forth).
• The Share target provides for delayed rendering of items (such as graphics), for long-running operations (such as when it’s necessary to upload large data files to a service), and for providing quicklinks to specific targets within the same app (such as frequent email recipients).
• The Search contract provides integration between an app and the Search charm. From the charm users can search the current app as well perform broad searches on local content and the web. The search contract allows apps to also provide query suggestions and result suggestions.
• In-app search is more commonly implemented by using the WinJS.UI.SearchBox control, whose interface is very similar to the search contact and provides the same capabilities.
• To simplify searches, apps can store files in the Indexed folder in local app data, using appcontent-ms XML files to include metadata for searches. Alternately, apps can use the ContentIndexer API to add arbitrary content and metadata to the system index.
• File type and URI scheme associations are how apps can launch other apps. An app’s associa-tions are declared in its manifest allowing it to be launched to service those associations. URI scheme associations are an excellent means for an app to provide workflow services to others.
• Working with contacts can happen through contact cards, which provide the users with convenient actions for a contact, or through the Contact Picker wherein the user can choose one or more contacts for the app to manipulate.
• The user’s calendar is made available to apps through the Appointments API, where the provider app supplies bits of UI to confirm additions, updates, and deletions. Apps can also ask the provider to display appointments for a particular time frame.
107 RTF stands for rich text format, a comparably ancient and somewhat uncommon precursor to HTML. There is also the setUri method that is deprecated in favor of setApplicationLink and setWebLink.
108 In any case, it’s a good idea to register your URI scheme with the Internet Assigned Numbers Authority (IANA). RFC 4395 is the particular specification for defining new URI schemes.
109 The SearchBox makes use of the Windows.ApplicationModel.Search.Core.SearchSuggestionManager class, which you'd use if you needed to implement a custom search control.
110 The query is always available through the control's queryText property, and eventArgs.detail.queryText is also included with the queryChanged events. The eventArgs.detail properties also include language (the current locale), linguisticDetails(a SearchQueryLinguisticDetails object that provides information related to input method editors), and, for querysubmitted, keyModifiersto indicate the state of the Ctrl, Shift, Menu, and Windows keys.
111 A comment in the sample erroneously states that getAsync retrieves an array of StorageItem objects. These are, as indicated in the table, IndexableContent objects.