Microsoft Press Programming Windows Store Apps with HTML, CSS and JavaScript (2014)
Chapter 16 Alive with Activity: Tiles, Notifications, the Lock Screen, and Background Tasks
At the risk of seriously dating myself once again, I still remember how a friend and I marveled when we first acquired modems that allowed us to do an online chat. At that time the modems ran at a whopping 300 baud (not Kb, not Mb—just b) and we connected by one of us calling the other’s phone number directly. It would have been far more efficient for us to just talk over the phone lines we were tying up with our bitstreams! Such were the early days of the kind of connectivity we enjoy today, where millions of services are ready to provide us with just about any kind of information we seek with transfer speeds that once challenged the limits of believability.
Even so, almost from the genesis of online services it’s been necessary to enter some kind of app, be it a client app or a web app, to view that information and get updates. When computers could run only a single app at a time (like the one I was using with that 300 baud modem112), this could become quite cumbersome, and it made it difficult, if not impossible, to move data from one program to another. With the advent of multitasking operating systems like Windows, you could run apps side-by-side and transfer information between them, a model that has stuck with us for several decades now. Even many web apps, for the most part, still operate this way. There have been innovations in this space, certainly, such as mashups that bring disparate information together into a more convenient place, but such an experience is still often hidden within an app.
Windows 8 changed that. As one columnist put it, “Using Windows 8 is like living in a house made out of Internet…The Start screen is a brilliant innovation, [a] huge improvement on the folder-littered desktops on every other OS, which serve exactly no purpose except to show a background photo. The Start screen makes it possible to check a dozen things”—if not more, I might add!—“in five seconds—from any app, just tap the Windows key and you can check to see if you have a new email, an upcoming appointment, inclement weather, or any breaking news. Tap the Windows key again and you’re back to your original app.”113 He goes on to suggest how long this would take if you had to go into individual apps to check the same information, even with high-speed broadband!
What makes the Start screen come alive in this way are what we call live tiles, Microsoft’s answer to the need to bring information from many sources together at the core of the user experience, an experience that “is constantly changing and updating,” as the same writer puts it, “because its every fiber is connected to the Internet.” With live tiles, each one is a small window onto whatever wealth of information an app is built around; the app is essentially extracting the most important pieces of that information according to each user’s particular interests. And as the user adds more apps to the system—which adds more tiles to the Start screen that the user can rearrange and group however he or she likes—the whole information experience becomes richer.
Even so, live tiles and the Start screen are just the beginning of the story. It’s ironic that this chapter has one of the longest titles in this book, listing off four things that do not, at first glance, appear to be related: tiles, notifications, the lock screen, and background tasks. Maybe you’re just thinking that I couldn’t figure out where else to put them all! In truth, they together form what is essentially a single topic: how apps work with Windows to create an environment that is constantly alive with activity while those apps often are not actually running or are allowed to run just a little bit.
Let’s begin by exploring those relationships and the general means through which apps wire their tiles and other notifications to their information sources.
Before going further Refer back to “Systemwide Enabling and Disabling of Animations” early in Chapter 14, “Purposeful Animations,” and check the PC Settings > Ease of Access > Other Options > Play Animations in Windows option. If animations are turned off, live tiles won’t be animated and you won’t see the complete experience they can provide.
Second, because all the topics of this chapter are related to one another, various aspects that I’ll discuss in one part of this chapter—in the context of tiles, for example—also apply to other parts—such as toast notifications. For this reason it is best to read this chapter from start to finish.
Third, many aspects of what we cover in this chapter are not enabled within the Windows Simulator, such as live tiles, toast notifications, and the lock screen. When running some of the samples within Visual Studio, be sure to use the Local Machine or Remote Machine debugging options.
Finally, the tile and notifications API is generally found within Windows.UI.Notifications, which is a lot to spell out every time. Unless noted, assume that the WinRT APIs we’re talking about come from that namespace.
Alive with Activity: A Visual Tour
After an app is acquired from the Windows Store and installed on a device, a user can pin its primary app tile is to the Start screen. As shown in Figure 16-1, these tiles can appear in four sizes: small (70x70 at 100% scaling), medium (150x150), wide (310x150), and large (310x310). The available options depend on what graphics the app provides in its package (for that full list, refer back to Chapter 3, “App Anatomy and Performance Fundamentals”). To customize a tile, the user can tap-and-hold (using touch) or right-click (using the mouse) a tile to bring up tile commands, as shown in Figure 16-2. Here she can unpin the tile, uninstall the app, change the tile size, and disable updates.
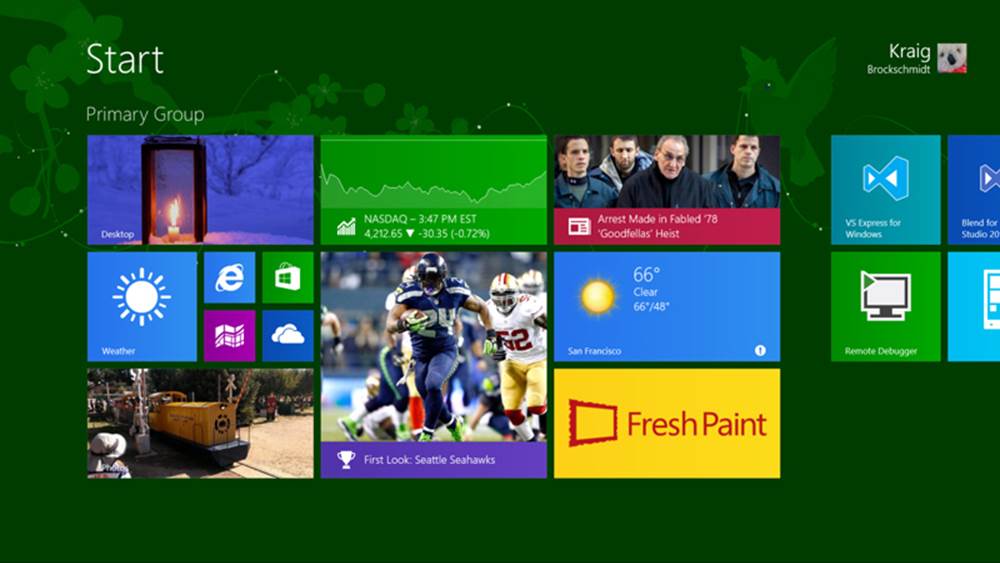
FIGURE 16-1 A typical Start screen with a variety of tile sizes. This happens to be my current configuration, where you can see a few development tools on the right.
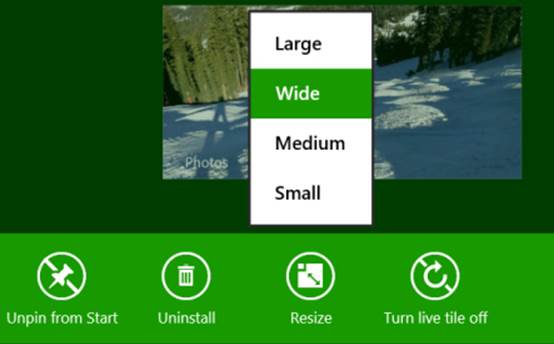
FIGURE 16-2 The app bar commands (left, for touch) and the menu (right, for mouse right-click and the keyboard menu key or Shift+F10) for a tile, including the options for changing a tile’s size. The Turn Live Tile Off command will disable updates for a given tile, so be careful not to annoy your customers with too much noise! Note also that the mouse right-click menu is available starting with Windows 8.1 Update 1.
When you first install Windows on a device, you’ll be greeted with a Start screen that lights up quite quickly, even before you’ve run any apps.114 Tiles for new apps that you install from the Windows Store but haven’t yet run can also become active right away (there’s a way to do this in the app manifest). In short, whatever Start screen you see when you first install Windows or get a new device won’t stay that way for long! Many tiles will change every few seconds as you can easily see by returning to your own Start screen.
What can appear on any given tile is quite extensive and varied. As you can see in Figure 16-1, everything but the smallest tiles can display text, images, and an app name or logo (at the lower left). All tiles, including the small size, can also show small glyphs or numbers called badges at the lower right. Here are some examples of all of these:

A key feature of “alive with activity” is that tiles can receive updates when the app is suspended or not otherwise running, as we’ll see next in “The Four Sources of Updates and Notifications.” Tiles can also cycle through up to five updates, an important feature that reduces the overall number of updates that actually need to be retrieved from the Internet (thus using less power). That is, by cycling through different updates, a tile can appear very alive without constantly pinging a service.
Copious inspiration! Hidden in the documentation at the end of the lengthy Tile template catalog is a section on Using live tiles that gives many examples of different design possibilities. It’s a great place to spend some time during the design phase of your project.
Tip Even though live tiles can be updated frequently through push notifications, be careful not to abuse that right. Think of live tiles as views into app content rather than gadgets: avoid trying to make a live tile an app experience unto itself (like a clock) because you cannot rely on high-frequency updates or update order. Furthermore, a tile update consists only of XML that defines the tile content—updates cannot trigger the execution of any code. In the end, think about the real experience you want to deliver through your live tile and use the longest update period that will still achieve that goal.
In the introduction I mentioned how acquiring more apps from the Windows Store is a way that the Start screen becomes increasingly richer. But new apps are not the only way that more tiles might appear. Apps can also create secondary tiles with all the capabilities of the app tile. Secondary tiles are essentially bookmarks into an app. A secondary tile is created from within an app, typically through a Pin command on its app bar. Upon the app’s request to create the tile, Windows automatically prompts the user for confirmation, as shown for the Weather app in Figure 16-3, thus always keeping the user in control of the Start screen (that is, apps cannot become litterbugs on that real estate!).
In this case the Weather app lets you pin secondary tiles for each location you’ve configured; the secondary tile always includes specific information that is given back to the app when it’s launched, allowing it to navigate to the appropriate page. The secondary tile flyout also lets the user choose the size of the tile. Apps must support at least small and medium tile sizes; wide and large sizes are optional (supporting large requires that you also support wide). In addition, apps can provide a selection of images for each tile size, all of which are available through the flyout’s FlipView.
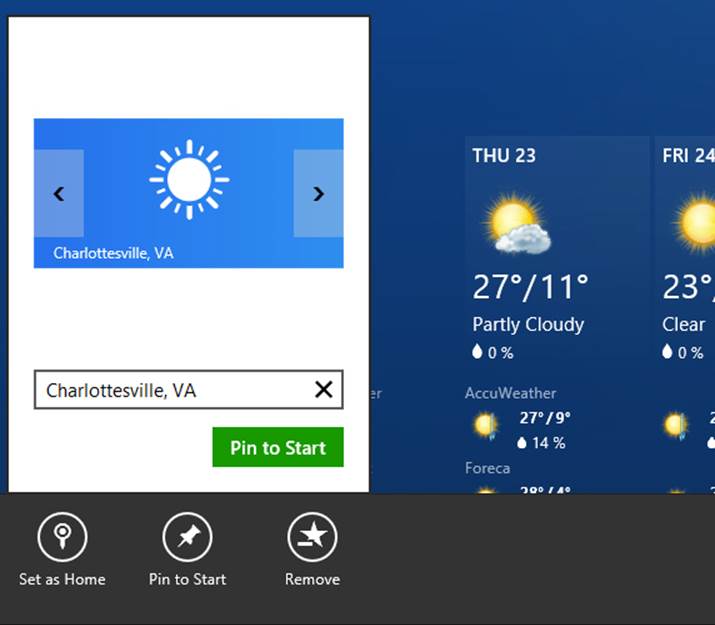

FIGURE 16-3 Pinning a secondary tile in the Weather app by using a Pin To Start app bar command, shown here with the automatic confirmation flyout in which you can select a tile size and image.
In the People app, similarly, you can pin—that is, create secondary tiles for—specific individuals. In the Mail app you can pin different accounts and folders. In Internet Explorer you can pin your favorite websites. You get the idea: secondary tiles let you populate the Start screen with very personalized views into different apps. The user can also unpin any app tile at any time, including the primary app tile (as can happen when one has created a number of secondary tiles for more specific views). An app can itself ask to unpin a secondary tile programmatically, in response to which Windows will again prompt the user for confirmation.
User tip The default customization view of the Start screen (which appears when you tap-and-hold a tile, or invoke the Customize command on the app bar) lets you rearrange individual tiles and name groups. To rearrange the groups as a whole, do a semantic zoom out on the Start screen (a pinch gesture, Ctrl+mouse wheel down, or the Ctrl+minus key), then drag-and-drop groups as you’d like.
In many ways, live tiles might reduce the need for a user to ever launch the app that’s associated with a tile. Yet this isn’t really the case. Because tiles are limited in size and must adhere to predefined configurations (templates), they provide essential details while simultaneously serving as teasers. They give you enough useful information for an at-a-glance view but not so much that your appetite for details is fully satisfied. Instead of being a deterrent to starting apps, they’re actually an invitation: they both inform and engage. For this reason, live tiles should be considered an essential app feature where they are appropriate.
I encourage you to get creative with what kinds of interesting information you might surface on a tile, even if your app doesn’t draw from web-based content. Games, for example, can cycle through tile updates that show progress on various levels, high scores, new challenges, and so forth—all of which invite the user to re-engage with that app. Do remember, though, that the user can always disableupdates for any given tile, so don’t give them a reason to defeat your purpose altogether!
As additional background on live tiles, check out the Updating live tiles without draining your battery post on the Building Windows blog. It’s good background on the system’s view of efficiently managing tiles.
Now, for all the excellence of live tiles, the Start screen isn’t actually where users will be spending the majority of their time—we expect them, of course, to mostly be engaged in apps themselves. Even so, users may want to be notified when important events occur, such as the arrival of an email, the triggering of an alarm, or perhaps a change in traffic conditions that indicates a good time to head home for the day (or a change in weather conditions that indicates a great time to go out skiing!).
For this purpose—surfacing typically time-sensitive information from apps that aren’t in the foreground—Windows provides toast notifications. These transient messages pop up (like real toast but without the bread crumbs) in the upper right corner of the screen (or the upper left in right-to-left languages). They appear on top of the foreground app, as shown in Figure 16-4, as well as on the Start screen, the desktop, and in certain cases the lock screen. Up to three toasts can appear at any one time, and each can be accompanied by a predefined sound, if desired. Apps can issue toasts to appear immediately or can schedule them to appear sometime in the future.
Toasts are, like tile updates, created using predefined templates and can be composed of images, text, and logos; they always use the originating app’s color scheme, as defined in that app’s manifest (the Foreground Text and Background Color settings in the Visual Assets section).
The purpose of toasts is, again, to give the user alerts and other time-sensitive information, but by default they appear only for a short time before disappearing. The default toast duration is five seconds, but this can be set to as long as five minutes in PC Settings > Ease of Access > Other Options, as shown in Figure 16-5. Apps can create long-duration toasts that remain visible for 25 seconds or the Ease of Access setting, whichever is longer. Furthermore, apps can create a toast with looping audio for events like a phone call or other situation where another human being might be waiting on the other end and it’s appropriate to keep the notification active for some time.
There is also a special case for alarm toast notifications, as employed by the Windows Alarms app. Alarm toasts can include Snooze and Dismiss commands:

A few similar commands are also available for VoIP apps, as we’ll see later.
FIGURE 16-4 Up to three toast notifications can appear on top of the foreground app (including the desktop and the Start screen). Each notification can also play one of a small number of predefined sounds.
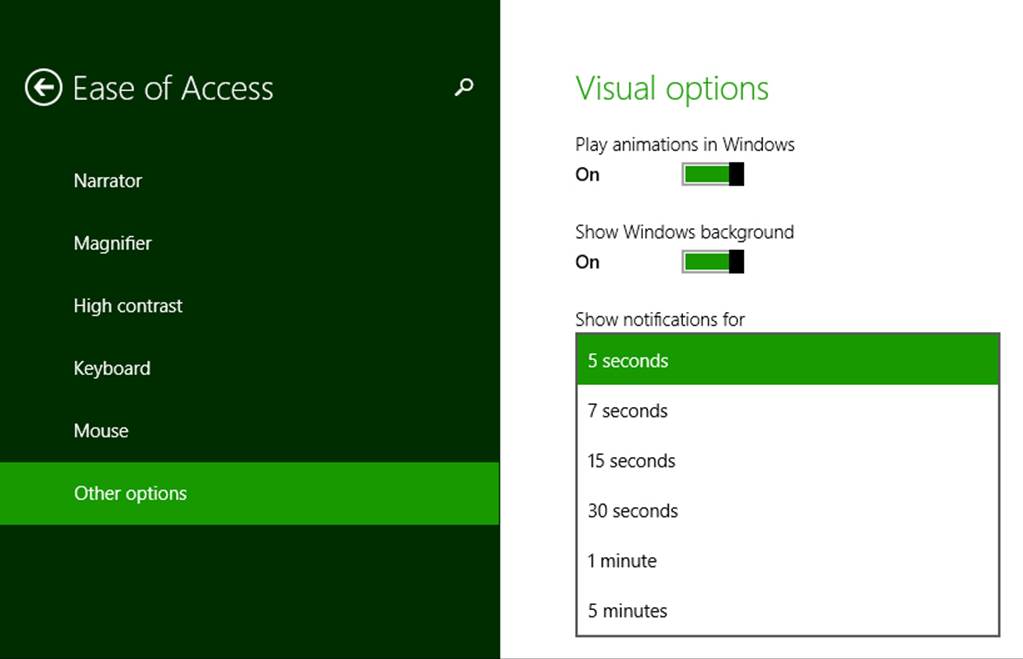
FIGURE 16-5 Toast duration settings (a drop-down list) in PC Settings > Ease of Access > Other Options.
As with tile updates, the user has complete control over toast notifications: for the entire system, for the lock screen, and for individual apps. Users do this through PC Settings > Search & Apps > Notifications, as shown in Figure 16-6. Here the user can turn notifications on and off completely, turn them on and off for the lock screen specifically, and enable or disable sounds. This area of PC Settings also controls quiet hours, a part of the day where the user probably wants to stay asleep! (Most background activity is disabled during quiet hours as well; see Updates to background task management for specifics.) And further down the user can control notifications for any individual app. All of this ultimately means that you want to make your notifications valuable to the user. If you toss up lots of superfluous toast, chances are that the user will turn them off for your app or for the whole system (and give you bad reviews in the Windows Store).
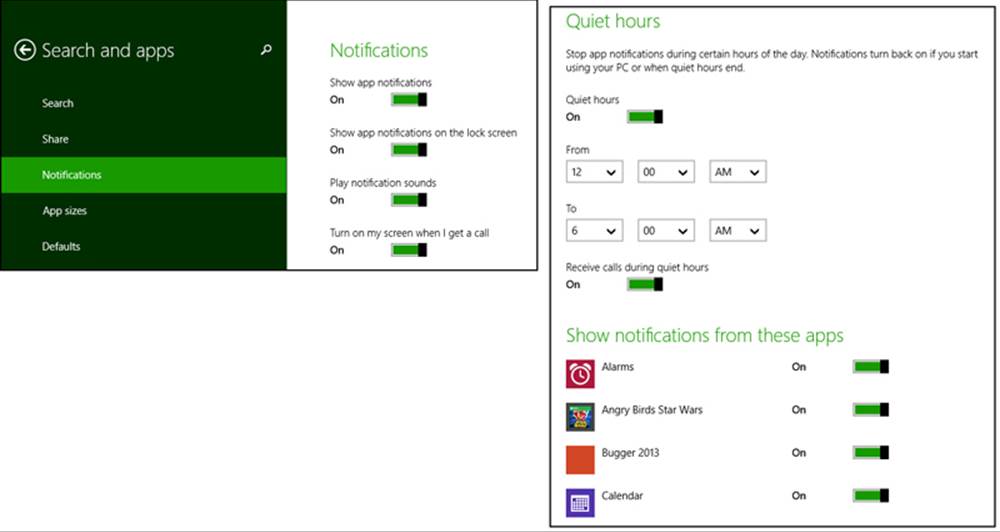
FIGURE 16-6 The user can exercise fine control over notifications in PC Settings > Search & Apps > Notifications, including the configuration of “Quiet Hours,” during which notifications are turned off temporarily.
As with secondary tiles, each toast notification contains specific data that is given to its associated app if the user taps the toast to activate the app. If the app is suspended, of course, Windows switches to that app and fires its activated event with the notification data. If the app isn’t running, Windows will launch it. (The Win+V key, by the way, will cycle the keyboard focus through active toasts, and pressing Enter will activate the one with the focus.)
This brings up the point that toast notifications, like tile updates, can originate from sources other than a running app—which should be obvious because nonforeground apps will typically be suspended! Again, we’ll talk about those sources soon. At the same time, you might be wondering if the last item in this chapter’s subtitle—background tasks—comes into play here.
Indeed it does. Background tasks are an essential part of the whole “alive with activity” story. As we’ve already seen with background transfers in Chapter 4, “Web Content and Services,” geofencing in Chapter 12, “Input and Sensors,“ and background audio in Chapter 13, “Media,” it’s not a hard-and-fast rule that apps are always suspended in the background. It’s just that Windows, on its quest to optimize battery life, doesn’t allow arbitrary apps to keep themselves running for arbitrary reasons. Instead, Windows allows apps to run focused background tasks for specific purposes—called triggers—subject to specific quotas on CPU time and network I/O. As you might expect, an app declares such background tasks in its manifest.
Triggers include a change in network connectivity, a time zone change, an update of an app, the expiration of a timer (with a 15-minute resolution), or the arrival of a push notification from an online source (that is, a notification sent in response to a condition that’s completely external to the device itself). Each trigger can also be configured with conditions such as whether there’s Internet connectivity. Whatever the case, the whole purpose of background tasks is not to launch an app—in fact, background tasks cannot display arbitrary UI. It is rather to allow them to update their internal state and, when needed, issue tile updates or toast notifications through which the user can make the choice to activate the app for further action.
One additional aspect of background tasks is that Windows also places a limit on the total number of apps that can handle certain kinds of triggers: timers, receipt of push notifications, and receipt of network traffic on a control channel as used by real-time communications apps. The limit is imposed by the fact that such apps must be added to the lock screen for their tasks to run at all.
The lock screen, as you certainly know by now and as shown in Figure 16-7, is what’s displayed anytime the user must log into the device. A device will be locked directly by the user or after a period of inactivity. An exception is made when an app has disabled auto-locking through theWindows.-System.Display.DisplayRequest API, as discussed in Chapter 13 in “Disabling Screen Savers and the Lock Screen During Playback.”

FIGURE 16-7 A typical lock screen. Up to seven apps can display badges along the bottom of the screen; one app can display text next to the clock.
Yet Windows doesn’t want to force the user to log in just to see the most important information from their most important apps. Through PC Settings, as shown in Figure 16-8 (where I’ve panned up a bit), the user can add up to seven apps to the lock screen (provided those apps have requested access, which is subject to user consent). These apps must be registered for lock screen–related background tasks during which they can issue badge updates to the lock screen—these are what you see above along the bottom of Figure 16-7, where each badge glyph (the numbers) is also accompanied by a monochrome graphic, referred to as the Badge Logo in the app manifest. This graphic is 24x24 at 100%, 33x33 at 140%, and 43x43 at 180%, and it must contain only white or transparent pixels.
In addition, the user can indicate a single app that can display a piece of text (but not an image) next to the clock, and a single app to show alarms. Note that toast notifications raised by these apps will surface on the lock screen; if tapped, the lock screen will bounce and the app will be activated once the user signs in.
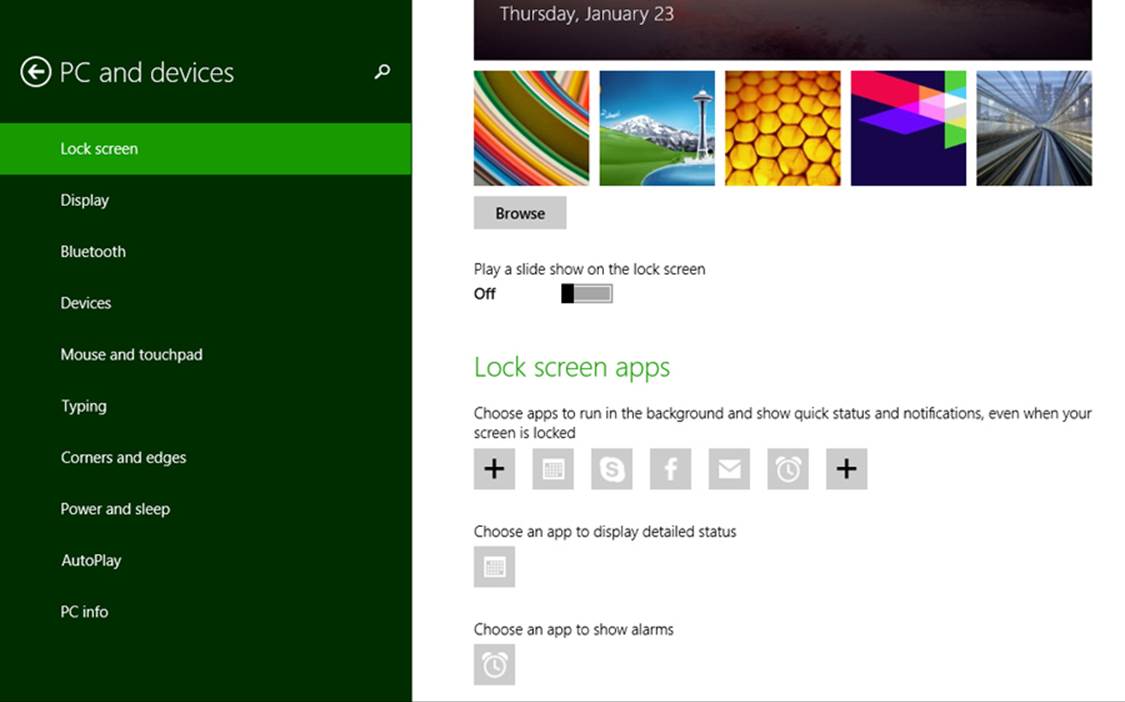
FIGURE 16-8 Configuring the lock screen and lock screen apps in PC Settings > PC and Devices > Lock Screen (I’ve panned the view on the right up a bit to show the Lock Screen Apps section).
Thus we complete the story of how Windows works with apps to be alive with activity—on the Start screen, on the lock screen, and while the user is engaged in other apps—while yet conserving battery power by intelligently managing how and when apps can issue their various updates. Let’s now see exactly how that’s accomplished, ideally without needing apps to run at all.
The Four Sources of Updates and Notifications
When an app is active in the foreground, it can clearly issue whatever notifications it wants: updates to any of its tiles, badge updates, and toast notifications. A background task running on the app’s behalf can do the same. Together these updates are simply referred to as local updates because they originate from running app code and are applied immediately, as shown in Figure 16-9. A running news app, as an example, might issue up to five updates to its tiles so that recent headlines continue to cycle when the user switches to another app. Such updates can also be set to expire at some date and time in the future so that they’ll disappear automatically (perhaps fulfilling the adage, “No news is good news”!). With toasts, note that a foreground app should use inline messages, flyouts, and message dialogs for errors that pertain to the currently visible content; toasts are only appropriate for alerts about content in some other part of the app.
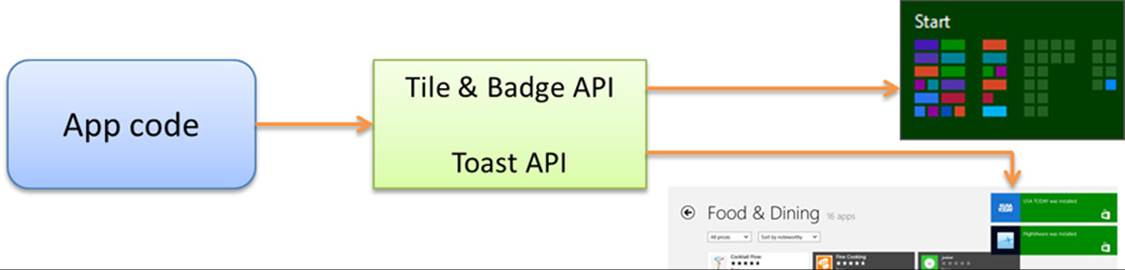
FIGURE 16-9 Local updates from a running app are applied immediately.
The second source of updates are scheduled notifications that apply to tile updates and toasts. A running app or background task issues these to the system with the date and time when the update or notification should appear, regardless of whether the app will be running, suspended, or not running at that future time. This is illustrated in Figure 16-10. A calendar app, for example, would typically use scheduled notifications for appointment reminders. An alarms app uses scheduled toasts as well but also requests alarm access such that its scheduled notifications appear on the lock screen and can be accompanied by Snooze and Dismiss commands, as shown earlier in “Alive with Activity: A Visual Tour.”
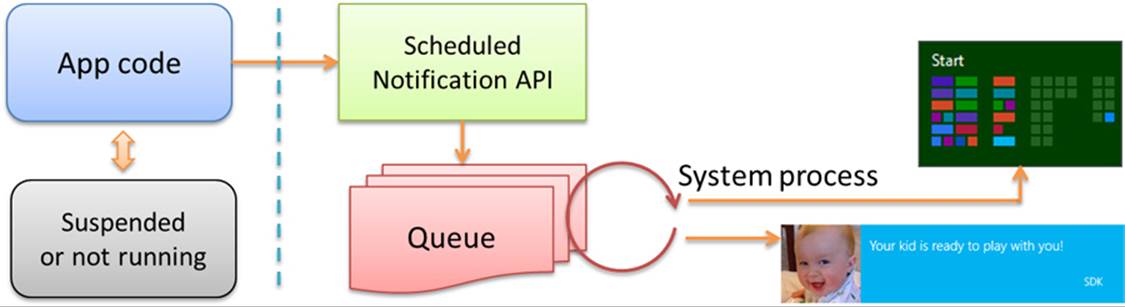
FIGURE 16-10 Scheduled notifications are managed by the system and will appear at the requested time irrespective of the state of the originating app.
The third way an app can issue updates—in this case for tiles and badges only—is through a periodic update. As illustrated in Figure 16-11, a running app configures the system’s tile and badge updaters to request an update from a specific URI at low-frequency intervals (the minimum is 30 minutes) beginning at a specified time, if desired. You can also specify the URI directly in the app manifest (Application tab > Tile Update) to get a live tile going as soon as the app is installed (but not badges). That is, when your app is installed, Windows checks the manifest for your URI and recurrence settings. It then makes the periodic update request on your behalf so that updates begin immediately. After this, any periodic updates configured from the running app will take precedence.
The REST endpoint or web service at the specified URI (which I’ll typically just refer to as a service) responds to these HTTP requests with an XML payload that’s equivalent to what a running app would provide in a local update, and updates can be set with an expiration date/time so that they’re automatically removed from the update cycle when appropriate. With all these capabilities, periodic updates are wholly sufficient for many apps to create very dynamic live tiles with relatively little effort.
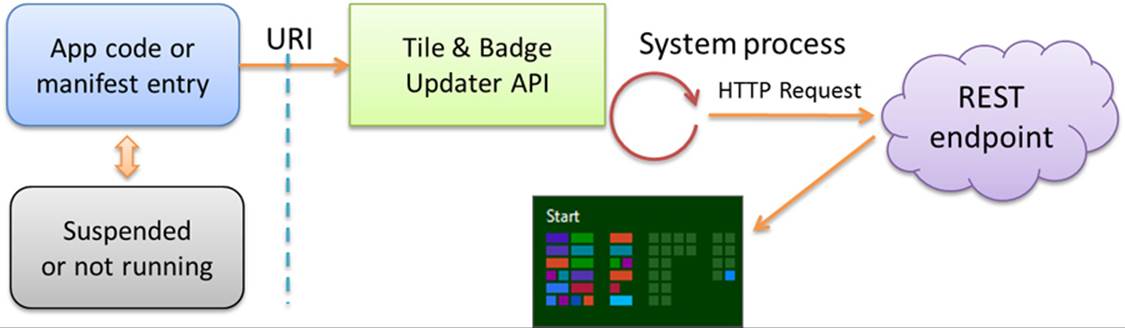
FIGURE 16-11 Periodic updates for tiles and badges are registered with the system’s tile updater, which will request an update from a given REST endpoint or web service at regular intervals.
Of course, a 30-minute minimum interval is simply not fast enough when an app wants to notify a user as soon as possible. Thus we have the fourth means for updates—push notifications—and this method applies across tiles and toasts, as well as non-UI (raw) notifications.
Push notifications are, as the name implies, sent directly to a device not at the request of an app but at the request of some associated server process that is typically monitoring information or other conditions around the clock. As illustrated in Figure 16-12, that server process employs the free Windows Push Notification Service (WNS for short) to send notifications to those apps that have created a channel for this purpose. Each channel is specific to a user and the device. This requires the app to be run at least once, because it’s during that first launch that the app establishes a WNS channel for its host device. On subsequent launches the app typically refreshes the channel, as it will otherwise expire after 30 days. A background task can also periodically refresh the channel.
Note Although push notifications can happen at any time with much greater frequency than other update methods, be aware that Windows will throttle the amount of push notification traffic on a device if it’s on battery power, if it’s in connected standby mode, or if notification traffic becomes excessive. This means there is no guarantee that all notifications will be delivered (especially if the device is turned off). So don’t try to use push notifications to implement a clock tile or other tile gadgets with a similar kind of frequency or time resolution. Instead, think about how you can use push notifications to connect tiles and notifications to a backend service that has interesting and meaningful information to convey to the user, which invites them to re-engage with your app.
A push notification can contain an XML payload as with other tile updates and toast notifications, or it can contain a raw notification with arbitrary data (see Guidelines for raw notifications for appropriate uses). A raw notification must be received by a running app or a by lock screen app with a background task for with the push notification trigger—otherwise the system clearly won’t know what to do with it! A standard update or toast can be handled either by the system or app code.
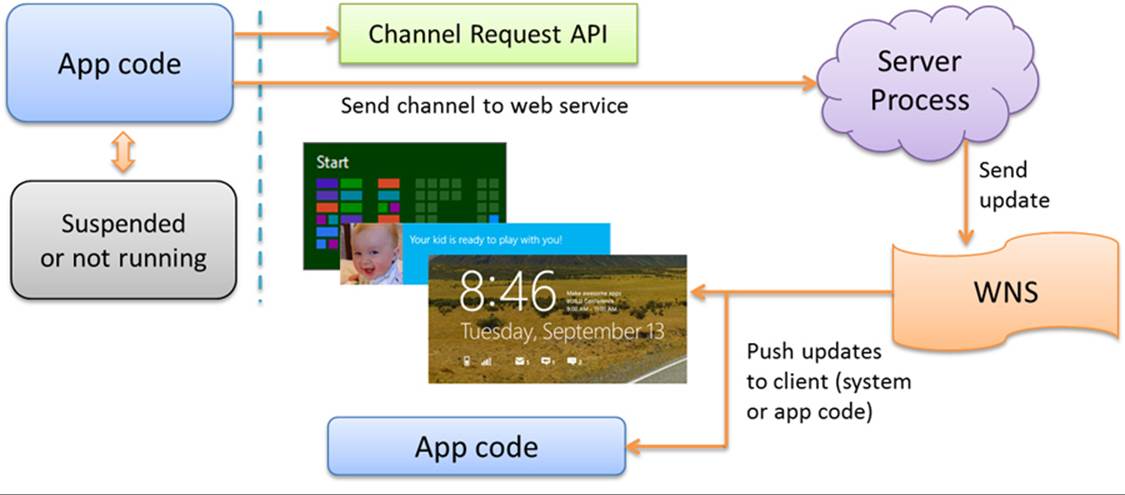
FIGURE 16-12 Push notifications originate with an always-running server process and are then sent to the Windows Push Notification Service for delivery to specific clients (a specific app on a specific user device) through their registered WNS channels.
A helpful summary of these different update mechanisms can be found on Choosing a notification delivery method in the documentation, a topic that includes various examples of when you might use each method. I’ve also summarized the available options for different types of notifications in the table below. Whatever the case, we’re now ready to see the details of how we employ all of them in an app to help keep a system alive with activity.

Sidebar: Connectivity and Remote Images in Live Tiles and Toasts
Periodic updates and push notifications are completely dependent on connectivity and will not operate without it. A running app, on the other hand, can still issue updates when the device is offline and can schedule updates and notifications for some time in the future when the device could then be offline. Under such circumstances, references to remote images will not be resolved without connectivity because the tile and toast systems do not presently support the use of local fallback images. When using remote images, then, consider whether to cache those images and use local image references instead (ms-appx:/// or ms-appdata:/// URIs), or opt for text-only tile and toast templates.
Sidebar: Windows Azure Mobile Services
Windows Azure Mobile Services is a set of cloud tools and a client library that together help you create a scalable backend for an app, including structured cloud data, identity, service endpoints (as for a periodic update service), scheduled jobs, and push notifications. In short, a mobile service (as I’ll refer to it), provides a prebuilt solution via REST endpoints that is very handy for a number of things we’ll need in this chapter! Various introductions and documentation can be found at the link above, and we’ll cover some parts in appropriate contexts.
Tiles, Secondary Tiles, and Badges
The first thing you should know about your app tile is that if you want to enable live wide or large tiles (including secondary ones), you must include wide and large logo images in the Visual Assets section of your manifest, as shown below (condensing the UI). Without these, you can still have live medium tiles (which is the only required size), but wide and large tile updates will be ignored. Small tiles (70x70) are always static but can display badges like all the other sizes.
At this point I encourage you to go back to Chapter 3 and review “Branding Your App 101,” where I discuss how different bits in the manifest affect your tiles, such as the Short Name and Show Name settings. As also covered there, remember to provide different scaled versions of each logo image for best quality. Even though you might issue tile updates as soon as your app is run, your static tiles will be essential to the user’s first impression of your app after it’s acquired from the Windows Store. The static tiles are also what the user will see if he or she turns your live tiles off or if all your updates expire. So, even if you plan for live tiles, be sure to still invest in great static tile designs as well.
Note If you don’t provide a small 70x70 image, Windows will automatically scale down the 150x150 asset. You can also provide different sizes for secondary tiles independent of the images provided in the manifest.
Again, providing static tiles for the 150x150, 310x150, and 310x310 sizes enables you to issue live tile updates for all of them, including secondary tiles of those sizes. In all cases, try to think through what the user would most want to see. When users select a wide or large tile—that is, electing to have your tile occupy more prime real estate on the Start screen—it’s likely that they’re looking for content that adds value to the Start screen. If users choose a medium tile, on the other hand, they’re probably more interested in only the most essential information: the number of new email messages (as expressed through a badge), for example, rather than the first line of those messages, or the current temperature in a location rather than a more extended forecast. And don’t worry if the user selects a small tile for your app, where only badges will appear: it typically means that they spend so much time in the app itself that they don’t need any info on the Start screen!
The Guidelines for tiles and badges topic in the documentation provides rather extensive design guidance where all this is concerned, along with appropriate use of logos, names, badges, and updates. Also see Using live tiles at the end of the Tile Template Catalog for inspiration. Here we’ll concern ourselves with how such updates and badges are sent to a tile, a process that involves tile templates, which are predefined configurations that you populate with text, images, and other properties via XML updates. These templates (which are also defined as XML, but don’t confuse them with the update schema) apply to all forms of tiles and update methods, which we’ll examine in a moment. First, however, let’s see how secondary tiles are managed, because everything we talk about thereafter applies equally to all tiles for the app.
Secondary Tiles
A secondary tile is a kind of bookmark into an app, to achieve what’s also called deep linking:a way to launch an app into a particular state or to a particular page. Secondary tiles allow the user to personalize the Start screen with more specific views of an app. As suggested on Guidelines for secondary tiles (a topic I highly recommend you read), offering the ability to create a secondary tile is a good idea whenever you have app state that could be a useful target or destination unto itself. But don’t abuse secondary tiles, such as using them for virtual command buttons—that would only educate customers that they shouldn’t bother to pin tiles from your app!
An app creates a secondary tile in response to a Pin command that it typically includes on its app bar (using the WinJS.UI.AppBarIcon.pin icon). Offer this command when the app is displaying pinnable content or the user has made an appropriately pinnable selection; hide or disable the command if the content or selection is not pinnable. In addition, change it to an Unpin command if the content is already pinned. For details on managing commands in the app bar, refer to Chapter 9, “Commanding UI.”
When the Pin command is invoked, the app makes the request to create the tile. Windows then prompts the user for their consent, as shown earlier in Figure 16-3.
Once created, a secondary tile has all the same capabilities as your app tile, including the ability to receive updates from any source. They key difference between the app tile and secondary tiles is that the former launches the app into its default (or current) state, whereas the latter launches the app with specific arguments that your activation handler uses to launch (or activate) the app into a specific state. Let’s see how it all works.
Note Although the tile and notifications API is found within Windows.UI.Notifications, the API for creating secondary tiles come from Windows.UI.StartScreen. Assume that is our context in the next four sections unless otherwise noted.
Creating Secondary Tiles
The process for creating a secondary tile in response to a pin command is quite simple: first create an instance of Windows.UI.StartScreen.SecondaryTile with the desired options, and then call either its requestCreateAsync or requestCreateForSelectionAsyncmethod. If the user confirms the creation of the tile, it will be added to the Start screen and your completed handler will receive a result argument of true. If the user dismisses the flyout (by tapping outside it), the completed handler will be called with a result argument of false. The error handler for these methods will be called if there is an exception, such as if you fail to provide required properties in the SecondaryTile.
When creating a SecondaryTile object, you can use one of three different constructors (there are two others, but they are deprecated in Windows 8.1):
• SecondaryTile() Creates a SecondaryTile with default properties; you must then set required properties directly before attempting to pin, update, or delete the tile.
• SecondaryTile(tileId) Initializes the SecondaryTile with a specific ID, typically used when creating an object before an update or when unpinning the file.
• SecondaryTile(tileId, displayName, arguments, logo, tileSize) Creates a SecondaryTile with the properties for a default medium tile (whose image is in logo).
The constructor arguments clearly correspond to the following SecondaryTile properties, all of which are required to be set when you call a requestCreate* method:
• tileId A unique string (a maximum of 64 alphanumeric characters including . and _) that identifies the tile within the package. You need this when you want to update or delete a tile, and it should always be set. This value is typically derived from the content related to the file. If you create secondary tiles with a tileId that already exists, the new one will takes its place.
• displayName The tile’s display name that will be shown in the tile’s tooltip, next to the app in the Start screen’s All Apps view, and in a few other areas within Windows. This can be whatever length you want and can contain any characters.
• arguments A string that’s passed to the app’s activation handler when the tile is invoked.logo A URI for the square (medium) 150x150 tile image. This can use either the ms-appx:/// or ms-appdata:///local schema. Be sure to avoid storing a dynamically generated image in temporary storage, and avoid deleting it unless all secondary tiles that reference it are deleted.
In addition to these you can set any of the other properties described in the following table before attempting to pin a secondary tile:
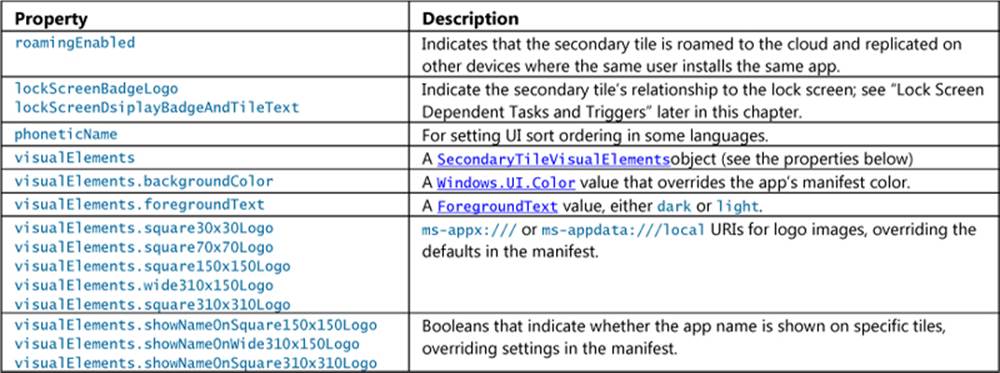
Note The following SecondaryTile properties are deprecated in Windows 8.1 because they are handled through the visualElements property instead: backgroundColor, foregroundText, shortName, logo, smallLogo, wideLogo, and most values of tileOptions. ThetileOptions.copyOnDeployment value is also replaced by of roamingEnabled.
At run time, you can also retrieve any of these properties to check the state of the secondary tile if needed. If you modify any properties for a SecondaryTile that has already been pinned, be sure to call its updateAsync method to propagate those changes.
The requestCreate* methods also have variations to control the placement of the user consent flyout (the flyout that’s shown in Figure 16-3). Calling requestCreateAsync by itself results in a default placement in a lower corner of the display. It’s usually better, however, for that flyout to appear close to the command that invoked it. For this purpose requestCreateAsync accepts an optional Windows.Foundation.Point, specifying where to place the lower right corner of the flyout.
requestCreateForSelectionAsync has two variations itself. The first takes a Windows.-Foundation.Rect describing the selection. The flyout will appear above that rectangle if possible. If you expect that this default placement will obscure the secondary tile’s content, you can also pass an optional value from Windows.Popup.Placement to indicate where the flyout should appear relative to that rectangle: above, below, left, and right.
You can play around with all of these options in the Secondary tiles sample. Scenarios 1 and 2 pin and unpin a secondary tile using on-canvas buttons, respectively, with scenario 7 doing the same through the app bar. We’ll see some of the other scenarios in the sections that follow. For the moment, the pinning function in scenario 1 shows the creation process using requestCreateFor-Selection-Async (js/pintile.js, copious comments removed):
function pinSecondaryTile() {
var Scenario1TileId = "SecondaryTile.Logo";
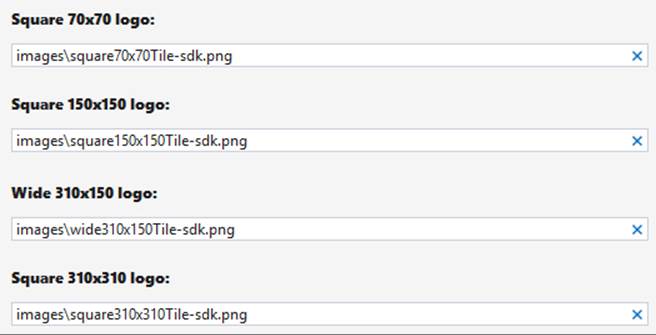
var square70x70Logo = new Windows.Foundation.Uri(
"ms-appx:///Images/square70x70Tile-sdk.png");
var square150x150Logo = new Windows.Foundation.Uri(
"ms-appx:///Images/square150x150Tile-sdk.png");
var wide310x150Logo = new Windows.Foundation.Uri(
"ms-appx:///Images/wide310x150Tile-sdk.png");
var square310x310Logo = new Windows.Foundation.Uri(
"ms-appx:///Images/square310x310Tile-sdk.png");
var square30x30Logo = new Windows.Foundation.Uri(
"ms-appx:///Images/square30x30Tile-sdk.png");
// Create activation arguments...
var currentTime = new Date();
var newTileActivationArguments = Scenario1TileId + " WasPinnedAt=" + currentTime;
var tile = new Windows.UI.StartScreen.SecondaryTile(Scenario1TileId,
"Title text shown on the tile",
newTileActivationArguments,
square150x150Logo, Windows.UI.StartScreen.TileSize.Square150x150);
// Setting other options
tile.visualElements.wide310x150Logo = wide310x150Logo;
tile.visualElements.square310x310Logo = square310x310Logo;
tile.visualElements.square70x70Logo = square70x70Logo;
tile.visualElements.square30x30Logo = square30x30Logo;
tile.visualElements.showNameOnSquare150x150Logo = false;
tile.visualElements.showNameOnWide310x150Logo = true;
tile.visualElements.showNameOnSquare310x310Logo = true;
tile.visualElements.foregroundText = Windows.UI.StartScreen.ForegroundText.dark;
tile.roamingEnabled = false;
var selectionRect = document.getElementById("pinButton").getBoundingClientRect();
tile.requestCreateForSelectionAsync(
{ x: selectionRect.left, y: selectionRect.top, width: selectionRect.width,
height: selectionRect.height },
Windows.UI.Popups.Placement.below)
.done(function (isCreated) {
if (isCreated) {
// The tile was successfully created
} else {
// The tile was not created
}
});
}
Note As mentioned in Chapter 9, the system flyout displayed when creating a secondary tile (and when removing it, see “Managing Secondary Tiles” below) will cause the app to lose focus and will dismiss a nonsticky app bar as a result. For this reason, scenario 7 of the Secondary tiles sample keeps the app bar visible by setting its sticky property to true before calling the secondary tile API.
Supplying Multiple Tile Graphics
In Figure 16-3 we saw that the secondary tile flyout lets the user flip through different tile sizes depending on what you’re provided in the SecondaryTile.visualElements property, but this is only the beginning of the story. To help apps create a truly engaging Start screen presence with their secondary tiles, it’s possible to provide up to three sets of additional tile graphics for each size, all of which are then shown in the flyout’s FlipView. This is done by responding to the SecondaryTile object’s visualelementsrequested event (a WinRT event, so remember to remove it).
This event is fired when you call a requestCreate* method, before the flyout appears. Its eventObj.request is a VisualElementsRequest object, and you specifically populate its alternateVisualElements vector with one or more additional SecondaryTileVisualElements objects. For reference. eventObj.request.visualElements is a copy of the original visualElements property from the SecondaryTile; that way you can avoid adding logos that are identical to the defaults.
Scenario 9 of the Secondary tiles sample provides a demonstration. First it sets an event handler before calling requestCreateForSelectionAsync (js/PinTileAlternateVisualElements.js):
// Most other details omitted
var tile = new Windows.UI.StartScreen.SecondaryTile(/* Includes 150x150 tile... */);
tile.visualElements.square70x70Logo = square70x70Logo;// Must set this to provide alternates
tile.visualElements.wide310x150Logo = wide310x150Logo;
tile.visualElements.square310x310Logo = square310x310Logo;
tile.onvisualelementsrequested = visualElementsRequestedHandler;
tile.requestCreateForSelectionAsync(/* ... */).done(function (isCreated) {
// ...
});
Its handler then adds three sets of (admittedly uninspiring) 70x70, 150x150, 310x150, and 310x310 logos to the alternateVisualElements vector. To prevent you from nodding off while reading highly redundant code, let me just show the first of these (omitting some temporary variables as well; js/PinTileAlternateVisualElements.js):
function visualElementsRequestedHandler(args){
args.request.alternateVisualElements[0].square70x70Logo = new Windows.Foundation.Uri(
"ms-appx:///Images/alternate1Square70x70Tile-sdk.png");
args.request.alternateVisualElements[0].square150x150Logo = new Windows.Foundation.Uri(
"ms-appx:///Images/alternate1Square150x150Tile-sdk.png");
args.request.alternateVisualElements[0].wide310x150Logo = new Windows.Foundation.Uri(
"ms-appx:///Images/alternate1Wide310x150Tile-sdk.png");
args.request.alternateVisualElements[0].square310x310Logo = new Windows.Foundation.Uri(
"ms-appx:///Images/alternate1Square310x310Tile-sdk.png");
args.request.alternateVisualElements[0].backgroundColor = Windows.UI.Colors.green;
args.request.alternateVisualElements[0].foregroundText =
Windows.UI.StartScreen.ForegroundText.dark;
args.request.alternateVisualElements[0].showNameOnSquare310x310Logo = true;
// Setting up alternativeVisualElements[1] and [2] omitted
}
Note that if you provide alternate square70x70Logo URIs this way, you must have set the default square70x70Logo property in the original visualElements. In any case, the result of all this is shown in Figure 16-13, which is easier seen in Video 16-1 where you can see all the alternates. The sample, of course, is simply providing tiles with different colors, which isn’t that much of a differentiation and also bad for branding. I fully expect that your apps will be much more creative! For example, if you’re pinning a tile for a person, you can provide alternate portraits, and if you’re pinning a location, you can supply different images of key landmarks. If you’re pinning a news article or web page, you can provide different images from that page as options.
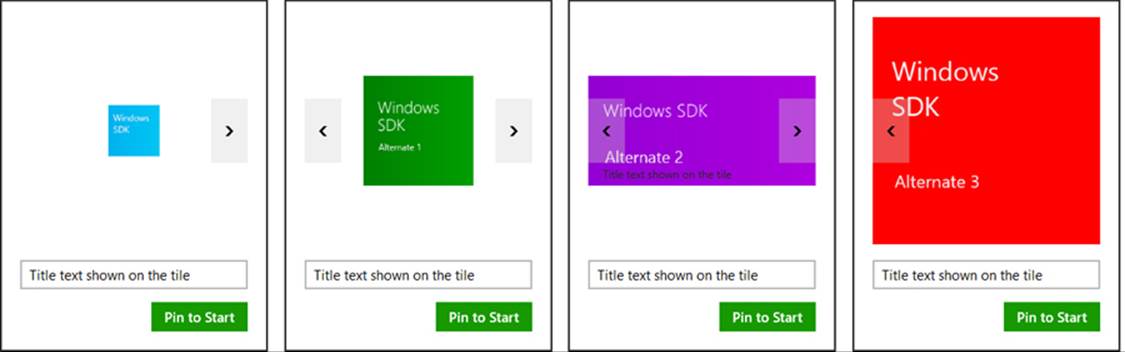
FIGURE 16-13 Flipping through alternate tile images in the Secondary tiles sample. The blue tiles are the defaults set in the SecondaryTile object. The green, purple, and red images, available in all sizes, are set through the visualelementsrequested event handler.
There are times, of course, when you want to use an image that you don’t necessarily have on hand already. For example, if you’re working with images of people in a contact database, you might need to run a query to retrieve them, or perhaps you simply need to open a file to get that information. These might be async operations, so the VisualElementsRequest object includes a getDeferral method and a deadline property (about five seconds from when the event is raised), These work like all other deferrals we’ve seen: once you call getDeferral for the deferral object, you can return from your handler and Windows will just display a progress ring in the flyout until you call the deferral’s complete method or the deadline has passed. If the deadline had passed by the time you return from your handler, all of your alternates will be ignored.
Using the deferral is demonstrated in scenario 10 of the sample, which just uses a 3-second delay to simulate async work (js/PinTileAlternateVisualElementsAsync.js):
function visualElementsRequestedAsyncHandler(args){
var deferral = args.request.getDeferral();
WinJS.Promise.timeout(3000).then(function () {
assignVisualElements(args);
deferral.complete();
});
}
The code in assignVisualElements is the same as in scenario 8 except that it checks whether we’re still within the deadline before populating the alternateVisualElements vector:
if (args.request.deadline >new Date()) {
args.request.alternateVisualElements[0].square70x70Logo = /* ... */;
// And so on...
}
App Activation from a Secondary Tile
Secondary tiles provide a way to activate an app to something other than its default state, according to the contents of the secondary tile’s arguments property. When a secondary tile is tapped or clicked, the app’s activated event is fired with an activation kind of launch and the tile’sarguments value in eventArgs.detail.arguments. The app then takes whatever action is appropriate for that data, such as navigating to a particular page of content, retrieving a piece of content from an online source, and so on. In the Secondary tiles sample, the activation code in js/default.js navigates to its scenario 5 page, where we pass arguments as the options parameter of WinJS.Navigation.navigate:
function activated(eventObject) {
if (eventObject.detail.kind ===
Windows.ApplicationModel.Activation.ActivationKind.launch) {
if (eventObject.detail.arguments !== "") {
// Activation args are present (declared when thesecondary tile was pinned)
eventObject.setPromise(WinJS.UI.processAll().done(function () {
// Navigate to scenario 5, where the user will be shownthe activation args
return WinJS.Navigation.navigate(scenarios[4].url,eventObject.detail.arguments);
}));
} else {
// Activate in default state
}
}
}
The page control (js/LaunchedFromSecondaryTile.js) receives the arguments string in the options parameter of both the processed and ready methods. In the case of the sample it just copies that string to the display:
var page = WinJS.UI.Pages.define("/html/LaunchedFromSecondaryTile.html", {
processed: function (element, options) {
if (options) {
document.getElementById("launchedFromSecondaryTileOutput").innerHTML += "<p>" +
"App was activated from a secondary tile with the following activation" +
"arguments : " + options + "</p>";
}
},
ready: function (element, options) {
}
});
That’s the whole mechanism. Your own app, of course, will do something much more interesting with arguments!
Managing Secondary Tiles
In addition to the methods and properties to create secondary tiles, the SecondaryTile class has two static methods to manage your app’s secondary tiles:
• exists Returns a Boolean indicating whether a secondary tile, identified with its tileId, is present on the Start screen. This tells you whether calling a requestCreate* method for a tile with that same tileId will replace an existing one. This is demonstrated in scenario 4 of the Secondary tiles sample.
• findAllAsync Retrieves a vector of SecondaryTile objects that have been created by the app. This will include any tiles roamed from another device (those created with the roamingEnabled option).115 This is demonstrated in scenario 3 of the sample.
In addition, here are a few other methods for working with a specific SecondaryTile instance:
• requestDeleteAsync and requestDeleteForSelectionAsync Direct analogs, with the same placement variations, to the requestCreate* methods, because unpinning a secondary tile is also subject to user consent. This is demonstrated again in scenarios 2 and 7.
• updateAsync Propagates any changes made to the SecondaryTile properties since it was added to the Start screen. This is demonstrated in scenario 8.
If you’ve been keeping score, you might have noticed that I’ve yet to mention scenario 6 of the sample. That’s because it shows how to make a secondary tile into a live tile with updates. To understand that, we need to look at updates more generally because the mechanisms involved apply to all tiles alike. This just so happens to be the next topic in this chapter—and yes, I planned it that way!
Basic Tile Updates
A local update for a tile, as described earlier in this chapter, is one that an app issues directly while it’s running or issues from a background task. This is clearly efficient because running app code generally has the information it needs for making updates to any of its tiles. In a number of cases—especially when an app is not related to a server—the information needed for the app’s live tiles is available only to the app’s code. A game, for example, can send updates showing best scores, new challenges, progress toward achievements, and other kinds of compelling invitations to re-engage with the app. (I must personally admit that this works quite well with the Fruit Ninja game.)
The process of sending a local tile update is very straightforward using the APIs in the Windows.UI.Notifications namespace:
• Create the XML payload, as it’s called, that describes the update within an XmlDocument object (this is in Windows.Data.Xml.Dom). The XML must always match one of the predefined tile templates. You can start with a system-provided XmlDocument, create it from scratch, or use theNotifications Extensions Library, which provides an object model and IntelliSense for this.
• Create a TileNotification object with that XML. The XML becomes the TileNotification object’s content property and can be set separately.
• Optionally set the expirationTime and tag properties of the TileNotification. By default, a locally issued update does not expire and is removed only if it’s evicted by a newer update or explicitly cleared. Setting expirationDate will automatically remove it at that particular time.(Cloud-issued notifications automatically expire after three days by default.) The tag property is a string of 16 or fewer characters that is used to manage the stack of updates that are cycled on the tile. More on this a little later.
• Call TileUpdateManager.createTileUpdaterForApplication to obtain a TileUpdater object that’s linked to your app tile; call TileUpdateManager.createTileUpdater-ForSecondaryTile (chew on that name!) to obtain a TileUpdater object for a secondary tile with a given tileId.
• Call TileUpdater.update with your TileNotification object. (The animation used to bring the update into view is similar to WinJS.UI.Animation.createPeekAnimation, as described in Chapter 14.)
Tip If you issue tile updates or other notifications when your app is running, think about whether it’s also appropriate to issue updates within aresuming event handler if you aren’t going to use other means like periodic updates or push notifications to refresh the tile. It may have been a while since you were suspended, so being resumed is a good opportunity to send updates.
Let’s turn now to the App tiles and badges sample for how updates appear in code. Because the Visual Studio simulator doesn’t enable live tiles and toasts, remember to run the sample with the Local Machine or Remote Machine option, and be sure that animations are enabled in PC Settings.
Assuming that we have our update XMLDocument in a variable named tileXml, sending the update takes only two lines of code (derived from the end of js/sendTextTile.js):
var tileNotification = new Windows.UI.Notifications.TileNotification(tileXml);
Windows.UI.Notifications.TileUpdateManager.createTileUpdaterForApplication()
.update(tileNotification);
and similarly for secondary tiles in scenario 6 of the Secondary tiles sample (js/SecondaryTile-Notification.js):
var tileNotification = new Windows.UI.Notifications.TileNotification(tileXml);
Windows.UI.Notifications.TileUpdateManager.createTileUpdaterForSecondaryTile(
"SecondaryTile.LiveTile").update(tileNotification);
The more interesting question is how we create that tileXml payload in the first place. This involves choosing one of the predefined visual tile templates and understanding the options we can exercise within them, which are covered in the next two sections. Then it’s a matter of choosing one of three methods to create the XMLDocument, which we’ll also explore individually. Finally, we’ll see how to properly reference images with the updates. Localization and accessibility are additional concerns for tile updates, but we’ll return to that subject later in Chapter 19, “Apps for Everyone, Part 1.”
Choosing a Tile Template
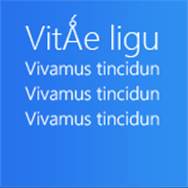
The first step in creating a tile update is to select an appropriate template from the Tile template catalog. Here you will find descriptions, images, and the exact XML for the 10 available medium templates, the 36 available wide templates, and the 29 available large templates—yes, 75 different templates in all, so I hope you understand why I’m not showing them all here! Some are text-only, some are image-only, and some are text and image both. Here are a few examples:
In addition, some of the options for medium and wide tiles are referred to as peek templates. These, if you look at them in the topic linked to above,116 are really composed of two stacked sections that are each the size of the whole tile, as shown below for medium tiles (left) and wide tiles (right):

With peek templates you effectively get to show twice the content as the other templates. When a peek update is shown on a live tile, the upper portion will appear first and then the tile will flip or give you a “peek” at the lower portion, and then it will switch back to the upper portion, after which the live tile will switch to the next update in the cycle, if one exists. (The Travel app uses peek templates on its medium and wide tiles, if you want an example; and the animation that’s employed here is again similar to WinJS.UI.Animation.createPeekAnimation.) Of course, both sections should contain related content because they are part of the same singular update.
Hidden gems Among all the wide peek templates, the TileWide310x150PeekImageAndText01 and 02 templates often go unnoticed because they don’t look particularly distinctive in the template catalog. They’re unique, though, in that on both sides of the peek they always show part of the text and part of the image. Check them out in scenario 6 of the App tiles and badges sample that we’ll see shortly.
Why templates? Although it might seem limiting that you must choose from a predefined template for your tile design, this helps ensure a consistency amongst all the tiles on the Start screen. Templates also describe the relationships between different parts of the tile content, which can then be rendered uniquely (as on Windows and Windows Phone) without changing those relationships. Also, be sure to check out Using live tiles at the end of the catalog page, which is easy to miss in what is a long page in the documentation!
There are a number of important details with the template layouts. First, when you look at the template catalog, you’ll see both version 1 (Windows 8) names like TileSquareText01 and version 2 (Windows 8.1) names like TileSquare150x150Text01. Within an app, always use the latest version. When implementing a service that supplies updates to both version 1 and version 2 clients, you can include both names in the same XML payload. We’ll come back to this in the next section.
Second, in many of the templates at present, the last line of text will not display if you’re also showing a logo or a short name on the tile (to avoid overlaps). It’s OK to include the extra text in the update, though—there’s no penalty for doing so.
Third, images are limited to 1024x1024 and 200KB maximum; if an image exceeds these limits, the entire update is silently ignored. Clearly, it’s better to avoid large images if you can help it because they’ll just increase memory consumption and possibly network usage (if the image is being downloaded). It’s also good to take the 80%, 100%, 140%, and 180% scale factors into account for tile images. However, if you don’t want to deal with individual scaling factors, size your tile images for 180% and let the system scale them down (which uses a high-quality algorithm so that images will look as good as if you scaled them down with photo-editing software). Also, for photographs, consider using JPEG instead of PNG as the former has better compression for such images.
Fourth, if you supply an image that doesn’t match the final aspect ratio, the image will be scaled and cropped to fit according to heuristics that generally produce good results with a variety of test images. Note too that a wide tile is not exactly a 2:1 aspect ratio; at 100% the wide tile is 310x150 pixels, meaning that an image occupying half of it will be something like 160x150 pixels depending on the template. Images in a collection view (the upper right portion of the rightmost image above) will also be special dimensions of their own. The tile template catalog documents all the sizes of these secondary images, and you can also find them in scenario 11 of the App tiles and badges sample.
Fifth, with some of the templates such as TileWide310x150ImageCollection, TileWide310x150Peek-ImageCollection01, and TileSquare310x310SmallImagesAndTextList02, which are the ones shown earlier with multiple images in the tile, there are specific dimensions for the small images that you should find in the template catalog. This can be helpful if you’re creating a backend to serve up those images and want to size them appropriately.
And finally, as a last resort you can always use an image-only template (TileSquare150x150Image, TileWide310x150Image, and TileSquare310x310Image) with a graphic you generate at run time. Be mindful that images with text won’t scale well, and don’t mislead users by making it look like the tile has buttons or other separately clickable areas: the tile always acts as a single unit to invoke the app.
Scenario 6 of the App tiles and badges sample provides a very helpful experimentation and design tool for tiles, the core of which is shown in Figure 16-14. This part of the sample is intended as a tool rather than code would use directly in an app. It lets you easily play around with all the templates and their contents, including images referenced from local and remote sources, without having to write specific code every time. It also lets you exercise the various options for branding the app and sending the result as an update to the sample’s tile on the Start screen. Scenario 11 of the sample, similarly, is a tool that lets you resize images for different parts of any selected template.
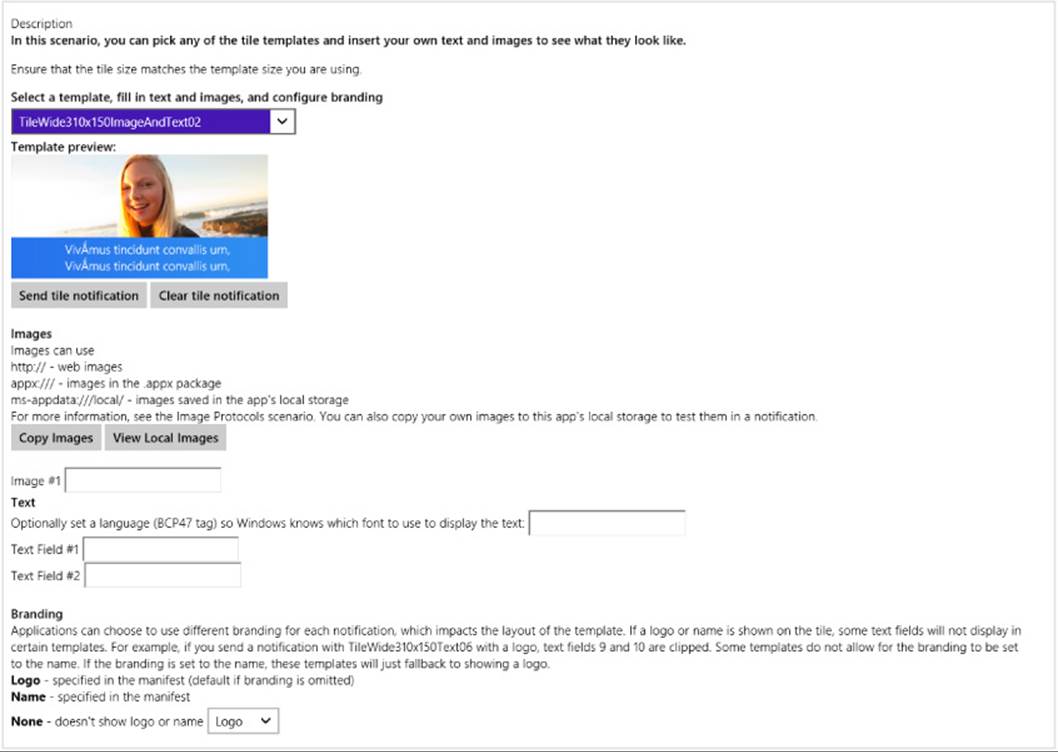
FIGURE 16-14 Scenario 6 of the App tiles and badges sample is a tool for testing out all the different tile templates and understanding how to populate them.
Tile Template Schema: Versioning, Branding, and Other Options
Before we look at the different methods for creating a tile payload, it’s helpful to look at the overall XML schema for tile updates, which reveals otherwise hidden features:
<?xml version="1.0"encoding="utf-8" ?>
<tile>
<visual version? = "integer"lang? = "string"baseUri? = "anyURI"
branding? = "string"addImageQuery? = "boolean">
<!--One or more binding elements: place large tiles last for compatibility-->
<binding template = "TileSquare150x150Image"|"TileSquare150x150Block"|...""
fallback? = "TileSquareImage"|"TileSquareBlock"|…=""
contentId = "string"lang? = "string"baseUri? = "anyURI"
branding? = "string"addImageQuery? = "boolean">
<!--Some combination of image and text. Id’s used to de-dupe updates -->
<image id = "integer"src = "string"
alt? = "string"addImageQuery? = "boolean" />
<text id = "integer"lang? = "string" />
</binding>
</visual>
</tile>
Note I know that this isn’t an exact schema, because that’s hard to capture in a concise view. For the precise details, refer to the Tile schema reference pages.
To begin with, the visual.version attribute must be 2 to support Windows 8.1 templates, including large tile sizes; version 1 supports only medium and wide Windows 8.0 templates. This matters when you have a service that supports both Windows 8 and Windows 8.1 apps through the same URI. In this case you want the service to provide a version 2 payload with the Windows 8.1 template name in the binding.template attribute and the Windows 8 template name in the binding.fallback attribute. This is what makes a single template compatible with both systems.
Next, the lang attribute that you see on all elements is where you can specify the current app language. This helps Windows determine the right font to use when rendering the tile and determine which localized images to pull from your resources. It’s also possible to localize text strings in the tile payload, but we’ll come back to that in Chapter 19. Note that any lang attribute on binding overrides that on visual, and any lang attribute on a text element overrides that of visual and binding.
The baseUri, alt, and addImageQuery attributes apply to images, which we’ll cover later in “Using Local and Web Images.”
Next, I noted in a comment that the single visual element can contain one or more binding elements. This is how you provide updates for medium, wide, and large tile sizes in a single payload, which allows the user to change tile sizes without losing information. The question here, though, is how you can maintain compatibility with Windows 8 apps when providing a version 2 payload that includes a large tile binding. The trick here is simple: always place the large binding last. A Windows 8 system will then process medium and wide bindings and ignore the large. Otherwise Windows 8 will stop processing the XML at the large binding and ignore anything that comes after it.
The ability to mix medium, wide, and large updates in single payload raises another issue, however, which is that some large updates can contain as much information as a two or three medium or wide updates. If you issue only a single update for your tile, this isn’t a problem. If, however, you use cycling to rotate through as many as five updates (discussed later in “Cycling, Scheduled, and Expiring Updates”), it will sometimes be necessary to send the same large tile content in payloads that contain different medium and wide tile content. However, Windows will naturally think that each large tile update is unique and cycle through them as it would the medium and wide updates. As a result, the user will see a large tile animation that doesn’t change the tile’s content at all!
This is where the binding.contentId attribute comes in for the large tile. Set this to any string you want so long as it uniquely identifies the particular content for that binding. That is, if you send three payloads that contain different medium and wide bindings but the same large binding, make sure that each large binding has an identical contentId. Windows will then know that there’s really only one large binding for the tile and won’t do any cycling. For a demonstration, refer to scenario 12 of the App tiles and badges sample.
The final bit in the schema is the branding attribute of the visual and binding elements. This can be set to none, logo (the default), or name to indicate whether to include the app’s 30x30 logo or short name on the tile, both of which are provided in the app’s manifest. Scenario 6 of the aforementioned sample lets you play with these variations.
Tip Large tile templates were designed with the assumption that you’d include branding elements at the bottom (hence the extra open space). Consider always including branding with large tile updates.
With branding, the Foreground Text and Background Color settings in the app manifest’s Visual Assets section define how tile text appears for all updates (and toasts for that matter), and they cannot be altered in the tile payload. This keeps the branding of the app consistent between updates; users would certainly find it confusing if multiple tiles from the same app showed up in different colors.
As a quick example, the App tiles and badges sample uses Light foreground text and a background color of #00b2f0. If you go to scenario 5, choose the TileWide310x150Text09 template, add some text, and select Logo for the branding, the result is shown below. (The small logo here contains a block with “SDK” in it, which is not a design to emulate. Logos should be iconic and not textual.)

Now that we’ve seen everything we can do with a tile template, let’s see how to create the XML payloads themselves.
Creating the Payload, Method 1: Populating Template Content
The first way to create the XML payload for a given template is to use the TileUpdateManager.-getTemplateContent method, to which you pass the name of a template (a value from TileTemplateType). This is shown in scenario 1 of the sample (js/sendTextTile.js; note that I’ve added the wn,tum, and tt variables for brevity in all the code snippets):
varwn= Windows.UI.Notifications;
vartum = Windows.UI.Notifications.TileUpdateManager;
vartt= Windows.UI.Notifications.TileTemplateType;
function sendTileTextNotificationWithXmlManipulation() {
var square150x150Xml = tum.getTemplateContent(tt.tileSquare150x150Text04);
This method returns an XmlDocument object that contains the structure of the XML for the template but not any specific content. If you run the sample and examine tileXml just after the call above, it will contain only the following—elements but no real data values:
<tile>
<visual version="2">
<binding template="TileSquare150x150Text04"fallback="TileSquareText04">
<text id="1"></text>
</binding>
</visual>
</tile>
The next step is to fill in the blanks (primarily attributes) by using the XmlDocument methods you probably already know (and may or may not love):
var squareTileTextAttributes = square150x150Xml.getElementsByTagName("text");
squareTileTextAttributes[0].appendChild(square150x150Xml.createTextNode(
"Hello World! My very own tile notification"));
In general, if you supports wide and large tiles, include XML for medium, wide, and large formats in the same payload, because the user can change the tile size any time. The sample does it this way:
varwide310x150Xml = tum.getTemplateContent(tt.tileWide310x150Text03);
var tileTextAttributes = wide310x150Xml.getElementsByTagName("text");
tileTextAttributes[0].appendChild(wide310x150Xml.createTextNode(
"Hello World! My very own tile notification"));
var square310x310Xml = tum.getTemplateContent(tt.tileSquare310x310Text09);
square310x310Xml.getElementsByTagName("text")[0].setAttribute("id", "1");
square310x310Xml.getElementsByTagName("text")[0].appendChild(
square310x310Xml.createTextNode("Hello World! My very own tile notification"));
node = square150x150Xml.importNode(wide310x150Xml.getElementsByTagName("binding")
.item(0), true);
square150x150Xml.getElementsByTagName("visual").item(0).appendChild(node);
var node = square150x150Xml.importNode(square310x310Xml.getElementsByTagName("binding")
.item(0), true);
square150x150Xml.getElementsByTagName("visual").item(0).appendChild(node);
Notice how we’re adding the wide and large templates directly into the original XmlDocument for the medium template by appending additional binding within the visual element, taking care to add the large binding last for compatibility with version 1 XML. The resulting structure (without the data) looks like this, where you’ll also notice that there’s no fallback for the large tile because version 1 templates don’t support that size:
<tile>
<visual version="2">
<binding template="TileSquare150x150Text04"fallback="TileSquareText04">
<text id="1"></text>
</binding>
<binding template="TileWide310x150Text03"fallback="TileWideText03">
<text id="1"></text>
</binding>
<binding template="TileSquare310x310Text09">
<text id="1"></text>
</binding>
</visual>
</tile>
With our XML payload build, we’re now ready to create the TileNotification object and send the update to the tile:
var tileNotification = newwn.TileNotification(square150x150Xml);
// send the notification to the app's tile
tum.createTileUpdaterForApplication().update(tileNotification);
}
Once this payload is sent, the default tile (below left) will show the updates on the right for the different tile sizes:

Creating the Payload, Method 2: XML Strings
Instead of calling TileUpdateManager.getTemplateContent to obtain an XmlDocument with the tile template contents, you can just create that XmlDocument directly from a string. This is just like creating elements in the DOM by using innerHTML instead of the DOM API—it takes fewer overall function calls to create the payload you need and lends itself well to predefining a bunch of mostly populated tile updates ahead of time.
This method is simple: define an XML string with the update contents, create a new XmlDocument, and use its loadXml method to turn the string into the payload. In scenario 1 of the sample we see how this is done to create the exact same payload as in the previous section (js/sendTextTile.js):
function sendTileTextNotificationWithStringManipulation() {
// create a string with the tile template xml
var tileXmlString = "<tile>"
+ "<visual version='2'>"
+ "<binding template='TileSquare150x150Text04' fallback='TileSquareText04'>"
+ "<text id='1'>Hello World! My very own tile notification</text>"
+ "</binding>"
+ "<binding template='TileWide310x150Text03' fallback='TileWideText03'>"
+ "<text id='1'>Hello World! My very own tile notification</text>"
+ "</binding>"
+ "<binding template='TileSquare310x310Text09'>"
+ "<text id='1'>Hello World! My very own tile notification</text>"
+ "</binding>"
+ "</visual>"
+ "</tile>";
var tileDOM = new Windows.Data.Xml.Dom.XmlDocument();
tileDOM.loadXml(tileXmlString); // Good idea to put this in a try/catch block
var tile = new Windows.UI.Notifications.TileNotification(tileDOM);
Windows.UI.Notifications.TileUpdateManager.createTileUpdaterForApplication()
.update(tile);
}
Clearly, this method is very simple but has the drawback of requiring you to do manual escaping when necessary. It is also more difficult to debug. (Looking for tiny errors in strings is not my favorite pastime!) Fortunately, there is a third available method: the Notifications Extensions Library, which offers the simplicity of using strings with a high degree of reliability.
Creating the Payload, Method 3: The Notifications Extensions Library
The third means of creating the necessary XmlDocument for a tile update is to use what’s called the Notifications Extensions Library. (Yes, it’s a double plural.) This is a WinRT component written in C# that’s included with a number of the SDK samples, including the App tiles and badges sample we’re looking at here. (Notice that it’s included in the project’s References.) We’ll be looking at the structure of such components in Chapter 18, “WinRT Components.” It’s possible that this library will become part of the Windows API in the future, so we do encourage developers to leverage it.
The library makes it easier to populate a template through object properties rather than XmlDocument methods, and because it’s been very well-tested within Microsoft it’s a more robust approach than creating an XmlDocument directly from strings. Here’s how it’s used in scenario 1 to create, once again, the same payload we’ve already seen (js/sendTileText.js; I’ve added the factory variable for brevity):
function sendTileTextNotification() {
varfactory = NotificationsExtensions.TileContent.TileContentFactory
var tileContent = factory.createTileSquare310x310Text09();
tileContent.textHeadingWrap.text = "Hello World! My very own tile notification";
var wide310x150Content = factory.createTileWide310x150Text03();
wide310x150Content.textHeadingWrap.text = "Hello World! My very own tile notification";
var square150x150Content = factory.createTileSquare150x150Text04();
square150x150Content.textBodyWrap.text = "Hello World! My very own tile notification";
wide310x150Content.square150x150Content = square150x150Content;
tileContent.wide310x150Content = wide310x150Content;
Windows.UI.Notifications.TileUpdateManager.createTileUpdaterForApplication()
.update(tileContent.createNotification());
}
Simply said, the library’s TileContentFactory object provides methods to create objects equivalent to the XML documents provided by TileUpdateManager.getTemplateContent. As shown in the code above, those objects have properties equivalent to each field in the template, and when you’re ready to pass it to TileUpdater.update, you just call its createNotification method.
Note The medium tile object is stored in the square150x150Content property of the wide tile object, and the wide tile object is stored in the wide310x150Content property of the large tile object. This hierarchy implies that you should support progressively larger sizes rather than using an arbitrary mix.
The other reason this library exists is to simplify the process of creating an ASP.NET service for periodic updates and push notifications (where the latter can send tile updates, badge updates, and toast notifications). Instead of creating the XML payloads manually—a fragile and highly error-prone practice at best—the service can use the Notifications Extensions Library to easily and consistently create the XML for all these notifications.
Because the object model in the library clearly describes the XML, it’s fairly easy to use. There is also a topic in the documentation for it called Quickstart: Using the NotificationsExtensions library in your code. The samples we look at in this chapter also show most use cases.
Using Local and Web Images
Scenario 1 of the sample, as we’ve seen, shows tile updates using text, but the more interesting ones include graphics as well (provided that the images stay under the 200KB and 1024 pixel limits). For tile updates, these can come either from the app package, local app data, or the web, usingms-appx:///, ms-appdata:///local, and http[s]:// URIs. These URIs are simply assigned to the src attributes of image elements within the XML tile templates. (These are image, not img as in HTML.) Note again that the first two URIs typically have three slashes at the beginning to denote “the current app”; http:// URIs also require that the Internet (Client) capability be declared in the app’s manifest.
Note If you plan on using remote images, review “Sidebar: Connectivity and Remote Images in Live Tiles and Toasts” at the end of “The Four Sources of Updates and Notifications” earlier in this chapter, because tiles do not support fallback images when a device is offline.
Scenario 2 of the sample (js/sendLocalImage.js) shows the use of ms-appx:/// for images within the app package, with variants for all three methods we’ve just seen to create the payload. When using XmlDocument methods, setting an image source looks like this:
var tileImageAttributes = wide310x150Xml.getElementsByTagName("image");
tileImageAttributes[0].setAttribute("src", "ms-appx:///images/redWideWide31x150.png");
The Notifications Extensions Library gives us properties to which we can assign a URI:
var tileContent = NotificationsExtensions.TileContent.TileContentFactory
.createTileWide310x150ImageAndText01();
tileContent.textCaptionWrap.text = "This tile notification uses ms-appx images";
tileContent.image.src = "ms-appx:///images/redWide310x150.png";
And when using XML strings, you can just include the URI directly in the image element. Note also that you can add alt attributes to each image element that are aggregated into accessibility text for the tile (as used by screen readers).
Scenario 3 (js/sendWebImageTile.js) shows the same things except you can enter an http:// URI of your choice. This is a good way to see the effects of pointing to images that have varying aspect ratios as well as those that exceed the allowable 1024px dimensions and 200KB file size. As you’ll see, the updates simply aren’t shown in those cases.
As for ms-appdata:///local URIs (roaming and temp are not allowed), their use is demonstrated in scenario 9 where you choose an image with the file picker and the sample copies it to the local app data folder. It then references that file with an ms-appdata:///local URI in the update payload (js/imageprotocols.js):
tileContent = NotificationsExtensions.TileContent.TileContentFactory
.createTileWide310x150Image();
tileContent.image.src = “ms-appdata:///local/” + imageRelativePath;
Because a number of tile templates let you specify multiple images, it’s convenient to provide a common base URI for the entire update (or for each binding element) so that you can just use relative paths in each image.src. This is the purpose of the visual.baseUri and binding.baseUriattributes. For example, if you were always referencing images from ms-appdata:///local/, you could store that string just once in visual.baseUri. The default is ms-appx:///.
Scenario 9 in the sample lets you play with in-package and remote URIs as well, as does the tile update designer in scenario 6. I also updated the Here My Am! app for this chapter (in the companion content) with a medium and wide peek tile updates containing the most recent image and the location, along with a large tile that combines image and text; see “Sidebar: PNG vs. JPEG Image Sizes” below.
Speaking of tools and images, check out scenario 11 again where you can crop and adjust images according to varying pixel densities so that they’ll work well with a selected tile template. You can save the images you adjust for inclusion in your app package. The code for the scenario can also be used to adjust images at run time. Like I said, very helpful!
A final capability with images is an option to have Windows automatically append a query string to http[s]:// URIs that describes the current scaling factor, contrast setting (for accessibility), and language. This enables your backend service to adjust images accordingly, avoiding the need to handle such concerns in the app itself. As described in the Tile schema reference, specifically for the image element, you indicate this option by setting the addImageQuery attribute of image to true (also supported on the visual and binding elements):
// XmlDocument form
var tileImageAttributes = tileXml.getElementsByTagName("image");
tileImageAttributes[0].setAttribute("addImageQuery", "true");
// XML string form (other lines omitted)
var tileXmlString = /* ... */ "<image id='1' addImageQuery="true"
src='ms-appx:///images/redWide310x150.png'/>"/* ... */
// If using Notifications Extensions Library (see scenario 9 in the sample)
var tileContent = NotificationsExtensions.TileContent.TileContentFactory
.createTileWideImageAndText01();
tileContent.image.src = "ms-appx:///images/redWide310x150.png";
tileContent.image.addImageQuery = true;
In all of these cases, the appended string will be of the form
?ms-scale=<scale>&ms-contrast=<contrast>&ms-lang=<language>
where <scale> is 80, 100, 140, or 180, <contrast> is standard, black, or white, and <language> is a BCP-47 language tag such as en-US, jp-JP, de-DE, and so forth. All of these are described on the Globalization and accessibility for tile and toast notifications in the documentation, including how to localize update text.
Sidebar: PNG vs. JPEG Image Sizes
When considering tile images for the larger 140% and 180% scales, the encoding you use for your images can make a big difference and keep them below the 200K size limit. As we saw in “Branding Your App 101” in Chapter 3, a wide tile at 180% is 558x270 pixels, a medium is 270x270 pixels, and a large is 558x558 pixels. With the wide and large tile sizes, a typical photographic PNG at this size will easily exceed 200K.I encountered this when first adding tile support to Here My Am! for this chapter, where it makes a smaller version of the current photo in the local appdata folder and uses ms-appdata:///local URIs in the tile XML payload. Originally the app was capturing PNG files that were too large, so I borrowed code from scenario 11 of the App tiles and badges sample, as we’ve been working with here, to create a smaller PNG from the img element using a temporary canvas and the blob APIs. This worked fine for a 270x270 medium tile image (a 180% scale that can be downsized), but for 558x270 and 558x558 the file was too large. So I borrowed code from scenario 3 of the Simple Imaging sample to directly transcode the StorageFile for the current image into a JPEG, where the compression is much better and we don’t need to use the canvas. For this second edition’s example I just capture JPEGs to begin with, which are already small enough, but I’ve preserved the code anyway for reference. You can find it in the transcodeImageFile function in pages/home/home.js, a routine that we’ll also rewrite in Chapter 18 using C# in a WinRT component.
Such considerations are certainly important for services that handle the addImageQuery parameters for scale. For larger image sizes, it’s probably wise to stick with the JPEG format to avoid going over the 200K limit.
Cycling, Scheduled, and Expiring Updates
Although you might read the heading above and think we’ll now be covering a grab bag of randomness, all it really means is that we’re looking at additional methods of the TileUpdater object and revisiting the two properties of the TileNotification object that we already mentioned. Simply said, now that we’ve seen how to do all the basic tile updates, we’re ready to start exploring the additional capabilities. Again, everything here applies to all tiles in the app, including secondary tiles.
First is the ability to programmatically clear all updates and reset the tile to its default state as defined in the manifest. This happens with a simple call to TileUpdater.clear (shown in scenario 1 of the App tiles and badges sample, js/sendTileText.js):
Windows.UI.Notifications.TileUpdateManager.createTileUpdaterForApplication().clear();
The next capability, as already mentioned, is to set the TileNotification.expirationTime property before sending that notification to TileUpdater.update. This ensures that a locally issued notification will be automatically removed, and it lets you override the default three-day expiration period for cloud-issued updates. The update will appear immediately (at the next tile refresh, that is) and will then be removed from the tile after it expires. This is demonstrated in scenario 8 of the sample—sending an update with an expiration date will display an update as on the left below. When it expires, it’s removed, which in this case causes the tile to revert to its default state, shown on the right:
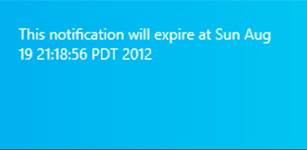
To delay the appearance of an update until a specified time, with or without an expiration, you do something a little different at the beginning: instead of creating a TileNotification object to send to the updater, create a ScheduledTileNotification and send it toTileUpdater.addToSchedule.
A ScheduledTileNotification is exactly the same as a TileNotification (including the expiration time) except that it contains an extra property called deliveryTime that indicates when—in UTC time, not local time!—the tile should first appear. For an example of this we have to take a brief detour to scenario 1 of the Scheduled notifications sample. But all that’s really different is that we take whatever XmlDocument we’ve created with the payload—through any of the methods covered earlier—and create the notification with the delivery time. Here’s a condensation of the code in the sample’s js/scenario1.js file:
// Namespace variable
var Notifications = Windows.UI.Notifications;
// The delay in delivery time from the sample's control
var dueTimeInSeconds = parseInt(document.getElementById("futureTimeBox").value);
// The actual delivery date and time
var currentTime = new Date();
var dueTime = new Date(currentTime.getTime() + dueTimeInSeconds * 1000);
// In here we create the XmlDocument in the variable tileDOM
// Now create the update with the delivery date
var futureTile = new Notifications.ScheduledTileNotification(tileDOM, dueTime);
Notifications.TileUpdateManager.createTileUpdaterForApplication().addToSchedule(futureTile);
Other than these small changes, everything else about the tile update is the same as before.
It’s certainly possible, as you can guess, to queue up many scheduled updates. At any time you can call TileUpdater.getScheduledTileNotifications to obtain a vector of active ScheduledTile-Notification objects. You can also remove any of those updates withTileUpdater.removeFrom-Schedule.
What happens if you schedule a series of updates that will end up being active at the same time? In the Scheduled notifications sample, for instance, issue a series of tile updates for 10 seconds from now, and then quickly switch to the Start screen to see the results. Those updates will appear in sequence, and one of them might actually be dropped if another update is scheduled right on its heels. And once you reach the last update, it just stays there until it expires, the tile is cleared, or some new update comes along.
In such cases it would be better to have the tile cycle through a series of tiles, thereby keeping the tile active with more than just the last update.
Live tiles support cycling through up to five updates, where the duration of each is controlled by the system so that the whole Start screen has a consistent look and feel. To enable this, you must first call TileUpdater.enableNotificationQueue(true) or one of itsenableNotifcationQueueFor<size> siblings (such as enableNotifcationQueueForSquare150x150), and you can call these with false to disable cycling for all tiles or a specific size. The queue itself is first in, first out (you cannot control the order otherwise), so the oldest notification is removed if a new one is added when the queue is already at maximum. In other words, if you enable the queue and issue updates as we’ve been doing, the five most recent updates will cycle.
Tip If you’re sending duplicate large tile updates in payloads with distinct medium and wide updates, remember to set the contentId property of the large size binding element to prevent duplicates in the queue. Refer back to “Tile Template Schema” earlier in this chapter.
You might want to selectively replace existing updates already in the queue rather than rely on the first-in first-out behavior (or calling TileUpdater.clear and reissuing the update you want to retain). This is the purpose of the tag property in TileNotification andScheduledTileNotification. The tag is again just a maximum 16-character string that identifies a particular update. If the queue is enabled, a new update with any given tag will replace any update already in the queue with the same tag. If that tag doesn’t exist, the update will replace the oldest in the queue. So, for example, a news app might have five tags for different categories of headlines such as world, local, politics, business, and health; a stock app would obviously use tags for different ticker symbols. Similarly, a weather app might tag updates with a zip code or other location identifier.
You can play with all this in scenario 6 of the App tile and badges sample. In the process you might note that when activating an app from a cycling live tile, it does not receive an indication as to which update is currently shown. For this reason, it’s currently recommended that activating a cycling live tile opens the app on a hub page that displays relevant content for all the updates together.
Badge Updates
The last bit you can use to update a live tile is a badge. I’ve kept this topic separate because it works through a separate API and is not part of the tile update XML payloads we’ve been using.
To review, badges are simply small glyphs—a one- or two-digit number, or one of a small number of symbols—that appear on a tile regardless of any other update activity. They are meant to indicate the status of the app rather than provide a piece of content, and they’re animated independently (using WinJS.UI.Animations.updateBadge, as briefly noted in Chapter 14).
How you send badges to your tile is structurally similar to a tile update. Start by creating an XmlDocument payload for the badge update by using a template from the Badge overview or using the Notifications Extensions Library, which contains full support for badges. In the case of badges, it’s overkill to speak of an XML “document” because it contains only one element, badge, with one attribute, value, for which you can indicate a number from 1–99 (anything over that will display 99+) or one of 12 specific glyphs, as shown below. Note that although the glyphs are shown here against a blue background, the actual color will be the Background Color in your manifest:
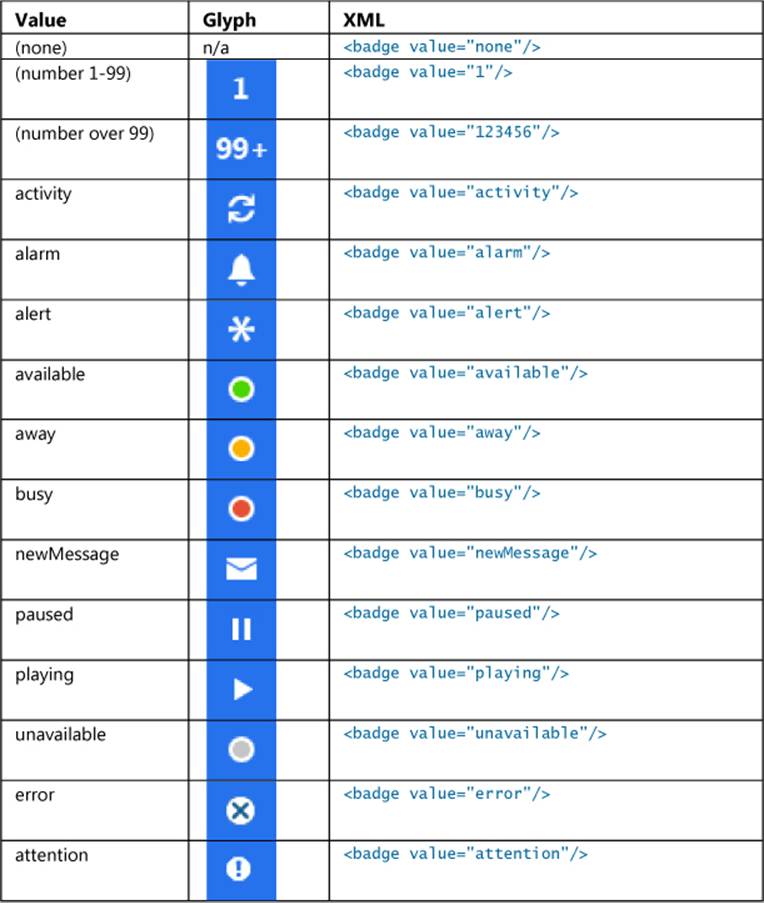
If you like, you can use the BadgeUpdateManager.getTemplateContent function to obtain an XmlDocument with such contents; there’s a bit of sample code on this method’s reference page that shows how. But because the XML is so simple, it’s just as easy to create the object from a string by using new Windows.Data.Xml.Dom.XmlDocument followed by a call to its loadXml method, as we’ve seen with tiles. The Notifications Extensions Library also has methods for this and doing updates. Both of these approaches are demonstrated in scenario 4 of the App tiles and badges sample.
However you create it, the next step is to instantiate a BadgeNotification with that XmlDocument:
var badge = new Windows.UI.Notifications.BadgeNotification(badgeDOM);
This notification object also supports an expirationTime property just like tiles do. That aside, the last step is to call BadgeUpdateManager.createBadgeUpdaterForApplication to obtain a BadgeUpdater for your app tile or—you can predict this one—BadgeUpdateManager.createBadge-UpdaterForSecondaryTile to obtain a BadgeUpdater for a secondary tile with a given tileId. After you obtain your BadgeNotification (and again, the Notifications Extensions Library can help here), you then call BadgeUpdate.update:
Windows.UI.Notifications.BadgeUpdateManager.createBadgeUpdaterForApplication().update(badge);
or:
Windows.UI.Notifications.BadgeUpdateManager.createBadgeUpdaterForSecondaryTile(
"SecondaryTile.LiveTile").update(badge);
And as with tiles, BadgeUpdater.clear removes the badge entirely, which is equivalent to sending an update with the value of none.
Beyond that, the BadgeUpdater class has just two additional methods, startPeriodicUpdate and stopPeriodicUpdate, which are also found on the TileUpdater class. And wouldn’t you know it? Periodic updates just so happen to be our next topic—yes, I planned it this way too!
Sidebar: How Much Network Traffic for Tiles?
Included with the many improvements to Task Manager is the ability to track your app’s network traffic for tile updates. Run Task Manager, make sure you click More Details in the lower left, and then click the App History tab. Network traffic for tile updates is shown on the rightmost column. This number will typically be small, but it’s a metric you can monitor to see whether updates become excessive.

Periodic Updates
As described earlier in this chapter, periodic updates configure the system to automatically request tile and/or badge updates from a service on behalf of an app. Provided that the app has declared the Internet (Client) capability, this enables the app to continually keep its live tiles fresh without needing to run at all. Periodic updates for tiles (but not badges) can also be configured in your app manifest so that tile updates begin upon install, without the need to run the app.
Periodic updates are great proof that Microsoft listens to developer feedback. When the first Developer Preview of Windows 8 was released in September 2011, many developers were interested in implementing live tiles but it could only be done with push notifications and the Windows Push Notification Service, even if the tiles needed only low-frequency updates. In other words, push notifications were total overkill for apps that needed to get only a bit of data from a service every once in a while to create their updates. So developers asked, “Is it possible to have my app just run in the background, periodically request data from my service, and then issue tile or badge updates?”
It was a completely legitimate request, but, as described earlier, background tasks are carefully controlled and allowed only for very specific scenarios. Hearing this feedback, the tiles and notifications team at Microsoft studied the problem and found that creating a new class of background task would also be overkill for low-frequency tile updates. Furthermore, they found that even if apps could use a background task for this purpose, they’d all pretty much do the same thing: poll data from a service and populate a tile or badge template. So, instead of adding a background task, they added an API for system-managed periodic updates for Windows 8 and then added the ability to configure periodic updates from the manifest in Windows 8.1.
This API for setting up periodic updates from the app consists of the following methods of the TileUpdater and BadgeUpdater classes:
• TileUpdater.startPeriodicUpdate and BadgeUpdater.startPeriodicUpdate Configure Windows to request an update from a given URI with a specified period (see below). These calls remove any previous URIs registered for the tile. An app can specify an optional date and time around which regular polling should begin, and in all cases the first request will happen immediately (very helpful for debugging!). A good time to call these is when the app is launched, when it’s resumed, and when a configuration changes that might alter the URI.
• TileUpdater.stopPeriodicUpdate and BadgeUpdater.stopPeriodicUpdate Cancels the current periodic update process but does not clear the tile of existing updates. To do that, call the updater’s clear method.
• TileUpdater.startPeriodicUpdateBatch For tile updates only, is identical to startPeriodicUpdate but accepts an array of up to five URIs, automatically creating an update queue with the results (replacing any previous URIs). Note that TileUpdater.enable-NotificationQueue must be set to true prior to using this method, as described earlier in “Cycling, Scheduled, and Expiring Updates.”
In all these cases, each URI is represented by a Windows.Foundation.Uri object and the polling period is set with a value from the PeriodicUpdateRecurrence enumeration. Values are halfHour, hour, sixHours, twelveHours, and daily giving a clear indication that periodic updates are meant for content that changes relatively infrequently, like the weather, daily offers from local retailers, or the phases of the moon. For anything that requires more timely delivery, like appointment reminders, traffic conditions, current sports scores, or online auction status, you’ll need to use push notifications.
In addition, all these updates can employ tags and expiration times like local updates. One detail is that for any given polling request, a service can respond with only a single update payload—hence the need for startPeriodicUpdateBatch. That said, if the notification queue is enabled and the updates from the same service URI contain different tags, the live tile will behave the same as if those updates were issued locally: the most recent update for each tag (up to five) will be cycled through the queue.
Hint The periodic update API does not directly provide a means to authenticate with the service. This typically isn’t necessary because periodic updates are not designed to be user-specific. However, you can certainly include encrypted credentials in the URI with a query string. You might also be able to use the Enterprise Authentication capability if the app is running on a domain-joined system.
The app side of the periodic update scene is demonstrated in the Push and periodic notifications client-side sample (which I’ll often refer to as just the Push notification sample). Specifically, see scenarios 4 and 5, which are somewhat general tools to employ the TileUpdater andBadgeUpdater methods with a given service URI as I’ve just described. A few lines of that code (condensed from js/scenario4.js) appear as follows:
var notifications = Windows.UI.Notifications;
var updater = notifications.TileUpdateManager.createTileUpdaterForApplication();
updater.enableNotificationQueue(true);
updater.startPeriodicUpdate(urisToPoll[0], recurrence);
updater.startPeriodicUpdateBatch(urisToPoll, recurrence);
To configure a periodic update through the app manifest, you specify the recurrence and the URI in the Application > Tile Update section:
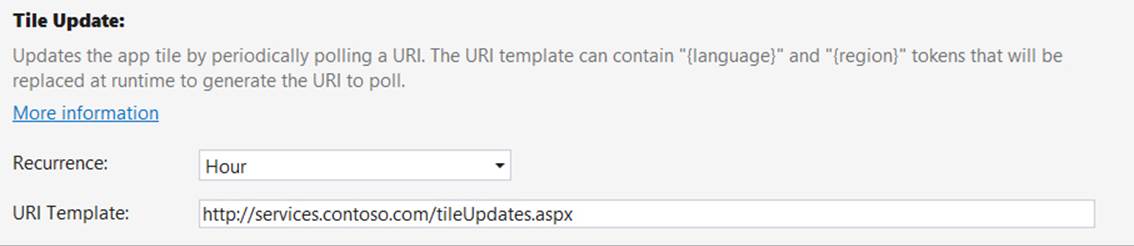
When the app is installed, Windows will take these two settings and call startPeriodicUpdate on your behalf, with the result that tile updates will begin before the app is even run the first time. Updating the tile from any other app code (including background tasks) will then override the settings in the manifest unless the app is uninstalled and reinstalled. This means that if you clear all updates from the tile and don’t reestablish other updates, the tile will revert to your static logo images.
Tip The {language} and {region} tokens that you can place in the URI (as indicated in the manifest editor) are used to localize tile updates from the server. We’ll cover these in Chapter 19.
As you can see, setting up periodic updates from the app is simple: the real work lies in the service itself, whose responsibility it is to return the appropriate XML with which Windows can create a local update. Indeed, being able to even run the client-side sample requires a service to which you can make requests, and unfortunately the Windows SDK does not provide one. So let’s remedy that situation with a service of our own.
Because you’ll likely use the client-side sample to play around with your own update service, though, you should make two changes, specifically to clear existing updates in the functions that stop polling. In js/scenario4.js, change the stopTilePolling function to read as follows:
function stopTilePolling() {
var updater = notifications.TileUpdateManager.createTileUpdaterForApplication();
updater.clear();
updater.stopPeriodicUpdate();
WinJS.log && WinJS.log("Stopped polling.", "sample", "status");
}
Similarly, change stopBadgePolling in js/scenario5.js to read as follows:
function stopBadgePolling() {
var updater = notifications.BadgeUpdateManager.createBadgeUpdaterForApplication();
updater.clear();
updater.stopPeriodicUpdate();
WinJS.log && WinJS.log("Stopped polling.", "sample", "status");
}
Without these changes, old updates will persist on the tile even after you stop the updates. If you then change your service but it has an error in the XML, you won’t see any change on the tile and might think that the update worked when it really didn’t. Trust me: making these small changes will simplify your life!
Creating an Update Service
Creating a service for periodic updates means creating a web page at some given URI whose sole purpose is to respond to an HTTP request with XML content for a TileNotification or Badge-Notification object. Ideally, such a page also handles the scaling, accessibility, and localization parameters provided in the query string described earlier in “Using Local and Web Images.”
The page can be implemented using whatever language, tools, and host you want. In fact, unless you enjoy programming in Notepad, you’ll want to utilize a good web development tool! One option covered later is to create an API through Windows Azure Mobile Services, but let’s talk first about the Visual Studio tools. Visual Studio Express for Windows is not itself equipped for the task of creating websites or services: you’ll need either the full version of Visual Studio or the free Visual Studio Express for Web; more on this in a moment. And if you use ASP.NET for your service, you can employ the Notifications Extensions Library for creating the tile XML.
As a minimal example, here is a functional one-line PHP page that generates XML for a badge update with the current day of the month:
<?phpecho "<badge value='".date("j")."'/>"; ?>
For proper XML we should also include a header element (the tile works with or without it):
<?phpecho '<?xml version="1.0" encoding="utf-8"?>';
echo "<badge value='".date("j")."'/>"; ?>
Drop this code into a .php file (see HelloTiles/dayofmonthservice.php in the companion content) on whatever web server you might have access to and—voila!—there’s a basic service that delivers badge updates. In fact, I’ve deployed this to a test service I created for this book on Windows Azure: http://programmingwin8-js-ch13-hellotiles.azurewebsites.net/dayofmonthservice.php. I’ll walk through this process in “Windows Azure and Azure Mobile Services.” Note that I created this for the first edition of the book when the present chapter was Chapter 13 instead; I’ve kept that original URI to demonstrate that the service side of things can be independent of the client, as we’ll also see with tile updates.
Anyway, you can use all this in scenario 5 of the Push and periodic notifications client-side sample—enter your service URI in the box, press the button to start polling, and then check the sample’s tile on the Start screen. In a few seconds you should see the day of the month appear as a badge. (Of course, with this ultrasimplistic example the date will reflect the local time on the server rather than the device, which could be completely mismatched. A real service would be sensitive to time zone and other locale-specific considerations.)
Tip If your service generates an error when handling the update request, you might see exceptions in your app code that otherwise don’t make any sense. With such mystery exceptions, carefully debug your service locally as described in “Debugging a Service Using the Localhost” later on.
Tip The tile and badge updaters are very sensitive to properly formed XML. In the PHP code above, leaving off the closing / for the badge element will cause the update to fail (that is, not appear). Avoiding such trivial errors is again why the Notifications Extensions Library was created, at least for ASP.NET. I’m hoping that some enterprising reader might consider a similar project for PHP and other server-side languages!
Another good option besides PHP is ASP.NET Razor syntax (typically in a .cshtml file), introduced with Microsoft WebMatrix. Razor/WebMatrix, along with tools such as Visual Studio Express for Web and a whole lot else, can be installed through the Web platform installer. To familiarize yourself with Razor, which works much in the same way as PHP, start with Walkthrough: Creating a Web Site using Razor Syntax in Visual Studio.
To make that long story short, here are the steps in Visual Studio Express for Web to create a simple tile update service with Razor:
• Select File > New Web Site from the menu.
• In the New Web Site dialog, select ASP.NET Web Site, give it a project name and folder, and press OK. Call this site HelloTiles.
• Once the project is created, you should see the Default.cshtml file opened.
• Copy and paste the following Razor code (that begins with @{) into that file, replacing the default contents. The little piece of C# code at the top for the weekDay variable is something we’ll use later to demonstrate debugging; it’s not used in generating the XML. Here, note that I tested and generated the XML contents by using the tile designer in scenario 6 of the App tiles and badges sample (refer back to Figure 16-14); this saved me lots of time wondering whether my XML was correct.
@{
//
// This is where any other code would be placed to acquire the dynamic content
// needed for the tile update. In this case we'll just return static XML to show
// the structure of the service itself.
//
var weekDay = DateTime.Now.DayOfWeek;
}
<?xml version="1.0" encoding="utf-8"?>
<tile>
@* version="2" enables Windows 8.1 templates but retains compatibility *@
<visual version="2" lang="en-US">
@* The fallback attribute specifies the Windows 8 template name *@
<binding template="TileSquare150x150PeekImageAndText02" branding="none"
fallback="TileSquarePeekImageAndText02" contentId="1">
<image id="1" src="http://www.kraigbrockschmidt.com/images/Liam07.png"/>
<text id="1">Liam--</text>
<text id="2">Giddy on the day he learned to sit up!</text>
</binding>
<binding template="TileWide310x150SmallImageAndText04" branding="none"
fallback="TileWideSmallImageAndText04" contentId="1">
<image id="1" src="http://www.kraigbrockschmidt.com/images/Liam08.png"/>
<text id="1">This is Liam</text>
<text id="2">Exploring the great outdoors!</text>
</binding>
@* Always put the large tile at the end for compatibility with Windows 8 systems *@
<binding template="TileSquare310x310SmallImagesAndTextList03" branding="none"
contentId="1">
<image id="1" src="http://www.kraigbrockschmidt.com/images/Liam07.png"/>
<text id="1">Liam--</text>
<text id="2">Giddy on the day he learned to sit up!</text>
<image id="2" src="http://www.kraigbrockschmidt.com/images/Liam08.png"/>
<text id="3">This is Liam</text>
<text id="4">Exploring the great outdoors!</text>
<image id="3" src="http://www.kraigbrockschmidt.com/images/Liam13a.jpg"/>
<text id="5">Still Liam</text>
<text id="6">He's older now, almost 7</text>
</binding>
</visual>
</tile>
• Run the website in Internet Explorer using the Debug > Start Debugging command or the Internet Explorer toolbar button (where you’d find the Local Machine or Simulator options in Visual Studio Express for Windows). This will launch Internet Explorer with a URI likehttp://localhost:52568/HelloTiles/Default.cshtml where the port number is what routes the URI to the site running in the debugger. If you need to set up your localhost server, see “Debugging a Service Using the Localhost.”
• Run the Push notifications sample, switch to scenario 4, paste the URI into the URL 1 field, and press the Start periodic updates.
• If all is well, you should see the wide tile update as follows. (OK, so it’s another shameless picture of my kid…what can I say? You have to give us fathers a break!) If you don’t see the update right away, try right-clicking and changing the tile size.
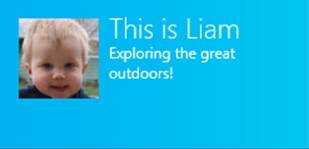
• If you make the tile smaller (to the medium size), you’ll see another gratuitous picture of my kid and peek text (below left), and the large tile size gives you yet more (below right):

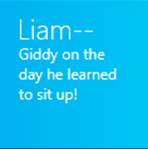
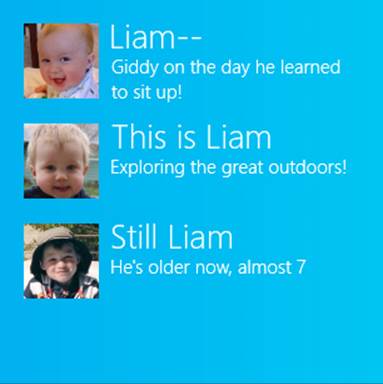
The complete website code for all this can be found in the HelloTiles example in this chapter’s companion content (and the page itself is deployed to my Windows Azure host at http://programmingwin8-js-ch13-hellotiles.azurewebsites.net/Default.cshtml). As simple as it is, it provides the basic framework in which you can add code to generate more dynamic results. In the top part of the file, within the @{ }, you can write whatever C# code you need.
Let me point out that although the tile update from Default.cshtml is a version 2 XML payload, I’m hosting it at the same URI on Azure that I used for the first (Windows 8) edition of this book that supported only version 1 payloads. Everything in the Windows 8 samples will still work because I’ve made sure to place the large tile update last, thereby keeping the rest of the payload v1 compatible.
Furthermore, there is a second page named Default2.cshtml in HelloTiles (and on my Azure host) that has different medium and wide tile payloads but the same large tile payload. In this XML you can see that I’ve used the same contentId for the large tile so that it appears only once while the medium and wide tiles cycle through two. You can again use scenario 4 of the Push notifications sample to put in either localhost (or Azure) URIs to see the effect.
Finally, the HelloTiles example includes another page called DefaultNE.aspx that shows how to use the Notifications Extensions Library on a web server. This requires that the library be compiled for use on an ASP.NET host rather than as a WinRT component, which I explain in my blog post Alive with Activity, part 2: Writing and debugging services for live tiles, under “Writing Services.” The companion content has a modified version of the library in the Notifications Extensions for Web folder.
Debugging a Service Using the Localhost
Debugging a tile and badge update service with periodic notifications can be a difficult proposition. You can just enter your service’s URI in a browser and use its View Source command to examine the XML, but how do you step through your server-side code to isolate problems?
The solution is to run your service on your local machine, as we just did in the previous section, where the URI references your localhost server, however you want to set it up. You can install a server like Apache or you can use the Internet Information Services (IIS) that’s built into Windows and integrated with the Visual Studio tools. To turn on IIS, go to Control Panel > Programs and Features > Turn Windows Features On Or Off as we saw also in Chapter 4. At the top level, check the Internet Information Services box at the top level, and when you click OK the core features will be installed:
Once installation is complete, the http://localhost/ URI is mapped to c:\inetpub\wwwroot. That’s where you drop something like the PHP page described in the last section so that you can use a URI like http://localhost/dayofmonthservice.php in the Push notifications sample (scenario 5, in this case, for badge updates). In doing so, you can now use your favorite server-side tools for debugging.
To use PHP with IIS, you might need to install it through Microsoft’s Web platform installer or the server-side code won’t execute properly. After PHP installation, try entering the URI for the PHP page in your browser. If you get an error message that says “Handler PHP53_via_FastCGI has a bad module” (yeah, that’s really helpful!), return to the Turn Windows Features On Or Off dialog, navigate to Internet Information Services > World Wide Web Services > Application Development Features, check the box for CGI, and press OK. Once the CGI engine is installed, your PHP page should work.
If you plan to work in ASP.NET or Razor, I highly recommend you also install Visual Studio Express for Web through the Web platform installer. When you run a website in its debugger, it assigns a port on localhost such as http://localhost:53528 and launches Internet Explorer with that URI. The port links the browser to the debugger, so if you set a breakpoint in the page code, the debugger will stop at that point whenever there’s a page request, allowing you to step through the code with the same features we’ve been enjoying with writing Windows Store apps.
For example, load up the HelloTiles example site with this chapter in Visual Studio Express for Web, set a breakpoint on the var weekDay line at the top (which is there only to give you something on which to set a breakpoint), and start debugging. Once Internet Explorer has loaded default.cshtml, copy and paste its URI into scenario 4 of the Push notifications sample. Press the Stop Periodic Updates button followed by the Start Periodic Update button to force a new request to the URI and—magic!—you should hit the breakpoint in the service:

Windows Azure and Azure Mobile Services
Generally speaking, a real service that provides tile and badge updates would typically be connected on the server side to some other useful source of information, perhaps to an always-running process that can monitor other sites, extract the desired data, and generate updates. Those updates can be returned from page requests, as we’ve seen here, or fed directly to the Windows Push Notification Service (WNS) so that they can be pushed directly to specific clients (as we’ll see later).
This is where the various capabilities of Windows Azure come in very handy, especially those of Windows Azure Mobile Services. But let’s take a step back for a moment and consider the bigger picture of Windows Azure.
When you’re ready to upload an app to the Windows Store and have real customers using your service, you’ll need to consider where, exactly, you’ll host that service so that it can scale to what hopefully becomes a very large customer base! During your development and testing process, of course, you can host the service anywhere you want because only a few instances of your app will ever call upon it. But if your app is acquired by many customers and each instance of that app starts banging on the host server for tile and badge updates, that host might soon become overloaded!
Windows Azure is thus a system that allows you to add more server power when it’s necessary and scale back when it’s not (and you pay only for what is actually used). To get started, visit http://www.windowsazure.com where you can set up a free 90-day trial for a hosted site and continue working within a free pricing tier indefinitely. The Windows Azure site also provides direct support and SDKs for .NET, node.js, PHP, Java, and Python, along with Visual Studio Express with Web for Windows Azure SDK—all available again through the Web platform installer. More importantly, many of the features you will likely need for apps are again provided through Windows Azure Mobile Services.
As a brief walkthrough to get you going, I started my Windows Azure trial, installed the Windows Azure SDK for .NET, and deployed the HelloTiles example service with these steps:
• Go to the Windows Azure Management Portal, and sign in with your account.
• Create a new website with some URI. I used ProgrammingWin8-JS-CH13-HelloTiles (originally for the first edition of this book), making the full site URI http://programmingwin8-js-ch13-hellotiles.azurewebsites.net/. This shows up in my portal under Web Sites:

• To upload the site, you must set up FTP credentials. Click the site in the list, which takes you to its specific dashboard. Under Publish Your App, click Set Up Deployment Credentials and enter a username and password.
• Click Dashboard along the top of the window, and scroll down the right side to find the FTP hostname:
• In Visual Studio Express for Web, right-click the project and select Copy Web Site. In the dialog that appears, click Connect along the top to open the Open Web Site dialog (below). Select FTP site on the left, enter the FTP hostname on the top, enter site/wwwroot in Directory, and then enter your credentials at the bottom. Make sure to prefix your username with the site name and a backslash (for example, ProgrammingWin8-JS-CH13-HelloTiles\JohnQUser) or you’ll be confused by Azure’s refusal to let you through the door! Finish by clicking Open.
• Once Visual Studio Express for Web is connected to the Azure site, you can upload your files through the Copy Web Site pane.
• When that’s complete, you should be able to use the site URI plus a page name as the URI for the badge and tile update services. Again try http://programmingwin8-js-ch13-hellotiles.azurewebsites.net/dayofmonthservice.php with the Push and periodic notifications client-side sample, scenario 5, and both http://ProgrammingWin8-JS-ch13-HelloTiles.azurewebsites.net/Default.cshtml and Default2.cshtml with scenario 4, and you’ll see the same results as when using the localhost. You can also just visit these URIs in a browser to see the XML they’re producing.
With this, you now have the ability to scale up your Windows Azure hosting, with your app supplying the hosted URI to the periodic update API. This also puts you in a good position to use push notifications, as we’ll see later, which specifically employs Windows Azure Mobile Services (which I refer to as AMS rather than its slang name “Zumo”).
Put simply, a mobile service on Azure is a collection of REST endpoints that provide powerful capabilities that apps need:
• Service endpoints (APIs), such as those to provide periodic tile and badge updates.
• Scheduled background jobs that can make requests to other services and store the results in your database. An example of this, to obtain tweets from Twitter, can be found on the Schedule recurring jobs in Mobile Services topic.
• Cloud storage in a SQL Server database, which is accessible like any other web-hosted SQL Server database and as tables through the client-side JavaScript library. The database can serve as a central data-gathering point from any number of web sites, services, scheduled jobs, and so forth, as shown in Figure 16-15 (coming up).
• Support for scalable push notifications (tiles, badges, toasts, and raw notifications alike).
• Authentication through different identity providers.
You can learn much more about mobiles services and the Mobile Services SDK on the How to use an HTML/JavaScript client For Windows Azure Mobile Services.
The utility of a central database becomes apparent when you think about creating a periodic notification service that draws data from other services. Although your service’s code could send off other HTTP requests to get data, those requests are asynchronous and are prone to a variety of failure conditions. This makes it difficult to just respond with an XML payload for a tile or badge update.
To simplify matters, we can take advantage of the fact that Windows will make requests to your service only at 30-minute or longer intervals, as enforced by the client API. This means you have lots of time during which other server-side processes—scheduled jobs, for example—can make external requests to monitor weather alerts, leaderboards, RSS feeds, and just about anything else for which there’s a web API. Those processes store results in your database, which are then ready for your periodic notification service to query (synchronously) when it receives its next request.
Indeed, any number of agents can update the same database. For example, users might be entering data through your website. They might be using mobile phone apps to track their activities, with results being automatically uploaded to a database. The database might also be getting updated by friends who are using the same app on their devices.
Such an arrangement is again illustrated in Figure 16-15, showing how the database serves as the central store for your backend state, with the periodic notification service acting only as a simple consumer of that state.

FIGURE 16-15 Using a central database to gather information that can be easily and synchronously consumed from a periodic notification service.
In any case, let’s return for the moment to the question of creating a periodic update endpoint, which takes only a bit of node.js code within AMS. To create the mobile service, click Mobile Services on the left side of the Azure portal, click + New on the bottom, and enter your details. As you can see, I have two mobile services in my Azure account:

Clicking the mobile service’s name takes you to the dashboard where all the capabilities are arrayed along the top:

The most interesting parts here are the Data section, where you can create cloud storage tables that your app and services can easily access through the client library; API, where you can create endpoints to serve up badge and tile updates; Scheduler, where you create server jobs to accumulate data for your tiles; Push, where you configure push notifications; and Identity, where you can set up authentication services.
Because we’re been talking about periodic updates, let’s use the API feature to create the same badge update service that we implemented earlier with PHP. Click API, click Create a Custom API, and give a name such as dayOfWeekBadge. Also, make sure the permissions for GET are set to “Everyone” or else a nonauthenticated user—namely the Windows tile manager—will not get the response!
A few moments after you create the API, it will appear on the API page. Click that name and you’ll open a script editor where you implement the service using node.js. Here’s a bit of script that responds with the same badge XML payload as the PHP page:
exports.get = function (request, response) {
var date = new Date();
var day = date.getDate();
var xml = "<?xml version='1.0' encoding='UTF-8'?><badge value='" + day + "'/>";
response.set('content-type', 'application/xml');
response.send(200, xml);
};
Once you save the script, your service endpoint is ready to go! The URI of the endpoint will be http[s]://<service_name>.azure-mobile.net/api/<api_name>. With my service shown here, it’s http://programmingwin-js-ams.azure-mobile.net/api/dayOfWeekBadge. Put this URI again into scenario 4 of the Push notifications sample, and you’ll see the badge on the tile. Put the URI into a browser, and you’ll see the raw XML.
For more on node.js, see the Server script reference and Script debugging in the Azure documentation along with //build 2013 session 2-509 Node.js on Windows Azure.
Toast Notifications
So far we’ve exhausted the subject of tiles and tile updates, which is a great prelude to our next topic, toast notifications. This is because the process of creating and issuing toasts is quite similar to that for tiles and is simplified by the fact that toasts do not get periodic updates: they either come from the running app, from background tasks, or through push notifications, as we’ll see in “Push Notifications and the Windows Push Notification Service” below. Fortunately, the topic of toasts is considerably shorter than that of tiles. Here are the salient aspects:
• Toasts always use the app’s Background Color and Foreground Text settings in the manifest for branding, along with the small logo. There are no means to override this; the branding attribute in the XML is ignored for toasts.
• An app must set the Toast Capable setting in its manifest for any toasts to appear on its behalf. This is found in the Application > Notifications area show below. Alarms, VoIP, and certain other apps also set the Lock Screen Notifications option here as well.
• As shown long ago in Figure 16-6, the user can disable toasts for a particular app or disable them globally (which I find helpful when recording a screencast!). System administrators can also disable toasts by policy. To check this status programmatically, look at the Toast-Notifier.settingproperty, a value from the NotificationSetting enumeration that will be enabled, disabledForApplication, disabledForUser, disabledByGroupPolicy, or disabledByManifest (meaning that you didn’t set Toast Capable to Yes).
• When enabled, toasts always appear in the upper right corner of the screen (left-to-right languages) or the upper left corner (right-to-left languages). This is not configurable.
• Toasts are managed through instances of the ToastNotification or ScheduledToast-Notification classes (for in Window.UI.Notificatons). The first supports an expirationTime property; the scheduled toast supports deliveryTime, snoozeInterval, and maximumSnoozeCount properties.
• As with tiles, the content of toasts are created with an XML payload from one of four text-only and four image-plus-text templates, as shown on the Toast template catalog. These are the same for Windows 8 and Windows 8.1 (that is, there is only one version). Toast templates are acquired from the ToastNotificationManager object’s getTemplateContent method, can be created from strings, or can be created through the Notifications Extensions Library. Various options can be set in the XML:
• Toasts can include text and an image, where the image can come from the app package, app data, or a remote source (given Internet Client capability). Images have the same limits as with tiles: 1024x1024 maximum resolution and 200KB maximum file size. Unlike tiles, however, if the image exceeds the limits, the notification will still show but with a gray placeholder image instead.
• Toasts can specify a predefined sound to play when the toast appears, with a looping option. Custom sounds are not supported.
• Toasts for alarms and incoming calls can display additional commands.
• By default, toasts appear for seven seconds (five seconds opaque plus a two-second fade) or until activated or dismissed. The user can control this time through PC Settings > Ease of Access > Other Options, and the opaque duration is available through theWindows.UI.ViewManagement.UISettings.messageDuration property. You can issue long-duration toasts, looping toasts, and recurring toasts that appear a given number of times with some interval in between.
• A toast is issued through the ToastNotifier class, namely the show and addToSchedule methods for immediate and scheduled toasts, respectively. The ToastNotifier also provides methods to manage previously scheduled toasts.
• Like secondary tiles, toast notifications can (and generally should) be created with specific arguments in the XML payload that will be passed to the app’s activated event handler with the activation kind of launch. Without such arguments, no activated event is raised, but otherwise an app handles toast notifications exactly as it would a secondary tile. Alternately, an app can listen to specific events that the toast itself will raise when it’s activated or dismissed.
Now we’ll examine a number of these steps, using the Toast notifications sampleand Scheduled notifications sample for reference. I also recommend you review the Guidelines for toast notifications. The Lock screen call SDK sample involves toasts too, but we’ll come back to that when we talk about the lock screen and background tasks.
Tip As noted before, toasts are not enabled within the Visual Studio simulator; you must run these samples on the Local Machine or a Remote Machine to see the toasts.
Creating Basic Toasts
Let’s start with scenarios 1, 2 and 3 of the Toast notifications sample, which shows how to issue toasts from a running app using the text and text+image templates. As shown in Figure 16-16 and Figure 16-17 (for text-only and text+image toasts, respectively), up to three toasts can be visible at one time. Remember that you must have Toast Capable set to Yes in the app manifest for any of this to work.
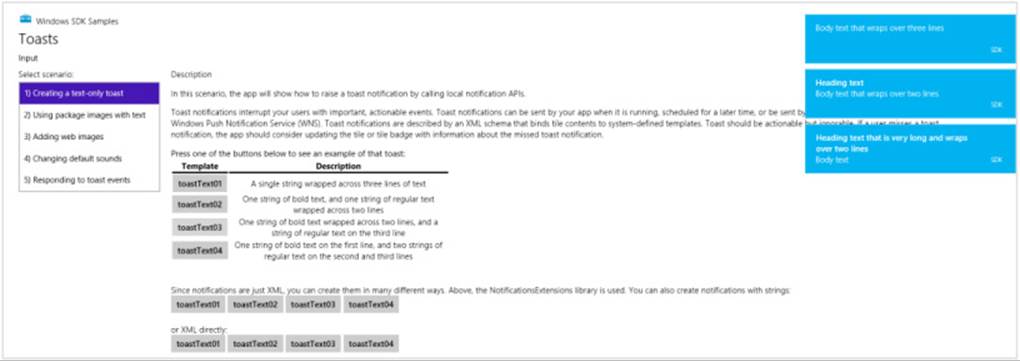
FIGURE 16-16 Issuing text toasts through scenario 1 of the Toast notifications sample. (The bottom of the app is cropped.)
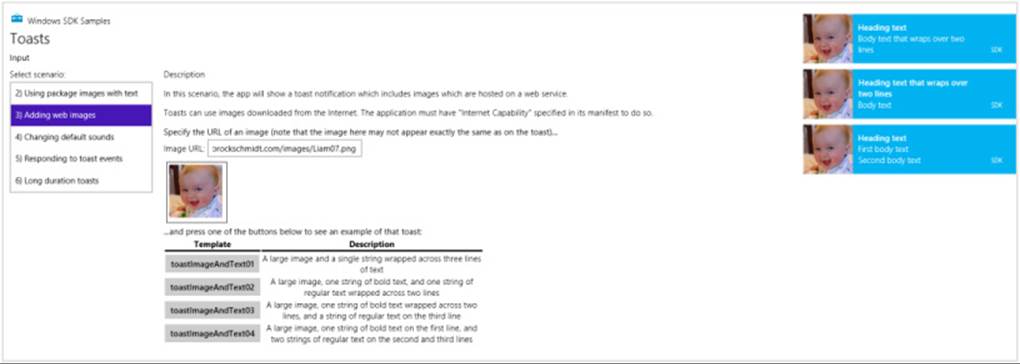
FIGURE 16-17 Issuing text+image toasts through scenario 3 of the sample (the bottom of the app is again cropped). Scenario 2 does the same thing with in-package images that aren’t nearly as interesting, in my paternal opinion, as my cute kid!
Just as we saw earlier with tiles, the sample shows how to create the XML payloads for toasts by using template content from ToastNotificationManager.getTemplateContent, the Notifications Extensions Library, or XML strings. The resulting XmlDocument is then used to create a Toast-Notification object that is then passed to the ToastNotifier.showmethod.
For example, here’s how scenario 1 (js/scenario1.js) issues a toast using the toastText01 template (a value from the ToastTemplateType enumeration) through getTemplateContent:
var Notifications = Windows.UI.Notifications;
function displayToastUsingXmlManipulation(e) {
// toastTemplateName is set according to the button you click
var notificationManager = Notifications.ToastNotificationManager;
var toastXml = notificationManager.getTemplateContent(
Notifications.ToastTemplateType[toastTemplateName]);
// Populate the XmlDocument in toastXml (code omitted)
var toast = new Notifications.ToastNotification(toastXml);
notificationManager.createToastNotifier().show(toast);
}
The following code from scenario 3 (js/scenario3.js) demonstrates creating a toast with XML strings (toastImageAndText01). As with tiles, you can use ms-appx:///, ms-appdata:///local, or http:// URIs to refer to images (in-package, app data, and remote images, respectively), and beware of connectivity when using remote images, as explained earlier in the chapter in “Sidebar: Connectivity and Remote Images in Live Tiles and Toasts.”
function displayWebImageToastWithStringManipulation(e) {
// toastTemplateName is set according to the button you click
var notificationManager = Notifications.ToastNotificationManager;
var toastXmlString;
if (templateName === "toastImageAndText01") {
toastXmlString = "<toast>"
+ "<visual version='1'>"
+ "<binding template='toastImageAndText01'>"
+ "<text id='1'>Body text that wraps over three lines</text>"
+ "<image id='1' src='" + urlBox.value + "' alt='" + altText + "'/>"
+ "</binding>"
+ "</visual>"
+ "</toast>";
} else {
// Other cases omitted
}
var toastDOM = new Windows.Data.Xml.Dom.XmlDocument();
toastDOM.loadXml(toastXmlString);
var toast = new Notifications.ToastNotification(toastDOM);
notificationManager.createToastNotifier().show(toast);
}
Butter and Jam: Options for Your Toast
Beyond the properties you can assign when creating a ToastNotification object (or a Scheduled-ToastNotification), there are additional bits you can include within the XML, as described in the Toast schema:
• The root toast element in the XML has optional launch and duration attributes. The launch attribute can be assigned a string that will be passed to the app’s activated handler as eventArgs.detail.arguments, exactly as happens with a secondary tile. (See “App Activation from a Secondary Tile” earlier in this chapter.) The duration attribute can have values of short (five seconds or the value from PC Settings > Ease of Access > Other Options) or long (25 seconds or the value from PC Settings, whichever is longer; refer back to Figure 16-6).
• The visual and binding elements in the XML can have addImageQuery attributes that act exactly like they do with tiles; refer back to “Using Local and Web Images” under “Tiles, Secondary Tiles, and Badges.” The image element also supports addImageQuery for scale, language, and contrast settings.
• The branding attribute in the visual and binding elements is ignored.
• The visual, binding, and text elements support a lang attribute to identify the current app language, which helps Windows find the right font for your text.
• Toasts that are used for alarms or incoming calls can include a commands element with a scenario attribute that can be alarm or incomingCall. It then contains one or more command children with id attributes. For alarms, the command ids are snooze and dismiss; for calls we have video,voice, and decline. We’ll see alarms soon; see “Lock Screen-Dependent Tasks and Triggers” for a bit more on calls.
The toast element can also have a child audio element through which you can add a sound to a toast notification provided that the user has not disabled notification sounds altogether in PC Settings > Search and Apps > Notifications. (Refer to Figure 16-6.) The particular sound is set with the src attribute whose value must be one of the following string values as described in the Toast audio options catalog:117
• ms-winsoundevent:Notification.Default
• ms-winsoundevent:Notification.IM
• ms-winsoundevent:Notification.Mail
• ms-winsoundevent:Notification.Reminder
• ms-winsoundevent:Notification.SMS
• ms-winsoundevent:Notification.Looping.Alarm[n] wheren is an optional number from 2 to 10. These sounds are clearly used with alarms.
• ms-winsoundevent:Notification.Looping.Call[n] wheren is an optional number from 2 to 10. These sounds are clearly used with incoming calls.
Separately, the audio.silent attribute controls whether audio plays at all (false, the default) or is muted (true). If the toast.duration attribute is set and you set audio.src to one of the “Looping” sounds above, you can also set audio.loop to true (to repeat the sound) or false (to play the sound only once, the default).
Scenario 4 in the Toast notifications sample lets you play with the different notification sounds—different buttons choose different sounds. The text of each button (in a variable named toast-SoundSource) is appended to the ms-winsoundevent:Notification., as in this XML used to create the notification:
"<audio src='ms-winsoundevent:Notification." + toastSoundSource + "'/>"
Scenario 6 shows the use of the loop attribute in the XML as well (but not all the sounds):
"<audio loop='true' src='ms-winsoundevent:Notification.Looping.Alarm'/>"
Did you actually hear any sounds? When I first ran these samples, I sure didn’t! It took me a while to figure out why, so let me save you the trouble.
The values in the audio.src attribute simply map to various system sounds that are assigned in Control Panel > Hardware and Sounds > Change System Sounds, which displays the dialog box below.Having tired of all the beeps, boings, and dingalings that were once all the rage on personal computers, I routinely select the “No Sounds” option under Sound Scheme. As a result, there were no sounds assigned to anything in the Program Events list, so there were no sounds whatsoever for toast notifications. When I selected the Windows Default scheme, I then heard sounds with the toasts.
In short, the user does have ultimate control over the sounds, both generally in PC Settings and specifically in the dialog box below. So, if it’s appropriate to use a sound at all, just choose the one that’s closest to the nature of your toast and leave it at that.
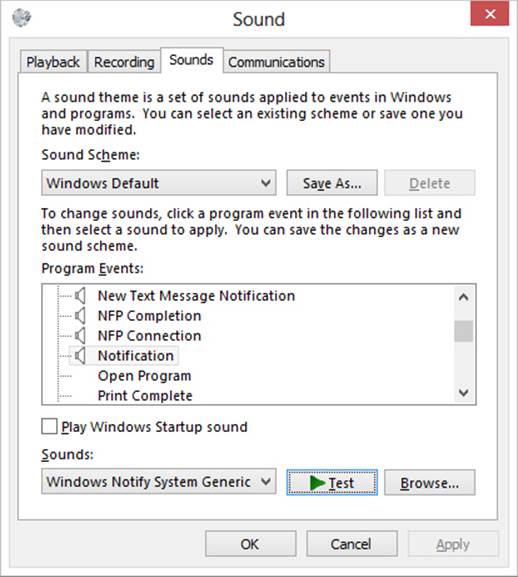
Tea Time: Scheduled Toasts and Alarms
Issuing toasts from a running app is all well and good, but it’s not actually a common scenario because the user is already looking at that same app. What’s more interesting are cases where the app isn’t necessarily running when a notification appears. This is why toasts are often used with push notifications and background tasks, as we’ll see in the last two sections of this chapter, but the other means is a scheduled toast that will simply appear at some later time regardless of whether the app is running, which is especially important for alarms apps. Scheduled toasts are a great way to invite the user to activate the app again.
A basic scheduled toast (we’ll come back to the special case of alarms) is created using the ScheduledToastNotification class instead of the usual ToastNotification. There are two forms of scheduled notification, as indicated by its pair of constructors:
• ScheduledToastNotification(content, deliveryTime) Creates a one-time scheduled toast with the toast’s XmlDocument in content and the UTC DateTime when it should appear in deliveryTime.
• ScheduledToastNotification(content, deliveryTime, snoozeInterval, maximumSnoozeCount) Creates a recurring scheduled toast whose content will appear at deliveryTime. If the toast is dismissed either explicitly or by letting it disappear on its own, it continues to appear a total ofmaximumSnoozeCount times at intervals defined by the number of milliseconds in snoozeInterval. The snoozeInterval must be set between 60 seconds and 60 minutes; for longer intervals it’s best to just schedule separate toasts altogether.
A ScheduledToastNotification also has an id property, a maximum 16-character string that’s used to identify that toast. If you schedule a toast with the same id as an existing one, the new one will replace the old.
In all cases, the toast is scheduled by calling the ToastUpdater.addToSchedule method passing in the notification object. Here’s the process in code, as found scenario 1 of the Scheduled notifications sample (js/scenario1.js), where toastDOM is the XmlDocument containing the content anddueTime is determined by a UI control in the sample. First, for a one-time notification:
var Notifications = Windows.UI.Notifications;
toast = new Notifications.ScheduledToastNotification(toastDOM, dueTime);
Notifications.ToastNotificationManager.createToastNotifier().addToSchedule(toast);
Second, for a notification that will repeat five times at 60-second intervals (the option that’s exercised if you check the Repeat checkbox in the sample’s UI):
var Notifications = Windows.UI.Notifications;
toast = new Notifications.ScheduledToastNotification(toastDOM, dueTime, 60 * 1000, 5);
Notifications.ToastNotificationManager.createToastNotifier().addToSchedule(toast);
To enumerate currently scheduled toasts, call ToastNotifier.getScheduledToast-Notifications. This returns a vector of ScheduledToastNotification objects, any of which can be canceled through ToastNotifier.removeFromSchedule. These methods are demonstrated in scenario 2 of the Scheduled notifications sample that I will leave you to examine more closely. Also, there are some debugging tips on the Guidelines for scheduled notifications topic in the documentation, mostly to note that the system has a limit of 4096 total notifications and to make sure you’ve set Toast Capable in the manifest to Yes.
Let’s talk about alarms now. If you refer back to Figure 16-8 (PC Settings > PC and Devices > Lock Screen), you’ll see an option at the bottom under Lock Screen Apps that says Choose An App to Show Alarms. This indicates that there is one app on the system that has the privilege to schedule alarms notifications and also have them appear on the lock screen, just like one calendar app can display detailed status. (That said, any alarms app that isn’t chosen for the lock screen can still issue scheduled toasts while it’s running and have them pop up more or less when they’re supposed to.)
To be a privileged alarms app, you must meet the following requirements:
• The app is toast capable (of course!) and declares a lock screen notification in its manifest.
• The app declares a background task of along with the windows.alarms extension in its manifest (making it lock screen capable).
• The app calls Windows.ApplicationModel.Background.AlarmApplicationManager.-requestAccessAsync, which prompts the user for consent to make this app the alarms app as shown below. Consent is necessary for alarms to appear on the lock screen; without it, scheduled toasts will still work as with any other app.
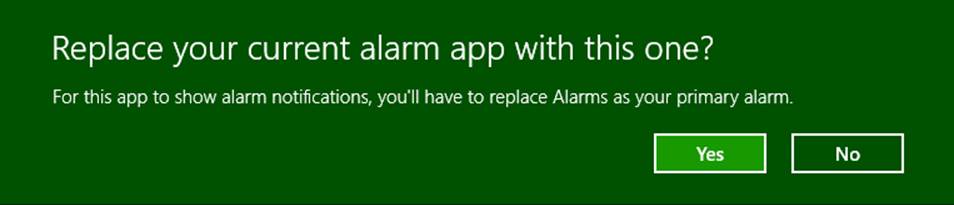
• The app then schedules toasts as always for its alarms, and can also include Snooze and Dismiss commands in the toast XML payload. These will appear with the toast only if the app is the one selected for the lock screen:
The Alarm toast notification sample in the SDK, from which the above images were taken, provides a simple demonstration of all these requirements. First is the declaration of toast capability and lock screen notification style on the manifest editor’s Application tab:
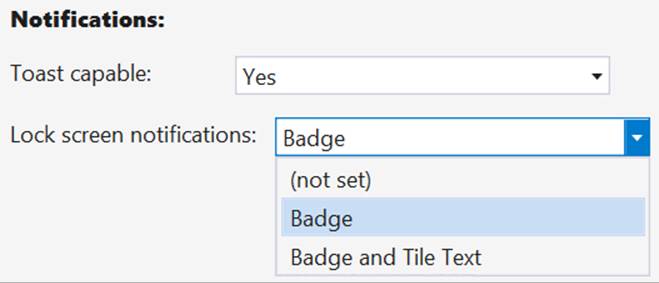
For the lock screen, of course, you’ll also need to provide badge graphics on the Visual Assets tab.
Next, on the Declarations tab of the manifest, add a Background Task declaration and check one of the task types like Timer (the sample also has Audio checked, but this isn’t necessary.) You also have to put something in the Entry Point field for the background task just to make the manifest XML schema happy. The sample actually includes a real entry point to a real file js/backgroundtask.js for this, but that code will never be invoked. You can just write “not used” and the app will still work fine.
What’s most important in the manifest is an extension with the category windows.alarms, which you must add in the XML. Altogether, then, the applicable XML within the Application element looks like this, using Timer as the most benign background task type:
<Extensions>
<Extension Category="windows.backgroundTasks"StartPage="not used">
<BackgroundTasks>
<Task Type="timer" />
</BackgroundTasks>
</Extension>
<m2:Extension Category="windows.alarm" />
</Extensions>
With all this in place, we ask to be the alarms app with one call (js/toast.js):
Windows.ApplicationModel.Background.AlarmApplicationManager.requestAccessAsync().done(
function (status) {
});
The result of requestAccessAsync is an AlarmAccessStatus value that indicates whether the user granted consent. The values are denied, allowedWithWakeupCapability, allowedWithoutWakeup-Capability, and unspecified (status isn’t known yet). The request can also be denied if the user has indicated through PC Settings to not allow alarms at all on the lock screen.
If at any time you want to check whether you are the privileged alarms app, the getStatusAsync method will return the current AlarmAccessStatus value.
Beyond this, it’s now just a matter of scheduling toasts as before, except that you can include a commands element within the XML payload alongside the visual element. Under commands you can include one or more command elements for snooze or dismiss features. Here’s the full payload as the sample builds in js/toast.js, shown as XML rather than the JavaScript string used to build it:
<toast duration="long">
<visual>
<binding template="ToastText02">
<text id="1">Alarms Notifications SDK Sample App</text>
<text id="2">Wake up Time with Default Snooze!</text>
</binding>
</visual>
<commands scenario="alarm">
<command id="snooze"/>
<command id="dismiss"/>
</commands>
<audio src="ms-winsoundevent:Notification.Looping.Alarm2"loop="true" />
</toast>
Toast Events and Activation
As far as toasts are concerned, we have perhaps saved the best topic for last! The whole purpose of a toast is to get the user’s attention and have them activate your app to take some kind of action. An app will commonly navigate to an appropriate page for whatever the content of the toast implies.
The most straightforward case of activation is with a scheduled toast, one that has been put up by a background task, or one that’s come through a push notification. In all of these cases the app won’t be running, so Windows will start it with the activation kind of launch, where the value of the payloads toast.launch attribute will be in the activated event’s eventArgs.detail.arguments property. This is, once again, identical to the way secondary tiles work and you can process the arguments value however you wish.
If the app is not running when the toast is activated, it will still be launched even if the toast.-launch attribute is empty. That is, toasts that occur under nonrunning conditions can be used to just launch the app, if desired. On the other hand, if a running app issues a toast with notoast.launch value, Windows will bring the app to the foreground but the app’s activated event will not be fired at all. This is a way of saying that activation through a toast with no additional information would never cause the app to navigate in the first place, so what’s the point of firing the activated event? None whatsoever. Thus, if a running app issues a toast with the intent that activating that toast will switch to a different part of the app, rather than just bringing the app to the foreground, a launch value is essential. (Of all the scenarios in the Toast notifications sample, only scenario 5 provides a launch value; set a breakpoint in the activated event of js/default.js, and you’ll see that scenario 5 is the only time that event will fire when you tap a toast.)
Still, a running app might want to know when the user interacts with a toast, launch arguments aside. For this purpose it can listen to a ToastNotification object’s activated, dismissed, and failed events, a few of which are demonstrated in scenario 5 of the sample. The activated event has no specific eventArgs, but dismissed comes with a ToastDismissalReason in eventArgs.reason (values are userCanceled, applicationHidden, and timedOut), and the failed event comes with an error code in eventArgs.errorCode. (These are all events from a WinRT object, so be sure to manage them with removeEventListener as appropriate. See “WinRT Events and removeEventListener” in Chapter 3.)
Note that a ScheduledToastNotification does not support any of these events because the assumption is that the app probably won’t be running by that time anyway.
Push Notifications and the Windows Push Notification Service
We’ve now finally arrived in this chapter where we can leave running apps behind and look at more of the fun things that can happen behind the scenes. Earlier, in “Periodic Updates,” we learned that the shortest interval you can use with that approach is pretty darn long by a computer’s reckoning: 30 minutes. That’s even long by many human standards, especially those of a user who really wants to know what’s happening with whatever information source your app is connected to.
To update a tile, set a badge, or issue a toast as quickly as the system allows, and to personalize the content (as with calendar reminders and email alerts), it’s necessary to be a little pushy and use push notifications. These are notifications that come to a system from an outside agent, typically a service that is monitoring some other source of information and detects conditions for which notifications are appropriate. We saw the mechanism in “The Four Sources of Updates and Notifications” and Figure 16-12 early in this chapter. To summarize:
• When launched, an app requests a channel URI for each of its live tiles and then sends those URIs to its associated backend service. An app should do this each time it’s launched, as the expiration period for a WNS channel is 30 days and use of the app at least once a month is a good indicator that the service should maintain that channel. Each channel URI is unique for the combination of user, tile, and device.
• The service stores the channel URI and associates it with a user to customize the user’s notification content (as again with email and calendar alerts, notifications from friends’ activities, etc.).
• When needed, the service issues updates (XML payloads) to that channel.
• WNS then sends the notification to the client devices where the app acquired the channel URI. Those notifications can update tiles, update badges, issue toasts, and update the lock screen (with appropriate lock screen apps and background tasks).
It’s also possible for the service and WNS to send a raw notification, which can contain any payload you want: there just needs to be someone listening as Windows won’t know what to do with the data. A foreground app can listen through thePushNotificationChannel.onpushnotificationreceived event; a lock screen app can listen with a background task. In the latter case, raw notifications are generally used to deliver information to the background task that then issues other notifications in response and/or updates app data.
Design tip You’ve probably fallen victim of apps that display interesting content on their tiles or in toasts, only to activate the app and find that the content isn’t yet available. The Windows News app is guilty of this: it sends new headlines from its backend through push notifications before the app can acquire the story. This disconnect between the notifications and the app content results in a poor user experience. To avoid this, use a raw notification to instruct a background task to acquire the content and store it in app data, and once that’s done, have the background task issue the toast or tile update such that activating either one will navigate the app to that specific content. The Sports app, in my observation, does a much better job of this with its tile.
Before you do anything in your app for push notifications, you must follow the instructions on How to authenticate with the Windows Push Notification Service (WNS) on the Windows Developer Center (which is part of a whole series on Push notifications). This will walk you through the steps on the Windows Store Dashboard to obtain a Package Security Identifier (SID) and a client secret with which your app’s web service authenticates itself with WNS.
In the sections that follow we’ll first go through each of the steps in turn, using scenarios 1–3 of the same Push and periodic notifications client-side sample we used earlier for periodic updates. This will illustrate the nature of the work that’s needed to make push notifications work. Then we’ll take a look at how Windows Azure Mobile Services (AMS) and other third-party offerings can do most of the work for you—I suspect that you’ll definitely want to employ such tools!
Tip To use the SDK sample to test push notifications, create an app for it in your Store account (don’t worry, you won’t publish it), and then use the Store > Associate App With The Store command in Visual Studio to set its identity. You’ll also need the SID and client secret from the Store dashboard so that your backend (including the example service we’ll be using) can authenticate with WNS.
Let me also point out that because channel URIs are unique for an app+user+device, using push notifications can become an expensive proposition for your backend, which must record and maintain a channel for every unique tile on every user’s device and then figure out when to send which notifications to which channels. If your app becomes popular, this will require scaling up your service to potentially manage thousands or even millions of channel URIs. A feature of AMS called notification hubs helps with this, and third-party services do as well. Still, it’s worth taking the time to seriously evaluate whether periodic notifications would be sufficient for your scenario, especially for updates that aren’t user-specific, because they will be much simpler on the server side of the picture and less expensive to sustain and maintain.
Requesting and Caching a Channel URI (App)
Requesting a channel URI is done through thePushNotificationChannelManager object. This manager has only two methods: createPushNotificationChannelForApplicationAsync and createPushNotificationChannelForSecondaryTileAsync. The first is clearly linked to the app tile as well as toast notifications; the second is clearly for use with secondary tiles and takes a tileId argument to identify the specific one.
The result of both async operations is a PushNotificationChannel object that will be passed to your completed handler, as shown in scenario 1 of the sample (start in js/scenario1.js, then go into js/notifications.js):
var channelOperation;
// Channel for the app tile
if (isPrimaryTile) {
channelOperation = Windows.Networking.PushNotifications.PushNotificationChannelManager
.createPushNotificationChannelForApplicationAsync();
} else {
// Channel for a secondary tile
channelOperation = Windows.Networking.PushNotifications.PushNotificationChannelManager
.createPushNotificationChannelForSecondaryTileAsync(itemId);
}
channelOperation.done(function (newChannel) {
// Send channel to service
}, /* error handler */
);
The PushNotificationChannel object (newChannel in the code above) is a simple object with just a few members, but they are important ones:
• expirationTime A read-only property indicating when the channel expires—notifications sent to this channel after expiration will be rejected. Apps must be sure to refresh their channels when needed to avoid an interruption in notifications.
• uri A read-only URI to which the backend service sends notifications to WNS.
• close A method that explicitly invalidates the channel.
• pushnotificationreceived An event that’s fired when a push notification is received on the client device from this notification channel. This will be fired only for apps that are in the foreground and includes raw notifications as well as tile, badge, and toast payloads.
Your app should go through this short process to obtain the necessary channel URIs whenever it’s launched and when it’s resumed (especially if any channel’s expirationTime has passed). It’s unlikely that an app would stay suspended for that long, but it’s still possible! Furthermore, if you’re concerned that your app might not run for more than 30 days, you can implement a background task on a maintenance trigger for this purpose. See “Tasks for Maintenance Triggers” later in this chapter and scenario 2 of the sample.
Again note that you’ll have multiple channel URIs if you’re using push notifications for both secondary tiles and your app tile. In this case you’ll be managing separate channel URIs for each tile. Also, save the channel URI for each tile in your local app state. This is so that you can check on subsequent runs if the URI is the same as one you’ve already obtained and sent to your service, and thus avoid unnecessary network traffic.
Sending the URI to your service can be done with a simple HTTP POST, as in the sample (inside channelOperation.done). Here we also see the checks for whether the URI is the same as before:
channelOperation.done(function (newChannel) {
// _urls[] is an array of channel ids for primary and secondary tiles
var tileData = that._urls[itemId];
// Upload the channel URI if the client hasn't recorded sending the same
// uri to the server
if (tileData && newChannel.uri === tileData.channelUri) {
// This saves the URI to local app data
that._updateUrl(url, newChannel.uri, itemId, isPrimaryTile);
completed(newChannel);
} else {
WinJS.xhr({
type: "POST",
url: url,// Best practice: use https URIs
headers: { "Content-Type": "application/x-www-form-urlencoded" },
data: "channelUri=" + encodeURIComponent(newChannel.uri) +
"&itemId=" + encodeURIComponent(itemId)
}).done(function (request) {
// Only update the data on the client if uploading the channel URI succeeds.
// If it fails, you may consider setting another background task, trying
// again, etc. (An exception will be thrown if it fails, ending up in the
// error hander instead.)
that._updateUrl(url, newChannel.uri, itemId, isPrimaryTile);
completed(newChannel);
}, failed);
}
}, failed);
Managing Channel URIs (Service)
If you use the code in the previous section, your service (the one that generates push notifications) will receive HTTP POST requests with unique channel URIs for each and every tile. This isn’t the only way to transport channel URIs, of course; in fact, because a channel URI might be used to transmit personal information through notifications, it should ideally be encrypted with a private key before it’s sent to the server, and even sent over HTTPS. Otherwise someone could possibly intercept that URI and use it to redirect user-specific notifications.
In any case, the service must expect to receive—and then manage—a unique URI for each app/user/device combination. This underscores the fact that push notifications are best used for user-specific notifications rather than broadcast notifications. In the latter case, setting up a service for periodic updates is again a much easier solution.
Once the service receives a channel URI along with any data to identify the user and the purpose of the channel, it should securely save that information in persistent storage of some kind, such as a SQL Server database (for an ASP.NET service or Azure Mobile Service) or a MySQL (for a PHP service).
It’s important that the service also removes obsolete channel URIs. If it receives a new URI for the same user and the same purpose, it should replace the old with the new. It should also remove any URIs if it receives an HTTP 404 or 410 error back from WNS, indicating an obsolete channel.
A simple ASP.NET service page that can receive a post from scenario 1 of the Push and periodic notifications client-side sample is the receiveuri.aspx page found in the HelloTiles website project in this chapter’s companion content. To run this service, make sure you have the localhost established, as described earlier in “Debugging a Service Using the Localhost.” You may also need to install ASP.NET on your localhost. An easy way to do this is to obtain the Background transfer sample, go into its Server folder, and then from an administrator command prompt runpowershell -ExecutionPolicy unrestricted -file serversetup.ps1. If you then run the site in Visual Studio Express for Web as we did before, you’ll have a localhost port for the service like http://localhost:52568/HelloTiles/-receiveuri.aspx.
You can then set a breakpoint in the service code, paste the service URI into scenario 1 of the Push notifications sample, and press its Reopen Channel And Send To Server button. This should hit the breakpoint in the service and allow you to step through the code that processes the request. Here you’ll find that the request contains channelUri and itemId values (along with LOGON_USER), which can be saved for when the service needs to send a notification to WNS.
Note that the receiveuri.aspx example page saves the URI into a text file with a hardcoded name (see its SaveChannel method), meaning that it’s good for just one channel URI! If you use this example as a basis for your own service, be sure to replace that code with something that can handle any number of URIs (or use tools so that you don’t have to do all the work manually).
Sending Updates and Notifications (Service)
Before a service can send updates, it must authenticate itself with WNS by sending the Package Security Identifier (SID) and client secret as obtained through the Windows Store Dashboard. This is a matter of sending a request to WNS (via HTTPS) that looks like this:
POST /accesstoken.srf HTTP/1.1
Content-Type: application/x-www-form-urlencoded
Host: https://login.live.com
Content-Length: 211
grant_type=client_credentials&client_id=ms-app%3a%2f%2fS-1-15-2-2972962901-2322836549-3722629029-1345238579-3987825745-2155616079-650196962&client_secret=Vex8L9WOFZuj95euaLrvSH7XyoDhLJc7&scope=notify.windows.com
where you must make sure the values of client_id and client_secret match the package SID and client secret. If the authentication works, you’ll receive a 200 OK response with the access token you need for sending notifications:
HTTP/1.1 200 OK
Cache-Control: no-store
Content-Length: 422
Content-Type: application/json
{
"access_token":"EgAcAQMAAAAALYAAY/c+Huwi3Fv4Ck10UrKNmtxRO6Njk2MgA=",
"token_type":"bearer"
}
Tip For everything that can go into a request to WNS and come back in the response, see Push notification service request and response headers. This includes setting an expiration time, setting cache policy, and tagging tile payloads.
Code that accomplishes these steps for a service written in C# can be found on How to authenticate with the Windows Push Notification Service, where your service would use the GetAccessToken method shown there to obtain an OAuthToken object with the information from the response. Services written in other languages will obviously need to use the appropriate means to send the request and receive the response.
Whatever the case, once you have the access token, you’re ready to start sending updates and notifications via HTTP requests to the channel URIs maintained by the service.
For tile updates, badge updates, and toast notifications, sending a notification means generating the XML payload as for any other update or notification, and then sending it to WNS with the previously acquired access token. The only real difference between these requests, besides the specific XML, is the value of X-WNS-Type in the request header: wns/badge, wns/tile, wns/toast, or wns/raw (see the next section). Otherwise the code is the same.
Generic code for a C# service can be found on Quickstart: Sending a push notification. I’ve included a badge update version in sendBadgeToWNS.aspx in the HelloTiles example site with this chapter, where the SID and client secret are old ones I once obtained for my copy of the Push notifications sample. You’ll need to change these for your copy of the sample that you’ve registered with the Store.
To test this now, run the HelloTiles website in Visual Studio Express for Web and set a breakpoint at the beginning of sendBadgeToWNS.aspx. Assuming you’re running scenario 1 of the Push notifications sample in Visual Studio Express for Windows to upload a channel URI to receiveuri.aspx, there should be a file called channeluri_aspx.txt in the website project that contains the uploaded data.
Now switch to scenario 3 of the Push Notifications sample, and press the button to start listening to the pushnotificationreceived event. In js/scenario3.js of that sample, set a breakpoint within the pushNotificationReceivedHandler function. With all this in place, open a browser and enter the address of sendBadgeToWNS.aspx on the Localhost, such as: http://localhost:52568/HelloTiles/sendBadgeToWNS.aspx. This should hit the breakpoint in Visual Studio Express for Web, where you can walk through that page’s code and see it loading the channel URI from channeluri_aspx.txt, to which it then sends a badge update. When that happens, you should hit the breakpoint in the Push notifications app where you can walk through that code. Note that when you get to the line e.cancel=true, skip over it—right-click the line below it and select Set Next Statement—or just make sure the value is false before your return. This will allow Windows to process the notification and update the badge for the Push notifications sample, which should now look like the following with a * (alert) badge on the lower right:
Note again that if you receive an HTTP 404 or 410 error back from WNS, the channel URI is no longer valid and you should remove it from your list. It’s also good for the app to notify your service whenever it no longer needs updates for a particular channel (no point in paying for unproductive bandwidth). And if WNS returns an error, avoid posting the update again unless it makes sense for your scenario.
404 or 410 errors are different, by the way, from an inability to deliver a notification because the client is offline. In this case WNS will cache the tile, badge, or raw notification until the client reconnects. In other words, it’s not a condition that your service has to worry about. Send notifications as you always would, and let WNS handle the delivery details.
Raw Notifications (Service)
If you use wns/raw as the push notification type, the payload included with the push notification can be anything you want, not just XML, as long as it’s under 5KB (see Guidelines for raw notifications). Of course, Windows cannot do anything with this payload directly, so an app has to provide a handler for receipt of the notification, as we’re about to see.
Receiving Notifications (App)
A running app receives push notifications through the PushNotificationChannel.onpushnotificationreceived event. This is again required to process wns/raw payloads but can be used for any type. If the app is not running, of course, it won’t receive this event. Instead, the app must be on the lock screen with a PushNotificationTrigger background task for this purpose. (See “Lock Screen Dependent Tasks and Triggers” later in this chapter.) That piece of code will then receive the XML payload, process it, and issue whatever tile/badge updates or toast notifications are necessary. Besides saving some state to the app data folders, this is really all that the background task can do, but it’s enough to keep that sense of aliveness going as well as invite the user to launch the app in response.
In the running app, the pushnotificationreceived event is fired for the other notification types as well. Scenario 3 of the Push notifications sample shows this in its event handler—I’ve modified this code a little bit for simplicity:
function startListening() {
// Assume channel has been obtained and validated
channel.addEventListener("pushnotificationreceived", pushNotificationReceivedHandler);
}
function pushNotificationReceivedHandler(e) {
// Extract notification payload for each notification type
var notificationPayload;
switch (e.notificationType) {
case pushNotifications.PushNotificationType.toast:
notificationPayload = e.toastNotification.content.getXml();
break;
case pushNotifications.PushNotificationType.tile:
notificationPayload = e.tileNotification.content.getXml();
break;
case pushNotifications.PushNotificationType.badge:
notificationPayload = e.badgeNotification.content.getXml();
break;
case pushNotifications.PushNotificationType.raw:
notificationPayload = e.rawNotification.content;
break;
}
// Process the notification: set e.cancel to true to suppress automatic handling.
}
The last bit in the comment above is important. When you receive this event in a running app, it wouldn’t be necessary to display a toast unless it pertains to some other part of the app that isn’t visible. For example, if you have an app that handles both email and a calendar, you might want to show email toasts when the user is looking at the calendar and calendar toasts when the user is looking at email. In this case, setting e.cancel to true will suppress the toast.
With the pushnotificationreceived event, the running app gets first crack at raw notifications. If the app doesn’t process it, the notification will be sent to any lock screen background task configured for the PushNotificationTrigger. In either case, refer to the Raw notifications samplefor details.
Debugging Tips
When using push notifications, experience shows that if notifications aren’t getting through, it’s typically not a problem with WNS. Here’s a list of things to check (thanks to Hans Andersen):
• Check the return status of your HTTP POSTs to WNS. If it’s returning an HTTP 200 response, check the X-WNS-NotificationStatus and other headers you get back. Look particularly for the status of “Received,” which indicates that a notification has gone to the client.
• Lacking anything conclusive in the headers, run Event Viewer and check the events under Application And Services Logs > Microsoft > Windows > Push Notifications Platform > Operational to see the activity.
• Also look under Application And Services Logs > Microsoft > Windows > Immersive-Shell > Microsoft-Windows-TWinUI > Operational to see if there are error messages related to XML parsing about the same time you expected to receive a notification.
• Even if the XML is well-formed, an update might not show up if a referenced image is either too large (pixel dimensions or file size), if the image is the wrong format (for example, TIF), if the image is corrupt, if the server handling the image request can’t handle the query parameters for the tile (scaling, contrast, language), or if the server is encountering other errors as might be revealed in its own logs.
• If updates appear but after a considerable delay, it could just mean internal timeouts or other network latency within the tile and notification infrastructure. If this happens, just accept that the world isn’t always perfect and operations must sometimes be retried!
Tools and Providers for Push Notifications
Now that we’ve gone through the intricate details of working with push notifications, even omitting the question of storage, you’re probably wondering, “Is there any way to make all this simpler?” Just imagine what it would take to manage potentially thousands or millions of channel URIs for a hopefully large and expanding customer base!
Fortunately, you’re not the first to ask such questions. First of all, a number of third parties provide solutions for push notifications, which you can find listed on http://services.windowsstore.com/ and filtering on the “Push Notifications” service type. There you’ll see providers such as Urban Airship, Push IO, and Parse, all of which I can recommend with confidence. You can also employ Windows Azure Mobile Services (AMS) and its JavaScript client library for this purpose as described on Get started with push notifications in Mobile Services. Here’s how it fulfills all the requirements:
• App Registration with the Windows Store Once you obtain the client secret and SID for your app from the Windows Store, go to the Push section of the mobile service and save those value under Windows Application Credentials.
• Obtaining and Refreshing Channel URIs Requesting and managing channel URIs in the app is purely a client-side concern and is the same as before.
• Sending Channel URIs to the Service This step becomes far easier with AMS. First you create a table in the mobile service under the Data section. Using the AMS client library, the app can then simply insert records with channel URIs and any other key information you need to attach. The client library takes care of the HTTP request behind the scenes and even updates the client-side record with any changes made on the server. Furthermore, AMS can automatically handle authentication through the user’s Microsoft Account or through three other OAuth providers—Facebook, Twitter, or Google—if you’ve registered your app with one of them. See Get started with authentication in Mobile Services.
• Sending the Notification Within the mobile service, you can attach scripts (written in node.js) to database operations, and also create scheduled jobs. In these scripts, a simple call to the push.wns object with a channel URI and a payload generates the necessary HTTP request to the channel. It’s also a simple matter to capture push failures and record the response with console.log. Those logs are easily reviewed on the Windows Azure portal.
For extensive details, see these two sample tutorials: Tile, Toast, and Badge Push Notifications using Windows Azure Mobile Services and Raw Notifications using Windows Azure Mobile Services. Also refer to my post on the Windows Developer Blog, Alive with Activity, Part 3: Push notifications and Windows Azure Mobile Services where I show the relevant highlights. The short of it is that you create an instance of the MobileServiceClient object in the AMS client library:
var mobileService = new Microsoft.WindowsAzure.MobileServices.MobileServiceClient(
"https://{mobile-service-url}.azure-mobile.net/",
"{mobile-service-key}");
This class encapsulates all the HTTP communication with the service, relieving you from all that low-level plumbing that you probably don’t want to think about. For example, instead of sending a channel URI and other to the service, you can just store it in a data table. In the mobile service, a node.js script can pick up that insertion and then send a push notification in response.
In my post I also elaborate on how you might use push notifications in different real-world scenarios, such as using social networks, issuing updates and alerts for news and weather, and messaging. The basic idea in all of them relates back to Figure 16-15 at the end of “Periodic Updates,” where you use a central database to gather information for your update services. With push notifications, you can use database inserts or other modifications as triggers to issue push notifications to the appropriate channels.
Background Tasks and Lock Screen Apps
At the end of the introduction to this chapter, I described how everything we’ve talked about so far helps to “create an environment that is constantly alive with activity while those apps are often not actually running or are allowed to runjust a little bit.” That last phrase—being allowed to run just a little bit through background tasks—is our last topic, and it relates to the lock screen because apps that are allowed to work behind the lock screen employ background tasks to do so.
Let me reiterate that we’ve already seen many scenarios in which users can experience app-related activity without apps having to run. Periodic tile updates, push notifications, scheduled toasts, and even sharing data through the Share contract all provide for activity when an app is suspended or not running. Apps can also configure background data transfers to occur while the app isn’t running, as we’ve seen in Chapter 4. And background audio provides for that specific class of apps that need to continue running to maintain VoIP sessions, audio playback, online meetings, device firmware updates, and so forth.
What’s left in the story are those little pieces of app code that Windows can run in response to specific triggers. Triggers in some cases can be further refined with optional conditions so that the background task runs only when it really needs to, thereby minimizing needless background activity that drain a device’s battery. Some types of triggers, in fact, require that the user has placed the app on the lock screen to specifically limit the number of apps that can respond to those triggers. Windows also limits the amount of CPU time that background tasks can consume:
• Lock screen background tasks Two seconds of cumulative CPU time per 15 minutes.
• Other background tasks One second of cumulative CPU time every two hours.
Consumption of network bandwidth is also limited on battery power. What that limit is, exactly, I cannot say, because the system analyzes energy usage more so than bytes transferred. A means of estimating the limit can be found on Supporting your app with background tasks. (While we’re at it, you might also be interested in Guidelines and checklists for background tasks, the Introduction to background taskswhitepaper, and Being productive in the background – background tasks on the Windows Developer Blog.)
“Whoa!” you’re probably saying, “Is Windows really that restrictive?”
The short answer is yes, because Windows wants to save battery power for the foreground app with which a user is engaged and to help the foreground app deliver the best user experience. This means it isn’t competing with background apps that would, if allowed, take up as many resources as they possibly can (like background services on the desktop seem to do!).
It’s likely that you’ve experienced situations like this directly, where you’ve started an app but it takes for-EV-er to get going because some other dark and mysterious service is chewing on the hard drive, pounding the network, flaring up the CPU, and so forth. I, for one, have dug through Task Manager and the Resource Monitor to figure out—and kill off—whatever process is pouring molasses on my system, let come what will. This is the kind of user experience that Microsoft is trying to avoid with Windows Store apps.
“OK,” you say (assuming that I’ve actually convinced you to some small degree), “does that mean that there isn’t any way to do some background work like indexing data, creating picture thumbnails, processing video, and so on?”
Actually, there are ways to do this. For one, when an app is visible (and thus in for foreground, though it might not have the focus), it can do however much it wants of all these things because it’s ultimately responsible for its own user experience.
Second, when a device is on AC power instead of battery, Windows allows apps to run background tasks in response to maintenance triggers on 15-minute or longer intervals (whatever is appropriate for the app). These are still limited in the total amount of CPU time they can consume, but tasks that don’t involve UI—and background tasks are not allowed to alter UI—can burn through a few billion instructions in one or two seconds on a gigahertz CPU!
What we have in this whole story, then, are three distinct classes of background tasks and their associated triggers:
• Tasks for maintenance triggers that run on AC power only.
• Tasks for potentially conditioned system triggers that run on AC or battery and don’t require being on the lock screen.
• Tasks for those privileged apps that the user has added to the lock screen.
We’ll look at each of these in detail, but let’s first examine a few aspects that all of them share: declaring background tasks in the manifest, the general process of building the task with the WinRT API, and applying conditions.
Lock screen personalization Configuring the lock screen image or slide show is not dependent on background tasks. This is discussed in Chapter 4 in “The User Profile (and Lock Screen Image)” and demonstrated through the Lock screen personalization sample.
Background Tasks in the Manifest
All background tasks for an app are declared in the manifest, where each declaration indicates the type of task as well as the code to execute for that task, as shown in Figure 16-18. We’ve seen this section of the manifest before in Chapter 12 and Chapter 13 where we checked Location and Audio, respectively, for background geolocation monitoring and background audio, respectively. As for the other options, System Event is used for maintenance and non–lock screen triggers; Control Channel, Timer, and Push Notification are used with lock screen apps.
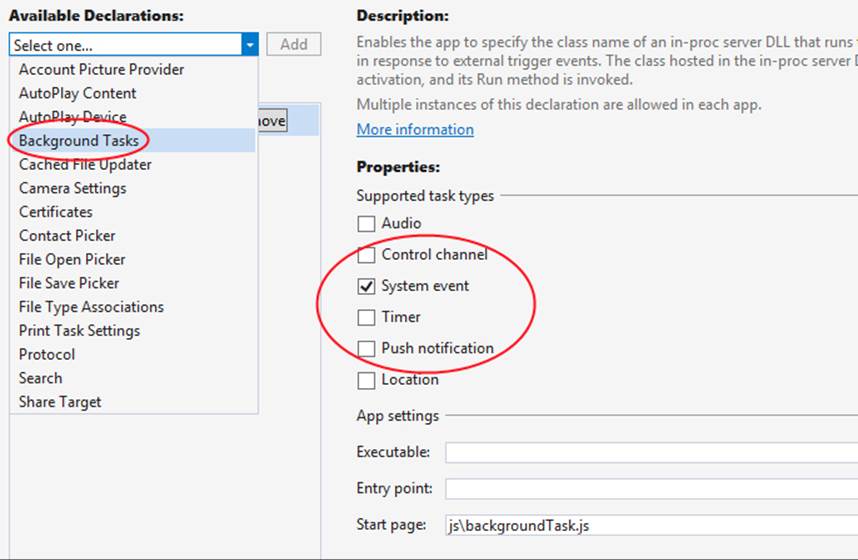
FIGURE 16-18 The manifest editor for declaring background tasks, showing the option for Background Tasks in the drop-down list of Available Declarations (left), the background task types (center), and the Start Page field to indicate the JavaScript code to run for the task (bottom). Background tasks can also be written in other languages, in which case the Executable and Entry Point fields are used.
In all cases, the Start Page field is where you indicate the JavaScript file to execute for the task, but do note that because background tasks execute independently of the app itself, sharing state only through app data, you can choose whatever language you want. Given the quotas on CPU time, writing a background task in a language like C++ or C# will allow you to do some tasks more efficiently, in which case you’ll use the Entry Point field (if the task is in a DLL in the package) and perhaps the Executable field (if the task is in another EXE in the package) to identify the code module and specific function to call.
It’s also good to note that even though the Start Page field suggests a page, you always point to a piece of JavaScript that runs as a web worker, and thus no HTML or CSS can be loaded here. Indeed, issuing tile updates, badge updates, and toasts is as much UI work as a background task is allowed. For anything else, the background task must write values to app data that the main app can pick up within its handlers for background task events, as we’ll see shortly.
You might also notice that triggers aren’t represented in the manifest. This is done in code when you build the task, as we’ll see next.
Building and Registering Background Tasks
The declaration of a background task in the manifest is only that—a declaration that tells the system that the app intends to use a background task. The app must still register the background task from code for it to execute at all, which is accomplished using the BackgroundTaskBuilder(whose namespace, Windows.ApplicationModel.Background, contains everything we’ll be referring to in the context of background tasks). Simply said, you create an instance of the builder, set its name and taskEntryPoint properties, call its setTrigger and addCondition methods to specify exactly when the task should run, and then call register.
Generic code for this is found in the Background task sample within js/global.js. This module declares a global object BackgroundTaskSample that contains a number of properties and methods. The one that concerns us here is a method called registerBackgroundTask that registers a given entry point (the name of a JavaScript file or the name of a class in C#, Visual Basic, or C++), with a given name, and applying some trigger and condition:
var BackgroundTaskSample = {
// Properties with names and entry points of the sample's tasks are omitted
// Register a background task with the specified taskEntryPoint, taskName, trigger,
// and condition (optional).
"registerBackgroundTask": function (taskEntryPoint, taskName, trigger, condition) {
var builder = new Windows.ApplicationModel.Background.BackgroundTaskBuilder();
builder.name = taskName;
builder.taskEntryPoint = taskEntryPoint;
builder.setTrigger(trigger);
if (condition !== null) {
builder.addCondition(condition);
}
var task = builder.register();
BackgroundTaskSample.attachProgressAndCompletedHandlers(task);
// [Sample-specific code omitted]
// Remove previous completion status from local settings.
var settings = Windows.Storage.ApplicationData.current.localSettings;
settings.values.remove(taskName);
},
In this code, the BackgroundTaskBuilder.register method returns a BackgroundTaskRegistration object through which you manage a registered task. A registered task will have a name property and a system-assigned taskId property, the latter of which you can use to tag app data that’s unique to the task. It also has an unregister method (which you would call for an obvious purpose) and two events: completed and progress. Handlers for those events are assigned in the usual manner with addEventListener, as seen within theBackgroundTaskSample.attachProgressAndCompleted-Handlers function in the sample:
"attachProgressAndCompletedHandlers": function (task) {
task.addEventListener("progress",
new BackgroundTaskSample.progressHandler(task).onProgress);
task.addEventListener("completed",
new BackgroundTaskSample.completeHandler(task).onCompleted);
},
One of the key uses of these handlers—which are part of the running app—is to perform UI update tasks in response to data left behind by the background tasks. Those tasks themselves cannot work with UI, but they can save data to the app data areas that they share with the main app. The completed and progress events, then, are how the main app with the UI thread can pick up those events from the background task to read values from app data and do the necessary updates. The Background task sample does this in each of its scenarios.
There is also one static property, BackgroundTaskRegistration.allTasks, a MapView through which you can retrieve the BackgroundTaskRegistration object for each registered task.
It’s very important to note that Windows allows you to register the same background task twice and will assign unique taskId values to both, so be careful to avoid duplicate tasks. Furthermore, background task registration will persist across app updates, so if you update your tasks be sure to check for and unregister old ones when your update is launched.
With this structure, the question now becomes: what do we provide for the triggers and the conditions? The answer is what differentiates the various kinds of background tasks.
Conditions
The specific conditions you can specify through BackgroundTaskBuilder.addCondition are instances of the SystemCondition class. A background task registered with one or more conditions—each call to addCondition is cumulative—will run only if the conditions are met. Each instance can be one of the following types as defined in the SystemConditionType enumeration:
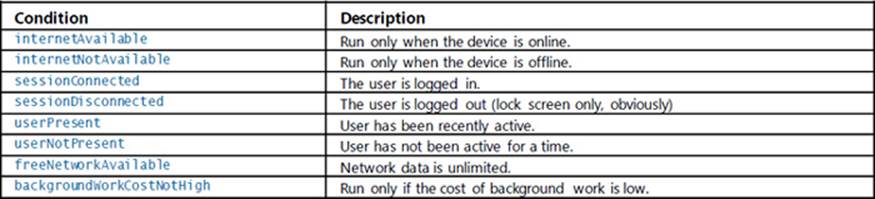
Clearly, each complementary pair of these conditions is mutually exclusive: if you register a task with internetAvailable and internetNotAvailable, Windows will recognize that you never really wanted to run the task in the first place, so it will let it sit on the roadside, forever undisturbed! Otherwise, you can use these to make sure that your task is run only when needed. If you want to execute a background task that renews push notification channels, for example, there’s no point in trying if there’s no connectivity. (We’ll see an example next in “Tasks for Maintenance Triggers.”) On the other hand, if you have a background task that you want to make sure never interferes with the overall user experience, you can add the userNotPresent condition.
Note that because the sessionDisconnected condition implies that the user has logged out, it’s useful only for background tasks that require the lock screen.
The backgroundWorkCostNotHigh condition relates to the static property BackgroundWorkCost.-currentBackgroundWorkCost. This contains a hint of the current resource availability for background tasks that comes from the BackgroundWorkCostValue enumeration. The values are low, medium, and high, so the condition here applies when the current hint is low or medium.
Tasks for Maintenance Triggers
Background tasks that use a maintenance trigger are the most generic kind of task—they run any kind of code you want to run every now and then when the system is on AC power.118 Such tasks are best for “checking up on something” or other activity that you want to run periodically but don’t really care when. As such, maintenance triggers aren’t appropriate for something like synchronizing data with a server because that should happen in a more timely manner and is best done with the background transfer API that we saw in Chapter 4.
A maintenance trigger—what you pass to BackgroundTaskBuilder.setTrigger—is an instance of the MaintenanceTrigger class. When creating the instance, you provide two parameters. The first is basically the refresh period you need (the freshnessTime property, in minutes), and you should use the longest period that’s reasonable for your scenario; the system will always wait at least this long before first running the task. The second parameter is a flag that indicates if the task needs to be run only once (the oneShot property).
Scenario 2 of the Push and periodic notifications client-side sample demonstrates using a maintenance trigger to periodically refresh its WNS channels, as described earlier in “Requesting and Caching a Channel URI.” The code here is condensed from js/scenario2.js, some of which is in an internal function called registerTask:
var background = Windows.ApplicationModel.Background;
var pushNotificationsTaskName = "UpdateChannels";
var maintenanceInterval = 10 * 24 * 60; // 10 days
var taskBuilder = new background.BackgroundTaskBuilder();
var trigger = new background.MaintenanceTrigger(maintenanceInterval, false);
taskBuilder.setTrigger(trigger);
taskBuilder.taskEntryPoint = "js\\backgroundTask.js";
taskBuilder.name = pushNotificationsTaskName;
var internetCondition = new
background.SystemCondition(background.SystemConditionType.internetAvailable);
taskBuilder.addCondition(internetCondition);
taskBuilder.register();
Because the expiration period for channel URIs is 30 days, the sample creates a trigger on a recurring 10-day interval (10 days * 24 hours/day * 60 minutes/hour). It also wisely adds the internetAvailable condition because it’s again pointless to attempt to renew channel URIs when there’s no connectivity.
The task itself can be found in the js/backgroundTask.js file of the sample, as indicated in the taskEntryPoint property:
(function () {
// Import the Notifier helper object
importScripts("//Microsoft.WinJS.2.0/js/base.js");
importScripts("notifications.js");
var closeFunction = function () {
close();
};
var notifier = new SampleNotifications.Notifier();
notifier.renewAllAsync().done(closeFunction, closeFunction);
})();
This task code pulls in a couple of other script files using importScripts, the second of which, notifications.js, is the sample’s set of helper functions for notifications where renewAllAsync refreshes the app’s list of previously saved channel URIs.
Important Notice that the completed and error handlers given to the promise from renewAllAsync both go to closeFunction, which makes this mysterious call to close. What close is this? Well, it’s not window.close but rather WorkerGlobalScope.close. Background tasks in an app written in JavaScript run as web workers, so the global scope within the code is WorkerGlobalScope rather than window. Calling this makes sure the independently running background task is shut down and guarantees that the resources that were allocated for the task are properly released.
Sidebar: The Task Instance and Background Task Deferrals
Within a JavaScript background task, the Windows.UI.WebUI.WebUIBackgroundTask-Instance.current property contains a WebUIBackgroundTaskInstanceRuntimeClass object with additional details about the running task: its instanceId, its associated BackgroundTaskRegistration object in the task property, a progress property in which the task can store a percentage value, a succeeded flag to indicate that the task has completed, a suspended count (when the task is suspended due to the resource quota being exceeded), and a canceled event that informs the task that the app as a whole has been terminated.
This object also provides a getDeferral method that, once again, returns a deferral object whose completed method you call when the task is complete. As always, you employ the deferral if you need to perform asynchronous operations within the background task. Just be sure to always call close when everything is finished.
Tasks for System Triggers (Non-Lock Screen)
The next class of background tasks contains those tied to a variety of system triggers, specifically instances of the SystemTriggerclass. You again create the trigger object with new and pass two parameters: a SystemTriggerType value (available afterwards as the triggerType property) and a oneShot Boolean flag. The triggers that operate independently of the lock screen are described in the following table:
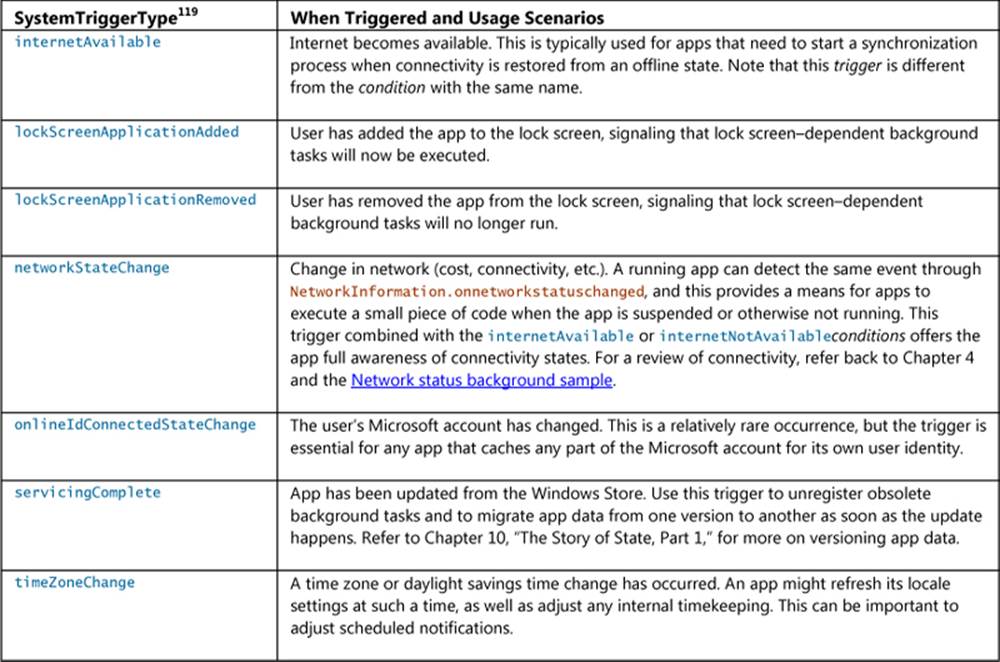
The Background task sample provides a few examples of these triggers. In scenario 1, js/sample-background-task-with-condition.js, we can see the use of timeZoneChange along with the userPresent condition (where BackgroundTaskSample is again a helper object in global.js):
BackgroundTaskSample.registerBackgroundTask(BackgroundTaskSample.sampleBackgroundTaskEntryPoint,
BackgroundTaskSample.sampleBackgroundTaskWithConditionName,
new Windows.ApplicationModel.Background.SystemTrigger(
Windows.ApplicationModel.Background.SystemTriggerType.timeZoneChange, false),
new Windows.ApplicationModel.Background.SystemCondition(
Windows.ApplicationModel.Background.SystemConditionType.userPresent));
This is clearly a case where I’d use another variable to not type the Windows.Application-Model.Background namespace out every time, but at least you can’t make a mistake in reading this code! In any case, the same sample, in scenario 4 and js/global.js, also shows use of the servicing-Complete trigger within a helper function registerServicingCompleteTask, which also checks if the task is already registered:
"registerServicingCompleteTask": function () {
// Check whether the servicing-complete background task is already registered.
var iter =
Windows.ApplicationModel.Background.BackgroundTaskRegistration.allTasks.first();
var hascur = iter.hasCurrent;
while (hascur) {
var cur = iter.current.value;
if (cur.name === BackgroundTaskSample.servicingCompleteTaskName) {
BackgroundTaskSample.updateBackgroundTaskStatus(
BackgroundTaskSample.servicingCompleteTaskName, true);
return;
}
hascur = iter.moveNext();
}
// The servicing-complete background task is not already registered.
BackgroundTaskSample.registerBackgroundTask(
BackgroundTaskSample.servicingCompleteTaskEntryPoint,
BackgroundTaskSample.servicingCompleteTaskName,
new Windows.ApplicationModel.Background.SystemTrigger(
Windows.ApplicationModel.Background.SystemTriggerType.servicingComplete, false),
null);
},
In the sample, the tasks associated with these triggers are implemented in C#, within a WinRT component found in the Tasks project of the solution. I won’t show the code here because we’ll be looking at the general structure of WinRT components in Chapter 18. What it does demonstrate, though, is that you can use a mixed-language approach for background tasks. In these cases, the Entry Point field for the tasks in the manifest point to the C# class/method that implements the background task, such as Tasks.ServicingComplete. If you go to the Background task sample page, you can also download the C# and C++ versions of the sample to see even more structural variants.
Lock Screen–Dependent Tasks and Triggers
The last group of background tasks are those that require the app be also added to the lock screen. For this there are four applicable SystemTrigger options from SystemTriggerType, along with the four other distinct types that are represented in the manifest editor: LocationTrigger, TimeTrigger, PushNotificationTrigger, and Windows.Networking.Sockets.ControlChannelTrigger. These are described here, along with pointers to available samples that demonstrate their usage:
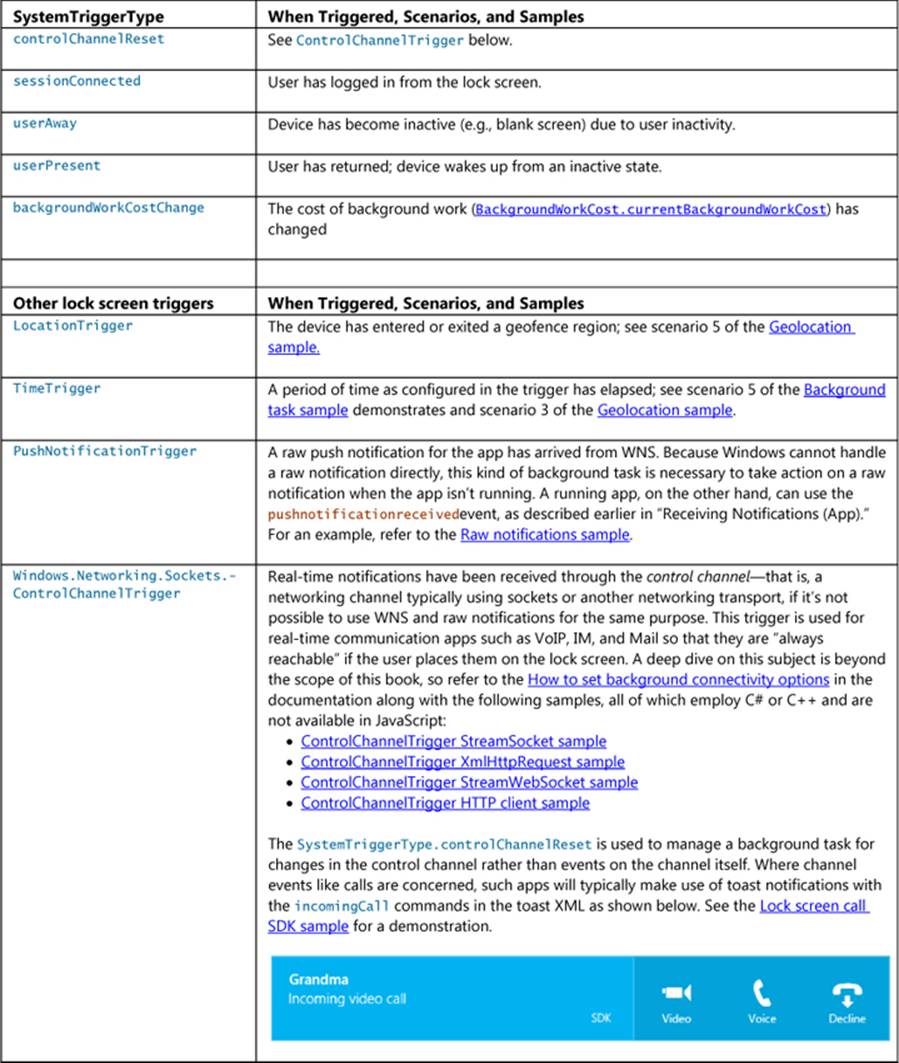
Note Working with the lock screen is not supported in the Visual Studio simulator. To debug lock screen apps and background tasks, use the Local Machine or Remote Machine debugging options.
Background tasks for these triggers are created and registered as we’ve already seen. A TimeTrigger, for example, is created with its freshnessTime interval (in minutes) and a oneShot flag, as seen in scenario 5 of the Background task sample (js/time-trigger-background-task.js):
BackgroundTaskSample.registerBackgroundTask(
BackgroundTaskSample.sampleBackgroundTaskEntryPoint,
BackgroundTaskSample.timeTriggerTaskName,
new Windows.ApplicationModel.Background.TimeTrigger(15, false), null);
A TimeTrigger is also used in scenario 3 of the Geolocation sample to allow the user to add a navigation app to the lock screen for more continuous tracking (scenario 5 uses the LocationTrigger for geofencing). Generally speaking, though, a navigation app isn’t particularly useful on the lock screen in the first place, since it wouldn’t be able to show a map! Better, then, to again use the Windows.System.Display.DisplayRequest API to prevent going to the lock screen at all.
Creating a PushNotificationTrigger is even simpler because there are no parameters. This can be seen in the Raw notifications sample, scenario 1 (js/scenario1.js):
function registerBackgroundTask() {
// Register the background task for raw notifications
var taskBuilder = new background.BackgroundTaskBuilder();
var trigger = new background.PushNotificationTrigger();
taskBuilder.setTrigger(trigger);
taskBuilder.taskEntryPoint = sampleTaskEntryPoint;
taskBuilder.name = sampleTaskName;
var task = taskBuilder.register();
task.addEventListener("completed", backgroundTaskComplete);
}
Although the call to BackgroundTaskBuilder.register might succeed, the task itself will not execute until the user adds the app to the lock screen, as we saw earlier in Figure 16-8. This latter action is never under the app’s control—all it can do is make sure it’s available for the user to select on that section of PC Settings, which is what asking for access is all about.
The request is made through the BackgroundExecutionManager.requestAccessAsync method; this call should be made prior to registering the background task (see scenario 5 of the Background task sample again):
Windows.ApplicationModel.Background.BackgroundExecutionManager.requestAccessAsync();
When this is called the first time in an app, it will generate a user consent prompt, as shown in Figure 16-19. If the user chooses Allow, the app will appear in PC Settings as an option for the lock screen, otherwise it won’t. As with other permissions, users can change their minds later on through the Permissions settings, as shown in Figure 16-20.
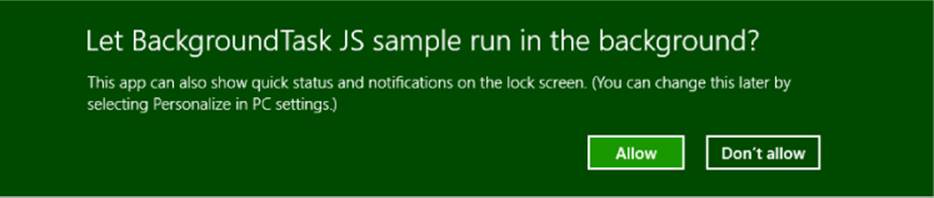
FIGURE 16-19 The user consent prompt when an app requests lock screen access.
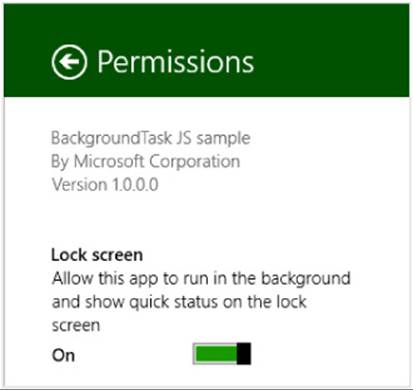
FIGURE 16-20 The lock screen option on the Permissions settings panel for apps that request access.
For a complete demonstration, refer to the Lock screen apps sample. Scenario 1 shows how to again request access to the lock screen and check the result, which is a value from the BackgroundAccessStatus enumeration. It also shows querying for and removing that access with thegetAccessStatus and removeAccess methods of BackgroundExecutionManager.
Scenario 2 then demonstrates sending badge updates to the lock screen, along with a text tile update if the app happens to be the single one selected for that privilege. There is nothing particular in this process where the lock screen is concerned, however: such updates happen exactly as they do for the primary app tile. It’s just that those updates are also reflected on the lock screen as determined by the setting in the Application > Notifications section of the manifest, as shown below. Remember that the badge graphic must have white or transparent pixels and the three scale sizes are 24x24 (100%), 33x33 (140%), and 43x43 (180%).
Scenario 3, finally, demonstrates that secondary tiles can be added to the lock screen as well, irrespective of the app tile. To make a secondary tile available for the lock screen, assuming that the app has requested lock screen access already, you need to set those two properties ofWindows.UI.-StartScreen.SecondaryTile that we mentioned long ago: lockScreenBadgeLogo and lockScreen-DisplayBadgeAndTileText. If the secondary tile is on the Start screen, these properties will also make it available on the PC Settings page for the lock screen.
Debugging Background Tasks
By this time you might have run the TimeTrigger background task in scenario 5 of the Background tasks sample, and unless it’s been more than 15 minutes since that time (maybe up to 30 minutes if you just missed the 15-minute window when timers are coalesced), you might still be waiting for that period to elapse. Is this, then, your destiny for debugging background tasks: to wait, wait, wait?
Fortunately, the answer is no, no, and maybe! That is, Visual Studio’s debugger is mostly aware of registered background tasks and provides a list of them on its Suspend drop-down toolbar menu:
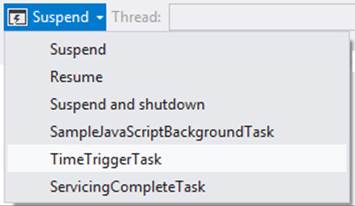
Selecting one of these will immediately trigger the background task, so you won’t have to wait or otherwise attempt to activate the trigger for real. One caveat is that if the trigger had oneShot set to true and already fired, it won’t fire again. A second caveat is that if you’re running a JavaScript app with background tasks written in other languages, you’ll need to change the debugger type for the main app project from Script Only to any of the others that list Managed or Native, as shown below, otherwise you can’t set breakpoints in those other modules:
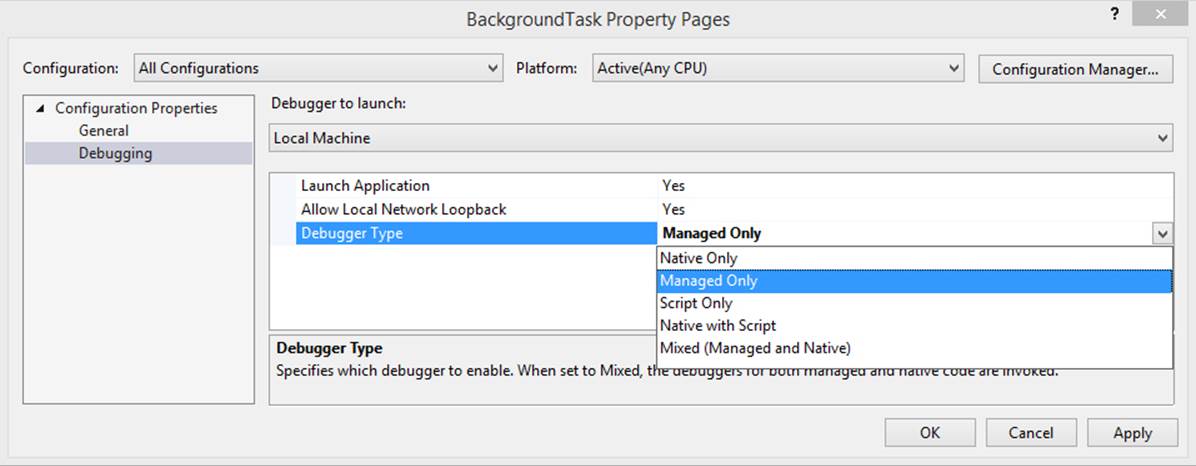
A third caveat is that background tasks using PushNotificationTrigger, ControlChannel-Trigger, and SystemTriggerType.SmsReceived will not appear on the drop-down menu. You might need to rely on the tried-and-true methods of outputting diagnostic information to figure out what’s going on with your task and checking events in the Event Viewer for activation failures. More on these methods can be found on How to debug a background task.
Finally, note one more time that background tasks are not supported in the Visual Studio simulator, as is also true of live tiles, notifications, and much else we’ve covered in this chapter. You’ll need to use the Local Machine or Remote Machine options instead.
What We’ve Just Learned (Whew!)
• Tile updates, on both the app’s primary and secondary tiles, along with badges, toast notifications, and background tasks are how an app contributes to the overall aliveness of the system even while the app isn’t running.
• Tile updates and notifications can be sent from a running app but there are other methods to deliver those updates when the app isn’t running. Updates can be scheduled to appear at a later time, and the app can configure the system to periodically ask a service for tile/badge updates. Apps can also configure push notifications that are raised from a service and sent to clients through the Windows Push Notification Service (WNS).
• Tile updates are issued using an XML payload based on predefined templates. Typical payloads include medium, wide, and large tile updates so that the user can choose how the tile is displayed on the Start screen. The XML can reference images from both local and remote sources, so long as the images are 1024x1024 pixels or smaller and less than 200KB in size.
• A tile can cycle through up to five updates at any given time for each tile size; each update can be replaced separately.
• Apps that have specific content that is interesting to bookmark as secondary tiles to the Start screen provide Pin and Unpin commands to the user for that purpose. Secondary tiles, which launch the app with specific startup arguments, can also receive live tile updates.
• Badges are small glyphs or numbers that can appear on any given tile. Badge updates are sent through the same mechanism as tile updates, but they operate independently.
• Toasts are popup notifications that appear for a time to alert the user of new information, reminders, and so on. They can play sounds, recur on a given interval, be scheduled to appear in the future, and for alarms and incoming calls can display relevant commands. Like secondary tiles, activating a toast launches the app with specific startup arguments.
• Periodic updates for tiles and badges means providing Windows the URIs of REST endpoints from which it will request updates at selected intervals between 30 minutes and 24 hours. Periodic updates are the easiest and lower-cost means to update a tile from a service.
• Push notifications for tiles, badges, toast notifications, and raw notifications (whatever data an app wants to manage) can be used for higher-frequency, user-specific updates. This involves creating services that communicate with WNS to issue those notifications to specific channel URIs, a process that is much more involved and expensive than periodic updates.
• Windows Azure Mobile Services can be used for many update activities, including the implementation of periodic update endpoints and backends for push notifications.
• Background tasks are small pieces of code that an app configures to run when certain triggers occur, such as changes in connectivity, timers, geofencing, receipt of push notifications, and app updates. Apps should never depend on background tasks, however, because they are always under the user’s control.
• Background task triggers can be refined through specific conditions to avoid running tasks when it’s not necessary (such as when there is no connectivity).
• Some triggers require that the app is also added to the lock screen. Such apps must first request access, which is subject to user consent, and the user must specifically add the app through PC Settings. Given that privilege, apps can issue badge updates and tile text to the lock screen.
• Through maintenance triggers, apps can also set up tasks to run periodically when a device is on AC power.
112 If you want the actual make and model, you’ll have to look for it in the footnotes of Chapter 1 of my book Mystic Microsoft, found on mysticmicrosoft.com or through my website, kraigbrockschmidt.com.
113 From This is my next: Windows 8, by David Pierce.
114 This is assuming you have Internet connectivity, which I mention with great irony because when I first wrote this chapter there was a fiber optic breakdown between Sacramento and Oakland, California, that had myself and many thousands of others completely offline!
115 The SecondaryTileclass also has a variant of findAllAsyncthat takes a different app name along with findAllFor-PackageAsyncthat’s described as enumerating secondary tiles for all apps in the same package. These were meant for packages that contain multiple apps, a feature that is not currently supported through the Windows Store.
116 A more succinct list of templates is also found on the reference page for TileTemplateType. This includes the name of the template and a representative image but doesn’t include the XML.
117 With all the catalogs we’ve seen in this chapter, it feels like we’ve been shopping! More seriously, the fact that you must use audio from this list means that custom audio is not supported.
118 This is about the only API for which a clear distinction is made for battery vs. AC power; WinRT does not offer a specific API to detect the power source. What this means is that apps should design for running on the battery but assign AC-only tasks to maintenance triggers, allowing Windows to manage power on a systemwide basis.
119 There is an additional trigger called smsReceivedthat is only for apps provided by mobile operators.