Microsoft Press Programming Windows Store Apps with HTML, CSS and JavaScript (2014)
Chapter 18 WinRT Components: An Introduction
At the very beginning of this book, in the first two pages of Chapter 1, “The Life Story of a Windows Store App,” we learned that apps can be written in a variety of languages and presentation technologies. For the better part of this book we’ve spoken of this as a somewhat singular choice: you choose the model that best suits your experience and the needs of your app and go from there.
At the same time, we’ve occasionally encountered situations where some sort of mixed language approach is possible, even necessary. In Chapter 1, in “Sidebar: Mixed Language Apps,” I introduced the idea that an app can actually be written in multiple languages. In Chapter 10, “The Story of State, Part 1,” I mentioned that gaining access to database APIs beyond IndexedDB could be accomplished with a WinRT component. In Chapter 13, “Media,” we saw that JavaScript might not necessarily be the best language in which to implement a pixel-crunching routine. InChapter 16, “Alive with Activity” we encountered the Notifications Extensions Library, a very useful piece of code written in C# that made the job of constructing an XML payload much easier from JavaScript. We also saw that background tasks can be written in languages that differ from that of the main app. And finally, in Chapter 17, “Devices and Printing,” I mentioned that some devices can be accessed through Win32 APIs when other WinRT APIs don’t exist and that you could use a WinRT component to create your own device-specific scenario API instead on top of the general purpose protocol APIs. Doing so can make it much easier for others to write apps for your device.
With the primary restriction that an app that uses HTML and CSS for its presentation layer cannot share a drawing surface with WinRT components written in other languages, the design of WinRT makes the mixed language approach possible. As discussed in Chapter 1, WinRT components written in any language are made available to other languages through a projection layer that translates the component’s interface into what’s natural in the target language. All of WinRT is written this way, and custom WinRT components simply take advantage of the same mechanism. (We’ll see the core characteristics of the JavaScript projection later in this chapter.)
What this means for you—writing an app with HTML, CSS, and JavaScript—is that you can implement various parts of your app in a language that’s best suited to the task or technically necessary. As a dynamic language, JavaScript shows its strength in easily gluing together functionality provided by other components that do the heavy lifting for certain kinds of tasks (like camera capture, background transfers, multi-threaded async work, etc.). Those heavy-lifting components are often best written in other language such as C++, where the compiled code runs straight on the CPU (instead of going through runtime layers like JavaScript) and has access to thread pools.
Indeed, when we speak of mixed language apps, you truly can use a diverse mix.125 You can write a C# component that’s called from JavaScript, and that C# component might invoke a component written in C++. You can use the best language for any particular job, including when you need to create your own async operations (that is, to run code on concurrent threads that don’t block the UI thread). In this context it’s helpful to also think through what this means in relationship to web workers, something that Windows Store apps can also employ.
Don’t forget You don’t always need to offload work to other threads: you can use the WinJS.-Utilities.Scheduler API that we discussed in Chapter 3, “App Anatomy and Performance Fundamentals.”
And don’t forget Events that are generated from within a custom WinRT component work just like those from built-in WinRT APIs. This means that apps written in JavaScript must prevent memory leaks by calling removeEventListener for temporary listeners. Refer to “WinRT Events and removeEventListener” in Chapter 3.
In this chapter, we’ll first look at the different reasons why you might want to take a mixed language approach in your app. We’ll go through a couple of quickstarts for C# and C++ so that we understand the structure of these components, how they appear in JavaScript, and the core concepts and terminology. The rest of the chapter will then primarily give examples of those different scenarios, which means we won’t necessarily be going deep into the many mechanical details. I’ve chosen to do this because there is very good documentation on those mechanics, which you can find in Creating Windows Runtime Components in the documentation.
As you peruse the subsections of that topic, don’t let the words “basic” and “simple” in the walkthrough titles deter you: all these topics are comprehensive cookbooks that cover the fine details of working with data types like vectors, maps, and property sets; declaring events; creating async operations; and how all this shows up in JavaScript. We’ll see some of these things in the course of this introduction, but with great topics covering the what, we’ll be spending our time here on why we’d want to use such components in the first place and the problems they can help solve. Plus, I want you to save some energy for the book’s finale in the next two chapters, where we’ll talk about getting your app out to the world once you solve those problems!
Note By necessity I have to assume in this chapter that you have a little understanding of the C# and C++ languages. If these languages are entirely new to you, spending a few hours familiarizing yourself with them will improve your mileage with this chapter.
Choosing a Mixed Language Approach (and Web Workers)
Here are some of the reasons to take a mixed language approach in your app, which can again include any number of WinRT components written in C#, Visual Basic (hereinafter just VB), and/or C++:
• You can accomplish certain tasks faster with higher performance code. This can reduce memory overhead and also consume less CPU cycles and power, an important consideration for background tasks for which a CPU quota is enforced—you might get much more done in 2 CPU seconds in C++ than with JavaScript, because there’s no language engine involved. However, the JavaScript language engine is highly optimized and could perform far better than you think. In other words, don’t think that JavaScript is inherently slow, especially when you factor in the costs of crossing language boundaries. We’ll see more later in “Comparing the Results.”
• C#, Visual Basic, and C++ have access to a sizable collection of additional APIs that are not available to JavaScript. These include .NET, Win32, and COM (Component Object Model) APIs, including the non-UI features of DirectX such as XAudio and XInput. We’ll see a number of examples later in “Access to Additional APIs.”
• Access to other APIs might be necessary for utilizing third-party .NET/Win32/COM libraries and gives you the ability to reuse existing code that you might have in C#, VB, or C++. The Developing Bing Maps Trip Optimizer, a Windows Store app in JavaScript and C++ topic shows a complete scenario along these lines, specifically that of migrating an ActiveX control to a WinRT component so that it can be used from an app, because ActiveX isn’t directly supported. (We won’t cover this scenario further in this chapter.)
• It can be easier to work with routines involving many async operations by using the await keyword in C# and Visual Basic, because the structure is much cleaner than with promises. An example of this can be found in the Here My Am! app of Chapter 19, “Apps for Everyone, Part 1,” where the transcodeImage function written in JavaScript for Chapter 16 is rewritten in C#. (See Utilities.ImageConverter.TranscodeImageAsync in the Utilities project.)
• A WinRT component written in C++ is more effective at obfuscating sensitive code than JavaScript and .NET languages. Although it won’t obfuscate the interface to that component, its internal workings are more painstaking to reverse-engineer.
• A WinRT component is the best way to write a non-UI library that other developers can use in their chosen language or that you can use in a variety of your own projects, like the Notifications Extensions library we saw in earlier chapters, a custom scenario API for a device, or a library to hide the details of interacting with a REST API on the web. In this context, see Creating a software development kit, which includes details how the component should be structured to integrate with Visual Studio. Also refer to //build 2013 session 4-142, Building a Great Windows Store Library/SDK.
• Although you can use web workers in JavaScript to execute code on different threads, a WinRT component can be much more efficient for custom asynchronous APIs. Other languages can also make certain tasks more productive, such as using language-integrated queries (LINQ) from C#/VB, creating parallel loops in C#/C++, using C++ Accelerated Massive Parallelism (AMP) to take advantage of the GPU, and so on.
Again, components can also make use of one another—the component system has no problem with that. I reiterate this point because it becomes relevant in the context of the last bullet above—web workers—and running code off the UI thread.
You are wholly free to use web workers (or just workers, as I’ll call them) in a Windows Store app. Visual Studio provides an item template for this purpose: right-click your project in Visual Studio’s solution explorer, select Add > New Item, and choose Dedicated Worker. I’ll also show an example later in “JavaScript Workers.” The real drawback here, compared with WinRT components, is that communication between the worker and the main app thread is handled entirely through the singular async postMessage mechanism; data transferred between the app and the worker must be expressed as properties of a message. In other words, workers are set up for a client-server architecture more so than one of objects with properties, methods, and events, though you can certainly create structures for such things through messages.
What this means is that using workers with multiple asynchronous operations can get messy. By comparison, the methods we’ve seen for working with async WinRT operations—namely WinJS promises—is much richer, especially when you need to chain or nest async operations, raise exceptions, and report progress. Fortunately, you can easily wrap a worker within a promise, as we’ll see in “JavaScript Workers.”
What also interesting to think about is how you might use a worker written in JavaScript to act as an agent that delegates work to WinRT components. The JavaScript worker then serves as the glue to bring all the results from those components together, reporting a combined result to the main app through postMessage.
Along these same lines, if you have some experience in .NET languages like C# and Visual Basic along with C++, you’ll know that their respective programming models have their own strengths and weaknesses. Just as you can take advantage of JavaScript’s dynamic nature where it serves best, you can use the strongly typed nature of .NET where it helps your programming model and then use C++ where you want the most performant code.
You can have your main app’s UI thread in JavaScript delegate a task to a worker in JavaScript, which then delegates some tasks to a WinRT component written in C#, which might then delegate its most intensive tasks to still other components written in C++. Truly, the combination of workers with WinRT components gives you a great deal of flexibility in your implementation.
Pros and cons One complication with WinRT components written in C# or Visual Basic is that they require loading the Common Language Runtime (CLR), which incurs additional memory overhead when used with an app written in JavaScript or C++. With a JavaScript app, it also introduces a second garbage collector, which can result in a consistently higher memory footprint for the app. On the flip side, a potential disadvantage of WinRT components written in C++ is that while JavaScript and .NET languages (C#/VB) are architecture-neutral and can target any CPU, C++ components must be separately compiled for x86, x64, and ARM. This means that your app will have at least two separate packages in the Windows Store (maybe three if you want to build an x64 target specifically). In the end, you need to decide what’s best for your project and your customers.
Quickstarts: Creating and Debugging Components
When you set out to add a WinRT component to your project, the easiest place to start is with a Visual Studio item template. Right-click your solution (not your project) in Visual Studio’s solution explorer, select Add > New Project, and choose Windows Runtime Component as listed under the Visual Basic >, Visual C# >, or Visual C++ > Windows Store nodes, as shown in Figure 18-1 (for a C# project).
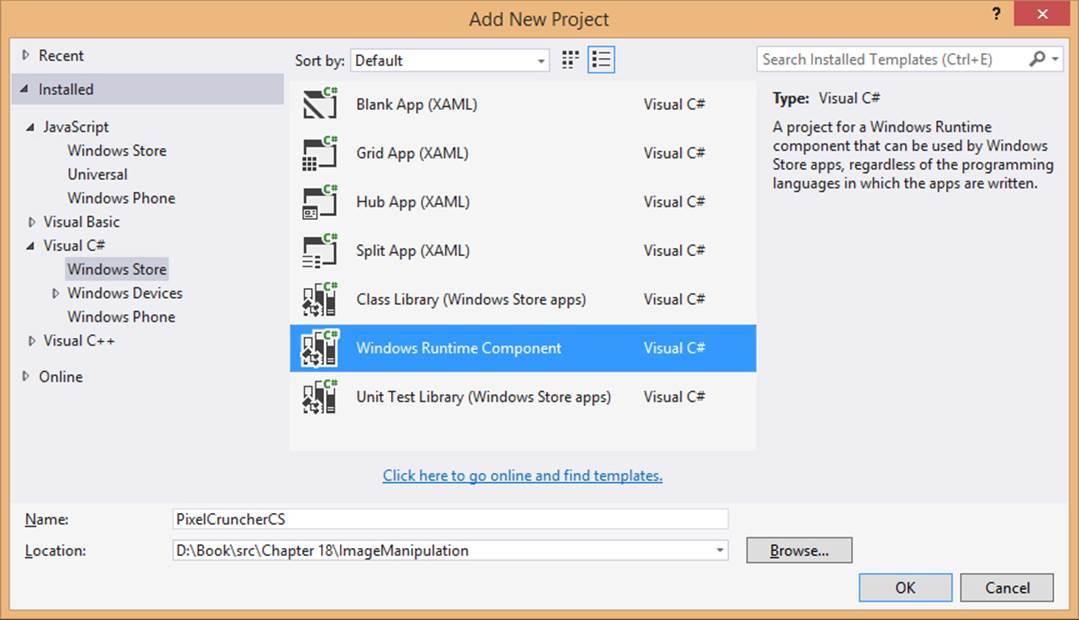
FIGURE 18-1 Visual Studio’s option for creating a C# WinRT Component project; similar options appear under Visual Basic > Windows Store and Visual C++ > Windows Store.
We’ll look at both the C# and C++ options as we fulfill a promise made in Chapter 13 to see whether we can improve the performance of the Image Manipulation example in this book’s companion content. That earlier sample performed a grayscale conversion on the contents of an image file and displayed the results on a canvas. We did the conversion in a piece of JavaScript code that performs quite well, actually, but it’s good to ask if we can improve that performance and perhaps make the conversion more memory-efficient. Our first two WinRT components, then, are equivalent implementations written in C# and C++. Together, all three give us the opportunity to compare relative performance, as we’ll do in “Comparing the Results.”
Warning Experience has shown that it’s generally better to write components in C++ rather than C# or Visual Basic because you avoid the overhead of garbage collection, especially with an app written in JavaScript where there’s another garbage collector at work already. In my tests with the Image Manipulation code, I’ve found that the C# variants have a much higher memory footprint both initially and over time than the C++ version, especially with the large amounts of data that’s being marshaled across the component boundary. However, for less data-intensive components, writing them in C# will incur some added overhead when first loading the component, which can be a small price to pay for the added productivity of developing in C#.
One problem with all these implementations is that they still run on the UI thread, so we’ll want to look at making the operations asynchronous. We’ll come back to that later in “Key Concepts and Details” so as to avoid making these quickstarts less than quick!
Note also that I introduce terminology and tooling considerations in the C# quickstart, so read it even if you plan on working in C++.
Sidebar: WinRT Components vs. Class Libraries (C#/VB) vs. Dynamic-Link Libraries
In the Add New Project dialog of Visual Studio, you’ll notice that an option for a Class Library is shown for Visual C# and Visual Basic and an option for a DLL (dynamic-link library) is shown for C++. These effectively compile into assemblies and DLLs, respectively, which bear resemblances to WinRT components. The difference is that these types of components can be used from only those same languages. A Class Library (.NET assembly) can be used by apps written in .NET languages but not from JavaScript. A DLL can be called from C++ and .NET languages (the latter only through a mechanism called P/Invoke) but is not available to JavaScript. A WinRT component is the only choice that works across language boundaries, thanks to the WinRT projection layers.
Sometimes a simple DLL is required, as with media extensions that provide custom audio/video effects or a codecs. These are not WinRT components because they lack metadata that would project them into other languages, nor is such metadata needed. Details on DLLs for the media platform can be found in Using media extensions and Media extensions sample.
Quickstart #1: Creating a Component in C#
As shown above in Figure 18-1, I’ve added a WinRT Component in C# to the Image Manipulation example, calling it PixelCruncherCS. Once this project has been added to the solution, we’ll have a file called class1.cs in that project that contains a namespace PixelCruncherCS with one class:
using System;
using System.Collections.Generic;
using System.Linq;
using System.Text;
using System.Threading.Tasks;
namespace PixelCruncherCS
{
publicsealedclassClass1
{
}
}
Not particularly exciting code at this point but enough to get us going. You can see that the class is marked public, meaning it will be visible to apps using the component. It is also marked sealed to indicate that other classes cannot be derived from it (because of current technical constraints). Both keywords are required for WinRT components. (These two keywords are Public and NotInheritable in Visual Basic.)
To test the interaction with JavaScript, I’ll give the class and its file a more suitable name (Tests and grayscale.cs, because we’ll be adding more to it) and create a test method and a test property:
public sealed class Tests
{
public static string TestMethod(Boolean throwAnException)
{
if (throwAnException)
{
throw new System.Exception("Tests.TestMethod was asked to throw an exception.");
}
return "Tests.TestMethod succeeded";
}
public int TestProperty { get; set; }
}
If you build the solution at this point (Build > Build Solution), you’ll see that the result of the PixelCruncherCS project is a file called PixelCruncher.winmd. The .winmd extension stands for Windows Metadata: a WinRT Component written in C# is a .NET assembly that includes extra metadata referred to as the component’s Application Binary Interface or ABI. This is what tells Windows about everything the component makes available to other languages (those public classes), and it’s also what provides IntelliSense for that component in Visual Studio and Blend.
In the app you must add a reference to the component so that it becomes available in the JavaScript namespace, just like the WinRT APIs. To do this, right-click References within the JavaScript app project and select Add Reference. In the dialog that appears, select Solution on the side and then check the box for the WinRT component project as shown in Figure 18-2.
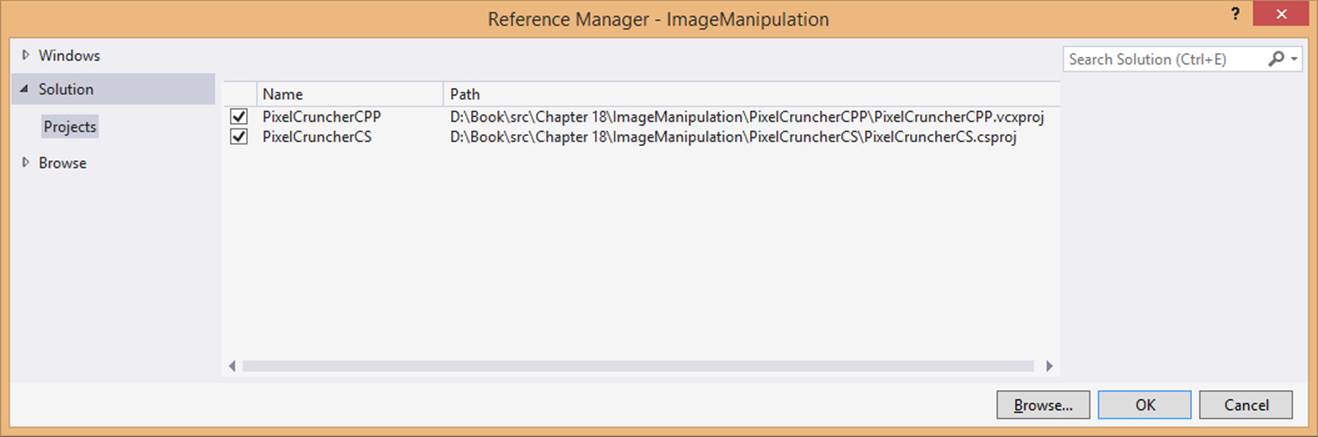
FIGURE 18-2 Adding a reference to a WinRT component within the same solution as the app.
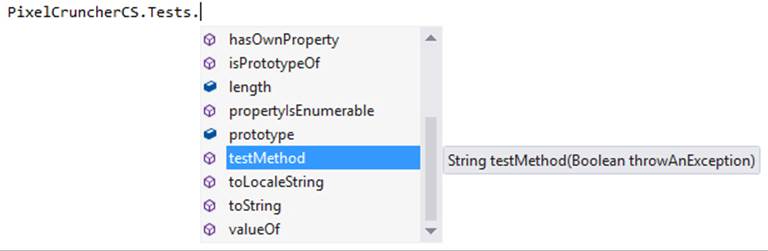
When writing code that refers to the component, you always start with the namespace, PixelCruncherCS in our case. As soon as you enter that name and a dot, IntelliSense will appear for available classes in that namespace:
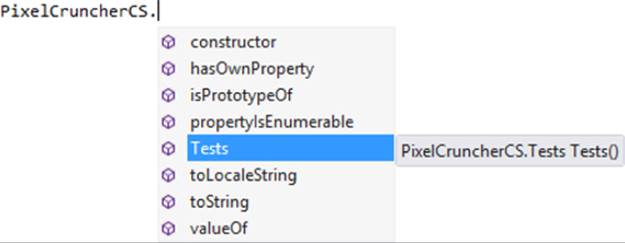
Once you add the name of a class and type another dot, IntelliSense appears for its methods and properties:
Note If you’ve made changes to namespace, class, and other names in your WinRT component project, you’ll need to run Build > Build Solution to see the updated names within IntelliSense.
Here you can see that the method in the C# code is TestMethod; it’s projected into JavaScript as testMethod, matching typical JavaScript conventions. This casing conversion is done automatically through the JavaScript projection layer for all WinRT components, including those in your own app.
Notice also that IntelliSense is showing only testMethod here but not testProperty (whose casing is also converted). Why is that? It’s because in C# TestMethod is declared as static, meaning that it can be executed without first instantiating an object of that class:
var result = PixelCruncherCS.Tests.testMethod(false);
On the other hand, testProperty, but not testMethod, is available on a specific instance:

I’ve set up TestMethod, by the way, to throw an exception when asked so that we can see how it’s handled in JavaScript with a try/catch block:
try {
result = PixelCruncherCS.Tests.testMethod(true);
} catch (e) {
console.log("PixelCruncherCS.Tests.testMethod threw: '" + e.description + "'.");
}
Let’s try this code. Attaching it to some button (see the testComponentCS function in the example’s js/default.js file), set a breakpoint at the top and run the app in the debugger. When you hit that breakpoint, step through the code using Visual Studio’s Step Into feature (F11 or Debug > Step Into). Notice that you do not step into the C# code: Visual Studio isn’t presently able to debug across the script/managed (C#) boundary, although it can do so across script/native (C++). What this means is that within a single instance of Visual Studio you can debug either the JavaScript or the C# side of your code, but not both at the same time. Console output can help here, but it’s also possible to use two instances of the debugger, as we’ll see later.
Having the basic mechanics worked out, we’re now ready to add our real functionality. The first step is to understand how to get the canvas pixel data arrays in and out of the WinRT component. In the JavaScript code (within the copyGrayscaleToCanvas method) we have an array namedpixels with the original pixel data and another empty one in imgData.data, where imgData is obtained as follows:
var imgData = ctx.createImageData(canvas.width, canvas.height);
We can pass both these arrays into a component directly. A limitation here is that arrays passed to a WinRT component can be used for input or output, but not both—a component cannot just manipulate an array in place. The topic Passing arrays to a Windows Runtime component has the fine details. To make the story short, we fortunately already have an input array, pixels, and an output array, imgData.data, that we can pass to a method in the component:
var pc = new PixelCruncherCS.Grayscale();
pc.convert(pixels, imageData.data); //Note casing on method name
Note The techniques shown here and in the article linked to above apply only to synchronous methods in the WinRT component; arrays cannot be used with asynchronous operations. See “Key Concepts for WinRT Components” later in this chapter for more on this topic.
To receive this array in C#, both parameters must to be appropriately marked with their directions. Such marks in C# are called attributes, not to be confused with those in HTML, and they appear in square brackets ([ ]) before the parameter name. In this particular case, the attributes appear as [ReadOnlyArray()] and [WriteOnlyArray()] preceding the parameters. (The ReadOnlyArray and WriteOnlyArray methods are found in the System.Runtime.InteropServices.WindowsRuntime namespace.) So the declaration of the method in the component, which again must be public, looks like this, just using a Boolean as a return type for the time being:
public Boolean Convert([ReadOnlyArray()] Byte[] imageDataIn,
[WriteOnlyArray()] Byte[] imageDataOut)
With this in place, it’s a simple matter to convert the JavaScript grayscale code to C#:
public Boolean Convert([ReadOnlyArray()] Byte[] imageDataIn,
[WriteOnlyArray()] Byte[] imageDataOut)
{
int i;
int length = imageDataIn.Length;
const int colorOffsetRed = 0;
const int colorOffsetGreen = 1;
const int colorOffsetBlue = 2;
const int colorOffsetAlpha = 3;
Byte r, g, b, gray;
for (i = 0; i < length; i += 4)
{
r = imageDataIn[i + colorOffsetRed];
g = imageDataIn[i + colorOffsetGreen];
b = imageDataIn[i + colorOffsetBlue];
//Assign each rgb value to brightness for grayscale
gray = (Byte)(.3 * r + .55 * g + .11 * b);
imageDataOut[i + colorOffsetRed] = gray;
imageDataOut[i + colorOffsetGreen] = gray;
imageDataOut[i + colorOffsetBlue] = gray;
imageDataOut[i + colorOffsetAlpha] = imageDataIn[i + colorOffsetAlpha];
}
return true;
}
Simultaneously Debugging Script and Managed/Native Code
One of the challenges in writing a mixed language app with WinRT components is debugging code that’s written in different languages, especially as you step across the component boundary. Fortunately it’s not too difficult to make this work.
The key is changing the debugger type in Visual Studio. Right-click your app project in solution explorer, select Debugging on the left, and choose a Debugger Type on the right, as shown in Figure 18-3. In this drop-down list, Script refers to JavaScript, Managed refers to C# or Visual Basic, and Native refers to C++, and you can see that you can choose from different combinations.
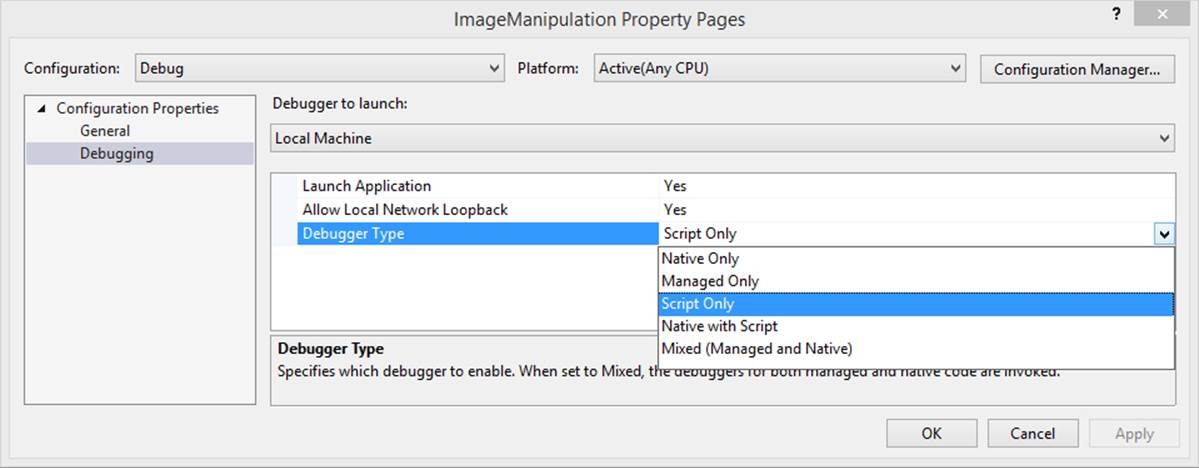
FIGURE 18-3 Debugger types in Visual Studio.
If you choose any of the “Only” options, it means that you can set breakpoints and step through code only in that language. These have their place, as we’ll see in a moment.
If you choose the Native With Script option (which was introduced with Visual Studio 2013 editions) and have a component written in C++, you can easily step from JavaScript into the C++ component and back—and set breakpoints in both—for a seamless debugging experience. This is one great reason to write C++ components!
If you have components written in both C#/VB and C++ in your project, choosing Mixed will allow you to debug all your component code but not your JavaScript. So what can you do here? That is, if you have only a component written in C#/VB like the one we worked with previously, is there a way to debug both the app and the component at the same time?
Fortunately, the answer is yes—you just need to use two instances of Visual Studio. Here’s how (a tip of the hat to Rob Paveza for this):
4. Launch the app (F5) with a Script debugging option. This is the instance of Visual Studio in which you’ll be stepping through JavaScript (and possibly C++ component code if you use Native With Script).
5. Load your project in a second instance of Visual Studio. Ignore warnings about IntelliSense files being already open, and prepare to wait a little while as Visual Studio builds a new copy of that database for this second instance.
6. In this second instance, set the debugging mode to an option that includes Managed so that you can debug C# or VB component code.
7. Select the Debug > Attach to Process menu command in the second instance. This displays a list of other running processes.
8. Find and select the line for WWAHost.exe (the app host for JavaScript) in the process list that has your app name in the title column.
9. Above the list, check the Attach To value. If it says “Automatic: Script code”, press the Select button and indicate Managed and Native instead. Close that dialog.
10. Click the Attach button.
11. Now you can set breakpoints and step through your component code in this second instance of Visual Studio. By setting breakpoints at the beginning of the component’s public methods, you’ll stop there whenever the component is called from JavaScript.
Note that this method also works for debugging a C++ component in 2012 editions of Visual Studio if you have a project that’s still targeting Windows 8.
Quickstart #2: Creating a Component in C++
To demonstrate a WinRT component written in C++, I’ve also added a project to the Image Manipulation example, calling it PixelCruncherCPP. The core code is the same as the C# example—manipulating pixels is a rather universal experience! The necessary code structure for the component, on the other hand, is unique to the language—C++ has ceremony all its own.
As we did with C#, let’s start by adding a new project using the Visual C++ > Windows Runtime Component item template, using the PixelCruncherCPP name. After renaming Class1 to Tests in the code and renaming the files, we’ll have the following code in the header (which I call grayscale.h, and omitting a compiler directive):
namespace PixelCruncherCPP
{
publicrefclassTestssealed
{
public:
Tests();
};
}
where we see that the class must be public ref and sealed, with a public constructor. These together make the object instantiable as a WinRT component. In Tests.cpp we have the following:
#include "pch.h"
#include "Grayscale.h"
using namespace PixelCruncherCPP;
using namespace Platform;
Tests::Tests()
{
}
Again, not too much to go on, but enough. (Documentation for the Platform namespace, by the way, is part of the Visual C++ Language Reference.) To follow the same process we did for C#, let’s add a static test method and a test property. The class definition is now:
public ref class Tests sealed
{
public:
Tests();
static Platform::String^ TestMethod(bool throwAnException);
propertyint TestProperty;
};
and the code for TestMethod is this:
String^ Tests::TestMethod(bool throwAnException)
{
if (throwAnException)
{
throw ref new InvalidArgumentException;
}
return ref new String(L"Tests.TestMethod succeeded");
}
When you build this project (Build > Build Solution), you’ll see that we now get PixelCruncherCPP.dll and PixelCruncherCPP.winmd files. Whereas a C# assembly can contain both the code and the metadata, a C++ component compiles into separate code and metadata files. The metadata is again used to project the component’s ABI into other languages and provides IntelliSense data for Visual Studio and Blend. If you now add a reference to this component in your app project—right-click the project > Add Reference > Solution, and choose PixelCruncherCPP, as in Figure 18-2—you’ll find that IntelliSense works on the class when writing JavaScript code.
You’ll also find that the casing of the component’s property and method names have also been changed. In fact, with the exception of the namespace, PixelCruncherCPP, everything we did to use the C# component in JavaScript looks exactly the same, as it should be: the app consuminga WinRT component does not need to concern itself with the language used to implement that component. And remember that by choosing Native With Script debugging in Visual Studio, as described previously, you get a seamless experience across the component boundary.
Now we need to do the same work to accept arrays into the component, using Array and WriteOnlyArray as a reference. In C++, an input array is declared with Platform::Array<T>^ and an output array as Platform::WriteOnlyArray<T>^, where we use uint8 as the type here instead ofByte in C#:
bool Grayscale::Convert(Platform::Array<uint8>^ imageDataIn,
Platform::WriteOnlyArray<uint8>^ imageDataOut)
The rest of the code is identical except for this one type change and for how we obtain the length of the input array, so we don’t need to spell it out here. The code to invoke this class from JavaScript is also the same as for C#:
var pc2 = new PixelCruncherCPP.Grayscale();
pc2.convert(pixels, imgData.data);
Sidebar: The Windows Runtime C++ Template Library
Visual Studio includes what is called the Windows Runtime C++ Template Library (or WRL), which helps you write low-level WinRT components in C++. It’s really a bridge between the raw COM level and what are called the C++/CX component extensions that we’ve been using here. If you have any experience with the Active Template Library (ATL) for COM, you’ll find yourself right at home with WRL. For more information, see the documentation linked to above along with the Windows Runtime Component using WRL sample.
Comparing the Results
The Image Manipulation example in this chapter’s companion content contains equivalent code in JavaScript, C#, and C++ to perform a grayscale conversion on image pixels. Taking a timestamp with new Date() around the code of each routine, I’ve compiled a table of performance numbers:126
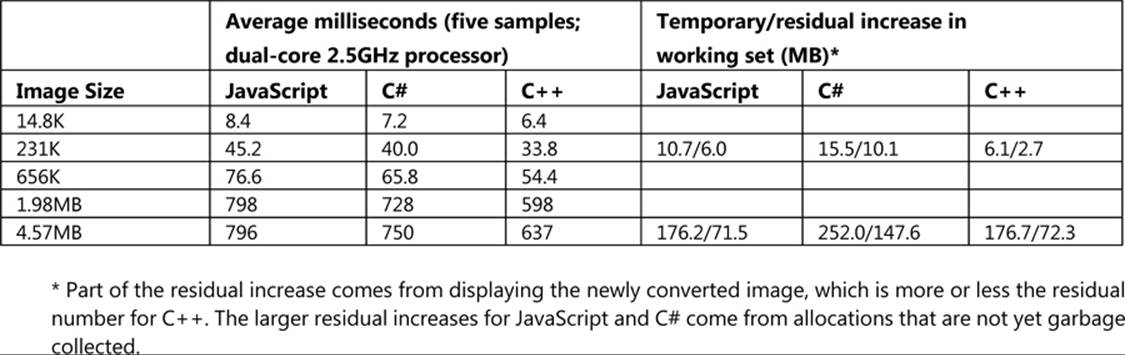
A couple of notes and observations about these numbers and measuring them:
• When doing performance tests like this, be sure to set the build target to Release instead of Debug. This makes a tremendous difference in the performance of C++ code, because the compiler inserts all kinds of extra run-time checks in a debug build.
• When taking measurements, also be sure to run the Release app outside of the debugger (in Visual Studio select Debug > Start Without Debugging). If you’ve enabled script debugging, JavaScript will run considerably slower even with a Release build and could lead you to think that the language is far less efficient than it really is in production scenarios. Again, the JavaScript engine is highly optimized and performs better than you might think!
• If you run similar tests in the app itself, you’ll notice that the time reported for the conversion is considerably shorter than the time it takes for the app to become responsive again. This is because the canvas element’s putImageData method takes a long time to copy the converted pixels. Indeed, the majority of the time for the whole process is spent in putImageData and not the grayscale conversion.
• Assuming the CPU load for the grayscale conversion is roughly identical between the implementations, you can see that a higher performance component reduces the amount of time that the CPU is carrying that load. Over many invocations of such routines, this can add up to considerable power savings.
• The first time you use a WinRT component for any reason, it will take a little extra time to load the component and its metadata. The numbers above do not include first-run timings. Thus, if you’re trying to optimize a startup process in particular, the extra overhead to load a component could mean that it’s best to just do the job in JavaScript.
Now let’s think about what these numbers mean for “performance.” I put that word in quotes because performance is ultimately something that is judged by your users, not by a diagnostic tool that’s giving you a measurement. What this means is that we have to look not just at a single measurement but at the larger picture of impact on the entire system. This is why I’ve also included a few measurements for working set, because for large images you can see that the impact is very significant and could affect the system in such a way as to hurt overall performance even though some particular routine in your app is running faster!
In short, always keep in mind that there is much more to measuring and improving app performance than just offloading computationally intensive routines to a WinRT component. Analyzing the performance of Windows Store apps and Analyzing the code quality of Windows Store apps with Visual Studio code analysis in the documentation will help you make a more thorough assessment of your app, as will High-Performance Windows Store Appsby Brian Rasmussen (Microsoft Press, 2014).
I also want to add that when I first ran these tests with the example program, I was seeing something like 100% improvements in C#/C++ over JavaScript. The reason for that came from the nature of the canvas element’s ImageData object (as returned by the canvas’s createImageDatamethod) and had little to do with JavaScript. In my original JavaScript code (since corrected), I was dereferencing the ImageData.data array to set every r, g, b, and a value for each pixel. When I learned how dreadfully slow that particular dereference operation actually is, I changed the code to cache the array reference in another variable and suddenly the JavaScript version became amazingly faster. Indeed, minimizing identifier references is generally a good practice for better performance in JavaScript. For more on this and other performance aspects, check out High Performance JavaScript, by Nicholas C. Zakas (O’Reilly, 2010).
Anyway, looking at just the raw CPU story with my measurements, we can see that C# runs between 6–21% faster than the equivalent JavaScript and C++ 25–46% faster. C++ also runs 13–22% faster than C#. This shows that for noncritical code, writing a component won’t necessarily give you a good return on the time you invest. It will be more productive to just stay in JavaScript most of the time and perhaps use a component in a few places where raw CPU performance really matters.
Comparing C# to C++, we can also see that the gain is incremental in terms of CPU, which means it’s not always worth incurring the extra complexity of writing in C++. But when we add in the memory footprint numbers, the equation looks somewhat different.
For one thing, just loading a component written in C# or Visual Basic means loading the CLR into your process, which I’ve found incurs a 6-to-8-megabyte hit initially. More importantly, though, is the fact that the CLR has its own garbage collection process that’s now running alongside that of JavaScript. With our grayscale conversion routines, the fact that we’re marshaling large arrays of data across the component boundary means that we’re allocating a bunch of memory in JavaScript, sharing it with the .NET Common Language Runtime (CLR), and then having to wait for both garbage collectors to figure out what, exactly, they can clean up (which might not happen until there is more demand for memory elsewhere). For this reason you can see that the C# component has a much higher residual memory footprint than the same routine written in C++.127
To further evaluate the effects of garbage collection and take the array allocations out of the picture, I added some simple counting routines in JavaScript, C#, and C++ to the Image Manipulation example and its components (they all look about the same as this JavaScript code):
function countFromZero(max, increment) {
var sum = 0;
for (var x = 0; x < max; x += increment) {
sum += x;
}
return sum;
}
Running a count with a max of 1000 and an increment of 0.000001 (only use this increment outside the debugger—otherwise you might be waiting a while!), the timings I got averaged 2112ms for JavaScript, 1568ms for C#, and 1534ms for C++. Again, the difference between JavaScript and the other languages is significant (35–38% gain), but it’s hardly significant between C# and C++. However, I occasionally found that, after loading a number of images and running the grayscale tests, counting in JavaScript and/or C# can take considerably longer than before, due to garbage collection falling behind my active use of the app.
Whatever the case, all of this becomes very important when your app is running on a device with all of 1GB of memory—the extra overhead could easily drag down overall system performance. If you’re writing a component for just your app alone, you can decide how important this is for your particular customers. On the other hand, if you’re writing a library for use by many other apps, some of which will be written in JavaScript, or if you simply want consistent and reliable performance for your component, we highly recommend implementing the component in C++ and thus minimizing the overhead.
Key Concepts for WinRT Components
The WinRT components we’ve just seen in “Quickstarts: Creating and Debugging Components” demonstrate the basic structure and operation of such components, but clearly there is much more to the subject. Because exploring all the nuances is beyond the scope of this chapter, I’ll refer you again to the references given in this chapter’s introduction. Here I’ll offer a summary of the most relevant points, followed by separate sections on asynchronous methods and the projection of WinRT into JavaScript.
Component Structure
• The output of a C#/VB component project is a .NET assembly with Windows metadata in a single .winmd file; the output of a C++ component is a DLL with the code and a separate .winmd file with the metadata.
• Apps that use components must include the .winmd/DLL files in their projects and add a reference to them; it’s not necessary to include the component source.
• Component classes that can be used by other languages are known as activatable classes. In C# these must be marked as public sealed, in Visual Basic as Public NotInheritable, and in C++ as public ref sealed. A component must have one activatable class to be usable from other languages.
• Classes can have static members (methods and properties) that are usable without instantiating an object of that class.
• A component can contain multiple public activatable classes as well as additional classes that are internal only. All public classes must reside in the same root namespace, which has the same name as the component metadata file.
• It is possible to create a data source in a WinRT component and bind it to controls in JavaScript. The simplest way is to use the WinJS.Binding.oneTime initializer, the reasons for which are described in Chapter 6, “Data Binding, Collections, and Templates,” under “Sidebar: Binding to WinRT Objects.” More work is needed in JavaScript if you want to do one-way or two-way binding, but it is possible. See the WinMD and Databinding post on the MSDN forum. Furthermore, if you need to also use converter in the binding relationship, then it’s necessary to write your own binding initializer and duplicate some of the functionality of oneTime.
• By default, all public classes in a component are visible to all other languages. A class can be hidden from JavaScript by applying the WebHostHiddenAttribute (that is, prefix the class declaration with [Windows.Foundation.Metadata.WebHostHidden] in C# or[Windows::Foundation::Metadata::WebHostHidden] in C++). This is appropriate for classes that work with UI (that cannot be shared with JavaScript, such as the whole of the Windows.Xaml namespace in WinRT) or others that are redundant with intrinsic JavaScript APIs (such asWindows.Data.Json which is redundant with JSON.*).
• For some additional structural options, see the following samples in the Windows SDK (all of which use the WRL; see “Sidebar: The Windows Runtime C++ Template Library (WRL)” under “Quickstart #2”):
• Creating a Windows Runtime in-process component sample (C++/CX)
• Creating a Windows Runtime EXE component with C++ sample
• Creating a Windows Runtime DLL component with C++ sample
• Windows Runtime in-process component authoring with proxy/stub generation sample
Types
• Within a component, you can use native language types (that is, .NET types and C++ runtime types). At the level of the component interface (the Application Binary Interface, or ABI), you must use WinRT types or native types that are implemented with WinRT types. Otherwise those values cannot be projected into other languages. In C++, WinRT types exist in the Platform namespace, and see Type System (C++/CX); in C#/VB, they exist in the System namespace, and see .NET Framework mappings of Windows Runtime types.
• A component can use structures created with WinRT types, which are projected into JavaScript as objects with properties that match the struct members.
• Collections must use specific WinRT types found in Windows.Foundation.Collections, such as IVector, IMap (and IMapView), and IPropertySet. This is why we’ve often encountered vectors, maps, and property sets throughout this book.
• Arrays are a special consideration because they can be passed in only one direction, as we saw in the quickstarts; each must therefore be marked as read-only or write-only. See Passing arrays to a Windows Runtime component. Furthermore, arrays cannot be effectively used with async methods, because an output array will not be transferred back to the caller when the async operation is complete. We’ll talk more of this in “Implementing Asynchronous Methods” below.
Component Implementation
• When creating method overloads, make the arity (the number of arguments) different for each one because JavaScript cannot resolve overloads by typeonly. If you do create multiple overloads with the same arity, one must be marked with the DefaultOverloadAttribute so that the JavaScript projection knows which one to use. A side-effect of this, however, is that the other overloads with the same arity are then inaccessible to JavaScript altogether. In this case, be sure to provide distinct overloads for each critical method.
• A delegate (an anonymous function in JavaScript parlance) is a function object. Delegates are used for events, callbacks, and asynchronous methods. Declaring a delegate defines a function signature.
• The event keyword marks a public member of a specific delegate type as an event. Event delegates—the signature for a handler—can are typically a Windows.Foundation.EventHandler<TResult> or a TypedEventHandler<TSender, TResult>. In all cases, support for JavaScript requires a little extra work to ensure that the event is raised on the UI thread. The details for this can be found on Raising events in Windows runtime components and in the four samples linked to above in “Component Structure.” We’ll see a concrete example later in “Library Components.”
• Throwing exception: use the throw keyword in C#, VB, and C++. In C#/VB, you throw a new instance of an exception type in the System namespace. In C++, you use throw ref new with one of the exception types within the Platform namespace, such as Platform::Invalid-ArgumentException. These appear in JavaScript with a stack trace in the message field of the exception; the actual message from the component will appear in Visual Studio’s exception dialog.
Implementing Asynchronous Methods
For as fast as the C# and C++ routines that we saw in the quickstarts might be, the fact of the matter is that they still take more than 50ms to complete while running on the UI thread. This is the recommended threshold at which you should consider making an operation asynchronous. This means running that code on other threads so that the UI thread isn’t blocked at all. To cover the basics, I’ll now show how to implement asynchronous versions of the simple countFromZero function we saw earlier in “Sidebar: Managed vs. Native.” We’ll do it first with a worker and then in C# and C++.
For C#/VB and C++ there is quite extensive documentation on creating async methods. The cookbook topics we’ve referred to already cover this in the subsections called Asynchronous operations and Exposing asynchronous operations for C#, and the “To add the public members” section in the C++ walkthrough. There is also Creating Asynchronous Operations in C++ for Windows Store apps, along with a series of comprehensive posts on the Windows Developer Blog covering both app and component sides of the story: Keeping apps fast and fluid with asynchrony in the Windows Runtime, Diving Deep with WinRT and await, and Exposing .NET tasks as WinRT asynchronous operations. Matching the depth of these topics here would be a pointless exercise in repetition, so the sections that follow focus on creating async versions of the pixel-crunching methods from the quickstarts and the lessons we can glean from that experience.
This turns out to be a fortuitous choice. The particular scenario that we’ve worked with—performing a grayscale conversion on pixel data and sending the result to a canvas—just so happens to reveal a number of complications that are instructive to work through and are not addressed directly in the other documentation. These include troubles with passing arrays between the app and a component, which introduces an interesting design pattern that is employed by some WinRT APIs. Even so, the solution brings us to something of a stalemate because of the limitations of the HTML canvas element itself. This forces us to think through some alternatives, which is a good exercise because you’ll probably encounter other difficulties in your own component work.
JavaScript Workers
For pure JavaScript, workers are the way you offload code execution to other threads, where those tasks do not need access to the document, window, or parent objects, or anything else in the DOM.128 A key point to understand here is that communication between the main app (the UI thread) and workers happens through the singular postMessage method and the associated message events. Workers are not like components in which you can just call methods and get results back. If you want to invoke methods inside that worker with specific arguments, you must make those calls through postMessage with a message that contains the desired values. On the return side, a function that’s invoked inside the worker sends its results to the main app through its own call to postMessage.
Various examples can be found in the JavaScript Web Workers app multitasking sample in the SDK. Here let me offer a simple one from the Image Manipulation example in this chapter—which is growing beyond its original intent for sure! I placed the countFromZero function into js/worker_count.js along with a message handler that serves as a simple method dispatcher:
onmessage = function (e) {
switch (e.data.method) {
case"countFromZero":
countFromZero(e.data.max, e.data.increment);
break;
default:
break;
}
};
function countFromZero(max, increment) {
var sum = 0;
max = 10;
for (var x = 0; x < max; x += increment) {
sum += x;
}
postMessage({ method: "countFromZero", sum: sum });
}
When this worker is started, the only code that executes is the onmessage assignment. When that handler receives the appropriate message, it then invokes countFromZero, which in turn posts its results. In other words, setting up a worker just means converting method calls and results into messages.
Invoking this method from the app now looks like this:
var worker = new Worker('worker_count.js');
worker.onmessage = function (e) { //e.data.sum is the result}
//Call the method
worker.postMessage({ method: "countFromZero", max: 1000, increment: .00005 });
Keep in mind that postMessage is itself an asynchronous operation—there’s no particular guarantee about how quickly those messages will be dispatched to the worker or the app. Furthermore, when a worker is created, it won’t start executing until script execution yields (as when you call setImmediate). This means that workers are not particularly well suited for async operations that you want to start as soon as possible or for those where you want to get the results as soon as they are available. For this reason, workers are better for relatively large operations and ongoing processing; small, responsive, and high-performance routines are better placed within WinRT components.
The postMessage mechanism is also not the best for chaining multiple async operations together, as we’re easily able to do with promises that come back from WinRT APIs. To be honest, I don’t even want to start thinking about that kind of code! I prefer instead to ask whether there’s a way that we can effectively wrap a worker’s messaging mechanism within a promise, such that we can treat async operations the same regardless of their implementation.
We need to get the result from within the worker.onmessage handler and send it to a promise’s completed handler. To do that, we use a bit of code in the main app that’s essentially what the JavaScript projection layer uses to turn an async WinRT API into a promise itself:
// This is the function variable we're wiring up.
var workerCompleteDispatcher = null;
var promiseJS = new WinJS.Promise(function (completeDispatcher, errorDispatcher,
progressDispatcher) {
workerCompleteDispatcher = completeDispatcher;
});
// Worker would be created here and stored in the 'worker' variable
// Listen for worker events
worker.onmessage = function (e) {
if (workerCompleteDispatcher != null) {
workerCompleteDispatcher(e.data.sum);
}
}
promiseJS.done(function (sum) {
// Output for JS worker
});
To repeat a few points from Appendix A, “Demystifying Promises,” a promise is a separate thing from the async operation itself. (It has to be, because WinRT APIs and components know nothing of promises.) In many ways a promise is just a tool to manage a bunch of listener functions on behalf of an async operation, like our worker here. When an async operation detects certain events—namely, completed, error, and progress—it wants to notify whoever has expressed an interest in those events. Those whoevers have done so by calling a promise’s then or done methods and providing one or more handlers.
Within then or done, a promise just saves those functions in a list (unless it knows the async operation is already complete, in which case it can call the completed or error functions immediately). This is why you can call then or done multiple times on the same promise—it just adds your completed, error, and progress handlers to the appropriate list within the promise. Of course, those lists are useless without some way to invoke the handlers they contain. For this purpose, a promise has three functions of its own to iterate each list and invoke the registered listeners. That’s again the core purpose of a promise: maintain lists of listeners and call those listeners when asked.
The code that starts up an async operation, then, will want to use a promise to manage those listeners, hence the call to new WinJS.Promise. When that promise is initialized, this function you pass to the constructor is called with references to the dispatcher functions that notify the listeners. The async operation code saves the dispatchers it needs later. In our worker’s case, we’re interested only in notifying the completed handlers, so we save that dispatcher in workerCompleteDispatcher.
When we then detect that the operation is complete—that is, when we receive the appropriate message from the worker—we check to make sure workerCompleteDispatcheris a good reference and then call it with the result value. That dispatcher will again loop through all the registered listeners and call them with that same result. In the code above, the only such listener is the anonymous function we gave to promiseJS.done.
Truth be told, it’s really just mechanics. To handle errors and progress, we’d simply save those dispatchers as well, add more specific code inside the onmessage event handler that would check e.data for other status values from the worker, and invoke the appropriate dispatcher in turn. Such relationships are illustrated in Figure 18-4.
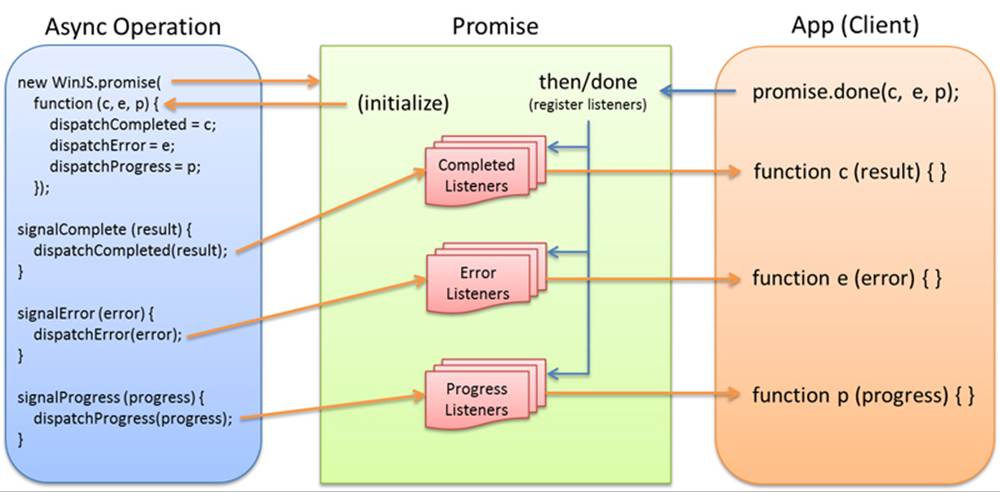
FIGURE 18-4 A promise manages and invokes listeners on behalf of an async operation.
Again, everything you see here with the exception of the call to done (which is client code and not part of the async operation) is what the JavaScript projection layer does for an async operation coming from WinRT. In those cases the async operation is represented by an object with anIAsync* interface instead of a worker. Instead of listening for a worker’s message event, the projection layer just wires itself up through the IAsync* interface and creates a promise to manage connections from the app.
The code above is included in the Image Manipulation example accompanying this chapter. It’s instructive to set breakpoints within all the anonymous functions and step through the code to see exactly when they’re called, even to step into WinJS and see how it works. In the end, what’s meaningful is that this code gives us a promise (in the promiseJS variable) that looks, feels, and acts like any other promise. This will come in very handy when we have promises from other async operations, as explained later in “Sidebar: Joining Promises.” It means that we can mix and match async operations from WinRT APIs, WinRT components, and workers alike.
Async Basics in WinRT Components
Within a WinRT component, there are three primary requirements to make any given method asynchronous. First, append Async to the method name, a simple act that doesn’t accomplish anything technically (and isn’t technically required) but clearly communicates to callers that their need to treat the method differently from synchronous ones.
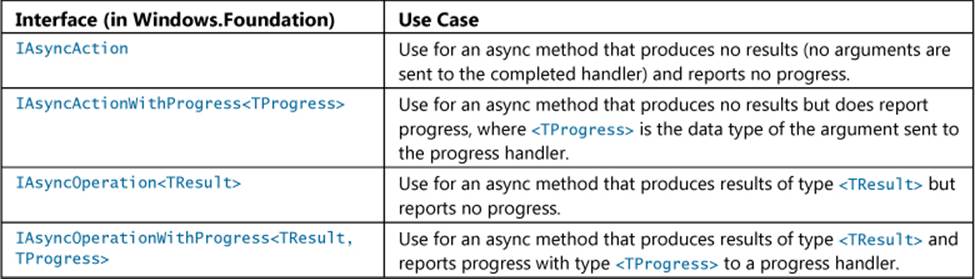
Second, the return value of the method must be one of the following Windows.Foundation interfaces, shown in the table below, each one representing a particular combination of async behaviors, namely whether the method produces a result and whether the method is capable of reporting progress:
Having chosen the type of async method we’re creating, we now have to run the method’s code on another thread. It is possible here to utilize threads directly, using the thread pool exposed in the Windows.System.Threading API, but there are higher level constructs in both C#/VB and C++ that make the job much easier.
Async Methods in C#/Visual Basic In C# and Visual Basic we have the System.Threading.-Tasks.Task class for this purpose. A Task is created through one of the static Task.Run methods. To this we give an anonymous function (called a delegate in .NET, defined with a lambda operator=>) that contains the code to execute. To then convert that Task into an appropriate WinRT async interface, we call the task’s AsAsyncAction or AsAsyncOperation extension method. Here’s what this looks like in a generic way:
public IAsyncOperation<string> SomeMethodAsync(int id)
{
var task = Task.Run<string>( () => // () => in C# is like function () in JS
{
return "Here is a string.";
});
return task.AsAsyncOperation();
}
If the code inside the task itself performs any asynchronous operations (for which we use the C# await keyword as described in the blog posts linked earlier), the delegate must be marked with async:
public IAsyncOperation<string> SomeMethodAsync(int id)
{
var task = Task.Run<string>(async () =>
{
var idString = await GetMyStringAsync(id); // await makes an async call looks sync
return idString;
});
return task.AsAsyncOperation();
}
Note that Task.Run does not support progress reporting and the AsAsyncAction and AsAsyncOperation extension methods don’t support cancellation. In these cases you need to use the System.Runtime.InteropServices.WindowsRuntime.AsyncInfo class and one of its Run methods as appropriate to the chosen async behavior. The Task.AsAsyncOperation call at the end is unnecessary here because AsyncInfo.Run already provides the right interface:
public IAsyncOperation<string> SomeMethodAsync(int id)
{
return AsyncInfo.Run<string>(async (token) =>
{
var idString = await GetMyStringAsync(id);
token.ThrowIfCancellationRequested();
return idString;
});
}
In this code, AsyncInfo.Run provides the delegate with an argument of type System.Threading.-CancellationToken. To support cancellation, you must periodically call the token’s ThrowIfCancel-lationRequested method. This will pick up whether the original caller of the async method has cancelled it (for example, calling a promise’s cancel method). Because cancellation is typically a user-initiated action, there’s no need to call ThrowIfCancellationRequested inside a very tight loop; calling it every 50 milliseconds or so will keep the app fully responsive.
Alternately, if a method like GetMyStringAsync accepted the CancellationToken, you could just pass the token to it. One strength of the CancellationToken model is that it’s highly composable: if you receive a token in your own async call, you can hand it off to any number of other functions you call that also accept a token. If cancellation happens, the request will automatically be propagated to all those operations.
Note that WinRT methods can accept a token because of an AsTask overload. Instead of this:
await SomeWinRTMethodAsync();
you can use this:
await SomeWinRTMethodAsync().AsTask(token);
Anyway, given these examples, here’s a noncancellable async version of CountFromZero:
public static IAsyncOperation<double> CountFromZeroAsync(double max, double increment)
{
var task = Task.Run<double>(() =>
{
double sum = 0;
for (double x = 0; x < max; x += increment)
{
sum += x;
}
return sum;
});
return task.AsAsyncOperation();
}
The IAsyncOperation interface returned by this method, like all the async interfaces in Windows.Foundation, gets projected into JavaScript as a promise, so we can use the usual code to call the method and receive its results (asyncVars is just an object to hold the variables):
asyncVars.startCS = new Date();
var promiseCS = PixelCruncherCS.Tests.countFromZeroAsync(max, increment);
promiseCS.done(function (sum) {
asyncVars.timeCS = new Date() - asyncVars.startCS;
asyncVars.sumCS = sum;
});
With code like this, which is in the Image Manipulation example with this chapter, you can start the async counting operations (using the “Counting Perf (Async)” button) and then immediately go open an image and do grayscale conversions at the same time.
Async Methods in C++ To implement an async method in C++, we need to produce the same end result as in C#: a method that returns one of the IAsync* interfaces and runs its internal code on another thread.
The first part is straightforward—we just need to declare the method with the C++ types (shown here in the C++ code; the class declaration in Grayscale.h is similar):
usingn amespace Windows::Foundation;
IAsyncOperation<double>^ Tests::CountFromZeroAsync(double max, double increment)
The C++ analogue of the AsyncInfo class is a task found in what’s called the Parallel Patterns Library for C++, also known as PPL or the Concurrency Runtime, whose namespace is concurrency. (Use a #include <ppltasks.h> and using namespace concurrency; in your C++ code, and you’re good to go.) The function that creates a task is called create_async. All we need to do is wrap our code in that function:
IAsyncOperation<double>^ Tests::CountFromZeroAsync(double max, double increment)
{
return create_async([max, increment]()
{
double sum = 0;
for (double x = 0; x <max; x += increment)
{
sum += x;
}
return sum;
});
}
As with C#, there are additional structures for when you’re nesting async operations, supporting cancellation, and reporting progress. I will leave the details to the documentation. See Asynchronous Programming in C++ and Task Parallelism, but one short excerpt from the CircusCannon2 example for this chapter will illustrate that async chaining in C++ looks a lot like promise chains in JavaScript:
IAsyncOperation<bool>^ Controller::ConnectAsync()
{
return create_async([=]()
{
Platform::String ^ ccSelector = HidDevice::GetDeviceSelector(
DeviceProperties::usage_page, DeviceProperties::usage_id,
DeviceProperties::vid, DeviceProperties::pid);
IAsyncOperation<DeviceInformationCollection^>^ deviceOp =
DeviceInformation::FindAllAsync(ccSelector);
return create_task(deviceOp).then([this](DeviceInformationCollection^ devices) {
if (devices->Size == 0) {
//This error message doesn't get through...not sure what the solution is.
throw"No Circus Cannon devices found";
}
//Take the first one
m_lastDevice = devices->GetAt(0);
//Do the connect and return its result
return _connectAsync();
});
});
}
task<bool> Controller::_connectAsync()
{
if (nullptr == m_lastDevice) {
throw"No device was enumerated so last device id is undefined.";
}
IAsyncOperation<HidDevice^>^ deviceOp = HidDevice::FromIdAsync(m_lastDevice->Id,
FileAccessMode::ReadWrite);
auto task = create_task(deviceOp);
return task.then([this](HidDevice^ device) {
if (nullptr == device) {
m_isConnected = false;
m_status = _statusString(m_lastDevice->Id);
} else {
m_status = "OK";
m_isConnected = true;
m_device = device;
_sendCommand(Commands::Stop);
_registerEvents();
}
return m_isConnected;
});
}
Here the first create_async call wraps a block of code to run it on a separate thread. Within that code we make another async call (FindAllAsync) and create a task from it. To chain, we use that task’s then method, provide a function (lambda) to receive the results, and return another task from another function whose ultimate return value is a Boolean.
Sidebar: Joining Promises
There’s one detail from the Image Manipulation example that takes advantage of having all the async operations managed through promises. In the app, we show a horizontal progress indicator before starting all the async operations with the Counting Perf (Async) button:
function testPerfAsync() {
showProgress("progressAsync", true);
//...
}
We want this control to stay visible while any of the async operations are still running, something that’s easily done with WinJS.Promise.join. What I wanted to point out is that because you can call a promise’s then or done as many times as you want, it’s just fine to attach handlers on each of the individual promises and to attach separate handlers to join:
promiseJS.done(function (sum) {
// Output for JS worker
}
promiseCS.done(function (sum) {
// Output for C# component
})
promiseCPP.done(function (sum) {
// Output for C++ component
});
WinJS.Promise.join([promiseJS, promiseCS, promiseCPP]).done(function () {
// Hide progress indicator when all operations are done
showProgress("progressAsync", false);
});
Now we see how much we simplify everything by wrapping a worker’s message mechanism within a promise! Without doing so, we’d need to maintain one flag to indicate whether the promises were fulfilled (set to true inside the join) and another flag to indicate if the worker’s results had been received (setting it to true inside the worker’s message handler). Inside the join, we’d need to check if the worker was complete before hiding the progress indicator; the worker’s message handler would do the same, making sure the join was complete. This kind of thing might be manageable on a small scale but would certainly get messy with more than a few parallel async operations—which is the reason promises were created in the first place!
Arrays, Vectors, and Other Alternatives
Now that we’ve seen the basic structure of asynchronous methods in WinRT components, let’s see how we might create an asynchronous variant of the synchronous Convert methods we implemented earlier. For the purpose of this exercise we’ll just stick with the C# component though, again, such things are generally best written in C++.
It would be natural with Convert to consider IAsyncAction as the method’s type, because we already return results in an output array. This would, in fact, be a great choice if we were using types other than an array. However, arrays present a variety of problems with asynchronous methods. First, although we can pass the method both the input and output arrays and the method can do its job and populate that output array, its contents won’t actually be transferred back across the async task boundary at present. So the completed handler in the app will be called as it would expect, but the output array passed to the async method will still be empty.
The next thing we can try is to turn the async action into an operation that produces a result. We might consider a return type of IAsyncOperation<Byte[]> (or an equivalent one using progress), where the method would create and populate the array it returns. The problem, however, is that the app receiving this array wouldn’t know how to release it—clearly some memory was allocated for it, but that allocation happened inside a component and not inside JavaScript, so there’s no clear rule on what to do. Because this is a sure-fire recipe for memory leaks, returning arrays like this isn’t supported.
An alternative is for the async method to return a specific WinRT collection type (where there are clear rules for deallocation), such as an IList<Byte>, which will be converted to a vector in JavaScript that can also be accessed as an array. (Note that IList is specific to .NET languages; the C++ walkthrough topic shows how to use a vector directly with the concurrent_vector type.) Here’s a simple example of such a method:
public static IAsyncOperation<IList<Byte>> CreateByteListAsync(int size)
{
var task = Task.Run<IList<Byte>>(() =>
{
Byte [] list = newByte[size];
for (int i = 0; i < size; i++)
{
list[i] = (Byte)(i % 256);
}
return list.ToList();
});
return task.AsAsyncOperation();
}
Applying this approach to the grayscale routine, we get the following ConvertPixelArrayAsync (see PixelCruncherCS > ConvertGrayscale.cs), where the DoGrayscale is the core code of the routine broken out into a separate function, the third parameter of which is a periodic callback that we can use to handle cancellation). This is the function that’s called if you select Async w/ Vector from the drop-down list in the Image Manipulation app’s UI:
public IAsyncOperation<IList<Byte>> ConvertPixelArrayAsync([ReadOnlyArray()]
Byte[] imageDataIn)
{
//Use AsyncInfo to create an IAsyncOperation that supports cancellation
return AsyncInfo.Run<IList<Byte>>((token) =>Task.Run<IList<Byte>>(() =>
{
Byte[] imageDataOut = new Byte[imageDataIn.Length];
DoGrayscale(imageDataIn, imageDataOut, () =>
{
token.ThrowIfCancellationRequested();
});
return imageDataOut.ToList();
}, token));
}
A fourth approach is to follow the pattern used by the Windows.Graphics.Imaging.PixelData-Provider class, which we’re already using in the Image Manipulation example. In the function setGrayscale (js/default.js), we open a file obtained from the file picker and then decode it withBitmapDecoder.getPixelDataAsync. The result of this operation is the PixelDataProvider that has a method called detachPixelData to provide us with the pixel array (some code omitted for brevity):
function setGrayscale(componentType) {
imageFile.openReadAsync().then(function (stream) {
return Imaging.BitmapDecoder.createAsync(stream);
}).then(function (decoderArg) {
//Configure the decoder ... [code omitted]
return decoder.getPixelDataAsync();
}).done(function (pixelProvider) {
copyGrayscaleToCanvas(pixelProvider.detachPixelData(),
decoder.pixelWidth, decoder.pixelHeight, componentType);
});
}
A similar implementation of our grayscale conversion routine is in PixelCruncherCS > ConvertGrayscale.cs in the function ConvertArraysAsync. Its type is IAsyncAction because it operates against the Grayscale.inputData array (which must be set first). The output is accessed fromGrayscale.detatchOutputData(). Here’s how the JavaScript code looks, which is used if you choose the Async w/ Properties option in the Image Maniupulation app’s UI:
pc1.inputData = pixels;
pc1.convertArraysAsync().done(function () {
var data = pc1.detachOutputData()
copyArrayToImgData(data, imgData);
updateOutput(ctx, imgData, start);
});
You might be wondering about that copyArrayToImgData function in the code above. I’m glad you are, because it points out a problem that forces us to take a different approach altogether, one that leads us to an overall better solution!
All along in this example we’ve been loading image data from a file, using the BitmapDecoder, and then converting those pixels to grayscale into an array provided by the canvas element’s createImageData method. Once the data is inside that image data object, we can call the canvas’sputImageData method to render it. All of this was originally implemented to show interaction with the canvas, including how to save canvas contents to a file. That was fine for Chapter 13, where graphics were our subject. But if we’re really looking to just convert an image file to grayscale, using a canvas isn’t necessarily the best road to follow!
The key issue that we’re encountering here is that the canvas’s putImageData method accepts only an ImageData object created by the canvas’s createImageData method. The canvas does not allow you to create and render a separate pixel array, nor insert a different array in theImageData.data property. The only way it works is to write data directly into the ImageData.data array.
In the synchronous versions of our component methods, it was possible to pass ImageData.data as the output array so that the component could perform a direct write. Unfortunately, this isn’t possible with the async versions. Those methods can provide us with the converted data all right, but because we can’t point ImageData.data to such an array, we’re forced to use a routine like copyArrayTo-ImageData function to copy those results into ImageData.data, byte by byte. Urk. That pretty much negates any speed improvement we might have realized by creating components in the first place!
Let me be clear that this is a limitation of the canvas element, not of WinRT or components in general. Moving arrays around between apps and components, as we’ve seen, works perfectly well for other scenarios (remembering, of course, that having multiple garbage collectors running between JavaScript and C# arrays can incur memory overhead). Still, the limitation forces us to ask whether we even have the right approach at all.
Taking a step back, the whole purpose of the demonstration is to convert an image file to grayscale and show that conversion on the screen. Using a canvas is just an implementation detail—we can achieve the same output in other ways. For example, instead of converting the pixels into a memory array, we could create a temporary file by using the Windows.Graphics.Image.BitmapEncoder class instead, just like we use in the SaveGrayscale function that’s already in the app. We’d just give it the converted pixel array instead of grabbing those pixels from the canvas again. Then we can use a thumbnail, URL.createObjectURL or an ms-appdata:/// URI to display it in an img element. This would likely perform much faster because the canvas’s putImageData method actually takes a long time to run, much longer than the conversion routines in our components.
Along these same lines, there’s no reason that we couldn’t place more of the whole process inside a component. Only those parts that deal with UI need to be in JavaScript: the rest can be written in another language. For example, why bother shuttling pixel arrays between JavaScript and a WinRT component? Once we get a source StorageFile from the file picker we can pass that to a component method directly. The component can then use the BitmapDecoder to obtain the pixel stream, convert it, and then create the temporary file and write the converted pixels back out using the BitmapEncoder, handing back a StorageFile for the temp file from which we can set an img.src or grab a thumbnail. The pixels, then, never leave the component and never have to be copied between memory buffers. This should result in both faster throughput as well as a smaller memory footprint.
To this end the PixelCruncherCS project in the Image Manipulation example has another async method called ConvertGrayscalFileAsync that does exactly what I’m talking of here:
public static IAsyncOperation<StorageFile> ConvertGrayscaleFileAsync(StorageFile file)
{
return AsyncInfo.Run<StorageFile>((token) =>Task.Run<StorageFile>(async () =>
{
StorageFile fileOut = null;
try
{
//Open the file and read in the pixels
using (IRandomAccessStream stream = await file.OpenReadAsync())
{
BitmapDecoder decoder = await BitmapDecoder.CreateAsync(stream);
PixelDataProvider pp = await decoder.GetPixelDataAsync();
Byte[] pixels = pp.DetachPixelData();
//We know that our own method can convert in-place,
//so we don't need to make a copy
DoGrayscale(pixels, pixels);
//Save to a temp file.
ApplicationData appdata = ApplicationData.Current;
fileOut = await appdata.TemporaryFolder.CreateFileAsync(
"ImageManipulation_GrayscaleConversion.png",
CreationCollisionOption.ReplaceExisting);
using (IRandomAccessStream streamOut =
await fileOut.OpenAsync(FileAccessMode.ReadWrite))
{
BitmapEncoder encoder = awaitBitmapEncoder.CreateAsync(
BitmapEncoder.PngEncoderId, streamOut);
encoder.SetPixelData(decoder.BitmapPixelFormat, decoder.BitmapAlphaMode,
decoder.PixelWidth, decoder.PixelHeight,
decoder.DpiX, decoder.DpiY, pixels);
await encoder.FlushAsync();
}
}
}
catch
{
//Error along the way; clear fileOut
fileOut = null;
}
//Finally, return the StorageFile we created, which makes it convenient for the
//caller tocopy it elsewhere, use in a capacity like URL.createObjectURL, or refer
//to it with"ms-appdata:///temp" + fileOut.Name
return fileOut;
}));
}
One thing we can see when comparing the equivalent JavaScript code with this is that the C# await keyword very much simplifies dealing with asynchronous methods—making them appear like they’re synchronous. This is one potential advantage to writing code in a component! The other important detail is to note the using statements around the streams. Streams, among other types, are disposable (they have an IDisposable interface) and must be cleaned up after use or else files will remain open and you’ll see access denied exceptions or other strange behaviors. Theusing statement encapsulates that cleanup logic for you.
In any case, with this method now we need only a few lines of JavaScript to do the job:
PixelCruncherCS.Grayscale.convertGrayscaleFileAsync(imageFile).done(function (tempFile) {
if (tempFile != null) {
document.getElementById("image2").src = "ms-appdata:///temp/" + tempFile.name;
}
});
The line with the URI could be replaced with these as well (which I’m using only because I’m displaying the full image at its original size—if you don’t need that full display, remember to use a thumbnail from the StorageFile):
var uri = URL.createObjectURL(tempFile, { oneTimeOnly: true });
document.getElementById("image2").src = uri;
Running tests with this form of image conversion, the app shows a much better response, so much so that the progress ring that’s normally shown while the operation is running doesn’t even appear! Furthermore, we reduce the overall memory spike for the operation by half, because we’re loading the pixels into memory just once, inside the component, rather than populating arrays in both the app and the component.
All this illustrates the final point of this whole exercise: if you’re looking for optimizations, think beyond just the most computationally intensive operations, especially if it involves moving lots of data around. As we’ve seen here, challenging our first assumptions can lead to a much better solution.
Projections into JavaScript
Already in this chapter we’ve seen some of the specific ways that a WinRT component is projected into JavaScript. In this section I’ll offer a fuller summary of how this world of WinRT looks from JavaScript’s point of view.
Let’s start with naming. We’ve seen that a JavaScript app project must add a component as a reference, at which point the component’s namespace becomes inherently available in JavaScript; no other declarations are required. The namespace and the classes in the component just come straight through into JavaScript. What does change, however, are the names of methods, properties, and events. Although namespaces and class names are projected as they exist in the component, method and property names (including members of struct and enum) are converted to camel casing: TestMethod and TestProperty in the component become testMethod and testProperty in JavaScript. This casing change can have some occasional odd side effects, as when the component’s name starts with two capital letters such as UIProperty, which will come through asuIProperty.
Event names, on the other hand, are converted to all lowercase as befits the JavaScript convention. An event named SignificantValueChanged in the component becomes significantvaluechanged in JavaScript. You’d use that lowercase name with addEventListener, and the class that provides it will also be given a property of that name prefixed with on, as in onsignificantvaluechanged. An important point with events is that it’s sometimes necessary to explicitly call removeEventListener to prevent memory leaks. For a discussion, refer back to “WinRT Events and removeEventListener” in Chapter 3. In the context of this chapter, WinRT events include those that come from your own WinRT components.
Static members of a class, as we’ve seen, can just be referred to directly using the fully qualified name of that method or property using the component’s namespace. Nonstatic members, on the other hand, are accessible only through an instance created with new or returned from a static member.
Next are two limitations that we’ve mentioned before but are worth repeating in this context. First is that a WinRT component cannot work with the UI of an app written in JavaScript. This is because the app cannot obtain a drawing surface of any kind that the component could use. Second is that JavaScript can resolve overloaded methods by arity (number of parameters) only and not by type. If a component provides overloads distinguished only by type, JavaScript can access only the one that’s marked as the default.
Next we come to the question of data types, which is always an interesting subject where interoperability between languages is concerned. Generally speaking, what you see in JavaScript is naturally aligned with what’s in the component. A WinRT DateTime becomes a JavaScript Date, aTimeSpan (based on 100ns units) becomes a number expressed in milliseconds, numerical values become a Number, bool becomes Boolean, strings are strings, and so on. Some WinRT types, like IMapView and IPropertySet, just come straight through to JavaScript as an object type (with the interface’s methods) because there are no intrinsic equivalents. Then there are other conversions that are, well, more interesting:
• Asynchronous operations in a component that return interfaces like IAsyncOperation are projected into JavaScript as promises.
• Because JavaScript doesn’t have a concept of struct as does C#, VB, and C++, structs from a WinRT component appear in JavaScript as objects with the struct’s fields as members. Similarly, to call a WinRT component that takes a struct argument, a Javascript app creates an object with the fields as members and passes that instead. Note that the casing of struct members is converted to camel casing in JavaScript.
• Some collection types, like IVector, appear in JavaScript as an array but with different methods (refer to Chapter 6 in “Collection Data Types”). That is, the collection can be accessed using the array operator [], but its methods are different. Be careful, then, passing these to JavaScript manipulation functions that assume those methods exist.
• Enums are translated into objects with camel-cased properties corresponding to each enum value, where those values are JavaScript Number types.
• WinRT APIs sometimes return Int64 types (alone or in structs) for which there is no equivalent in JavaScript. The 64-bit type is preserved in JavaScript, however, so you can pass it back to WinRT in other calls. However, if you modify the variable holding that value, even with something as simple as a ++ operator, it will be converted into a JavaScript Number. Such a value will not be accepted by methods expecting an Int64.
• If a component method provides multiple output parameters, these show up in JavaScript as a single object with those different values as properties. No clear standard for this exists in JavaScript; it’s best to avoid in component design altogether.
The bottom line is that the projection layer tries to make WinRT components written in any other language look and feel like they belong in JavaScript, without introducing too much overhead.
Scenarios for WinRT Components
Earlier in “Choosing a Mixed Language Approach” I briefly outlined a number of scenarios where WinRT components might be very helpful in the implementation of your app. In this section we’ll think about these scenarios a little more deeply, and I’ll point you to demonstrations of these scenarios in the samples, where such are available.
Higher Performance (Perhaps)
Increasing the performance of a Windows Store app written in HTML, CSS, and JavaScript is one of the primary scenarios for offloading some work to a WinRT component, but do so carefully.
When evaluating the performance of your app, keep an eye open for specific areas that are computationally intensive or involve moving a lot of data around. For example, if you found it necessary to implement an extended splash screen for those exact reasons, perhaps you can reduce the time the user has to wait (especially on first launch) before the app is active. Any other situation where the user might have to wait—and have better things to do than watch a progress indicator!—is a great place to use a high-performance component if possible. Clearly, in some scenarios the performance of the app isn’t so much the issue as is network latency, but once you get data back from a service you might be able to pre-process it faster in a component than in JavaScript.
As another example, an app package might include large amounts of compressed data to minimize the size of its download from the Store, and it needs to decompress that data on first run. A WinRT component might significantly shorten initialization time. If the component uses WinRT APIs to write to your app data folders, all that data will also be accessible from JavaScript through those same APIs.
One challenge is that writing a component to chew on a bunch of data might mean passing JavaScript arrays into that component and getting arrays back out. As we saw in the quickstarts, this works just fine with synchronous operations but is not presently supported for async, which is how you’d often want to implement potentially long-running methods. Fortunately, there are ways around this limitation, either by transferring results for an async operation through synchronous properties or by using other collection types such as vectors.
That said, marshaling data across language boundaries has its costs, and in various cases the performance gain of code written in C++ will be lost in the overhead. For this reason, investigate whether you can keep the work centered around app data, which can be shared between the app and components without the transfer cost.
One place where performance is very significant is with background tasks. As explained in Chapter 16, background tasks are limited to a few seconds of CPU time every 15 minutes. Because of this, you can get much more work accomplished in a background task written in a higher-performance language than one written in JavaScript.
The structure of a component with such tasks is no different than any other, as demonstrated in the C# Tasks component included with the Background task sample. Each of the classes in the Tasks namespace is marked as public and sealed, and because the component is brought into the JavaScript project as a reference, those class names (and their public methods and properties) are in the JavaScript namespace. As a result, their names can be given to the BackgroundTaskBuild.taskEntry-Point property without any problems.
Another example of the same technique can be found in the Network status background sample.
Something that we didn’t discuss in Chapter 16, but which is appropriate now, is that when you create a WinRT component for this purpose, the class that implements the background task must derive from Windows.ApplicationModel.Background.IBackgroundTask and implement its singular Run method. That method is what gets called when the background task is triggered. We can see this in the Network status background sample where the whole C# implementation of the component comprises just a few dozen lines of code (see BackgroundTask.cs in the sample’s NetworkStatusTask project; some comments and debug output omitted):
namespace NetworkStatusTask
{
public sealed class NetworkStatusBackgroundTask : IBackgroundTask
{
ApplicationDataContainer localSettings = ApplicationData.Current.LocalSettings;
// The Run method is the entry point of a background task.
public void Run(IBackgroundTaskInstance taskInstance)
{
// Associate a cancellation handler with the background task.
taskInstance.Canceled += new BackgroundTaskCanceledEventHandler(OnCanceled);
try
{
ConnectionProfile profile =
NetworkInformation.GetInternetConnectionProfile();
if (profile == null)
{
localSettings.Values["InternetProfile"] = "Not connected to Internet";
localSettings.Values["NetworkAdapterId"] = "Not connected to Internet";
}
else
{
localSettings.Values["InternetProfile"] = profile.ProfileName;
var networkAdapterInfo = profile.NetworkAdapter;
if (networkAdapterInfo == null)
{
localSettings.Values["NetworkAdapterId"] =
"Not connected to Internet";
}
else
{
localSettings.Values["NetworkAdapterId"] =
networkAdapterInfo.NetworkAdapterId.ToString();
}
}
}
catch (Exception e)
{
// Debug output omitted
}
}
// Handles background task cancellation.
private void OnCanceled(IBackgroundTaskInstance sender,
BackgroundTaskCancellationReason reason)
{
// Debug output omitted
}
}
}
You can see that the Run method receives an argument through which it can register a handler for cancelling the task. The code above doesn’t do anything meaningful with this because the task itself executes only a small amount of code. The C# tasks in the Background tasks sample, on the other hand, simulate longer-running operations, in which case it uses the handler to set a flag that will stop those operations.
Access to Additional APIs
Between the DOM API, WinJS, third-party libraries, and JavaScript intrinsics, JavaScript developers have no shortage of APIs to utilize in their apps. At the same time, there is a whole host of .NET and Win32/COM APIs that are available to C#, VB, and C++ apps that are not directly available to JavaScript, including the DirectX, ESE “Jet” database, and Media Foundation APIs.
With the exception of APIs that affect UI or drawing surfaces (namely Direct2D and Direct3D), WinRT components can make such functions—or, more likely, higher-level operations built with them—available to apps written in JavaScript.
The Building your own Windows Runtime components to deliver great apps post on the Windows Developer Blog gives some examples of this. It shows how to use the System.IO.Compression API in .NET to work with ZIP files and the XAudio APIs (part of DirectX) to bypass the HTML audio element and perform native audio playback. In the latter case, you might remember from Chapter 13, in “Playing Sequential Audio,” that no matter how hard we tried to smooth the transition between tracks with the audio element, there is always some discernible gap. This is because of the time it takes for the element to translate all of its operations into the native XAudio APIs. By going directly to those same APIs, you can circumvent the problem entirely. (That said, Microsoft knows about the behavior of the audio element and will likely improve its performance in the future.)
The DirectWrite font enumeration sample similarly uses the DirectWrite Win32 APIs through a C++ component to enumerate fonts, a capability not otherwise provided in WinRT.
This approach can also be used to communicate with external hardware that’s not represented in the WinRT APIs (except perhaps through a protocol API) but is represented in Win32/COM. We’ll take a closer look at the XInput and JavaScript controller sketch sample soon.
Another very simple example would be creating a component to answer an oft-heard question: “How do I create a GUID in JavaScript?” Although you can implement a routine to construct a GUID string from random numbers, it’s not a proper GUID in that there is no guarantee of uniqueness (GUID stands for Globally Unique Identifier, after all). To do the job right, you’d want to use the Win32 API CoGreatGuid, for which you can create a very simple C++ wrapper.
Overkill? Some developers have commented that going to all the trouble to create a WinRT component just to call one method like CoCreateGuidsounds like a heavyweight solution. However, considering the simplicity of a basic WinRT component as we’ve seen in this chapter, all you’re really doing with a component is setting up a multilanguage structure through which you can use the full capabilities of each language. The overhead is really quite small: a Release build of the C++ component in “Quickstart #2” produces a 39K DLL and a 3K .winmd file, for example.
Using a WinRT component in this way applies equally to COM DLLs that contain third-party APIs like code libraries. You can use these in a Windows Store app provided they meet three requirements:
• The DLL is packaged with the app.
• The DLL uses only those Win32/COM APIs that are allowed for Windows Store apps. Otherwise the app will not pass certification.
• The DLL must implement what is called Regfree COM, meaning that it doesn’t require any registry entries for its operation. (Windows Store apps do not have access to the registry and thus cannot register a COM library.) The best reference I’ve found for this is the article Simplify App Deployment with ClickOnce and Registration-Free COM in MSDN Magazine.
If all of these requirements are met, the app can then use the CoCreateInstanceFromApp function from a component to instantiate objects from that DLL.
The XInput API and Game Controllers
In Chapter 17 and its XboxController example, I demonstrated how to work with this particular device through the Windows.Devices.HumanInterfaceDevice.HidDevice protocol API. That’s certainly one way to go about it, but has a few drawbacks. For one, it might not work with similar controllers because we were interpreting the input reports according to a very specific byte (and bit!) pattern. Furthermore, some of the controls like the triggers are somewhat odd in how they report their state and could use a little better interpolation.
The XInput API, part of DirectX, is a Win32 API that works with a range of game controllers and is on the list of allowable Win32/COM APIs. The most commonly used function here is XInputGetState, which returns an XINPUT_STATE structure that describes the position of the various thumb controllers, how far throttle or other triggers are depressed (with interpolation to remove the oddities), and the on/off states of all the buttons. It’s basically meant to be polled with every animation frame in something like a game; the API doesn’t itself raise events when the controller state changes.
The XInput and JavaScript controller sketch sample in the Windows SDK demonstrates exactly this. Because the XInput API is not accessible directly through JavaScript, it’s necessary to create a WinRT component for this purpose. First, here’s the header file from the GameController project (Contoller.h):
namespace GameController
{
public value struct State
{
// [Omitted--just contains the same values as the Win32 XINPUT_STATE structure
};
public ref class Controller sealed
{
~Controller();
uint32 m_index;
bool m_isControllerConnected; // Do we have a controller connected
XINPUT_CAPABILITIES m_xinputCaps; // Capabilites of the controller
XINPUT_STATE m_xinputState; // The current state of the controller
uint64 m_lastEnumTime; // Last time a new controller connection
// was checked
public:
Controller(uint32 index);
void SetState(uint16 leftSpeed, uint16 rightSpeed);
State GetState();
};
}
The implementation of GetState in Controller.cpp then just calls XInputGetState and copies its properties to an instance of the component’s public State structure:
StateController::GetState()
{
// defaults to return controllerState that indicates controller is not connected
State controllerState;
controllerState.connected = false;
// An app should avoid calling XInput functions every frame if there are
// no known devices connectedas initial device enumeration can slow down
// app performance.
uint64 currentTime = ::GetTickCount64();
if (!m_isControllerConnected && currentTime - m_lastEnumTime < EnumerateTimeout)
{
return controllerState;
}
m_lastEnumTime = currentTime;
auto stateResult = XInputGetState(m_index, &m_xinputState);
if (stateResult == ERROR_SUCCESS)
{
m_isControllerConnected = true;
controllerState.connected = true;
controllerState.controllerId = m_index;
controllerState.packetNumber = m_xinputState.dwPacketNumber;
controllerState.LeftTrigger = m_xinputState.Gamepad.bLeftTrigger;
controllerState.RightTrigger = m_xinputState.Gamepad.bRightTrigger;
// And so on [copying all the other properties omitted.]
}
else
{
m_isControllerConnected = false;
}
return controllerState;
}
The constructor for a Controller object is also very simple:
Controller::Controller(uint32index)
{
m_index = index;
m_lastEnumTime = ::GetTickCount64() - EnumerateTimeout;
}
In a JavaScript app—once the reference to the component has been added—the GameController namespace contains the component’s public API, and we can utilize it like we would other scenario APIs. In the case of the sample, it first instantiates a Controller object (with index of zero) and then kicks off animation frames (program.js):
app.onactivated = function (eventObj) {
if (eventObj.detail.kind ===
Windows.ApplicationModel.Activation.ActivationKind.launch) {
// [Other setup omitted]
// Instantiate the Controller object from the WinRT component
controller = new GameController.Controller(0);
// Start rendering loop
requestAnimationFrame(renderLoop);
};
};
The renderLoop function then just calls the component’s getState method and applies the results to a canvas drawing before repeating the loop (also in program.js, though much code omitted):
function renderLoop() {
var state = controller.getState();
if (state.connected) {
controllerPresent.style.visibility = "hidden";
// Code added to the sample to extend its functionality
if (state.leftTrigger) {
context.clearRect(0, 0, sketchSurface.width, sketchSurface.height);
requestAnimationFrame(renderLoop);
return;
}
if (state.a) {
context.strokeStyle = "green";
} elseif (state.b) {
context.strokeStyle = "red";
} elseif (state.x) {
context.strokeStyle = "blue";
} elseif (state.y) {
context.strokeStyle = "orange";
}
// Process state and draw the canvas [code omitted]
};
// Repeat with the next frame
requestAnimationFrame(renderLoop);
};
The output of this sample is shown in Figure 18-5, reflecting the features I added to the modified sample in the companion content (which is what I’m showing above) to make it more interesting to my young son: changing colors with the A/B/X/Y buttons and clearing the canvas with the left trigger. As you can see, my own artwork with this app isn’t a whole lot different from his!
FIGURE 18-5 The XInput and JavaScript controller sketch sample with some modifications to change colors. The varying line width is controlled by the position of the right trigger.
Obfuscating Code and Protecting Intellectual Property
Back in Chapter 1 in “Playing in Your Own Room: The App Container,” we saw how apps written in HTML, CSS, and JavaScript exist on a consumer’s device as source files, which the app host loads and executes. By now you’ve probably realized that for as much as Windows tries to hide app packages from casual access, all that code is there on their device where a determined user can gain access to it. In other words, assume your code is just as visible in an app package as it is on the web through a browser’s View Source command.
It’s certainly possible—and common, in fact—to embed web content in a webview element to keep some of your code on a server. Still, there will be parts of an app that must exist and run on the client, so you are always running the risk of someone taking advantage of your generosity!
Ever since developers started playing with Windows Store apps written in HTML, CSS, and JavaScript, they’ve been asking about how to protect their code. In fact, developers using C# and Visual Basic ask similar questions because although those languages are compiled to IL (intermediate language), plenty of decompilers exist to produce source code from that IL just as other tools circumvent JavaScript minification. Neither JavaScript nor .NET languages are particularly good at hiding their details.
Code written in C++, being compiled down to machine code, is somewhat harder to reverse-engineer, although it’s still not impossible for someone to undertake such a task (in which case you have to ask why they aren’t just writing their own code to begin with!). Nevertheless, it’s the best protection you can provide for code that lives on the client machine.
If the rest of the app is written in a language other than C++, especially JavaScript, know that it’s a straightforward manner to also reverse-engineer the interface to a component. The issue here, then, is whether a malicious party could use the knowledge of a component’s interface to employ that component in their own apps. The short answer is yes, because your code might show them exactly how. In such cases, a more flexible and nearly watertight solution would be for the component vendor to individually manage licenses to app developers. The component would have some kind of initialization call to enable the rest of its functionality. Within that call, it would compare details of the app package obtained through the Windows.ApplicationModel.PackageId class against a known and secure registry of its own, knowing that the uniqueness of app identity is enforced by the Windows Store. Here are some options for validation:
• Check with an online service This would require network connectivity, which might not be a problem in various scenarios. Just remember to encrypt the data you send over the network to avoid snooping with a tool like Fiddler!
• Check against information encrypted and compiled into the component itself That is, the component is compiled for each licensee uniquely. This is the most difficult to hack.
• Check against an encrypted license file distributed with the component that is unique to the licensee (contains the app name and publisher, for instance) Probably the easiest solution, because even if the license file is copied out of the licensed app’s package, the info contained would not match another app’s package info at run time. The encryption algorithm would be contained within the compiled component, so it would be difficult to reverse-engineer in order to hack the license file—not impossible, but difficult. Another app could use that component only if it used the same package information, which couldn’t be uploaded to the Store but could still possibly be side-loaded by developers or an unscrupulous enterprise.
In the end, though, realize that Windows itself cannot guarantee the security of app code on a client device. Further protections must be implemented by the app itself, or you have to keep the code on a server and use it from there, either via HTTP requests or within a webview.
Concurrency
We’ve already seen that web workers and WinRT components with asynchronous methods can work hand in hand to delegate tasks to different threads. If you really want to exercise such an option, you can architect your entire app around concurrent execution by using these mechanisms, spinning up multiple async operations at once, possibly across multiple web workers. A WinRT component can also use multiple Task.Run or create_async/task calls, not just the single ones we’ve seen.
Deeper still, a WinRT component can utilize the APIs in Windows.System.Threadingto get at the thread pool, along with those APIs in Windows.System.Threading.Core that work with semaphores and other threading events. The details of these are well beyond the scope of this book, but I wanted to mention them because many of the built-in WinRT APIs make use of these and your components can do the same. And although it doesn’t demonstrate components, necessarily, the Thread pool sample provides a good place to start on this topic.
Tip To check if your C#, VB, or C++component code is running on the UI thread, use Window.UI.Core.CoreWindow.GetForCurrentThread, which returns null on non-UI threads.
Library Components
A library component is a piece of code that’s designed to be used by any number of other apps written in the language of their choice. You might be looking to share such a library with other developers (perhaps as a commercial product), or you might just be looking to modularize your own apps.
You could, of course, create a .js library for JavaScript apps, a .NET assembly for C# and VB, and a DLL for C++, and then ship and maintain each one separately. A single WinRT component, on the other hand, works with all languages, including any new language projections that might be added to Windows in the future. This greatly reduces development and maintenance costs over time.
We’ve seen some examples of library components already in some of the Windows SDK samples. For example, the HttpClient sample provides two sample filters for HTTP requests. Because the authors of this sample needed to provide JavaScript, C#, VB, and C++ variants, it made sense to implement the filters that were common to all of them as WinRT components in C++.
Another example is the Notifications Extensions Library that we saw in various samples of Chapter 16: App tiles and badges sample, Lock screen apps sample, Scheduled notifications sample, Secondary tiles sample, and Toast notifications sample. This library was designed to be incorporated you’re your own apps as-is, as we’ve done with the Here My Am! app for that chapter. (Note that because all the methods in the library’s classes are small and fast, they’re all designed to be synchronous.)
If you plan to create a commercial library, you can ship source code for every app to recompile, but it’s better to follow the How to: Create a software development kit documentation so that you can provide only the compiled DLL and/or WinMD file to your customers. Customers will add these libraries to their projects, so they’re packaged directly with the app.
Note When shipping a DLL or WinMD written in C++, be sure to provide separate builds x86, x64, and ARM targets. Providing standard compilations for each target is important to enable multiple apps to share the same library, a feature that the Store automatically manages on your behalf, as we’ll see in Chapter 20, “Apps for Everyone, Part 2.”
A primary use case for library components is to simplify interaction with a backend service, where the library can abstract complex HTTP interactions. Another is to create a simplified interface for a custom device. Although the protocol APIs that we explored in Chapter 17 make these devices accessible, you’re still typically working on a very low level where details are concerned: creating packets, setting bits in output reports, and so forth. Such details are very sensitive to errors, as even a single bit out of place can cause a malfunction.
With a WinRT component you can effectively create your own scenario API for a device or a set of devices (abstracting their differences underneath the API). The code in the component presents a simplified or higher level interface to its clients, which it then translates into lower-level interactions with the protocol APIs. Such a component can also smooth out the eccentricities of a device so that app logic doesn’t have to concern itself with such details.
Consider the Dream Cheeky Circus Cannon that we worked with in Chapter 17, a device that I can now say from experience has its eccentricities. These come from the nature of its internal mechanics: it has internal switches that are closed when movement in some direction reaches its limit. When these switches are closed, specific bits in one byte of the input report change from 0 to 1, and when the switches are opened again due to movement in the opposite direction, they change from 1 to 0. The device, however, only reports the state of the switches—it does not automatically stop itself when the limit is reached. Unless you issue a command to stop or move in the opposite direction, the cannon will sit there and grind its gears rather unpleasantly.
In the code we saw in Chapter 17, I used changes in the limit switches to automatically stop movement, thereby preventing the gear grinding (from js/default.js in that example):
function inputReportReceived(e) {
//Read input report from e.report.data (omitted)
//Stop if a limit is hit to prevent grinding.
var upDown = report[CircusCannon.offset.upDown];
var leftRight = report[CircusCannon.offset.leftRight];
var atLimit = (upDown & (CircusCannon.status.topLimit | CircusCannon.status.bottomLimit))
|| (leftRight & (CircusCannon.status.leftLimit | CircusCannon.status.rightLimit));
if (atLimit) {
sendCommand(CircusCannon.commands.stop);
}
}
So far so good. However, the device constantly sends input reports with current status, not when status changes, and it takes some movement in the opposite direction before a closed limit switch opens again. As a result, issuing a command to move the cannon in the direction opposite a closed limit switch doesn’t open that switch automatically. With the code above, movement stops right away because the limit switch remains closed until we send enough commands to make the device move far enough. It’s therefore necessary to debounce the limit switches, which means ignoring a closed limit switch until it first opens again. This way we can convert the constant input reports into discrete events for hitting a limit.
Along similar lines, issuing a command to fire missiles just turns on a motor for the firing mechanism, and that motor continues to spin until you issue a stop command. In the mechanism there’s another switch that closed about the time that a missile is fired, and opened again once the firing mechanism has rotated past the trigger point. I say “about” because it’s not really that precise: the switch can close before a missile has actually been released—in my tests it’s more like the switch has to first close and then open again to be sure that firing took place. Furthermore, I found that it’s good to let the mechanism keep moving about another 100ms past the point where the switch gets re-opened to be sure that it won’t suddenly report being closed again. All of these characteristics make it difficult to tell the cannon to “fire one shot” because what that means, exactly, is a bit tricky to determine.
For UI purposes, I also wanted to be able to tell the cannon to move a little in any given direction. However, the device has no concept of step-wise movement: you tell it to start and stop, nothing more. (It does have slow movement commands, but they continue until a stop is issued.) To create such behavior, it’s necessary to use timers with something like 500ms intervals.
All together, then, you can see that mapping simple user-level commands like “move in a direction,” “move a little in a direction,” “fire a missile,” and “fire all three missiles” requires some intricate communication with the device and some additional device-level logic. Putting all this behind a custom scenario API in a WinRT component makes a lot of sense.
You can see such an implementation in the CircusCannon2 example in this chapter’s companion content, where the CircusCannonControl project contains a C++ WinRT component that does everything I’ve described: it debounces the limit switches and raises singular events for any given limit, it works with the missile-fired bit in the input report to provide reliable “fire one” and “fire all” commands, and it implements step movements using internal timers. This all makes it very straightforward to write a decent app UI around the device (though the UI of the front-end test app in the example falls well short of “decent”!).
One part of this component that bears a little more discussion is properly raising events such that single-threaded JavaScript apps can consume them. Again, the Raising events in Windows Runtime Components topic in the documentation has all the details, so let me just show you what I used in the example. First of all, I used a simple EventHandler type for each event along with the C++ event keyword (see CircusCannonControl project > CannonControl.h):
event Windows::Foundation::EventHandler<bool>^ LeftLimitChanged;
event Windows::Foundation::EventHandler<bool>^ RightLimitChanged;
event Windows::Foundation::EventHandler<bool>^ TopLimitChanged;
event Windows::Foundation::EventHandler<bool>^ BottomLimitChanged;
event Windows::Foundation::EventHandler<bool>^ MissileFired;
Here, each event provides a Boolean argument to indicate the status of the limit switch (debounced, of course). In theory, raising an event as I do within the inputreportreceived handler (CannonControl.cpp) just means calling the event name with the sender object and handler args:
LeftLimitChanged(this, true);
The caveat is that unless the event is raised on the UI thread, you’ll see exceptions in a JavaScript app and other complications in C#, VB, and C++ apps. The topic on raising events linked above discusses the options to handle this: (a) be sure to raise the event on the UI thread, (b) raise the event such that Windows can provide an automatic proxy and stub for the event, which loses type information in the arguments, and (c) provide your own proxy and stub.129 For the purposes of my component, I chose to issue the events on the UI thread directly using the following code:
using namespace Windows::ApplicationModel::Core;
using namespace Windows::UI:Core;
CoreApplication::MainView->CoreWindow->Dispatcher->RunAsync(CoreDispatcherPriority::Normal,
ref new DispatchedHandler([this]() {
LeftLimitChanged(this, true);
}))
Because I use the same structure for all five events, I implemented it as a C++ macro in CannonControl.h, and with this little bit of wrapper the events work great with JavaScript.
What We’ve Just Learned
• Windows Store apps need not be written in just a single language; with WinRT components, apps can effectively use the best language for any given problem. Although components can share app data with the host app, they cannot work with UI on behalf of an app written in HTML, CSS, and JavaScript.
• Reasons for using a mixed language approach include improving performance, gaining access to additional APIs (including third-party libraries) that aren’t normally available to JavaScript, obfuscating code to protect intellectual property, creating modular library components that can be used by apps written in any other language, and effectively managing concurrency.
• For computationally intensive routines, a component written in C#/VB can realize on the order of a 15% improvement over JavaScript and a component written in C++ an improvement on the order of 25%. When testing performance, be sure to build a Release version of the app and run outside of the debugger, otherwise you’ll see very different results for the different languages. Be mindful, though, that the overhead of marshaling data across language boundaries could be more costly than the savings in execution time, so you’ll need to evaluate each case individually.
• Windows Store apps can employ web workers for creating asynchronous routines that run separately from the UI thread, and you can wrap that worker within a WinJS promise to treat it like other async method in WinRT.
• Async methods can also be implemented in WinRT components by using task, concurrency, and thread pool APIs. Compared to web workers, such async methods are more responsive because they are directly structured as methods.
• No matter what language a component is written in, the JavaScript projection layer translates some of its structures into forms that are natural to JavaScript, including the casing of names and conversion of data types.
125 Mixed language apps have occasionally been referred to as “hybrid apps,” a term I’ve chosen to avoid because it’s typically used to describe apps that combine native functionality with hosted content in a webview control.
126 You might be interested in a series of blog posts by David Rousset about building a camera app using HTML and JavaScript. In Part 4 of that series he offers much more in-depth performance analysis for a variety of devices, using pixel manipulation components much like we’ve been working with here.
127 It’s also possible to avoid marshaling arrays (and the associated memory spike) altogether by just sending a StorageFile to the component, which I’ll discuss later.
128 There are also a few libraries that build on workers to provide parallel processing. Just do a web search for “parallel JavaScript” and you’ll find them.
129 The custom proxy/stub approach is demonstrated in the Windows Runtime in-process component authoring with proxy\stub generation sample.