Microsoft Press Programming Windows Store Apps with HTML, CSS and JavaScript (2014)
Chapter 17 Devices and Printing
I sometimes marvel at all the stuff that’s hanging off the humble laptop with which I’ve been writing this book. Besides the docking station that is currently also serving well as a monitor stand and rather efficient dust collector, there’s a mouse (wired), a keyboard (wireless), two large monitors, speakers, a USB thumb drive, a headset, an Xbox game controller, and the occasional external hard drive. Add to that a couple of printers and media receivers hanging off my home network and, well, I probably don’t come close to what the majority of my readers probably have around their home and workplace!
For all that might be going on within one computer itself, and for all the information it might be obtaining from online sources, the world of external devices is another great realm, especially those that apps can work with directly. Indeed, we’ve spent most of our time in this book talking about what’s going on within an app and its host system and about using networks and services to gather data. It’s time that we take a look at the other ways we can draw on external hardware to make a great app experience.
We’ve already encountered a few of these areas:
• In Chapter 11, “The Story of State, Part 2,” we learned about the Removable Storage capability (in the manifest) that enables an app to work with files on USB sticks and other pluggable media. When a device is connected, those folders become available through Windows.-Storage.KnownFolders.removableDevices, a StorageFolder object whose subfolders are each connected to a particular storage device. See the Removable storage sample.
• In Chapter 2, “Quickstart,” along with Chapter 13, “Media,” we took full advantage of the Windows.Media.Capture API to effortlessly obtain audio, images, and video from an attached camera (see the CameraCaptureUI Sample). This included the ability to select a specific capture device through scenario 2 of the Media capture using capture device sample, for which we used the API in Windows.Devices.Enumeration.
• Also in Chapter 13 we looked at the Windows.Media.PlayTo API to connect media to a PlayTo capable receiver, as demonstrated in the Media Play To sample.
• In Chapter 12, “Input and Sensors,” we explored pointer input devices (touch, mouse, and stylus), keyboard input, the APIs for reading sensor data, and using a GPS device (for geolocation and geofencing). Refer to that chapter for applicable samples.
In this chapter we’re ready to expand the story more generally, even though we’ll only be scratching the surface of the world of hardware! Our topics include:
• Declaring device access in the app manifest.
• Device enumeration and watcher APIs that you use in scenarios where you wouldn’t just use the default device of a given class. Enumerating available devices and watching them as they’re added to or removed from a system are processes that are generally applicable, so we’ll discuss these before looking at any device-specific APIs.
• Device scenario APIs work with known types of devices, namely printers (2D and 3D), scanners, point-of-service devices (barcode readers and magnetic stripe readers), fingerprint readers, virtual smartcards, and Bluetooth call control devices. Each class of devices responds to a set of standard commands that are hidden behind the API abstraction (see Figure 17-1) so that the same app code works for any device of that class that the user might attach.
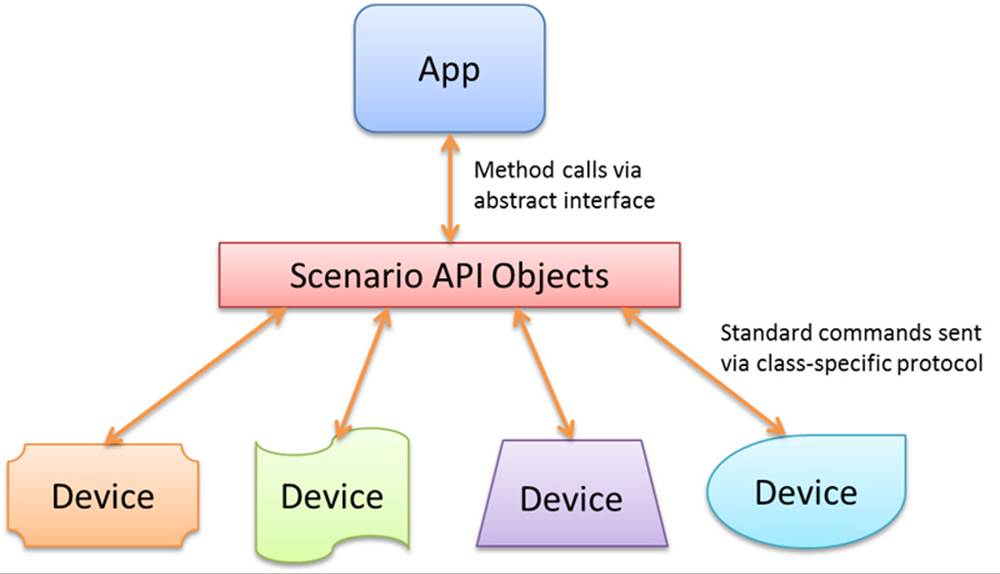
FIGURE 17-1 Scenario APIs abstract different device classes and the standard commands used to communicate with them. Through that API, an app can work with any number of connected devices that conform to that class.
• Protocol APIs allow you to communicate with a wide variety of devices through specific protocols, namely Bluetooth, HID, USB, and Wi-Fi Direct. In this cased the APIs handle the details of the underlying transport and the app sends device-specific commands through that protocol (see Figure 17-2). Such apps, therefore, are written to work with a specific device or a set of such devices. Note also that protocol APIs specifically block access to devices that are otherwise supported through device scenario APIs or other more general WinRT APIs like those for pointer events, keyboards, and sensors.
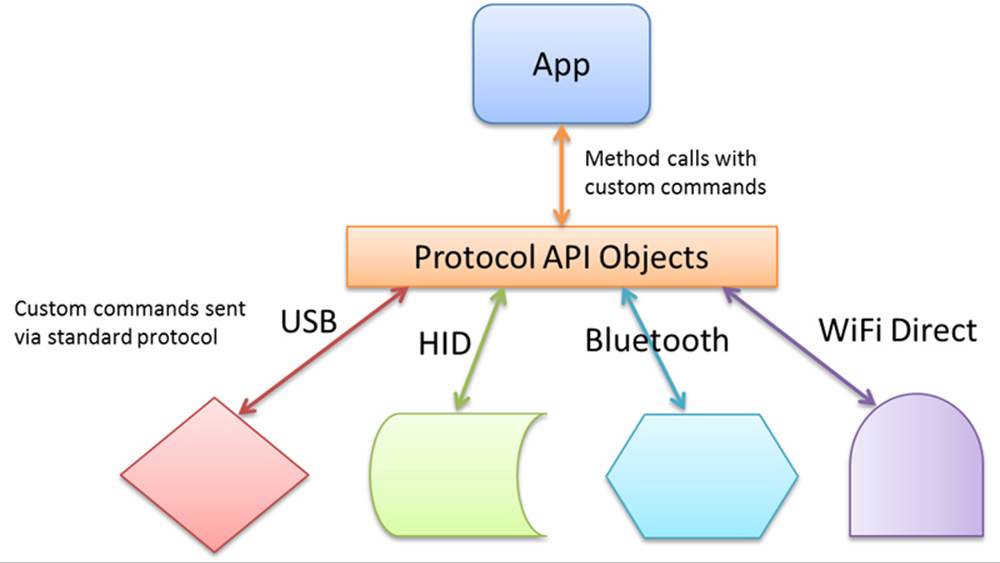
FIGURE 17-2 Protocol APIs abstract the details of transport protocols—namely USB, HID, Bluetooth, or Wi-Fi Direct—allowing apps to easily send device-specific commands to a wide variety of devices.
• Finally, NFC (near-field communications) connects with devices in the vicinity of the one your app is running on, including inexpensive NFC tags. The initial NFC handshakes happen over Bluetooth or Wi-Fi Direct protocols, and once the connection is made, apps communicate using sockets, as shown in Figure 17-3.
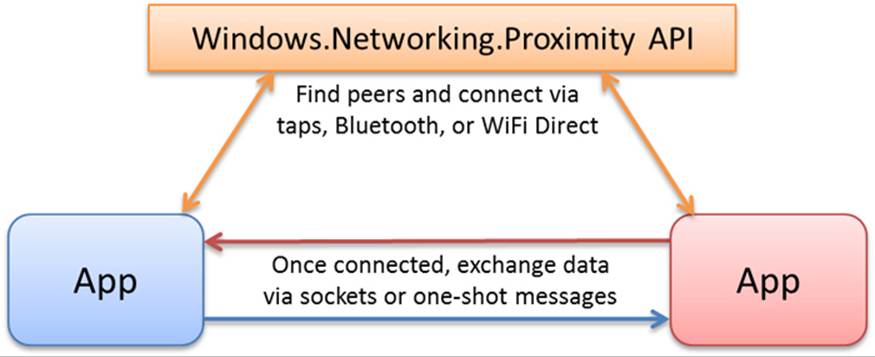
FIGURE 17-3 Near-field communications (NFC) use taps, Bluetooth, or Wi-Fi Direct to establish a connection, then apps exchange data directly via sockets or messages.
Note For wireless devices (like those using Bluetooth and Wi-Fi Direct), Windows has a pairing UI already built in, meaning that apps don’t need any pairing features themselves.
Another special group of devices are those accessible through Win32/COM APIs, for which you can then basically create your own scenario API as a Windows Runtime Component. For example, I could use the HID protocol API to talk to an Xbox 360 game controller (and will in this chapter), or I can use the XInput API (part of DirectX) through a WinRT component, whose interface is projected into JavaScript like any other WinRT API. We’ll see how to do this in Chapter 18, “WinRT Components.”
Clearly, you can build an app around many devices, and you can enable many creative scenarios by building around multiple devices. It’s important to note that with the protocol APIs you’ll typically be declaring access to specific devices and their features, so you won’t so much be thinking about general-purpose apps that can work with random devices. With Windows Store apps it’s good to be focused anyway, and the nature of devices pretty much forces this.
All that said, there are a few things we won’t be covering in this chapter. One topic is 3D printing, which, due to its intense graphical requirements, is designed to work with DirectX and is therefore applicable to Windows Store or desktop apps written with C++. For more on this subject, refer to 3D Printing in the documentation, the 3D printing sample (C++), and the //build 2013 session, 3D Printing with Windows.
We also won’t be covering what are called Windows Store Device Apps, the ones that can be automatically acquired from the Windows Store when their associated devices are attached into a system. This also includes mobile broadband apps that deal with provisioning a mobile account. Such dedicated device apps are associated with their hardware through device metadata, and also have more privileges than other apps such as launch on connect, updating firmware, background sync, and much more generous budgets for background CPU time and I/O traffic.
For more details on this subject, refer to the Windows Store Device App Workshop (Channel 9 videos), along with the Windows 8.1 Device Experience area of the documentation. The latter includes sections on AutoPlay, automatic installation, device sync/firmware update, apps for printers, apps for cameras, apps for internal devices, and mobile broadband/mobile operator concerns. Here are also a number of other device app samples to draw on:

A much more specific one is the Custom driver access sample, which works with a device called FX2 in the OSR USB FX2 Learning Kit (from Open System Resources). This is a piece of hardware that those learning how to develop device drivers use to understand the intricacies. Let me also mention that many device-oriented sessions can be found in the //build 2013 conference content on Channel 9, filtered for Device Apps. I’ll be referring to some of these as we go along, but you might at this point be interested in the overview session, Building Apps the Connect with Devices.
Declaring Device Access
Many devices require that you have a DeviceCapability declaration in your manifest—for instance:
<Capabilities>
<m2:DeviceCapability Name="pointOfService" />
</Capabilities>
where Name is an appropriate value for the type of device in question and the m2 namespace signifies the Windows 8.1 manifest schema, which is necessary for most of the devices we’ll be covering in this chapter. I also show such a capability in XML because Visual Studio’s manifest editor does not expose device-related features in its UI. When working with devices, then, you’ll get used to right-clicking package.appxmanifest in Visual Studio and selecting View Code to edit the XML manually.
Some hardware, such as printers, scanners, and fingerprint readers, do not require a manifest declaration, but nearly every other device does. We’ll see the detailed entries in the appropriate context for each, which sometimes include more child elements under DeviceCapability. For example:
<m2:DeviceCapability Name="humaninterfacedevice">
<m2:Device Id="vidpid:045E 0610">
<m2:Function Type="usage:FFAA 0001" />
</m2:Device>
</m2:DeviceCapability>
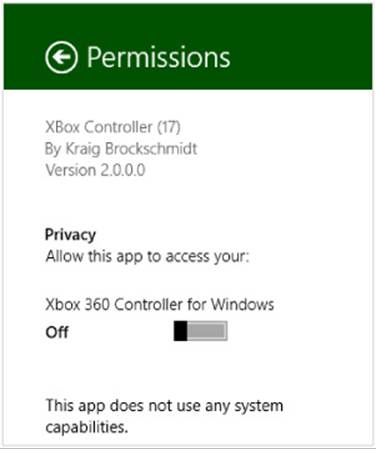
As with other manifest capabilities, these declarations are necessary to access the hardware at all (otherwise you’ll always see Access Denied exceptions) and will generate a user consent prompt like this one when you first attempt access:

It’s important to note whatever API call might trigger the prompt should always happen on the UI thread. This is a given for apps written in JavaScript, but if you’re working in other languages you’ll need to take this into account. Also, because the user can deny access at this point, you must always be prepared to respond accordingly.
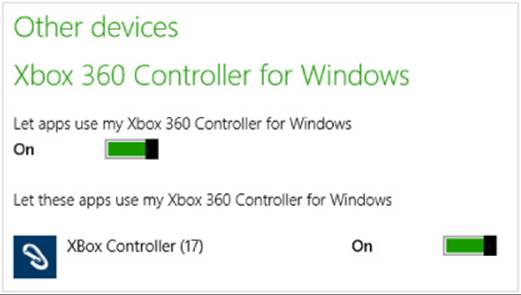
As with all other capabilities, the user can change their consent at any time through the app’s Settings > Permissions (below left) or PC Settings > Privacy > Other Devices (below right), so also be prepared for device access to change at any time:
Enumerating and Watching Devices
To talk to any device through its associated WinRT API, it’s necessary to acquire a device-specific API object, such as a BarcodeScanner, ImageScanner, HidDevice, and so on. In a few cases, namely BarcodeScanner and MagneticStripeReader, the object provides a static getDefaultAsyncmethod that shortcuts the whole process:
Windows.Devices.PointOfService.BarcodeScanner.getDefaultAsync().then(function (scanner) {
// scanner is a BarcodeScanner instance.
}
Windows.Devices.PointOfService.MagneticStripeReader.getDefaultAsync().then(function (reader) {
// reader is a MagneticStripeReader instance.
}
Most other device APIs, however, don’t have this shortcut, and so it’s necessary to enumerate devices of that type. Enumeration means to obtain a list of all devices that match a particular selector, as we’ll see in a moment. Each device in the list is represented by a DeviceInformationobject (in Windows.Devices.Enumeration), whose id property is needed by another ubiquitous static method, fromIdAsync (e.g., HidDevice.fromIdAsync), to connect with that specific piece of hardware.
To connect with the default device in the enumerations, use the id from the first Device-Information object in the list, call fromIdAsync, and go from there. The DeviceInformation objects you get through the process of enumeration makes displaying a list of available devices in your UI straightforward so that the user can choose which camera, microphone, scanner, printer, or game controller they want to play with. For all the details, refer to Enumerating Devices in the documentation, but let me give an overview here before we look at device-specific APIs.
Again, enumeration works with something called a selector, specifically an Advanced Query Syntax (AQS) string, as we encountered in Chapter 11 in “Custom Queries.” A device selector typically looks something like this:
System.Devices.InterfaceClassGuid:="{E5323777-F976-4F5B-9B55-B94699C46E44}" AND
System.Devices.InterfaceEnabled:=System.StructuredQueryType.Boolean#True
where the interface class GUID shown here is the particular one for webcams.
In the simplest cases, common selectors have numerical shortcuts obtained from the DeviceClass enumeration: audioCapture, audioRender, portableStorageDevice, videoCapture, imageScanner, and location (as well as all). You can pass one of these values to one variant of the staticDeviceInformation.findAllAsync method, for example:
var wde = Windows.Devices.Enumeration;
wde.DeviceInformation.findAllAsync(wde.DeviceClass.videoCapture)
.done(function (devices) {
//devices is a DeviceInformationCollection, essentially
//an array of DeviceInformation objects
});
In this example, the videoCapture shortcut maps to the same AQS string for webcams shown earlier. The result of findAllAsync is then a DeviceInformationCollection, which in JavaScript can basically be treated as an array of DeviceInformation objects.
Another way to obtain a selector is to ask for one from a device-specific class in WinRT, typically through a method called getDeviceSelector.120 You’ll find such a method on quite a number of classes, including ProximityDevice, StorageDevice, SmsDevice, UsbDevice, HidDevice,SmartCardReader, BarcodeScanner, ImageScanner, MagneticStripeReader, and so on. We’ll encounter these throughout this chapter. The one odd duck of the group is the MediaDevice object, which has getAudioCaptureSelector, getAudioRenderSelector, and getVideoCaptureSelector methods. With the latter, for example:
var mediaDevice = Windows.Media.Devices.MediaDevice;
selectorString = mediaDevice.getVideoCaptureSelector();
you’ll get back the same AQS string as before.
Thirdly, you can also construct a selector from scratch if you have a known GUID that isn’t otherwise represented in the WinRT API. Scenario 1 of the Device enumeration sample does this with known GUIDs for printers, webcams, and portable devices (html/interfaces.html):
<select size="3" id="selectInterfaceClass" aria-labelledby="listLabel">
<option selectedvalue="{0ECEF634-6EF0-472A-8085-5AD023ECBCCD}">Printers</option>
<option value="{E5323777-F976-4F5B-9B55-B94699C46E44}">Webcams</option>
<option value="{6AC27878-A6FA-4155-BA85-F98F491D4F33}">Portable Devices</option>
</select>
When you select one of these from the sample’s drop down and click the button to enumerate, it builds a selector string like so (js/interfaces.js):
var deviceInterfaceClass = deviceInterfaceClassText.value;
var selector = "System.Devices.InterfaceClassGuid:=\"" + deviceInterfaceClass + "\"";
// + " AND System.Devices.InterfaceEnabled:=System.StructuredQueryType.Boolean#True";
where the InterfaceEnabled part of the string is optional but generally a good idea.
However you obtain the selector string, the next step is to use the other variant of DeviceInformation.findAllAsync that accepts a string selector along with an array of additional property strings (such as sub-containers in a device; pass null if you don’t have anything else to specify):
Windows.Devices.Enumeration.DeviceInformation.findAllAsync(selector, null).done(
function(devinfoCollection) {
var numDevices = devinfoCollection.length;
for (var i = 0; i < numDevices; i++) {
displayDeviceInterface(devinfoCollection[i], id("scenario1Output"), i);
}
});
Really important for JavaScript! I can’t stress the following point enough because it’s caused me some hours of grief. The DeviceInformation class has twofindAllAsync methods that accept one argument, but the only one that’s projected into JavaScript accepts a DeviceClass object and not a selector string. Unfortunately, that method accepts a string without complaint and proceeds to enumerate every device on your system! Therefore, if you’re using a selector string, always pass null as the second argument (as shown above) so that you get the right variant offindAllAsync.
In any case, the result of an enumeration is just an array of DeviceInformation objects. As noted before, to use the first enumerated device as the default, just grab the first item in the array and pass its id property to the appropriate object’s fromIdAsync. Otherwise you can use the other properties and methods in DeviceInformation to create an attractive list of devices in your UI such as those shown in Figure 17-4 and Figure 17-5 (using the sample). Here the device image is obtained from DeviceInformation.getThumbnailAsync and the glyph from getGlyphThumbnailAsync.
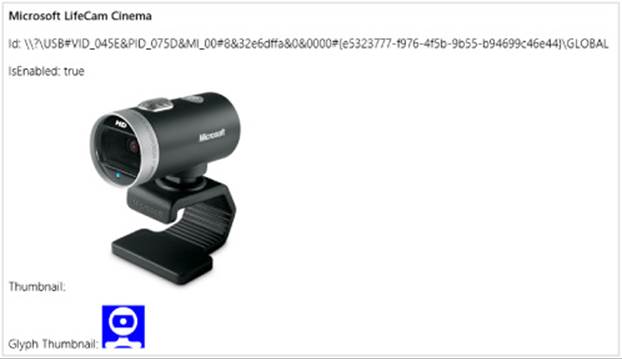
FIGURE 17-4 Sample device enumeration output for a webcam—which perfectly represents the one sitting on top of my monitor.
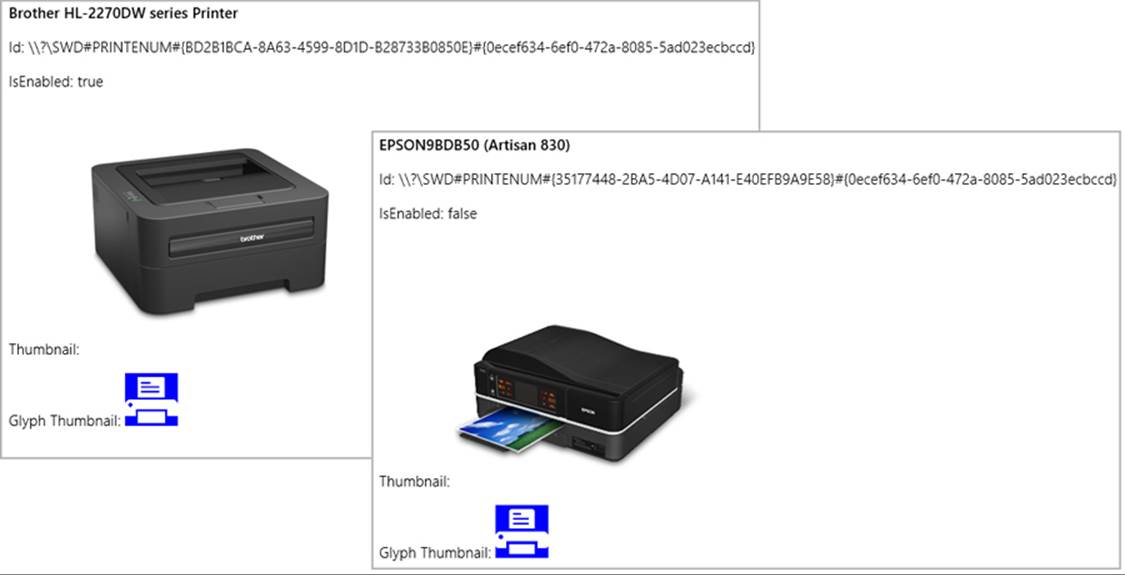
FIGURE 17-5 Sample device enumeration output for printers—showing two that look exactly like those sitting next to my desk.
Scenario 2 of the sample executes the same process (with plain text output) for Plug and Play (PnP) object types using Windows.Devices.Enumeration.Pnp.PnpObject.findAllAsync. This API lets you enumerate devices by interface, interface class, and container (the visible and localized aspects of a piece of hardware, like manufacturer and model name):
Windows.Devices.Enumeration.Pnp.PnpObject.findAllAsync(deviceContainerType,
propertiesToRetrieve).done(function (containerCollection) {
var numContainers = containerCollection.length;
for (var i = 0; i < numContainers; i++) {
displayDeviceContainer(containerCollection[i], id("scenario2Output"));
}
});
In the call above, the propertiesToRetrieve variable contains an array of strings that identify the Windows propertiesyou’re interested in. The sample uses these:
var propertiesToRetrieve = ["System.ItemNameDisplay", "System.Devices.ModelName",
"System.Devices.Connected"];
The result of the enumeration—the containerCollection variable in the code above—is a PnpObjectCollection that contains PnpObject instances. The sample just takes the information from these (which might take a while to produce) and displays a text output for each.
Note that there is a variant of findAllAsync that accepts an AQS string as a filter. This is a string that you obtain from APIs like Windows.Devices.Portable.StorageDevice.getDeviceSelector that makes enumeration of those particular devices easier.
The findAllAsync methods that we’ve seen so far enumerate devices on demand. At other times you want to actively watch for devices as they are added or removed from the system. This is done with the DeviceInformation.createWatcher and PnpObject.createWatcher static methods, the former of which has variants that accept DeviceClass and selector strings as with findAllAsync.
The watcher objects that you get back, DeviceWatcher and PnpObjectWatcher, respectively, have various events to tell you about when the available devices change: added, removed, and updated, each of which supplies the appropriate DeviceInformation objects. These are clearly what you’d use to maintain a display of active devices in your app (as a number of the samples do), rather than using a timer to periodically enumerate the devices with findAllAsync. Just be sure to call the watcher’s start method to enable periodic scanning, otherwise you’ll be severely disappointed in the results!
As a final note, the API for near-field communication provides similar enumeration and watching capabilities, but the structure is slightly different. We’ll see these in “Finding Your Peers (No Pressure!).”
Sidebar: Enumerating “Portable Devices”
Another group of devices are known as portable devices. Enumerating these is a third option in scenario 1 of the Device enumeration sample and is also demonstrated in the Portable device service sample. In both contexts, what we’re talking about here opens the doors to the subject ofWindows Portable Devices (or WPD), a driver technology that supports things like phones, digital cameras, portable media players, Bluetooth devices, and so on, where the need is primarily to transfer data between the device and the system. WPD supplies an infrastructure for this, and the Windows.Devices.Portable API lets you interact directly with WPD. Here you’ll find the ServiceDevice and StorageDevice classes, both of which simply provide methods that return selector strings and id properties. In the former case, such information is meaningful only to the device app associated with the hardware. In the latter case, however, the StorageDevice.-fromId method provides a StorageFolder through which you can enumerate its contents. This is demonstrated in scenario 3 of the Removable storage samplethat we noted in Chapter 11, where it will create a list of removable storage devices to choose from and then display the first image found on the one you select.
Scenario API Devices
As described in the introduction, the scenario APIs work with different classes of devices for which both the underlying protocol and command structures are standardized. As a result, WinRT provides an abstract interface for different device types and apps don’t need to have any knowledge of specific makes and models.Printing is the primary example of this, so much so that we’ll come back to that concern (2D printing) in “Printing Made Easy.” Input devices, sensors, and geolocation devices also fall into this category, and we’ve already given those a chapter unto themselves (Chapter 12).
What we’ll explore here are a handful of other device types: image scanners, point of service devices (barcode scanners and magnetic stripe readers), smart cards, fingerprint readers, and Bluetooth call control devices. Most of these are represented by APIs within the Windows.Devicesnamespace, although fingerprint readers come from Windows.Security and Bluetooth call control from Windows.Media. In those cases too you don’t need to worry about manifest declarations or device discovery. But let’s not quibble over such concerns but move right into fun parts! And to make it all the more fun, I hope you have at least some of these devices on hand so that you can try them out through the SDK samples.
Image Scanners
If printing is a way to take digital information and render it in physical form, scanners serve the opposite purpose: to take physical manifestations of information and render them digitally. From there, such digital information can be shared, archived, edited, and otherwise manipulated in ways that are much less difficult or expensive than with the physical forms.
Image scanners in particular serve to digitize the many pictures and documents (from receipts and check stubs to legal documents and medical records) that we so often still have piling up around our homes and workplaces (especially if you work in a legal firm!). I know I once spent many hours converting several thousand 35mm color slides that filled a shelf worth of three ring binders into digital form, now taking up only a small amount of space on the 2TB drives in my home server. And I’m always happy to empty a file drawer through the document scanner on my Epson Artisan 830 shown earlier in Figure 17-5, offering the remains to my trust recycling bin.
Image scanners are also distinct from cameras in that they eliminate shadows, eliminate distortions, provide consistent lighting and color quality, often have document feeders, and often provide much higher pixel resolutions and therefore image quality than cameras do.
Recognizing the unique role of image scanners, you can start to identify the many different ways that your apps can help customers digitize the information that flows through their lives. When you do, the image scanning API in Windows.Devices.Scanners (which doesn’t require any special capabilities in your manifest) allows you to work with the hardware, specifically any scanner that bears the Windows logo. (And telemetry shows that something like two-thirds of all printers connected to Windows devices are also scanners, so there are many of them out there!)
Background scanning Because scanning typically takes a lot more time than users are willing to wait, the API automatically prevents an app from being suspended during scanning operations. Once the operations are complete, an app that’s still in the background will then be suspended. However, in your completed handler for the operation you can issue a toast notification to alert the user that the job is done. That way he knows to switch back to your app to see those results.
As with many device interactions, you’ll typically start by enumerating available scanners or just using the default. Through this you obtain the appropriate ImageScanner object, after which you can set configuration options and enable a preview, if desired. Then you call itsscanFilesToFolderAsync method, which creates files in the designated folder for which you can obtain the StorageFile objects. In other words, the scanner API is set up to generate user data files, because typically the user will want to do something else with all their scans and not have them hidden away in your app data.
To enumerate scanners, use DeviceInformation.findAllAsync or createWatcher with DeviceClass.imageScanner. The Scan runtime API sample, where all this is demonstrated, uses a watcher (js/scannercontext.js):
scannerWatcher = Windows.Devices.Enumeration.DeviceInformation.createWatcher(
Windows.Devices.Enumeration.DeviceClass.imageScanner);
// Register to know when devices are added or removed, and when the enumeration ends
scannerWatcher.addEventListener("added", onScannerAdded);
scannerWatcher.addEventListener("removed", onScannerRemoved);
scannerWatcher.addEventListener("enumerationcompleted", onScannerEnumerationComplete);
scannerWatcher.start();
This code is run from scenario 1, where the event handlers simply maintain a list of available devices (in the variable ScannerContext.scannerList) that are used in the sample’s other scenarios, where you always need to select a scanner from a drop-down list. Each scanner has a device id assigned to it, which you pass to the static ImageScanner.fromIdAsync method to obtain the ImageScannerinstance for that particular device:
Windows.Devices.Scanners.ImageScanner.fromIdAsync(deviceId).then(function (myScanner) {
// myScanner is an ImageScanner
});
From here we have a number of different paths to take with the ImageScanner, which are demonstrated in the other scenarios of the sample. Scenario 2, for instance, just does a default scan with the selected scanner (ScannerContext.currentScannerId), saving the result in the Pictures library (for which we need the capability selected in the manifest). This code is condensed from js/scenario2JustScan.js—I’ve removed some code so that we can see the core interaction path:
scanToFolder(ScannerContext.currentScannerId, Windows.Storage.KnownFolders.picturesLibrary);
function scanToFolder(deviceId, folder) {
// Get the scanner object for this device id
Windows.Devices.Scanners.ImageScanner.fromIdAsync(deviceId).then(function (myScanner) {
// Scan API call to start scanning
return myScanner.scanFilesToFolderAsync(
Windows.Devices.Scanners.ImageScannerScanSource.default, folder);
}
}).done(function (result) {
if (result) {
if (result.scannedFiles.size > 0) {
displayResults(result.scannedFiles);
}
}
}, function (error) {
if (error.name === "Canceled") {
// Operation was canceled
} else {
// Other errors
}
}, function(progress) {
// Display progress
});
}
Once we have the ImageScanner object, we can ask it to make a scan with its default source into the given folder by using scanFilesToFolderAsync. The result of this (result in the code) is an ImageScannerScanResult object that contains a single property, scannedFiles, which is a vector view (therefore read-only) of StorageFile objects. With this you can generate whatever kind of display you want, just like you would had you enumerated files from some other folder.
Note If nothing is scanned, scanFilesToFolderAsync will succeed but the scannedFiles vector will be empty and its size property set to zero.
Other errors can occur that prevent the scan from completing, in which case the promise’s error handler is invoked. If the promise from scanFileToFolderAsync is canceled (through the promise’s cancel method), the error handler is invoked with error.name set to “Canceled”, as you can see above. Other errors can be paper jams, cover open, user intervention needed, and so on. Refer to the reference page on scanFilesToFolderAsync for a list of possible errors.
You’ll notice too that scanFileToFolderAsync supports progress, so you can attach a progress handler to the promise to receive the number of files that have been scanned. This is most helpful when you are running multiple scans from some kind of feeder (see scenario 7 of the sample for a demonstration), because you can display a thumbnail of each scan file as its scan completes. On the other hand, if you want to provide a scan preview without generating a file, you use the scanPreviewTo-StreamAsync method, which we’ll see in a little bit.
First, let’s talk about the other options for the ImageScanner. In the scanFileToFolder-Async call we pass a scan source value from ImageScannerScanSource. The options here are default (auto-select), autoConfigured, flatbed, and feeder, all of which are used in various scenarios in the sample. The scanner’s default can be retrieved through the ImageScanner.defaultScanSource property, and to determine whether a certain source is available, as when you want to present the user with the choice, call ImageScanner.isScanSourceSupported for the applicable options.
If you’re using a scan source other than the default, you’ll typically configure that source prior to starting the scan. Each of the specific scan sources has an associated configuration property on the ImageScanner object:
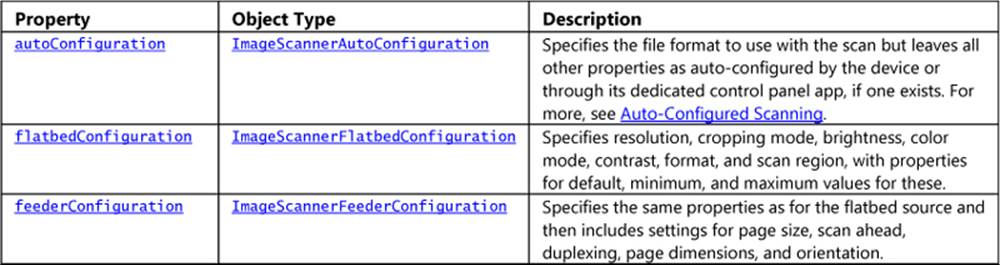
The flatbed and feeder configuration objects are rather involved, so I won’t list all the options here. For the most part, you use the min/max/default settings and their various is*Supported methods to build a configuration UI that specifically reflects the scanner’s actual capabilities, as shown in Figure 17-6 for the Windows Scan app. For example, the ImageScannerAutoConfiguration object has just format and defaultFormat properties, which come from the ImageScannerFormat enumeration (with values like jpeg, gif, png, tiff, pdf, etc.). Its isFormatSupported method tells you which formats it can scan to, so when building a selection list, you iterate the formats and call isFormatSupported to determine whether that setting should be included.
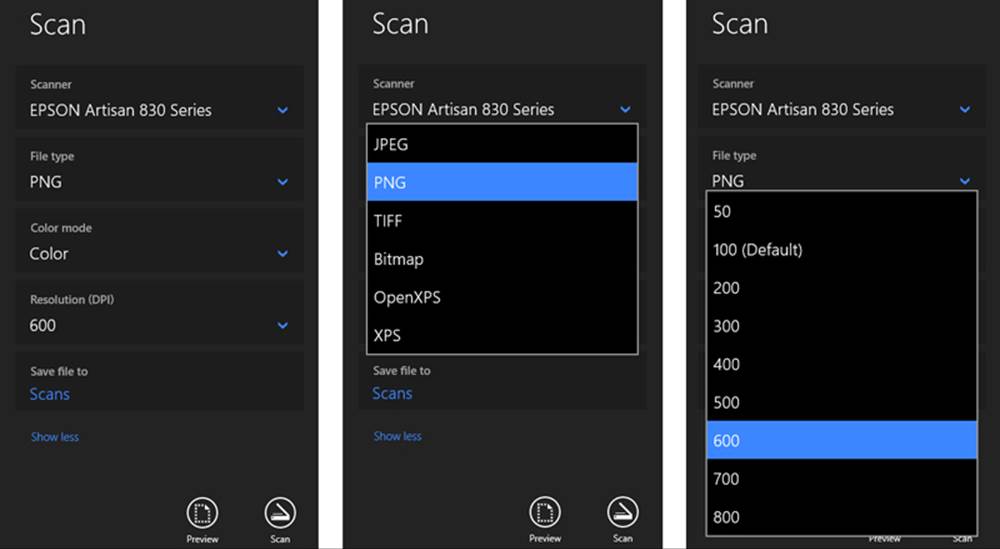
FIGURE 17-6 How the Windows Scan app displays various scanner properties and capabilities.
Let’s see a few concrete examples in code. Scenario 4 of the Scan runtime API sample works with auto configuration (see js/scenario4DeviceAutoConfiguredScan.js). It checks first that auto configuration is supported and then sets the file format to PNG, if that’s supported. Then it starts the scan with the autoConfigured source (I’ve added the namespace variable wds for brevity):
varwds = Windows.Devices.Scanners;
if (myScanner.isScanSourceSupported(wds.ImageScannerScanSource.autoConfigured)) {
// Set the scan file format to PNG, if available
if (myScanner.autoConfiguration.isFormatSupported(wds.ImageScannerFormat.png)) {
myScanner.autoConfiguration.format = wds.ImageScannerFormat.png;
}
return myScanner.scanFilesToFolderAsync(wds.ImageScannerScanSource.autoConfigured, folder);
}
Scenario 5 does more or less the same thing for the flatbed configuration, setting the format to a device-independent bitmap (js/scenario5ScanFromFlatbed.js):
if (myScanner.isScanSourceSupported(wds.ImageScannerScanSource.flatbed)) {
myScanner.flatbedConfiguration.format = wds.ImageScannerFormat.deviceIndependentBitmap;
return myScanner.scanFilesToFolderAsync(wds.ImageScannerScanSource.flatbed, folder);
}
Scenario 6 uses the feeder source and shows the additional steps of setting a grayscale color mode and duplex scanning. I’ve taken the liberty here of modifying the code to set PDF as a primary format, using JPEG as a backup and shortening a few lines (js/scenario6ScanFromFeeder.js):
var wds = Windows.Devices.Scanners;
if (myScanner.isScanSourceSupported(wds.ImageScannerScanSource.feeder)) {
var fc = myScanner.feederConfiguration;
fc.format = fc.isFormatSupported(wds.ImageScannerFormat.pdf) ?
wds.ImageScannerFormat.pdf | wds.ImageScannerFormat.jpeg;
if (fc.isColorModeSupported(wds.ImageScannerColorMode.grayscale)) {
fc.colorMode = wds.ImageScannerColorMode.grayscale;
}
fc.duplex = fc.canScanDuplex;
fc.maxNumberOfPages = 0;// Zero means scan all the pages that are present in the feeder
return myScanner.scanFilesToFolderAsync(wds.ImageScannerScanSource.feeder, folder);
}
And that’s pretty much it for the scanning source. As you can see, there’s a definite pattern that you follow for all the options.
The last part of the API is the ability to get a preview of a scan prior to scanning to a file. First, check ImageScanner.isPreviewSupported to discover whether the device is capable of previews, and if so, call ImageScanner.scanPreviewToStreamAsync to do the job. This method takes a scan source, as we’ve seen, and also a RandomAccessStream rather than a folder. To use the example from scenario 3 of the sample (code shortened from js/scenario3PreviewFromFlatbed.js):
var stream = new Windows.Storage.Streams.InMemoryRandomAccessStream();
scanPreviewToStreamAsync(wds.ImageScannerScanSource.flatbed, stream).done(function (result) {
if (result&&result.succeeded) {
displayResult(stream);
}
}
As with any other stream, you can call MSApp.createBlobFromRandomAccessStream, pass the blob to URL.createObjectURL, and assign that URL to an img element:
function displayResult(stream) {
var image = document.getElementById("displayImage");
var blob = window.MSApp.createBlobFromRandomAccessStream("image/bmp", stream);
var url = window.URL.createObjectURL(blob);
image.src = url;
}
Note that scanPreviewToStreamAsync does not support a progress handler nor interim results for a scan in progress, so you need to wait until the operation is complete before displaying the preview. In the meantime, you’ll generally want to include some kind of progress ring or such to show that the scanner is working, and again remember that scanning will continue when the app is moved to the background.
Barcode and Magnetic Stripe Readers (Point-of-Service Devices)
Without having thought about it much, I’m sure you’ve encountered many point-of-service (PoS) devices in recent months. When you go to an airport and scan a receipt, a credit card, or some other identification, you’re interacting with PoS devices, as does the boarding agent when scanning your boarding pass. When you swipe a card at a retailer to make payment, you’re using a PoS device. When you go through self-checkout at a grocery store or a clerk scans the UPC codes of your items for you, PoS devices are involved. (PoS is sometimes called “point-of-sale,” but many interactions have nothing to do with sales, which is why we use the more generic “service.”)
These devices are quite diverse in their forms and include everything from scanners and card readers to cash drawers, change machines, receipt printers, NFC card scanners, and do on. In many cases you’ll work with those devices through one of the protocol APIs discussed later in this chapter. For the two most common ones, however—barcode readers and magnetic stripe readers (MSRs)—Windows provides dedicated APIs that are found in Windows.Devices.PointOfService: BarcodeScanner and MagneticStripeReader. The job of these APIs is to convert data that’s represented as barcodes or data that’s written onto a magnetic card into a form that apps can consume. They work over USB HID connectivity with devices that adhere to the Unified POS standard, which has been adopted internationally for such common peripheral devices. If you want a little more background, watch the beginning of //build 2013 session 3-029, How to Use Point-of-Sale Devices in YourApp. In this chapter I’ll just focus on the basic device interactions.
To use either device, you must first declare a DeviceCapability in your app manifest as follows (editing the XML directly):
<Capabilities>
<DeviceCapability Name="pointOfService" />
</Capabilities>
The next step is to acquire a device. You can, of course, enumerate available devices and give the user a choice, or watch for devices being added and removed from the system, but for specifically engineered PoS systems it’s much more likely that there is only one device. This means you can ask for the default device and be done with it. The BarcodeScanner and MagneticStripeReader classes make this easy by providing static getDefaultAsync methods:
Windows.Devices.PointOfService.BarcodeScanner.getDefaultAsync().then(function (scanner) {
// scanner is a BarcodeScanner instance.
}
Windows.Devices.PointOfService.MagneticStripeReader.getDefaultAsync().then(function (reader) {
// reader is a MagneticStripeReader instance.
}
Notice that I’m showing both classes in parallel, drawing code from the Barcode scanner sample and the Magnetic stripe reader sample (or MSR sample for show). Because they share a common paradigm, we can talk about their basic operations together. A little later we’ll discuss each one’s specifics.
At this point the device objects can report only on their capabilities (which are rich and varied), health (checkHealthAsync), statistics (retrieveStatisticsAsync), and status (statusupdated events). With the BarcodeScanner you can also retrieve and check for profiles along with supported symbologies (via getSupportedSymbologiesAsync and isSymbologySupportedAsync, with the BarcodeSymbologies class identifying dozens of these). With the MagneticStripeReader you also check the deviceAuthenticationProtocol and supportedCardTypes.
Now, acquiring an instance of the device object is not enough to obtain readings. For that you need to claim exclusive use of the device (see js/scenario1.js in both samples):
scanner.claimScannerAsync().done(function (claimedScanner) {
// claimedScanner is an instance of ClaimedBarcodeScanner
}
reader.claimReaderAsync().done(function (claimedReader) {
// claimedReader is an instance of ClaimedMagneticStripeReader
}
This step of claiming the device is what allows you to attach event handlers to it and to start receiving data (you’ll find events in the ClaimedBarcodeScanner and ClaimedMagneticStripeReader classes, which I’ll refer together to as Claimed<Device>). Why this extra step? It’s because there can be multiple apps on the same system wanting to access the device. The APIs here thus work on a cooperative claim-and-release model. Let’s say app A has a claim and thus has the Claimed<Device>object. When app B makes a request, app A will receive theClaimed<Device>.releaseDevice-Requested event. By default, this will release the claim from app A and give it to app B. However, because app A might be in the middle of a transaction, it can deny the request by calling Claimed<Device>.retainDevice. Code for this can be found in scenarios 1 and 2 of the Barcode scanner sample, but to show it simply:
claimedScanner.addEventListener("releasedevicerequested",function () {
claimedScanner.retainDevice();
});
The MSR sample doesn’t show handling of the event, but it works identically. In the end, you almost always want to have such a handler because otherwise another app can come along and take the claim away at any time.
Note If app A has a claim that is suspended and then app B makes a request, app B will be granted the claim automatically because the system will not resume app A nor fire the event. When app A resumes, it must request its claim again.
Assuming that you have a claim, you can then tell the device to decode encrypted data automatically by setting Claimed<Device>.isDecodeDataEnabled to true. If you want to do the decryption in the app, set this to false.
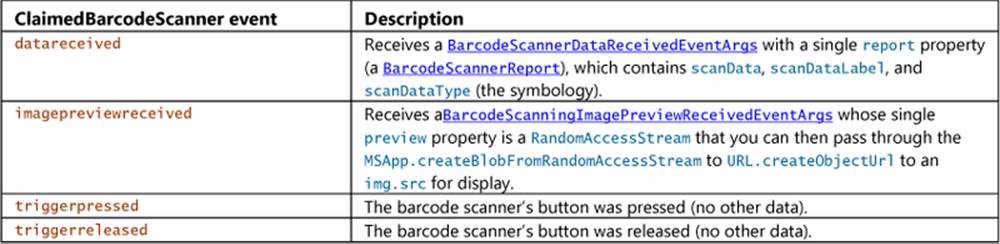
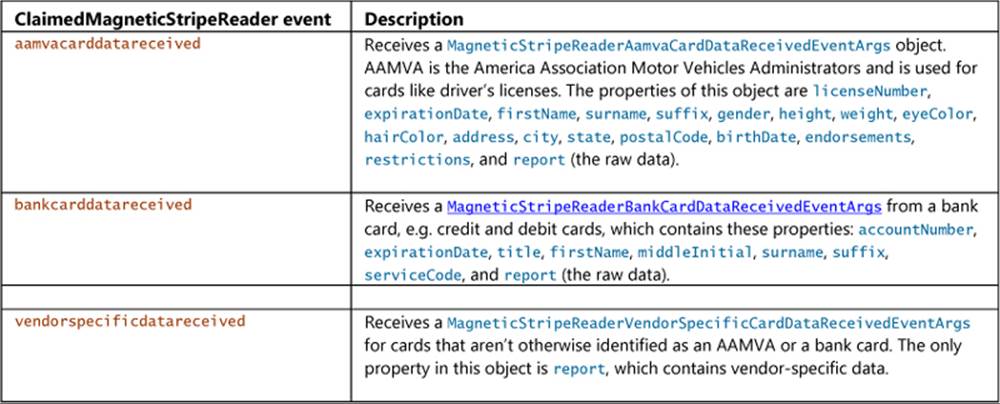
Next you register for the events of interest, which, apart from releasedevicerequested and erroroccurred, are unique for each class. Be mindful that all these are WinRT events and must be properly released to avoid memory leaks.
Once you’re ready to receive events, the last step in the process is to enable the device to receive data. “My, my,” you say, “I already had to claim a device. Why must I now also enable it?” The reason for this is that doing something meaningful with the scanned data can take a considerable amount of time, during which you don’t necessarily want to get another reading. For example, scanning an item at a self-checkout station just gets you the UPC number, which isn’t enough to show any meaningful data to the customer who just waved that product through the laser field. The app will typically need to do an async database lookup with the UPC and display the results before allowing the customer to scan their next item.121 Similarly, an MSR doesn’t need to send more data while the app is busy authenticating the last credit card swipe.
Therefore, the app needs a way to tell the device, “Please wait a bit until I’m ready to receive data again,” and this is what disable-enable does. By calling the Claimed<Device>.enableAsync call, you say that you’re ready to receive data via events. When you need to hold off for a bit, callClaimed<Device>.disableAsync before starting your other async lookups. When you’re ready to receive more data, call enabledAsync. And to simplify matters, you can instruct the Claimed<Device> to automatically call disableAsync after each data event by setting itsisDisabledOnDataReceived property to true. (And the isEnabled property will return the status at any time.)
In short, claiming a device establishes a pipeline and disable-enable provides a quick way to open and close the valve on that pipe so you can control the flow of information in your app.
Beyond this, you can explore many other details with these devices, such as statistics, authentication, encryption, track IDs on MSRs, and more. I won’t go into those details; if you’re creating a PoS system, you’ll necessarily know what more you need to explore within theWindows.Devices.PointOfService namespace.
Smartcards
If you’re working with or have worked with a company that has grown large enough to take security seriously, you have encountered a smart card. As a Microsoft employee, I’ve had one for many years, which serves a dual purpose of giving me access to buildings on various corporate campuses as well as authenticating me when I connect to the corporate network over VPN. For the latter purpose I have both my physical smartcard and a virtual smartcard. The virtual smartcard is wholly convenient because I don’t have to plug my physical card into a reader to connect over VPN.
This book is not the place to go into details about security, so let me briefly outline the API in Windows.Devices.SmartCards. First, the SmartCardReader object lets you find connected cards through its static findAllCardsAsync, fromIdAsync, and getDeviceSelector methods, and you can watch for cards through its cardadded and cardremoved events. Each reader (which represents a reader device, not a card) also has a kind (SmartReaderKind), a name, a deviceId, and status (getStatusAsync, SmartCardReaderStatus).
Each individual card is then represented by a SmartCard object, which provides basic info through getStatusAsync, reader, and getAnswerToResetAsync.
The richest piece of the API is the SmartCardProvisioning class, which is what you can use to create virtual smart cards (requestVirtualSmartCardCreationAsync), reset or change the card’s PIN (requestPinChangeAsync, requestPinResetAsync), and delete cards (requestVirtualSmartCard-DeletionAsync). All this is the focus of the Smart card sample in the SDK. The only other bit I’ll mention is that the sample declares the Shared User Certificates capability in its manifest, which is necessary for using the smart card APIs.
Fingerprint (Biometric) Readers
This particular scenario API isn’t actually found in Windows.Devices but rather in Windows.-Security.Credentials.UI.UserConsentVerifier. This is what works with fingerprint readers on suitably equipped devices and does not involve any capabilities nor enumeration.
The name of the object here, UserConsentVerifier, underscores the fact that a fingerprint reader specifically validates the physical presence of the logged in user. This is much more certain than a PIN or a password, because you just can’t share a fingerprint with anyone else! (Biometric devices have many ways to defeat fake fingers too.) It also allows for an additional level of security when a user shares their tablet or laptop with another person without logging out.So, if your app does any kind of high-value transaction for which you should double-check user consent (such as stock trades or financial exchanges), using a fingerprint adds a deeper layer of authentication. What’s more, it’s much easier for the user as well, especially on touch-only devices. For more background, refer to //build 2013 session 2-9110, Biometrics – Fingerprints for Apps.
The API is also super-simple: the UserConsentVerifier object has just two methods. First, checkAvailabilityAsync returns a UserConsentVerifier-Availability value: available, deviceNotPresent, disabledByPolicy, notConfiguredForUser, and deviceBusy:
var uci = Windows.Security.Credentials.UI;
uci.UserConsentVerifier.checkAvailabilityAsync().done(function (consentAvailability) {
// Take action on availability
});
This is demonstrated in scenario 1 (js/s1-check-availability.js) of the UserConsentVerifier sample.122 Assuming there is availability, scenario 2 (js/s2-request-consent.js) requests verification via request-VerificationAsync. The message argument for this method will be displayed in aMessageDialog, and assuming the user does a scan, the result of the operation is a UserConsentVerificationResult value (code simplified from the sample):
var uci = Windows.Security.Credentials.UI;
var ucvr = uci.UserConsentVerificationResult;
uci.UserConsentVerifier.requestVerificationAsync(message).done(function (consentResult) {
switch (consentResult) {
case ucvr.verified:
// User's presence verified.
break;
case ucvr.deviceNotPresent:
// No biometric device found.
break;
case ucvr.disabledByPolicy:
// Biometrics is disabled by policy.
break;
case ucvr.retriesExhausted:
// Too many failed attempts.
break;
case ucvr.notConfiguredForUser:
// User has no fingeprints registered.
break;
case ucvr.deviceBusy:
// Biometric device is busy.
break;
case ucvr.canceled:
// Consent request prompt was canceled.
break;
default:
// Consent verification with fingerprints is currently unavailable.
break;
}
});
For both methods, the only cases that invoke an error handler for the promise is when there’s a problem unrelated to device availability or its status.
Bluetooth Call Control
Although we’ll deal with generic Bluetooth devices in “Protocol APIs,” another scenario API exists for a special case: Bluetooth communications devices that can handle calls, such as headsets and other telephony devices. These devices typically handle audio transfer and provide one or more buttons to perform actions like redial, hang up, and so on. For these there exists an API in Windows.Media.-Devices.CallControl and no manifest declarations are needed.
To obtain a device instance, call the static methods CallControl.getDefault or fromId. With that object you either instruct it to reflect call status or respond to events raised by the device. In all cases the app is the one that’s doing the actual calling, such as doing real-time communications over sockets: the device is just a piece of peripheral hardware that can participate in the process, in much the same way a keyboard participates in text entry.
The CallControl object has four methods to set indicators on the device to reflect call status: indicateNewIncomingCall, indicateNewOutgoingCall, indicateActiveCall, and endCall methods. How the device responds depends on its design.
The events that the device can raise also depends on its design, but the CallControl object can receive the following: answerrequested, audiotransferrequested, hanguprequested, redialrequested, and keypadpressed. Your event handlers for these will typically invoke the CallControlmethods. For example, if you respond to answerrequested by starting a call, you’d invoke indicateActiveCall.
The CallControl.hasRinger property also tells you if the device has its own ringer.
If you have a suitable device to play with, you can see the API in action through the Bluetooth Call Control sample. A walkthrough of the sample can be found on How to manage calls on the default Bluetooth communications device.
Printing Made Easy
An embarrassingly long time ago, when I was first working in the computer industry, I remember hearing excited talk about the “paperless office” and how very soon now we wouldn’t need things like printers because everything would be shuttled around digitally. Decades later, we do find ourselves shuttling around plenty of digital content, and yet printing is still alive and well (except for this present book, of course, where early on we decided on an ebook format so that we could use extensive hyperlinks and color!). Maybe we still like paper for how it feels, how it uses our eyes differently, how it’s cheap and disposable (unlike your Windows tablet), how it can be used to start fires in a pinch or make airplanes, and how it makes good use of all the small trees that get thinned out of commercial tree farms (at least here in the western United States). Maybe too it’s just part of the human experience—after all, as much as we play with our computers, we do still live in a physical world with physical objects, so it makes sense that we continue to appreciate placing information onto physical media. And when we make printouts, we also give ourselves a good excuse to exercise our scanners!
Sometimes I wonder whether the idea of the paperless office wasn’t fueled in part by the fact that many apps didn’t implement printing very well, an artifact of it being a difficult task to begin with. (And then there were printer drivers of dubious quality, connection difficulties, and many other challenges.) But gradually the whole world of printing has improved, both for consumers and for developers. More recently this has also seen the rise of 3D printing, a topic that is beyond the scope of this book because it requires that an app is written in C++.
Of course, printing isn’t always about going to paper either. I frequently use a PDF “printer” to create read-only copies of documents that are more suitable for sharing in many cases than my originals. Occasionally I print to a fax machine (to send a fax), and more occasionally I’ll print an email or web page directly to Microsoft OneNote for filing. In fact, while you’re working on printing features in an app, I highly recommend setting your default printer to a digital target. That way you’ll avoid producing copious amounts of scratch paper in the process, unless you happen to own a tree farm that you’ll be thinning in a couple of years!
Get the backstory If you want to know more about how printing as a whole has been reimagined, check out Simplifying printing in Windows 8 on the Building Windows 8 Blog, a post that provides deep soul satisfaction knowing that your printing future includes fewer drivers.
To understand how to implement printing in an app, let’s first see what it looks like to the user. Then we’ll see how to prepare content for printing and how to handle the printing-related events that you receive from Windows.
Note A Windows Store app written in JavaScript can use the window.print method to print with default settings. It’s not recommended, however, because it doesn’t work with the print UI and doesn’t always produce the best output. Windows Store apps should give the user the full Windows experience as described here.
The Printing User Experience
Printing typically starts in an app where the user is looking at something she wants to print and invokes an appropriate command. In scenario 2 of the refreshingly short-named Print sample, for instance, whose code we’ll be looking at later in the chapter, we see a big block of content along with a Print button, as shown in Figure 17-7. Note that such a Print button would normally be on the app bar and not on the app canvas, but this is a sample.
To start printing, the user can either tap this Print button or open the Charms bar and select Devices. Either way, if the app is registered for printing—that is, it’s listening for the event that’s raised from the Devices charm and provides suitable content—the user will see a list of print targets, as shown on the left side of Figure 17-8. If the app doesn’t have printable content—that is, it doesn’t listen for the event or provides no content in response—the user will see a panel like that on the right side of Figure 17-8. This is very much the same experience that a user sees with the Share charm depending on whether the app provides data for that feature. You’ve likely seen the epic fail message of “This app can’t share.” Printing supplies a similar disappointment for apps that lack the capability. Don’t let your app be one of them.
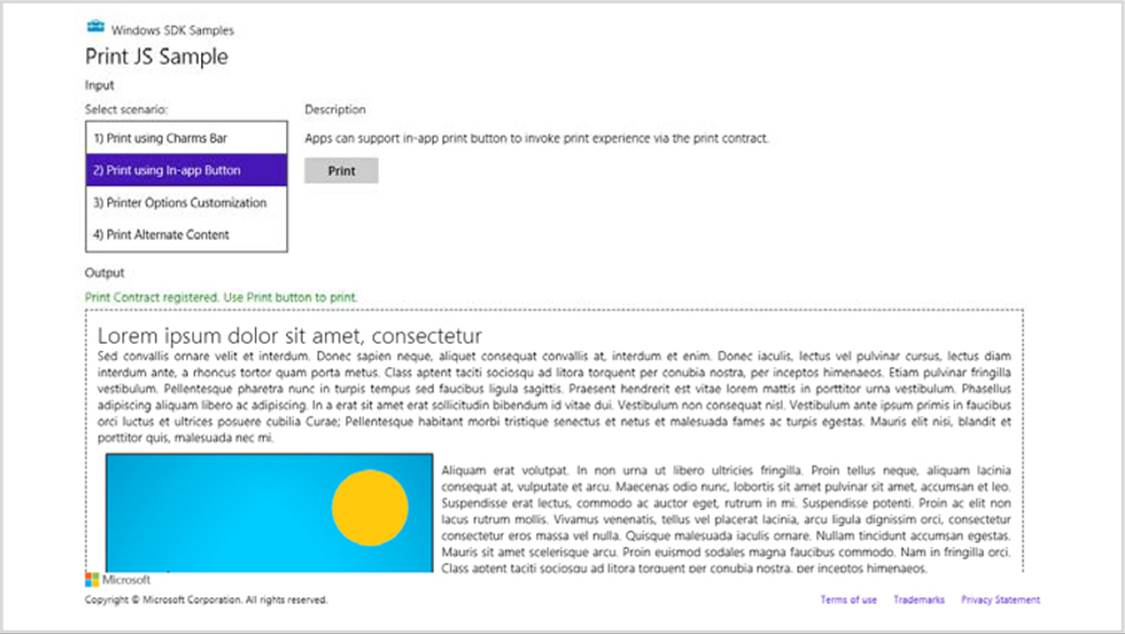
FIGURE 17-7 Scenario 2 of the Print sample shows a typical app with something ready to print.
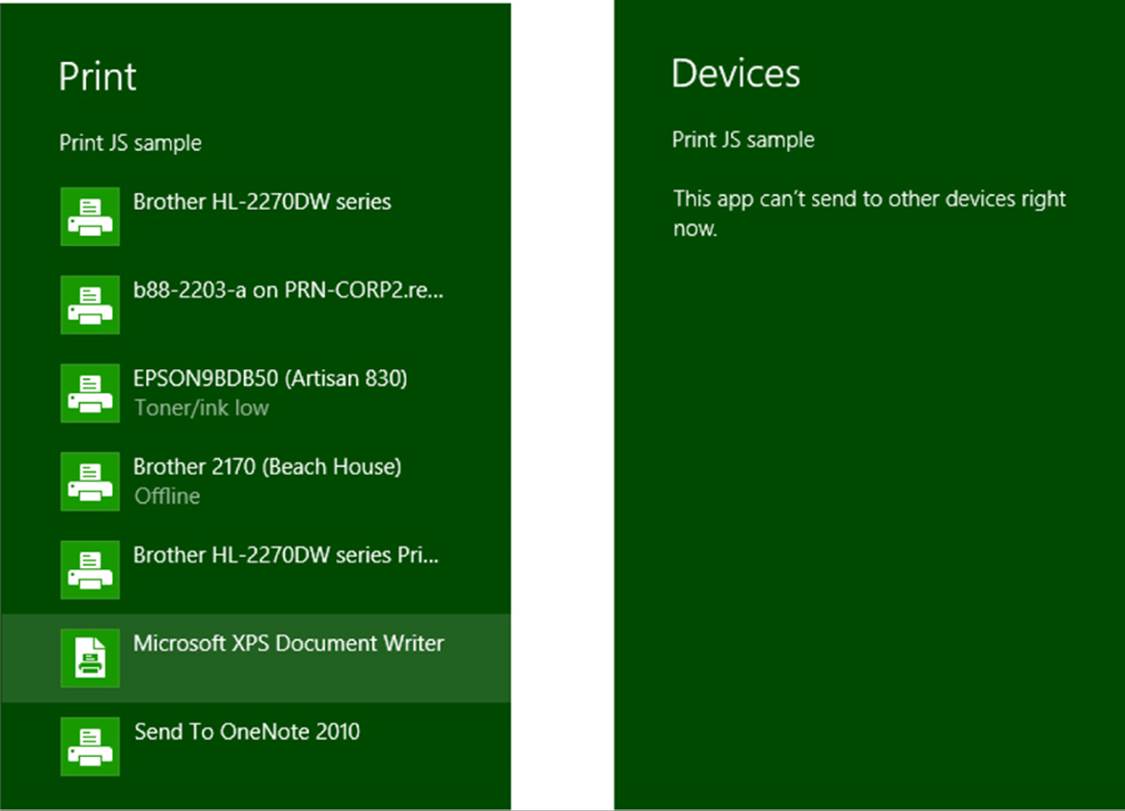
FIGURE 17-8 The Devices charm when an app has available print content (left) and when it doesn’t (right).
From this point on, the system is just taking whatever content the app provides and displaying UI based on the capabilities of the printer driver, as shown in Figure 17-9 for my trusty Brother (actually, my real brother’s name is Kevin). From the app’s point of view, it thankfully gets all of this for free! The app can also indicate additional options to customize the UI, such as paper size and duplex printing, as shown in Figure 17-10, which comes from scenario 3 of the sample.
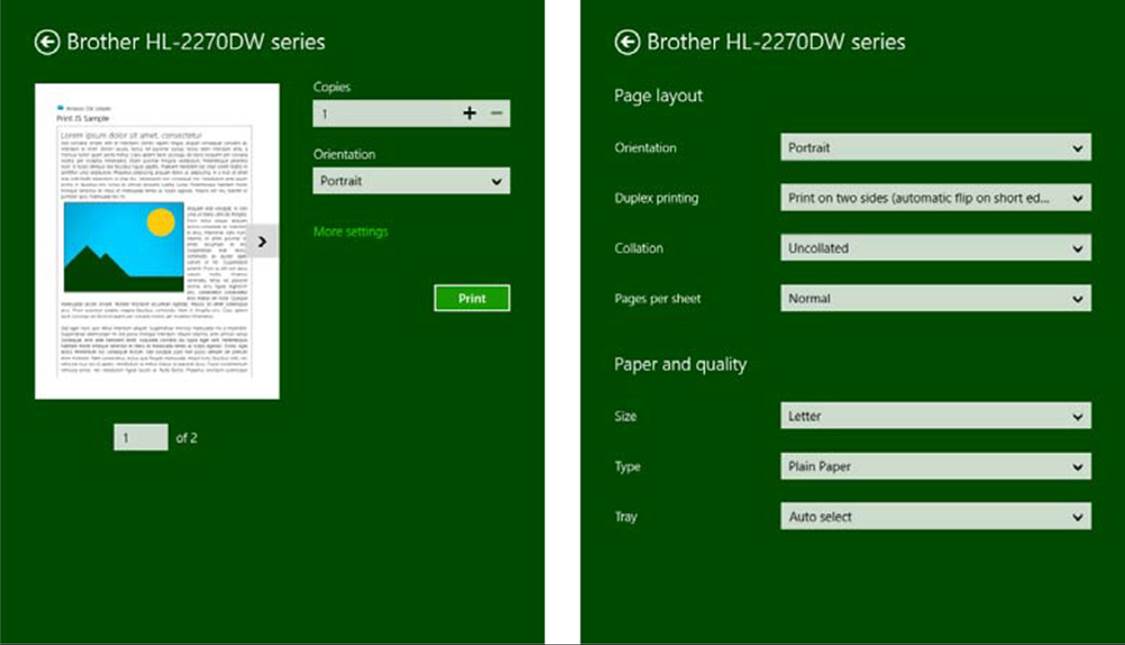
FIGURE 17-9 Print preview and printer options are shown once the user selects a printer. The More Settings link on the left is what opens the options pane on the right.
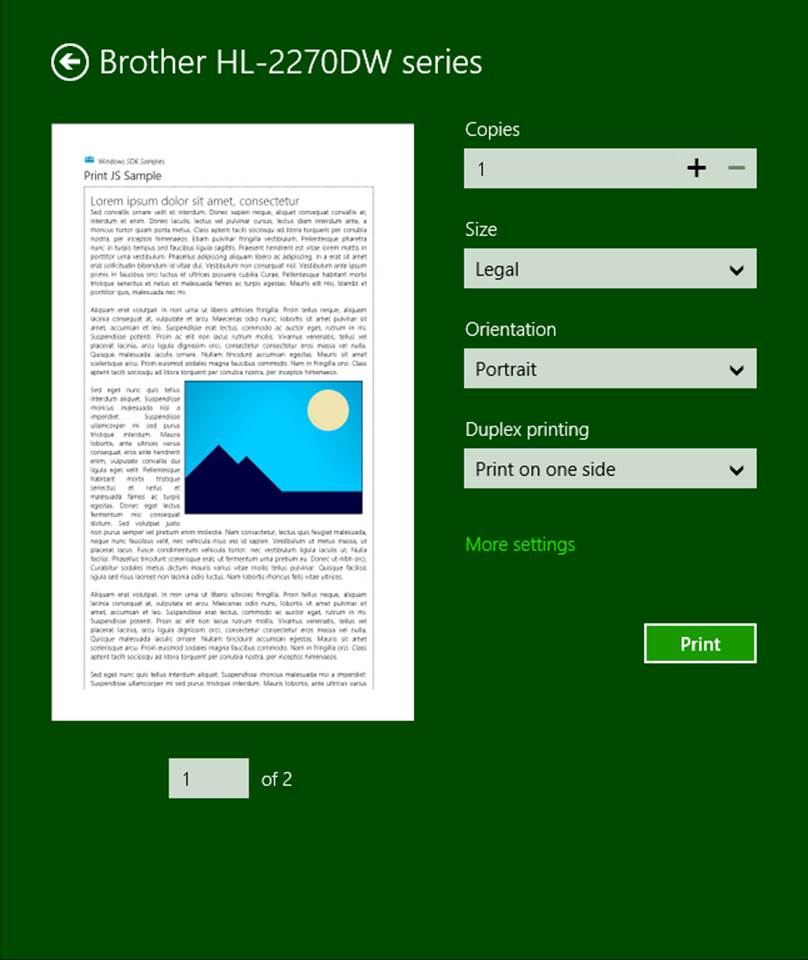
FIGURE 17-10 The Print pane reflecting customization options indicated by the app.
Sidebar: Device Apps for Printers
Apps that are specifically associated with printers have the ability to extend the print settings in the UI and also participate in issuing print notifications to the user. For more details, refer to Windows Store device apps for printers along with the Print settings and print notifications sample in the SDK.
Print Document Sources
No matter where the user might want to print content, the important thing is to make that content ready for printing. The key API you need to know about here is not found in WinRT but in the MSApp object: MSApp.getHtmlPrintDocumentSource. I like the way the documentation once put it (since changed): “This method is used as the bridge between HTML and [Windows app] style printing. In other words, this is how an app dev says ‘give me some stuff to print’.” What you give it is an HTML document that contains your content.
I emphasize the word document here because what you pass to getHtmlPrintDocumentSource cannot be any arbitrary element in the DOM. It must be the same kind of thing that the document variable always points to, or else you’ll see a run-time exception with “no such interface supported.”
So where do you get such an object?
If what your app is showing on the screen is exactly what you want to print, you can just use the document object directly. This is what scenarios 1–3 of the Print sample do:
MSApp.getHtmlPrintDocumentSource(document);
Of course, you don’t necessarily want to print everything on the screen; you can see that what’s on the screen in Figure 17-7 and what appears in the print preview of Figure 17-9 and Figure 17-10 is different. This is where the print media query in CSS comes into play:
@mediaprint {
/*Print-only styles*/
}
Simply said, if there’s anything you don’t want to show up in the printed output, set the display: none style within this media query. An alternate strategy, one that the sample employs, is to create a separate CSS file, such as css/print.css, and link it in your HTML file with the mediaattribute set to print (see html/scenario1.html):
<link rel="stylesheet" type="text/css" href="/css/print.css" media="print"/>
Print styles need not be limited to visibility of content: you can also use them however you like to arrange your content for more printer-friendly output. In a way, printing is like another view state where you’re not adding to or changing the content, you’re simply changing the visibility and layout. There are also some events you can use to do more specific formatting before and after printing has happened, as we’ll see later.
But what if the content you want to print isn’t your document object at all? How do you create another? There are several options here:
• In the document.body.onbeforeprint event handler, append additional child elements to the document and use the document.body.onafterprint event to remove them (the structure of such handlers is shown in scenario 2 of the Print sample). If your print CSS leaves only those newly added elements visible, that’s all that gets printed. This very effectively controls the entire print output, such as adding additional headers and footers that aren’t visible in the app. You might have a place in the app, in fact, where the user can configure those headers and footers.
• Call document.createDocumentFragment to obtain a document fragment and then populate it with whatever elements you want to print. getHtmlPrintDocumentSource accepts such a fragment. Note that if you want to drop in an HTML string (such as a piece acquired from a webview), insert it using outerHTML rather than innerHTML.
• If you have an iframe whose src is set to an SVG document (one of the tips we discussed for SVG’s in Chapter 13), obtain that SVG document directly through the iframe element’s contentDocument property. This too can be passed directly to getHtmlPrintDocumentSource and will print just that SVG, for example:
<!-- in HTML -->
<iframe id="diagram" src="/images/diagram.svg"></iframe>
//In JavaScript
var frame = document.getElementById("diagram");
args.setSource(MSApp.getHtmlPrintDocumentSource(frame.contentDocument));
• If you want to print the contents of an altogether different HTML page, create a link element in the document head that points to that other page for print media (see below). This will redirect getHtmlPrintDocumentSource to process that page’s content instead.
The latter is demonstrated in scenario 4 of the Print sample, where a link element is added to the document with the following code (js/scenario4.js):
var alternateLink = document.createElement("link");
alternateLink.setAttribute("id", "alternateContent");
alternateLink.setAttribute("rel", "alternate");
alternateLink.setAttribute("href", "http://go.microsoft.com/fwlink/?LinkId=240076");
alternateLink.setAttribute("media", "print");
document.getElementsByTagName("head")[0].appendChild(alternateLink);
Here the rel attribute indicates that this is alternate content, the media attribute indicates that it’s only for print, and href points to the alternate content (id is optional). Note that if the target page has any print-specific media queries, those are certainly applied when creating the print source.
Providing Print Content and Configuring Options
Now that we know how to get a source for print content, it’s straightforward to provide that content to Windows for printing. First, obtain the Windows.Graphics.Printing.PrintManager object:
var printManager = Windows.Graphics.Printing.PrintManager.getForCurrentView();
and then listen for its printtaskrequested event (a WinRT event), either through addEvent-Listener or by assigning a handler as done in the sample:
printManager.onprinttaskrequested = onPrintTaskRequested;
If you don’t add a handler for this event, the user will see the message on the right side of Figure 17-7 when invoking the Devices charm, unless you’ve also registered for other device-related events such as Windows.Media.PlayTo.PlayToManager.sourceRequested (see Chapter 13).
If you want to directly invoke printing from an app command, such as the Print button in scenario 2 of the sample, call the PrintManager.showPrintUIAsync method. This is equivalent to the user invoking the Devices charm when the app has registered for the printtaskrequested event.
The printtaskrequested event is fired when the Devices charm is invoked. In response, your handler creates a PrintTask object with a callback function that will provide the content document when needed. Here’s how that works. First, your handler receives a PrintTaskRequest object that has just three members:
• deadline The date and time that indicates how long you have to fulfill the request.
• getDeferral Returns a PrintTaskRequestedDeferral object in case you need to perform any async operations to fulfill the request. As with all deferrals, you call its complete method when the async operation has finished.
• createPrintTask Creates a PrintTask with a given title and a function that provides the source document when requested.
The structure of createPrintTask is slightly tricky. Although it returns a PrintTask object through which you can set options and listen to task-related events, as we’ll see shortly, its source property is read-only. So, instead of creating a task and storing your content document in this property, you provide a callback function that does the job when requested. The function itself is simple: it just receives a PrintTaskSourceRequestedArgs object whose setSource method you call with what you get back from MSApp.getHtmlDocumentPrintSource.
This is typically where you can also do other work to configure the task, so let’s take an example from scenario 3 of the Print sample (where I’ve added a namespace variable for brevity):
function onPrintTaskRequested(printEvent) {
var printTask = printEvent.request.createPrintTask("Print Sample", function (args) {
args.setSource(MSApp.getHtmlPrintDocumentSource(document));
// Choose the printer options to be shown.The order in which the options are
// appended determines the order in which they appear in the UI
var options = Windows.Graphics.Printing.StandardPrintTaskOptions;
printTask.options.displayedOptions.clear();
printTask.options.displayedOptions.append(options.copies);
printTask.options.displayedOptions.append(options.mediaSize);
printTask.options.displayedOptions.append(options.orientation);
printTask.options.displayedOptions.append(options.duplex);
// Preset the default value of the printer option
printTask.options.mediaSize =
Windows.Graphics.Printing.PrintMediaSize.northAmericaLegal;
// Register the handler for print task completion event
printTask.oncompleted = onPrintTaskCompleted;
});
}
Note that PrintTaskSourceRequestedArgs also contains a getDeferral method, should you need it, along with a deadline.
Tip If you step through the code in your printtaskrequestedhandler but you pass the deadline, the print UI will time out and say there’s nothing available to print. This might not be an error in the app at all—remove or disable the breakpoints and run the app again to check.
You can exercise some control over the appearance of the print UI through PrintTask.options, in which context you should review Guidelines for print-capable apps. The options object here, of type PrintTaskOptions, has a number of properties. A few obvious numerical ones aremaxCopies, minCopies, and numberOfCopies. You can also call getPageDescription with a page number to obtain a PrintPageDescription with resolution information for that page.
Then there is a host of properties whose values come from various printing enumerations:
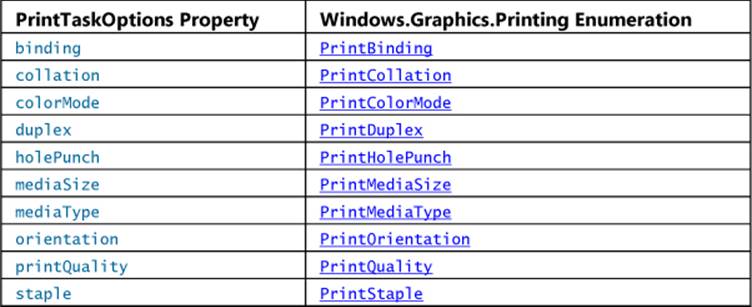
PrintTaskOptions.displayedOptions, for its part, is a vector of strings that must come from the StandardPrintTaskOptions class, as shown in the earlier code. Each of these controls the visibility of the option in the print UI if, of course, the printer supports it (otherwise the option will not be shown). The full list of options is binding, collation, colorMode, copies, duplex, holePunch, inputBin, mediaSize, mediaType, nUp, orientation, printQuality, and staple.
Take special note of the mediaSize property, for which there are literally 172 different values in the PrintMediaSize enumeration that reflect all the sizes of paper, envelopes, and so forth that we find around the world. When you intend to market a print-capable Windows Store app in different regions, you might want to include mediaSize in displayedOptions and set its value to something that’s applicable to the region (as the code above is doing for legal size paper). Even so, the media size is typically available in the More Settings panel in the print UI, depending on what the printer in question supports, so users will have access to it.
The final bit to mention in the code above is that a PrintTask has a completed event, along with previewing, progressing, and submitting. You can use these to reflect the status of print tasks in your app should you choose to do so. More information about the task itself is also available through its properties, which will typically contain the title you gave to the print job along with a unique ID. In all of this, however, you might have noticed a conspicuous absence of any method in PrintTask that would cancel a print job—in fact, there is none. This is because the HTML print model, as presently used by Windows Store apps written in JavaScript, is an all-or-nothing affair: once the job gets into the print engine, there’s no programmatic means to stop it. The user can still go to the printer control panel on the desktop and cancel the job there, or revert to the old-school method of yanking out the paper tray, but at present an app isn’t able to provide such management functions itself.
Protocol APIs: HID, USB, Bluetooth, and Wi-Fi Direct
Whereas the scenario APIs in WinRT that we saw earlier in this chapter provide a focused interface to a set of specific devices, the protocol APIs give you access to the much broader ecosystem of gadgets and gizmos. So long as a device adheres to one of the supported standards—Bluetooth (RFCOMM/SPP), Bluetooth Smart (LE/GATT), USB HID, USB (custom devices), and Wi-Fi Direct—you can use one of these APIs to communicate with it. The only exceptions are for those devices that already have a dedicated scenario API: where such support exists, as with barcode scanners, magnetic stripe readers, printers, sensors, mice, keyboards, and so on, Windows automatically blocks access through the protocol APIs.
To be honest, one could (and I hope someone does!) write a whole book on the subject of these protocol APIs, so in this chapter my intent is to give you enough of an introduction to familiarize you with the possibilities and point you to additional resources. Toward that end I start each of the following sections with a summary list of the device capability name, the primary namespace and object class in WinRT for that protocol, applicable samples in the SDK, background documentation, and the applicable talk from //build 2013 where all of these APIs were introduced. Where I happen to have some suitable hardware available to me I’ll go into more detail about the protocol API in question; in other cases I’ll just give a shorter overview.
For the sake of efficiency, let me also point out the common characteristics of the protocol APIs so that I don’t have to bore you later by repeating myself five times!
The first commonality is, of course, declaring device access in the manifest. For all protocol APIs other than Wi-Fi Direct, this takes the following form:
<m2:DeviceCapabilityName="[capability]">
<m2:DeviceId="[id]">
<m2:FunctionType="[usage]" />
</m2:Device>
</m2:DeviceCapability>
where m2 is the Windows 8.1 manifest namespace, [capability] identifies the protocol, such as humaninterfacedevice,[id] is a string such as any (for “broad” devices) or vidpid:045E 0610 to identify a specific (“narrow device) vendor/product id, and [usage] identifies the specific operational interface to that device.
If you are declaring access to multiple devices, you can have multiple m2:Device entries under the same capability. If you are declaring access to multiple devices with different capabilities, you’ll have multiple m2:DeviceCapability entries.
Device discovery is also the same as we’re seen earlier, where each protocol API class has a static getDeviceSelector method that you pass to the DeviceInformation.findAllAsync or createWatcher to obtain a specific DeviceInformation object. You then pass its id property to the staticfromIdAsync method of the protocol API class to instantiate the object. Here’s an example using the Wi-Fi Direct API, but the pattern is the same for all protocol APIs:
varnamespace = Windows.Devices.WiFiDirect;
vardeviceClass = Windows.Devices.WiFiDirect.WiFiDirectDevice;
var deviceSelector = deviceClass.getDeviceSelector();
Windows.Devices.Enumeration.DeviceInformation.findAllAsync(deviceSelector, null).done(
function (devices) {
// Set up selection UI
}
// When a device is selected from your UI list, create an object instance using its id.
// This will prompt the user for consent. If consent is denied, fromIdAsync will succeed
// but the deviceInstance variable will be null. (Other errors can also occur that will
// invoke your error handler.
deviceClass.fromIdAsync(selectedId).done(
function (deviceInstance) {
// Do your stuff!
}
);
Beyond this there is one more common characteristic: in your suspending handler you must call a device object’s close method and null out your variable, and then reacquire the object in your resuming handler. For example:
Windows.UI.WebUI.WebUIApplication.addEventListener("suspending", function () {
// Stop all existing I/O
// Close the device instance
deviceInstance && deviceInstance.close();
deviceInstance = null;
});
Windows.UI.WebUI.WebUIApplication.addEventListener("resuming", function () {
// Reacquire the device object
deviceInstance = acquireDeviceInstance();
})
The acquireDeviceInstance function would call deviceClass.fromIdAsync again, as shown in the previous bit of code, and reset the deviceInstance variable. The reason for this suspending behavior that Windows will automatically invalidate and turn off a device when it’s not being used by a foreground app. By closing it and nulling out your variable, you remind yourself that you must reacquire the device when you resume and thus avoid exception.
It’s also worth mentioning that if you’re building devices of your own that apps could work with through these protocol APIs, consider building a WinRT component that supplies a focused scenario API of your own. The component, in other words, would provide a higher-level interface to your device’s specific capabilities and make it much easier for developers to write apps for your device. We’ll be looking at WinRT components in Chapter 18 and implementing an example for this purpose.
Human Interface Devices (HID)
Manifest capability name:humaninterfacedevice
Protocol API namespace:Windows.Devices.HumanInterfaceDevice
Primary class:HidDevice
SDK Sample(s): Custom HID device access sample, XBoxController and CircusCannon examples in the companion content
Background docs:Human Interface Devices (MSDN) and Human interface device (Wikipedia)
Applicable //build 2013 session:Apps for HID Devices (2-924b)
It’s highly likely you’ve been using many HID devices already for a long time—this category includes most mice and other pointing devices, keyboards, front-panel controls, game controllers, and sensors. It’s just that those devices already have dedicated APIs of their own, such as those inChapter 12, so you don’t need to (and cannot, in fact) talk to them on a lower level. Barcode readers and magnetic stripe readers are also HID devices, but they too already have a scenario API. In short, this protocol API is intended for custom external peripheral devices, and it blocks a number of HID usages, as listed on Supporting human interface devices.
Technically speaking, HID is a device class over the more generic USB protocol (and others like I2C), but it has become specialized enough to be treated as its own thing. One reason for this is that HID devices generally work with small bits of data, as opposed to general USB devices like external hard drives that can deal with much larger amounts.
Through HID, you communicate with a device using reports, which are simply the HID term for blobs of binary data that go back and forth. The three types of reports are input (data coming from the device), output (data going to the device), and feature (for configuration and settings). Generally speaking, a report provides values for Boolean and Numeric controls, which essentially translate to pieces of the hardware that have on/off states (like buttons) and variable states (like joysticks or trackballs), respectively. A report descriptor is then what describes the format and the meaning of those blobs of data should you want to interpret reports dynamically. Most frequently, however, you’ll write your code to work directly with specific report structures.
Beyond that, this book is not the place to give you all the background, which you can find in the section of the documentation. Here, we just want to look at the HumanInterfaceDevice API and its usage, namely that of the HidDevice class.
With manifest declarations you use the humaninterfacedevice capability, beneath which you must declare the specific device ID and its usage (function). For example, in the Custom HID device access sample in the SDK, it declares access to a test device known as SuperMutt (seeMUTT (Microsoft USB Test Tool) devices on MSDN):
<m2:DeviceCapability Name="humaninterfacedevice">
<!--SuperMutt Device-->
<m2:Device Id="vidpid:045E 0610">
<m2:Function Type="usage:FFAA 0001" />
</m2:Device>
</m2:DeviceCapability>
The device ID is always in the format vidpid:<vid><pid> (meaning vendor ID and product ID); the function type is always in the format usage:<usagepage><usageid>. See How to specify device capabilities for HID.
Although you can find some of these hexadecimal values through Device Manager, the best way is to use the HCLIENT tool that’s a sample in the Windows Driver Development Kit (WDK). (Note that the WDK requires Visual Studio 2013 Ultimate and does not work with the express editions; see How to get the WDK for installation instructions.) Once you build and run this tool, plug in your device and see what gets added to the topmost drop-down. In the image below, I plugged in an Xbox 360 game controller and saw that Device #15 appeared:
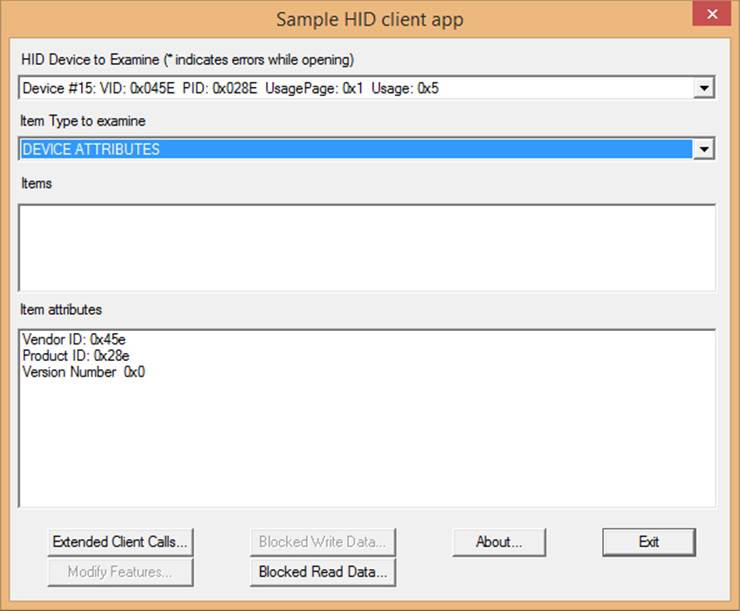
Therefore, to access this device, I need the following in my manifest:
<m2:DeviceCapability Name=”humaninterfacedevice”>
<m2:Device Id=”vidpid:045E 028E”>
<m2:Function Type=”usage:0001 0005” />
</m2:Device>
</m2:DeviceCapability>
Similarly, I have a Dream Cheeky Circus Cannon on my desk, whose IDs and usage are as follows (see the CircusCannon example):123
<m2:DeviceCapability Name=”humaninterfacedevice”>
<m2:Device Id=”vidpid:1941 8021”>
<m2:Function Type=”usage:FFA0 0001” />
</m2:Device>
</m2:DeviceCapability>
In a number of cases, you can write an app to work with a group of devices that all use the same commands. Then you use any instead for the device ID and a “top level” usage of *:
<m2:DeviceCapability Name=”humaninterfacedevice”>
<m2:Device Id=”any”>
<m2:Function Type=”usage:0005 *” />
</m2:Device>
</m2:DeviceCapability>
With your manifest declaration in place, use HidDevice.getDeviceSelector as the basis for enumeration. This method has two variants, one that takes the usage page and usage value only (as when your device ID in the manifest is any) and one that takes usage value plus avid and pid (for when you declare a specific device). Either way, send the selector to DeviceInformation.-findAllAsync or createWatcher to get a specific DeviceInformation object, whose id property you can then pass to HidDevice.fromIdAsync to instantiate the object. You can see this in scenario 1 of the Custom HID device access sample, although you have to step through quite a bit of the code to see the sequence because it uses a somewhat involved object model. So let me instead offer something simpler from the XboxController example in this chapter’s companion content, where we just use the first device of this type that we find (if any; js/default.js):
function acquireController() {
var xbcSelector = hid.getDeviceSelector(0x0001, 0x0005, 0x045E, 0x028E);
var id = null;
var name = null;
//Notice the second null argument (required in JavaScript when using a selector)
Windows.Devices.Enumeration.DeviceInformation.findAllAsync(xbcSelector, null)
.then(function (devInfo) {
//If no devices are found, throw an error out to our chain's handler
if (devInfo.size == 0) {
throw"no devices found";
}
//If we find any, assume we just have one such device on the system and use it.
id = devInfo[0].id;
name = devInfo[0].name;
return hid.fromIdAsync(id, Windows.Storage.FileAccessMode.read);
}).done(function (device) {
if (device == null) {
//Device could be enumerated but not accessed; user likely denied consent.
var status = Windows.Devices.Enumeration.DeviceAccessInformation.createFromId(id);
txtOutput.innerText = "Device exists but not acquired. Status: " +
statusString(status.currentStatus);//statusString is a helper (not shown)
} else {
controllerDevice = device;
txtOutput.innerText = "Device aquired: " + name;
}
}, function (e) {
//Some other error happened
txtOutput.innerText = "Error acquiring device: " + e;
});
}
I use nearly identical code in the CircusCannon example, just changing the arguments to gerDeviceSelector to match that device. Note also that the FileAccessMode value you pass to fromIdAsync determines whether the device can be shared (read) or is open for exclusive access (readwrite). Exclusive access is necessary if you want to send output reports (that is, write) to the device, as with the Circus Cannon.
Now that we have a HidDevice instance for this device in hand, its usageId, usagePage, vendorId, productId, and version are all available as properties. We also must remember to close and release the instance on suspend/resume. Most importantly, though, we can start talking to it through its methods and events:

In short, if you want to read information from the device, use getInputReportAsync and/or the inputreportreceived event; the XboxController example with this chapter uses the event, for instance, to watch for any changes in the hardware. If you want to send specific reports to the device, use createOutputReportAsync or createFeatureReportAsync, followed by sendOutputReport-Async or sendFeatureReportAsync.
What exactly you can do with input, output, and feature reports depends on the device you’re working with, of course, but there are some general characteristics. The HidInputReport, HidOutput-Report, and HidFeatureReport objects all share most of their properties and methods in common, with the input report having two extra properties:
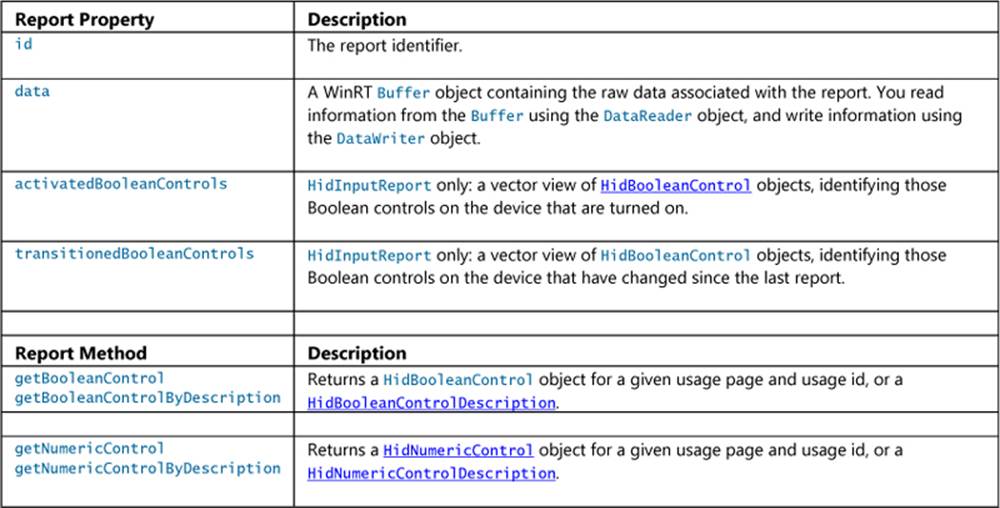
If a device raises interrupts that cause the HidDevice object to fire its inputreportreceived event, your event handler will receive a HidInputReport object in eventArgs.report. For the Xbox 360 controller, as demonstrated in the XboxController example for this chapter, the input report contains all the button states, stick positions, and so forth. Some of these states come through in a single bit in the report, so it’s important to know the exact report structure. To help illustrate this, the example’s code in the inputReportReceived event handler (js/default.js), shows both the raw hex dump of the report along with a more human-readable deconstruction. I’ll leave you to look at that code for the details.
The CircusCannon also issues ongoing inputreportreceived events to report the status of its internal switches. Four bits in the second and third bytes of the report represent switches that indicate that left, right, up, or down motion has reached its mechanical limit (thereby closing a switch). Similarly, there’s a switch that’s closed and then opened each time a missile fires, which shows up as a bit in the third byte of the report. We can use these bits, then, to automatically stop the movement or firing mechanisms as shown below, where the CircusCannon namespace contains the various constants and bit masks for the device (js/default.js):
function inputReportReceived(e) {
var reader = Windows.Storage.Streams.DataReader.fromBuffer(e.report.data);
var report = new Uint8Array(e.report.data.length);
reader.readBytes(report);
var upDown = report[CircusCannon.offset.upDown];
var leftRight = report[CircusCannon.offset.leftRight];
var atLimit = (upDown & (CircusCannon.status.topLimit | CircusCannon.status.bottomLimit))
|| (leftRight & (CircusCannon.status.leftLimit | CircusCannon.status.rightLimit));
var missileFired = report[CircusCannon.offset.missile] & CircusCannon.status.missileFired;
//Stop movement if we're at a limit, or stop the firing after one shot.
if (atLimit || missileFired) {
sendCommand(CircusCannon.commands.stop);
}
}
In working with the device, I found that the limit switches can stay closed even after movement in an opposite direction has started, so turning this kind of input into a good user experience means ignoring some of the reports until the switch is reset. The example for this chapter does not do such debouncing, so you generally have issue multiple movement commands through the UI until the switch is opened. We’ll correct this shortcoming in the control component we create in Chapter 18.
Controlling the motion and firing mechanisms of the cannon is done with a simple 9 byte output report, with report id of 0 and the relevant command in the second byte:
WinJS.Namespace.define("CircusCannon", {
commands: {
stop: 0x00,
up: 0x01,
upSlow: 0x0D,
down: 0x02,
downSlow: 0x0E,
left: 0x04,
leftSlow: 0x07,
right: 0x08,
rightSlow: 0x0B,
fire: 0x10,
upLeft: 0x01 + 0x04,
upRight: 0x01 + 0x08,
downLeft: 0x02 + 0x04,
downRight: 0x02 + 0x08,
nop: 0xFF
},
//Other members omitted
}
function sendCommand(command) {
if (launcher == null) {
return;
}
var reportId = 0x00;
var report = launcher.createOutputReport(reportId);
var dataWriter = new Windows.Storage.Streams.DataWriter();
var packet = new Uint8Array([reportId, command, 0, 0, 0, 0, 0, 0, 0]);
dataWriter = writeBytes(packet);
report.data = dataWriter.detachBuffer();
try {
launcher.sendOutputReportAsync(report);
} catch (e) {
console.log(e);
}
}
With this code, controlling the device is as easy as calling sendCommand with a value like CircusCannon.commands.fire. To create a good user experience out of it, however, it’s helpful to build a higher-level API on top of the input and output reports so that we don’t have to deal with such low-level minutiae. Again, we’ll come back to this in Chapter 18.
Finally, as an example of a feature report, the SuperMutt device supports an LED blink pattern report, as demonstrated in scenario 2 of the Custom HID device access sample. Here you can also see the use of the DataReader and DataWriter objects to work with the data buffers in the report (js/scenario2_featureReports.js). :
getLedBlinkPatternAsync: function () {
return SdkSample.CustomHidDeviceAccess.eventHandlerForDevice.current
.device.getFeatureReportAsync(SdkSample.Constants.superMutt.ledPattern.reportId)
.then(function (featureReport) {
if (featureReport.data.length === 2) {
var reader = Windows.Storage.Streams.DataReader.fromBuffer(featureReport.data);
// First byte is always report id
var reportId = reader.readByte();
var pattern = reader.readByte();
WinJS.log && WinJS.log("The Led blink pattern is " + pattern, "sample", "status");
}
});
},
// Set the blink pattern (see full sample comments for details). Note that creating
// a feature report nulls out all data in the report.
setLedBlinkPatternAsync: function (pattern) {
var featureReport = SdkSample.CustomHidDeviceAccess.eventHandlerForDevice.current
.device.createFeatureReport(SdkSample.Constants.superMutt.ledPattern.reportId);
var writer = new Windows.Storage.Streams.DataWriter();
writer.writeByte(featureReport.id);
writer.writeByte(pattern);
featureReport.data = writer.detachBuffer();
return SdkSample.CustomHidDeviceAccess.eventHandlerForDevice.current
.device.sendFeatureReportAsync(featureReport).then(function (bytesSend) {
});
}
The other scenarios in the sample, as you would expect, exercise additional capabilities.
Custom USB Devices
Manifest capability name:usb
Protocol API namespace:Windows.Devices.Usb
Primary class:UsbDevice
SDK Sample(s): Custom USB device access sample, USB CDC Control sample (also Firmware Update USB device sample for dedicated device apps)
Background docs:Windows Store app for a USB device, Writing Apps for USB devices
Applicable //build 2013 session:Apps for USB Devices (3-924a)
Whereas HID covers a wide range of devices that transfer small amounts of data, the USB protocol API covers a much wider swath of device classes, namely those that don’t belong to a device class or those that rely on the generic WinUSB driver (which is a requirement for this API). The specific list of supported class codes (along with subclass and protocol codes) is found on How to add USB device capabilities to the app manifest. Those classes include CDC control, Physical, PersonalHeathCare, ActiveSync, PalmSync, DeviceFirmwareUpdate (for dedicated device apps), IrDA (infrared), Measurement, and vendor-specific classes. Audio/video, imaging, printing, storage, smart card, and wireless controller classes are not supported through this API because they already have scenario APIs of their own. The API is also intended solely for peripherals and thus blocks access to internal devices.
Overall, the subject of general USB devices is quite deep, so I very much recommend the documentation linked to earlier for a complete treatment of the subject. Here I’ll just summarize.
In the manifest, you can declare either a name, class id, or a WinUsbId GUID for the m2:Function element. The Custom USB device access sample shows the first two:
<m2:DeviceCapability Name="usb">
<!--OSRFX2 Device-->
<m2:Device Id="vidpid:0547 1002">
<m2:Function Type="classId:ff * *"/>
</m2:Device>
<!--SuperMutt Device (USB interface, not HID) -->
<m2:Device Id="vidpid:045E 0611">
<m2:Function Type="name:vendorSpecific"/>
</m2:Device>
</m2:DeviceCapability>
The classId function string maps to the class, subclass, and protocol for the device. It can be in one of these formats: classId:nn * *, classId:nn 00 *, or classId:nn 00 00, where nn is a two-digit hexadecimal value. A name is whatever the device uses, and a GUID is specified with the form winUsbId:<GUID>.
The device ID can be a vidpid, as we see above, or any. The latter, any, can be used only when the classId also identifies a specific (or narrow) device class, namely those whose class id’s start with 02 (CDC), 0A (CDC-data), EF (miscellaneous), FE (application-specific), and FF (vendor specific). It cannot be used for winUsbId, serial-over-USB, miscellaneous, app-specific, or vendor-specific device classes.
To find all of this information, you can simply open the desktop Device Manager and view the properties for the device. The Hardware Ids (below left) give you what you need for the m2:Device element, and the Compatible Ids (below right) show the values you can use for classId:
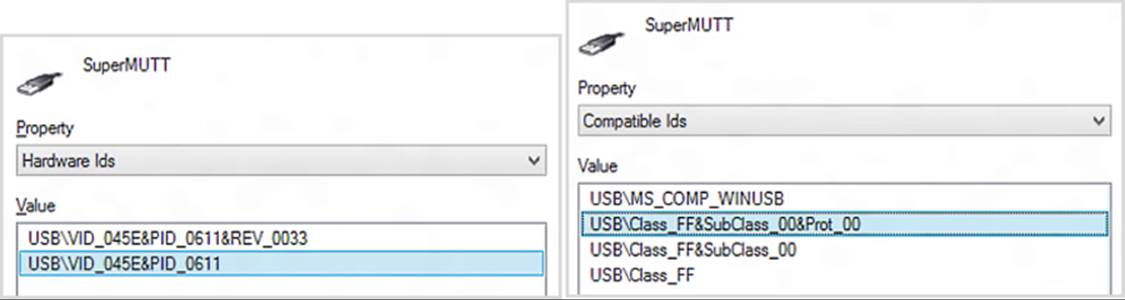
Connecting to a device through the process of enumeration and UsbDevice.fromIdAsync gets you an instance of the UsbDevice class. With that in hand, you can retrieve the device’s configuration descriptor set through its deviceDescriptor property, which conveniently parses the descriptor information into a UsbDeviceDescriptor object. Custom descriptors will be included here, if they exist. Standard descriptors can be decoded using the static tryParse methods of three other specific classes: UsbConfigurationDescriptor, UsbInterfaceDescriptor, andUsbEndpointDescriptor. See How to get USB descriptors.
You then have three supported ways to communicate with the device, as described in the following table (isochronous transfers are not supported). I especially encourage you to read the linked documentation—those topics include detailed diagrams and step-by-step guides to the communication model.

For further information on USB devices, again refer to the documentation I’ve linked here along with Concepts for app USB developers and Talking to USB devices, start to finish.
Bluetooth (RFCOMM)
Manifest capability name:bluetooth.rfcomm or vidpid: <vid><pid> bluetooth
Protocol API namespace:Windows.Devices.Bluetooth.Rfcomm
Primary class:RfcommDeviceService
SDK Sample(s):Bluetooth Rfcomm chat sample; also see the SpheroColorController example in the companion content
Background docs:Supporting Bluetooth devices, Bluetooth Devices
Applicable //build 2013 session:Apps for Bluetooth, HID, and USB Devices (3-026)
When we talk about Bluetooth devices we have to be clear about what specification they support. Bluetooth RFCOMM or SPP (Serial Port Protocol), means the 1.x, 2.x, and 3.x specifications (sometimes also referred to as Bluetooth “classic” or “legacy”). This is for high-speed streaming devices with higher power consumption, such as a pair of wireless speakers, a Bluetooth printer, or connecting your phone to your car’s audio system. Bluetooth Smart, LE (low energy), and GATT (Generic Attribute Profile using LE as a transport), on the other hand, use the 4.0 specification for small or slow data transfers with lower power devices, such as heart rate monitors that you charge up only once a week. In short, the two are really separate things, something like the Java and JavaScript programming languages! (And to make it even more confusing, the Bluetooth Smart Ready logo means that the device supports all Bluetooth specs, whereas Bluetooth Smart is just 4.0. There will be a quiz next week!)
Here, we’ll talk about working with Bluetooth RFCOMM devices, such as the Sphero, and we’ll look at Bluetooth Smart (LE) after that. In both cases, the APIs work with devices that have already been paired with Windows, and fortunately such pairing capabilities are already built into the system. That is, if the user has gone to PC Settings > PC and Devices > Bluetooth and paired the device, your app will find it in the process of enumeration.
As indicated above, the capability name for Bluetooth RFCOMM is, not surprisingly, bluetooth.rfcomm, or you can use the vidpid: <vid><pid>bluetooth form. In the manifest, the device id is generally any and the function is either serviceId:<GUID> where <GUID> is specific to the device or a descriptive form like name:serialPort.
To talk to the Sphero device, for instance, you’d use the following declaration, as shown in the SpheroColorController example in this chapter’s companion content:
<m2:DeviceCapability Name="bluetooth.rfcomm">
<m2:Device Id="any">
<m2:Function Type="serviceId:00001101-0000-1000-8000-00805F9B34FB" />
</m2:Device>
</m2:DeviceCapability>
You can also use the serial port profile by name (which maps to the GUID above):
<m2:Function Type="name:serialPort" />
The Bluetooth Rfcomm chat sample in the SDK provides another example:
<m2:DeviceCapability Name="bluetooth.rfcomm">
<m2:Device Id="any">
<m2:Function Type="serviceId:34B1CF4D-1069-4AD6-89B6-E161D79BE4D8" />
</m2:Device>
</m2:DeviceCapability>
In this case the serviceId GUID is just an arbitrary GUID that’s been assigned to this particular app, because the sample doesn’t work with an external device. It instead sets up a chat session between two PCs running the same sample.
For the full list of supported devices for Bluetooth RFCOMM, see How to specify device capabilities for Bluetooth. This also includes a list of devices that aren’t supported through this protocol API, because other APIs already exist for them.
Enumeration and discovery, as usual, starts with a selector from RfcommDeviceService.get-DeviceSelector and ends with RfcommDeviceService.fromIdAsync to get a specific instance of RfcommDeviceService. That instance has the following methods and properties:
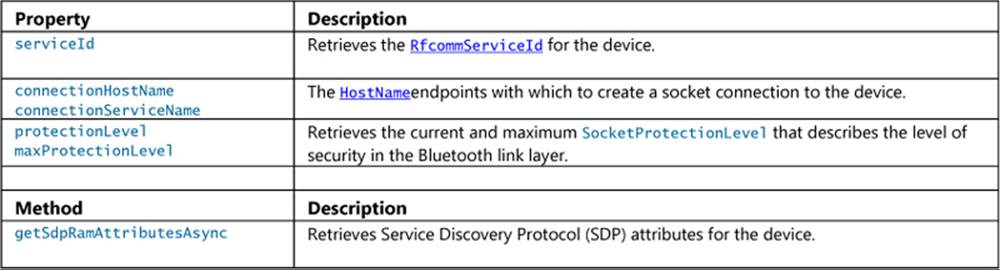
As suggested by its connection properties, the RfcommDeviceService instance has no dedicated communication methods of its own: you instead use the WinRT sockets APIs that are described in Appendix D, “Provider-Side Contracts.” Here’s a generic piece of code where deviceObj is the device instance, derived from the Bluetooth Rfcomm sample (js/s1-chat-client.js):
var sockets = Windows.Networking.Sockets;
var streams = Windows.Storage.Streams;
socket = new sockets.StreamSocket();
socket.connectAsync(deviceObj.connectionHostName, deviceObj.connectionServiceName,
sockets.SocketProtectionLevel.plainSocket)
.done(function () {
// Device is connected and ready to use.
// Send data to the device through writer.writeBytes, etc. and storeAsync.
writer = new streams.DataWriter(socket.outputStream);
// Send data to the device through reader.readerBytes, etc. and loadAsync.
varreader = newstreams.DataReader(socket.inputStream);
});
As a more specific example, here’s how the SpheroColorController example generates a random color packet and sends it to the device, using a socket and DataWriter as done in the code above (js/default.js):
// writer is a DataWriter instance for the socket
function changeColor() {
if (writer == null) {
return;
}
var packet = generateRandomColorPacket();
writer.writeBytes(packet);
writer.storeAsync().done(function () {
}
}
function generateRandomColorPacket() {
var r = Math.floor(Math.random() * 256);
var g = Math.floor(Math.random() * 256);
var b = Math.floor(Math.random() * 256);
//Checksum is the lower 8 bits of the packet contents minus the 0xFFFE prefix
var checksum = (0x02 + 0x20 + 0x01 + 0x05 + r + g + b + 0x01) % 256;
returnnew Uint8Array([0xFF, 0xFE, 0x02, 0x20, 0x01, 0x05, r, g, b, 0x01, ~checksum]);
}
Tip When I first converted Ellick Sung’s C# Sphero sample (from his //build 2013 talk linked at the beginning of this section) to JavaScript, I was hitting an exception in DataWriter.storeAsync that told me only “The operation identifier is not valid.” Say what? The problem, which was really hard to see, was a simple casing error: I’d used socket.OutputStream (which resolved to undefined) when constructing the DataWriter instead of the valid socket.outputStream. However, the DataWriter does not validate this backing stream during construction, and the stream isn’t otherwise touched until storeAsync, which is when I saw the exception. So, if you’re seeing odd behavior like this, check your constructor arguments! (Thanks to Matthew Beaver and Nigel D’Souza for helping track this down!)
Finally, as a reminder of properly cleaning up our objects when the app is suspended, here’s the code that disconnects from the device, the socket, and the DataWriter (js/default.js):
var wui = Windows.UI.WebUI.WebUIApplication;
wui.addEventListener("suspending", function (e) {
disconnect();
});
function disconnect() {
output.innerText = "";
writer && writer.close();
writer = null;
socket && socket.close();
socket = null;
device = null;
}
For good measure the example saves the last device id that it connected to so that we can automatically reconnect when the app is resumed:
var rfc = Windows.Devices.Bluetooth.Rfcomm;
wui.addEventListener("resuming", function (e) {
//Attempt to reconnect to previously enumerated device
if (lastDeviceId != 0) {
connectToDevice(lastDeviceId);
}
})
function connectToDevice(id) {
rfc.RfcommDeviceService.fromIdAsync(id).done(function (foundDevice) {
device = foundDevice;
openSocket();
});
}
Bluetooth Smart (LE/GATT)
Manifest capability name:bluetooth.genericAttributeProfile
Protocol API namespace:Windows.Devices.Bluetooth.GenericAttributeProfile
Primary class:GattDeviceService
SDK Sample(s):Bluetooth Generic Attribute Profile – Heart Rate Service sample
Background docs:Bluetooth Low Energy Overview, Bluetooth low energy (Wikipedia)
Applicable //build 2013 session:Apps for Bluetooth Smart Devices (3-9028)
Having previously introduced the various flavors of Bluetooth—which you can go back and read if you want!—we’ll waste no more time here and just dive straight into the considerations for Bluetooth Smart, LE (Low Energy), and GATT (Generic Attribute Profile) devices. These are again those that work with small amounts of data transfer in exchange for long battery life, and as with other Bluetooth devices, Windows provides a built-in pairing UI so that apps needn’t worry about that part of the story. Of course, user consent is involved whenever an app attempts to connect to a device the first time.
The communication model for GATT devices centers around characteristics, which is a data value transferred between the device and a client, such as a heart rate reading, battery voltage, temperature, and so forth. Optional descriptors provide information about a characteristic, such as units, min/max values, etc. A GATT service is then a hierarchal collection of related characteristics and descriptors; most devices will provide more than one characteristic, for instance, a battery level along with a specific reading like heart rate or thermometer. Collectively, services, characteristics, and descriptors are all referred to as attributes that each have some kind of GUID assigned to it.
In the app manifest, the general device capability name is bluetooth.genericAttributeProfile, where the device id is typically any, model, or a vidpid. The service id can be a string with serviceId:<GUID> or name:<service_name>, same as with Bluetooth RFCOMM. The SDK sample, for instance, asks to work with Bluetooth LE heart rate monitors:
<Capabilities>
<m2:DeviceCapability Name="bluetooth.genericAttributeProfile">
<m2:Device Id="any">
<m2:Function Type="name:heartRate" />
</m2:Device>
</m2:DeviceCapability>
</Capabilities>
For the full list of supported devices for Bluetooth RFCOMM, see How to specify device capabilities for Bluetooth. Note that the GATT service for HID is not supported, as you’d use the HID API for that.
Enumeration and discovery starts with a selector from GattDeviceService.getDeviceSelector and ends with GattDeviceService.fromIdAsync to get a specific instance of GattDeviceService. This is the object representing the device’s service, and through it you can get the deviceId as well as the service’s uuid. Two methods, getIncludedServices and getCharacteristics, let you then explore the device’s capabilities, along with the attributeHandle property.
Characteristics, which is what you’re typically most interested in, are represented by GattCharacteristic objects, through which you exchange data (readValueAsync and writeValueAsync methods and a valuechanged event), control encryption (protectionLevel), work with descriptors (getDescriptors and [read | write]CharacteristicConfiguration-DescriptorAsync), characteristicProperties, and presentationFormats.
You can see usage examples in the SDK sample linked above, which as its name suggests deals with heart rate monitors. Some code is shared between its scenarios in js/heart-rate-service.js, such as connecting to a device, setting up a valuechanged event handler, and doing some configuration. Scenario 1 monitors the event for ongoing heart rate readings, where the event args object (a GattValueChangedEventArgs) contains a timestamp and characteristicValue.
The characteristic value here is a WinRT Buffer object, as is any reading you get from GattCharacteristic.readValueAsync. You also use a buffer to send information to the device through GattCharacteristic.writeValueAsync. As such, you use the DataReader and DataWriter objects to put data into the buffers. Thus the event handler in js/heart-rate-service.js processes the reading as follows:124
function onHeartRateMeasurementValueChanged(args) {
var heartRateData = new Uint8Array(args.characteristicValue.length);
Windows.Storage.Streams.DataReader.fromBuffer(args.characteristicValue)
.readBytes(heartRateData);
// Interpret the Heart Rate measurement value according to the Heart Rate Bluetooth Profile
var heartRateMeasurement = processHeartRateMeasurementData(heartRateData);
// Save the processed data in our namespace
data[data.length] = {
timestamp: args.timestamp,
value: heartRateMeasurement.heartRateValue,
expendedEnergy: heartRateMeasurement.energyExpended,
toString: function () {
returnthis.value + ' bpm @ ' + this.timestamp;
}
};
// Code to dispatch a custom event to the scenario code omitted.
}
One of the other typical characteristics of a heart rate monitor describes the location of the monitor, such as the chest, wrist, finger, and so on. Scenario 2 of the sample shows how to retrieve this bit of information (js/s2-read-characteristic-value.js):
var gatt = Windows.Devices.Bluetooth.GenericAttributeProfile;
var bodySensorLocationCharacteristics = HeartRateService.getHeartRateService()
.getCharacteristics(gatt.GattCharacteristicUuids.bodySensorLocation);
if (bodySensorLocationCharacteristics.length > 0) {
bodySensorLocationCharacteristics[0].readValueAsync().done(function (readResult) {
if (readResult.status === gatt.GattCommunicationStatus.success) {
var bodySensorLocationData = new Uint8Array(readResult.value.length);
Windows.Storage.Streams.DataReader.fromBuffer(readResult.value)
.readBytes(bodySensorLocationData);
// Process the location data (see hs/heart-rate-service.js)
var bodySensorLocation = HeartRateService.processBodySensorLocation(
bodySensorLocationData);
});
}
Similarly, scenario 3 writes a characteristic value to the device to reset the expended energy status value, and also watches this characteristic through the valuechanged event. Here’s the code to reset the status (condensed from js/s3-write-characteristic-value.js):
var heartRateControlPointCharacteristics = HeartRateService.getHeartRateService()
.getCharacteristics(gatt.GattCharacteristicUuids.heartRateControlPoint);
if (heartRateControlPointCharacteristics.length > 0) {
characteristic = heartRateControlPointCharacteristics[0];
var writer = new Windows.Storage.Streams.DataWriter();
writer.writeByte(1);
characteristic.writeValueAsync(writer.detachBuffer()).done(function (status) {
if (status === gatt.GattCommunicationStatus.success) {
// Value written
}
});
}
It’s worth noting that most apps that connect to a Bluetooth LE device will acquire values for various status characteristics like location and battery life and then display those in a way to keep the user informed. This is especially useful if the device itself doesn’t make such information readily available otherwise. For a demonstration and a few other advanced topics, refer to //build 2013 session 3-9028 linked at the beginning of this section.
Wi-Fi Direct
Manifest capability name: use the top level Proximity capability
Protocol API namespace:Windows.Devices.WiFiDirect
Primary class:WiFiDirectDevice
SDK Sample(s): WiFiDirectDevice sample
Background docs:WiFi Direct (Wikipedia)
Applicable //build 2013 session:Building Windows Apps that Use Wi-Fi Direct (3-9030)
Generally speaking, Wi-Fi Direct means connecting two endpoints, like a phone and a laptop, or your phone and your automobile’s audio system, without the need for an access point. Working with Wi-Fi Direct devices is very similar to what we’ve seen already with other protocols. As mentioned in the introduction to this chapter, pairing of wireless devices is something that Windows handles at the OS level, so all you really need to do from an app is declare the necessary capability in your manifest, enumerate the devices you care about, pick the one you want to use, and then use the API in Windows.Devices.WiFiDirect to communicate with it. In this case, communication happens through sockets, for which you use the WinRT APIs discussed in Appendix D.
The WiFiDirectDevice sample that we’ll draw from here demonstrates the API, as usual, and also provides a good app for testing connections with Wi-Fi Direct devices. If you find that your own app is having troubles with a device, try it also with this sample and compare the results.
As noted above, the sample shows that the only capability you need for Wi-Fi Direct is Proximity, which you can set through Visual Studio’s manifest editor directly:
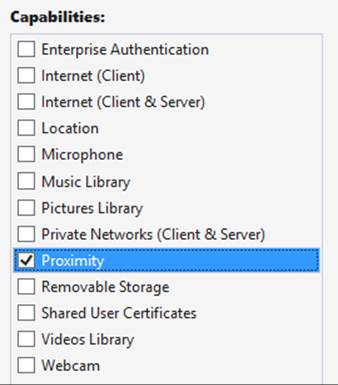
When you enumerate Wi-Fi Direct devices, you’ll enumerate only those that have been paired. Once you have the ID you want, WiFiDirectDevice.fromIdAsync gets you the WiFiDirectDevice instance for that specific hardware (assuming the user consents). At that point, register a handler for the WiFiDirectDevice.onconnectionstatuschanged event:
varwfd = Windows.Devices.WiFiDirect;
wfd.WiFiDirectDevice.fromIdAsync(selectedId).done(
function (wfdDevice) {
// Listen for status changes (assuming wfdDevice is non-null)
wfdDevice.onconnectionstatuschanged = statusHandler;
// Start communications
}
);
This event tells you when the device object’s connectionStatus property changes. Its values are simply connected or disconnected. Apps typically use the connection status to show some kind of visual indicator, stop data transfers, and/or prompt the user to select a different device if the one they’ve been using is unavailable.
The other key thing to do when you lose a connection is to close any sockets you’ve opened for it. As mentioned earlier, communication with a Wi-Fi Direct device happens through sockets. This starts by calling WiFiDirectDevice.getConnectionEndpointPairs to retrieve the endpoints and then open and close as many sockets as you desire using DatagramSocket and StreamSocket objects and their connectAsync methods (setting the EndpointPair.remoteServiceName to the desired TCP port). See Appendix D for details on working with sockets, and watch the //build 2013 session linked to earlier for a live demonstration (it starts at about 12m 15s in).
Near Field Communication and the Proximity API
Connecting with devices that are near to the one on which your app is running is one area that I suspect will see much creative innovation in the coming years as PCs are increasing equipped with the requisite hardware. In this case we’re speaking of “devices” more generally than we have been. In some cases there will be a separate discrete device, most notably Bluetooth devices or NFC tags. But then we’re also speaking of an app running on one machine connecting with itself or another that’s running on a different machine. In this sense, apps can communicate with each other as if they were themselves separate “devices.”
Caveat Although it is possible for different apps to know about each other and communicate, the Windows Store certification requirements do not allow them to be interdependent. Approach such communication scenarios as a way to extend the functionality of the app, but be sure to provide value when the app is run in isolation.
Near Field Communication (NFC) is one of the key ways for apps to connect to devices and across devices. NFC works with electromagnetic sensors (including unpowered NFC tags) that resonate with each other when they get close, usually within 3–4 centimeters. Practically speaking, this means that the devices actually make physical contact, a tap that effectively initiates a digital handshake to open a conversation. When this pairing happens between the apps running on both devices that share a communication protocol (which is easy if they’re the same app), those apps can have an ongoing conversation.
When you think about “devices” in this context, though, they can vary tremendously. The devices that are making the connection don’t need to be at all similar. One device might be your tablet PC, and the other might by anything from a large all-in-one PC display to a simple NFC tag mounted in a poster or name badge.
Apps can also learn about each other on different devices through Wi-Fi Direct (if the wireless adapter supports it) and Bluetooth. In these cases it’s possible for one app to browse for available (advertised) connections on other devices, which might or might not be coming from the same app. The devices don’t need to be as physically close as with a tap, just within range of their wireless signals.
Whatever the case, working with proximity—as all of this is collectively referred to—is useful for many scenarios, such as sharing content, setting up multiplayer experience, broadcasting activity, and really anything else where some kind of exchange might happen, including both one-time data transfers and setting up more persistent connections.
Three main conditions exist for using proximity (see Guidelines for proximity):
• The app must declare the Proximity capability in its manifest.
• Communications are supported only for foreground apps (there are no background tasks to maintain a conversation).
• The app must ask for user consent to enter into a multiuser relationship. An app should show waiting connections, connections being established, and connections that are active, and it should allow the user to disconnect at any time. Note that using the APIs to make a connection will automatically prompt the user.
The API for working with proximity is in the appropriately named Windows.Networking.-Proximity namespace, as is the Proximity sample that we’ll be working with here. It almost goes without saying that doing any deep exploration of proximity will require two machines that are suitably equipped or one device plus an NFC tag. For NFC between two machines there is also a driver sample in the Windows Driver Kit that simulates NFC over a network connection. To use it, you’ll also need Visual Studio 2013 Ultimate Edition; the Express version does not support driver development. In that case it might make more sense to just acquire an NFC-capable device!
To install the Windows Driver Kit, follow the instructions on How to get the WDKafter installing Visual Studio 2013 Ultimate. To start the download, you run the small the installer and then select the option to acquire the kit for use on another computer. Then, according to the Proximity sample’s description page:
After you have installed the WDK and samples, you can find the proximity driver sample in the src\nfp directory in the location where you installed the WDK samples. See the NetNfpProvider.html file in the src\nfp\net directory for instructions on building and running the simulator.[Note: be sure to specify a Windows 8.1 target when you build.] After you start the simulator, it runs in the background while your proximity app is running in the foreground. Your app must be in the foreground for the tap simulation to work.
For more complete instructions, refer to How to use Near-Field Proximity API without NFC hardware on Stephanié Hertrich’s MSDN blog. There you can also find a C# library for Transferring a file between 2 peers using Wifi-Direct and Proximity API, which you might find helpful or instructive.
Assuming that you have an environment in which proximity can at least be simulated, let’s look at the two mainline scenarios now. The first uses the PeerFinder class to create a socket connection between two peer apps for ongoing communication; the second uses the ProximityDeviceclass to send data packets between two devices.
Finding Your Peers (No Pressure!)
To find peers, an app on one device can advertise its availability such that apps on other devices can browse advertised peers and initiate a connection over Wi-Fi Direct (Windows devices) or Bluetooth (Windows Phone). The second way to find a peer is through a direct NFC tap (which works on Windows and Windows Phone). Both methods are shown in scenario 1 of the Proximity sample, but these three distinct functions—advertise, browse, and tap to connect—are somewhat intermixed, because they each use some distinct parts of the PeerFinder class and some parts in common.
One commonality is the static property PeerFinder.supportedDiscoveryTypes, which indicates how connections can be made. This contains a combination of values from the PeerDiscoveryTypes enumeration and depends on the available hardware in the device. Those values are browse(Wi-Fi Direct is available), triggered (NFC tapping is available), and none (PeerFinder can’t be used). You can use these values to selectively enable or disable certain capabilities in your app as needed. Scenario 1 of the Proximity sample, for instance, checks the discovery types to set some flags and enable buttons for NFC activities. Otherwise, it just shows disappointing messages (this code is condensed somewhat from the page’s ready method js/PeerFinder.js, and note the namespace variable at the top):
var ProxNS = Windows.Networking.Proximity;
var supportedDiscoveryTypes = ProxNS.PeerFinder.supportedDiscoveryTypes;
// Enable triggered (tap) related UI only if the hardware support is present
if (supportedDiscoveryTypes & ProxNS.PeerDiscoveryTypes.triggered) {
triggeredConnectSupported = true;
} else {
peerFinderErrorMsg = "Tap based discovery of peers not supported \n";
}
// Enable browse related buttons only if the hardware support is present
if (supportedDiscoveryTypes & ProxNS.PeerDiscoveryTypes.browse) {
browseConnectSupported = true;
// [Add listeners to buttons, code omitted]
} else {
// [Show messages, code omitted]
}
if (triggeredConnectSupported || browseConnectSupported) {
// [Set up additional UI]
}
// ...
}
Now let’s tease apart the distinct areas.
Advertising a Connection
Making yourself available to others through advertising has two parts: putting out the word and listening for connections that are made. Assuming that some form of communication is possible, the first step in all of this is to configure the PeerFinder with the displayName that will appear to other devices when you advertise and to set allowBluetooth, allowInfrastructure, and allowWiFi-Direct as desired to allow discovery over additional networks (infrastructure refers to TCP/IP). Setting none of these flags will still enable connections through NFC tapping, which is always enabled.
Next, set up a handler for the PeerFinder.onconnectionrequested event, followed by a call to the static method PeerFinder.start (again, ProxNS is a namespace variable):
ProxNS.PeerFinder.onconnectionrequested = connectionRequestedEventHandler;
ProxNS.PeerFinder.start();
Note connectionrequestedis an event that originates within WinRT. Because this is perhaps an event you might listen to only temporarily, be sure to call removeEventListener or assign null to the event property to prevent memory leaks. See “WinRT Events and removeEventListener” in Chapter 3, “App Anatomy and Performance Fundamentals.”
The connectionrequested event is triggered when other devices pick up your advertisement and call your toll-free hotline, so to speak, specifically over Wi-Fi Direct or Bluetooth. The event receives a ConnectionRequestedEventArgs object that contains a single property, peerInformation, which is an instance of—not surprisingly—the PeerInformation class. This object too is simple, containing nothing but a displayName, but that is enough to make a connection.
function connectionRequestedEventHandler(e) {
requestingPeer = e.peerInformation;
ProximityHelpers.displayStatus("Connection Requested from peer: "
+ requestingPeer.displayName);
// Enable Accept button (and hide Send and Message) [some code omitted]
ProximityHelpers.id("peerFinder_AcceptRequest").style.display = "inline";
}
A connection is established by passing that PeerInformation object to PeerFinder.-connectAsync. This will prompt the user for consent, and, given that consent, your completed handler will receive a Windows.Networking.Sockets.StreamSocket, which is explained in Appendix C, “Additional Networking Topics.”
function peerFinder_AcceptRequest() {
ProxNS.PeerFinder.connectAsync(requestingPeer).done(function (proximitySocket) {
startSendReceive(proximitySocket);
});
}
From this point on, you’re free to send whatever data with whatever protocols you’d like, on the assumption, of course, that the app on the other end will understand what you’re sending. This is clearly not a problem when it’s the same app on both ends of the connection; different apps, of course, will need to share a common protocol. In the sample, the “protocol” exchanges only some basic values, but the process is all there.
If at any time you want to stop advertising, call PeerFinder.stop. To close a specific connection, call the socket’s close method.
Making a Connection
On the other side of a proximity relationship, an app can look for peers that are advertising themselves over Wi-Fi Direct or Bluetooth. In the Proximity sample, a Browse Peers button is enabled if the browse discovery type is available. This button triggers a call to the following function (js/PeerFinder.js) that uses PeerFinder.findAllPeersAsync to populate a list of possible connections, including those from different apps:
function peerFinder_BrowsePeers() {
// Empty the current option list [code omitted]
ProxNS.PeerFinder.findAllPeersAsync().done(function (peerInfoCollection) {
// Add newly found peers into the drop down list.
for (i = 0; i < peerInfoCollection.size; i++) {
var peerInformation = peerInfoCollection[i];
// Create and append option element using peerInformation.displayName
// to the peerFinder_FoundPeersList control [code omitted]
}
});
}
When you select a peer to connect to, the sample takes its PeerInformation object and calls PeerFinder.connectAsync as before (during which the user is prompted for consent):
function peerFinder_Connect() {
var foundPeersList = ProximityHelpers.id("peerFinder_FoundPeersList");
var peerToConnect = discoveredPeers[foundPeersList.selectedIndex];
ProxNS.PeerFinder.connectAsync(peerToConnect).done(
function (proximitySocket) {
startSendReceive(proximitySocket);
});
}
Once again, this provides a StreamSocket as a result, which you can use as you will. To terminate the connection, call the socket’s close method.
Tap to Connect and Tap to Activate
To detect a direct NFC tap—which again works to connect apps running on two devices—listen to the PeerFinder.onTriggeredConnectionStateChanged (a WinRT event that I spell out in camel casing so that it’s readable!). In response, start the PeerFinder:
ProxNS.PeerFinder.ontriggeredconnectionstatechanged =
triggeredConnectionStateChangedEventHandler;
ProxNS.PeerFinder.start();
The process of connecting through tapping will go through a series of state changes (including user consent), where those states are described in the TriggeredConnectState enumeration: listening, connecting, peerFound, completed, canceled, and failed. Each state is included in the event args sent to the event (a TriggeredConnectionStateChangedEventArgs…some of these names sure get long!), and when that state reaches completed, the socket property in the event args will contain the StreamSocket for the connection:
function triggeredConnectionStateChangedEventHandler€ {
// [Other cases omitted]
if (e.state === ProxNS.TriggeredConnectState.completed) {
startSendReceive(e.socket);
}
}
Again, from this point on, it’s a matter of what data is being exchanged through the socket—the NFC tap is just a means to create the connection. And once again, call the socket’s close when you’re done with it.
When tapping connects the same app across devices, it’s possible for the tap to launch an app on one of those devices. That is, when the app is running on one of the devices and has started the PeerFinder, Windows will know the app’s identity and can look for it on the other device. If it finds that app, it will launch it (or activate it if it’s already running). The app’s activated handler is then called with an activation kind of launch, where eventArgs.detail.arguments will contain the string “Windows.Networking.Proximity.PeerFinder:StreamSocket” (see js/default.js in the Proximity sample; the code here is modified for clarity):
var tapLaunch = ((eventObject.detail.kind ===
Windows.ApplicationModel.Activation.ActivationKind.launch) &&
(eventObject.detail.arguments ===
"Windows.Networking.Proximity.PeerFinder:StreamSocket"));
if (tapLaunch) {
url = scenarios[0].url; // Force scenario 0 if launched by tap to start the PeerFinder.
}
return WinJS.Navigation.navigate(url, tapLaunch);
The code in scenario 1 picks up this condition (the tapLaunch parameter to WinJS.Navigation.-Navigate is true) and calls PeerFinder.start automatically instead of waiting for a button press. In the process of startup, the app also registers its own triggeredConnectionStateChangedhandler so that it will also receive a socket when the connection is complete.
Watching for Peers
In addition to deliberately browsing for peers in response to user interaction, for which you use PeerFinder.findAllPeersAsync, an app can dynamically watch for peers as they become visible. This is helpful for implementing multipeer scenarios.
After calling PeerFinder.start, a watcher—an instance of the PeerWatcher class—is created through PeerFinder.createWatcher, as demonstrated in scenario 2 of the Proximity sample (js/PeerWatcher.js):
peerWatcher = ProxNS.PeerFinder.createWatcher();
When you’re ready to watch, call PeerWatcher.start:
peerWatcher.start();
If you want to stop watching, call the stop method. But while watching is active, the PeerWatcher fires relevant events for peer activity:
• added A peer has entered into the proximity space.
• removed A peer has exited the proximity space.
• updated A peer in the proximity space has changed either its displayName or discoveryData property.
• enumerationcompleted The PeerWatcher has completed a scan of the proximity space. Note that the watcher will continue to scan periodically, so this event will be fired repeatedly.
• stopped PeerWatcher.stop was called, or the watcher was stopped for some other reason. To determine the cause, check the PeerWatcher.status property.
With the added, removed, and updated events, your handler receives the PeerInformation object for the appropriate peer. If, for example, you wanted to watch for and automatically connect to a peer that you’ve connected with before, have your added handler check the PeerInformationproperties of new peers as they show up, and call PeerFinder.connectAsync on those are in your auto-connect list.
The PeerWatcher.status property, as mentioned for the stopped event, contains a value from PeerWatcherStatus. This will be one of created (ready to watch), started (actively watching), stopping (in the process of shutting down), stopped (no longer watching), aborted (stopped due to failure), and enumerationCompleted (set after the first scan).
Sending One-Shot Payloads: Tap to Share
Although the PeerFinder sets up a StreamSocket and is good for scenarios involving ongoing communication, other scenarios—like sharing a photo, a link, or really any kind of information including data from an NFC tag—need only send some data from one device to another and be done with it. For such purposes we have the ProximityDevice class, which you obtain as follows:
var proximityDevice = Windows.Networking.Proximity.ProximityDevice.getDefault();
An app that has something to share “publishes” that something as a message in the form of a string, a URI, or a binary buffer. NFC tags publish their messages passively; an app, on the other hand, uses the ProximityDevice class and its publishMessage, publishUriMessage, andpublishBinary-Message methods (and a matching stopPublishing method). For example, drawing from scenario 3 of the Proximity sample (js/ProximityDevice.js, there publishText contains the contents of an edit control):
var publishedMessageId = proximityDevice.publishMessage("Windows.SampleMessageType",
publishText);
On the other side, an app that would like to receive such a message calls ProximityDevice.-subscribeForMessage, passing the name of the message it expects along with a handler for when messages arrive:
var subscribedMessageId = proximityDevice.subscribeForMessage("Windows.SampleMessageType",
messageReceived);
function messageReceived(receivingDevice, message) {
// Process the message
}
If the app is no longer interested in messages, it calls stopSubscribingForMessage.
With this simple protocol, you can see that an app that supports “tap to share” (as it’s called) would publish messages whenever it has appropriate content in hand. It can also use the ProximityDevice object’s devicearrived and devicedeparted events to know when other tap-to-share peers are in proximity such that it’s appropriate to publish (these are WinRT events, demonstrated in scenario 4 of the Proximity sample). The devicearrived event is also what you use to discover that an NFC tag has come into proximity (see below).
What’s interesting to think about, though, is what kind of data you might share. Consider a travel app in which you can book flights, hotels, rental cars, and perhaps much more. It can, of course, publish messages with basic details but could also publish richer binary messages that would allow it to transfer an entire itinerary to the same app running on another device, typically to another user. This would enable one person to set up such an itinerary and then share it with a second person, who could then just tap a Book It button and be done! This would be far more efficient than emailing that itinerary as text and having the second person re-enter everything by hand.
On a simpler note, publishing a URI makes it super-simple for one person to tap-and-share whatever they’re looking at with another person, again avoiding the circuitous email route or other forms of sharing. A quick tap, and you’re seeing what I’m seeing. Again, though, there’s so much more than can be shared that it’s a great thing to consider in your design, especially if you’re targeting mobile devices. “What do people near each other typically do together?” That’s the question to ask and to answer in the form of a great proximity app.
Do note that the URIs you share don’t have to be http:// references to websites but can contain any URI scheme. If there’s an app associated with that URI scheme, tap-to-share also becomes tap-to-activate because Windows will launch the default app for that association. And if there’s no association, Windows will ask if you want to acquire a suitable app from the Store. You can also consider using a Windows Store URI that will lead a user to directly install an app. Those URIs are described on Creating links with the Windows Store protocol.
Such URIs make it possible for NFC tags, whose messages are basically hardcoded into the device, to support tap-to-share and tap-to-activate scenarios. When you tap an NFC tag to an NFC-capable device, the ProximityDevice object will fire a devicearrived event. An app can then receive the tag’s message through ProximityDevice.subscribeForMessage. This means that the app will need to know what type of message might be sent from that tag—it might be a standard type, or the app might be written specifically for tags with specific programming. For example, an art gallery could place tags near every piece it displays and then make an app available in the Windows Store for that gallery (or any other galleries that work in cooperation) that knows what messages those tags will send. If the message has an appropriate URI scheme in it, tapping on an NFC tag can help the user acquire an app and enjoy a rich experience.
For more, check out Develop a cutting edge app with NFC on the Windows Developer Blog.
What We’ve Just Learned
• The WinRT device APIs allow apps to access a wide range of peripheral devices. One app can also be registered as the dedicated app for a device, which gives it special permissions like performing firmware updates.
• Accessing devices begins with declaring appropriate capabilities in the app manifest. In a few cases the capabilities are supported through Visual Studio’s manifest editor, but most of the time you need to edit the XML directly.
• The Windows.Devices.Enumeration API allows an app to discover what hardware is connected to a machine. Enumeration results in one or more DeviceInformation objects, and an app can either use the first (or default) device found or present the list to the user and let him or her choose the specific device to use.
• The enumeration API also provides for watchers that raise events when a suitable device is connected or disconnected from a system.
• Scenario APIs in WinRT provide for access to specific types of hardware that are backed by standards commands and communication protocols. Supported devices in Windows 8.1 include image scanners, barcode scanners, magnetic stripe readers, smartcards, and fingerprint readers.
• Printing (a scenario API), having been reimagined for Windows as a whole, is relatively easy to implement in a Windows Store app. It involves listening for the printing event when the Devices charm is invoked and providing HTML content to Windows.
• Printable content can come from the app’s document, a document fragment, an SVG document, or a remote source. Such content can be customized using a CSS media query for print, and Windows takes care of the layout and flow of the information on the target printer.
• Protocol APIs in WinRT provide the means to communicate with devices through supported communication mechanisms, namely HID, USB, Bluetooth RFCOMM, Bluetooth Smart (LE/GATT), and Wi-Fi Direct. In these cases the app must tailor its commands to the devices in question, but the APIs take care of low-level transport concerns.
• The Windows.Networking.Proximity API supports peer browsing (over Wi-Fi Direct and Bluetooth) as well as tap-to-connect and tap-to-share scenarios with near field communication (NFC)–capable machines.
• Proximity connections can employ sockets for ongoing communication (like a multiplayer game) or can simply send messages from one device to another through a publish-and-subscribe mechanism, as is typical with tap-to-share scenarios, including NFC tags.
120 Note that in the code snippet in the Quickstart: enumerating commonly used devices topic in the docs (at the time of writing) uses GetDeviceSelector in a couple of cases, which will throw exceptions. The camel-cased getDeviceSelector is correct, and in the case of the ServiceDevice object it also requires an additional argument that the code in the docs does not provide.
121This is true even considering just how slowly some people seem to work through their baskets in the self-checkout lines!
122 Scenario 1 of the sample also has a (misspelled) retriesExhaused case for availability, but this is not a member of the availability enumeration. It is included in the UserConsentVerificationResult enumeration.
123 This is a fun device, though I had to disassemble it and unjam two of the three motors to get it to work. Nevertheless, understanding the internal mechanisms and how they related to the input reports was also very helpful when creating a WinRT component as a device library, which we’ll see in Chapter 18.
124 There’s also an event handler in js/s1-eventing.js, but this does not handle the WinRT event directly: the handler in js/heart-rate-service.js dispatches its own event once it has processed the raw data so that the scenario 1 code can consume a higher level structure.
All materials on the site are licensed Creative Commons Attribution-Sharealike 3.0 Unported CC BY-SA 3.0 & GNU Free Documentation License (GFDL)
If you are the copyright holder of any material contained on our site and intend to remove it, please contact our site administrator for approval.
© 2016-2026 All site design rights belong to S.Y.A.