Node.js in Action (2014)
Part 2. Web application development with Node
Chapter 8. Express
This chapter covers
· Starting a new Express application
· Configuring your application
· Creating Express views
· Handling file uploads and downloads
Things are about to get even more fun. The Express web framework (http://expressjs.com) is built on top of Connect, providing tools and structure that make writing web applications easier, faster, and more fun. Express offers a unified view system that lets you use nearly any template engine you want, plus simple utilities for responding with various data formats, transferring files, routing URLs, and more.
In comparison to application frameworks such as Django or Ruby on Rails, Express is extremely small. The philosophy behind Express is that applications vary greatly in their requirements and implementations, and a lightweight framework allows you to craft exactly what you need and nothing more. Both Express and the entire Node community are focused on smaller, more modular bits of functionality rather than monolithic frameworks.
Throughout this chapter, you’ll learn how to use Express to create applications by building a photo sharing application from start to finish. During the build, you’ll learn how to do the following:
· Generate the initial application structure
· Configure Express and your application
· Render views and integrate template engines
· Handle forms and file uploads
· Handle resource downloads
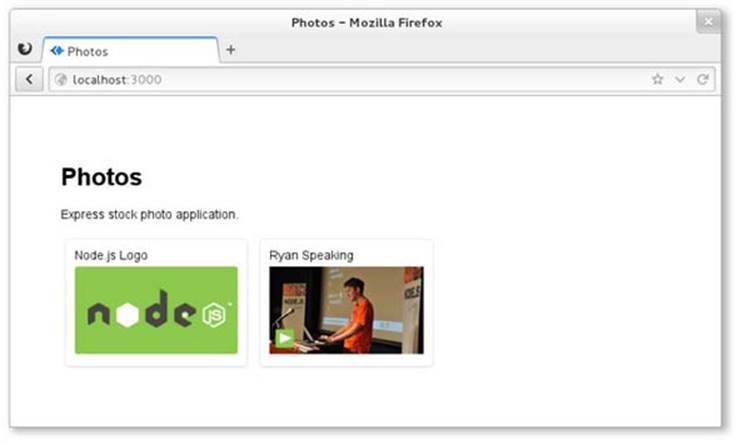
The final stock photo application will have a list view that will look like figure 8.1.
Figure 8.1. The photo list view
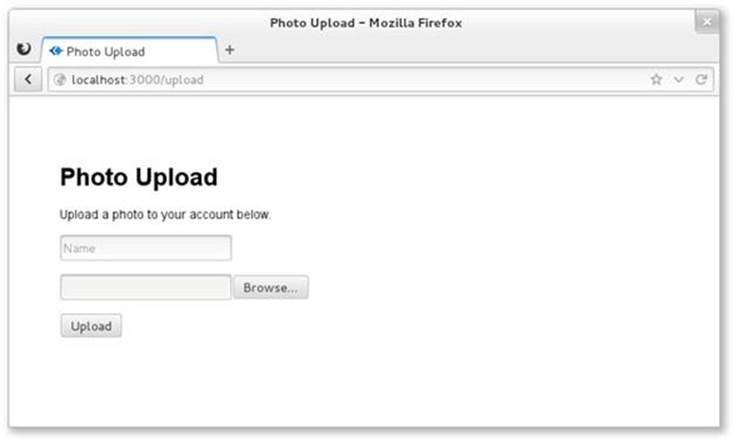
It’ll also include a form for uploading new photos, as shown in figure 8.2.
Figure 8.2. The photo upload view
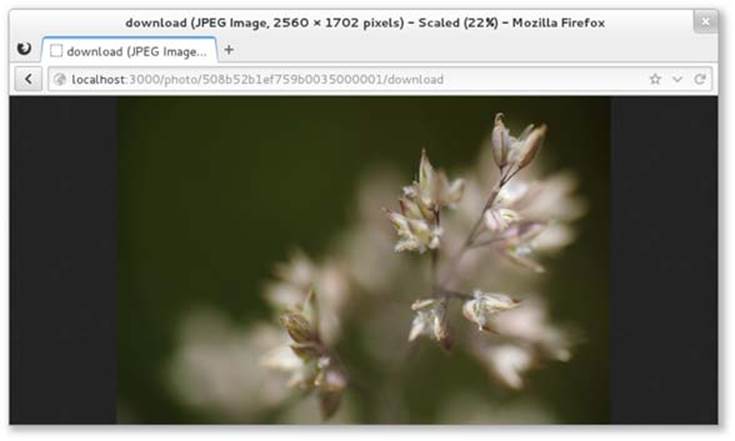
Finally, it’ll have a mechanism for downloading photos, as shown in figure 8.3.
Figure 8.3. Downloading a file
Let’s get started by looking at the application’s structure.
8.1. Generating the application skeleton
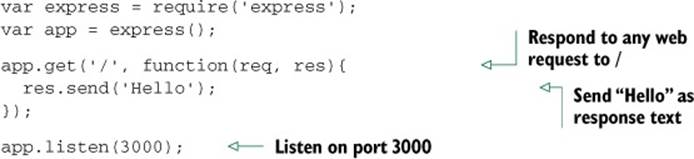
Express doesn’t force application structure on the developer—you can place routes in as many files as you want, public assets in any directory you want, and so on. A minimal Express application can be as small as the following listing, which implements a fully functional HTTP server.
Listing 8.1. A minimal Express application
The express(1) executable script bundled with Express can set up an application skeleton for you. Using the generated application is a good way to get started if you’re new to Express, as it sets up an application complete with templates, public assets, configuration, and more.
The default application skeleton that express(1) generates consists of only a few directories and files, as shown in figure 8.4. This structure is designed to get developers up and running with Express in seconds, but the application’s structure is entirely up to you and your team to create.
Figure 8.4. Default application skeleton structure using EJS templates
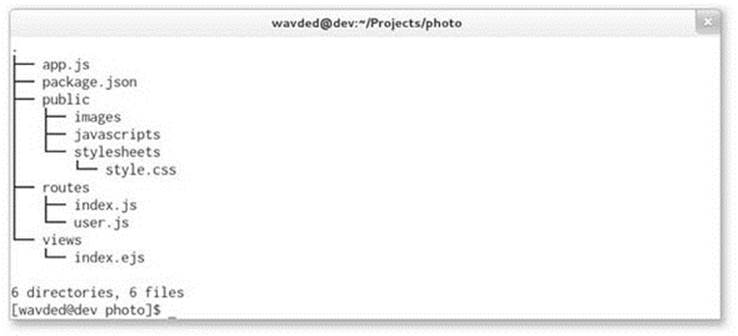
In this chapter’s example, we’ll use EJS templates, which are similar in structure to HTML. EJS is similar to PHP, JSP (for Java), and ERB (for Ruby), where server-side JavaScript is embedded in an HTML document and executed prior to being sent to the client. We’ll look at EJS more closely in chapter 11.
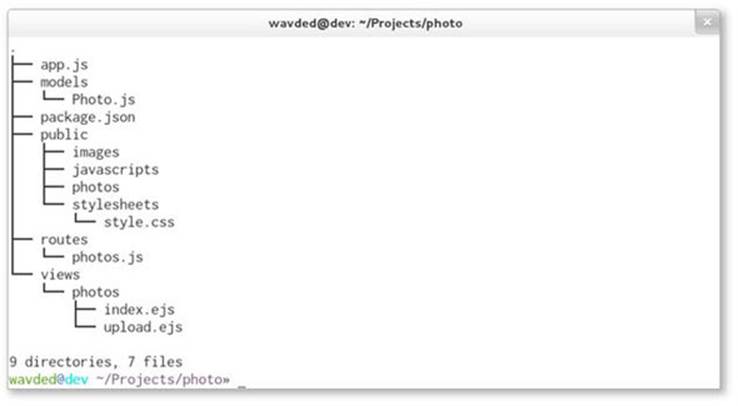
By the end of this chapter, you’ll have an application with a similar but expanded structure, as shown in figure 8.5.
Figure 8.5. Final application structure
In this section you’ll do the following:
· Install Express globally with npm
· Generate the application
· Explore the application and install dependencies
Let’s get started.
8.1.1. Installing the Express executable
First you’ll want to install Express globally with npm:
$ npm install -g express
Once it’s installed, you can use the --help flag to see the options available, as shown in figure 8.6.
Figure 8.6. Express help

Some of these options will generate small portions of the application for you. For example, you can specify a template engine to generate a dummy template file for the chosen template engine. Similarly, if you specify a CSS preprocessor using the --css option, a dummy template file will be generated for it. If you use the --sessions option, session middleware will be enabled.
Now that the executable is installed, let’s generate what will become the photo application.
8.1.2. Generating the application
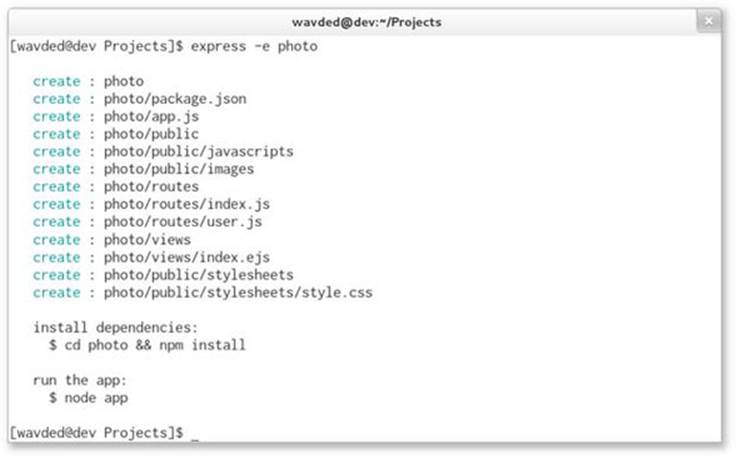
For this application, you’ll use the -e (or --ejs) flag to use the EJS templating engine. Execute express -e photo.
A fully functional application will be created in the photo directory. It will contain a package.json file to describe the project and dependencies, the application file itself, the public file directories, and a directory for routes (see figure 8.7).
Figure 8.7. Generating the Express application
8.1.3. Exploring the application
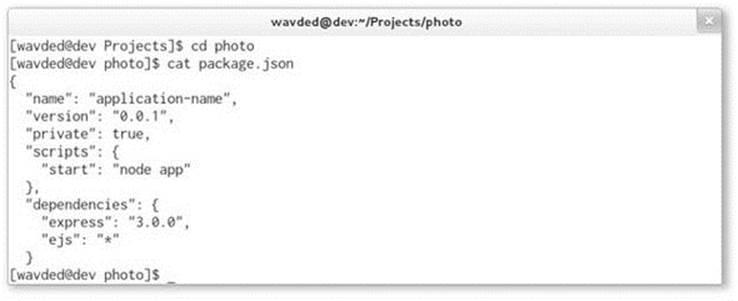
Let’s take a closer look at what was generated. Open the package.json file in your editor to see the application’s dependencies, as shown in figure 8.8. Express can’t guess which version of the dependencies you’ll want, so it’s good practice to supply the major, minor, and patch levels of the module so you don’t introduce any surprise bugs. For example, "express": "3.0.0" is explicit and will provide you with identical code on each installation.
Figure 8.8. Generated package.json contents
To add the latest version of a module, in this case EJS, you can pass npm the --save flag on installation. Execute the following command, and then open package.json again to see the change:
$ npm install ejs --save
Now look at the application file generated by express(1), shown in the following listing. For now you’ll leave this file as is. You should be familiar with these middleware components from the Connect chapter, but it’s worth taking a look at how the default middleware configuration is set up.
Listing 8.2. Generated Express application skeleton
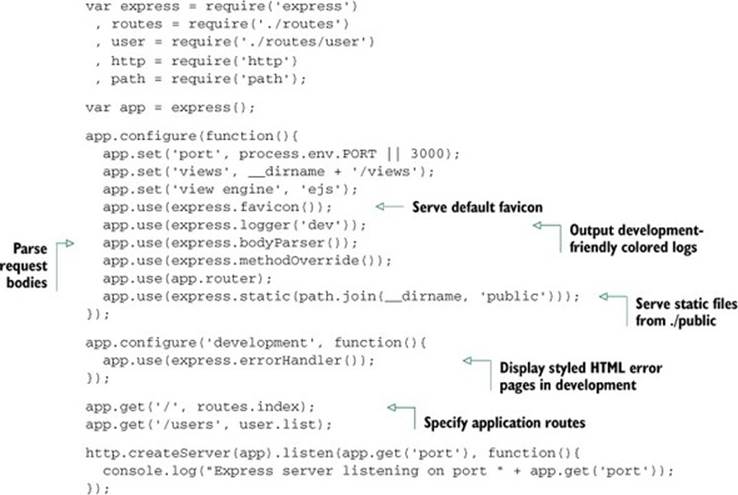
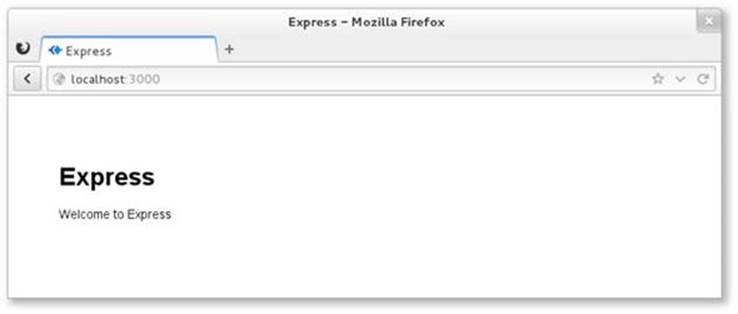
You’ve got the package.json and app.js files, but the application won’t run yet because the dependencies haven’t been installed. Whenever you generate a package.json file from express(1), you’ll need to install the dependencies (as shown in figure 8.9). Execute npm install to do this, and then execute node app.js to fire up the application. Check out the application by visiting http://localhost:3000 in your browser. The default application looks like the one in figure 8.10.
Figure 8.9. Install dependencies and run application
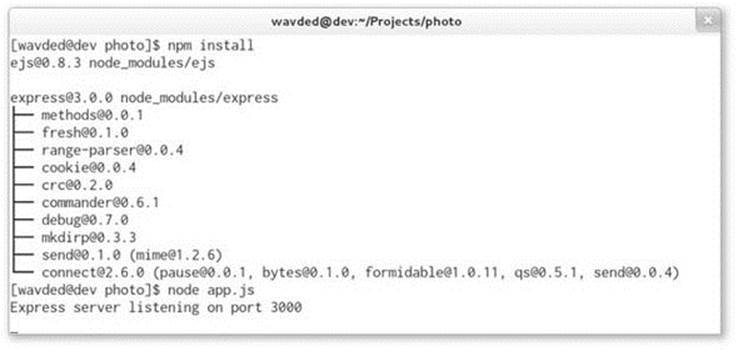
Figure 8.10. Default Express application
Now that you’ve seen the generated application, let’s dive into the environment-specific configuration.
8.2. Configuring Express and your application
Your application’s requirements will depend on the environment in which it’s running. For example, you may want verbose logging when your product’s in development, but a leaner set of logs and gzip compression when it’s in production. In addition to configuring environment-specific functionality, you may want to define some application-level settings so Express knows what template engine you’re using and where it can find the templates. Express also lets you define custom configuration key/value pairs.
Express has a minimalistic environment-driven configuration system, consisting of five methods, all driven by the NODE_ENV environment variable:
· app.configure()
· app.set()
· app.get()
· app.enable()
· app.disable()
In this section, you’ll see how to use the configuration system to customize how Express behaves, as well as how to use it for your own purposes throughout development.
Let’s take a closer look at what “environment-based configuration” means.
Setting environment variables
To set an environment variable in UNIX systems, you can use this command:
$ NODE_ENV=production node app
In Windows, you can use this code:
$ set NODE_ENV=production
$ node app
These environment variables will be available in your application on the process.env object.
8.2.1. Environment-based configuration
Although the NODE_ENV environment variable originated in Express, many other Node frameworks have adopted it as a means to notify the Node application which environment it’s operating within, defaulting to development.
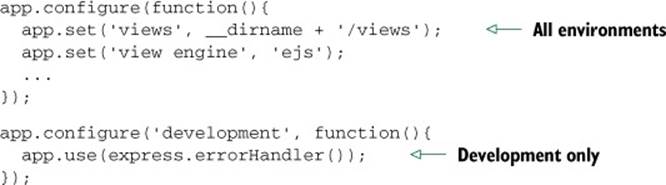
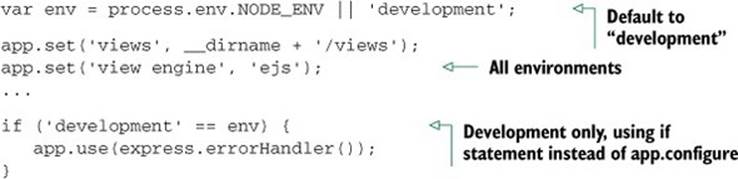
As shown in listing 8.3, the app.configure() method accepts optional strings representing the environment, and a function. When the environment matches the string passed, the callback is immediately invoked; when only a function is given, it will be invoked for all environments. These environment names are completely arbitrary. For example, you may have development, stage, test, and production, or prod for short.
Listing 8.3. Using app.configure() to set environment-specific options
To illustrate that app.configure() is purely sugar, the following listing would be equivalent to the preceding one. You’re not forced to use this feature; for example, you could load the configuration from JSON or YAML.
Listing 8.4. Using conditionals to set environment-specific options
Express uses the configuration system internally, allowing you to customize how Express behaves, but it’s also available for your own use. For the application you’re building in this chapter, you’ll only use a single setting, photos, whose value is the directory that will be used to store the uploaded images. This value could be changed in production to permit saving and serving photos from a different volume with more disk space:
app.configure(function(){
...
app.set('photos', __dirname + '/public/photos');
...
});
app.configure('production', function(){
...
app.set('photos', '/mounted-volume/photos');
...
});
Express also provides Boolean variants of app.set() and app.get(). For example, app.enable(setting) is equivalent to app.set(setting, true), and app.enabled (setting) can be used to check if the value was enabled. The methods app.disable (setting) andapp.disabled(setting) complement the truthful variants.
Now that you’ve seen how to take advantage of the configuration system for your own use, let’s look at rendering views in Express.
8.3. Rendering views
In this chapter’s application, we’ll utilize EJS templates, though as previously mentioned almost any template engine in the Node community can be used. If you’re not familiar with EJS, don’t worry. It’s similar to templating languages found in other languages (PHP, JSP, ERB). We’ll cover some basics of EJS in this chapter, but we’ll discuss EJS and several other template engines in greater detail in chapter 11.
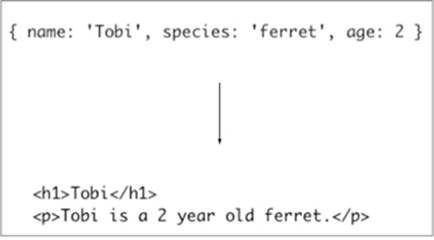
Whether it’s rendering an entire HTML page, an HTML fragment, or an RSS feed, rendering views is crucial for nearly every application. The concept is simple: you pass data to a view, and that data is transformed, typically to HTML for web applications. You’re likely familiar with the idea of views, because most frameworks provide similar functionality; figure 8.11 illustrates how a view forms a new representation for the data.
Figure 8.11. HTML template plus data = HTML view of data
Express provides two ways to render views: at the application level with app .render(), and at the request or response level with res.render(), which uses the former internally. In this chapter, you’ll only use res.render(). If you look in ./routes/index.js, a single function is exported: the index function. This function invokes res.render() in order to render the ./views/index.ejs template, as shown in the following code:
exports.index = function(req, res){
res.render('index', { title: 'Express' });
};
In this section, you’ll see how to do the following:
· Configure the Express view system
· Look up view files
· Expose data when rendering views
Before looking at res.render() more closely, let’s configure the view system.
8.3.1. View system configuration
Configuring the Express view system is simple. But even though express(1) generated the configuration for you, it’s still useful to know what’s going on behind the scenes so you can make changes. We’ll focus on three areas:
· Adjusting the view lookup
· Configuring the default template engine
· Enabling view caching to reduce file I/O
First up is the views setting.
Changing the lookup directory
The following snippet shows the views setting that the Express executable created:
app.set('views', __dirname + '/views');
This specifies the directory that Express will use during view lookup. It’s a good idea to use __dirname so that your application isn’t dependent on the current working directory being the application’s root.
__dirname
__dirname (with two leading underscores) is a global variable in Node that identifies the directory in which the currently running file exists. Often in development this directory will be the same as your current working directory (CWD), but in production the Node executable may run from another directory. Using __dirname helps keep paths consistent across environments.
The next setting is view engine.
Default template engine
When express(1) generated the application, the view engine setting was assigned ejs because EJS was the template engine selected by the -e command-line option. This setting enables you to render index rather than index.ejs. Otherwise Express requires the extension in order to determine which template engine is to be used.
You might be wondering why Express even considers extensions. The use of extensions allows you to use multiple template engines within a single Express application, while providing a clean API for common use cases, because most applications will use one template engine.
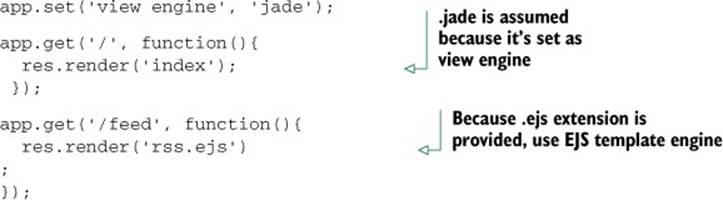
Suppose, for example, you find writing RSS feeds easier with another template engine, or perhaps you’re migrating from one template engine to another. You might use Jade as the default, and EJS for the /feed route, as indicated in the following listing by the .ejs extension.
Listing 8.5. Specifying the template engine using a file extension
Keeping Package.Json in Sync
Keep in mind that any additional template engines you wish to use should be added to your package.json dependencies object.
View caching
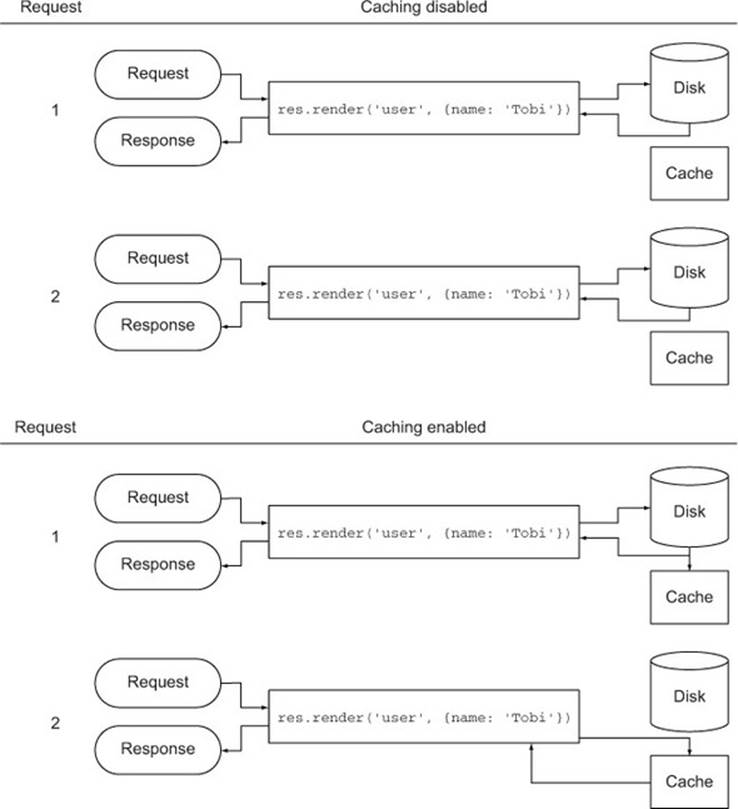
The view cache setting is enabled by default in the production environment and prevents subsequent render() calls from performing disk I/O. The contents of the templates are saved in memory, greatly improving performance. The side effect of enabling this setting is that you can no longer edit the template files without restarting the server, which is why it’s disabled in development. If you’re running a staging environment, you’ll likely want to enable this option.
As illustrated in figure 8.12, when view cache is disabled, the template is read from disk on every request. This is what allows you to make changes to a template without restarting the application. When view cache is enabled, the disk is only hit once per template.
Figure 8.12. The view cache setting
You’ve seen how the view-caching mechanism helps improve performance in a nondevelopment environment. Now let’s see how Express locates views in order to render them.
8.3.2. View lookup
Now that you know how to configure the view system, let’s take a look at how Express looks up the view, which is where the target view file is located. Don’t worry about creating these templates yet; you’ll do that later.
The process of looking up a view is similar to how Node’s require() works. When res.render() or app.render() is invoked, Express will first check whether a file exists at an absolute path. Next, Express will look relative to the views directory setting discussed in section 8.3.1. Finally, Express will try an index file.
This process is represented as a flowchart in figure 8.13.
Figure 8.13. Express view lookup process
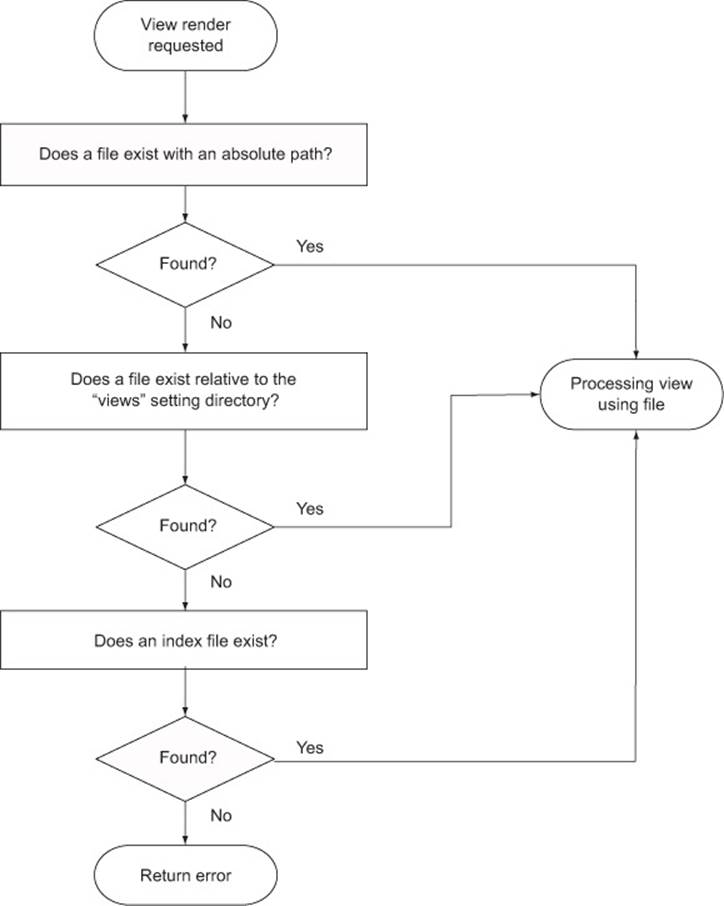
Because ejs is set as the default engine, the render call omits the .ejs extension, but it’s still resolved correctly.
As the application evolves, you’ll need more views, and sometimes several for a single resource. Using view lookup can help with organization—for example, you can use subdirectories related to the resource and create views within them, as illustrated by the photos directory in figure 8.14.
Figure 8.14. Express view lookup
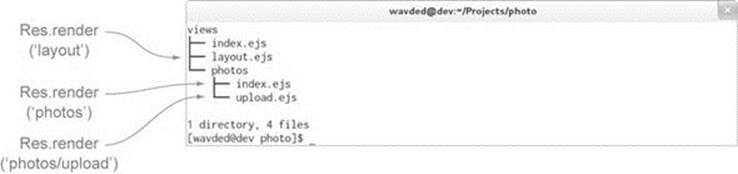
Adding subdirectories allows you to eliminate redundant parts of names such as upload-photo.ejs and show-photo.ejs. Express will then add the view engine extension and resolve the view as ./views/photos/upload.ejs.
Express will check to see if a file named index resides in that directory. When files are named with a pluralized resource, such as photos, this typically implies a resource listing. An example is res.render('photos') in figure 8.14.
Now that you know how Express looks up views, let’s start creating the photo listings and put this feature to work.
8.3.3. Exposing data to views
Express provides several mechanisms for exposing local variables to the views being rendered, but first you need something to render. In this section, you’ll use some dummy data to populate the initial photo listing view.
Before getting databases involved, let’s create this placeholder data. Create a file named ./routes/photos.js, which will contain the photo-specific routes. Now create a photos array in this same file that will act as the faux database. This is shown in the following code.
Listing 8.6. Dummy photo data to populate the view
var photos = [];
photos.push({
name: 'Node.js Logo',
path: 'http://nodejs.org/images/logos/nodejs-green.png'
});
photos.push({
name: 'Ryan Speaking',
path: 'http://nodejs.org/images/ryan-speaker.jpg'
});
...
Now that you have some content, you’ll need a route to display it.
Creating the photo listing view
To start displaying the dummy photo data, you need to define a route that will render an EJS photos view, as shown in figure 8.15.
Figure 8.15. Initial photo listing view

To get started, open up ./routes/photos.js and export a function named list (shown in the following code). In practice, this function can be named whatever you like. Route functions are identical to regular Connect middleware functions, accepting request and response objects, as well as thenext() callback, which isn’t used in this example. This is the first and main method of passing objects to a view, by passing an object to res.render().
Listing 8.7. List route
exports.list = function(req, res){
res.render('photos', {
title: 'Photos',
photos: photos
});
};
In ./app.js you can then require the photos module to get access to the exports.list function you just wrote. To display the photos for the index page, /, pass the photos .list function to the app.get() method, which is used to map the HTTP method GET and the path matching / to this function.
Listing 8.8. Adding photos.list route

With the dummy data and route set up, you can write the photo view. You’ll have several photo-related views, so create a directory named ./views/photos and index.ejs inside of it. Using a JavaScript forEach, you can then iterate through each photo in the photos object that was passed tores.render(). Each photo name and image is then displayed, as the following listing shows.
Listing 8.9. A view template to list photos
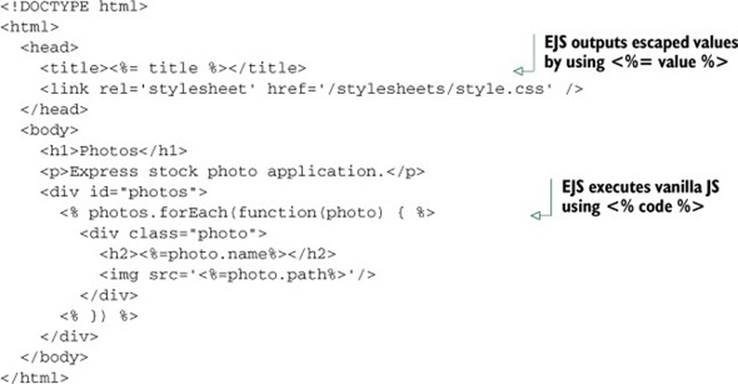
This view will produce markup similar to the following listing.
Listing 8.10. HTML produced by the photos/index.ejs template
...
<h1>Photos</h1>
<p>Express stock photo application.</p>
<div id="photos">
<div class="photo">
<h2>Node.js Logo</h2>
<img src="http://nodejs.org/images/logos/nodejs-green.png" />
</div>
...
If you’re interested in styling your application, here’s the CSS used for ./public/stylesheets/style.css.
Listing 8.11. CSS used to style this chapter’s tutorial application
body {
padding: 50px;
font: 14px "Helvetica Neue", Helvetica, Arial, sans-serif;
}
a { color: #00B7FF; }
.photo {
display: inline-block;
margin: 5px;
padding: 10px;
border: 1px solid #eee;
border-radius: 5px;
box-shadow: 0 1px 2px #ddd;
}
.photo h2 {
margin: 0;
margin-bottom: 5px;
font-size: 14px;
font-weight: 200;
}
.photo img { height: 100px; }
Fire up the application with node app, and take a look at http://localhost:3000 in your browser. You’ll see the photo display shown earlier in figure 8.15.
Methods of exposing data to views
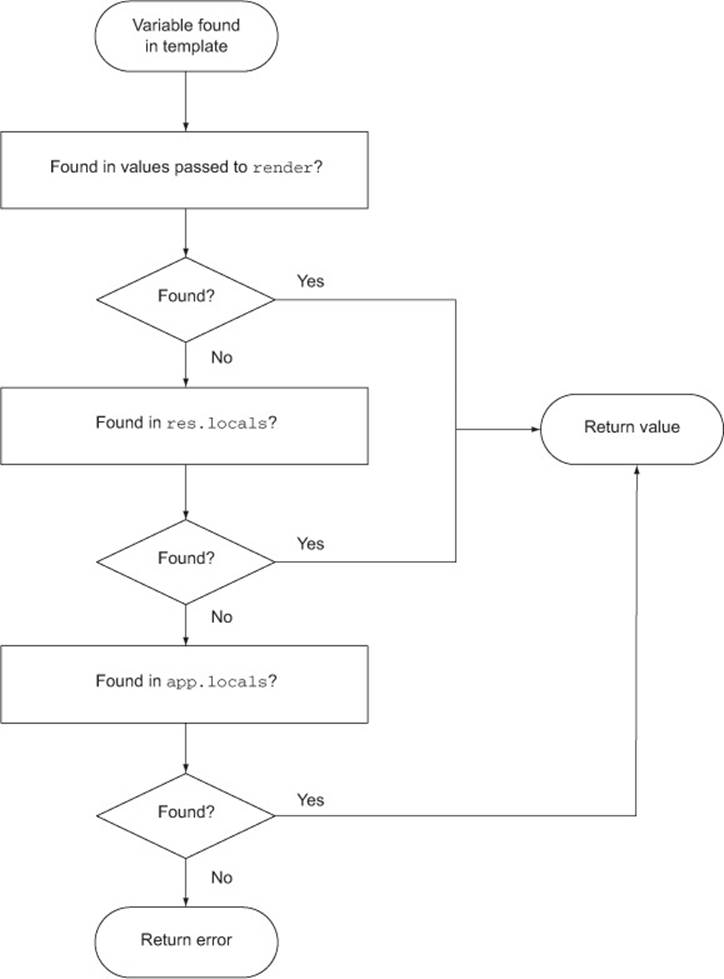
You’ve seen how you can pass local variables directly to res.render() calls, but you can also use a few other mechanisms for this. For example, app.locals can be used for application-level variables and res.locals for request-level local variables.
The values passed directly to res.render() will take precedence over values set in res.locals and app.locals, as figure 8.16 shows.
Figure 8.16. Values passed directly to the render function take precedence when rendering a template.
By default, Express exposes only one application-level variable, settings, to views, which is the object containing all of the values set with app.set(). For example, using app.set('title', 'My Application') would expose settings.title in the template, as shown in the following EJS snippet:
<html>
<head>
<title><%=settings.title%></title>
</head>
<body>
<h1><%=settings.title%></h1>
<p>Welcome to <%=settings.title%>.</p>
</body>
Internally, Express exposes this object with the following JavaScript:
app.locals.settings = app.settings;
That’s all there is to it.
For convenience, app.locals is also a JavaScript function. When an object is passed, all the keys will be merged, so if you have existing objects that you want to expose in their entirety, such as some i18n data, you can do the following:
var i18n = {
prev: 'Prev',
next: 'Next',
save: 'Save
};
app.locals(i18n);
This will expose prev, next, and save to all templates. This feature exposes view helpers to help reduce logic within templates. For example, if you have the Node module helpers.js with a few functions exported, you could expose all of these functions to the views by doing the following:
app.locals(require('./helpers'));
Let’s add a way to upload files to this site and learn how Express uses Connect’s bodyParser middleware component to make that possible.
8.4. Handling forms and file uploads
Let’s implement the photo upload feature. Make sure you have the photos setting defined for this application, as discussed earlier in section 8.2.1. This will give you the freedom to change the photo directory in various environments. For now they’ll be saved in ./public/photos, as the following code shows. Create this directory.
Listing 8.12. A custom setting that allows a photo upload destination to be set
...
app.configure(function(){
app.set('views', __dirname + '/views');
app.set('view engine', 'ejs');
app.set('photos', __dirname + '/public/photos');
...
There are three main steps involved in implementing the photo upload feature:
· Define the photo model
· Create a photo upload form
· Display a photo listing
8.4.1. Implementing the photo model
We’ll use the simple Mongoose model we discussed in chapter 5 to make the model. Install Mongoose with npm install mongoose --save. Then create the file ./models/Photo.js with the model definition shown here.
Listing 8.13. A model for your photos
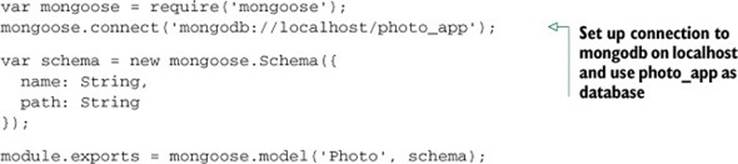
Mongoose provides all the CRUD methods (Photo.create, Photo.update, Photo .remove, and Photo.find) on the model, so you’re done.
8.4.2. Creating a photo upload form
With the photo model in place, you can now implement the upload form and related routes. Much like the other pages, you’ll need a GET route and a POST route for the uploads page.
You’ll pass the photos directory the POST handler and return a route callback, so the handler has access to the directory. Add the new routes to app.js below the default (/) route:
...
app.get('/upload', photos.form);
app.post('/upload', photos.submit(app.get('photos')));
...
Creating the photo upload form
Next you’ll create the upload form shown in figure 8.17. This form contains an optional photo name and a file input for the image.
Figure 8.17. Photo upload form
Create the file views/photos/upload.ejs with the following EJS code.
Listing 8.14. A form for uploading photos
<!DOCTYPE html>
<html>
<head>
<title><%= title %></title>
<link rel='stylesheet' href='/stylesheets/style.css' />
</head>
<body>
<h1><%= title %></h1>
<p>Upload a photo to your account below.</p>
<form method='post' enctype='multipart/form-data'>
<p><input
type='text', name='photo[name]', placeholder='Name'/>
</p>
<p><input type='file', name='photo[image]'/></p>
<p><input type='submit', value='Upload'/></p>
</form>
</body>
</html>
Let’s now look at adding a route for the photo upload.
Adding a route for the photo upload page
Now you have a photo upload form, but no way to display it. The photos.form function will do this. In ./routes/photos.js, export the form function, which will render ./views/photos/upload.ejs.
Listing 8.15. Add the form route
exports.form = function(req, res){
res.render('photos/upload', {
title: 'Photo upload'
});
};
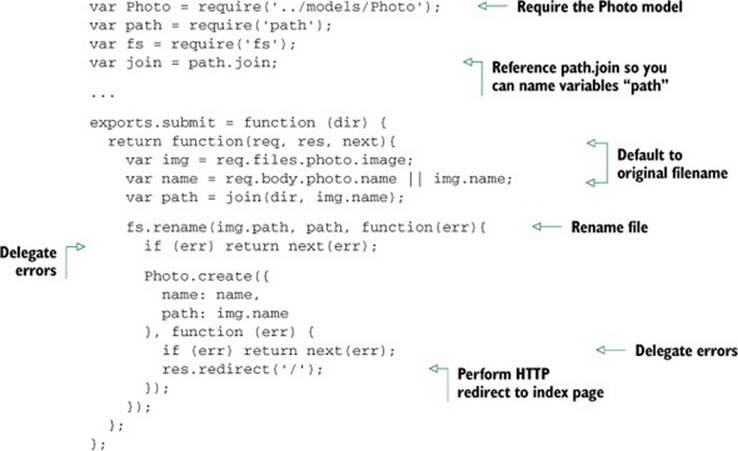
Handling photo submissions
Next you’ll need a route to handle the form submission. As discussed in chapter 7, the bodyParser() and, more specifically, the multipart() middleware component (which bodyParser includes), will provide you with a req.files object representing files that have been uploaded and saved to disk. This object can be accessed via req.files.photo.image, and the field in the upload form, photo[name], can be accessed via req.body.photo.name.
The file is “moved” with fs.rename() to its new destination within the dir passed to exports.submit(). Remember, in your case, dir is the photos setting you defined in app.js. After the file is moved, a new Photo object is populated and saved with the photo’s name and path. Upon a successful save, the user is redirected to the index page, as the following code shows.
Listing 8.16. Adding photo submit route definition
Great! Now you can upload photos. Next you’ll implement the logic necessary to display them on the index page.
8.4.3. Showing a list of uploaded photos
In section 8.3.3, you implemented the route app.get('/', photos.list) using dummy data. Now it’s time to replace it with the real thing.
Previously the route callback did little more than pass the dummy array of photos to the template, as shown here:
exports.list = function(req, res){
res.render('photos', {
title: 'Photos',
photos: photos
});
};
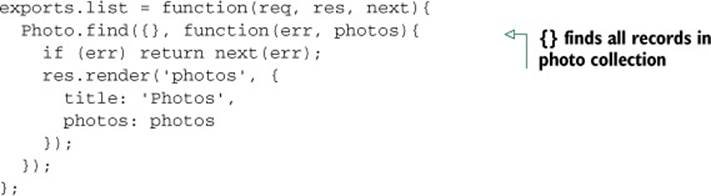
The updated version uses Photo.find, provided in Mongoose, to grab every photo you ever uploaded. Note that this example will perform poorly with a large collection of photos. You’ll learn how to implement pagination in the next chapter.
Once the callback is invoked with an array of photos, the rest of the route remains the same as it was before introducing the asynchronous query.
Listing 8.17. Modified list route
Let’s also update the ./views/photos/index.ejs template so it’s relative to ./public/photos.
Listing 8.18. Modified view to use settings for photos path
...
<% photos.forEach(function(photo) { %>
<div class="photo">
<h2><%=photo.name%></h2>
<img src='/photos/<%=photo.path%>'/>
</div>
<% }) %>
...
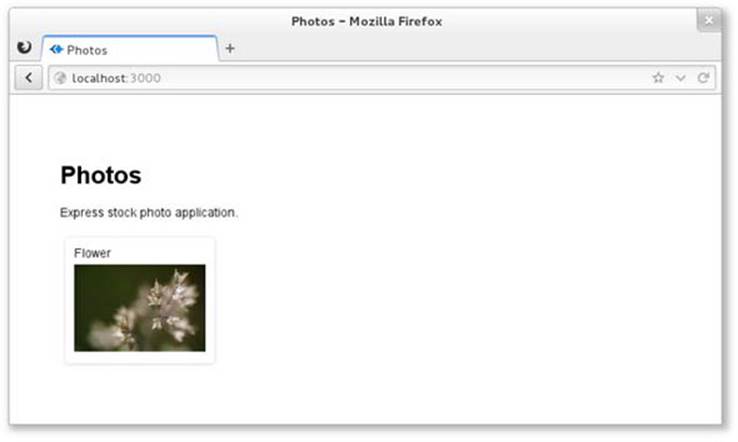
The index page will now display a dynamic list of photos uploaded through the application, as shown in figure 8.18.
Figure 8.18. The photo application as it appears at this point
So far the routes you’ve defined have been simple: they don’t accept wildcards. Let’s dive into the routing capabilities of Express.
8.5. Handling resource downloads
You’ve been serving static files with the express.static() middleware component, but Express provides several helpful response methods for dealing with file transfers. These include res.sendfile() for transferring files and the res.download() variant, which prompts the browser to save the file.
In this section, you’ll tweak your application so that original photos can be downloaded by adding a GET /photo/:id/download route.
8.5.1. Creating the photo download route
First you’ll need to add a link to the photos so that users can download them. Open up ./views/photos/index.ejs and revise it to match the following listing. This change adds a link around the img tag pointing to the GET /photo/:id/download route.
Listing 8.19. Add a download hyperlink

Back in app.js, define the following route anywhere you like among the others:
app.get('/photo/:id/download', photos.download(app.get('photos')));
Before you can try this out, you need the download route. Let’s implement it.
8.5.2. Implementing the photo download route
In ./routes/photos.js, export a download function, as shown in listing 8.20. This route loads up the requested photo and transfers the file at that given path. res.sendfile() is provided by Express and is backed by the same code as express.static(), so you get HTTP cache, range, and other features for free. This method also takes the same options, so you can pass values like { maxAge: oneYear } as the second argument.
Listing 8.20. Photo download route

If you fire up the application, you should now be able to click the photos when you’re authenticated.
The result you get may not be what you’d expected. With res.sendfile(), the data is transferred and interpreted by the browser. In the case of images, the browser will display them within the window, as shown in figure 8.19. Next we’ll look at res.download(), which will prompt the browser for download.
Figure 8.19. Photo transferred with res.sendfile()
sendfile callback argument
A callback can also be provided as the second or third argument (when using options) to notify the application when a download is complete. For example, you could use a callback to decrement a user’s download credits.
Trigger a browser download
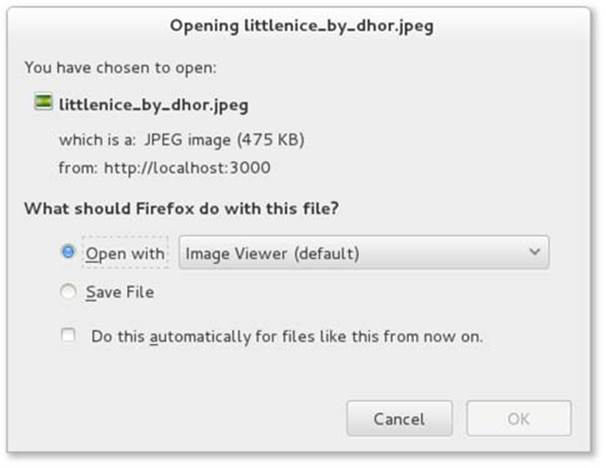
Replacing res.sendfile() with res.download() will alter the behavior of browsers when files are transferred. The Content-Disposition header field will be set to the file’s name, and the browser will prompt for download accordingly.
Figure 8.20 shows how the original image’s name (littlenice_by_dhor.jpeg) was used as the downloaded file’s name. Depending on your application, this might not be ideal.
Figure 8.20. Photo transferred with res.download()
Let’s look at res.download()’s optional filename argument next.
Setting a download’s filename
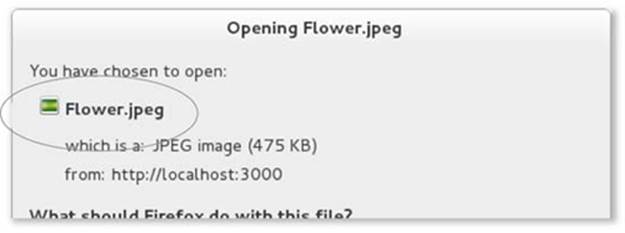
The second argument of res.download() allows you to define a custom name to be used when downloading rather than defaulting to the original filename. Listing 8.21 changes the previous implementation to provide the name given when the photo was uploaded, such as Flower.jpeg.
Listing 8.21. Photo download route with explicit filename
...
var path = join(dir, photo.path);
res.download(path, photo.name+'.jpeg');
...
If you fire up the application and try clicking a photo now, you should be prompted to download it, as shown in figure 8.21.
Figure 8.21. Photo transferred with res.download() and a custom filename
8.6. Summary
In this chapter, you learned how to create an Express application from scratch and how to deal with common web development tasks.
You learned how a typical Express application’s directories are structured and how to use environmental variables and the app.configure method to change application behavior for different environments.
The most basic components of Express applications are routes and views. You learned how to render views and how to expose data to them by setting app.locals and res.locals and by passing values directly using res.render(). You also learned how basic routing works.
In the next chapter, we’ll go into more advanced things you can do with Express, such as using authentication, routing, middleware, and REST APIs.