Node.js in Action (2014)
Part 2. Web application development with Node
Chapter 10. Testing Node applications
This chapter covers
· Testing logic with Node’s assert module
· Using Node unit-testing frameworks
· Simulating and controlling web browsers using Node
As you add features to your application, you run the risk of introducing bugs. An application isn’t complete if it’s not tested, and as manual testing is tedious and prone to human error, automated testing has become increasingly popular with developers. Automated testing involves writing logic to test your code, rather than running through application functionality by hand.
If the idea of automated testing is new to you, think of it as a robot doing all of the boring stuff for you, allowing you to focus on the interesting stuff. Every time you make a change to the code, you can get the robot to make sure bugs haven’t crept in. Although you may not have completed or started your first Node application yet, it’s good to get a handle on how you can implement automated testing because you’ll be able to write tests as you develop.
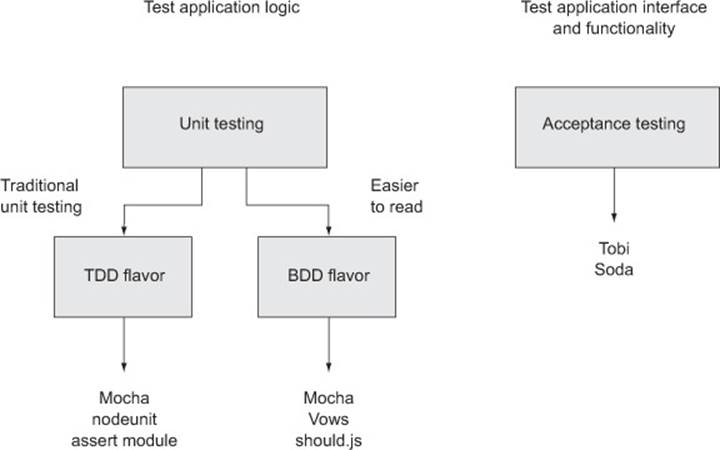
In this chapter, we’ll look at two types of automated testing: unit testing and acceptance testing. Unit testing tests code logic directly, typically at a function or method level, and it’s applicable to all types of applications. Unit-testing methodology can be divided into two major forms: test-driven development (TDD) and behavior-driven development (BDD). Practically speaking, TDD and BDD are largely the same thing, with the differences mostly being in the language used to describe the tests, as you’ll see when we go through some examples. There are other differences between TDD and BDD, but they’re beyond the scope of this book.
Acceptance testing is an additional layer of testing most commonly used for web applications. Acceptance testing involves scripting control of a browser and attempting to trigger web application functionality with it.
We’ll look at established solutions for both unit and acceptance testing. For unit testing, we’ll cover Node’s assert module and the Mocha, nodeunit, Vows, and should.js frameworks. For acceptance testing, we’ll look at the Tobi and Soda frameworks. Figure 10.1 places the tools alongside their respective testing methodologies and flavors.
Figure 10.1. Test framework overview
Let’s start with unit testing.
10.1. Unit testing
Unit testing is a type of automated testing where you write logic to test discrete parts of your application. Writing tests makes you think more critically about your application design choices and helps you avoid pitfalls early. The tests also give you confidence that your recent changes haven’t introduced errors. Although unit tests take a bit of work up front to write, they can save you time by lessening the need to manually retest every time you make a change to an application.
Unit testing can be tricky, and asynchronous logic can add new challenges. Asynchronous unit tests can run in parallel, so you’ve got to be careful to ensure that tests don’t interfere with each other. For example, if your tests create temporary files on disk, you’ll have to be careful that when you delete the files after a test, you don’t delete the working files of another test that hasn’t yet finished. For this reason, many unit-testing frameworks include flow control to sequence the running of tests.
In this section, we’ll show you how to use the following:
· Node’s built-in assert module— A good building block for TDD-style automated testing
· nodeunit— A longtime favorite TDD-style testing framework of the Node community
· Mocha— A relatively new testing framework that can be used for TDD- or BDD-style testing
· Vows— A widely used BDD-style testing framework
· should.js— A module that builds on Node’s assert module to provide BDD-style assertions
Let’s start with the assert module, which is included with Node.
10.1.1. The assert module
The basis for most Node unit testing is the built-in assert module, which tests a condition and, if the condition isn’t met, throws an error. Node’s assert module is taken advantage of by many third-party testing frameworks, but even without a testing framework, you can do useful testing with it.
A simple example
Suppose you have a simple to-do application that stores items in memory, and you want to assert that it’s doing what you think it’s doing.
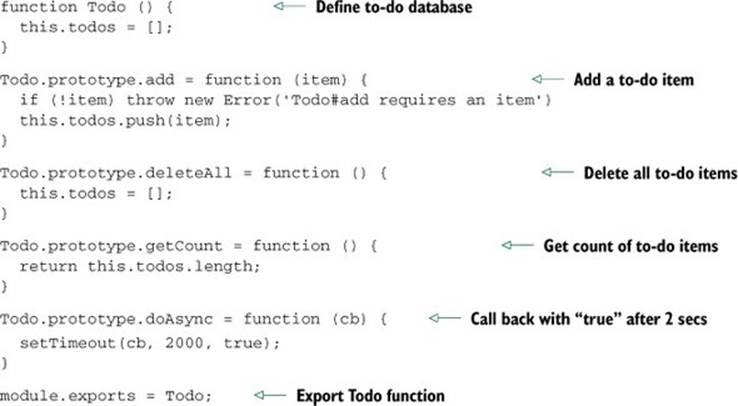
The following listing defines a module containing the core application functionality. Module logic supports creating, retrieving, and deleting to-do items. It also includes a simple doAsync method, so we can look at testing asynchronous methods too. Let’s call this file todo.js.
Listing 10.1. A model for a to-do list
Now you can use Node’s assert module to test the code.
In a file called test.js, enter the following code to load the necessary modules, set up a new to-do list, and set a variable that will track testing progress.
Listing 10.2. Set up necessary modules
var assert = require('assert');
var Todo = require('./todo');
var todo = new Todo();
var testsCompleted = 0;
Using equal to test the contents of a variable
Next, you can add a test of the to-do application’s delete functionality.
Note the use of equal in listing 10.3. equal is the assert module’s most-used assertion, and it tests that the contents of a variable are indeed equal to a value specified in the second argument. In the example here, a to-do item is created, and then all items are deleted.
Listing 10.3. Test to make sure that no to-do items remain after deletion

As there should be no to-dos at the end of this test, the value of todo.getCount() should be 0 if the application logic is working properly. If a problem occurs, an exception is thrown. If the variable todo.getCount() isn’t set to 0, the assertion will result in a stack trace showing an error message, “No items should exist,” outputted to the console. After the assertion, testsCompleted is incremented to note that a test has completed.
Using notEqual to find problems in logic
Next, add the code in the following listing to test.js. This code is a test of the to-do application’s add functionality.
Listing 10.4. Test to make sure adding a to-do works

The assert module also allows notEqual assertions. This type of assertion is useful when the generation of a certain value by application code indicates a problem in logic.
Listing 10.4 shows the use of a notEqual assertion. All to-do items are deleted, an item is added, and the application logic then gets all items. If the number of items is 0, the assertion will fail and an exception will be thrown.
Using addition functionality: strictEqual, notStrictEqual, deepEq- qual, notDeepEqual
In addition to equal and notEqual functionality, the assert module offers strict versions of assertions called strictEqual and notStrictEqual. These use the strict equality operator (===) rather than the more permissive version (==).
To compare objects, the assert module offers deepEqual and notDeepEqual. The deep in the names of these assertions indicates that they recursively compare two objects, comparing two object’s properties and, if the properties are themselves objects, comparing these as well.
Using ok to test for an asynchronous value being true
Now it’s time to add a test of the to-do application’s doAsync method, as shown in listing 10.5. Because this is an asynchronous test, we’re providing a callback function (cb) to signal to the test runner when the test has completed—we can’t rely on the function returning to tell us like we can with synchronous tests. To see if the result of doAsync is the value true, we use the ok assertion. The ok assertion provides an easy way to test a value for being true.
Listing 10.5. Test to see if the doAsync callback is passed true

Testing that thrown errors are correct
You can also use the assert module to check that thrown error messages are correct, as the following listing shows. The second argument in the throws call is a regular expression that looks for the text “requires” in the error message.
Listing 10.6. Test to see if add throws when missing a parameter

Adding logic to run your tests
Now that you’ve defined the tests, you can add logic to the file to run each of the tests. The logic in the following listing will run each test, and then print how many tests were run and completed.
Listing 10.7. Running the tests and reporting test completion

You can run the tests with the following command:
$ node test.js
If the tests don’t fail, the script informs you of the number of tests completed. It also can be smart to keep track of when tests start execution as well as when they complete, to protect against flaws in individual tests. For example, a test may execute without reaching the assertion.
In order to use Node’s built-in functionality, each test case had to include a lot of boilerplate to set up the test (such as deleting all items) and to keep track of progress (the “completed” counter). All this boilerplate shifts the focus away from the primary concern of writing test cases, and it’s better left to a dedicated framework that can do the heavy lifting while you focus on testing business logic. Let’s look at how you can make things easier using nodeunit, a third-party unit-testing framework.
10.1.2. Nodeunit
Using a unit-testing framework simplifies unit testing. Frameworks generally keep track of how many tests have run and they make it easy to run multiple test scripts.
A number of excellent testing frameworks have been created by the Node community. We’ll start with a look at nodeunit (https://github.com/caolan/nodeunit) as it’s a time-tested favorite of Node developers who prefer TDD-flavored testing. Nodeunit provides a command-line tool that will run all of your application’s tests and let you know how many pass and fail, saving you from having to implement your own application-specific testing tool.
In this section, you’ll learn how to write tests with nodeunit that can test both Node application code and client-side code run using a web browser. You’ll also learn how nodeunit deals with the challenge of keeping track of running tests asynchronously.
Installing nodeunit
Enter the following to install nodeunit:
$ npm install -g nodeunit
Once it has completed, you’ll have a new command available named nodeunit. This command is given one or more directories or files containing tests, as an argument, and it will run all scripts with the extension .js within the directories passed.
Testing Node applications with nodeunit
To add nodeunit tests to your project, create a directory for them (the directory is usually named test). Each test script should populate the exports object with tests.
Here’s an example nodeunit server-side test file:
exports.testPony = function(test) {
var isPony = true;
test.ok(isPony, 'This is not a pony.');
test.done();
}
Note that the previous test script doesn’t require any modules. Nodeunit automatically includes Node’s assert module’s methods in an object that it passes to each function exported by a test script. In the preceding example, this object is called test.
Once each function exported by the test script has completed, the done method should be called. If it isn’t called, the test will report a failure of “Undone tests.” By requiring that this method be called, nodeunit checks that all tests that were started were also finished.
It also can be helpful to check that all the assertions fire within a test. Why wouldn’t assertions fire? When writing unit tests, the danger always exists that the test logic itself is buggy, leading to false positives. Logic in the test may be written in such a way that certain assertions don’t evaluate. The following example shows how test.done() can fire and report success even though one of the assertions hasn’t executed:
exports.testPony = function(test) {
if (false) {
test.ok(false, 'This should not have passed.');
}
test.ok(true, 'This should have passed.');
test.done();
}
If you want to safeguard against this, you could manually implement an assertion counter, such as the one shown in the following listing.
Listing 10.8. Manually counting assertions
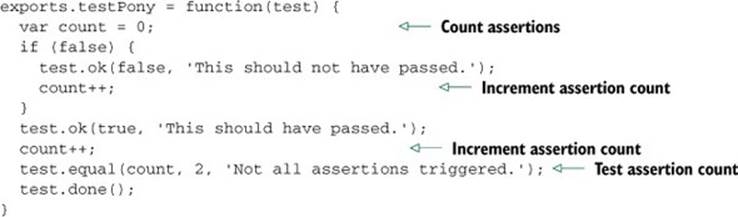
This is tedious. Nodeunit offers a nicer way to do this by using test.expect. This method allows you to specify the number of assertions each test should include. The result is fewer lines of unnecessary code:
exports.testPony = function(test) {
test.expect(2);
if (false) {
test.ok(false, 'This should not have passed.');
}
test.ok(true, 'This should have passed.');
test.done();
}
In addition to testing Node modules, nodeunit also allows you to test client-side JavaScript, giving you the ability to use one test harness for your web applications. You can learn about that and more advanced techniques by checking out nodeunit’s online documentation:https://github.com/caolan/nodeunit.
Now that you’ve learned how to use a TDD-flavored unit-testing framework, let’s look at how you can incorporate a BDD style of unit testing.
10.1.3. Mocha
Mocha is the newest testing framework you’ll learn about in this chapter, and it’s an easy framework to grasp. Although it defaults to a BDD style, you can also use it in a TDD style. Mocha has a wide variety of features, including global variable leak detection, and, like nodeunit, Mocha supports client-side testing.
Global variable leak detection
You should have little need for global variables that are readable application-wide, and it’s considered a programming best practice to minimize your use of them. But in JavaScript it’s easy to inadvertently create global variables by forgetting to include the var keyword when declaring a variable. Mocha helps detect accidental global variable leaks by throwing an error when you create a global variable during testing.
If you want to disable global leak detection, run mocha with the --ignored-leaks command-line option. Alternatively, if you want to allow a select number of globals to be used, you can specify them using the --globals command-line option followed by a comma-delimited list of allowable global variables.
By default, Mocha tests are defined and their logic is set up using BDD-flavored functions called describe, it, before, after, beforeEach, and afterEach. Alternatively, you can use Mocha’s TDD interface, which replaces the use of describe with suite, it with test, beforewith setup, and after with teardown. For our example, we’ll stick with the default BDD interface.
Testing Node applications with Mocha
Let’s dive right in and create a small project called memdb—a small in-memory database—and use Mocha to test it. First, you need to create the directories and files for the project:
$ mkdir -p memdb/test
$ cd memdb
$ touch index.js
$ touch test/memdb.js
The test directory is where the tests will live, but before you write any tests you need to install Mocha:
$ npm install -g mocha
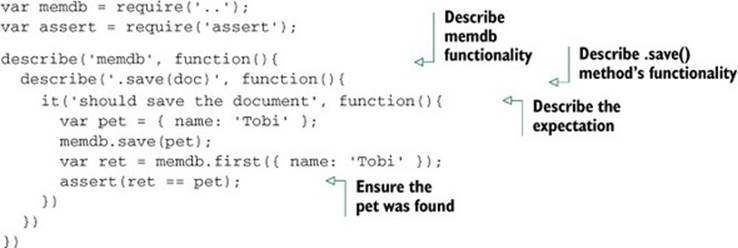
By default, Mocha will use the BDD interface. The following listing shows what it looks like.
Listing 10.9. Basic structure for Mocha test
var memdb = require('..');
describe('memdb', function(){
describe('.save(doc)', function(){
it('should save the document', function(){
});
});
});
Mocha also supports TDD and qunit, and exports style interfaces, which are detailed on the project’s site (http://visionmedia.github.com/mocha), but to illustrate the concept of different interfaces, here’s the exports interface:
module.exports = {
'memdb': {
'.save(doc)': {
'should save the document': function(){
}
}
}
}
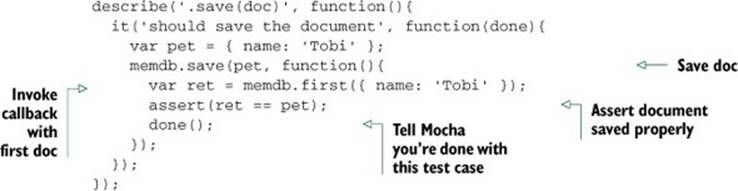
All of these interfaces provide the same functionality, but for now let’s stick to the BDD interface and write the first test, shown in the following listing, in test/memdb.js. This test uses Node’s assert module to perform the assertions.
Listing 10.10. Describing the memdb.save functionality
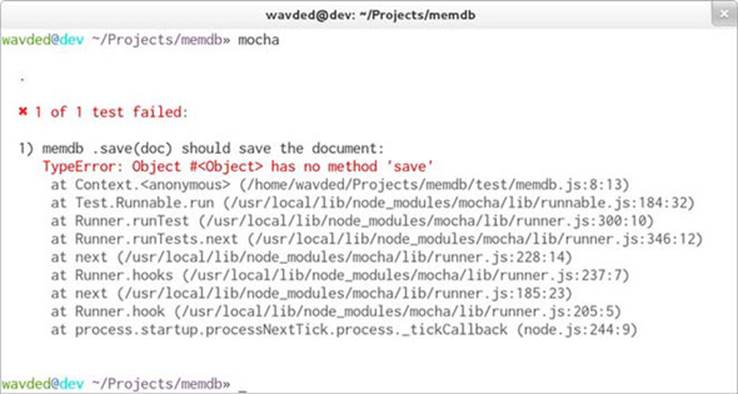
To run the tests, all you need to do is execute mocha. Mocha will look in the ./test directory by default for JavaScript files to execute. Because you haven’t implemented the .save() method yet, you’ll see that the single test defined fails, as shown in figure 10.2.
Figure 10.2. Failing test in Mocha
Let’s make it pass! Add the code in the following listing to index.js.
Listing 10.11. Added save functionality
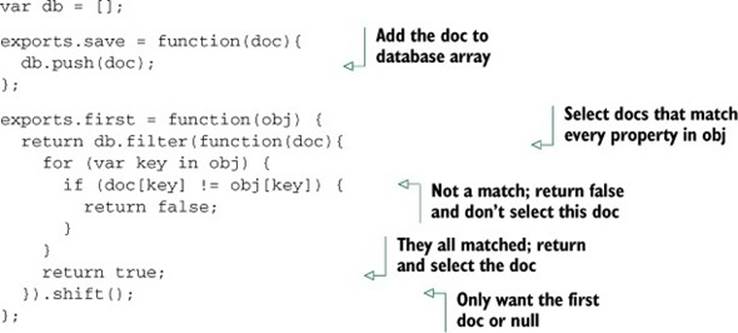
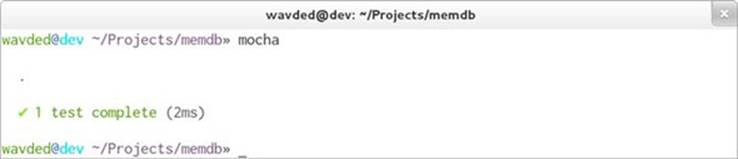
Run the tests again with Mocha and see success, as shown in figure 10.3.
Figure 10.3. Successful test in Mocha
Defining setup and cleanup logic using Mocha hooks
This test case makes the assumption that memdb.first() functions appropriately, so you’ll want to add a few test cases for it as well, with expectations defined using the it() function. The revised test file, listing 10.12, includes a new concept—the concept of Mocha hooks. For example, the BDD interface exposes beforeEach(), afterEach(), before(), and after(), which take callbacks, allowing you to define setup and cleanup logic before and after test cases and suites defined with describe().
Listing 10.12. Adding a beforeEach hook
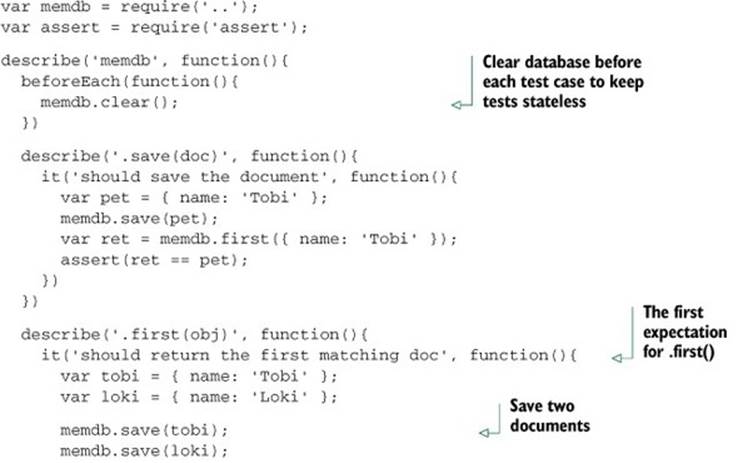
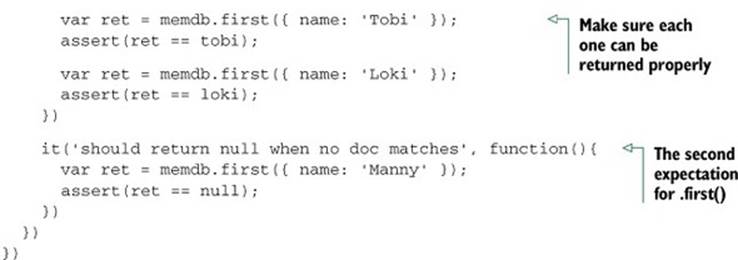
Ideally test cases share no state whatsoever. To achieve this with memdb, you simply need to remove all the documents by implementing the .clear() method in index.js:
exports.clear = function(){
db = [];
};
Running Mocha again should show you that three tests have passed.
Testing asynchronous logic
One thing we haven’t yet dealt with in Mocha testing is testing asynchronous logic. To show how this is done, let’s make a small change to one of the functions defined earlier in index.js. By changing the save function to the following, a callback can be optionally provided that will execute after a small delay (meant to simulate some sort of asynchronous operation):
exports.save = function(doc, cb){
db.push(doc);
if (cb) {
setTimeout(function() {
cb();
}, 1000);
}
};
Mocha test cases can be defined as async simply by adding an argument to a function defining testing logic. The argument is commonly named done. The following listing shows how you could change the initial .save() test to work with asynchronous code.
Listing 10.13. Testing asynchronous logic
This same rule applies to all of the hooks. For example, the beforeEach() hook to clear the database could add a callback, and Mocha could wait until it’s called in order to move on. If done() is invoked with an error as the first argument, then Mocha will report the error and mark the hook or test case as a failure:
beforeEach(function(done){
memdb.clear(done);
})
For more about Mocha, check out its full online documentation: http://visionmedia.github.com/mocha. Mocha also works for client-side JavaScript like nodeunit.
Mocha’s use of nonparallel testing
Mocha executes tests one after another rather than in parallel, which makes test suites execute more slowly but makes writing tests easier. But Mocha won’t let any test run for an inordinately long time. Mocha, by default, will only allow any given test to run for 2,000 milliseconds before failing it. If you have tests that take longer, you can run Mocha with the --timeout command-line option and then specify a larger number.
For most testing, running tests serially is fine. If you find this problematic, there are other frameworks that execute in parallel, like Vows, covered in the next section.
10.1.4. Vows
The tests you can write using the Vows unit-testing framework are more structured than those of many other frameworks, with the structure intended to make the tests easy to read and maintain.
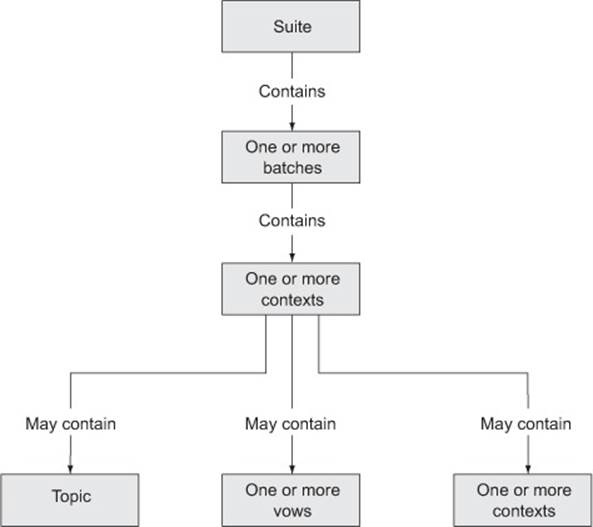
Vows uses its own BDD-flavored terminology to define test structure. In the realm of Vows, a test suite contains one or more batches. A batch can be thought of as a group of related contexts, or conceptual areas of concern that you want to test. The batches and contexts run in parallel. A context may contain a number of things: a topic, one or more vows, and/or one or more related contexts (inner contexts also run in parallel). A topic is testing logic that’s related to a context. A vow is a test of the result of a topic. Figure 10.4 visually represents how Vows structures tests.
Figure 10.4. Vows can structure tests in a suite using batches, contexts, topics, and vows.
Vows, like nodeunit and Mocha, is geared toward automated application testing. The difference is primarily in flavor and parallelism, with Vows tests requiring a specific structure and terminology. In this section, we’ll run through an example application test and explain how you can use a Vows test to run multiple tests at the same time.
Typically, you’d install Vows globally to give you access to the vows command-line test-running tool. Enter the following command to install Vows:
$ npm install -g vows
Testing application logic with Vows
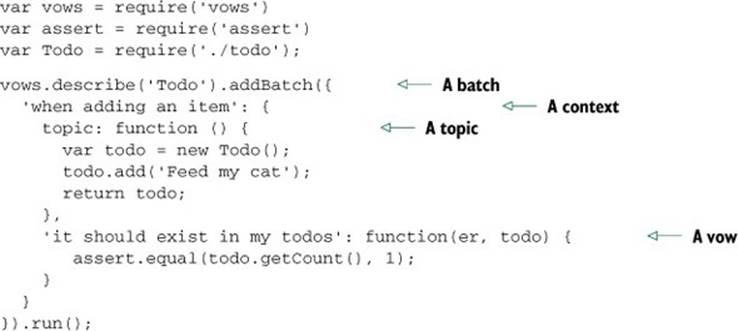
You can trigger testing in Vows either by running a script containing test logic or by using the vows command-line test runner. The following example of a standalone test script (which can be run like any other Node script) uses one of the tests of the to-do application’s core logic.
Listing 10.14 creates a batch. Within the batch, you define a context. Within the context, you define a topic and a vow. Note how the code makes use of the callback to deal with asynchronous logic in the topic. If a topic isn’t asynchronous, a value can be returned rather than being sent via a callback.
Listing 10.14. Using Vows to test the to-do application
If you want to include the previous code listing in a folder of tests, where it could be run with the Vows test runner, you’d change the last line to the following:
...
}).export(module);
To run all tests in a folder named test, enter the following command:
$ vows test/*
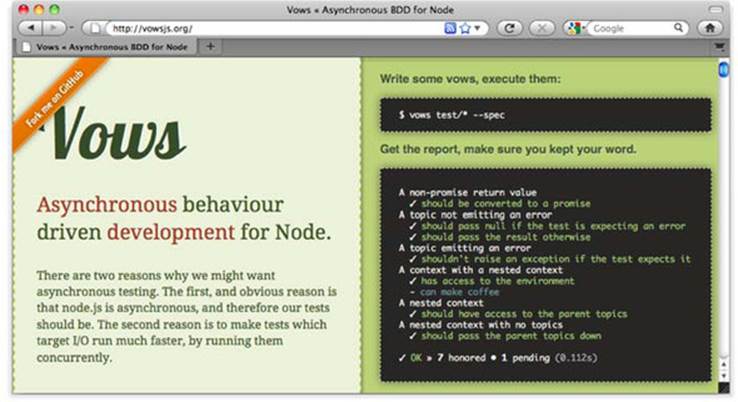
For more about Vows, check out the project’s online documentation (http://vowsjs.org/), as shown in figure 10.5.
Figure 10.5. Vows combines full-featured BDD testing capabilities with features such as macros and flow control.
Vows offers a comprehensive testing solution, but you might not like the test structure it imposes, as Vows requires the use of batches, contexts, topics, and vows. Or you might like the features of a competing testing framework or be familiar with another framework and see no need to learn Vows. If this sounds like you, should.js might be a good alternative to explore. Rather than being yet another testing framework, should.js offers a BDD-flavored alternative to using Node’s assert module.
10.1.5. Should.js
Should.js is an assertion library that can help make your tests easier to read by allowing you to express assertions in a BDD-like style. It’s designed to be used in conjunction with other testing frameworks, which lets you continue to use your own preferred framework. In this section, you’ll learn how to write assertions with should.js and, as an example, you’ll write a test for a custom module.
Should.js is easy to use with other frameworks because it augments Object .prototype with a single property: should. This allows you to write expressive assertions such as user.role.should.equal("admin"), or users.should.include("rick").
Testing module functionality using should.js
Let’s say you’re writing a Node command-line tip calculator that you want to use to figure out who should pay what amount when you split a bill with friends. You’d like to write tests for your calculation logic in a way that’s easily understood by your nonprogrammer friends, because then they won’t think you’re cheating them.
To set up your tip calculator application, enter the following commands, which will set up a folder for the application and install should.js for testing:
$ mkdir -p tips/test
$ cd tips
$ touch index.js
$ touch test/tips.js
Now you can install should.js by running the following command:
$ npm install should
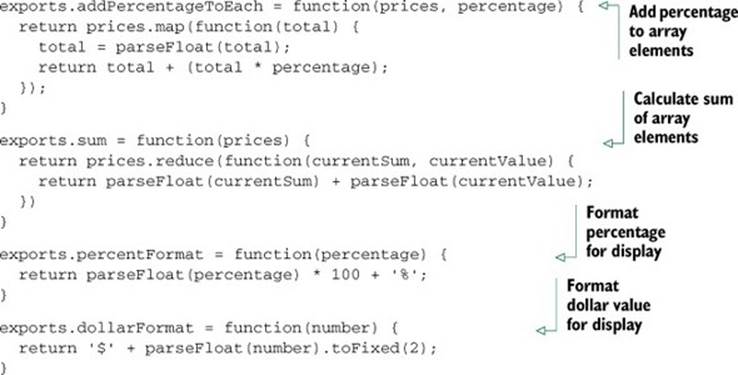
Next, edit the index.js file, which will contain the logic defining the application’s core functionality. Specifically, the tip calculator logic includes four helper functions:
· addPercentageToEach— Increases each number in an array by a given percentage
· sum— Calculates the sum of each element in an array
· percentFormat— Formats a percentage for display
· dollarFormat— Formats a dollar value for display
Add this logic by populating index.js with the contents of the following listing.
Listing 10.15. Logic for calculating tips when splitting a bill
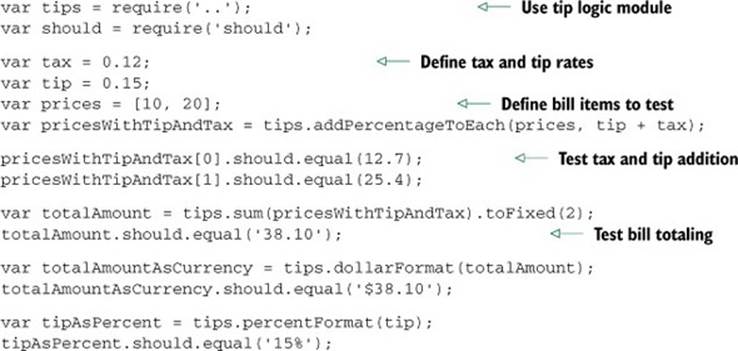
Now edit the test script in test/tips.js, as shown in listing 10.16. The script loads the tip logic module, defines a tax and tip percentage and the bill items to test, tests the addition of a percentage to each array element, and tests the bill total.
Listing 10.16. Logic that calculates tips when splitting a bill
Run the script using the following command. If all is well, the script should generate no output, because no assertions have been thrown, and your friends will be reassured of your honesty:
$ node test/tips.js
Should.js supports many types of assertions—everything from assertions that use regular expressions to assertions that check object properties—allowing comprehensive testing of data and objects generated by your application. The project’s GitHub page (http://github.com/visionmedia/should.js) provides comprehensive documentation of should.js’s functionality.
Now that we’ve looked at tools designed for unit testing, let’s move on to an altogether different style of testing: acceptance testing.
10.2. Acceptance testing
Acceptance testing, also called functional testing, tests outcomes, not logic. After you’ve created a suite of unit tests for your project, acceptance testing will provide an additional level of protection against bugs that unit testing might not detect.
Acceptance testing is similar, conceptually, to testing by end users who follow a list of things to test. But being automated makes acceptance testing fast, and it doesn’t require human labor.
Acceptance testing also deals with complications created by client-side JavaScript behavior. If there’s a serious problem created by client-side JavaScript, server-side unit testing won’t catch it, but thorough acceptance testing will. For example, your application may make use of client-side JavaScript form validation. Acceptance testing will ensure that your validation logic works, rejecting and accepting input appropriately. Or, for another example, you may have Ajax-driven administration functionality—such as the ability to browse content to select featured content for a website’s front page—that should only be available to authenticated users. To deal with this, you could write a test to ensure that the Ajax request produces expected results when the user logs in, and write another test to make sure that those who aren’t authenticated can’t access this data.
In this section, you’ll learn how to use two acceptance-testing frameworks: Tobi and Soda. Soda provides the benefit of harnessing real browsers for acceptance testing, whereas Tobi, which we’ll look at first, is easier to learn and to get up and running on.
10.2.1. Tobi
Tobi (https://github.com/LearnBoost/tobi) is an easy-to-use, acceptance-testing framework that emulates the browser and takes advantage of should.js, offering access to its assertion capabilities. The framework uses two third-party modules, jsdom and htmlparser, to simulate a web browser, allowing access to a virtual DOM.
Tobi enables you to painlessly write tests that will log into your web application, if need be, and send web requests that emulate someone using your application. If Tobi returns unexpected results, your test can then alert you to the problem.
Because Tobi must emulate a user’s activities and check the results of web requests, it must often manipulate or examine DOM elements. In the world of client-side JavaScript development, web developers often use the jQuery library (http://jquery.com) when they need to interact with the DOM. Developers can also use jQuery on the server side, and Tobi’s use of jQuery minimizes the amount of learning required to create tests with it.
In this section, we’ll talk about how you can use Tobi to test any running web application, including non-Node applications, over the network. We’ll also show you how to use Tobi to test a web application created with Express, even if the Express-based web application isn’t running.
Testing web applications with Tobi
If you’d like to create tests using Tobi, first create a directory for them (or use an existing application directory), and then change to the directory in the command line and enter the following to install Tobi:
$ npm install tobi
Listing 10.17 is an example of using Tobi to test web application functionality of a website—in this case running the to-do application we tested in chapter 5. The test attempts to create a to-do item, and then looks for it on the response page. If you run the script using Node and no exceptions are thrown, the test passed.
The script creates a simulated browser, uses it to perform an HTTP GET request for the main page with the entry form, fills in the form’s fields, and submits the form. The script then checks the contents of a table cell for the text “Floss the Cat.” If the table cell contains the text, the test passes.
Listing 10.17. Testing a web application via HTTP

You can test the previous application without even running it. The following Tobi test shows how you’d do this:
var tobi = require('tobi');
var app = require('./app');
var browser = tobi.createBrowser(app);
browser.get('/about', function(res, $){
res.should.have.status(200);
$('div').should.have.one('h1', 'About');
app.close();
});
Tobi doesn’t include a test runner, but you can use it with unit-testing frameworks such as Mocha or nodeunit.
10.2.2. Soda
Soda (https://github.com/LearnBoost/soda) takes a different approach to acceptance testing. Whereas other Node acceptance-testing frameworks simulate browsers, Soda remotely controls real browsers. Soda, as shown in figure 10.6, does this by sending instructions to the Selenium Server (also known as Selenium RC), or the Sauce Labs on-demand testing service.
Figure 10.6. Soda is an acceptance-testing framework that allows real browsers to be remotely controlled. Whether using Selenium RC or the Sauce Labs service, Soda provides an API that allows Node to perform direct testing that takes into account the realities of different browser implementations.
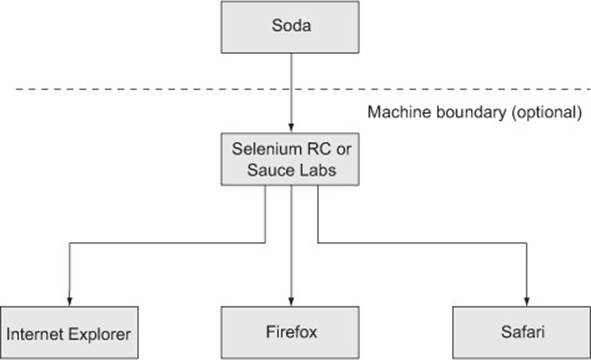
Selenium Server will open browsers on the machine on which it’s installed, whereas Sauce Cloud will open virtual ones on a server somewhere on the internet. Selenium Server and Sauce Labs, rather than Soda, do the talking to the browsers, but they relay any requested info back to Soda. If you want to do a number of tests in parallel and not tax your own hardware, consider using Sauce Labs.
In this section, you’ll learn how to install Soda and the Selenium Server, how to test applications with Soda and Selenium, and how to test applications with Soda and Sauce Labs.
Installing Soda and the Selenium Server
To do testing with Soda, you need to install the soda npm package and the Selenium Server (if you’re not using Sauce Labs). Enter the following to install Soda:
$ npm install soda
Selenium Server requires Java to run. If Java isn’t installed, please consult the official Java download page for instructions specific to your operating system (www.java.com/en/download/).
Installing Selenium Server is fairly straightforward. All you have to do is download a recent .jar file from the Selenium “Downloads” page (http://seleniumhq.org/download/). Once you’ve downloaded the file, you can run the server with the following command (although the filename will likely contain a different version number):
java -jar selenium-server-standalone-2.6.0.jar
Testing web applications with Soda and Selenium
Once you have the server running, you can include the following code in a script to set up for running tests. In the call to createClient, the host and port settings indicate the host and port used to connect to the Selenium Server. By default, these should be 127.0.0.1 and 4444, respectively. The url in the call to createClient specifies the base URL that you should open in the browser for testing, and the browser value specifies the browser to be used for testing:
var soda = require('soda')
var assert = require('assert');
var browser = soda.createClient({
host: '127.0.0.1',
port: 4444,
url: 'http://www.reddit.com',
browser: 'firefox'
});
In order to get feedback on what your testing script is doing, you may want to include the following code. This code prints each Selenium command as it’s attempted:
browser.on('command', function(cmd, args){
console.log(cmd, args.join(', '));
});
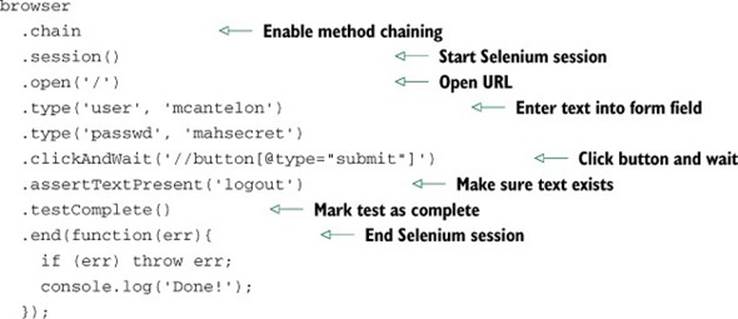
Next in your test script should be the tests themselves. The following listing is an example test that attempts to log a user into Reddit and fails if the text “logout” isn’t present on the resulting page. Commands like clickAndWait are documented on the Selenium website (http://release.seleniumhq.org/selenium-core/1.0.1/reference.html).
Listing 10.18. A Soda test allows commands to control the actions of a browser.
Testing web applications with Soda and Sauce Labs
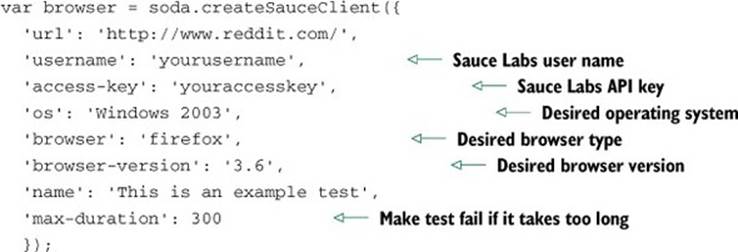
If you go the Sauce Labs route, sign up for the service at the Sauce Labs website (https://saucelabs.com) and change the code in your test script that returns browser to something like what you see in the following listing.
Listing 10.19. Using Soda to control a Sauce Labs browser
And that’s it. You’ve now learned the fundamentals of a powerful testing method that can complement your unit tests and make your applications much more resistant to accidentally created bugs.
10.3. Summary
By incorporating automated testing into your development, you greatly decrease the odds of bugs creeping into your codebase, and you can develop with greater confidence.
If you’re new to unit testing, Mocha and nodeunit are excellent frameworks to start with: they’re easy to learn, flexible, and can work with should.js if you want to run BDD-style assertions. If you like the BDD approach and are seeking a system for structuring tests and controlling flow, Vows may also be a good choice.
In the realm of acceptance testing, Tobi is a great place to start. Tobi is easy to set up and use, and if you’re familiar with jQuery you’ll be up and running quickly. If your needs require acceptance testing in order to take into account browser discrepancies, Soda may be worth running, but testing is slower and you must learn the Selenium API.
Now that you’ve got a handle on how automated testing can be conducted in Node, let’s take a deeper dive into Node web application templating by looking at some template engines that will help boost your web development productivity and enjoyment.
All materials on the site are licensed Creative Commons Attribution-Sharealike 3.0 Unported CC BY-SA 3.0 & GNU Free Documentation License (GFDL)
If you are the copyright holder of any material contained on our site and intend to remove it, please contact our site administrator for approval.
© 2016-2026 All site design rights belong to S.Y.A.