Node.js in Action (2014)
Part 1. Node fundamentals
Chapter 3. Node programming fundamentals
This chapter covers
· Organizing your code into modules
· Coding conventions
· Handling one-off events with callbacks
· Handling repeating events with event emitters
· Implementing serial and parallel flow control
· Leveraging flow-control tools
Node, unlike many open source platforms, is easy to set up and doesn’t require much in terms of memory and disk space. No complex integrated development environments or build systems are required. Some fundamental knowledge will, however, help you a lot when starting out. In this chapter we’ll address two challenges that new Node developers face:
· How to organize your code
· How asynchronous programming works
The problem of organizing code is familiar to most experienced programmers. Logic is organized conceptually into classes and functions. Files containing the classes and functions are organized into directories within the source tree. In the end, code is organized into applications and libraries. Node’s module system provides a powerful mechanism for organizing your code, and you’ll learn how to harness it in this chapter.
Asynchronous programming will likely take some time to grasp and master; it requires a paradigm shift in terms of thinking about how application logic should execute. With synchronous programming, you can write a line of code knowing that all the lines of code that came before it will have already executed. With asynchronous development, however, application logic can initially seem like a Rube Goldberg machine. It’s worth taking the time, before beginning development of a large project, to learn how you can elegantly control your application’s behavior.
In this chapter, you’ll learn a number of important asynchronous programming techniques that will allow you to keep a tight rein on how your application executes. You’ll learn
· How to respond to one-time events
· How to handle repeating events
· How to sequence asynchronous logic
We’ll start, however, with how you can tackle the problem of code organization through the use of modules, which are Node’s way of keeping code organized and packaged for easy reuse.
3.1. Organizing and reusing Node functionality
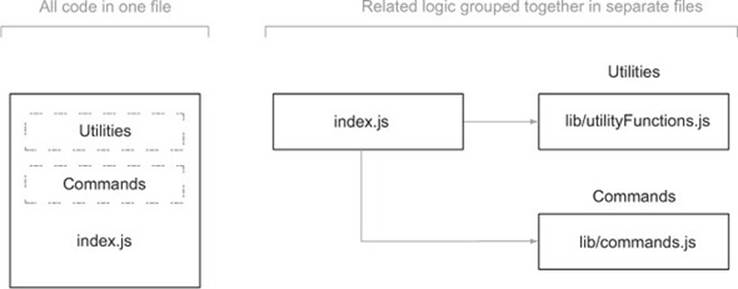
When creating an application, Node or otherwise, you often reach a point where putting all of your code in a single file becomes unwieldy. When this happens, the conventional approach, as represented visually in figure 3.1, is to take a file containing a lot of code and try to organize it by grouping related logic and moving it into separate files.
Figure 3.1. It’s easier to navigate your code if you organize it using directories and separate files rather than keeping your application in one long file.
In some language implementations, such as PHP and Ruby, incorporating the logic from another file (we’ll call this the “included” file) can mean all the logic executed in the included file affects the global scope. This means that any variables created and functions declared in the included file risk overwriting those created and declared by the application.
Say you were programming in PHP; your application might contain the following logic:
function uppercase_trim($text) {
return trim(strtoupper($text));
}
include('string_handlers.php');
If your string_handlers.php file also attempted to define an uppercase_trim function, you’d receive the following error:
Fatal error: Cannot redeclare uppercase_trim()
In PHP you can avoid this by using namespaces, and Ruby offers similar functionality through modules. Node, however, avoids this potential problem by not offering an easy way to accidentally pollute the global namespace.
PHP Namespaces, Ruby Modules
PHP namespaces are discussed in the manual at http://php.net/manual/en/language.namespaces.php. Ruby modules are explained in the Ruby documentation: www.ruby-doc.org/core-1.9.3/Module.html.
Node modules bundle up code for reuse, but they don’t alter global scope. Suppose, for example, you were developing an open source content management system (CMS) application using PHP, and you wanted to use a third-party API library that doesn’t use namespaces. This library could contain a class with the same name as one in your application, which would break your application unless you changed the class name either in your application or the library. Changing the class name in your application, however, could cause problems for other developers using your CMS as the basis of their own projects. Changing the class name in the library would require you to remember to repeat this hack each time you update the library in your application’s source tree. Naming collisions are a problem best avoided altogether.
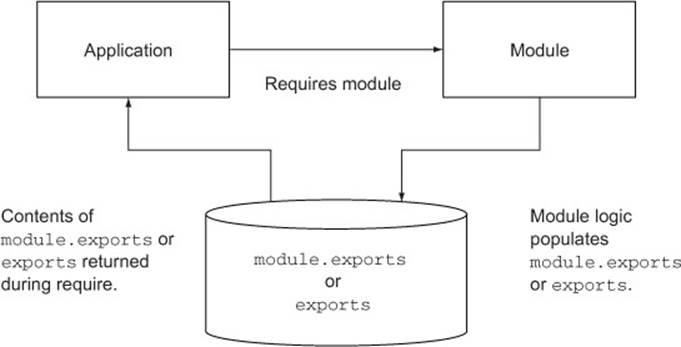
Node modules allow you to select what functions and variables from the included file are exposed to the application. If the module is returning more than one function or variable, the module can specify these by setting the properties of an object called exports. If the module is returning a single function or variable, the property module .exports can instead be set. Figure 3.2 shows how this works.
Figure 3.2. The population of the module.exports property or the exports object allows a module to select what should be shared with the application.
If this seems a bit confusing, don’t worry; we’ll run through a number of examples in this chapter.
By avoiding pollution of the global scope, Node’s module system avoids naming conflicts and simplifies code reuse. Modules can then be published to the npm (Node Package Manager) repository, an online collection of ready-to-use Node modules, and shared with the Node community without those using the modules having to worry about one module overwriting the variables and functions of another. We’ll talk about how to publish to the npm repository in chapter 14.
To help you organize your logic into modules, we’ll cover the following topics:
· How you can create modules
· Where modules are stored in the filesystem
· Things to be aware of when creating and using modules
Let’s dive into learning the Node module system by creating our first simple module.
3.1.1. Creating modules
Modules can either be single files or directories containing one or more files, as can be seen in figure 3.3. If a module is a directory, the file in the module directory that will be evaluated is normally named index.js (although this can be overridden: see section 3.1.4).
Figure 3.3. Node modules can be created by using either files (example 1) or directories (example 2).

To create a typical module, you create a file that defines properties on the exports object with any kind of data, such as strings, objects, and functions.
To show how a basic module is created, let’s add some currency conversion functionality to a file named currency.js. This file, shown in the following listing, will contain two functions that will convert Canadian dollars to US dollars, and vice versa.
Listing 3.1. Defining a Node module
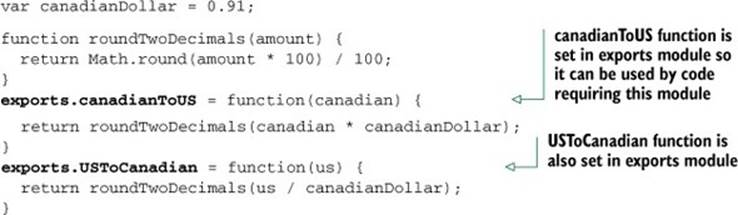
Note that only two properties of the exports object are set. This means only the two functions, canadianToUS and USToCanadian, can be accessed by the application including the module. The variable canadianDollar acts as a private variable that affects the logic in canadianToUSand USToCanadian but can’t be directly accessed by the application.
To utilize your new module, use Node’s require function, which takes a path to the module you wish to use as an argument. Node performs a synchronous lookup in order to locate the module and loads the file’s contents.
A note about require and synchronous I/O
require is one of the few synchronous I/O operations available in Node. Because modules are used often and are typically included at the top of a file, having require be synchronous helps keep code clean, ordered, and readable.
But avoid using require in I/O-intensive parts of your application. Any synchronous call will block Node from doing anything until the call has finished. For example, if you’re running an HTTP server, you would take a performance hit if you used require on each incoming request. This is typically why require and other synchronous operations are used only when the application initially loads.
In the next listing, which shows test-currency.js, you require the currency.js module.
Listing 3.2. Requiring a module
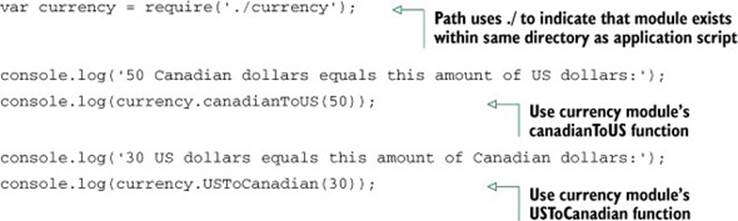
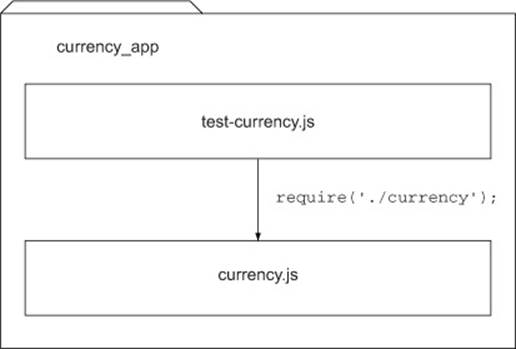
Requiring a module that begins with ./ means that if you were to create your application script named test-currency.js in a directory named currency_app, then your currency.js module file, as represented visually in figure 3.4, would also need to exist in the currency_app directory. When requiring, the .js extension is assumed, so you can omit it if desired.
Figure 3.4. When you put ./ at the beginning of a module require, Node will look in the same directory as the program file being executed.
After Node has located and evaluated your module, the require function returns the contents of the exports object defined in the module. You’re then able to use the two functions returned by the module to do currency conversion.
If you wanted to put the module into a subdirectory, such as lib, you could do so by simply changing the line containing the require logic to the following:
var currency = require('./lib/currency');
Populating the exports object of a module gives you a simple way to group reusable code in separate files.
3.1.2. Fine-tuning module creation using module.exports
Although populating the exports object with functions and variables is suitable for most module-creation needs, there will be times when you want a module to deviate from this model.
The currency converter module created earlier in this section, for example, could be redone to return a single Currency constructor function rather than an object containing functions. An object-oriented implementation could behave something like the following:
var Currency = require('./currency');
var canadianDollar = 0.91;
var currency = new Currency(canadianDollar);
console.log(currency.canadianToUS(50));
Returning a function from require, rather than an object, will make your code more elegant if it’s the only thing you need from the module.
To create a module that returns a single variable or function, you might guess that you simply need to set exports to whatever you want to return. But this won’t work, because Node expects exports to not be reassigned to any other object, function, or variable. The module code in the next listing attempts to set exports to a function.
Listing 3.3. This module won’t work as expected
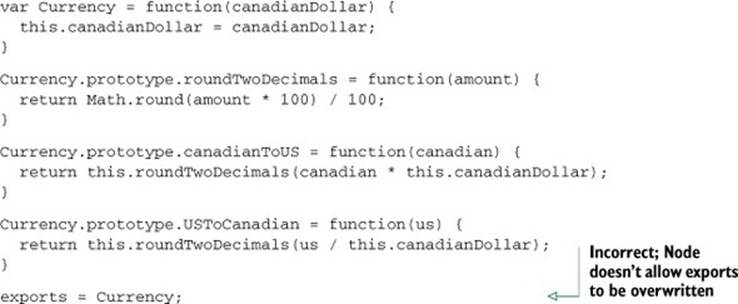
In order to get the previous module code to work as expected, you’d need to replace exports with module.exports. The module.exports mechanism enables you to export a single variable, function, or object. If you create a module that populates both exports andmodule.exports, module.exports will be returned and exports will be ignored.
What really gets exported
What ultimately gets exported in your application is module.exports. exports is set up simply as a global reference to module.exports, which initially is defined as an empty object that you can add properties to. So exports.myFunc is just shorthand formodule.exports.myFunc.
As a result, if exports is set to anything else, it breaks the reference between module.exports and exports. Because module.exports is what really gets exported, exports will no longer work as expected—it doesn’t reference module .exports anymore. If you want to maintain that link, you can make module.exports reference exports again as follows:
module.exports = exports = Currency;
By using either exports or module.exports, depending on your needs, you can organize functionality into modules and avoid the pitfall of ever-growing application scripts.
3.1.3. Reusing modules using the node_modules folder
Requiring modules in the filesystem to exist relative to an application is useful for organizing application-specific code, but isn’t as useful for code you’d like to reuse between applications or share with others. Node includes a unique mechanism for code reuse that allows modules to be required without knowing their location in the filesystem. This mechanism is the use of node_modules directories.
In the earlier module example, you required ./currency. If you omit the ./ and simply require currency, Node will follow a number of rules, as specified in figure 3.5, to search for this module.
Figure 3.5. Steps to finding a module
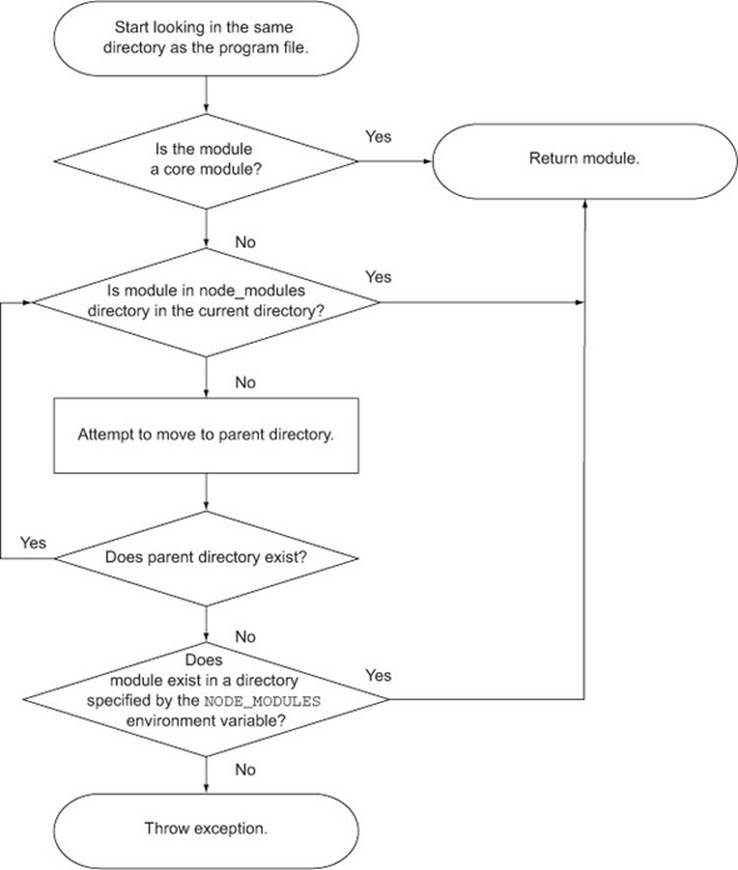
The NODE_PATH environmental variable provides a way to specify alternative locations for Node modules. If used, NODE_PATH should be set to a list of directories separated by semicolons in Windows or colons in other operating systems.
3.1.4. Caveats
While the essence of Node’s module system is straightforward, there are two things to be aware of.
First, if a module is a directory, the file in the module directory that will be evaluated must be named index.js, unless specified otherwise by a file in the module directory named package.json. To specify an alternative to index.js, the package.json file must contain JavaScript Object Notation (JSON) data defining an object with a key named main that specifies the path, within the module directory, to the main file. Figure 3.6 shows a flowchart summarizing these rules.
Figure 3.6. The package.json file, when placed in a module directory, allows you to define your module using a file other than index.js.

Here’s an example of a package.json file specifying that currency.js is the main file:
{
"main": "./currency.js"
}
The other thing to be aware of is Node’s ability to cache modules as objects. If two files in an application require the same module, the first require will store the data returned in application memory so the second require won’t need to access and evaluate the module’s source files. The second require will, in fact, have the opportunity to alter the cached data. This “monkey patching” capability allows one module to modify the behavior of another, freeing the developer from having to create a new version of it.
The best way to get comfortable with Node’s module system is to play with it, verifying the behavior described in this section yourself.
Now that you have a basic understanding of how modules work, let’s move on to asynchronous programming techniques.
3.2. Asynchronous programming techniques
If you’ve done front-end web programming in which interface events (such as mouse clicks) trigger logic, then you’ve done asynchronous programming. Server-side asynchronous programming is no different: events occur that trigger response logic. There are two popular models in the Node world for managing response logic: callbacks and event listeners.
Callbacks generally define logic for one-off responses. If you perform a database query, for example, you can specify a callback to determine what to do with the query results. The callback may display the database results, do a calculation based on the results, or execute another callback using the query results as an argument.
Event listeners, on the other hand, are essentially callbacks that are associated with a conceptual entity (an event). For comparison, a mouse click is an event you would handle in the browser when someone clicks the mouse. As an example, in Node an HTTP server emits a request event when an HTTP request is made. You can listen for that request event to occur and add some response logic. In the following example, the function handleRequest will be called whenever a request event is emitted:
server.on('request', handleRequest)
A Node HTTP server instance is an example of an event emitter, a class (EventEmitter) that can be inherited and that adds the ability to emit and handle events. Many aspects of Node’s core functionality inherit from EventEmitter, and you can also create your own.
Now that we’ve established that response logic is generally organized in one of two ways in Node, let’s jump into how it all works by learning about the following:
· How to handle one-off events with callbacks
· How to respond to repeating events using event listeners
· Some of the challenges of asynchronous programming
Let’s look first at one of the most common ways asynchronous code is handled: the use of callbacks.
3.2.1. Handling one-off events with callbacks
A callback is a function, passed as an argument to an asynchronous function, that describes what to do after the asynchronous operation has completed. Callbacks are used frequently in Node development, more so than event emitters, and they’re simple to use.
To demonstrate the use of callbacks in an application, let’s make a simple HTTP server that does the following:
· Pulls the titles of recent posts stored as a JSON file asynchronously
· Pulls a basic HTML template asynchronously
· Assembles an HTML page containing the titles
· Sends the HTML page to the user
The results will be similar to figure 3.7.
Figure 3.7. An HTML response from a web server that pulls titles from a JSON file and returns results as a web page

The JSON file (titles.json), shown in the following listing, will be formatted as an array of strings containing titles of posts.
Listing 3.4. A list of post titles
[
"Kazakhstan is a huge country... what goes on there?",
"This weather is making me craaazy",
"My neighbor sort of howls at night"
]
The HTML template file (template.html), shown next, will include just a basic structure to insert the titles of the blog posts.
Listing 3.5. A basic HTML template to render the blog titles

The code that pulls in the JSON file and renders the web page is shown next (blog_recent.js). The callback functions are displayed in bold.
Listing 3.6. An example of the use of callbacks in a simple application
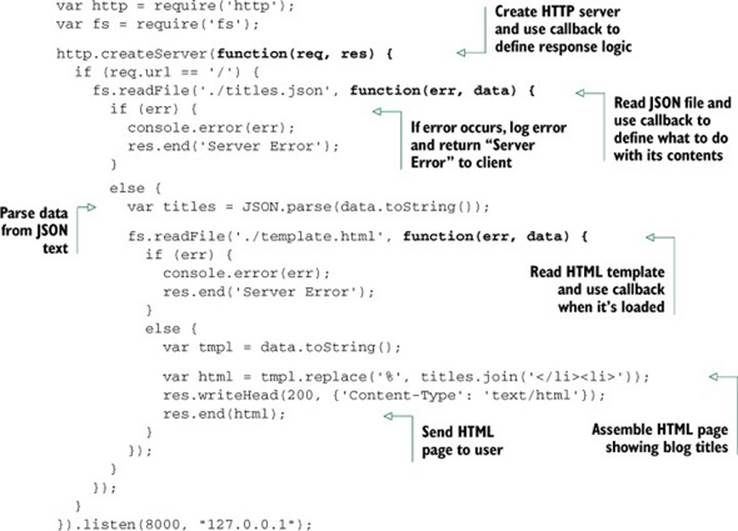
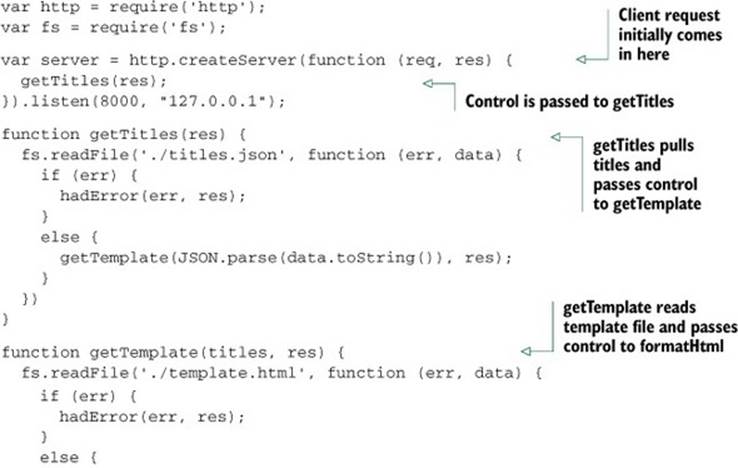
This example nests three levels of callbacks:
http.createServer(function(req, res) { ...
fs.readFile('./titles.json', function (err, data) { ...
fs.readFile('./template.html', function (err, data) { ...
Three levels isn’t bad, but the more levels of callbacks you use, the more cluttered your code looks, and the harder it is to refactor and test, so it’s good to limit callback nesting. By creating named functions that handle the individual levels of callback nesting, you can express the same logic in a way that requires more lines of code, but that could be easier to maintain, test, and refactor. The following listing is functionally equivalent to listing 3.6.
Listing 3.7. An example of reducing nesting by creating intermediary functions

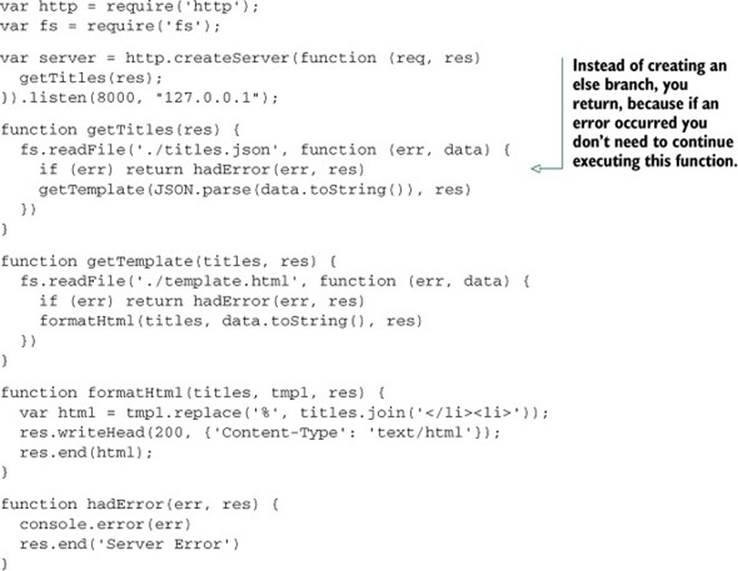
You can also reduce the nesting caused by if/else blocks with another common idiom in Node development: returning early from a function. The following listing is functionally the same but avoids further nesting by returning early. It also makes it explicit that the function should not continue executing.
Listing 3.8. An example of reducing nesting by returning early
Now that you’ve learned how to use callbacks to handle one-off events for such tasks as defining responses when reading files and web server requests, let’s move on to organizing events using event emitters.
The Node convention for asynchronous callbacks
Most Node built-in modules use callbacks with two arguments: the first argument is for an error, should one occur, and the second argument is for the results. The error argument is often abbreviated as er or err.
Here’s a typical example of this common function signature:
var fs = require('fs');
fs.readFile('./titles.json', function(er, data) {
if (er) throw er;
// do something with data if no error has occurred
});
3.2.2. Handling repeating events with event emitters
Event emitters fire events and include the ability to handle those events when triggered. Some important Node API components, such as HTTP servers, TCP servers, and streams, are implemented as event emitters. You can also create your own.
As we mentioned earlier, events are handled through the use of listeners. A listener is the association of an event with a callback function that gets triggered each time the event occurs. For example, a TCP socket in Node has an event called data that’s triggered whenever new data is available on the socket:
socket.on('data', handleData);
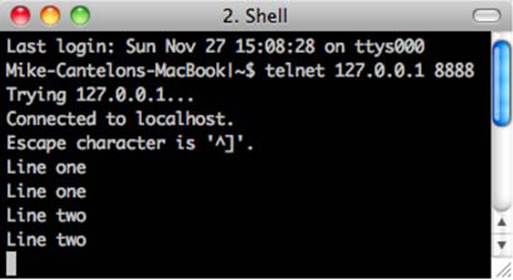
Let’s look at using data events to create an echo server.
An Example Event Emitter
A simple example where repeated events could occur is an echo server, which, when you send data to it, will echo the data back, as shown in figure 3.8.
Figure 3.8. An echo server repeating the data sent to it
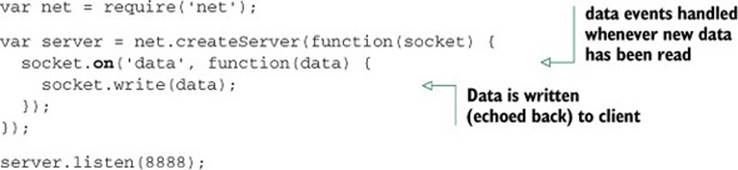
The following listing shows the code needed to implement an echo server. Whenever a client connects, a socket is created. The socket is an event emitter to which you can then add a listener, using the on method, to respond to data events. These data events are emitted whenever new data is available on the socket.
Listing 3.9. Using the on method to respond to events
You run this echo server by entering the following command:
node echo_server.js
After the echo server is running, you can connect to it by entering the following command:
telnet 127.0.0.1 8888
Every time data is sent from your connected telnet session to the server, it will be echoed back into the telnet session.
Telnet on Windows
If you’re using the Microsoft Windows operating system, telnet may not be installed by default, and you’ll have to install it yourself. TechNet has instructions for the various versions of Windows: http://mng.bz/egzr.
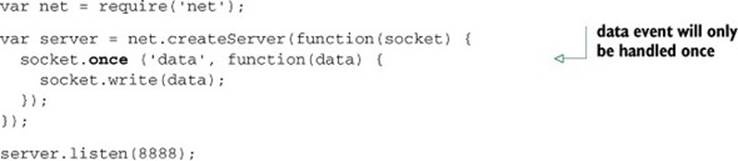
Responding to an event that should only occur once
Listeners can be defined to repeatedly respond to events, as the previous example showed, or listeners can be defined to respond only once. The code in the following listing, using the once method, modifies the previous echo server example to only echo the first chunk of data sent to it.
Listing 3.10. Using the once method to respond to a single event
Creating Event Emitters: a Pub/Sub Example
In the previous example, we used a built-in Node API that leverages event emitters. Node’s built-in events module, however, allows you to create your own event emitters.
The following code defines a channel event emitter with a single listener that responds to someone joining the channel. Note that you use on (or, alternatively, the longer form addListener) to add a listener to an event emitter:
var EventEmitter = require('events').EventEmitter;
var channel = new EventEmitter();
channel.on('join', function() {
console.log("Welcome!");
});
This join callback, however, won’t ever be called, because you haven’t emitted any events yet. You could add a line to the listing that would trigger an event using the emit function:
channel.emit('join');
Event names
Events are simply keys and can have any string value: data, join, or some crazy long event name. There’s only one special event, called error, that we’ll look at soon.
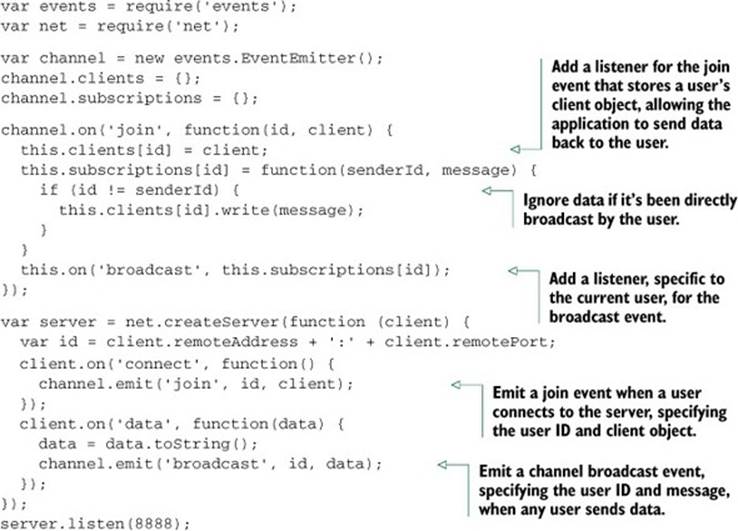
In chapter 2 you built a chat application that leverages the Socket.io module for publish/subscribe capabilities. Let’s look at how you could implement your own publish/subscribe logic.
If you run the script in listing 3.11, you’ll have a simple chat server. A chat server channel is implemented as an event emitter that responds to join events emitted by clients. When a client joins the channel, the join listener logic, in turn, adds an additional client-specific listener to the channel for the broadcast event that will write any message broadcast to the client socket. The names of the event types, such as join and broadcast, are completely arbitrary. You could use other names for these event types if you wished.
Listing 3.11. A simple publish/subscribe system using an event emitter
After you have the chat server running, open a new command line and enter the following code to enter the chat:
telnet 127.0.0.1 8888
If you open up a few command lines, you’ll see that anything typed in one command line is echoed to the others.
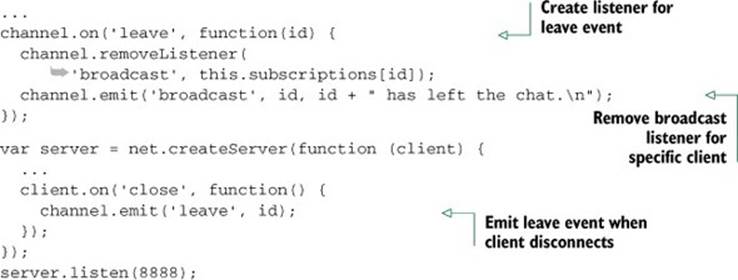
The problem with this chat server is that when users close their connection and leave the chat room, they leave behind a listener that will attempt to write to a client that’s no longer connected. This will, of course, generate an error. To fix this issue, you need to add the listener in the following listing to the channel event emitter, and add logic to the server’s close event listener to emit the channel’s leave event. The leave event essentially removes the broadcast listener originally added for the client.
Listing 3.12. Creating a listener to clean up when clients disconnect
If you want to prevent a chat for some reason, but don’t want to shut down the server, you could use the removeAllListeners event emitter method to remove all listeners of a given type. The following code shows how this could be implemented for our chat server example:
channel.on('shutdown', function() {
channel.emit('broadcast', '', "Chat has shut down.\n");
channel.removeAllListeners('broadcast');
});
You could then add support for a chat command that would trigger the shutdown. To do so, change the listener for the data event to the following code:
client.on('data', function(data) {
data = data.toString();
if (data == "shutdown\r\n") {
channel.emit('shutdown');
}
channel.emit('broadcast', id, data);
});
Now when any chat participant enters shutdown into the chat, it’ll cause all chat participants to be kicked off.
Error handling
A convention you can use when creating event emitters is to emit an error type event instead of directly throwing an error. This allows you to define custom event response logic by setting one or more listeners for this event type.
The following code shows how an error listener handles an emitted error by logging into the console:
var events = require('events');
var myEmitter = new events.EventEmitter();
myEmitter.on('error', function(err) {
console.log('ERROR: ' + err.message);
});
myEmitter.emit('error', new Error('Something is wrong.'));
If no listener for this event type is defined when the error event type is emitted, the event emitter will output a stack trace (a list of program instructions that had executed up to the point when the error occurred) and halt execution. The stack trace will indicate an error of the type specified by the emit call’s second argument. This behavior is unique to error type events; when other event types are emitted, and they have no listeners, nothing happens.
If an error type event is emitted without an error object supplied as the second argument, a stack trace will indicate an “Uncaught, unspecified ‘error’ event” error, and your application will halt. There is a deprecated method you can use to deal with this error—you can define your own response by defining a global handler using the following code:
process.on('uncaughtException', function(err){
console.error(err.stack);
process.exit(1);
});
Alternatives to this, such as domains (http://nodejs.org/api/domain.html), are being developed, but they’re considered experimental.
If you want to provide users connecting to chat with a count of currently connected users, you could use the following listeners method, which returns an array of listeners for a given event type:
channel.on('join', function(id, client) {
var welcome = "Welcome!\n"
+ 'Guests online: ' + this.listeners('broadcast').length;
client.write(welcome + "\n");
...
To increase the number of listeners an event emitter has, and to avoid the warnings Node displays when there are more than ten listeners, you could use the setMax-Listeners method. Using your channel event emitter as an example, you’d use the following code to increase the number of allowed listeners:
channel.setMaxListeners(50);
Extending the event emitter: a file watcher example
If you’d like to build upon the event emitter’s behavior, you can create a new JavaScript class that inherits from the event emitter. For example, you could create a class called Watcher that would process files placed in a specified filesystem directory. You’d then use this class to create a utility that would watch a filesystem directory (renaming any files placed in it to lowercase) and then copy the files into a separate directory.
There are three steps to extending an event emitter:
1. Creating a class constructor
2. Inheriting the event emitter’s behavior
3. Extending the behavior
The following code shows how to create the constructor for your Watcher class. The constructor takes, as arguments, the directory to monitor and the directory in which to put the altered files:
function Watcher(watchDir, processedDir) {
this.watchDir = watchDir;
this.processedDir = processedDir;
}
Next, you need to add logic to inherit the event emitter’s 'margin-top:12.0pt;margin-right:0cm;margin-bottom: 12.0pt;margin-left:8.75pt;line-height:normal'>var events = require('events')
, util = require('util');
util.inherits(Watcher, events.EventEmitter);
Note the use of the inherits function, which is part of Node’s built-in util module. The inherits function provides a clean way to inherit another object’s behavior.
The inherits statement in the previous code snippet is equivalent to the following JavaScript:
Watcher.prototype = new events.EventEmitter();
After setting up the Watcher object, you need to extend the methods inherited from EventEmitter with two new methods, as shown in the following listing.
Listing 3.13. Extending the event emitter’s functionality
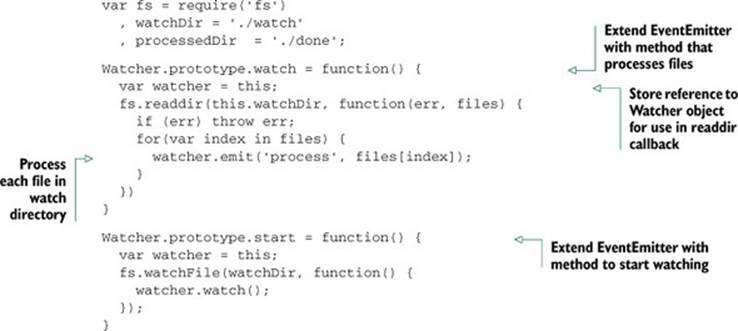
The watch method cycles through the directory, processing any files found. The start method starts the directory monitoring. The monitoring leverages Node’s fs.watchFile function, so when something happens in the watched directory, the watch method is triggered, cycling through the watched directory and emitting a process event for each file found.
Now that you’ve defined the Watcher class, you can put it to work by creating a Watcher object using the following code:
var watcher = new Watcher(watchDir, processedDir);
With your newly created Watcher object, you can use the on method, inherited from the event emitter class, to set the logic used to process each file, as shown in this snippet:
watcher.on('process', function process(file) {
var watchFile = this.watchDir + '/' + file;
var processedFile = this.processedDir + '/' + file.toLowerCase();
fs.rename(watchFile, processedFile, function(err) {
if (err) throw err;
});
});
Now that all the necessary logic is in place, you can start the directory monitor using the following code:
watcher.start();
After putting the Watcher code into a script and creating watch and done directories, you should be able to run the script using Node, drop files into the watch directory, and see the files pop up, renamed to lowercase, in the done directory. This is an example of how the event emitter can be a useful class from which to create new classes.
By learning how to use callbacks to define one-off asynchronous logic and how to use event emitters to dispatch asynchronous logic repeatedly, you’re one step closer to mastering control of a Node application’s behavior. In a single callback or event emitter listener, however, you may want to include logic that performs additional asynchronous tasks. If the order in which these tasks are performed is important, you may be faced with a new challenge: how to control exactly when each task, in a series of asynchronous tasks, executes.
Before we get to controlling when tasks execute—coming up in section 3.3—let’s take a look at some of the challenges you’ll likely encounter as you write asynchronous code.
3.2.3. Challenges with asynchronous development
When creating asynchronous applications, you have to pay close attention to how your application flows and keep a watchful eye on application state: the conditions of the event loop, application variables, and any other resources that change as program logic executes.
Node’s event loop, for example, keeps track of asynchronous logic that hasn’t completed processing. As long as there’s uncompleted asynchronous logic, the Node process won’t exit. A continually running Node process is desirable behavior for something like a web server, but it isn’t desirable to continue running processes that are expected to end after a period of time, like command-line tools. The event loop will keep track of any database connections until they’re closed, preventing Node from exiting.
Application variables can also change unexpectedly if you’re not careful. Listing 3.14 shows an example of how the order in which asynchronous code executes can lead to confusion. If the example code was executing synchronously, you’d expect the output to be “The color is blue.” Because the example is asynchronous, however, the value of the color variable changes before console.log executes, and the output is “The color is green.”
Listing 3.14. How scope behavior can lead to bugs
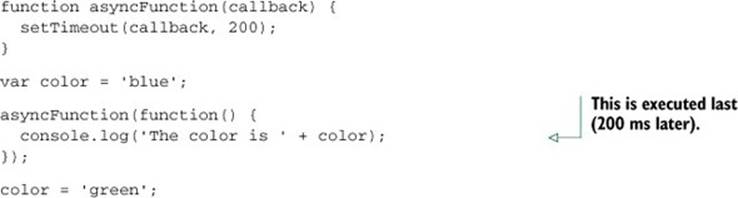
To “freeze” the contents of the color variable, you can modify your logic and use a JavaScript closure. In listing 3.15, you wrap the call to asyncFunction in an anonymous function that takes a color argument. You then execute the anonymous function immediately, sending it the current contents of color. By making color an argument for the anonymous function, it becomes local to the scope of that function, and when the value of color is changed outside of the anonymous function, the local version is unaffected.
Listing 3.15. Using an anonymous function to preserve a global variable’s value
function asyncFunction(callback) {
setTimeout(callback, 200);
}
var color = 'blue';
(function(color) {
asyncFunction(function() {
console.log('The color is ' + color);
})
})(color);
color = 'green';
This is but one of many JavaScript programming tricks you’ll come across in your Node development.
Closures
For more information on closures, see the Mozilla JavaScript documentation: https://developer.mozilla.org/en-US/docs/JavaScript/Guide/Closures.
Now that you understand how you can use closures to control your application state, let’s look at how you can sequence asynchronous logic in order to keep the flow of your application under control.
3.3. Sequencing asynchronous logic
During the execution of an asynchronous program, there are some tasks that can happen any time, independent of what the rest of the program is doing, without causing problems. But there are also some tasks, however, that should happen only before or after certain other tasks.
The concept of sequencing groups of asynchronous tasks is called flow control by the Node community. There are two types of flow control: serial and parallel, as figure 3.9 shows.
Figure 3.9. Serial execution of asynchronous tasks is similar, conceptually, to synchronous logic: tasks are executed in sequence. Parallel tasks, however, don’t have to execute one after another.
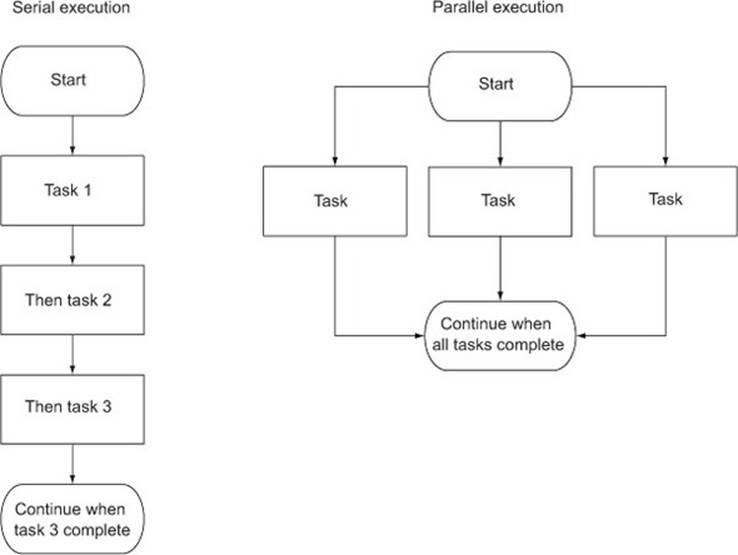
Tasks that need to happen one after the other are called serial. A simple example would be the tasks of creating a directory and then storing a file in it. You wouldn’t be able to store the file before creating the directory.
Tasks that don’t need to happen one after the other are called parallel. It isn’t necessarily important when these tasks start and stop relative to one another, but they should all be completed before further logic executes. One example would be downloading a number of files that will later be compressed into a zip archive. The files can be downloaded simultaneously, but all of the downloads should be completed before creating the archive.
Keeping track of serial and parallel flow control involves programmatic bookkeeping. When you implement serial flow control, you need to keep track of the task currently executing or maintain a queue of unexecuted tasks. When you implement parallel flow control, you need to keep track of how many tasks have executed to completion.
Flow control tools handle the bookkeeping for you, which makes grouping asynchronous serial or parallel tasks easy. Although there are plenty of community-created add-ons that deal with sequencing asynchronous logic, implementing flow control yourself demystifies it and helps you gain a deeper understanding of how to deal with the challenges of asynchronous programming.
In this section we’ll show you the following:
· When to use serial flow control
· How to implement serial flow control
· How to implement parallel flow control
· How to leverage third-party modules for flow control
Let’s start by looking at when and how you handle serial flow control in an asychronous world.
3.3.1. When to use serial flow control
In order to execute a number of asynchronous tasks in sequence, you could use callbacks, but if you have a significant number of tasks, you’ll have to organize them. If you don’t, you’ll end up with messy code due to excessive callback nesting.
The following code is an example of executing tasks in sequence using callbacks. The example uses setTimeout to simulate tasks that take time to execute: the first task takes one second, the next takes half of a second, and the last takes one-tenth of a second. setTimeout is only an artificial simulation; in real code you could be reading files, making HTTP requests, and so on. Although this example code is short, it’s arguably a bit messy, and there’s no easy way to programmatically add an additional task.
setTimeout(function() {
console.log('I execute first.');
setTimeout(function() {
console.log('I execute next.');
setTimeout(function() {
console.log('I execute last.');
}, 100);
}, 500);
}, 1000);
Alternatively, you can use a flow-control tool such as Nimble to execute these tasks. Nimble is straightforward to use and benefits from having a very small codebase (a mere 837 bytes, minified and compressed). You can install Nimble with the following command:
npm install nimble
Now, use the code in the next listing to re-implement the previous code snippet using serial flow control.
Listing 3.16. Serial control using a community-created add-on
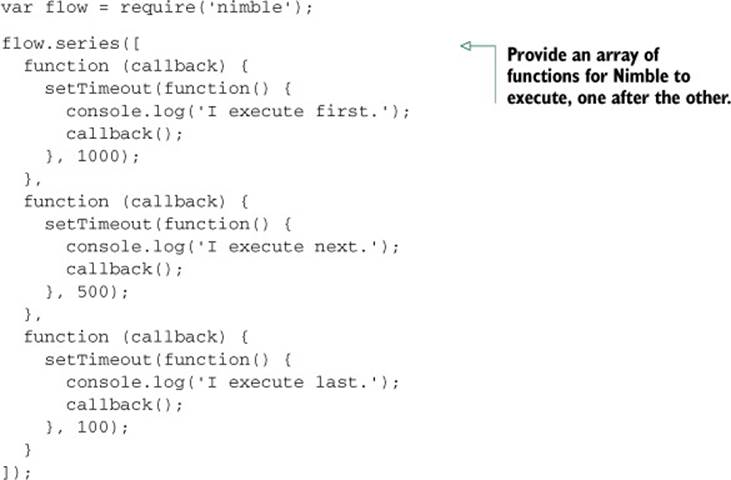
Although the implementation using flow control means more lines of code, it’s generally easier to read and maintain. You’re likely not going to use flow control all the time, but if you run into a situation where you want to avoid callback nesting, it’s a handy tool for improving code legibility.
Now that you’ve seen an example of the use of serial flow control with a specialized tool, let’s look at how to implement it from scratch.
3.3.2. Implementing serial flow control
In order to execute a number of asynchronous tasks in sequence using serial flow control, you first need to put the tasks in an array, in the desired order of execution. This array, as figure 3.10 shows, will act as a queue: when you finish one task, you extract the next task in sequence from the array.
Figure 3.10. How serial flow control works
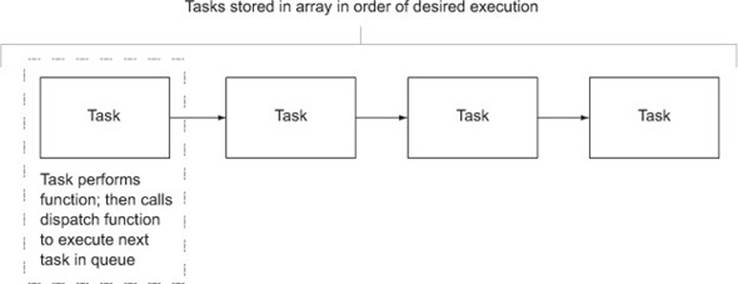
Each task exists in the array as a function. When a task has completed, the task should call a handler function to indicate error status and results. The handler function in this implementation will halt execution if there’s an error. If there isn’t an error, the handler will pull the next task from the queue and execute it.
To demonstrate an implementation of serial flow control, we’ll make a simple application that will display a single article’s title and URL from a randomly chosen RSS feed. The list of possible RSS feeds will be specified in a text file. The application’s output will look something like the following text:
Of Course ML Has Monads!
http://lambda-the-ultimate.org/node/4306
Our example requires the use of two helper modules from the npm repository. First, open a command-line prompt, and then enter the following commands to create a directory for the example and install the helper modules:
mkdir random_story
cd random_story
npm install request
npm install htmlparser
The request module is a simplified HTTP client that you can use to fetch RSS data. The htmlparser module has functionality that will allow you to turn raw RSS data into JavaScript data structures.
Next, create a file named random_story.js inside your new directory that contains the code shown here.
Listing 3.17. Serial flow control implemented in a simple application
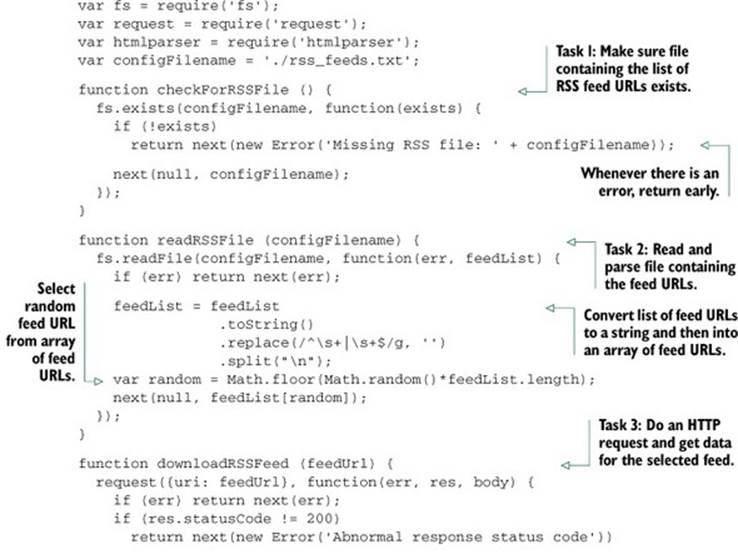
Before trying out the application, create the file rss_feeds.txt in the same directory as the application script. Put the URLs of RSS feeds into the text file, one on each line of the file. After you’ve created this file, open a command line and enter the following commands to change to the application directory and execute the script:
cd random_story
node random_story.js
Serial flow control, as this example implementation shows, is essentially a way of putting callbacks into play when they’re needed, rather than simply nesting them.
Now that you know how to implement serial flow control, let’s look at how you can execute asynchronous tasks in parallel.
3.3.3. Implementing parallel flow control
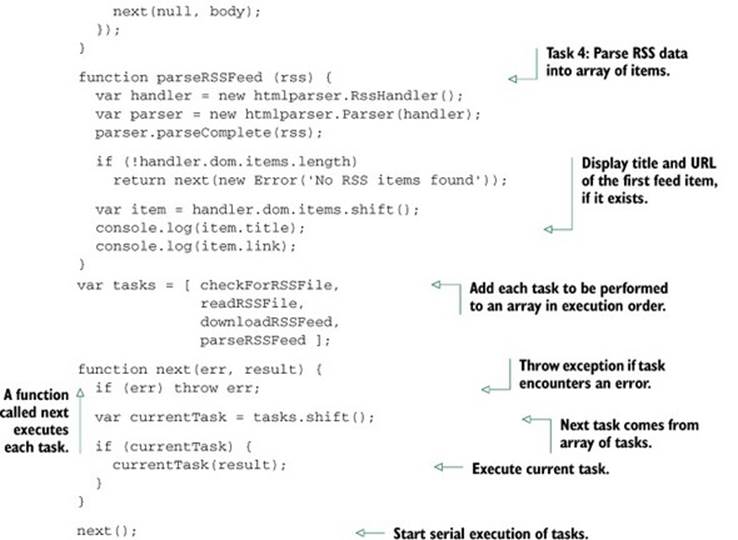
In order to execute a number of asynchronous tasks in parallel, you again need to put the tasks in an array, but this time the order of the tasks is unimportant. Each task should call a handler function that will increment the number of completed tasks. When all tasks are complete, the handler function should perform some subsequent logic.
For a parallel flow control example, we’ll make a simple application that will read the contents of a number of text files and output the frequency of word use throughout the files. Reading the contents of the text files will be done using the asynchronous readFile function, so a number of file reads could be done in parallel. How this application works is shown in figure 3.11.
Figure 3.11. Using parallel flow control to implement a frequency count of word use in a number of files

The output will look something like the following text (although it will likely be much longer):
would: 2
wrench: 3
writeable: 1
you: 24
Open a command-line prompt and enter the following commands to create two directories: one for the example, and another within that to contain the text files you want to analyze:
mkdir word_count
cd word_count
mkdir text
Next, create a file named word_count.js inside the word_count directory that contains the code that follows.
Listing 3.18. Parallel flow control implemented in a simple application

Before trying out the application, create some text files in the text directory you created earlier. After you’ve created these files, open a command line and enter the following commands to change to the application directory and execute the script:
cd word_count
node word_count.js
Now that you’ve learned how serial and parallel flow control work under the hood, let’s look at how to leverage community-created tools that allow you to easily benefit from flow control in your applications, without having to implement it yourself.
3.3.4. Leveraging community tools
Many community add-ons provide convenient flow-control tools. Some popular addons include Nimble, Step, and Seq. Although each of these is worth checking out, we’ll use Nimble again for another example.
Community add-ons for flow control
For more information about community add-ons for flow control, see the article “Virtual Panel: How to Survive Asynchronous Programming in JavaScript” by Werner Schuster and Dio Synodinos on InfoQ: http://mng.bz/wKnV.
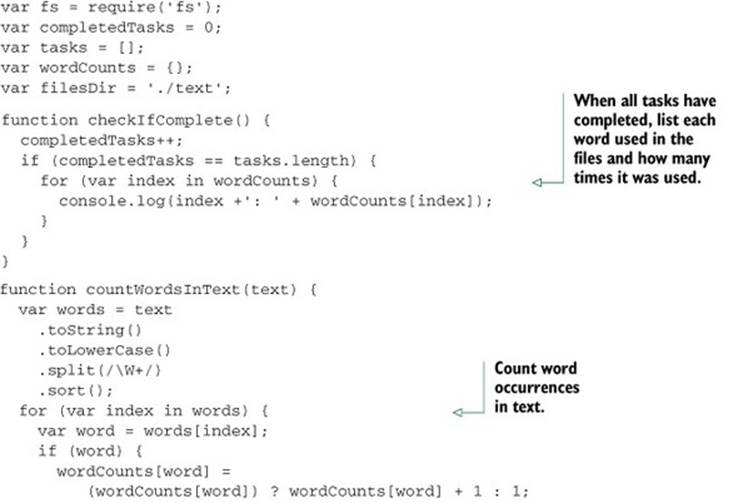
The next listing is an example of using Nimble to sequence tasks in a script that uses parallel flow control to download two files simultaneously and then archives them.
The following example won’t work in Microsoft Windows
Because the Windows operating system doesn’t come with the tar and curl commands, the following example won’t work in this operating system.
In this example, we use serial control to make sure that the downloading is done before proceeding to archiving.
Listing 3.19. Using a community add-on flow-control tool in a simple application
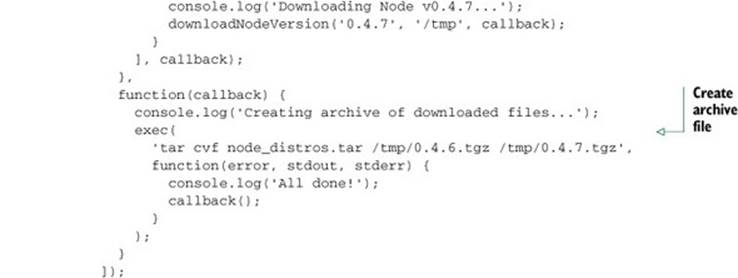
The script defines a helper function that will download any specified release version of the Node source code. Two tasks are then executed in series: the parallel downloading of two versions of Node and the bundling of the downloaded versions into a new archive file.
3.4. Summary
In this chapter, you’ve learned how to organize your application logic into reusable modules, and how to make asynchronous logic behave the way you want it to.
Node’s module system, which is based on the CommonJS module specification (www.commonjs.org/specs/modules/1.0/), allows you to easily reuse modules by populating the exports and module.exports objects. The module lookup system affords you a lot of flexibility in terms of where you can put modules and have them be found by application code when you require them. In addition to allowing you to include modules in your application’s source tree, you can also use the node_modules folder to share module code between multiple applications. Within a module, the package.json file can be used to specify which file in the module’s source tree is first evaluated when the module is required.
To manage asynchronous logic, you can use callbacks, event emitters, and flow control. Callbacks are appropriate for one-off asynchronous logic, but their use requires care to prevent messy code. Event emitters can be helpful for organizing asynchronous logic, since they allow it to be associated with a conceptual entity and to be easily managed through the use of listeners.
Flow control allows you to manage how asynchronous tasks execute, either one after another or simultaneously. Implementing your own flow control is possible, but community add-ons can save you the trouble. Which flow-control add-on you prefer is largely a matter of taste and project or design constraints.
Now that you’ve spent this chapter and the last preparing for development, it’s time to sink your teeth into one of Node’s most important features: its HTTP APIs. In the next chapter, you’ll learn the basics of web application development using Node.
All materials on the site are licensed Creative Commons Attribution-Sharealike 3.0 Unported CC BY-SA 3.0 & GNU Free Documentation License (GFDL)
If you are the copyright holder of any material contained on our site and intend to remove it, please contact our site administrator for approval.
© 2016-2026 All site design rights belong to S.Y.A.