Node.js in Action (2014)
Part 2. Web application development with Node
Chapter 6. Connect
In this chapter
· Setting up a Connect application
· How Connect middleware works
· Why middleware ordering matters
· Mounting middleware and servers
· Creating configurable middleware
· Using error-handling middleware
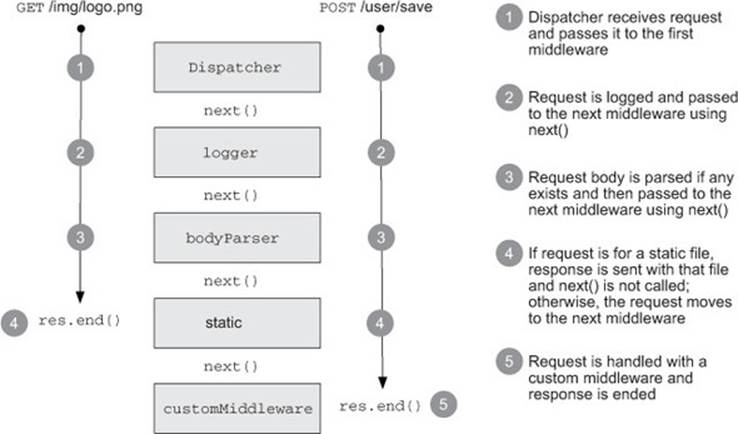
Connect is a framework that uses modular components called middleware to implement web application logic in a reusable manner. In Connect, a middleware component is a function that intercepts the request and response objects provided by the HTTP server, executes logic, and then either ends the response or passes it to the next middleware component. Connect “connects” the middleware together using what’s called the dispatcher.
Connect allows you to write your own middleware but also includes several common components that can be used in your applications for request logging, static file serving, request body parsing, and session managing, among others. Connect serves as an abstraction layer for developers who want to build their own higher-level web frameworks, because Connect can be easily expanded and built upon. Figure 6.1 shows how a Connect application is composed of the dispatcher, as well as an arrangement of middleware.
Figure 6.1. The lifecycle of two HTTP requests making their way through a Connect server
Connect and Express
The concepts discussed in this chapter are directly applicable to the higher-level framework Express because it extends and builds upon Connect with additional higher-level sugar. After reading this chapter, you’ll have a firm understanding of how Connect middleware works and how to compose components together to create an application.
In chapter 8 we’ll use Express to make writing web applications more enjoyable with a higher-level API than Connect provides. In fact, much of the functionality that Connect now provides originated in Express, before the abstraction was made (leaving lower-level building blocks to Connect and reserving the expressive sugar for Express).
To start off, let’s create a basic Connect application.
6.1. Setting up a Connect application
Connect is a third-party module, so it isn’t included by default when you install Node. You can download and install Connect from the npm registry using the command shown here:
$ npm install connect
Now that installing is out of the way, let’s begin by creating a basic Connect application. To do this, you require the connect module, which is a function that returns a bare Connect application when invoked.
In chapter 4, we discussed how http.createServer() accepts a callback function that acts on incoming requests. The “application” that Connect creates is actually a JavaScript function designed to take the HTTP request and dispatch it to the middleware you’ve specified.
Listing 6.1 shows what the minimal Connect application looks like. This bare application has no middleware added to it, so the dispatcher will respond to any HTTP request that it receives with a 404 Not Found status.
Listing 6.1. A minimal Connect application
var connect = require('connect');
var app = connect();
app.listen(3000);
When you fire up the server and send it an HTTP request (with curl or a web browser), you’ll see the text “Cannot GET /” indicating that this application isn’t configured to handle the requested URL. This is the first example of how Connect’s dispatcher works—it invokes each attached middleware component, one by one, until one of them decides to respond to the request. If it gets to the end of the list of middleware and none of the components respond, the application will respond with a 404.
Now that you’ve learned how to create a bare-bones Connect app and how the dispatcher works, let’s take a look at how you can make the application do something by defining and adding middleware.
6.2. How Connect middleware works
In Connect, a middleware component is a JavaScript function that by convention accepts three arguments: a request object, a response object, and an argument commonly named next, which is a callback function indicating that the component is done and the next middleware component can be executed.
The concept of middleware was initially inspired by Ruby’s Rack framework, which provided a very similar modular interface, but due to the streaming nature of Node the API isn’t identical. Middleware components are great because they’re designed to be small, self-contained, and reusable across applications.
In this section, you’ll learn the basics of middleware by taking that bare-bones Connect application from the previous section and building two simple layers of middleware that together make up the app:
· A logger middleware component to log requests to the console
· A hello middleware component to respond to the request with “hello world”
Let’s start by creating a simple middleware component that logs requests coming in to the server.
6.2.1. Middleware that does logging
Suppose you want to create a log file that records the request method and URL of requests coming in to your server. To do this, you’d create a function, which we’ll call logger, that accepts the request and response objects and the next callback function.
The next function can be called from within the middleware to tell the dispatcher that the middleware has done its business and that control can be passed to the next middleware component. A callback function is used, rather than the method returning, so that asynchronous logic can be run within the middleware component, with the dispatcher only moving on to the next middleware component after the previous one has completed. Using next() is a nice mechanism to handle the flow between middleware components.
For the logger middleware component, you could invoke console.log() with the request method and URL, outputting something like “GET /user/1,” and then invoke the next() function to pass control to the next component:
function logger(req, res, next) {
console.log('%s %s', req.method, req.url);
next();
}
And there you have it, a perfectly valid middleware component that prints out the request method and URL of each HTTP request received and then calls next() to pass control back to the dispatcher. To use this middleware in the application, invoke the .use() method, passing it the middleware function:
var connect = require('connect');
var app = connect();
app.use(logger);
app.listen(3000);
After issuing a few requests to your server (again, you can use curl or a web browser) you’ll see output similar to the following on your console:
GET /
GET /favicon.ico
GET /users
GET /user/1
Logging requests is just one layer of middleware. You still have to send some sort of response to the client. That will come in your next middleware component.
6.2.2. Middleware that responds with “hello world”
The second middleware component in this app will send a response to the HTTP request. It’s the same code that’s in the “hello world” server callback function on the Node homepage:
function hello(req, res) {
res.setHeader('Content-Type', 'text/plain');
res.end('hello world');
}
You can use this second middleware component with your app by invoking the .use() method, which can be called any number of times to add more middleware.
Listing 6.2 ties the whole app together. The addition of the hello middleware component in this listing will make the server first invoke the logger, which prints text to the console, and then respond to every HTTP request with the text “hello world.”
Listing 6.2. Using multiple Connect middleware components
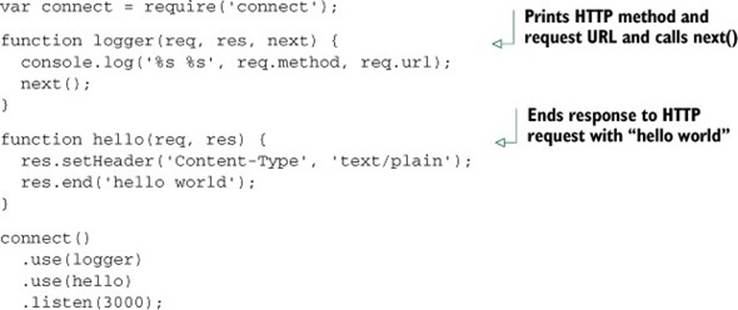
In this case, the hello middleware component doesn’t have a next callback argument. That’s because this component finishes the HTTP response and never needs to give control back to the dispatcher. For cases like this, the next callback is optional, which is convenient because it matches the signature of the http.createServer callback function. This means that if you’ve already written an HTTP server using just the http module, you already have a perfectly valid middleware component that you can reuse in your Connect application.
The use() function returns an instance of a Connect application to support method chaining, as shown previously. Note that chaining the .use() calls is not required, as shown in the following snippet:
var app = connect();
app.use(logger);
app.use(hello);
app.listen(3000);
Now that you have a simple “hello world” application working, we’ll look at why the ordering of middleware .use() calls is important, and how you can use the ordering strategically to alter how your application works.
6.3. Why middleware ordering matters
Connect tries not to make assumptions, in order to maximize flexibility for application and framework developers. One example of this is that Connect allows you to define the order in which middleware is executed. It’s a simple concept, but one that’s often overlooked.
In this section, you’ll see how the ordering of middleware in your application can dramatically affect the way it behaves. Specifically, we’ll cover the following:
· Stopping the execution of remaining middleware by omitting next()
· Using the powerful middleware-ordering feature to your advantage
· Leveraging middleware to perform authentication
Let’s first see how Connect handles a middleware component that does explicitly call next().
6.3.1. When middleware doesn’t call next()
Consider the previous “hello world” example, where the logger middleware component is used first, followed by the hello component. In that example, Connect logs to stdout and then responds to the HTTP request. But consider what would happen if the ordering were switched, as follows.
Listing 6.3. Wrong: hello middleware component before logger component
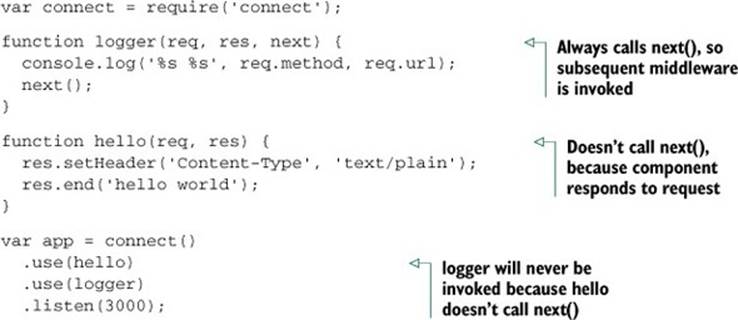
In this example, the hello middleware component will be called first and will respond to the HTTP request as expected. But logger will never be called because hello never calls next(), so control is never passed back to the dispatcher to invoke the next middleware component. The moral here is that when a component doesn’t call next(), no remaining middleware in the chain of command will be invoked.
In this case, placing hello in front of logger is rather useless, but when leveraged properly, the ordering can be used to your benefit.
6.3.2. Using middleware order to perform authentication
You can use order of middleware to your advantage, such as in the case of authentication. Authentication is relevant to almost any kind of application. Your users need a way to log in, and you need a way to prevent people who are not logged in from accessing the content. The order of the middleware can help you implement your authentication.
Suppose you’ve written a middleware component called restrictFileAccess that grants file access only to valid users. Valid users are able to continue to the next middleware component, whereas if the user isn’t valid, next() isn’t called. The following listing shows how therestrictFileAccess middleware component should follow the logger component but precede the serveStaticFiles component.
Listing 6.4. Using middleware precedence to restrict file access

Now that we’ve discussed middleware precedence and how it’s an important tool for constructing application logic, let’s take a look at another of Connect’s features that helps you use middleware.
6.4. Mounting middleware and servers
Connect includes the concept of mounting, a simple yet powerful organizational tool that allows you to define a path prefix for middleware or entire applications. Mounting allows you to write middleware as if you were at the root level (the / base req.url) and use it on any path prefix without altering the code.
For example, when a middleware component or server is mounted at /blog, a req.url of /article/1 in the code will be accessible at /blog/article/1 by a client request. This separation of concerns means you can reuse the blog server in multiple places without needing to alter the code for different sources. For example, if you decide you want to host your articles at /articles (/articles/article/1) instead of /blog, you only need to make a change to the mount path prefix.
Let’s look at another example of how you can use mounting. It’s common for applications to have their own administration area, such as for moderating comments and approving new users. In our example, this admin area will reside at /admin in the application. Now you need a way to make sure that /admin is only available to authorized users and that the rest of the site is available to all users.
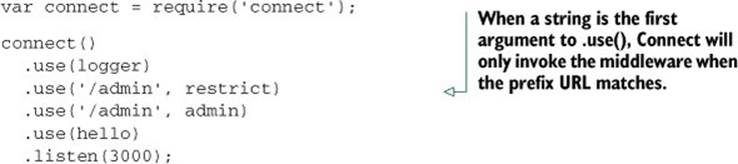
Besides rewriting requests from the / base req.url, mounting also will only invoke middleware or applications when a request is made within the path prefix (the mount point). In the following listing, the second and third use() calls have the string '/admin' as the first argument, followed by the middleware component. This means that the following components will only be used when a request is made with a /admin prefix. Let’s look at the syntax for mounting a middleware component or server in Connect.
Listing 6.5. The syntax for mounting a middleware component or server
Armed with that knowledge of mounting middleware and servers, let’s enhance the “hello world” application with an admin area. We’ll use mounting and add two new middleware components:
· A restrict component that ensures a valid user is accessing the page
· An admin component that’ll present the administration area to the user
Let’s begin by looking at a middleware component that restricts users without valid credentials from accessing resources.
6.4.1. Middleware that does authentication
The first middleware component you need to add will perform authentication. This will be a generic authentication component, not specifically tied to the /admin req.url in any way. But when you mount it onto the application, the authentication component will only be invoked when the request URL begins with /admin. This is important, because you only want to authenticate users who attempt to access the /admin URL; you want regular users to pass through as normal.
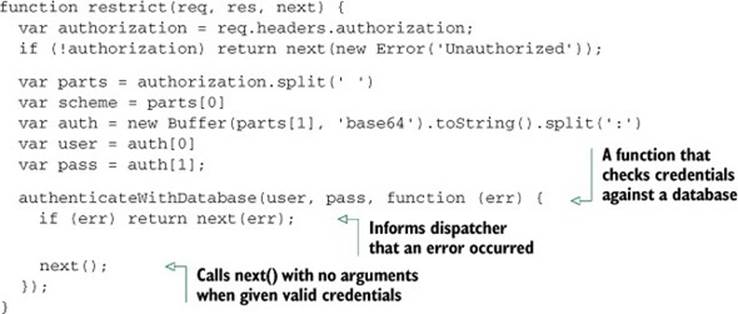
Listing 6.6 implements crude Basic authentication logic. Basic authentication is a simple authentication mechanism that uses the HTTP Authorization header field with Base64-encoded credentials (see the Wikipedia article for more details:http://wikipedia.org/wiki/Basic_access_authentication). Once the credentials are decoded by the middleware component, the username and password are checked for correctness. If they’re valid, the component will invoke next(), meaning the request is okay to continue processing; otherwise it will throw an error.
Listing 6.6. A middleware component that performs HTTP Basic authentication
Again, notice how this middleware doesn’t do any checking of req.url to ensure that /admin is what is actually being requested, because Connect is handling this for you. This allows you to write generic middleware. The restrict middleware component could be used to authenticate another part of the site or another application.
Invoking Next with an Error Argument
Notice in the previous example how the next function is invoked with an Error object passed in as the argument. When you do this, you’re notifying Connect that an application error has occurred, which means that only error-handling middleware will be executed for the remainder of this HTTP request. Error-handing middleware is a topic you’ll learn about a little later in this chapter. For now, just know that it tells Connect that your middleware has finished and that an error occurred in the process.
When authorization is complete, and no errors have occurred, Connect will continue on to the next middleware component, which in this case is admin.
6.4.2. A middleware component that presents an administration panel
The admin middleware component implements a primitive router using a switch statement on the request URL. The admin component will present a redirect message when / is requested, and it’ll return a JSON array of usernames when /users is requested. The usernames are hardcoded for this example, but a real application would more likely grab them from a database.
Listing 6.7. Routing admin requests
function admin(req, res, next) {
switch (req.url) {
case '/':
res.end('try /users');
break;
case '/users':
res.setHeader('Content-Type', 'application/json');
res.end(JSON.stringify(['tobi', 'loki', 'jane']));
break;
}
}
The important thing to note here is that the strings used are / and /users, not /admin and /admin/users. The reason for this is that Connect removes the prefix from the req.url before invoking the middleware, treating URLs as if they were mounted at /. This simple technique makes applications and middleware more flexible because they don’t care where they’re used.
For example, mounting would allow a blog application to be hosted at http://foo.com/blog or at http://bar.com/posts without requiring any change to the blog application code for the change in URL. This is because Connect alters the req.url by stripping off the prefix portion when mounted. The end result is that the blog app can be written with paths relative to /, and doesn’t need to know about /blog or /posts. The requests will use the same middleware components and share the same state. Consider the server setup used here, which reuses the hypothetical blog application by mounting it at two different mount points:
var connect = require('connect');
connect()
.use(logger)
.use('/blog', blog)
.use('/posts', blog)
.use(hello)
.listen(3000);
Testing it all out
Now that the middleware is taken care of, it’s time to take your application for a test drive using curl. You can see that regular URLs other than /admin will invoke the hello component as expected:
$ curl http://localhost
hello world
$ curl http://localhost/foo
hello world
You can also see that the restrict component will return an error to the user when no credentials are given or incorrect credentials are used:
$ curl http://localhost/admin/users
Error: Unauthorized
at Object.restrict [as handle]
(E:\transfer\manning\node.js\src\ch7\multiple_connect.js:24:35)
at next
(E:\transfer\manning\node.js\src\ch7\node_modules\
![]() connect\lib\proto.js:190:15)
connect\lib\proto.js:190:15)
...
$ curl --user jane:ferret http://localhost/admin/users
Error: Unauthorized
at Object.restrict [as handle]
(E:\transfer\manning\node.js\src\ch7\multiple_connect.js:24:35)
at next
(E:\transfer\manning\node.js\src\ch7\node_modules\
![]() connect\lib\proto.js:190:15)
connect\lib\proto.js:190:15)
...
Finally, you can see that only when authenticated as “tobi” will the admin component be invoked and the server respond with the JSON array of users:
$ curl --user tobi:ferret http://localhost/admin/users
["tobi","loki","jane"]
See how simple yet powerful mounting is? Now let’s take a look at some techniques for creating configurable middleware.
6.5. Creating configurable middleware
You’ve learned some middleware basics; now we’ll go into detail and look at how you can create more generic and reusable middleware. Reusability is one of the major benefits of writing middleware, and in this section we’ll create middleware that allows you to configure logging, routing requests, URLs, and more. You’ll be able to reuse these components in your applications with just some additional configuration, rather than needing to re-implement the components from scratch to suit your specific applications.
Middleware commonly follows a simple convention in order to provide configuration capabilities to developers: using a function that returns another function. (This is a powerful JavaScript feature, typically called a closure.) The basic structure for configurable middleware of this kind looks like this:

This type of middleware is used as follows:
app.use(setup({some: 'options'}))
Notice that the setup function is invoked in the app.use line, where in our previous examples we were just passing a reference to the function.
In this section, we’ll apply this technique to build three reusable configurable middleware components:
· A logger component with a configurable printing format
· A router component that invokes functions based on the requested URL
· A URL rewriter component that converts URL slugs to IDs
Let’s start by expanding our logger component to make it more configurable.
6.5.1. Creating a configurable logger middleware component
The logger middleware component you created earlier in this chapter was not configurable. It was hardcoded to print out the request’s req.method and req.url when invoked. But what if you want to change what the logger displays at some point in the future? You could modify yourlogger component manually, but a better solution would be to make the logger configurable from the start, instead of hardcoding the values. So let’s do that.
In practice, using configurable middleware is just like using any of the middleware you’ve created so far, except that you can pass additional arguments to the middleware component to alter its behavior. Using the configurable component in your application might look a little like the following example, where logger can accept a string that describes the format that it should print out:
var app = connect()
.use(logger(':method :url'))
.use(hello);
To implement the configurable logger component, you first need to define a setup function that accepts a single string argument (in this example, we’ll name it format). When setup is invoked, a function is returned, and it’s the actual middleware component Connect will use. The returned component retains access to the format variable, even after the setup function has returned, because it’s defined within the same JavaScript closure. The logger then replaces the tokens in the format string with the associated request properties on the req object, logs to stdout, and calls next(), as shown in the following listing.
Listing 6.8. A configurable logger middleware component for Connect

Because we’ve created this logger middleware component as configurable middleware, you can .use() the logger multiple times in a single application with different configurations or reuse this logger code in any number of future applications you might develop. This simple concept of configurable middleware is used throughout the Connect community, and it’s used for all core Connect middleware to maintain consistency.
Now let’s write a middleware component with a little more involved logic. Let’s create a router to map incoming requests to business logic!
6.5.2. Building a routing middleware component
Routing is a crucial web application concept. Put simply, it’s a method of mapping incoming request URLs to functions that employ business logic. Routing comes in many shapes and sizes, ranging from highly abstract controllers used by frameworks like Ruby on Rails to simpler, less abstract, routing based on HTTP methods and paths, such as the routing provided by frameworks like Express and Ruby’s Sinatra.
A simple router in your application might look something like listing 6.9. In this example, HTTP verbs and paths are represented by a simple object and some callback functions; some paths contain tokens prefixed with a colon (:) that represent path segments that accept user input, matching paths like /user/12. The result is an application with a collection of handler functions that will be invoked when the request method and URL match one of the routes that’s been defined.
Listing 6.9. Using the router middleware component
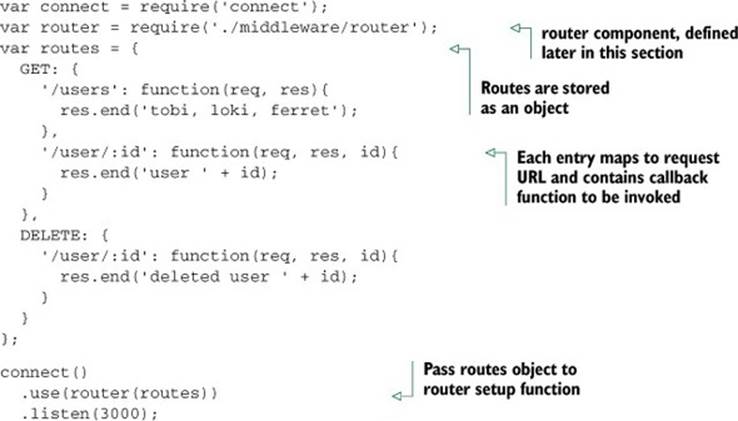
Because there are no restrictions on the number of middleware components in an application or on the number of times a middleware component can be used, it’s possible to define several routers in a single application. This could be useful for organizational purposes. Suppose you have both user-related routes and administration routes. You could separate these into module files and require them for the router component, as shown in the following snippet:
var connect = require('connect');
var router = require('./middleware/router');
connect()
.use(router(require('./routes/user')))
.use(router(require('./routes/admin')))
.listen(3000);
Now let’s build this router middleware. This will be more complicated than the middleware examples we’ve gone over so far, so let’s quickly run through the logic this router will implement, as illustrated in figure 6.2.
Figure 6.2. Flowchart of the router component’s logic
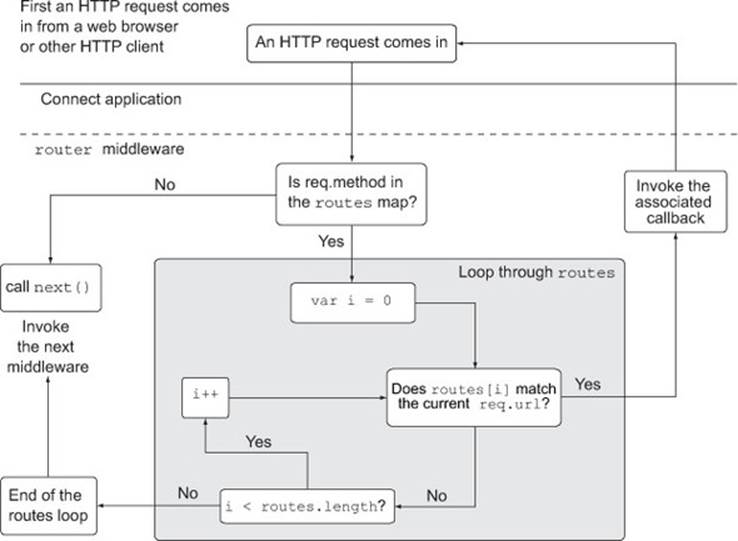
You can see how the flowchart almost acts as pseudocode for the middleware, which can help you implement the actual code for the router. The middleware in its entirety is shown in the following listing.
Listing 6.10. Simple routing middleware
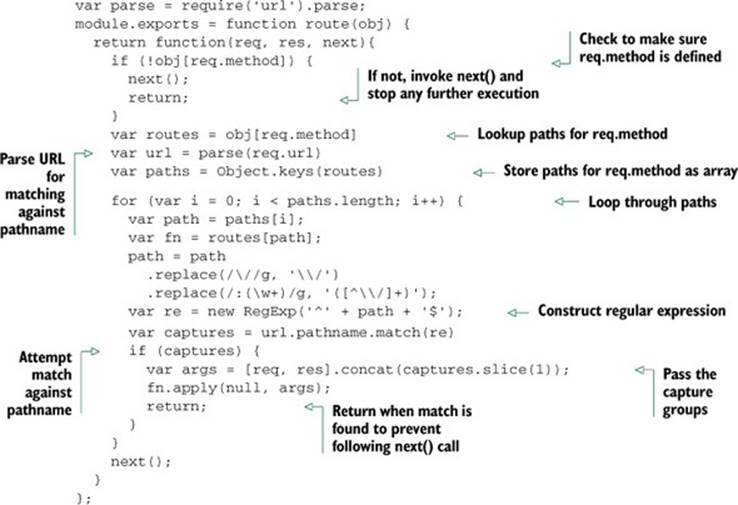
This router is a great example of configurable middleware, as it follows the traditional format of having a setup function return a middleware component for Connect applications to use. In this case, it accepts a single argument, the routes object, which contains the map of HTTP verbs, request URLs, and callback functions. It first checks to see if the current req.method is defined in the routes map, and stops further processing in the router if it isn’t (by invoking next()). After that, it loops through the defined paths and checks to see if one matches the currentreq.url. If it finds a match, then the match’s associated callback function will be invoked, hopefully completing the HTTP request.
This is a complete middleware component with a couple of nice features, but you could easily expand on it. For example, you could utilize the power of closures to cache the regular expressions, which would otherwise be compiled for each request.
Another great use of middleware is for rewriting URLs. We’ll look at that next, with a middleware component that handles blog post slugs instead of IDs in the URL.
6.5.3. Building a middleware component to rewrite URLs
Rewriting URLs can be very helpful. Suppose you want to accept a request to /blog/posts/my-post-title, look up the post ID based on the end portion of the post’s title (commonly known as the slug part of the URL), and then transform the URL to /blog/posts/<post-id>. This is a perfect task for middleware!
The small blog application in the following snippet first rewrites the URL based on the slug with a rewrite middleware component, and then passes control to the showPost component:
var connect = require('connect')
var url = require('url')
var app = connect()
.use(rewrite)
.use(showPost)
.listen(3000)
The rewrite middleware implementation in listing 6.11 parses the URL to access the pathname, and then matches the pathname with a regular expression. The first capture group (the slug) is passed to a hypothetical findPostIdBySlug function that looks up the blog post ID by slug. When it’s successful, you can then re-assign the request URL (req.url) to whatever you like. In this example, the ID is appended to /blog/post/ so that the subsequent middleware can perform the blog post lookup via ID.
Listing 6.11. Middleware that rewrites the request URL based on a slug name

What these Examples Demonstrate
The important takeaway from these examples is that you should focus on small and configurable pieces when building your middleware. Build lots of tiny, modular, and reusable middleware components that collectively make up your application. Keeping your middleware small and focused really helps break down complicated application logic into smaller pieces.
Next up, let’s take a look at a final middleware concept in Connect: handing application errors.
6.6. Using error-handling middleware
All applications have errors, whether at the system level or the user level, and being well prepared for error situations—even ones you aren’t anticipating—is a smart thing to do. Connect implements an error-handling variant of middleware that follows the same rules as regular middleware but accepts an error object along with the request and response objects.
Connect error handling is intentionally minimal, allowing the developer to specify how errors should be handled. For example, you could pass only system and application errors through the middleware (for example, “foo is undefined”) or user errors (“password is invalid”) or a combination of both. Connect lets you choose which is best for your application.
In this section, we’ll make use of both types, and you’ll learn how error-handling middleware works. You’ll also learn some useful patterns that can be applied while we look at the following:
· Using Connect’s default error handler
· Handing application errors yourself
· Using multiple error-handling middleware components
Let’s jump in with a look at how Connect handles errors without any configuration.
6.6.1. Connect’s default error handler
Consider the following middleware component, which will throw a ReferenceError error because the function foo() isn’t defined by the application:
var connect = require('connect')
connect()
.use(function hello(req, res) {
foo();
res.setHeader('Content-Type', 'text/plain');
res.end('hello world');
})
.listen(3000)
By default, Connect will respond with a 500 status code, a response body containing the text “Internal Server Error,” and more information about the error itself. This is fine, but in any kind of real application, you’d probably like to do more specialized things with those errors, like send them off to a logging daemon.
6.6.2. Handing application errors yourself
Connect also offers a way for you to handle application errors yourself using error-handling middleware. For instance, in development you might want to respond with a JSON representation of the error to the client for quick and easy reporting, whereas in production you’d want to respond with a simple “Server error,” so as not to expose sensitive internal information (such as stack traces, filenames, and line numbers) to a potential attacker.
An error-handling middleware function must be defined to accept four arguments—err, req, res, and next—as shown in the following listing, whereas regular middleware takes the arguments req, res, and next.
Listing 6.12. Error-handling middleware in Connect
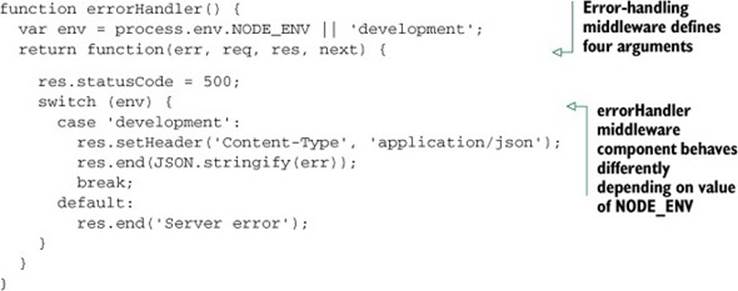
Use NODE_ENV to Set the Application’s Mode
A common Connect convention is to use the NODE_ENV environment variable (process.env.NODE_ENV) to toggle the behavior between different server environments, like production and development.
When Connect encounters an error, it’ll switch to invoking only error-handling middleware, as you can see in figure 6.3.
Figure 6.3. The lifecycle of an HTTP request causing an error in a Connect server
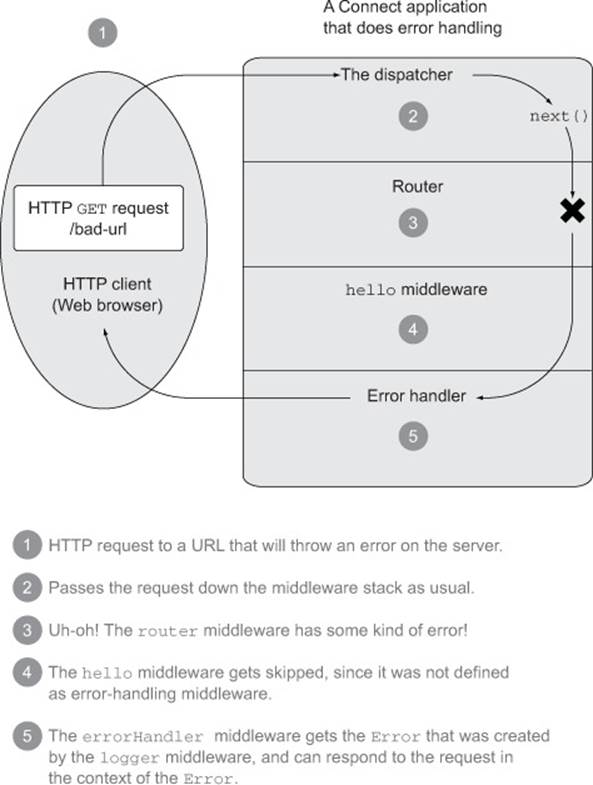
For example, in our previous admin application, if the routing middleware component for the user routes caused an error, both the blog and admin middleware components would be skipped, because they don’t act as error-handling middleware—they only define three arguments. Connect would then see that errorHandler accepts the error argument and would invoke it:
connect()
.use(router(require('./routes/user')))
.use(router(require('./routes/blog'))) // Skipped
.use(router(require('./routes/admin'))) // Skipped
.use(errorHandler());
6.6.3. Using multiple error-handling middleware components
Using a variant of middleware for error handling can be useful for separating error-handling concerns. Suppose your app has a web service mounted at /api. You might want any web application errors to render an HTML error page to the user, but /api requests to return more verbose errors, perhaps always responding with JSON so that receiving clients can easily parse the errors and react properly.
To see how this /api scenario works, implement this small example as you read along. Here app is the main web application and api is mounted to /api:
var api = connect()
.use(users)
.use(pets)
.use(errorHandler);
var app = connect()
.use(hello)
.use('/api', api)
.use(errorPage)
.listen(3000);
This configuration is easily visualized in figure 6.4.
Figure 6.4. Layout of an application with two error-handling middleware components
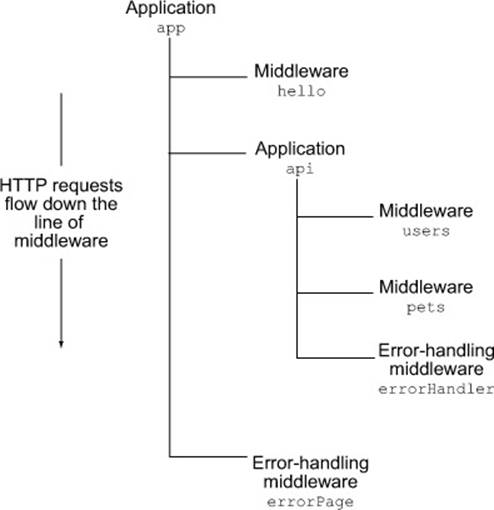
Now you need to implement each of the application’s middleware components:
· The hello component will respond with “Hello World\n.”
· The users component will throw a notFoundError when a user doesn’t exist.
· The pets component will cause a ReferenceError to be thrown to demonstrate the error handler.
· The errorHandler component will handle any errors from the api app.
· The errorPage component will handle any errors from the main app app.
Implementing the hello middleware component
The hello component is simply a function that matches “/hello” with a regular expression, as shown in the following snippet:
function hello(req, res, next) {
if (req.url.match(/^\/hello/)) {
res.end('Hello World\n');
} else {
next();
}
}
There’s no possible way for an error to occur in such a simple function.
Implementing the users middleware component
The users component is slightly more complex. As you can see in listing 6.13, you match the req.url using a regular expression and then check if the user index exists by using match[1], which is the first capture group for your match. If the user exists, it’s serialized as JSON; otherwise an error is passed to the next() function with its notFound property set to true, allowing you to unify error-handling logic later in the error-handling component.
Listing 6.13. A component that searches for a user in the database
var db = {
users: [
{ name: 'tobi' },
{ name: 'loki' },
{ name: 'jane' }
]
};
function users(req, res, next) {
var match = req.url.match(/^\/user\/(.+)/)
if (match) {
var user = db.users[match[1]];
if (user) {
res.setHeader('Content-Type', 'application/json');
res.end(JSON.stringify(user));
} else {
var err = new Error('User not found');
err.notFound = true;
next(err);
}
} else {
next();
}
}
Implementing the pets middleware component
The following code snippet shows the partially implemented pets component. It illustrates how you can apply logic to the errors, based on properties such as the err.notFound Boolean assigned in the users component. Here the undefined foo() function will trigger an exception, which will not have an err.notFound property:
function pets(req, res, next) {
if (req.url.match(/^\/pet\/(.+)/)) {
foo();
} else {
next();
}
}
Implementing the errorHander middleware component
Finally, it’s time for the errorHandler component! Contextual error messages are especially important for web services—they allow web services to provide appropriate feedback to the consumer without giving away too much information. You certainly don’t want to expose errors such as"{"error":"foo is not defined"}", or even worse, full stack traces, because an attacker could use this information against you. You should only respond with error messages that you know are safe, as the following errorHandler implementation does.
Listing 6.14. An error-handling component that doesn’t expose unnecessary data
function errorHandler(err, req, res, next) {
console.error(err.stack);
res.setHeader('Content-Type', 'application/json');
if (err.notFound) {
res.statusCode = 404;
res.end(JSON.stringify({ error: err.message }));
} else {
res.statusCode = 500;
res.end(JSON.stringify({ error: 'Internal Server Error' }));
}
}
This error-handling component uses the err.notFound property set earlier to distinguish between server errors and client errors. Another approach would be to check whether the error is an instanceof some other kind of error (such as a ValidationError from some validation module) and respond accordingly.
Using the err.notFound property, if the server were to accept an HTTP request to, say, /user/ronald, which doesn’t exist in your database, the users component would throw a notFound error, and when it got to the errorHandler component it would trigger the err.notFound code path, which returns a 404 status code along with the err.message property as a JSON object. Figure 6.5 shows what the raw output looks like in a web browser.
Figure 6.5. The JSON object output of the “User not found” error

Implementing the errorPage middleware component
The errorPage component is the second error-handling component in this example application. Because the previous error-handling component never calls next(err), this component will only be invoked by an error occurring in the hello component. That component is very unlikely to generate an error, so there’s very little chance that this errorPage component will ever be invoked. That said, we’ll leave implementing this second error-handling component up to you, because it literally is optional in this example.
Your application is finally ready. You can fire up the server, which we set to listen on port 3000 back in the beginning. You can play around with it using a browser or curl or any other HTTP client. Try triggering the various routes of the error handler by requesting an invalid user or requesting one of the pets entries.
To re-emphasize, error handling is a crucial aspect of any kind of application. Error-handling middleware components offer a clean way to unify the error-handling logic in your application in a centralized location. You should always include at least one error-handling middleware component in your application by the time it hits production.
6.7. Summary
In this chapter, you’ve learned everything you need to know about the small but powerful Connect framework. You’ve learned how the dispatcher works and how to build middleware to make your applications modular and flexible. You’ve learned how to mount middleware to a particular base URL, which enables you to create applications inside of applications. You’ve also been exposed to configurable middleware that takes in settings and thus can be repurposed and tweaked. Lastly, you learned how to handle errors that occur within middleware.
Now that the fundamentals are out of the way, it’s time to learn about the middleware that Connect provides out of the box. That’s covered in the next chapter.
All materials on the site are licensed Creative Commons Attribution-Sharealike 3.0 Unported CC BY-SA 3.0 & GNU Free Documentation License (GFDL)
If you are the copyright holder of any material contained on our site and intend to remove it, please contact our site administrator for approval.
© 2016-2026 All site design rights belong to S.Y.A.