jQuery and JavaScript Phrasebook (2014)
13. Using AJAX to Communicate with Web Servers and Web Services
AJAX communication is one of the most vital parts of most web sites. The sites allow jQuery and JavaScript to get additional data from the server and update individual elements on the page instead of reloading or loading a new web page.
The phrases in this chapter are designed to help you explore the world of asynchronous communication with the server using AJAX requests in jQuery and JavaScript.
Understanding AJAX
Despite its importance, AJAX tends to be a bit daunting to get into at first. With all the communication terms, it may seem easy to get overwhelmed. That really shouldn’t be the case. AJAX is simply a request from jQuery or JavaScript to the web server. The request sends data to the server, and the server responds with a success or failure and possibly additional data. That is it—nothing more, nothing less.
Watch out!
Don’t confuse server-side dynamic creation of web pages with AJAX. Dynamic creation of web pages is still the old traditional method, but it is just a bit easier to manage. Each request back to the server still requires a full new web page to be returned. The only advantage is that the web page is generated in memory instead of read from disk.
The cool thing about AJAX requests is that they only send and receive the bits of data that are necessary instead of full pages. Traditional web requests always build full web pages that are loaded/reloaded in the browser. Figure 13.1 illustrates the difference between the two methods of updating data in the browser. The following is a list of a few of the benefits of AJAX requests:
![]() Less data requested from the web server.
Less data requested from the web server.
![]() Allows the user to continue using the web page even while the request is being processed.
Allows the user to continue using the web page even while the request is being processed.
![]() Errors can be caught and handled on the client side before a request is ever made to the server.
Errors can be caught and handled on the client side before a request is ever made to the server.
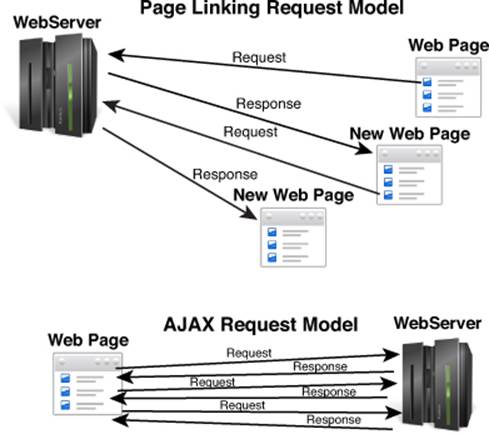
Figure 13.1 Comparison of AJAX requests to traditional page linking.
Understanding Asynchronous Communication
When you request a web page from the web server, the communication is synchronous to your browser. That means the browser waits until the HTML document is downloaded from the server before it begins rendering it and retrieving the additional resources necessary.
Did you know?
You can do synchronous AJAX requests with both jQuery and JavaScript. The jQuery .ajax() method and the JavaScript send() function both have a boolean field that allows this. I don’t recommend this, though, because you can cause the browser to lock up, which creates some unhappy users. In fact, in jQuery 1.8 and later, that option is deprecated.
Asynchronous AJAX communication is different. When you send an AJAX request, control is returned immediately back to the jQuery or JavaScript, which can do additional things. Only when the request has completed or timed out are events triggered in the browser that allow you to handle the request data.
Understanding Cross-Domain Requests
Cross-domain requests occur when you send AJAX requests to separate servers from different domains. The browser prevents this, and correctly so, because of a multitude of security reasons.
The only problem with blocking cross-domain requests is that you often want to obtain data from services external to the current web site. You can get around this in a couple of different ways.
The first method is to have the web server act as a proxy to the other servers or services, meaning that instead of directly communicating via JavaScript, you send the request to the server and have the server do it for you.
Another option is to do what is called on-demand JavaScript, which JSON with Padding (JSONP) uses. This method takes advantage of the fact that you can download a script from another web site as a resource using the following syntax:
<script type="text/javascript"
src="http://new.domain.com/getData?jsonp=parseData">
</script>
Understanding GET versus POST Requests
The two main types of requests that you send to the web server are GET and POST. A GET request passes parameters as part of the URL, whereas a POST request passes them as part of the request data.
GET Request URL:
http://localhost/code/example1.html?first=Brad&last=Dayley
GET Request Data:
<empty>
POST Request URL:
http://localhost/code/example1.html
POST Request Data:
first=Brad
last=Dayley
Understanding Response Data
When you send an AJAX request to the server, the server responds with response data. There are four main types of response that you will be working. These response data types are script, text, JSON, and XML/HTML.
In JavaScript, the response data is available in the response and responseText attributes of the XMLHttpRequest object once the request completes. In jQuery, the response data is passed as the first parameter to the AJAX handler function you define.
The script and text are handled pretty simply by the .load() and .getScript() methods. JSON and XML/HTML can be a bit more complex.
Using .getScript() to Load JavaScript Using AJAX
$.getScript("scripts/ajax/newLibray.js",
function(script, status, jqxr){
. . . handler code here . . .
});
Script data is JavaScript code that can be loaded in the browser and subsequently used after the AJAX request. The best way to handle script data is to use the jQuery .getScript(url [,successHandler(script,status, jqXHR)) method. This method loads the script automatically so that it is available for use.
The url is the location of the script on the server, and the optional successHandler is the AJAX handler function that is triggered on success.
Handling Text Data
. . . jQuery . . .
function ajaxHandler(data){
$("#myP").html(data); }
. . . JavaScript . . .
var xmlhttp = new XMLHttpRequest();
xmlhttp.onreadystatechange=function() {
document.getElementById(
"myP").innerHTML=xmlhttp.responseText;
}
Text data is the most basic type of return value. You can treat the text data as a simple string. For example, in jQuery, to set a paragraph element to the text returned by the server, you would use the following AJAX handler:
function ajaxHandler(data){
$("#myP").html(data); }
In JavaScript, you can just use the responseText attribute of the XMLHttpRequest object:
var xmlhttp = new XMLHttpRequest();
xmlhttp.onreadystatechange=function() {
document.getElementById(
"myP").innerHTML=xmlhttp.responseText;
}
Using JSON Response Objects
function ajaxHandler(jsonData){
var name = jsonData.first + " " + jsonData.last;
}
JSON data is by far the easiest format to work with in AJAX responses when dealing with complex data. In jQuery, JSON data is automatically converted to a JavaScript object. So you can access the data via dot naming. For example, the following JSON response from the server:
{"first":"Brad", "last":"Dayley"}
Can be accessed in the response data as follows:
var name = data.first + " " + data.last;
Converting JSON Response Strings to JavaScript Objects
. . . jQuery . . .
var data = $.parseJSON(
'{"first":"Brad", "last":"Dayley"}');
var name = data.first + " " + data.last;
. . . JavaScript . . .
var data = JSON.parse(
'{"first":"Brad", "last":"Dayley"}');
var name = data.first + " " + data.last;
In JavaScript and even some cases in jQuery, you end up with a text response that contains a JSON string. That is also simple to handle. In jQuery, you can use $.parseJSON() to convert the JSON string to a JavaScript object. For example:
var data = $.parseJSON('{"first":"Brad", "last":"Dayley"}');
var name = data.first + " " + data.last;
In JavaScript, you use the JSON.parse() method to convert the JSON string to a JavaScript object:
var data = JSON.parse('{"first":"Brad", "last":"Dayley"}');
var name = data.first + " " + data.last;
Using XML/HTML Response Data Response Objects
. . . jQuery . . .
var name = $(data).find("first").text() + " " +
$(data).find("last").text();;
}
. . . JavaScript . . .
var first =
xmlhttp.responseXML.getElementsByTagName("first");
var last =
xmlhttp.responseXML.getElementsByTagName("last");
XML/HTML data is not as easy as JSON, but jQuery does make it fairly simple to work with. XML data in the response is returned as a DOM object, which can be converted to jQuery and searched/navigated using jQuery’s extensive options. For example, the following XML response from the server:
<person><first>Brad</first><last>Dayley</last></person>
Can be accessed in the response data as follows:
var name = $(data).find("first").text() + " " + $(data).find("last").text();
The XML/HTML data can be accessed in the JavaScript AJAX response in the responseXML attribute of the XMLHttpRequest object. For example:
var first = xmlhttp.responseXML.getElementsByTagName("first");
var last = xmlhttp.responseXML.getElementsByTagName("last");
Converting XML/HTML Response Data into XML DOM Object
var xmlStr =
"<person><first>Brad</first><last>Dayley</last></person>");
. . . jQuery . . .
var data = $.parseXML(xmlStr);
var name = $(data).find("first").text() + " " +
$(data).find("last").text();
. . . JavaScript . . .
parser=new DOMParser();
xmlDoc=parser.parseFromString( xmlStr,"text/xml");
var last = xmlDoc.getElementsByTagName("last");
Similar to JSON, if the response data object comes as a string, you can use the .parseXML() to get a DOM object. For example:
var data = $.parseXML(
"<person><first>Brad</first><last>Dayley</last></person>");
var name = $(data).find("first").text() + " " +
$(data).find("last").text();
In JavaScript, you need to get an XML DOMParser object and then call the parseFromString(xmlString, "text/xml") method. This returns a DOM object of the XML string:
parser=new DOMParser();
xmlDoc=parser.parseFromString(
xmlhttp.responseText,"text/xml");
AJAX from JavaScript
To implement an AJAX request in JavaScript, you need access to a new window.XMLHttpRequest object. Table 13.1 describes the important methods and attributes of the XMLHttpRequest object.
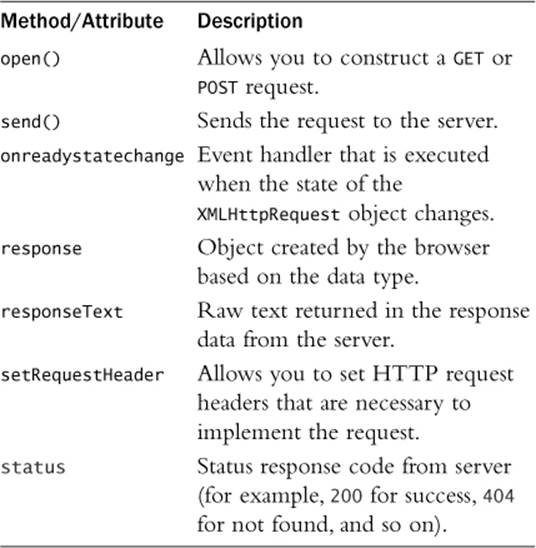
Table 13.1 Important Methods and Attributes of the XMLHttpRequest Object
Geting an XMLHttpRequest Object
var xmlhttp;
if (window.XMLHttpRequest){ //newer Browsers
xmlhttp=new XMLHttpRequest(); }
else {// Older IE6, IE5
xmlhttp=new ActiveXObject("Microsoft.XMLHTTP"); }
Newer browsers provide the XMLHttpRequest object directly as window.XMLHtpRequest. Older IE browsers do not provide an XMLHttpRequest object directly. Instead, they use an ActiveXObject("Microsoft.XHMLHTTP") object. If you want your AJAX code to support the older browsers, you need to add an alternative way of getting the access to an XMLHttpRequest by building the IE version if window.XMLHttpRequest is not available.
Sending a GET Request from JavaScript
var xmlhttp = new XMLHttpRequest();
xmlhttp.onreadystatechange=function() {
if (xmlhttp.readyState==4 && xmlhttp.status==200)
{ document.getElementById("email").innerHTML=xmlhttp.responseText;}}
xmlhttp.open("GET","getUserEmail.php?userid=brad",true);
xmlhttp.send();
To send a GET request from JavaScript, you first need to implement an onreadystatechange event handler to handle the response or responseText values. Then you need to call open("GET", URL) to open the connection and send() to send the request.
The following code shows an example of a GET request that is sent to the web server via JavaScript. The user value is added to the query string in line 15. Figure 13.2 shows the response string below the input field:
01 <html>
02 <head>
03 <title>Python Phrasebook</title>
04 <meta charset="utf-8" />
05 <script>
06 var xmlhttp = new XMLHttpRequest();
07 xmlhttp.onreadystatechange=function() {
08 if (xmlhttp.readyState==4 && xmlhttp.status==200){
09 document.getElementById(
10 "message").innerHTML=xmlhttp.responseText;
11 }
12 }
13 function getEmail(){
14 var user = document.getElementById("email").value;
15 xmlhttp.open("GET","getEmail.php?user="+user);
16 xmlhttp.send();
17 }
18 </script>
19 </head>
20 <body>
21 <input id="email" type="text" />
22 <button onclick="getEmail()">Get Email</button>
23 <p id="message"></p>
24 </body>
25 </html>
ch1301.html

Figure 13.2 Results of sending a GET request using JavaScript code in ch1301.html.
Sending a POST Request from JavaScript
var xmlhttp = new XMLHttpRequest();
var params = "first=Brad&last=Dayley&email=brad@dayleycreations.com";
xmlhttp.setRequestHeader("Content-type",
"application/x-www-form-urlencoded");
xmlhttp.setRequestHeader("Content-length", params.length);
xmlhttp.onreadystatechange=function() {
if (xmlhttp.readyState==4 && xmlhttp.status==200)
{ alert("Email Updated: " + xmlhttp.responseText); }
}
xmlhttp.open("POST","setUserEmail.php",true);
xmlhttp.send(params);
To send a POST request from JavaScript, you first need to implement an onreadystatechange event handler to handle the response or responseText values. For example:
xmlhttp.onreadystatechange=function() {
if (xmlhttp.readyState==4 && xmlhttp.status==200)
{ alert("Email Updated: " + xmlhttp.responseText); }
}
Next, you need to add the Content-length and Content-type headers to make sure that the data is treated correctly at the server. The Content-length is set to the length of the params string. The Content-type tells the server how to handle the data in the POST. Use"application/x-www-form-urlencoded" when submitting form data.
var params = "first=Brad&last=Dayley&email=brad@dayleycreations.com";
http.setRequestHeader("Content-type",
"application/x-www-form-urlencoded");
http.setRequestHeader("Content-length", params.length);
Finally, you can call open("POST", URL) to open the connection and send(params) to send the request:
xmlhttp.open("POST","setUserEmail.php",true);
xmlhttp.send(params);
The following code shows an example of a POST request that is sent to the web server via JavaScript. The user and email values are added to the params string that is sent in the send(params) call in line 24. Figure 13.3 shows the response string below the input field:
01 <html>
02 <head>
03 <title>Python Phrasebook</title>
04 <meta charset="utf-8" />
05 <script>
06 var xmlhttp = new XMLHttpRequest();
07 xmlhttp.onreadystatechange=function() {
08 if (xmlhttp.readyState==4 && xmlhttp.status==200){
09 var response = JSON.parse(xmlhttp.response);
10 document.getElementById(
11 "message").innerHTML=response.msg;
12 }
13 }
14 function setEmail(){
15 var params = "user="
16 params += document.getElementById("user").value;
17 params += "&email=";
18 params += document.getElementById("email").value;
19 xmlhttp.open("POST","postEmail.php",true);
20 xmlhttp.setRequestHeader("Content-type",
21 "application/x-www-form-urlencoded");
22 xmlhttp.setRequestHeader("Content-length",
23 params.length);
24 xmlhttp.send(params);
25 }
26 </script>
27 </head>
28 <body>
29 <input id="user" type="text">User</input><br>
30 <input id="email" type="text">Email</input><br>
31 <button onclick="setEmail()">Set Email</button>
32 <p id="message"></p>
33 </body>
34 </html>
ch1302.html
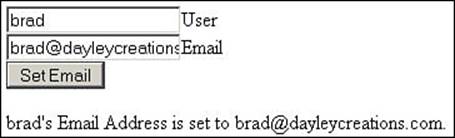
Figure 13.3 Results of sending a POST request using JavaScript code in ch1302.html.
AJAX from jQuery
jQuery provides wrapper functions that offer a bit cleaner interface to send AJAX requests. In jQuery, the XMLHttpRequest object is replaced by the jqXHR object, which is a jQuery version with a few additional methods to support the jQuery AJAX wrapper functions. The following is a list of the jQuery AJAX wrapper functions:
![]() .load(url [, data ] [, success(data, textStatus, jqXHR) ] )—This method is used to load data from the server directly into the elements represented by jQuery object.
.load(url [, data ] [, success(data, textStatus, jqXHR) ] )—This method is used to load data from the server directly into the elements represented by jQuery object.
![]() .getScript (url [, data ] [, success(data, textStatus, jqXHR) ] ) )—This method is used to load and then immediately execute a JavaScript/jQuery script.
.getScript (url [, data ] [, success(data, textStatus, jqXHR) ] ) )—This method is used to load and then immediately execute a JavaScript/jQuery script.
![]() .getJSON(url [, data ] [, success(data, textStatus, jqXHR) ] ) )—This method is used to load data in JSON format using a JSONP request to servers on different domains.
.getJSON(url [, data ] [, success(data, textStatus, jqXHR) ] ) )—This method is used to load data in JSON format using a JSONP request to servers on different domains.
![]() .get(url [, data ] [, success(data, textStatus, jqXHR) ] [, dataType ]) )—This method is used to send a generic GET request to the server.
.get(url [, data ] [, success(data, textStatus, jqXHR) ] [, dataType ]) )—This method is used to send a generic GET request to the server.
![]() .post(url [, data ] [, success(data, textStatus, jqXHR) ] [, dataType ]) )—This method is used to send a generic POST request to the server.
.post(url [, data ] [, success(data, textStatus, jqXHR) ] [, dataType ]) )—This method is used to send a generic POST request to the server.
Each of these methods allows you to specify the url of the request. The .load() method loads data directly into elements represented by the jQuery object. The .get() and .post() methods are used to send GET and POST requests.
The data argument can be a string or a basic JavaScript object. In the following example, obj, objString, and formString are all valid data arguments:
var obj ={"first":"Brad", "last":"Dayley"};
var objString = $.param(obj);
var formString = $("form").serialize();
You can also specify the function that executes when the response from the server succeeds. For example, the following success handler sets the value of the #email element to the value response data:
$.get("getEmail.php?first=Brad&last=Dayley", null, function (data, status, xObj){
$("#email").html(data);
}));
The .get() and .post() methods also allow you to specify a dataType parameter as a string, such as "xml", "json", "script", and "html", that formats the expected format of the response data from the server. For example, to specify a response type of JSON, you would use this:
$.get("getUser.php?first=Brad&last=Dayley", null, function (data, status, xObj){
$("#email").html(data.email);
}), "json");
Loading HTML Data into Page Elements
$("#content").load("new.html");
A great way to add dynamic data to a web page is to have the web server deliver the data already formatted as HTML. Then, using the jQuery .load() AJAX method, you can load the data directly into an element.
The .load() AJAX method can be called from any jQuery object and performs an AJAX get request in the background, formats the response, and injects it as the innerHTML of the element. For example:
$("#content").load("new.html");
The following code shows an example of using the .load() method to load lorem ipsum article data from the web server into an existing <div> container. Figure 13.4 illustrates loading the different articles by clicking on the nav items on the left:
01 <html>
02 <head>
03 <title>Python Phrasebook</title>
04 <meta charset="utf-8" />
05 <script type="text/javascript"
06 src="../js/jquery-2.0.3.min.js"></script>
07 <script>
08 function setArticle(){
09 $("#content").load($(this).attr("article")+".html");
10 }
11 $(document).ready(function(){
12 $(".navItem").click(setArticle);
13 });
14 </script>
15 <style>
16 div {display:inline-block; float:left;
17 text-align:center; }
18 .navItem { border:1px dotted; display:block;
19 margin:3px; cursor:pointer;}
20 #content {border:1px solid blue;}
21 #article { width: 372px; height:360px; padding:10px;
22 overflow-y:scroll; border:1px solid;}
23 #title { font-size:20px; display:block;
24 background-color:black; color:white; }
25 p {background-color:#DDDDDD; border-radius: 5px; }
26 </style>
27 </head>
28 <body>
29 <div>
30 <div id="leftNav">
31 <span class="navItem" article="article1">
32 jQUery Under the Hood</span>
33 <span class="navItem" article="article2">
34 jQuery Your New Best Friend</span>
35 </div>
36 <div id="content">
37 <span id="title"></span>
38 <div id="article"></div>
39 </div>
40 </div>
41 </body>
42 </html>
ch1303.html
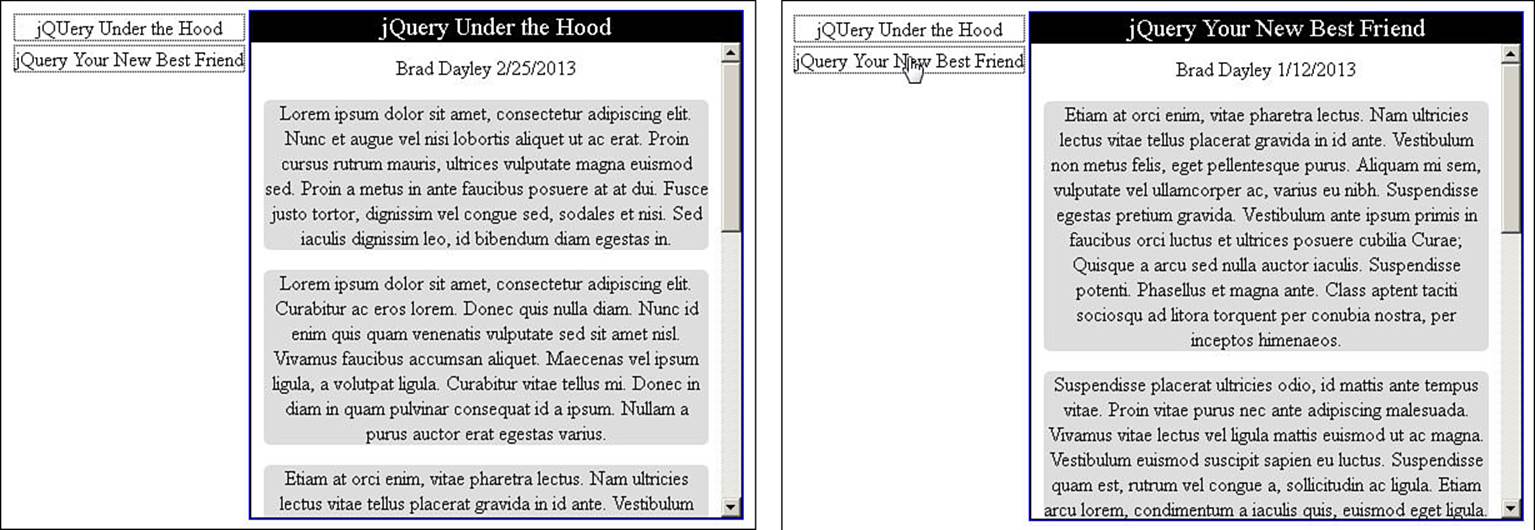
Figure 13.4 Loading HTML data directly into a <div> element using jQuery code in ch1303.html.
Using a jQuery .get() AJAX Request to Handle JSON Data
$.get("getJSONData.php", myHandler);
function myHandler(data){
var responseValue = data.value;
}
Using jQuery to get JSON data from the server is extremely easy. Just call the .get(url, handler(data)) method, pass in the url to the server location, and specify a handler to handle the data. For example:
$.get("getJSONData.php", myHandler);
The JSON data returned by the response will be a JSON object that is passed as the first argument to the handler function. You can access the data using dot syntax; for example:
function myHandler(data){
var responseValue = data.value;
}
The best way to demonstrate how to handle a .get() request with JSON data is to show you an example. The following code makes a .get() request directly to a JSON file and then uses that data to build the image list shown in Figure 13.5.
01 <html>
02 <head>
03 <title>Python Phrasebook</title>
04 <meta charset="utf-8" />
05 <script type="text/javascript"
06 src="../js/jquery-2.0.3.min.js"></script>
07 <script>
08 function updateImages(data){
09 for (i=0; i<data.length; i++){
10 var imageInfo =data[i];
11 var img = $('<img />').attr("src",
12 "../images/"+imageInfo.image);
13 var title = $("<p></p>").html(imageInfo.title);
14 var div = $("<div></div>").append(img, title);
15 $("#images").append(div);
16 }
17 }
18 $(document).ready(function(){
19 $.get("images.json", updateImages);
20 });
21 </script>
22 <style>
23 div {border:3px ridge white; display:inline-block;
24 box-shadow: 5px 5px 5px #888888; margin:10px; }
25 p { background-color:#E5E5E5;
26 margin:0px; padding:3px; text-align:center; }
27 img { height:130px; vertical-align:top; }
28 #images { background-color:black; padding:20px; }
29 </style>
30 </head>
31 <body>
32 <div id="images"></div>
33 </body>
34 </html>
ch1304.html
[ {"title":"Rugged Strength", "image":"bison.jpg"},
{"title":"Great Heights", "image":"peak.jpg"},
{"title":"Summer Fun", "image":"boy.jpg"},
{"title":"Grandure of Nature", "image":"falls.jpg"},
{"title":"Soft Perfection", "image":"flower.jpg"},
{"title":"Looking Forward", "image":"boy2.jpg"},
{"title":"Joy of Finishing", "image":"sunset.jpg"}]
JSON Server Response

Figure 13.5 Using a .get() AJAX request to turn JSON data into an image gallery using the jQuery code in ch1304.html.
Using a jQuery .get() AJAX Request to Handle XML Data
$.get("getXMLData.php", myHandler);
function myHandler(data){
var parks = $(data).find("park");
parks.each(function(){
var value = $(this).children("value").text();
}
}
Using jQuery to get XML data from the server is a bit different from using JSON data. You still call the .get(url, handler(data)) method and pass in the url to the server location and specify a handler to handle the data. For example:
$.get("getXMLData.php", myHandler);
However, the XML data returned by the response will be a DOM object that is passed as the first argument to the handler function. The best way to handle the DOM object is to convert it to a jQuery object and then use the extensive jQuery filtering and navigating methods to get the data you want. For example:
function myHandler(data){
var parks = $(data).find("park");
parks.each(function(){
var value = $(this).children("value").text();
}
}
The best way to demonstrate how to handle a .get() request with XML data is to show you an example. The following code makes a .get() request directly to an XML file and then uses that data to build the image list shown in Figure 13.6.
01 <html>
02 <head>
03 <title>Python Phrasebook</title>
04 <meta charset="utf-8" />
05 <script type="text/javascript"
06 src="../js/jquery-2.0.3.min.js"></script>
07 <script>
08 function updateTable(data){
09 var parks = $(data).find("park");
10 parks.each(function(){
11 var tr = $("<tr></tr>");
12 tr.append($("<td></td>").html(
13 $(this).children("name").text()));
14 tr.append($("<td></td>").html(
15 $(this).children("location").text()));
16 tr.append($("<td></td>").html(
17 $(this).children("established").text()));
18 var img = $('<img />').attr("src", "../images/"+
19 $(this).children("image").text());
20 tr.append($("<td></td>").append(img));
21 $("tbody").append(tr);
22 });
23 }
24 $(document).ready(function(){
25 $.get("parkdata.xml", updateTable);
26 });
27 </script>
28 <style>
29 img {width:80px;}
30 caption, th { background-color:blue; color:white;
31 font:bold 18px arial black; }
32 caption { border-radius: 10px 10px 0px 0px;
33 font-size:22px; height:30px; }
34 td { border:1px dotted; padding:2px; }
35 </style>
36 </head>
37 <body>
38 <table>
39 <caption>Favorite U.S. National Parks</caption>
40 <thead><th>Park</th><th>Location</th>
41 <th>Established</th><th> </th></thead>
42 <tbody></tbody>
43 </table>
44 <p></p>
45 </body>
46 </html>
ch1305.html
<parkinfo>
<park>
<name>Yellowstone</name>
<location>Montana, Wyoming, Idaho</location>
<established>March 1, 1872</established>
<image>bison.jpg</image>
</park>
<park>
<name>Yosemite</name>
<location>California</location>
<established>March 1, 1872</established>
<image>falls.jpg</image>
</park>
<park>
<name>Zion</name>
<location>Utah</location>
<established>November 19, 1919</established>
<image>peak.jpg</image>
</park>
</parkinfo>
XML Server Response

Figure 13.6 Using a .get() AJAX request to turn XML data into a table using the jQuery code in ch1305.html.
Using a jQuery .post() AJAX Request to Update Server Data
var params = [{name:"user",value:"Brad"},
{name:"rating", value:"1"}]
$.post("setRating.php", params, myHandler);
Using jQuery to post data to the server is easy with the .post() helper method because .post() handles all the necessary headers in the background. You call the .post(url, params, handler(data)) method and pass in the url to the server location, parameter string, or object. Then you specify a handler to handle the data.
If you pass in an object, it needs to be a list of objects with name and value pairs. For example:
var params = [{name:"user",value:"Brad"},
{name:"rating", value:"1"}]
$.post("setRating.php", params, myHandler);
The handler function works the same way that the .get() handler function works. The following code shows an example of using a .post() request to update data on the server. The code you need to focus on is in lines 31–39. That function builds the params array and then sends the.post() request to the server to update the rating using a PHP script.
The PHP script alters the JSON file that is used to build the data shown in Figure 13.7. Notice that in the handler function for the .post() request retrieves the updated data from the server and updates the web page with the posted values.
01 <html>
02 <head>
03 <title>Python Phrasebook</title>
04 <meta charset="utf-8" />
05 <script type="text/javascript"
06 src="../js/jquery-2.0.3.min.js"></script>
07 <script>
08 function addTrip(data){
09 for (var idx in data){
10 var item = data[idx];
11 var div = $("<div></div>").attr("id",
12 item.location);
13 div.append($("<img></img>").attr("src",
14 "../images/"+item.image).addClass ("photo"));
15 div.append($("<span></span>").html(
16 item.location));
17 for(var i=0;i<parseInt(item.rating);i++){
18 div.append($("<img></img>").attr("src",
19 "../images/star.ico").addClass("star")) ; }
20 for(var i=0;i<(5-parseInt(item.rating)); i++){
21 div.append($("<img></img>").attr("src",
22 "../images/empty.ico").addClass ("star")); }
23 $("#vacations").append(div);
24 }
25 $(".star").click(sendRating);
26 }
27 function getTrips(){
28 $("#vacations").children().remove();
29 $.get("trips.json", addTrip);
30 }
31 function sendRating(){
32 var parent = $(this).parent();
33 var rating =
34 parent.children(".star").index($(this)) +1;
35 var params = [{name:"location",
36 value:parent.attr("id")},
37 {name:"rating", value:rating}]
38 $.post("setRating.php", params, getTrips);
39 }
40 $(document).ready(function(){
41 getTrips();
42 });
43 </script>
44 <style>
45 #banner, #vacations { display:block;
46 font-size:30px; width:500px;}
47 div, span { display:inline-block;
48 width:120px; text-align:center;}
49 span { font-size:20px; }
50 .photo { height:50px; border:5px ridge white;
51 box-shadow: 10px 10px 5px #888888; margin:20px;
52 border-radius:10px;}
53 .star { border:none; height:auto; width:auto; }
54 </style>
55 </head>
56 <body>
57 <div><div id="banner">Vacations</div>
58 <div id="vacations"></div>
59 </body>
60 </html>
ch1306.html

Figure 13.7 A .post() AJAX request updates server data using the jQuery code in ch1306.html.
location=Zion&rating=5
POST Data to setRating.php
[{"location":"Hawaii","image":"flower.jpg","rating":"4"},
{"location":"Yosemite","rating":"4","image":"falls.jpg"},
{"location":"Montana","rating":"5","image":"bison.jpg"},
{"location":"Zion","rating":"5","image":"peak.jpg"}]
JSON Server Response
Handling jQuery AJAX Responses
$.get("getUser.php?first=Brad&last=Dayley", null, function (data, status, xObj){
alert("Request Succeeded");
}), "json").fail(function(data, status, xObj){
alert("Request Failed");
}).always(function(data, status, xObj){
alert("Request Finished");
});
In addition to specifying the success option, the wrapper methods also allow you to attach additional handlers using the following methods:
![]() .done(data, textStatus, jqXHR)—Called when a successful response is received from the server.
.done(data, textStatus, jqXHR)—Called when a successful response is received from the server.
![]() .fail(data, textStatus, jqXHR)—Called when a failure response is received from the server or the request times out.
.fail(data, textStatus, jqXHR)—Called when a failure response is received from the server or the request times out.
![]() .always(data, textStatus, jqXHR)—Always called when a response is received from the server.
.always(data, textStatus, jqXHR)—Always called when a response is received from the server.
For example, the following code adds an event handler to be called when the request fails:
$.get("getUser.php?first=Brad&last=Dayley", null, function (data, status, xObj){
$("#email").html(data.email);
}), "json").fail(function(data, status, xObj){
alert("Request Failed");
});
To illustrate this in a practical example, the following code implements the .done(), .fail(), and .always() AJAX event handlers on a basic login request. The login page sends the username and password to a server-side PHP script that checks for username="user" andpassword="password". If the correct username and password are entered, the request succeeds; otherwise, the request fails. Alerts are called for all three types of handler functions, as shown in Figure 13.8.
01 <html>
02 <head>
03 <title>Python Phrasebook</title>
04 <meta charset="utf-8" />
05 <script type="text/javascript"
06 src="../js/jquery-2.0.3.min.js"></script>
07 <script>
08 function failure(){ alert("Login Failed"); }
09 function success(){ alert("Login Succeeded"); }
10 function always(){ alert("Login Request done"); }
11 function login(){
12 $.get("login.php",
13 $("#loginForm").serialize()).done(
14 success).fail(failure).always(always);
15 return false;
16 }
17 $(document).ready(function(){
18 $("#loginButton").click(login);
19 });
20 </script>
21 <style>
22 #login { border-radius: 15px; text-align:center;
23 height:180px; width:250px; border:3px ridge blue;}
24 #title { background-color:blue; color:white;
25 border-radius:10px 10px 0px 0px; height:30px;
26 font:bold 22px arial black; }
27 input { border-radius:10px; border:3px groove blue;
28 margin-top:20px; padding-left:10px; }
29 label { font:italic 18px arial black; }
30 </style>
31 </head>
32 <body>
33 <div id="login">
34 <div id="title">Login</div>
35 <form id="loginForm">
36 <label>Username: </label>
37 <input type="text" name="user" /><br>
38 <label>Password: </label>
39 <input type="password" name="pw" /><br>
40 <input id="loginButton" type="button"
41 value="Login" />
42 </form>
43 </div>
44 </body>
45 </html>
ch1307.html
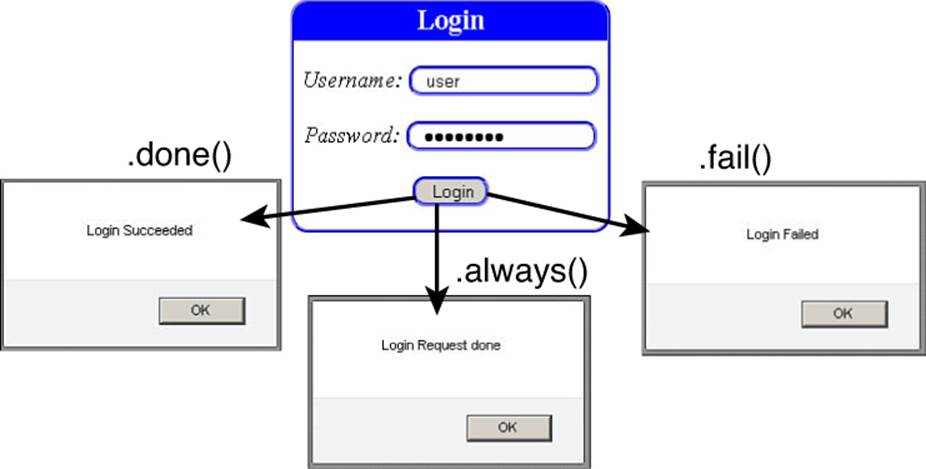
Figure 13.8 Handling success, failure, and always AJAX events using the jQuery code in ch1307.html.
Using Advanced jQuery AJAX
The concepts already covered in this chapter should take care of most of your AJAX needs. However, they far from cover the full power of the jQuery AJAX interface. The following sections discuss some of the additional AJAX functionality built directly into jQuery.
Changing the Global Setup
$.ajaxSetup({url:"service.php", accepts:"json})
jQuery provides the .ajaxSetup() method that allows you to specify options that configure AJAX requests throughout the script. Table 13.2 lists some of the options that can be specified when calling .ajaxSetup(). For example, the following code sets the default global URL for requests:
$.ajaxSetup({url:"service.php", accepts:"json})
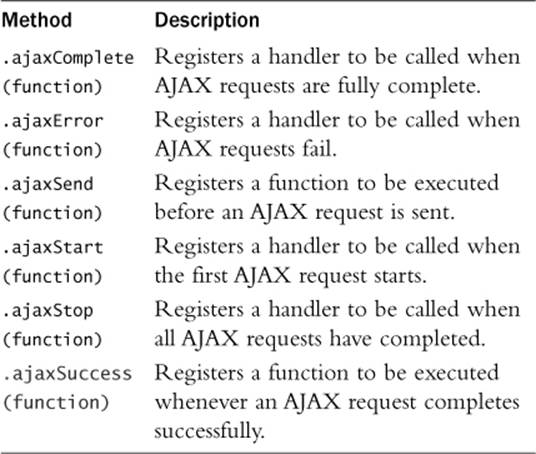
Table 13.2 jQuery Global AJAX Event Handler Registration Methods
Using Global Event Handlers
$(document).ajaxStart(function(){
$("form").addClass("processing");
});
$(document).ajaxComplete(function(){
$("form").removeClass("processing");
});
jQuery provides methods to create global event handlers that are called on events such as initialization or completion for all AJAX requests. The global events are fired on each AJAX request. Table 13.2 lists the methods that can be used to register global event handlers.
An example of using a global event handler to set the class of a form is shown here:
$(document).ajaxStart(function(){
$("form").addClass("processing");
});
$(document).ajaxComplete(function(){
$("form").removeClass("processing");
});
By the way
Global events are never fired for cross-domain script or JSONP requests, regardless of the value of global.
Implementing Low-Level AJAX Requests
$.ajax({
url:"setEmail",
type:"get",
accepts:"json",
contentType: 'application/x-www-form-urlencoded; charset=UTF-8',
data: {"first":"Brad", "last":"Dayley"}
}).fail(function(){ alert("request Failed"); });
All AJAX request wrapper methods that you have been working with in his chapter are handled underneath through the .ajax(url [, settings]) interface. This interface is a bit more difficult to use, but it gives you much more flexibility and control of the AJAX request.
The .ajax() method is called the same way that .get() and .post() are, but the settings argument allows you to set a wide variety of settings when making the request.
Table 13.3 lists the more common settings you can apply to the .ajax() method.
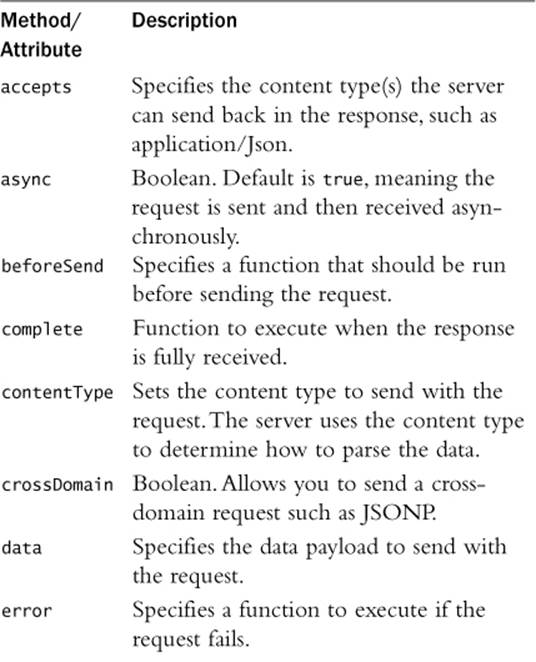
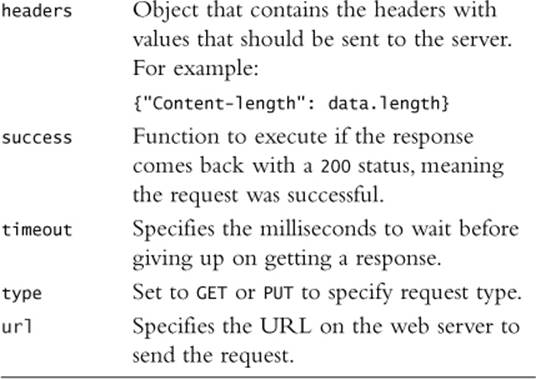
Table 13.3 Common Settings Available in the .ajax() Request Method
A simple example of using the .ajax() interface is shown in the following code:
$.ajax({
url:"setEmail",
type:"get",
accepts:"json",
contentType: 'application/x-www-form-urlencoded; charset=UTF-8',
data: {"first":"Brad", "last":"Dayley"}
}).fail(function(){ alert("request Failed"); });
The .ajax() method returns a jqXHR method that provides some additional functionality, especially when handling the response. Table 13.4 lists some of the methods and attributes attached to the jqXHR object.
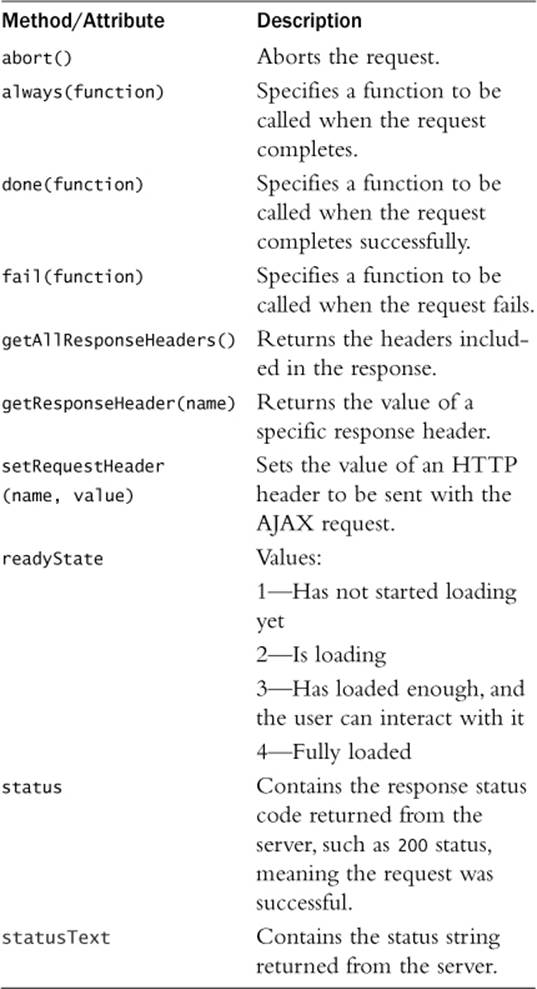
Table 13.4 Common Methods and Attributes of the jqXHR Object Returned by .ajax()
All materials on the site are licensed Creative Commons Attribution-Sharealike 3.0 Unported CC BY-SA 3.0 & GNU Free Documentation License (GFDL)
If you are the copyright holder of any material contained on our site and intend to remove it, please contact our site administrator for approval.
© 2016-2026 All site design rights belong to S.Y.A.