jQuery and JavaScript Phrasebook (2014)
6. Capturing and Using Browser and User Events
One of the major goals of jQuery and JavaScript is to allow developers to create incredibly sophisticated and richly active web pages. At the heart of interactive web pages are events. An event refers to anything happening in the browser environment, from a page loading, to a mouse movement or click, to keyboard input, to resizing of the window.
Understanding events, the objects that represent them, and how to apply them in your web pages will enable to you to create some spectacular user interaction. This chapter covers the concepts required to understand events and how to utilize them in building rich, interactive web pages.
The phrases in this chapter are designed to show you how the JavaScript event engine works and how to apply JavaScript and jQuery code to implement event handlers. You will be able to apply the concepts in this chapter with concepts from other chapters to implement professional and rich user interactions.
Understanding Events
The browser event concept is pretty simple. An event is anything that alters the state of the browser or web page. These include loading of the page, mouse movements and clicks, keyboard input, as well as form submissions and other things occurring in the page. Each event has an event object that describes the event that took place and what object it took place on.
This section provides a few tables to help you get a quick overview of what event objects look like, what some of the more common events triggered in JavaScript are, and what triggers them.
Reviewing Event Types
An event type is a keyword that JavaScript and jQuery use to identify the physical event that took place. These keywords are used to attach handlers to specify types of events. Also, as you will see later on, the keywords are used in the names of methods so that you can attach event handlers or trigger events manually.
JavaScript provides several event types that correspond to the different events that occur during dynamic page interaction. jQuery event handling supports all the JavaScript and adds a few event types of its own. Table 6.1 lists the different event types that JavaScript and jQuery support.

Table 6.1 JavaScript and jQuery Event Types
Adding Event Handlers
An event handler is a function that is called when the event is triggered. The event object is passed to the event handler so you will have access in the event handler to information about the event.
The following phrases show ways to add event handlers in HTML, JavaScript, and jQuery.
Adding a Page Load Event Handler in JavaScript
<script>
function onloadHandler(){
(initialization code here...)
}
</script>
...
<body onload="onloadHandler()>
To add initialization code that runs when the pages are loaded in JavaScript, create a function in JavaScript that performs the initialization. For example, the following JavaScript code shows a simple skeleton initialization function:
function onloadHandler(){
(initialization code here...)
}
To cause the onloadHandler() to trigger when the page is fully loaded, add the event hander function to the onload attribute of the <body> element in the HTML. For example:
<body onload="onloadHandler()>
Adding Initialization Code in jQuery
$(document).ready(function(){
(initialization code here...)
}
or
$(document).load(function(){
(initialization code here...)
}
In jQuery, you can trigger and execute initialization code at two different times: when the DOM is ready, and when the document and its resources have fully loaded. The option to use depends on what needs to happen in your initialization code.
Using the .ready() jQuery method triggers the initialization code to run when the DOM is fully ready. All the DOM objects will be created, and the page will be displayed to users. Note that not all page resources, such as images, may have fully downloaded at this point. This is the option that I use most frequently because it allows me to add interactions and functionality as soon as possible. The following shows an example of using .ready() to attach a simple initialization function:
$(document).ready(function(){
(initialization code here...)
}
Using the .load() jQuery method triggers the initialization code to run after all page resources have loaded and are rendered to the user. On occasion, I use this option if I need resource information, such as image dimensions, when I am applying the initialization code. The following code shows an example of using load() to attach a simple initialization function:
$(document).load(function(){
(initialization code here...)
}
Watch out!
The .ready() and .load() methods are not compatible with using the onload="..." attribute in the <body> tag. If you are using jQuery, use .ready() or .load(); if not, use the onload attribute.
Assigning an Event Handler in HTML
function clickHandler(e){
$("div").html("clicked at X postion: " + e.screenX);
}
. . .
<div onclick="clickHandler(event)">Click Here</div>
The most basic method of adding an event handler to a DOM element is directly in the HTML code. The advantage of this method is that it is simple and easy to see what event handler is assigned to a particular DOM object.
Event handlers are added to DOM objects in HTML by setting the value of the handler attribute in the tag statement. For each event that the element supports, there is an attribute that starts with on followed by the name of the event. For example, the click event attribute is onclick, and the load event attribute is onload. To view a list of the event types, see Table 6.1.
The following example shows just how easy it is to add a click event handler to a DOM element in the HTML code:
<div onclick="clickHandler()">Click Here</div>
The browser will call the following function when you click the <div> element:
function clickHandler(){
$("div").html("clicked");
}
You can also include the DOM event object as a parameter to the event handler using the event keyword. This allows you to access the event information in the event handler, for example:
<div onclick="clickHandler(event)">Click Here</div>
The browser will call the following function when the <div> element is clicked and change the text to display the x coordinate of the mouse cursor by reading e.screenX:
function clickHandler(e){
$("div").html("clicked at X postion: " + e.screenX);
}
Adding Event Handlers in JavaScript
function clickHandler(e, data){
(Event Handler Code)
}
...
document.getElementById("div1").addEventListener('click',
function(e){
eventHandler(e,"data");
},false);
You can also dynamically add and remove event handlers to DOM objects inside JavaScript code. To add an event handler in JavaScript, simply call addEventListener() on the DOM object.
The addEventListener() function takes three parameters. The first is the event type (event types are defined in Table 6.1), a function to call and a boolean that specifies true if the handler should be called during the capturing phase and the bubbling phase or false if the handler should be called only during the bubbling phase.
To pass custom data into the handler call, wrap the actual function handler inside of a simple wrapper function that passes the arguments to the event handler.
For example, the following code calls the click handler with additional information, including the ID of a different object that is updated:
function clickHandler(e,objId,num,msg){
var obj = document.getElementById(objId);
obj.innerHTML = "DIV " + num + " says " + msg +" at X postion: " + e.screenX;
}
...
document.getElementById("div1").addEventListener('click',
function(e){
eventHandler(e, "heading", 1, "yes");
},false);
By the way
You can also set the access event handler on the DOM object using the handler attribute. The handler attribute will be “on” plus the event type. For example, for the click event, the attribute is obj.onclick. You can call the event handler using obj.onclick() or assign it directly using obj.onclick= function handler(){ ...};.
Removing Event Handlers in JavaScript
var obj = document.getElementById("div1");
obj.addEventListener('click', clickHandler);
. . .
obj.removeEventListener('click', clickHandler);
You can also remove event handlers from the event using the removeEventListener() function on the DOM object. You need to specify the event type and the name of the event handler to remove. For example, the following code adds an event handler and then removes it:
function clickHandler(e){
. . .
}
var obj = document.getElementById("div1");
obj.addEventListener('click', clickHandler);
Adding Event Handlers in jQuery
$("div").on("click", "span", {name:"Brad", number:7},
function(e){
(event handler code here)
}):
Events are added in jQuery using the .on(events,[,selector][,data]handler(eventObject) method. This method accepts one or more event types such as those listed in Table 6.1 as the first argument.
The optional selector value defines the descendant elements that trigger the event. Any descendant elements that match the selector also trigger the event.
The data object is anything that you want to pass to the event handler in the event.data attribute. Typically, this is either a single value or a JavaScript object. However, anything is accepted.
The handler function is the function to be executed when the event is triggered. The eventObject is passed to the handler function and provides you with the details about the event.
The great thing about using jQuery to add event handlers is that you get to use the jQuery selector functionality. For example, to add the click handler to the first paragraph in the document, you would use the following:
$("p:first").on("click", function(e){ (event handler code here) }):
Or to add a keyup event handler to all <input> elements with the .texting class set, you would use this:
$("input.texting").on("click", function(e){ (event handler code here) }):
Another example that adds a click event handler to all <div> elements that is also triggered on <span> descendants and passes an object follows:
$("div").on("click", "span", {name:"Brad", number:7},
function(e){
(event handler code here)
}):
Removing Event Handlers in jQuery
$("div").off("keypress"):
or
$("div").off("click", "span",
function(e){
(event handler code here)
}):
Removing an event handler in jQuery is extremely easy using the .off(events[,selector ][,handler(eventObject)]) method. This method has similar arguments to the .on() event handler. The arguments match so closely so that you can add multiple event handlers to elements. Using the arguments helps jQuery know which event matches the one you want to turn off.
Controlling Events
An important aspect of handling JavaScript is the ability to control the event behavior. The following list describes the event process that happens when a user interacts with the web page or browser window.
1. Physical event happens—A physical event occurs. For example, a user clicks or moves the mouse or presses a key.
2. Events are triggered in the browser—The user interaction results in events being triggered by the web browser. Often, multiple events are triggered at the same time. For example, when a user presses a key on the keyboard, three events are triggered: keypressed, keydown, andkeyup.
3. Browser creates an object for the event—The web browser creates a separate object for each event that is triggered. The objects contain information about the event that handlers can use.
4. User event handlers are called—User-defined event handlers are called. You can create handlers in JavaScript that interact with the event objects or page elements to provide interactivity with HTML elements. The event handlers can be acting in three phases. The following describes the three phases shown in Figure 6.1:
![]() Capturing—The capturing phase occurs on the way down to the target HTML element from the document directly through each of the parent elements. By default, behavior for event handlers for the capturing phase is disabled.
Capturing—The capturing phase occurs on the way down to the target HTML element from the document directly through each of the parent elements. By default, behavior for event handlers for the capturing phase is disabled.
![]() Target—The target phase occurs when the event is in the HTML element where it was initially triggered.
Target—The target phase occurs when the event is in the HTML element where it was initially triggered.
![]() Bubbling—The bubbling phase occurs on the way up through each of the parents of the target HTML element all the way back to the document. By default, the bubbling phase is enabled for events.
Bubbling—The bubbling phase occurs on the way up through each of the parents of the target HTML element all the way back to the document. By default, the bubbling phase is enabled for events.
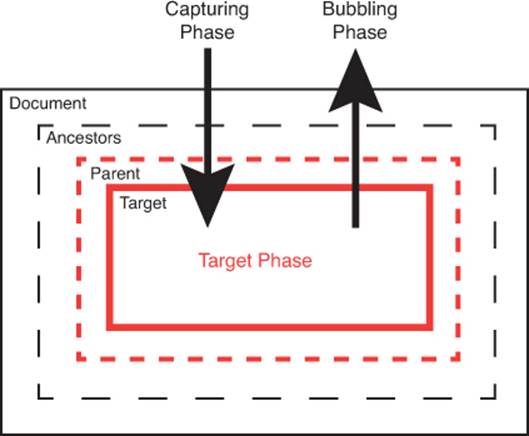
Figure 6.1 Events are handled first in the capturing phase from the document down to the target, then in the target phase, and finally in the bubbling phase from the target up through the document.
5. Browser handlers are called—In addition to user event handlers, the browser has default handlers that do different things based on the event that was triggered. For example, when the user clicks on a link, the browser has an event handler that is called and navigates to the hreflocation specified in the link.
The following phrases describe ways to interact with and control the event process.
Stopping Event Bubbling Up to Other Elements
function myEventHandler(e){
...handler code...
e.stopPropogation();
return false;
}
Often, you don’t want an event to bubble up to parent objects because you have already handled it in a child object. JavaScript provides a simple way to stop bubbling from occurring. Calling the event.stopPropagation() method on the event object passed to the handler stops the event from bubbling up to parent elements. The event still triggers the default handlers in the browser that provide the web page interaction, such as selecting a check box or activating a link.
Stopping Default Behavior
function myEventHandler(e){
...handler code...
e.preventDefault();
return false;
}
Occasionally, you might want to prohibit the browser from applying the default handler interaction for the event. For example, you might not want the browser to activate a link, or you might not want to allow a form to be reset. You can stop the default browser action by calling theevent.preventDefault() method on the event object passed to the handler.
Triggering Events Manually in jQuery
$("span").mouseenter();
$("#myButton").click();
$("input.bigText").trigger({'type':'keypress', 'charCode':13});
jQuery objects have methods such as click() and dblclick() that correspond to many of the event types that you can call directly. Form elements add additional methods such as blur(), focus(), keypress(), keydown(), and keyup() that can be called to trigger specific events. For example, the following statement triggers the click event for all <span> elements:
$("span").click();
jQuery also provides a way to trigger events while specifying the values of the event object using the trigger() method. There are two different syntaxes for the trigger() method, as listed here:
trigger(eventType [, extraParameters])
trigger( eventObject)
The following is an example of using the first method to trigger the click event for all elements with class="checkbox":
$(".checkbox").trigger("click");
Next is an example of using the second method on all input items with class="bigText". This method actually passes in a simple event object for the keypress event that sets the charCode attribute of the event object to 13 or the Return key.
$("input.bigText").trigger({'type':'keypress', 'charCode':13});
Using Event Objects
The browser creates event objects when it detects that an event has occurred. If jQuery defined the event handler, the event object is converted to a jQuery event object that has a few more attributes and methods. Therefore, you need to be aware of which event object type you are working with.
Event objects provide additional information about the event, such as what type the event was (such as a click or a keypress), which key(s) were pressed, what position the mouse was in, what HTML element the event occurred on, and so on. Table 6.2 describes the most commonly used event attributes that you will be working with.
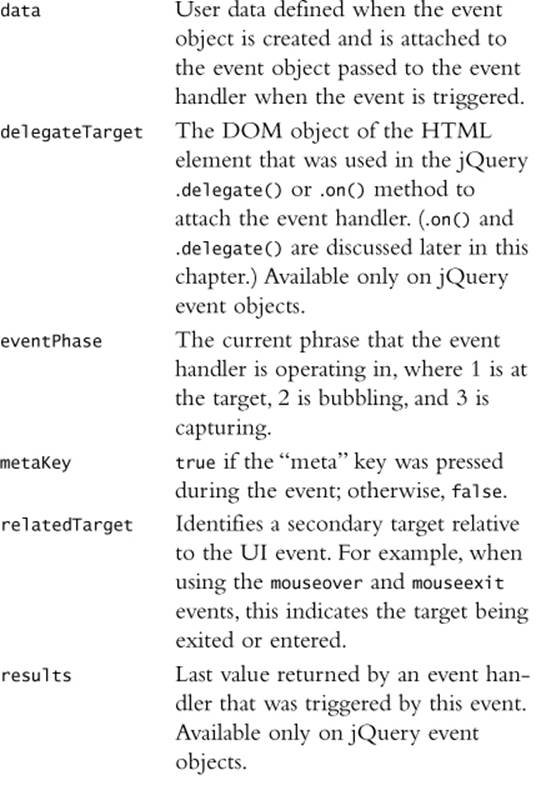
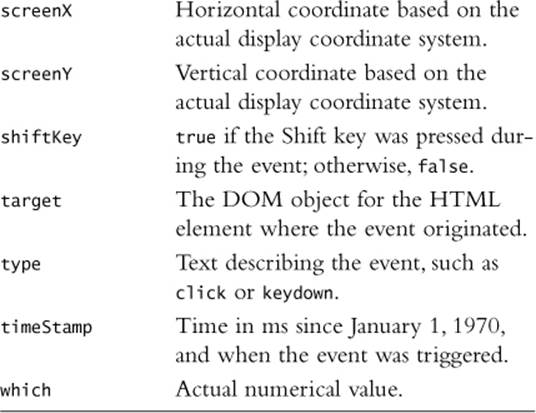
Table 6.2 JavaScript and jQuery Event Object Attributes
The following phrases provide examples of utilizing the data in the event object.
Getting the Event Target Objects
function myHandler(e){
//get the value of the object that triggered the event
var originalValue = $(e.target).val();
//get the value of the current object
var currentValue = $(e.currentTarget).val();
//get the inner HTML of the current object
var currentHTML = $(this).html();
}
The event object provides a link to the DOM object that originally triggered the event as the event .target attribute. The event object also provides a link to the DOM object that triggered the current event handler as the event.currentTarget attribute. Having access to these objects is useful because it allows you to obtain additional information, such as checked state or value.
The object that triggered the event handler is also available using the this keyword. For example, you can get the inner HTML value of the element using the following:
var currentHTML = $(this).html();
Getting the Mouse Coordinates
function myHandler(e){
$("#p1").html("From left side of screen: " + e.screenX);
$("#p2").html("From right side of screen: " + e.screenX);
$("#p3").html("From left side of browser: " + e.clientX);
$("#p4").html("From right side of browser: " + e.clientY);
}
For many graphical web apps, it is critical to not only know what target mouse events originated in, but the exact location on the screen or in the web browser display. The JavaScript mouse event object includes the event.screenX and event.screenY attributes that allow you to get the offset from the top and left of the screen in pixels.
Additionally, the JavaScript mouse event includes the event.clientY and event.clientY attributes that allow you to get the offset from the top and left of the browser window in pixels. These are often the more important coordinates because they help establish the mouse position in relation to the web page.
Handling Mouse Events
The most common events that occur in web browsers are mouse events. Each movement of the mouse is an event. Events also include a mouse entering or leaving an HTML element and mouse clicks and scrolls. The phrases in this section give you some examples of utilizing the mouse events in your JavaScript and jQuery code.
Adding Mouse-Click-Handling Code
$("p").on("click", function (e){
$(this).html("You clicked here.");
});
$("span").on("dblclick", function (e){
$(this).html("You double-clicked here.");
});
To register a click handler in jQuery, you should use the .on("click") or .on("dblclick") method. Inside the handler function, you can perform whatever event functionality your application requires. It is easy to apply the click handler to multiple objects using jQuery selectors. For example, the following applies a click handler to all <div> elements:
$("div").on("click", function (e){
$(this).html("You clicked here.");
});
Handling the Mouse Entering or Leaving Elements
$("p").on("mouseover", function (e){
$(this).html("Hello mouse.");
});
$("p").on("mouseout", function (e){
$(this).html("Wait, don't go.");
});
The browser provides an event each time the mouse enters or leaves an element. The standard JavaScript events are mouseover and mouseout, so you can use .on("mouseover") to add an event handler for the mouse entering an element and .on("mouseout") to add an event handler for when the mouse leaves.
Applying a Right-Click
$("#menu").hide();
$("#main").on("mousedown", function(e){
if(e.button == 2){ $("#menu").show(); } });
$("#main").on("mouseup", function(e){
if(e.button == 2){ $("#menu").hide(); } });
$('#main').on("contextmenu", function(e){
return false; });
Applying a right-click to an element requires some additional actions because the default browser action is to bring up a right-click menu for the browser page.
The first thing you need to do in your event handler is to determine which mouse button was clicked by looking at the event.button attribute, which contains 0 for left, 1 for center, and 2 for right.
You also need to suppress the default browser contextmenu behavior, as shown in lines 14 and 15, in most instances to add your own right-click behavior. The following code example demonstrates how to implement the framework for your own custom popup menu that is displayed only when you right-click, as shown in Figure 6.2:
01 <html>
02 <head>
03 <title>Python Phrasebook</title>
04 <meta charset="utf-8" />
05 <script type="text/javascript"
06 src="../js/jquery-2.0.3.min.js"></script>
07 <script>
08 $(document).ready(function(){
09 $("#menu").hide();
10 $("#main").on("mousedown", function(e){
11 if(e.button == 2){ $("#menu").show(); } });
12 $("#main").on("mouseup", function(e){
13 if(e.button == 2){ $("#menu").hide(); } });
14 $('#main').on("contextmenu", function(e){
15 return false; })
16 });
17 </script>
18 </head>
19 <body>
20 <div id="main"> Right-Click Me
21 <div id="menu">
22 <p>Item 1</p><p>Item 2</p><p>Item 3</p>
23 </div>
24 </div>
25 </body>
26 </html>
ch0601.html
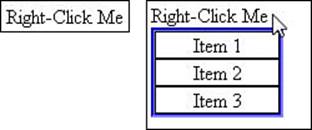
Figure 6.2 Right-clicking on the text pops up a simple list of items.
Handling Keyboard Events
An often forgotten event when working with web pages is the keyboard event. However, keyboard events can be some of the most useful, especially if you are trying to make your web site feel more like a web app.
Users are accustomed to hot keys that perform different functions and interactions as you enter data into fields in applications. Keyboard events let you accomplish just that. The following phrases show you how to detect keyboard input and utilize the event object to determine which key(s) were pressed.
Detecting Changes to Text Input Elements
$("input[type=text]").on("keypress",
function(){
$("#p1").html("Key Pressed"); });
$("input[type=text]").on("keydown",
function(){
$("#p1").html("Key is Down"); });
$("input[type=text]").on("keyup",
function(){
$("#p1").html("Key is Up"); });
JavaScript provides three events that are triggered when a key is pressed on the keyboard: keydown, keypress, and keyup. These events allow you to capture each keystroke into the text input.
For example, if you want to add an event handler that is triggered each time a key is pressed in text input, you could use the following:
$("input[type=text]").on("keypress",
function(){handler_code});
Did you know?
A useful trick when getting the text in a text box while handling keyboard events to input elements is to use the keyup instead of the keypress event. When the keypress event is triggered, the value of the input box may not include the typed key yet. However, if you use the keyup event, the textbox value will always include the typed key.
Determining What Key Was Pressed
$("input[type=text]").on("keypress",
function(e){
var s = "You Pressed ";
if (e.ctrlKey){ s += "CTRL + "; };
if (e.altKey){ s += "SHIFT + "; };
if (e.shiftKey){ s += "SHIFT + "; };
s += String.fromCharCode(e.charCode);
$("#p1").html(s);
});
});
The event passed to the event keyboard event handler includes the character code and the auxiliary key information. To determine which key was pressed, use the event.charCode attribute to get the character code. You can convert the character code to a character using theString.fromCharCode(code) method. For example:
var charcter = String.fromCharCode(event.charCode);
To determine if the Ctrl, Alt, or Shift keys were pressed, you can check the event.shiftKey, event.altKey, and event.ctrlKey attributes. These are boolean values that indicate whether that key was pressed.
The following code shows an example of using the event data to determine which key(s) were pressed and display that information to the web page. Figure 6.3 shows the resulting web page interaction:
01 <html>
02 <head>
03 <title>Python Phrasebook</title>
04 <meta charset="utf-8" />
05 <script type="text/javascript"
06 src="../js/jquery-2.0.3.min.js"></script>
07 <script>
08 $(document).ready(function(){
09 $("input[type=text]").on("keypress",
10 function(e){
11 var s = "You Pressed ";
12 if (e.ctrlKey){ s += "CTRL + "; };
13 if (e.altKey){ s += "SHIFT + "; };
14 if (e.shiftKey){ s += "SHIFT + "; };
15 s += String.fromCharCode(e.charCode);
16 $("#p1").html(s);
17 });
18 });
19 </script>
20 </head>
21 <body>
22 <p id="p1"></p>
23 <input type="text" />
24 </body>
25 </html>
ch0602.html

Figure 6.3 Getting the keystroke events in an event handler using JavaScript in ch0602.html.
Form Events
Some of the most important events especially for e-commerce sites are form events. Form events are used heavily when providing users with cart interactions, checkouts, registrations, and more. Adding event handlers to form events allows you to provide some dynamic interactions with the user as the user fills out the forms.
The following phrases are designed to cover the basic concepts of handling the different types of form events. Additionally, there are keyboard and mouse events in the form that have already been covered in this chapter.
Handling Focus Changes
$("input").on("focus",
function(e){
gain_focus_code_here
});
$("input").on("blur",
function(e){
lose_focus_code_here
});
When handling form events, two important events are focus and blur. These events are triggered when a form element receives or loses focus. There is a lot that you can use these events for. For instance, you might want to change the look and feel of a form element when it gains focus or loses focus.
Handling Selection Changes
$("select").on("change",
function(e) {
select_change_code_here });
$("input[type=checkbox]").on("change",
function(e) {
checkbox_change_code_here });
$(" input[type=radio]").on("change",
function(e) {
radio_change_code_here });
Another important type of event to handle when working with forms is the selection change in check boxes, radio inputs, and select elements. All these elements have a change event handler that is triggered when the selection changes.
To handle selection changes on these items in jQuery, add the following event handler. Then put whatever change code you would like inside the handler function:
$("#formElement").on("change",
function(e) {
change_code_here
});