jQuery and JavaScript Phrasebook (2014)
7. Manipulating Web Page Elements Dynamically
At the heart of dynamic programming is programmatically altering the existing web page elements on the fly to react to user input. This provides the rich interactive experience that people are beginning to expect from all web sites.
jQuery and JavaScript provide several methods to easily alter the appearance, style, and content of the page elements, from changing an image source and paragraph content to dynamically highlighting text and container borders.
The following sections describe how to utilize jQuery and JavaScript to access and manipulate the web page elements.
Getting and Setting DOM Element Attributes and Properties
DOM objects provide direct access to the DOM object attributes as well as the DOM element properties of the HTML elements they represent. This really is not reasonable in jQuery, because jQuery objects often represent multiple elements with varying attributes. For that reason, jQuery provides the .attr() and .prop() methods to get and set the attributes and properties of these elements.
The .attr(attribute, [value]) method allows you to specify an attribute name only to get the current value as well as an optional value to set the current value. For example, the following code gets the src value for a specific image element with id="bannerImg":
var state = $("#bannerImg").attr("src");
Then the following statement sets the src attribute value for all <img> elements:
$("img").attr("src","images/default.jpg");
The .prop(property, [value]) method allows you to specify the property to get the current value and an optional value to set the current value. For example, the following code gets the checked state a specific element with id="firstCheckbox":
var state = $("#firstCheckbox").prop("checked");
And the following statement sets the checked value of all <input> elements to true:
$("input").prop("checked", true);
Did you know?
The only difference between a property and an attribute as far as jQuery goes is that attributes are values that define the HTML structure, and properties are values that affect the dynamic state of the object. For example, in an <input> element, "type" is an attribute because it defines the structure, whereas “checked” is a property because it only affects the state.
Changing a Link Location
<script>
$("#pageLink").attr("href", "complexpage.html");
</script
. . .
<body>
<a id="pageLink" href="simplepage.html">Link</a>
</body>
With web pages becoming more and more dynamic, even the links that are built into have become dynamic. A great advantage of using jQuery and JavaScript in your pages is that you can easily alter the URL that links point to dynamically based on user input or other sources of data.
To change the URL that a link points to, use the .attr("href", newURL) method. When the user clicks on the link, the browser reads the href attribute of the <a> element and then loads that location as the next page.
Changing an Image Source File
var imgArr = ["bison.jpg","peak.jpg","falls.jpg"];
var idx = 0;
$(document).ready(function (){
$("img").on("click", function(){
if(idx<2) { idx++; } else { idx=0; }
$(this).attr("src", imgArr[idx]);
});
});
A common task in jQuery and JavaScript is changing the images displayed on the screen. Whether it is an online ad, a game, or an image gallery, it is much nicer to simply swap out the source file for an <img> element than reload the web page.
To change the image that is displayed in an <img> element, use the .attr("src", newImageURL) method to specify a new location of the new user file. When the src attribute changes, the browser automatically downloads the new image if needed and renders it in the web page without requiring a reload.
The following code shows a good example of swapping out images, as illustrated in Figure 7.1. A single image is in the web page. On line 13, in a click handler, the src attribute is changed to one of the values from the imgArr array:
01 <html>
02 <head>
03 <title>Python Phrasebook</title>
04 <meta charset="utf-8" />
05 <script type="text/javascript"
06 src="../js/jquery-2.0.3.min.js"></script>
07 <script>
08 var imgArr = ["bison.jpg","peak.jpg","falls.jpg"];
09 var idx = 0;
10 $(document).ready(function (){
11 $("img").on("click", function(){
12 if(idx<2) { idx++; } else { idx=0; }
13 $(this).attr("src", imgArr[idx]);
14 });
15 });
16 </script>
17 <style>
18 img { width:300px; border:3px ridge white;
19 box-shadow: 5px 5px 5px #888888; margin:10px; }
20 </style>
21 </head>
22 <body>
23 <img src="bison.jpg" />
24 </body>
25 </html>
ch0701.html

Figure 7.1 Swapping images using jQuery code in ch0701.html.
Getting and Setting CSS Properties
jQuery makes it extremely easy to get and set CSS values using the .css(property, [value]) method. For example, the following code retrieves the cursor CSS property value of an element:
$("#buttonA").css("cursor");
Then the following sets the border-radius value:
$("#buttonA").css("border-radius", "10px 15px");
The .css() method also allows you to pass a map object with properties and values. This allows you to set several settings at once. For example, the following code uses .css() to set the margin, padding, float, and font-weight attributes at the same time:
$("span").css({margin:0, padding:2, float:"left", "font-weight":"bold"});
Notice that the property names can either be enclosed in quotes or not. You need to use quotes if the property name contains a – or another character that is not valid in a JavaScript object name. The values can be numbers or strings. The numerical values represent distance, which can be expressed in px, cm, or %. The default is px, so if you want to specify pixels, you only need to enter the number. If you want to specify cm, %, or some other value type, you need to use a string, such as "100%".
Changing Colors
$("h1").on("click", function(){
$(this).css({color:"white",
"background-color":"black"});
});
A great way to provide interaction with user actions is to alter the colors of elements on the screen. Colors can provide additional meaning. For instance, changing the color of text to red or the background color of text to a yellow highlight accentuates the text as important to read.
In jQuery, you can change all the CSS attributes that control the colors on the screen using the .css(property, value) method. However, if you are changing multiple color properties, it makes much more sense to use the .css({property:value, property:value...})method, which allows you to change several properties at once.
The following code provides a good example of using jQuery to dynamically change the color of a header when it is clicked on. A click handler alters the background and foreground colors so that the header stands out more, as illustrated in Figure 7.2. Notice that the background-property key had to be placed in quotes to support the JavaScript language syntax.
01 <html>
02 <head>
03 <title>Python Phrasebook</title>
04 <meta charset="utf-8" />
05 <script type="text/javascript"
06 src="../js/jquery-2.0.3.min.js"></script>
07 <script>
08 $(document).ready(function (){
09 $("h1").on("click", function(){
10 $(this).css({color:"white",
11 "background-color":"black"});
12 });
13 });
14 </script>
15 </head>
16 <body>
17 <h1>Heading 1</h1>
18 <h1>Heading 2</h1>
19 </body>
20 </html>
ch0702.html
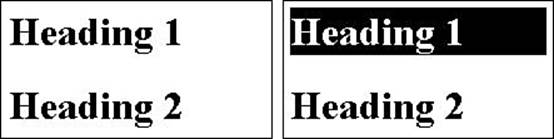
Figure 7.2 Changing foreground and background colors using jQuery code in ch0702.html.
Adding Borders
$("ul").on("click", function(){
$(this).css({"border":"3px groove black"});
});
$("li").on("click", function(){
$(this).css({"border-style":"dotted",
"border-size":1,
"border-color":"blue"});
});
Another useful style that can be programmatically applied to elements is borders. Borders give you a way to highlight specific elements on the page or just change the look of things.
You can change the CSS attributes that apply borders to elements in jQuery using the .css(property, value) or .css({property:value, property:value...}) method.
By the way
You can set all the border options at the same time using the border property with a size, style, and color, for example:
$(this).css({"border":"3px groove black"});
The following code provides a good example of using jQuery to dynamically add borders to <ul> and <li> elements. I provide two examples: one that changes all attributes in a single border property setting, and the other that changes them individually. A click handler applies the borders to the list element and list item elements illustrated in Figure 7.3:
01 <html>
02 <head>
03 <title>Python Phrasebook</title>
04 <meta charset="utf-8" />
05 <script type="text/javascript"
06 src="../js/jquery-2.0.3.min.js"></script>
07 <script>
08 $(document).ready(function (){
09 $("ul").on("click", function(){
10 $(this).css({"border":"3px groove black"});
11 });
12 $("li").on("click", function(){
13 $(this).css({"border-style":"dotted",
14 "border-size":1,
15 "border-color":"blue"});
16 });
17 });
18 </script>
19 </head>
20 <body>
21 <ul>
22 <li>George Washington</li>
23 <li>John Adams</li>
24 <li>Thomas Jefferson</li>
25 </ul>
26 </body>
27 </html>
ch0703.html

Figure 7.3 Adding borders using jQuery code in ch0703.html.
Changing Fonts
$("p").on("click", function(){
$(this).css({"font-weight":"bold",
"font-style":"italic",
"font-size":22,
"font-family":"cursive, sans-serif"});
});
A fun option available using the .css() method is the ability to alter the font of paragraphs and other elements. You can use the .css() method for a variety of purposes, such as illustrating an area already read or accentuating text that becomes contextually important. You can adjust thefont-weight, font-size, font-style, and font-family attributes directly to change the appearance of the text.
To programmatically alter the font values, apply the .css(property, value) or .css({property:value, property:value...}) method. The following code provides a good example of using jQuery to dynamically change the style of a paragraph once you click it. Theclick handler, shown in lines 9–14, applies the font changes when the user clicks on the paragraph, as illustrated in Figure 7.4:
01 <html>
02 <head>
03 <title>Python Phrasebook</title>
04 <meta charset="utf-8" />
05 <script type="text/javascript"
06 src="../js/jquery-2.0.3.min.js"></script>
07 <script>
08 $(document).ready(function (){
09 $("p").on("click", function(){
10 $(this).css({"font-weight":"bold",
11 "font-style":"italic",
12 "font-size":22,
13 "font-family":"cursive, sans-serif"});
14 });
15 });
16 </script>
17 </head>
18 <body>
19 <p>The play's the thing, wherein
20 I'll catch the conscience of the king.</p>
21 </body>
22 </html>
ch0704.html
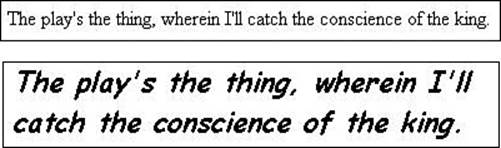
Figure 7.4 Changing font styles using jQuery code in ch0704.html.
Adding a Class
$("span").addClass("baseClass");
An important part of rich interactive web pages is good CSS design. JavaScript and jQuery can enhance the CSS design by dynamically adding and removing classes from elements.
jQuery makes it extremely simple to add, remove, and toggle classes on and off. If you design your CSS code well, it’s easy to apply some nice effects.
You add classes using the .addClass(className) method. For example, to add a class named active to all <span> elements, you could use the following statement:
$("span").addClass("active");
Removing a Class
$("span").removeClass("oldClass");
You remove classes using the .removeClass([className]) method. For example, to remove the active class from the <span> elements, you call the following:
$("span").removeClass("active");
You can also use remove with no className, which removes all classes from the elements. For example, the following statement removes all classes from <p> elements:
$("p").removeClass();
Toggling Classes
$("span").on("click", function(){
$(this).toggleClass("active");
});
You can toggle classes on and off using the .toggleClass(className [, switch) method. In addition to the className, you can specify true or false for the optional switch parameter, indicating to turn the class on or off.
For example, to turn the active class and the inactive class off for all <span> elements, the code would be as follows:
$("span").toggleClass("active", true);
$("span").toggleClass("inactive", false);
The following code provides a good example of using jQuery to dynamically toggle a class on and off when a user clicks on a <span> element. The click handler in lines 9–11 uses the .toggleClass() method to switch the .active class on and off. Figure 7.5 illustrates the look and behavior of the code:
01 <html>
02 <head>
03 <title>Python Phrasebook</title>
04 <meta charset="utf-8" />
05 <script type="text/javascript"
06 src="../js/jquery-2.0.3.min.js"></script>
07 <script>
08 $(document).ready(function (){
09 $("span").on("click", function(){
10 $(this).toggleClass("active");
11 });
12 });
13 </script>
14 <style>
15 span {
16 border:3px ridge white; border-radius:10px;
17 padding:3px; color:black; background-color:#CCCCCC;
18 cursor:pointer; }
19 .active {
20 background-color:blue; color:white;
21 border-color:blue; font-weight:bold;}
22 </style>
23 </head>
24 <body>
25 <span>Option 1</span>
26 <span>Option 2</span>
27 </body>
28 </html>
ch0705.html

Figure 7.5 Toggling classes on and off using jQuery code in ch0705.html.
Getting and Manipulating Element Content
Often, you will not know all the elements that belong on a web page until a user begins using it, or you will receive additional information from a web service or some other interaction. In those cases, you may need to be able to add or replace element content on the fly using jQuery and JavaScript code.
The text of the element content is stored in the innerHTML attribute of the DOM element. You can change the content using JavaScript simply by setting the innerHTML to the new content. For example:
document.getElementById("#p1").innerHTML = "New Text";
In jQuery, you can change the innerHTML content using the .html() method, which gets or sets the innerHTML sting. For example:
$("#p1").html("Paragraph 1 goes here");
Getting the Content of an HTML Element
var p1Contents = $("#p1").html();
var div1Contents = $("#div1").html();
Containing the content inside an HTML element is easy using the jQuery .html() method. Calling this method with no parameter returns an HTML string version of the content. If the content is just text, the return is a simple string. If the content is HTML elements, the string is included in the HTML tags.
Appending and Prepending Text to a Basic HTML Element
$("#p1").prepend("*New* :");
$("#p1").append(". . .read");
Another common dynamic task is adding text to a basic HTML element such as a span or paragraph. jQuery makes this extremely simple using the .append() method. This method appends content to the end of the element’s current content. It doesn’t matter if the content is a string or other elements.
For example, the following code appends the text ". . .read" to a paragraph with id="p1":
$("#p1").append(". . .read");
You may also want to prepend text to the beginning of an element’s content. In jQuery, the .prepend() method prepends content to the beginning of the element’s current content. It doesn’t matter if the content is a string or other elements.
For example, the following code prepends the text "*New* :" to a paragraph with id="p1":
$("#p1").prepend("*New* :");
Replacing Element Text
$("$mySpan").html("content");
. . .
$("$mySpan").html("newer content");
. . .
$("$mySpan").html("even newer content");
Rather than prepending or appending text (or content, for that matter) to an element, you may want to replace the element content entirely. The simplest way to do this in jQuery is to use .html(), which sets the value of the content to whatever string or object you pass into it, thus replacing the existing content.
Appending Elements to Parent Content
var newP = $("<p></p>");
newP.html("This is the first paragraph.");
$("div").prepend(newP);
newP.html("This is the last paragraph.");
$("div").append(newP);
You can also use the .prepend() and .append() methods in jQuery to prepend or append content to the element. Another major advantage of jQuery is that you can append HTML DOM elements created using the jQuery constructor jquery(htmlString) or $(htmlString) to add new HTML elements to the page. For example, the following code constructs a jQuery object with a <p> element, sets the content of the new paragraph element using .html(), and then appends the paragraph to all <div> elements.
var newP = $("<p></p>");
newP.html("This is a new paragraph.");
$("div").append(newP);
All materials on the site are licensed Creative Commons Attribution-Sharealike 3.0 Unported CC BY-SA 3.0 & GNU Free Documentation License (GFDL)
If you are the copyright holder of any material contained on our site and intend to remove it, please contact our site administrator for approval.
© 2016-2026 All site design rights belong to S.Y.A.