jQuery and JavaScript Phrasebook (2014)
9. Dynamically Working with Form Elements
Web forms are an integral part of dynamic web programming. You may think of forms only in terms of credit card payments, online registration, and the like, but anytime you need actual data input from the user, you are using web forms.
Web forms can be a positive or negative experience for users. If it seems difficult to input the data on the form because the form is clunky or difficult to understand, users hate it and have a bad experience.
Applying dynamic adjustment to the web form by dynamically accessing and manipulating the flow of the form allows you to give users a much better experience. The phrases in this chapter focus on accessing the form data and then using that data to dynamically manipulate the form to improve the overall user experience.
Getting and Setting Text Input Values
var inText = $("#inBox").val();
if (inText != "default"){
$("#outBox").val(inText);
}
The most common type of form elements are textual inputs. These elements include the <textarea> element as well as <input> elements with the following type attribute values: color, date, datetime, datetime-local, email, month, number, password, range,search, tel, text, time, url, and week.
Although the browser uses these values a bit differently, all are rendered in the same basic text box and are accessed in the same basic way. Each of them has a value attribute that is displayed in the text box as the image is rendered.
In jQuery, you can access the value text inputs using the .val() method of the jQuery object. To get the text typed into the text box, you should call the .val() method with no arguments. For example, to get the value of #textbox1, you would use the following:
var textbox1text = $("#textbox1").val();
To set the text that appears in the text box, you would use .val(string). For example, to set the value of #textbox1 to “new string”, you would use this:
$("#textbox1").val("new string");
Watch out!
The .attr(), .prop(), and .val() methods only get the values of the first element in the matched jQuery set. If you are working with multiple elements in the set, you may need to use a .map() or .each() method to get values from all elements.
Checking and Changing Check Box State
if ($("#myCheckbox").is(":checked)){
$("#myCheckbox").removeAttr("checked");
else{
$("#myCheckbox").attr("checked");
}
Check box input elements have a boolean value based on whether the element is checked. You access the value by getting the value of the checked attribute. If the element is checked, then checked has a value such as true or “checked”. Otherwise, the value will be undefined orfalse.
You can get and set the state of a check box element from JavaScript in the following manner:
domObj.checked = true;
domObj.checked = false;
var state = domObj.checked;
Determining whether an item is checked with jQuery is a bit different. Remember, in jQuery you may be dealing with multiple check boxes at once, so the safest way to see if the jQuery object represents an object that is checked is the .is() method. For example:
$("#myCheckbox").is(":checked");
To set the state of a jQuery object representing check boxes to checked, you would simply set the checked attribute as follows:
$("#myCheckbox").attr("checked", true);
Setting the state of a jQuery object representing check boxes to unchecked is a bit different. You need to remove the checked attribute using removeAttr(). For example:
$("#myCheckbox").removeAttr("checked");
Getting and Setting the Selected Option in a Radio Group
if ($("#maleRB").is(":checked)){
$("#maleRB").removeAttr("checked");
else{
$("#maleRB").attr("checked");
}
var genderGroup = $("input[name=gender]");
var checkedGender = genderGroup.filter(":checked");
var selectedGender = checkedGender.val();
Radio inputs are almost always used in groups. The value of a radio input that a group represents is not boolean. Instead, it is the value attribute of the currently selected element. For example, the value of the following radio button group is either "male" or "female":
<input id="maleRB" type="radio" name="gender" value="male">
<label for="maleRB">Male</label>
<input id="femaleRB" type="radio" name="gender" value="female">
<label for="femaleRB">Female</label>
To get the value of a radio input group in code, you first need to access all the elements in the group, find out which one is selected, and then get the value attribute from that object. The following code gets the value of a radio input group that is grouped by name="gender" in jQuery:
var genderGroup = $("input[name=gender]");
var checkedGender = genderGroup.filter(":checked");
var selectedGender = checkedGender.val();
Setting the checked value of individual radio inputs works the same way as check boxes. To see if the jQuery object represents a radio button that is checked, use the .is() method. For example:
$("#maleRB").is(":checked");
To set the state of a jQuery object representing a radio button to checked, you simply set the checked attribute as follows:
$("#maleRB").attr("checked", true);
To set the state of a jQuery object representing a radio button to unchecked, you need to remove the checked attribute using removeAttr(). For example:
$("#maleRB").removeAttr("checked");
Getting and Setting Select Values
var value = $("#singleSelect").val();
var values = $("#multiSelect").val();
. . .
$("#singleSelect").val("one");
$("#multiSelect").val(["two", "three"]);
Select inputs are really container inputs for a series of <option> elements. The value of the select element is the value(s) of the currently selected option(s). Once again, the submission and serialization in jQuery and JavaScript handle this automatically for you. However, doing it manually requires a bit of code.
Did you know?
If you do not specify a value attribute for an <option> element, the value returned is the value of the innerHTML. For example, the value of the following option is "one":
<option>one</option>
You may want a couple of different values when accessing a <select> element. One is the full value represented by the element. Getting that value is simple in jQuery using the .val() method. For example, consider the following code:
HTML:
<select id="mySelect">
<option value="one">One</option>
<option value="two">Two</option>
<option value="three">Three</option>
</select>
jQuery:
$("#mySelect").val();
The value returned by the jQuery statement if the first option is selected is this:
"one"
For multiple selects, the .val() method returns an array of the values instead of a single value. On a multiple select, the value returned by the jQuery statement if the first option is selected is this:
["one"]
On a multiple select, the value returned by the jQuery statement if the first option is selected follows:
["one", "two", "three"]
You can also use the .val() method to set the selected elements. For example, the following statement selects the second element in the previous select:
$("#mySelect").val("one");
The following statement selects the second and third options in a multiple select element:
$("#mySelect").val(["two", "three"]);
Getting and Setting Hidden Form Attributes
var hiddenValue = $("#hidden").val();
var hiddenValue = $("#hidden").attr("other");
var hiddenValue = $("#hidden").prop("otherProp");
var hiddenValue = $("#hidden").data("storedValue");
A great HTML element to use if you need to supply additional information to the browser from a form is the hidden input. The hidden input is not displayed with the form, but it can contain a name and value pair that is submitted or even just values that you want to store in the form and have accessible during dynamic operations.
The parts to be sent with the form are the name and value attributes. However, you can attach additional values to a hidden form object or any HTML DOM object from jQuery using the .data(key [,value]) method. This method works like .attr() and .prop() in that you pass it a key if you want to get the value or, alternatively, you pass a key and value if you want to set the value of a key. For example, the following code defines a simple hidden element and then uses jQuery to assign the submission value and an extended attribute:
HTML:
<input id="invisibleMan" name="InvisibleMan" type="hidden" />
jQuery:
$("#invisibleMan").val("alive");
$("#invisibleMan").data("hairColor", "clear");
var state = $("#invisibleMan").val();
var state = $("#invisibleMan").data("hairColor");
Disabling Form Elements
$("#cbSame").on("click", function(){
if($(this).is(":checked")){
$("#billInfo :input").attr("disabled",true); }
else {
$("#billInfo :input").removeAttr("disabled"); }
});
Disabling web elements still displays them, but it prevents the user from interacting with them. Typically, it only makes sense to disable a form element instead of disable it if you still want the user to be able to see the values of the elements.
To disable a form element, you need to set the disabled attribute. In JavaScript, you can do this directly on the DOM object. In jQuery, you use the .attr() method. For example:
$("#deadElement").attr("disabled", "disabled");
To re-enable a disabled element, you remove the disabled attribute. For example:
$("#deadElement").removeAttr("disabled");
The following code shows an example of using a check box to enable and disable multiple form elements. The click handler checks the state of a check box and, if checked, the input elements inside the #billInfo <div> are disabled. Otherwise, they are enabled. Figure 9.1 shows the form elements that are disabled and enabled.
01 <html>
02 <head>
03 <title>Python Phrasebook</title>
04 <meta charset="utf-8" />
05 <script type="text/javascript"
06 src="../js/jquery-2.0.3.min.js"></script>
07 <script>
08 $(document).ready(function (){
09 $("#cbSame").on("click", function(){
10 if($(this).is(":checked")){
11 $("#billInfo :input").attr("disabled",true); }
12 else {
13 $("#billInfo :input").removeAttr("disabled"); }
14 });
15 });
16 </script>
17 <style>
18 </style>
19 </head>
20 <body>
21 <form>
22 <span>Shipping Info</span><br>
23 <div id="shipInfo">
24 <input type="text">Name</input><br>
25 <input type="text">Address</input><br>
26 <input type="text">City</input><br>
27 <select class="state" id="state"></select>
28 <input type="text">Zip</input><br>
29 </div>
30 <span>Billing Info</span><br>
31 <input type="checkbox" id="cbSame"/>
32 <label for="cbSame">Same as Shipping</label>
33 <div id="billInfo">
34 <input type="text">Name on Card</input><br>
35 <input type="text">Address</input><br>
36 <input type="text">City</input><br>
37 <select class="state" id="state"></select>
38 <input type="text">Zip</input><br>
39 </div>
40 </form>
41 </body>
42 </html>
ch0901.html
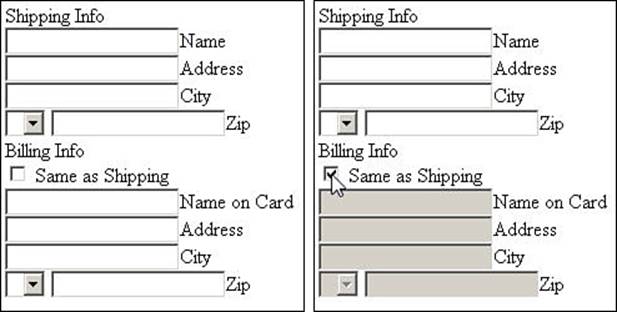
Figure 9.1 Disabling form elements by checking the state of a check box using jQuery code in ch0901.html.
Showing/Hiding Form Elements
$("#tires,#model").hide();
$("#make").on("change", function(){
if($(this).val() == ""){
$("#tires,#model").hide(); }
else{ $("#model").show(); }
});
Another great trick when providing flow control for a web form is to dynamically hide and show elements. Less is more; you shouldn’t necessarily show users more elements than they need to fill out.
For example, if the form has elements for both men’s sizes and women’s sizes, don’t show both. Wait for users to select the gender and then display the appropriate size elements.
Form elements can be shown and hidden in jQuery using the .show() and .hide() methods. Alternatively, if you want to make the element invisible but still take up space, you can set the opacity CSS attribute to 0 or 1.
The following code shows a basic web form with three selects. Only the select that allows users to select a car make is displayed at first, but as users select the make, a model menu appears. Likewise, as users select the model, a tires size menu appears. The click handlers use .show() and.hide() to show and hide the menus appropriately. Figure 9.2 shows the form elements being displayed as more items are selected:
01 <html>
02 <head>
03 <title>Python Phrasebook</title>
04 <meta charset="utf-8" />
05 <script type="text/javascript"
06 src="../js/jquery-2.0.3.min.js"></script>
07 <script>
08 $(document).ready(function (){
09 $("#tires,#model").hide();
10 $("#make").on("change", function(){
11 if($(this).val() == ""){
12 $("#tires,#model").hide(); }
13 else{ $("#model").show(); }
14 });
15 $("#modelS").on("change", function(){
16 var v = $(this).val();
17 if($(this).val() == ""){
18 $("#tires").hide(); }
19 else{
20 $("#tires").show(); }
21 });
22 });
23 </script>
24 <style>
25 select {width:100px; }
26 </style>
27 </head>
28 <body>
29 <form>
30 <select id="make">Maker
31 <option></option>
32 <option>Jeep</option>
33 </select><label>Make</label><br>
34 <div id="model"><select id="modelS">
35 <option></option>
36 <option>Wrangler</option>
37 <option>Cherokee</option>
38 </select><label>Model</label></div>
39 <div id="tires"><select>
40 <option></option>
41 <option>32"</option>
42 <option>33"</option>
43 <option>36"</option>
44 </select><label>Tires</label></div>
45 </form>
46 </body>
47 </html>
ch0902.html

Figure 9.2 Dynamically showing and hiding selects elements using jQuery code in ch0902.html.
Forcing Focus to and Away from Form Elements
$("input[type=radio]").on("change",
function(){
$("#cardNum").focus();
});
A great flow control feature in web forms is to automatically focus elements when you know the user is ready to enter them. For example, if the user selects a year and the next element is a month selection, it makes sense to make the month active for the user automatically.
To set the focus of an element in jQuery, call the .focus() method on that object. For example, the following code sets the focus for an object with id="nextInput":
$("#nextInput").focus();
You can also blur an element that you want to navigate the user away from by calling the .blur() method:
$("#nextInput").blur();
The following code shows an example of a credit card payment form. The logical step for the user to take after selecting the card type is to enter the credit card number. The form detects a change on the radio button group and then immediately shifts focus to the card number input element.Figure 9.3 illustrates the selection automation in the form:
01 <html>
02 <head>
03 <title>Python Phrasebook</title>
04 <meta charset="utf-8" />
05 <script type="text/javascript"
06 src="../js/jquery-2.0.3.min.js"></script>
07 <script>
08 $(document).ready(function (){
09 $("input[type=radio]").on("change", function(){
10 $("#cardNum").focus();
11 });
12 });
13 </script>
14 <style>
15 </style>
16 </head>
17 <body>
18 <form>
19 <input type="radio" name="ptype" id="visa" />
20 <label for="visa"><img src="visa.png" /></label>
21 <input type="radio" name="ptype" id="mc" />
22 <label for="mc"><img src="mc.png" /></label>
23 <input type="radio" name="ptype" id="amex" />
24 <label for="amex"><img src="amex.png" /></label>
25 <div id="ccInfo">
26 <input type="text" id="cardNum">Card Number</input>
27 <br><input type="text" id="csc">CSC</input><br>
28 <label>Expires</label><select id="expiresY"></select>
29 <select id="expiresM"></select><br>
30 </div>
31 </form>
32 </body>
33 </html>
ch0903.html
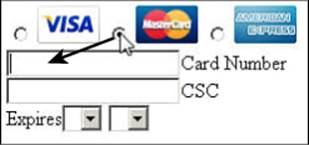
Figure 9.3 Automatically focusing on the credit card number when the card type is selected using jQuery code in ch0903.html.
Controlling Form Submission
$("form").submit(function(e){
alert("Sorry. Not yet Implemented.");
e.preventDefault();
});
Another important aspect of dynamic form flow control is intercepting the submit and reset event and performing actions based on various conditions. For example, you might want to validate form values before you allow the form to be submitted.
The way that you control the form submission functions to attach a submit event handler to the form. Inside the event handler, you have access to information about the event as well as the form data to be submitted. You can perform whatever tasks you need and then either allow the form to be submitted or reset or prevent the default browser action.
The following code illustrates an example of stopping the form submission by calling .preventDefault() on the event:
$("form").submit(function(e){
alert("Sorry. Not yet Implemented.");
e.preventDefault();
})