jQuery and JavaScript Phrasebook (2014)
10. Building Web Page Content Dynamically
A critical part of using jQuery and JavaScript is the ability to dynamically build content to add to the page. This content may be form elements, images, lists, tables, or whatever type of element fits the need. Adding content to the page dynamically instead of requesting a new page from the server eliminates the server request time and allows you to build only those new pieces instead of everything.
The phrases in this chapter are designed to help you understand the methods of creating and adding content to the web page. They cover appending, prepending, and inserting elements of different types. Also covered is how to remove content from the web page.
Creating HTML Elements Using jQuery
var newP = $('<p id="newp" class="nice">new P</p>');
var img = $("<img></img>");
img.attr("src", "images/newImg.jpg");
var opt = $("<option></option>");
opt.html("Option 1");
opt.val(1);
opt.attr("selected",true):
An extremely important aspect of jQuery is the ability to create HTML elements from an HTML string. To create an HTML object from a string, simply call jQuery(htmlString) or $(htmlString). The string can include attribute settings and content. For example:
var newP = $('<p id="newp" class="nice">new Paragraph</p>');
Notice that I used single quotes to define the htmlString. That allowed me to put in the id="newp" and class="nice" without having to escape the double quotes. The resulting newP object is a jQuery object with a single <p> element in its set.
Another big advantage to building HTML is that you can use the .attr(), .html(), .prop(), .val(), and .data() methods to store additional values and set attributes, properties, and content.
For example, the following code creates an image element and then assigns the src attribute:
var img = $("<img></img>");
img.attr("src", "images/newImg.jpg");
Another example creates a new <option>, assigns a value, and then sets the <option> as selected by setting the value of the <select> to the value of the option:
var opt = $("<option></option>");
opt.html("Option 1");
opt.val(1);
select.val(opt.val());
Adding Elements to the Other Elements
An important aspect of dynamic web programming is the ability to add content based on user interaction without the need to request a new page from the server. This gives the users a much quicker and more seamless experience. The phrases in this section are designed to illustrate the basics of prepending, appending, and inserting new HTML elements into existing ones.
Prepending to the Beginning of an Element’s Content
var newDiv = $("<div></div>");
$("body").append(newDiv);
newDiv.append($("<p>Paragraph A</p>"));
$("<p>Paragraph A</p>").appendTo("div");
jQuery provides methods to prepend content before the existing content in an element. For example, you can add list items, a table row, or paragraph text before existing list items, table rows, or text in a paragraph.
These methods are existingObject.prepend(newContent) and newContent.prependTo(existingObject). The existingObject can be an object you already have, or you can use a selector to specify the existing object.
For example, the following code creates a new <div> and appends it to body. Then it prepends two paragraphs each using a different method:
var newDiv = $("<div></div>");
$("body").prepend(newDiv);
newDiv.prepend($("<p>Paragraph A</p>"));
$("<p>Paragraph A</p>").prependTo("div");
Appending to the Bottom of an Element’s Content
var newDiv = $("<div></div>");
$("body").append(newDiv);
newDiv.append($("<p>Paragraph A</p>"));
$("<p>Paragraph B</p>").appendTo("div");
jQuery also provides methods to append content after the existing content in an element. For example, you can add list items, table rows, or paragraph text at the end of a list item, table row, or text in a paragraph.
These methods are existingObject.append(newContent) and newContent.appendTo(existingObject). The existingObject can be an object you already have, or you can use a selector to specify the existing object.
For example, the following code creates a new <div> and appends it to body. Then it appends two paragraphs each using a different method:
var newDiv = $("<div></div>");
$("body").append(newDiv);
newDiv.append($("<p>Paragraph A</p>"));
$("<p>Paragraph A</p>").appendTo("div");
Inserting into the Middle of an Element’s Content
$("ul li:eq(2)).insertBefore($("<li>New Item</li>"));
$("<p>Title</p>").before("#subtitle");
$("ul li:eq(2)).insertAfter($("<li>New Item</li>"));
$("<p>Sub Title</p>").after("#title");
Often, you will want to add new items to the middle of an element’s content. For example, you might need to insert an item into the middle of a list or select or add a new paragraph right before an existing paragraph.
jQuery provides methods to insert content immediately before and after existing content. The new content is a sibling of the existing content.
To insert an element before an existing element, use existingObject.insertBefore(newContent) or newContent.before(existingObject). The existingObject can be an object you already have, or you can use a selector to specify the existing object.
For example, the following code inserts a new list item immediately before the third item already in the list:
$("ul li:eq(2)).insertBefore($("<li>New Item</li>"));
The following code inserts a new paragraph before one with an id="subtitle" using the .before() method:
$("<p>Title</p>").before("#subtitle");
To insert an element after an existing element, use existingObject.insertAfter(newContent) or newContent.after(existingObject). The existingObject can be an object you already have, or you can use a selector to specify the existing object.
For example, the following code inserts a new list item immediately after the third item already in the list:
$("ul li:eq(2)).insertAfter($("<li>New Item</li>"));
The following code inserts a new paragraph immediately after one with an id="title" using the .after() method:
$("<p>Sub Title</p>").after("#title");
Adding Elements Example
The code that follows appends, inserts, and prepends paragraphs to an existing <div> element when the button is clicked so that you can see how the dynamic inserts work. Figure 10.1 illustrates how the page looks before and after adding the elements:
01 <html>
02 <head>
03 <title>Python Phrasebook</title>
04 <meta charset="utf-8" />
05 <script type="text/javascript"
06 src="../js/jquery-2.0.3.min.js"></script>
07 <script>
08 $(document).ready(function (){
09 $("button").on("click", function(){
10 $("div").prepend("<p>Paragraph 1</p>");
11 $("div p:eq(1)").after("<p>Paragraph 3</p>");
12 $("div").append("<p>Paragraph 5</p>");
13 });
14 });
15 </script>
16 </head>
17 <body>
18 <button>Add Paragraphs</button>
19 <div>
20 <p>Paragraph 2</p>
21 <p>Paragraph 4</p>
22 </div>
23 </body>
24 </html>
ch1001.html
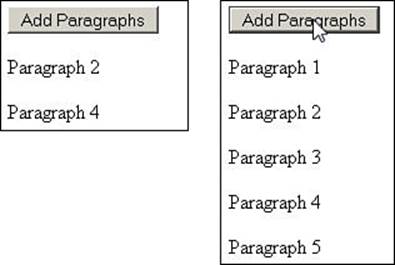
Figure 10.1 Dynamically adding paragraph elements using jQuery code in ch1001.html.
Removing Elements from the Page
$("p").remove();
$("p").remove(".menu");
$("#myList").children("li").remove();
You remove elements from the web page using the .remove([selector]) method on the jQuery object. This method modifies the DOM and removes the nodes from the tree.
There are a few different ways to use the .remove() method. Calling .remove() with no parameters removes all elements in the jQuery object’s set. For example, the following statement removes all <p> elements:
$("p").remove();
You can also pass a selector into .remove(), which limits the removal to items in the set that match the selector value. For example, the following statement removes all <p> elements with class="menu":
$("p").remove(".menu");
Often, you won’t want to remove the element itself, but its children. For example, the following code removes all <li> elements in a list with id="myList":
$("#myList").children("li").remove();
The following code shows an example of using selectors to remove elements from a list. The code first generates a list of ten elements and then provides buttons that call handlers that use .remove("li:even") or .remove("li:odd") to remove only the even or odd elements from the list, as shown in Figure 10.2:
01 <html>
02 <head>
03 <title>Python Phrasebook</title>
04 <meta charset="utf-8" />
05 <script type="text/javascript"
06 src="../js/jquery-2.0.3.min.js"></script>
07 <script>
08 $(document).ready(function (){
09 for(var i=0; i<10; i++){
10 $("ul").append($("<li></li>").html("Item "+ i));
11 }
12 $("#odd").on("click", function(){
13 $("li:odd").remove(); });
14 $("#even").on("click", function(){
15 $("li:even").remove(); });
16 });
17 </script>
18 </head>
19 <body>
20 <button id="odd">Remove Odd</button>
21 <button id="even">Remove Even</button>
22 <ul></ul>
23 </body>
24 </html>
ch1002.html
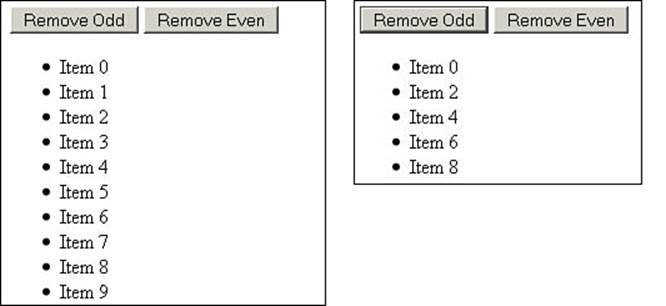
Figure 10.2 Dynamically removing list elements using jQuery code in ch1002.html.
Dynamically Creating a Select Form Element
var select = $("<select></select>");
var opt = $("<option></option");
opt.val("1");
opt.html("Option 1");
select.append(opt);
select.val(opt.val());
jQuery makes it easy to dynamically generate a select element. This is useful if you are trying to add selects with a large number of options or if the data for the select is coming in a dynamic way, such as user input or an AJAX request.
To dynamically create a select, you first need to create a <select> element using the following code:
var select = $("<select></select>");
Then you need to add options by creating the <option> element, setting a value for the option, and then defining the HTML to appear in the select. The following code creates a new <option> and adds it to <select>:
var opt = $("<option></option");
opt.val("1");
opt.html("Option 1");
select.append(opt);
You can also set an option as selected using the following statement to set the value of the select to the value of the option:
select.val(opt.val());
The following code illustrates an example of dynamically building date selects of month, day, year using for loops and a month name array. Figure 10.3 shows the dynamically generated selects:
01 <html>
02 <head>
03 <title>Python Phrasebook</title>
04 <meta charset="utf-8" />
05 <script type="text/javascript"
06 src="../js/jquery-2.0.3.min.js"></script>
07 <script>
08 var mNames = ["Jan", "Feb", "Mar", "Apr", "May",
09 "Jun", "Jul", "Aug", "Sep", "Oct", "Nov", "Dec" ];
10 $(document).ready(function (){
11 var months = $('<select id="mon"></select>');
12 var days = $('<select id="day"></select>');
13 var years = $('<select id="year"></select>');
14 for(var i=0; i<mNames.length; i++){
15 var month = $("<option></option");
16 var v = mNames[i];
17 month.val(mNames[i]).html(mNames[i]);
18 months.append(month); }
19 for(var i=1; i<=31; i++){
20 var day = $("<option></option");
21 day.val(i).html(i);
22 days.append(day); }
23 for(var i=2010; i<=2030; i++){
24 var year = $("<option></option");
25 year.val(i).html(i);
26 years.append(year); }
27 $("body").append(months, days, years);
28 $("select").on("change", function(){
29 $("p").html($("#mon").val() +" " +
30 $("#day").val() +", " + $("#year").val());
31 });
32 $("select").attr("size", 3);
33 });
34 </script>
35 </head>
36 <body>
37 <p>Date</p>
38 </body>
39 </html>
ch1003.html

Figure 10.3 Dynamically creating select elements using jQuery and JavaScript code in ch1003.html.
Appending Rows to a Table
var newRow = $("<tr></tr>");
var newCell = $("<td>cel1</td>");
newRow.append(newCell);
$("tbody").append(newRow):
A common task when dynamically manipulating web pages is to add rows to elements in a table. To add rows to a table, you need to create a new <tr> element and then add the <td> elements. For example:
var newRow = $("<tr></tr>");
var newCell = $("<td>cel1</td>");
newRow.append(newCell);
$("tbody").append(newRow):
The following example illustrates using table building using a series of arrays to populate the data. The buildTable() function selects a random item out of the arrays to be placed into the <td> elements. Figure 10.4 shows the final table:
01 <html>
02 <head>
03 <title>Python Phrasebook</title>
04 <meta charset="utf-8" />
05 <script type="text/javascript"
06 src="../js/jquery-2.0.3.min.js"></script>
07 <script>
08 var tArr = ["Mens", "Womens", "Youth", "Childs"];
09 var sArr = ["XL", "M", "S", "XS"];
10 var kArr = ["pants", "shirt", "sweater", "belt"];
11 function randInt(max) {
12 return Math.floor((Math.random()*max)+1); }
13 function buildTable(){
14 for(var x=1;x<10;x++){
15 var row =$("<tr></tr>");
16 row.append($("<td></td>").html(x));
17 row.append($("<td></td>").html(
18 tArr[randInt(3)]+" "+sArr[randInt(3)] +
19 " " +kArr[randInt(3)]));
20 row.append($("<td></td>").html(randInt(20)));
21 row.append($("<td></td>").html(
22 ((Math.random()*80)+5).toFixed(2)));
23 $("tbody").append(row);}
24 }
25 $(document).ready(function (){
26 buildTable()
27 });
28 </script>
29 <style> td {border:.5px dotted black; } </style>
30 </head>
31 <body>
32 <table>
33 <thead><tr>
34 <th class="numeric"><span>ID#</span></th>
35 <th ><span>Product</span></th>
36 <th class="numeric"><span>Quantity</span></th>
37 <th class="numeric"><span>Price</span></th>
38 <td class="spacer"></td>
39 </tr></thead>
40 <tbody></tbody>
41 </table>
42 </body>
43 </html>
ch1004.html
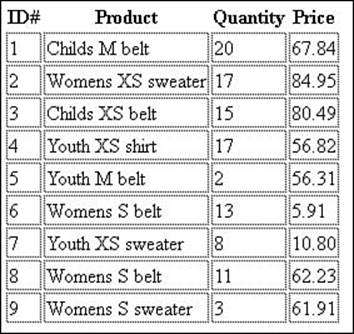
Figure 10.4 Dynamically adding rows to a table using jQuery and JavaScript code in ch1004.html.
Inserting Items into a List
var item = "New Item";
var nextItem = false;
$("ul li").each(function(i, item){
if ($(item).html() > newItem){
nextItem = item;
return false; }});
if (!nextItem){
$("ul").append($("<li></li>").html(newItem)); }
else {
$(nextItem).before($("<li></li>").html(newItem));}
Another common task when dynamically manipulating web pages is to insert elements into a list. But what if the list needs to be sorted? There are a few different ways to do this.
One way to add the item would be to iterate through the list elements until you find one that is larger than the new item. Then insert the new item before that existing item. If a larger item is not found, just append the item to the list.
The following example illustrates using a text input to allow the user to add items to a grocery list by typing the item and pressing the Enter key. The items are added in alphabetical order in the addToList() function. Figure 10.5 illustrates adding items to the list:
01 <html>
02 <head>
03 <title>Python Phrasebook</title>
04 <meta charset="utf-8" />
05 <script type="text/javascript"
06 src="../js/jquery-2.0.3.min.js"></script>
07 <script>
08 function addToList(newItem){
09 var nextItem = false;
10 $("ul li").each(function(i, item){
11 if ($(item).html() > newItem){
12 nextItem = item;
13 return false; }
14 });
15 if (!nextItem){
16 $("ul").append($("<li></li>").html(newItem)); }
17 else {
18 $(nextItem).before($("<li></li>").html(newItem));}
19 }
20 $(document).ready(function (){
21 $("input").on("keyup",function(e){
22 if (e.keyCode == 13){
23 addToList($(this).val());
24 $(this).val("");
25 }
26 });
27 });
28 </script>
29 </head>
30 <body>
31 <p>Grocery List</p>
32 <input type="text" />
33 <ul><li>eggs</li><li>milk</li></ul>
34 </body>
35 </html>
ch1005.html
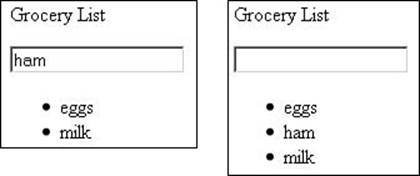
Figure 10.5 Dynamically inserting items alphabetically into a list using jQuery and JavaScript code in ch1005.html.
Creating a Dynamic Image Gallery
var img = $("<img></img>");
img.attr("src", "images/newImage.jpg");
$("div").append(img);
Images are becoming a mainstay in web pages. They deliver much more content, and they accomplish it more quickly and often more accurately than text. jQuery and JavaScript allow you to add images to a web page dynamically on demand by creating image elements, then setting thesource attribute of each and then appending them to the correct location.
For example, the following code creates an <img> element, sets the src attribute to define the file location, and then appends the image to a <div> element:
var img = $("<img></img>");
img.attr("src", "images/newImage.jpg");
$("div").append(img);
As an example, the following code uses an array of image names to dynamically build a small image gallery on the web page. The addImages() function iterates through the image list and then appends the images to the page by creating <img>, <span>, and <p> elements. Figure 10.6shows the final image gallery:
01 <html>
02 <head>
03 <title>Python Phrasebook</title>
04 <meta charset="utf-8" />
05 <script type="text/javascript"
06 src="../js/jquery-2.0.3.min.js"></script>
07 <script>
08 var images = ["arch", "flower", "sunset2",
09 "tiger", "falls", "volcano",
10 "beach", "img1", "flower2"];
11 function addImages(){
12 for (i in images){
13 var imgbox = $("<span></span>");
14 var img = $("<img></img>");
15 var label = $("<p></p>").html(images[i]);
16 img.attr("src", images[i] + ".jpg");
17 imgbox.append(label, img );
18 $("div").append(imgbox); }
19 }
20 $(document).ready(function (){
21 addImages();
22 });
23 </script>
24 <style>
25 div, img { border:5px ridge white;
26 box-shadow:10px 10px 5px #888888; }
27 div { background-color:black;
28 width:660px; height:520px }
29 span { display:inline-block; width:200px;
30 text-align:center; margin:10px; }
31 p {color:white; margin:0px;
32 background-color:#3373A5; font-weight:bold; }
33 img { height:100px; margin:10px;}
34 </style>
35 </head>
36 <body>
37 <div>
38 </div>
39 </body>
40 </html>
ch1006.html
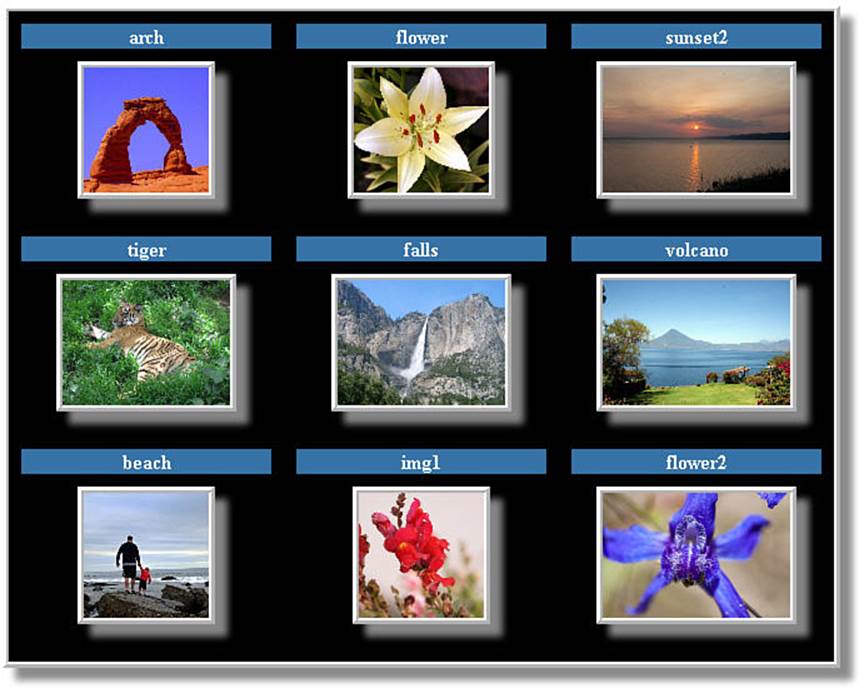
Figure 10.6 Dynamically generating an image gallery using jQuery and JavaScript code in ch1006.html.
Adding HTML5 Canvas Graphics
var c = $("canvas").get(0);
var lineValues = [10,15,80,79];
c.width = c.width;
var xAdj = c.width/lineValues.length;
var ctx = c.getContext("2d");
ctx.fillStyle = "#000000";
ctx.strokeStyle = "#00ff00";
ctx.lineWidth = 3;
var x = 1;
ctx.moveTo(x,(c.height));
for (var idx in lineValues){
var value = parseInt(lineValues[idx]);
ctx.lineTo(x+xAdj, (c.height - value));
x += xAdj;
}
ctx.stroke();
As HTML5 begins to become more and more mainstream, many possibilities open up for graphics. Using dynamic jQuery and JavaScript code with the new <canvas> element, you can easily provide some rich, interactive graphics to your web pages.
Using JavaScript, you can access the <canvas> element, get the context, set the line colors and the size, and then add lines to your file. To illustrate this, look at the renderSpark() function in the following code.
This code accepts a list of values and a <canvas> element and then uses the values to draw a series of lines on the canvas. The line values are dynamically generated in the adjValues() function and updated on a setTimeout() interval. The result is a dynamically updating spark line. You can easily replace the adjValues() function with an AJAX request to get server data to populate the canvas graph. Figure 10.7 shows the dynamically rendered graphs on the canvas:
01 <html>
02 <head>
03 <title>Python Phrasebook</title>
04 <meta charset="utf-8" />
05 <script type="text/javascript"
06 src="../js/jquery-2.0.3.min.js"></script>
07 <script>
08 function randInt(max) {
09 return Math.floor((Math.random()*max)+1); }
10 function adjValues(){
11 $("canvas").each(function(){
12 var lineValues = $(this).data("valueArr");
13 lineValues.shift();
14 lineValues.push(randInt(100));
15 renderSpark(this, lineValues);
16 });
17 setTimeout(adjValues, 1000);
18 }
19 function renderSpark(c, lineValues){
20 c.width = c.width;
21 var xAdj = c.width/lineValues.length;
22 var ctx = c.getContext("2d");
23 ctx.fillStyle = "#000000";
24 ctx.strokeStyle = "#00ff00";
25 ctx.lineWidth = 3;
26 var x = 1;
27 ctx.moveTo(x,(c.height));
28 for (var idx in lineValues){
29 var value = parseInt(lineValues[idx]);
30 ctx.lineTo(x+xAdj, (c.height - value));
31 x += xAdj;
32 }
33 ctx.stroke();
34 }
35 function getRandomArray(){
36 var arr = new Array();
37 for(var x=0; x<20; x++){ arr.push(randInt(100)); }
38 return arr;
39 }
40 $(document).ready(function(){
41 $("canvas").each(function(){
42 $(this).data("valueArr", getRandomArray()); });
43 adjValues();
44 });
45 </script>
46 <style>
47 canvas{height:50px;width:200px;background-color:black;
48 border:3px solid;vertical-align:bottom;margin:10px;}
49 label, span {display:inline-block; text-align:right;
50 width:160px;border-bottom:2px dotted;font-size:26px;}
51 span{ width:50px; color:blue;
52 </style>
53 </head>
54 <body>
55 <label>Utilization</label><canvas></canvas>
56 <label>Speed</label><canvas></canvas>
57 <label>Uploads</label><canvas></canvas>
58 <label>Downloads</label><canvas></canvas>
59 </body>
60 </html>
ch1007.html
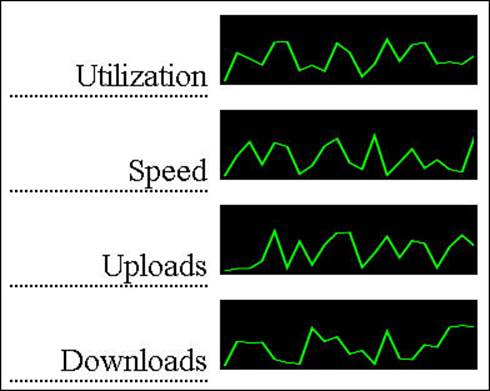
Figure 10.7 Dynamically adding lines to a <canvas> element using JavaScript code in ch1007.html.