Beginning Java Programming: The Object-Oriented Approach (Programmer to Programmer) (2015)
9. Working with Databases in Java
WHAT YOU WILL LEARN IN THIS CHAPTER:
· Basic concepts of relational databases
· Key problems when working with relational databases in Java
· How to use JDBC and SQLJ
· How to use an object relational mapper like Hibernate
· How to use object-oriented databases
· Key advantages and disadvantages of different approaches
WROX.COM CODE DOWNLOADS FOR THIS CHAPTER
The wrox.com code downloads for this chapter are found at www.wrox.com/go/beginningjavaprogramming on the Download Code tab. The code is in the Chapter 9 download and individually named according to the names throughout the chapter.
Many Java applications need to either retrieve, update, delete, or store data. In Chapter 8, you discovered how files can be used for this purpose. For small applications, it is definitely possible to use files for data storage. However, for larger-scale applications, the file-based approach to data storage and management creates several problems. First, since every Java program needs to explicitly define the structure of the file, a strong dependency is created between files and Java programs. In other words, the Java program is strongly tied to the physical representation of the file. This creates substantial maintenance issues when the files are being accessed by multiple Java programs simultaneously. For example, when the physical storage structure of a file is changed, such as distributing its content over a network, all Java classes working with the file would need to be updated. Likewise, when changing its internal content and/or representation, such as by adding, deleting, or changing data elements, changes need to be made to all the Java programs that access it. Moreover, in a multi-application distributed environment, many files will contain duplicate data, which obviously not only implies a waste of storage space, but also increases the risk of inconsistent data manipulation, in case the data is updated in one file but not in other files. Finally, from an application integration perspective, the file-based approach to data management comes with high difficulty and thus substantial cost.
To store and manage data in a more structured way, databases have been introduced. A database represents a subset of a particular real-world problem and has an intrinsic meaning to a specific group of users. It is being managed by a database management system (DBMS). This is a collection of programs that facilitates the process of defining, constructing, and manipulating databases for various applications. Throughout the past decades, many different types of DBMSs have been introduced in the industry: hierarchical DBMSs, Codasyl DBMSs, relational DBMSs, object-oriented DBMSs, object relational DBMSs, and so on. Undoubtedly, the most popular DBMS technology in use nowadays is the relational DBMS (RDBMS). Various software implementations of RDBMSs have been provided by leading firms such as Microsoft, Oracle, and IBM. A key characteristic of an RDBMS is that it stores both data and data definitions in a comprehensive and transparent way. This is illustrated in Figure 9.1.

Figure 9.1
In this chapter, you learn how to access RDBMSs from within Java. First, there is an introduction or refresher covering the basic concepts of relational database technology. Next, Java Database Connectivity (JDBC) as a popular application programming interface (API) for accessing tabular data is discussed. Following that, SQLJ, structured query language combined with Java, and Hibernate, a popular object relational mapping framework capable of mapping Java objects to relational databases in a transparent way, are both introduced. Java-friendly object-oriented database management systems (OODBMS) are presented as an alternative to relational databases. Then you will find a brief comparison of these technologies and their place in the business world.
COVERING THE BASICS OF RELATIONAL DATABASES
A fundamental building block of a relational database is a relational scheme that’s a gathering of various database tables and related constructs (queries, views, and indexes) describing real-life concepts. It is typically developed during database design and is not expected to change too frequently. Every relational scheme has one or more relational tables that store information about a particular item of interest. Table 9.1 shows an example relational table that stores information about employees.
Table 9.1 Employee Relational Table
|
EMPLOYEEID |
NAME |
GENDER |
DNR |
|
1 |
Bart Baesens |
Male |
1 |
|
2 |
Aimée Backiel |
Female |
1 |
|
3 |
Seppe vanden Broucke |
Male |
1 |
|
4 |
Michael Jackson |
Male |
2 |
|
5 |
Sarah Adams |
Female |
3 |
The table has four columns, also called attribute types, which specify the employee characteristics that should be stored. The first attribute type, EmployeeID, is called the primary key and is unique for each employee. The table has five rows, which are also called tuples. Conceptually, a relational database table corresponds to a mathematical set, which implies that every row is unique and there are no duplicate rows. Every row consists of a series of values, whereby every value comes from a specific type (integer, text, date, and so on) or can also be NULL, which means that the value is unknown or not applicable. The last column, DNR, is a foreign key that refers to the department number in the table Department, which is defined as shown in Table 9.2.
Table 9.2 Department Relational Table
|
DNR |
DNAME |
DADDRESS |
|
1 |
ICT |
Brussels |
|
2 |
Marketing |
|
|
3 |
Finance |
Singapore |
|
4 |
Accounting |
Sydney |
Note that by using foreign keys, relationships can be established between various tables. As such, it can be easily seen that in the example, employees Bart Baesens, Aimée Backiel, and Seppe vanden Broucke work in ICT, whereas Michael Jackson works in Marketing and Sarah Adams in Finance.
RDBMSs use structured query language (SQL) as the underlying language to both define and manipulate the database concepts. In fact, SQL has a subset of instructions to define data structures, called data definition language (DDL), as well as to manipulate data, called data manipulation language (DML). SQL is a declarative language. Hence, as discussed in Chapter 1, you need only to specify which data to retrieve, in contrast to procedural languages, where you have to explicitly declare how to retrieve the data.
The SQL DDL needed to define Tables 9.1 and 9.2 is illustrated in the following code:
CREATE TABLE 'EmployeeSchema'.'Employee' (
'EmployeeID' INT NOT NULL,
'Name' VARCHAR(45) NULL,
'Gender' VARCHAR(45) NULL,
'DNR' INT NULL,
PRIMARY KEY ('EmployeeID'),
INDEX 'DNRForeign_idx' ('DNR' ASC),
CONSTRAINT 'DNRForeign'
FOREIGN KEY ('DNR')
REFERENCES 'EmployeeSchema'.'Department' ('DNR')
ON DELETE NO ACTION
ON UPDATE NO ACTION)
CREATE TABLE 'EmployeeSchema'.'Department' (
'DNR' INT NOT NULL
'DName' VARCHAR(45) NULL,
'DAddress' VARCHAR(45) NULL,
PRIMARY KEY ('DNR'))
The SQL DML instructions allow you to query, insert, update, and delete the data. Some examples are presented in Table 9.3.
Table 9.3 Examples of SQL Queries
|
SQL QUERY |
MEANING |
|
Select * From Employeeschema.Employee; |
Select all information from the Employee table. |
|
Select Name From Employeeschema.Employee Where DNR=1; |
Select the name of all employees working in department number 1. |
|
Select count(*) From Employeeschema.Department; |
Select the number of departments from the Department table. |
|
Select E.Name, D.Dname From Employeeschema.Employee E, Employeeschema.Department D Where E.DNR=D.DNR; |
Select the names of all employees together with the names of the departments they work in. |
|
Insert Into Employeeschema.Employee Values (6, “David Peeters”, “Male”,2); |
Add a new employee to the Employee table. |
|
Update Employeeschema.Employee Set DNR=3 Where Name=”David Peeters”; |
Change the department of an employee. |
|
Delete From Employeeschema.Employee Where Name=”David Peeters”; |
Delete an employee from the Employee table. |
In the remainder of this chapter, MySQL is used to demonstrate relational database access from within Java. MySQL is a popular open-source RDBMS currently maintained by Oracle (www.mysql.com). It has been very popular in web applications and is also part of the LAMP (Linux, Apache, MySQL, and Perl/PHP/Python) open-source software stack.
TRY IT OUT Creating a Relational Database in MySQL
This exercise shows you how to create a simple relational database using MySQL.
1. Download and install the MySQL Community Edition (GPL) from http://www.mysql.com/downloads/.
2. Open the MySQL workbench application. See Figure 9.2.
Figure 9.2
3. Create a new MyConnection connection by clicking the + button next to MySQL Connections, as shown in Figure 9.3.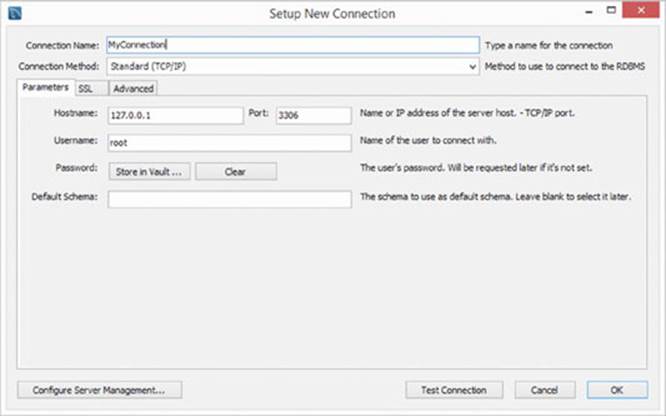
Figure 9.3
4. Open MyConnection and create a schema called Employeeschema. Your screen now looks as shown in Figure 9.4.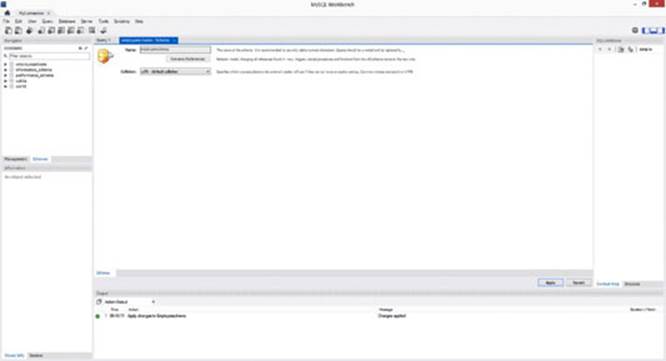
Figure 9.4
5. Create two tables—Employee and Department—as shown in Figures 9.5 and 9.6.
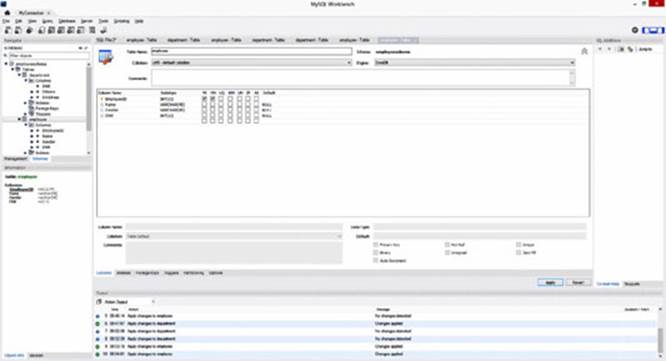
Figure 9.5
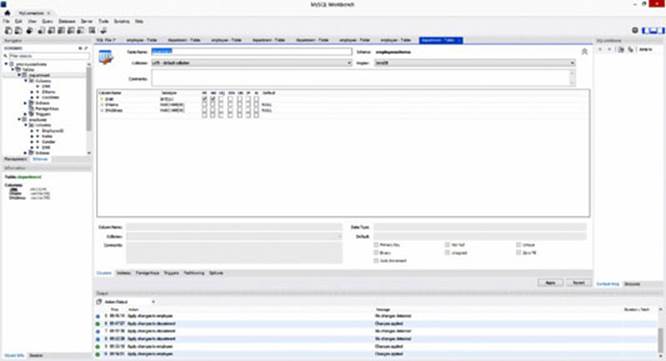
Figure 9.6
6. Make sure to also create a foreign key relationship between DNR in Employee and DNR in Department. The SQL DDL corresponding to both these tables is:
7. CREATE TABLE IF NOT EXISTS 'EmployeeSchema'.'Employee' (
8. 'EmployeeID' INT NOT NULL,
9. 'Name' VARCHAR(45) NULL,
10. 'Gender' VARCHAR(45) NULL,
11. 'DNR' INT NULL,
12. PRIMARY KEY ('EmployeeID'),
13. INDEX 'DNRForeign_idx' ('DNR' ASC),
14. CONSTRAINT 'DNRForeign'
15. FOREIGN KEY ('DNR')
16. REFERENCES 'EmployeeSchema'.'Department' ('DNR')
17. ON DELETE NO ACTION
18. ON UPDATE NO ACTION)
19. ENGINE = InnoDB
20.
21. CREATE TABLE IF NOT EXISTS 'EmployeeSchema'.'Department' (
22. 'DNR' INT NOT NULL,
23. 'DName' VARCHAR(45) NULL,
24. 'DAddress' VARCHAR(45) NULL,
25. PRIMARY KEY ('DNR'))
ENGINE = InnoDB
26. Use an SQL insert statement to add the following tuples to the Department table:
27. insert into employeeschema.department
28. values
29. (1, 'ICT', 'Brussels'),
30. (2, 'Marketing', 'New York'),
31. (3, 'Finance', 'Singapore'),
(4, 'Accounting', 'Sydney');
32. Use an SQL insert statement to add the following tuples to the Employee table:
33. insert into employeeschema.employee
34. values
35. (1, 'Bart Baesens', 'Male', 1),
36. (2, 'Aimée Backiel', 'Female', 1),
37. (3, 'Seppe vanden Broucke', 'Male', 1),
38. (4, 'Michael Jackson', 'Male', 2),
(5, 'Sarah Adams', 'Female', 3);
39.Your MySQL screen should now look like Figure 9.7.
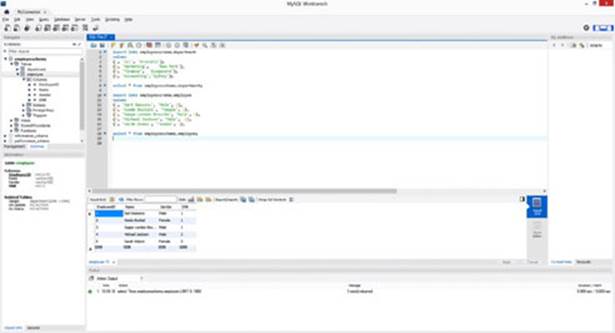
Figure 9.7
ACCESSING RELATIONAL DATABASES FROM JAVA
Accessing relational databases from Java is not a straightforward exercise. Various issues arise due to the intrinsic conceptual differences between Java as an object-oriented programming environment and the database, which is typically based on relational concepts and SQL. The discrepancy between both environments is often referred to as the impedance mismatch problem.
The first problem concerns the incompatibility between the data types implemented in Java and the types available in SQL. Some SQL data types are directly equivalent to a Java type. An example of this is the SQL INTEGER data type, which is identical to the Java intdata type. Other SQL data types need to be converted. Examples are the SQL CHAR, VARCHAR, and LONGVARCHAR data types, which can be easily converted to the Java equivalent String data type. For the SQL DATE data type, a special Java data type, Java.Date, was created.
Another complication is that SQL relations are sets of records with no prior limitation on the number. Hence, Java needs to foresee a mechanism to appropriately import and handle the results of SQL queries. One popular approach here is a cursor mechanism that will allow you to iteratively loop through a set of records and process them one at a time in Java.
A discussion on the various ways of accessing databases from Java, each with their own approach to dealing with both of these problems, follows. It begins with an introduction to JDBC, which is a standard database application programming interface (API) available in Java. This is followed by a discussion of SQLJ, which allows SQL statements to be directly embedded into Java programs.
Java Database Connectivity (JDBC)
Every database vendor provides its own application programming interface (API). Hence, when connecting to a particular database, you need to be aware of the proprietary routines that make up the particular API. This makes it tedious and difficult to use different databases in an application. Java database connectivity (JDBC) is a popular standardized application programming interface (API) that gives database-independent access to tabular data typically stored in relational databases or Microsoft Excel. It allows you to set up a connection with the database (or tabular data source), exchange SQL statements (such as CREATE, SELECT, INSERT, UPDATE, and DELETE), and process the results. A key advantage of JDBC is that it provides an easy access mechanism to various existing data sources. Moreover, since it is based on Java technology, it is easy to learn and use in your Java programs. Given its popularity, many database vendors provide support for it, such as Oracle, IBM, Microsoft, and more. The most recent version is JDBC 4.2 and is included in Java SE 8. The JDBC classes are implemented using the packages java.sql and javax.sql. There are four types of JDBC drivers to access the data, as shown in Table 9.4.
Table 9.4 JDBC Driver Types
|
DRIVER TYPE |
DESCRIPTION |
|
JDBC type 1 driver |
JDBC/ODBC bridge. Open Database Connectivity (ODBC) is another standard API for accessing databases developed by Microsoft. This driver will convert JDBC calls to client-side ODBC calls, which then communicate with the network database. |
|
JDBC type 2 driver |
This driver converts JDBC calls into client-side API calls, which will then further communicate to the network database. |
|
JDBC type 3 driver |
This is a 100% Java driver whereby JDBC calls are translated to the protocol adopted by a separate middleware application server, which then further communicates to the database. |
|
JDBC type 4 driver |
This is a 100% Java driver whereby JDBC calls are directly translated into the network protocol used by the database. |
From Table 9.4, it is clear that the JDBC type 4 driver is the most powerful. Its workings are further clarified in Figure 9.8.
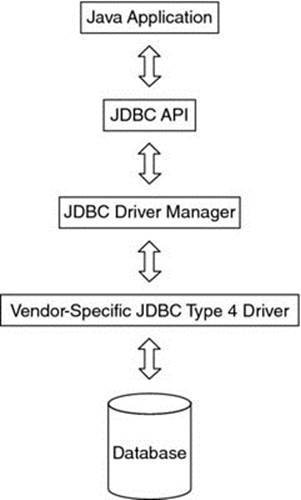
Figure 9.8
Table 9.5 describes the core JDBC classes and methods.
Table 9.5 JDBC Classes and Purpose
|
JDBC CLASS |
PURPOSE |
|
DriverManager |
Locate the JDBC driver. |
|
Connection |
Set up a database connection. |
|
Statement |
Define a static SQL statement. |
|
PreparedStatement |
Define a dynamic SQL statement. |
|
CallableStatement |
Execute stored procedures in the database. |
|
ResultSet |
Provide a JDBC cursor mechanism. |
In the next exercise, you see how these classes can be used to access data from a MySQL database.
TRY IT OUT Accessing a Relational Database Using JDBC
1. Download and install the JDBC driver for MySQL. In my case (working on a Windows 8 computer), I downloaded MySQL Connector/J from http://dev.mysql.com/downloads/connector/j/5.0.html, which is the official JDBC type 4 driver for MySQL. The file called mysql-connector-java-5.1.30-bin.jar was then installed in my directory C:\Program Files (x86)\MySQL\Connector J 5.1.30. Make sure to add the directory C:\Program Files (x86)\MySQL\Connector J 5.1.30 to the CLASSPATH environment variable. As an alternative, you could also right-click the project in Eclipse, choose Build Path Configure Build Path Add External JARs, and then explicitly add the file mysql-connector-java-5.1.30-bin.jar.
2. Create a new project in Eclipse. Perhaps call it Chapter9 to keep the exercises organized according to the chapters in this book.
3. Create a new class by right-clicking on the src folder in your new project. Select New Class.
4. In the Name field, enter the name of your class, JDBCExample1. In the bottom portion of the New Java Class window, there is a section that reads, “Which method stubs would you like to create?” You may choose to check the box next to “public static void main(String[] args)” to automatically create a main method.
5. You should automatically have the basis for the class body shown here:
6. public class JDBCExample1 {
7.
8. public static void main(String[] args) {
9. // TODO Auto-generated method stub
10. }
}
11. Adapt this class definition as follows:
12. import java.sql.*;
13.
14. public class JDBCExample1 {
15.
16. public static void main(String[] args) {
17. try {
18. System.out.println("Loading JDBC driver...");
19. Class.forName("com.mysql.jdbc.Driver");
20. System.out.println("JDBC driver successfully loaded!");
21. } catch (ClassNotFoundException e) {
22. throw new RuntimeException(e);
23. }
24. String url = "jdbc:mysql://localhost:3306/employeeschema";
25. String username = "root";
26. String password = "mypassword123";
27. String query = "select E.Name, D.DName" +
28. "from employee E, department D" +
29. "where E.DNR=D.DNR;";
30. Connection connection = null;
31. Statement stmt=null;
32.
33. try {
34. System.out.println("Connecting to the MySQL database...");
35. connection = DriverManager.getConnection(url, username, password);
36. System.out.println("MySQL Database connected!");
37. stmt = connection.createStatement();
38. ResultSet rs = stmt.executeQuery(query);
39. while (rs.next()) {
40. System.out.print(rs.getString(1));
41. System.out.print(" ");
42. System.out.println(rs.getString(2));
43. }
44. stmt.close();
45. } catch (SQLException e) {
46. System.out.println(e.toString());
47. } finally {
48. System.out.println("Closing the connection.");
49. if (connection != null) {
50. try {
51. connection.close();
52. } catch (SQLException ignore) {
53. }
54. }
55. }
56. }
}
57.Save the class by clicking the disk icon or selecting File Save.
58.Run the application by clicking the green play icon or selecting Run Run.
59. You should receive the following output:
60. Loading JDBC driver...
61. JDBC driver successfully loaded!
62. Connecting to the MySQL database...
63. MySQL Database connected!
64. Bart Baesens ICT
65. Aimée Backiel ICT
66. Seppe vanden Broucke ICT
67. Michael Jackson Marketing
68. Sarah Adams Finance
Closing the connection.
How It Works
The program starts by importing the JDBC package by using the statement import java.sql.*;.The first part of the code then sets up the connection with the database. The statement Class.forName("com.mysql.jdbc.Driver") dynamically loads the MySQL database driver. It is embedded in a try catch block in case exceptions occur. The URL variable contains the location of the database schema, and the username and password variables store the logon credentials. The query variable is a string containing the SQL query you want to execute. Note that it is a join query, whereby the Employee and Department tables are joined. The statement connection = DriverManager.getConnection(url, username, password) establishes a connection to the MySQL database by creating a connection object using the logon information. In JDBC, all SQL statements are executed within the context of a connection object. A Java program can have multiple connections to different databases. The statementstmt = connection.createStatement() creates a statement object for sending SQL statements to the MySQL database. The statement ResultSet rs = stmt.executeQuery(query); executes the query and stores the result thereof into the rs object. It’s important to note that in JDBC, all SQL queries are compiled and processed at runtime. The rs resultset object contains a cursor pointing to a particular row of data in the result. Initially, it is put before the first row and can be moved using the method next. The latter returns false when there are no more rows in the resultset. The while loop, which follows, now navigates through the results of the resultset. The statement System.out.print(rs.getString(1)); then retrieves the first element (E.Name ) of the row where the cursor is positioned. The statement System.out.print(" "); then adds some extra space and is followed by the statement System.out.println(rs.getString(2)); which retrieves the second element (i.e. D.DName) of the row where the cursor is positioned and adds a line break. To conclude the program, the statement and connection objects are properly closed.
In the following example, you will use JDBC to access a MySQL database in combination with user-provided input.
TRY IT OUT Accessing a Relational Database Using JDBC and User Input
In this example, you will allow the user to provide input for the query in the JDBC program.
1. Create a new class by right-clicking on the src folder in your Chapter99 project. Select New Class.
2. In the Name field, enter the name of your class, JDBCExample2. In the bottom portion of the New Java Class window, there is a section that reads, “Which method stubs would you like to create?” You may choose to check the box next to “public static void main(String[] args)” to automatically create a main method.
3. You should automatically have the basis for the class body shown here:
4. public class JDBCExample2 {
5.
6. public static void main(String[] args) {
7. // TODO Auto-generated method stub
8. }
}
9. Adapt this class definition as follows:
10. import java.sql.*;
11. import java.util.*;
12.
13. public class JDBCExample2 {
14.
15. public static void main(String[] args) {
16. int DeptNr=0;
17. try {
18. System.out.println("Loading JDBC driver...");
19. Class.forName("com.mysql.jdbc.Driver");
20. System.out.println("JDBC driver successfully loaded!");
21. } catch (ClassNotFoundException e) {
22. throw new RuntimeException(e);
23. }
24.
25. Scanner keyboard = new Scanner(System.in);
26. try {
27. System.out.println("Please enter the department number: ");
28. DeptNr=keyboard.nextInt();
29. } catch(InputMismatchException err) {
30. System.out.println("Incorrect input");
31. }
32. String url = "jdbc:mysql://localhost:3306/employeeschema";
33. String username = "root";
34. String password = "mypassword123";
35. String query="select Name, Gender, DNR" +
36. " from employee where DNR=?";
37. Connection connection = null;
38. Statement stmt = null;
39. try {
40. System.out.println("Connecting to the MySQL database...");
41. connection = DriverManager.getConnection(url, username, password);
42. System.out.println("MySQL Database connected!");
43. PreparedStatement preparedStatement =
44. connection.prepareStatement(query);
45. preparedStatement.setInt(1, DeptNr);
46. ResultSet rs = preparedStatement.executeQuery();
47. while (rs.next()) {
48. System.out.print(rs.getString(1));
49. System.out.print((" "));
50. System.out.print(rs.getString(2));
51. System.out.print((" "));
52. System.out.println(rs.getInt(3));
53. }
54. preparedStatement.close();
55. } catch (SQLException e) {
56. System.out.println(e.toString());
57. } finally {
58. System.out.println("Closing the connection.");
59. if (connection != null) {
60. try {
61. connection.close();
62. } catch (SQLException ignore) {
63. }
64. }
65. }
66. }
}
67.Save the class by clicking the disk icon or selecting File Save.
68.Run the application by clicking the green play icon or selecting Run Run. Enter 1 for the department number.
69.You will now get the output shown in Figure 9.9.
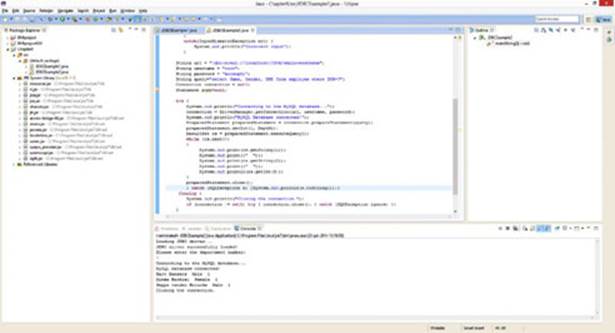
Figure 9.9
How It Works
The first part of the code is similar to the previous example. The only thing that is different is that a Scanner object is created (using the java.util.* package) to provide input using the keyboard. The DeptNr variable stores the number of the department for which you want to list the employees. This is accomplished using a PreparedStatement object. This object can take parameters that are being input using the keyboard or from a GUI application. In this example, the statement PreparedStatement preparedStatement = connection.prepareStatement(query); creates a preparedStatement object based upon the query string variable, which is defined as follows: String query="select Name, Gender, DNR from employee where DNR=?";. The question mark in the query variable refers to a value that needs to be specified before the query can be executed. In this example, this variable will be set to DeptNr (which was obtained via the keyboard) using the following statement: preparedStatement.setInt(1, DeptNr);. The prepared statement object can then be executed and the results stored in a resultset object using the following statement: ResultSet rs = preparedStatement.executeQuery();. A while loop can then be used to navigate through the results of this resultset object as in the previous example.
SQLJ
SQLJ is built on top of JDBC and allows you to embed SQL statements directly into Java programs. A preprocessor will then translate the SQL statements into Java/JDBC statements, which are then further compiled by the Java compiler to bytecode. This is illustrated in Figure 9.10.
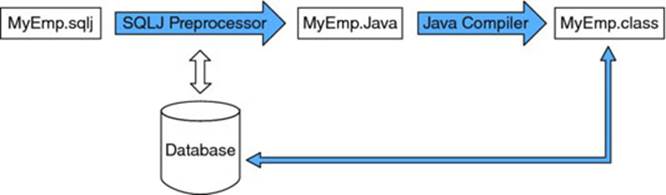
Figure 9.10
The preprocessor can perform syntax checks, Java/SQL type matching, and verify the query against the database schema at design time. This will not only result in fewer errors at runtime, but will also improve the performance of the query. Another key difference with JDBC is that SQL statements are compiled at runtime.
Note that as illustrated in Figure 9.10, a Java program with embedded SQLJ statements should have an *.sqlj filename extension. Both SQLJ and JDBC statements can be used in the same program. This allows you to combine the benefits of static, pre-compiled SQL offered by SQLJ with the runtime flexibility offered by JDBC.
The sqlj.runtime and sqlj.runtime.ref packages contain the Java runtime classes and interfaces used by SQLJ and should be imported at the start of the program. The JDBC java.sql package will also be imported to set up the JDBC connection and perform error handling:
import sqlj.runtime.*;
import sqlj.runtime.ref.*;
import java.sql.*;
A SQLJ program starts by loading a JDBC driver and creating a connection context (similar to a JDBC connection object) as follows:
try {
System.out.println("Loading JDBC driver...");
Class.forName("com.mysql.jdbc.Driver");
DefaultContext.setDefaultContext(new DefaultContext(
"jdbc:mysql://localhost:3306/employeeschema","root","mypassword123"));
} catch (Exception e) {
//do something
}
By default, all SQLJ statements will then be executed within the defined default connection context.
SQLJ statements start with an #sql delimiter and are terminated with a semicolon as follows:
#sql {<sql-statement>};
This allows the SQLJ preprocessor to easily recognize the SQL instructions. The SQLJ statement itself can span multiple lines and may also include host variables and/or expressions. Host variables are variables defined within the Java program and can be included in a SQLJ statement preceded by a colon, such as the following:
#sql {select EmployeeID, Name
into :empID,:ename
from EmployeeSchema.Employee
where DNR = :dnr };
SQLJ has two types of cursors: iterators and positional iterators. They are always defined at the start of the Java class file and not within a class. Remember the Employee table defined earlier:
CREATE TABLE 'EmployeeSchema'.'Employee' (
'EmployeeID' INT NOT NULL,
'Name' VARCHAR(45) NULL,
'Gender' VARCHAR(45) NULL,
'DNR' INT NULL,
PRIMARY KEY ('EmployeeID'),
INDEX 'DNRForeign_idx' ('DNR' ASC),
CONSTRAINT 'DNRForeign'
FOREIGN KEY ('DNR')
REFERENCES 'EmployeeSchema'.'Department' ('DNR')
ON DELETE NO ACTION
ON UPDATE NO ACTION)
Let’s now define a named iterator as follows:
#sql iterator EmpNameIter (int EmployeeID, String Name, int DNR);
class SQLJEx1 {
void AccessEmpData() throws SQLException {
EmpNameIter MyNamedIter;
#sql MyNamedItter =
{SELECT Name, EmployeeID, DNR FROM EmployeeSchema.Employee };
}
}
Note that the iterator column names match the table column names. Also observe that the order of the columns in the SQL statement should not match the order in the iterator statement or table since data is matched by name and not by position, which is very convenient. You can then access the columns by their name, as follows:
while (MyNamedItter.next()) {
System.out.println(MyNamedItter.EmployeeID +
" " + MyNamedItter.Name + " " + MyNamedItter.DNR));
}
The method next retrieves the next row of the iterator and then returns true unless there are no more rows to be retrieved, in which case it returns false.
A positional iterator defines only the data type of each column and not its name. An example is as follows:
#sql iterator EmpPosIter (int, String, in);
class SQLJEx2 {
void AccessEmpData () throws SQLException {
EmpPosIter MyPosIter;
#sql MyPosItter =
{ SELECT EmployeeID, Name, DNR FROM EmployeeSchema.Employee };
}
}
Observe that the order is the same for the table, iterator, and SQL statement. To retrieve data from a positional iterator, you must use the FETCH INTO statement and the endfetch() method to verify if the end of the data has been reached as follows:
while (true) {
#sql {FETCH : MyPosIter INTO :EmployeeID, :Name, :DNR} ;
if (MyPosIter.endFetch()) {
break;
}
}
As with other database objects, it is important to close every iterator using the close() method to free the occupied resources.
When compared to JDBC, SQLJ programs are usually more concise and thus easier to debug. As discussed, SQLJ also allows you to do syntactic and semantic query checking at design time, in contrast to JDBC where queries are verified at runtime. Despite its advantages, the SQLJ standard has been less popular than JDBC in the industry.
PUSHING COMPLEX DATA PROCESSING TO THE DATABASE
SQL is a very powerful database manipulation language that allows complex data-processing operations in the RDBMS itself. When using JDBC or SQLJ, it is highly recommended to push as many complex data operations as possible to the database instead of programming them in Java. Every RDBMS has built-in sophisticated facilities for indexing and caching, which have a huge impact on query performance.
In the first JDBC example in this chapter, the SQL query performs a join between two tables. Alternatively, you could opt to retrieve the data from both tables into the Java program and program the join in Java. However, from a performance viewpoint, this is highly discouraged as it would create more network traffic and processing time. Hence, it is of key importance that a Java developer accessing a RDBMS through JDBC or SQLJ possess a deep understanding of SQL in order to write high-performing Java database applications!
ENSURING OBJECT PERSISTENCE
During Java program execution, a distinction can be made between transient objects, which only exist during program execution, and persistent objects, which need to be permanently stored in a database. Earlier in this chapter, you learned about the impedance mismatch problem, which refers to the intrinsic incompatibility between Java objects and relational SQL tables. To bridge this incompatibility problem, two solutions can be pursued. A first solution is to use an object relational mapping (ORM) framework, which tackles the impedance problem by directly mapping Java objects to relational concepts and vice versa. Every plain old Java object (POJO) or JavaBean that needs to be made persistent can be directly mapped by the ORM to one or more tuples in a relational database without having to implement (vendor-) specific interfaces or classes. The ORM provides full support of all CRUD (CREATE, READ, UPDATE, and DELETE) database operations. A key advantage of using an object relational mapper is that it waives the Java developer from fully understanding and mastering all details of relational database design and advanced SQL query tuning, since all database interactions are directly handled and optimized by the ORM. This will result in more compact Java code, a potential decrease in database calls, more efficient queries, and higher portability across database platforms.
A second solution is to abandon the idea of using a relational database and use an object-oriented DBMS (OODBMS) instead. OODBMSs support the storage of objects rather than relational tuples. This will allow the storage of all POJOs directly and transparently as objects in an OODBMS without having to perform any translation. Obviously, avoiding all the mapping operations will greatly benefit the performance of the Java application.
The Java community has introduced various standards for object persistence. The most popular are the Java Persistence API (JPA) and Java Data Objects (JDO). Both provide a set of rules and guidelines to make POJOs persistent for both Java SE and Java EE environments using either an ORM, OODBMS, or another storage format (such as XML). JPA was mainly designed for relational databases, whereas JDO was more targeted toward OODBMSs, which are less popular in the industry. Hence, given the widespread availability of relational databases, this discussion will continue with JPA. For more details about JDO, refer to http://www.oracle.com/technetwork/java/index-jsp-135919.html.
JPA was first developed in 2006. The most recent version, JPA 2.1, was released in 2013. The JPA API is specified in the javax.persistence package. To facilitate the mapping between the Java application and the database (either relational or OO), annotations are used. JPA also includes the Java Persistence Query Language (JPQL) as an SQL-like standard to define object-oriented queries on objects. JPQL queries are also formulated as Select... From... queries but can now return objects rather than field values, as is the case in SQL. When using an ORM, the JPQL queries will be translated to relational SQL queries, whereas when using an OODBMS, the JPQL queries can be directly executed on the database, thereby increasing the performance of the query. JPQL provides full support of all OO concepts such as (multiple) inheritance, dynamic binding, polymorphism, and so on. Example implementations of the JPA standard are:
· ORM: Hibernate, EclipseLink (formerly Oracle TopLink), and OpenJPA
· OODBMS: ObjectDB
It is important to keep in mind that JPA was developed after many of the ORMs (such as Hibernate and TopLink) were already available. The result is one overall, uniform interface that facilitates switching between different persistence providers.
Two examples to illustrate the use of JPA follow. Hibernate is an example of an ORM implementation of JPA, and ObjectDB is an example of an OODBMS implementation of JPA.
Hibernate
We will start by discussing Hibernate, one of the most commonly used ORMs in the industry. It is an open-source ORM currently maintained by Red Hat at http://hibernate.org/. It provides support for most commercial database platforms such as MySQL, Oracle, Sybase, and so on. Just like SQLJ, it uses JDBC to communicate to the database. It also includes facilities for transaction management, concurrency control, caching, and connection pooling. Figure 9.11 gives a high-level outline of the Hibernate architecture.
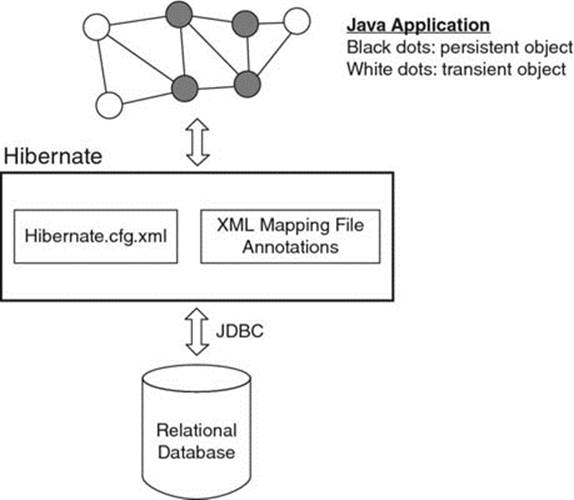
Figure 9.11
A first important building block when creating a Hibernate application is the hibernate.cfg.xml configuration file. This is one application-specific XML file containing the essential information to set up the database connection by specifying the JDBC driver, connection URL, the database username and password, and the Java classes that need to be mapped. The object relational mapping itself can then be specified using either an XML file or annotations. By convention, the XML file has the same name as the class that’s to be mapped and is in the same directory. An example employee.hbm.xml file providing a mapping of the Java class Employee to the MySQL relational Employee table could be a follows:
<?xml version="1.0" encoding="utf-8"?>
<!DOCTYPE hibernate-mapping PUBLIC
"-//Hibernate/Hibernate Mapping DTD//EN"
"http://www.hibernate.org/dtd/hibernate-mapping-3.0.dtd">
<hibernate-mapping>
<class name="Employee" table="EMPLOYEE">
<meta attribute="class-description">
This class contains the employee detail.
</meta>
<id name="id" type="int" column="id">
<generator class="native"/>
</id>
<property name="JEmpID" column="EmployeeID" type="int"/>
<property name="JName" column="Name" type="string"/>
<property name="JGender" column="Gender" type="string"/>
<property name="JDNR" column="DNR" type="int"/>
</class>
</hibernate-mapping>
This example clearly illustrates how the various class properties are mapped to relational database columns.
When using annotations, the mapping is directly specified in the POJO class definition itself. Table 9.6 provides an overview of commonly used annotations available in Hibernate. See http://hibernate.org/ for a comprehensive overview.
Table 9.6 Common Hibernate Annotations
|
ANNOTATION |
DESCRIPTION |
|
@Entity |
Declares a persistent POJO class. |
|
@Table |
Allows you to explicitly specify the name of the relational table to map the persistent POJO class to, in case both names are different. |
|
@Column |
Allows you to explicitly specify the name of the relational table column in case it is different from the persistent POJO class field. |
|
@ID |
Maps a persistent POJO class field to a primary key of a relational table. |
|
@Transient |
Allows you to define POJO class fields that are transient and thus should not be made persistent. |
As opposed to XML, annotations are directly compiled to bytecode and thus provide better performance. This is a key reason why most developers nowadays use annotations to perform the mapping. A disadvantage of both XML and annotations is that the persistence details are spread across different classes or XML files instead of being centralized, which may hamper the maintenance.
Although Hibernate allows you to directly embed SQL queries in Java, it also comes with a new full-fledged, database agnostic query language called Hibernate Query Language (HQL). HQL is object-oriented and works with classes and properties instead of tables and columns. It is less verbose than SQL and includes support for inner/outer joins, polymorphism, subqueries, aggregation, grouping, and ordering. Queries can be formulated by navigating object relations rather than relational tables. All HQL queries are translated to relational SQL queries at runtime. JPQL is based on HQL, since JPA was introduced after Hibernate was created.
In the “Try It Out” that follows, you develop your first Hibernate application.
TRY IT OUT Accessing a Relational MySQL Database Using Hibernate
In this example, you will be able to access a relational MySQL database using Hibernate.
1. First, install Hibernate from http://hibernate.org/orm/downloads/. In this example, hibernate release 4.3.5.final is installed in the directory C:\hibernate-release-4.3.5.Final.
2. Now add the Hibernate JARs to the build path of the project. Right-click the project, choose Properties Java Build Path Add Library. Define a User Library called MyHibernateLibrary and add the files from C:\hibernate-release-4.3.5.Final\lib\required, as shown in Figure 9.12.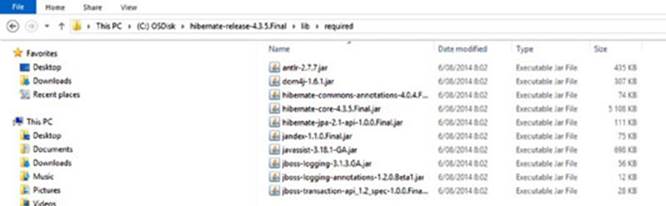
Figure 9.12
3. Make sure to also add the mysql-connector-java-5.1.30-bin.jar to the Build Path. Your Eclipse project now looks like Figure 9.13.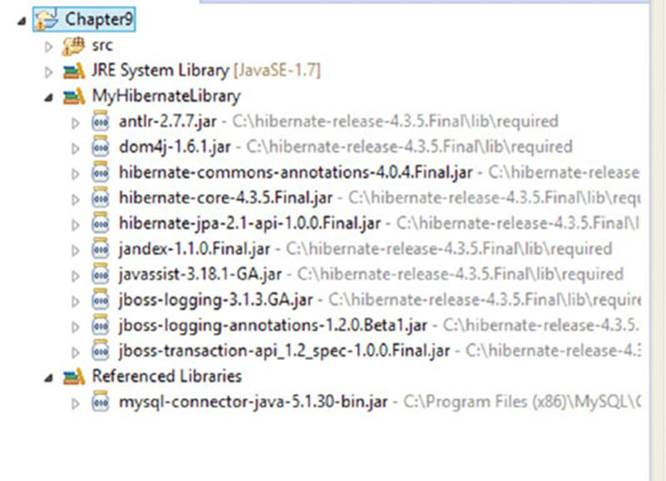
Figure 9.13
4. Create a file called hibernate.cfg.xml with the following content:
5. <?xml version='1.0' encoding='utf-8'?>
6. <!DOCTYPE hibernate-configuration PUBLIC
7. "-//Hibernate/Hibernate Configuration DTD//EN"
8. "http://www.hibernate.org/dtd/hibernate-configuration-3.0.dtd">
9. <hibernate-configuration>
10. <session-factory>
11. <property name="hibernate.connection.driver_class">
12. com.mysql.jdbc.Driver</property>
13. <property name="hibernate.connection.url">
14. jdbc:mysql://localhost:3306/employeeschema</property>
15. <property name="hibernate.connection.username">
16. root</property>
17. <property name="hibernate.connection.password">
18. mypassword123</property>
19. <property name="hibernate.connection.pool_size">
20. 10</property>
21. <property name="show_sql">true</property>
22. <property name="dialect">
23. org.hibernate.dialect.MySQLDialect</property>
24. <property name="hibernate.current_session_context_class">
25. thread</property>
26. <mapping class="Employee" />
27. </session-factory>
</hibernate-configuration>
28.Add the file to the src directory of your project. Your Eclipse environment now looks like Figure 9.14.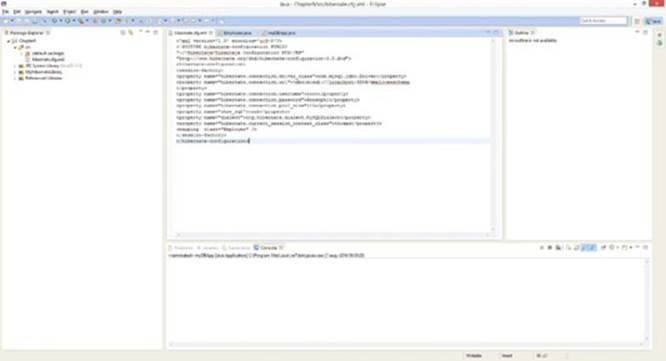
Figure 9.14
29. Create a new class called Employee.java, as follows:
30. import javax.persistence.Entity;
31. import javax.persistence.Id;
32.
33. @Entity
34. public class Employee {
35. private int EmployeeID;
36. private String Name;
37. private String Gender;
38. private int DNR;
39.
40. @Id
41. public int getEmployeeID() {
42. return EmployeeID;
43. }
44.
45. public void setEmployeeID( int id ) {
46. this.EmployeeID = id;
47. }
48.
49. public String getName() {
50. return Name;
51. }
52.
53. public void setName( String name ) {
54. this.Name = name;
55. }
56.
57. public String getGender() {
58. return Gender;
59. }
60.
61. public void setGender( String gender ) {
62. this.Gender = gender;
63. }
64.
65. public int getDNR() {
66. return DNR;
67. }
68.
69. public void setDNR( int dnr) {
70. this.DNR = dnr;
71. }
72.
}
73. Create a class called myDBApp.java, as follows:
74. import org.hibernate.SessionFactory;
75. import org.hibernate.Session;
76. import org.hibernate.cfg.Configuration;
77. import org.hibernate.Query;
78.
79. import java.util.List;
80.
81. public class myDBApp {
82. public static void main(String[] args) {
83. // Create new employee and store in MySQL
84. Employee Myemp=new Employee();
85. Myemp.setName("Hibernate dude");
86. Myemp.setGender("Male");
87. Myemp.setEmployeeID(6);
88. Myemp.setDNR(2);
89.
90. SessionFactory sessionFactory =
91. new Configuration().configure().buildSessionFactory();
92. Session session=sessionFactory.openSession();
93. session.beginTransaction();
94. session.save(Myemp);
95. session.getTransaction().commit();
96. // Retrieve employee data from MySQL
97. Query query = session.createQuery("from Employee where EmployeeID = 6");
98. List<?> list = query.list();
99. Employee emp = (Employee)list.get(0);
100. System.out.println(emp.getName());
101. System.out.println(emp.getGender());
102. System.out.println(emp.getDNR());
103. session.close();
104. sessionFactory.close();
105. }
}
106. Run the class and inspect its output. It should now look like Figure 9.15.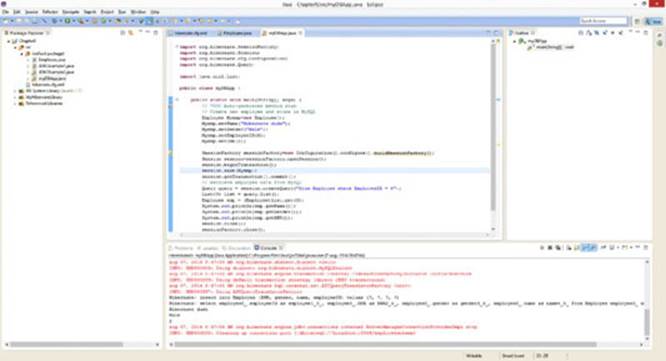
Figure 9.15
107. Also inspect the Employee table in MySQL to verify if the new employee has been successfully added, as shown in Figure 9.16.
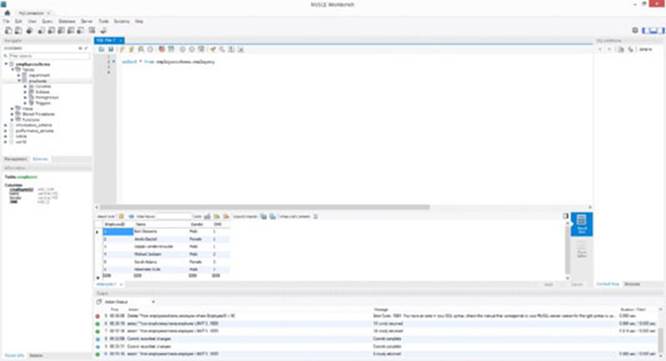
Figure 9.16
How It Works
1. It begins with installing all the necessary JARs to use both Hibernate and MySQL. The hibernate.cfg.xml file contains all the Hibernate configuration details that will be used by the sessionFactory object to set up a database connection. Note that Hibernate will communicate with the MySQL database using JDBC. The following properties were set:
2. hibernate.connection.driver_class: JDBC driver class
3. hibernate.connection.url: JDBC URL
4. hibernate.connection.username: database user
5. hibernate.connection.password: database user password
hibernate.connection.pool_size: maximum number of pooled JDBC connections
6. By setting the show_SQL property to true, the SQL commands generated by Hibernate are displayed in the console. This is very handy for debugging. The dialect property allows you to specify which SQL language should be used to communicate with the relational database, for example, Oracle9Dialect, PostgreSQLDialect, SybaseDialect, and so on. Since you are working with a MySQL database, it was set to MySQLDialect. By setting the hibernate.current_session_context_class property to thread, the Hibernate session is executed in the thread in which it was created. The <mapping class="Employee" /> statement then defined the class for which you want to create the mapping to the MySQL database.
7. Then the Employee class was created. It contains the same four attributes as in the MySQL database: EmployeeID, Name, Gender, and DNR. The mapping to the Employee MySQL table is performed using the @Entity and @Id annotations. The @Entityannotation is included before the class definition and maps the class to the relational MySQL Employee table. The @Id annotation then defines the identifier of the class that will be mapped to the primary key of the MySQL Employee table. Note that the Java class may have a different name than the MySQL table. In this case, the @Table annotation can be used to define the mapping. If no @Table annotation is used, the name of the class is used, which is fine in this case since it is identical to the name of the MySQL table. Likewise, the @Column annotation can be used to map Java properties to MySQL columns. Refer to http://hibernate.org/ for other examples of annotations.
8. In Step 7 of the Try It Out, the myDBApp class was created to perform some basic database operations. It starts with creating a new employee object Myemp and setting its characteristics. Then a sessionFactory object was created, which will in turn allow the creation of a session object. The latter represents a single-threaded wrapped JDBC connection with the database. Note that Hibernate often introduces new classes and methods to create both sessionFactory and session objects, and it is thus recommended to check http://hibernate.org/ regularly for updates.
9. The session object serves as a factory for creating database transactions. The statement session.beginTransaction(); initiates a database transaction that represents an atomic unit of database operations. If needed, multiple transactions per session can be created. The Myemp employee object will then be made persistent in the MySQL database using the method session.save(Myemp) followed by session.getTransaction().commit(). Then the insert is verified by issuing the HQL query: Query query = session.createQuery("from Employee where EmployeeID = 6"). The results of the query are stored in a list object List<?> list = query.list(). The query will return one result, which will be stored in the object emp as follows: Employee emp = (Employee)list.get(0). This is followed by retrieving the various attributes and displaying them on the console. The program finishes by closing the session and sessionFactory objects.
10. Since the show_SQL property was set to true in the configuration file, you can see the SQL statements that are being generated by Hibernate as follows:
11. Hibernate: insert into Employee (DNR, gender, name, employeeID) values (?, ?, ?, ?)
12. Hibernate: select employee0_.employeeID as employee1_0_, employee0_.DNR as DNR2_0_,
13. employee0_.gender as gender3_0_, employee0_.name as name4_0_
14. from Employee employee0_
where EmployeeID=6
The result of the query is then:
Hibernate dude
Male
2
This is also confirmed by inspecting the table directly in MySQL.
In most applications, Java objects and their corresponding relational tables will be associated using relationships. Hibernate also has facilities for managing the object relational mapping of these associations. Obviously, the mapping depends on the type and the multiplicity of the association.
Associations can be implemented as unidirectional or bidirectional depending upon how they are being used and navigated. A unidirectional association always navigates from a parent object (owning side) to a child object (inverse side), whereas in a bidirectional association, both directions of navigation are supported. Depending upon the multiplicity, the association can then be qualified using the following annotations: @OnetoMany, @ManytoOne, or @ManytoMany. An example of mapping a unidirectional many-to-many relationship in Hibernate follows.
TRY IT OUT Many-to-Many Relationship Mapping Using Hibernate
In this example, you perform a many-to-many mapping using annotations in Hibernate.
1. Start by creating a new table called project in MySQL. The table has two attributes—ProjectID is the primary key and PName contains the name of the project. The SQL DDL for the project table is as follows:
2. CREATE TABLE 'project' (
3. 'ProjectID' int(11) NOT NULL,
4. 'PName' varchar(45) DEFAULT NULL,
5. PRIMARY KEY ('ProjectID')
) ENGINE=InnoDB DEFAULT CHARSET = utf8;
6. Now assume that there is a many-to-many relationship between the tables employee and project. In other words, an employee can work on at least 0 and at most m projects, whereas a project is assigned to at least 0 and at most n employees. This can be visualized in an Entity Relationship (ER) diagram, as shown in Figure 9.17.
Figure 9.17
7. In order to implement this many-to-many relationship in MySQL, create a new table called works_on as follows:
8. CREATE TABLE 'works_on' (
9. 'EmployeeID' int(11) NOT NULL,
10. 'ProjectID' int(11) NOT NULL,
11. PRIMARY KEY ('EmployeeID','ProjectID'),
12. KEY 'works_onProj_idx' ('ProjectID'),
13. CONSTRAINT 'works_onEmp' FOREIGN KEY ('EmployeeID')
14. REFERENCES 'employee' ('EmployeeID')
15. ON DELETE NO ACTION
16. ON UPDATE NO ACTION,
17. CONSTRAINT 'works_onProj' FOREIGN KEY ('ProjectID')
18. REFERENCES 'project' ('ProjectID')
19. ON DELETE NO ACTION
20. ON UPDATE NO ACTION
) ENGINE = InnoDB DEFAULT CHARSET = utf8;
The works_on table has two attributes—EmployeeID and ProjectID—which make up the primary key and are at the same time foreign keys referring to the primary keys of the Employee and Project tables, respectively.
21. Now write a Java application that will create POJO objects that will be made persistent in both the project and works_on tables using Hibernate. Start by creating a new class called Project.java, as follows:
22. import javax.persistence.Entity;
23. import javax.persistence.Id;
24.
25. @Entity
26. public class Project {
27. private int ProjectID;
28. private String PName;
29.
30. public Project(int ProjectID, String PName) {
31. super();
32. this.ProjectID = ProjectID;
33. this.PName = PName;
34. }
35.
36. @Id
37. public int getProjectID() {
38. return ProjectID;
39. }
40.
41. public void setProjectID(int projectID) {
42. ProjectID = projectID;
43. }
44.
45. public String getPName() {
46. return PName;
47. }
48.
49. public void setPName(String pName) {
50. PName = pName;
51. }
}
52. Adjust the Employee class as follows:
53. import java.util.HashSet;
54. import java.util.Set;
55.
56. import javax.persistence.Entity;
57. import javax.persistence.CascadeType;
58. import javax.persistence.ManyToMany;
59. import javax.persistence.JoinTable;
60. import javax.persistence.JoinColumn;
61. import javax.persistence.Id;
62.
63. @Entity
64. public class Employee {
65. private int EmployeeID;
66. private String Name;
67. private String Gender;
68. private int DNR;
69. private Set<Project> projects=new HashSet<Project>(0);
70.
71. public Employee(int EmployeeID, String Name, String Gender,
72. int DNR, Set<Project> projects) {
73. super();
74. this.EmployeeID = EmployeeID;
75. this.Name = Name;
76. this.Gender = Gender;
77. this.DNR = DNR;
78. this.projects = projects;
79. }
80.
81. @Id
82. public int getEmployeeID() {
83. return EmployeeID;
84. }
85.
86. public void setEmployeeID( int id ) {
87. this.EmployeeID = id;
88. }
89.
90. public String getName() {
91. return Name;
92. }
93.
94. public void setName( String name ) {
95. this.Name = name;
96. }
97.
98. public String getGender() {
99. return Gender;
100. }
101.
102. public void setGender( String gender ) {
103. this.Gender = gender;
104. }
105.
106. public int getDNR() {
107. return DNR;
108. }
109.
110. public void setDNR( int dnr) {
111. this.DNR = dnr;
112. }
113.
114. @ManyToMany (cascade = CascadeType.ALL)
115. @JoinTable(name = "works_on", joinColumns =
116. { @JoinColumn(name = "EmployeeID") },
117. inverseJoinColumns = { @JoinColumn(name = "ProjectID") })
118.
119. public Set<Project> getProjects(){
120. return this.projects;
121. }
122.
123. public void setProjects (Set<Project> projects) {
124. this.projects = projects;
125. }
}
126. Make sure to include the Project class in the hibernate.cfg.xml file, as follows:
127. <?xml version='1.0' encoding='utf-8'?>
128. <!DOCTYPE hibernate-configuration PUBLIC
129. "-//Hibernate/Hibernate Configuration DTD//EN"
130. "http://www.hibernate.org/dtd/hibernate-configuration-3.0.dtd">
131. <hibernate-configuration>
132. <session-factory>
133. <property name="hibernate.connection.driver_class">
134. com.mysql.jdbc.Driver</property>
135. <property name="hibernate.connection.url">
136. jdbc:mysql://localhost:3306/employeeschema</property>
137. <property name="hibernate.connection.username">
138. root</property>
139. <property name="hibernate.connection.password">
140. mypassword123</property>
141. <property name="hibernate.connection.pool_size">
142. 10</property>
143. <property name="show_sql">true</property>
144. <property name="dialect">
145. org.hibernate.dialect.MySQLDialect</property>
146. <property name="hibernate.current_session_context_class">
147. thread</property>
148. <mapping class="Employee" />
149. <mapping class="Project" />
150. </session-factory>
</hibernate-configuration>
151. Create a new class called myDBApp2 as follows:
152. import org.hibernate.Session;
153. import org.hibernate.SessionFactory;
154. import org.hibernate.cfg.Configuration;
155.
156. import java.util.HashSet;
157. import java.util.Set;
158.
159. public class myDBApp2 {
160. public static void main(String[] args) {
161. Set<Project> projects=new HashSet<Project>();
162. projects.add(new Project(1,"Hibernate Basic Project"));
163. projects.add(new Project(2, "Hibernate Many to Many Project"));
164.
165. Employee Myemp=new Employee(7,"Hibernate freak", "Male", 1, projects );
166.
167. SessionFactory sessionFactory =
168. new Configuration().configure().buildSessionFactory();
169. Session session=sessionFactory.openSession();
170. session.beginTransaction();
171. session.save(Myemp);
172. session.getTransaction().commit();
173.
174. session.close();
175. sessionFactory.close();
176. }
}
177. Run the myDBApp2 class and inspect its output. It should look like Figure 9.18 now.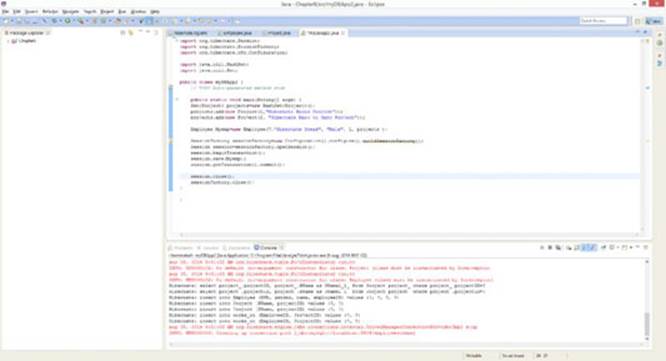
Figure 9.18
178. Also inspect the relational tables called employee, project, and works_on in MySQL. You will see that they look as shown in Figure 9.19, 9.20 and 9.21.
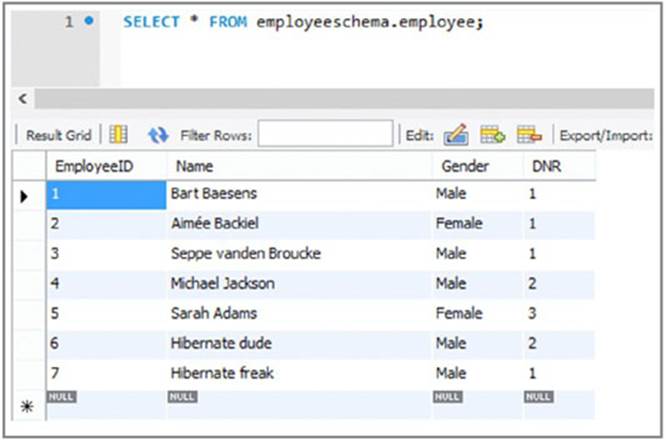
Figure 9.19
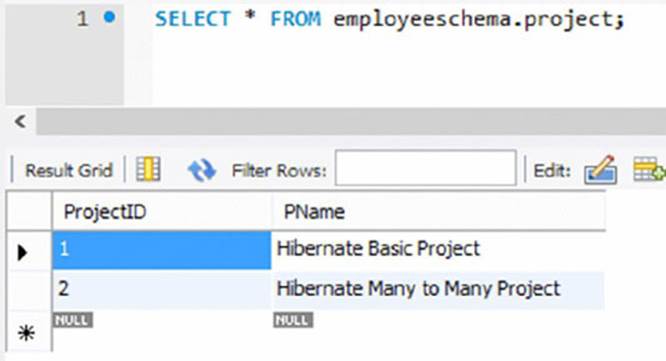
Figure 9.20
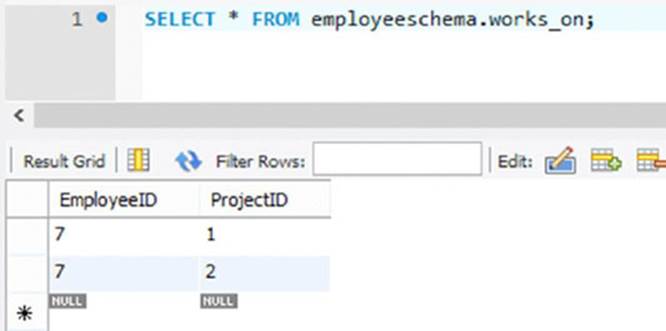
Figure 9.21
179. In these tables, you can see the new employee who is added to the employee table, both new projects in the project table, and the rows that have been added to the works_on table connecting the new employee to both new projects.
How It Works
1. The first three steps created the tables project and works_on in MySQL. Note that both tables are empty and will be populated from Java using Hibernate.
2. Next, the Project Java class was defined. Again, note that the @Entity annotation was included before the class definition to specify the mapping to the project MySQL table. The Project class also has a constructor method with two input arguments—ProjectID and PName. Finally, the @Id annotation maps the ProjectID property to the primary key of the Project MySQL table.
3. The Employee class was defined next. It starts with the annotation @Entity and includes a constructor method. Note that besides EmployeeID, Name, Gender, and DNR, this method also takes a set of project objects as input, which are to be assigned to the employee object upon creation. In other words, during object creation and manipulation, you navigate unidirectionally from the employee object (owning object) to the project objects (non-owning objects). You could also define this in the opposite direction from a project object (owning object) to the employee objects (non-owning objects) or implement it bidirectionally. In this last case, both objects would be considered owning objects. Again, the @Id annotation is used to map the EmployeeIDproperty to the corresponding primary key in the relational Employee MySQL table.
4. The many-to-many mapping between Employee and Project is then implemented using the @ManyToMany annotation. The option cascade=CascadeType.ALL indicates that all data manipulations of employee objects will be immediately propagated to both theemployee and works_on MySQL tables. For example, if an employee object is removed, then Hibernate will not only remove the corresponding tuple from the employee MySQL table, but also all referring tuples from the works_on MySQL table. The@JoinTable annotation then defines the connection to the join table. It is always specified in the class representing the owning side, which in this case is the Employee class. The name property specifies the corresponding join works_on MySQL table. ThejoinColumns property connects to the relevant MySQL attribute of the owning side (Employee) using the @JoinColumn annotation. The inverseJoinColumns property connects to the relevant MySQL attribute of the non-owning side (Project), again by using the @JoinColumn annotation. This is then followed by the setter and getter methods for the project’s attribute.
5. In Step 6 of the Try It Out, you made sure that the Project class was now also included in the hibernate.cfg.xml mapping file.
6. In the next step, the class myDBApp2 was created. First, a set object projects was defined and two new project objects were added to it. Then a new Employee object called Myemp was created and the projects set object was added to it. As in the previous example, a sessionFactory object was created, which then opened a session object, which in turn started a transaction. The Myemp object was then saved, the transaction was committed, and the session and sessionFactory objects were closed.
7. As in the previous example, since the show_SQL property was set to true in the configuration file, you can see the SQL statements that are being generated by Hibernate as follows:
8. Hibernate: select project_.projectID, project_.PName as PName2_1_
9. from Project project_ where project_.projectID=?
10. Hibernate: select project_.projectID, project_.PName as PName2_1_
11. from Project project_ where project_.projectID=?
12. Hibernate: insert into Employee (DNR, gender, name, employeeID) values (?, ?, ?, ?)
13. Hibernate: insert into Project (PName, projectID) values (?, ?)
14. Hibernate: insert into Project (PName, projectID) values (?, ?)
15. Hibernate: insert into works_on (EmployeeID, ProjectID) values (?, ?)
Hibernate: insert into works_on (EmployeeID, ProjectID) values (?, ?)
16.The results can then also be confirmed by inspecting the employee, project, and works_on tables in MySQL.
NOTE For small-scale, single-user applications, you could also opt to adopt SQLite (or its Java implementation SQLJet) instead of MySQL. This is an in-process library implementing a lightweight, self-contained, server-less, zero-configuration SQL-based RDBMS. No external client-server based communication (using something like sockets or ports) is needed since all database communication is handled directly in the process in which the application runs. The database itself is then stored in a simple file that can be easily accessed and moved.
Object-Oriented Database Access from Java
As mentioned, OODBMs store objects rather than relational tuples. Hence, no mapping is needed to store Java objects into an OODBMS. Although this may seem conceptually appealing at first sight, the success of OODBMSs in the industry has been limited to niche sectors, such as spatial and scientific applications. One of the reasons often mentioned for this is their intrinsic complexity when compared to RDBMSs.
In the next exercise, you see how Java can work with ObjectDB, a popular OODBMS, providing support for all the common database operations (such as transaction management, query processing, indexing, and so on). This is an example using the JPA and JDO APIs you saw earlier in the chapter. It is implemented as a single JAR and the database is stored as a single file.
TRY IT OUT Working with ObjectDB from Java
In this example, you will use ObjectDB to see how OODBMSs interact with Java directly.
1. Start by installing ObjectDB from http://www.objectdb.com/object/db/database/download. In this example, ObjectDB version 2.5.6_04 was installed in the directory C:\objectdb-2.5.6_04.
2. Continue from your previous Java project, Chapter9, and add the file C:\objectdb-2.5.6_04\objectdb-2.5.6_04\bin\objectdb.jar to the build path of the project. Remember, you can do this by right-clicking the project and choosing Build Path Add External Archives.
3. Make sure the classes Employee.java and Project.java, as defined in the previous activity, are still available in the current project.
4. Create a new class called myDBApp3 as follows:
5. import javax.persistence.*;
6. import java.util.*;
7. public class myDBApp3 {
8. public static void main(String[] args) {
9. EntityManagerFactory emf =
10. Persistence.createEntityManagerFactory(
11. "C:/objectdb-2.5.6_04/db/employeeadm.odb");
12. EntityManager em = emf.createEntityManager();
13. em.getTransaction().begin();
14. Set<Project> projects=new HashSet<Project>();
15. projects.add(new Project(1,"Basic ObjectDB Project"));
16. projects.add(new Project(2, "Advanced ObjectDB Project"));
17. Employee Myemp=new Employee(1,"Object DB freak", "Male", 1, projects );
18. em.persist(Myemp);
19. em.getTransaction().commit();
20. Query q1 = em.createQuery("SELECT COUNT(emp) FROM Employee emp");
21. System.out.println("Total Employees: " + q1.getSingleResult());
22. TypedQuery<Project> query =
23. em.createQuery("SELECT proj FROM Project proj", Project.class);
24. List<Project> results = query.getResultList();
25. for (Project proj : results) {
26. System.out.print(proj.getProjectID());
27. System.out.print(" ");;
28. System.out.println(proj.getPName());
29. }
30. em.close();
31. emf.close();
32. }
}
33.Run the myDBApp3 class and inspect its output on the console. It should look like Figure 9.22.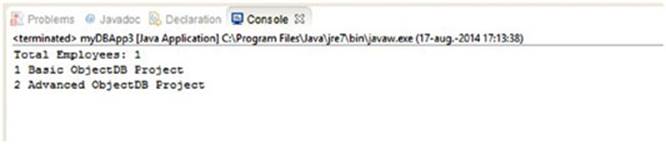
Figure 9.22
34.Now open the ObjectDB explorer by double-clicking the file: C:\objectdb-2.5.6_04\objectdb-2.5.6_04\bin\explorer.exe.
35.Right-click the Employee Entity Class and choose Open Tree Window. Double-click the Employee object and the project’s HashSet object. You will now get the results shown in Figure 9.23.
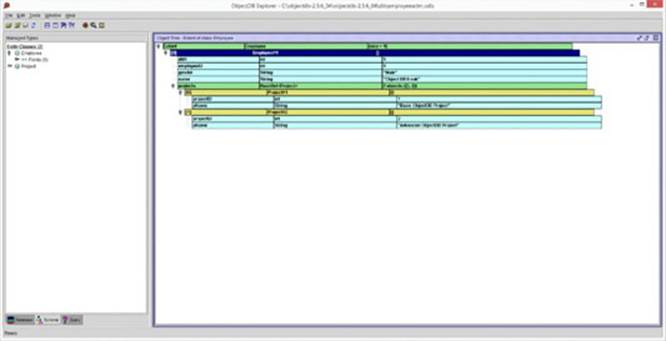
Figure 9.23
How It Works
1. The class MyDBApp3 starts by importing the JPA javax.persistence.* package.
2. An EntityManagerFactory object emf is defined for the database in C:\objectdb-2.5.6_04\objectdb-2.5.6_04\db\employeeadm.odb using a static factory method of the JPA bootstrap class Persistence. If the database does not exist, which is the case in this example, then a new one will be created. Note that an URL combined with a username and a password can also be used when creating the EntityManagerFactory object. The connection to the database is then represented by the EntityManager object em, which is created by the emf object. The emf object may create multiple EntityManager objects in case multiple database connections are needed, which can then be efficiently pooled by the emf object. The method em.getTransaction().begin(); then initiates a database transaction. The next lines of Java code then create two new Project objects and a new Employee object to which the Project objects are assigned using a HashSet object called projects. The Employee object is then stored in ObjectDB using the method em.persist(Myemp); and the transaction is committed by em.getTransaction().commit();. The Employee object has now been made persistent and can now be queried. Note how easy this is here, compared to the Hibernate approach where a configuration file had to be defined to specify the mapping details.
3. In JPA, queries can be implemented using the (old) Query or (new) TypedQuery interface. The Query interface can be used when the result type of the query is unknown, whereas the TypedQuery interface is used when a known result type is expected. Note that queries are always formulated in JPQL.
4. The statement Query q1 = em.createQuery("SELECT COUNT(emp) FROM Employee emp"); creates a JPQL query object called q1, which counts the number of employees in the Employee Entity Class in ObjectDB. The result of the query is a single value and is written to the console using the method System.out.println("Total Employees: " + q1.getSingleResult());.
5. A JPQL query will now retrieve all Project objects and list them on the console. The statement TypedQuery<Project> query = em.createQuery("SELECT proj FROM Project proj", Project.class); creates a TypedQuery object whereby the return type of the query, i.e. Project, is now explicitly specified. The statement List<Project> results = query.getResultList(); then executes the query and stores the results in a list of Project objects. A for loop is then used to iterate through this list and display the relevant information to the console. Finally, the em and emf objects are closed using the methods em.close(); and emf.close();.
6. Finally, the object tree for the Employee and Project objects is displayed.
COMPARING JAVA DATABASE ACCESS TECHNOLOGIES
In this chapter, you have seen several ways to access databases from Java: JDBC, SQLJ, Hibernate as an ORM framework example, and OpenDB as an OODBMS example. In the industry, the most popular approaches currently adopted are JDBC and Hibernate. Despite their intrinsic advantages, SQLJ and OODBMSs are only seldom used because both are often perceived (rightfully or not) as complex to work with.
For simple applications working with only one database and less than 10 relational tables, it is advised to use JDBC. It’s quite easy to install and use when compared to Hibernate, which has a rather steep learning curve and bigger footprint.
Hibernate is typically recommended when working with complex database models consisting of hundreds of relational tables with complex relationships between them. One of the key benefits of Hibernate is that it allows the complex underlying database design to be completely abstracted. Managing all these tables and relationships in JDBC would be a very cumbersome exercise. Since many professional software development methodologies are object-oriented, another key advantage of Hibernate is that it provides a straightforward mapping from a conceptual OO model to a Java application without having to bother with database design issues. Furthermore, Hibernate is a very portable solution, making it easy to switch to another ORM if desired. However, a key concern that is often heard by many Java developers working with ORM frameworks in general is that many ORMs could benefit from further query optimization and tuning, for example, improved indices and caching. Because of this performance issue, some developers use a mixed approach, using native SQL for read operations (which typically make up the majority of an application anyway) and Hibernate for the remaining create, update, and delete operations.
WHAT’S AHEAD
Nowadays, databases are expanding massively in size. IBM estimates that every day 2.5 quintillion bytes of data are generated. In relative terms, this means that 90% of the data in the world has been created in the last two years. New database technologies have been introduced to efficiently cope with this big data storm. NoSQL (Not only SQL) is one of these newer technologies. NoSQL databases abandon the well-known and popular relational database scheme in favor of a more flexible, schema-less database structure that more closely aligns with the needs of a big data-generating business process. One of its key advantages is that it more easily scales horizontally in terms of storage. Four popular types of NoSQL database technologies are key-value-based databases, document-based databases, column-based databases, and graph-based databases. This chapter concludes with a brief discussion of these technologies.
Key-value-based databases access data by means of keys. In other words, data is stored as a table with only two columns: a (primary) key and a corresponding value, similar to a dictionary. The value itself is stored as a meaningless binary large object (blob), and it is the responsibility of the application to understand its content. An example of a key-value-based database is Amazon’s Dynamo.
Document-based databases are very similar to key-value-based databases except that the value is now a document. Various document formats can be supported, such as XML, JSON, BSON, PDF, Microsoft Word, and others. Unlike in key-value-based databases where the values are unstructured, a document consists of semi-structured elements specified using a predefined set of tags. A very popular example of a document-based database is MongoDB.
Contrary to classical relational databases where the data is stored row by row, column-based databases store data in a column-by-column format. Every column then contains a name, a value, and a timestamp (which can be used to verify how recent the data is). A column family then groups various columns together, much like a table in a relational database environment. Two popular examples of column-based databases are Google’s BigTable and Facebook’s Casandra.
Graph databases store database objects using a graph-based format consisting of nodes, properties, and edges. A node can have 0 or more properties. Nodes are linked by means of edges. Just like nodes, edges can also have properties. Graph databases can be easily navigated through by hopping from one node to another along the existing edges. Hence, they provide a transparent storage format for Java objects, which are typically also highly interlinked. Every node in the graph then corresponds to a Java object—the node properties to the fields of the Java object and the edges to the associations between the Java objects. A key advantage of graph databases compared to relational databases is that they are schema-less, meaning that node properties and edges can be dynamically added. Furthermore, they are more efficient at querying highly interlinked data structures, which can now be tackled using path traversal through the graph, instead of resource-expensive SQL join operations as would be the case with an RDBMS. Popular examples of graph databases are Oracle NoSQL, HyperGraphDB, and Neo4j.
Although the JDBC and JPA specifications were originally developed for relational database access, some vendors have provided JDBC/JPA access to NoSQL databases. Hibernate has introduced the Object/Grid Mapper (OGM), which uses its ORM engine to provide Java persistence (JPA) support for NoSQL databases. It currently supports key-value, document, and graph databases. EclipseLink also provides JPA support for NoSQL databases.
To summarize, as also illustrated by a recent KDnuggets poll (see http://goo.gl/KCTCoA), SQL is far from dead, and given its widespread adoption will still remain an important data-manipulation language for years to come. In fact, despite the name NoSQL, many of the database systems discussed in this chapter still provide active support for SQL to manipulate the data. Moreover, in response to the NoSQL stream, some vendors came up with NewSQL database products by equipping traditional RDBMs with facilities to provide the same scalability as their NoSQL counterparts. A popular example here is Google’s Spanner. Hence from a Java programmer’s perspective, it will remain important to know the basic concepts of SQL in order to develop high-performing Java database applications.