Beginning Java Programming: The Object-Oriented Approach (Programmer to Programmer) (2015)
10. Accessing Web Sources
WHAT YOU WILL LEARN IN THIS CHAPTER:
· How computers communicate with each other over networks and the Internet
· What web services are and what the common web service standards are
· How to access web services and information on the Internet with Java
· How to set up your own web services with Java
WROX.COM CODE DOWNLOADS FOR THIS CHAPTER
The wrox.com code downloads for this chapter are found at www.wrox.com/go/beginningjavaprogramming on the Download Code tab. The code is in the Chapter 10 download and individually named according to the names throughout the chapter.
Since its inception, Java has always been merited for its strong networking support, enabling computers to communicate with each other and transmit information between Java programs over networks and the Internet. To say it in the words of John Cage—the 21st employee of Sun Microsystems (where Java originated)—“the network is the computer.” This phrase was reflected in Sun’s philosophy and can be observed in Java as well.
In this day and age, programs rarely behave as an “island,” but communicate instead with a vast array of other platforms. In fact, you have seen one example of this in the previous chapter on how to communicate with database management systems in Java. This chapter takes you a step further and shows you how to interact with websites and web services, and how to create your own web services in Java to provide information to other parties.
Web applications are an incredibly important application area for Java, so much so that entire books have been devoted to the topic. Thus, this chapter will not be able to cover each and every detail regarding networking, web applications, and web services, but it will provide you with enough information to get started in terms of being able to retrieve information from the web, and even in making your own programs accessible from the outside world.
This chapter is organized as follows: as each web application builds on top of a networking infrastructure, the first section provides a brief, general introduction to computer networks. The goal here is just to provide you with enough information to bring you up to speed, but it will not cover how to program so-called low-level networking applications in Java. That’s an advanced area of programming entailing a great deal of complexity. Instead, you can use the higher-level classes and techniques to abstract away some of this complexity by using Java’s strong support for interacting with so-called web services.
A large number of web service technologies exist—each of which differs in terms of complexity, flexibility, and ease of use. This chapter discusses Remote Procedure Calls (RPC), Remote Method Invocation (RMI), Simple Object Access Protocol (SOAP), and Representational State Transfer (REST). After explaining these techniques, you will see how to access such services with Java. Note, however, that not all information you want to access online will be provided to you in the form of a neatly packaged web service, so you will also learn how to make Java act as a web browser and retrieve information from web sources in that way.
Finally, the last section in this chapter shows you how to create your own web services with Java and make your programs accessible to the outside world. Note that this chapter is one of the harder ones in this book. As such, don’t be afraid to take your time to explore the different code examples or skip parts you don’t feel comfortable with yet. Especially if you’ve never worked with web technologies before, some of the concepts discussed in this chapter can seem a bit daunting at first. Additionally, note that this chapter follows a more hands-on approach than other chapters. As such, each section immediately guides you through an example program to illustrate the different topics.
A BRIEF INTRODUCTION TO NETWORKING
Nowadays, computer networks have become so integrated into our day-to-day computing activities that you rarely think about their complexity. Whenever you surf the web, access social networks, use e-mail clients, use smartphone apps, or upload files on a company’s intranet site, information is being passed over some sort of computer network. Put simply, a computer network is no more than a series of connected machines that allow devices to exchange data with one another, be it PCs, phones, or servers.
Although this description looks simple enough, computer networks are composed of so many different protocols (a protocol is a standard “agreement” on how to communicate) and services, that it is just short of amazing that they work and work fast. As an example, consider what happens when you try to access a website, say, www.wrox.com for example:
1. You enter www.wrox.com into your web browser, so the browser needs to figure out the IP address for this site. IP stands for “Internet Protocol.” It’s the core protocol of the Internet, as it enables networks to route and redirect communication packets between connected computers, which are all given a so-called IP address. To communicate with the Wrox web server, you need to know its IP address. Since the IP address is basically a number, users cannot be expected to remember all addresses for all websites they want to visit (this would be the same as remembering a telephone book!). Therefore, your browser sets off to figure out the correct address for you.
2. In order to retrieve the IP address for a website, web browsers use another protocol, called DNS (Domain Name System). First, the web browser will inspect its own cache (its “short-term memory,” if you will) to see whether you’ve visited this website in the past. If you have, the browser can reuse the stored address. If not, the browser will ask the underlying operating system (Windows, for instance) to see whether it knows the address for www.wrox.com. In case you already know the IP address up front (not likely) and type it in your browser’s URL bar directly, this address lookup step can, of course, be skipped.
3. If the operating system is also unaware of this domain, the browser will send a DNS request to your router, which is the machine that connects you to the Internet and typically keeps its own DNS cache.
4. If your router is also unaware of the correct address, your browser will start sending a number of data packets to known DNS servers, for example, to those maintained by your Internet service providers. To send these requests, a number of protocols are used on top of each other. First, IEEE 802.3 (Ethernet) communicates with machines on the same network; IP correctly routes the request to the IP address of the DNS server; UDP (a “transport protocol”) builds on top of IP to provide a standardized simple messaging facility; and finally, DNS governs how the actual DNS request message should look. A simple “tell me the address for www.wrox.com” message looks like Figure 10.1 if you capture it from the network.
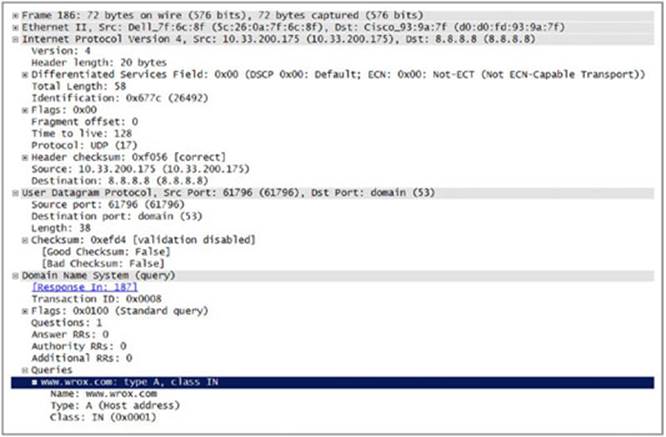
Figure 10.1
NOTE The excellent free and open source Wireshark tool is used to capture and show network packets here.
Figure 10.1 shows the “stack” of protocols discussed previously. At the top, you can see a “frame” message, which describes your message in its most basic “physical” terms—a series of bytes, 0 and 1 pulses on a wire. Below this, you find “Ethernet,” which in this case shows that communication is going on between a Dell laptop and a Cisco router (the manufacturer information can be derived from a unique identifier which is associated with every Ethernet device). Under this, you have the Internet Protocol, which shows that a message is sent from the address 10.33.200.175 (the laptop) to 8.8.8.8 (Google’s DNS server). The IP protocol includes some basic checksums to make sure the receiver can check the integrity of the package (errors occur when the transmission is sent over wires). Next, you see the “User Datagram Protocol” (UDP), which shows that a message is being sent to port 53, the standard port DNS servers are listening on. Assigning messages a destination port number provides a simple way for the receiving party to know for which application the message is intended. The computer also specifies a temporary source port (61796) to indicate that a reply is expected to be sent to this port. Finally, at the bottom, you find the “Domain Name System” (DNS) message, which tells you that this message contains a query for www.wrox.com.
5. You’re not out of the woods yet, as the DNS server still has to send back a reply. Again, a complex message is constructed and sent back, as shown in Figure 10.2.
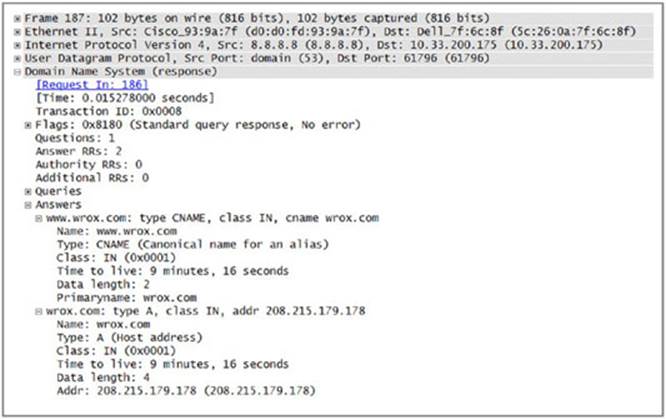
Figure 10.2
The Ethernet protocol informs you that a message is coming in from the Cisco router back to the laptop. The IP protocol specifies that the message is coming from address 8.8.8.8 and back to your address 10.33.200.175. The UDP protocol tells you that the message originates from port 53 and is destined for port 61796—the one you’re listening on to receive a reply. The DNS message contains a structured answer, telling you that www.wrox.com is the same as wrox.com, and that wrox.com has the IP address 208.215.179.178.
6. All of this was done just to figure out the IP address of www.wrox.com. Your browser can now establish a connection to 208.215.179.178. Again, a number of protocols are combined to construct a complex message. You have already seen IEEE 802.3 (Ethernet) and IP. Instead of UDP, another transport protocol is used on top of this, called TCP (Transmission Control Protocol). TCP provides a more reliable means of delivering network messages, as it includes functionality for error-checking, makes sure that packets are delivered in the right order, and takes care of resending packets when they are lost in transmission. Finally, HTTP (HyperText Transfer Protocol) is used to request and receive the web page. Figure 10.3 shows the complete package the browser sends to request a web page from www.wrox.com (208.215.179.178).
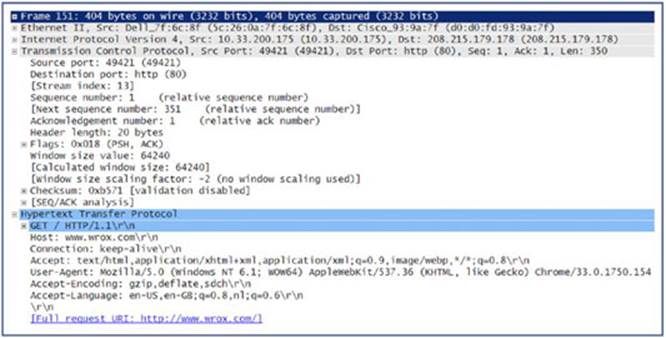
Figure 10.3
Figure 10.3 shows the whole stack of protocols at work here. Note the sequence number, the acknowledgement number, and the checksum in the TCP message, which make sure messages are delivered correctly and in the right order. Note also that, just as with UDP, TCP uses the ports mechanism to organize messages. The HTTP message looks like the following:
GET / HTTP/1.1
Host: www.wrox.com
Connection: keep-alive
Accept: text/html,application/xhtml+xml,application/xml;q=0.9,image/webp,*/*;
q=0.8
User-Agent: Mozilla/5.0 (Windows NT 6.1; WOW64) AppleWebKit/537.36
(KHTML, like Gecko) Chrome/33.0.1750.154 Safari/537.36
Accept-Encoding: gzip,deflate,sdch
Accept-Language: en-US,en-GB;q=0.8,nl;q=0.6
The HTTP request is composed of an HTTP verb (GET) to a location (/) and version specification (HTTP/1.1) (the first line), followed by the number of headers, followed by a blank line to close the request. Browsers are free to include as many headers as they want to request information from and send instructions to the web server. Since HTTP will be used throughout the remainder of this chapter, this simple request message is explained line by line here:
· GET / HTTP/1.1 denotes that you are performing a GET request for the URL / on this web server. HTTP/1.1 denotes that you are compatible with version 1.1 of the HTTP protocol.
· Since the same web server can host multiple websites, the “Host” header specifies that you are requesting a web page from www.wrox.com, so the web server knows from which site it should return a page.
· The “Connection” header instructs the server to keep the connection open, if possible. This allows the following HTTP requests to speed up. If this header is not provided (or the server is not willing to accept keep-alive connections), a new complete HTTP transaction will be set up for each request.
· The “Accept” header informs the web server that the web browser is capable of receiving the following formats. Web servers can use this information to adapt their response accordingly.
· The “User-Agent” header provides information about the browser and operating system the user is using to visit the websites. This is one of the easiest ways for sites to detect which browser you are using.
· The “Accept-Encoding” and “Accept-Language” headers also inform the web server about formats and languages the browser accepts. This can be used by the web server to compress the reply before sending it (as the browser accepts GZIP), for instance, or to send a translated version of the requested page if the user desires.
NOTE If TCP is so much more reliable than UDP, you might be wondering why it’s not used by default. For most applications, TCP is the transport protocol of choice to be used in combination with IP. So commonly, in fact, that the whole stack of protocols (Ethernet, IP, and TCP) is oftentimes just denoted as TCP/IP. Then why use UDP? Well, sometimes network applications need to be fast above all else, so programmers might prefer to use the bare-bones offerings of UDP above TCP and are willing to sacrifice reliability aspects. Games, for example, typically apply UDP instead of TCP in order to minimize latency. Lost packets can then just be dealt with by the application and re-sent if necessary.
7. Next, you receive the following HTTP reply from the web server. The complete protocol stack is not shown this time (Ethernet, IP, TCP, and HTTP); it just shows the HTTP message contained within:
8. HTTP/1.0 302 Found
9. Date: Fri, 11 Apr 2014 09:45:49 GMT
10. Server: Apache
11. Location: http://www.wrox.com/WileyCDA/
12. Vary: Accept-Encoding
13. Content-Encoding: gzip
14. Content-Length: 190
15. Connection: close
16. Content-Type: text/html; charset=iso-8859-1
17.
18. <!DOCTYPE HTML PUBLIC "-//IETF//DTD HTML 2.0//EN">
19. <html><head>
20. <title>302 Found</title>
21. </head><body>
22. <h1>Found</h1>
23. <p>The document has moved <a href="http://www.wrox.com/WileyCDA/">here</a>.</p>
</body></html>
HTTP replies are structured mostly in the same manner as an HTTP request. The first line indicates the HTTP protocol version the server adheres to (HTTP/1.0), together with a status message (302) and a textual description of the status (Found). Next, the server sends a number of headers followed by a newline, followed by the actual contents of the page, which is the message body. In this case, the server is telling you that your requested resource (/) was found, but should be retrieved at another location:www.wrox.com/WileyCDA/. The server was able to adhere to the request to compress the contents (GZIP), but is unwilling to keep the connection open (“Connection: close”). Note that the actual contents have been uncompressed to show you what is returned to the browser.
24.If you were using an archaic or broken web browser, the browser would display the received body to the user. The actual body is formatted in HTML (HyperText Markup Language), which is the standard language used to create web pages. Luckily, your browser is smart enough to understand the 302 status code, so it fires off another request to the given location: http://www.wrox.com/WileyCDA/.
25. Luckily, this time the browser remembers the IP address for www.wrox.com, so it can immediately send a new HTTP request:
26. GET /WileyCDA/ HTTP/1.1
27. Host: www.wrox.com
28. Connection: keep-alive
29. Accept: text/html,application/xhtml+xml,application/xml;q=0.9,image/webp,*/*;
30. q=0.8
31. User-Agent: Mozilla/5.0 (Windows NT 6.1; WOW64) AppleWebKit/537.36
32. (KHTML, like Gecko) Chrome/33.0.1750.154 Safari/537.36
33. Accept-Encoding: gzip,deflate,sdch
Accept-Language: en-US,en-GB;q=0.8,nl;q=0.6
This request looks similar to the previous one, except that now, the location /WileyCDA/ is accessed. The server now happily replies:
HTTP/1.0 200 OK
Date: Fri, 11 Apr 2014 09:45:50 GMT
Server: Apache
X-Powered-By: SPA
Set-Cookie: JSESSIONID=495BF51CF5892A07BBF54D9F6CA32D48; Path=/
Instance: p4
Vary: Accept-Encoding
Content-Encoding: gzip
Connection: close
Content-Type: text/html;charset=ISO-8859-1
<!DOCTYPE HTML PUBLIC "-//W3C//DTD HTML 4.01 Transitional//EN">
<!-- Build: R16B063 -->
<!-- Strand Id: 0229556601 -->
<!-- layout( Wrox Homepage ) -->
<html>
<head>
<link rel="canonical" href="http://www.wrox.com" />
<link href="http://media.wiley.com/spa_assets/R16B063/site/wrox/include/
style.css" type="text/css" rel="stylesheet" />
<title>Programming Books, Free Code Downloads, Ebooks, Blogs, Articles,
Forums - Wrox</title>
... LOTS OF HTML CODE ...
</html>
<!-- / layout( Wrox Homepage ) -->
Most of the HTML reply is omitted here, as printing the whole thing would take multiple pages. Just note that the server now replies a 200 status message, indicating the request could be handled successfully.
NOTE Many other HTTP status codes exist. Most of us are familiar with the 404 (“Not Found”) status code. One other peculiar “error” status code is 418 (“I’m a teapot”), which was added to the standard as a 1998 April Fools’ joke, but is not expected to be implemented by actual HTTP servers.
34. The web browser starts interpreting the HTML code and displays the page to the user. The web browser sees, however, that the page also includes a number of images. For each image, the browser will have to fire off a new HTTP request. As such, rendering just one web page might involve a large number of HTTP requests. Modern browsers, such as Firefox and Chrome, allow you to show a timeline of all requests being made, such as the one shown in Figure 10.4 for rendering www.wrox.com.
Luckily, browsers are smart and will start rendering the page as soon as information is coming in, showing images and other visuals as they are retrieved. In addition, as can be observed from the timeline shown in Figure 10.4, browsers will send a number of HTTP requests in parallel to speed up the loading process.

Figure 10.4
With so many protocols, requests, and back-and-forth communication going on, it is nothing short of amazing that you are able to view a simple web page in less than one second. To standardize this wealth of protocols, the International Organization of Standardization (ISO) maintains the so-called Open Systems Interconnection (OSI) model, which defines aspects of communication into seven layers, from bottom to top:
· Layer 1: Physical layer: Includes the Ethernet protocol, but also USB, Bluetooth, and other radio protocols
· Layer 2: Data link layer: Includes the Ethernet protocol
· Layer 3: Network layer: Includes IP (Internet Protocol)
· Layer 4: Transport layer: TCP and UDP
· Layer 5: Session layer: Includes protocols for opening/closing and managing sessions. TCP’s session management is found on this layer.
· Layer 6: Presentation layer: Includes protocols to format and translate data. This layer also includes encryption protocols.
· Layer 7: Application layer: HTTP and DNS, for instance
Not all network communications need to use protocols from all these layers. To request a web page for instance, layers 1 (physical), 2 (Ethernet), 3 (IP), 4 (TCP), and 7 (HTTP) are involved, but the layers are constructed so that each protocol found at a higher level can be contained inside the message of a lower-layer protocol. When you request a secure web page, for instance, the HTTP message (layer 7) will be encoded in an encrypted SSL or TLS message (layer 6).
The lower the layer you aim for when programming networked applications, the more functionality and complexity you need to deal with. In Java, for example, it is possible to set up so-called server and client “sockets,” which are networking endpoints that define a TCP/IP, UDP/IP, or raw IP connection. Once this connection is established, it is up to you, the programmer, to define how the actual messages you transmit should look, so that you are then effectively creating a higher-layered protocol on top of this.
TRY IT OUT Creating a Simple Networked Application in Java
Now that you have the basics of networking under your belt, take a quick look at how you would implement the most basic client-server networking application in Java using a simple example. Similarly to how HTTP works, you will create a simple request-reply program using TCP/IP sockets in Java.
Note that this is the only time when you will be applying Java sockets directly. Earlier in this chapter, you read that programming this close to the “networking metal” is a complex and challenging task, and in this Try It Out, you’ll see the reasons why.
1. Create two classes in Eclipse: TCPServer and TCPClient. Put them in a package called socketexample.
2. Write the following source code for the TCPServer class:
3. package socketexample;
4.
5. import java.io.*;
6. import java.net.*;
7.
8. public class TCPServer {
9. public static void main(String args[]) {
10. // Listen to incoming connections at port 9000
11. try (ServerSocket serverSocket = new ServerSocket(9000)) {
12. String message = null;
13. while (!"STOP".equals(message)) {
14. // Accept incoming client
15. System.out.println("Waiting for connection...");
16. try ( // Set up socket for connection with client
17. Socket connectionSocket = serverSocket.accept();
18. // Set up input stream reader (from client)
19. DataInputStream incoming =
20. new DataInputStream(connectionSocket.getInputStream());
21. // Set up output stream writer (to client)
22. DataOutputStream outgoing =
23. new DataOutputStream(connectionSocket.getOutputStream());
24. ) {
25. // Get the message the client sent
26. System.out.println("Waiting for message...");
27. message = incoming.readUTF().trim();
28. System.out.println("CLIENT SAID: " + message);
29. // Send message back
30. outgoing.writeUTF("MESSAGE RECEIVED\n");
31. if ("STOP".equals(message))
32. // Send additional line
33. outgoing.writeUTF("SERVER CLOSING DOWN\n");
34. // Close output stream to indicate that no more data is to be
35. sent
36. outgoing.close();
37. } catch (IOException e) {
38. e.printStackTrace();
39. }
40. }
41. } catch (IOException e) {
42. e.printStackTrace();
43. }
44. }
}
45. For the TCPClient class, the code reads as follows:
46. package socketexample;
47.
48. import java.io.*;
49. import java.net.*;
50.
51. public class TCPClient {
52. public static void main(String args[]) {
53. try ( // Create a socket connecting to server
54. Socket clientSocket = new Socket("localhost", 9000);
55. // Set up input stream reader to read keyboard input
56. BufferedReader keyboardReader =
57. new BufferedReader(new InputStreamReader(System.in, "UTF-8"));
58. // Set up input stream reader (from server)
59. DataInputStream incoming =
60. new DataInputStream(clientSocket.getInputStream());
61. // Set up output stream writer (to server)
62. DataOutputStream outgoing = new
63. DataOutputStream(clientSocket.getOutputStream());
64. ) {
65. // Read message from user
66. System.out.println("Enter message to send to server: ");
67. String message = keyboardReader.readLine();
68. // Send message to server
69. outgoing.writeUTF(message + '\n');
70. // Read the reply from server
71. System.out.println("Server replied: ");
72. try {
73. String reply = incoming.readUTF();
74. System.out.print(reply);
75. } catch (EOFException eof) {
76. // Do nothing... server has closed the connection
77. }
78. // Close the connection
79. clientSocket.close();
80. System.out.println("Connection closed gracefully");
81. } catch (IOException e) {
82. e.printStackTrace();
83. }
84. }
}
85. To try out this code, start TCPServer first, followed by TCPClient. Note that you might get a warning from your firewall telling you that network activity is being requested by Java. Naturally, to make the code work, you should allow this. You should be able to type a message in the TCPClient console window and receive a reply. The output for TCPServer will then read like so:
86. Waiting for connection...
87. Waiting for message...
88. CLIENT SAID: Hello there server!
Waiting for connection...
Whereas for the client, you will see:
Enter message to send to server:
Hello there server!
Server replied:
MESSAGE RECEIVED
Connection closed gracefully
How It Works
Now take a look at the way this code works.
1. On the server’s side, a ServerSocket is created that will listen for incoming connections on the local computer (the default) on port 9000, using TCP/IP. (UDP/IP server-client programs, on the other hand, are created through another class,DatagramSocket.)
2. Next, the server performs a loop that accepts a client connection (using a second socket), reads a message from the client, sends back an acknowledgement, and closes the output stream. If a client sends a STOP message, the server will stop accepting new connections and will close itself down. Note that the stream types are matching on both sides of the connection (data input and output streams). Also note the use of writeUTF and readUTF to make sure the client and server can communicate by using the full Unicode spectrum (e.g., also in Mandarin).
3. On the client’s side, a normal socket is created to connect to localhost (the hostname denoting the local computer; you can also use the special IP address 127.0.0.1, which also refers to the local computer). The user is then asked to enter a message, which is sent to the server. Next, as long as the server is sending back data, the reply to the user is printed out before closing the connection.
4. If you get a "java.net.BindException: Address already in use: JVM_Bind" exception on the server’s side, this means that a TCP/IP socket is already listening on port 9000. Make sure you haven’t started TCPServer multiple times, or try to change the port number in TCPServer and TCPClient to something else—perhaps there is another program on your computer listening to this port number.
5. Take some time if you want to experiment with the program and try out some simple modifications. For instance, try changing the client and server classes to allow the client to send multiple lines before receiving a reply from the server. To indicate when the client has finished sending its message, you can use another terminator string (such as a blank newline, like the one used in the HTTP protocol).
The setup of this example might not seem too difficult to understand, but this example has been kept deliberately simple. Once more functionality is required, things start getting more complex rather quickly. For example, you have created a simple request-reply “protocol” here, which is much simpler to implement than a program where both the client and the server transmit a number of messages to each other. In addition, try launching multiple client programs at once. You’ll note how the server is able to deal with only one client at once, forcing the other one to wait to establish its connection. This means that, if you run this program in a real-life setting, one single client can block access to the service by just waiting indefinitely to send its message. To overcome this problem, you need to use a multithreaded setup where multiple connections can be active at once (and dealt with separately in parallel running threads). Finally, this program is also “blocking,” meaning that when you write something like reply = incoming.readUTF(), the execution of the program will stop until actual data is received (this is why you close the outgoing stream explicitly on the server’s side). So-called “asynchronous” (non-blocking) communication is also possible in Java, but is harder to implement correctly.
Luckily, Java comes with a number of libraries and frameworks that help to abstract away a lot of this complexity, so that you can focus on the task at hand—accessing actual information over the networks and the Internet.
This concludes the brief introduction to basic networking. From now on, a variety of built-in Java classes and libraries will be used to help you access and retrieve information stored on computer networks—such as the Internet—which is made accessible in a standardized, structured way.
WEB SERVICES
This section first provides a short introduction on web services and how they help to make information accessible over the network.
On a conceptual level, web service standards are frequently separated into two large categories. The first category can be denoted as “heavyweight” web services, which typically use XML-based formats to exchange messages, involving a variety of protocols and standards to pass information, as well as define which kinds of information can be accessed and how. For example, a complex web service may involve the HTTP protocol (which is now used as a transport protocol to pass the actual message); SOAP, the messaging protocol that encodes messages in XML; WSDL (Web Services Description Language), a protocol used to describe the functionalities offered by the web service, and UDDI (Universal Description Discovery and Integration), which can be used to make web services discoverable by registering them in a central location.
Due to the complexity of heavyweight web services, a new web service standard, called REST (Representational State Transfer), has been gaining traction in recent years. REST is built directly on top of HTTP and is completely stateless and light in terms of bandwidth consumption. It has been adopted by most websites offering some kind of API. For example, most social networks use a REST-based API to handle the communication between the service and mobile apps.
RPC and RMI
RPC stands for “Remote Procedure Call,” and it’s used as a general term to denote any form of communication between computer programs where one program accesses a routine or procedure in another program, often over the network. In Object-Oriented Programming, the term RMI is used, which stands for “Remote Method Invocation.”
RPC messages are initiated by the client, which sends a message to request the execution of a certain method to a server, together with the parameters to send to this method. The remote server sends a response back to the client, which can then be processed. As explained in the Try It Out, “A Simple Networked Application in Java,” earlier in “A Brief Introduction to Networking” section, RPC calls can come in two varieties: synchronous (where the client blocks and waits until it receives a reply) and asynchronous (where the client can continue to execute some tasks while waiting for the reply). Of course, since communication is performed over a network, you must take special care when handling failures such as the network going down, without the client knowing if part of the RPC call was actually executed. If the called method performs data changes on the server’s side, rollback mechanisms must be provided to undo these changes in the event of a failure.
RPC and RMI have a long history. RPC was originally invented by Sun Microsystems (the same company from which Java originated) and was ultimately standardized and implemented as the Open Network Computing Remote Procedure Call. Java also provides built-in mechanisms to perform RMI, called Java RMI. This book will not go into much detail on how Java RMI works, but the following Try It Out briefly shows how it works.
TRY IT OUT RMI in Java
This exercise will help you see how Java RMI works. You will create a simple server for two basic number manipulations: addition and subtraction.
1. Create two classes and an interface: RMIClient, RMIServer, and RMIInterface. Create a package called rmiexample to hold them.
2. Start with RMIInterface. This interface defines the methods the server will expose to the client without specifying the actual code to be executed, just as a normal interface would. The code for RMIInterface looks like this:
3. package rmiexample;
4.
5. import java.rmi.Remote;
6. import java.rmi.RemoteException;
7.
8. public interface RMIInterface extends Remote {
9. public int addTwoNumbers(int a, int b) throws RemoteException;
10. public int substractTwoNumbers(int a, int b) throws RemoteException;
}
11. The RMIServer class implements this interface and thus specifies the method body for addTwoNumbers and substractTwoNumbers. A main method is also included in this class and it instantiates an RMIServer object:
12. package rmiexample;
13.
14. import java.rmi.Naming;
15. import java.rmi.RemoteException;
16. import java.rmi.server.UnicastRemoteObject;
17. import java.rmi.registry.*;
18.
19. public class RMIServer
20. extends UnicastRemoteObject implements RMIInterface {
21.
22. public RMIServer() throws RemoteException {
23. super();
24. }
25.
26. public int addTwoNumbers(int a, int b) throws RemoteException {
27. System.out.println("addTwoNumbers was called");
28. return a + b;
29. }
30.
31. public int substractTwoNumbers(int a, int b) throws RemoteException {
32. System.out.println("substractTwoNumbers was called");
33. return a - b;
34. }
35.
36. public static void main(String args[]) throws Exception {
37. System.out.println("Starting server...");
38.
39. try {
40. // Create registry on local machine running on port 1099
41. LocateRegistry.createRegistry(1099);
42. System.out.println("RMI registry was created");
43. } catch (RemoteException e) {
44. System.out.println("RemoteException occurred: ");
45. e.printStackTrace();
46.
47. }
48.
49. RMIServer theServer = new RMIServer();
50.
51. // Bind the server instance to the name "RMIServer"
52. Naming.rebind("//localhost/RMIServer", theServer);
53. System.out.println("RMIServer bound in registry");
54. }
}
55. RMIClient just contains a main method to try out the RMI server:
56. package rmiexample;
57.
58. import java.rmi.registry.LocateRegistry;
59. import java.rmi.registry.Registry;
60.
61. public class RMIClient {
62. public static void main(String args[]) throws Exception {
63. // Get RMI registry running at the local computer
64. Registry registry = LocateRegistry.getRegistry("localhost");
65. // Request interface bound on name "RMIServer"
66. RMIInterface serverInterface = (RMIInterface) registry.lookup("RMIServer");
67.
68. // Execute methods over RMI
69. System.out.println(serverInterface.addTwoNumbers(3, 4));
70. System.out.println(serverInterface.substractTwoNumbers(10, 3));
71. }
}
72. To try out this code, start the main class of RMIServer first, followed by RMIClient. If everything goes right, you should see this on the server’s console:
73. Starting server...
74. RMI registry was created
75. RMIServer bound in registry
76. addTwoNumbers was called
substractTwoNumbers was called
With the results of the two method calls on the client’s console:
7
7
How It Works
Here’s how it works:
1. RMIInterface defines the methods the server will expose to the client without actually specifying the code to be executed, just as a normal interface would. However, unlike normal interfaces, note that RMI interfaces need to extend the remote interface in order to be used as an RMI service. In addition, each method you define in the interface needs to throw a RemoteException exception.
2. Concerning RMIServer, most of the code should be self-explanatory, especially the implementation of the two provided methods. Two important aspects should be noted: first, the class should implement the interface you’ve defined earlier. Second, you are extending another class—UnicastRemoteObject—which is a built-in class that allows you to automatically export a so-called “stub” for RMIServer. A stub is basically a bare-bones version of the RMIServer class that includes functionality for parameter conversion. Since the server and client code of an RMI program can run on different machines with different architectures, they might not agree on the data representation of different parameters. Consider, for example, 32- and 64-bit machines using different sizes to represent number types. A stub handles the conversion of passed method arguments and deconversion of returned results automatically. There are two ways to generate stubs: manually, using the rmic program included in the Java JDK (this would create an RMIServer_Stub.class file), or automatically, like you’ve done here by extending UnicastRemoteObject.
3. Next, take a look at the main method of RMIServer. First, this method uses the LocateRegistry built-in class to create an RMI registry running on port 1099. An RMI registry keeps track of the services provided by an RMI server by binding objects providing methods over RMI to specific names. Again, it is possible to start this registry from the operating system (using the rmiregistry program included in the Java JDK), but you’re taking the programmatic route here. Next, the main class instantiates an RMIServer object and binds it to the name RMIServer on the local machine, localhost.
4. The client (RMIClient) uses the LocateRegistry class to retrieve the registry running on localhost, and then an interface object is created by looking up the bound object to the name RMIServer in the registry. Finally, everything is set for methods to be executed on this object, just as you would with a normal object. The difference, however, is that the method arguments will now be sent over the network.
Apart from Java RMI, a large number of additional RPC-based standards and protocols have been defined throughout the past years, not all of them being specific to Java, of course. For example, the Common Object Request Broker Architecture (CORBA) is a standard that was defined by the OMG (Object Management Group) and enables communication between systems. The reason I mention it is because it is the only OMG standard that’s been incorporated in Java SE as a built-in library, with classes being located in the org.omg.CORBA package. Conceptually speaking, CORBA enables the same functionality as Java RMI, with the difference that CORBA allows communication between very diverse systems (i.e., not only between Java programs) running on different architectures, different operating systems, and written using different programming languages. However, CORBA has been subject to quite a bit of criticism—some of it relating to technical aspects, some of it to design choices—and the complexity of the standard means that it is not very widely adapted. As such, I will not discuss it in more detail here, but if you ever hear the name again, you know what it relates to.
SOAP
Another RPC-based protocol that enables accessing objects over a network is called SOAP, and it was designed as the successor of XML-RPC (XML-based RPC). SOAP is quite popular in “enterprise” environments as a method to access and provide web services.
SOAP stands for “Simple Object Access Protocol,” although the W3 standards body has dropped the use of the name as an acronym in a recent revision of the standard in favor of just using “SOAP” as is. While this protocol is easier to use than CORBA, it can be argued that it is still not really. . . simple. Recall that the introduction stated that web service technologies are typically separated into “heavyweight” and “lightweight” categories, and SOAP—like other RPC-based technologies—is one of the former. The basic idea behind SOAP is to provide an XML-based messaging framework that’s extensible (new features can be easily added), neutral (SOAP messages can travel on top of HTTP and a variety of other protocols), and independent (can be used independently of the programming language and architecture used). These aspects make SOAP very versatile, but the standard is also slower and more verbose than other RPC standards, as XML messages can grow large quickly. For example, the following code snippet shows a SOAP request to call a method AddTwoNumbers, which is embedded inside an HTTP request:
POST /mathematicsService HTTP/1.1
Host: www.example.org
Content-Type: application/soap+xml; charset=utf-8
Content-Length: *LENGTH*
<?xml version="1.0"?>
<soap:Envelope
xmlns:soap="http://www.w3.org/2001/12/soap-envelope"
soap:encodingStyle="http://www.w3.org/2001/12/soap-encoding">
<soap:Body xmlns:m="http://www.example.org/mathematics">
<m:AddTwoNumbers>
<m:FirstNumber>3</m:FirstNumber >
<m:SecondNumber>6</m:SecondNumber>
</m:AddTwoNumbers>
</soap:Body>
</soap:Envelope>
And the server answers with the following reply:
HTTP/1.1 200 OK
Content-Type: application/soap+xml; charset=utf-8
Content-Length: *LENGTH*
<?xml version="1.0"?>
<soap:Envelope
xmlns:soap="http://www.w3.org/2001/12/soap-envelope"
soap:encodingStyle="http://www.w3.org/2001/12/soap-encoding">
<soap:Body xmlns:m="http://www.example.org/mathematics">
<m:AddTwoNumbersResult>
<m:Result>9</m:Result>
</m:AddTwoNumbersResult>
</soap:Body>
</soap:Envelope>
As you can see from this example, XML—just like HTML—is another markup language that’s used to encode documents in a format that is both human- and machine-readable. It is similar to HTML in the sense that documents are formatted as a tree of tags. For example, the following XML document describes a simple book listing:
<?xml version="1.0"?>
<books>
<book>
<title>My First Book</title>
<authors>
<author>
<firstname>Anton</firstname>
<lastname>Anonymous</lastname>
</author>
</authors>
</book>
<book>
<title>Another Book</title>
<authors>
<author>
<firstname>Anton</firstname>
<lastname>Anonymous</lastname>
</author>
<author>
<firstname>Bruce</firstname>
<lastname>McAuthor</lastname>
</author>
</authors>
</book>
</books>
SOAP is often combined with another standard, called WSDL (Web Services Description Language). WSDL is used to describe the functionalities offered by the web service. You will see more about WSDL later, when you learn how to access SOAP services with Java.
Java provides excellent functionalities to communicate with SOAP services, as you will see later. However, the verbosity and “heaviness” of this technique have caused a shift toward simpler protocols in recent years. Traditionally, the Java ecosystem has always been very “XML friendly,” with many messaging formats and configuration files being defined and stored as XML. In recent years, especially with the rise of “modern” web frameworks such as Ruby on Rails, a shift has been occurring toward simpler architectures, which prefer to use simpler data description languages such as JSON or YAML. For example, here is how the “books” data structure as provided in the previous XML could be represented as a YAML document, which is arguably more readable and definitely more concise:
---
books:
- title: My First Book
authors:
- {Anton, Anonymous}
- title: Another Book
authors:
- {Anton, Anonymous}
- {Bruce, McAuthor}
However, every technology comes with advantages and disadvantages, and SOAP remains in wide use, especially in enterprise environments that have a strong need for its versatility.
REST
This section looks at how REST—Representational State Transfer—works. REST is extremely well suited for basic, ad hoc web services. In addition, as the standard is very tightly coupled with HTTP, it has become the architecture of choice by “modern” web companies (think of social networks, for example) to provide APIs with which third-party developers can develop applications. In fact, a shift is going on where developers can be seen first constructing a REST API (API-first development) and then building their own applications and websites around this API.
One of the biggest differences between REST and SOAP is that SOAP is communication agnostic (remember that SOAP messages can be transferred on top of HTTP or any other network protocol), whereas REST is tightly integrated with HTTP and “embraces” the protocol. In fact, a REST request looks completely similar to a normal HTTP request:
GET /books/B101 HTTP/1.1
Host: www.example.com
This is a normal HTTP GET request for the URI /books/B101 sent to the host www.example.com. The server can then respond with a formatted representation of the book with ID B101. Other HTTP request types—apart from GET—exist. In the previous discussion on SOAP, for example, the SOAP request message was sent using a POST request type. GET and POST are the most commonly used HTTP methods. In fact, your browser will typically execute GET requests to request an URL and will perform POST requests to send web forms to the server. In the context of “RESTful” web services, however, the following HTTP methods are used, which are typically requested on collection resources (with an URI such as http://www.example.com/books) or specific resource elements (such ashttp://www.example.com/books/B101 as shown previously):
· GET: Retrieve a list of resources belonging to a collection, or a formatted representation of information on a resource element.
· PUT: Replace the entire collection with a new one, replace the resource element with a new one, or create a resource element if its identifier does not exist.
· POST: Create a new entry in a collection, or create a new entry in a resource element (less commonly used).
· DELETE: Delete an entire collection or a resource element.
Unlike SOAP, REST does not have an official standard, so different APIs may apply different conventions in terms of how they deal with the HTTP methods listed previously. Additionally, REST does not specify a formatting language or standard for the actual request and response messages to represent data, which means that the server may answer the GET /books/B101 query shown previously with a JSON, YAML, XML or even plain English description of the book. Some developers choose to support multiple formats, either by using and adhering to the “Accept” header in the HTTP request, or by adding an extension prefix to the requested URI, for example, GET /books/B101.xml.
Nowadays, companies such as Twitter, Facebook, and PayPal are all providing a REST interface to access their services, information, and functionalities (Facebook calls this their “Graph API,” but it works the same way). Due to the fact that there is no real REST standard, conventions might differ among implementations—so you will need to browse through the API documentation of each service you want to access—but they all agree on using simple HTTP-based request-response communication.
TRY IT OUT Accessing Facebook’s REST Interface
This small exercise illustrates how RESTful web services are defined on top of simple HTTP requests.
1. Navigate to http://graph.facebook.com/me with your web browser.
2. You should receive the following reply:
3. {
4. "error": {
5. "message": "An active access token must be used to query information
6. about the current user.",
7. "type": "OAuthException",
8. "code": 2500
9. }
}
How It Works
Here’s how it works:
1. Navigating to http://graph.facebook.com/me with a web browser will result in the browser executing an HTTP GET request for the /me endpoint.
2. Facebook uses JSON to format its REST replies.
3. As can be read from the reply, the server refuses to provide you with any information, as you have not authenticated yourself first. Most RESTful web services nowadays use the so-called “OAuth” validation technology to perform the authentication step.
4. Luckily, Facebook also provides a “sandbox” where you can play around with their REST API at https://developers.facebook.com/tools/explorer, which will automatically handle the authentication for you. Now, execute a GET request on /me?fields=id,name,birthday. The server responds with something similar to:
5. {
6. "id": "507162275",
7. "name": "Seppe Vanden Broucke",
8. "birthday": "11/09/1986"
}
9. Note how you have supplied arguments with your request this time. You provided one fields argument with content id,name,birthday to specify which fields you want to get back. This way of passing arguments to REST requests is comparable to method-argument passing in SOAP or RMI.
ACCESSING WEB SERVICES AND SOURCES WITH JAVA
Now that you know what web services are and how they work, it’s high time you get to see how you can access them using Java. This section discusses how to access three kinds of web services: services offered over SOAP, RESTful web services, and web services that are, in fact, not offered as a web service at all, using a technique called “screen scraping,” for when you really, absolutely want to get some information out of a website.
Accessing SOAP Services
The first of the three kinds of web services discussed in this section is SOAP. This protocol was introduced earlier in this chapter. Here you learn how to use it.
Installing JAX-WS
JAX-WS Java library will be used to access SOAP services. If you’re using Eclipse with the Java JRE (that is, you don’t have the JDK installed), you’ll need to perform the following steps to get JAX-WS running. If you’re using the JDK, you’re already up and running and can skip the installation steps below.
1. Browse to https://jax-ws.java.net and download the ZIP file offered there (this book uses jaxws-ri-2.2.8.zip at the time of writing).
2. This ZIP file contains a docs folder with documentation, a bin folder with some executables, a samples folder containing code samples, and a lib folder with the actual library and support classes, stored in compressed Java Archives (or JAR) files. Extract the libfolder somewhere you can easily find it (e.g., on your desktop).
3. Open Eclipse and create a new Java project, e.g., SOAPWithJava.
4. Drag the extracted lib folder to your Eclipse project, i.e., to the SOAPWithJava entry in the package explorer.
5. Eclipse will ask you how it should import your files. You should copy them in the Eclipse project to keep things neatly in one place, as shown in Figure 10.5.
6. The package explorer should now list a lib folder under the SOAPWithJava project. It’s best to rename this folder jaxws (right-click, select Refactor and then Rename). Do this before you move on to the next step.
7. You now need to add all the JAR files in the jaxws folder to the build path, so Eclipse and Java know that you want to use the classes contained in these files in your project. You do so by selecting all JAR files in jaxws and in the plugins subdirectory, right-clicking, and then selecting Add to Build Path under Build Path, as shown in Figure 10.6.
8. The JAR files will now show up under “Referenced Libraries” in the package explorer.
9. Finally, keep the extracted ZIP file around, as you’ll need to use the executables provided in the bin folder.
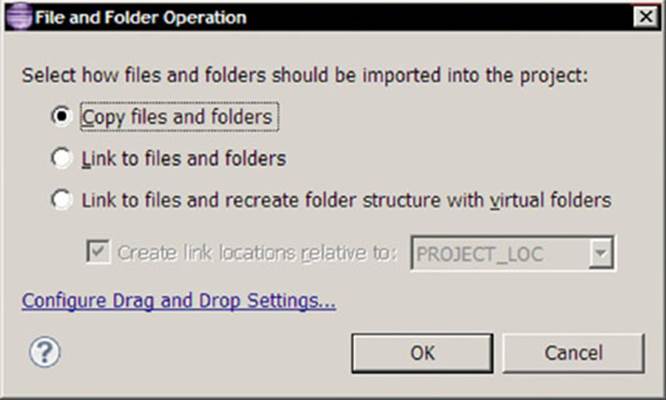
Figure 10.5
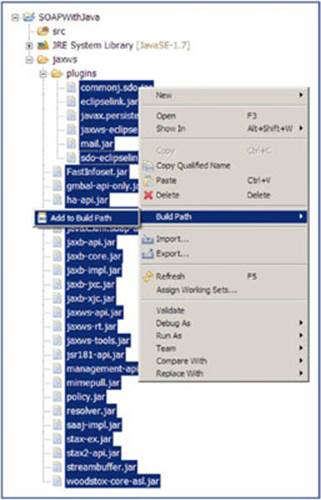
Figure 10.6
You’re now ready to move on with the implementation of the actual client.
Accessing SOAP Services with JAX-WS Without WSDL
In this section, you first take a look at how to access web services without using the WSDL descriptor file.
To test the examples in this chapter, you’ll need a server that can respond to SOAP queries. To this end, you’ll be using the services offered by the following website: http://www.webservicex.net. This website hosts a number of small, working, example web services, and serves over six million requests a day. The following Try It Out will help you explore the website.
TRY IT OUT Exploring SOAP Services
This exercise will let you explore the webservicex.net website and its services to get a feel for how they work.
1. Navigate to http://www.webservicex.net in your web browser. You’ll see a page appearing with a list of web services you can choose from.
2. In this example, use the “Stock Quote” web service, retrievable at http://www.webservicex.net/ws/WSDetails.aspx?CATID=2&WSID=9.
3. The page shown in Figure 10.7 should appear for the “Stock Quote” web service.
Figure 10.7
4. In the lower pane, you’ll see a list of operations—methods—this web service supports. For the “Stock Quote” service, only one operation is available: GetQuote. Click this operation to get some more information about it, as shown in Figure 10.8.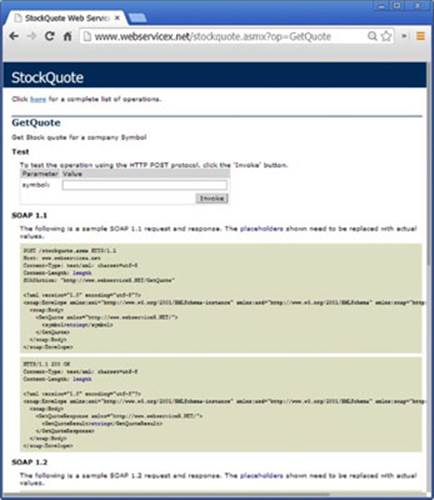
Figure 10.8
5. The web service tells you that one parameter, “symbol,” is required to pass to this operation. You can test the web service using your browser. For example, try typing in IBM and pressing Invoke. The web service should show the result demonstrated inFigure 10.9.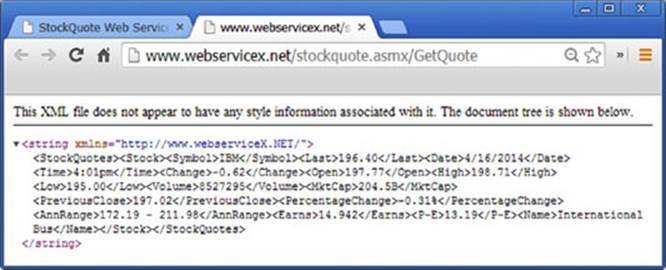
Figure 10.9
6. Finally, the web service also provides an example of a SOAP request-reply interchange to access this web service. Let’s take a look at the example request:
7. POST /stockquote.asmx HTTP/1.1
8. Host: www.webservicex.net
9. Content-Type: text/xml; charset=utf-8
10. Content-Length: length
11. SOAPAction: "http://www.webserviceX.NET/GetQuote"
12.
13. <?xml version="1.0" encoding="utf-8"?>
14. <soap:Envelope xmlns:xsi="http://www.w3.org/2001/XMLSchema-instance"
15. xmlns:xsd="http://www.w3.org/2001/XMLSchema"
16. xmlns:soap="http://schemas.xmlsoap.org/soap/envelope/">
17. <soap:Body>
18. <GetQuote xmlns="http://www.webserviceX.NET/">
19. <symbol>string</symbol>
20. </GetQuote>
21. </soap:Body>
</soap:Envelope>
This request message tells you a few things. First, you now know that you should make a request to the URL /stockquote.asmx at the host www.webservicex.net. Next, you should also provide a SOAPAction header with the contenthttp://www.webserviceX.NET/GetQuote. Finally, the XML encoded SOAP message itself contains the GetQuote operation call with a symbol tag to pass the argument.
If all goes well, the server replies with the following:
HTTP/1.1 200 OK
Content-Type: text/xml; charset=utf-8
Content-Length: length
<?xml version="1.0" encoding="utf-8"?>
<soap:Envelope xmlns:xsi="http://www.w3.org/2001/XMLSchema-instance"
xmlns:xsd="http://www.w3.org/2001/XMLSchema"
xmlns:soap="http://schemas.xmlsoap.org/soap/envelope/">
<soap:Body>
<GetQuoteResponse xmlns="http://www.webserviceX.NET/">
<GetQuoteResult>string</GetQuoteResult>
</GetQuoteResponse>
</soap:Body>
</soap:Envelope>
So now you know you can expect a SOAP reply message with a GetQuoteResponse tag containing one internal tag—GetQuoteResult—which you can parse in your program.
22.Finally, note that the web service also provides a WSDL file, which you will see later on in a bit more depth.
How It Works
Here’s how it works:
1. The http://www.webservicex.net website hosts a number of useful SOAP services, one of which is the stock quote provider.
2. Each SOAP service provides a number of “operations.” Think of these as “methods” you can call on the service. In the case of the stock quote provider, only one operation is provided: GetQuote.
3. SOAP requests can be sent to invoke a service operation. To do so, a request message needs to be constructed that will be sent to the service URI (the endpoint). That method must contain a SOAPAction header with the operation you want to call and a message body containing the parameters you want to send to the operation handler. The WebserviceX.NET websites provides example messages for each of its operations.
4. If the request succeeds, you know you will receive a reply formatted to the specifications as shown on the example page. You know you can expect a SOAP reply message with a GetQuoteResponse tag containing one internal tag: GetQuoteResult. This tag contains a “string”—you can’t be sure yet how this string is formatted or what information it contains, so you’ll need to take a closer look at it once you receive SOAP replies in your program.
It’s time to get started and see how you can access this service in Java. Create a class called ClientWithoutWSDL to do so. From the example in the Try It Out, you know that you will need the following to access the web service:
· The hostname of the service. In this case, this is www.webservicex.net.
· The “endpoint” to which you should send the request using HTTP. For the “Stock Quote” web service, this is /stockquote.asmx. Together with the hostname, this forms the full endpoint URI: http://www.webservicex.net/stockquote.asmx.
· The name of the operation you want to invoke. In this case, this is GetQuote. The name of the operation is also used to construct the SOAPAction header: http://www.webserviceX.NET/GetQuote.
To keep things orderly, you can set up a number of static variables to hold this information, so the first iteration of the ClientWithoutWSDL class should look like this:
public class ClientWithoutWSDL {
private final static String SERVICE_HOST = "http://www.webserviceX.NET/";
private final static String SERVICE_METHOD = "GetQuote";
private final static String SERVICE_ENDPOINT = "stockquote.asmx";
public static void main(String args[]) {
}
}
Take special care to enter these constants exactly as listed in the code snippet. Note that you should be using http://www.webserviceX.NET/ and not http://www.webservicex.net/ or www.webservicex.net. These addresses are case sensitive. The reasons for this will become apparent later on.
NOTE The Internet is a rapidly changing place, and with a chapter on web services, we risk the possibility that websites might no longer work (or have been changed) by the time you read this chapter. That said, all web resources used here have been chosen based on the amount of time they have been around and their maturity (e.g., WebServiceX responds to millions of queries a day). Keep an eye on the online resources for this book at www.wrox.com to get notified in case things break.
Next, you will start creating the actual SOAP request message. To do so, you will use a number of classes made available under javax.xml.soap:
import javax.xml.soap.SOAPConnection;
import javax.xml.soap.SOAPConnectionFactory;
import javax.xml.soap.SOAPMessage;
public class ClientWithoutWSDL {
private final static String SERVICE_HOST = "http://www.webserviceX.NET/";
private final static String SERVICE_METHOD = "GetQuote";
private final static String SERVICE_ENDPOINT = "stockquote.asmx";
private final static String STOCK_SYMBOL = "IBM";
public static void main(String args[]) {
try {
// Create a new SOAP connection
SOAPConnectionFactory soapConnectionFactory =
SOAPConnectionFactory.newInstance();
SOAPConnection soapConnection = soapConnectionFactory.createConnection();
// Send a SOAP Message to SOAP server
// Send this message to http://www.webserviceX.NET/stockquote.asmx
SOAPMessage soapResponse = soapConnection.call(
createSOAPRequest(STOCK_SYMBOL),
SERVICE_HOST + SERVICE_ENDPOINT);
// Close the connection
soapConnection.close();
} catch (Exception e) {
System.err.println("Fatal error occurred");
e.printStackTrace();
}
}
private static SOAPMessage createSOAPRequest(String stockSymbol) {
// Construct a new SOAP request message
return null;
}
}
Now take a look at the changes you’ve made. First, you created a global exception catcher in the main class to print out any errors that might occur. Using a global exception catcher is not good practice in general, but it’s fine to create the prototype. Next, you use a class called SOAPConnectionFactory to instantiate a SOAPConnection object.
There are a number of programming patterns at work here. First, note that you do not call the constructor for SOAPConnection directly (using the new keyword), but instead ask the factory class to instantiate this object for you. “Factories” are a common Object-Oriented Programming pattern and are used for a couple of reasons. First, it allows the factory object to keep track of all objects it has instantiated, providing a centralized means to itemize them and access them later. Second, since factories take care of the actual instantiation of an object, the factory can decide which subclass is best suited whenever multiple subclasses are available. Indeed, SOAPConnection is an abstract class, which is why you cannot instantiate it directly (even if you wanted to do so), so the factory can decide which actual subclass of SOAPConnection is best suited for your needs.
You can see a similar pattern occurring for the instantiation of the SOAPConnectionFactory object. Again, you are not constructing this object directly using the new keyword, but instead calling the static newInstance method to instantiate a factory object. The reasoning behind this is also similar: it allows the internals of the library to keep track of all the factories that have been created and to select the proper factory subclass to use. In some cases, you’ll also see the so-called “Singleton” pattern at work here, where the newInstancemethod—or getOrCreateInstance, which would be a better name in this case—will create a new factory if no factory exists and return the existing factory if it does exist, effectively only allowing one single instantiation of this class (one single factory). Both the Factory and Singleton patterns are heavily used design patterns in Object-Oriented Programming. Chapter 12 provides more insights on object-oriented patterns, but it’s good to briefly mention them here.
Further on in the code, the call method is called on your SOAPConnection object to send a SOAP request to http://www.webserviceX.NET/stockquote.asmx, the full endpoint URI. You also need to pass a SOAPMessage object to send, which you create using another—currently empty—method you’ve added: createSOAPRequest. The stock symbol is passed to this method as an argument, and a constant is added to set the symbol “IBM.”
Let’s now start to fill in the createSOAPRequest method. You can start by creating an empty SOAP message, so that your code now looks like the following:
import javax.xml.namespace.QName;
import javax.xml.soap.MessageFactory;
import javax.xml.soap.MimeHeaders;
import javax.xml.soap.SOAPBody;
import javax.xml.soap.SOAPBodyElement;
import javax.xml.soap.SOAPConnection;
import javax.xml.soap.SOAPConnectionFactory;
import javax.xml.soap.SOAPElement;
import javax.xml.soap.SOAPMessage;
public class ClientWithoutWSDL {
private final static String SERVICE_HOST = "http://www.webserviceX.NET/";
private final static String SERVICE_METHOD = "GetQuote";
private final static String SERVICE_ENDPOINT = "stockquote.asmx";
private final static String STOCK_SYMBOL = "IBM";
public static void main(String args[]) {
try {
// Create a new SOAP connection
SOAPConnectionFactory soapConnectionFactory =
SOAPConnectionFactory.newInstance();
SOAPConnection soapConnection = soapConnectionFactory.createConnection();
// Send a SOAP Message to SOAP server
// Send this message to http://www.webserviceX.NET/stockquote.asmx
SOAPMessage soapResponse = soapConnection.call(
createSOAPRequest(STOCK_SYMBOL),
SERVICE_HOST + SERVICE_ENDPOINT);
// Close the connection
soapConnection.close();
} catch (Exception e) {
System.err.println("Fatal error occurred");
e.printStackTrace();
}
}
private static SOAPMessage createSOAPRequest(String stockSymbol)
throws Exception {
// Construct a new SOAP request message
MessageFactory messageFactory = MessageFactory.newInstance();
SOAPMessage soapMessage = messageFactory.createMessage();
// Construct the SOAP "body" with the method arguments
soapMessage.saveChanges();
// Print out the request message:
System.out.println("Sending SOAP request:");
soapMessage.writeTo(System.out);
System.out.printf("%n");
return soapMessage;
}
}
Again, the same Factory patterns are being applied here to construct the SOAPMessage object. You will need to modify this actual message—which you will do in the next step—but you should call the saveChanges method after you’re done constructing your SOAP request. This seems a bit ad hoc. Normally, most objects you have worked with so far immediately perform any changes you apply and do not need to have a special save method called. In some cases, however, complex methods might need to perform a series of CPU or disk-intensive operations when performing changes, so that programmers will wait to execute these steps until the programmer explicitly indicates that they are finished modifying the object and all intensive steps can be performed. The SOAPMessage object works exactly like this.
NOTE You might be wondering how you can possibly know when programmers decide that a special saveChanges method needs to be called on the objects they provide in their libraries. The answer is that you can’t, really. The context sensitive pop-ups in Eclipse can provide an indication (if you see a saveChanges method appearing, it might be a strong indication that you’ll need to call it at some point), but it’s easy to miss this. Another way to find this out is by reading the documentation and API reference for the libraries you use. Finally—and what will happen in most real-life situations—it’s also possible to discover this just by doing. If you forget to call this method, things might not work as expected, but reported error messages will lead you in the right direction. As always, don’t be afraid to search around on the Internet to find an answer for your problem.
You also add a number of statements to print out the constructed SOAP message for inspection by asking the object to print out its string representation to the output stream System.out, using the writeTo method.
Finally, note that you have added a throws Exception declaration to your method definition to “bubble up” any errors to the try-catch block in your main method. At this point, your code is runnable, so why not test it? If you run the main method, you’ll see something like this appear:
Sending SOAP request:
<SOAP-ENV:Envelope xmlns:SOAP-ENV="http://schemas.xmlsoap.org/soap/envelope/">
<SOAP-ENV:Header/><SOAP-ENV:Body/></SOAP-ENV:Envelope>
Does this mean your code is working? The SOAP message does not seem to contain much. To figure out what’s going on, take a closer look at the soapResponse object you get back, which is also a SOAPMessage object, by simply printing out its contents:
import javax.xml.namespace.QName;
import javax.xml.soap.MessageFactory;
import javax.xml.soap.MimeHeaders;
import javax.xml.soap.SOAPBody;
import javax.xml.soap.SOAPBodyElement;
import javax.xml.soap.SOAPConnection;
import javax.xml.soap.SOAPConnectionFactory;
import javax.xml.soap.SOAPElement;
import javax.xml.soap.SOAPMessage;
public class ClientWithoutWSDL {
private final static String SERVICE_HOST = "http://www.webserviceX.NET/";
private final static String SERVICE_METHOD = "GetQuote";
private final static String SERVICE_ENDPOINT = "stockquote.asmx";
private final static String STOCK_SYMBOL = "IBM";
public static void main(String args[]) {
try {
// Create a new SOAP connection
SOAPConnectionFactory soapConnectionFactory =
SOAPConnectionFactory.newInstance();
SOAPConnection soapConnection = soapConnectionFactory.createConnection();
// Send a SOAP Message to SOAP server
// Send this message to http://www.webserviceX.NET/stockquote.asmx
SOAPMessage soapResponse = soapConnection.call(
createSOAPRequest(STOCK_SYMBOL),
SERVICE_HOST + SERVICE_ENDPOINT);
System.out.println("Received SOAP reply:");
soapResponse.writeTo(System.out);
System.out.println("\r\n");
// Close the connection
soapConnection.close();
} catch (Exception e) {
System.err.println("Fatal error occurred");
e.printStackTrace();
}
}
private static SOAPMessage createSOAPRequest(String stockSymbol)
throws Exception {
// *UNCHANGED*
}
}
If you run the code again, you’ll see:
Sending SOAP request:
<SOAP-ENV:Envelope xmlns:SOAP-ENV="http://schemas.xmlsoap.org/soap/envelope/">
<SOAP-ENV:Header/><SOAP-ENV:Body/></SOAP-ENV:Envelope>
Received SOAP reply:
<?xml version="1.0" encoding="utf-8"?><soap:Envelope
xmlns:soap="http://schemas.xmlsoap.org/soap/envelope/"
xmlns:xsi="http://www.w3.org/2001/XMLSchema-instance"
xmlns:xsd="http://www.w3.org/2001/XMLSchema"><soap:Body>
<soap:Fault><faultcode>soap:Client</faultcode><faultstring>
System.Web.Services.Protocols.SoapException:
Server did not recognize the value of HTTP Header SOAPAction: .
at System.Web.Services.Protocols.Soap11ServerProtocolHelper.RouteRequest()
at System.Web.Services.Protocols.SoapServerProtocol.RouteRequest
(SoapServerMessage message)
at System.Web.Services.Protocols.SoapServerProtocol.Initialize()
at System.Web.Services.Protocols.ServerProtocolFactory.Create(Type type,
HttpContext context, HttpRequest request, HttpResponse response,
Boolean& abortProcessing)</faultstring><detail
/></soap:Fault></soap:Body></soap:Envelope>
Apparently, the server is not too happy with the message you’ve sent and complains that it needs a value for the SOAPAction header. Add one to your request message by changing your createSOAPRequest method to look like this:
private static SOAPMessage createSOAPRequest(String stockSymbol)
throws Exception {
// Construct a new SOAP request message
MessageFactory messageFactory = MessageFactory.newInstance();
SOAPMessage soapMessage = messageFactory.createMessage();
// Construct the SOAP "body" with the method arguments
// Add a SOAP action header to the request
// Action: http://www.webserviceX.NET/GetQuote
MimeHeaders headers = soapMessage.getMimeHeaders();
headers.addHeader("SOAPAction", SERVICE_HOST + SERVICE_METHOD);
// Save our changes
soapMessage.saveChanges();
// Print out the request message:
System.out.println("Sending SOAP request:");
soapMessage.writeTo(System.out);
System.out.println("\r\n");
return soapMessage;
}
This piece of code will add the following HTTP header to your request:
SOAPAction: "http://www.webserviceX.NET/GetQuote"
If you followed along with the “Exploring SOAP Services” Try It Out, you already saw this SOAPAction header in the example provided by WebserviceX.NET. In most cases, the SOAPAction header combines the hostname with the SOAP operation (GetQuote). Later on in this chapter, you’ll see how you can use WSDL to provide this information.
If you execute this code once more, you now get a different reply from the server.
Sending SOAP request:
<SOAP-ENV:Envelope xmlns:SOAP-ENV="http://schemas.xmlsoap.org/soap/envelope/">
<SOAP-ENV:Header/><SOAP-ENV:Body/></SOAP-ENV:Envelope>
Received SOAP reply:
<?xml version="1.0" encoding="utf-8"?><soap:Envelope
xmlns:soap="http://schemas.xmlsoap.org/soap/envelope/"
xmlns:xsi="http://www.w3.org/2001/XMLSchema-instance"
xmlns:xsd="http://www.w3.org/2001/XMLSchema">
<soap:Body><GetQuoteResponse xmlns="http://www.webserviceX.NET/">
<GetQuoteResult>exception</GetQuoteResult></GetQuoteResponse>
</soap:Body></soap:Envelope>
You’re making progress, but this is still not the expected reply. The “exception” result seems to indicate that something went wrong, although the server is not too helpful in detailing exactly what. Debugging sessions with limited information can get very frustrating quickly, but in this case, you have a good idea of what’s wrong: your actual SOAP message does not contain any content and is empty. Let’s start filling it up.
NOTE Remember how you’ve read before that it’s important to use http://www.webserviceX.NET/ for the SERVICE_HOST variable. Servers can be very picky about how they parse the SOAPAction header. In this case, using another capitalization ofhttp://www.webserviceX.NET/ will cause the server to continue complaining about the SOAPAction header.
Modify your createSOAPRequest method once again to look like this:
private static SOAPMessage createSOAPRequest(String stockSymbol) throws Exception {
// Construct a new SOAP request message
MessageFactory messageFactory = MessageFactory.newInstance();
SOAPMessage soapMessage = messageFactory.createMessage();
// Construct the SOAP "body" with the method arguments
SOAPBody soapBody = soapMessage.getSOAPBody();
QName bodyName = new QName(SERVICE_HOST, SERVICE_METHOD);
SOAPBodyElement bodyElement = soapBody.addBodyElement(bodyName);
SOAPElement soapBodyArgument1 = bodyElement.addChildElement("symbol");
soapBodyArgument1.addTextNode(stockSymbol);
// Add a SOAP action header to the request
// Action: http://www.webserviceX.NET/GetQuote
MimeHeaders headers = soapMessage.getMimeHeaders();
headers.addHeader("SOAPAction", SERVICE_HOST + SERVICE_METHOD);
soapMessage.saveChanges();
// Print out the request message:
System.out.println("Sending SOAP request:");
soapMessage.writeTo(System.out);
System.out.printf("%n");
return soapMessage;
}
This piece of code will add a body to your SOAP message containing a GetQuote element (SERVICE_METHOD). Within this XML tag, you add another element—symbol—with your provided stock quote as the content.
The use of the QName object to add an XML element is a bit peculiar. The reason for this is that the web service specifies that you need to add a GetQuote element, which looks like this:
<GetQuote xmlns="http://www.webserviceX.NET/">...</GetQuote>
And not just:
<GetQuote>...</GetQuote>
If you use the following piece of code to construct your message:
// Construct the SOAP "body" with the method arguments
SOAPBody soapBody = soapMessage.getSOAPBody();
SOAPElement bodyElement = soapBody.addChildElement(SERVICE_METHOD);
SOAPElement soapBodyArgument1 = bodyElement.addChildElement("symbol");
soapBodyArgument1.addTextNode(stockSymbol);
You get the following request message—which looks okay:
<SOAP-ENV:Envelope xmlns:SOAP-ENV="http://schemas.xmlsoap.org/soap/envelope/">
<SOAP-ENV:Header/>
<SOAP-ENV:Body>
<GetQuote><symbol>IBM</symbol></GetQuote>
</SOAP-ENV:Body>
</SOAP-ENV:Envelope>
But the server still responds with an “exception” reply. Again, servers can be very picky about how they parse request messages, so take care to construct messages exactly as indicated by the service provider.
With your code, however, you now see the following interchange happening:
Sending SOAP request:
<SOAP-ENV:Envelope xmlns:SOAP-ENV="http://schemas.xmlsoap.org/soap/envelope/">
<SOAP-ENV:Header/>
<SOAP-ENV:Body>
<GetQuote xmlns="http://www.webserviceX.NET/">
<symbol>IBM</symbol>
</GetQuote>
</SOAP-ENV:Body>
</SOAP-ENV:Envelope>
Received SOAP reply:
<?xml version="1.0" encoding="utf-8"?>
<soap:Envelope xmlns:soap="http://schemas.xmlsoap.org/soap/envelope/"
xmlns:xsi="http://www.w3.org/2001/XMLSchema-instance"
xmlns:xsd="http://www.w3.org/2001/XMLSchema">
<soap:Body>
<GetQuoteResponse xmlns="http://www.webserviceX.NET/">
<GetQuoteResult>
<StockQuotes><Stock><Symbol>IBM<
/Symbol><Last>196.40</Last><Date>
4/16/2014</Date><Time>4:01pm</Time>
<Change>-
0.62</Change><Open>197.77</Open><
High>198.71</High><Low>195.00</Low>
<Volume>8527415</Volume><MktCap>204.5B<
/MktCap><PreviousClose>197.02</PreviousClose>
<PercentageChange>-0.31%</PercentageChange><
>172.19 - 11.98</AnnRange><Earns>
14.942</Earns><P-E>13.19</P-E><Name>
International Bus</Name></Stock></StockQuotes>
</GetQuoteResult>
</GetQuoteResponse>
</soap:Body>
</soap:Envelope>
Great! You seem to be getting something back now. However, as you can observe, this particular service has chosen to encode its result as one big mess within the GetQuoteResult tag. In fact, the text included herein is a so-called “escaped” XML string. Note how all the< and > characters have been replaced with < and >. Why this particular server is behaving like this instead of including the XML as is—which would be easier to parse—remains a mystery, but to parse your result, you’ll need to get out the escaped XML string and then interpret it again as XML.
NOTE If you’re paying very close attention, you might note that this SOAP message still looks somewhat different from the example provided at the WebserviceX.NET website. Most notable is that all your tags start with SOAP-ENV, whereas the example uses soap. Funnily enough, the server is not picky regarding this aspect. The reason for this is that a so-called “namespace” definition is explicitly provided in the message. In the example provided, this is done byxmlns:soap="http://schemas.xmlsoap.org/soap/envelope/". In your message, the same namespace is provided, but with the name SOAP-ENV. A namespace is basically a way to indicate the following: “Let’s agree to use a set of tags we both know about. You can find their definition and description on this URL, and I’m going to prepend the tag names with SOAP-ENV.” As long as the server knows about the namespace being used, it does not matter what shorthand name you use to prepend the tags.
To parse the information contained in the reply, you can add a new method, showSOAPResponse. You can also remove all the System.out.println statements as you do not need them anymore—you know your messages are working:
import javax.xml.namespace.QName;
import javax.xml.soap.MessageFactory;
import javax.xml.soap.MimeHeaders;
import javax.xml.soap.SOAPBody;
import javax.xml.soap.SOAPBodyElement;
import javax.xml.soap.SOAPConnection;
import javax.xml.soap.SOAPConnectionFactory;
import javax.xml.soap.SOAPElement;
import javax.xml.soap.SOAPMessage;
public class ClientWithoutWSDL {
private final static String SERVICE_HOST = "http://www.webserviceX.NET/";
private final static String SERVICE_METHOD = "GetQuote";
private final static String SERVICE_ENDPOINT = "stockquote.asmx";
private final static String STOCK_SYMBOL = "IBM";
public static void main(String args[]) {
try {
// Create a new SOAP connection
SOAPConnectionFactory soapConnectionFactory = SOAPConnectionFactory
.newInstance();
SOAPConnection soapConnection = soapConnectionFactory
.createConnection();
// Send a SOAP Message to SOAP server
// Send this message to http://www.webserviceX.NET/stockquote.asmx
SOAPMessage soapResponse = soapConnection.call(
createSOAPRequest(STOCK_SYMBOL), SERVICE_HOST
+ SERVICE_ENDPOINT);
showSOAPResponse(soapResponse);
// Close the connection
soapConnection.close();
} catch (Exception e) {
System.err.println("Fatal error occurred");
e.printStackTrace();
}
}
private static SOAPMessage createSOAPRequest(String stockSymbol)
throws Exception {
// Construct a new SOAP request message
MessageFactory messageFactory = MessageFactory.newInstance();
SOAPMessage soapMessage = messageFactory.createMessage();
// Construct the SOAP "body" with the method arguments
SOAPBody soapBody = soapMessage.getSOAPBody();
QName bodyName = new QName(SERVICE_HOST, SERVICE_METHOD);
SOAPBodyElement bodyElement = soapBody.addBodyElement(bodyName);
SOAPElement soapBodyArgument1 = bodyElement.addChildElement("symbol");
soapBodyArgument1.addTextNode(stockSymbol);
// Add a SOAP action header to the request
// Action: http://www.webserviceX.NET/GetQuote
MimeHeaders headers = soapMessage.getMimeHeaders();
headers.addHeader("SOAPAction", SERVICE_HOST + SERVICE_METHOD);
soapMessage.saveChanges();
return soapMessage;
}
private static void showSOAPResponse(SOAPMessage soapResponse)
throws Exception {
}
}
Let’s start filling in this method. First, add the following two lines:
Node responseNode = soapResponse.getSOAPBody().getFirstChild();
System.out.println(responseNode.getTextContent());
This will take the SOAP body part from the response message (which is an XML document), and then take the first child node in this body. Then you print the text content of this node, i.e., the text between the tags in the XML message, which gives you the following:
<StockQuotes><Stock><Symbol>IBM</Symbol><Last>196.40</Last>
<Date>4/16/2014</Date><Time>4:01pm</Time><Change>-
0.62</Change><Open>197.77</Open><High>198.71</High><Low>195.00
</Low><Volume>8527415</Volume><MktCap>204.5B</MktCap>
<PreviousClose>197.02</PreviousClose><PercentageChange>-
0.31%</PercentageChange><AnnRange>172.19 - 211.98</AnnRange>
<Earns>14.942</Earns><P-E>13.19</P-E><Name>International
Bus</Name></Stock></StockQuotes>
You can see that Java has already “un-escaped” the XML for you, but it is still regarded as one big string. To parse this information, you need to construct a new object representing an XML document out of this string, so you change the method to look like so:
private static void showSOAPResponse(SOAPMessage soapResponse) throws Exception {
Node responseNode = soapResponse.getSOAPBody().getFirstChild();
String xmlText = responseNode.getTextContent();
DocumentBuilderFactory factory = DocumentBuilderFactory.newInstance();
DocumentBuilder builder = factory.newDocumentBuilder();
Document document = builder.parse(new InputSource(
new StringReader(xmlText)));
}
This code will create an org.w3c.dom.Document object representing an XML tree. You can now traverse this tree to get out your information. Looking at the result, you can see that stock information is provided in “Stock” tags, with each piece of information being stored in a separate subtag. So modify your method once again, so that the complete class will look like this:
import java.io.StringReader;
import javax.xml.namespace.QName;
import javax.xml.parsers.DocumentBuilder;
import javax.xml.parsers.DocumentBuilderFactory;
import javax.xml.soap.MessageFactory;
import javax.xml.soap.MimeHeaders;
import javax.xml.soap.SOAPBody;
import javax.xml.soap.SOAPBodyElement;
import javax.xml.soap.SOAPConnection;
import javax.xml.soap.SOAPConnectionFactory;
import javax.xml.soap.SOAPElement;
import javax.xml.soap.SOAPMessage;
import org.w3c.dom.Document;
import org.w3c.dom.Node;
import org.w3c.dom.NodeList;
import org.xml.sax.InputSource;
public class ClientWithoutWSDL {
private final static String SERVICE_HOST = "http://www.webserviceX.NET/";
private final static String SERVICE_METHOD = "GetQuote";
private final static String SERVICE_ENDPOINT = "stockquote.asmx";
private final static String STOCK_SYMBOL = "IBM";
public static void main(String args[]) {
try {
// Create a new SOAP connection
SOAPConnectionFactory soapConnectionFactory = SOAPConnectionFactory
.newInstance();
SOAPConnection soapConnection = soapConnectionFactory
.createConnection();
// Send a SOAP Message to SOAP server
// Send this message to http://www.webserviceX.NET/stockquote.asmx
SOAPMessage soapResponse = soapConnection.call(
createSOAPRequest(STOCK_SYMBOL), SERVICE_HOST
+ SERVICE_ENDPOINT);
showSOAPResponse(soapResponse);
// Close the connection
soapConnection.close();
} catch (Exception e) {
System.err.println("Fatal error occurred");
e.printStackTrace();
}
}
private static SOAPMessage createSOAPRequest(String stockSymbol)
throws Exception {
// Construct a new SOAP request message
MessageFactory messageFactory = MessageFactory.newInstance();
SOAPMessage soapMessage = messageFactory.createMessage();
// Construct the SOAP "body" with the method arguments
SOAPBody soapBody = soapMessage.getSOAPBody();
QName bodyName = new QName(SERVICE_HOST, SERVICE_METHOD);
SOAPBodyElement bodyElement = soapBody.addBodyElement(bodyName);
SOAPElement soapBodyArgument1 = bodyElement.addChildElement("symbol");
soapBodyArgument1.addTextNode(stockSymbol);
// Add a SOAP action header to the request
// Action: http://www.webserviceX.NET/GetQuote
MimeHeaders headers = soapMessage.getMimeHeaders();
headers.addHeader("SOAPAction", SERVICE_HOST + SERVICE_METHOD);
soapMessage.saveChanges();
return soapMessage;
}
private static void showSOAPResponse(SOAPMessage soapResponse)
throws Exception {
Node responseNode = soapResponse.getSOAPBody().getFirstChild();
String xmlText = responseNode.getTextContent();
DocumentBuilderFactory factory = DocumentBuilderFactory.newInstance();
DocumentBuilder builder = factory.newDocumentBuilder();
Document document = builder.parse(new InputSource(
new StringReader(xmlText)));
NodeList stockElements = document.getElementsByTagName("Stock");
for (int i = 0; i < stockElements.getLength(); i++) {
System.out.println("----- Stock nr. " + i + " ------");
NodeList infoElements = stockElements.item(i).getChildNodes();
for (int j = 0; j < infoElements.getLength(); j++) {
System.out.println(infoElements.item(j).getNodeName() +
"\t --> " +
infoElements.item(j).getTextContent());
}
}
}
}
If you execute this code, the program will show the following result:
----- Stock nr. 0 -----
Symbol --> IBM
Last --> 196.40
Date --> 4/16/2014
Time --> 4:01pm
Change --> -0.62
Open --> 197.77
High --> 198.71
Low --> 195.00
Volume --> 8527415
MktCap --> 204.5B
PreviousClose --> 197.02
PercentageChange --> -0.31%
AnnRange --> 172.19 - 211.98
Earns --> 14.942
P-E --> 13.19
Name --> International Bus
Take some time to explore the code you’ve written at your own leisure. Try experimenting with different stock symbols, or if you feel up to it, try selecting one of the other provided web services at WebserviceX.NET and see whether you can get it to work (the “Global Weather” service—http://www.webservicex.net/ws/WSDetails.aspx?CATID=12&WSID=56—works nicely).
In this section, you’ve been accessing SOAP services in a very ad hoc manner, constructing SOAP messages by hand and parsing the responses manually. You had to look up the correct endpoint URI and hostname to use, and had to deal with picky server error messages. Luckily, many SOAP web services also provide a so-called WSDL file that describes the operations the service offers, together with the ways they can be accessed. JAX-WS contains a handy feature to automatically construct a set of service-interacting classes from this WSDL file, as you’ll see in the following section.
First, however, this section ends with a hands-on Try It Out. It shows you how to clean up the code you’ve written some more, if you’re up for it.
TRY IT OUT A True Object-Oriented SOAP Client
The code you wrote to access a SOAP client does not really look like clean, object-oriented Java code. In fact, the code has more similarities to a procedural scripting language, with one big main method delegating some tasks to other static methods.
For building a quick prototype—e.g., when you’re just starting out and trying to see if you can get your SOAP client to work—this is fine, but in real-life applications, you’ll want to clean up your code to be more in line with the object-oriented paradigm.
Let’s see how you can do this for the stock quote client. The goal is to abstract away the complexity of SOAP interaction and to provide an object structure for your applications to work with.
1. Create a new package called withoutwsdlobjectoriented to hold your classes (feel free to pick a more suitable or creative name, but this one will match the code provided with this book). As you know by now, when you think about objects and classes, you want your classes to represent your domain concepts. What is your most primary concept in a stock quote application? Naturally, a class representing a stock symbol and its information. As such, create a Stock class as follows:
2. package withoutwsdlobjectoriented;
3.
4. import java.util.Date;
5.
6. public class Stock {
7. private String symbol, name;
8. private double last, open, high, low;
9. private long volume;
10. private Date timestamp;
11. private double marketCap;
12. private double previousClose;
13. private double change, percentageChange;
14. private double annRangeLow, annRangeHigh;
15. private double earns;
16. private double pe;
17.
18. public Stock(String symbol, String name, double last, double open, double high,
19. double low, long volume, Date timestamp, double marketCap,
20. double previousClose, double change, double percentageChange,
21. double annRangeLow, double annRangeHigh, double earns, double pe) {
22. this.symbol = symbol;
23. this.name = name;
24. this.last = last;
25. this.open = open;
26. this.high = high;
27. this.low = low;
28. this.volume = volume;
29. this.timestamp = timestamp;
30. this.marketCap = marketCap;
31. this.previousClose = previousClose;
32. this.change = change;
33. this.percentageChange = percentageChange;
34. this.annRangeLow = annRangeLow;
35. this.annRangeHigh = annRangeHigh;
36. this.earns = earns;
37. this.pe = pe;
38. }
39.
40. public String getSymbol() {
41. return symbol;
42. }
43.
44. public String getName() {
45. return name;
46. }
47.
48. public double getLast() {
49. return last;
50. }
51.
52. public double getChange() {
53. return change;
54. }
55.
56. public double getOpen() {
57. return open;
58. }
59.
60. public double getHigh() {
61. return high;
62. }
63.
64. public double getLow() {
65. return low;
66. }
67.
68. public long getVolume() {
69. return volume;
70. }
71.
72. public Date getTimestamp() {
73. return timestamp;
74. }
75.
76. public double getMarketCap() {
77. return marketCap;
78. }
79.
80. public double getPreviousClose() {
81. return previousClose;
82. }
83.
84. public double getPercentageChange() {
85. return percentageChange;
86. }
87.
88. public double getAnnRangeLow() {
89. return annRangeLow;
90. }
91.
92. public double getAnnRangeHigh() {
93. return annRangeHigh;
94. }
95.
96. public double getEarns() {
97. return earns;
98. }
99.
100. public double getPe() {
101. return pe;
102. }
103.
104. public String toString() {
105. String r = "";
106. r += "STOCK " + symbol + ": " + name + "\r\n";
107. int l = r.length() - 2;
108. for (int i = 0; i < l; i++)
109. r += "=";
110. r += "\r\n";
111. r += "* Retrieved at: " + timestamp + "\r\n";
112. r += "* Last / High / Low / Open: " +
113. last + " / " + high + " / " + low + " / " + open + "\r\n";
114. r += "* Previous close: " + previousClose + "\r\n";
115. r += "* Volume: " + volume + "\r\n";
116. r += "* Market Cap: " + marketCap + "B" + "\r\n";
117. r += "* Change (%): " + change + " (" + percentageChange + "%)" + "\r\n";
118. r += "* Annual range High / Low: " +
119. annRangeHigh + " / " + annRangeLow + "\r\n";
120. r += "* Earns: " + earns + "\r\n";
121. r += "* P/E: " + pe + "\r\n";
122. return r;
123. }
}
124. You need a way to instantiate a Stock object based on the response you receive from the web service. There are multiple ways to approach this. You can create an additional constructor, add a static method (e.g., createStockFromXML) to the Stock class, or abstract out this functionality using a separate class. In this exercise the last method is used, to keep your Stock class as clean as possible and to add a layer of abstraction between domain logic and web-service-oriented logic. As such, create aStockFactory class that will just contain some static methods to help instantiate a Stock object using a received SOAP reply:
125. package withoutwsdlobjectoriented;
126.
127. import java.io.IOException;
128. import java.io.StringReader;
129. import java.text.ParseException;
130. import java.text.SimpleDateFormat;
131. import java.util.Date;
132. import java.util.Locale;
133. import java.util.Set;
134. import java.util.HashSet;
135.
136. import javax.xml.parsers.DocumentBuilder;
137. import javax.xml.parsers.DocumentBuilderFactory;
138. import javax.xml.parsers.ParserConfigurationException;
139. import javax.xml.soap.SOAPException;
140. import javax.xml.soap.SOAPMessage;
141.
142. import org.w3c.dom.Document;
143. import org.w3c.dom.Element;
144. import org.w3c.dom.Node;
145. import org.w3c.dom.NodeList;
146. import org.xml.sax.InputSource;
147. import org.xml.sax.SAXException;
148.
149. public class StockFactory {
150. public static Set<Stock> newStocksFromSOAPReplyMessage(SOAPMessage soapResponse) {
151. try {
152. Node responseNode = soapResponse.getSOAPBody().getFirstChild();
153. String xmlText = responseNode.getTextContent();
154. return newStocksFromXMLString(xmlText);
155. } catch (SOAPException e) {
156. e.printStackTrace();
157. }
158. // If we end up here, something went wrong:
159. return null;
160. }
161.
162. public static Set<Stock> newStocksFromXMLString(String xmlText) {
163. try {
164. DocumentBuilderFactory factory = DocumentBuilderFactory.newInstance();
165. DocumentBuilder builder = factory.newDocumentBuilder();
166. Document document =
167. builder.parse(new InputSource(new StringReader(xmlText)));
168. return newStocksFromXMLDocument(document);
169. } catch (ParserConfigurationException e) {
170. e.printStackTrace();
171. } catch (SAXException e) {
172. e.printStackTrace();
173. } catch (IOException e) {
174. e.printStackTrace();
175. }
176. // If we end up here, something went wrong:
177. return null;
178. }
179.
180. public static Set<Stock> newStocksFromXMLDocument(Document document) {
181. Set<Stock> stocksSet = new HashSet<Stock>();
182. NodeList stockElements = document.getElementsByTagName("Stock");
183. for (int i = 0; i < stockElements.getLength(); i++) {
184. Stock stock = newStockFromXMLElement(
185. (Element) stockElements.item(i));
186. stocksSet.add(stock);
187. }
188. return stocksSet;
189. }
190.
191. public static Stock newStockFromXMLElement(Element node) {
192. String symbol, name;
193. double last, open, high, low, marketCap,
194. previousClose, change, percentageChange, annRangeLow,
195. annRangeHigh, earns, pe;
196. long volume;
197. Date timestamp;
198.
199. symbol = getEl(node, "Symbol");
200. name = getEl(node, "Name");
201. last = Double.parseDouble(getEl(node, "Last"));
202. open = Double.parseDouble(getEl(node, "Open"));
203. high = Double.parseDouble(getEl(node, "High"));
204. low = Double.parseDouble(getEl(node, "Low"));
205. volume = Long.parseLong(getEl(node, "Volume"));
206. marketCap = Double.parseDouble(getEl(node, "MktCap").replace("B", ""));
207. previousClose = Double.parseDouble(getEl(node, "PreviousClose"));
208. percentageChange = Double.parseDouble(getEl(node, "PercentageChange")
209. .replace("%", "")
210. .replace("+", "")
211. .replace("-", ""));
212. change = Double.parseDouble(getEl(node, "Change")
213. .replace("+", "")
214. .replace("-", ""));
215. String[] annRange = getEl(node, "AnnRange").split(" - ");
216. annRangeLow = Double.parseDouble(annRange[0]);
217. annRangeHigh = Double.parseDouble(annRange[1]);
218. earns = Double.parseDouble(getEl(node, "Earns"));
219. pe = Double.parseDouble(getEl(node, "P-E"));
220.
221. try {
222. String fullDate = getEl(node, "Date")+" "+getEl(node, "Time");
223. fullDate = fullDate.replace("pm", " pm").replace("am", " am");
224. timestamp = new SimpleDateFormat("M/d/y K:m a",
225. Locale.ENGLISH).parse(fullDate);
226. } catch (ParseException e) {
227. e.printStackTrace();
228. timestamp = new Date();
229. }
230.
231. return new Stock(symbol, name,
232. last, open, high, low,
233. volume, timestamp, marketCap,
234. previousClose, change,
235. percentageChange, annRangeLow,
236. annRangeHigh, earns, pe);
237. }
238.
239. private static String getEl(Element node, String n) {
240. return node.getElementsByTagName(n).item(0).getTextContent();
241. }
242.
}
243. Also define another helper class, called StockServiceClient, which will communicate with the SOAP service, like so:
244. package withoutwsdlobjectoriented;
245.
246. import javax.xml.namespace.QName;
247. import javax.xml.soap.MessageFactory;
248. import javax.xml.soap.MimeHeaders;
249. import javax.xml.soap.SOAPBody;
250. import javax.xml.soap.SOAPBodyElement;
251. import javax.xml.soap.SOAPConnection;
252. import javax.xml.soap.SOAPConnectionFactory;
253. import javax.xml.soap.SOAPElement;
254. import javax.xml.soap.SOAPException;
255. import javax.xml.soap.SOAPMessage;
256.
257. public class StockServiceClient {
258. private final static String SERVICE_HOST = "http://www.webserviceX.NET/";
259. private final static String SERVICE_METHOD = "GetQuote";
260. private final static String SERVICE_ENDPOINT = "stockquote.asmx";
261.
262. public static SOAPMessage getStockQuote(String stockSymbol) {
263. SOAPConnection soapConnection = null;
264. try {
265. SOAPConnectionFactory soapConnectionFactory =
266. SOAPConnectionFactory.newInstance();
267. soapConnection =
268. soapConnectionFactory.createConnection();
269.
270. SOAPMessage soapResponse = soapConnection.call(
271. createSOAPRequest(stockSymbol),
272. SERVICE_HOST + SERVICE_ENDPOINT);
273.
274. soapConnection.close();
275.
276. return soapResponse;
277. } catch (UnsupportedOperationException | SOAPException e) {
278. e.printStackTrace();
279. } finally {
280. if (soapConnection != null)
281. try { soapConnection.close(); } catch (SOAPException i) {}
282. }
283.
284. return null;
285. }
286.
287. private static SOAPMessage createSOAPRequest(String stockSymbol) {
288. try {
289. MessageFactory messageFactory = MessageFactory.newInstance();
290. SOAPMessage soapMessage = messageFactory.createMessage();
291.
292. SOAPBody soapBody = soapMessage.getSOAPBody();
293. QName bodyName = new QName(SERVICE_HOST, SERVICE_METHOD);
294. SOAPBodyElement bodyElement = soapBody.addBodyElement(bodyName);
295. SOAPElement soapBodyArgument1 = bodyElement.addChildElement("symbol");
296. soapBodyArgument1.addTextNode(stockSymbol);
297.
298. MimeHeaders headers = soapMessage.getMimeHeaders();
299. headers.addHeader("SOAPAction", SERVICE_HOST + SERVICE_METHOD);
300.
301. soapMessage.saveChanges();
302.
303. return soapMessage;
304. } catch (SOAPException e) {
305. e.printStackTrace();
306. }
307.
308. return null;
309. }
}
310. Finally, you can create a test class containing a main method, called StockQuoteProgram:
311. package withoutwsdlobjectoriented;
312.
313. import java.util.Set;
314. import javax.xml.soap.SOAPMessage;
315.
316. public class StockQuoteProgram {
317. public static void main(String[] args) {
318. SOAPMessage soapReply = StockServiceClient.getStockQuote("IBM");
319.
320. Set<Stock> stocks =
321. StockFactory.newStocksFromSOAPReplyMessage(soapReply);
322.
323. for (Stock stock : stocks) {
324. System.out.println(stock.toString());
325. }
326. }
}
327. Run the program. If all goes well—the website or your Internet connection might be down—you should see the following:
328. STOCK IBM: International Bus
329. ============================
330. * Retrieved at: Thu Apr 17 16:02:00 CEST 2014
331. * Last / High / Low / Open: 190.01 / 190.7 / 187.01 / 187.29
332. * Previous close: 196.4
333. * Volume: 11255493
334. * Market Cap: 197.9B
335. * Change (%): 6.39 (3.25%)
336. * Annual range High / Low: 211.98 / 172.19
337. * Earns: 14.942
* P/E: 13.14
How It Works
Here’s how it works:
1. In the Stock class, you created instance variables to hold all the information the web service will provide, together with a constructor to initialize Stock objects. You used private variables with generated getters and setters to do so. While it is generally a good idea to access data in objects from the outside world by using methods provided by the object (instead of using public fields), for “data-heavy” classes such as the Stock class, feel free to resort to public final fields if you don’t want to make your code too verbose. Especially when none of the getters and the setters have side effects (meaning that they just return or change one field), this is an okay approach.
2. At this point, it might also be prudent to note that—generally speaking—it is not a good idea to store monetary values and amounts as doubles or floats, not only in Java, but in most programming languages. The reason for this is that the internal representation of a floating point number cannot accurately represent fractions, which will introduce subtle rounding errors over time once you start performing addition, multiplication, subtraction, and division on them, as monetary software tends to do. There are ways to work around this, for example, by using the built-in BigDecimal class in Java. For these exercises, it’s simpler to work with doubles, but keep this remark in mind when working with monetary values in a real-life setting.
3. The StockFactory class includes a number of methods to construct a set of Stock objects from a received SOAP message. The newStocksFromSOAPReplyMessage method extracts the reply string from the message, which is then passed to a separate method,newStocksFromXMLString. This method converts the string to an XML document, which is then passed to another method, newStocksFromXMLDocument, which iterates over all the “Stock” tags and parses them using newStockFromXMLElement. getEl is a helper method defined to get the text content from the first XML tag within a node given a specific tag name. Note that you need to parse some of the information you receive from the server. For example, since the server returns the string "172.19 - 211.98"to specify the annual range, you need to split up this string and parse it using Double.parseDouble()to store it in your variables. Note also the use of the SimpleDateFormat class to parse a string to a Date object.
4. StockServiceClient contains most of the same logic you’ve seen before to communicate with the SOAP service.
5. Finally, your now nimble main method just invokes the StockServiceClient and StockFactory classes to do the heavy lifting. You have neatly separated all aspects of this program—the domain logic (Stock), the service interaction logic (StockServiceClient), and the parsing logic (StockFactory). If you want, you can continue to expand on this program some more. For example, try expanding the main method to take a list of stock symbols, retrieve their information, and show a ranking based on price/earnings ratio.
Accessing SOAP Services with JAX-WS with WSDL
You have seen how to access a web service by constructing SOAP request messages manually. However, this method assumes that you are aware of the endpoints the service provides, the operations, and the parameters to be passed.
To overcome this issue, most SOAP-based web services provide a so-called WSDL file. WSDL, or “Web Services Description Language,” is an XML format for describing network services and their endpoints, together with the operation they support and the arguments they expect. You can use the information stored in such files to allow JAX-WS to do a lot of the work for you.
Let’s take another look at the Stock Quote service page at WebserviceX.NET: http://www.webservicex.net/WS/WSDetails.aspx?CATID=2&WSID=9. The description mentions that a WSDL file is provided at http://www.webservicex.net/stockquote.asmx?WSDL, which you can request with your web browser, and indeed looks like an XML document containing the following:
<wsdl:definitions xmlns:tm="http://microsoft.com/wsdl/mime/textMatching/"
xmlns:soapenc="http://schemas.xmlsoap.org/soap/encoding/"
xmlns:mime="http://schemas.xmlsoap.org/wsdl/mime/"
xmlns:tns="http://www.webserviceX.NET/"
xmlns:soap="http://schemas.xmlsoap.org/wsdl/soap/"
xmlns:s="http://www.w3.org/2001/XMLSchema"
xmlns:soap12="http://schemas.xmlsoap.org/wsdl/soap12/"
xmlns:http="http://schemas.xmlsoap.org/wsdl/http/"
xmlns:wsdl="http://schemas.xmlsoap.org/wsdl/"
targetNamespace="http://www.webserviceX.NET/">
<wsdl:types>
<s:schema elementFormDefault="qualified"
targetNamespace="http://www.webserviceX.NET/">
<s:element name="GetQuote">
<s:complexType>
<s:sequence>
<s:element minOccurs="0" maxOccurs="1" name="symbol" type="s:string"/>
</s:sequence>
</s:complexType>
</s:element>
<s:element name="GetQuoteResponse">
<s:complexType>
<s:sequence>
<s:element minOccurs="0" maxOccurs="1" name="GetQuoteResult" type="s:string"/>
</s:sequence>
</s:complexType>
</s:element>
<s:element name="string" nillable="true" type="s:string"/>
</s:schema>
</wsdl:types>
<wsdl:message name="GetQuoteSoapIn">
<wsdl:part name="parameters" element="tns:GetQuote"/>
</wsdl:message>
<wsdl:message name="GetQuoteSoapOut">
<wsdl:part name="parameters" element="tns:GetQuoteResponse"/>
</wsdl:message>
<wsdl:message name="GetQuoteHttpGetIn">
<wsdl:part name="symbol" type="s:string"/>
</wsdl:message>
<wsdl:message name="GetQuoteHttpGetOut">
<wsdl:part name="Body" element="tns:string"/>
</wsdl:message>
<wsdl:message name="GetQuoteHttpPostIn">
<wsdl:part name="symbol" type="s:string"/>
</wsdl:message>
<wsdl:message name="GetQuoteHttpPostOut">
<wsdl:part name="Body" element="tns:string"/>
</wsdl:message>
<wsdl:portType name="StockQuoteSoap">
<wsdl:operation name="GetQuote">
<wsdl:documentation xmlns:wsdl="http://schemas.xmlsoap.org/wsdl/">
Get Stock quote for a company Symbol</wsdl:documentation>
<wsdl:input message="tns:GetQuoteSoapIn"/>
<wsdl:output message="tns:GetQuoteSoapOut"/>
</wsdl:operation>
</wsdl:portType>
<wsdl:portType name="StockQuoteHttpGet">
<wsdl:operation name="GetQuote">
<wsdl:documentation xmlns:wsdl="http://schemas.xmlsoap.org/wsdl/">
Get Stock quote for a company Symbol</wsdl:documentation>
<wsdl:input message="tns:GetQuoteHttpGetIn"/>
<wsdl:output message="tns:GetQuoteHttpGetOut"/>
</wsdl:operation>
</wsdl:portType>
<wsdl:portType name="StockQuoteHttpPost">
<wsdl:operation name="GetQuote">
<wsdl:documentation xmlns:wsdl="http://schemas.xmlsoap.org/wsdl/">
Get Stock quote for a company Symbol</wsdl:documentation>
<wsdl:input message="tns:GetQuoteHttpPostIn"/>
<wsdl:output message="tns:GetQuoteHttpPostOut"/>
</wsdl:operation>
</wsdl:portType>
<wsdl:binding name="StockQuoteSoap" type="tns:StockQuoteSoap">
<soap:binding transport="http://schemas.xmlsoap.org/soap/http"/>
<wsdl:operation name="GetQuote">
<soap:operation soapAction="http://www.webserviceX.NET/GetQuote"
style="document"/>
<wsdl:input>
<soap:body use="literal"/>
</wsdl:input>
<wsdl:output>
<soap:body use="literal"/>
</wsdl:output>
</wsdl:operation>
</wsdl:binding>
<wsdl:binding name="StockQuoteSoap12" type="tns:StockQuoteSoap">
<soap12:binding transport="http://schemas.xmlsoap.org/soap/http"/>
<wsdl:operation name="GetQuote">
<soap12:operation soapAction="http://www.webserviceX.NET/GetQuote"
style="document"/>
<wsdl:input>
<soap12:body use="literal"/>
</wsdl:input>
<wsdl:output>
<soap12:body use="literal"/>
</wsdl:output>
</wsdl:operation>
</wsdl:binding>
<wsdl:binding name="StockQuoteHttpGet" type="tns:StockQuoteHttpGet">
<http:binding verb="GET"/>
<wsdl:operation name="GetQuote">
<http:operation location="/GetQuote"/>
<wsdl:input>
<http:urlEncoded/>
</wsdl:input>
<wsdl:output>
<mime:mimeXml part="Body"/>
</wsdl:output>
</wsdl:operation>
</wsdl:binding>
<wsdl:binding name="StockQuoteHttpPost" type="tns:StockQuoteHttpPost">
<http:binding verb="POST"/>
<wsdl:operation name="GetQuote">
<http:operation location="/GetQuote"/>
<wsdl:input>
<mime:content type="application/x-www-form-urlencoded"/>
</wsdl:input>
<wsdl:output>
<mime:mimeXml part="Body"/>
</wsdl:output>
</wsdl:operation>
</wsdl:binding>
<wsdl:service name="StockQuote">
<wsdl:port name="StockQuoteSoap" binding="tns:StockQuoteSoap">
<soap:address location="http://www.webservicex.net/stockquote.asmx"/>
</wsdl:port>
<wsdl:port name="StockQuoteSoap12" binding="tns:StockQuoteSoap12">
<soap12:address location="http://www.webservicex.net/stockquote.asmx"/>
</wsdl:port>
<wsdl:port name="StockQuoteHttpGet" binding="tns:StockQuoteHttpGet">
<http:address location="http://www.webservicex.net/stockquote.asmx"/>
</wsdl:port>
<wsdl:port name="StockQuoteHttpPost" binding="tns:StockQuoteHttpPost">
<http:address location="http://www.webservicex.net/stockquote.asmx"/>
</wsdl:port>
</wsdl:service>
</wsdl:definitions>
Certainly, this is a pretty hefty WSDL descriptor, but it does provide a good general overview on how they are defined. First, the WSDL document lists a number of types that are used throughout the service. Note the symbol and GetQuoteResult types. By looking atGetQuoteResult, there’s no doubt that this type provides a single string that you will need to parse. Next, the WSDL document lists a number of messages to define the various messages that will be interchanged. These are used in the definition of WSDL “ports.” For example, StockQuoteHttpPost indicates that it’s possible to interchange messages by an HTTP POST request to perform the GetQuote operation, and it will use the GetQuoteHttpPostIn and GetQuoteHttpPostOut messages to do so (which is exactly what you’re doing when trying out the service using your browser, as seen earlier). Finally, to make ports available for public access, they need to be “bound” to endpoints. You can see, for example, that a binding named StockQuoteSoap has been defined for the GetQuote operation, which is bound to the endpoint http://www.webserviceX.NET/GetQuote.
While WSDL files are certainly not meant for human reading, they do provide a means to easily construct clients to consume the web services defined therein.
Here you will see how to use the wsimport tool provided by JAX-WS. Contrary to what we’ve seen thus far, you’ll now need to have the Java Development Kit (JDK) installed. The tool itself is located in the bin folder of your JDK installation.
Next, open a command prompt and navigate to the location of the wsimport executable (using the cd command, as shown in Figure 10.10). Most likely, you will get the error message shown in Figure 10.10
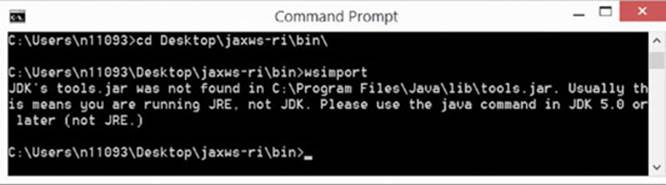
Figure 10.10
To fix this, you’ll need to explicitly provide the location of the JDK. Depending on the version you installed and the architecture you’re using, this might either be located in C:\Program Files\Java\jdk*VERSION* or C:\Program Files (x86)\Java\jdk*VERSION*. Make sure to check the exact location. In this case, it’s C:\Program Files\Java\jdk1.8.0_05. Execute the following command to point wsimport in the right direction:
set JAVA_HOME=C:\Program Files\Java\jdk1.8.0_05
Run wsimport again; you should now get back some helpful information, as shown in Figure 10.11.
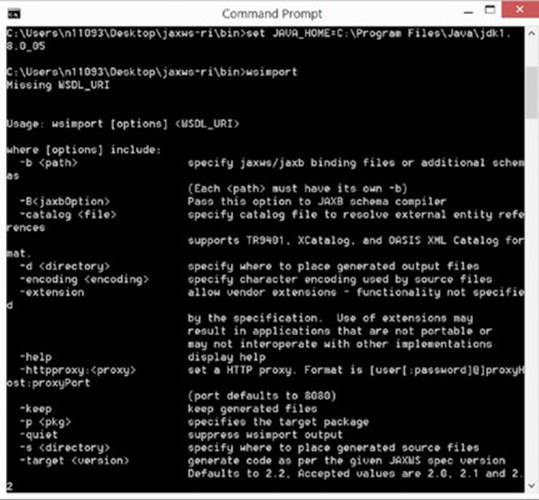
Figure 10.11
NOTE You’ll need to execute the set JAVA_HOME command every time you want to run wsimport and open a command prompt. If you want to avoid this, you can also edit the wsimport.bat file in a text editor and add the command after the :LAUNCH line, so it looks like this:
:LAUNCH
set JAVA_HOME=C:\Program Files\Java\jdk1.8.0_05
%JAVA% %WSIMPORT_OPTS% -jar "%JAXWS_HOME%\lib\jaxws-tools.jar" %*
Try to execute wsimport using the WSDL URL:
wsimport http://www.webservicex.net/stockquote.asmx?WSDL
However, you’ll get an error message telling you that a schema document could not be read because file access is not allowed, as shown in Figure 10.12.
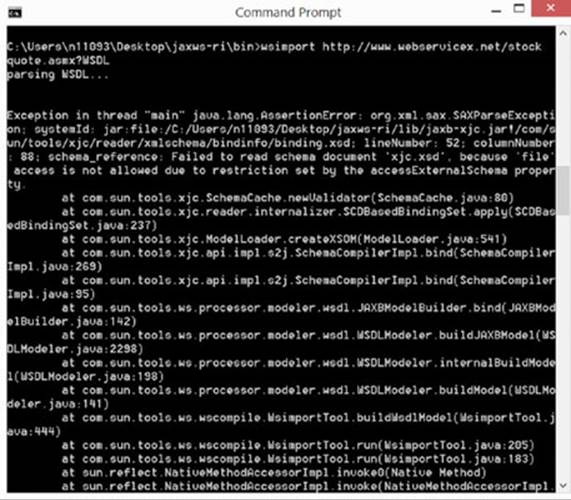
Figure 10.12
To work around this, you need to set another variable, called WSIMPORT_OPTS, with the following command:
set WSIMPORT_OPTS=-Djavax.xml.accessExternalSchema=all
Pay close attention when entering this command (there is only one space and note the capitalization). Once you’ve executed this command, you can run wsimport again. You should now get the results shown in Figure 10.13.
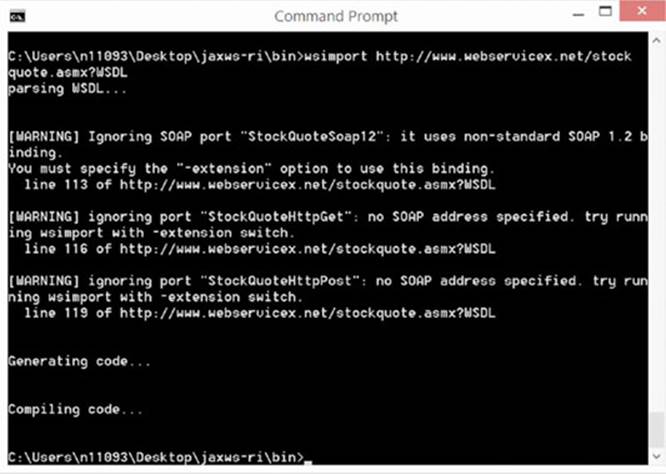
Figure 10.13
wsimport is warning you that it found some ports that are not SOAP-specific or using a non- standard binding. You can safely ignore this warning, as you’re interested in the SOAP 1.1 endpoint only.
What has happened here? wsimport downloaded the WSDL file, parsed its contents, constructed some classes, and compiled them, placing them in the location where you executed the tool (the bin folder in this case). If you take a look with the file explorer, you’ll see that a new folder called net has been added, as shown in Figure 10.14.

Figure 10.14
When exploring this folder deeper, you’ll see a listing of class files, as shown in Figure 10.15.
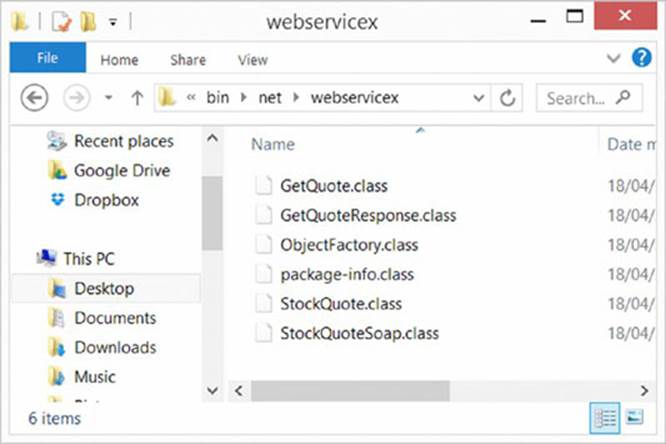
Figure 10.15
These generated class files can immediately be used in your project to interact with the web service. However, since you would like to take a look at the generated source code, run the wsimport tool again, but this time with the -keep option set, like so:
wsimport -keep http://www.webservicex.net/stockquote.asmx?WSDL
The generated files will now also include Java source files. Now, take a look at them in Eclipse. You can continue to use the SOAPWithJava project, as this contains the references to JAX-WS, but you can also set up a new project if you want. Create a new package in Eclipse called net .webservicex, and drag all the .java files (you should have six of them) located in the net\webservicex folder to this package in the Eclipse package explorer.
Take a look at the classes wsimport has generated:
· package-info is a meta file containing no real information.
· ObjectFactory is a Factory class containing methods to create GetQuote and GetQuoteResponse objects.
· StockQuote is a class to wrap access to the service, with methods returning StockQuoteSoap objects to access one of the service endpoints.
· StockQuoteSoap is a class to wrap access to an endpoint provided by the service, in this case a SOAP endpoint. It contains a single method, called getQuote, to perform the GetQuote operation.
· GetQuote and GetQuoteResponse wrap the XML messages themselves.
Based on the classes wsimport has created for you from the WSDL file, it becomes very easy to access SOAP services. You no longer have to be concerned with manually constructing the SOAP request message with the proper parameters and knowing the endpoints you need to access. Try this out by creating a new class called ClientWithWSDL:
package withwsdl;
import net.webservicex.StockQuote;
import net.webservicex.StockQuoteSoap;
public class ClientWithWSDL {
public static void main(String[] args) {
StockQuote service = new StockQuote();
StockQuoteSoap soapService = service.getStockQuoteSoap();
String stock = soapService.getQuote("IBM");
System.out.println(stock);
}
}
Just as before, this should give you the following output (note that executing this code might take some time):
<StockQuotes><Stock><Symbol>IBM</Symbol><Last>190.01</Last><Date>4/17/2014</Date>
<Time>4:02pm</Time><Change>-
6.39</Change><Open>187.29</Open><High>190.70</High><Low>187.01</Low>
<Volume>11255493</Volume><MktCap>197.9B</MktCap><PreviousClose>196.40
</PreviousClose><PercentageChange>-3.25%</PercentageChange><AnnRange>
172.19 - 211.98</AnnRange><Earns>14.942</Earns><P-E>13.14</P-E>
<Name>International Bus</Name></Stock></StockQuotes>
You only need to use the service-providing classes. All the rest is dealt with automatically. The ObjectFactory class is used by the service classes to construct the GetQuote and GetQuoteResponse objects—you do not need to construct them manually, but can instead call your desired method directly with the stock symbol (“IBM”) as the method argument.
Naturally, since this SOAP service is still returning a single string, you still need to perform the parsing of this string manually, just like earlier:
package withwsdl;
import java.io.IOException;
import java.io.StringReader;
import javax.xml.parsers.DocumentBuilder;
import javax.xml.parsers.DocumentBuilderFactory;
import javax.xml.parsers.ParserConfigurationException;
import org.w3c.dom.Document;
import org.w3c.dom.NodeList;
import org.xml.sax.InputSource;
import org.xml.sax.SAXException;
import net.webservicex.StockQuote;
import net.webservicex.StockQuoteSoap;
public class ClientWithWSDL {
public static void main(String[] args) {
StockQuote service = new StockQuote();
StockQuoteSoap soapService = service.getStockQuoteSoap();
String stock = soapService.getQuote("IBM");
showSOAPResponse(stock);
}
private static void showSOAPResponse(String responseString) {
Document document = null;
try {
DocumentBuilderFactory factory = DocumentBuilderFactory.newInstance();
DocumentBuilder builder = factory.newDocumentBuilder();
document = builder.parse(new InputSource(
new StringReader(responseString)));
} catch (SAXException | IOException | ParserConfigurationException e) {
e.printStackTrace();
return;
}
NodeList stockElements = document.getElementsByTagName("Stock");
for (int i = 0; i < stockElements.getLength(); i++) {
System.out.println("----- Stock nr. " + i + " ------");
NodeList infoElements = stockElements.item(i).getChildNodes();
for (int j = 0; j < infoElements.getLength(); j++) {
System.out.println(infoElements.item(j).getNodeName() +
"\t --> " +
infoElements.item(j).getTextContent());
}
}
}
}
In most cases, it’s best to access SOAP services in this manner, i.e., by using wsimport to generate service-wrapping classes and use those in your projects. One final remark concerns the fact that the WSDL file will continue to be accessed by the generated classes every time you use them. To see how, take a look at the generated StockQuote class and note the following lines:
static {
URL url = null;
WebServiceException e = null;
try {
url = new URL("http://www.webservicex.net/stockquote.asmx?WSDL");
} catch (MalformedURLException ex) {
e = new WebServiceException(ex);
}
STOCKQUOTE_WSDL_LOCATION = url;
STOCKQUOTE_EXCEPTION = e;
}
NOTE The code snippet that shows the generated StockQuote class shows a so-called “static block,” which you have not worked with explicitly before. Static code blocks are helpful when you want to instantiate some static variables, but need to catch some error conditions with a try-catch block as well, as can be observed here. Just typing the following would not work, as Java expects you to catch a possible exception—a MalformedURLException—which can occur during the instantiation of an URL object:
private final static URL STOCKQUOTE_WSDL_LOCATION = new
URL("http://www.webservicex.net/stockquote.asmx?WSDL");
To speed up the code somewhat, and to prevent the code from breaking down when the WSDL file is unavailable (but the SOAP service itself still works), it’s also possible to store this file on your local machine.
To do so, navigate to http://www.webservicex.net/stockquote.asmx?WSDL in your web browser and save this file somewhere, for instance on your desktop, as stockquote.wsdl. Next, in Eclipse, right-click the SOAPWithJava project in the package explorer (or on your project name if you’re using a different one) and create a new “Folder” (not a “Source Folder”). Call it wsdl. See Figure 10.16.
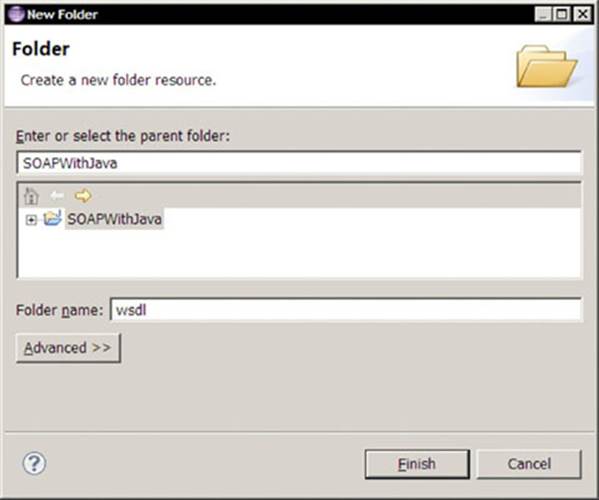
Figure 10.16
Next, drag your saved stockquote.wsdl file over to the wsdl folder in the package explorer and create a copy (you may now remove your originally saved file). Next, edit the code in StockQuote to look like the following:
static {
ClassLoader classloader = Thread.currentThread().getContextClassLoader();
WebServiceException e = null;
URL url = classloader.getResource("wsdl/stockquote.wsdl");
STOCKQUOTE_WSDL_LOCATION = url;
STOCKQUOTE_EXCEPTION = e;
}
The generated class will now use the locally stored WSDL file instead of retrieving it online.
You have now seen how to access SOAP web services, both by constructing SOAP messages manually and by using the wsimport tool to automatically generate classes. Obviously, in most cases, the functionality offered by wsimport is the recommended way to write clients using SOAP services. Again, take some time to go over all the code you’ve seen to make sure you understand everything. If you’re up for it, you can try some of the other web services offered at WebserviceX.NET and see if you can get them to work with wsimport.
One aspect of SOAP you’ll probably agree on is the fact that its services are not really “simple” at all. They involve a wealth of protocols and message formats, involving terminology such as ports, bindings, and endpoints. In enterprise environments, however, SOAP services remain very popular, so it is helpful to know how to access them in the programs you write. In the next section, you’ll take a look at a simpler web service “standard,” which is not really a standard, but more like an agreed-upon method to access web sources using the infrastructure that’s already in place to serve websites to end users: HTTP.
Accessing REST Services
REST stands for “Representational State Transfer” and describes a simple, common methodology for accessing ad hoc web services. In recent years, it has become the methodology of choice by “modern” web companies to provide APIs to access their information.
Recall from the introduction that one of the biggest differences between REST and SOAP is that REST is stateless and SOAP is stateful. However, as you’ve seen in the preceding section, since many SOAP services do not track state (in fact, only complex SOAP services do), this is not really an issue for most applications.
Recall also that REST builds heavily on the existing HTTP protocol. If you’re very observant, you might recall that SOAP can wrap its messages inside the HTTP protocol. Take, for instance, the example provided by WebserviceX.NET to access the stock quote service:
POST /stockquote.asmx HTTP/1.1
Host: www.webservicex.net
Content-Type: text/xml; charset=utf-8
Content-Length: length
SOAPAction: "http://www.webserviceX.NET/GetQuote"
<?xml version="1.0" encoding="utf-8"?>
<soap:Envelope xmlns:xsi="http://www.w3.org/2001/XMLSchema-instance"
xmlns:xsd="http://www.w3.org/2001/XMLSchema"
xmlns:soap="http://schemas.xmlsoap.org/soap/envelope/">
<soap:Body>
<GetQuote xmlns="http://www.webserviceX.NET/">
<symbol>string</symbol>
</GetQuote>
</soap:Body>
</soap:Envelope>
So what is the difference here? In SOAP, the HTTP protocol is just one way to “encapsulate” a SOAP message. Other methods exist. For example, it is possible to send SOAP messages over the so-called SMTP protocol, the Simple Mail Transfer Protocol that is used to send e-mails. When you are coding SOAP clients, however, JAX-WS assumes by default that you’re going to send SOAP messages over HTTP, and the main concern then is to construct the actual XML SOAP message.
In REST, the HTTP protocol is the complete exchange protocol, meaning that REST basically instructs programmers to use the same protocol as your web browser uses to access websites, with the difference being that web servers will not return HTML data to be rendered by a web browser, but structured data that can be parsed by a computer. This can be in XML as well, but with the difference that this XML will not contain any of the SOAP-defined tags. For example, you could send the following HTTP GET request to a RESTful web service:
GET /stockquote/IBM HTTP/1.1
Host: www.example.com
Connection: keep-alive
Accept: application/xml
And simply get back the following reply:
HTTP/1.0 200 OK
Content-Type: application/xml
<StockQuotes>
<Stock>
<Symbol>IBM</Symbol>
<Last>190.01</Last>
<Date>4/17/2014</Date>
<Time>4:02pm</Time>
<Change>-6.39</Change>
<Open>187.29</Open>
<High>190.70</High>
<Low>187.01</Low>
<Volume>11255493</Volume>
<MktCap>197.9B</MktCap>
<PreviousClose>196.40</PreviousClose>
<PercentageChange>-3.25%</PercentageChange>
<AnnRange>172.19 - 211.98</AnnRange>
<Earns>14.942</Earns>
<P-E>13.14</P-E>
<Name>International Bus</Name>
</Stock>
</StockQuotes>
The idea behind REST stems from the realization that most web services just provide simple request-reply functionality, for which HTTP is already perfectly suited, and thus extra standards, such as SOAP, which add extra overhead and complexity, are not needed. REST just uses HTTP as-is, with some extra conventions added to it—one of them being that messages should be structured to be parsed and understood by machines, and the other one being that HTTP methods other than GET and POST (used by your browser) should be used on a structured set of URLs, either on an URL representing a collection (http://www.example.com/books) or specific resource elements (http://www.example.com/books/B101). To repeat, the four common HTTP methods being used are:
· GET: Retrieves a list of resources belonging to a collection or a formatted representation of information on a resource element.
· PUT: Replaces the entire collection with a new one, or replaces the resource element with a new one, or creates a resource element if its identifier does not exist.
· POST: Creates a new entry in a collection or creates a new entry in a resource element (less commonly used).
· DELETE: Deletes an entire collection or a resource element.
Do keep in mind, however, that unlike SOAP, REST does not have an official standard, so different APIs may apply different conventions in terms of how they deal with these HTTP methods. Some providers choose to use GET and POST only, or to define different URLs to deal with different actions (/book/retrieve/B101, /book/insert/B101, and so on). However, since RESTful web services are easy to understand—as they’re built straight on top of HTTP—perusing the documentation given by the service provider is in most cases enough to get going.
Accessing REST Services Without Authentication
To get started, you will see how you can access a REST service without authentication. As before, the examples use publicly offered services, the first of which is a simple service located at http://www.thomas-bayer.com/sqlrest/.
Try opening this URL in your web browser. You’ll see the results shown in Figure 10.17.
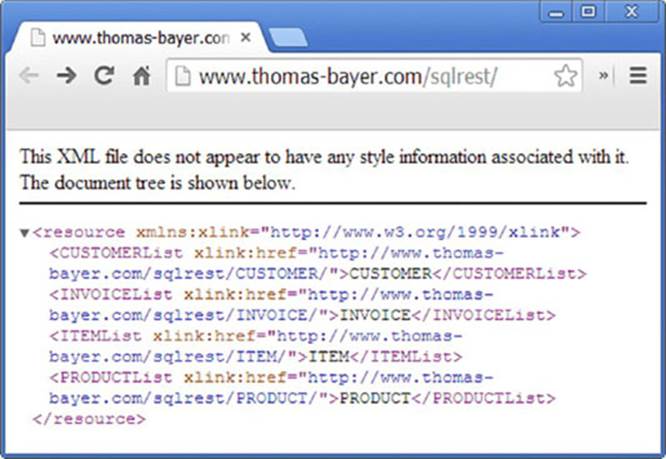
Figure 10.17
Now try following the link http://www.thomas-bayer.com/sqlrest/CUSTOMER/, which is a collection URL and thus provides a list of customers. See Figure 10.18.
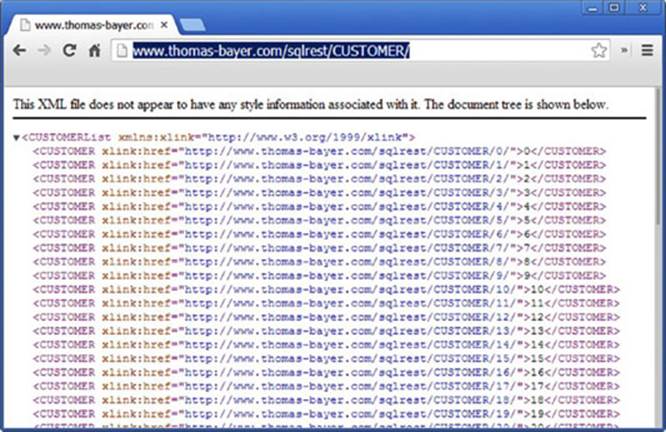
Figure 10.18
Now try accessing a specific customer, e.g., http://www.thomas-bayer.com/sqlrest/CUSTOMER/8/, which is a resource element. See Figure 10.19.
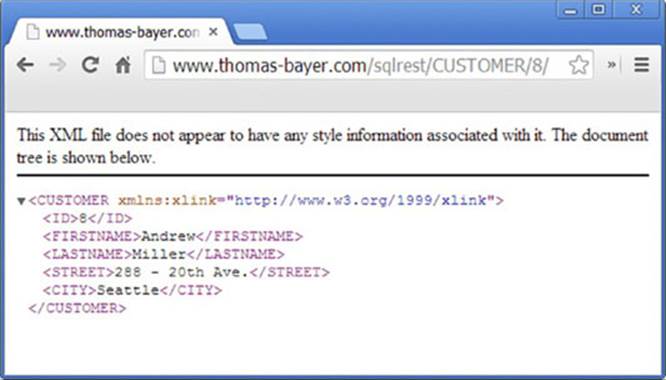
Figure 10.19
As you can observe, your browser is making simple HTTP GET requests to specified, agreed-upon URLs and getting back structured information, in this case formatted as XML.
To access REST web services using Java, you’ll need a way to work with the HTTP protocol directly. Many good libraries exist to do so, but for now, take a look at Java’s built-in HTTP connection class: java.net.HttpURLConnection. Create a new project in Eclipse—RESTWithJava—and use it throughout this section.
Instead of writing Java code like a script (as you’ve done before to show off SOAP services), make sure the resources you request from the web service are immediately converted to objects, which is the proper object-oriented way to go. If you take a look at the web service, you’ll see that it defines four kinds of resources:
· A customer: With an ID, first name, last name, street, and city
· An invoice: With an ID, which is the customer ID the invoice relates to and a total sum
· A product: With an ID, name, and price
· An item line: Relates to an invoice, a product, quantity, and total cost
You can verify this by exploring the other URLs in your browser. You should create classes to represent each of these and place them in the com.thomasbayer.sqlrest package, starting with a customer:
package com.thomasbayer.sqlrest;
public class Customer {
private int id;
private String firstName, lastName;
private String street, city;
public Customer(int id) {
this.id = id;
}
public Customer(int id,
String firstName, String lastName,
String street, String city) {
this(id);
this.firstName = firstName;
this.lastName = lastName;
this.street = street;
this.city = city;
}
public int getId() {
return id;
}
public String getFirstName() {
return firstName;
}
public void setFirstName(String firstName) {
this.firstName = firstName;
}
public String getLastName() {
return lastName;
}
public void setLastName(String lastName) {
this.lastName = lastName;
}
public String getStreet() {
return street;
}
public void setStreet(String street) {
this.street = street;
}
public String getCity() {
return city;
}
public void setCity(String city) {
this.city = city;
}
public String toString() {
return String.format(
"Customer[#%s: %s, %s -- %s, %s]",
id, lastName, firstName,
street, city);
}
}
Recall that you can use the “Generate Getters and Setters. . .” function under “Source” when right-clicking in Eclipse’s code window to generate getter and setter methods. Note also that here the String.format method is used to format the string representation in thetoString method. This is a more readable alternative than having to work with long, concatenated strings.
Next up, create a class to represent a product:
package com.thomasbayer.sqlrest;
public class Product {
private int id;
private String name;
private double price;
public Product(int id) {
this.id = id;
}
public Product(int id, String name, double price) {
this(id);
this.name = name;
this.price = price;
}
public int getId() {
return id;
}
public String getName() {
return name;
}
public void setName(String name) {
this.name = name;
}
public double getPrice() {
return price;
}
public void setPrice(double price) {
this.price = price;
}
public String toString() {
return String.format(
"Product #%s: %s: priced at %s",
id, name, price);
}
}
Followed by an invoice:
package com.thomasbayer.sqlrest;
import java.util.ArrayList;
import java.util.List;
public class Invoice {
private int id;
private Customer customer;
private double totalSum;
private final List<Item> items;
public Invoice(int id) {
this.id = id;
this.items = new ArrayList<Item>();
}
public Invoice(int id, Customer customer, double totalSum, List<Item> items) {
this(id);
this.customer = customer;
this.totalSum = totalSum;
this.items.addAll(items);
}
public Customer getCustomer() {
return customer;
}
public void setCustomer(Customer customer) {
this.customer = customer;
}
public double getTotalSum() {
return totalSum;
}
public void setTotalSum(double totalSum) {
this.totalSum = totalSum;
}
public int getId() {
return id;
}
public void addItem(Item item) {
items.add(item);
}
public void removeItem(Item item) {
items.remove(item);
}
public List<Item> getItems() {
return new ArrayList<Item>(items);
}
public void setItems(List<Item> items) {
this.items.clear();
this.items.addAll(items);
}
public String toString() {
return String.format(
"Invoice #%s: total sum %s" +
"%n%s",
id, totalSum,
customer );
}
}
And finally, an item:
package com.thomasbayer.sqlrest;
public class Item {
private Invoice invoice;
private Product product;
private int quantity;
private double cost;
public Item(Invoice invoice, Product product) {
this.invoice = invoice;
this.product = product;
}
public Item(Invoice invoice, Product product, int quantity, double cost) {
this(invoice, product);
this.quantity = quantity;
this.cost = cost;
}
public Invoice getInvoice() {
return invoice;
}
public Product getProduct() {
return product;
}
public int getQuantity() {
return quantity;
}
public void setQuantity(int quantity) {
this.quantity = quantity;
}
public double getCost() {
return cost;
}
public void setCost(double cost) {
this.cost = cost;
}
public String toString() {
return String.format(
"Item: quantity: %s, cost: %s" +
"%n%s" +
"%n%s",
quantity, cost,
invoice,
product);
}
}
Next, create a RestServiceClient class to communicate with the web service:
package com.thomasbayer.sqlrest;
import java.io.BufferedReader;
import java.io.IOException;
import java.io.InputStreamReader;
import java.io.StringReader;
import java.io.StringWriter;
import java.net.HttpURLConnection;
import java.net.URL;
import javax.xml.parsers.DocumentBuilder;
import javax.xml.parsers.DocumentBuilderFactory;
import javax.xml.parsers.ParserConfigurationException;
import javax.xml.transform.Transformer;
import javax.xml.transform.TransformerException;
import javax.xml.transform.TransformerFactory;
import javax.xml.transform.dom.DOMSource;
import javax.xml.transform.stream.StreamResult;
import org.w3c.dom.Document;
import org.xml.sax.InputSource;
import org.xml.sax.SAXException;
public class RestServiceClient {
private final static String URL_API_ROOT =
"http://www.thomas-bayer.com/sqlrest/";
public enum Resource {
CUSTOMER, PRODUCT, INVOICE, ITEM
};
public Document getResourceCollection(Resource resource) {
return stringToXMLDocument(getHttpUrl(URL_API_ROOT + resource.name()));
}
public Document getResourceItem(Resource resource, int itemId) {
return stringToXMLDocument(
getHttpUrl(URL_API_ROOT + resource.name() + "/" + itemId));
}
public String getHttpUrl(String url) {
HttpURLConnection connection = null;
try {
URL u = new URL(url);
connection = (HttpURLConnection) u.openConnection();
// We will be making GET requests only to this service
connection.setRequestMethod("GET");
connection.connect();
int responseCode = connection.getResponseCode();
if (responseCode != HttpURLConnection.HTTP_OK) {
// We got a non 200 (OK) status code: error or server is down
System.err.println("Server returned status code: " + responseCode);
return null;
}
// Fetch the response from the server
StringBuilder stringBuilder = new StringBuilder();
// getInputStream is data coming back from the server
// getOutputStream is meant for sending data to the server
try (BufferedReader reader = new BufferedReader(
new InputStreamReader(connection.getInputStream(), "UTF-8"))) {
String s;
while ((s = reader.readLine()) != null) {
stringBuilder.append(s + "\n");
}
} catch (IOException e) {
e.printStackTrace();
}
connection.disconnect();
return stringBuilder.toString();
} catch (IOException e) {
e.printStackTrace();
} finally {
if (connection != null)
connection.disconnect();
}
return null;
}
static public Document stringToXMLDocument(String xmlText) {
try {
DocumentBuilderFactory factory = DocumentBuilderFactory.newInstance();
DocumentBuilder builder = factory.newDocumentBuilder();
Document document = builder.parse(new InputSource(
new StringReader(xmlText)));
return document;
} catch (ParserConfigurationException | SAXException | IOException e) {
e.printStackTrace();
}
return null;
}
public static void main(String args[]) throws TransformerException {
// Testing our RestServiceClient
RestServiceClient client = new RestServiceClient();
// Set up a transformer to properly convert an XML document to a string
Document d;
TransformerFactory tf = TransformerFactory.newInstance();
Transformer transformer = tf.newTransformer();
// Test collection URL
StringWriter writer = new StringWriter();
d = client.getResourceCollection(Resource.CUSTOMER);
transformer.transform(new DOMSource(d), new StreamResult(writer));
System.out.println(writer);
// Test item URL
writer = new StringWriter();
d = client.getResourceItem(Resource.PRODUCT, 3);
transformer.transform(new DOMSource(d), new StreamResult(writer));
System.out.println(writer);
}
}
Pay particular attention to the HttpUrlConnection class used here to establish an HTTP connection and get a response from the server. This object exposes two streams using the getInputStream and getOutputStream methods. The first enables you to get information from the server (the input), whereas the second allows you to send information to the server (the output), which you do not have to use here as the URL on its own is enough for the server to know which information you want to retrieve. A short main method is added here to test the functionality of this class, using a Transformer to convert an XML document back to a string (just using toString() will not work for document objects). Finally, note that a BufferedReader is used together with a StringBuilder object to quickly construct a string of the HTTP response received.
Next up, create an ObjectFactory to convert received XML replies to your Java objects:
package com.thomasbayer.sqlrest;
import java.util.ArrayList;
import java.util.List;
import org.w3c.dom.Document;
import org.w3c.dom.Element;
import org.w3c.dom.Node;
import org.w3c.dom.NodeList;
import com.thomasbayer.sqlrest.RestServiceClient.Resource;
public class ObjectFactory {
private final static RestServiceClient client = new RestServiceClient();
public static int[] getCustomerIds() {
return getCollectionIds(Resource.CUSTOMER);
}
public static int[] getProductIds() {
return getCollectionIds(Resource.PRODUCT);
}
public static int[] getItemIds() {
return getCollectionIds(Resource.ITEM);
}
public static int[] getInvoiceIds() {
return getCollectionIds(Resource.INVOICE);
}
public static Customer createCustomer(int id) {
Document document = client.getResourceItem(Resource.CUSTOMER, id);
Customer customer = new Customer(id);
customer.setFirstName(getEl(document, "FIRSTNAME"));
customer.setLastName(getEl(document, "LASTNAME"));
customer.setStreet(getEl(document, "STREET"));
customer.setCity(getEl(document, "CITY"));
return customer;
}
public static Product createProduct(int id) {
Document document = client.getResourceItem(Resource.PRODUCT, id);
Product product = new Product(id);
product.setName(getEl(document, "NAME"));
product.setPrice(Double.parseDouble(getEl(document, "PRICE")));
return product;
}
public static Invoice createInvoice(int id) {
Document document = client.getResourceItem(Resource.INVOICE, id);
Invoice invoice = new Invoice(id);
invoice.setCustomer(
createCustomer(Integer.parseInt(getEl(document, "CUSTOMERID"))));
invoice.setTotalSum(Double.parseDouble(getEl(document, "TOTAL")));
invoice.setItems(createItems(id, invoice));
return invoice;
}
public static List<Item> createItems(int id, Invoice invoice) {
Item item;
Product product = null;
int quantity = 0;
double cost = 0D;
Document document = client.getResourceItem(Resource.ITEM, id);
List<Item> items = new ArrayList<Item>();
if (document.getChildNodes().getLength() == 0)
return items;
NodeList children = document.getChildNodes().item(0).getChildNodes();
// Loop over the XML document
for (int i = 0; i < children.getLength(); i++) {
Node node = children.item(i);
switch (node.getNodeName()) {
case "PRODUCTID":
product = createProduct(Integer.parseInt(node.getTextContent()));
break;
case "QUANTITY":
quantity = Integer.parseInt(node.getTextContent());
break;
case "COST":
cost = Double.parseDouble(node.getTextContent());
// This is the last line, commit our item to the list
item = new Item(invoice, product, quantity, cost);
items.add(item);
break;
default:
break;
}
}
return items;
}
private static int[] getCollectionIds(Resource resource) {
Document document = client.getResourceCollection(resource);
NodeList elements = document.getElementsByTagName(resource.name());
int[] ids = new int[elements.getLength()];
for (int i = 0; i < ids.length; i++) {
ids[i] = Integer.parseInt(((Element) elements.item(i)).getTextContent());
}
return ids;
}
private static String getEl(Document document, String n) {
return document.getElementsByTagName(n).item(0).getTextContent();
}
}
Finally, you can create a RestClientProgram class to test what you’ve built:
package com.thomasbayer.sqlrest;
public class RestClientProgram {
public static void main(String[] args) {
int[] customerIds = ObjectFactory.getCustomerIds();
System.out.println("----------- Collection test -----------");
System.out.println("First three customer ids: " +
customerIds[0] + ", " +
customerIds[1] + ", " +
customerIds[2]);
System.out.println("----------- Customer test -----------");
Customer customer = ObjectFactory.createCustomer(customerIds[1]);
System.out.println(customer);
System.out.println("----------- Product test -----------");
Product product = ObjectFactory.createProduct(0);
System.out.println(product);
System.out.println("----------- Invoice test -----------");
Invoice invoice = ObjectFactory.createInvoice(0);
System.out.println(invoice);
System.out.println("----------- Invoice items test -----------");
System.out.println(invoice.getItems());
}
}
If you run this class, you should get something like the following:
----------- Collection test -----------
First three customer ids: 0, 1, 2
----------- Customer test -----------
Customer #1: King, Susanne - 366 - 20th Ave., Olten
----------- Product test -----------
Product #0: Iron Iron: priced at 5.4
----------- Invoice test -----------
Invoice #0: total sum 2607.6
Customer #0: Steel, Laura - 429 Seventh Av., Dallas
----------- Invoice items test -----------
[Item: quantity: 12, cost: 12.6
Invoice #0: total sum 2607.6
Customer #0: Steel, Laura -- 429 Seventh Av., Dallas
Product #7: Telephone Shoe: priced at 8.4, Item: quantity: 19, cost: 18.6
Invoice #0: total sum 2607.6
Customer #0: Steel, Laura -- 429 Seventh Av., Dallas
Product #14: Telephone Iron: priced at 12.4, Item: quantity: 3, cost: 26.7
That’s all there is to the basics of accessing RESTful web services. Note that the essential code is found in the RestServiceClient class, where the HttpUrlConnection class is used to establish the connection. All the other classes deal with parsing the responses received from the server and establishing an object representation for them.
NOTE If you’ve already worked through the previous chapter on databases, you might recognize that what is built here is quite similar to Object Relational Mapping (ORM), where the relational structure of a database is mapped to objects in Java, abstracting the aspect of having to deal with SQL manually by or and just working with plain objects and their methods. What you’re doing here is similar: abstracting communication with the REST service in a separate class.
Again, take some time to explore this code at your own leisure. One “issue” that’s still present is that you are creating objects in an ad hoc manner, even if an object might already exist. For instance, if you create two Invoice objects belonging to the same customer, the customer information is requested twice, and two separate Customer objects are created containing the same information. You might try to modify the code to work around this. To do so, you need a global set of object “managing” classes, which keep track of a set of objects (customers, for instance). This class can then provide a method—e.g., createOrGetCustomer—that returns a Customer object for a given ID if it has been created earlier (stored in a map, for example) or fetches and creates a new Customer object and returns that one (after adding it to its map for quick retrieval later). You can also try to add constructors to the resource objects to create a resource by fetching information from a web service (using the ObjectFactory), instead of directly accessing the methods of ObjectFactory. You will often have to think about these kinds of architectural decisions when writing more complex programs. Different solutions to solve the same problem exist, and depending on your needs, you might need to add more abstraction or managing classes. As you get more experienced in programming in Java, the right “patterns” to use for a given circumstance will present themselves more quickly and easily, but don’t be afraid to iterate over your code and refactor when necessary.
NOTE Another interesting aspect is the way to fetch “related” objects. For example, when an Invoice object is created, the information for Customer is requested immediately to construct a Customer object and store this in the Invoice object. This technique is called “eager” loading, where you immediately request all information you need, potentially leading to slower code. For instance, consider an object with a very large related object. If you only need basic information, eagerly loading the related object leads to bandwidth and time overhead.
As such, it would be possible to adapt your classes to only store the customer ID for an invoice, for instance, and keep the Customer field set to null. Once the programmer requests the full customer information (using the getCustomer method), an additional request to the server to instantiate and set the customer field can be fired. If you feel up for it, you can try modifying the code to allow for “lazy” loading.
Note that the same terminology pops up when working with Object Relational Mappers to interact with databases, for instance, to indicate whether you want to immediately fetch all relations in a one-to-many connection or wait until the programmer explicitly requests to do so.
In any case, now you know how to access a simple RESTful service using Java. Now, take a look at a more complex RESTful service, which involves authentication and requests other than GET, in order to send information to the service.
Accessing REST Services with Authentication
Not all RESTful services are as simple as the one used in the previous section. In fact, many RESTful services involve authentication of some kind.
Depending on the REST service you’re using, different authentication schemes can be used:
· Sending a username and password with every request as an URL parameter. You then send requests to the following URL, for instance: http://www.example.com/books/B101?username=me&password=secret.
· Sending a so-called “key” with every request as an URL parameter. This is a secret “password” given to you by the service provider. You then send requests to the following URL, for instance: http://www.example.com/books/B101?api_key=1234567890/.
· Username/password or key-based authentication schemes where the key is sent in an HTTP header.
· Username/password or key-based authentication schemes using HTTP cookies. Users then first authenticate once and send the given cookie in each of the subsequent requests.
· RESTful services using middleware—such as OAuth—to handle authentication; this is especially helpful when you need more fine-grained authentication (instead of just allowing or disallowing requests).
URL parameter and cookie-based authentication is becoming quite rare in modern REST services. The reason for this is that keys and passwords can be stolen by intercepting network traffic, especially when services are exposed over non-secured HTTP connections.
For all of the authentication schemes mentioned previously, Java’s built-in HttpUrlConnection class will work fine (just add the URL parameters in the URL you request). When you need to work with cookies, you can use the java.net.CookieManager class to help out—in the “Screen Scraping” section that follows, there is an example on how to use this class. However, for REST services using OAuth, you might want to resort to another library to handle the authentication aspect for you, as doing this step manually is somewhat complex.
To this end, these examples will use Google’s Java OAuth Client Library. This library is built on top of Google’s HTTP Library for Java, which in turn can wrap using HttpUrlConnection or the Apache HTTP Client Library for Java, an alternative third-party class to communicate with HTTP servers. To set up this library, navigate to https://code.google.com/p/google-oauth-java-client/ and download the latest version of the library (google-oauth-java-client-1.17.0-rc.zip is used here). Extract this ZIP file somewhere. Next, create a new folder in your Eclipse project (this book continues to use RESTWithJava, but you can create a new one) named google-http. Next, drag and copy the contents of the libs folder in the extracted ZIP to this folder. Finally, add all the JAR files in the google-http folder to the build path in Eclipse.
Twitter’s REST service is used here to build a sample client. Twitter is a social networking service that enables users to send and read short messages, called “tweets.” Take a look at Twitter’s documentation concerning its REST service athttps://dev.twitter.com/docs/api/1.1. The documentation lists a number of resources that can be accessed using only GET and POST HTTP requests. For example, the page on “statuses/home_timeline”—seehttps://dev.twitter.com/docs/api/1.1/get/statuses/home_timeline—mentions that this resource can be used to return a collection of tweets posted by the authenticated user and the users they follow. The page mentions that accessing this resource requires a “user context.” The page also lists parameters that can be submitted with the request and an example request message. Try to open the URL https://api.twitter.com/1.1/statuses/home_timeline.json in your browser, and you’ll get the following response:
{"errors":[{"message":"Bad Authentication data","code":215}]}
Clearly, Twitter requires you to perform some additional steps before you can access its REST service. However, you can see already that Twitter does not return XML-formatted responses, but instead uses JSON, another notation to structure documents. You will see how to deal with parsing JSON soon.
Now take a look at setting up OAuth authentication to access the Twitter service. Even without knowing it, you might be familiar with OAuth if you’ve accessed Twitter—or services such as Facebook—before. Whenever you see a pop-up in your browser asking you if you want to grant a third-party application access to your Twitter information, OAuth is under the hood. Every OAuth authentication basically involves these three steps:
1. Get a “request token,” which is a temporary identifier shared between your application and the service that will be used to authorize an access token.
2. Ask the user to identify and allow access, basically indicates that this “request token” has been granted access.
3. If the user authorizes access, an “access token” can be given to the requesting application, which is requested using the request token. Once this is done, the request token is discarded and the access token is used for following requests.
The documentation of Twitter’s REST service also provides excellent documentation regarding OAuth. Take a look at https://dev.twitter.com/docs/auth/3-legged-authorization and https://dev.twitter.com/docs/auth/authorizing-request. The latter mentions that normally, you would be able to send a REST HTTP POST request like this to post a tweet:
POST /1/statuses/update.json?include_entities=true HTTP/1.1
Accept: */*
Connection: close
User-Agent: OAuth gem v0.4.4
Content-Type: application/x-www-form-urlencoded
Content-Length: 76
Host: api.twitter.com
status=Hello%20Ladies%20%2b%20Gentlemen%2c%20a%20signed%20OAuth%20request%21
However, this request would be considered invalid, since Twitter would not know which application makes the request, for which user the request is being posed, if the user is allowed to post this tweet, and whether the request has been tampered with. A valid request thus needs to look like this:
POST /1/statuses/update.json?include_entities=true HTTP/1.1
Accept: */*
Connection: close
User-Agent: OAuth gem v0.4.4
Content-Type: application/x-www-form-urlencoded
Authorization:
OAuth oauth_consumer_key="xvz1evFS4wEEPTGEFPHBog",
oauth_nonce="kYjzVBB8Y0ZFabxSWbWovY3uYSQ2pTgmZeNu2VS4cg",
oauth_signature="tnnArxj06cWHq44gCs1OSKk%2FjLY%3D",
oauth_signature_method="HMAC-SHA1",
oauth_timestamp="1318622958",
oauth_token="370773112-GmHxMAgYyLbNEtIKZeRNFsMKPR9EyMZeS9weJAEb",
oauth_version="1.0"
Content-Length: 76
Host: api.twitter.com
status=Hello%20Ladies%20%2b%20Gentlemen%2c%20a%20signed%20OAuth%20request%21
This request is similar, except that it now contains a special “Authorization” OAuth header. This header contains the following information:
· oauth_consumer_key: Identifies the application making the REST request.
· oauth_nonce: A unique token generated for each request. This is to prevent the same request being sent multiple times.
· oauth_signature: A hash of the request and some secret values that can be used to check the request on the server’s side to make sure it has not been tampered with.
· oauth_signature_method: The method that was used to construct the signature.
· oauth_timestamp: Indicates when the request was created. OAuth services will reject requests that were created too far in the past.
· oauth_token: The access token representing the permission by the user to share access to your application.
· oauth_version: The version of the OAuth protocol being used.
It is possible to construct this header manually and send it along every request, e.g., using HttpUrlConnection. Since this is a complex process involving a great deal of steps, you can use Google’s Java OAuth Client Library instead.
The first thing you’ll need to do is create a Twitter API key to identify your application. This is the oath_consumer_key mentioned previously. To create it, navigate to https://apps.twitter.com/, log in with your Twitter account (it’s easy to create one if you haven’t already), and select Create New App. You will need to fill in some details:
· Name: The name given to your application. For this example, the name NAMEJavaTestClient is used. Fill in your name instead of “NAME” (application names need to be unique).
· Description: “Testing Twitter’s REST Service in Java.”
· Website: You can just put a placeholder here, e.g., http://www.example.com.
· Callback URL: Fill in nothing.
Accept the agreements and press Create Your Twitter Application. If all goes well, you’ll be brought to a page with details for your app. See Figure 10.20.

Figure 10.20
Note your API key and take note of the request token, authorize, and access token URLs. They’ll reappear in your code soon. You’ll also need to modify your app permissions (click the link) and allow for Read and Write access. Update your settings and go back to the Details tab. There, next to the API key, click Manage API Keys and note your API Secret as well. Also note that the access level has been set to Read and Write. As the Twitter page mentions, never give out your secret key to anyone, as this will allow others to pose as your application. In real-life applications, you’ll want to store this key in an encrypted form, but for these purposes, you can just use it in plain form in the code.
Next, create a TwitterTest class in a new com.twitter.api package to build a prototype working with OAuth. The code should like the following:
package com.twitter.api;
import java.io.BufferedReader;
import java.io.InputStreamReader;
import com.google.api.client.auth.oauth.OAuthAuthorizeTemporaryTokenUrl;
import com.google.api.client.auth.oauth.OAuthCredentialsResponse;
import com.google.api.client.auth.oauth.OAuthGetAccessToken;
import com.google.api.client.auth.oauth.OAuthGetTemporaryToken;
import com.google.api.client.auth.oauth.OAuthHmacSigner;
import com.google.api.client.auth.oauth.OAuthParameters;
import com.google.api.client.http.GenericUrl;
import com.google.api.client.http.HttpRequest;
import com.google.api.client.http.HttpRequestFactory;
import com.google.api.client.http.HttpResponse;
import com.google.api.client.http.HttpTransport;
import com.google.api.client.http.javanet.NetHttpTransport;
public class TwitterTest {
private static final String CONSUMER_KEY = "FILL IN YOUR API KEY";
private static final String CONSUMER_SECRET = "FILL IN YOUR SECRET KEY";
private static final String REQUEST_TOKEN_URL =
"https://api.twitter.com/oauth/request_token";
private static final String AUTHORIZE_URL =
"https://api.twitter.com/oauth/authenticate";
private static final String ACCESS_TOKEN_URL =
"https://api.twitter.com/oauth/access_token";
private static final String API_ENDPOINT_URL =
"https://api.twitter.com/1.1/statuses/home_timeline.json";
public static void main(String[] args) throws Exception {
// HttpTransport will be used to handle the HTTP requests
// This is part of the google-http library
HttpTransport transport = new NetHttpTransport();
// The OAuthHmacSigner will be used to create the oauth_signature
// Using HMAC-SHA1 as the oauth_signature_method
// The signer needs the secret key to sign requests
OAuthHmacSigner signer = new OAuthHmacSigner();
signer.clientSharedSecret = CONSUMER_SECRET;
// Step 1: Get a request token
// ---------------------------
// We need to provide our application key
// We also need to provide an HTTP transport object
// And the signer which will sign the request
OAuthGetTemporaryToken requestToken =
new OAuthGetTemporaryToken(REQUEST_TOKEN_URL);
requestToken.consumerKey = CONSUMER_KEY;
requestToken.transport = transport;
requestToken.signer = signer;
// Get back our request token
OAuthCredentialsResponse requestTokenResponse = requestToken.execute();
System.out.println("Request Token:");
System.out.println("- oauth_token = " + requestTokenResponse.token);
System.out.println("- oauth_token_secret = " +
requestTokenResponse.tokenSecret);
// Update the signer to also include the request token
signer.tokenSharedSecret = requestTokenResponse.tokenSecret;
// Step 2: User grants access
// ---------------------------
// Construct an authorization URL using the temporary request token
OAuthAuthorizeTemporaryTokenUrl authorizeUrl =
new OAuthAuthorizeTemporaryTokenUrl(AUTHORIZE_URL);
authorizeUrl.temporaryToken = requestTokenResponse.token;
// We ask the user to open this URL and grant access
// Twitter includes an extra safety measure, asks the user to provide PIN
String pin = null;
System.out.println("Go to the following link:\n" + authorizeUrl.build());
InputStreamReader converter = new InputStreamReader(System.in, "UTF-8");
BufferedReader in = new BufferedReader(converter);
while (pin == null) {
System.out.println("Enter the verification PIN provided by Twitter:");
pin = in.readLine();
}
// Step 3: Request the access token the user has approved
// ------------------------------------------------------
// Get the access token
// We need to provide our application key
// The signer, the transport objects
// The temporary request token
// And a verifier string (the PIN number provided by Twitter)
OAuthGetAccessToken accessToken = new OAuthGetAccessToken(ACCESS_TOKEN_URL);
accessToken.consumerKey = CONSUMER_KEY;
accessToken.signer = signer;
accessToken.transport = transport;
accessToken.temporaryToken = requestTokenResponse.token;
accessToken.verifier = pin;
// Get back our access token
OAuthCredentialsResponse accessTokenResponse = accessToken.execute();
System.out.println("Access Token:");
System.out.println("- oauth_token = " + accessTokenResponse.token);
System.out.println("- oauth_token_secret = " +
accessTokenResponse.tokenSecret);
// Update the signer again
// We now replace the temporary request token with the final access token
signer.tokenSharedSecret = accessTokenResponse.tokenSecret;
// Set up OAuth parameters which can now be used in authenticated requests
OAuthParameters parameters = new OAuthParameters();
parameters.consumerKey = CONSUMER_KEY;
parameters.token = accessTokenResponse.token;
parameters.signer = signer;
// OAuth steps finished, we can now start accessing the service
// ------------------------------------------------------------
HttpRequestFactory factory = transport.createRequestFactory(parameters);
GenericUrl url = new GenericUrl(API_ENDPOINT_URL);
HttpRequest req = factory.buildGetRequest(url);
HttpResponse resp = req.execute();
System.out.println(resp.getStatusCode());
System.out.println(resp.parseAsString());
}
}
Take some time to read through the code and the comments. Don’t forget to fill in the keys you received from Twitter in the CONSUMER_KEY and CONSUMER_SECRET variables. Note also the REQUEST_TOKEN_URL, AUTHORIZE_URL, and ACCESS_TOKEN_URL variables, containing the OAuth URLs provided to you earlier by Twitter.
Execute this code in Eclipse; you’ll see the following output:
Request Token:
- oauth_token = QEaZwniqkgRcB25gAuGGQg7rHz48OR5a8uoZ3AJs
- oauth_token_secret = scnIHqN59V0WAe2nyEoxiOWRejcBA7WPmQv5Ah5Q
Go to the following link:
https://api.twitter.com/oauth/authenticate?oauth_token=
QEaZwniqkgRcB25gAuGGQg7rHz48OR5a8uoZ3AJs
Enter the verification PIN provided by Twitter:
(Your tokens will differ.) Open the given link in your web browser. A Twitter page will appear asking you if you want to allow access to an external application. See Figure 10.21.
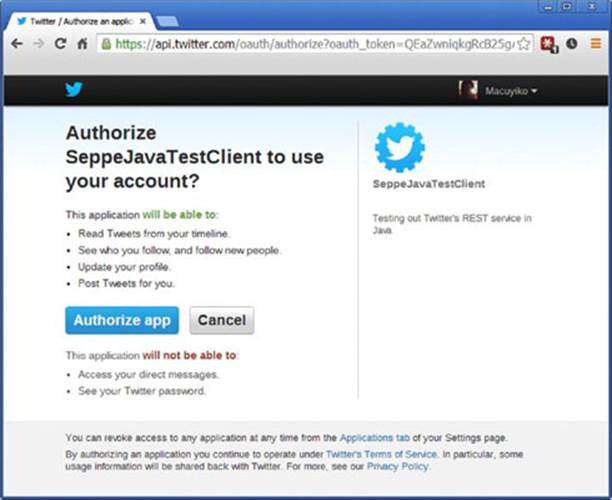
Figure 10.21
Press Authorize App. Next, Twitter will provide you with a PIN that you’ll need to provide to the application. See Figure 10.22.
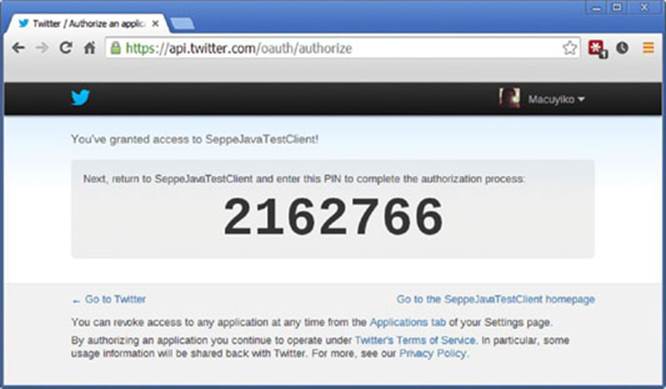
Figure 10.22
Go back to the running Eclipse console, enter the PIN, and press Enter. The program will resume and execute the REST call:
Enter the verification PIN provided by Twitter:
2162766
Access Token:
- oauth_token = 9807092-pEFWjo4juyL3MhZ1IruqvUeq1bvbpb83ZcDGCBtVEB
- oauth_token_secret = QlG4enz5Zo4YKMXq6Pv4kgoLFH5x7cLBZpHsYshhNynwz
200
[*REALLY LONG JSON RESPONSE*]
NOTE If you had set a callback URL, Twitter would not provide a PIN but would refer the user back to an URL you specify with the access token provided as an URL parameter, which your application can then intercept automatically. Since setting up web servers with Java hasn’t been covered yet, here you can use the PIN-based approach.
Great, everything works. However, the code is contained in one huge main method and thus could use some cleaning up. You’ll also need to find a way to parse the received JSON, and it would be better to avoid users having to grant permission to your application each time it is run, as you can just as well reuse the same access token for future requests.
Start by creating an OAuthParametersProvider class, which you can use to perform a three-step OAuth authentication, and will be able to store access tokens for later use. First, create a new folder (not a source folder) in your RESTWithJava project called tokens. Next, enter the following code:
package com.twitter.api;
import java.awt.Desktop;
import java.io.BufferedReader;
import java.io.FileNotFoundException;
import java.io.IOException;
import java.io.InputStreamReader;
import java.io.PrintWriter;
import java.io.UnsupportedEncodingException;
import java.net.URI;
import java.net.URISyntaxException;
import java.nio.charset.StandardCharsets;
import java.nio.file.Files;
import java.nio.file.Paths;
import java.util.List;
import com.google.api.client.auth.oauth.OAuthAuthorizeTemporaryTokenUrl;
import com.google.api.client.auth.oauth.OAuthCredentialsResponse;
import com.google.api.client.auth.oauth.OAuthGetAccessToken;
import com.google.api.client.auth.oauth.OAuthGetTemporaryToken;
import com.google.api.client.auth.oauth.OAuthHmacSigner;
import com.google.api.client.auth.oauth.OAuthParameters;
import com.google.api.client.http.HttpTransport;
import com.google.api.client.http.javanet.NetHttpTransport;
public class OAuthParametersProvider {
protected final String configurationName;
protected final String consumerKey;
protected final String consumerSecret;
protected final String requestTokenUrl;
protected final String authorizeUrl;
protected final String accessTokenUrl;
protected final boolean requiresVerification;
protected final HttpTransport transport;
protected final OAuthHmacSigner signer;
public OAuthParametersProvider(String configurationName,
String consumerKey, String consumerSecret,
String requestTokenUrl, String authorizeUrl, String accessTokenUrl,
boolean requiresVerification) {
this.configurationName = configurationName;
this.consumerKey = consumerKey;
this.consumerSecret = consumerSecret;
this.requestTokenUrl = requestTokenUrl;
this.authorizeUrl = authorizeUrl;
this.accessTokenUrl = accessTokenUrl;
this.requiresVerification = requiresVerification;
this.transport = new NetHttpTransport();
this.signer = new OAuthHmacSigner();
this.signer.clientSharedSecret = consumerSecret;
}
public OAuthParameters getOAuthParameters() {
OAuthParameters parameters = new OAuthParameters();
parameters.consumerKey = consumerKey;
OAuthCredentialsResponse accessToken = getAccessToken();
parameters.token = accessToken.token;
// Construct a new signer
OAuthHmacSigner requestSigner = new OAuthHmacSigner();
requestSigner.clientSharedSecret = consumerSecret;
requestSigner.tokenSharedSecret = accessToken.tokenSecret;
parameters.signer = requestSigner;
return parameters;
}
public OAuthCredentialsResponse getAccessToken() {
return getAccessToken(false);
}
public OAuthCredentialsResponse getAccessToken(boolean forceNewToken) {
OAuthCredentialsResponse token = getStoredAccessToken();
if (!forceNewToken && token != null)
return token;
OAuthCredentialsResponse requestToken = getRequestToken();
OAuthCredentialsResponse accessToken = getAccessToken(requestToken);
return accessToken;
}
protected OAuthCredentialsResponse getStoredAccessToken() {
String path = "tokens/"+configurationName+".txt";
if (Files.notExists(Paths.get(path)))
return null;
try {
List<String> lines = Files.readAllLines(Paths.get(path),
StandardCharsets.UTF_8);
OAuthCredentialsResponse accessToken = new OAuthCredentialsResponse();
accessToken.token = lines.get(0);
accessToken.tokenSecret = lines.get(1);
return accessToken;
} catch (IOException e) {
e.printStackTrace();
}
return null;
}
protected String getStoredVerifier() {
String path = "tokens/"+configurationName+".txt";
if (!Files.exists(Paths.get(path)))
return null;
try {
List<String> lines = Files.readAllLines(Paths.get(path),
StandardCharsets.UTF_8);
return lines.get(2);
} catch (IOException e) {
e.printStackTrace();
}
return null;
}
protected void storeAccessTokenAndVerifier(OAuthCredentialsResponse accessToken,
String verifier) {
String path = "tokens/"+configurationName+".txt";
try (PrintWriter writer = new PrintWriter(path, "UTF-8")) {
writer.println(accessToken.token);
writer.println(accessToken.tokenSecret);
writer.println(verifier); }
catch (FileNotFoundException | UnsupportedEncodingException e) {
e.printStackTrace();
}
}
protected OAuthCredentialsResponse getRequestToken() {
signer.tokenSharedSecret = null;
OAuthGetTemporaryToken requestToken =
new OAuthGetTemporaryToken(requestTokenUrl);
requestToken.consumerKey = consumerKey;
requestToken.transport = transport;
requestToken.signer = signer;
try {
OAuthCredentialsResponse requestTokenResponse = requestToken.execute();
return requestTokenResponse;
} catch (IOException e) {
e.printStackTrace();
}
return null;
}
protected OAuthCredentialsResponse getAccessToken(
OAuthCredentialsResponse requestToken) {
signer.tokenSharedSecret = requestToken.tokenSecret;
OAuthAuthorizeTemporaryTokenUrl oAuthAuthorizeUrl =
new OAuthAuthorizeTemporaryTokenUrl(authorizeUrl);
oAuthAuthorizeUrl.temporaryToken = requestToken.token;
System.out.println("Go to the following link in your browser:\n"
+ oAuthAuthorizeUrl.build());
try {
// Try to open browser automatically
Desktop.getDesktop().browse(new URI(oAuthAuthorizeUrl.build()));
} catch (IOException | URISyntaxException e1) {
e1.printStackTrace();
}
String verifier = null;
if (requiresVerification)
verifier = getVerificationCode();
OAuthGetAccessToken accessToken = new OAuthGetAccessToken(accessTokenUrl);
accessToken.consumerKey = consumerKey;
accessToken.signer = signer;
accessToken.transport = transport;
accessToken.temporaryToken = requestToken.token;
if (requiresVerification)
accessToken.verifier = verifier;
OAuthCredentialsResponse accessTokenResponse;
try {
accessTokenResponse = accessToken.execute();
storeAccessTokenAndVerifier(accessTokenResponse, verifier);
return accessTokenResponse;
} catch (IOException e) {
e.printStackTrace();
}
return null;
}
protected String getVerificationCode() {
String verifier = null;
InputStreamReader converter = new InputStreamReader(System.in, "UTF-8");
BufferedReader in = new BufferedReader(converter);
while (verifier == null) {
System.out.println(
"Enter the verification code provided by the service:");
try {
verifier = in.readLine();
} catch (IOException e) {}
}
return verifier;
}
}
This code contains much of the same logic you’ve seen earlier, but now neatly separated into different methods. There is also the added functionality to store access tokens in text files and retrieve them later. A few lines of code were added to automatically open a browser window:
try {
// Try to open browser automatically
Desktop.getDesktop().browse(new URI(oAuthAuthorizeUrl.build()));
} catch (IOException | URISyntaxException e1) {}
Note also that protected fields and methods are used in this class, in order to extend it later (the reason will be made clear soon).
Next, create a TwitterRESTClient class:
package com.twitter.api;
import java.io.IOException;
import java.util.Map;
import java.util.Map.Entry;
import com.google.api.client.http.GenericUrl;
import com.google.api.client.http.HttpRequest;
import com.google.api.client.http.HttpRequestFactory;
import com.google.api.client.http.HttpResponse;
import com.google.api.client.http.HttpTransport;
import com.google.api.client.http.UrlEncodedContent;
import com.google.api.client.http.javanet.NetHttpTransport;
public class TwitterRESTClient {
private static final String API_ENDPOINT_URL = "https://api.twitter.com/1.1/";
private final HttpTransport transport;
private final OAuthPostSignatureParametersProvider parametersProvider;
public TwitterRESTClient(
OAuthPostSignatureParametersProvider parametersProvider) {
this.transport = new NetHttpTransport();
this.parametersProvider = parametersProvider;
}
public String makeRequest(String operation) {
return makeRequest(operation, "GET");
}
public String makeRequest(String operation, String method) {
return makeRequest(operation, method, true, null);
}
public String makeRequest(String operation, Map<String, String> parameters) {
return makeRequest(operation, "GET", true, parameters);
}
public String makeRequest(String operation, String method,
Map<String, String> parameters) {
return makeRequest(operation, method, true, parameters);
}
public String makeRequest(String operation, String method, boolean useOAuth,
Map<String, String> parameters) {
HttpRequestFactory factory;
if (useOAuth)
factory = transport.createRequestFactory(
parametersProvider. getOAuthPostSignatureParameters());
else
factory = transport.createRequestFactory();
String url = API_ENDPOINT_URL + operation;
GenericUrl reqUrl = new GenericUrl(url);
UrlEncodedContent content = null;
if (parameters != null && method.equals("POST"))
content = new UrlEncodedContent(parameters);
if (parameters != null && method.equals("GET"))
for (Entry<String, String> parameter : parameters.entrySet())
reqUrl.put(parameter.getKey(), parameter.getValue());
HttpRequest req = null;
try {
req = factory.buildRequest(method, reqUrl, content);
HttpResponse resp = req.execute();
if (resp.isSuccessStatusCode()) {
return resp.parseAsString();
} else {
System.err.println("Request failed with status code: " +
resp.getStatusCode());
}
} catch (IOException e) {
e.printStackTrace();
}
return null;
}
}
Again, much of the same logic is at work here. The makeRequest method allows you to send an OAuth authenticated request to the Twitter REST service and takes parameters (and adds them to the URL in the case of a GET request or to the HTTP request body in case of a POST request) before firing off the request.
Note that OAuthParametersProvider is not used here. Instead, the code uses OAuthPostSignatureParametersProvider, which is a class that still needs to be made:
package com.twitter.api;
import com.google.api.client.auth.oauth.OAuthCredentialsResponse;
import com.google.api.client.auth.oauth.OAuthHmacSigner;
public class OAuthPostSignatureParametersProvider extends OAuthParametersProvider {
public OAuthPostSignatureParametersProvider(String configurationName,
String consumerKey, String consumerSecret, String requestTokenUrl,
String authorizeUrl, String accessTokenUrl,
boolean requiresVerification) {
super(configurationName, consumerKey, consumerSecret, requestTokenUrl,
authorizeUrl, accessTokenUrl, requiresVerification);
}
public OAuthPostSignatureParameters getOAuthPostSignatureParameters() {
OAuthPostSignatureParameters parameters = new OAuthPostSignatureParameters();
parameters.consumerKey = consumerKey;
OAuthCredentialsResponse accessToken = getAccessToken();
parameters.token = accessToken.token;
// Twitter is sometimes picky on requiring a callback in every request
// As well as the original verifier
parameters.callback = "http://127.0.0.1/";
if (requiresVerification)
parameters.verifier = getStoredVerifier();
// Construct a new signer
OAuthHmacSigner requestSigner = new OAuthHmacSigner();
requestSigner.clientSharedSecret = consumerSecret;
requestSigner.tokenSharedSecret = accessToken.tokenSecret;
parameters.signer = requestSigner;
return parameters;
}
}
This class simply extends OAuthParametersProvider and adds an extra method, which does not return a set of OAuthParameters, but OAuthPostSignatureParameters instead. The reason for this is that Google’s OAuth Client Library for Java does not allow you to include POSTparameters in the signature, something that Twitter requires (see https://dev.twitter.com/docs/auth/creating-signature). Thus, you need to roll your own OAuthPostSignatureParameters, which is very similar to Google’s OAuthParameters:
package com.twitter.api;
import com.google.api.client.auth.oauth.OAuthSigner;
import com.google.api.client.http.GenericUrl;
import com.google.api.client.http.HttpContent;
import com.google.api.client.http.HttpExecuteInterceptor;
import com.google.api.client.http.HttpRequest;
import com.google.api.client.http.HttpRequestInitializer;
import com.google.api.client.http.UrlEncodedContent;
import com.google.api.client.util.escape.PercentEscaper;
import java.io.IOException;
import java.security.GeneralSecurityException;
import java.security.SecureRandom;
import java.util.Collection;
import java.util.Map;
import java.util.TreeMap;
public final class OAuthPostSignatureParameters
implements HttpExecuteInterceptor, HttpRequestInitializer {
/*
* Due to a limitation in OAuthParameters, form parameters (as those
* used by POST requests) are not included in the construction of the
* OAuth signature. As such, we build a new class based on the source
* code of OAuthParameters to work around this issue.
*
* Note that, normally, we would write a superclass which extends
* OAuthParameters, but since OAuthParameters is declared as a final
* class, we cannot do so here.
*/
private static final SecureRandom RANDOM = new SecureRandom();
public OAuthSigner signer;
public String callback;
public String consumerKey;
public String nonce;
public String realm;
public String signature;
public String signatureMethod;
public String timestamp;
public String token;
public String verifier;
public String version;
private static final PercentEscaper ESCAPER =
new PercentEscaper("-_.~", false);
public void computeNonce() {
nonce = Long.toHexString(Math.abs(RANDOM.nextLong()));
}
public void computeTimestamp() {
timestamp = Long.toString(System.currentTimeMillis() / 1000);
}
public void computeSignature(String requestMethod, GenericUrl requestUrl,
HttpContent httpContent)
throws GeneralSecurityException {
OAuthSigner signer = this.signer;
String signatureMethod = this.signatureMethod = signer.getSignatureMethod();
TreeMap<String, String> parameters = new TreeMap<String, String>();
// Include all OAuth values in the signature
putParameterIfValueNotNull(parameters, "oauth_callback", callback);
putParameterIfValueNotNull(parameters, "oauth_consumer_key", consumerKey);
putParameterIfValueNotNull(parameters, "oauth_nonce", nonce);
putParameterIfValueNotNull(parameters, "oauth_signature_method",
signatureMethod);
putParameterIfValueNotNull(parameters, "oauth_timestamp", timestamp);
putParameterIfValueNotNull(parameters, "oauth_token", token);
putParameterIfValueNotNull(parameters, "oauth_verifier", verifier);
putParameterIfValueNotNull(parameters, "oauth_version", version);
// Include URL query parameters
for (Map.Entry<String, Object> fieldEntry : requestUrl.entrySet()) {
Object value = fieldEntry.getValue();
if (value != null) {
String name = fieldEntry.getKey();
if (value instanceof Collection<?>) {
for (Object repeatedValue : (Collection<?>) value) {
putParameter(parameters, name, repeatedValue);
}
} else {
putParameter(parameters, name, value);
}
}
}
// Include postdata parameters (added in our implementation)
if (httpContent != null && httpContent instanceof UrlEncodedContent) {
@SuppressWarnings("unchecked")
Map<String, Object> data = (Map<String, Object>)
((UrlEncodedContent)httpContent).getData();
for (Map.Entry<String, Object> dataEntry : data.entrySet()) {
Object value = dataEntry.getValue();
if (value != null) {
String name = dataEntry.getKey();
if (value instanceof Collection<?>) {
for (Object repeatedValue : (Collection<?>) value) {
putParameter(parameters, name, repeatedValue);
}
} else {
putParameter(parameters, name, value);
}
}
}
}
// Normalize parameters
StringBuilder parametersBuf = new StringBuilder();
boolean first = true;
for (Map.Entry<String, String> entry : parameters.entrySet()) {
if (first) {
first = false;
} else {
parametersBuf.append('&');
}
parametersBuf.append(entry.getKey());
String value = entry.getValue();
if (value != null) {
parametersBuf.append('=').append(value);
}
}
String normalizedParameters = parametersBuf.toString();
// Normalize URL
GenericUrl normalized = new GenericUrl();
String scheme = requestUrl.getScheme();
normalized.setScheme(scheme);
normalized.setHost(requestUrl.getHost());
normalized.setPathParts(requestUrl.getPathParts());
int port = requestUrl.getPort();
if ("http".equals(scheme) && port == 80 ∥ "https".equals(scheme)
&& port == 443) {
port = -1;
}
normalized.setPort(port);
String normalizedPath = normalized.build();
// Construct signature base string
StringBuilder buf = new StringBuilder();
buf.append(escape(requestMethod)).append('&');
buf.append(escape(normalizedPath)).append('&');
buf.append(escape(normalizedParameters));
String signatureBaseString = buf.toString();
signature = signer.computeSignature(signatureBaseString);
}
public String getAuthorizationHeader() {
StringBuilder buf = new StringBuilder("OAuth");
appendParameter(buf, "realm", realm);
appendParameter(buf, "oauth_callback", callback);
appendParameter(buf, "oauth_consumer_key", consumerKey);
appendParameter(buf, "oauth_nonce", nonce);
appendParameter(buf, "oauth_signature", signature);
appendParameter(buf, "oauth_signature_method", signatureMethod);
appendParameter(buf, "oauth_timestamp", timestamp);
appendParameter(buf, "oauth_token", token);
appendParameter(buf, "oauth_verifier", verifier);
appendParameter(buf, "oauth_version", version);
return buf.substring(0, buf.length() - 1);
}
private void appendParameter(StringBuilder buf, String name, String value) {
if (value != null) {
buf.append(' ').append(escape(name)).append("=\"")
.append(escape(value)).append("\",");
}
}
private void putParameterIfValueNotNull(TreeMap<String, String> parameters,
String key, String value) {
if (value != null) {
putParameter(parameters, key, value);
}
}
private void putParameter(TreeMap<String, String> parameters, String key,
Object value) {
parameters.put(escape(key),
value == null ? null : escape(value.toString()));
}
public static String escape(String value) {
return ESCAPER.escape(value);
}
public void initialize(HttpRequest request) throws IOException {
request.setInterceptor(this);
}
public void intercept(HttpRequest request) throws IOException {
computeNonce();
computeTimestamp();
try {
computeSignature(request.getRequestMethod(), request.getUrl(),
request.getContent());
} catch (GeneralSecurityException e) {
IOException io = new IOException();
io.initCause(e);
throw io;
}
request.getHeaders().setAuthorization(getAuthorizationHeader());
}
}
Don’t be too concerned about how this code works; it is basically the same as OAuthParameters, with the addition that it now also includes POST data to compute the signature.
Next, go back to the TwitterTest class and modify it as follows:
package com.twitter.api;
import java.util.HashMap;
public class TwitterTest {
private static final String CONSUMER_KEY = "FILL IN YOUR API KEY";
private static final String CONSUMER_SECRET = "FILL IN YOUR SECRET KEY";
private static final String REQUEST_TOKEN_URL =
"https://api.twitter.com/oauth/request_token";
private static final String AUTHORIZE_URL =
"https://api.twitter.com/oauth/authenticate";
private static final String ACCESS_TOKEN_URL =
"https://api.twitter.com/oauth/access_token";
public static void main(String[] args) throws Exception {
OAuthPostSignatureParametersProvider parametersProvider =
new OAuthPostSignatureParametersProvider("twitter",
CONSUMER_KEY, CONSUMER_SECRET,
REQUEST_TOKEN_URL, AUTHORIZE_URL, ACCESS_TOKEN_URL,
true);
TwitterRESTClient client = new TwitterRESTClient(parametersProvider);
String jsonResponse;
System.out.println("----- Get user time line -----");
jsonResponse = client.makeRequest("statuses/home_timeline.json");
System.out.println(jsonResponse);
System.out.println("----- Get user time line: 5 tweets -----");
jsonResponse = client.makeRequest("statuses/home_timeline.json",
new HashMap<String, String>() {{
put("count", "5");
}});
System.out.println(jsonResponse);
System.out.println("----- Get user WileyTech's timeline: 5 tweets -----");
jsonResponse = client.makeRequest("statuses/user_timeline.json",
new HashMap<String, String>() {{
put("screen_name", "WileyTech");
put("count", "5");
}});
System.out.println(jsonResponse);
System.out.println("----- Post a tweet -----");
jsonResponse = client.makeRequest("statuses/update.json", "POST",
new HashMap<String, String>() {{
put("status", "Posting this Tweet from Java!" +
" [" + System.currentTimeMillis() + "]");
}});
System.out.println(jsonResponse);
}
}
Again, don’t forget to fill in your API keys. If all goes right, the first time you execute this code a browser window will open and ask you to authorize the app. Enter the PIN in the console, and the remainder of the code will execute. Try executing this code again, and the stored access code will be used:
----- Get user time line -----
[** HUGE JSON RESPONSE **]
----- Get user time line: 5 tweets -----
[** SHORTER JSON RESPONSE **]
----- Get user WileyTech's timeline: 5 tweets -----
[** DIFFERENT SET OF TWEETS**]
----- Post a tweet -----
{** JSON CONTAINING POSTED TWEET **}
Check your Twitter page. Notice that your tweet has been posted (a timestamp was added because Twitter does not allow you to post the same tweet again). See Figure 10.23.
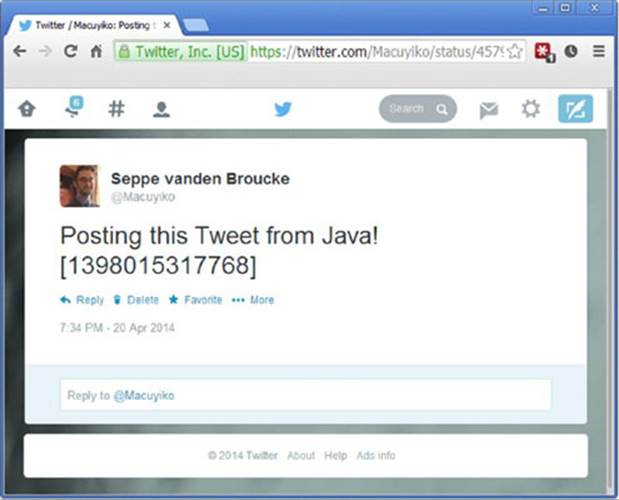
Figure 10.23
If you’re getting errors, it might be due to the following:
· Your access token might have been revoked. Try removing the text files under the tokens folder (you might need to refresh this folder in Eclipse) and trying again.
· You might be trying to post or request too many tweets in rapid succession. Twitter applied rate limiting to its services. Try again later.
· The parameters or endpoints might have changed (unlikely, as Twitter would assign a new version number). Check Twitter’s documentation.
NOTE the shorthand notation used here to initialize an anonymous HashMap:
new HashMap<String, String>() {{
put("count", "5");
}};
You can apply the same approach to initialize lists. Why the use of double braces ({{ and }}) here? The first set of braces creates a new anonymous inner class, extending the HashMap object. The second set of braces declares an “instance initializer” block that is run when the anonymous inner class is instantiated.
The only thing left do is actually parse the received JSON. To do so, you’ll be using another Google library called Google JSON, or GSON for short. You can find it at https://code.google.com/p/google-gson/. Installation is similar to what you’ve seen before—you download the latest version (here, google-gson-2.2.4-release.zip is used), extract the ZIP file, copy gson-2.2.4.jar to a folder in your Eclipse project (google-json is used here to keep in line with google-http), and add the library to the build path. Next, modify theTwitterTest class to look like this:
package com.twitter.api;
import java.util.HashMap;
import com.google.gson.JsonArray;
import com.google.gson.JsonElement;
import com.google.gson.JsonParser;
public class TwitterTest {
private static final String CONSUMER_KEY = "FILL IN YOUR API KEY";
private static final String CONSUMER_SECRET = "FILL IN YOUR SECRET KEY";
private static final String REQUEST_TOKEN_URL =
"https://api.twitter.com/oauth/request_token";
private static final String AUTHORIZE_URL =
"https://api.twitter.com/oauth/authenticate";
private static final String ACCESS_TOKEN_URL =
"https://api.twitter.com/oauth/access_token";
public static void main(String[] args) throws Exception {
OAuthPostSignatureParametersProvider parametersProvider =
new OAuthPostSignatureParametersProvider("twitter",
CONSUMER_KEY, CONSUMER_SECRET,
REQUEST_TOKEN_URL, AUTHORIZE_URL, ACCESS_TOKEN_URL,
true);
TwitterRESTClient client = new TwitterRESTClient(parametersProvider);
String jsonResponse;
System.out.println("----- Get user time line: 5 tweets -----");
HashMap<String, String> data = new HashMap<>();
Data.put("count", "5");
jsonResponse = client.makeRequest("statuses/home_timeline.json",
data);
JsonParser jsonParser = new JsonParser();
JsonElement jsonElement = jsonParser.parse(jsonResponse);
JsonArray jsonArray = jsonElement.getAsJsonArray();
for (JsonElement element : jsonArray)
System.out.println(element.getAsJsonObject().get("text"));
}
}
If you run this code, you’ll now see the following, more user-friendly output (of course, your tweets will vary):
----- Get user time line: 5 tweets -----
"RT @wwwtxt: Hi, is there anyone out there on the net this Easter?
I will be back again tomorrow if you miss me today. ?92APR"
"RT @BobVila: Here's something everyone can make! 5 Things to do with...
Junk Mail! http://t.co/2qyTBJEkQX http://t.co/32ymeLUff9"
"RT @hari: How @reddit @Disqus @smittenkitchen are taming the 'Wild West'
of online comments | http://t.co/I8f2FKJ694"
"RT @MDogGeist: so the wii-u is as old as the dreamcast when it was killed
and the wii-u has sold less than half what the dreamcast did..."
"I've now been on twitter for half an hour or so, but I'm \"totally coding
right now\" in my head. Procrastinators, unite!"
If you want, you can take some time to familiarize yourself with the GSON library, but its usage is relatively straightforward and can be derived quickly by using Eclipse’s context pop-ups. You can also explore the Twitter REST service somewhat further to get out and post different information.
NOTE One interesting way to use the Twitter REST service is through the search/tweets.json GET endpoint (this requires a single mandatory parameter, q, which contains the search query). You can use this, for example, to search for tweets users are posting about you or your company.
This concludes the section on accessing REST services. This section has covered a lot of ground, so feel free to go over the code again or experiment some more to get a feel for how everything works. Since REST has become so popular in recent years, you might want to explore the developer’s section of your favorite productivity site or social network to see if they’re offering something similar.
NOTE These examples have been using a set of libraries and built-in classes to deal with HTTP communication and OAuth for you. However, many RESTful services also offer even higher-lever libraries (or third parties offer them), providing “bindings” to a number of languages, Java often among them. For Twitter, for instance, you can check out the Twitter4J library at http://twitter4j.org/, which offers a Java library to interact with Twitter’s REST service. Methods and classes offered by such libraries are oftentimes more closely defined to the actual service (i.e., a method called postTweet), but since the goal here is to familiarize yourself with REST services in general, a more “pure” approach is applied.
You’ve now seen how to work with Java’s built-in HttpURLConnection class to access RESTful services, as well as used Google’s OAuth and HTTP client libraries to access more complex services. You’ve also seen how to parse XML and JSON.
As a final exercise, the next Try It Out shows how to access another REST service—Facebook.
TRY IT OUT Accessing Facebook
This exercise demonstrates how to use the REST service of Facebook. It assumes that you already have a Facebook account at http://www.facebook.com. Facebook developer’s documentation can be found at https://developers.facebook.com/. Information on its REST API (which Facebook now calls the “Graph API”) can be found at https://developers.facebook.com/docs/graph-api/reference/, and includes a list of all the resources you can access.
1. To access the Facebook Graph API, you’ll first need to register as a developer. This can be done by navigating to https://developers.facebook.com/ and selecting Register as a Developer under Apps in the upper menu.
2. Next, just as for Twitter, you need to create a set of keys under https://developers.facebook.com/tools/accesstoken/. Create a new app, give it a unique name, and select a category.
3. After creating your app, you’ll be brought to your app’s “Dashboard,” which contains a wealth of information and settings to play with. See Figure 10.24.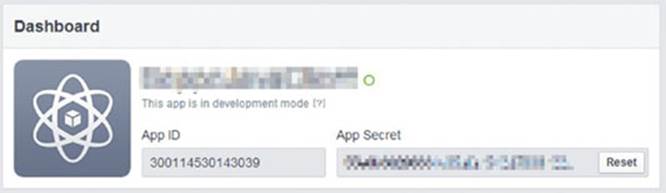
Figure 10.24
4. Be sure to note your “App ID” and “App Secret” keys. Click + Add Platform, choose website, and enter http://www.example.com as the site URL, which you’ll also use as a callback URL. Even if you’re not the owner of this domain, it’ll work fine to extract the callback URL (together with the access token) and copy it in your application. Don’t forget to save your changes.
5. Facebook uses a complicated login flow with the possibility to modify many options and permissions, inspired by OAuth but not exactly the same. The page on manually building a login flow, found at https://developers.facebook.com/docs/facebook-login/manually-build-a-login-flow, provides more details if you’re interested (there is a lot to read through).
6. Create a single class, called FacebookTest, using the following code:
7. package com.facebook.graph;
8.
9. import java.awt.Desktop;
10. import java.io.BufferedReader;
11. import java.io.IOException;
12. import java.io.InputStreamReader;
13. import java.net.URI;
14. import java.net.URISyntaxException;
15. import java.util.HashMap;
16. import java.util.Map;
17. import java.util.Map.Entry;
18.
19. import com.google.api.client.http.GenericUrl;
20. import com.google.api.client.http.HttpRequest;
21. import com.google.api.client.http.HttpRequestFactory;
22. import com.google.api.client.http.HttpResponse;
23. import com.google.api.client.http.UrlEncodedContent;
24. import com.google.api.client.http.javanet.NetHttpTransport;
25.
26. public class FacebookTest {
27. public static final String CLIENT_ID = "300114530143039";
28. public static final String CLIENT_SECRET = "55e0b30296331c05afa1542d7806122c";
29. public static final String API_ENDPOINT_URL = "https://graph.facebook.com/";
30. public static final String CALLBACK_URL = "http://www.example.com";
31.
32. public static void main(String[] args) {
33. // Step 1: open browser and ask user to allow access: get user access token
34. String userGrantAccessUrl = "https://www.facebook.com/dialog/oauth?" +
35. "client_id=" + CLIENT_ID +
36. "&redirect_uri=" + CALLBACK_URL +
37. "&response_type=token";
38. try {
39. Desktop.getDesktop().browse(new URI(userGrantAccessUrl));
40. } catch (IOException | URISyntaxException e) {}
41.
42. final String userAccessToken = getAccessToken();
43.
44. System.out.println("User access token: " + userAccessToken);
45.
46. // Step 2: get an app access token
47. final String appGrantAccessToken = makeRequest("oauth/access_token", "GET",
48. new HashMap<String, String>(){{
49. put("client_id", CLIENT_ID);
50. put("client_secret", CLIENT_SECRET);
51. put("grant_type", "client_credentials");
52. }})
53. .replace("access_token=", "");
54.
55. System.out.println("App access token: " + appGrantAccessToken);
56.
57. // Step 3: verify the user token with our app token
58. String verificationResponse = makeRequest("debug_token", "GET",
59. new HashMap<String, String>(){{
60. put("input_token", userAccessToken);
61. put("access_token", appGrantAccessToken);
62. }});
63.
64. System.out.println("Status of token verification: " + verificationResponse);
65.
66. // Step 4: access the API
67. // You'll need to provide the user access token with every request
68. String userInformation = makeRequest("me", "GET",
69. new HashMap<String, String>(){{
70. put("access_token", userAccessToken);
71. }});
72. System.out.println("Here's some information about the user: ");
73. System.out.println(userInformation);
74.
75. }
76.
77. private static String getAccessToken() {
78. String accessToken = null;
79. InputStreamReader converter = new InputStreamReader(System.in, "UTF-8");
80. BufferedReader in = new BufferedReader(converter);
81. while (accessToken == null) {
82. System.out.println("Enter the access token from the callback URL:");
83. try {
84. accessToken = in.readLine();
85. } catch (IOException e) {}
86. }
87. return accessToken;
88. }
89.
90. private static String makeRequest(String operation, String method,
91. Map<String, String> parameters) {
92. NetHttpTransport transport = new NetHttpTransport();
93. HttpRequestFactory factory;
94. factory = transport.createRequestFactory();
95.
96. GenericUrl reqUrl = new GenericUrl(API_ENDPOINT_URL + operation);
97. UrlEncodedContent content = null;
98. if (parameters != null && method.equals("POST"))
99. content = new UrlEncodedContent(parameters);
100. if (parameters != null && method.equals("GET"))
101. for (Entry<String, String> parameter : parameters.entrySet())
102. reqUrl.put(parameter.getKey(), parameter.getValue());
103.
104. // If set, the access_token must be provided as a GET parameter
105. // Even when we're making a POST request
106. if (parameters != null && parameters.get("access_token") != null)
107. reqUrl.put("access_token", parameters.get("access_token"));
108.
109. HttpRequest req = null;
110. try {
111. req = factory.buildRequest(method, reqUrl, content);
112. HttpResponse resp = req.execute();
113. if (resp.isSuccessStatusCode()) {
114. return resp.parseAsString();
115. } else {
116. System.err.println("Request failed with status code: "
117. + resp.getStatusCode());
118. }
119. } catch (IOException e) {
120. e.printStackTrace();
121. }
122.
123. return null;
124. }
}
125. Test the program. The first time you run this program, Facebook will ask you whether you want to give your app permission. Note that the default permissions do not allow you to post through your app. See Figure 10.25.
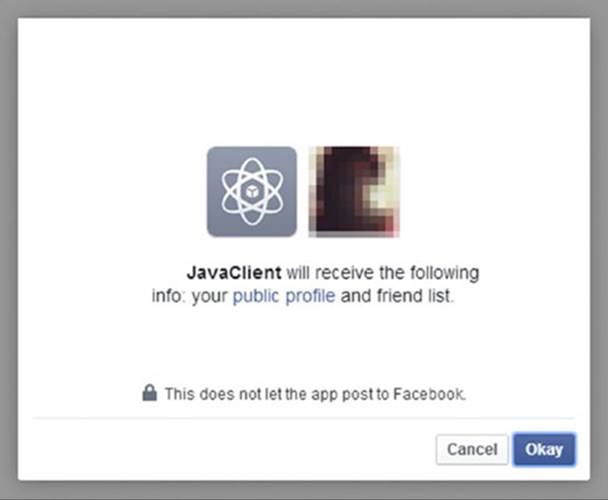
Figure 10.25
Next, Java will redirect you to the callback URL, which in this case is http://www.example.com. See Figure 10.26.
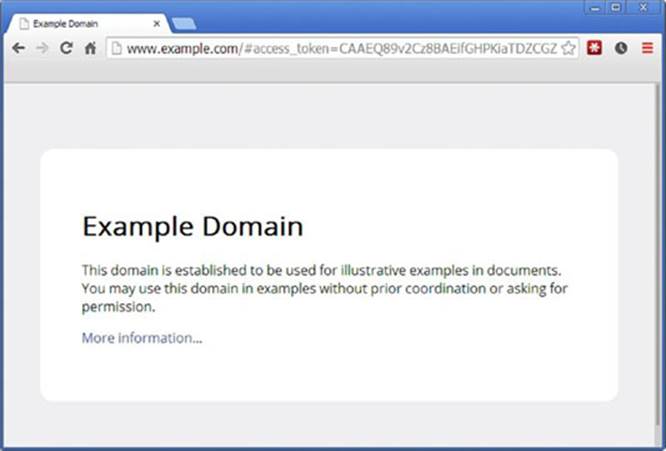
Figure 10.26
Your Java program is waiting for you to provide the access token. This is the ACCESS_TOKEN_HERE part of the callback URL: http://www.example.com/#access_token=ACCESS_TOKEN_HERE&expires_in=NUMBER. Again, if you open the Facebook authorization page in your Java program (using a GUI and web browser component), you can “sniff out” this access token, but here, just manually copy and paste it into the Eclipse console.
Next, your program will continue with requesting an app access token and verifying the user access token with the app access token, using a similar makeRequest method as the one you used for your Twitter client. Once this final authorization step is finished, you can execute a real request, in this case requesting some information about the user who authorized the app (you). The final output should look like this:
Enter the access token from the callback URL:
CAAEQ89v2Cz8BAEifGHPKiaTDZCGZAf1Uf5NaODOFKrC8kL1C5iYBsY4LLCmh6J8sGTuWCMdCOP
faba9CEhJMweXofNMUp8W9skDOXGAZAimENwY3ZAebfEWx89ZAaxNCLL2PDi25X5mbUWoxD6dEiA
9fxu16iZB7EVKj4vT4uoRaV4x4tofrgUWvulVZBnsgMYZD
User access token:
CAAEQ89v2Cz8BAEifGHPKiaTDZCGZAf1Uf5NaODOFKrC8kL1C5iYBsY4LLCmh6J8sGTuWCMdCOP
faba9CEhJMweXofNMUp8W9skDOXGAZAimENwY3ZAebfEWx89ZAaxNCLL2PDi25X5mbUWoxD6dEiA
9fxu16iZB7EVKj4vT4uoRaV4x4tofrgUWvulVZBnsgMYZD
App access token: 300114530143039|lhvmPn7r6HbmN4dj3LgAFgoisIk
Status of token verification:
{"data":{"app_id":"300114530143039","is_valid":true,"application":
"SeppeJavaClient","user_id":"507162275","expires_at":1398038400,
"scopes":["public_profile","basic_info","user_friends"]}}
Here's some information about the user:
{"id":"507162275",** ALL KINDS OF INFORMATION **}
126. This exercise is meant to give you a taste of what’s possible with Java and Facebook. Note that, just like for Twitter, there exists a Facebook4J library (http://facebook4j.org/) that makes this whole process a lot easier. Take a look if you want to invest more time in developing Java applications that interact with Facebook.
Screen Scraping
The last type of web service this chapter is going to discuss is not really a web service at all, but involves a technique called “screen scraping,” used when you really, absolutely want to get some information out of a website, or when a website just didn’t bother to provide a structured service based on SOAP or REST.
Let’s say you’re visiting an interesting page on Wikipedia about coffee varieties at http://en.wikipedia.org/wiki/List_of_coffee_varieties. You notice the list shown in Figure 10.27.
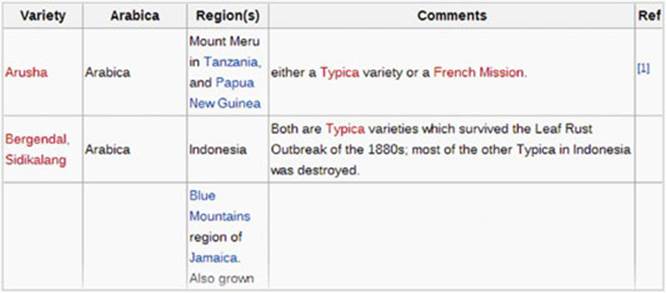
Figure 10.27
You’d like to extract this list for later use (perhaps to import into a database). You know you can copy and paste tables from websites into Excel, but where’s the fun in that? You’ve already seen how to make HTTP requests to REST services interact with them, so why wouldn’t it be possible to make HTTP requests to normal websites and parse the HTML page they give back? Sure, HTML contains a lot of formatting and is not a structured format such as XML or JSON, but it definitely seems possible.
This is exactly what screen scraping (also called data scraping or web scraping) does—it extracts data programmatically from output that’s meant to be consumed by humans.
Depending on the type of data you want to extract, screen scraping can be more or less difficult to pull off. Some websites are structured in a complex way, make HTTP requests even after the main page has loaded (using JavaScript), or require certain cookies to be set (e.g., indicating that a user is logged in) before you can access pages. This section takes a look at screen scraping web pages both with and without cookie-based authentication. To screen scrape, you need to use yet another library in order to help parse and search through the received HTML pages. You certainly don’t want to do this manually using Java’s String manipulation methods.
As always, start by setting up a new project in Eclipse, called ScreenScrapingWithJava. The library you will be using to do the HTML parsing is called jsoup and can be downloaded at http://jsoup.org/download (in this book version 1.7.3 is used). Simply download the core library JAR file and drag and copy it into an Eclipse folder within your project, named jsoup. Finally, right-click the JAR in Eclipse to add it to the build path. See Figure 10.28.
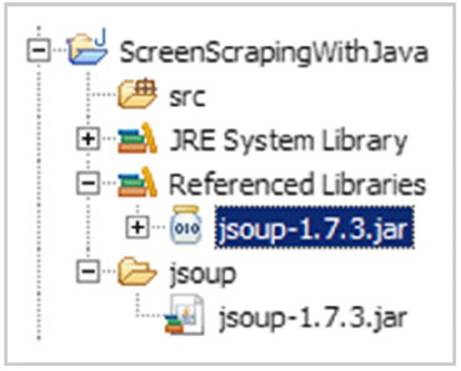
Figure 10.28
This is all you need to do to set up. Now take a look at how to extract data from a web page.
Screen Scraping Without Cookies
Create a class called WikipediaGetter with the following content:
import java.io.IOException;
import java.util.ArrayList;
import java.util.List;
import org.jsoup.Jsoup;
import org.jsoup.nodes.Document;
import org.jsoup.nodes.Element;
import org.jsoup.select.Elements;
public class WikipediaGetter {
public static void main(String[] args) throws IOException {
List<String[]> coffee = new ArrayList<String[]>();
Document doc = Jsoup.connect(
"http://en.wikipedia.org/wiki/List_of_coffee_varieties").get();
Elements wikiTables = doc.select("table.wikitable");
System.out.println(wikiTables.size() + " wikitables found");
for (Element table : wikiTables) {
if (table.html().contains("<th>Arabica</th>")) {
// We've found our table!
Elements rows = table.select("tr");
for (Element row : rows) {
Elements cells = row.select("td");
if (cells.size() == 0)
continue;
String[] line = new String[cells.size()];
for (int i = 0; i < line.length; i++) {
line[i] = cells.get(i).text();
}
coffee.add(line);
}
break;
}
}
for (String[] variety : coffee) {
System.out.println("----- " + variety[0] + " -----");
System.out.println("Arabica: " + variety[1]);
System.out.println("Region(s): " + variety[2]);
System.out.println("Comments: " + variety[3]);
}
}
}
This simple script does the following: it connects to the Wikipedia page using jsoup. Apart from being an excellent HTML parser, jsoup also provides user-friendly methods to perform HTTP requests, so you don’t have to build your own makeRequest method aroundHttpURLConnection. Next, it fetches the HTML table elements with the wikitable class, searches until it finds the right table, and then loops through the tr and td elements to extract the contents of the tables.
If you’re wondering how to know which element to fetch from the HTML structure, most browsers provide a way to inspect the source of each web page you view. See Figure 10.29.
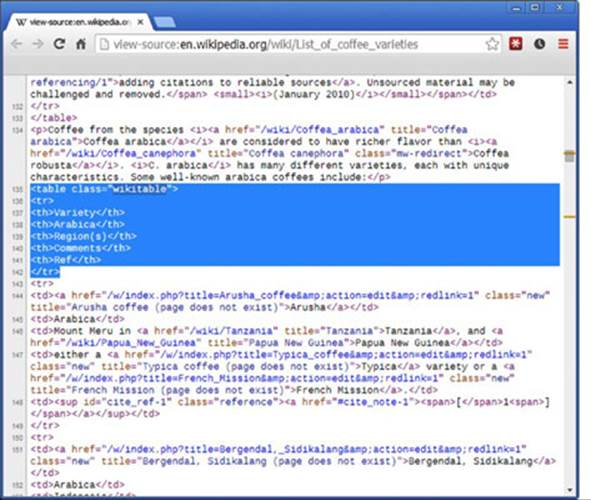
Figure 10.29
To retrieve elements from the HTML tree, jsoup applies a selector method. Basic selectors include:
· tagname: Finds elements by the tag name, e.g., table
· #id: Finds elements based on ID, e.g., #main-table
· .class: Finds elements based on class name, e.g., .wikitable
· [attribute]: Finds elements with an attribute
· [attribute=value]: Finds elements whose attribute equals a value
Selectors can be combined to build more complex queries, e.g., table.wikitable could select all table elements with the class wikitable, or table a could find all link elements within a table. You can read more about selectors on the jsoup site.
Running your code will produce the following result:
2 wikitables found
----- Arusha -----
Arabica: Arabica
Region(s): Mount Meru in Tanzania, and Papua New Guinea
Comments: either a Typica variety or a French Mission.
----- Bergendal, Sidikalang -----
Arabica: Arabica
Region(s): Indonesia
Comments: Both are Typica varieties which survived the Leaf Rust Outbreak
of the 1880s; most of the other Typica in Indonesia was destroyed.
** AND SO ON **
As you no doubt agree, screen scraping can oftentimes offer a very straightforward and simple method to extract data from web pages. However, screen scraping is generally regarded as an inelegant technique to be used only when no other mechanism for structured data exchange is available (such as REST or SOAP). The reasons for this are both technical and “ethical” in nature. First, web pages may change without notice, causing your screen scraping programs to break and require a great deal of maintenance. Second, it is not regarded good form to “hammer” websites with screen scraping programs. It makes thousands of requests to extract all data from the websites, which was originally meant for human consumption only. Therefore, always take care when screen scraping a website not to anger the website owner.
NOTE People sometimes build wrappers around websites that do not offer an official REST API based on screen scraping techniques, but rather a so-called “Evil API” that can be used by programmers to access a website in a programmatic manner. The reason such third-party tools are denoted as “evil” is due to the fact that the website owner does not intend or want programmers to access their resources in a programmatic manner.
Screen Scraping with Cookies
Before showing you their content, websites frequently require your browser to send a set of cookies (small tokens of information) that were set by the website earlier to be able to identify you again. Recall that this was HTTP’s way to work around its stateless nature. For instance, when you visit Twitter or Facebook in your browser and no cookie is sent with the request, the site will ask you to log in before continuing. Once you provide your username and password, the site will set a cookie to remember you in subsequent requests.
To see how this works, the next exercise accesses Twitter again, but this time using screen scraping techniques only. Create a class named TwitterScraper with the following source code:
import java.io.IOException;
import java.util.HashMap;
import java.util.Map;
import org.jsoup.Connection;
import org.jsoup.Jsoup;
import org.jsoup.nodes.Document;
import org.jsoup.nodes.Element;
public class TwitterScraper {
private static final Map<String, String> COOKIES =
new HashMap<String, String>();
private static final String USERNAME = "FILL IN YOUR USERNAME";
private static final String PASSWORD = "FILL IN YOUR PASSWORD";
public static void main(String[] args) throws IOException {
System.out.println("Trying to log into Twitter...");
boolean result = login(USERNAME, PASSWORD);
System.out.println("Cookies are now:");
System.out.println(COOKIES);
if (!result) {
System.out.println("Login failed! Try the following:");
System.out.println("- Has the Twitter website changed?");
System.out.println("- Are your username and password correct?");
System.exit(0);
}
String username = getUsername();
System.out.println("Your username is: "+username);
String[] myStats = getStats(username);
System.out.println("Your stats: ");
System.out.println("- Tweets: "+myStats[0]);
System.out.println("- Following: "+myStats[1]);
System.out.println("- Followers: "+myStats[2]);
String[] wileyStats = getStats("WileyTech");
System.out.println("@WileyTech stats: ");
System.out.println("- Tweets: "+wileyStats[0]);
System.out.println("- Following: "+wileyStats[1]);
System.out.println("- Followers: "+wileyStats[2]);
}
public static String[] getStats(String username) throws IOException {
Connection connection = Jsoup.connect("https://twitter.com/"+username);
// We do not need to be logged in to get stats
Document result = connection.get();
String[] stats = new String[3]; // tweets, following, followers
try {
Element statsTable = result.select("table.js-mini-profile-stats").get(0);
stats[0] = statsTable.select(
"a[data-element-term=tweet_stats]").text();
stats[1] = statsTable.select(
"a[data-element-term=following_stats]").text();
stats[2] = statsTable.select(
"a[data-element-term=follower_stats]").text();
} catch (IndexOutOfBoundsException e) {
// table.js-mini-profile-stats could not be found
// Perhaps this user has enabled the new Twitter profile?
Element statsTable = result.select("ul.ProfileNav-list").get(0);
stats[0] = statsTable.select(
"a[data-nav=tweets] span.ProfileNav-value").text();
stats[1] = statsTable.select(
"a[data-nav=following] span.ProfileNav-value").text();
stats[2] = statsTable.select(
"a[data-nav=followers] span.ProfileNav-value").text();
}
return stats;
}
public static String getUsername() throws IOException {
Connection connection = Jsoup.connect("https://twitter.com")
.cookies(COOKIES);
Document result = connection.get();
COOKIES.putAll(connection.response().cookies());
return result.select("div[role=navigation] li.profile a.js-
nav").attr("href").replace("/", "");
}
public static boolean login(String username, String password)
throws IOException {
COOKIES.clear(); // Clear all cookies
// Request Twitter homepage to set first cookies and get token
String authenticityToken = getAuthenticityToken();
// Then login using a POST request
Connection connection = Jsoup.connect("https://twitter.com/sessions")
.data("session[username_or_email]", username)
.data("session[password]", password)
.data("remember_me", "1")
.data("return_to_ssl", "true")
.data("redirect_after_login", "/")
.data("remember_me", "1")
.data("authenticity_token", authenticityToken)
.cookies(COOKIES);
Document result = connection.post();
COOKIES.putAll(connection.response().cookies());
if (result.html().contains("action=\"https://twitter.com/sessions\"")) {
// The sign-in form is still present in the result
// The login was probably incorrect
return false;
}
return true;
}
private static String getAuthenticityToken() throws IOException {
// Request Twitter homepage and get token
Connection initialConnection = Jsoup.connect("https://twitter.com/");
Document initialResult = initialConnection.get();
String authenticityToken = initialResult
.select("input[name=authenticity_token]").get(0).val();
// Update cookies
COOKIES.putAll(initialConnection.response().cookies());
return authenticityToken;
}
}
This code is mostly similar to the one you saw previously, with the difference that you’re now making POST requests, setting and sending cookies, and using more complex selectors. If you’re wondering how you can figure out the names of the POST parameters to send along with the login request, these can be obtained by inspecting network traffic using the developer tools in any modern web browser (e.g., Firefox or Chrome). See Figure 10.30.
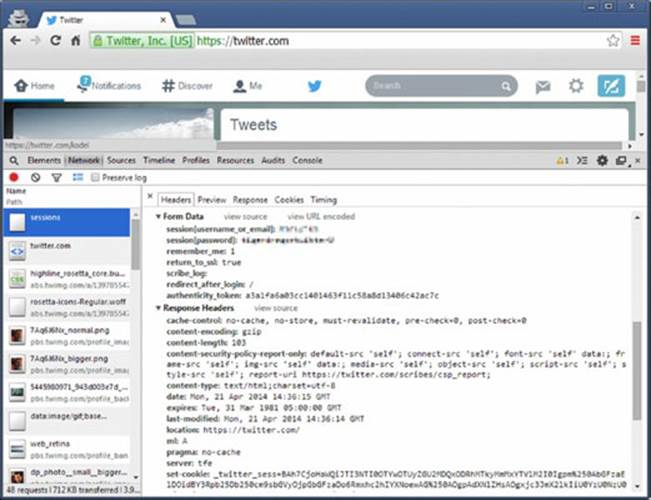
Figure 10.30
After executing this code (don’t forget to fill in your username and password), you should receive something like the following output:
Trying to log into Twitter...
Cookies are now:
{twid="u=9807092", guest_id=v1%3A139809069245291074, remember_checked_on=1,
auth_token=0a5fe41724884eaab2e8b121e6ed74d6f74a2754,
_twitter_sess=BAh7CiIKZmxhc2hJQzonQWN0aW9uQ29udHJvbGxlcjo6Rmxhc2g6OkZsYXNo
%250ASGFzaHsABjoKQHVzZWR7ADoHaWQiJTRiM2IyN2VjMDZkZGMxZTVjNzc2MGI1%250AOTBh
NzAwN2U1Og9jcmVhdGVkX2F0bCsIZfeyhEUBOgxjc3JmX2lkIiUzMGQ2%250ANzNkMjQxNjRiN
TMzNDgzNzBjYTJiMDZjZWNhZjoJdXNlcmkD9KSV--4244a4f3d399fab8a4eda1a3ad69e3f29
6a23c84, lang=en,
h=%7B%22tweet_id%22%3A%22456581708179972100%22%2C%22advertiser_id%22%3A%22
121336088%22%2C%22newer_tweet_id%22%3A%22458251425135734784%22%2C%22
older_tweet_id%22%3A%22458251414578270208%22%2C%22promoted_content%22%3A%7B%22
impression_id%22%3A%2242597fa3f64f6b16%22%2C%22disclosure_type%22%3A%22
promoted%22%2C%22disclosure_text%22%3A%22%22%7D%2C%22experiment_values%22%3A%7B%22
display.display_style%22%3A%22show_social_context%22%7D%7D}
Your username is: ** YOUR USERNAME **
Your stats:
- Tweets: 556
- Following: 377
- Followers: 143
@WileyTech stats:
- Tweets: 1 943
- Following: 897
- Followers: 3 832
CREATING YOUR OWN WEB SERVICES WITH JAVA
Now that you’ve seen how to access web services, you might be wondering how you can offer your own information over the web using Java. Java has excellent support for setting up web servers, services, and applications, but a full discussion of those is out of scope for a beginner’s book.
Instead, this book will be using a simple framework—aptly named “Simple”—which can be downloaded from http://www.simpleframework.org/. Like always, create a new project in Eclipse (HTTPServer, for instance) and unzip the JAR file (simple-6.0.1.jar) to a folder in Eclipse (e.g., simple). Finally, add the JAR file to the build path.
Setting Up an HTTP Server
Create a class called HTTPServer with the following source code:
import java.awt.Desktop;
import java.io.PrintStream;
import java.net.InetSocketAddress;
import java.net.SocketAddress;
import java.net.URI;
import org.simpleframework.http.Request;
import org.simpleframework.http.Response;
import org.simpleframework.http.core.Container;
import org.simpleframework.http.core.ContainerSocketProcessor;
import org.simpleframework.transport.connect.Connection;
import org.simpleframework.transport.connect.SocketConnection;
public class HTTPServer implements Container {
public void handle(Request request, Response response) {
try {
PrintStream body = response.getPrintStream();
response.setValue("Content-Type", "text/plain");
body.println("Hello there, you've requested: "+request.getPath());
body.close();
} catch (Exception e) {
e.printStackTrace();
}
}
public static void main(String[] list) throws Exception {
// If you get an Address already in use: bind error, try changing the port
int port = 880;
Container container = new HTTPServer();
ContainerSocketProcessor server = new ContainerSocketProcessor(container);
Connection connection = new SocketConnection(server);
SocketAddress address = new InetSocketAddress(port);
connection.connect(address);
Desktop.getDesktop().browse(new URI("http://127.0.0.1:" + port));
System.out.println("Press ENTER to stop server...");
System.in.read();
connection.close();
server.stop();
}
}
Run the code. A web browser will open and connect you to a running HTTP server. Try modifying the URL (e.g., http://127.0.0.1:880/test/me) and note that the server changes its response accordingly. See Figure 10.31.
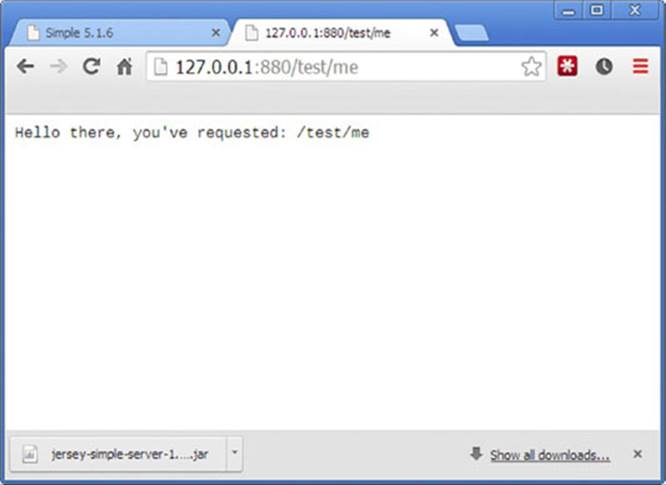
Figure 10.31
You can easily extend this class with what you’ve learned in the chapter on working with files to open and transmit HTML and other files stored on the server to the browser. The following class shows you how to do so:
import java.awt.Desktop;
import java.io.OutputStream;
import java.io.PrintStream;
import java.net.InetSocketAddress;
import java.net.SocketAddress;
import java.net.URI;
import java.nio.file.Files;
import java.nio.file.Path;
import java.nio.file.Paths;
import org.simpleframework.http.Request;
import org.simpleframework.http.Response;
import org.simpleframework.http.core.Container;
import org.simpleframework.http.core.ContainerSocketProcessor;
import org.simpleframework.transport.connect.Connection;
import org.simpleframework.transport.connect.SocketConnection;
public class HTTPServer implements Container {
private static final int PORT = 880;
private static final String ROOTDIR = "data";
public void handle(Request request, Response response) {
try {
System.err.println(request.getPath());
Path path = Paths.get(ROOTDIR + request.getPath());
if (Files.exists(path) && Files.isRegularFile(path)) {
OutputStream body = response.getOutputStream();
byte[] data = Files.readAllBytes(path);
body.write(data);
body.close();
} else {
PrintStream body = response.getPrintStream();
body.println("404 Not Found");
body.close();
response.setStatus(org.simpleframework.http.Status.NOT_FOUND);
}
} catch (Exception e) {
e.printStackTrace();
}
}
public static void main(String[] list) throws Exception {
Container container = new HTTPServer();
ContainerSocketProcessor server = new ContainerSocketProcessor(container);
Connection connection = new SocketConnection(server);
SocketAddress address = new InetSocketAddress(PORT);
connection.connect(address);
Desktop.getDesktop().browse(new URI("http://127.0.0.1:" + PORT));
System.out.println("Press ENTER to stop server...");
System.in.read();
connection.close();
server.stop();
}
}
In your Eclipse project, create a new folder called data. In this folder, you can create or put files. For instance, try creating a file called hello.htm in your text editor with the content:
<html><body><h1>Hello!</h1></body></html>
Run the server (make sure to stop any running servers). Note the 404 error when opening http://127.0.0.1:880/. Now try accessing http://127.0.0.1:880/hello.htm; the web page shown in Figure 10.32 will appear.
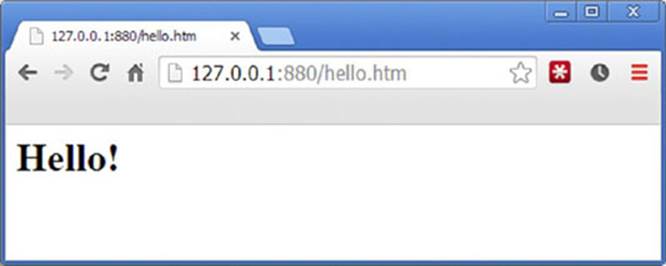
Figure 10.32
The Simple library is easy to extend with even more functionality (getting data the users enter in forms, for example). If you only need to provide information from Java to users via a web server, this should be enough to get started. Check out the documentation athttp://www.simpleframework.org/ for more information.
Providing REST Services
Just as with the JAX-WS library discussed earlier for SOAP, there exists an API for offering REST services called JAX-RS. Multiple implementations of this API exist, the most complete of which is called “Jersey.” This library offers a complete package to offer and access REST services, but is somewhat complex to set up, so it will not be discussed further.
However, based on what you’ve seen so far, you know that a RESTful web service is nothing more than a structured URI scheme with a web server sending structured responses. As such, the Simple framework discussed in the previous section can also be leveraged to build a REST service. By combining what you’ve seen about databases, file IO, web services, and XML, you should be able to create your own REST services without much hassle.
For now, this chapter and the wonderful world of web services is left behind you. The chapter covered a lot of topics, ranging from networking, protocols, and HTTP to SOAP, REST, JSON and XML, and OAuth. Take some time to revisit some of the code you’ve seen, or feel free to explore on your own. As always, don’t be afraid to search for help online whenever you get stuck. Web technologies can get very complex, but the good thing is that there is a large community of programmers trying to accomplish similar things, so you’ll always find an answer if you encounter a problem.
In addition, this chapter—more so than others—has clearly illustrated the benefits of a rich library ecosystem as the one found for Java. To accomplish almost all of the tasks in this chapter, you’ve been using a third-party library handling a lot of the heavy lifting for you. Setting up an OAuth token exchange between a REST service still might not be as easy as you’d like, but think back on the small example on TCP/IP sockets in the beginning of this chapter and imagine having to write all other aspects of interacting with a web service on top of this. . . This illustrates another important point when programming in Java: don’t be afraid to use existing libraries. As the old saying goes, buy the best, build the rest.