Beginning Java Programming: The Object-Oriented Approach (Programmer to Programmer) (2015)
11. Designing Graphical Interfaces
WHAT YOU WILL LEARN IN THIS CHAPTER:
· The types of graphical user interface frameworks that exist in Java
· How you can make programs with a graphical user interface
· Understanding the containment hierarchy, layout managers, and events in a GUI context
· Using best practices when building graphical user interfaces
WROX.COM CODE DOWNLOADS FOR THIS CHAPTER
The wrox.com code downloads for this chapter are found at www.wrox.com/go/beginningjavaprogramming on the Download Code tab. The code is in the Chapter 11 download and individually named according to the names throughout the chapter.
Up until now, all the programs you’ve been working with throughout this book have been rather Spartan looking. Since most of the action happened on a command-line (or the Eclipse console), you might be wondering whether it is possible to give your programs a bit more visual flair, and, more importantly, make them more useful by means of adding some buttons or a textbox or two.
Luckily, Java provides a wide range of capabilities to work with graphical user interfaces—commonly abbreviated as GUIs—out of the box. Trying to come up with your own GUI classes from scratch would take you many years. This also means, however, that working with GUIs in Java is less straightforward than just dealing with input and output through the console, and constructing visual-rich programs will take up many more lines of code as well. As you might expect, all the components you’ll need in order to build a nice-looking user interface will be implemented as classes. These classes adhere to Object-Oriented Programming principles, so you can find your way through them using the principles you’ve already learned.
COVERING THE BASICS OF GUIs IN JAVA
Java has been around for a while, so there are quite a number of GUI frameworks to choose from when you decide to start building your own user interfaces, both in the form of built-in as well as third-party libraries.
The reasons behind this are mostly historical, but are also influenced quite a bit by functional decisions. Some frameworks, for instance, will opt to keep as close as possible to the native look and feel of the operating system Java is running on, whereas others will try to go for a fancy, modern, or eccentric look. Some will focus on robustness or simplicity, whereas others will utilize advanced, performance-oriented functionalities such as hardware acceleration.
As a beginner’s chapter on building GUIs with Java, things will be kept simple, using only built-in functionality without relying on third-party libraries or features that are too hard or complex to use. You’ll note that unless you’re building graphic-intensive programs, these components will serve just fine.
Highlighting the Built-In GUI Libraries
Before getting your feet wet with building your first GUI application, you need to get acquainted with some of the basics. You can start off with a short introduction, highlighting a bit more the architecture and history of Java’s built-in GUI libraries.
Abstract Window Toolkit (AWT)
Back when Java was first released in 1995, Sun Microsystems provided a built-in library, called the Abstract Window Toolkit (AWT), to provide a standard widget toolkit (a widget is a typical GUI term used for a specific GUI component, such as a button or a check box) in the form of a thin layer above the native, underlying user interface, defined by the operating system. This meant that creating a button with AWT would call the routines of the underlying operating system as straightforwardly as possible to display the actual button, meaning that widgets created with AWT would look different depending on the actual operating system the Java program was running on; For example, OSX buttons look different than Windows buttons.
Although AWT is closely coupled to the underlying operating system (its components are called “heavyweight components” for that reason), the library itself is still enormous. It consists of no less than 12 packages, containing the collection of GUI widgets, classes to deal with GUI events (you will learn about events in the context of GUIs later), classes dealing with layout managers, interfaces to deal with input devices such as the mouse and keyboard, and even classes to handle the clipboard (copying and pasting) and drag-and-drop functionality.
Swing
Swing was originally developed to offer a more advanced set of GUI widgets compared to AWT. One goal was to offer a set of GUI components that would emulate the look and feel of the host operating system (as this was what users were familiar with) by default, but would also support a pluggable look-and-feel system that would allow applications to have a separate visual style.
In addition, Swing aimed to offer more components when compared to AWT, such as tabbed panels, lists, and scroll panes. Finally, unlike AWT widgets, Swing components are not implemented by relying on operating system–specific code. Instead, they are written entirely in Java and thus completely platform independent, so these widgets are referred to as being “lightweight.” The notions of heavyweight and lightweight in this case indicate how the GUI components are implemented, rather than how they look or how complex they are.
NOTE In fact, not all Swing components are lightweight—there a few notable exceptions, but more on that later.
One important aspect to keep in mind is that Swing is implemented, for the most part, as an extension of AWT. That is, every Swing top-level component (don’t worry about what top-level means, you’ll encounter this again in more detail soon) is implemented as a class extending an AWT counterpart, the difference being that the Swing components extend the AWT set in such a way that no native calls to the operating system are made anymore.
Since Swing draws the components itself (instead of relying on the operating system), it makes sense that there is some common set of functionality to draw basic 2D primitives (rectangles, lines, text, circles, and so on) on-screen. Indeed, this core functionality is provided by another set of libraries called “Java 2D,” which, confusingly, is located under the java.awt package (the reason for this is that AWT already contained some form of basic graphic functionality, which was thus also extended).
Standard Widget Toolkit (SWT)
When people build GUIs in Java, they’ll still almost always be using Swing to do so. Therefore, in this chapter, you’ll focus most on this library. That said, however, there exists a number of additional GUI libraries as well, with the Standard Widget Toolkit (SWT) as a notable first example.
The origins of SWT date all the way back from when AWT was still in its infancy (and Swing still under development). The developers at IBM decided that AWT was too buggy and developed their own alternative, SWT. It is similar to AWT in the sense that its components are also heavyweight and thus also call native operating system routines to draw and display GUI components. However, SWT also offers some additional widgets using native code, in cases where native-platform GUI routines do not support the functionality required for SWT. In that way, SWT is a compromise between native performance and Swing’s ease of use of.
It is interesting to note that SWT was originally conceived to support the development of VisualAge, an IDE made by IBM at the time. The company decided to eventually open-source the project, which then led to the development of Eclipse. That means Eclipse itself—the IDE used in this book—can be regarded as a prime example of SWT in action.
Does it make sense to use it yourself? In some cases, it might. When you are looking for a GUI toolkit that provides a sensible programming interface to access native widgets in a functional manner and with a more sensible structure and fallbacks than AWT, it might be interesting to give SWT a shot. If you care more about customization support and ease of use, and want a look and feel that appears similar on all platforms, Swing is probably better suited.
JavaFX
JavaFX is the “new kid” on the block concerning GUI toolkits, even though it has been around for quite some time by now. Its original goal was to offer a software platform for creating rich Internet and mobile applications, but is now geared toward replacing Swing as the standard GUI toolkit for Java, although Oracle will continue to offer both in the foreseeable future.
Note that JavaFX has been around since 2008, but it took a few years until the library was ready for use on non-Windows platforms. With the release of Java 8, JavaFX became an integral part of the JRE (and JDK), so that the latest version of JavaFX went from 2.2 to just simply JavaFX 8. These aspects form the main reason behind the lack of larger adoption of this GUI toolkit. Even though Oracle has been trying to put more effort behind the project in recent years, it can be argued that the time for a big breakthrough has passed, and even though the toolkit keeps improving, most people still stick to Swing as their default GUI toolkit today. Another reason why the framework is not yet as popular as it could be is because most of the GUI-related innovations these days tend to focus on web and mobile development, with standard desktop application development being more stabilized.
NOTE Speaking of platforms, Oracle—and Sun before them—has missed the boat somewhat regarding the creation of a GUI framework for Java on mobile platforms, i.e., iOS and Android. For Android, Google has driven a great deal of attention toward creating a nice-looking set of widgets (Android itself runs heavily on Java technology). Although Oracle had an internal prototype of JavaFX working on iOS and Android at one point, the code base was renamed and reworked significantly afterwards (called RoboVM on iOS). Even today, these mobile UI toolkits are considered experimental and not yet ready for prime time.
Other Toolkits and Libraries
Apart from the ones you’ve just seen, there are a number of additional GUI toolkits and libraries as well. For instance, there are add-on libraries oriented toward extending Swing with additional helpful components, such as JGoodies or SwingX from SwingLabs, a library which also contains a number of Swing components. There also exist additional libraries that try to offer a complete solution, such as Apache Pivot, which is trying to position itself against JavaFX by offering a completely open-source package (parts of JavaFX are still proprietary). There’s also Qt Jambi, a binding between the Qt GUI toolkit (that works across various platforms) and Java, as well as GTK-Java, which does the same for Java and the GTK GUI toolkit. Finally, as noted before, in case you might be interested in developing apps on Android later (which are written in Java), keep in mind that the platform comes with its own GUI toolkit and thus its own set of components and classes, although learning GUI libraries gets easier once you have seen one.
Choosing a GUI Library
In this section you’ve seen an overview of several GUI libraries, and by now you might be getting worried or overwhelmed by the number of choices offered. Which one is the best? Which one is easiest to learn? Which one should you go for?
For most of this chapter, you will continue with Swing. The reasons for this are because Swing is very robust, pretty easy to work with (as long as your GUIs don’t need to be very complex), and well known by Java programmers, so you can easily find or get help. Remember that using Swing will always involve talking a little bit about AWT as well, which Swing extends.
Finally, keep in mind that some people who feel Swing is outdated will disagree with this choice; some would rather see Swing quietly disappear to be replaced with a more modern system—most likely, JavaFX. The reality, however, is that the multitude of projects in Java are, and continue to be, written with Swing. You certainly won’t be left empty-handed regarding JavaFX, however. In the final parts of this chapter, you can take a look at setting up a small project with JavaFX, so you can get a feel for how everything works and decide yourself whether you want to continue with this UI toolkit and leave Swing behind.
Building with Containers and Components
You have already learned, generally, about many different GUI widget toolkits or GUI libraries offering a collection of GUI widgets, or GUI components, as they’re called. Now what exactly is a GUI component? Basically, the GUI components determine the set of building blocks you can use to construct a user interface. They are the elementary, basic GUI entities. Think of a button, a text label, a textbox, and so on. In the Microsoft realm, GUI components are sometimes referred to as “controls,” whereas other libraries prefer to use the term “widget.” Just keep in mind, a GUI component is a widget is a control.
In Swing, every component has its own class, and all extend the base class JComponent, located under the javax.swing package. Why not take a look at some of them?
|
CLASS |
USED AS |
LOOKS LIKE |
|
JButton |
JComponent component = new JButton("BUTTONS!"); |
|
|
JLabel |
JComponent component = new JLabel("A label"); |
|
|
JList |
JComponent component = new JList<String>( new String[]{ "---1---", "---2---" }); |
|
|
JProgressBar |
JProgressBar component = new JProgressBar(0, 100); component.setValue(20); |
|
|
JScrollBar |
JComponent component = new JScrollBar( JScrollBar.HORIZONTAL, 50, 20, 1, 500); |
|
|
JSlider |
JComponent component = new JSlider(0, 100, 33); |
|
|
JSpinner |
JComponent component = new JSpinner(); |
|
|
JTextField |
JComponent component = new JTextField("Text field"); |
|
|
JTextArea |
JComponent component = new JTextArea("Text area"); |
|
|
JComboBox |
JComponent component = new JComboBox<String>( new String[]{ "---1---", "---2---" }); |
|
|
JCheckBox |
JComponent component = new JCheckBox("Check boxes"); |
|
|
JRadioButton |
JComponent component = new JRadioButton( "And radio buttons"); |
|


Apart from components, there is also a second GUI element you should be aware of, called a “container.” Containers hold components together in a specific layout and can also contain sub-containers. Therefore, a container can be seen as a special kind of component that holds other components and organizes them in a specific manner.
You should be aware of the following Swing container classes: JApplet, JFrame, JDialog, JWindow, and JPanel; all of them are derived from the AWT java.awt.Container class (which is subclassed in a number of AWT containers you can ignore, as you will only be using the Swing ones). You’re probably getting anxious to start coding by now, so why not introduce one of the containers by means of a Try It Out?
TRY IT OUT Writing Your First GUI Application
In this Try It Out, you will construct a simple GUI application using the JFrame container class.
1. As always, feel free to create a new project in Eclipse.
2. Create a class called MyFirstFrame with the following content:
3. import java.awt.BorderLayout;
4. import java.awt.Color;
5.
6. import javax.swing.JButton;
7. import javax.swing.JFrame;
8. import javax.swing.JLabel;
9. import javax.swing.JPanel;
10.
11.
12. public class MyFirstFrame {
13. public static void main(String[] args) {
14. JFrame frame new JFrame();
15. frame.setDefaultCloseOperation(JFrame.EXIT_ON_CLOSE);
16. frame.setTitle("My First Frame");
17.
18. JPanel bluePanel = new JPanel();
19. JPanel redPanel = new JPanel();
20.
21. JLabel label = new JLabel("<–– pick your side ––>");
22.
23. frame.getContentPane().add(label, BorderLayout.CENTER);
24.
25. bluePanel.setBackground(Color.blue);
26. redPanel.setBackground(Color.red);
27.
28. frame.getContentPane().add(bluePanel, BorderLayout.LINE_START);
29. frame.getContentPane().add(redPanel, BorderLayout.LINE_END);
30.
31. JButton blueButton = new JButton("PICK BLUE TEAM");
32. JButton redButton = new JButton("PICK RED TEAM");
33.
34. bluePanel.add(blueButton);
35. redPanel.add(redButton);
36.
37. frame.pack();
38. frame.setVisible(true);
39. }
}
40.Run the project from Eclipse. You should see the window shown in Figure 11.1.

Figure 11.1
How It Works
This is how it works:
1. The window you see is your actual JFrame, a container for other components or containers. The getContentPane() method gives you access to the actual container to which you can add() other components (or containers). Note the setTitle() method allows you to set the title, and the setDefaultCloseOperation() method allows you to specify what the Java program should do (in this case, stop completely) when the user closes this JFrame object.
2. You also constructed two JPanel containers and set their background colors. They are added to the left and right sides of the JFrame content pane. The default layout for a JFrame content pane is a so-called border layout. Don’t worry about this too much, as you will see layouts in more detail soon.
3. Next, two buttons are created with different text labels, and they are added to the JPanels.
4. Finally, calling the pack() method of JFrame ensures everything is laid out correctly and then shows the frame to the user.
5. Try resizing the window. What works and what does not? What could look better? Keep these aspects in mind for later.
6. Note that Java, by default, will pick a “look and feel” to match a cross-platform theme. You might have noted that the button Java shows looks nothing like a normal Windows button. If you want to select another Swing look, try adding the following code at the top of the main method:
7. try {
8. UIManager.setLookAndFeel(UIManager.getSystemLookAndFeelClassName());
9. } catch (ClassNotFoundException | InstantiationException
10. | IllegalAccessException | UnsupportedLookAndFeelException e) {
11. e.printStackTrace();
}
(Eclipse will suggest which classes to import.) When you run the program again, you will see the window in Figure 11.2, which looks a lot more similar to your normal system environment.

Figure 11.2
If you’ve followed along with the Try It Out (or just looked at the pictures), you might note that Swing will handle the look and feel of the buttons you’ve added to your window, but the window itself—its title bar; minimize, maximize, and close buttons; and border—still look as if they were drawn by the operating system. So what gives?
The explanation behind this is that there are four Swing components that are actually not lightweight and thus still drawn and displayed on-screen by calling an underlying operating system function. These are JFrame, JDialog, JWindow, and JApplet, which are all the container components that have some kind of border that’s displayed in a window. Instead of Swing drawing these windows by itself (and thus also determining the look and feel of title bars and borders), it was decided to continue offloading this to the operating system, and that is why the actual window retains its look in this example.
NOTE Actually, it is possible to define so-called “undecorated” windows in Swing, if you do want to draw your own custom controls for taking care of window management or apply custom borders. It is also possible to change the opacity (transparency) and shape of windows, so it is possible to make windows that look like whatever you want, although it requires some advanced usage of Swing and takes much more code than showing a standard looking window.
On another note, you might expect there to be a wealth of Swing look and feel to choose from, but in actuality, the number of high-quality “themes” out there is very limited. The main reason for this is that creating a complete look-and-feel package is very complex (especially when all components need to look good in all cases). You saw Nimbus mentioned (a SwingLabs project) as a notable exception. You can enable it by inserting the following code at the top of your main method:
try {
for (LookAndFeelInfo info : UIManager.getInstalledLookAndFeels()) {
if ("Nimbus".equals(info.getName())) {
UIManager.setLookAndFeel(info.getClassName());
break;
}
}
} catch (Exception e) {
// Nimbus not available, revert to system look and feel
try {
UIManager.setLookAndFeel(UIManager.getSystemLookAndFeelClassName());
} catch (Exception ign) {}
}
(This snippet also shows you how to get a list of available look and feels.) The Nimbus look and feel looks like Figure 11.3 (using the “SwingSet” example provided by Oracle).
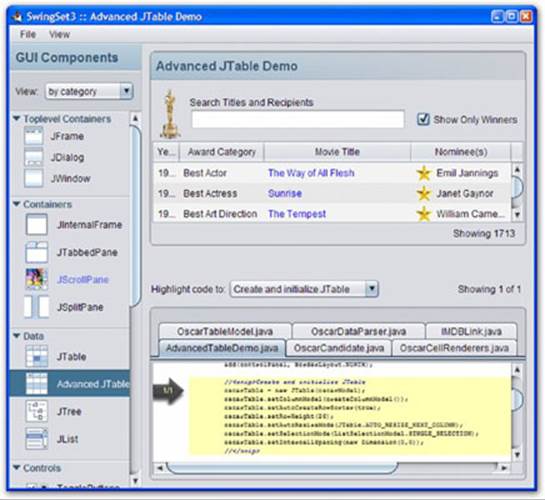
Figure 11.3
Feel free to use it in your own projects or just stick with the defaults.
Looking at the Full Picture
You’ve now seen the differences between Swing components and containers and already utilized a handful of Swing classes. Earlier, you read that Swing extends the older and native AWT library. It therefore makes sense to take a step back and look at the whole class hierarchy to understand what exactly is going on, as the GUI hierarchy in Java can be somewhat confusing.
Start with the class tree representing only AWT objects, which will keep Swing out of the mix for now. You then end up with the GUI class hierarchy illustrated in Figure 11.4.
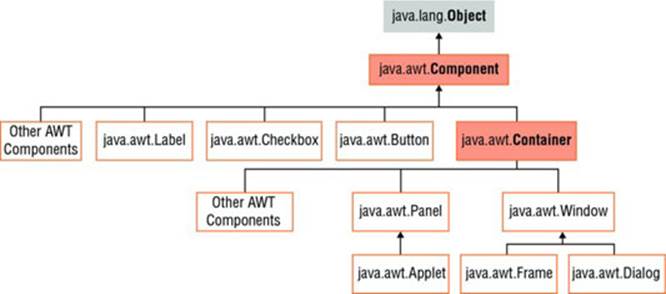
Figure 11.4
However, recall that you have been using J-classes (JButton, JFrame, and JWindow), that is, Swing classes. This means completely ignoring the AWT components and containers when making GUIs. Now see what happens when you ignore the AWT components and add the Swing components to the mix. This is illustrated in Figure 11.5.

Figure 11.5
Note that each Swing component extends the JComponent, and that JComponent itself extends the AWT Container class, meaning that a JButton does not extend an AWT Button, a JLabel does not extend an AWT Label, and so on.
Now, where do Swing containers fit in? One of them, the JPanel, you can already find among the JComponents. However, the ones with a window border, namely JFrame, JApplet, JDialog, and JWindow, are missing. They are added to the class tree as shown in Figure 11.6.
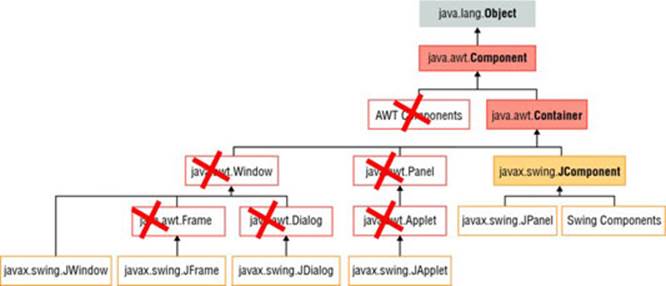
Figure 11.6
There they are. Note how things are a bit complicated (JPanel for instance does not extend the AWT Panel), but the main classes you’ll be working with are all part of Swing, all starting with “J”.
Annotating the class tree somewhat more, you finally get the full picture shown in Figure 11.7.
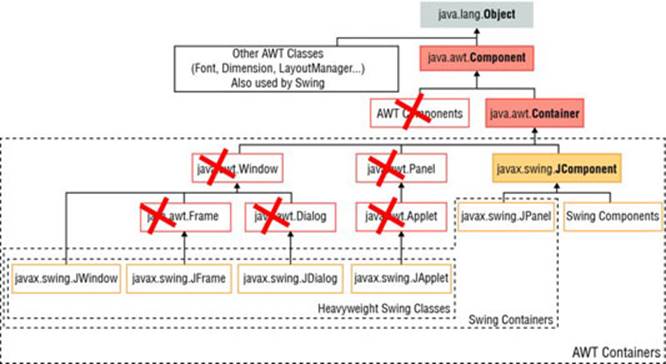
Figure 11.7
COMPARING LAYOUT MANAGERS
Now that you have a clear picture of the GUI class hierarchy, you are ready to move on to the next topic. Some of the general AWT classes that are reused in Swing represent layout managers. What is a layout manager? Basically, an object specifying the way components in a container should be laid out. Java offers a number of them out of the box, and you can combine these (by nesting containers inside each other) to create relatively intricate layouts.
Specifying a layout manager for a container is a simple operation. You just need to call the following method:
public void setLayout(LayoutManager manager)
For example:
JPanel redPanel = new JPanel();
redPanel.setLayout(new BorderLayout());
The questions then are which layout managers exist and what does each of them do? The following sections discuss each of the built-in layout managers in detail and provide examples of all of them.
FlowLayout
In a FlowLayout, all components will be arranged from left to right in the order that they are added. When a row is filled, a new row is started. Resizing the container or changing the width of the container programmatically thus changes the appearance. The FlowLayoutis the default layout for JPanel.
TRY IT OUT Creating Flowing Panels
In this Try It Out, you will create a JFrame, set its layout manager to use a FlowLayout, and add some panels.
1. As always, feel free to create a new project in Eclipse.
2. Now make a rainbow. Create a class called FlowLayoutFrame with the following content:
3. import java.awt.Color;
4. import java.awt.Dimension;
5. import java.awt.FlowLayout;
6.
7. import javax.swing.JFrame;
8. import javax.swing.JPanel;
9.
10.
11. public class FlowLayoutFrame {
12. public static void main(String[] args) {
13. JFrame frame = new JFrame();
14. frame.setDefaultCloseOperation(JFrame.EXIT_ON_CLOSE);
15. frame.setTitle("FlowLayout frame");
16.
17. frame.getContentPane().setLayout(new FlowLayout());
18.
19. frame.getContentPane().add(makePanel(Color.red));
20. frame.getContentPane().add(makePanel(Color.orange));
21. frame.getContentPane().add(makePanel(Color.green));
22. frame.getContentPane().add(makePanel(Color.blue));
23. frame.getContentPane().add(makePanel(new Color(75, 0, 130)));
24. frame.getContentPane().add(makePanel(new Color(138, 43, 226)));
25.
26. frame.pack();
27. frame.setVisible(true);
28. }
29.
30. private static JPanel makePanel(Color color) {
31. JPanel panel = new JPanel();
32. panel.setBackground(color);
33. return panel;
34. }
}
35.Run the project from Eclipse. You should see the window in Figure 11.8.
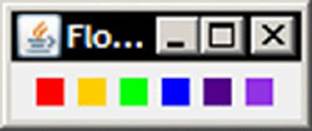
Figure 11.8
How It Works
This is how it works:
1. In this class, a JFrame is created and given a title like before, but its layout manager is changed to be a FlowLayout. Then seven panels are added and colored with a rainbow pattern.
2. Try resizing the window. Note how you cannot make the window smaller than its starting size. This is due to the fact that this is the minimum size for windows in Windows, and thus the layout manager has determined this to be the optimal size and has sized the panels accordingly as well, since none of them contain any components. Now say you would like to make your rainbow a bit bigger. You can do so by adding the following line to the makePanel method:
panel.setPreferredSize(new Dimension(100, 100));
3. Run the program again; you will now see a bigger rainbow. Note that resizing the window shows the FlowLayout in action, as shown in Figure 11.9.
4. You might be wondering why you are using setPreferredSize instead of just setSize, which is also available as a method. This is because setBounds and setSize only have an effect when the layout manager of the container holding your components is set to null. This is a common mistake that throws many beginners off, especially since all containers have default layout managers and are thus not equal to null. By using setPreferredSize, you effectively signal to the layout manager: I would like this component to be this size, if you deem it possible.
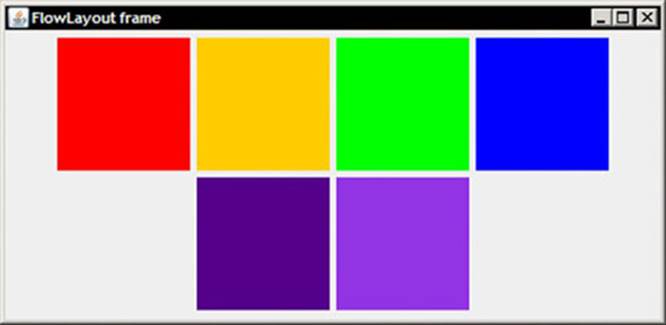
Figure 11.9
The FlowLayout comes with three constructors. These are:
public FlowLayout();
public FlowLayout(int align);
public FlowLayout(int align, int hgap, int vgap);
// align: either FlowLayout.LEFT (or FlowLayout.LEADING),
// FlowLayout.RIGHT (or FlowLayout.TRAILING),
// or FlowLayout.CENTER
// hgap, vgap: horizontal/vertical gap between the components
ABOUT RIGHT-TO-LEFT ORIENTATION
Some languages, such as Arabic, are read from right to left, and operating systems include functionality to also make UI components appear in the correct reading order. In Java, it is also possible to change the reading orientation, and Swing will honor this setting as well—FlowLayout, for instance, will then order components from right to left. You can try this out with the following code snippet:
import java.awt.ComponentOrientation;
import javax.swing.JFrame;
public class RightToLeft {
public static void main(String[] args) {
JFrame.setDefaultLookAndFeelDecorated(true);
JFrame frame = new JFrame("Right to Left Frame");
frame.setComponentOrientation(
ComponentOrientation.RIGHT_TO_LEFT);
frame.setSize(300, 300);
frame.setDefaultCloseOperation(JFrame.DISPOSE_ON_CLOSE);
frame.setVisible(true);
}
}
BorderLayout
In a BorderLayout, a container is divided into five “zones,” called North, South, West, East, and Center, in which components can be placed. You do not need to add components to all zones for a BorderLayout to work, as the components are allowed to stretch to fill available space.
The BorderLayout comes with two constructors. These are:
public BorderLayout();
public BorderLayout (int hgap, int vgap);
// hgap, vgap: horizontal/vertical gap between the components
Note that the BorderLayout is the default layout manager for the content pane of a windowed container (e.g., for a JFrame). You’ve already seen how it works in your first Try It Out for this chapter, but look at another example here.
TRY IT OUT Experimenting with the BorderLayout
In this Try It Out, you create a JFrame to see how the BorderLayout layout manager works.
1. As always, feel free to create a new project in Eclipse when you want to. Create a class called BorderLayoutFrame with the following content:
2. import java.awt.BorderLayout;
3.
4. import javax.swing.JButton;
5. import javax.swing.JFrame;
6.
7.
8. public class BorderLayoutFrame {
9.
10. public static void main(String[] args) {
11. JFrame frame = new JFrame();
12. frame.setDefaultCloseOperation(JFrame.EXIT_ON_CLOSE);
13. frame.setTitle("BorderLayout frame");
14.
15. /* Since the default layout manager for bordered containers is
16. * already a BorderLayout, the following line is OPTIONAL here.
17. */
18. frame.getContentPane().setLayout(new BorderLayout());
19.
20. frame.getContentPane().add(new JButton("NORTH"), BorderLayout.NORTH);
21. // ... or BorderLayout.PAGE_START
22.
23. frame.getContentPane().add(new JButton("WEST"), BorderLayout.WEST);
24. // ... or BorderLayout.LINE_START
25.
26. frame.getContentPane().add(new JButton("EAST"), BorderLayout.EAST);
27. // ... or BorderLayout.LINE_END
28.
29. frame.getContentPane().add(new JButton("SOUTH"), BorderLayout.SOUTH);
30. // ... or BorderLayout.PAGE_END
31.
32. frame.getContentPane().add(new JButton("CENTER"), BorderLayout.CENTER);
33. frame.pack();
34. frame.setVisible(true);
35. }
}
36.Run the project from Eclipse. You should see the window in Figure 11.10.
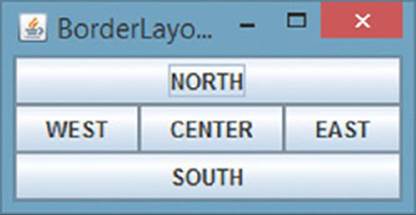
Figure 11.10
How It Works
This is how it works:
1. This class is similar to the previous one, but now a BorderLayout object is specified as the layout manager. This step is optional in the case of a JFrame container, because its default layout manager is already BorderLayout.
2. Components are now added to a specific position by specifying the location as the second argument of the add method.
3. Try resizing the window and see how the controls behave. Try removing a few of the buttons and see how the window reacts, as shown in Figure 11.11.
4. Try adding a call to setPreferredSize for one of the buttons. What happens? As you can see, BorderLayout has its own ideas about sizing components and does not adhere to your size hints. This does make the layout manager well suited to host nestedJPanels, however (which then can be given their own separate layout manager in which you can lay out all components).
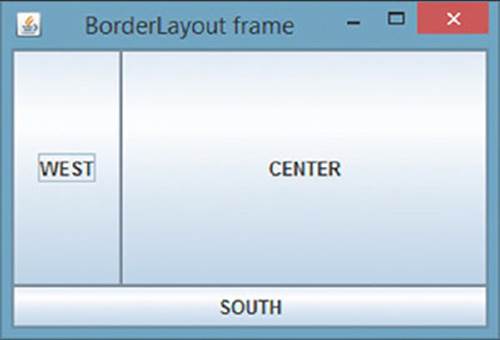
Figure 11.11
GridLayout
A GridLayout layout manager places components, as the name suggests, in a grid of cells. Each component will take up all the available space in its cell, and the dimensions of each cell are the same. When resizing containers with a GridLayout layout manager, the width and height of each cell will be resized accordingly.
A GridLayout layout manager can be constructed in two ways:
public GridLayout(int rows, int columns);
public GridLayout(int rows, int columns, int hgap, int vgap);
// rows, columns: number of rows and columns in the grid
// hgap, vgap: horizontal/vertical gap between the components
Note that when you specify 0 (zero) for the number of rows or columns (but not both), any number of components can be placed in the column or row, respectively (the actual non-zero value is then effectively ignored). When you specify both the number of rows and columns, the column value is also ignored. The number of components you add and the number of rows you have specified determine the real number of columns.
The following Try It Out shows an example.
TRY IT OUT Creating the Useless Pocket Calculator
In this Try It Out, you create a JFrame to see how the GridLayout layout manager works. You also see how containers can be nested to create more complex layouts.
1. As always, feel free to create a new project in Eclipse when you want to. Create a class called GridLayoutFrame with the following content:
2. import java.awt.Container;
3. import java.awt.GridLayout;
4.
5. import javax.swing.JButton;
6. import javax.swing.JFrame;
7.
8. public class GridLayoutFrame {
9.
10. public static void main(String[] args) {
11. JFrame frame = new JFrame();
12. frame.setDefaultCloseOperation(JFrame.EXIT_ON_CLOSE);
13. frame.setTitle("GridLayout frame");
14.
15. // 7 8 9 0
16. // 4 5 6 C
17. // 1 2 3 =
18. // + - * /
19.
20. frame.getContentPane().setLayout(new GridLayout(4, 4));
21.
22. addButtons(frame.getContentPane(),
23. "7", "8", "9", "0", "4", "5", "6", "C",
24. "1", "2", "3", "=", "+", "-", "*", "/"
25. );
26.
27. frame.pack();
28. frame.setVisible(true);
29.
30. }
31.
32. private static void addButtons(Container contentPane, String ... strings) {
33. for (String label : strings) {
34. contentPane.add(new JButton(label));
35. }
36. }
37.
}
38.Run the project from Eclipse. You should see the window shown in Figure 11.12.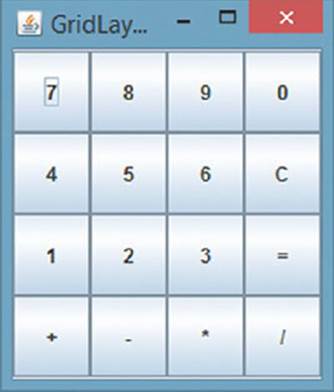
Figure 11.12
39. The buttons don’t do anything (yet) and are pretty useless for now, but you can see already that you will need to add a textbox for any calculations. It is probably also apparent that it’s not good to cram this into a single cell. It would be better to span this text the width of a whole row. Why not put your buttons in a JPanel and the textfield in the north position of the BorderLayout layout manager? Change your class to look like this:
40. import java.awt.BorderLayout;
41. import java.awt.Container;
42. import java.awt.GridLayout;
43.
44. import javax.swing.JButton;
45. import javax.swing.JFrame;
46. import javax.swing.JPanel;
47. import javax.swing.JTextField;
48.
49. public class GridLayoutFrame {
50.
51. public static void main(String[] args) {
52. JFrame frame = new JFrame();
53. frame.setDefaultCloseOperation(JFrame.EXIT_ON_CLOSE);
54. frame.setTitle("GridLayout frame");
55.
56. JPanel buttonPanel = new JPanel();
57. buttonPanel.setLayout(new GridLayout(4, 4));
58.
59. addButtons(buttonPanel,
60. "7", "8", "9", "0", "4", "5", "6", "C",
61. "1", "2", "3", "=", "+", "-", "*", "/"
62. );
63.
64. JTextField resultBox = new JTextField("*** BATTERY EMPTY ***");
65. resultBox.setEditable(false); // Prevent user editing
66.
67. frame.getContentPane().add(buttonPanel, BorderLayout.CENTER);
68. frame.getContentPane().add(resultBox, BorderLayout.NORTH);
69.
70. frame.pack();
71. frame.setVisible(true);
72.
73. }
74.
75.
76. private static void addButtons(Container contentPane, String... strings) {
77. for (String label : strings) {
78. contentPane.add(new JButton(label));
79. }
80. }
81.
}
The result will now look like Figure 11.13.
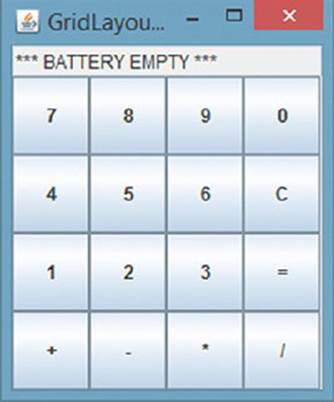
Figure 11.13
How It Works
This is how it works:
1. This class is similar to the previous one, but now you have specified a GridLayout object as the layout manager.
2. In the second version, a new JPanel container is constructed, and its layout manager is set to be a GridLayout. Then it is added to the center of the JFrame. A JTextField is then added in the north position. Note the use of the setEditable method to prevent users from typing in characters in the textbox.
GridBagLayout
The GridBagLayout layout manager is one of the most flexible and complex layout managers Java provides, while still being easy enough to use in a manual manner (GroupLayout and SpringLayout are even more flexible, but almost impossible to use by hand).
A GridBagLayout allows components to be placed in a grid of rows and columns, just like the GridLayout manager, but unlike GridLayout, cells in a GridBagLayout can have different widths and heights. In addition, it is possible for components to span across cells.
To arrange components, the GridBagLayout layout manager bases itself on the preferred sizes set for each component, as well as a series of so-called constraints, formulated by means of a GridBagConstraints object. Before you read more about these constraints, the following Try It Out introduces the GridBagLayout layout manager.
TRY IT OUT Creating the Pocket Calculator with GridBagLayout
In this Try It Out, you change your pocket calculator from the previous Try It Out to use GridBagLayout to demonstrate the added flexibility of this layout manager.
1. As always, feel free to create a new project in Eclipse when you want to. Create a class called GridBagLayoutFrame with the following content:
2. import java.awt.GridBagConstraints;
3. import java.awt.GridBagLayout;
4. import java.awt.Insets;
5. import java.util.HashMap;
6. import java.util.Map;
7.
8. import javax.swing.JButton;
9. import javax.swing.JFrame;
10. import javax.swing.JTextField;
11.
12. public class GridBagLayoutFrame {
13.
14. public static void main(String[] args) {
15. JFrame frame = new JFrame();
16. frame.setDefaultCloseOperation(JFrame.EXIT_ON_CLOSE);
17. frame.setTitle("GridLayout frame");
18.
19. frame.getContentPane().setLayout(new GridBagLayout());
20.
21. Map<String, JButton> buttons = makeButtons(
22. "7", "8", "9", "0", "4", "5", "6", "C",
23. "1", "2", "3", "=", "+", "-", "*", "/"
24. );
25.
26. JTextField resultBox = new JTextField("*** BATTERY EMPTY ***");
27. resultBox.setEditable(false);
28.
29. GridBagConstraints constraints = new GridBagConstraints();
30.
31. // Add number buttons
32. constraints.fill = GridBagConstraints.BOTH;
33. constraints.weightx = 1; constraints.weighty = 1;
34. constraints.fill = GridBagConstraints.BOTH;
35.
36. // First row
37. constraints.gridy = 1;
38. constraints.gridx = 0;
39. frame.add(buttons.get("7"), constraints);
40. constraints.gridx = 1;
41. frame.add(buttons.get("8"), constraints);
42. constraints.gridx = 2;
43. frame.add(buttons.get("9"), constraints);
44. // Second row
45. constraints.gridy = 2;
46. constraints.gridx = 0;
47. frame.add(buttons.get("4"), constraints);
48. constraints.gridx = 1;
49. frame.add(buttons.get("5"), constraints);
50. constraints.gridx = 2;
51. frame.add(buttons.get("6"), constraints);
52. // Third row
53. constraints.gridy = 3;
54. constraints.gridx = 0;
55. frame.add(buttons.get("1"), constraints);
56. constraints.gridx = 1;
57. frame.add(buttons.get("2"), constraints);
58. constraints.gridx = 2;
59. frame.add(buttons.get("3"), constraints);
60.
61. // Add text field on row above
62. constraints.gridy = 0;
63. constraints.gridx = 0;
64. constraints.gridwidth = 4;
65. constraints.anchor = GridBagConstraints.PAGE_START;
66. constraints.insets = new Insets(10, 4, 10, 4);
67. frame.add(resultBox, constraints);
68.
69. // Add bottom buttons
70. constraints.gridy = 4;
71. constraints.gridwidth = 1;
72. constraints.anchor = GridBagConstraints.PAGE_END;
73. constraints.insets = new Insets(10, 0, 0, 0);
74. constraints.gridx = 0;
75. frame.add(buttons.get("+"), constraints);
76. constraints.gridx = 1;
77. frame.add(buttons.get("-"), constraints);
78. constraints.gridx = 2;
79. frame.add(buttons.get("*"), constraints);
80. constraints.gridx = 3;
81. frame.add(buttons.get("/"), constraints);
82.
83. // Add buttons to the right
84. constraints.anchor = GridBagConstraints.LINE_END;
85. constraints.gridx = 3;
86. constraints.gridy = 1;
87. constraints.insets = new Insets(0, 0, 0, 0);
88. frame.add(buttons.get("0"), constraints);
89.
90. constraints.insets = new Insets(0, 10, 0, 0);
91. constraints.gridy = 2;
92. frame.add(buttons.get("C"), constraints);
93. constraints.gridy = 3;
94. frame.add(buttons.get("="), constraints);
95.
96.
97.
98. frame.pack();
99. frame.setVisible(true);
100.
101. }
102.
103.
104. private static Map<String, JButton> makeButtons(String... strings) {
105. Map<String, JButton> buttons = new HashMap<>();
106. for (String label : strings)
107. buttons.put(label, new JButton(label));
108. return buttons;
109. }
110.
111.
}
112. Run the project from Eclipse. You should see the window in Figure 11.14.
113. Try resizing the window. Observe how the components stretch and behave.
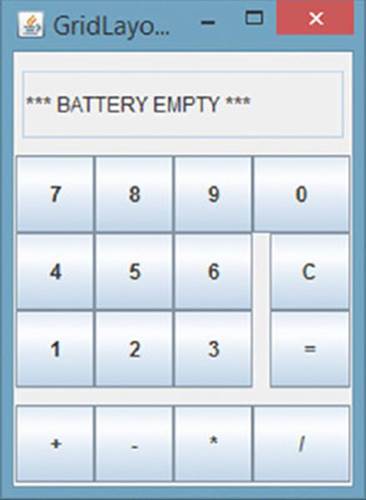
Figure 11.14
How It Works
This is how it works:
1. This class is similar to the previous one, but a GridBagLayout object is now specified as the layout manager.
2. All components are added with the add method, as always, but they now specify a GridBagConstraints object as the second argument, which the layout manager will use to lay out all the components. The GridBagConstraints object is a simple container for a number of fields (gridx, gridy, and so on), and the same object can be reused to position all components.
3. Try playing around with the constraints to guess what they do. Try changing some of them and observe how they influence the look of the form. Try removing the weightx and weighty lines. What happens?
Now take a closer look at the fields in GridBagConstraints. You can set the following GridBagConstraints instance variables:
· gridx and gridy: These integers specify the row and column of the cell where you want to place the component. The upper leftmost cell has the position gridx=0 and gridy=0. You can also set this to GridBagConstraints.RELATIVE to specify that a component should follow directly right of and/or under the component that was placed before.
· gridwidth and gridheight: These integers specify the number of columns and rows the component spans. The default value for these is 1 (the component takes up a single cell). You can set this to GridBagConstraints.REMAINDER to specify that the component should take up all the remaining space in the row and/or column.
· fill: Used when the component’s cell(s) span a larger area than the preferred size of the component. When set to GridBagConstraints.NONE, the component’s size will not be stretched. When set to GridBagConstraints.HORIZONTAL, VERTICAL, or BOTH, the component’s size will be stretched accordingly (try playing with these in the previous Try It Out).
· ipadx and ipady: These integers specify the internal padding of the component, with a default value of 0. This determines how much space will be added to the size of the component.
· insets: Add a java.awt.Insets object here to specify the external padding of the component, i.e., the minimum amount of space between the component and the edges of the cell(s) it resides in. By default, no external padding is used.
· anchor: This field determines where to place the component when the size of the component is smaller than its cell(s). Valid values are GridBagConstraints.CENTER (the default), PAGE_START, PAGE_END, LINE_START, LINE_END, FIRST_LINE_START (top-left corner),FIRST_LINE_END (top-right corner), LAST_LINE_START (bottom-left corner), and LAST_LINE_END (bottom-right corner). You can also use compass names (NORTH, NORTHEAST, and so on) if you prefer, although those are considered to be deprecated.
· weightx and weighty: These two values determine how the layout manager should distribute space among the columns and rows, which is important for resizing behavior. The official Javadocs mention that specifying weights “is an art that can have a significant impact on the appearance of the components.” In general, it is advisable to use either 0.0 or 1.0 as weights, and use the numbers in between whenever necessary. Also important to know is that when you specify a weight of 0.0 (the default) for all components in the container, they will all clump together in the center of the container. This is because the GridBagLayout will then put all extra space between the edges of the container and the edges of the cell grid. Try removing the weightx and weighty lines from the previous Try It Out and check this out for yourself.
CardLayout
The CardLayout layout manager is useful when you have two or more components (usually JPanel objects) that should share the same display space and when the user can choose which component should be shown.
Constructing it is very easy:
public CardLayout();
public CardLayout(int hgap, int vgap);
// hgap, vgap: horizontal/vertical gap between the components
The following Try It Out shows how it works.
TRY IT OUT Playing Your Cards Right with the CardLayout
In this Try It Out, you will get to see the CardLayout layout manager in use.
1. As always, feel free to create a new project in Eclipse when you want to. Create a class called CardLayoutFrame with the following content:
2. import java.awt.BorderLayout;
3. import java.awt.CardLayout;
4. import java.awt.Color;
5. import java.awt.Dimension;
6. import java.awt.event.ItemEvent;
7. import java.awt.event.ItemListener;
8.
9. import javax.swing.JComboBox;
10. import javax.swing.JFrame;
11. import javax.swing.JPanel;
12.
13.
14. public class CardLayoutFrame {
15. public static void main(String[] args) {
16. JFrame frame = new JFrame();
17. frame.setDefaultCloseOperation(JFrame.EXIT_ON_CLOSE);
18. frame.setTitle("CardLayout frame");
19.
20.
21. JPanel cardPanel = new JPanel();
22. cardPanel.setLayout(new CardLayout());
23. cardPanel.setPreferredSize(new Dimension(300, 400));
24.
25. JPanel bluePanel = new JPanel();
26. JPanel redPanel = new JPanel();
27. bluePanel.setBackground(Color.blue);
28. redPanel.setBackground(Color.red);
29.
30. cardPanel.add(bluePanel, "BLUE PANEL");
31. cardPanel.add(redPanel, "RED PANEL");
32.
33. JPanel comboBoxPanel = new JPanel();
34. String comboBoxItems[] = { "BLUE PANEL", "RED PANEL" };
35. JComboBox<String> cb = new JComboBox<g>(comboBoxItems);
36. cb.setEditable(false);
37. cb.addItemListener(new ItemListener(){
38. @Override
39. public void itemStateChanged(ItemEvent evt) {
40. CardLayout cl = (CardLayout)(cardPanel.getLayout());
41. cl.show(cardPanel, (String)evt.getItem());
42. }
43. });
44. comboBoxPanel.add(cb);
45.
46. frame.getContentPane().add(comboBoxPanel, BorderLayout.PAGE_START);
47. frame.getContentPane().add(cardPanel, BorderLayout.CENTER);
48.
49. frame.pack();
50. frame.setVisible(true);
51. }
}
52.Run the project from Eclipse. You should see the window in Figure 11.15.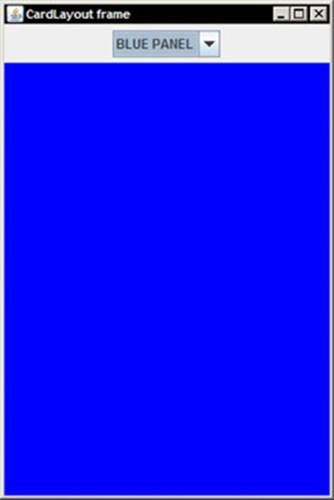
Figure 11.15
53.Try selecting a different panel from the drop-down combobox. Notice how the blue panel changes to make room for the red one and vice versa.
54. You can also achieve the same effect by using a JTabbedPane Swing component instead of a CardLayout layout manager. The following class shows how:
55. import java.awt.BorderLayout;
56. import java.awt.Color;
57. import java.awt.Dimension;
58. import javax.swing.JFrame;
59. import javax.swing.JPanel;
60. import javax.swing.JTabbedPane;
61.
62.
63. public class TabbedFrame {
64. public static void main(String[] args) {
65. JFrame frame = new JFrame();
66. frame.setDefaultCloseOperation(JFrame.EXIT_ON_CLOSE);
67. frame.setTitle("Tabbed frame");
68.
69. JTabbedPane cardTabs = new JTabbedPane();
70. cardTabs.setPreferredSize(new Dimension(300, 400));
71.
72. JPanel bluePanel = new JPanel();
73. JPanel redPanel = new JPanel();
74. bluePanel.setBackground(Color.blue);
75. redPanel.setBackground(Color.red);
76.
77. cardTabs.add(bluePanel, "BLUE PANEL");
78. cardTabs.add(redPanel, "RED PANEL");
79.
80. frame.getContentPane().add(cardTabs, BorderLayout.CENTER);
81.
82. frame.pack();
83. frame.setVisible(true);
84. }
}
85.When you run the JTabbedPane version, you’ll see Figure 11.16.
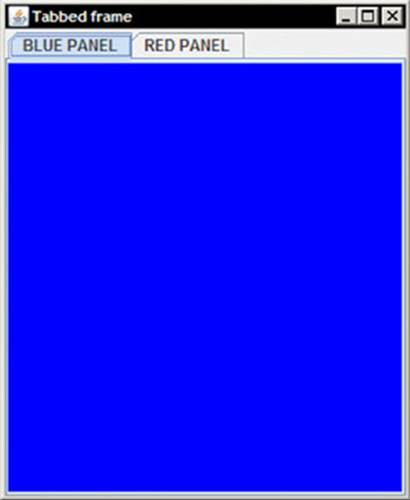
Figure 11.16
How It Works
This is how it works:
1. Note that the setup of this example is a bit more complicated than the previous ones. First of all, the layout manager for the content pane of the JFrame is unchanged (BorderLayout). Next, a new JPanel is created to store your “cards,” and its layout manager is set to a CardLayout instance. Next, two colored cards (also JPanels) are created and added to the cardPanel. The second argument of the add method, when using a CardLayout, should be a string identifier for this card.
2. Next, an additional panel is created to hold a JComboBox, which has the same strings used for the names of the panels (“BLUE PANEL” and “RED PANEL”) included here as items. Some additional code adds an item listener, which is necessary to make the combobox actually do something when selecting an item. Don’t worry about the details yet, as you will see much more about listeners when you read about GUI events. Just note for now that this code gets the CardLayout object from the cards JPaneland then instructs this layout manager to show a card in the cardPanel with a given string identifier.
3. The TabbedFrame version is somewhat simpler. Here, a single JTabbedPane component is set up and added to the JFrame. Now, you can directly add your two colored panels, and the JTabbedPane component handles everything else for you.
In the Try It Out, the most important line is the one that gets the CardLayout layout manager to show another card:
CardLayout cl = (CardLayout)(cardPanel.getLayout());
cl.show(cardPanel, (String)evt.getItem());
There are a few other helpful methods you can call for a CardLayout object:
· first (Container parentContainer): Show the first card of the container.
· next (Container parentContainer): Show the next card of the container or flip back to the first one when the end is reached.
· previous (Container parentContainer): Show the previous card or flip to the last one when the beginning is reached.
· last (Container parentContainer): Show the last card of the container.
· show (Container parentContainer, String name): Show the card that was added to the container with the given specific name (this is the one used in the Try It Out example).
In general, you’ll not see the CardLayout used that often, especially since components such as JTabbedFrame allow you to accomplish the same with less boilerplate code (showing how many cards exist, handling switching between cards, and so on).
BoxLayout
BoxLayout is another layout manager that’s relatively simple to use. Put simply, BoxLayout will stack components on top of each other or place them in a row. Therefore, you can think of it as a version of the FlowLayout layout manager, but with greater functionality.
There’s only one constructor available:
public BoxLayout(Container target, int axis);
The target specifies for which container the layout should be performed, whereas the axis specifies whether you want components to be placed in a row or column by providing BoxLayout.LINE_AXIS or PAGE_AXIS.
One aspect you need to be aware of is that the BoxLayout constructor expects to get the container as an argument. Instead of writing the following:
myContainer.setLayout(new BoxLayout(BoxLayout.PAGE_AXIS));
You actually need to write the following:
myContainer.setLayout(new BoxLayout(myContainer, BoxLayout.PAGE_AXIS));
When laying out components, the BoxLayout will take the minimum, preferred, and maximum sizes into account. The layout manager will also adhere to the alignment of a component, which you can specify by passing Component.LEFT_ALIGNMENT, CENTER_ALIGNMENT, and so on, to the setAlignmentX and setAlignmentY methods of components. The following Try It Out introduces how everything works.
TRY IT OUT Stacking Boxes with BoxLayout
In this Try It Out, you use the BoxLayout layout manager.
1. As always, feel free to create a new project in Eclipse when you want to. Create a class called BoxLayoutFrame with the following content:
2. import java.awt.Color;
3. import java.awt.Component;
4. import java.awt.Dimension;
5.
6. import javax.swing.BoxLayout;
7. import javax.swing.JFrame;
8. import javax.swing.JPanel;
9.
10.
11. public class BoxLayoutFrame {
12.
13. public static void main(String[] args) {
14. JFrame frame = new JFrame();
15. frame.setDefaultCloseOperation(JFrame.EXIT_ON_CLOSE);
16. frame.setTitle("BoxLayout frame");
17.
18. frame.getContentPane().setLayout(
19. new BoxLayout(frame.getContentPane(), BoxLayout.PAGE_AXIS));
20.
21. frame.getContentPane().add(makePanel(Color.red, 10,
22. Component.CENTER_ALIGNMENT));
23. frame.getContentPane().add(makePanel(Color.blue, 50,
24. Component.LEFT_ALIGNMENT));
25. frame.getContentPane().add(makePanel(Color.yellow, 100,
26. Component.RIGHT_ALIGNMENT));
27. frame.getContentPane().add(makePanel(Color.green, 200,
28. Component.LEFT_ALIGNMENT));
29. frame.getContentPane().add(makePanel(Color.pink, 500,
30. Component.CENTER_ALIGNMENT));
31.
32. frame.pack();
33. frame.setVisible(true);
34.
35. }
36.
37. private static JPanel makePanel(Color col, int w, float a) {
38. JPanel panel = new JPanel();
39. panel.setBackground(col);
40. panel.setAlignmentX(a);
41. panel.setPreferredSize(new Dimension(w, 50));
42. panel.setMaximumSize(panel.getPreferredSize());
43. panel.setMinimumSize(panel.getPreferredSize());
44. return panel;
45. }
46.
}
47.Run the project from Eclipse. You should see the window in Figure 11.17.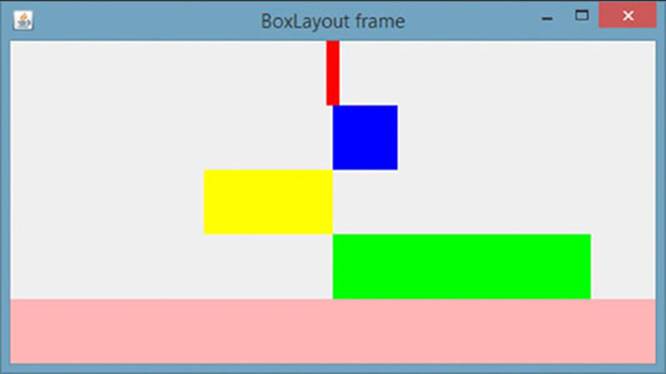
Figure 11.17
48. Observe what happens when you resize this window. A BoxLayout also allows you to create invisible “filler” components. Now modify this class to see how the filler components work:
49. import java.awt.Color;
50. import java.awt.Component;
51. import java.awt.Dimension;
52.
53. import javax.swing.Box;
54. import javax.swing.BoxLayout;
55. import javax.swing.JFrame;
56. import javax.swing.JPanel;
57.
58.
59. public class BoxLayoutFrame {
60.
61. public static void main(String[] args) {
62. JFrame frame = new JFrame();
63. frame.setDefaultCloseOperation(JFrame.EXIT_ON_CLOSE);
64. frame.setTitle("BoxLayout frame");
65.
66. frame.getContentPane().setLayout(
67. new BoxLayout(frame.getContentPane(), BoxLayout.PAGE_AXIS));
68.
69. frame.getContentPane().add(Box.createRigidArea(new Dimension(50,50)));
70. frame.getContentPane().add(makePanel(Color.red, 10,
71. Component.CENTER_ALIGNMENT));
72. frame.getContentPane().add(Box.createVerticalGlue());
73. frame.getContentPane().add(makePanel(Color.blue, 50,
74. Component.LEFT_ALIGNMENT));
75. frame.getContentPane().add(Box.createVerticalGlue());
76. frame.getContentPane().add(makePanel(Color.yellow, 100,
77. Component.RIGHT_ALIGNMENT));
78. frame.getContentPane().add(Box.createVerticalGlue());
79. frame.getContentPane().add(makePanel(Color.green, 200,
80. Component.LEFT_ALIGNMENT));
81. frame.getContentPane().add(Box.createVerticalGlue());
82. frame.getContentPane().add(makePanel(Color.pink, 500,
83. Component.CENTER_ALIGNMENT));
84.
85. frame.pack();
86. frame.setVisible(true);
87.
88. }
89.
90. private static JPanel makePanel(Color col, int w, float a) {
91. JPanel panel = new JPanel();
92. panel.setBackground(col);
93. panel.setAlignmentX(a);
94. panel.setPreferredSize(new Dimension(w, 50));
95. panel.setMaximumSize(panel.getPreferredSize());
96. panel.setMinimumSize(panel.getPreferredSize());
97. return panel;
98. }
99.
}
100. Run the program again. Observe what happens when you resize the window now.
How It Works
This is how it works:
1. The workings of this example should be easy to follow. First, the layout manager of the JFrame content pane is changed to a BoxLayout.
2. Next, a number of panels are added. You set their background colors; minimum, maximum, and preferred sizes; and horizontal alignments using the makePanel method.
3. Finally, in the second version of the class, Box.createRigidArea and Box.createVerticalGlue add rigid areas and glue between stacked components. The following section shows these options in more detail.
You saw in the Try It Out how to add glue and rigid areas, i.e. invisible components. You’ll next consider these in a little more detail, but not before these general tips:
· Note how the alignment of a component can be set to a float value, meaning that you can also specify intermediate alignments between all the way to the left (0F), all the way to the right (1F), or a center alignment (0.5F). Try playing with this in the Try It Out.
· Note how the minimum and maximum sizes of the panels were set to be equal to the preferred size. If these are different values, or if you don’t specify them all, the panel will be more flexible to stretch and fill any available space. When you’re having trouble with components misbehaving in a BoxLayout, try checking their sizes.
· Now, concerning glue and rigid areas, there are three types of invisible components that can help you add space between components in a BoxLayout:
· A rigid area, created with Box.createRigidArea(Dimension d): Use this when you want a fixed-size space between two components.
· Glue, created with Box.createHorizontalGlue() or Box.createVerticalGlue(): Use this to specify where excess space in a layout should go when resizing a window. Think of this component as some invisible elastic stretching glue between components. It still allows components to stick closely together, but will expand when stretched.
· A custom filler, created with new Box.Filler(Dimension minimumSize, Dimension preferredSize, Dimension maximumSize): Use this to specify a component with whatever minimum, preferred, and maximum sizes you want. This is equal to creating some invisibleJPanel with set sizes.
· A strut: Well, you read that there are three types of invisible components, but in actuality, there are four. A strut also provides a way to add filler, but the rigid area provides the same functionality and avoids some sizing issues in some cases, so that it is always better to use a rigid area instead of a strut.
· Finally, you can also add an invisible border to components to push them apart. We recommend against this solution, however, because you will end up adding glue or rigid areas anyway once you want to add a real border to your components.
GroupLayout and SpringLayout
The next two layout managers are placed in the same section, as they both offer a huge amount of flexibility, but are also incredibly hard to use. The reason behind this is that they were never meant to be used in a manual manner anyway.
The GroupLayout layout manager was originally developed to be used in combination with graphical GUI designers, such as the one provided in Netbeans (an IDE just like Eclipse). GroupLayout can still be used in a manual manner; the basic thing to know is that components are grouped hierarchically and groups are laid out either sequentially (one after another) or parallel (next to each other). On the other hand, the SpringLayout layout manager is even more complex, with the ability to emulate almost all features of the other layout managers. You can find online references showing you how to construct a SpringLayout by hand.
This book doesn’t cover either of these layout managers in detail. This is because the other layout managers you have seen, GridBagLayout in particular, already allow you to build complex interfaces, especially once you start nesting containers and also throw smart components such as JTabbedFrame or JSplitPane in the mix. Later in this chapter, however, you’ll get a quick tour of some visual GUI builders, which also allow you to see which kind of GroupLayout- or SpringLayout-based code these editors come up with.
Absolute Positioning (No Layout Manager)
Earlier in this chapter, you read that it is also possible to pass null as a layout manager to components. Doing so allows you to leave the positioning of components entirely up to you. Now explore this with a simple example in the following Try It Out.
TRY IT OUT Going Solo: Absolute Positioning Without a Layout Manager
In this Try It Out, you see how to lay out components manually, without using a layout manager.
1. As always, feel free to create a new project in Eclipse when you want to. Create a class called ManualLayoutFrame with the following content:
2. import java.awt.Color;
3. import javax.swing.JFrame;
4. import javax.swing.JPanel;
5.
6. public class ManualLayoutFrame {
7.
8. public static void main(String[] args) {
9. JFrame frame = new JFrame();
10. frame.setDefaultCloseOperation(JFrame.EXIT_ON_CLOSE);
11. frame.setTitle("Manual layout frame");
12.
13. frame.getContentPane().setLayout(null);
14.
15. JPanel bluePanel = new JPanel(),
16. redPanel = new JPanel(),
17. greenPanel = new JPanel();
18. bluePanel.setBackground(Color.blue);
19. redPanel.setBackground(Color.red);
20. greenPanel.setBackground(Color.green);
21.
22. bluePanel.setBounds(100, 100, 100, 100);
23. redPanel.setBounds(50, 200, 400, 200);
24. greenPanel.setBounds(150, 100, 50, 50);
25.
26. frame.add(bluePanel);
27. frame.add(redPanel);
28. frame.add(greenPanel);
29.
30. frame.pack();
31. frame.setVisible(true);
32.
33. frame.setSize(500, 500);
34. }
35.
36.
}
37.Run the project from Eclipse. You should see the window in Figure 11.18.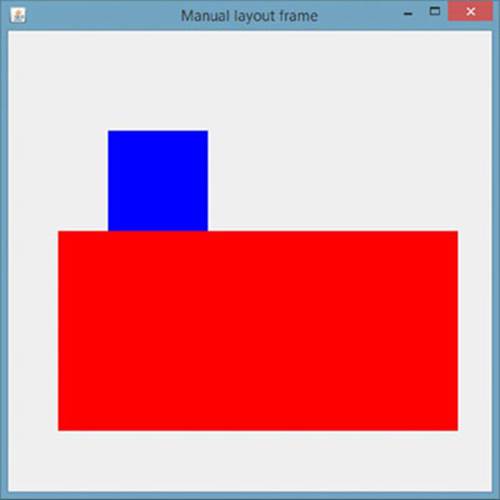
Figure 11.18
38.Observe what happens when you resize this window (there is no layout manager now to stretch things around). Also, try changing the order of the add method lines to make the green panel appear above the other ones (it is currently hidden).
How It Works
This is how it works:
1. The workings of this class should be easy to understand. The main things to note are the use of a null layout manager, as well as calling setBounds on the panels. Four dimensions are given: x-position, y-position, width, and height.
2. Finally, note the use of the setSize method here to size the JFrame, as there is now no layout manager that can make an informed guess based on the components contained in the JFrame container on which size to give the frame.
This concludes the overview on layout managers and how to use them. Take your time to play around with them and create some nested structures. Before moving on to the next big topic when dealing with GUIs—events—consider these helpful tips that help you when you lay out components.
· One of the problems beginners encounter when dealing with layout managers relates to the sizing of components. Remember that setSize and setBounds only work when a layout manager is not controlling your component. Since JPanels are controlled by aFlowLayout, by default, and bordered containers by a BorderLayout, this will never be the case by default.
· To specify sizes, you’ll hence to resort to the setMinimumSize, setPreferredSize, and setMaximumSize methods. Try these first before trying something else.
· Sometimes, you’ll want to add components while your program is running. You might encounter cases where your component does not appear. Occassionally, you might note that the added component suddenly pops into view when resizing its containers. In that case, check out the revalidate and repaint methods of the component, which will force Java to draw it after adding it.
· You’ll note that building GUIs is mostly a matter of creating components and adding them to each other. For these simple examples, it was easy to just put the complete GUI initialization in a main method and leave it at that. However, be aware that it is an easy mistake when building GUIs to suddenly forget everything about Object-Oriented Programming and end up with monster classes setting up a huge amount of GUI components. Thus, when building GUIs, always ask if you might be able to reuse certain parts, and keep in mind you can extend GUI classes just like you could any class! If you need a bold red label in many places of your program, why not construct an ErrorLabel that extends the JLabel class that already contains the right calls to set up the font and size, instead of always directly setting up a nice-looking JLabel every time you need it? If you need some kind of easy way to create forms row-by-row, consider creating a class-extending JPanel that uses a GridBagLayout together with some hand-rolled methods to make the GUI setup easier. In short, don’t be afraid to abstract GUI aspects. Another even more important issue arising from putting logic and GUI-related code into the main method (the main method, in the examples above) is the fact that you might run into threading issues with Swing. The next section will explain in detail what this entails and how you can avoid such issues.
· Finally, when constructing GUIs, it is a nice idea to sketch out on paper first how your GUI should look, and derive some component/container tree out of it. Maybe the JFrame should contain two panels. One panel would contain a JSplitPane, with the left component a JScrollPane and the right component another panel. The layout manager would stack a number of different JPanels, each of which would contain certain buttons and labels. Sketch your ideas on paper first, and don’t be afraid to put things into a separate JPanel (or even better, into a custom class-extending JPanel). It takes a little more work at first, but you’ll be thankful later.
UNDERSTANDING EVENTS
All the GUI applications you’ve been building so far do not have any true functionality associated with them. Sure, you can add a JButton and even click it, but how do you make it actually do something? To add behavior to your graphical interfaces, you first need an introduction to the concept of events.
Introduction to Events
An event can be defined as a happening of something, an occurrence, meaning that something happened somewhere. In graphical user interfaces, events usually result from a user’s action. For instance, the user clicks on a button, closes a window, resizes a window, selects an item in a combobox, or even moves the mouse around inside a window.
When building console programs, there is a set sequence of actions, and the program will stop execution when it expects input from the user, and continues onward once it has received it. In graphical programs, the user can at any time do a number of things: type in a textbox, minimize a window, or click a button. All these actions by the user are called “events.” Not only in Java, but in many other programming languages, there is usually an “event loop,” which is a background task that constantly checks for any new event and responds accordingly. This type of program is said to be event-driven. In Java, you do not have to deal with this event loop directly, but you can plug into it so you can capture interesting events (a user clicked a button) and deal with them accordingly. This is done by creating so-called event listeners.
NOTE Some programming languages make the concept of an “event loop” a core architectural construct. Node.js, for instance, has become popular as a JavaScript-based (not Java) programming framework that applies an event loop to the whole program, not just to the GUI.
Event Listeners
You’ve already learned that any user action within a GUI application will lead to some kind of event. By default, all of these events just happen, but to make useful applications, you’ll need to define event listeners. These are objects that can receive a notification when a specific event of interest has happened. This is illustrated in the following Try It Out example.
TRY IT OUT Creating a BMI Calculator
In this Try It Out, you create a graphical Body Mass Index (BMI) calculator.
1. As always, feel free to create a new project in Eclipse when you want to. Create a class called BMICalculator with the following content:
2. import java.awt.Dimension;
3.
4. import javax.swing.Box;
5. import javax.swing.BoxLayout;
6. import javax.swing.JButton;
7. import javax.swing.JFrame;
8. import javax.swing.JLabel;
9. import javax.swing.JTextField;
10. import javax.swing.SwingUtilities;
11.
12. public class BMICalculator extends JFrame {
13.
14. private final JTextField txtMass = new JTextField();
15. private final JTextField txtHeight = new JTextField();
16. private final JButton btnCalc = new JButton("Calculate BMI");
17.
18. public BMICalculator() {
19. super();
20. setDefaultCloseOperation(JFrame.EXIT_ON_CLOSE);
21. setTitle("BMI Calculator");
22.
23. getContentPane().setLayout(
24. new BoxLayout(getContentPane(), BoxLayout.PAGE_AXIS));
25.
26. txtMass.setPreferredSize(new Dimension(200,30));
27. txtHeight.setPreferredSize(new Dimension(200,30));
28. txtMass.setMaximumSize(txtMass.getPreferredSize());
29. txtHeight.setMaximumSize(txtHeight.getPreferredSize());
30.
31. getContentPane().add(new JLabel("Your mass (kg):"));
32. getContentPane().add(Box.createRigidArea(new Dimension(5,5)));
33. getContentPane().add(txtMass);
34. getContentPane().add(Box.createRigidArea(new Dimension(5,5)));
35.
36. getContentPane().add(Box.createVerticalGlue());
37.
38. getContentPane().add(new JLabel("Your height (cm):"));
39. getContentPane().add(Box.createRigidArea(new Dimension(5,5)));
40. getContentPane().add(txtHeight);
41. getContentPane().add(Box.createRigidArea(new Dimension(5,5)));
42.
43. getContentPane().add(Box.createVerticalGlue());
44. getContentPane().add(btnCalc);
45. getContentPane().add(Box.createRigidArea(new Dimension(5,5)));
46.
47.
48. pack();
49. setVisible(true);
50. }
51.
52. public static void main(String[] args) {
53. SwingUtilities.invokeLater(new Runnable() {
54. public void run() {
55. new BMICalculator();
56. }
57. });
58. }
}
59.Run the project from Eclipse. You should see the window in Figure 11.19.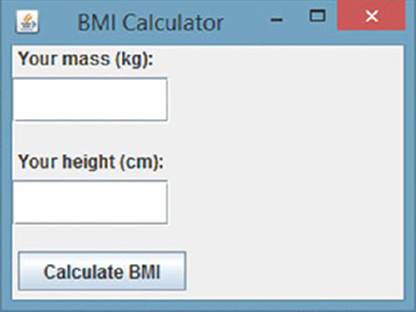
Figure 11.19
60. This is a good time to explore a bit and add some styling if you want to do so. Here’s an example of something you can come up with:
61. import java.awt.Color;
62. import java.awt.Dimension;
63. import java.awt.Font;
64. import java.awt.Insets;
65.
66. import javax.swing.BorderFactory;
67. import javax.swing.Box;
68. import javax.swing.BoxLayout;
69. import javax.swing.JButton;
70. import javax.swing.JFrame;
71. import javax.swing.JLabel;
72. import javax.swing.JTextField;
73. import javax.swing.SwingUtilities;
74.
75. public class BMICalculator extends JFrame {
76.
77. private final JTextField txtMass = makePrettyTextField();
78. private final JTextField txtHeight = makePrettyTextField();
79. private final JButton btnCalc = makePrettyButton("Calculate BMI");
80.
81. public BMICalculator() {
82. super();
83. setDefaultCloseOperation(JFrame.EXIT_ON_CLOSE);
84. setTitle("BMI Calculator");
85.
86.
87. getContentPane().setLayout(
88. new BoxLayout(getContentPane(), BoxLayout.PAGE_AXIS));
89.
90. txtMass.setPreferredSize(new Dimension(200,30));
91. txtHeight.setPreferredSize(new Dimension(200,30));
92. txtMass.setMaximumSize(txtMass.getPreferredSize());
93. txtHeight.setMaximumSize(txtHeight.getPreferredSize());
94.
95. getContentPane().setBackground(new Color(232, 240, 255));
96.
97. getContentPane().add(makePrettyLabel("Your mass (kg):"));
98. getContentPane().add(Box.createRigidArea(new Dimension(5,5)));
99. getContentPane().add(txtMass);
100. getContentPane().add(Box.createRigidArea(new Dimension(5,5)));
101.
102. getContentPane().add(Box.createVerticalGlue());
103.
104. getContentPane().add(makePrettyLabel("Your height (cm):"));
105. getContentPane().add(Box.createRigidArea(new Dimension(5,5)));
106. getContentPane().add(txtHeight);
107. getContentPane().add(Box.createRigidArea(new Dimension(5,5)));
108.
109. getContentPane().add(Box.createVerticalGlue());
110. getContentPane().add(btnCalc);
111. getContentPane().add(Box.createRigidArea(new Dimension(5,5)));
112.
113.
114. pack();
115. setVisible(true);
116. }
117.
118. private JButton makePrettyButton(String title) {
119. JButton button = new JButton(title);
120. button.setFont(new Font(Font.SANS_SERIF, Font.PLAIN, 16));
121. button.setBorder(BorderFactory.createRaisedBevelBorder());
122. button.setBackground(Color.white);
123. button.setForeground(new Color(53, 124, 255));
124. return button;
125. }
126.
127. private JTextField makePrettyTextField() {
128. JTextField field = new JTextField();
129. field.setFont(new Font(Font.SANS_SERIF, Font.ITALIC, 14));
130. field.setHorizontalAlignment(JTextField.RIGHT);
131. field.setBorder(BorderFactory.createLoweredBevelBorder());
132. return field;
133. }
134.
135. private JLabel makePrettyLabel(String title) {
136. JLabel label = new JLabel(title);
137. label.setFont(new Font(Font.SANS_SERIF, Font.BOLD, 14));
138. label.setForeground(new Color(53, 124, 255));
139. return label;
140. }
141.
142. public static void main(String[] args) {
143. SwingUtilities.invokeLater(new Runnable() {
144. public void run() {
145. new BMICalculator();
146. }
147. });
148. }
}
149. To add a behavior to the Calculate button, change the class once again to look as follows:
150. import java.awt.Color;
151. import java.awt.Dimension;
152. import java.awt.Font;
153. import java.awt.event.ActionEvent;
154. import java.awt.event.ActionListener;
155.
156. import javax.swing.BorderFactory;
157. import javax.swing.Box;
158. import javax.swing.BoxLayout;
159. import javax.swing.JButton;
160. import javax.swing.JFrame;
161. import javax.swing.JLabel;
162. import javax.swing.JOptionPane;
163. import javax.swing.JTextField;
164. import javax.swing.SwingUtilities;
165.
166. public class BMICalculator extends JFrame {
167.
168. private final JTextField txtMass = makePrettyTextField();
169. private final JTextField txtHeight = makePrettyTextField();
170. private final JButton btnCalc = makePrettyButton("Calculate BMI");
171.
172. private final BMICalculator self = this;
173.
174. public BMICalculator() {
175. super();
176. setDefaultCloseOperation(JFrame.EXIT_ON_CLOSE);
177. setTitle("BMI Calculator");
178.
179.
180. getContentPane().setLayout(
181. new BoxLayout(getContentPane(), BoxLayout.PAGE_AXIS));
182.
183. txtMass.setPreferredSize(new Dimension(200,30));
184. txtHeight.setPreferredSize(new Dimension(200,30));
185. txtMass.setMaximumSize(txtMass.getPreferredSize());
186. txtHeight.setMaximumSize(txtHeight.getPreferredSize());
187.
188. getContentPane().setBackground(new Color(232, 240, 255));
189.
190. getContentPane().add(makePrettyLabel("Your mass (kg):"));
191. getContentPane().add(Box.createRigidArea(new Dimension(5,5)));
192. getContentPane().add(txtMass);
193. getContentPane().add(Box.createRigidArea(new Dimension(5,5)));
194.
195. getContentPane().add(Box.createVerticalGlue());
196.
197. getContentPane().add(makePrettyLabel("Your height (cm):"));
198. getContentPane().add(Box.createRigidArea(new Dimension(5,5)));
199. getContentPane().add(txtHeight);
200. getContentPane().add(Box.createRigidArea(new Dimension(5,5)));
201.
202. getContentPane().add(Box.createVerticalGlue());
203. getContentPane().add(btnCalc);
204. getContentPane().add(Box.createRigidArea(new Dimension(5,5)));
205.
206. // Add BMI calculation
207. btnCalc.addActionListener(new ActionListener() {
208. @Override
209. public void actionPerformed(ActionEvent arg0) {
210. double mass;
211. double height;
212. try {
213. mass = Double.parseDouble(txtMass.getText());
214. height = Double.parseDouble(txtHeight.getText());
215. } catch (NumberFormatException e) {
216. JOptionPane.showMessageDialog(self,
217. "Please enter a valid number for mass and height.",
218. "Input error",
219. JOptionPane.ERROR_MESSAGE);
220. return;
221. }
222. double result = calculateBMI(mass, height);
223. JOptionPane.showMessageDialog(self,
224. "Your BMI is: " + (Math.round(result*100.0)/100.0),
225. "Your BMI result",
226. JOptionPane.PLAIN_MESSAGE);
227. }
228. });
229.
230. pack();
231. setVisible(true);
232. }
233.
234. protected double calculateBMI(double mass, double height) {
235. return mass / Math.pow(height/100.0, 2.0);
236. }
237.
238. private JButton makePrettyButton(String title) {
239. JButton button = new JButton(title);
240. button.setFont(new Font(Font.SANS_SERIF, Font.PLAIN, 16));
241. button.setBorder(BorderFactory.createRaisedBevelBorder());
242. button.setBackground(Color.white);
243. button.setForeground(new Color(53, 124, 255));
244. return button;
245. }
246.
247. private JTextField makePrettyTextField() {
248. JTextField field = new JTextField();
249. field.setFont(new Font(Font.SANS_SERIF, Font.ITALIC, 14));
250. field.setHorizontalAlignment(JTextField.RIGHT);
251. field.setBorder(BorderFactory.createLoweredBevelBorder());
252. return field;
253. }
254.
255. private JLabel makePrettyLabel(String title) {
256. JLabel label = new JLabel(title);
257. label.setFont(new Font(Font.SANS_SERIF, Font.BOLD, 14));
258. label.setForeground(new Color(53, 124, 255));
259. return label;
260. }
261.
262. public static void main(String[] args) {
263. SwingUtilities.invokeLater(new Runnable() {
264. public void run() {
265. new BMICalculator();
266. }
267. });
268. }
}
269. Try running the program and enter some numbers. Note that the button actually works, as shown in Figure 11.20.
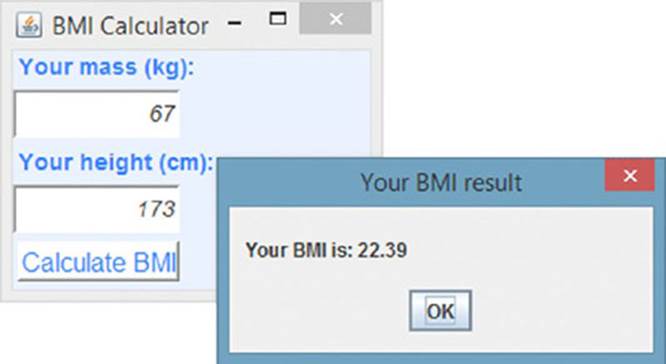
Figure 11.20
How It Works
This is how it works:
1. Instead of putting all the code in a single main method, like in the trivial examples before, now a proper class, extending JFrame, is created.
2. Note also the addition of the following pattern in the main method:
3. SwingUtilities.invokeLater(new Runnable() {
4. public void run() {
5. // Execute UI code here
6. }
});
Using the static invokeLater method of the SwingUtilities class ensures that all UI-related code is executed on the Event Dispatch Thread. You’ll see later on what this means exactly. For now, just keep this pattern in mind.
7. A set of methods is defined to create “pretty” text fields, buttons, and labels. Your definition of pretty might vary, so feel free to change and experiment with these methods.
8. Then the GUI is set up within the constructor of the class. A BoxLayout is used here, and all the components are stacked under each other.
9. The important code is located in the addActionListener method. As the name suggests, this method allows you to add a listener to your btnCalc button that’s notified whenever an ActionEvent occurs. The listener itself is constructed by using an anonymous inner class (new ActionListener(){ . . . }), a pattern that you will see occurring often for event listeners. This anonymous class needs to override and specify one method, actionPerformed, which will be called by the button whenever the user performs an action. In the case of a JButton, this means whenever the button is activated (clicked, focused on, and then Enter is pressed).
10.Inside the action listener, the mass and height are taken from the text fields, and a check is done to see if these fields contain invalid input (if they do, an error is displayed). To show messages, another Swing component called JOptionPane shows the message dialogs using a single static method. The first argument indicates the parent component of the message dialog to be shown, which in this case means the BMI Calculator. You cannot, however, just pass this, as this, in this context, would resolve to the anonymous ActionListener object, not to the BMICalculator object. Instead, use a simple trick and define a final variable called self, which can be used in the anonymous inner class. This is another pattern you might see occurring often when creating event listeners.
11.It is always a good idea to separate logic code from interface code whenever you can. Therefore, the actual calculation of a BMI is properly separated into its own method: calculateBMI. The result is shown to the user with another message dialog.
SERIAL VERSION IDS
When following along with the Try It Out, you might have spotted an Eclipse warning saying that BMICalculator does not contain a serial version identifier. Eclipse will offer to generate a random one for you, which boils down to a line of code similar to this one being added to your class:
private static final long serialVersionUID = -8952857142790654268L;
Now what is this identifier and why is it useful? The reason behind this has to do with serialization (storing objects in a format that allows you to read them back out and initialize them as class instances again later). To make sure that the data of a stored object still matches a class definition (as this might have changed over time), Java also stores a special identifier that verifies that the object to be loaded back in still matches the identifier of the class. As such, as the name suggests, the serialVersionUID is mainly helpful for versioning reasons (an object with UID 100 will not be able to get instantiated to its class when the class definition is on version 101).
In most cases, Java can generate a serialVersionUID based on various aspects of the class at hand. However, it is recommended that all serializable classes explicitly declare serialVersionUID values, since the default serialVersionUID computation is sensitive to class details that may vary depending on compiler implementations. Since Swing components implement Serializable and because Eclipse cares about best practices, it asks you to specify a serialVersionUID.
Since it is unlikely that you will start serializing Swing components (they shouldn’t contain important data anyway and should just concern themselves with UI), the best thing to do if you want to avoid these warnings is to use the default UID everywhere:
private static final long serialVersionUID = 1L;
You can also turn off these warning by navigating to Window, Preferences, Java Compiler Errors/Warnings and setting Serializable Class Without serialVersionUID to Ignore under Potential Programming Problems.
Now take a closer look to see how event listeners work. Swing components hold a collection of listener objects, which have registered themselves to be interested in being notified whenever an event occurs. For instance, for a JButton, you have seen how ActionListenerobjects can be registered using the addActionListener method. Note that the same listener can in theory be registered with multiple components.
NOTE Note By using the term event listener, you might expect the listening objects to be the active players in this setup, but actually, it is the event source (e.g., a button) that will notify its listeners when something interesting happens, by calling one of their methods.
This listener-notifier setup is a typical programming pattern, commonly referred to as the observer pattern. The following chapter has much more information on Object-Oriented Programming patterns.
Generally speaking, there are three ways you will see listener objects being defined and registered. First of all, for simple event listeners you know you’ll only need with one particular component, it is common to define the listener directly as an anonymous inner class, like so:
import java.awt.event.ActionEvent;
import java.awt.event.ActionListener;
import javax.swing.JButton;
import javax.swing.JFrame;
import javax.swing.JOptionPane;
import javax.swing.SwingUtilities;
public class ActionListenerExample extends JFrame {
public ActionListenerExample() {
super();
setDefaultCloseOperation(JFrame.EXIT_ON_CLOSE);
JButton btn = new JButton("Click Me!");
btn.addActionListener(new ActionListener() {
@Override
public void actionPerformed(ActionEvent arg0) {
JOptionPane.showMessageDialog(
null,
"You clicked me, nice!",
"Aw yeah!",
JOptionPane.PLAIN_MESSAGE);
}
});
this.add(btn);
pack();
setVisible(true);
}
public static void main(String[] args) {
SwingUtilities.invokeLater(new Runnable() {
public void run() {
new ActionListenerExample();
}
});
}
}
The main benefit of this technique is that it is easy and simple, so it works well for simple components. The downside it that it leads quickly to messy-looking code, does not allow the same listener to be reused in multiple components, and will sometimes require you to do some variable hocus-pocus to access them in the inner class (remember the self variable from the Try It Out).
The second way will make the container component itself the event listener. This is helpful when you have multiple components to listen to and you already have a custom class for your container. In this case, you’ll see the pattern class Name extends JContainerName implements ListenerName appearing, like in this example:
import java.awt.event.ActionEvent;
import java.awt.event.ActionListener;
import javax.swing.JButton;
import javax.swing.JFrame;
import javax.swing.JOptionPane;
import javax.swing.SwingUtilities;
public class ActionListenerExample extends JFrame implements ActionListener {
public ActionListenerExample() {
super();
setDefaultCloseOperation(JFrame.EXIT_ON_CLOSE);
JButton btn = new JButton("Click Me!");
// The JFrame is now also the listener object
btn.addActionListener(this);
this.add(btn);
pack();
setVisible(true);
}
@Override
public void actionPerformed(ActionEvent arg0) {
JOptionPane.showMessageDialog(
null,
"You clicked me, nice!",
"Aw yeah!",
JOptionPane.PLAIN_MESSAGE);
}
public static void main(String[] args) {
SwingUtilities.invokeLater(new Runnable() {
public void run() {
new ActionListenerExample();
}
});
}
}
The upside of this approach is that it allows the class you already have as a container to act as a listener for its child components. The downside is that you need to add some extra code when you want to add a listener to multiple buttons, for instance, and need to know which button (not just that a button) was clicked. More about how to deal with this later.
Finally, you can also decide to keep the listener separated as much as possible by defining it in a new class:
import javax.swing.JButton;
import javax.swing.JFrame;
import javax.swing.JOptionPane;
import javax.swing.SwingUtilities;
public class ActionListenerExample extends JFrame {
public ActionListenerExample() {
super();
setDefaultCloseOperation(JFrame.EXIT_ON_CLOSE);
JButton btn = new JButton("Click Me!");
MySimpleButtonListener listener = new MySimpleButtonListener();
btn.addActionListener(listener);
this.add(btn);
pack();
setVisible(true);
}
public static void main(String[] args) {
SwingUtilities.invokeLater(new Runnable() {
public void run() {
new ActionListenerExample();
}
});
}
}
import java.awt.event.ActionEvent;
import java.awt.event.ActionListener;
public class MySimpleButtonListener implements ActionListener {
@Override
public void actionPerformed(ActionEvent arg0) {
JOptionPane.showMessageDialog(
null,
"You clicked me, nice!",
"Aw yeah!",
JOptionPane.PLAIN_MESSAGE);
}
}
Obviously, the advantage is that it becomes easy to reuse the same listener class (and instances, even) across different components. The downside is that this requires a little more effort to set up.
So far, you’ve only seen the ActionListener for a JButton. A wealth of other listeners exists as well. The general usage is always the same: construct a listener with the appropriate type using one of the three techniques seen previously, and then add it to a component using addLISTENERTYPEListener. A nonexhaustive list of some of the interesting listeners is included in the following table.
|
LISTENER (INTERFACE): METHOD TO ADD |
CAN BE USED WITH: PURPOSE |
METHOD(S) TO IMPLEMENT |
|
Action Listener (ActionListener) - addActionListener |
Fires ActionEvent when user performs primary action on component. Can be used with JButton, JCheckBox, JComboBox, JRadioButton, and JTextField. |
actionPerformed: Code that reacts to the action. |
|
Caret Listener (CaretListener) - addCaretListener |
Fires CaretEvent whenever the caret (the cursor in a text field, for instance) moves or when the selection changes. Can be used with JTextArea, JTextField, and JTextPane. |
caretUpdate: Code that reacts whenever caret is updated (is moved, the selection changes, text is inserted, and so on). |
|
Change Listener (ChangeListener) - addChangeListener |
Fires ChangeEvent whenever a component changes its state. |
stateChanged: Code that reacts to component changes. |
|
Can be used with JButton, JCheckBox, JProgressBar, and JRadioButton. Also useful with JSlider and JSpinner, as these will fire events for the value of the slider or the spinner changes. These two components do not accept ActionListeners, so here you’ll want to use Change Listeners. |
||
|
Item Listener (ItemListener) - addItemListener |
Fires ItemEvent whenever a state change occurs in the component’s items. JCheckBox, JComboBox, and other components keep a list of items that accept this listener. |
itemStateChanged: Code that reacts when state of items changes. |
|
List Selection Listener (ListSelectionListener) - addListSelectionListener |
Fires ListSelectionEvent when selection changes in the component’s items. Only JList and JTable accept this listener. |
valueChanged: Code that reacts when another item is selected from the component’s items. |
|
Window Listener (WindowListener) - addWindowListener |
Fires WindowEvent when state changes occur in windowed components. JDialog and JFrame accept this listener. |
windowOpened: Code that reacts when window has been shown for first time (in program’s execution). windowClosing: Code that reacts when user requests the window to close. windowClosed: Code that reacts just after window has closed. windowIconified and windowDeiconified: Code that reacts when window is minimized or unminimized. windowActivated and windowDeactivated: Code that reacts when window is activated or deactivated. This method will not work with frames or dialogs, so you need to use the Window FocusListener here instead. |
|
Window Focus Listener (WindowFocusListener) - addWindowFocusListener |
Fires WindowEvent when a windowed component gains or loses focus. JDialog and JFrame accept this listener. |
windowGainedFocus and windowLostFocus: Code that reacts when window gains or loses focus. |
|
Window State Listener (WindowStateListener) - addWindowStateListener |
Fires WindowEvent when the state of a windowed component changes, such as is maximized or minimized. JDialog and JFrame accept this listener. |
windowStateChanged: Code that reacts when window is being (un)minimized, maximized, or returned to normal. |
|
Component Listener (ComponentListener) - addComponentListener |
Fires ComponentEvent when a component is hidden, moved, resized, or shown. All components accept this listener. |
componentHidden and componentShown: Code that reacts when component is made invisible or visible. componentMoved and componendResized: Code that reacts when position or dimensions of component changes. |
|
Focus Listener (FocusListener) - addFocusListener |
Fires FocusEvent when component loses or gains focus. All components accept this listener. |
focusGained and focusLost: Code that reacts when component gains or loses focus. |
|
Key Listener (KeyListener) - addKeyListener |
Fires KeyEvent when user types on the keyboard and the component the listener is registered with has focus. All components accept this listener. |
keyTyped: Code that reacts when user types a key (presses and releases a key). keyPressed and keyReleased: Code that reacts when user presses and releases a key. |
|
Mouse Listener (MouseListener) - addMouseListener |
Fires MouseEvent when the mouse pointer interacts with a component. All components accept this listener. |
mouseClicked: Code that reacts when a user clicks a mouse button. mouseEntered and mouseExited: Code that reacts when the mouse pointer enters or exits a component. mousePressed and mouseReleased: Code that reacts when user presses and releases a mouse button. |
|
Mouse Motion Listener (MouseMotionListener) - addMouseMotionListener |
Fires MouseEvent when the mouse pointer is dragged or moved over a component. All components accept this listener. |
mouseDragged: Code that reacts when a user moves the mouse while holding a mouse button down. mouseMoved: Code that reacts when a user moves the mouse. |
|
Mouse Wheel Listener (MouseWheelListener) - addMouseWheelListener |
Fires MouseWheelEvent when user scrolls the mouse wheel. All components accept this listener. |
mouseWheelMoved: Code that reacts when the user moves the mouse wheel. |
|
Mouse Adapter (MouseAdapter) - addMouseListener, addMouseMotionListener, addMouseWheelListener |
Can be used to define all three mouse event listeners at the same time. Convenience class. |
See three mouse event listeners above. |
Don’t worry if the amount of event types and listeners seems overwhelming for now (and this isn’t even all of them). Just refer to this table when you encounter a need to add more behavior to your components. In most cases, using action listener should cover most of your needs.
That said, whichever listener you’re using, you should still consider a few additional aspects. The first one relates to the event source—the component sending the event to the listeners. Earlier on, you read that in some cases you might want to determine exactly which button was clicked. For example, take the following base scenario:
import java.awt.FlowLayout;
import java.awt.event.ActionEvent;
import java.awt.event.ActionListener;
import javax.swing.JButton;
import javax.swing.JFrame;
import javax.swing.JOptionPane;
import javax.swing.SwingUtilities;
public class ActionListenerExample extends JFrame implements ActionListener {
public ActionListenerExample() {
super();
this.setLayout(new FlowLayout());
setDefaultCloseOperation(JFrame.EXIT_ON_CLOSE);
JButton btn1 = new JButton("Click Me!");
JButton btn2 = new JButton("No, click me!");
btn1.addActionListener(this);
btn2.addActionListener(this);
getContentPane().add(btn1);
getContentPane().add(btn2);
pack();
setVisible(true);
}
@Override
public void actionPerformed(ActionEvent ev) {
JOptionPane.showMessageDialog(
null,
"You clicked a button!",
"Aw yeah!",
JOptionPane.PLAIN_MESSAGE);
}
public static void main(String[] args) {
SwingUtilities.invokeLater(new Runnable() {
public void run() {
new ActionListenerExample();
}
});
}
}
This class is comparable to the earlier example and acts as both a container and an action listener for two buttons. Now say you want to show a different message depending on which button was clicked.
The first way to do this is by changing the actionPerformed method as follows:
@Override
public void actionPerformed(ActionEvent ev) {
String message;
if (((JButton)ev.getSource()).getText().equals("Click Me!"))
message = "First button was clicked";
else
message = "Second button was clicked";
JOptionPane.showMessageDialog(null,
message, "Aw yeah!",
JOptionPane.PLAIN_MESSAGE);
}
Of course, this is a terrible way to implement the desired functionality. Not only are you making an unsafe case (who says the source component will always be a button?), but you’re also hardcoding some text that might later be changed. This does introduce an interesting method though: getSource(). This method allows you to get the source component for the incoming event. Why not directly use this method as is? You will need to make the two buttons class fields, however:
import java.awt.FlowLayout;
import java.awt.event.ActionEvent;
import java.awt.event.ActionListener;
import javax.swing.JButton;
import javax.swing.JFrame;
import javax.swing.JOptionPane;
import javax.swing.SwingUtilities;
public class ActionListenerExample extends JFrame implements ActionListener {
private final JButton btn1 = new JButton("Click Me!");
private final JButton btn2 = new JButton("No, click me!");
public ActionListenerExample() {
super();
this.setLayout(new FlowLayout());
setDefaultCloseOperation(JFrame.EXIT_ON_CLOSE);
btn1.addActionListener(this);
btn2.addActionListener(this);
getContentPane().add(btn1);
getContentPane().add(btn2);
pack();
setVisible(true);
}
@Override
public void actionPerformed(ActionEvent ev) {
String message = "";
if (ev.getSource() == btn1)
message = "First button was clicked";
else if (ev.getSource() == btn2)
message = "Second button was clicked";
JOptionPane.showMessageDialog(null,
message, "Aw yeah!",
JOptionPane.PLAIN_MESSAGE);
}
public static void main(String[] args) {
SwingUtilities.invokeLater(new Runnable() {
public void run() {
new ActionListenerExample();
}
});
}
}
This is much better. There is, however, also another mechanism by which you can determine the correct action to take whenever an event is fired, that is by means of a so-called action command. This is especially useful when the same event source can lead to different behavior. The following example shows how action commands work. Pay particular attention to the use of the setActionCommand and getActionCommand methods.
import java.awt.Color;
import java.awt.FlowLayout;
import java.awt.event.ActionEvent;
import java.awt.event.ActionListener;
import javax.swing.JButton;
import javax.swing.JFrame;
import javax.swing.SwingUtilities;
public class DiscoLightsExample extends JFrame implements ActionListener {
private final String ACTION_ON = "LIGHT ON";
private final String ACTION_OFF = "LIGHT OFF";
private final String ACTION_CYCLE = "CYCLE COLOR";
private final Color[] COLORS = new Color[]{
Color.white,
Color.green,
Color.red,
Color.yellow,
Color.orange,
Color.pink
};
private int currentColor = 0;
private boolean isLightOn = false;
public DiscoLightsExample() {
setTitle("Disco Light Party Frame");
setLayout(new FlowLayout());
setDefaultCloseOperation(JFrame.EXIT_ON_CLOSE);
JButton btnOffOn = new JButton("Lights On");
JButton btnColor = new JButton("Cycle Color");
btnOffOn.setActionCommand(ACTION_ON);
btnColor.setActionCommand(ACTION_CYCLE);
btnOffOn.addActionListener(this);
btnColor.addActionListener(this);
getContentPane().add(btnOffOn);
getContentPane().add(btnColor);
pack();
setVisible(true);
}
@Override
public void actionPerformed(ActionEvent ev) {
String action = ev.getActionCommand();
System.err.println("Got action "+action);
switch (action) {
case ACTION_ON:
isLightOn = true;
getContentPane().setBackground(COLORS[currentColor]);
((JButton) ev.getSource()).setText("Lights Off");
((JButton) ev.getSource()).setActionCommand(ACTION_OFF);
break;
case ACTION_OFF:
isLightOn = false;
getContentPane().setBackground(Color.black);
((JButton) ev.getSource()).setText("Lights On");
((JButton) ev.getSource()).setActionCommand(ACTION_ON);
break;
case ACTION_CYCLE:
if (isLightOn)
getContentPane().setBackground(COLORS[++currentColor
% COLORS.length]);
break;
}
}
public static void main(String[] args) {
SwingUtilities.invokeLater(new Runnable() {
public void run() {
new DiscoLightsExample();
}
});
}
}
On Threading and Swing
Finally, before moving on to the next section, there is one more important thing to highlight when working with event listeners—and indeed with UIs in general when using Swing. Recall that whenever you build a GUI with Java Swing, an event loop will start running in the background that will check for user actions and dispatch events to your listeners. To be more precise, all Swing event handling code runs on a special thread known as the Event Dispatch Thread. We won’t talk in depth about threads in a beginner’s book on programming, but in general, think about a thread as a unit of execution in a program. For instance, the following code snippet shows how two threads are created that will count from 1 to 10 in parallel:
public class CountingTask implements Runnable {
private static int COUNTER = 0;
private int threadId;
public CountingTask() {
threadId = ++COUNTER;
}
public void run() {
for (int i = 1; i <= 10; i++) {
System.out.println("Thread #"+threadId+" is at: "+i);
try {
// Rest a bit to give other threads a chance to work
Thread.sleep(10);
} catch (InterruptedException e) {
e.printStackTrace();
}
}
}
public static void main(String[] args) {
Thread thread1 = new Thread(new CountingTask());
Thread thread2 = new Thread(new CountingTask());
thread1.start();
thread2.start();
}
}
If you try to execute this code, you’ll note that both threads’ output lines will end up mixed on the console. This shows how threads can serve as a helpful way to define multiple work tasks within the same program. Note that your operating system is responsible for the actual allocation of CPU time to the various threads in your program. Even if you have only one CPU core, the operating system will make sure to divide calculation time so that each thread in all running programs on your computer get a chance to do their work, causing them to seemingly run in parallel. Note that running the code snippet above actually involves the creation of three threads: the main thread (all programs have one main thread, where the main method is invoked) and the two custom-defined ones.
Let’s return to the discussion of the Event Dispatch Thread (EDT). This thread is started in the background (i.e., next to the main thread) to continually process events: button clicks, mouse clicks, and so on. Whenever you write code that makes changes to the GUI of a program, all this code must be executed in this Event Dispatch Thread as well. Updating visible components from other threads is the source of many common bugs in Java programs that use Swing. Note that this aspect is not specific to Swing; the same concept exists in other UI toolkits as well. To see how updating the UI outside the EDT can cause problems, take a look at the following code:
import javax.swing.DefaultListModel;
import javax.swing.JFrame;
import javax.swing.JList;
public class MultiThreadedFrame extends JFrame {
public static final int LENGTH = 100;
public static final JList<String> COMPONENT = new JList<>();
public class CountingTask implements Runnable {
public void run() {
for (int i = 1; i <= LENGTH; i++) {
// Add an item
((DefaultListModel<String>) COMPONENT.getModel()).clear();
((DefaultListModel<String>)
COMPONENT.getModel()).addElement("At: "+i);
// Force component repaint
COMPONENT.repaint();
COMPONENT.invalidate();
COMPONENT.repaint();
// Sleep for a little to give other threads a chance
try {
Thread.sleep(1);
} catch (InterruptedException e) {
e.printStackTrace();
}
}
}
}
public MultiThreadedFrame() {
DefaultListModel<String> listModel = new DefaultListModel<>();
COMPONENT.setModel(listModel);
getContentPane().add(COMPONENT);
pack();
setSize(300,500);
setVisible(true);
// Increase the number of threads if problem does not appear
for (int t = 0; t < 16; t++) {
Thread thread = new Thread(new CountingTask());
thread.start();
}
}
public static void main(String[] args) {
new MultiThreadedFrame();
}
}
When you run this code, you’ll see a number of exceptions appearing in the console. Another undesired aspect of the code is that you’ll (most likely) end up with multiple elements in your JList when the program stops running, even though you execute the clear()method before adding a new item in every thread. This is due to the fact that threads can run in parallel, meaning that two threads can add items right after they have both cleared the list.
NOTE Some Swing components’ methods are called “thread safe.” However, this behavior has changed between Java versions before, so it is generally a good idea not to rely on thread-safe components. This also applies to JList.
You’ve already seen an important rule regarding the EDT, namely that all UI-related code should be run inside this thread. The way to do so is simple, namely by using the SwingUtilities helper class, which defines the following methods to help out with threading:
· invokeLater(Runnable doRun): Executes doRun.run() asynchronously on the event dispatching thread.
· invokeAndWait(Runnable doRun): Executes doRun.run() synchronously on the event dispatching thread, meaning that this method will wait until doRun.run() has completed.
· isEventDispatchThread(): Returns true if the current thread is the event dispatching thread.
In almost all cases, you’ll use the invokeLater method to wrap UI-affecting code as follows:
SwingUtilities.invokeLater(new Runnable() {
public void run() {
// UI affecting code
}
});
One particular place where it is important to use this method is in the main method of your programs, as it is guaranteed there that you will not yet be in the EDT (but instead in the initial main thread). Using SwingUtilities, you can rewrite the earlier example as follows:
import javax.swing.DefaultListModel;
import javax.swing.JFrame;
import javax.swing.JList;
import javax.swing.SwingUtilities;
public class MultiThreadedFrame extends JFrame {
public static final int LENGTH = 100;
public static final JList<String> COMPONENT = new JList<>();
public class CountingTask implements Runnable {
public void run() {
for (int i = 1; i <= LENGTH; i++) {
// Add an item
((DefaultListModel<String>) COMPONENT.getModel()).clear();
((DefaultListModel<String>)
COMPONENT.getModel()).addElement("At: "+i);
// Force component repaint
COMPONENT.repaint();
COMPONENT.invalidate();
COMPONENT.repaint();
// Sleep for a little to give other threads a chance
try {
Thread.sleep(1);
} catch (InterruptedException e) {
e.printStackTrace();
}
}
}
}
public MultiThreadedFrame() {
DefaultListModel<String> listModel = new DefaultListModel<>();
COMPONENT.setModel(listModel);
getContentPane().add(COMPONENT);
pack();
setSize(300,500);
setVisible(true);
for (int t = 0; t < 16; t++) {
SwingUtilities.invokeLater(new CountingTask());
}
}
public static void main(String[] args) {
SwingUtilities.invokeLater(new Runnable() {
public void run() { new MultiThreadedFrame(); }
});
}
}
The fact that you must ensure all UI updating code is run on the EDT might seem like an annoying aspect of GUI programming at first, but there is a silver lining that relates to event listeners. Because the EDT is responsible for catching user-interface events and also passes these to any event listeners, any code that you execute inside an event listener will be run inside the EDT. This means that you do not need to use invokeLater, for instance, when running code inside the actionPerformed method of an ActionListener for a button, which, luckily, will also contain the multitude of UI-related code.
However, since this code is executed in the EDT, this means that, while the EDT is busy executing the event listeners, the event loop will block until all event listeners have finished what they need to do. Subsequent events will thus need to wait until they are handled, and since this can involve anything from button clicks to window resizes, this can quickly lead to unresponsive, sluggish interfaces when you stick too much calculation-heavy code in your event listeners. Again, this is illustrated with a simple example. Imagine you come up with the following beautiful progress-tracking interface to wrap around some heavy-duty code:
import java.awt.FlowLayout;
import java.awt.event.ActionEvent;
import java.awt.event.ActionListener;
import javax.swing.JButton;
import javax.swing.JFrame;
import javax.swing.JProgressBar;
import javax.swing.SwingUtilities;
public class ProgressTrackingFrame extends JFrame implements ActionListener {
private boolean isRunning = false;
private final JProgressBar bar = new JProgressBar(0, 100);
private final JButton btn = new JButton("Start Calculation");
public ProgressTrackingFrame() {
super();
setDefaultCloseOperation(JFrame.EXIT_ON_CLOSE);
setTitle("Progress Tracker");
setLayout(new FlowLayout());
btn.addActionListener(this);
add(bar);
add(btn);
pack();
setVisible(true);
}
@Override
public void actionPerformed(ActionEvent arg0) {
if (isRunning) {
// How to cancel here?
} else {
isRunning = true;
btn.setText("Stop Calculation");
long total = 1000000000;
for (long i = 0; i < total; i++) {
int perc = (int)
(i * (bar.getMaximum() - bar.getMinimum())
/ total);
bar.setValue(perc);
}
}
isRunning = false;
btn.setText("Start Calculation");
}
public static void main(String[] args) {
SwingUtilities.invokeLater(new Runnable() {
public void run() { new ProgressTrackingFrame(); }
});
}
Try running the program and starting the calculation. Unless you have a very fast machine, the loop will take some time to finish. Notice how the rest of the UI becomes frozen during the execution of the action listener. Try resizing the window. You’ll note that this will lead to a garbled result that’s typical for programs that do not redraw their UI anymore, as shown in Figure 11.21.
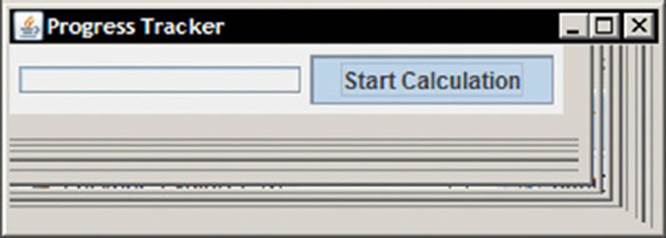
Figure 11.21
In some cases, Windows will notice that your program is not responding and might attempt to close it. Just wait a few more seconds, however, and you’ll see that the program suddenly pops into life again and the event loop catches up to handle the other events. This is because the event listener includes heavy-duty code that is run inside the EDT.
Of course, you would like a way to improve things, and if possible, you’d also like to implement a way to cancel a running calculation.
Again, luckily, Swing already provides a mechanism to do this in a fairly simple manner, by means of the SwingWorker class. This class allows you to construct objects that represent some kind of background task. Here’s how you can implement it. First of all, define a new class field like so:
private SwingWorker<Boolean, Integer> backgroundTask = null;
You can remove the isRunning field, as you’ll no longer need it. Next, create a method to construct a background task for you:
public SwingWorker<Boolean, Integer> makeBackgroundTask(final long total) {
}
This method will construct a new SwingWorker anonymous inner class. You will need to provide two type parameters to this class. The first one represents the type of the final result value (you use a Boolean here). The second one represents the type of the intermediate result values (Integer is used here as these will be sent out to update the progress bar):
public SwingWorker<Boolean, Integer> makeBackgroundTask(final long total) {
SwingWorker<Boolean, Integer> task = new SwingWorker<Boolean, Integer>(){
@Override
protected Boolean doInBackground() throws Exception {
return true;
}
};
return task;
}
The doInBackground method needs to be implemented and has to have your indicated final result type as a return type (Boolean). This method contains the work that will be performed in the background, so fill it up with your loop:
public SwingWorker<Boolean, Integer> makeBackgroundTask(final long total) {
SwingWorker<Boolean, Integer> task = new SwingWorker<Boolean, Integer>(){
@Override
protected Boolean doInBackground() throws Exception {
btn.setText("Stop Calculation");
for (long i = 0; i < total; i++) {
int perc = (int)
(i * (bar.getMaximum() - bar.getMinimum())
/ total);
}
return true;
}
};
return task;
}
Although you could still update the progress bar value inside this method, SwingWorker also provides a way to work with intermediate values in a better manner, by using its publish method. This method will queue intermediate results that can then be processed by aprocess method. You don’t need to manually call the latter, as SwingWorker will determine when (based on time and results gathered) it is a good time to call this method:
public SwingWorker<Boolean, Integer> makeBackgroundTask(final long total) {
SwingWorker<Boolean, Integer> task = new SwingWorker<Boolean, Integer>(){
@Override
protected Boolean doInBackground() throws Exception {
btn.setText("Stop Calculation");
for (long i = 0; i < total; i++) {
int perc = (int)
(i * (bar.getMaximum() - bar.getMinimum())
/ total);
publish(perc);
}
return true;
}
@Override
protected void process(List<Integer> percs) {
for (int perc : percs)
if (bar.getValue() < perc)
bar.setValue(perc);
}
};
return task;
}
You can also use the isCancelled method to figure out whether your background task was cancelled from the outside. It is a good idea to check the result of this method as often as possible so a cancellation request can be dealt with as soon as possible, for instance in the deepest level of a loop:
public SwingWorker<Boolean, Integer> makeBackgroundTask(final long total) {
SwingWorker<Boolean, Integer> task = new SwingWorker<Boolean, Integer>(){
@Override
protected Boolean doInBackground() throws Exception {
btn.setText("Stop Calculation");
for (long i = 0; i < total; i++) {
if (isCancelled()) {
bar.setValue(0);
return false;
}
int perc = (int)
(i * (bar.getMaximum() - bar.getMinimum())
/ total);
publish(perc);
}
return true;
}
@Override
protected void process(List<Integer> percs) {
for (int perc : percs)
if (bar.getValue() < perc)
bar.setValue(perc);
}
};
return task;
}
Finally, you can also override the done method to update your UI:
public SwingWorker<Boolean, Integer> makeBackgroundTask(final long total) {
SwingWorker<Boolean, Integer> task = new SwingWorker<Boolean, Integer>(){
@Override
protected Boolean doInBackground() throws Exception {
btn.setText("Stop Calculation");
for (long i = 0; i < total; i++) {
if (isCancelled()) {
bar.setValue(0);
return false;
}
int perc = (int)
(i * (bar.getMaximum() - bar.getMinimum())
/ total);
publish(perc);
}
return true;
}
@Override
protected void process(List<Integer> percs) {
for (int perc : percs)
if (bar.getValue() < perc)
bar.setValue(perc);
}
@Override
public void done() {
btn.setText("Start Calculation");
backgroundTask = null;
}
};
return task;
}
Next, the only thing left to do is to change your original action listener so it now sets up and executes your background task, using the execute method. Use the cancel method to send a cancellation request in case the user wants to cancel the calculation. The final result looks like this:
import java.awt.FlowLayout;
import java.awt.event.ActionEvent;
import java.awt.event.ActionListener;
import java.util.List;
import javax.swing.JButton;
import javax.swing.JFrame;
import javax.swing.JProgressBar;
import javax.swing.SwingUtilities;
import javax.swing.SwingWorker;
public class ProgressTrackingFrame extends JFrame implements ActionListener {
private final JProgressBar bar = new JProgressBar(0, 100);
private final JButton btn = new JButton("Start Calculation");
private SwingWorker<Boolean, Integer> backgroundTask = null;
public ProgressTrackingFrame() {
super();
setDefaultCloseOperation(JFrame.EXIT_ON_CLOSE);
setTitle("Progress Tracker");
setLayout(new FlowLayout());
btn.addActionListener(this);
add(bar);
add(btn);
pack();
setVisible(true);
}
public SwingWorker<Boolean, Integer> makeBackgroundTask(final long total) {
SwingWorker<Boolean, Integer> task = new SwingWorker<Boolean, Integer>(){
@Override
protected Boolean doInBackground() throws Exception {
btn.setText("Stop Calculation");
for (long i = 0; i < total; i++) {
if (isCancelled()) {
bar.setValue(0);
return false;
}
int perc = (int)
(i * (bar.getMaximum() - bar.getMinimum())
/ total);
publish(perc);
}
return true;
}
@Override
protected void process(List<Integer> percs) {
for (int perc : percs)
if (bar.getValue() < perc)
bar.setValue(perc);
}
@Override
public void done() {
btn.setText("Start Calculation");
backgroundTask = null;
}
};
return task;
}
@Override
public void actionPerformed(ActionEvent arg0) {
if (backgroundTask == null) {
backgroundTask = makeBackgroundTask(1000000000);
backgroundTask.execute();
} else {
backgroundTask.cancel(true);
}
}
public static void main(String[] args) {
SwingUtilities.invokeLater(new Runnable() {
public void run() { new ProgressTrackingFrame(); }
});
}
Try running the program again and observe what happens. Finally, it is good to know that you can also call get() and get(long timeout, TimeUnit unit) on a SwingWorker object to block until the background task has completed and you get the final result. In most cases, this blocking behavior is not what you want, and it is a better idea to have the done method of the worker call one of your objects to notify about the completion.
You’ve now seen all the important things you need to know about GUIs in Java. With a complex class hierarchy, a huge list of components and containers, layout managers that all have different behavior and a plethora of event listeners, building GUIs in Java can appear to be a daunting task at first. Don’t be afraid to get started and build some simple interfaces. Check the online documentation and Eclipse’s helpful autosuggest feature to get to know Swing’s components and utilize them whenever you can. Exercise is key here, and this chapter has only outlined the basics. The final chapter in this book contains many case study examples that will have you building more realistic, complex graphical user interfaces, utilizing many of the available Swing components. Don’t hesitate to have a look.
CLOSING TOPICS
This chapter closes with some additional topics related to the concept of GUIs.
Best Practices: Keeping Looks and Logic Separated
A first topic you’ll read about relates to best practices when writing graphical user interfaces. Generally speaking, even after gaining knowledge of Object-Oriented Programming, beginners will find it relatively hard to keep domain logic separated from user-interface concerns. When you find yourself making monstrous user interfaces where buttons and text fields keep track of state, you’ll know it is time for a change.
Ideally, you should be able to perform all your application logic using pure Java objects and without using any graphical user interface at all. Therefore, it is always a good idea to construct your core domain concepts first. Which concepts exist? What data needs to be stored? Which actions can be undertaken? Afterward, you can start building the GUI around all of this. As a challenge, consider creating a “console” version for your applications as an alternative to the graphical one. How hard would it be? Where are the main root issues? Here lies the opportunity for solid refactoring.
The next chapter talks more about patterns, and you will get acquainted with a very helpful pattern when building GUI-driven applications: the model-view-controller pattern.
Although separating your logic from UI is a must, it is also a good idea to keep your UI as architecturally sound as possible. Many of the examples you’ve seen in this chapter already reflect a natural progress in UI architecture, starting with sticking everything in amain method (bad) to creating custom UI classes (good), from creating huge event listeners in inner classes (bad) to separating them into separate classes and even into background tasks (good), from trying to make UIs as hierarchically flat as possible and fighting with layout managers (bad) to accepting the fact that you might want to create another JPanel, or perhaps a separate custom class extending JPanel and nesting this in a reusable manner (good). Writing GUIs in Java is by no means easy. It is oftentimes cumbersome, boring even. You want to focus on the core concepts of your program, and that involves a lot of boilerplate code. However, architectural decisions you make at the beginning might end up saving you a lot of time and headache later.
Let’s Draw: Defining Custom Draw Behavior
It’s already been stated that Swing components handle all drawing behavior by themselves, which is why they can look similar on each platform they’re run on. You saw before how to work with different look and feels inside Swing, but you might also be interested in knowing whether you can override or extend rendering behavior of components.
The answer is that indeed, you can. All Swing components (JComponent) come with the following built-in methods:
· public void paint(Graphics g): Paints the component, its border, and its children by calling these methods:
· protected void paintComponent(Graphics g)
· protected void paintBorder(Graphics g)
· protected void paintChildren(Graphics g)
The Graphics object that’s passed along can be regarded as a general surface area on which Java can draw, representing the geometric area of the component that will need to be painted.
To show this off, the following Try It Out will lead you through a simple painting application, which is also a good opportunity to show off a mouse listener and show another helpful component, the JFileChooser.
TRY IT OUT Making a Paint Application with Custom-Painted Components
In this Try It Out, you create a simple painting application by overriding the default painting behavior of a component.
1. As always, feel free to create a new project in Eclipse when you want to. Create a class called SimplePaint with the following content as a bare bones starting point:
2. import javax.swing.JFrame;
3. import javax.swing.SwingUtilities;
4.
5. public class SimplePaint extends JFrame {
6. public SimplePaint() {
7. super();
8. setDefaultCloseOperation(JFrame.EXIT_ON_CLOSE);
9. setTitle("Simple Paint");
10.
11.
12. pack();
13. setVisible(true);
14. }
15. public static void main(String[] args) {
16. SwingUtilities.invokeLater(new Runnable() {
17. public void run() { new SimplePaint(); }
18. });
19. }
}
20. Start out by adding some menu items to your JFrame. In fact, a JFrame comes with built-in functionality to set up a menu bar. You just need to construct a menu first:
21. import java.awt.event.ActionEvent;
22. import java.awt.event.ActionListener;
23.
24. import javax.swing.JFrame;
25. import javax.swing.JMenu;
26. import javax.swing.JMenuBar;
27. import javax.swing.JMenuItem;
28.
29.
30. public class SimplePaint extends JFrame implements ActionListener {
31. private final String ACTION_NEW = "New Image";
32. private final String ACTION_LOAD = "Load Image";
33. private final String ACTION_SAVE = "Save Image";
34.
35. public SimplePaint() {
36. super();
37. setDefaultCloseOperation(JFrame.EXIT_ON_CLOSE);
38. setTitle("Simple Paint");
39.
40. initMenu();
41.
42. pack();
43. setVisible(true);
44. }
45.
46. private void initMenu() {
47. JMenuBar menuBar = new JMenuBar();
48. JMenu menu = new JMenu("File");
49. JMenuItem mnuNew = new JMenuItem(ACTION_NEW);
50. JMenuItem mnuLoad = new JMenuItem(ACTION_LOAD);
51. JMenuItem mnuSave = new JMenuItem(ACTION_SAVE);
52. mnuNew.setActionCommand(ACTION_NEW);
53. mnuLoad.setActionCommand(ACTION_LOAD);
54. mnuSave.setActionCommand(ACTION_SAVE);
55. mnuNew.addActionListener(this);
56. mnuLoad.addActionListener(this);
57. mnuSave.addActionListener(this);
58. menu.add(mnuNew);
59. menu.add(mnuLoad);
60. menu.add(mnuSave);
61. menuBar.add(menu);
62. this.setJMenuBar(menuBar);
63. }
64.
65. @Override
66. public void actionPerformed(ActionEvent ev) {
67.
68. }
69.
70. public static void main(String[] args) {
71. SwingUtilities.invokeLater(new Runnable() {
72. public void run() { new SimplePaint(); }
73. });
74. }
}
75. Feel free to run the program in between steps and check the result. You should get something like Figure 11.22.
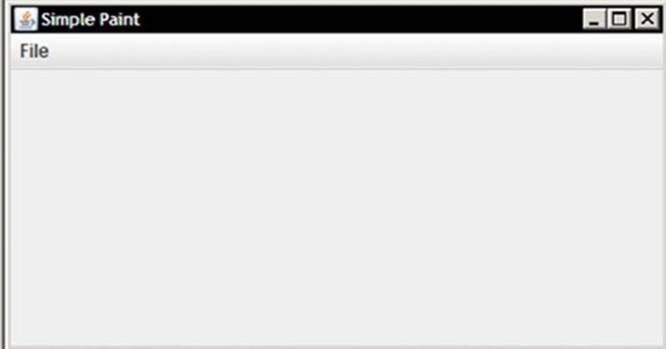
Figure 11.22
Next, create a custom panel, that is, a panel with some custom paint code:
import java.awt.Color;
import java.awt.Dimension;
import java.awt.Graphics;
import java.awt.Point;
import java.awt.event.MouseAdapter;
import java.awt.event.MouseEvent;
import java.util.Collection;
import java.util.HashSet;
import java.util.Set;
import javax.swing.JPanel;
public class SimplePaintPanel extends JPanel {
private final Set<Point> blackPixels = new HashSet<Point>();
private final int brushSize;
private int mouseButtonDown = 0;
public SimplePaintPanel() {
this(5, new HashSet<Point>());
}
public SimplePaintPanel(Set<Point> blackPixels) {
this(5, blackPixels);
}
public SimplePaintPanel(int brushSize, Set<Point> blackPixels) {
this.setPreferredSize(new Dimension(300, 300));
this.brushSize = brushSize;
this.blackPixels.addAll(blackPixels);
final SimplePaintPanel self = this;
MouseAdapter mouseAdapter = new MouseAdapter() {
@Override
public void mouseDragged(MouseEvent ev) {
if (self.mouseButtonDown == 1)
self.blackPixels.addAll(getPixelsAround(ev.getPoint()));
else if (self.mouseButtonDown == 3)
self.blackPixels.removeAll(getPixelsAround(ev.getPoint()));
self.invalidate();
self.repaint();
}
@Override
public void mousePressed(MouseEvent ev) {
self.mouseButtonDown = ev.getButton();
}
};
this.addMouseMotionListener(mouseAdapter);
this.addMouseListener(mouseAdapter);
}
public void paint(Graphics g) {
int w = this.getWidth();
int h = this.getHeight();
g.setColor(Color.white);
g.fillRect(0, 0, w, h);
g.setColor(Color.black);
for (Point point : blackPixels)
g.drawRect(point.x, point.y, 1, 1);
}
private Collection<? extends Point> getPixelsAround(Point point) {
Set<Point> points = new HashSet<>();
for (int x = point.x - brushSize; x < point.x + brushSize; x++)
for (int y = point.y - brushSize; y < point.y + brushSize; y++)
points.add(new Point(x, y));
return points;
}
76. Next, add this custom component to your JFrame:
77. import java.awt.event.ActionEvent;
78. import java.awt.event.ActionListener;
79.
80. import javax.swing.JFrame;
81. import javax.swing.JMenu;
82. import javax.swing.JMenuBar;
83. import javax.swing.JMenuItem;
84.
85. public class SimplePaint extends JFrame implements ActionListener {
86. private final String ACTION_NEW = "New Image";
87. private final String ACTION_LOAD = "Load Image";
88. private final String ACTION_SAVE = "Save Image";
89.
90. private final SimplePaintPanel paintPanel = new SimplePaintPanel();
91.
92. public SimplePaint() {
93. super();
94. setDefaultCloseOperation(JFrame.EXIT_ON_CLOSE);
95. setTitle("Simple Paint");
96.
97. initMenu();
98. this.getContentPane().add(paintPanel);
99.
100. pack();
101. setVisible(true);
102. }
103.
104. private void initMenu() {
105. JMenuBar menuBar = new JMenuBar();
106. JMenu menu = new JMenu("File");
107. JMenuItem mnuNew = new JMenuItem(ACTION_NEW);
108. JMenuItem mnuLoad = new JMenuItem(ACTION_LOAD);
109. JMenuItem mnuSave = new JMenuItem(ACTION_SAVE);
110. mnuNew.setActionCommand(ACTION_NEW);
111. mnuLoad.setActionCommand(ACTION_LOAD);
112. mnuSave.setActionCommand(ACTION_SAVE);
113. mnuNew.addActionListener(this);
114. mnuLoad.addActionListener(this);
115. mnuSave.addActionListener(this);
116. menu.add(mnuNew);
117. menu.add(mnuLoad);
118. menu.add(mnuSave);
119. menuBar.add(menu);
120. this.setJMenuBar(menuBar);
121. }
122.
123. @Override
124. public void actionPerformed(ActionEvent ev) {
125.
126. }
127.
128. public static void main(String[] args) {
129. SwingUtilities.invokeLater(new Runnable() {
130. public void run() { new SimplePaint(); }
131. });
132. }
}
133. Try running the program again. Try dragging the mouse using the left and right mouse buttons. Although the implementation is horribly inefficient, the concept works, as shown in Figure 11.23.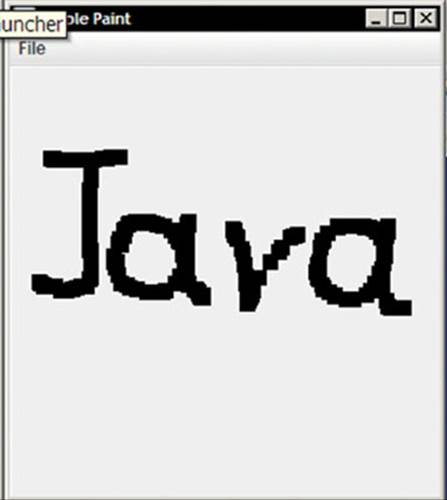
Figure 11.23
134. Now continue by making the menu work. To do so, first make some modifications to your SimplePaintPanel, adding/changing the following methods:
135. // Inside the mouseAdapter:
136. @Override
137. public void mouseDragged(MouseEvent ev) {
138. if (mouseButtonDown == 1)
139. addPixels(getPixelsAround(ev.getPoint()));
140. else if (mouseButtonDown == 3)
141. removePixels(getPixelsAround(ev.getPoint()));
142. }
143.
144. // Add the following methods:
145. public void clear() {
146. this.blackPixels.clear();
147. this.invalidate();
148. this.repaint();
149. }
150.
151. public void addPixels(Collection<? extends Point> blackPixels) {
152. this.blackPixels.addAll(blackPixels);
153. this.invalidate();
154. this.repaint();
155. }
156.
157. public void removePixels(Collection<? extends Point> blackPixels) {
158. this.blackPixels.removeAll(blackPixels);
159. this.invalidate();
160. this.repaint();
161. }
162.
163. public boolean isPixel(Point blackPixel) {
164. return this.blackPixels.contains(blackPixel);
165. }
166.
167. // Change this method:
168. private Collection<? extends Point> getPixelsAround(Point point) {
169. Set<Point> points = new HashSet<>();
170. for (int x = point.x - brushSize; x < point.x + brushSize; x++)
171. for (int y = point.y - brushSize; y < point.y + brushSize; y++)
172. points.add(new Point(x, y));
173. return points;
}
174. Making the New menu work then becomes a simple manner of filling up the actionPerformed method in the SimplePaint class like so:
175. @Override
176. public void actionPerformed(ActionEvent ev) {
177. switch (ev.getActionCommand()) {
178. case ACTION_NEW:
179. paintPanel.clear();
180. break;
181. }
}
182. Next up is the ability to load images. Some tricks are used to convert everything to black and white, but you could theoretically show the image as is if you want to (try this out later by yourself if you want to take up the challenge):
183. @Override
184. public void actionPerformed(ActionEvent ev) {
185. switch (ev.getActionCommand()) {
186. case ACTION_NEW:
187. paintPanel.clear();
188. break;
189. case ACTION_LOAD:
190. doLoadImage();
191. break;
192. }
193. }
194.
195. private void doLoadImage() {
196. JFileChooser fileChooser = new JFileChooser();
197. fileChooser.setFileSelectionMode(JFileChooser.FILES_ONLY);
198. int result = fileChooser.showOpenDialog(this);
199. if (result != JFileChooser.APPROVE_OPTION)
200. return;
201. BufferedImage image;
202. File openFile = fileChooser.getSelectedFile();
203. try (FileInputStream fis = new FileInputStream(openFile)) {
204. image = ImageIO.read(fis);
205. } catch (IOException e) {
206. return;
207. }
208. if (image == null)
209. return;
210. paintPanel.clear();
211. Set<Point> blackPixels = new HashSet<Point>();
212. for (int x = 0; x < image.getWidth(); x++) {
213. for (int y = 0; y < image.getHeight(); y++) {
214. Color c = new Color(image.getRGB(x, y));
215. if ((c.getBlue() < 128 || c.getRed() < 128 || c.getGreen() < 128)
216. && c.getAlpha() == 255) {
217. blackPixels.add(new Point(x, y));
218. }
219. }
220. }
221. paintPanel.addPixels(blackPixels);
}
222. Try loading the project again and loading an image, as shown in Figure 11.24.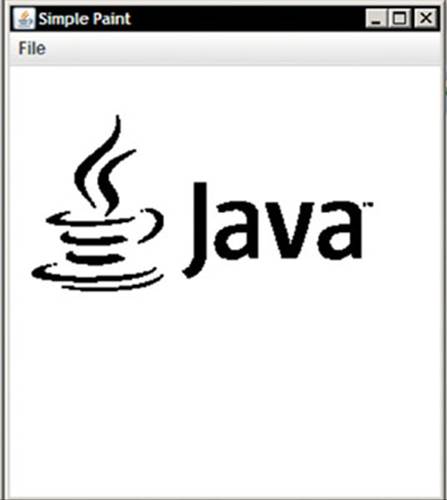
Figure 11.24
223. Finally, you can add the ability to save images:
224. @Override
225. public void actionPerformed(ActionEvent ev) {
226. switch (ev.getActionCommand()) {
227. case ACTION_NEW:
228. paintPanel.clear();
229. break;
230. case ACTION_LOAD:
231. doLoadImage();
232. break;
233. case ACTION_SAVE:
234. doSaveImage();
235. break;
236. }
237. }
238.
239. private void doSaveImage() {
240. JFileChooser fileChooser = new JFileChooser();
241. fileChooser.setFileSelectionMode(JFileChooser.FILES_ONLY);
242. int result = fileChooser.showSaveDialog(this);
243. if (result != JFileChooser.APPROVE_OPTION)
244. return;
245. File saveFile = fileChooser.getSelectedFile();
246. if (!saveFile.getAbsolutePath().toLowerCase().endsWith(".png"))
247. saveFile = new File(saveFile.getAbsolutePath() + ".png");
248. BufferedImage image = new BufferedImage(
249. paintPanel.getSize().width,
250. paintPanel.getSize().height,
251. BufferedImage.TYPE_INT_RGB);
252. for (int x = 0; x < image.getWidth(); x++) {
253. for (int y = 0; y < image.getHeight(); y++) {
254. image.setRGB(x, y, Color.white.getRGB());
255. if (paintPanel.isPixel(new Point(x, y))) {
256. image.setRGB(x, y, Color.black.getRGB());
257. }
258. }
259. }
260. try {
261. ImageIO.write(image, "png", saveFile);
262. } catch (IOException e) {
263. return;
264. }
}
This approach works just as well, as shown in Figure 11.25.
Figure 11.25
Here is the full code for the two classes once more for convenience:
import java.awt.Color;
import java.awt.Point;
import java.awt.event.ActionEvent;
import java.awt.event.ActionListener;
import java.awt.image.BufferedImage;
import java.io.File;
import java.io.FileInputStream;
import java.io.IOException;
import java.util.HashSet;
import java.util.Set;
import javax.imageio.ImageIO;
import javax.swing.JFileChooser;
import javax.swing.JFrame;
import javax.swing.JMenu;
import javax.swing.JMenuBar;
import javax.swing.JMenuItem;
import javax.swing.SwingUtilities;
public class SimplePaint extends JFrame implements ActionListener {
private final String ACTION_NEW = "New Image";
private final String ACTION_LOAD = "Load Image";
private final String ACTION_SAVE = "Save Image";
private final SimplePaintPanel paintPanel = new SimplePaintPanel();
public SimplePaint() {
super();
setDefaultCloseOperation(JFrame.EXIT_ON_CLOSE);
setTitle("Simple Paint");
initMenu();
this.getContentPane().add(paintPanel);
pack();
setVisible(true);
}
private void initMenu() {
JMenuBar menuBar = new JMenuBar();
JMenu menu = new JMenu("File");
JMenuItem mnuNew = new JMenuItem(ACTION_NEW);
JMenuItem mnuLoad = new JMenuItem(ACTION_LOAD);
JMenuItem mnuSave = new JMenuItem(ACTION_SAVE);
mnuNew.setActionCommand(ACTION_NEW);
mnuLoad.setActionCommand(ACTION_LOAD);
mnuSave.setActionCommand(ACTION_SAVE);
mnuNew.addActionListener(this);
mnuLoad.addActionListener(this);
mnuSave.addActionListener(this);
menu.add(mnuNew);
menu.add(mnuLoad);
menu.add(mnuSave);
menuBar.add(menu);
this.setJMenuBar(menuBar);
}
@Override
public void actionPerformed(ActionEvent ev) {
switch (ev.getActionCommand()) {
case ACTION_NEW:
paintPanel.clear();
break;
case ACTION_LOAD:
doLoadImage();
break;
case ACTION_SAVE:
doSaveImage();
break;
}
}
private void doSaveImage() {
JFileChooser fileChooser = new JFileChooser();
fileChooser.setFileSelectionMode(JFileChooser.FILES_ONLY);
int result = fileChooser.showSaveDialog(this);
if (result != JFileChooser.APPROVE_OPTION)
return;
File saveFile = fileChooser.getSelectedFile();
if (!saveFile.getAbsolutePath().toLowerCase().endsWith(".png"))
saveFile = new File(saveFile.getAbsolutePath() + ".png");
BufferedImage image = new BufferedImage(
paintPanel.getSize().width,
paintPanel.getSize().height,
BufferedImage.TYPE_INT_RGB);
for (int x = 0; x < image.getWidth(); x++) {
for (int y = 0; y < image.getHeight(); y++) {
image.setRGB(x, y, Color.white.getRGB());
if (paintPanel.isPixel(new Point(x, y))) {
image.setRGB(x, y, Color.black.getRGB());
}
}
}
try {
ImageIO.write(image, "png", saveFile);
} catch (IOException e) {
return;
}
}
private void doLoadImage() {
JFileChooser fileChooser = new JFileChooser();
fileChooser.setFileSelectionMode(JFileChooser.FILES_ONLY);
int result = fileChooser.showOpenDialog(this);
if (result != JFileChooser.APPROVE_OPTION)
return;
BufferedImage image;
File openFile = fileChooser.getSelectedFile();
try (FileInputStream fis = new FileInputStream(openFile)) {
image = ImageIO.read(fis);
} catch (IOException e) {
return;
}
if (image == null)
return;
paintPanel.clear();
Set<Point> blackPixels = new HashSet<Point>();
for (int x = 0; x < image.getWidth(); x++) {
for (int y = 0; y < image.getHeight(); y++) {
Color c = new Color(image.getRGB(x, y));
if ((c.getBlue() < 128 || c.getRed() < 128 || c.getGreen() < 128)
&& c.getAlpha() == 255) {
blackPixels.add(new Point(x, y));
}
}
}
paintPanel.addPixels(blackPixels);
}
public static void main(String[] args) {
SwingUtilities.invokeLater(new Runnable() {
public void run() { new SimplePaint(); }
});
}
}
import java.awt.Color;
import java.awt.Dimension;
import java.awt.Graphics;
import java.awt.Point;
import java.awt.event.MouseAdapter;
import java.awt.event.MouseEvent;
import java.util.Collection;
import java.util.HashSet;
import java.util.Set;
import javax.swing.JPanel;
public class SimplePaintPanel extends JPanel {
private final Set<Point> blackPixels = new HashSet<Point>();
private final int brushSize;
private int mouseButtonDown = 0;
public SimplePaintPanel() {
this(5, new HashSet<Point>());
}
public SimplePaintPanel(Set<Point> blackPixels) {
this(5, blackPixels);
}
public SimplePaintPanel(int brushSize, Set<Point> blackPixels) {
this.setPreferredSize(new Dimension(300, 300));
this.brushSize = brushSize;
this.blackPixels.addAll(blackPixels);
final SimplePaintPanel self = this;
MouseAdapter mouseAdapter = new MouseAdapter() {
@Override
public void mouseDragged(MouseEvent ev) {
if (mouseButtonDown == 1)
addPixels(getPixelsAround(ev.getPoint()));
else if (mouseButtonDown == 3)
removePixels(getPixelsAround(ev.getPoint()));
}
@Override
public void mousePressed(MouseEvent ev) {
self.mouseButtonDown = ev.getButton();
}
};
this.addMouseMotionListener(mouseAdapter);
this.addMouseListener(mouseAdapter);
}
public void paint(Graphics g) {
int w = this.getWidth();
int h = this.getHeight();
g.setColor(Color.white);
g.fillRect(0, 0, w, h);
g.setColor(Color.black);
for (Point point : blackPixels)
g.drawRect(point.x, point.y, 1, 1);
}
public void clear() {
this.blackPixels.clear();
this.invalidate();
this.repaint();
}
public void addPixels(Collection<? extends Point> blackPixels) {
this.blackPixels.addAll(blackPixels);
this.invalidate();
this.repaint();
}
public void removePixels(Collection<? extends Point> blackPixels) {
this.blackPixels.removeAll(blackPixels);
this.invalidate();
this.repaint();
}
public boolean isPixel(Point blackPixel) {
return this.blackPixels.contains(blackPixel);
}
private Collection<? extends Point> getPixelsAround(Point point) {
Set<Point> points = new HashSet<>();
for (int x = point.x - brushSize; x < point.x + brushSize; x++)
for (int y = point.y - brushSize; y < point.y + brushSize; y++)
points.add(new Point(x, y));
return points;
}
How It Works
This is how it works:
1. There is a lot going on in this small project. Start by taking a look at the SimplePaint class. The JFrame is set up just like before; a SimplePaintPanel component is added to the content pane, and the initMenu() is called to initialize the menu bar.
2. The initMenu() shows you how you can set up menus with Swing. Note that JFrame has a dedicated area to place menu bars, which you can set and get using the setJMenuBar and getJMenuBar methods. Here, a single File menu entry was created, and three menu items were placed under it.
NOTE The Swing menu components are used here. Menu, MenuBar, MenuItem, setMenuBar, and getMenuBar also exist, but these correspond to the AWT components, which should be considered outdated. The naming is somewhat confusing, but that’s the way it is.
3. You will have noted that it is possible to assign action listeners to menu items. In this project, the SimplePaint class acts as a listener for all menu items as well. The actionPerformed method then determines which method to call based on the action command.
4. The New menu item performs a simple operation and just calls the clear method on the paint panel.
5. Loading an image is a bit more convoluted. First, a JFileChooser is constructed (you could also make this a class field; go ahead and try this if you want) and configured so users can only select files. Next, the showOpenDialog method is called to display an Open File dialog. JFileChooser also has a lot of additional options you can configure, such as filtering which files to show. The result of this method is an integer determining whether the user selected a file or cancelled the dialog, or an error occurred. Next, the getSelectedFile method retrieves your file. Note that JFileChooser still utilizes the legacy File class. Next, a built-in utility class called ImageIO does the heavy lifting regarding reading image files. This class reads in common file formats, such as PNG, JPG, BMP, and GIF files, and returns a BufferedImage object to store the image data. Next, it iterates over all pixels in the image and applies a simple trick to determine whether the pixel color should be converted to a black pixel. Dark colors are converted to black, whereas light colors are not; that is what the if ((c.getBlue() < 128 || c.getRed() < 128 || c.getGreen() < 128) && c.getAlpha() == 255) line does. Once all the black pixels are gathered, the paintPanel object is instructed to add them.
6. The save method works similarly. Here, a fresh image is constructed with the width and height equal to the current width and height of the paint panel. Next, it loops over each pixel again and sets them to black when necessary. Note that some additional logic is applied to make the filename selected with showSaveDialog end in .png, as there is no way to force the JFileChooser to do this for you. (This is because file extensions are just a convention to tell the operating system what the default program should be to open files ending in a particular suffix. There is nothing preventing you from saving a PNG image as image.txt and opening it with an image editor afterward.)
7. Now take a look at the SimplePaintPanel class. This class extends JPanel and implements a mouse and mouse motion event listener by using the MouseAdapter class.
8. The mouse-related methods that are implemented are mouseDragged and mousePressed. The latter determines which button (left or right) is being pressed. When the mouse is dragged, it looks at the mouse button currently being pressed and determines whether black pixels should be added or removed. You might wonder why you can’t just use ev.getButton() in the mouseDragged method to determine which mouse button is being pressed. The reason for this is that this will always return 0, asgetButton() only returns the button number when the state has changed. Since you keep holding down the mouse button whilst dragging, no button state is changing. You can, however, use SwingUtilities.isLeftMouseButton(ev) instead, which will work, but here things were done manually to show off how the mouse event listener works as well.
9. The second interesting aspect to note is the custom paint method for this class. First, the whole panel surface is filled out with white, after which a pixel is drawn for each point in the blackPixels set.
10.Finally, it is important to know that you should tell Java when “my surface has changed; you should draw me again.” This is what is done with the invalidate method. A repaint call is placed right after this to instruct Java to redraw the component (which will have Java make a call to the paint method).
11.You will notice this yourself when drawing quickly; the drawing code is horribly inefficient. There are many reasons for this. First, working with a set of pixels is not ideal, especially not for larger images. Second, Swing components were never really designed to perform high-speed drawing updates, which is what is done here while dragging. In a real painting application, you need to look for better-suited drawing components (those exist). That said, this example helps to explain various concepts, and custom drawing code can still be helpful whenever you know components will not need to be redrawn continuously.
If you want to try to improve this simple painting application (this is a great starter project with the right amount of challenges), here are some suggestions:
· Try using background tasks. Perhaps you don’t need to call for a repaint every time the mouse is moved while dragged; perhaps you can postpone the redraw until the movement has settled down?
· Similarly, instead of adding a set of pixels based on every point the mouse touches while dragging, you can also poll less aggressively and draw line segments between two points the mouse has been. This solves the problem of gaps while drawing quickly, but makes it harder to draw smooth curves when moving quickly.
· Try exploring the java.awt.Canvas component. This component has been specifically designed for custom free-form drawing.
· Finally, you can add a panel with some buttons, such as to select colors and so on. In this case, you might want to drop the set of black pixels and work directly on and with the painting surface. You can also try using a BufferedImage to store your image data directly (and more efficiently).
Visual GUI Designers: Making Life Easy?
Earlier in this chapter, you learned that the GroupLayout and SpringLayout layout managers were originally designed to be used in combination with visual GUI designers. So what are these exactly?
Eclipse, by default, does not come with a visual GUI designer, but you can install one by selecting Install New Software from the Help menu and searching for the WindowBuilder packages, as shown in Figure 11.26.

Figure 11.26
NOTE To make WindowBuilder understand Swing components, you will also need to search for the “Swing Designer” packages and install these as well.
Once the new package is installed (and you restart Eclipse), try creating a new class. Right-click it in the Package Explorer and select Open With WindowBuilder Editor. From this editor, you can switch between a Source and Design tab, as shown in Figure 11.27.
Figure 11.27
When you switch to the Design tab, WindowBuilder will complain about the fact that it cannot figure out that this is a GUI class. No worries; just modify the class to make it a JFrame:
import javax.swing.JFrame;
public class WindowBuilderExample extends JFrame {
public WindowBuilderExample() {
}
}
Open the Design tab once more (select Reparse when nothing appears). You will be presented with the screen shown in Figure 11.28.
Figure 11.28
Here, you can drag and drop components and layouts to your JFrame. Figure 11.29 shows an example after five minutes of tinkering.
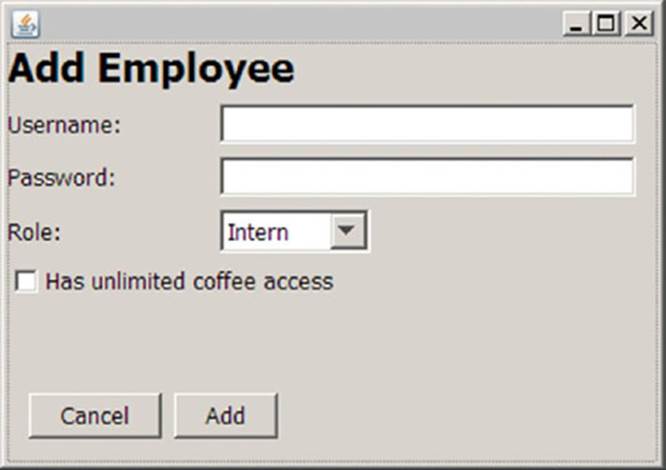
Figure 11.29
Note the row of buttons at the top of the designer view, including the one that allows you to quickly test a preview of your component in Figure 11.30.

Figure 11.30
Once you’re done prototyping, you can switch back to the source view and check out the generated code:
import javax.swing.JFrame;
import javax.swing.GroupLayout;
import javax.swing.GroupLayout.Alignment;
import javax.swing.JLabel;
import java.awt.Font;
import javax.swing.LayoutStyle.ComponentPlacement;
import javax.swing.JTextField;
import javax.swing.JComboBox;
import javax.swing.DefaultComboBoxModel;
import javax.swing.JCheckBox;
import javax.swing.JButton;
import java.awt.event.ActionListener;
import java.awt.event.ActionEvent;
public class WindowBuilderExample extends JFrame {
private JTextField textField;
private JTextField textField_1;
public WindowBuilderExample() {
JLabel lblAddEmployee = new JLabel("Add Employee");
lblAddEmployee.setFont(new Font("Tahoma", Font.BOLD, 22));
JLabel lblUsername = new JLabel("Username:");
textField = new JTextField();
textField.setColumns(10);
JLabel lblPassword = new JLabel("Password:");
textField_1 = new JTextField();
textField_1.setColumns(10);
JLabel lblRole = new JLabel("Role:");
JComboBox comboBox = new JComboBox();
comboBox.setModel(new DefaultComboBoxModel(
new String[] {"Intern", "Employee", "Manager"}));
JCheckBox chckbxHasUnlimitedCoffee =
new JCheckBox("Has unlimited coffee access");
JButton btnCancel = new JButton("Cancel");
JButton btnAdd = new JButton("Add");
btnAdd.addActionListener(new ActionListener() {
public void actionPerformed(ActionEvent arg0) {
}
});
GroupLayout groupLayout = new GroupLayout(getContentPane());
groupLayout.setHorizontalGroup(
groupLayout.createParallelGroup(Alignment.LEADING)
.addGroup(groupLayout.createSequentialGroup()
.addGroup(groupLayout.createParallelGroup(Alignment.LEADING)
.addComponent(lblAddEmployee)
.addGroup(groupLayout.createSequentialGroup()
.addGroup(groupLayout.createParallelGroup(Alignment.LEADING)
.addComponent(lblUsername)
.addComponent(lblPassword)
.addComponent(lblRole))
.addGap(54)
.addGroup(groupLayout.createParallelGroup(Alignment.LEADING)
.addComponent(comboBox, GroupLayout.PREFERRED_SIZE,
GroupLayout.DEFAULT_SIZE, GroupLayout.PREFERRED_SIZE)
.addComponent(textField, GroupLayout.DEFAULT_SIZE,
229, Short.MAX_VALUE)
.addComponent(textField_1, GroupLayout.DEFAULT_SIZE,
229, Short.MAX_VALUE)))
.addComponent(chckbxHasUnlimitedCoffee)
.addGroup(groupLayout.createSequentialGroup()
.addContainerGap()
.addComponent(btnCancel)
.addPreferredGap(ComponentPlacement.RELATED)
.addComponent(btnAdd)))
.addContainerGap())
);
groupLayout.setVerticalGroup(
groupLayout.createParallelGroup(Alignment.LEADING)
.addGroup(groupLayout.createSequentialGroup()
.addComponent(lblAddEmployee)
.addPreferredGap(ComponentPlacement.RELATED)
.addGroup(groupLayout.createParallelGroup(Alignment.BASELINE)
.addComponent(lblUsername)
.addComponent(textField, GroupLayout.PREFERRED_SIZE,
GroupLayout.DEFAULT_SIZE, GroupLayout.PREFERRED_SIZE))
.addPreferredGap(ComponentPlacement.RELATED)
.addGroup(groupLayout.createParallelGroup(Alignment.BASELINE)
.addComponent(lblPassword)
.addComponent(textField_1, GroupLayout.PREFERRED_SIZE,
GroupLayout.DEFAULT_SIZE, GroupLayout.PREFERRED_SIZE))
.addPreferredGap(ComponentPlacement.RELATED)
.addGroup(groupLayout.createParallelGroup(Alignment.BASELINE)
.addComponent(lblRole)
.addComponent(comboBox, GroupLayout.PREFERRED_SIZE,
GroupLayout.DEFAULT_SIZE, GroupLayout.PREFERRED_SIZE))
.addPreferredGap(ComponentPlacement.RELATED)
.addComponent(chckbxHasUnlimitedCoffee)
.addPreferredGap(ComponentPlacement.RELATED, 49, Short.MAX_VALUE)
.addGroup(groupLayout.createParallelGroup(Alignment.BASELINE)
.addComponent(btnCancel)
.addComponent(btnAdd))
.addContainerGap())
);
getContentPane().setLayout(groupLayout);
}
}
Well, the result certainly looks complicated. WindowBuilder will do its best to anticipate your further code and will make components such as textfields and class fields so you can access them from other methods and objects when needed (to get and set text). By default, listeners are inlined with anonymous inner classes, but you can change this to real listener objects as well. Be careful when changing around too many things, though, as WindowBuilder might then not be able to convert your changes to a GUI layout it understands. This immediately illustrates both the advantages and disadvantages of visual GUI designers. They provide a great, easy method to quickly prototype a GUI (image building the GUI above by hand), but can lose their head once you start making too many custom changes.
In general, especially when you’re starting out, you are advised not to fall into the luring trap of visual designers promising rapid development. If you can construct your GUI with some nimble nested components and simple layout managers, then by all means go ahead. If you do need to build complex forms and don’t want to waste time laying out everything by hand, WindowBuilder provides a great alternative. The designer is also a helpful way to get acquainted quickly with unfamiliar components.
Finally, it is worth noting that you can also download other plug-ins to make WindowBuilder aware of GUI toolkits other than AWT/Swing, such as SWT. Other IDEs (Netbeans especially) also come with great visual designers, and there are some commercial ones as well (Jvider, JFormDesigner, and others).
JavaFX: The Road Ahead?
Swing has been around for a long time, and although the toolkit is immensely robust, it is starting to show its age. You have seen this already when talking about custom painting, or when taking a look at some of the . . . less nice-looking look and feels. With high-resolution retina displays, smartphones, tablets, rich Internet applications, and hardware-accelerated desktop compositors, the Java community started to desire a more modern UI toolkit. JavaFX was kickstarted to answer this need, and the UI toolkit has been around since 2008. With the release of Java 8, JavaFX became an integral part of the JRE (and JDK), so that the latest version of JavaFX went from 2.2 to simply JavaFX 8.
Sadly, this beginner book can’t go into depth on all aspects of JavaFX, but when you are familiar with Swing, switching to JavaFX, should you want to, doesn’t pose too many hurdles. Answering the question whether you should use JavaFX is not so straightforward. If you’re itching to use the latest and greatest, then by all means go ahead. Keep in mind, however, that the community surrounding JavaFX is still young, so it will be much easier to find Swing-related libraries, support, and help when you need it. Finally, the multitude of GUIs in Java were built and are still being built with Swing, so if you’re looking to apply your skills in a real-life setting, you still need to be acquainted with Swing.
The chapter concludes with two example projects built with JavaFX. In the first example, you’ll learn how to build the BMI calculator again. If you’re following along, you can just copy the old BMICalculator class and throw out anything that has to do with AWT or Swing. You’ll also see a few things commented out so you don’t forget to deal with them later:
public class BMICalculatorFX {
//private final JTextField txtMass = makePrettyTextField();
//private final JTextField txtHeight = makePrettyTextField();
//private final JButton btnCalc = makePrettyButton("Calculate BMI");
public BMICalculatorFX() {
/*
btnCalc.addActionListener(new ActionListener() {
@Override
public void actionPerformed(ActionEvent arg0) {
double mass;
double height;
try {
mass = Double.parseDouble(txtMass.getText());
height = Double.parseDouble(txtHeight.getText());
} catch (NumberFormatException e) {
JOptionPane.showMessageDialog(self,
"Please enter a valid number for mass and height.",
"Input error",
JOptionPane.ERROR_MESSAGE);
return;
}
double result = calculateBMI(mass, height);
JOptionPane.showMessageDialog(self,
"Your BMI is: " + (Math.round(result*100.0)/100.0),
"Your BMI result",
JOptionPane.PLAIN_MESSAGE);
}
});
*/
}
protected double calculateBMI(double mass, double height) {
return mass / Math.pow(height/100.0, 2.0);
}
public static void main(String[] args) {
SwingUtilities.invokeLater(new Runnable() {
public void run() { new BMICalculatorFX(); }
});
}
}
The first thing to do is to figure out a way to show a simple window using JavaFX. In JavaFX, the main actor is called an application, and it can manage and show various stages. For this simple JavaFX application, this leads to the following:
import javafx.application.Application;
import javafx.scene.Group;
import javafx.scene.Scene;
import javafx.stage.Stage;
public class BMICalculatorFX extends Application {
//private final JTextField txtMass = makePrettyTextField();
//private final JTextField txtHeight = makePrettyTextField();
//private final JButton btnCalc = makePrettyButton("Calculate BMI");
public BMICalculatorFX() {
/*
btnCalc.addActionListener(new ActionListener() {
@Override
public void actionPerformed(ActionEvent arg0) {
double mass;
double height;
try {
mass = Double.parseDouble(txtMass.getText());
height = Double.parseDouble(txtHeight.getText());
} catch (NumberFormatException e) {
JOptionPane.showMessageDialog(self,
"Please enter a valid number for mass and height.",
"Input error",
JOptionPane.ERROR_MESSAGE);
return;
}
double result = calculateBMI(mass, height);
JOptionPane.showMessageDialog(self,
"Your BMI is: " + (Math.round(result*100.0)/100.0),
"Your BMI result",
JOptionPane.PLAIN_MESSAGE);
}
});
*/
}
@Override
public void start(Stage stage) throws Exception {
Scene scene = new Scene(new Group());
stage.setTitle("JavaFX BMI Calculator");
stage.setScene(scene);
stage.sizeToScene();
stage.show();
}
protected double calculateBMI(double mass, double height) {
return mass / Math.pow(height/100.0, 2.0);
}
public static void main(String[] args) {
Application.launch(args);
}
}
Note that Eclipse will complain about your JavaFX imports. The reason for this is that they are only part of Oracle’s JRE and other Java implementations might not support this. To solve this warning, right-click your project in the Package Explorer, select Build Path followed by Configure Build Path. In the window that opens, navigate to the Libraries tab and expand the entry for JRE System Library. Select Access Rules and click Edit. Next, add an access rule to make javafx/** accessible, as illustrated in Figure 11.31.
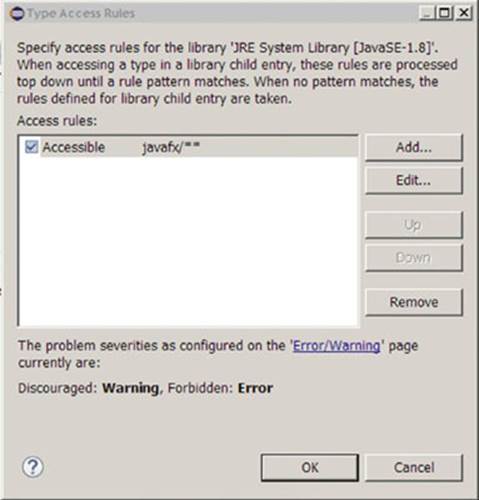
Figure 11.31
Press OK. Your build path window should now look like Figure 11.32.
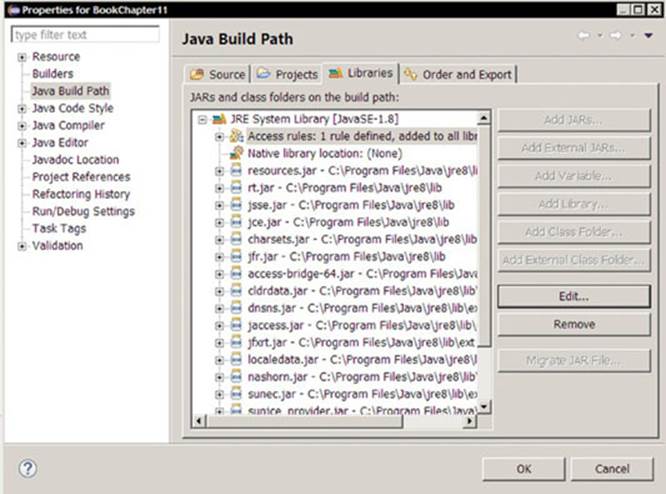
Figure 11.32
Press OK again. Your project will recompile and the errors should disappear.
You can try running the project now. A window will appear, but it seems to contain absolutely nothing, which is not surprising seeing that you set up an empty scene for the stage:
Scene scene = new Scene(new Group());
Now you can fill this scene with some actors. Just as with Swing, JavaFX also has several layout managers you can use. A simple VBox layout is used here:
import javafx.application.Application;
import javafx.scene.Group;
import javafx.scene.Scene;
import javafx.scene.control.Button;
import javafx.scene.control.Label;
import javafx.scene.control.TextField;
import javafx.scene.layout.VBox;
import javafx.scene.text.Font;
import javafx.stage.Stage;
public class BMICalculatorFX extends Application {
private final TextField txtMass = new TextField();
private final TextField txtHeight = new TextField();
private final Button btnCalc = new Button("Calculate BMI");
public BMICalculatorFX() {
/*
btnCalc.addActionListener(new ActionListener() {
@Override
public void actionPerformed(ActionEvent arg0) {
double mass;
double height;
try {
mass = Double.parseDouble(txtMass.getText());
height = Double.parseDouble(txtHeight.getText());
} catch (NumberFormatException e) {
JOptionPane.showMessageDialog(self,
"Please enter a valid number for mass and height.",
"Input error",
JOptionPane.ERROR_MESSAGE);
return;
}
double result = calculateBMI(mass, height);
JOptionPane.showMessageDialog(self,
"Your BMI is: " + (Math.round(result*100.0)/100.0),
"Your BMI result",
JOptionPane.PLAIN_MESSAGE);
}
});
*/
}
@Override
public void start(Stage stage) throws Exception {
VBox vbox = new VBox(10);
Label lblTitle = new Label("BMI Calculator");
lblTitle.setFont(Font.font(18));
vbox.getChildren().add(lblTitle);
vbox.getChildren().add(new Label("Your mass (kg):"));
vbox.getChildren().add(txtMass);
vbox.getChildren().add(new Label("Your height (cm):"));
vbox.getChildren().add(txtHeight);
vbox.getChildren().add(btnCalc);
Scene scene = new Scene(new Group(vbox));
stage.setTitle("JavaFX BMI Calculator");
stage.setScene(scene);
stage.sizeToScene();
stage.show();
}
protected double calculateBMI(double mass, double height) {
return mass / Math.pow(height/100.0, 2.0);
}
public static void main(String[] args) {
Application.launch(args);
}
}
You’ll notice that the basic concepts are not so different from Swing. Running your project now provides the beautifully crafted window shown in Figure 11.33.
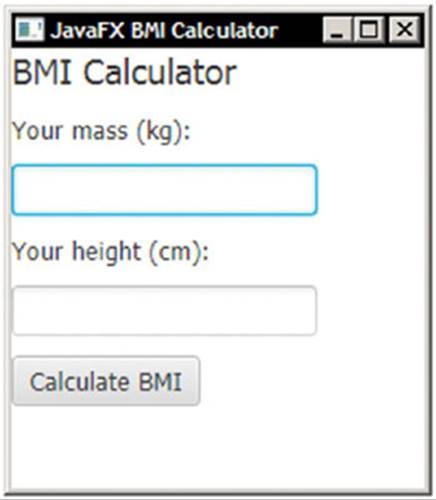
Figure 11.33
Next, you’ll need to add an action handler to the button. Again, the basic concepts are the same—you need to catch interesting UI events and respond to them:
import javafx.application.Application;
import javafx.event.ActionEvent;
import javafx.event.EventHandler;
import javafx.scene.Group;
import javafx.scene.Scene;
import javafx.scene.control.Button;
import javafx.scene.control.Label;
import javafx.scene.control.TextField;
import javafx.scene.layout.VBox;
import javafx.scene.text.Font;
import javafx.stage.Stage;
import javafx.geometry.Pos;
import javafx.scene.layout.HBox;
import javafx.stage.Modality;
import javafx.stage.StageStyle;
public class BMICalculatorFX extends Application {
private Stage stage;
private final TextField txtMass = new TextField();
private final TextField txtHeight = new TextField();
private final Button btnCalc = new Button("Calculate BMI");
@Override
public void start(Stage stage) throws Exception {
this.stage = stage;
VBox vbox = new VBox(10);
Label lblTitle = new Label("BMI Calculator");
lblTitle.setFont(Font.font(18));
vbox.getChildren().add(lblTitle);
vbox.getChildren().add(new Label("Your mass (kg):"));
vbox.getChildren().add(txtMass);
vbox.getChildren().add(new Label("Your height (cm):"));
vbox.getChildren().add(txtHeight);
vbox.getChildren().add(btnCalc);
btnCalc.setOnAction(new EventHandler<ActionEvent>() {
@Override
public void handle(ActionEvent ev) {
double mass;
double height;
try {
mass = Double.parseDouble(txtMass.getText());
height = Double.parseDouble(txtHeight.getText());
} catch (NumberFormatException e) {
showMessage("Check your input.", "Error in number input");
return;
}
double result = calculateBMI(mass, height);
showMessage("Your BMI is: " +
(Math.round(result*100.0)/100.0), "Your BMI result");
}
});
Scene scene = new Scene(new Group(vbox));
stage.setTitle("JavaFX BMI Calculator");
stage.setScene(scene);
stage.sizeToScene();
stage.show();
}
protected double calculateBMI(double mass, double height) {
return mass / Math.pow(height/100.0, 2.0);
}
public static void main(String[] args) {
Application.launch(args);
}
public void showMessage(final String message, final String title) {
final Stage dialog = new Stage(StageStyle.UTILITY);
dialog.setTitle(title);
dialog.setResizable(false);
dialog.initModality(Modality.WINDOW_MODAL);
dialog.initOwner(this.stage);
VBox vbox = new VBox(2);
HBox pane = new HBox(10);
dialog.setScene(new Scene(vbox));
vbox.setAlignment(Pos.CENTER);
vbox.getChildren().add(pane);
pane.getChildren().add(new Label(message));
Button btn = new Button("OK");
btn.setOnAction(new EventHandler<ActionEvent>() {
@Override
public void handle(ActionEvent e) {
dialog.close();
}
});
pane.getChildren().add(btn);
dialog.showAndWait();
}
}
Note that JavaFX does not provide a built-in method to show dialogs (this might be included in future Java updates, though). Here, a simple showMessage method was added that constructs a new stage window to show a message with an OK button. The end result looks like Figure 11.34.
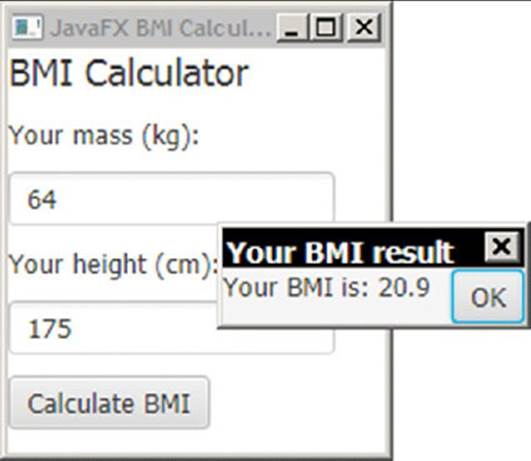
Figure 11.34
As of now, you might appreciate the cleaner coding style and look of JavaFX, but still wonder what the big deal is. Earlier, you read that JavaFX hardware accelerated graphics to allow for more spectacular graphical applications as well. The following and final example (adapted from an Oracle tutorial) shows this in action:
import static java.lang.Math.random;
import javafx.animation.Animation;
import javafx.animation.KeyFrame;
import javafx.animation.KeyValue;
import javafx.animation.Timeline;
import javafx.application.Application;
import javafx.scene.Group;
import javafx.scene.Node;
import javafx.scene.Scene;
import javafx.scene.effect.BlendMode;
import javafx.scene.effect.BoxBlur;
import javafx.scene.paint.Color;
import javafx.scene.paint.CycleMethod;
import javafx.scene.paint.LinearGradient;
import javafx.scene.paint.Stop;
import javafx.scene.shape.Circle;
import javafx.scene.shape.Rectangle;
import javafx.scene.shape.StrokeType;
import javafx.stage.Stage;
import javafx.util.Duration;
public class ScreenSaver extends Application {
public static void main(String[] args) {
launch(args);
}
@Override
public void start(Stage primaryStage) {
Group root = new Group();
Scene scene = new Scene(root, 800, 600, Color.WHITE);
primaryStage.setScene(scene);
Group circles = new Group();
for (int i = 0; i < 500; i++) {
Circle circle = new Circle(30, Color.web("black", 0.10));
circle.setStrokeType(StrokeType.OUTSIDE);
circle.setStroke(Color.web("black", 0.15));
circle.setStrokeWidth(2);
circles.getChildren().add(circle);
}
Rectangle colors = new Rectangle(scene.getWidth(), scene.getHeight(),
new LinearGradient(0f, 1f, 1f, 0f, true, CycleMethod.REPEAT,
new Stop[]{
new Stop(0, Color.web("#f8bd55")),
new Stop(0.14, Color.web("#c0fe56")),
new Stop(0.28, Color.web("#5dfbc1")),
new Stop(0.43, Color.web("#64c2f8")),
new Stop(0.57, Color.web("#be4af7")),
new Stop(0.71, Color.web("#ed5fc2")),
new Stop(0.85, Color.web("#ef504c")),
new Stop(1, Color.web("#f2660f"))}
));
colors.widthProperty().bind(scene.widthProperty());
colors.heightProperty().bind(scene.heightProperty());
Group blendModeGroup = new Group(
new Group(
new Rectangle(scene.getWidth(), scene.getHeight(),
Color.WHITE), circles), colors);
colors.setBlendMode(BlendMode.OVERLAY);
root.getChildren().add(blendModeGroup);
circles.setEffect(new BoxBlur(10, 10, 3));
Timeline timeline = new Timeline();
for (Node circle : circles.getChildren()) {
timeline.getKeyFrames().addAll(
new KeyFrame(Duration.ZERO,
new KeyValue(circle.translateXProperty(),
random() * scene.getWidth()),
new KeyValue(circle.translateYProperty(),
random() * scene.getHeight())),
new KeyFrame(new Duration(60000),
new KeyValue(circle.translateXProperty(),
random() * scene.getWidth()),
new KeyValue(circle.translateYProperty(),
random() * scene.getHeight())));
}
timeline.setCycleCount(Animation.INDEFINITE);
timeline.play();
primaryStage.show();
}
}
Feel free to daydream while JavaFX shows its graphical prowess in Figure 11.35.
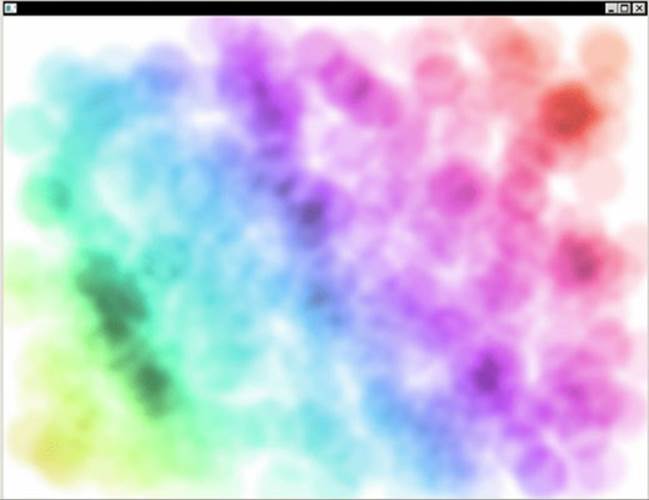
Figure 11.35
This concludes the chapter on building graphical interfaces. This has been a lengthy one, and even now, many Swing (and JavaFX) components remain worth taking a closer look at. As such, don’t hesitate to get started building your own GUIs and exploring the Javadocs to hone your skills. Make sure to keep the best practices listed in this chapter in mind—keep logic and looks separated and structure your UI code in a neat manner.
Speaking of best practices, the following chapter will be completely devoted to these, as you delve into the topic of Object-Oriented Programming patterns. It covers best practices to solve common architectural challenges and structure your applications in the best maintainable and understandable way possible, something that will become immensely important as your applications start growing in size and complexity.