Beginning Java Programming: The Object-Oriented Approach (Programmer to Programmer) (2015)
2. Getting to Know Java
WHAT YOU WILL LEARN IN THIS CHAPTER:
· The history of Java
· The key features of Java
· How the Java technology works
· The key components of the Java Runtime Environment (JRE) and how they collaborate
· The different types of Java platforms and applications
· The relationship between Java and JavaScript
· The basic concepts of the Java language structure
· The primitive Java data types and how they are used
WROX.COM CODE DOWNLOADS FOR THIS CHAPTER
The wrox.com code downloads for this chapter are found at www.wrox.com/go/beginningjavaprogramming on the Download Code tab. The code is in the Chapter 2 download and individually named according to the names throughout the chapter.
Before you get your hands wet trying your first Java program, you need to learn some basic concepts relating to the Java architecture and language semantics. The chapter starts by providing a bird’s eye overview of Java’s history, its key features, and the underlying technology. The chapter then zooms into the Java Runtime Environment (JRE), which is the software environment in which Java programs are executed. This will be followed by a discussion of various types of Java applications, such as standalone applications, applets, servlets, and Java beans.
The chapter then covers the basic concepts of the Java language structure. You will read about various concepts such as classes, identifiers, Java keywords, variables, methods, comments, and naming conventions in depth. After that, you’ll learn about Java data types. First, the various primitive data types will be covered, followed by a discussion of literals, operators, arrays, and type casting. The BMI example introduced in Chapter 1 is used to demonstrate and clarify the new concepts. This chapter is a very important one because it lays the foundation for all subsequent chapters. Many of the concepts that are introduced here will be elaborated on in later chapters.
A SHORT JAVA HISTORY
In 1991, Sun Microsystems funded the research project called “Green” to design a programming language to be used in intelligent consumer electronic devices, like televisions, VCRs, and washing machines. Since home appliance processor chips change on a continuous basis, the programming language used needed to be extremely portable. Existing programming languages such as C++ were clearly not suitable. Often, the embedded language was tied closely to the appliance processor, and a new language needed to be developed. This new language was originally termed Oak (referring to the tree that was outside the main developer’s, James Gosling’s, window), but was quickly renamed Java. The use of Java for home appliance applications turned out to be initially unsuccessful, but the emergence of the Web gave it a new future. In 1994, the first Java-enabled web browser HotJava was developed. A year later, Netscape incorporated Java support into its web browser. Other companies quickly followed and Java’s popularity rapidly rose. Sun released Java 1.0 to the public in 1995. In 2007, Sun made Java’s core code available as open source under the terms of the GNU General Public License (GPL). In 2009, Sun was acquired by Oracle, which is currently continuing the development of Java. Table 2.1gives an overview of the major releases, together with some key characteristics. Note that the versions were originally referred to as JDKs (Java Development Kits) and later rebranded into J2SE (Java 2 Platform, Standard Edition).
Table 2.1 Characteristics of Major Java Releases
|
MAJOR RELEASE |
DATE |
KEY CHARACTERISTICS |
|
JDK 1.0 |
1996 |
First stable version of Java |
|
JDK 1.1 |
1997 |
Inner classes; Java beans; JDBC; RMI; Just in Time (JIT) compiler for Windows platforms |
|
J2SE 1.2 |
1998 |
Swing classes; Java IDL; Collections |
|
J2SE 1.3 |
2000 |
Java platform debugger architecture (JPDA); JavaSound; HotSpot JVM |
|
J2SE 1.4 |
2002 |
Regular expressions; IPv6 support; image I/O API; non-blocking I/O (nio); XML parser and XSLT processor |
|
J2SE 5.0 |
2004 |
Generics; annotations; autoboxing; enumerations; varargs; for each loop |
|
Java SE 6 |
2006 |
Improved GUI support; improved web service support |
|
Java SE 7 |
2011 |
New file I/O capabilities; support for new network protocols |
|
Java SE 8 |
2014 |
Lambda expressions; new date and time API |
|
Java SE 9 |
2016 (expected) |
Money and currency API |
FEATURES OF JAVA
The key characteristics of the Java programming language that have made it so popular include the following:
· Simple: Java omits some of the vaguely defined features of C++. It has facilities for automatic garbage collection to automatically release unused memory while a program is running. It also includes a rich predefined set of packages (such as for mathematics, statistics, database access, GUI design, and so on) that can be easily reused by application developers. Its syntax looks very similar to C/C++, making it easy for experienced programmers to learn and use.
· Platform independent and portable: By using a hybrid compilation/interpretation approach, Java programs can be executed in a networked environment with different hardware platforms and architectures. This also makes Java applications extremely portable, effectively realizing the “write once, run everywhere” philosophy.
· Object-oriented: Java implements the object-oriented programming paradigm by grouping data and operations into classes and/or objects.
· Secure: Java has many facilities to guarantee security in a networked environment. It imposes various types of access restrictions to (networked) resources and carefully supervises memory allocation. It allows code to be downloaded over a network and executed safely in the confined spaces of memory. It also foresees extensive capabilities for configuring security levels.
· Multi-threaded: Java delivers the power of advanced multi-threaded capabilities to the developer in an environment without complexity. More specifically, Java code can be run concurrently as multiple threads in a process, in order to improve its execution performance.
· Dynamic: Java allows code to be added to libraries dynamically and then can determine which code should run at execution time. It also foresees a strict separation between interface and implementation.
The remainder of this book explores each of these features in much greater detail.
LOOKING UNDER THE HOOD
In this section, we will take a look under the hood of Java. We will discuss Java bytecode, the Java Runtime Environment (JRE), and Java platforms and applications.
Bytecode
Given the proliferation of hardware platforms and/or machine architectures available in today’s networked environment, the Java developers aimed at coming up with a cross-platform solution that would not require developing expensive compilers to compile Java source code to machine code for every possible target platform. In order to accomplish this goal, Java introduced a hybrid approach to run programs by combining both compiler and interpreter technology. First, every Java source program (BMI.java) is compiled into an intermediate language called bytecode (BMI.class), which is platform independent. During this compilation step, errors in the code can be reported. Java bytecode is not native machine code, so it cannot be run as such on a host computer. Instead, the bytecode will be parsed by a platform-specific interpreter in order to run it on a particular architecture, such as on Windows, Linux, Mac OS, Sun Solaris, and so on. Interpreters have been developed for various platforms. All of them are implementations of the Java virtual machine (JVM). The bytecode can then be considered as machine code for the JVM. The JVM is basically a virtual CPU complete with its own operation codes. Irrespective of which platform you are on, the bytecode is the exact same. The JVM is then a separate process that runs on top of a native processor. Figure 2.1 illustrates the bytecode for a Windows 8 platform generated for a Java program based on the BMI calculator example.
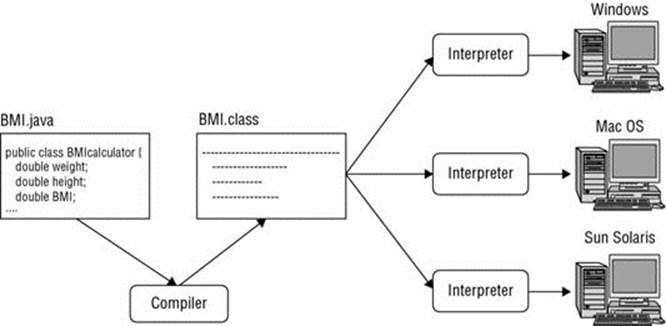
Figure 2.1
static double BMI;
public BMIcalculator();
Code:
0: aload_0
1: invokespecial #12 // Method java/lang/Object."<init>":()V
4: return
public static void main(java.lang.String[]);
Code:
0: ldc2_w #20 // double 60.0d
3: putstatic #22 // Field weight:D
6: ldc2_w #24 // double 1.7d
9: putstatic #26 // Field height:D
12: invokestatic #28 // Method calculateBMI:()V
15: getstatic #31 // Field java/lang/System.out:Ljava/io/PrintStream;
18: new #37 // class java/lang/StringBuilder
21: dup
22: ldc #39 // String Your BMI is
24: invokespecial #41 // Method java/lang/
// StringBuilder.
// "<init>":(Ljava/lang/String;)V
27: getstatic #44 // Field BMI:D
30: invokevirtual #46 // Method java/lang/StringBuilder.append:
(D)Ljava/lang/StringBuilder;
33: ldc #50 // String .
35: invokevirtual #52 // Method java/lang/StringBuilder.append:
(Ljava/lang/String;)Ljava/lang/StringBuilder;
38: invokevirtual #55 // Method java/lang/StringBuilder.toString:
()Ljava/lang/String;
41: invokevirtual #59 // Method java/io/PrintStream.println:
(Ljava/lang/String;)V
44: return
public static void calculateBMI();
Code:
0: getstatic #22 // Field weight:D
3: getstatic #26 // Field height:D
6: getstatic #26 // Field height:D
9: dmul
10: ddiv
11: putstatic #44 // Field BMI:D
14: return
}
When compared to a pure interpreter technology, errors are detected during compilation time instead of during execution time. When compared to a pure compiler technology, the portability is better since this setup essentially implements a “write once, compile, run everywhere” strategy so that every platform with a Java Virtual Machine can run Java bytecode. This is especially relevant in a networked (Internet) environment with many host systems having their own specific platform.
Java Runtime Environment (JRE)
The Java Runtime Environment (JRE) is the software environment in which Java programs run. It consists of various components, as depicted in Figure 2.2.
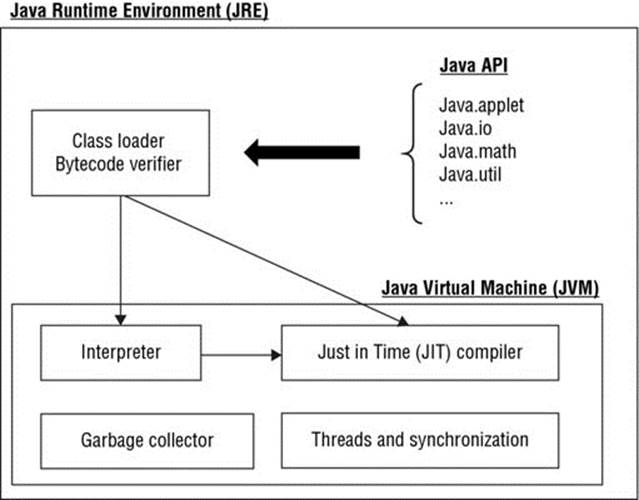
Figure 2.2
The next subsections elaborate on the following components:
· Java API (Application Programming Interface)
· Class loader
· Bytecode verifier
· Java Virtual Machine (JVM)
Java Application Programming Interface (API)
The Java Application Programming Interface (API) is the set of prepackaged, ready-made Java components grouped into libraries. It provides programmers with many useful capabilities. Some popular API libraries are listed in Table 2.2.
Table 2.2 Example Libraries from the Java API
|
JAVA LIBRARY |
FUNCTIONALITY |
|
Java.awt; Java.swing |
Support for creating graphical user interfaces (GUIs) |
|
Java.applet |
Functionality to create applets |
|
Java.beans |
Functionality to create Java beans |
|
Java.io |
Support for I/O through files, keyboard, network, and so on |
|
Java.lang |
Functionality fundamental to the Java programming language |
|
Java.math |
Mathematical routines |
|
Java.security |
Security functions |
|
Java.sql |
Support for accessing relational databases by means of SQL |
|
Java.text |
Text support |
|
Java.util |
Various programming utilities |
|
Javax.imageIO |
Support for image I/O |
|
Javax.xml |
Support for XML handling |
Many of these libraries are discussed and used in later chapters of this book. When developing new Java applications, it is important to consider the API to see if you can use some of the functionalities that are already implemented. This saves you from having to program every aspect yourself, and it can also make your program more recognizable and usable to other programmers. The API is flexible and open, which means that new packages or libraries can be added to it on an ongoing basis.
Class Loader
The class loader locates and reads the *.class files needed to execute the Java program and loads the bytecodes into memory. To safeguard a secure execution, it can assign different portions (namespaces) of memory to locally versus remotely obtained classes. Classes are typically assembled into libraries that are stored physically in JAR (Java Archive) files. The libraries may have been written by the user or obtained externally. In order to locate the classes, the class loader will first find the corresponding libraries and then load the classes as they are needed by the program (called on-demand loading). The class loader basically has three subcomponents:
· Bootstrap class loader
· Extensions class loader
· System class loader
The bootstrap class loader loads the core Java libraries located in <JAVA_HOME>/jre/lib. The contents of this directory in the JRE7 environment are shown in Figure 2.3.
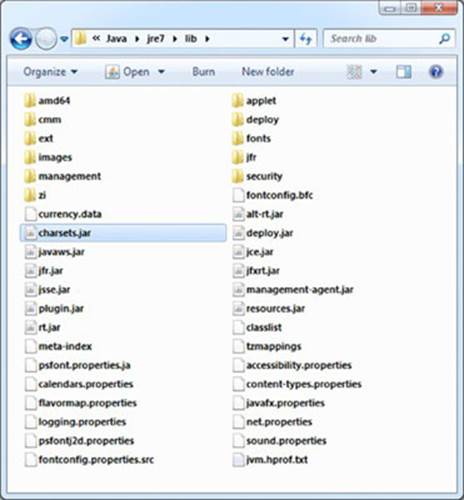
Figure 2.3
You can clearly see the different *.jar files that will be considered (charsets.jar, deploy.jar, and so on).
The extensions class loader loads the classes from the extensions directory <JAVA_HOME>/jre/lib/ext. Figure 2.4 shows the contents of the extensions directory in a JRE7 environment.
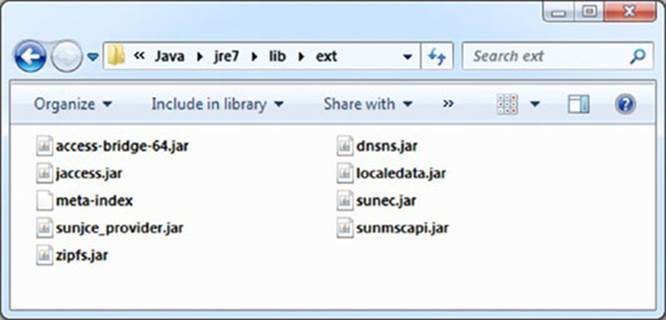
Figure 2.4
Again, you can clearly see the different JAR files available: access-bridge-64.jar, localedata.jar, and so on.
Finally, the system class loader loads the code from the locations specified in the CLASSPATH environment variable, which is defined by the operating system. The latter provides the path to all physical directories where the system class loader can look for Java files. It can be found in Windows 7 and Windows 8 by going to the Control Panel System and Security System, Advanced System Settings Advanced tab Environment Variables. Figure 2.5 shows the window from a Windows 7 operating system, but Windows 8 looks very much the same.
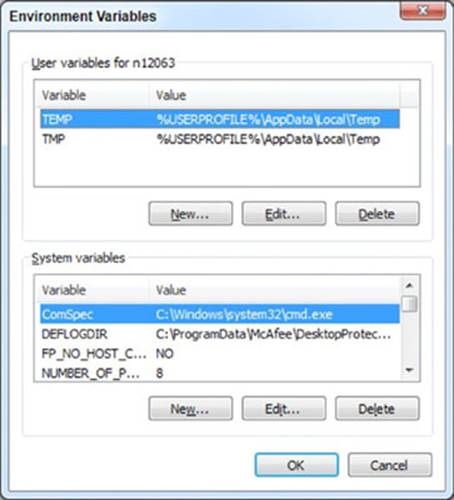
Figure 2.5
Bytecode Verifier
The bytecode verifier checks to make sure the bytecodes are valid without breaching any of Java’s security rules. It pays special attention to type checking all the variables and expressions in the code and ensures that there is no unauthorized access to memory. Note that when a Java program is invoked, you can choose to disable the bytecode verifier (which will make it run slightly faster), enable it only for code that was downloaded remotely from the network, or enable it for all the code. Once the code is verified, it will be offered to the Java Virtual Machine (JVM) for interpretation.
Java Virtual Machine (JVM)
The Java Virtual Machine (JVM) can be considered an abstract computer machine capable of executing bytecode on a particular hardware platform. It constitutes the heart of the “write once, run everywhere” philosophy. Various JVM implementations have been provided for various hardware and/or operating system environments. The most popular JVM is HotSpot produced by Oracle. It is available for Windows, Linux, Solaris, and Mac OS X. A key component of the JVM is the interpreter responsible for interpreting the bytecode instructions. The garbage collector cleans up unused memory to improve the efficiency of the program. The JVM typically also includes facilities for multithreading and synchronization, whereby a Java program can be executed in one or more parallel execution paths (threads) scheduled on one or more CPUs, hereby significantly accelerating its execution time.
The interpreter may monitor how often each bytecode instruction is executed and hand over the frequently executed instructions (also called hot spots) to the Just in Time (JIT) compiler, which is also an environment-specific component. The JIT compiler will then compile the bytecode of these hot spots into native, more efficient machine code so they can be executed by the JVM directly (just in time) instead of having to interpret them. In this way, frequent code will be compiled and less frequent code will be interpreted. The user can set the threshold to determine whether a piece of code is considered frequent or not. This feature substantially improves the execution time of the program at runtime, especially when it is executed multiple times. Although this is not recommended, the JIT compiler option can also be turned off.
Java Platforms
A Java platform or edition consists of a JRE with a specific set of libraries for a specific application environment. Table 2.3 gives an overview of the most important Java platforms.
Table 2.3 Java Platforms
|
PLATFORM |
KEY CHARACTERISTICS |
|
J2SE (Java 2 Platform, Standard Edition) |
Core Java platform designed for applications running on desktop PCs |
|
J2EE (Java 2 Platform, Enterprise Edition) |
Design, development, assembly, and deployment of business applications |
|
J2ME (Java 2 Platform, Micro Edition) |
Design of small, embedded applications in consumer devices (such as mobile phones) |
|
Java Card |
Design of small Java applications that run on smart cards |
|
JavaFX |
Design of Rich Internet Applications (RIAs) |
As discussed, this book predominantly focuses on the J2SE platform.
Java Applications
In this section, we will discuss various types of Java applications such as standalone applications, Java applets, Java servlets, and Java beans.
Standalone Applications
A standalone application is one that can run on its own without needing to be embedded in a particular host environment (such as a web browser). Standalone applications only need a JVM to execute. They can be command-line applications or graphical user interface (GUI) applications. A command-line application uses the command prompt for the input and output. This is illustrated in Figure 2.6.
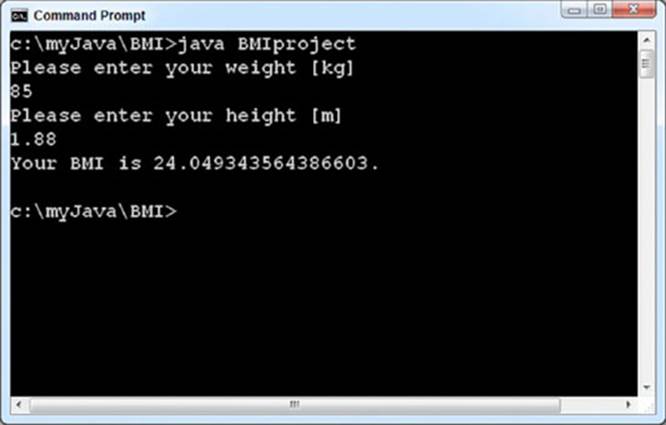
Figure 2.6
A GUI application uses graphical components to facilitate the input and output of the program. An example GUI for calculating BMI is shown in Figure 2.7.
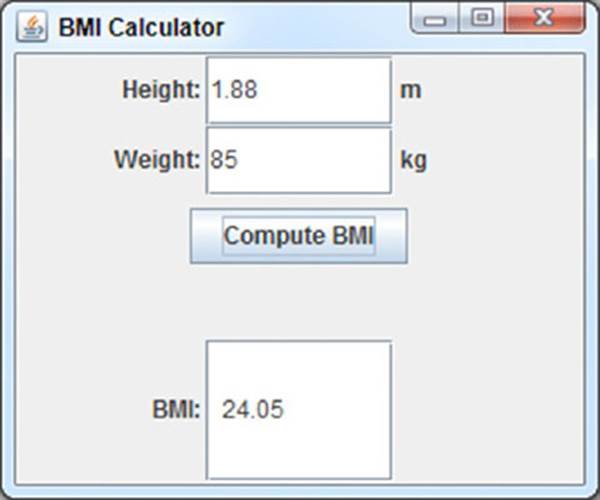
Figure 2.7
Java Applets
An applet is a Java application that’s typically embedded in an HTML page and run by the client web browser. Applets run in a sandbox, which is a confined space in memory that guarantees their execution is secure. Applets can make use of the full expressive power of the Java language. They are defined in HTML by means of the <applet> tag, as follows:
<Applet>
</Applet)
They were typically used for graphics and rich interfaces but are not that popular anymore due to some recent security exploits. Their functionality has been replaced more and more by JavaScript and HTML 5. In fact, applets are no longer supported by many tablets or other mobile devices.
Java Servlets
Servlets are part of the J2EE platform and are small Java applications that run on a Java-enabled Application server. Servlets can read and process data (originated from, for example, an HTML form) sent by the client browser through HTTP. They can interact with a server database, invoke web services, or call other servlets or server-side functionality. The results can then be communicated back to the client browser in a variety of formats (such as in HTML, XML, Word, and so on). Servlets are used in an environment where they may process multiple requests simultaneously. This is visualized in Figure 2.8.
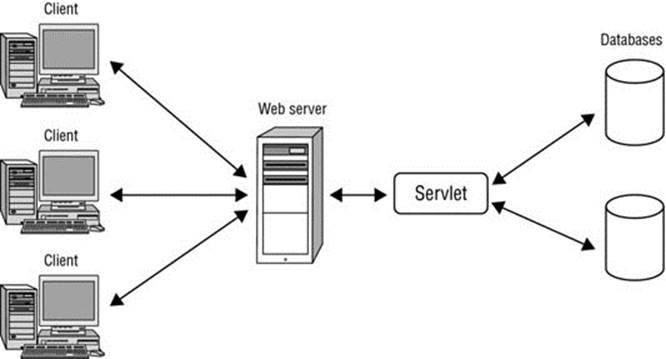
Figure 2.8
Java Beans
A Java bean is a reusable software component that can be visually manipulated in a builder tool. These tools allow beans to be customized by setting their properties and specifying how they react to events.
JAVA LANGUAGE STRUCTURE
This section provides a brief overview of the Java language structure. Many of the concepts addressed will then be further elaborated on in subsequent chapters. Let’s consider the following running example of a Java program calculating BMI to illustrate the discussion.
public class BMICalculator {
// declare variables
double weight;
double height;
double BMI;
public BMICalculator(double w, double h) {
weight = w;
height = h;
}
public double calculateBMI() {
return weight / (height * height);
}
// This is our main method.
public static void main(String[] args) {
BMICalculator calculator = new BMICalculator(60, 1.70);
double bmi = calculator.calculateBMI();
// print BMI to screen
System.out.println("Your BMI is " + bmi + ".");
}
}
Before you start discussing this example in more detail, let’s quickly note a few things. First, note that Java is a form-free language and does not require special indentation. Any statement can start at any place of indentation. Also, extra whitespace, tabs, and new lines are ignored by the compiler. The program can thus be formatted in many ways. To improve the readability of your code, it is highly recommended that you use a consistent formatting style. This book always formats the code according to convention. This makes it easy to read and also helps you get used to a standard formatting style.
The program contains several statements, each ending with a semicolon (;). A statement performs a specific action and can span multiple lines. The bytecode corresponding to this program was presented earlier in the “Bytecode” section of this chapter. Figure 2.9shows the output after executing this program in Java.
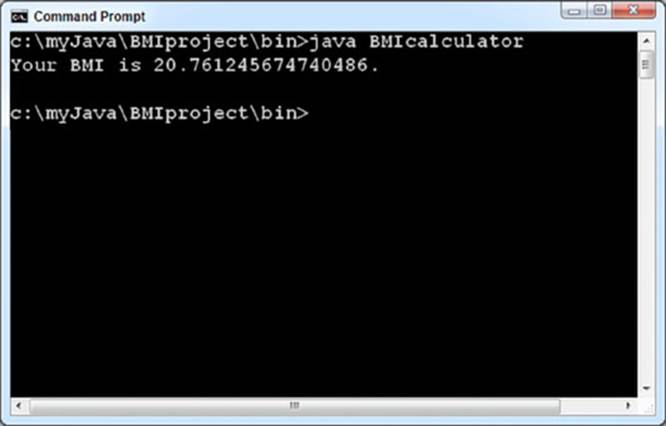
Figure 2.9
Classes
In Java, all code is grouped into classes. A class is thus a code container. The definition of the class starts with an access modifier (public in this case), which specifies which classes have access to it (you will learn about this later more extensively). This is followed by the keyword class and the name of the class (BMICalculator). Every class definition is enclosed within brackets {}. It has both variables (weight, height, and BMI) and methods (BMICalculator, calculateBMI, and main). The main method is a special method since it is the entry point of program execution. In other words, when the class BMICalculator is run by the Java Runtime Environment, it will start by executing the main method. Note that not every Java class should have a main method.
Identifiers
An identifier is a name of a language element. This can be a class, variable, or method. In the BMI example, the following are identifiers: BMICalculator, weight, height, BMI, main, and calculateBMI. Use these naming conventions when defining identifiers:
· In theory, an identifier can have an unlimited length, although practically it needs to be less than 64k of Unicode characters and digits, but it cannot begin with a digit. Although technically it is possible to start an identifier with a currency sign ($) or punctuation character (such as _), it is highly discouraged since it will decrease the readability of the code.
· An identifier cannot be equal to a reserved keyword, null literal, or boolean literal.
Just like C, Java is case sensitive. So the identifiers bmi, Bmi, and BMI are all different according to Java. Hence, it is important to carefully check your spelling and capitalization. When creating identifiers, make sure to use full words instead of abbreviations as much as possible, unless the abbreviations can be unambiguously interpreted. This will facilitate the understanding and future maintenance of the code. In the BMI example, it’s more intuitive to work with height, weight, and BMI, rather than h, w, and b. Imagine if you added new functionality to the calculator that accepted the measurement of a person’s waist. It would be even more difficult to keep track of what w meant.
Java Keywords
Table 2.4 lists the 50 keywords of Java. All these keywords have a special reserved meaning in Java and thus cannot be used as identifiers. The BMI example uses the following keywords: public, class, static, void, and double.
Table 2.4 Java Keywords
|
abstract |
continue |
for |
new |
switch |
|
assert |
default |
goto |
package |
synchronized |
|
boolean |
do |
if |
private |
this |
|
break |
double |
implements |
protected |
throw |
|
byte |
else |
import |
public |
throws |
|
case |
enum |
instanceof |
return |
transient |
|
catch |
extends |
int |
short |
try |
|
char |
final |
interface |
static |
void |
|
class |
finally |
long |
strictfp |
volatile |
|
const |
float |
native |
super |
while |
Variables
As stated earlier, every class definition consists of both variables and methods. A variable is a name for a memory location that stores a specific value. This value may change during program execution, which is why it’s called a “variable.” The BMICalculator class starts by defining the following variables:
// declare variables
double weight;
double height;
double BMI;
The weight, height, and BMI variables are defined using the data type double, which represents a floating point number. Other data types exist in Java and will be covered in a subsequent section. In Java, variables must always be defined in a class.
Methods
As discussed earlier, a method is a piece of code within a class definition, and it performs a specific kind of functionality. Just as with a class, every method definition is enclosed within brackets {...}. In the BMICalculator example, three methods have been defined—BMICalculator,CalculateBMI, andmain. Consider the main method:
public static void main(String[] args) {
BMICalculator calculator = new BMICalculator(60, 1.70);
double bmi = calculator.calculateBMI();
// print BMI to screen
System.out.println("Your BMI is " + bmi + ".");
}
As stated earlier, the main method is the main entry point of program execution. So, it is the first method that runs when executing the class BMICalculator. The first line, called the method declaration, contains several keywords. We’ll discuss these in much greater length in later chapters, but for now, we will briefly introduce those you see here.
· public: This method can be accessed by other classes and/or methods without restriction.
· static: This method does not need an object.
· void: This method does not return any value.
· (String[] args): This is a conventional way to refer to the arguments of the method. In this case, the method takes an array of strings as its input parameter.
Now you will investigate what is actually happening inside the main method. The method starts by assigning the values of 60 and 1.70 to the variables of weight and height, respectively. In later chapters, you will allow the user to interactively enter the weight and height using either the console or a graphical user interface. It then continues by calculating the BMI by calling another method called calculateBMI. The calculateBMI method then looks as follows:
// method calculating BMI
public static void calculateBMI(){
BMI = weight/(height*height);
}
It calculates the BMI as BMI = weight/(height*height). The main method then prints the BMI to the screen using the following statement:
System.out.println("Your BMI is " + BMI +".");
You will learn the exact meaning of this statement later. To conclude this subsection, remember that all methods in Java must be defined in a class.
Comments
Java has several ways of adding comments to program code. Remember, comments are needed to improve code readability and facilitate future maintenance operations. They are not executed when the Java program runs. One way of including comments is as follows:
// This is our main method.
Using //, you create a line comment that runs until the end of the line. Block comments span multiple lines and can be defined using the delimiters /* ... */, as follows:
/* Here, we call the method calculateBMI which will
* calculate the BMI
*/
A very handy feature is the Javadoc tool, which is a documentation generator developed by Oracle and comes as part of the core JDK. It produces HTML documentation from Java source code and allows for various pieces of documentation to be hyperlinked together. Reconsider the BMI example as follows:
/** This class allows you to calculate the <b> <u> BMI </u></b> using the inputs:
* <ul>
* <li> weight; </li>
* <li> height. </li>
* </ul>
* See <a href="http://en.wikipedia.org/wiki/Body_mass_index">Wikipedia</a> for
* more information.
* @author Bart Baesens
*/
public class BMICalculator {
// declare variables
static double weight;
static double height;
static double BMI;
// This is our main method.
public static void main(String[] args){
weight=60;
height=1.70;
/* Here, we call the method calculateBMI which will
* calculate the BMI
*/
calculateBMI();
// print BMI to screen
System.out.println("Your BMI is " + BMI +".");
}
// method calculating BMI
public static void calculateBMI(){
BMI = weight/(height*height);
}
}
This is essentially the same code as before, except that a header has been added, as follows:
/** This class allows you to calculate the <b> <u> BMI </u></b> using the inputs:
* <ul>
* <li> weight; </li>
* <li> height. </li>
* </ul>
* See <a href="http://en.wikipedia.org/wiki/Body_mass_index">Wikipedia</a> for
* more information.
* @author Bart Baesens
*/
This header adds Javadoc HTML documentation to the class definition. Javadoc comments are enclosed between /** ... and */. Remember the HTML tags <b>... </b>, and <ul>... </ul> represent text in bold face and underlined, respectively. The HTML tag <ul>...</ul> defines an unordered list with the items specified as <li> ... </li>. You can add a link to the Wikipedia page with BMI information using the HTML tag <a href=“. . .”>... </a>. You can then use the @author tag to credit the programmer. Part of the Javadoc generated from this program is shown in Figure 2.10.
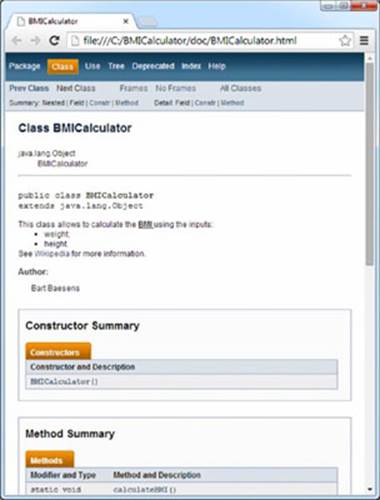
Figure 2.10
Note that at the top of the page, you will find the information included in the program. Next to the information we added, Javadoc will also generate some documentation by default, like the fields (variables) and methods of the class defined. As you will see later, some integrated development environments (IDEs) such as Eclipse generate Javadoc HTML documentation code by default.
It is highly recommended that you use a consistent documentation style. Consider providing comments at the top of the class, explaining what the class does and naming the author, and also adding comments to each variable and method definition to clarify their meaning. This is especially important with large-scale projects, where many Java classes are simultaneously being programmed by multiple developers.
Naming Conventions
Various Java communities have introduced naming conventions for identifiers. These are not strictly enforced, so your code will compile successfully even if you don’t comply. However, you will improve the readability and future maintenance of your Java programs if you follow these conventions. A very popular naming convention originally suggested by Sun Microsystems is explained in Table 2.5.
Table 2.5 Java Naming Convention
|
IDENTIFIER |
CONVENTION |
GOOD EXAMPLES |
BAD EXAMPLES |
|
Class |
UpperCamelCase: The first letter of each word is capitalized. |
BMICalculator Student MyProgram |
bmiCalculator STUDENT myProgram |
|
Variable |
lowerCamelCase: The first letter is lowercase and the first letters of all following words are capitalized. |
myHeight; myWeight; height; weight; |
MyHeight; myheight; Height; WEIGHT; |
|
Method |
lowerCamelCase: The first letter is lowercase and the first letters of all following words are capitalized. |
main calculateMyBMI |
Main CalculateBMI |
JAVA DATA TYPES
Java is a strongly typed language. This means that every variable should first be carefully declared upfront before it can be used. You already saw examples of this in the BMIConstructor class, as follows:
// declare variables
double weight;
double height;
double BMI;
The data type of a variable specifies the kind of values it can be assigned. For example, the weight, height, and BMI variables are declared as double variables, so they can only be assigned floating-point numbers from a specific range. A data type tells the compiler how much memory to allocate to a variable, the format in which it will be stored, and the operations that can run on it. Although a variable can change value during program execution, its type always remains fixed. A distinction can be made between primitive and composite data types. A primitive data type is a basic building block supported by Java. On the other hand, a composite data type is composed of primitive data types using a composition construct. The following sections elaborate on both of these data types.
Primitive Data Types
Java supports eight built-in primitive data types. Table 2.6 defines each of these and specifies the range and default value. If the user has not initialized a variable, the compiler will automatically assign the default value. Note that the ranges and default values are uniform and do not depend on the underlying machine architecture on which the Java program runs.
Table 2.6 Java Primitive Data Types
|
TYPE |
DEFINITION |
MINIMUM |
MAXIMUM |
DEFAULT |
|
byte |
8-bit signed integer |
-128 |
127 |
0 |
|
short |
18-bit signed integer |
32,768 |
32,767 |
0 |
|
int |
32-bit signed integer |
-231 |
231 |
0 |
|
long |
64-bit signed integer |
-263 |
263-1 |
0L |
|
float |
Single-precision 32-bit IEEE 754 floating point number |
1.40239846x10-45 |
3.40282347x1038 |
0.0f |
|
double |
Double-precision 64-bit IEEE 754 floating point number |
4.9406564581246544 x10-324 |
1.79769313486231570 x10-308 |
0.0d |
|
boolean |
One bit of information; flag indicator |
false |
true |
false |
|
char |
Single 16-bit Unicode character |
‘\u0000’ (or 0) |
‘\uffff’ (or 65,535) |
‘\u0000’ |
NOTE Beginning with Java 8, some changes have been introduced. The data type int can also be used to define an unsigned integer from 0 to 232-1. The data type long can be used to define an unsigned integer between 0 and 264-1. If your application doesn’t require negative values, this will offer you a larger range of valid positive numbers.
You may think that strings (such as name = "Bart Baesens") are lacking in Table 2.6. In fact, as we will discuss later, Java does not have a built-in string type. It offers special facilities to work with strings. Note that the default value for the long data type is 0L. The L stands for long and is capitalized to avoid confusion with the number one (l versus 1). Likewise, the default values for float and double end with f and d, respectively.
It is important to define each variable using the appropriate data type. In fact, limiting the range of a variable can serve as very useful documentation to better understand its meaning during code inspection and/or maintenance. Furthermore, it can also help save memory if a variable is defined as byte instead of int (since byte is four times smaller than int).
Literals
A literal is a value assigned to a variable of a specific type. An example of this is:
weight = 60;
height = 1.70;
In this example, the equals sign (=) is used as an assignment operator to assign the literals 60 and 1.70 to the variables weight and height, respectively.
Here are some other examples of literals:
boolean overweight = true;
short age = 38;
character initial = 'B';
Note that literals of type long, float, and double can end with the letters L/l, F/f, and D/d, respectively. Floating point literals can also be expressed in scientific notation using E or e. This is illustrated here:
Double bmi = 24.2;
Double bmi = 24.2d;
Float bmi = 0.242e2;
Character literals (char) are always enclosed in single quotes and may contain any Unicode character (see www.unicode.org for more details). An example of this is as follows:
char gbPoundUniSymbol = '\u00A3';
char gbPoundSymbol = '£';
char dollarUniSymbol = '\u0024';
char dollarSymbol = '$';
There are also some characters, called escape characters, that have a special meaning. They are used for displaying text in specific ways, either for inserting tabs or enters where desired, or by displaying a character that’s normally reserved for code syntax. For example, we just discussed that the single quote (') indicates the beginning and end of a char literal. But what if you want to use the (') character in your code? You can do so by putting a backslash (\) before it. Some of the more common escape characters are listed in Table 2.7.
Table 2.7 Escape Characters in Java
|
SHORTCUT NOTATION |
MEANING |
UNICODE |
|
\b |
Backspace |
\u0008 |
|
\t |
Tab |
\u0009 |
|
\n |
Linefeed |
\u000A |
|
\r |
Carriage return |
\u000D |
|
\'' |
Quote mark |
\u0022 |
|
\' |
Apostrophe |
\u0027 |
|
\\ |
Backslash |
\u005C |
In order to improve code readability, you can use underscores ( _ ) anywhere within literals of a numeric data type. Just like a space in a sentence, they break up a number into smaller parts to make it easier to read and verify it. Consider this example:
long creditCardNumber = 1234_4567_8901L;
Operators
Operators perform data manipulations on one or more input variables (called operands). For example, in the expression 2+3, the operands are 2 and 3, and the operator is +. In terms of the number of operands, a distinction can be made among unary operators (one operand), binary operators (two operands), and ternary operators (three operands). In terms of the operations performed, a distinction can be made among the following:
· Arithmetic operators
· Assignment operators
· Bitwise operators
· Logical operators
· Relational operators
Arithmetic Operators
Arithmetic operators perform basic mathematical operations on numerical values. The most popular ones are listed in Table 2.8.
Table 2.8 Arithmetic Operators
|
ARITHMETIC OPERATOR |
EXAMPLE |
MEANING |
RESULT |
|
+ |
4+2 |
Addition |
6 |
|
- |
4-2 |
Subtraction |
2 |
|
* |
4*2 |
Multiplication |
8 |
|
/ |
4/2 |
Division |
2 |
|
% |
8%3 |
Modulo (remainder after integer division) |
2 |
Most of these operators are probably very familiar to you already. Addition, subtraction, multiplication, and division are used in everyday calculations. It is worth noting at this point that while they operate in the way you understand and expect, the answer is not always exactly what you’re looking for. In other cases, the way data is stored as binary numbers cannot accurately represent non-whole numbers. For this reason, operations on floating point numbers often result in a number that’s very close to what you expect, but with several digits after the decimal point. This is simply due to the fact that these decimals are approximations. For example, if you multiply 1.3 times 0.01, the answer would be 0.013. However, when you ask Java to calculate 1.3f*0.01f, the result is 0.12999999. Of course, this rounds to the 0.013 you are expecting, so the operation is the same.
Sometimes the problem is not with rounding, but due to the data type being used. To illustrate this, imagine you have two integers, 5 and 2. If you add them together, you expect 7 (and this is what Java will return as well). However, if you divide 5 by 2, you already know the answer is 2.5. However, Java is using integers, so the result of integer operations must be an integer. Therefore, Java evaluates 5/2 = 2. The remainder is not included in the result.
This is where the modulo operator comes in. It will calculate the remainder in division. So, while 5/2 = 2 (and the remainder of 1 was ignored), 5%2 = 1 (here is that remainder of 1). Between the two operators, you have the complete solution. It’s interesting to note that the modulo operator is often used to check whether a number is even or odd. For an even number, %2 will result in 0, whereas for an odd number, %2 will result in 1.
In Java, expressions are evaluated following the usual mathematical order of operations. This means in terms of precedence, the operators (*), (/), and (%) are processed before the operators (+) and (-). For example, the expression 4+6*2 will be evaluated to 16. To change the order of processing, you can use parentheses to indicate which operations should be evaluated first. The expression (4+6)*2 will consequently be evaluated to 20. When you use more than one operator with the same level of precedence, the expression will be evaluated from left to right. The expression 6+2+4+5*6 will thus be equivalent to (((6+2) +4)+(5*6)), or 42.
Assignment Operators
The assignment operator assigns values to a variable. In previous examples, you read about the (=) operator, which assigns a value to a variable. Table 2.9 lists some important assignment operators.
Table 2.9 Assignment Operators
|
ASSIGNMENT OPERATOR |
EXAMPLE |
MEANING |
RESULT |
|
= |
weight = 85; |
Assign the value 85 to the variable weight |
85 |
|
+= |
weight += 2; |
Same as weight = weight + 2; |
87 |
|
-= |
weight -= 2; |
Same as weight = weight - 2; |
85 |
|
*= |
weight *= 2; |
Same as weight = weight * 2; |
170 |
|
/= |
weight /= 2; |
Same as weight = weight / 2; |
85 |
|
%= |
weight %= 2; |
Same as weight = weight % 2; |
1 |
|
++ |
weight++; |
Same as weight = weight + 1; |
2 |
|
-- |
weight--; |
Same as weight = weight - 1; |
1 |
Bitwise Operators
Bitwise operators work on bits and perform bit-by-bit operations on the operands. The operands can be of type long, int, short, char, or byte. To illustrate these operators, consider the following Java integer variables and their bitwise representation. Note the preceding 1 in int c indicates that it is a negative number:
· int a = 40; //binary a: 0010 1000
· int b = 122; //binary b: 0111 1010
· int c = -12; //binary c: 1111 0100
Table 2.10 shows the bitwise operators and some examples of how they are used.
Table 2.10 Bitwise Operators
|
BITWISE OPERATOR |
MEANING |
EXAMPLES |
RESULT |
|
& |
Bitwise AND operator: Puts a 1 bit in the result if both input operands have a 1 bit at the given position. |
a&b; |
a: 0010 1000 |
|
| |
Bitwise OR operator: Puts a 1 bit in the result if one of both input operands have a 1 bit at the given position. |
a|b; |
a: 0010 1000 |
|
^ |
Bitwise exclusive OR (XOR) operator: Puts a 1 bit in the result if one of the operands, but not both, has a 1 bit at the given position. |
a^b; |
a: 0010 1000 |
|
~ |
Unary bitwise inverse operator: Changes every 1 bit to 0 and every 0 bit to 1. |
~a |
a: 0010 1000 |
|
>> |
Signed right shift operator: Shifts the left operand to the right by the number of bits specified. The left digits of a positive number are then filled with 0s, while the left digits of a negative number are filled with 1s. This preserves the original sign of the number, hence the name “signed right shift.” |
a>>2 c>>2 |
a: 0010 1000 |
|
>>> |
Unsigned right shift operator: Shifts the left operand to the right by the specified number of bits. The left digits are always filled with 0s, regardless of the sign, hence the name “unsigned right shift.” |
a>>>3 c>>>3 |
a: 0010 1000 |
|
<< |
Left shift operator: Shifts the left operand to the left by the number of bits indicated. The right digits are then filled with 0s. Since only the right side is filled, it is not possible to fill with 1s or 0s to ensure a positive or negative number. Therefore there is no distinction between a “signed left shift” and an “unsigned left shift.” |
a<<2 c<<2 |
a: 0010 1000 |
Logical Operators
A logical operator returns a Boolean result based on the Boolean result of one or more expressions. For this reason, they may also be called Boolean operators. Logical or Boolean operators are always evaluated from left to right. Consider, for example, the following expressions and their Boolean results. Table 2.11 then illustrates the evaluation of the logical operators that can be used in Java on these expressions.
· A: 3 > 2 (True)
· B: 2 < 1 (False)
Table 2.11 Logical Operators
|
LOGICAL OPERATOR |
MEANING |
EXAMPLES |
RESULT |
|
&& |
Conditional AND operator: True if both operands are true. |
A && B |
False |
|
|| |
Conditional OR operator: True if at least one operand is true. |
A || B |
True |
|
^ |
Bitwise and Logical XOR operator: True if one, and only one, operand is true. |
A ^ B |
True |
|
! |
Unary NOT operator: True if the operand is false. |
!A |
False |
The truth tables for these Boolean operators are illustrated in Table 2.12. Table 2.12 assumes two operands that may be either true or false, as indicated by the first and second column.
Table 2.12 Truth Table for Logical Operators
|
OPERAND 1 |
OPERAND 2 |
AND |
OR |
XOR |
NOT (OPERAND 1) |
|
True |
True |
True |
True |
False |
False |
|
True |
False |
False |
True |
True |
False |
|
False |
True |
False |
False |
True |
True |
|
False |
False |
False |
False |
False |
True |
The bitwise AND (&) and OR (|) operators can also be used with Boolean operands. However, there is a difference between the conditional and bitwise operators. If the first operand evaluates to false, the conditional AND operator (&&) will not consider the second operand, since it already knows the outcome will be false. This is often referred to as short-circuiting behavior. The bitwise AND operator (&) always evaluates both operands. Similarly, if the first operand evaluates to true, the conditional OR operator (||) will no longer evaluate the second operand, since it already knows that the outcome will be true. The bitwise OR operator (|) always evaluates both operands.
This means that using the conditional (&&) and (||) operators can lead to more efficient program executions. But that is not the only reason to use the conditional operators. If evaluating an expression may lead to an error, taking advantage of the short-circuiting feature can prevent this by ignoring the error-prone expression in cases where the error would occur. For example, trying to divide a number by 0 will cause an error. So you could use the conditional AND (&&) to first check if the number is not zero and then check the result of dividing by it only if it is, in fact, not zero. If it is zero, the second expression will not be evaluated.
Relational Operators
Relational operators are usually binary operators. They check the relationship between two operands that are usually numbers or at least can be represented as numbers. They typically return a Boolean value. Consider the following variables:
int a=4;
int b=9;
int c=4;
Table 2.13 illustrates the relational operators that can be used in Java.
Table 2.13 Relational Operators
|
RELATIONAL OPERATOR |
MEANING |
EXAMPLES |
RESULT |
|
> |
Greater than: Verifies whether operand 1 is strictly bigger than operand 2. |
a > b |
False |
|
>= |
Greater than or equals: Verifies whether operand 1 is strictly bigger than or equal to operand 2. |
b > a |
True |
|
< |
Less than: Verifies whether operand 1 is strictly lesser than operand 2. |
c < b |
True |
|
<= |
Less than or equals: Verifies whether operand 1 is strictly lesser than or equal to operand 2. |
b < a |
False |
|
== |
Equal: Verifies whether operand 1 is equal to operand 2. |
a == c |
True |
|
!= |
Not equal: Verifies whether operand 1 is not equal to operand 2. |
a != b |
True |
Arrays
An array is a composite variable holding a fixed amount of values of a specific type (such as int, long, char, float, double, and so on). When an array is declared, the data type it will contain is set. When it is initialized, the number of elements must be set as well. An array has a fixed number of elements that are accessed by an index, which points to the nth element of the array. It’s important to note that the first element of the array has an index of 0. To begin working with arrays, consider the following statement:
float[] weightArray;
This defines a variable called weightArray, which is an array of floating point numbers. Note the square brackets ([]), which denote that the variable is an array. Although not recommended, an array can also be declared as follows:
float weightArray[];
The array can then be initialized using the new operator, as follows:
weightArray = new float[5];
The array now has space to store five floating numbers—the first number is stored at index position 0 and the last number is stored at index position 4. The values stored initially will be the default values for the data type, which is 0.0 for float. Figure 2.11 gives a visual representation of the array in this initialized state.
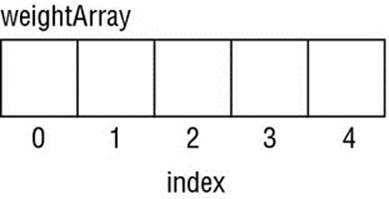
Figure 2.11
You can now populate the array as follows:
weightArray[0] = 85f;
weightArray[1] = 72f;
weightArray[2] = 68f;
weightArray[3] = 94f;
weightArray[4] = 78f;
Remember the letter f is added at the end of each of the numbers to indicate that they are floating point numbers. The weightArray populated with the specified floats is visualized in Figure 2.12.
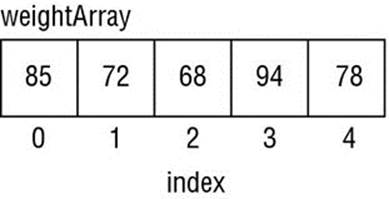
Figure 2.12
Initializing and populating the array can both be done more concisely, as follows:
float[] weightArray = {85f, 72f, 68f, 94f, 78f};
This way, the data type is given, the array is indicated with the square brackets ([]), the name is given as weightArray, and the size is set based on the number of elements given between the brackets ({}).
The following Java program illustrates how arrays can be used to calculate the BMI for a set of five people.
public class BMIcalculator {
// This is our main method.
public static void main(String[] args){
// initialize the three arrays as each having 5 elements
float[] weightArray = new float[5];
float[] heightArray = new float[5];
float[] BMIArray = new float[5];
// assign the values to the weight array
weightArray[0] = 85f;
weightArray[1] = 72f;
weightArray[2] = 68f;
weightArray[3] = 94f;
weightArray[4] = 78f;
//assign the values to the height array
heightArray[0] = 1.74f;
heightArray[1] = 1.80f;
heightArray[2] = 1.90f;
heightArray[3] = 1.84f;
heightArray[4] = 1.88f;
//compute the BMIs and store in the BMIArray
BMIArray[0] = weightArray[0]/(heightArray[0]*heightArray[0]);
BMIArray[1] = weightArray[1]/(heightArray[1]*heightArray[1]);
BMIArray[2] = weightArray[2]/(heightArray[2]*heightArray[2]);
BMIArray[3] = weightArray[3]/(heightArray[3]*heightArray[3]);
BMIArray[4] = weightArray[4]/(heightArray[4]*heightArray[4]);
// print the BMIs to the screen
System.out.println("The BMI of person 1 is: " + BMIArray[0] + ".");
System.out.println("The BMI of person 2 is: " + BMIArray[1] + ".");
System.out.println("The BMI of person 3 is: " + BMIArray[2] + ".");
System.out.println("The BMI of person 4 is: " + BMIArray[3] + ".");
System.out.println("The BMI of person 5 is: " + BMIArray[4] + ".");
}
}
The output of the Java program is:
The BMI of person 1 is: 28.075043.
The BMI of person 2 is: 22.222223.
The BMI of person 3 is: 18.836565.
The BMI of person 4 is: 27.76465.
The BMI of person 5 is: 22.06881.
Multidimensional arrays are arrays where the elements are arrays themselves. A popular example of this is a matrix. Consider the following Java class:
public class MatrixExample {
// declare and initialize the matrix
// This is our main method.
public static void main(String[] args){
int[][] matrix={{1, 2, 4},{2, 6, 8},{10, 20, 30}};
// print some of the matrix numbers to the screen
System.out.println("Element at row 0 and column 1 is: " + matrix[0][1] + ".");
System.out.println("Element at row 2 and column 2 is: " + matrix[2][2] + ".");
System.out.println("Element at row 2 and column 1 is: " + matrix[2][1] + ".");
System.out.println("Element at row 1 and column 0 is: " + matrix[1][0] + ".");
}
}
The matrix variable is an array of an array of integer numbers. It is immediately initialized during declaration. The output of this program will be as follows:
Element at row 0 and column 1 is: 2.
Element at row 2 and column 2 is: 30.
Element at row 2 and column 1 is: 20.
Element at row 1 and column 0 is: 2.
Note that the matrix variable is an array of equal size arrays, each having three elements. This does not necessarily need to be the case. You can also create arrays of unequal sized arrays, as follows:
public class MatrixExample {
// declare and initialize the matrix
static int[][] weirdMatrix={{1, 2},{2, 6, 8},{10}};
// This is our main method.
public static void main(String[] args){
// print some of the matrix numbers to the screen
System.out.println("Element at row 0 and column 1 is: " +
weirdMatrix[0][1] + ".");
System.out.println("Element at row 2 and column 2 is: " +
weirdMatrix[2][0] + ".");
System.out.println("Element at row 2 and column 1 is: " +
weirdMatrix[1][2] + ".");
}
}
The output of this program is now:
Element at row 0 and column 1 is: 2.
Element at row 2 and column 2 is: 10.
Element at row 2 and column 1 is: 8.
Here, you are accessing each element directly using the weirdMatrix[1][2] notation, but there are also loop structures that are often used to iterate through the elements of an array somewhat automatically. These are discussed in Chapter 5, and arrays will be revisited there.
Type Casting
Type casting refers to converting a value from a specific type to a variable of another type. Booleans cannot be converted to numeric types. For the other data types, two types of conversion can be considered: widening conversion (implicit casting) and narrowing conversion (explicit casting). Before we discuss these further, remember the hierarchy of primitive data types as follows (from high precision to low precision): double, float, long, int, short, and byte.
A widening conversion is when a value of a narrower (lower precision) data type is converted to a value of a broader (higher precision) data type. This causes no loss of information and will be performed by the JVM implicitly. An example is as follows:
static int a = 4;
double x = a;
In this example, an integer variable a with value 4 is promoted to a higher-order double data type without loss of information. Although this code will successfully compile, it is good programming practice to explicitly mention the casting as follows:
static int a = 4;
double x = (double) a;
In Java, the following widening conversions are possible:
· From a byte to a short, an int, a long, a float, or a double
· From a short to an int, a long, a float, or a double
· From a char to an int, a long, a float, or a double
· From an int to a long, a float, or a double
· From a long to a float or a double
· From a float to a double
A narrowing conversion is when a value of a broader (higher precision) data type is converted to a value of a narrower (lower precision) data type. This will typically involve loss of information. An example of this is as follows:
static float b = 6.82f;
int y = b;
Because of Java’s strict type checking, this code will not compile and an error will be generated, as follows:
Type mismatch: cannot convert from float to int
Here, the casting is not done implicitly by the JVM and should be made explicit by the programmer using the following statement:
int y = (int) b;
In Java, the following narrowing conversions are possible:
· From a byte to a char
· From a short to a byte or a char
· From a char to a byte or a short
· From an int to a byte, a short, or a char
· From a long to a byte, a short, a char, or an int
· From a float to a byte, a short, a char, an int, or a long
· From a double to a byte, a short, a char, an int, a long, or a float
To conclude, consider the following TypeCastingExample class in Java:
public class TypeCastingExample {
// This is our main method.
public static void main(String[] args){
int intA = 4;
float floatB = 6.82f;
//Widening conversion
double doubleX = (double) intA;
//Narrowing conversion
int intY = (int) floatB;
// print out the values
System.out.println("The value of intA is: " + intA +".");
System.out.println("The value of floatB is: " + floatB +".");
System.out.println("The value of doubleX is: " + doubleX +".");
System.out.println("The value of intY is: " + intY +".");
}
}
The output of this program is:
The value of intA is: 4.
The value of floatB is: 6.82.
The value of doubleX is: 4.0.
The value of intY is: 6.
Observe how narrowing the conversion of the floating point number 6.82 caused the floating point to be dismissed. Consider the following example:
public class AnotherTypeCastingExample {
public static void main(String[] args){
float x = 3/9;
float y = (float) 3/(float) 9;
float z = (float) 3/9;
System.out.println("The value of x is: " + x +".");
System.out.println("The value of y is: " + y +".");
System.out.println("The value of z is: " + z +".");
}
}
The output of this program is:
The value of x is: 0.0.
The value of y is: 0.33333334.
The value of z is: 0.33333334.
Let’s now discuss why Java gives this output. For the first expression, float x = 3/9;, Java considers both operands as integers and thus uses integer division. The result of this is zero, and Java will then do the widening conversion to float, yielding a zero floating number. For the second expression, float y = (float) 3/(float) 9;, Java will first perform the widening conversion for the values 3 and 9, and then do the floating point division and assign the result to the floating point variable y. For the third expression, float z = (float) 3/9;, Java will first do a widening conversion to the value 3, and then do an (implicit) widening conversion to the value 9. It will then perform the floating point division and assign the desired value to the floating point variable z.
SUMMARY
This finishes this introductory chapter on getting to know Java. Remember, we started by discussing the history of Java, its key features, and how the Java technology works. This was followed by an overview of the key components of the Java Runtime Environment (JRE) and how they collaborate. Also the different types of Java platforms and applications were highlighted. The chapter was concluded by discussing the basic concepts of the Java language structure, together with the primitive data types.