Beginning Java Programming: The Object-Oriented Approach (Programmer to Programmer) (2015)
3. Setting Up Your Development Environment
WHAT YOU WILL LEARN IN THIS CHAPTER:
· How and where to start programming
· What Integrated Development Environments are
· How to install Eclipse IDE for your own use
· How to begin using Eclipse for Java programming
WROX.COM CODE DOWNLOADS FOR THIS CHAPTER
The wrox.com code downloads for this chapter are found at www.wrox.com/go/beginningjavaprogramming on the Download Code tab. The code is in the Chapter 3 download and individually named according to the names throughout the chapter.
The first two chapters provided you with some background and a theoretical foundation for basic programming in Java. So that you can get started programming right away, this third chapter takes a short detour from Java concepts to give you a development environment to start coding. In this book, Eclipse is the development environment used. However, it is by no means the only or even the best environment. This chapter covers some of the most commonly used development platforms, so you’ll be familiar with them if you encounter a different environment in use on a project you join in the future. You may also like to try the different options to see which is most comfortable for your personal use. In order to provide consistency throughout this book, the following chapters assume you are using Eclipse when giving directions related to the environment. There is no reason the concepts you read in the later chapters cannot be implemented in the environment of your choice.
Because of the focus, this chapter is more technical, as it includes download and installation instructions and far less concept or theory about Java or basic programming. If you have been programming in Java or another language, you probably already have a preferred development environment. It should not be difficult for you to continue using that while following the exercises in this book, even if it is not Eclipse. Just note that the figures and instructions are based on how Eclipse looks and functions.
This chapter is organized in two main sections: introduction to Integrated Development Environments and installing Eclipse. In the introduction, you’ll look at programming in basic text editors and command-line execution and in more advanced Integrated Development Environments (IDE), such as Eclipse, NetBeans, and IntelliJ IDEA. The second section focuses on one commonly used IDE, Eclipse, including how to download and install it and set it up for the first time. At the end of the installation section, you will practice using Eclipse by creating a small program, so you can compare programming in an IDE to programming with text editors and the command line. If you already have a development environment, and do not need or want to investigate others, you can skip this chapter. If you are brand new to programming, this chapter should help you get started with your first coding experience.
INTEGRATED DEVELOPMENT ENVIRONMENTS
Integrated Development Environments (IDEs) are applications that offer programmers facilities for developing software. IDEs include tools that support all aspects of software development, including creating, debugging, compiling, and running the code. Typically, IDEs check your code for syntax errors, as you type not so different from how spelling and grammar check works in word processing programs. Debugging support allows you to move slowly and methodically through your program to find errors. IDEs also keep track of your many projects and programs, and the files associated with them, so you can easily organize your work.
Most of the features provided by IDEs are available as stand-alone tools, but IDEs integrate several programming components into one user-friendly interface. An Integrated Development Environment is not required for programming. However, in order to create and compile Java programs of your own, you need the Java Development Kit (JDK). If you don’t have it already, you can download the latest version from Oracle’s website at http://www.oracle.com/technetwork/java/javase/downloads/index.html. Make sure you choose the most recent release of the JDK that is appropriate for your operating system. Oracle offers the JDK for Linux (32 or 64 bit), Mac OS, Solaris, and Windows (32- or 64-bit). If you’re using a Windows machine and aren’t sure if it’s 32-bit or 64-bit, you can right-click on My Computer and check Properties (or go to Control Panel System and Security System). You should see the system type listed there. The Windows JDK you download from Oracle includes an installer, which will lead you through the installation step-by-step. If you need more instructions for another system or want a more detailed explanation, installation guides are available on the Oracle website.
Coding in Text Editors
Once you have installed the Java Development Kit, you can begin coding with simple text editors, like Notepad, which you already have on your computer. You will try this as your first exercise, before learning about the different IDEs available. You learned in Chapter 1 about source code and byte code. When you think of programming or coding, you are thinking about writing source code. Since you’re learning basic programming in Java, you must type statements using the specific language and structure that Java prescribes. Source code doesn’t look exactly like writing you’d read in a newspaper, but it’s relatively readable to humans, particularly those who have learned Java basics. It’s essentially text, and for that reason, you can write it in a text editor like Notepad or any similar program.
After you’ve written the source code, a Java compiler can translate what you’ve written into machine-readable byte code. That’s one of the features that your newly installed JDK offers. Once your code has been compiled, you can run the program. In the first exercise, you’ll go through these three steps to create, compile, and run your first Java application.
TRY IT OUT Creating Your First Java Application in Notepad
In this exercise, you code a very simple Java program in a text editor, then compile and run it from the command window of your computer.
1. Open Notepad or a similar text editor and start a new text file. On Windows 7 and earlier, you can open Notepad by opening the Start menu. Then under All Programs, find the Accessories folder. In Windows 8, you can access the Apps screen by clicking the down arrow at the bottom of your screen.
2. Enter the following code in your text file:
3. /**
4. * This is a simple Java application.
5. * It prints a short statement to the standard output.
6. */
7.
8. class MyFirstApplication {
9. public static void main(String[] args){
10. System.out.println("I've coded, compiled, and run my first Java program!");
11. }
}
Be aware that Java code is case-sensitive, so pay attention to upper- and lowercase letters as you type. MyFirstApplication, myfirstapplication, MyFIRSTApplication, and so on are all different names.
12.Save the file as MyFirstApplication.java (as before, watch for capitalization and be consistent between the name of your class and the filename). Save your file as a text document with the *.txt extension. If you do not specify the encoding, the platform default converter is used. For this exercise, save the file in a location that you can easily find. You should end up with something like Figure 3.1 when you go to save.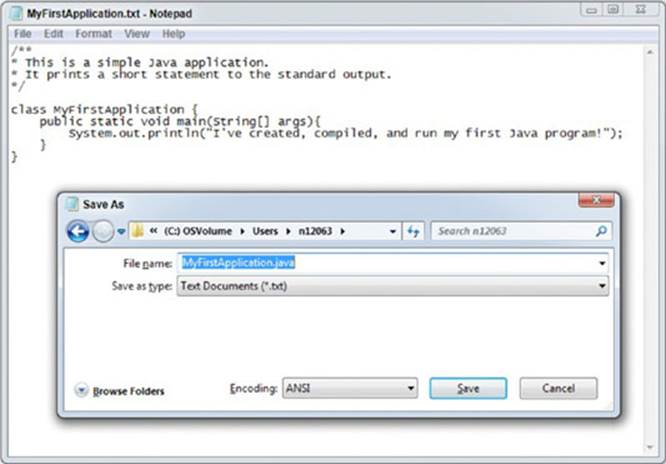
Figure 3.1
13.Close Notepad and open a command window. In Windows 7 and earlier, you can click Start Run, then type cmd and press Enter. On a Windows 8 machine, you can go back to the Apps screen and scroll to the Windows System section where you will find the command prompt.
14. Note the drive that is shown when the command window opens; this is your current directory. You can move your new Java file to this location or change your current directory to the location where you saved your file. To change the current directory, type cd followed by the location path (the example shown here will not be identical to your own path), and then press Enter:
cd C:\Users\n12063\MyFiles
15.You can verify that your file is in the current directory by typing dir and pressing Enter. This will show you the contents of the current directory. If you can see MyFirstApplication.java in the list, you’re ready to proceed.
16. Next, you want to instruct your Java compiler to compile your program. To do so, you need to point to the compiler’s location and then instruct it to compile your Java file. Your Java compiler is called javac and is located in the bin folder of your JDK; it depends on where you first installed the JDK. Navigate to the right folder and find the location path, then enter it exactly in the command prompt to tell Windows where to find your Java compiler. Start with a quotation mark, enter the location of the bin folder, then type \javac and another quotation mark. Finally, add a space and the name of your java file. Press Enter. It should look something like this:
"C:\Program Files\Java\jdk1.8.0_25\bin\javac" MyFirstApplication.java
17.You can type dir again to see if the newly compiled MyFirstApplication.class file is there. If you see both MyFirstApplication.java and MyFirstApplication.class, you’re ready to continue.
18. You’re ready to run your program now. Enter the following prompt and press Enter:
java -cp . MyFirstApplication
19.You should end up with something like Figure 3.2 in the end.
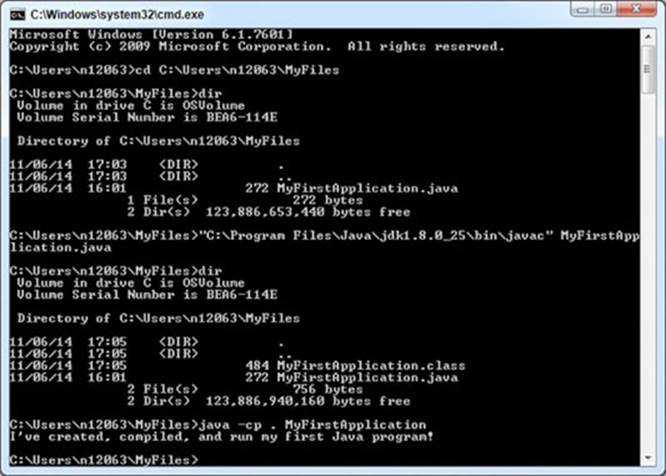
Figure 3.2
How It Works
Here’s how it works:
1. In Java, source code is saved in .java files that may contain one or more classes or other types that you will learn more about later in this book, such as interfaces, enums, and annotations. Each source code file can contain at most one public access type and any number of non-public types. When your compilation unit contains a public access type, like the public class in this exercise, both the type and the .java file must have the same name. You declared a public type with the nameMyFirstApplication and stored it in a .java source code file called MyFirstApplication.java.
2. The first few lines of code start with /** and end with */. These are special symbols that indicate a block comment. Comments are not compiled or executed, so they allow you to provide information to humans that can be ignored by the computer. Here, a comment is used to indicate the purpose of the class. Single-line comments begin with // and function the same way.
3. Next, you have a class declaration class MyFirstApplication, and you’ll find the body of the class between curly brackets: { and }.
4. First in your class is the declaration of your main method: public static void main (String[] args). Remember from Chapter 2 that the main method is the entry point for execution. When a program runs, it will start from the main method.
5. Inside the main method, between an inner set of curly brackets, you find the statements to be executed. In this small example, there is only one statement: System.out.println("I've coded, compiled, and run my first Java program!");. This statement prints the text you see between parentheses to the standard output.
6. The last two lines contain the closing bracket of the main method and the closing bracket of the class.
7. Now, the command prompts need to be explained. First, the cd prompt changes the current directory so the .java file can be located.
8. The dir prompt simply displays the current contents of the directory. You used it to check if the .java and .class files were located in the current directory.
9. Then you pointed Windows to your Java compiler, called javac, and instructed it to compile your .java file. This may be confusing, because you need to first locate your compiler. However, if the compiler was located in the current directory, you could have just typed javac MyFirstApplication.java, and it would find both without needing the whole path.
10.Finally, you used the java -cp prompt to run your program. This executes the program as explained in Steps 1–6. You should have seen the text I've created, compiled, and run my first Java program! printed to the command window after you pressed Enter.
You may have already encountered some difficulties in the previous Try It Out. If you typed the program yourself, it’s possible you introduced some small typos that prevented your code from properly compiling or running. You may have had trouble accessing the correct directory for reading or writing your files. Integrated Development Environments can make this easier as they allow you to write, compile, and run in the same place. They also check for errors as you type and remind you when you misspell something or forget a punctuation mark. In the next sections, you learn about some different IDEs and what they offer you as a developer.
Choosing an IDE
IDEs offer many tools and conveniences compared to coding in text editors and compiling from the command line. Due to the popularity of Java, you can choose from dozens of IDEs. This book introduces three: Eclipse, NetBeans, and IntelliJ IDEA. Why these three? First, they are very popular, which means it’s easier to find support from online communities. Second, they are all available as open source software, so you can download and use them for free. (IntelliJ IDEA does have a paid Ultimate Edition, which offers enhanced support for some more advanced features.) Finally, all three are available on Windows, Mac OS, Linux, and Solaris, so most readers should be able to use any of them. In fact, they offer very similar functionality, so your choice may come down to personal preference or what the people around you are using. In the rest of this section, you look a little closer at each IDE.
Eclipse
Eclipse Foundation (https://eclipse.org/home/) offers an online cloud-based platform and the more common desktop version, referred to as a workbench. The workbench contains several perspectives, each of which offers multiple views and tools to the developer. Eclipse Platform 4.4, called Luna, was released in 2014 and includes support for Java 8. Platform 4.8 (Mars) is planned to be released in mid-2015. Eclipse is offered under the open source Eclipse Public License. Eclipse is associated with IBM, so it was adopted early by a huge IBM community and had the resources of the computing giant behind its development. These early advantages made it one of the most popular IDEs available, but others are gaining popularity. Orion is the cloud-based platform that allows developers access and to edit their code from any browser. Because it is web-based, initial support is focused on web client languages like JavaScript, CSS, and HTML. Java development is possible, but you will find better features in Eclipse’s desktop workbench.
NetBeans
NetBeans (https://netbeans.org/) is a modular environment where each module provides some functionality for the developer. In this way, the environment can be expanded to meet the demands of each project. Because NetBeans is a part of Oracle, the owner of the Java platform, it is considered the official IDE for Java 8. NetBeans IDE 8.0 was released in 2014, and the 9.0 release is not yet scheduled, as of the writing of this book. NetBeans is offered under a dual license of Sun’s Common Development and Distribution License and the GNU General Public License. Because of its start as an open source Sun project, NetBeans was more slowly adopted in the beginning; however, that is changing.
IntelliJ IDEA
IntelliJ IDEA (https://www.jetbrains.com/idea/), offered by JetBrains, was developed more recently than Eclipse or NetBeans, first appearing in 2001. The most current IntelliJ IDEA 14 was released in November 2014. One difference with this IDE is they sell an Ultimate Edition in addition to the open source Community Edition. It is available at varying prices for different categories of users (you can see the different licensing options at https://www.jetbrains.com/idea/buy/license-matrix.jsp). For programming beginners, the premium features are probably not necessary; the Community Edition should be more than sufficient to get you started.
Continuing with One IDE
It’s probably not easy to choose an IDE right now. After all, you’ve only been briefly introduced to three popular choices, and if you’ve never programmed before, you probably don’t even know what you’re looking for in a development environment. However, for cohesiveness in this book, from this point forward only one IDE will be used. All the exercises, figures, and instructions you’ll find in the other chapters are based on the Eclipse IDE. This is not to say that Eclipse is better than the others, but it will be easier for you to follow if everything in this book remains consistent.
If you have a preference for one of the other IDEs, already have one installed on your computer, or work in a company or group that expects you to use their choice, you can still follow along with the exercises on another platform. Some of the images and instructions won’t entirely match what you see on your screen, but the code will be the same and the process will be quite similar.
On the other hand, if you proceed with Eclipse now and want to try the others later, they all offer facilities to transfer projects from one platform to the other. There are many help resources devoted to assisting users of other environments to quickly learn their way around a new environment. The skills you develop programming in Eclipse are transferable to other environments.
INSTALLING ECLIPSE ON YOUR COMPUTER
In this second section of this chapter, you learn how to download and install Eclipse. Before finishing, you’ll have a chance to try out the Eclipse environment and compare the experience to coding in a plain text editor. If you already have Eclipse or another IDE running on your machine, this may be redundant. In that case, you may want to proceed to the next chapter, where you can start right away with Object-Oriented Programming.
Earlier in this chapter, there were instructions for downloading and installing the Java Development Kit (JDK) from Oracle. In order to program in Java, whether compiling code from your text editor or using an IDE, you need the JDK. Be sure you have installed it before you continue. You need it to develop Java programs in Eclipse.
Downloading and Installing Eclipse
If you do not have Eclipse on your computer, you can follow these instructions to download and install it. Eclipse 4.4.1 (Luna release) includes support for Java 8, so it’s recommended that you use this or a later version. If you have an older version of Eclipse, you can update to Luna by following these instructions. If you must continue using Eclipse 4.3.2 (Kepler), you can find a Java 8 patch that offers preliminary Java 8 support. You can download the standard Eclipse platform from Eclipse packages that bundle some additional components.
The standard Eclipse platform is sufficient to complete the exercises in this book and offers enough functionality for most beginner programmers. You can download it from http://download.eclipse.org/eclipse/downloads/. Make sure you choose the most recent build date under Latest Release. Click on the build name, and you should see a list of Eclipse SDK options, as shown in Figure 3.3. As with the JDK, you’ll have to choose the version that matches your operating system. Click on the corresponding (http) under the column heading Download to access the download site. Your download may begin automatically, or you may need to press the green arrow to download the compressed file.

Figure 3.3
If you prefer to download a package, Eclipse IDE for Java Developers offers some extra tools for developers. You can download a package from http://eclipse.org/downloads/. Figure 3.4 shows you where to look for the Java Developer package. There is a drop-down to select your operating system. Once you choose the correct platform, click on the link for the correct version.
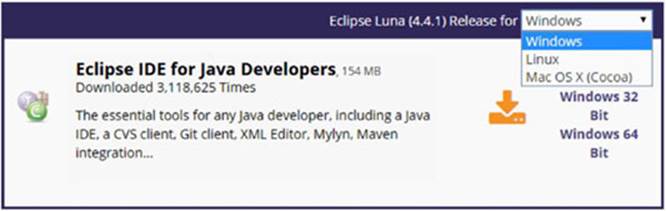
Figure 3.4
Once you have downloaded the ZIP (compressed) file, you need to unzip (decompress) it. Inside the decompressed folder, you should see the icon for starting Eclipse. The icon from the Luna release is shown in Figure 3.5.

Figure 3.5
You can create a shortcut to this file on your desktop or in your Start Menu to make it easier to find and open Eclipse. When you’re ready to proceed, open the eclipse.exe file to start the program. When you open Eclipse, it will ask you where you want to store your workspace. This is a folder where all your projects are stored. You can check a box to save that location as the default and not have to confirm the location every time you open Eclipse. If you work with different workspaces, such as one for work and one for personal use, you might want to leave this box unchecked and select the appropriate workspace each time you open Eclipse.
Using Eclipse
After you choose your workspace, Eclipse opens to the Welcome screen, shown in Figure 3.6, by default. From here you can link to some introductory materials for Eclipse, including tutorials, samples, and an overview of features and updates. Take your time exploring. When you’re ready, you can close the Welcome screen by pressing the white “x” next to the Welcome tab or by clicking the arrow in the top-right corner to proceed to your workbench.
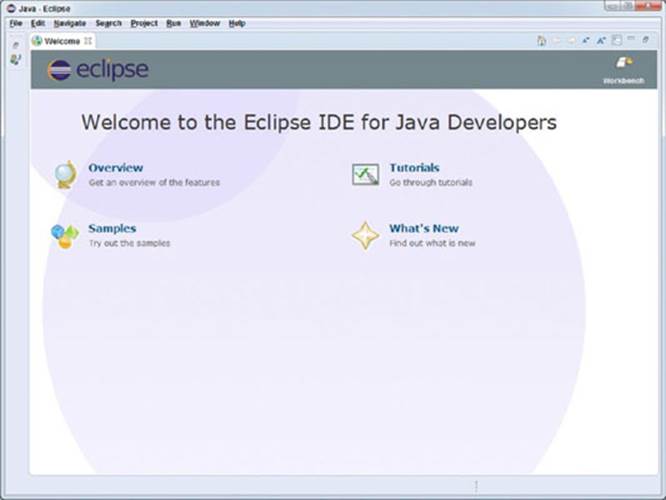
Figure 3.6
Your workbench should look similar to the workbench shown in Figure 3.7, from the Eclipse IDE for Java Developers of the Luna release. It is divided into several views, which give you access to different information and tools. The views can be thought of as sub-windows, where one activity or display is contained. A perspective groups together a particular set of views necessary or helpful for a particular task. By default, you are shown the Java perspective, which is a collection of views used when programming in Java. In this perspective, you’ll see the Package Explorer on the left, the Code Editor in the center, the outline of the current class on the right (with the task list above it if you’re using the Java developer package), and a series of tabs at the bottom.
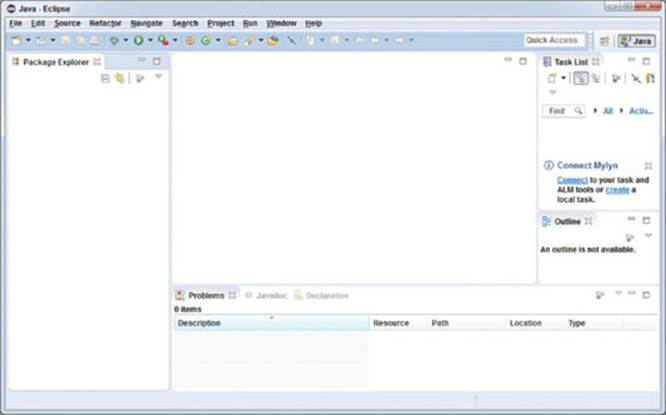
Figure 3.7
In the Window menu, you can change the perspective, for instance the Debug perspective includes the views linked to the debugging facilities in Eclipse. You can close or minimize views by clicking the x or - in the top-right corner of each view, similar to how you close and minimize windows in the Windows operating system. You can add other views by selecting Show View from the Window menu (see Figure 3.8). You can rearrange the views in your workbench by clicking and dragging on the title bar of the view.
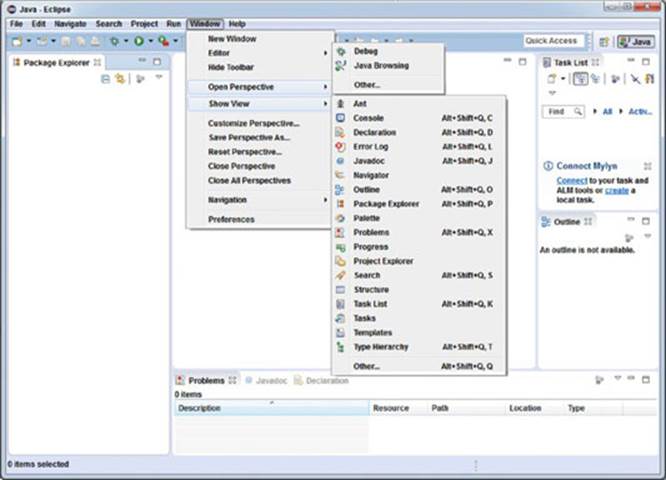
Figure 3.8
One recommendation for customizing your Java perspective is to remove the Package Explorer and replace it with a Project Explorer. The two look very similar in that they show you a list of your projects and the packages and classes included in them. However, the Project Explorer will display a red “x” on classes that have unresolved errors. This makes it much easier to spot code that needs your attention, especially when you start working with multiple classes in the same project.
To close the Package Explorer, you can just click the white “x” in the top-right corner of the Package Explorer tab. You’ll notice when you close it, your Code Editor will stretch to fill the space. To add the Project Explorer, click Window and choose Show View. If Project Explorer is displayed there, you can select it. If not, click Other and you’ll find it in the General folder. When you open the Project Explorer, it will take the place of the Package Explorer, and the Code Editor will shrink back to the center again.
Java programs are organized in a project hierarchy in Eclipse, as depicted in Figure 3.9. Projects are the top-level folder. You should use one project for each program you are working on. Projects are divided into packages that keep related Java classes together. Packages are a Java construct that serves not only to organize your class files, but also allows you to specify a specific class based on its package location. You can have several classes with the same name, but by referring to its package, you can distinctly identify one class. Projects can also contain folders that can be used to store other non-class files, such as text or image files associated with your program.
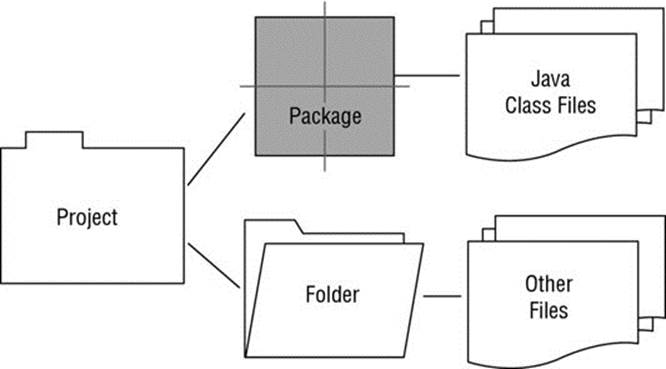
Figure 3.9
You are now ready to start your first project in Eclipse. The following exercise takes you through the process step-by-step, to help you get acquainted with Eclipse and how its projects are organized. You’ll follow very similar steps in every exercise that follows in this book.
TRY IT OUT Creating Your First Java Application in Eclipse
In this exercise, you create a very simple Java program. You will code, compile, and run it all within the Eclipse development environment.
1. Open Eclipse and select the workspace you want to use. This is where your project will be saved by default.
2. Go to File New Java Project to create a new project. You will see a New Java Project window, like the one shown in Figure 3.10, to input information about the project.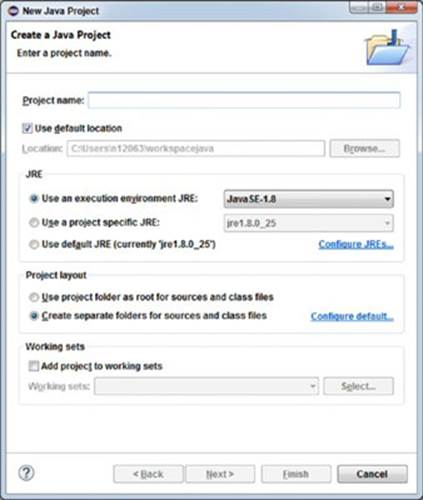
Figure 3.10
3. Type MyFirstJavaProject for the project name.
4. Leave the default settings for the remaining fields. Check that the execution environment is the most recent Java. JavaSE-1.8 is the most recent as of the printing of this book.
5. Click Finish to create your project. You should see the project appear in your Project Explorer (or Package Explorer if you did not change the view).
6. If you double-click on the project name or press the small arrow to the left of the project, you will see the contents of the project folder. Right now, it contains a folder called src, which stands for source, and the JRE System Library for the Java release attached to this project, JavaSE-1.8, in the book examples. The src folder is still empty since you have not created any source files yet.
7. Create a package to organize your source files. This step is not necessary, as putting class files directly into the src folder will place them in a default package. However, using this default package is discouraged. As you develop larger programs, it will become more important to use packages. Add a package by right-clicking on the project or src folder, as shown in Figure 3.11, or choosing File New Package.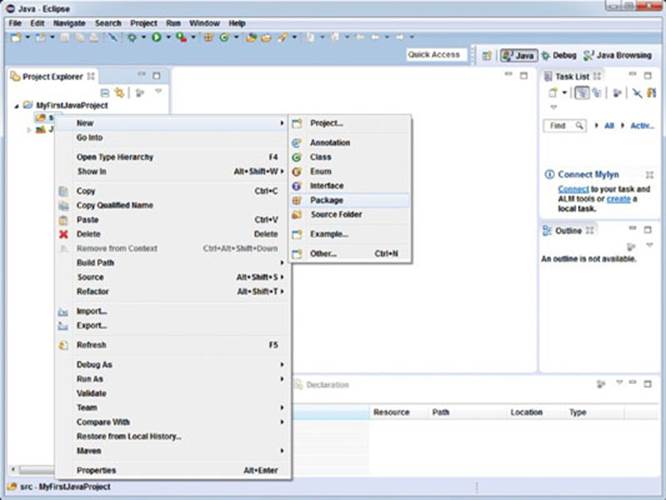
Figure 3.11
8. A New Java Package window, like the one shown in Figure 3.12, will appear. Indicate which project this package belongs to and the name of the package. The source folder should say MyFirstProject/src; it may automatically enter this or you may need to enter it yourself. You can also find the correct project location using the Browse button. Name the package myPackage and press Finish. You should see the package appear under the src folder in your project. The square package icon will be white, indicating that it is empty.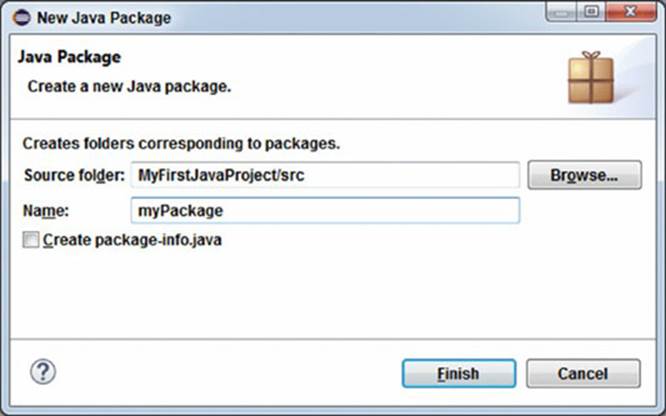
Figure 3.12
9. Now you need to create a new class. As with the package, you can do this multiple ways. You can right-click on the project name, the src folder, or package and select New Class, as shown in Figure 3.13. You can also choose File New Class. In either case, a New Java Class window will appear, where you enter information about your class, as shown in Figure 3.14.
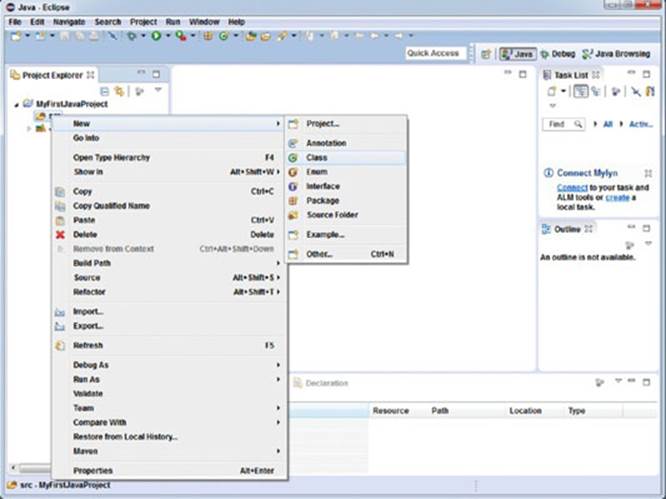
Figure 3.13
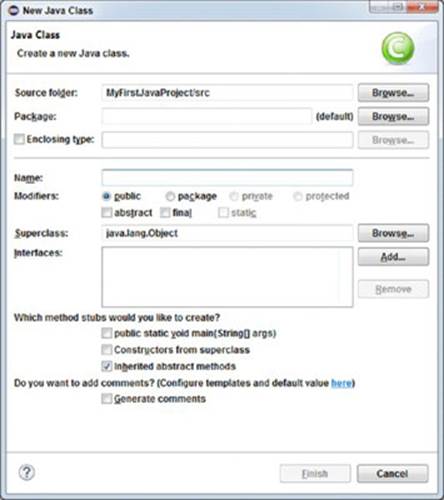
Figure 3.14
10.Enter MyFirstApplication as the class name. Make sure the source folder refers to the correct project and the package refers to the correct package. You can leave the Modifier set to Public and the Superclass set to java.lang.Object. None of the checkboxes need to be checked. You will learn much more about these concepts as you continue through the book. Press Finish to create your class.
11.You should see some code already written in the Code Editor. Also, the view should now include the tab MyFirstApplication.java, the source file for your first class. If some of your checkboxes were checked, you might have more code automatically provided than what is shown in Figure 3.15.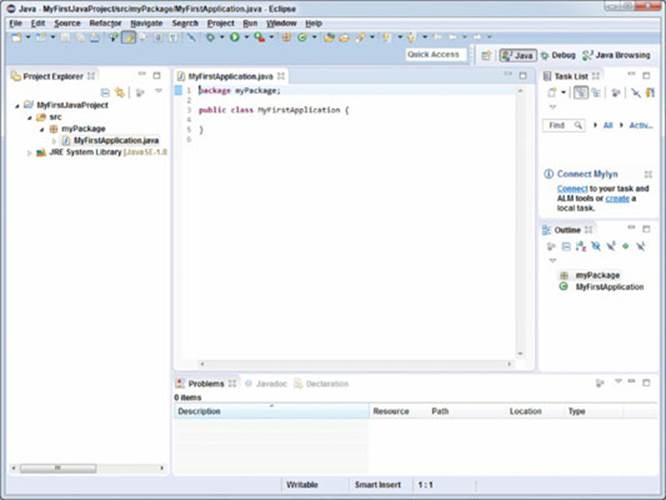
Figure 3.15
12. Below the package myPackage; line, type /** and press Enter. You should see a blue comment block appear with space for you to enter comments about your class. It may include the @author information if your computer has some user information saved. You can delete or edit this if you like. Add a comment describing your class after one of the * symbols. It should look something like this:
13. /**
14. * This is a simple Java application.
15. * It prints a short statement to the standard output.
*/
16. Below this comment, you will see public class MyFirstApplication {, then a blank line and }. In between the two curly brackets, where the blank line is, you can add the code for your class. This is a very small program, so you only need a main method. Add it so the class looks like the following:
17. public class MyFirstApplication {
18. public static void main(String[] args){
19. System.out.println("I've coded, compiled, and run my first Java program!");
20. }
}
21.Save your files. Again, there are multiple ways of doing this. Choose File Save or press Ctrl+S to save the class you are currently working on. Choose File Save All or press Ctrl+Shift+S to save all the open classes. Notice that unsaved files have an asterisk (*) next to their name in the Code Editor tab. Once they are saved, this * will disappear. You can see an example of this in the top-left corner of Figure 3.16.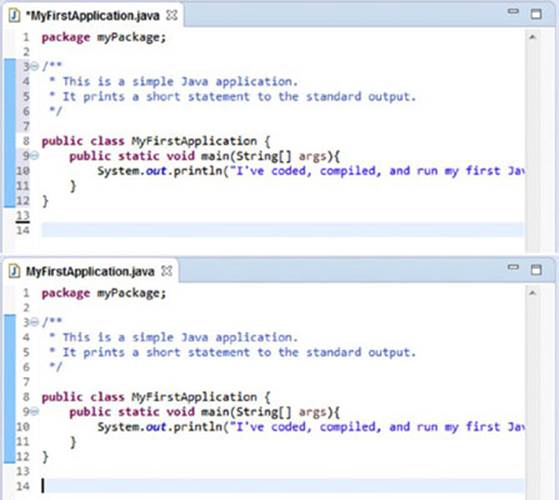
Figure 3.16
22.You’re ready to run your program now. Go to Run Run to compile and run your application. If you have not saved your files, Eclipse will warn you and offer to save them for you. You can check the box to instruct Eclipse to always save your files before running. After the program runs, you should see a new Console tab displayed in the bottom view. This is where standard output is printed in Eclipse. The bottom view will look something like Figure 3.17.
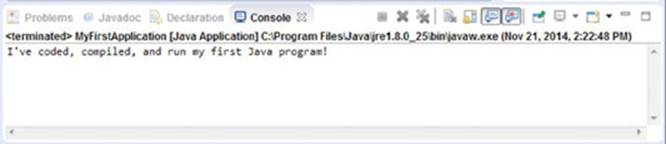
Figure 3.17
How It Works
Here’s how it works:
1. In Eclipse, every Java project is stored in its own location, referred to conveniently as a project. You created your first project called MyFirstJavaProject to store all the components required for the project in this exercise.
2. Next, you created a package. A package acts as a folder for related class files.
3. You created a class and placed it inside this package. The first line of your class reads package myPackage; and indicates where the class is located. The word package is a keyword in Java, so it is shown in a bold purple font to highlight it.
4. After the package declaration, there are a few lines of code that start with /** and end with */. These are special symbols that indicate a block comment. Comments are not compiled or executed, so they allow you to provide information to humans that can be ignored by the computer. Here, comments are used to indicate the purpose of the class. Single-line comments begin with // and function the same way. In Eclipse, unlike in very basic text editors, comments are colored to set them apart from other parts of the code. Block comments are displayed in blue while single-line comments are displayed in green.
5. Next you have a class declaration public class MyFirstApplication, and you’ll find the body of the class between curly brackets { and }. The public modifier indicates that classes outside the package can access this class. This concept was introduced in Chapter 2 but will be covered in more detail in Chapter 4.
6. The first statement in your class is the declaration of your main method: public static void main (String[] args). Remember from Chapter 2 that the main method is the entry point for execution. When a program runs, it will start from the mainmethod. Sometimes you will see a notification from Eclipse that it is searching for the main method before it can run a program. You may also see an error if the main method cannot be found. You should always check to be sure that your program has a main method (if you want to run it) and that the declaration is correct and complete. It should always start: public static void main (String[] args){.
7. Inside the main method, between an inner set of curly brackets, you find the statements to be executed. In this small example, there is only one statement: System.out.println("I've coded, compiled, and run my first Java program!");. This prints the text you see between the parentheses to the standard output. In Eclipse, the standard output is the console.
8. The last two lines contain the closing bracket of the main method and the closing bracket of the class.
9. Unlike the exercise using the command window, Eclipse manages the compilation and execution of your program for you. When you click Run, the .java source file is compiled to a .class machine-readable file. After compilation, the program is executed.
10.After execution, you should have seen the text I've created, compiled, and run my first Java program! printed to the Console tab in the bottom view of your workbench.
11.If there were any errors, you can simply edit the class file in the Code Editor view and re-run the program. Also, if there were typos or other mistakes, Eclipse can often highlight these the way a word processing program will show you misspellings and grammatical errors. The code checker and the seamless integration of coding, compiling, and executing are some of the many benefits a new programmer will enjoy when using an IDE compared to command-line programming.
In addition to the menu bar and right-click options, Eclipse has a row of buttons you can use for many common operations. Some of the buttons are shown in the next few figures with a short description of what they do. The first set of buttons on the far left are from the File menu. The first, an icon of a window with a yellow plus sign, allows you to create new projects, packages, classes, and so on. The next looks similar but shows some details inside the window icon; this is for creating new graphical components. The icon of a single floppy disk is the equivalent of choosing File Save. The icon of a stack of three floppy disks is the equivalent of choosing File Save All. The last one in this panel, an icon of a printer, is for printing. These icons are shown in Figure 3.18.

Figure 3.18
The second button panel includes some different display options for the Code Editor view. The third panel includes a bug icon for debugging your programs, a green play button for running your programs, and one other button for running external tools. The first two, debug and run, are most useful at this point. This panel is shown in Figure 3.19.

Figure 3.19
Five more buttons that you might find useful are in the next two panels, shown in Figure 3.20. The new package button has an icon that matches the package icon in the Project Explorer, which is a small brown square with a cross through it. Next to it is a green circle with a C and a plus sign; this is a shortcut to create a new class. You can change it from a class to another type with the drop-down arrow beside it. The yellow folder with a blue ball and a green ball is for opening classes (or other types). If you are using the IDE for Java Developers, there’s a yellow folder with a white box in it; this is for opening a task. Finally, there is an icon of a yellow flashlight, which opens the search window.

Figure 3.20
Now that you’ve had a tour of Eclipse, you’re prepared to continue with the rest of this book. In the following chapters, there will be many exercises to demonstrate Object-Oriented Programming concepts in Java. They are written with the Eclipse IDE in mind, so you can refer back to this chapter if you need a refresher on some of the basic technical aspects of creating programs in Eclipse. You can also find a wealth of resources online from Eclipse if you’re having trouble with something. Also, as stated earlier, if you prefer to use another development environment, you will still be able to follow along, but the instructions intended for Eclipse won’t exactly match your IDE. The many platforms available, including NetBeans and IntelliJ IDEA as well as many others, are often similar enough that you can easily adapt from one to the other.
All materials on the site are licensed Creative Commons Attribution-Sharealike 3.0 Unported CC BY-SA 3.0 & GNU Free Documentation License (GFDL)
If you are the copyright holder of any material contained on our site and intend to remove it, please contact our site administrator for approval.
© 2016-2026 All site design rights belong to S.Y.A.