Beginning Java Programming: The Object-Oriented Approach (Programmer to Programmer) (2015)
4. Moving Toward Object-Oriented Programming
WHAT YOU WILL LEARN IN THIS CHAPTER:
· What is Object-Oriented Programming and why it is useful
· How to work with classes and objects and the differences between them
· How variables are defined and what is meant by their scope
· How methods are defined and what is meant by their scope
· Some of the frequently used standard classes
WROX.COM CODE DOWNLOADS FOR THIS CHAPTER
The wrox.com code downloads for this chapter are found at www.wrox.com/go/beginningjavaprogramming on the Download Code tab. The code is in the Chapter 4 download and individually named according to the names throughout the chapter.
Now that you’re familiar with programming in general, understand Java’s general concepts, and have set up your development environment, it’s time you delve into Java for real. Chapter 2 highlighted the fact that Java is an object-oriented programming language, meaning that objects, with their data variables and methods, are first-class citizens in Java and that defining a well-thought-out class architecture is the foundation of any solid program or application you will develop.
This chapter is organized as follows. The first section provides a general overview of the basic concepts of the object-oriented programming paradigm. Next, it discusses how to work with classes and objects in Java. This is then further explored in the following sections, which explain in more detail how to define data (variables) and behaviors (methods) for classes. The final section in this chapter provides an overview of helpful built-in classes in Java SE, which will be used throughout this book as well.
BASIC CONCEPTS OF OBJECT-ORIENTED PROGRAMMING
As you saw in Chapter 1, object-oriented programming is a programming paradigm where concepts in the program are represented by “objects.” Each object is an instance of a class, which can be seen as a “blueprint” or template of the object’s characteristics. Contrary to procedural programming, these characteristics include data—attributes or variables describing the object’s state—and behaviors—methods or procedures describing the actions an object can perform.
A simple example can help explain this. Imagine you are developing an application to keep track of courses and student registrations. In procedural programming, your first task would be to come up with an appropriate data structure to represent the concepts you are dealing with. You thus might define two lists—one for holding the students and one for holding the courses. Each list would contain a dictionary of values representing a single student or course. This might look as follows:
STUDENTS = [
{id : 'S0001', last: 'Demmick', first: 'Larry', birthdate: '1989-05-13'},
{id : 'S0002', last: 'Newandyke', first: 'Freddy', birthdate: '1991-01-05'},
...
]
COURSES = [
{id : 'C00A', name: 'Introduction to Java'},
{id : 'C00B', name: 'Advanced Data Base Management'},
...
]
Pay no attention to the syntax being used here—it’s just pseudo-code to illustrate the point. The following step defines a series of operations—procedures—that you want to perform on your concepts. For example, you’ll need a procedure to add a student:
procedure add_student(i, n, fn, bd) {
STUDENTS += {id : i, name: n, firstname: fn, birthdate: bd}
}
Similar procedures can be created to add courses and to remove or modify students and courses. You also might want to keep track of which students registered for which courses. Multiple possibilities exist as to how to approach this: you can either add a list of course IDs to each student (representing the courses the student registered for), or a list of student IDs to each course (representing the students registered for this course). Another way to do this is to create an additional data structure—REGISTRATIONS—to keep track of registrations.
Procedural programming has substantial drawbacks from a maintenance viewpoint. For one, when the definition of a data structure changes, all procedures using this structure need to be reviewed and updated accordingly. Second, when data structures are linked, care needs to be taken that the state of the program is kept valid at all times. When deleting a course in this example, for instance, you’ll also need to ensure that all registrations for this course are removed as well. The greatest drawback comes from the fact that all data is stored in global structures, which are accessible to all procedures. For large programs, it becomes unwieldy to keep track of which procedures are using which structures, how they modify them, and what effect a change in one procedure or data structure will have in other parts of the program.
When using an object-oriented programming paradigm, objects encapsulate only local data, which is by default accessible only by the object itself. Rather than having to think about data and code as two separate concepts, an object-oriented program merges the two in the concept of an object. This increases understanding (analysts and programmers can consider objects of interest without internalizing the workings of the complete program) and ease of maintenance.
To realize the latter, object-oriented programming applies two concepts known as encapsulation and information hiding. One of the greatest sources of errors in programs is when some parts of the program are interfering with other parts. Indeed, it is easy to see that, in this course administration example, the addition of more procedures and data will quickly lead to so-called spaghetti code, where it becomes very complex to follow the trace of execution as data can jump from one part to another in the program. Object-oriented programming resolves this issue by encapsulating both data and behavior within an object.
However, this in itself is not sufficient to guarantee maintainable programs, as you also need to prevent an object’s data from being directly accessible by other objects. Therefore, object-oriented programming also emphasizes the concept of information hiding, where an object’s data can by default be accessed only by methods contained in the same object. When data elements of one object need to be used by another object, the latter must call a publicly accessible method of the former, basically requesting the “owning object” to perform a change to its data. As such, object-oriented programming encourages programmers to place data where it is not directly accessible or modifiable by the rest of the system. Instead, the data is accessible through methods, which can also include checks and safeguards to make sure the requested change is permitted by the owning object.
Object-oriented programming also defines concepts to help with structuring programs so that they can be easily extended and evolved. These concepts are polymorphism, which is the ability to treat objects of different types in a similar manner, and inheritance, which is a concept to allow for extending objects and enabling code reuse. You will revisit these concepts in more detail in Chapter 8, when you delve deeper into object-oriented concepts. For now, you’ll see how the object-oriented concepts you have seen so far—the classes, objects, variables (data), and methods (behavior)—are used in Java.
CLASSES AND OBJECTS IN JAVA
Now that you have gained knowledge on the basics of Java, it is time to move on to the topics that make Java an object-oriented language: classes and objects. The following sections will guide you through the concept of a class, which serves as a declaration, or blueprint, for objects, which can be instantiated from classes.
Defining Classes in Java
As discussed in Chapter 2, Java is a “pure” object-oriented programming language, meaning that there are no standalone constants, variables, or functions. It is not possible to define such standalone elements, and everything is thus accessed through classes and objects. Before version 5 of Java, primitive types (such as int and double) were not represented as objects, a decision made by Java’s designers for performance reasons. Due to this, Java was not considered to be a pure object-oriented programming language. However, Java 5 introduced a concept called autoboxing, where programmers can access primitive types as if they were instances of their wrapper class.
AUTOBOXING
Autoboxing is an automatic conversion made by the Java compiler between primitive types and their corresponding wrapper classes. For example, converting a double to a Double is called boxing, and converting a Double back to a double is called unboxing.
For each primitive type, there is an associated wrapper class available:
· boolean wrapper class: Boolean
· byte wrapper class: Byte
· char wrapper class: Character
· float wrapper class: Float
· int wrapper class: Integer
· long wrapper class: Long
· short wrapper class: Short
· double wrapper class: Double
· void wrapper class: Void
The void wrapper class does not actually hold a value but is a representation for the void return type.
The mechanism of autoboxing entails that it is perfectly fine to write code like this:
Double d1 = 5.4;
double d2 = new Double(3.3);
You might be wondering if it makes sense to use the primitive types’ wrapper classes instead of the default keywords. The best practice, however, is simply to use the primitive keywords and the wrapper classes only when you need to, that is, when you want to access a primitive variable as an object. Later in this chapter, when you read about Java’s collection types, you will see a typical use case where this is necessary.
In Chapter 2, you read an overview on Java’s language structure, including the syntax for classes, methods, and variables, and the different types in Java. Don’t worry if you don’t recall all the details, as you will revisit these concepts again in the following sections and learn about them step-by-step.
You’ll now convert the example of the course administration system to an object-oriented Java program. The first thing you need to do is define the concepts—the blueprints, templates, and types—that will be used in your application. These are the classes. In this example, you can introduce two class definitions: one for a Course and one for a Student.
TRY IT OUT Course and Student Classes
To create some simple Java classes representing students and courses, follow these steps:
1. If you haven’t opened a project in Eclipse, or just prefer to follow along and create a new one, you should do so by navigating to File New and then selecting Java Project in Eclipse. A dialog window will open asking you to fill in a project name. ChooseCourseAdministration. You can then press Finish to create the project.
2. You will create two classes within the src folder: Course.java and Student.java. You do so by right-clicking the src folder in the package explorer in Eclipse and then selecting New Class. A window will pop up asking you to fill in some details. The number of options offered might seem a bit daunting at first, but remember that the only necessary element you need to provide is the class name. All other aspects can be modified directly in the class’ source code, or changed by moving the class around. Let’s start with the Student class. In the wizard screen, you should enter the class name without the .java suffix, as Eclipse will add this for you (you will receive a warning when you do add the file suffix). Do not pay attention for now to the"The use of the default package is discouraged" warning. You’re just starting out, and can thus afford to be a bit sloppy. You will learn about packages later.
3. The Student.java file is created and opened in the Eclipse code editor (if it is not, you can double-click the file to open it in the Eclipse editor), showing a bare-bones class definition:
4. public class Student {
5.
}
6. Edit Student.java to look like the following:
7. class Student {
8. int id;
9. String firstName;
10. String lastName;
11. int birthYear, birthMonth, birthDay;
}
12.Save your file. You have now created a bare-bones class definition for the Student concept, containing variables for the ID, first name, last name, and date of birth. (For now, you’ll use a combination of three integers to represent the date of birth. There is also a Date class that will be discussed later.)
13. Similarly, create a Course.java class with the following source code:
14. class Course {
15. int id;
16. String name;
}
How It Works
Now take a look at how it works.
1. In Java, classes are stored in .java files, which should bear the same name as the class that is defined in them. In the first two steps, you initiate a new Java project in Eclipse and add two class source files using the wizard: Course.java andStudent.java.
2. The student and course classes are defined by declaring some variables, such as id, firstName, and birthYear. You remove the public declaration Eclipse has automatically added to the class source, as you will learn about access modifiers (such aspublic) later.
3. This is all you do for now. You’re not actually running or executing anything yet. Feel free to experiment, however, by adding more variables you can think of using the primitive types you saw in Chapter 2 to familiarize yourself with the syntax (Eclipse will provide errors or warnings when you make a mistake).
If you’ve followed along with the Try It Out, you will have noticed that a class definition looks pretty straightforward at this point:
class CLASSNAME {
// VARIABLE DEFINITIONS
}
That is, class definitions start with the keyword class, followed by the class name. Java imposes almost no restrictions on which characters or names you can use for class names, except for the fact that class names should start with a letter, the underscore character (“_”) or a dollar sign (“$”). The following names can all be valid class names:
· Course
· Student
· _
· abcde
· Number0
· $DOLLAR$
· ![]()
· ![]()
Remember, as discussed in Chapter 2, keywords are not valid class names, meaning that class, true, null, and so on are not accepted as class names.
In general, however, it is a very good idea not to go overboard when defining classes and to stick to (western) alphabetical characters only. If you recall the section on naming conventions in Chapter 2, you will remember that you format class names in UpperCamelCase(meaning that each word in the class name starts with a capital letter). This is the widely accepted convention in the Java community, and one this book follows as well.
NOTE By the way, you might have tried to create a class named “![]() ” in Eclipse, only to have it show up as an empty file with Eclipse throwing a warning about character encodings. The reason for this is that Eclipse by default uses a subset of all possible characters for source code, called Cp1252. While this subset contains most Western characters, it does not contain Chinese, Japanese, Thai, or other characters found in non-Western languages. This implies that it is also not possible to include code such as this:
” in Eclipse, only to have it show up as an empty file with Eclipse throwing a warning about character encodings. The reason for this is that Eclipse by default uses a subset of all possible characters for source code, called Cp1252. While this subset contains most Western characters, it does not contain Chinese, Japanese, Thai, or other characters found in non-Western languages. This implies that it is also not possible to include code such as this:
System.out.println("The word for student in " +
"Chinese and Japanese is written in the " +
"same way: ![]() ");
");
If you want to use all characters in Eclipse source code, you will need to open the Preferences window, navigate to General ➢ Workspace, and then select Other: UTF-8 under Text File Encoding. This will ensure that Eclipse saves your source files with Unicode encoding, and will thus allow you to use Unicode class names and output. (Unicode is a gigantic character set supporting and containing almost all character glyphs in use by humanity today; see www.unicode.org for more details.)
Before you rush off to the preferences to change this setting, keep in mind, however, that changing the source file encoding is generally a bad idea. The reason for this mainly stems from portability and compatibility. Not all operating systems and Java versions support Unicode equally well, meaning that Unicode characters that look and open fine on your workstation (with your version of Eclipse) might not show up correctly on other people’s machines.
But what if you just came up with a killer application and want to target the Chinese market? Surely, it should be possible to translate your program? When that happens, you have two ways to make this work. The first is to change your source file encoding (and deal with portability issues as they pop up). The second way is to use “escape” Unicode characters, like so:
System.out.println("The word for student in " +
"Chinese and Japanese is written in the " +
"same way: \u5B66\u751F");
To escape a Unicode character, you write a backslash (\), followed by the lowercase letter u, followed by four hexadecimal (0-9, A-F) characters representing the code point of the character. You can find tables and websites helping out with this task online. One such example that allows you to look up characters is: http://www.fileformat.info/info/unicode/char/search.htm
As a final note, you might have tried one of these code samples in Eclipse to see if the text appears in the output, only to see two question marks (??) or garbled text appearing where the Unicode characters should be. The reason behind this is that not only does your editor need to enable support for saving Unicode files, your console—which runs the program—must also be able to show them. By default, neither the Eclipse console nor the Windows console offers support for this (showing Unicode code characters in GUI applications, however, will work). On Linux—another operating system—the console does support Unicode character output.
This all being said, I’m sure you will agree that character encodings, Internationalization, and Unicode is a complex affair. In fact, this is not a problem with Java itself. Java actually provides very solid Unicode support compared to most other programming languages. This problem plagues all aspects of computing, programming, and software engineering. Computers in the 80s did not deal with languages other than English and thus supported only a very small, basic set of characters, the effects of which still have an impact on programming languages today. As such, I will keep things simple throughout this book and work with basic Western characters only.
The class’ body is surrounded by curly brackets, { and }. Within this body, you define the variables (the data) and the methods (the behaviors) of the class. Variable definitions start with a variable type, followed by one or more variable names, followed by a semicolon (used at the end of each statement in Java). Here are some examples:
· int id;
· String firstName, lastName;
· double discountPercentage;
Observe the use of the comma (,) as a shorthand to define variables of the same type. That is, you could also write String firstName, lastName; as:
String firstName;
String lastName;
Recall the naming convention of writing variable names in lowerCamelCase, whereby each word in the variable name is capitalized, except for the first one, which starts with a lowercase letter. This convention helps to distinguish variables from class names. Note that this convention is not as widely adhered to as CamelCase for class names. That is, you might find code that uses snake_case (using underscores) as well.
You will learn about variable definitions in a little more detail later. For now, you’ll continue looking into the basic class definition, and seeing how you extend it to add method definitions:
class CLASSNAME {
// VARIABLE DEFINITIONS
// METHOD DEFINITIONS
}
The following Try It Out shows you how to add some simple methods to the Student and Course classes.
TRY IT OUT Adding Methods to the Course and Student Classes
You will use the Student class definition to add a number of methods.
1. Open the Student.java class you defined in the previous Try It Out in Eclipse, or create a blank class if you haven’t done so already.
2. Modify the class definition so that it looks as follows:
3. class Student {
4. int id;
5. String firstName;
6. String lastName;
7. int birthYear, birthMonth, birthDay;
8.
9. boolean isBirthday() {
10. // Return true if it's the student's birthday today.
11. return false;
12. }
13.
14. void giveWarning(boolean isFinalWarning) {
15. // You should study harder!
16. }
17.
18. int numberOfFriends() {
19. // Return the number of friends the student has.
20. return 0;
21. }
}
How It Works
Now take a look at how it works.
1. In the source code of this class, you have now added three method definitions: for isBirthday, giveWarning, and numberOfFriends, respectively.
2. Each of these methods starts with a return type (boolean, int, or void when no return type is expected), the name of the method, and a number of arguments the method takes as inputs.
3. The method bodies do not look particularly interesting as of now, and just return a value immediately or do nothing.
4. Again, you’re not running this code yet, but feel free to add more method definitions for the Student and Course classes. If you’re up to it, you can also try adding some code to the method bodies.
Again, if you’ve followed along with the Try It Out, you’ll recognize the same pattern showing up for each method definition. That is, methods start with a return type, followed by the name of the method, and then a number of arguments the method takes as inputs (for example, the isFinalWarning argument for the giveWarning method). Just as with variables, recall that method names are written in lowerCamelCase. The method’s “body” is surrounded by curly brackets, { and }, just as for classes. Note that this creates a hierarchy: methods are defined within the class body, and the code for the method itself is defined within the method body.
Methods can return any kind of type, meaning that the following can all be valid method definitions:
· String nickname(){ /* ... */ }
· int numberOfPartiesWentTo(){ /* ... */ }
· Student bestFriend(){ /* ... */ }
· String[] listOfFavoriteCountries(){ /* ... */ }
When a method returns something, you need to specify the return value by using a return statement in the method’s body. Even when a method does not return anything, you need to explicitly specify this fact by using the void keyword in the method’s definition, as shown, for example, in the giveWarning method in the Try It Out.
A method takes an arbitrary number of arguments. Arguments are separated by commas (,), and for each argument, the type needs to be specified. Even when a method takes no arguments, the parentheses () need to be added to the method name. Some examples:
· void drinkBeer(int nrOfGlasses){ /*...*/ }
· int numberOfCoursesPassed(boolean onlyIncludeFirstTry) { /*...*/ }
Take some time to get acquainted with these concepts and familiarize yourself with basic class definitions. Feel free to add more classes (Teacher and CourseRoom are fine examples) and come up with some variables and methods for them.
Schematically, a class definition with a variable and methods can be represented as shown in Figure 4.1.
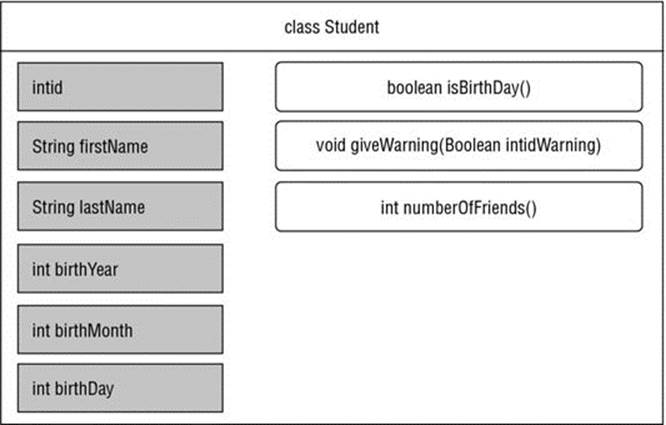
Figure 4.1
You now know how to define the “blueprints” for these concepts, but you haven’t seen yet how to instantiate these blueprints. That is, how do you create objects from the blueprints you defined? The next section explains how to do so.
NOTE Recall that the basic class definition, for now, looks as follows:
class CLASSNAME {
// VARIABLE DEFINITIONS
// METHOD DEFINITIONS
}
You might be wondering if this ordering is strict, meaning whether the classes really have to start with variable definitions first, followed by method definitions. The answer is no. For example, it is perfectly okay (syntactically) to write a class like the following:
class Student {
boolean isBirthday() {
// Return true if it's the student's birthday today.
return false;
}
int id;
void giveWarning(boolean isFinalWarning) {
// You should study harder!
}
String firstName;
int numberOfFriends() {
// Return the number of friends the student has.
return 0;
}
int birthYear, birthMonth, birthDay;
String lastName;
}
While neither Eclipse nor Java will care about this, you—the programmer—should. Stylistically, this code scores badly. It’s hard to follow and will only serve to confuse you and others later. Therefore, it’s best to stick to the convention of “variables first, methods next.” In addition, keep in mind that code is read more often than written, no matter the language it is written in. Therefore, it is always a good idea to keep program code as clean, organized, structured, and readable as possible, as well as to follow common conventions and commenting where necessary.
Creating Objects
You have seen how to define simple classes in Java. Remember that classes are like blueprints or prototypes from which objects are created. For example, you defined the class Student as a concept having a name, an ID, and some methods describing its behavior, but you have not yet created an actual student. Now that you have defined the class, however, you can create, or instantiate, hundreds of students, each with their own properties. In object-oriented programming terms, you say that you want to create a student object that’s an instance of the class of objects known as Student.
Objects are created using the new keyword. For example, to create a new student, you would simply write the following statement:
new Student();
Of course, just creating a student in itself does not help you much, as you need to have a way to access this particular object later on. How do you do so? By simply assigning the newly created student to a variable, of course:
Student myFirstStudent = new Student();
Now you can use the myFirstStudent variable to access the first student later. You might be wondering why the parentheses appear at the end of student. It’s not a method definition, right? So, why not just write:
Student myFirstStudent = new Student; // Incorrect!
The reason is that when you instantiate a class, you are in fact actually calling a special method of the class called a constructor. Since it is a method, it can take a number of arguments. For example, you might have defined the class so that you immediately need to pass a name for the new student:
Student myFirstStudent = new Student("Sophie", "Last Name");
In fact, this is a better way to define the class, as it doesn’t make much sense to allow programmers to define students who do not have a name. Since you are just getting started with classes and objects, however, you can be a bit sloppy in the name of learning. Don’t worry, you will return to constructors later in this chapter. For now, the classes can be instantiated without any arguments.
NOTE Observant readers might wonder why the Student class definition does not contain a constructor method to create a new Student, even when this method does not take any arguments. For all the other methods, you see that you have written, for example:
int numberOfFriends() {
// Return the number of friends the student has.
return 0;
}
So where is the constructor method? The answer is that you do not have to define it. When you do not supply any constructor method, Java will be smart enough to know that it should just create a new Student object with all its variables set to the default values when you write:
Student myFirstStudent = new Student();
You will explore constructors in more detail later in this chapter.
Now that I am talking about constructors and Student objects being created without a name, it’s a good time to emphasize another important aspect, namely the fact that the name you give your Student variable has nothing to do with the variables of the Student. An example will help to illustrate this. Say you define a student as follows:
Student marc = new Student();
Even though the variable is named marc, this does not mean that the firstName variable of this object must be equal to marc. Of course, it makes sense to use marc as a variable name for the student named Marc, and no one in their right mind would use sophie as a variable name for the student named Marc, but there is nothing prohibiting you from doing so. The name of the Student variable is just a handle to refer to the Student object itself, and has nothing to do with the internals of that object.
The following Try It Out will show you how to create some students in the example course administration program.
TRY IT OUT Creating Student Objects
You will use the Student class definition as a blueprint to create a number of Student objects. If you have not followed along with the previous Try It Outs, you should create a Student class now with the following content:
class Student {
int id;
String firstName;
String lastName;
int birthYear, birthMonth, birthDay;
boolean isBirthday() {
// Return true if it's the student's birthday today.
return false;
}
void giveWarning(boolean isFinalWarning) {
// You should study harder!
}
int numberOfFriends() {
// Return the number of friends the student has.
return 0;
}
}
1. Add the following main method to the Student class definition as follows. Note the use of the new keyword to create objects:
2. public static void main(String[] args) {
3. Student firstStudent = new Student();
4. Student secondStudent = new Student();
5. firstStudent.id = 1;
6. firstStudent.firstName = "Marc";
7.
8. secondStudent.id = 2;
9. secondStudent.firstName = "Sophie";
10.
11. System.out.println("The student object referred to "+
12. "by the variable secondStudent has the first "+
13. "name: "+secondStudent);
}
14.You should now be able to run the Student class from Eclipse and observe the output given on the console.
How It Works
Now take a look at how it works.
1. The new keyword is used to create objects, which you will use to create a bunch of students. Note the use of the dot (.) operator in this code to access (read and write) the Student objects’ variables.
2. As Java is a fully object-oriented program, however, you need to find an appropriate place to create the students. Loose scripts cannot exist in Java, meaning that you have to create the students inside a method definition of a class.
3. To actually execute, that is, run the program, you add a so-called main method to the Student class. As Java has no way of knowing which particular method you want to use as the entry point of the program, a special method exists—the so-called mainmethod—that serves exactly this purpose.
4. When running this program from Eclipse, Java will call the class’ main method. The main method will create some students, set their variables, and print some information to Eclipse’s console.
5. You might be wondering what the public and static keywords are doing before the main method definition. Don’t worry about these too much for now. You will see what static does later on in this chapter and learn about the role of public in Chapter 8. For now, just keep in mind that the main method must be public, static, return nothing (void), and take a single argument: an array of strings, String[]. The name of the argument can be changed, but by convention, args is used. The reason for this is that this method argument will contain the list of arguments that was passed to Java.
6. Note that, generally speaking, mixing in this main method with the student class definition is not a good idea. Ask yourself the following: is a student responsible for creating some students? The answer is, of course, no.
7. As such, you can also put this program logic somewhere else. The question is then, of course, where? Think about this, which class of objects should be responsible for the behavior of creating some students? You might come up with different answers. For example, you might say, “I just want my program to create some students.” So what you can do is add a class, called MyProgram, to hold a single main method:
8. class MyProgram {
9. // I am the program managing your Student and Course objects.
10.
11. public static void main(String[] args) {
12. Student firstStudent = new Student();
13. Student secondStudent = new Student();
14. firstStudent.id = 1;
15. firstStudent.firstName = "Marc";
16.
17. secondStudent.id = 2;
18. secondStudent.firstName = "Sophie";
19.
20. System.out.println("The student object referred to "+
21. "by the variable secondStudent has the first "+
22. "name: "+secondStudent.firstName);
23. }
}
24.The behavior of managing students is now cleanly separated from the behavior a student itself exposes. Later, you might want to create an Administrator class to perform this sort of management, but for now, all you want to do is run this simple example program, so the current way of doing things is fine to illustrate the idea.
Figure 4.2 represents the creation of objects from classes, schematically.
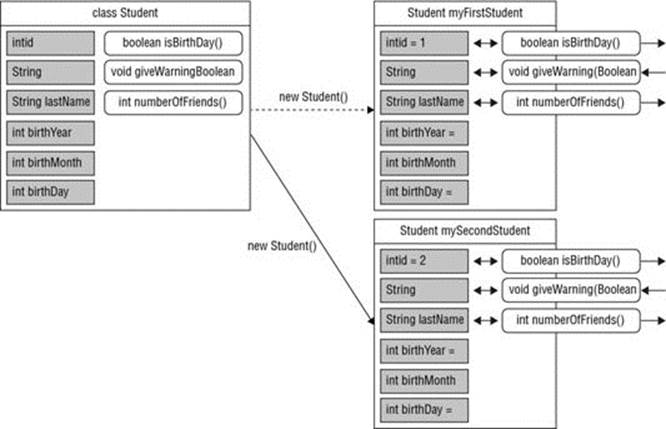
Figure 4.2
You have now seen how to create simple class definitions in Java, containing variables and methods. By now, you should grasp the differences between classes and objects, and should be able to define classes and to instantiate them. You’ve been taken on a quick tour through the concepts of classes and objects in Java, so now that you get the bigger picture, you can take a step back and learn more about variables and methods, with all their intricacies, which is exactly what you will do in the following sections.
STORING DATA: VARIABLES
In the previous section, I defined the simple class outline as follows. A class contains a block of variable definitions (data) and methods (behaviors), like so:
class CLASSNAME {
// VARIABLE DEFINITIONS
// METHOD DEFINITIONS
}
You will now zoom in further on the aspect of defining variables within a class. Specifically, this section discusses:
· Instance variables: Variables that will be used to hold data of objects.
· Class variables: Variables that are not bound to an object but instead belong to the class as such, that is, to the blueprint of the object.
· Final variables: Variables that—after their initial assignment—cannot be modified.
Finally, I will also devote some words to the topic of variable scope. A scope of a variable is the context in which it’s defined. This means that, depending on how you define a variable, it will affect where and how this variable can be accessed.
Instance Variables
In object-oriented programming, an instance variable is a variable that’s defined in a class (as you have done before for firstName and lastName in the Student class, for instance). Instance variables are also commonly referred to as member variables or fields of a class.
Instance variables belong to objects, meaning that each object of the class keeps a separate copy of this variable. Let’s illustrate this idea with an example: instance variables can be introduced by simply defining them in the class body. Let’s say you want to create a class for the concept of a book. The bare-bones class then looks like this:
class Book {
}
(Feel free to follow along in Eclipse.) An empty class it not much fun to work with, so you need to think of some data. Well, since books have a title and an author, you might want to define some variables to represent this. Since a book can have multiple authors, you might even want to define this data aspect as a composite data type. Perhaps something like the following:
class Book {
String title;
String[] authors;
}
NOTE If you were thinking, “Wouldn’t it be a good idea to abstract authors away into a separate class, say, Author?”, you would be absolutely right, although it depends on the complexity you foresee your program having to deal with. Can you imagine keeping author information nicely separated with authors having their own data (first name, last name, and birth date) and behaviors? Then yes, it makes sense to create an Author class. If you are planning on keeping a simple string to represent author information for books (like you are doing here), the simple solution is fine.
To paraphrase the famous quote from Einstein, “Everything should be made as simple as possible, but no simpler.”
Now, you have already seen how to create some Book objects, that is, some books. For example, you might write a piece of code doing something like the following:
Book book1 = new Book();
book1.title = "Beginning Java";
book1.authors = new String[]{
"Bart Baesens",
"Aimee Backiel",
"Seppe vanden Broucke"
};
Book book2 = new Book();
book2.title = "Catcher in the Rye";
book2.authors = new String[]{"J. D. Salinger"};
This code creates two book objects—book1 and book2—and sets their title and author variables. As you can observe, each book object keeps its own copy of the title and author variables, which can be accessed and modified independently.
That is all you need to know to get the idea about what instance variables are all about. They are basically just a part of the class blueprint, and get instantiated for each object you define belonging to that class.
As a reminder, however, recall that you can define multiple variables of the same type by separating them with commas, like so:
int a, b, c;
In fact, this not only works for instance variables, but works for any variable you define no matter where and no matter of which type (it does not have to be a primitive type). For example, the code sample to create the two books could also be rewritten like so:
Book book1, book2; // Define two empty Book objects
book1 = new Book(); // Set first book
book1.title = "Beginning Java";
book1.authors = new String[]{
"Bart Baesens",
"Aimee Backiel",
"Seppe vanden Broucke"
};
book2 = new Book(); // Set second book
book2.title = "Catcher in the Rye";
book2.authors = new String[]{"J. D. Salinger"};
Every instance variable you define defaults to a particular value, depending on the variable type. For instance, you might wonder what happens if you ask for the title of a book, without specifying a title first:
Book book3 = new Book();
// Oops, forgot to set title...
System.out.println("Title equals: "+book3.title);
The answer is that “Title equals: null”. For variables with a class type, the default value is a special keyword representing emptiness, null. Since String is a non-primitive class, its default value is thus null. Remember, as discussed in Chapter 2, the default values, per data type, are:
· For boolean: false
· For byte: 0
· For short: 0
· For int: 0
· For long: 0L
· For float: 0.0f
· For double: 0.0d
· For char: \u0000 (the null character)
· For String or any object: null
Note that these default values apply only to fields (instance variables). That means if you try to be clever and add the following to the code snippet:
Book book;
System.out.println("Now, book equals: "+book);
book = new Book();
System.out.println("And now, book equals: "+book);
Eclipse will complain about the book variable not being initialized. This can be fixed like so:
Book book = null;
System.out.println("Now, book equals: "+book);
book = new Book();
System.out.println("And now, book equals: "+book);
The same applies for other variables you define that are not instance variables:
int a = 0;
System.out.println("int a equals"+a);
NOTE You might have tried to execute this code snippet to see something like the following appearing on-screen:
Now, book equals: null
And now, book equals: Book@709fa12f
What’s going on with this Book@709fa12f (your output will differ and return a different part after the @)? The reason for this is that all Java objects have a built-in method to return their so-called “String representation,” which can be extended by programmers to provide a friendly output for an object, that is, a String that textually represents the object (don’t worry about the specifics of this too much for now; you will get back to this later). The key aspect to know here is that, when no extension is provided by the programmer, Java will just resort to showing the class name (Book), followed by an @, followed by the hexadecimal representation of the object’s hashcode.
Hashcodes are an advanced Java concept and are used to provide a quick integer representation for an object, which can be used as a quick check to see if two objects are equal (they have the same hashcode). Again, the way a hashcode is calculated can be extended by the programmer. If this is not done, then the hashcode corresponds to the internal address of the object in memory, although the particular default behavior may vary from one JVM implementation to another.
Finally, you might be wondering what happens when you try to access an object’s field (instance variable) when an object was not created first, such as done here:
Book book = null;
System.out.println("Now, book title equals: "+book.title);
Eclipse will allow you to execute this code, but the program will quickly crash with the following message:
Exception in thread "main" java.lang.NullPointerException
at Book.main(Book.java:XX)
Not surprising, because accessing a variable of something that doesn’t exist is sure to give problems. In this code sample, it’s easy to see where the problem lies (Eclipse will even put up a warning regarding this foolish behavior), but in larger programs, it is a common pattern for methods to create objects, or return null in case something failed. When this object is then accessed (or passed on to another method, perhaps) without explicitly checking for null, a NullPointerException error will pop up as soon as you try to access a variable or method of this object, as the following code sample illustrates:
Book giveMeABook() {
//return new Book(); --> Sorry, no books available for now
return null; // Return null instead
}
Book myNewbook = giveMeABook();
// Forgot the check for null?
System.out.println("Title equals: "+myNewBook.title);
// This will give an error
NullPointerException errors are a prevalent problem when programming in Java, and oftentimes it is hard to track down the root cause behind them as you have to track down where and why a particular object has not been instantiated (i.e., the variable equals null). Therefore, it is a good idea either to program defensively and always check for null when retrieving an object and before moving on with using the object, or to program in such a way that only in a limited number of cases a null variable is passed from one part of your program to another.
This code also immediately illustrates that you are not forced to use the default values for instance variables. For example, you can modify the Book class to assign defaults to the title and author variables:
class Book {
String title = "Unknown Title";
String[] authors = new String[]{"Anonymous"};
}
And, combining this with the knowledge on how to define multiple variables of the same type in one go, you can add:
class Book {
String title = "Unknown Title";
String[] authors = new String[]{"Anonymous"};
int yearReleased = 2014, copiesSold = 0;
}
With this knowledge under your belt, you might be wondering, as each object keeps its own copy of instance variables, is there also a way to define a common variable, something that’s shared between all objects belonging to the same class? Indeed there is . . .
Class Variables
In object-oriented programming, a class variable, also denoted as a static variable, is a variable that’s been allocated “statically”—meaning that this variable is shared between all objects (instances) belonging to this class. Further, since class variables belong to the class blueprint, it is not necessary to create objects to be able to access and modify class variables. It is sometimes argued that class variables do not really adhere to “pure” object-oriented programming principles. Other, stricter programming languages, such as Scala, do not allow them, for instance. That said, this is not to be regarded as a shortcoming of Java, as we will see that class variables can come in handy in many cases. However, it is best not to overuse them.
I’ll explain this by providing an example. Let’s modify the Book class so it looks as follows:
class Book {
static int maxAmountOfPages = 500;
String title = "Unknown Title";
String[] authors = new String[]{"Anonymous"};
int yearReleased = 2014, copiesSold = 0, nrOfPages = 1400;
}
Note the static keyword in front of the maxAmountOfPages class variable. This variable denotes the maximum amount of pages you currently support for books, which could be used in combination with the nrOfPages instance variable to check whether you can publish a given book, for instance. Although the number of pages is different for each book you define, the maximum amount of pages the printers support is a global property throughout all Book objects, is defined as a class variable, and is thus accessible by all Book objects.
A code sample illustrating this concept might look like this:
Book superLargeBook = new Book();
superLargeBook.title = "Super Large Boring Book";
System.out.println("I have a book here with the title: "+superLargeBook.title);
System.out.println("Written by: "+superLargeBook.authors);
System.out.println("Released in: "+superLargeBook.yearReleased);
System.out.println("With number of pages: "+superLargeBook.nrOfPages);
System.out.println("However, we only support books with max. pages: "
+superLargeBook.maxAmountOfPages);
Running this code outputs:
I have a book here with the title: Super Large Boring Book
Written by: [Ljava.lang.String;@1271ba
Released in: 2014
With number of pages: 1400
However, we only support books with max. pages: 500
NOTE You might have spotted the following line:
Written by: [Ljava.lang.String;@1271ba
And wondered what’s up with this. This isn’t the default Anonymous author you set! The reason for this behavior is again due to the way Java derives a String representation of composite types, which is not very user friendly in this case. There are two ways to resolve this issue. The first is to loop through the array and show each element one by one (you will look at looping constructs in the next chapter). The second way is to use so-called “Collection” classes, which are similar to arrays in the sense that they hold a bunch of information, but are also much more flexible and efficient. In addition, their String representation looks much friendlier. You will learn about collections later in this chapter.
However, for the last line, when accessing the static variable, Eclipse complains about the fact that "The static field superLargeBook.maxAmountOfPages should be accessed in a static way". What is meant by this? Well, it means that it’s generally preferred to access and modify static variables not by accessing them through an object variable, but by using the class name directly, like so:
Book.maxAmountOfPages = 2000; // Let's increase the max amount of pages
System.out.println("We now support books with max. pages: "
+Book.maxAmountOfPages);
Accessing and modifying static variables in this manner has two benefits. First, you do not need to create an object in order to access the static variable. Second, this way makes it clear to readers that the variable being accessed is a static one, without them needing to read the class definition. Finally, speaking of class definitions, it’s generally a good idea to define class variables before defining instance variables when you write classes, just to keep things clean and readable.
Static variables are oftentimes used to define so-called constants: variables whose values will never change during the execution of a program. However, as you have seen, it is perfectly okay to change the maximum amount of pages by setting a new value toBook.maxAmountOfPages. If you want to keep variables fixed during the program’s execution, you need to consider another concept: final variables.
Final Variables
In Java, final variables are variables that can be initialized only once, either directly when defining the variable, or later in one of the class methods. Once a value has been given to the variable, however, it cannot be modified any longer.
You can see an example of a final variable by returning to the book class and modifying it a little, so the complete class looks as follows:
class Book {
final String title = "Unknown Title";
String[] authors = new String[]{"Anonymous"};
int yearReleased = 2014, copiesSold = 0, nrOfPages;
public static void main(String[] args) {
Book superLargeBook = new Book();
superLargeBook.title = "Super Large Boring Book";
superLargeBook.nrOfPages = 1400;
}
}
Note the change to the title variable, as it now has the final property. To keep things simple for now, I have also removed the static variable and have put some testing code in a main method, so you can execute this class.
NOTE The previous testing code snippets can also be placed in the main method of Book, but remember that it is generally not a good idea to “pollute” classes representing real-world concepts with main methods. Alternatively, you may also create aMyProgram class and put the code snippets in its main method, similar to what you did in the course administration example earlier in this chapter.
However, Eclipse will refuse to compile this code, as it complains that you cannot give the title variable a new value (“Super Large Boring Book”), as it has already received its value at the time of creating the object (“Unknown Title”). To get this code to work, you might be inclined to make title a blank final variable, like so:
class Book {
final String title;
final String[] authors;
final int yearReleased, nrOfPages;
int copiesSold = 0;
public static void main(String[] args) {
Book superLargeBook = new Book();
superLargeBook.title = "Super Large Boring Book";
superLargeBook.nrOfPages = 1400;
}
}
Note that I have also reworked some other variables, as it makes sense that the title, authors, number of pages, and the release date never change for a book (not taking into account reprints and other such intricacies at the moment). Hence, it makes sense to set these to read-only.
However, you will notice that Java will still complain about the title and nrOfPages assignments and refuse to compile this code fragment. Why? Especially when the following code (you can put this somewhere in the main method) does in fact work:
final int a;
a = 5;
The reason lies in the fact that title, authors, yearReleased, and so on are class variables, whereas the a integer is just a local variable. Remember that when you initialize an object, Java will assign default values to the instance and class variables for which no value was set. For final variables, on the other hand, Java will not set an initial value and will force you, the programmer, to explicitly provide an initial value. For local variables inside our main method, we can define a blank variable and initialize it later (before using it), as seen above, but for instance and class variables, this remark entails that we cannot do the following:
class Book {
final String title;
}
If we try to do this, Java will warn that we have not initialized the title variable.
Given this point, it might occur to you that final class variables are, for now, pretty useless. You have found no way to create books with a given initial title that’s kept as a read-only variable. To resolve this, you need to understand another concept: objectconstructors. Don’t worry, you will learn about these a few pages later, and you will revisit final class variables there as well.
There is, however, another way that final variables come in handy, and that is when you use them in combination with static variables. Change the Book class again to look like the following:
class Book {
final static int MAX_AMOUNT_OF_PAGES = 500;
final static int MIN_AMOUNT_OF_PAGES = 50;
String title;
String[] authors;
int yearReleased, nrOfPages;
int copiesSold = 0;
public static void main(String[] args) {
Book superLargeBook = new Book();
superLargeBook.title = "Super Large Boring Book";
superLargeBook.nrOfPages = 1400;
System.out.println("Check if your book has a correct amount of pages...");
System.out.println("- Minimum amount: "+Book.MIN_AMOUNT_OF_PAGES);
System.out.println("- Maximum amount: "+Book.MAX_AMOUNT_OF_PAGES);
System.out.println("- Your book: "+superLargeBook.nrOfPages);
}
}
Note the two final static variables at the top of the class body. This pattern is very heavily used by Java programmers to define constants, meaning that you desire to set the maximum and minimum amount of pages only once (they are final), and also to keep them shared by all objects (they are part of the class blueprint). Note by the way that Java has a const keyword, but it currently remains unused.
Also observe the change in naming convention when declaring constants with final static variables. Instead of writing in lowerCamelCase, you name them using CAPITALIZED_UNDERSCORE_SEPARATED form. Again, this is not required, but it’s a widely followed convention by Java programmers to indicate constant variables.
There is one final (no pun intended) important remark I need to make regarding final variables. Remember that I have stated that final variables can only be initialized once, and then keep their value. For primitive types, the effects of this are easy to grasp—a final integer set to the number five remains five for the remainder of its life. However, for more complex types, such as objects, the story is a little more complicated. Consider the following example:
class Book {
final static int MAX_AMOUNT_OF_PAGES = 500;
final static int MIN_AMOUNT_OF_PAGES = 50;
String title;
String[] authors;
int yearReleased, nrOfPages;
int copiesSold = 0;
public static void main(String[] args) {
final Book superLargeBook = new Book();
superLargeBook.title = "Super Large Boring Book";
superLargeBook.nrOfPages = 1400;
// Change the amount of copies sold
superLargeBook.copiesSold += 1000;
}
}
Note how superLargeBook is final. However, later on, you have to modify the number of copies sold for this object. How is this possible when the code declared this object as final? After all, you should not be able to change it, right? The reasoning here is that final affects the number of times a variable may be initialized, or set. It does not mean that all the fields of an object (when the variable represents an object) will become “frozen” as well.
To illustrate the difference, the following code shows what you cannot do:
class Book {
final static int MAX_AMOUNT_OF_PAGES = 500;
final static int MIN_AMOUNT_OF_PAGES = 50;
String title;
String[] authors;
int yearReleased, nrOfPages;
int copiesSold = 0;
public static void main(String[] args) {
final Book superLargeBook = new Book();
superLargeBook.title = "Super Large Boring Book";
superLargeBook.nrOfPages = 1400;
// Change the amount of copies sold
superLargeBook.copiesSold += 1000;
// Assign a new book
superLargeBook = new Book(); // EEK!
}
}
Eclipse throws an error, telling you that you are not allowed to assign a new book (or any other existing book) to the superLargeBook variable.
The same reasoning holds for composite types (arrays). The following code again shows an example:
final int[] numbers = new int[]{1,2,3};
numbers[0] = 10; // This is okay
int[] newNumbers = new int[]{10,20,30};
numbers = newNumbers; // This is not okay
There is one case, however, that’s a little bit special, namely Strings. As you have seen, Strings are not a primitive type in Java, and are, in fact, objects like any other. You might thus try something like the following:
final String myString = "Hi there";
myString = "bye";
However, this approach will not work, as this is actually a shorthand notation for the following:
final String myString = new String("Hi there");
myString = new String("bye");
When writing this piece of code, it becomes clear why you cannot do it this way. However, when you are particularly observant, you might say, since String is a class and I create String objects, surely the actual value of the String object must be stored somewhere, probably as an array of char’s. The answer is that, indeed, a String object keeps an internal representation of the actual textual value, but it cannot be publicly accessed or modified. This is done for performance reasons. But wait—why then can you execute the following:
String myString = "a";
myString = "b";
myString += "cde";
Again, the reason is that this is shorthand and Java helps you out. In fact, this code actually corresponds to:
String myString = new String("a");
myString = new String("b");
myString = new String(myString + "cde");
This immediately provides you with the reasoning behind the fact that changing Strings in Java are an intensive, relatively slow operation. For a few modifications, this does not matter, but when you have to modify a String many thousands of times, it is advisable to look at other text-representing classes, such as StringBuilder—more about this later.
NOTE Variables are not the only elements that can be defined as being final. Methods can also be set as being final—meaning that they cannot be overridden or hidden by subclasses. Classes can also be set to final, meaning that they cannot be subclassed at all.
Don’t worry about what subclassing and subclasses mean at this point, as I will explain them when we talk about advanced object-oriented concepts in Chapter 8. Just remember for now that “final” can serve as a way to allow for stricter and more secure coding (in fact, many of Java’s built-in classes are final so they cannot be tampered with).
A common misconception exists that says that declaring classes or methods as final helps to speed up execution. The explanation behind this oftentimes follows a reasoning such as, “Well, since the compiler knows this method will never be modified or extended by subclasses, it must be able to optimize on this.” This perception, however, is incorrect, as the Java JIT compiler does no such thing. In fact, declaring classes and methods final can be a great burden when programming, as they limit the options for code reuse and extending functionality of existing classes. Of course, there are good reasons to declare a class or method final, when you want to guarantee that classes and methods remain immutable (meaning that they cannot be extended or modified by other classes).
For instance variables, however (as seen here), the reasoning is so dissimilar that it’s almost confusing that we use the same final keyword. Not only is setting a variable to final a great way to enforce a read-only variable, which occurs more often than you might think (many variables are read-only), it also does help the compiler to optimize your program. As a final variable keeps the same value after initialization, the compiler is able to cache (store) this value to perform quick checks on this variable whenever it’s asked to.
Variable Scope
A very important aspect when working with variables in Java—and, in fact, other programming languages as well—is their scope. Without knowing anything about variable scope, trying to access variables can get confusing once the compiler starts yelling at you for making a mistake. Consider the following simple class with two methods:
class ScopeTest {
void makeA() {
int a = 5;
}
void readA() {
System.out.println("The value of a is: "+a);
}
}
If you try to enter this in Eclipse, you’ll get an error telling you that the variable a cannot be resolved. The reason for this is scope. A variable’s scope is basically the context in which the variable is known. Depending on where a variable is declared, you will be able or unable to access this variable. The following “levels” of scope can be defined:
· Local variables: Variables that are declared inside a method or block.
· Parameter variables: Variables that are declared as a method argument or a loop variable.
· Instance variables: Variables that are declared in the class definition.
These levels of scope are ordered so that variables that are defined in a higher level can be accessed from lower-level locations. To give the simplest example, instance variables (highest level) can be accessed by all methods inside the class. Method arguments (a parameter variable) can only be accessed by that method, but not by other methods. This is exactly why the previous example doesn’t work.
Figure 4.3 graphically illustrates the scope of an instance variable (instanceVar), a parameter variable (paramVar), and a local variable (localVarA).
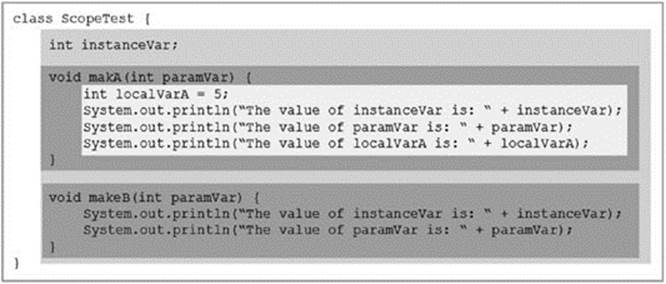
Figure 4.3
As the example in Figure 4.3 shows, the instance variable (instanceVar) is accessible by each method in the class. Parameter variables are accessible only within their methods, and can thus re-use the same name throughout different method definitions. Finally, locally declared variables (such as localVarA) are accessible only within their method, meaning that method makeB will not be able to access localVarA.
Note that parameter variables are accessible only within their method or loop. What do I mean by their loop? I will leave the main explanation regarding loops for the next chapter, but the following example provides a sneak preview:
class ScopeTest {
void doTheLoop() {
String[] names = new String[]{"Alice", "Bob", "Mia", "Marcus"};
for (int i = 0; i < names.length; i++) {
System.out.println("Name number "+i+" equals: "+names[i]);
}
System.out.println("The value of i is now: "+i); // Will not work
}
}
Again, you have one class definition, with one method, taking no arguments this time. Inside the method, you have one local variable (names) followed by a so-called for loop. Don’t concern yourself with the specifics of this construct for now, just understand that this code basically says, “For an integer i going from 0 but not including the number of names. That is, for i equal to 0, 1, 2, and 3, do whatever’s inside this block.” What is important to know, however, is that the variable i is only available within the for block, which is why the last println statement in the previous code snippet will throw an error in Eclipse, as i is no longer accessible at this point. Another point to note is that the names variable is also accessible from within the loop block. Again, this illustrates the basic rule saying that variables that are declared at a higher level (locally in the method) can be accessed by a lower level (a loop block within the method).
I close this section on variable scope—and variables in general—with a number of important remarks. First, you might be wondering what happens whenever variables defined in different locations (that is, at a different level of scope) clash in terms of naming. For example, consider the following example:
class ScopeTest {
int a = 5;
void printA() {
int a = 10;
System.out.println("The value of a is now: "+a);
}
}
What will show up when the method printA is called? Again, remembering that rule that higher-level variables can be accessed from lower-level locations provides some guidance here, as accessing a variable will “bubble up” from the current scope. This means that Java will first try to access the variable locally, and then move outward until looking for instance variables or static class variables bearing the requested name. This means that in the previous example, the local variable gets precedence and the result displaying on the screen will thus be 10. This concept is known as “variable shadowing” (consider the local variable to overshadow the higher-level ones). Keep this in mind when naming variables. Note also that Eclipse will provide subtle formatting and coloring hints to indicate which variable is being accessed.
NOTE What if you really wanted to access the instance variable and not the local variable in this example, without renaming one of them? In that case, you have to explicitly tell Java you want the instance variable, using the keyword this, like so:
class ScopeTest {
int a = 5;
void printA() {
int a = 10;
System.out.println("The value of INSTANCE VARIABLE " +
"a is now: "+this.a);
}
}
And when a is a class variable, remember to use the class name:
class ScopeTest {
static int a = 5;
void printA() {
int a = 10;
System.out.println("The value of INSTANCE VARIABLE " +
"a is now: "+ScopeTest.a);
}
}
For now, it is best to stick to clear, unambiguous naming; you will return to learn about the keyword this in-depth in a later chapter.
Another important remark concerns the fact that local and parameter variables are forgotten once their scope is exited, meaning that method arguments will disappear once you exit the method (this allows you to use the same variable name for arguments throughout different methods), just as local variables will be discarded once the compiler steps out of its block (a method or loop body). To illustrate this once more, consider the following:
class ScopeTest {
void scopeTest(int a) {
int b = a + 10;
for (int c = 0; c < 10; c++) {
int d = c + 3;
b = b + 1;
}
}
}
Try to work out what is happening here. Variable d (local variable) is only accessible within the loop block. Variable c (parameter variable) is initialized for each iteration of the loop and is only accessible within the loop body. Variable b (local variable) is discarded after the method is exited but is accessible in the whole method. Variable a (parameter variable) is also discarded after the method is exited and is accessible in the whole method, but it’s passed as a method argument.
NOTE If you want to do so, note that you can also arbitrarily create your own scope blocks, different from class, method, or loop bodies. This is done simply by wrapping a piece—a block—of code in curly brackets: { and }. For example, the previous code snippet can be extended as such:
class ScopeTest {
void scopeTest(int a) {
int b = a + 10;
for (int c = 0; c < 10; c++) {
int d = c + 3;
{
int e = d + 3;
}
// e not accessible here
b = b + 1;
}
// c not accessible here
{
int c = 3;
}
// c also not accessible here
}
}
While this is an often forgotten tidbit of Java that can come in handy to structure complex pieces of code, it’s best not to rely on this feature too much. When you find yourself putting large amounts of code in blocks like this, it is probably a good idea to try to separate some behavior into multiple methods or classes to split things up.
This concludes the discussion of scope and the overview of different types of variables. You now know how to declare instance variables (member variables or fields), class (static) variables, and final variables, and are aware that variables are defined within a specific scope or context, which determines how they can be accessed.
The next section turns your attention to the other big part of classes: behavior as defined through methods. Just as with variables, there are different types of methods, but many of the aspects you learned here will return.
DEFINING BEHAVIOR: METHODS
Recall once more the simple class outline as follows. A class contains a block of variable definitions (data) and methods (behavior), like so:
class CLASSNAME {
// VARIABLE DEFINITIONS
// METHOD DEFINITIONS
}
Or, to be more specific:
class CLASSNAME {
// FINAL CLASS VARIABLE DEFINITIONS
// CLASS VARIABLE DEFINITIONS
// FINAL INSTANCE VARIABLE DEFINITIONS
// INSTANCE VARIABLE DEFINITIONS
// METHOD DEFINITIONS
}
This section discusses in full the concept of class behavior, as defined through its methods. Specifically, you will see:
· Instance methods: Methods that are accessible by objects.
· Class methods: Methods that are not bound to an object but instead belong to the class as such, that is, to the blueprint of the object.
· Constructors: A special method that governs how a class is instantiated; you have already read about this method.
· The main method: A special method definition that can be used to run your application.
Finally, you will also learn about argument passing. You have seen how methods can take argument variables to use within the method’s body. The way variables are passed to methods can be a little bit daunting in Java at first—and can introduce subtle bugs when you’re not aware—so it makes sense to learn about this in a separate section.
Instance Methods
Just as with instance variables, an instance method (or a member method) is a method that’s accessible only through objects belonging to that class—meaning that they can be accessed only through an initialized object.
A simple example can help to explain this. Suppose you create a Dog class with one method, bark, like so:
class Dog {
void bark() { // Instance method
System.out.println("Woof!");
}
}
Since bark is an instance method, you first need to create an object to call it, like so:
Dog myDog = new Dog();
// Call the instance method on the object myDog:
myDog.bark();
That’s all there is to defining instance methods. As a reminder, however, recall that methods always return a type or void if they don’t return anything. The following example modifies the Dog class to illustrate this once again:
class Dog {
boolean isSitting;
String getBarkSound() {
return "Woof!";
}
boolean isSitting() {
return isSitting;
}
void sit() {
isSitting = true;
}
void stand() {
isSitting = false;
}
}
NOTE Note that the sit, stand, and isSitting methods neatly illustrate the concept of encapsulation, meaning that data in a class (the isSitting variable) should be accessed through instance methods (myDog.sit()), instead of directly accessing its variables (myDog.isSitting = true). When you learn about advanced object-oriented programming concepts in Chapter 8, you will see how to effectively block accessing instance variables directly, forcing the use of methods.
Recall that methods returning something (that is, methods that do not return void) always need to include a reachable return statement in their body. Note that you can also place return statements in void methods. In this case, the return statement does not actually return something, but just exits the method. For example, if you want to exit out of the sit method before sitting down, you can change this method as follows:
void sit() {
if (isSitting)
return; // Exit out method if already sitting
isSitting = true;
}
This will especially come in handy for governing the control flow of your program. This aspect will be discussed in detail in the next chapter.
Recall that methods can also take one or more arguments. Consider, for example, the following method declarations:
· void giveCookie(Cookie cookie) { /*...*/ }
· void chaseDog(Dog dog) { /*...*/ }
· void lickPerson(Person person, int nrLicks) { /*...*/ }
· void giveNickNames(String[] nickNames) { /*...*/ }
· void giveNickNames(String... nickNames) { /*...*/ }
The last example in this listing will look unfamiliar to you, and it uses a construct called varargs (variable arguments). Basically, the last two methods are equivalent in the sense that the nickNames variable will be available as an array of strings in the method body, for instance:
void giveNickNames(String... nickNames) {
System.out.println("You have given me "+nickNames.length+" names");
}
The way these two methods are called, however, differs. In the first case (String[] nickNames), the method is called using an array of strings as an argument, as you’d expect:
String[] newNames = new String[] {"Puppers", "Droopy"};
myDog.giveNickNames(newNames);
In the second case, however (String... nickNames), you can just supply an arbitrary number of strings (including none at all), like so:
myDog.giveNickNames("Puppers", "Droopy");
// Or any other amount of strings:
myDog.giveNickNames("Puppers", "Droopy", "Tissues", "Clifford");
myDog.giveNickNames();
Varargs can provide a handy way of avoiding having to pass an array explicitly. However, keep in mind that the varargs argument (the one with the three dots, ...) must always be the last method argument, and only one varargs argument can be defined for a method. With arrays, on the other hand, you are free to define any number of arguments in any order you want. To illustrate:
· method(String... s1): Allowed
· method(String... s1, String s2): Not allowed
· method(String... s1, int s2): Not allowed
· method(String... s1, String... s2): Not allowed
· method(String... s1, Dog... dogs): Not allowed
· method(String[] s1): Allowed
· method(String[] s1, String s2): Allowed
· method(String[] s1, String[] s2): Allowed
· method(String[] s1, String[] s2, Dog[] dogs): Allowed
· method(int i1, String[] s1, int i2): Allowed
· method(int i1, String[] s1, String... s2): Allowed
· method(int i1, String... s1, String[] s2): Not allowed
You don’t have to memorize this list (or these rules), as Eclipse will simply warn you when you define a method incorrectly.
Class Methods
Just as you’ve seen for class variables, a class method, also denoted as a static method, is a method that has been defined statically, meaning that this method is shared between all objects (instances) belonging to the class. Again, as class methods belong to the class blueprint, it is not even necessary to create objects to be able to use them.
I’ll illustrate this concept with another example from the realm of pets. This time, let’s define a Cat class as follows:
class Cat {
static String preferredFood() {
return "Fish";
}
}
Note the static modifier in front of the method declaration is similar to what you’ve seen with static variables. preferredFood is defined as a blueprint method, returning the preferred food for all cats. Just as for instance methods, it is possible to call class methods through an object:
Cat myCat = new Cat();
System.out.println("A cat's preferred food is: "+myCat.preferredFood());
However, just as for class variables, this is not good practice, and Eclipse will warn you about such behavior. Again, you should clearly indicate that you’re accessing a static method by using the class name, instead of the object variable:
System.out.println("A cat's preferred food is: "+Cat.preferredFood());
This also clearly illustrates that you do not have to create an object to use static methods.
It is important to note that, since class methods operate on the class as a whole (as a blueprint), they are not able to access instance variables. For example, the following is not allowed:
class Cat {
String name;
static void changeName() {
name = "ANONYMOUS CAT";
}
}
What you can do, however, is the following:
class Cat {
static String preferredFood = "fish";
static String getPreferredFood() {
return preferredFood;
}
static void setPreferredFood(String newFood) {
preferredFood = newFood;
}
}
And call this code as follows:
System.out.println("A cat's preferred food is: "+Cat.getPreferredFood());
Cat.setPreferredFood("milk");
System.out.println("A cat's preferred food is now: "+Cat.getPreferredFood());
This last example illustrates the power of combining class variables with class methods, as they allow you to create class-global variables that can be changed if necessary.
NOTE Again, you are seeing the concept of encapsulation in practice here. Whereas earlier you would have accessed the class variable preferredFood by writing Cat.preferredFood directly, you now neatly use the getPreferredFood and setPreferredFoodmethods to do so. Does this mean you can no longer write Cat.preferredFood = “milk”? The answer is that—for now—you can, but again, you will see later how you can effectively block accessing instance variables directly, forcing the use of methods (and preventing tampering of variables outside their owning class).
Constructors
Constructors are special class methods that are used to initialize objects of that class. If you recall the discussion on final variables, you might remember that you had—at the time—no way to create Book objects with an initial title that’s kept as a read-only variable (using final). You might also recall that when you do the following:
Book myBook = new Book();
You are writing () as if you are invoking a method, because, in fact, you are—namely the constructor method for the class. Constructor methods are defined similarly as instance methods, with the following differences:
· Constructors bear the same name as the class in which they are defined.
· Constructors have no return type, not even void.
In all the classes you have seen so far, you will notice that you did not define a constructor method. The reason for this is that Java will automatically assume a “blank” constructor when you do not define one, meaning that defining a class like:
Class Book {
}
Is exactly the same as writing:
class Book {
Book() {
}
}
So far, this constructor does not really do much. What can they be used for? A constructor is invoked each time you instantiate (that is, “construct”) a new object using the new keyword. Most commonly, constructors will initialize default values for the object being created. To illustrate this, let’s return to the earlier issue: you aim to define a variable to hold the title of a book, but you want to define this variable so it can be set only once. As such, the following solution does not suffice:
class Book {
String title;
}
As there is nothing preventing multiple assignments to title in this case. You have seen that you can use the final keyword like so:
class Book {
final String title = "Initial Title";
}
But of course, you would like to make the initial title user-specified and different for each book. The previous solution does not allow you to write:
Book myBook = new Book();
myBook.title = "The Real Title";
Finally, you have seen that you can remove the initialization of the variable to make it a so-called blank final variable:
class Book {
final String title;
}
Recall, however, from our discussion regarding final variables that Java will complain about the fact that the title instance variable might not be initialized, as you need to explicitly assign a value. You have seen before that you can solve this by doing something like:
class Book {
final String title = "";
}
But again, we have no way to change the title variable to the title we actually want to give to a particular book. That is, Java will complain about doing something like:
Book myBook = new Book();
myBook.title = "The Real Title";
This happens because we have already initialized the title variable to "", preventing it from being changed again. So how do you deal with this problem? Well, by initializing final variables inside your own constructor, like so:
class Book {
final String title;
Book() {
title = "Initial Title";
}
}
To supply a user-specific title, you now can just modify the constructor method so that it takes an argument. Watch out when naming your constructor arguments. Remember that using local or parameter variables with the same name as instance variables will take precedence. Hence, you should modify the constructor like so:
class Book {
final String title;
Book(String t) {
title = t;
}
}
Now how do you call this constructor? Easily, by providing an argument when creating an object:
Book myBook = new Book("Title of the Book");
Note that you have seen how Java will assume the presence of a blank constructor taking no arguments when you do not define one in the class. If you do define a constructor with arguments—like you’ve just seen—the constructor taking no arguments will not be available any longer, unless you also explicitly define it. Meaning that for this example, you can no longer write:
Book myBook = new Book("Title of the Book"); // This works
Book myBook = new Book(); // This no longer works
You might be confused by the wording of “unless you also explicitly define it.” Is it possible to define multiple constructor methods? Indeed it is; consider, for example, the following class definition:
class Book {
final static int DEFAULT_YEAR = 2014;
final String title;
final int releaseYear;
int copiesSold;
Book(String t) {
title = t;
releaseYear = DEFAULT_YEAR;
// copiesSold will default to 0
}
Book(String t, int r) {
title = t;
releaseYear = r;
// copiesSold will default to 0
}
Book(String t, int r, int s) {
title = t;
releaseYear = r;
copiesSold = s;
}
}
Given everything you’ve seen so far, you should be able to understand this class. Take some time to figure out what is happening here, and make sure to note the following:
· Three constructors are available for this class, each taking a different number of arguments.
· One final static variable is acting as a constant that will be used as a default initializing value in one of the constructors.
· The two other blank final variables (non-static) need to be initialized by every constructor.
· Constructors can also initialize nonfinal variables.
NOTE Using methods with the same name—but taking different arguments—is provided by a feature called method overriding. As the name suggests, this feature is not only available for constructors, but in fact for every method. Method overriding provides advanced capabilities, so it’s covered in-depth in Chapter 8.
You might be annoyed by the fact that some statements, such as title = t;, are duplicated across different constructors, while in fact the constructors are forming a hierarchy. Luckily, it is possible for constructors to call other constructors to perform a piece of the requested initialization, as the following code snippet shows:
class Book {
final static int DEFAULT_YEAR = 2014;
final String title;
final int releaseYear;
int copiesSold;
Book(String t) {
// Call other constructor:
this(t, DEFAULT_YEAR, 0);
}
Book(String t, int r) {
// Call other constructor:
this(t, r, 0);
}
Book(String t, int r, int s) {
title = t;
releaseYear = r;
copiesSold = s;
}
}
Note the use of the keyword this here. I’ve briefly mentioned this keyword before when illustrating how you can use it to refer to the current object (this.title), but here it acts as a way to call another constructor. Again, don’t worry if this is still a bit overwhelming, as the this keyword will be revisited later. In fact, for now, I will avoid defining multiple constructors until you are ready to move a step further, so that you will not run into the intricacies relating to defining more than one constructor. So for now, just keep in mind that it is possible to create multiple constructors within a class.
NOTE When you think about the concept of constructors—or if you’re coming from other programming languages such as C++—you might wonder if the counterpart of destructors also exists. In Java, it does not, as the JVM itself will keep an eye out for objects that are no longer accessible and should thus be removed automatically. Consider for example:
Book myBook = new Book("My first book");
myBook = new Book("My second book");
myBook = null;
What happens with the "My first book" object stored in the myBook variable once you assign the second book (a new object) to this variable? Since you have no way to refer to this object anymore (which is now floating around nameless somewhere in the computer memory), the JVM will automatically clean up this piece of memory (this is performed by a mechanism called garbage collection) to remove (destroy) the object. The same happens when assigning null to the variable with the second object. The variable now refers to nothing, and the second object can also no longer be referenced, and is thus removed as well.
Whenever the JVM cleans up objects in this manner, it will call a special built-in method, finalize(), on them. Programmers can implement their own finalization method if they desire, which comes in handy when objects are utilizing resources that need to be cleanly closed when they are removed (think, for example, about open network connections). In practice, however, there is rarely a need to override the default behavior.
Again, you need to learn how to walk before you can run, so for now, just be glad about the fact that Java takes care of these cleanup aspects for you. You do not need to concern yourself with writing destructors.
The Main Method
Earlier in this chapter, you learned that there exists one special method used as an entry point to actually execute (run) your program—the so-called main method.
The main method can be defined in any class, but is always defined as:
public static void main(String[] args) {
}
Meaning that the main method:
· Is publicly accessible. (public is an access modifier. I have ignored access modifiers for now, but for the main method, you have to define it.)
· Is a static class method, as no objects exist yet when a program is started.
· Returns nothing (void).
· Takes one argument, the arguments passed to the program.
Let’s have a closer look at the main method. Suppose you once more define a simple Book class to look as follows:
class Book {
final String title;
final int releaseYear;
int copiesSold;
Book(String t, int r) {
title = t;
releaseYear = r;
}
void sell(int nrCopies) {
copiesSold += nrCopies;
}
int nrCopiesSold() {
return copiesSold;
}
}
If you now want to create an actual program that can be executed, the simplest way to do so is by creating a main method within this class, like so:
class Book {
final String title;
final int releaseYear;
int copiesSold;
Book(String t, int r) {
title = t;
releaseYear = r;
}
void sell(int nrCopies) {
copiesSold += nrCopies;
}
int nrCopiesSold() {
return copiesSold;
}
public static void main(String[] args) {
Book firstBook = new Book("First Book", 2004);
Book secondBook = new Book("Another Book", 2014);
firstBook.sell(200);
System.out.println("Number of copies sold of first book is now: "
+firstBook);
System.out.println("Title of the second book is: "+secondBook.title);
}
}
In general, however, it is not good practice to mix a main method with a class definition relating to a real-world concept. As such, it is better to create a separate “controller” class to separate program logic from class concepts, like so:
// File Book.java:
class Book {
final String title;
final int releaseYear;
int copiesSold;
Book(String t, int r) {
title = t;
releaseYear = r;
}
void sell(int nrCopies) {
copiesSold += nrCopies;
}
int nrCopiesSold() {
return copiesSold;
}
}
// File Program.java:
class Program {
public static void main(String[] args) {
Book firstBook = new Book("First Book", 2004);
Book secondBook = new Book("Another Book", 2014);
firstBook.sell(200);
System.out.println("Number of copies sold of first book is now: "
+firstBook);
System.out.println("Title of the second book is: "+secondBook.title);
}
}
Some developers like to supply main methods in their class definitions in larger programs as a quick way to test if the class is working correctly, without having to run the complete program and go through a series of steps. This is fine, so long as you keep these “test”mains small and short, for testing purposes only, and remember that there exist better ways to perform thorough code tests. This remark does illustrate another aspect, though, namely the fact that a Java project can contain multiple main methods. In fact, it’s possible to provide a main method in every class you define. So how does Eclipse or Java know how to execute which one? To figure this out, you’ll return to the very first example context you saw at the beginning of this chapter: the course administration program. The following Try It Out will guide you from beginning to end to re-create the course administration example, using all of the knowledge you’ve gained so far.
TRY IT OUT Course and Student Administration Revisited
Let’s revisit the course and student administration example you saw earlier, now applying all of the knowledge you’ve gained so far.
1. It’s best to create a new project in Eclipse. Remember you can do so by navigating to File New and then selecting Java Project in Eclipse. A dialog window will open asking you to fill in a project name, such as CourseAdministrationDoneWell. You can then press Finish to create the project.
2. Create the Course.java class by right-clicking the src folder in the package explorer in Eclipse and then selecting New Class. Define this class as follows:
3. import java.util.HashSet;
4.
5. class Course {
6. static int nextId = 0;
7.
8. final int id;
9. final String name;
10. final HashSet<Student> registeredStudents =
11. new HashSet<Student>();
12.
13. Course(String n) {
14. id = nextId;
15. nextId++;
16.
17. name = n;
18. }
19.
20. String getName() {
21. return name;
22. }
23.
24. void registerStudent(Student s) {
25. registeredStudents.add(s);
26. }
27.
28. void unregisterStudent(Student s) {
29. registeredStudents.remove(s);
30. }
31.
32. HashSet<Student> registeredStudents() {
33. return registeredStudents;
34. }
35.
36. int nrOfRegisteredStudents() {
37. return registeredStudents.size();
38. }
}
39. Similarly, create a Student class with the following content:
40. class Student {
41. static int nextId = 0;
42.
43. final int id;
44. final String firstName, lastName;
45.
46. Student(String fn, String ln) {
47. id = nextId;
48. nextId++;
49.
50. firstName = fn;
51. lastName = ln;
52. }
53.
54. String getFirstName() {
55. return firstName;
56. }
57.
58. String getLastName() {
59. return lastName;
60. }
61.
62. void registerForCourse(Course c) {
63. c.registerStudent(this);
64. }
65.
66. void unregisterForCourse(Course c) {
67. c.unregisterStudent(this);
68. }
}
69. Create a Program class containing the main method:
70. class Program {
71. public static void main(String[] args) {
72. p("Welcome to the course administration program");
73. p("--------------------------------------------");
74. p("");
75.
76. p("Creating two courses...");
77. Course courseA = new Course("First Course");
78. Course courseB = new Course("Second Course");
79.
80. p("- courseA ID is: "+courseA.id);
81. p("- courseA name is: "+courseA.getName());
82. p("- courseB ID is: "+courseB.id);
83. p("- courseB name is: "+courseB.getName());
84. p("");
85.
86. p("Creating two students...");
87. Student student1 = new Student("Alice", "The Student");
88. Student student2 = new Student("Bob", "McStudent");
89.
90. p("- student1 ID is: "+student1.id);
91. p("- student1 name is: "+student1.getFirstName()+", "+
92. student1.getLastName());
93. p("- student2 ID is: "+student2.id);
94. p("- student1 name is: "+student2.getFirstName()+", "+
95. student2.getLastName());
96. p("");
97.
98. p("Registering for courses...");
99. student1.registerForCourse(courseA);
100. student1.registerForCourse(courseB);
101. courseA.registerStudent(student2);
102.
103. p("- courseA number of students: "+courseA.nrOfRegisteredStudents());
104. p("- courseB number of students: "+courseB.nrOfRegisteredStudents());
105. }
106.
107. static void p(String l) {
108. System.out.println(l);
109. }
}
110. To run this program from Eclipse, make sure the Program class is open and the main method is active (by putting your cursor inside the method body), and then press the Run button. Eclipse will show you the name of the class that contains the mainmethod that will be run.
How It Works
Now take a look at how it works.
1. You’re creating two new Student and Course classes in a new Eclipse project.
2. For the Course class, note the use of the nextId variable to automatically use an incrementing counter to provide IDs for courses. This is a well-known pattern that you will see show up commonly in Java code. Also note the use of the HashSet object. AHashSet is a set, storing a bunch of objects (Student objects, in this case). The HashSet class is built-in by default in Java, but to enable its use, you first have to import it, hence the import statement before defining the class itself. Don’t concern yourself too much with its usage for now, but make sure you understand the registerStudent and unregisterStudent methods, which add and remove students to and from the set.
3. For the Student class, you’re using the keyword this to pass the current student object (meaning the object the method was called on) to the course object to register or unregister a student, as it is the course object that keeps a list of registered students.
4. The Program class contains the main method, and it creates two courses, gives some information about them, creates two students, and registers them in the courses. The p method just serves as a shorthand to avoid having to write System.out.println all the time.
5. You then run this program from Eclipse by invoking the main method in the Program class. Note that it is possible at this point to create another class containing a main method and run that one in Eclipse by just making sure the main method you want to run is open in the code editor.
ACCESS MODIFIERS
You might have noticed that this code uses courseA.id (directly accessing a variable) and courseA.getName() (accessing a variable through a method) in the Try It Out. In other examples, you read that it’s generally better to access variables through methods whenever possible instead of directly accessing variables.
If it is generally recommended to go through methods, then why does Java allow you to access courseA.id directly? The reason for this is due to the access modifier being used. Classes, variables, and methods can all take access modifiers. In Java, four access modifiers exist:
· public: For classes, methods, and member variables (class or instance)
· protected: Methods and member variables (class or instance) (not for classes)
· no modifier: For classes, methods, and member variables (class or instance)
· private: Methods and member variables (class or instance) (not for classes)
You have seen one of these (public) already, namely in the main method, where the inclusion of this access modifier was mandatory:
public static void main(String[] args)
For all the other classes, methods, and variables you’ve seen so far, however, I’ve avoided talking about access modifiers and just supplied no modifier. So what do these modifiers actually do? You will read an in-depth discussion about them in Chapter 8, but for now, just be aware that access-level modifiers determine which other classes can use the class, method, or variable the modifier relates to. When no modifier is supplied, as with these examples, Java will make the class, method, or variable accessible to the class itself (luckily, this should always be the case, otherwise the method or variable would not be of much use), and also to classes living in the same package. So far, you have not dealt with packages, so that each class you created in Eclipse lives in the so-called “default package,” and each class can access the variables from another class.
This default behavior goes against the encapsulation ideology of object-oriented programming, and it is a little bit of a pity that this is chosen as the default behavior in Java. For now, you can afford to be a little sloppy, but you will notice that you start to encapsulate more and more data by wrapping methods around them when you define classes, until you arrive at Chapter 7 where you will be introduced to access modifiers for real—as to prevent direct variable access. One question you might have at this point is whether it ever makes sense to make a member variable directly accessible (by supplying no modifier or by making it public). The answer is very rarely. In most cases, it pays off to keep data hidden within the object and use methods as guards around it. Only for very simple “data structure” classes (such as a Point class with x and y variables) is it okay to allow direct access.
The previous Try It Out mentioned that it is possible to add more than one main method to your Java projects (although they should be contained in different classes, of course). You might be wondering how Java decides which main method to run when running your programs directly (without going through Eclipse). The answer is that Java will either rely on a special description file, or on the users passing the class name they want to run the main method from explicitly. If you’re interested in knowing more, you can explore the following Try It Out. The Try It Out will also show you how to utilize the main method’s single String[] argument, which we’ve ignored so far.
TRY IT OUT Working with Program Arguments
This exercise demonstrates how to use program arguments.
1. Create a new Eclipse project and add a single Program class with the following main method:
2. class Program {
3. public static void main(String[] args) {
4. p("You have supplied "+args.length+" arguments...");
5. for (int i = 0; i < args.length; i++) {
6. p("Argument "+i+" equals: "+args[i]);
7. }
8. p("");
9. }
10.
11. static void p(String l) {
12. System.out.println(l);
13. }
}
14.When running this code from Eclipse, you will notice that the args variable is empty (the array has a length of zero).
15.You’re going to create a so-called “runnable JAR” file. JAR stands for Java ARchive, which is basically the same as a compressed folder (a ZIP file) containing compiled classes. A runnable JAR file is a JAR file that can be executed. To execute it, right-click your project folder in Eclipse and choose Export. Next, navigate to Java and select Runnable JAR File. A wizard will pop up asking you to select a launch configuration and an export destination. In the launch configuration, you can select the class Java should use to run the main method. In this case, select Program - YOURPROJECT (of course, YOURPROJECT represents the name you’ve chosen). If this option does not appear in the drop down, you might have forgotten to run the main method in Eclipse first (see Step 2). As the export destination, you will create a JAR file somewhere in the desktop ( C:\Users\USERNAME\Desktop\YOURPROJECT.jar, replacing USERNAME with your actual username).
16. Press Finish to create the runnable JAR, which should then appear on your desktop. Normally, it is possible to just double-click this file to run it (like with normal programs), but since you have not created a GUI application, you need to run this JAR from the command line. Open a command window (run cmd.exe in Windows) and execute the following:
17. cd "C:\Users\USERNAME\Desktop\"
java -jar courseadministration.jar
18. You should get back the same output as the Eclipse console gave you earlier. Now let’s take a look at the args variable. Keeping the command-line window open, execute the following:
java -jar courseadministration.jar Argument1 Argument_2 Argument-3 Argument 4
19. Take note of the output now. The program will report that you have supplied five arguments: Argument1, Argument_2, Argument-3, Argument, and 4. This immediately shows you that arguments are just strings (hence the String array) coming from what you pass in the program call (split based on spaces, ‘ ‘). What if you want to include a space in your argument? Then you just enclose your arguments in double quotes, like so:
java -jar courseadministration.jar "first argument" "second argument"
20. The final question that remains is how Java knows which main method to run in a given JAR file. This information is stored in a special META-INF folder inside the JAR file. This folder contains a MANIFEST.MF file, which will in this case contain the following information (you can hunt down this file yourself by opening YOURPROJECT.jar in an archive manager, such as WinZIP, WinRAR, or 7-Zip, but this is by no means required):
21. Manifest-Version: 1.0
22. Class-Path: .
Main-Class: Program
23. Finally, if you want to run a main method from a JAR file not containing a MANIFEST.MF file (not exported as a runnable JAR file in Eclipse) or want to run another main method, you can do so by executing the following command:
java -classpath courseadministration.jar Program
How It Works
Now take a look at how it works.
1. When running programs from Eclipse, the args variable will be empty by default. It is also possible to supply arguments to programs from Eclipse, but this is a bit involved and generally not required.
2. In the next steps, you create the runnable JAR. Eclipse will compile your classes, compress them, and store them in the JAR file together with a MANIFEST.MF file.
3. Next, you run the program from the command line:
4. cd "C:\Users\USERNAME\Desktop\"
java -jar courseadministration.jar
You should get back the same output as the Eclipse console gave you earlier. The first command (cd) navigates to the desktop directory where you saved your JAR. The second command (java) calls Java and tells it to execute your JAR in the command line. JAR files can be distributed to others and run on all platforms where a Java Runtime Environment (JRE) is available.
5. The next command does the same, but passes in some arguments from the command line to the program:
java -jar courseadministration.jar Argument1 Argument_2 Argument-3 Argument 4
Why are arguments useful? In most cases—especially for command-line programs—they supply configuration parameters to the program at hand, for example, an argument can indicate the filename that should be read in by a program, or an argument can specify an image-conversion program indicating the desired quality of the resulting image, and so on. In most cases, however, you will not need to use program arguments in day-to-day programming, as it is oftentimes easier (and cleaner) to either let your program read in a configuration file (you will see how to deal with file input and output in a later chapter) or create a GUI to provide configuration options to users (GUIs will be dealt with later as well).
6. The next steps show how Java determines which main method to run from a JAR file, either by using a MANIFEST.MF file (created by Eclipse), or by passing this manually:
java -classpath courseadministration.jar Program
This command will add your JAR file to the Java classpath (the locations in which Java will look to find classes) and then supplies the class name (Program) from which to run the main method.
Method Argument Passing
There is one final point I want to make in regard to the way parameter variables are passed to methods. Argument passing can be daunting and tricky in Java at first sight, so I’ve devoted a section to this concept to get the point across.
To start the discussion, consider the following code:
class Test {
int a = 4;
static void increaseInt(int anInt) {
anInt++;
}
public static void main(String[] args) {
Test t = new Test();
System.out.println("Instance var a is: "+t.a);
Test.increaseInt(t.a);
System.out.println("Instance var a is now: "+t.a);
}
}
What will this code output?
Instance var a is: 4
Instance var a is now: 4
Even though you have supplied the instance variable to the method, after the method finishes, the value of this variable remains unchanged. This might lead you to believe that the anInt variable will be considered as a copy of t.a. In programming jargon, this behavior is called “pass by value.”
This is easy enough to understand until you try the same trick with a non-primitive data type, such as arrays:
class Test {
int[] array = new int[]{1,2,3};
static void increaseFirstInt(int[] anIntArray) {
anIntArray[0]++;
}
public static void main(String[] args) {
Test t = new Test();
System.out.println("First element in array is: "+t.array[0]);
Test.increaseFirstInt(t.array);
System.out.println("First element in array is now: "+t.array[0]);
}
}
The output given now? Completely different:
First element in array is: 1
First element in array is now: 2
Is Java going haywire? Not really. . . Some sources might explain this behavior by telling you that primitive types in Java are passed by value (as seen before), but all other types are passed by reference, meaning that the argument variable will refer to the same location in memory as the original variable, and thus, any changes you make in the argument variable will be reflected in the original variable (as they both reference the same location). This explanation, however, is wrong.
To see why, consider the following slight modification of this example:
class Test {
int[] array = new int[]{1,2,3};
static void increaseFirstInt(int[] anIntArray) {
anIntArray[0]++;
}
static void changeIntArray(int[] anIntArray) {
anIntArray = new int[] {100,200,300};
}
public static void main(String[] args) {
Test t = new Test();
System.out.println("First element in array is: "+t.array[0]);
Test.increaseFirstInt(t.array);
System.out.println("First element in array is now: "+t.array[0]);
Test.changeIntArray(t.array);
System.out.println("First element in array is now: "+t.array[0]);
}
}
The output is probably different than what you would expect:
First element in array is: 1
First element in array is now: 2
First element in array is now: 2
If Java indeed passes non-primitive types by reference, the changeIntArray would effectively put a new integer array in the same memory address the old array was stored in, and the final line of code would output 100 instead of 2, but this is not what is happening here. The truth is that all arguments in Java are passed by value. The key thing to understand as well, however, is that Java objects are internally represented as a reference to a location in memory, and this reference is passed as a value. That is, the memory address of objects is passed by value.
At first sight, it seems like this should make no difference, but it does in fact help to figure out what is happening in this example. Step through the code line by line. First, you create a new variable, called t, as such:
Test t = new Test();
Try not to think of this variable as containing all information and behavior stored in the Test object (this helps you understand the difference between classes and objects, but is not the way Java uses object variables), but just as a piece of paper holding an address in memory, as shown in Figure 4.4.

Figure 4.4
Next, you call the following method:
Test.increaseFirstInt(t.array);
t.array is also a non-primitive type, so once again, try to imagine this variable as a piece of paper holding an address. When you write t.array, think of Java first going to the address in memory written on the piece of paper for t, then retrieving the array variable there, which contains another address pointing toward the location in memory where the actual data can be found. When you write t.array[0], you would thus traverse two memory addresses to eventually find the actual integer data. Figure 4.5 shows a simplified view of the basic idea.
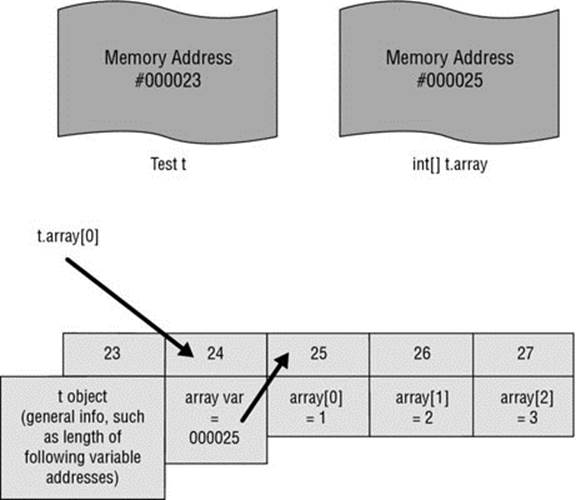
Figure 4.5
The address written on the t.array piece of paper is passed to the increaseFirstInt method by value (!). This means that you do not pass the piece of paper itself, but instead take another sheet of paper, write down the same address, and use that piece within the method (a copy of the address is made).
However, when this method executes the following:
anIntArray[0]++;
It will, of course, point to the same address in memory, as you have created a copy of the piece of paper, but both contain the same address. This is why the changes are reflected in the member variable, even though your second piece of paper (anIntArray) is thrown away once the method exits. Figure 4.6 depicts this in the simplified view you’ve been following.
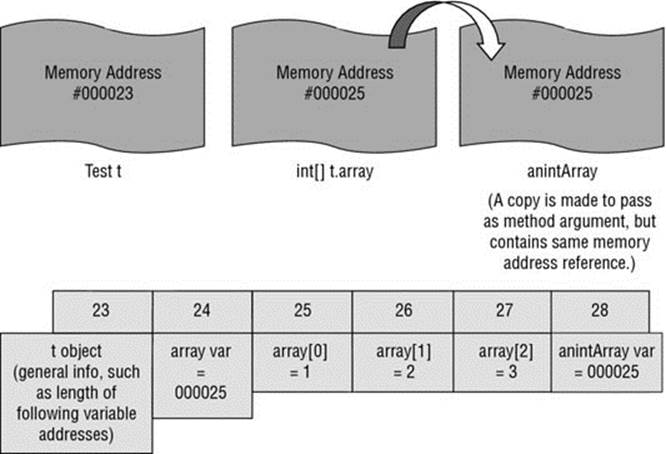
Figure 4.6
Now let’s take a look at what happens next:
Test.changeIntArray(t.array);
Again, there is the same reasoning. You do not pass the t.array piece of paper itself, but again make a copy to pass to the changeIntArray method, which is named anIntArray. However, this method calls:
anIntArray = new int[] {100,200,300};
Meaning that you create a new object and scribble down its address on the copied anIntArray sheet of paper, overriding the old one, which is different from the one written in t.array. This means that all the changes you then make to anIntArray will not be reflected in the member variable (as the addresses differ). Even more, the object stored in the location referred to by anIntArray will cease to exist when the method exits, as the piece of paper is discarded, and Java will detect that the object living at that address can no longer be accessed through any variable, as shown in Figure 4.7.

Figure 4.7
NOTE Again, it’s important to take special care when dealing with Strings. Strings are a non-primitive type, meaning that you might try to write the following code:
class Test {
String a = "a";
static void changeString(String s) {
s = "b";
}
public static void main(String[] args) {
Test t = new Test();
System.out.println("a is: "+t.a);
Test.changeString(t.a);
System.out.println("a is now: "+t.a);
}
}
But see that the changes you make to the String are not reflected in the member variable. The reason for this is simple. Remember that assigning (new) values to a String will always create a new String object. This code is thus equal to writing:
class Test {
String a = new String("a");
static void changeString(String s) {
s = new String("b");
}
public static void main(String[] args) {
Test t = new Test();
System.out.println("a is: "+t.a);
Test.changeString(t.a);
System.out.println("a is now: "+t.a);
}
}
As such, modifying the argument variable s will cause a new String object to be created, which will also cause the address referenced to by that variable to change, and be different from the original address in t.a.
One interesting remark to make in this context is about final variables. As you have seen, instance variables and local variables can be declared as being final to prevent multiple initializations. Parameter variables can also be final, meaning that it’s possible to write a method like so:
class Test {
void editNames(final String[] argNames) {
// Will not work due to final modifier:
// argNames = new String[]{"Caesar"};
// This will work:
argNames[0] = "Caesar";
}
}
This completely corresponds with the definition of final variables as explained before, keeping in mind that finalizing a variable is not the same as “freezing” it completely, but it does prevent new initializations. However, since argNames will be discarded once the method is exited, why would you even bother to declare a parameter variable as final? One particularly straightforward reason is to prevent you from accidentally re-initializing the variable, to prevent you from overwriting the address stored on a variable’s piece of paper with a new one. When you actually want methods to directly modify an object, you in fact want to avoid creating a new object, as the address referenced by the argument will then change and be discarded once you exit the method. Using final helps prevent such mistakes.
This concludes the overview on beginning object-oriented programming in Java. You have covered a lot of ground. You have seen how to define classes, with data being represented by instance and class variables—final or not—and behavior being represented by instance and class methods. You have also seen how to define class constructors, and read about the special main method to execute your programs.
The complete class definition “template” now looks like this:
class CLASSNAME {
// FINAL CLASS VARIABLE DEFINITIONS
// CLASS VARIABLE DEFINITIONS
// FINAL INSTANCE VARIABLE DEFINITIONS
// INSTANCE VARIABLE DEFINITIONS
// CONSTRUCTOR METHOD DEFINITIONS
// INSTANCE METHOD DEFINITIONS
// CLASS METHOD DEFINITIONS
// MAIN METHOD DEFINITION (OPTIONAL)
}
The final section of this chapter guides you through Java’s standard edition built-in classes and highlights some particularly useful ones that will return in many of the following chapters.
JAVA SE BUILT-IN CLASSES
Recall from the introduction to Java in Chapter 2 that there are multiple “editions” of Java. The most widely used edition—the one used here as well—is aptly named Java SE, Standard Edition. This edition comes with class libraries containing a number of built-in classes that meet most of your needs you will encounter while programming. One of them—the HashSet—was already briefly discussed in the last Try It Out, as a simple way to keep a set of objects. This class is part of the so-called “collections” class library, which contains a number of other helpful “array alternatives” as well.
The following subsections provide a short tour through all of Java SE’s frequently used built-in classes. I’ve organized them by their packages. I still need to discuss packages in-depth, but for now, just think of them as a way to organize classes using a naming scheme that looks a bit like web URLs. For example, both the Java HashSet and ArrayList classes are found in the package java.util. Their full canonical names are java.util.HashSet and java.util.ArrayList, which is all you need to know for now.
Classes in the java.lang Package
The java.lang package contains core classes related to the Java language, including:
· java.lang.Object: Every class you define silently inherits all the behavior defined in this class. This class contains methods such as equals (to perform object equality checks), clone (to make a copy of an object), and toString (to retrieve a textual representation of an object), which can be overridden and customized by programmers. Chapter 8 will tell you more about this.
· java.lang.Exception and all its subclasses: Classes representing errors. Chapter 6 talks more about exceptions, errors, debugging, and testing.
· java.lang.String, as well as wrapper classes for all primitive types (java.lang.Integer, java.lang.Double, and so on).
· java.lang.StringBuilder: An alternative class for dealing with strings that’s especially helpful if you need to perform a lot of modifications to a String.
· java.lang.System: Class providing system operations.
· java.lang.Math: Class providing methods to perform basic mathematics.
Other than this, this package also provides a number of classes to deal with complex Java aspects such as reference management, reflection, and process spawning and control. All advanced concepts which you can safely ignore for now.
The two classes that jump out, however, and that can be very useful are the Math and StringBuilder classes.
Math contains two static constants (E, the base of natural logarithms, and PI, the ratio of the circumference of a circle to its diameter), as well as a number of methods—abs, max, min, ceil, floor, sin, cos, tan, pow, and sqrt—to help out with mathematics when programming.
TRY IT OUT Mathematics in Java
Here is a short exercise to begin using mathematics in Java.
1. Create a MathTester class in Eclipse with the following content:
2. class MathTester {
3. public static void main(String[] args) {
4. double num1 = 2.34;
5. double num2 = 1.56;
6.
7. System.out.println(Math.max(num1, num2));
8. System.out.println(Math.min(num1, num2));
9. System.out.println(Math.sqrt(num1));
10. System.out.println(Math.pow(num1, num2));
11. }
}
12.Run the main method and observe the output.
How It Works
Now take a look at how it works.
1. The Math class contains a number of methods to help out with mathematics when programming. Take your time to explore other methods using Eclipse’s context menu.
2. Since the Math class belongs to the java.lang package, you do not need to write an import statement but can use this class directly.
3. All of Math’s methods are static, meaning that you do not have to create a Math object to be able to use its methods. This is a common pattern for “utility” classes in Java, which are classes containing a set of helpful grouped methods that can be statically accessed.
The StringBuilder class represents a mutable sequence of characters, compared to a normal String that represents an immutable sequence of characters (which is why Java creates a new String object every time you modify a String). The following Try It Out shows where the StringBuilder can be useful.
TRY IT OUT StringBuilder versus String
Different classes can be used for working with strings. This exercise will help you differentiate two common classes: String and StringBuilder.
1. Create a StringTester class in Eclipse with the following content:
2. class StringTester {
3. public static void main(String[] args) {
4. String string = "";
5. long startTime1 = System.currentTimeMillis();
6. for (int i = 0; i < 100000; i++) {
7. string += "a";
8. }
9. long endTime1 = System.currentTimeMillis();
10.
11. StringBuilder stringBuilder = new StringBuilder();
12. long startTime2 = System.currentTimeMillis();
13. for (int i = 0; i < 100000; i++) {
14. stringBuilder.append("b");
15. }
16. long endTime2 = System.currentTimeMillis();
17.
18. System.out.println("String took: "+(endTime1-startTime1)+"ms");
19. System.out.println("StringBuilder took: "+(endTime2-startTime2)+"ms");
20. }
}
21.Run this piece of code to benchmark the performance of String (100,000 times adding a character) with StringBuilder.
How It Works
Now take a look at how it works.
1. This code benchmarks the performance of the StringBuilder class against normal strings, by performing 100,000 single character concatenations. The example uses a for loop here, which I’ve not discussed in-depth yet, but the meaning is clear—you simply count from 0 to 100,000.
2. When running the benchmark, you should get something like the following output. Observe the drastic difference:
3. String took: 3231ms
StringBuilder took: 5ms
Classes in the java.io and java.nio Packages
The java.io package provides classes to deal with input and output, for instance to deal with reading and writing files. In Java SE 1.4, New IO (java.nio) was added to optimize performance and to include a number of new features. Chapter 7 discusses how to deal with files in detail, and you will revisit these classes there.
Classes in the java.math Package
The java.math package provides classes supporting multi-precision arithmetic, such as BigDecimal and BigInteger. These classes come in helpful in cases where rounding errors, which can occur when working with normal float or double types, are unacceptable, e.g., in financial and scientific applications.
Contrary to what logical thinking would imply, the main Math class is found in java.lang and not in java.math (and is also not duplicated there).
Classes in the java.net, java.rmi, javax.rmi, and org.omg.CORBA Packages
The classes contained in java.net allow functionality for networking, talking to web servers, and other transactions. java.rmi and javax.rmi contain classes dealing with Remote Method Invocation (RMI), the object-oriented counterpart of RPC (Remote Procedure Calls). The org.omg.CORBA package provides a number of complex classes supporting remote communication between applications using the CORBA RMI protocol, but is not widely used anymore.
The keyword to remember here is “communication.” Providing an in-depth discussion on network programming is out of scope for this book, but you will see in Chapter 10 how to access web sources with Java, where these packages and their classes show up again.
Classes in the java.awt and javax.swing Packages
The classes contained in java.awt (Abstract Window Toolkit) provide access to a basic set of GUI (graphical user interface) widgets, as well as classes to provide support for clipboard operations (copying and pasting) and input devices (mice, keyboards, and the like).Swing —java.swing—provides a collection of classes that builds on top of the Abstract Window Toolkit to extend GUI support with more advanced routines.
You will learn about building graphical user interfaces in Java in Chapter 11, where these packages and their classes are covered in full.
Note that Java 8 also introduces a large update for the so-called JavaFX technology. JavaFX describes a series of packages aiming to bring rich, graphical applications to a number of devices and web browsers, and is intended to replace Swing in the future, although both Swing and JavaFX will remain in the JRE for some time. Main features of JavaFX include support for modern 3D graphics and web technologies. On the other hand, building applications with JavaFX has a steeper learning curve than Swing, so the latter remains the preferred option in most cases for beginners, and for the development of applications that do not require advanced graphical capabilities.
Classes in the java.util Package
The java.util built-in classes in Java contain a large number of classes to deal with various data structures. You will heavily utilize these classes throughout the rest of the book, and as they will no doubt be the built-in classes in Java SE you will use the most, it makes sense to discuss them in more detail.
Collections
A large part of the classes contained in the java.util package belong to the Java’s collections framework (the JCF). The Collections API provides a number of general-purpose data structures, which generally can be described as “better alternatives for arrays.” One of these, the HashSet, you briefly encountered in the last Try It Out, as a simple way to keep a set of objects.
To illustrate why Java’s Collections API is so useful, consider this example of how to implement a set of Strings, using only arrays:
class SetAsArray {
String[] items;
SetAsArray() {
items = new String[] {};
}
int indexOf(String item) {
// Check if item is already present
for (int i = 0; i < items.length; i++) {
if (items[i].equals(item)) {
return i;
}
}
return -1;
}
boolean hasItem(String item) {
return indexOf(item) > -1;
}
void addItem(String item) {
if (hasItem(item)) {
// Item already present
return;
}
// Make new array
String[] newItems = new String[items.length + 1];
// Add existing items
System.arraycopy(items, 0, newItems, 0, items.length);
// Add item to new array
newItems[newItems.length - 1] = item;
// Set new array
items = newItems;
}
void removeItem(String item) {
if (!hasItem(item)) {
// Item not present
return;
}
// Make new array
String[] newItems = new String[items.length - 1];
// Add existing items except item to be removed
System.arraycopy(items, 0, newItems, 0, indexOf(item)); // First half
System.arraycopy(items, indexOf(item) + 1, newItems, indexOf(item),
items.length - indexOf(item) - 1); // Second half
// Set new array
items = newItems;
}
void showContents() {
System.out.println("Set contains " + items.length + " elements");
for (int i = 0; i < items.length; i++) {
System.out.println(" - Element " + i + ": " + items[i]);
}
}
int size() {
return items.length;
}
public static void main(String[] args) {
SetAsArray mySet = new SetAsArray();
mySet.addItem("A");
mySet.addItem("B");
mySet.addItem("C");
mySet.addItem("A");
mySet.showContents();
mySet.removeItem("B");
mySet.showContents();
mySet.addItem("D");
mySet.showContents();
}
}
As shown, the SetAsArray class provides functionality for adding, removing, and looking up items, as well as for returning the size of the set. This example might look a bit daunting (it uses a for loop to iterate over the array and the if construct to govern program flow, which you’ll read about in-depth in the following chapter), but the point is that rolling data structures such as sets by hand is frustrating, difficult, and time-consuming. Here is the same main method, using a HashSet:
import java.util.HashSet;
public class HashSetTester {
public static void main(String[] args) {
HashSet<String> mySet = new HashSet<String>();
mySet.add("A");
mySet.add("B");
mySet.add("C");
mySet.add("A");
System.out.println(mySet);
mySet.remove("B");
System.out.println(mySet);
mySet.add("D");
System.out.println(mySet);
}
}
Clearly, using Java collections is much more straightforward. Notice again the import statement at the top, before the class definition. Contrary to classes located in java.lang, you need to specify which classes to use in your code when they are outside your current package. You will read about packages and importing classes in Chapter 8, and Eclipse will help you to figure out which import statement to include, but the basic idea should be clear from this example.
So which data structures does Java provide out of the box? These are:
· Lists (classes implementing java.util.List), such as ArrayList and LinkedList, that provide a user-friendly alternative to arrays.
· Stacks (classes implementing java.util.Stack) that keep a stack of objects. A stack is a last-in-first-out (LIFO) data structure that allows you to add (push) new objects on top of the stack and retrieve (pop) objects back out from the stack. As a metaphor, you can compare a stack to a pile of papers on your desk. New papers (objects) are placed on top of the pile, and every paper (object) can be taken from the top of the pile as well.
· Queues (classes implementing java.util.Queue) provide a data structure similar to a stack, but with the difference that objects are taken from the beginning of the queue (first-in-first-out, FIFO). Double-ended queues (java.util.Dequeue) are also provided and allow you to insert and remove objects both at the front and the back.
· Sets (classes implementing java.util.Set), such as the HashSet and TreeSet, store a set of objects (that is, a group of objects without duplicates).
· Maps (classes implementing java.util.Map) provide a simple data structure that associates values (objects) with a key. That is, it maps keys to values. Think of a map as a dictionary (in other programming languages, this is the term used for this data structure): the word being looked up is the key, whereas the description is the value. Just as a real-life dictionary organizes words according to the alphabet, maps in Java organize their keys in an efficient manner, so retrieving values is generally very fast.
Maps, lists, and sets are by far the most commonly used collection types in Java. The following Try It Out shows how they work.
TRY IT OUT Collections in Java
This Try It Out shows how collection types work in Java.
1. Create a class called CollectionsTester in Eclipse.
2. Add a main method. Create an ArrayList, HashSet, and HashMap variable and store some items, so that the class looks like this:
3. class CollectionsTester {
4. public static void main(String[] args) {
5. ArrayList<String> listOfStrings = new ArrayList<String>();
6. listOfStrings.add("first item");
7. listOfStrings.add("second item");
8. listOfStrings.add("third item");
9. listOfStrings.add("fourth item");
10. listOfStrings.remove(0); // Remove the first item
11.
12. HashSet<Integer> setOfIntegers = new HashSet<Integer>();
13. setOfIntegers.add(2);
14. setOfIntegers.add(4);
15. setOfIntegers.add(2);
16. setOfIntegers.remove(2);
17.
18. HashMap<String,Integer> mapOfStringToInteger =
19. new HashMap<String,Integer>();
20. mapOfStringToInteger.put("Alice", 4);
21. mapOfStringToInteger.put("Bob", 3);
22. mapOfStringToInteger.remove("Alice");
23.
24. }
}
25.Eclipse will complain about the fact that it does not recognize the ArrayList, HashSet, and HashMap classes. If you mouse over the error, you will see that Eclipse automatically provides a way to import these classes. The first option is Import 'ArrayList' (java.util).
26. Another handy way to automatically resolve missing imports in Eclipse is by navigating to Source and then selecting Organize Imports. You can also use the helpful keyboard shortcut Ctrl+Shift+O. After fixing all the errors, the following imports should appear at the beginning of your code:
27. import java.util.ArrayList;
28. import java.util.HashMap;
import java.util.HashSet;
How It Works
Now take a look at how it works.
1. The CollectionsTester class shows the use of ArrayList, HashSet, and HashMap classes, that is, lists, sets, and maps. These are the three collection types you’ll use the most.
2. The program returns no output, but you can use the get() method to retrieve and show items from the collections. Take some time to play around with this code fragment to get a feel for the different methods provided by the collection types. You can use Eclipse’s context menu to browse around by typing listOfStrings and then looking through the possible methods offered.
You will be using collection types extensively throughout the remainder of this book, and you will become more familiar with them as you move on. For now, I leave you with two remarks. First, note that most collection types (sets and lists) in Java implement the Collection interface. You have not seen interfaces yet, but what this means is that all of the following methods are available for each of these classes (as illustrated in the last Try It Out):
· boolean add(E e): Adds an element; returns true if the collection changed.
· boolean addAll(Collection<? extends E> c): Adds all elements from the given collection to this collection; returns true if the collection changed.
· void clear(): Removes all elements from the collection.
· boolean contains(Object o): Returns true if the collection contains the given object, false otherwise.
· boolean containsAll(Collection<?> c): Returns true if this collection contains all of the elements in the given collection, false otherwise.
· boolean equals(Object o): Performs an equality comparison.
· boolean isEmpty(): Returns true if the collection is empty (contains no elements).
· boolean remove(Object o): Removes the given element from the collection; returns true if the collection changed.
· boolean removeAll(Collection<?> c): Removes all elements in the given collection from this collection; returns true if the collection changed.
· boolean retainAll(Collection<?> c): Keeps only the elements in this collection that are contained in the given collection; returns true if the collection changed.
· int size(): Returns the number of elements in the collection.
· Object[] toArray(): Returns an array containing all the elements in the collection.
· <T> T[] toArray(T[] a): Returns an array containing all the elements in the collection; the type of the array will be that of the specified array.
Note that maps use a different set of methods:
· void clear(): Removes all mappings from the map.
· boolean containsKey(Object key): Returns true if the map contains the specified key, false otherwise.
· boolean containsValue(Object value): Returns true if the map contains the specified value, false otherwise.
· Set<Map.Entry<K,V>> entrySet(): Returns a set containing Entry objects. Each Entry object models a key and value pair.
· boolean equals(Object o): Performs an equality comparison.
· V get(Object key): Returns the value mapped to the key, or null if the key is not present.
· boolean isEmpty(): Returns true if the map contains no mappings, false otherwise.
· Set<K> keySet(): Returns a set containing all the keys contained in this map.
· V put(K key, V value): Inserts a key/value pair; if the key exists, the value will be overridden.
· void putAll(Map<? extends K,? extends V> m): Inserts all mappings contained in the given map in this map.
· V remove(Object key): Removes a mapping for the given key.
· int size(): Returns the number of mappings in this map.
· Collection<V> values(): Returns a collection of all values in the map; note that this function does not return a set (like keyset() does), as duplicate values may exist in the map.
A second point I want to make at this point is related to so-called “generics” in Java. When glancing over the code and method lists, you might be wondering what the use of <T>, <? extends T>, and <String> in ArrayList<String> indicates. Generics was added to Java in 2004, in Java SE 5 to be precise. Put briefly, generics allow classes and methods to work with objects of various classes, without declaring up front what these classes should be while still retaining compiler safety checks. To illustrate this, try writing the following in Eclipse:
ArrayList aList = new ArrayList();
aList.add(2);
aList.add("Alice");
This will work, but Eclipse will throw up warnings complaining about the fact that ArrayList should be parameterized. To explain what this means, try to think about what a list should represent. Basically, a list class should be able to store a list of objects that all belong to a specific type. Which type? Well, when rolling the custom SetAsArray before, you enforced all items to be Strings, but ideally, you would like to keep this generic, as lists, sets, and maps should be able to contain objects of any type. This is exactly why the example provides this type when instantiating collection types, like so:
ArrayList<String> aList = new ArrayList<String>();
aList.add(2);
aList.add("Alice");
Initializing collections in this way allows the Java compiler to perform an additional number of type checks. If you’re following along, you’ll note that Eclipse now displays an error when trying to add an integer (2) to this list, as the list is only allowed to hold Strings.
Now what if you want your list to hold any kind of object? Then you can just write:
ArrayList<Object> aList = new ArrayList<Object>();
aList.add(2);
aList.add("Alice");
In general, however, it’s best to be as precise as possible when instantiating collections (and other classes using generics). Not only does this allow Java to perform safety checks for you, but another reason is that Java will use the class you provided when instantiating the collection to return objects stored in the collection when retrieving them, for instance:
ArrayList<Object> aList = new ArrayList<Object>();
aList.add(new Dog("Puppers")); // Add a Dog object as the first item
aList.add(2);
aList.add("Alice");
Object item = aList.get(0); // Get first item
As you can observe, when you want to fetch an item from the list and assign it to a variable, this variable must be declared as an Object. Even though you know that your first element belongs to the Dog class, you will be unable to execute the following code:
//...
Object item = aList.get(0); // Get first item
item.bark();
Java will complain about the fact that there is no bark() method for the Object class. Is there a way to specify that the item you retrieved is really of the class Dog? The answer is yes, using type casting, as mentioned in Chapter 2:
//...
Dog item = (Dog) aList.get(0); // Get first item and type cast it
item.bark();
Keep in mind, however, that type casting is generally an unsafe operation and should be avoided. As such, it’s best to keep your collections as specific as possible, and use multiple collections to hold different items whenever necessary. Finally, in case you were wondering, it’s also possible to define your own classes using generics in Java, but this is a more advanced aspect of programming in Java I will not cover in full.
AUTOBOXING ONCE AGAIN
In the beginning of this chapter, you read about the concept of Autoboxing, which is an automatic conversion made by the Java compiler between primitive types and their corresponding wrapper classes. For example, converting a double to a Double is called boxing, and converting a Double back to a double is called unboxing.
Back then, I stated that there was one typical use case where you should know about autoboxing, and now—as I’ve discussed collections and generics—is the time to mention this. Generics in Java are always provided as classes. This means that primitive types cannot be used as generic types and you cannot declare a list as follows:
ArrayList<int> aList = new ArrayList<int>();
Luckily, using the mechanism of autoboxing, you can just replace the primitive type with its wrapper class, Integer, like so:
ArrayList<Integer> aList = new ArrayList<Integer>();
Other than keeping this in mind, you do not have to worry about the differences between int—the primitive type—and Integer—its wrapper class, as Java will handle all the rest for you. What about an array of integers? Then you just write:
ArrayList<int[]> aList = new ArrayList<int[]>();
This declares a list of integer arrays. As arrays are proper, non-primitive classes, it’s fine to use them as generic parameters. It’s even possible to define a list that’s holding lists of integers, like so:
ArrayList<ArrayList<Integer>> aList =
new ArrayList<ArrayList<Integer>>();
By combining collections in this manner, it’s easy to define complex custom data structures to hold complex information. Don’t go overboard with this however. When you find yourself declaring maps of lists of sets, it might be better to abstract some of this hierarchical complexity by creating some additional classes instead.
Other Utility Classes
Besides collection classes, the java.util package also contains a number of other helpful classes to provide a great deal of functionality. These include:
· java.util.Arrays: This class contains a large number of static helper methods to sort and search arrays. Note, however, that the arraycopy method is part of the java.lang.System class (you saw this method in the SetAsArray class). The reason for this is that this method directly performs a memory operation and is thus closer to a “system operation” than what the methods provided by arrays do. Another reason is the fact that java.util.Arrays was introduced in Java 1.2, whereas the arraycopy method existed before that point.
· java.util.Date: A class to deal with dates and time. While this class provides solid support for working with dates and time, proper date and time support has been the thorn in the eye of many Java developers, as this class rapidly ceases to be useful once complex aspects such as multiple time zones come into play. The class is also not very well designed. For example, years start counting at 1990, months at 1, and days at 0 (!), which is not very intuitive. This is exactly why Java SE 8 introduced a new Date and Time API, which is located in its proper package: java.time. Whenever possible, it is highly advisable to use this class instead of the older ones.
· java.util.Calendar: A class that provides methods to convert between a point in time and a set of calendar fields. This can be helpful to retrieve the year, month, day, and so on for a given Date object. This class has been updated in Java SE 8 as well, with better support for internalization.
· java.util.Currency: A class to represent a currency.
· java.util.Locale: A class to represent a geographical, political, or cultural region. This class has been updated in Java SE 8 as well.
· java.util.Random: A class providing a random number generator.
· java.util.Scanner: A class providing a text scanner that can parse texts. You will utilize this class to parse text files in Chapter 7.
Other Classes and Custom Libraries
There are a number of other built-in classes in Java SE that I do not cover in-depth here. For instance, there is java.text, which contains a number of classes to provide parsing routines for text; java.security, which provides encryption services; and classes to work with sound and images.
Finally, it is also good to keep in mind that Java has a rich ecosystem of third-party libraries you can easily incorporate in your own projects whenever you find that the built-in classes do not suffice. Many of these libraries in fact provide alternatives for some of these built-in classes, providing better support to deal with dates and times, for instance, or providing alternatives or extensions for Java’s collection classes. Chapter 12 provides an overview of some of these libraries and shows you how to include them in your projects.
For now, however, the built-in classes will guide you through the rest of this book. You have seen how to get started with object-oriented programming in Java. You now know how to define classes, variables, and methods, and are aware of Java’s built-in classes, most notably of which being Java’s collection types. You still have a lot of ground to cover, however. In some of the examples discussed in this chapter, I already hinted at the for and if constructs to govern the control flow of your program. In the next chapter, this topic will become your focus of attention.