Beginning Java Programming: The Object-Oriented Approach (Programmer to Programmer) (2015)
6. Handling Exceptions and Debugging
WHAT YOU WILL LEARN IN THIS CHAPTER:
· What kinds of errors can occur in programming
· How to find errors in your program
· How to handle exceptions that could crash your program
· How to test your program
WROX.COM CODE DOWNLOADS FOR THIS CHAPTER
The wrox.com code downloads for this chapter are found at www.wrox.com/go/beginningjavaprogramming on the Download Code tab. The code is in the Chapter 6 download and individually named according to the names throughout the chapter.
You are now midway through this book. You’ve learned the basics of Java and programming already. In the following chapters, you’ll be going more in depth with object-oriented programming and interacting with users and data sources outside your Java program. This chapter is placed in between to offer you the tools and techniques needed to handle many of the errors that might begin to pop up as your programs start to become more complex. The chapter is divided into three main sections: types of errors, testing options, and programming styles. You saw the concepts introduced as early as Chapter 1, but here you will see actual solutions put into practice with a chance to try them out on your own. By the end of this chapter, you should have developed the skills to avoid errors while you program and to find and fix the errors that will still inevitably occur.
RECOGNIZING ERROR TYPES
Errors are almost unavoidable when programming. Just as when you are writing an essay and sometimes make typos or misuse words, you will make occasional mistakes when programming in Java. These mistakes can be referred to as bugs, errors, or exceptions. Here you will find them classified into three main categories: syntax errors, runtime errors, and logical errors. In general, syntax errors are the easiest to find and correct while logical errors are the most difficult.
Identifying Syntax Errors
Syntax errors are the programming equivalent of spelling and grammar mistakes in natural languages. Syntax errors include the following examples:
· Misspelled class, variable, or method names
· Misspelled keywords
· Missing semicolons
· Missing return type for methods
· Out of place or mismatched parentheses and brackets
· Undeclared or uninitialized variables
· Incorrect format of loops, methods, or other structures
In the following code example, see how many syntax errors you can spot:
public class errors {
public static vod main(String[] args) {
age = 30;
int retirementFund = 10000;
int yearsInRetirement = 0;
String name = "David Johnson",
for (int i = age; <= 65; ++){
recalculate(retirementFund,0.1);
}
int monthlyPension = retirementFund/yearsInRetirement/12
System.out.printline(name + " will have $" + monthlyPension
+ " per month for retirement."];
}
public static recalculate(fundAmount, rate){
fundAmount = fundAmount*(1+rate);
}
}
}
You probably can spot several just by reading the code. The keyword void is misspelled, the declaration of the string name should end with a semicolon instead of a comma, and the print statement should close with a parenthesis followed by a semicolon. If you have a good eye for it, you could see several others, too. Now, look at what Eclipse shows you when you enter the code exactly as it’s typed. If you try to run the program now, Eclipse will warn you that there are errors and ask if you would still like to proceed. See Figure 6.1.
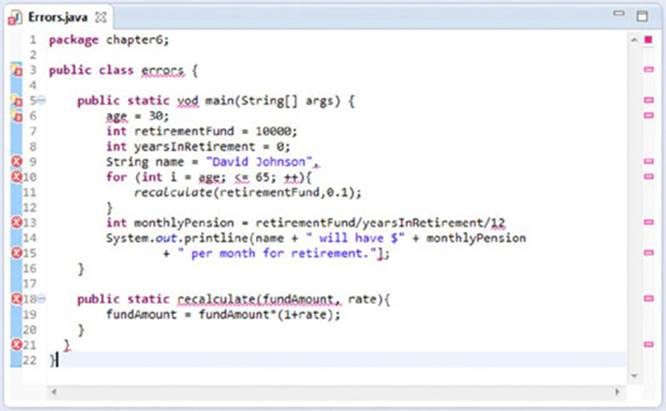
Figure 6.1
You can see that Eclipse points out syntax errors as you type, so you can more easily find them and fix them immediately. Errors are indicated in the code itself by a red underline, and also noted to the left of the line number as a red X. If you hover your mouse over the red X, you will see a pop-up note indicating what Eclipse thinks the problem is, as shown in Figure 6.2.
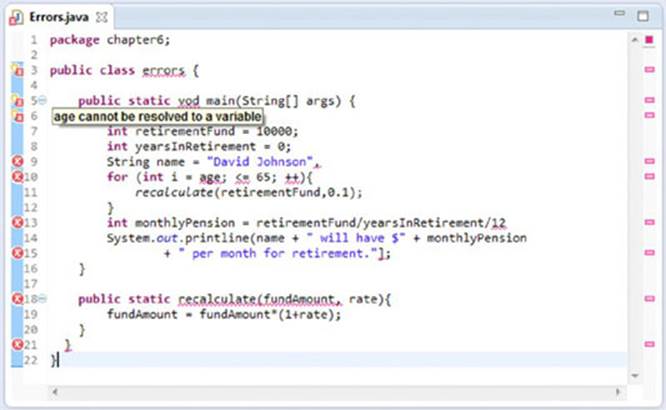
Figure 6.2
The note age cannot be resolved to a variable indicates that a variable called age has not been declared yet. Therefore, you cannot assign it a value. If you click on the red X, a new popup window appears with possible solutions for the error, if Eclipse has one or more solutions to propose. See Figure 6.3.
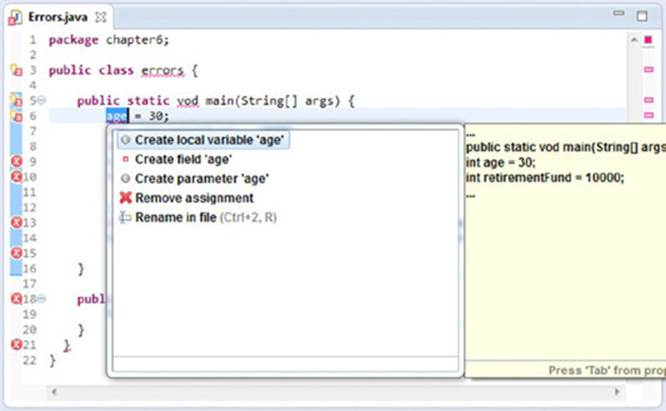
Figure 6.3
By double-clicking on the first solution, Create local variable 'age', the code is automatically edited to include the variable declaration. You can see that it becomes an int variable, because Eclipse assumes a value of 30 belongs to an int data type. Also, the red X now shows as a faint white X, so you can see that the error was resolved. See Figure 6.4. When you save the file, this white X will disappear. It’s important to note already that the proposed solution will not always be the correct one, so be careful that you read and understand both the error and the solution before applying it.
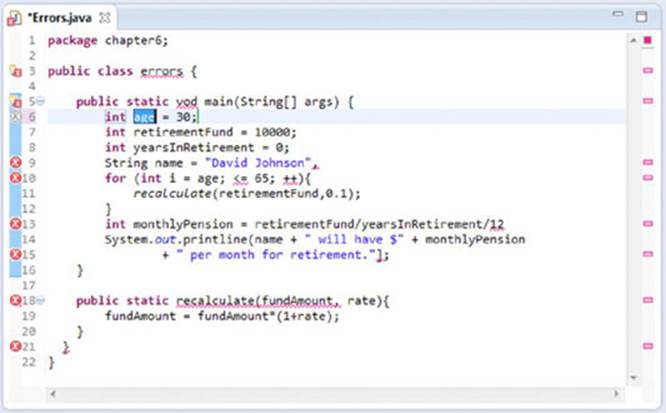
Figure 6.4
Following this approach, you can resolve all of the syntax errors in this code.
· Line 3: Rename type to Errors (class name must match .java filename).
· Line 5: Change to void (main method return type is always void).
· Line 9: Change the comma to a semicolon.
· Line 10: Change the for loop to for (int i = age; i <= 65; i++).
· Line 18: Set the method return type to void (recalculate method doesn’t return any value).
· Line 18: Add the parameter data types to double fundAmount, double rate (this also solves the bug indicated at line 10).
· Line 13: Add a semicolon at the end.
· Line 14: Change to println (printline is not correct syntax).
· Line 15: Change the square bracket to a parenthesis.
· Line 22: Delete the last closing curly bracket (there was one too many).
After all of these corrections, the syntax errors are resolved and your program can be executed. The resulting code looks like this:
public class Errors {
public static void main(String[] args) {
int age = 30;
int retirementFund = 10000;
int yearsInRetirement = 0;
String name = "David Johnson";
for (int i = age; i <= 65; i++){
recalculate(retirementFund,0.1);
}
int monthlyPension = retirementFund/yearsInRetirement/12;
System.out.println(name + " will have $" + monthlyPension
+ " per month for retirement.");
}
public static void recalculate(double fundAmount, double rate){
fundAmount = fundAmount*(1+rate);
}
}
Identifying Runtime Errors
If you tried running the program after fixing all the syntax errors, you probably already found your first runtime error. In the console you’ll find red text indicating there was an exception in the thread main. See Figure 6.5. Exception is a Java class including many types of runtime problems. Java distinguishes exceptions and errors: exceptions can—and should—be managed by the programmer, while errors are serious problems that reasonable programs are not expected to handle. Here, the word error is more generally applied.
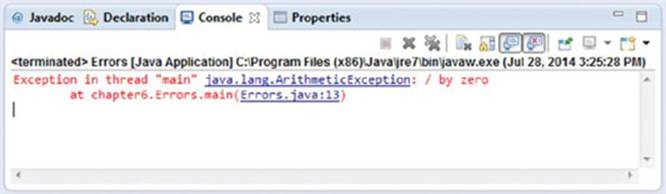
Figure 6.5
Luckily, there are clues in the error message that can help you sort out where and why it happened. First note the type of exception: java.lang.ArithmeticException. Already from the name, you can see it must be something related to the calculations. Then, specifically it states “/ by zero,” so somewhere your program has tried to divide by zero, an operation that’s undefined and therefore cannot be computed by Java. In such a small program, you can probably easily locate where the division is occurring, but in case you need some direction, the error message also shows where the error occurred: chapter6.Errors.main(Errors.java:13). In other words, line 13 in the main thread of the Errors class in the chapter6 package. If you go to line 13, you’ll see the program is trying to divide retirementFund byyearsInRetirement. If you refer back to the initializations of these two variables, you’ll find retirementFund = 10000 and yearsInRetirement = 0. There’s the problem! If you set yearsInRetirement to some other value, say 20 years, for a person retiring at 65 and living to age 85, you will no longer have a division by zero exception.
Division by zero is a classic runtime error example, because the syntax is correct and it is only during runtime that a problem occurs. Other typical examples that you will no doubt encounter, if you haven’t already, include null pointer exception, index out of bounds exception, and file not found exception. In the next section, you’ll see explanations of the most common exceptions beginners see.
Identifying Logical Errors
If you’ve run the code that you just fixed, did you notice anything strange? There shouldn’t be any syntax or runtime errors, so your program should run normally. You should see David Johnson will have $41 per month for retirement. printed to the console. At first glance, this seems fine, but on further inspection, the number is lower than you would expect. In fact, 10,000 divided by 20 years divided by 12 months is 41 dollars per month. But the program is supposed to be calculating an annual return rate of 10% for all the years between age 30 and age 65. So what’s going on here?
This is an example of a logical error. The code compiles and executes without error, but logically produces the wrong result. Logical errors are perhaps the most difficult to spot, because there’s nothing to suggest there’s an error unless you know what to expect and compare the actual results to the expected results. If you are not careful to review what is happening, you may easily miss logical errors lurking in your code.
So first try to sort out where this program went wrong. We know the return rate is not being calculated correctly; this could be a problem in the for loop that is iterating each year or in the recalculate method itself. You can start by testing one recalculate method call and see if it’s working. Add the following print statement to the main method to check this: System.out.println("100 at 10% annual interest is: " + recalculate(100,0.1));
But now, there’s already a hint that something isn’t right. See Figure 6.6.
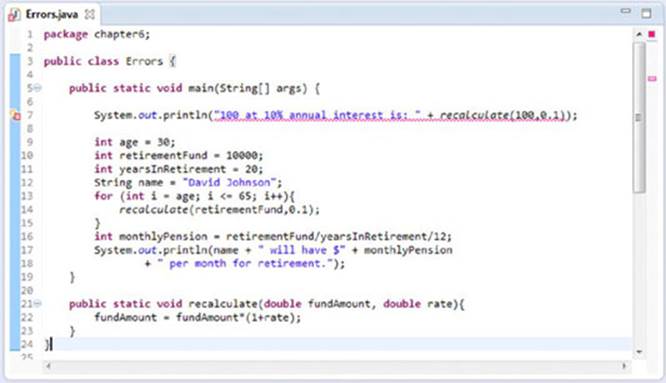
Figure 6.6
The error hint tells you that you cannot add a void to a string. But the recalculate method returns a void. You will have to change this. Since the method is calculating a double type, it makes sense to make the method return a double.
public static double recalculate(double fundAmount, double rate){
return fundAmount*(1+rate);
}
That corrects the syntax error, so you can try running the program now. The output should now read:
100 at 10% annual interest is: 110.00000000000001
David Johnson will have $41 per month for retirement.
So the method seems to be calculating correctly now, since 100 + 10% return is 110.
NOTE It’s worth mentioning the rounding error you see here. Doubles are not appropriate data types for dealing with things where precision is important, including money. BigDecimal would be a much more appropriate choice because it allows the developer control over the rounding of floating point values. An example of how this program could use BigDecimal is included at the end of this section.
So you now know the error is in the for loop. You might first check the initialization and termination conditions of the loop, just to be sure it’s iterating properly. It should repeat for each year between age 30 and 65 (presumably retirement age). That shouldn’t be a problem. Therefore, it must be in the body of the for loop. In fact, the change you made to the return type is already a hint as to what needs to be edited here, too. The method now returns a double, but that double is not used in any way during the loop. Therefore, every time the loop is executed, the same retirementFund = 10000 is used in the calculation again. What you need to do is assign the newly calculated double value to the retirementFund variable, so the new amount is used in the next calculation. Because the fundAmount is a double, you also need to change the type of retirementFund to a double as well. If you do this, you’ll also see an error pop up for the monthlyPension variable, since it uses retirementFund in its calculation. Change this to a double type also. You can, of course, remove the first print statement now that you know the method is calculating correctly. You should end up with something like this.
public class Errors {
public static void main(String[] args) {
int age = 30;
double retirementFund = 10000;
int yearsInRetirement = 20;
String name = "David Johnson";
for (int i = age; i <= 65; i++){
retirementFund = recalculate(retirementFund,0.1);
}
double monthlyPension = retirementFund/yearsInRetirement/12;
System.out.println(name + " will have $" + monthlyPension
+ " per month for retirement.");
}
public static double recalculate(double fundAmount, double rate){
return fundAmount*(1+rate);
}
}
The output now, which should make you feel a little more optimistic about potential retirement, is David Johnson will have $1288.0283555362819 per month for retirement. It is also possible to reformat the string representation of that double to a more common two-decimal place number using a DecimalFormat class. That implementation isn’t important for this chapter, but you might find it interesting.
import java.text.DecimalFormat;
public class Errors {
public static void main(String[] args) {
int age = 30;
double retirementFund = 10000;
int yearsInRetirement = 20;
String name = "David Johnson";
for (int i = age; i <= 65; i++){
retirementFund = recalculate(retirementFund,0.1);
}
double monthlyPension = retirementFund/yearsInRetirement/12;
// create a decimal format with two decimal points
DecimalFormat df = new DecimalFormat ("0.##");
// use the df.format() method to format the double
System.out.println(name + " will have $" + df.format(monthlyPension)
+ " per month for retirement.");
}
public static double recalculate(double fundAmount, double rate){
return fundAmount*(1+rate);
}
}
PRECISION ROUNDING: BIGDECIMAL VS. DOUBLE
You’ve seen in this small example that the way doubles are rounded makes them inaccurate, especially when representing important decimal values, such as money. There are other classes that will not result in these rounding errors and should be used in real applications. BigDecimal would be a much better choice because it offers the developer complete control over how values are rounded. BigDecimal allows you to specify a scale, or a number of digits after the decimal point, and the rounding method to use to accomplish this scaling. To illustrate this, have a look at the same program written with BigDecimal instead of doubles. Remember how you needed to specify a decimal format to display your double value nicely. With BigDecimal, you can control the rounding at each calculation, so not only is it displayed nicely, but the actual value matches the nice string representation as well.
import java.math.BigDecimal;
public class Errors {
public static void main(String[] args) {
int age = 30;
BigDecimal retirementFund = new BigDecimal("10000.00");
// set the scale to 2 decimal points
// and the rounding to round up when the next digit is >= 5
retirementFund.setScale(2,BigDecimal.ROUND_HALF_UP);
BigDecimal yearsInRetirement = new BigDecimal("20.00");
String name = "David Johnson";
for (int i = age; i <= 65; i++){
retirementFund = recalculate(retirementFund,new
BigDecimal("0.10"));
}
BigDecimal monthlyPension = retirementFund.divide(
yearsInRetirement.multiply(new BigDecimal("12")));
System.out.println(name + " will have $" + monthlyPension
+ " per month for retirement.");
}
public static BigDecimal recalculate(BigDecimal fundAmount,
BigDecimal rate){
// use BigDecimal methods for arithmetic operations
return fundAmount.multiply(rate.add(new
BigDecimal("1.00")));
}
}
Actually, because BigDecimal is a class and its value is stored in an instance of the class, some of the problems with the method return type also disappear. You could change the recalculate() method so that it updates the value of the BigDecimal retirementFund instead of returning a BigDecimal.
import java.math.BigDecimal;
public class Errors {
public static void main(String[] args) {
int age = 30;
BigDecimal retirementFund = new BigDecimal("10000.00");
// set the scale to 2 decimal points
// and the rounding to round up when the next digit is >= 5
retirementFund.setScale(2,BigDecimal.ROUND_HALF_UP);
BigDecimal yearsInRetirement = new BigDecimal("20.00");
String name = "David Johnson";
for (int i = age; i <= 65; i++){
recalculate(retirementFund,new BigDecimal("0.10"));
}
BigDecimal monthlyPension = retirementFund.divide
(yearsInRetirement.multiply(new BigDecimal("12")));
System.out.println(name + " will have $" + monthlyPension
+ " per month for retirement.");
}
public static void recalculate(BigDecimal fundAmount,
BigDecimal rate){
// use BigDecimal methods for arithmetic operations
fundAmount.multiply(rate.add(new BigDecimal("1.00")));
}
}
EXCEPTIONS
In the previous section, three kinds of errors were discussed: syntax errors, runtime errors, and logical errors. These types have been discussed in a more general way as they occur in many settings outside of Java programming, though as you saw in the examples, they certainly apply to Java as well. Exceptions are more specific to programming as they are events that disrupt the execution of a program. Exceptions can be indications that something went wrong, and they can happen automatically as a result of something Java is unable to complete or can be explicitly thrown when certain conditions are met. In the following sections, you’ll be introduced to some common exceptions, and you’ll get to see how to handle them in your own programs.
Common Exceptions
There are some exceptions that occur often enough, not just with new programmers, but even with experienced developers. In this short section, you’ll get to see two in particular that come up all the time: null pointer exceptions and index out of bounds exceptions. There are explanations and examples that will help you recognize when, where, and why these exceptions might pop up in your programs.
Null pointer exceptions indicate that the program is trying to access an object that doesn’t exist yet. Before you can reference a primitive data type, like int, you need to initialize it, which is setting the value. If you forget to do this, Eclipse will warn you, like it did for other syntax errors. When you declare a variable of a composite data type, you are actually creating a pointer to an object. Now, if you declare a variable without assigning an object to point to, you are left with a pointer to null or, in other words, you are pointing at nothing. Then trying to access that variable’s object will likely result in a null pointer exception. Usually, if it’s obvious, Eclipse will complain about this, too. But it is possible that the references are not so straightforward and the problem is not a syntax error. In that case, you will encounter a null pointer exception. Consider the following examples, which illustrate these concepts.
public class ExceptionExamples {
public static void main(String[] args) {
Person employee;
printPerson(employee);
}
public static void printPerson(Person myPerson){
System.out.println(myPerson.name + " is " + myPerson.age + " years old.");
}
}
class Person{
String name;
int age;
Person (){
}
}
NOTE In some of these examples, you’ll notice that instance variables, name and age, of a Person object are accessed directly through the myPerson instance. In Chapter 4, encapsulation and information hiding principles were introduced, but you’ll see this in much more detail in Chapter 9. It is discouraged to access variables directly, but instead you should use accessor methods like getName() to return the person’s name. To keep the examples in this chapter simple, getter and setter methods are not included in every code example, but it is good practice to get in the habit of creating these methods to access fields.
When you try to reference employee in line 7, Eclipse displays an error reminding you that the variable employee has not been initialized. See Figure 6.7.
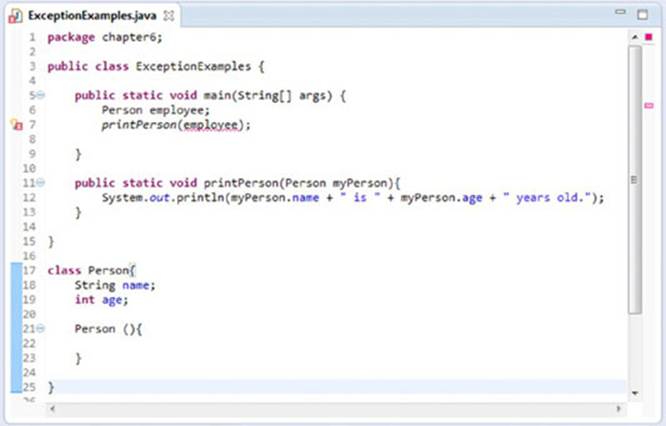
Figure 6.7
The suggestion offered to initialize the variable will change line 6 to Person employee = null; Of course, this will lead to a null pointer exception; you can see that just by reading the code. You can correct it by initializing a new Person object referenced by the employeevariable.
public class ExceptionExamples {
public static void main(String[] args) {
Person employee = new Person();
printPerson(employee);
}
public static void printPerson(Person myPerson){
System.out.println(myPerson.name + " is " + myPerson.age + " years old.");
}
}
class Person{
String name;
int age;
Person (){
}
}
You probably expect this to lead to a null pointer exception at line 12 now, because you never initialized the name or age of the Person object referenced by employee. However, if you run this code, the following line is output to the console: null is 0 years old. This is because Java will automatically initialize fields of an object to a default value, null for objects and 0 for int, and it is possible to print these values.
You might be wondering then, how a null pointer exception comes up, aside from actually initializing a variable to null. One way this can happen, shown in the following code, is when a second object type JobType is added and a Person object is assigned a JobTypeobject.
public class ExceptionExamples {
public static void main(String[] args) {
Person employee = new Person();
printPerson(employee);
}
public static void printPerson(Person myPerson){
System.out.println(myPerson.name + " is " + myPerson.age +
" years old and works as a " + myPerson.job.JobName);
}
}
class Person{
String name;
int age;
JobType job;
Person (){
}
}
class JobType{
String JobName;
int salaryBand;
JobType (){
}
}
Now when you try to run this code, you will receive a null pointer exception, as shown in Figure 6.8.
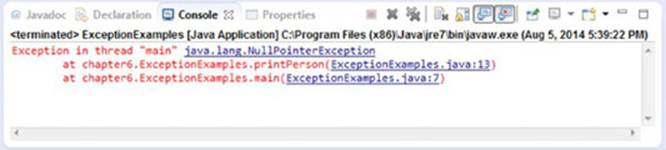
Figure 6.8
This looks very similar to the ArithmeticException you saw in the retirement fund examples. However, here, because you have more than just the main method, there is some further information about the location where the exception occurred. You can see from the first line the type of exception and that it occurred during the execution of the main method. After that, it’s easier to read from the bottom up to try to find the exact cause of the error. During the execution, there was an error at line 7, when the printPerson() method was called. The execution then jumps to the body of that method and the exception occurred during line 13 of the printPerson() method. In that line, the only reference was to myPerson.job.JobName, so you know that the job or JobName was never initialized for the Personobject referenced by myPerson. myPerson references employee from line 7.
One way to avoid this kind of situation is by requiring initialization as part of the constructor. Previously, you saw empty constructors for Person and JobType. This means that when you create a Person object, you do not specify a name, age, or job type. Depending on the system you are creating, there may be reasons to leave some of these empty when you create a new person. For example, if you create a Person object as soon as you start a job search, you may only know the job type. On the other hand, if you create a Person object as soon as someone applies to work at your company, you may only know their name and age, but not which job you will hire them for (if you hire them at all). However, if you create a Person object precisely when you hire a person for a specific job, you’ll have all three pieces of information at creation. This last situation is implemented here, where all the information is known and can be initialized in the constructor. In real applications, you may need more than one constructor to handle different cases, but if you leave some fields null, you will need to handle null pointer exceptions in other ways. To avoid this, you might decide to create a JobType for every case, including Interviewee for people who have not yet been hired or NewHire for new employees who have not been given a specificJobType. Alternatively, you could have a Boolean method hasJobType() check whether the Person already has a JobType assigned and handle these cases as needed.
public class ExceptionExamples {
public static void main(String[] args) {
JobType manager = new JobType("Manager", 6);
Person employee = new Person("Bob Little", 47, manager);
printPerson(employee);
}
public static void printPerson(Person myPerson){
System.out.println(myPerson.name + " is " + myPerson.age +
" years old and works as a " + myPerson.job.JobName);
}
}
class Person{
String name;
int age;
JobType job;
Person (String name, int age, JobType job){
this.name = name;
this.age = age;
this.job = job;
}
}
class JobType{
String JobName;
int salaryBand;
JobType (String name, int band){
JobName = name;
salaryBand = band;
}
}
Another common exception is index out of bounds. This occurs when you have an indexed object, such as an array, and you try to access an element outside the limits of the array. As you’ve already seen, arrays are indexed starting from 0, so the last element is one less than the size of the array. For example, an array of size 5 has elements indexed at 0, 1, 2, 3, and 4. It is important to consider this, for example, when looping through the elements of an array.
public class IndexExceptionExample {
public static void main(String[] args) {
int[] hoursWorked = {7,8,7,9,5};
int totalHours = 0;
for (int i = 0; i <= hoursWorked.length; i++){
totalHours += hoursWorked[i];
}
System.out.println("Total Hours = " + totalHours);
}
}
This simple program iterates through an array and adds the total number of hours from each element together. Then, the total is output to the console. If you try to run it, though, you will encounter an exception, as shown in Figure 6.9.

Figure 6.9
As before, you can track down the exception by the information shown in the error message. First, you can see that it is an ArrayIndexOutOfBoundsException. The index that’s out of bounds is 5, and it occurred in line 10 of the program. If you look at line 10, it is the last line of the for loop, so you know to check the iterator of the for loop. In the code, it was set to start from 0, the lower limit of the array’s index, and stop at hoursWorked.length, but the length is 5 and the index only goes to 4. Simply changing the termination condition to i < hoursWorked.length will stop the loop at 4 (since 4 is less than 5) and avoid an out of bounds exception.
public class IndexExceptionExample {
public static void main(String[] args) {
int[] hoursWorked = {7,8,7,9,5};
int totalHours = 0;
for (int i = 0; i < hoursWorked.length; i++){
totalHours += hoursWorked[i];
}
System.out.println("Total Hours = " + totalHours);
}
}
Two other common exceptions you might encounter are StackOverFlowError and OutOfMemoryError. These occur when the program you are running demands more memory than your machine allows for Java or your IDE. The stack is the part of your memory allocated for parameters and local variables. This can overflow when you are calling a method recursively or when two methods call each other. The heap is where objects are allocated in memory. Creating too many objects, often within an infinite loop, can quickly consume all the available memory. To see these kinds of errors for yourself, try running the following small applications.
import java.util.ArrayList;
public class EndlessLoop {
static ArrayList<String> myStrings = new ArrayList<String>();
public static void main(String[] args) {
for (int i = 0; i >= 0; i++) {
myStrings.add("String number: " + i);
}
}
}
Depending on your machine and settings, this will sooner or later throw a java.lang.OutOfMemoryError. The problem is the termination condition of the for loop. The iterator, int i, is initialized with a value of 0 and increments by 1 with each loop. The loop is supposed to terminate when the value of i goes below 0, but it will never reach this condition because it is increasing, not decreasing. This might be easy to spot here, but if your termination condition is dependent on a variable or method result, you might not immediately see where infinite looping is possible. If you encounter an OutOfMemoryError, take a look at object creation events, especially inside loops or recursive method calls.
public class EndlessMethodCall {
public static void main(String[] args) {
printMe();
}
public static void displayMe(){
printMe();
}
public static void printMe(){
displayMe();
}
}
Running this program will almost immediately cause a java.lang.StackOverflowError exception to be thrown. The two methods call each other back and forth without end. If you experience this kind of error, you should first look into method calls to see whether you’ve unintentionally created an infinite loop. A related problem occurs when a method calls itself, something referred to as recursion. Recursion is often a valuable tool, as long as there is an appropriate stopping condition to keep it from calling itself infinitely, or until an exception is thrown, of course.
It is impossible to cover every possible exception in this book, but with this foundation, you should be able to begin to deal with them appropriately. If you encounter other exceptions as you are programming, searching online for the name of the exception will help you understand why it is occurring. The techniques demonstrated in the next section will help you deal with all kinds of exceptions.
Catching Exceptions
Now that you’ve been introduced to the three main error categories and some common exceptions, it’s time to start learning how to handle them when you do encounter them. The first step is a new structure called a try/catch block. This essentially allows you to tryexecuting a piece of code to see if an exception is thrown. If none is thrown, the program will proceed normally, but if one is thrown, you can catch it and specifically indicate what should be done next. This prevents your program from crashing and at least allows you to recover some information before it terminates.
The general form of a try/catch block looks like this:
try {
// execute some statements
} catch (Exception exc){
// statements to handle the exception
} finally {
// no matter what, do this
}
NOTE While this book refers to these as try/catch blocks, there are in fact three separate components: try,catch, and finally blocks. You may encounter any of the following: a try block with (one or more) catch blocks; a try block with (one or more)catch blocks and a finally block; or, less commonly, a try block with only a finally block.
Now you can see how they are used by looking again at the retirement fund examples. Recall how you got a division by zero exception when you tried to divide an int retirementFund by another int yearsInRetirement, if the latter was given the value 0.
public class Errors {
public static void main(String[] args) {
int age = 30;
int retirementFund = 10000;
int yearsInRetirement = 0;
String name = "David Johnson";
for (int i = age; i <= 65; i++){
recalculate(retirementFund,0.1);
}
double monthlyPension = retirementFund/yearsInRetirement/12;
System.out.println(name + " will have $" + monthlyPension
+ " per month for retirement.");
}
public static void recalculate(double fundAmount, double rate){
fundAmount = fundAmount*(1+rate);
}
}
You could enclose the division and print statements inside a try block and add a catch block, like this:
try {
double monthlyPension = retirementFund/yearsInRetirement/12;
System.out.println(name + " will have $" + monthlyPension
+ " per month for retirement.");
} catch (ArithmeticException ae){
System.out.println(ae);
System.exit(0);
}
The division and print statements will be attempted, but if an ArithmeticException is thrown, the catch block will catch it. Then the exception will be printed and the program will be terminated. Of course, you may prefer that the program not be terminated, but continue. You can change the statements inside the catch block to accomplish this.
try {
double monthlyPension = retirementFund/yearsInRetirement/12;
System.out.println(name + " will have $" + monthlyPension
+ " per month for retirement.");
} catch (ArithmeticException ae){
System.out.println("Years in retirement should not be 0." +
"Default value is 20 years.");
double monthlyPension = retirementFund/20/12;
System.out.println(name + " will have $" + monthlyPension
+ " per month for retirement.");
}
Now if you run the program, it will try the original calculation, throw a division by 0 exception, catch the exception in the catch block, and calculate the monthly pension using another non-zero value. This way, the program can execute fully.
You’ll notice though, that the catch block was designed here to catch only exceptions of the ArithmeticException type. You might have more than one exception type that must be handled. In older versions of Java, you had two choices: create a separate catch block for each type of exception or catch all exceptions (or even all throwables, which include errors and exceptions, though this is not advised) in one generic catch block. Since Java 7, you can catch more than one specific type of exception in a single catch block.
try {
double monthlyPension = retirementFund/yearsInRetirement/12;
System.out.println(name + " will have $" + monthlyPension
+ " per month for retirement.");
} catch (ArithmeticException|NullPointerException exc){
System.out.println("Fields should not be null.");
System.out.println("Years in retirement should not be 0." +
"Default value is 20 years.");
double monthlyPension = retirementFund/20/12;
System.out.println(name + " will have $" + monthlyPension
+ " per month for retirement.");
}
You can see that if either of the specified exceptions is caught, the response in the catch block is the same. In this particular case, you probably would prefer not to do this, since a null pointer exception does not mean that the yearsInRetirement needs to be overwritten by the default value. Therefore, it makes more sense to separate the two exceptions into two separate catch blocks.
try {
double monthlyPension = retirementFund/yearsInRetirement/12;
System.out.println(name + " will have $" + monthlyPension
+ " per month for retirement.");
} catch (ArithmeticException ae){
System.out.println("Years in retirement should not be 0." +
"Default value is 20 years.");
double monthlyPension = retirementFund/20/12;
System.out.println(name + " will have $" + monthlyPension
+ " per month for retirement.");
} catch (NullPointerException np){
System.out.println("Fields should not be null.");
System.exit(0);
}
Alternatively, you can also use a very generic catch block to catch all throwables, both errors and exceptions. In practice, it is better to be as specific as possible, so that you have the best chance at properly handling any foreseeable exceptions.
try {
double monthlyPension = retirementFund/yearsInRetirement/12;
System.out.println(name + " will have $" + monthlyPension
+ " per month for retirement.");
} catch (Throwable thrown){
System.out.println(thrown);
System.exit(0);
}
Thus far, you haven’t seen the finally block in action. A finally block includes the statements you want to execute regardless of the outcome of the try block. When you try something, if it throws an exception or not, you still want to make sure certain things are done. You could do this by adding these statements to both the try and catch blocks, because that would mean they are executed in either case. However, as you’ve seen so far, it’s best to avoid duplicate code for readability and maintainability later. Therefore, it’s better to use a finally block for this. You should note that a System.exit() call will always immediately terminate the program and, in this case, the finally block, or anything after the exit call, would not be executed.
try {
double monthlyPension = retirementFund/yearsInRetirement/12;
System.out.println(name + " will have $" + monthlyPension
+ " per month for retirement.");
} catch (ArithmeticException ae){
System.out.println("Years in retirement should not be 0." +
"Default value is 20 years.");
double monthlyPension = retirementFund/20/12;
System.out.println(name + " will have $" + monthlyPension
+ " per month for retirement.");
} catch (NullPointerException np){
System.out.println("Fields should not be null.");
System.exit(0);
} finally {
System.out.println("Finally was reached. ");
}
In this example, if the monthlyPension calculation succeeds without any exception, then Finally was reached. will be printed to the console. If the monthlyPension calculation throws an ArithmeticExeption, the Finally was reached. will still be printed to the console. If the calculation throws a NullPointerException, the program will terminate and Finally was reached. will not be printed. The last case, which perhaps was not considered, is if an exception is thrown but not one of the ones in the catch blocks, say anIndexOutOfBoundsException. Then the exception will be thrown, Finally was reached. will be printed to the console, and the unhandled exception will cause the program to crash.
You will see finally blocks commonly used to ensure that resources, like databases, are closed whether the update was successful or not. A feature added in Java 7, however, makes this even easier. The so-called try-with-resources block automatically ensures the resources are closed without the need for a finally block. You will see more in-depth examples in the chapter on input and output, but a short example is provided here to demonstrate the similarities and differences with more traditional try-catch-finally blocks.
Some concepts haven’t been covered quite yet, but it is sufficient to know that Scanner objects can be used to scan simple text and parse primitive types or strings. Here it is scanning System.in, which includes user input to the console. The nextInt() and nextDouble()methods parse ints and doubles from the text entered by the user. If a user enters the character 5, the nextInt() method will parse an int with value 5. If a user enters the word employee, this cannot be parsed using the nextInt() method and an InputMismatchExceptionwill be thrown.
First, look at how this was done using try and finally blocks.
import java.text.DecimalFormat;
import java.util.Scanner;
public class Resources {
Scanner scan = new Scanner(System.in);
public static void main(String[] args) {
try {
System.out.print("Enter the loan amount: ");
double principle = scan.nextDouble();
System.out.print("Enter the interest rate: ");
double rate = scan.nextDouble();
System.out.print("Enter the loan term (in years): ");
double years = scan.nextInt();
double interest = principle*rate*years;
double total = principle + interest;
double payment = total/years/12;
DecimalFormat df = new DecimalFormat ("0.##");
System.out.println("Monthly payment: $"
+ df.format(payment));
} catch (Exception exc){
System.out.println(exc);
} finally {
scan.close();
}
}
}
Note that in order for the scan object to be accessible in both the try and finally blocks, it must be declared outside either block. Now look at the try-with-resources block.
import java.text.DecimalFormat;
import java.util.Scanner;
public class Resources {
public static void main(String[] args) {
try (Scanner scan = new Scanner(System.in)){
System.out.print("Enter the loan amount: ");
double principle = scan.nextDouble();
System.out.print("Enter the interest rate: ");
double rate = scan.nextDouble();
System.out.print("Enter the loan term (in years): ");
double years = scan.nextInt();
double interest = principle*rate*years;
double total = principle + interest;
double payment = total/years/12;
DecimalFormat df = new DecimalFormat ("0.##");
System.out.println("Monthly payment: $"
+ df.format(payment));
} catch (Exception exc){
System.out.println(exc);
}
}
}
By adding the declaration and initialization directly to the try block, the resource will automatically be closed no matter how the rest of the try block completes (with or without exception). Imagine you come back to this code later and decide to change the System.inscanner to some other user interface. Simply by changing the resource in the try clause, you are assured that it will be closed correctly. You can also declare more than one resource, if necessary, simply by separating the resources with a semicolon. You will see many more examples of this in Chapter 8, where the different tools available for reading and writing will be explained fully.
In Java, there are two types of exceptions: checked and unchecked. Specifically, the Exception class has a subclass called runtime exceptions. Runtime exceptions and any subclasses are unchecked, while all other types of exceptions are checked. Java requires that checked exceptions be handled, and you will see this indicated with an error alert in Eclipse or other compilers. Eclipse offers two possible solutions: declare that the method might throw a particular type of exception or enclose particular statements in a try/catchdesigned to handle those exceptions. If you simply add a throws declaration, you are not handling the exception in any way; you are simply alerting anyone who might call this method that an exception is possible. In order to handle the exceptions, you should use atry/catch block. In your main method, the try/catch solution is certainly appropriate. In other methods, it might be suitable to add the throws declaration and then handle the exception (with a try/catch block) in the main or other method that calls this method.
In order to demonstrate how this works, consider the next example.
import java.text.DecimalFormat;
import java.util.InputMismatchException;
import java.util.Scanner;
public class ThrowsExceptions {
public static void main(String[] args) {
try {
// store the double[] returned by the scanValues() method
double[] userValues = scanValues();
// store the double returned by the calculatePayment() method
double payment = calculatePayment(userValues);
// create a decimal format with two places after the decimal point
DecimalFormat df = new DecimalFormat("0.##");
// print the calculated payment according to the format above
System.out.println("Monthly payment: $" + df.format(payment));
} catch (InputMismatchException ime) {
// scanValues() method throws InputMismatchException
// if user's entry cannot be parsed into a double
System.out.println("You must enter double values. "
+ "Please restart program.");
// terminate the program
System.exit(0);
} catch (ArithmeticException ae) {
// calculatePayment() method throws ArithmeticException
// if years == 0
System.out.println("Years must be greater than 0. "
+ "Please restart program.");
// terminate the program
System.exit(0);
} catch (IndexOutOfBoundsException ioob) {
// calculatePayment() method throws IndexOutOfBoundsException
// if double[] has less than 3 elements
System.out.println("Three doubles are required. "
+ "Please restart program.");
// terminate the program
System.exit(0);
}
}
// method asks for and scans three doubles:
// principle, interest rate, and loan years
public static double[] scanValues() throws InputMismatchException {
double[] values = new double[3];
try (Scanner scan = new Scanner(System.in)) {
System.out.print("Enter the loan amount: ");
values[0] = scan.nextDouble();
System.out.print("Enter the interest rate: ");
values[1] = scan.nextDouble();
System.out.print("Enter the loan term (in years): ");
values[2] = scan.nextInt();
}
return values;
}
// method takes a double[] with three elements
// and calculates a monthly payment
public static double calculatePayment(double[] values)
throws ArithmeticException, IndexOutOfBoundsException {
double principle = values[0];
double rate = values[1];
double years = values[2];
double interest = principle * rate * years;
double total = principle + interest;
return total / years / 12;
}
}
In this example, there are three methods: main(), scanValues(), and calculatePayment(), but together they accomplish the same goal as the previous example. You can see how the throws declaration in the “lower” methods warns that there are possible exceptions, but any exception is not handled directly there in the method. An exception will be thrown and caught “higher up” the chain, in the main method, where it is handled by the appropriate catch block.
This is also where you might encounter try blocks without catch blocks. When a method throws an exception (to be caught higher up), it will interrupt the execution of the method. Therefore, you may need a finally block to take care of things, like open resources, before exiting the method. Consider just the previous scanValues() method. You can see that there are no catch blocks, so you might use a try/finally here instead of the try with resources. Any exception will be thrown up, but the scanner will be closed in the finallyblock before exiting.
// method asks for and scans three doubles:
// principle, interest rate, and loan years
public static double[] scanValues() throws InputMismatchException {
double[] values = new double[3];
Scanner scan = new Scanner(System.in);
try {
System.out.print("Enter the loan amount: ");
values[0] = scan.nextDouble();
System.out.print("Enter the interest rate: ");
values[1] = scan.nextDouble();
System.out.print("Enter the loan term (in years): ");
values[2] = scan.nextInt();
} finally {
scan.close();
}
return values;
}
DEBUGGING YOUR APPLICATIONS
In the previous section, you debugged a small program while you learned about the kinds of errors, or bugs, that you will encounter. One technique you saw was using System.out.println() messages to see what was happening at different points in your program. This is still used a lot, as a quick-and-dirty approach to debugging. But it is not ideal for a number of reasons. For one, it’s not particularly elegant to fill up your code with print statements. It can be messy and you will not only have to add them in all the places you want to investigate, but you’ll also have to carefully remove them afterward. Other debugging approaches offer more flexibility and functionality. In this section, you’ll see and use debugger and logger tools to debug better.
Using a Debugger Tool
In the first part of this chapter, you learned about different kinds of errors or bugs. Because the example problems were small, it was relatively easy to spot the bugs yourself. As your applications grow, it may become difficult to track down each bug just by looking through the code and outputs, and even the error messages may not shed sufficient light on the problem. Eclipse and other development environments offer debugging tools to support this process. Essentially, a debugger allows you, the programmer, to execute a program step-by-step to see exactly what’s happening at each line.
In order to control the debugging process, you need to set breakpoints on particular lines of code. When the program hits a breakpoint while running in debug mode, the execution will pause so you can review the current state of the program and the value of the variables at this point in time. You can then continue to the next breakpoint. This allows you to see exactly where something goes wrong.
To illustrate the process of debugging using the debugger tool, start from the small retirement fund program you saw earlier:
public class Errors {
public static void main(String[] args) {
int age = 30;
double retirementFund = 10000;
int yearsInRetirement = 20;
String name = "David Johnson";
for (int i = age; i <= 65; i++){
recalculate(retirementFund,0.1);
}
double monthlyPension = retirementFund/yearsInRetirement/12;
System.out.println(name + " will have $" + monthlyPension
+ " per month for retirement.");
}
public static void recalculate(double fundAmount, double rate){
fundAmount = fundAmount*(1+rate);
}
}
Recall that when running the program at this stage, the result was much lower than expected. You would like to find the bug and you’ve narrowed it down to two possibilities. The actual recalculate method might be programmed wrong or the for loop might not be using the method correctly. Therefore, you can place a breakpoint in each place to see what’s happening there.
To place a breakpoint, move your cursor to the left of the line number you’re interested in. You can either double-click there or right-click and select Toggle Breakpoint. You should see a small dot appear next to the line number, as shown in Figure 6.10.
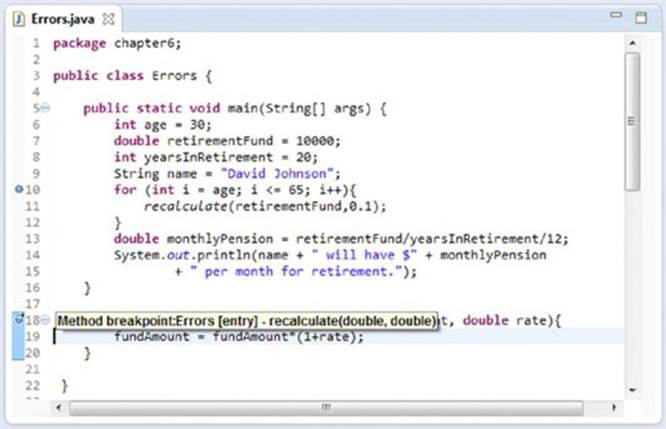
Figure 6.10
Once your breakpoints are set, all you need to do is open the debug perspective. There are several ways to do this:
1. Click the Bug icon.
2. Click Run and then select Debug.
3. Right-click on the .java file in the navigator, select Debug As, then Java application.
4. Press F11 on your keyboard.
Eclipse will ask if you would like to switch to the Debug perspective. Select Yes and your layout will change. See Figure 6.11.
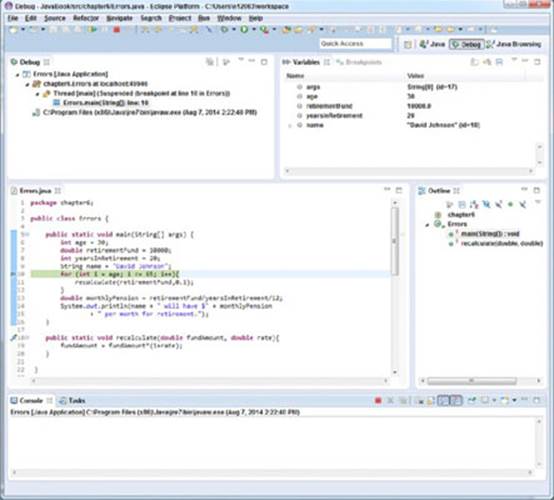
Figure 6.11
You will still see the Errors class and the outline and console look the same as the normal Java perspective. In addition, you will see at the top the Debug window and the names and values of the variables in your program. One thing to keep in mind is that the variables displayed depend on the method your program is currently inside and how much of that method has already been executed, so you can see the variables from the main method until just before the for loop, since this is your first breakpoint.
The program is paused here, waiting for your instructions. To control the execution, you can use the buttons built into Eclipse or the F5–F8 keys on your keyboard.
· Step Into (F5): Executes the current line and moves to the next line. Moves through the program step-by-step.
· Step Over (F6): Executes the current method without showing each step in the debugger tool. Lets the subroutines run in the background, but keeps the debugger in the main routine.
· Step Return (F7): Finishes executing the current method in the background and returns to the main routine.
· Resume (F8): Executes everything until the next breakpoint or the end of the program if there are no further breakpoints. Does not show everything step-by-step.
All of these have buttons in the program as well. You can find them at the top of the screen. See Figure 6.12.

Figure 6.12
For this small example, Step Into (F5) is fine to move through each step and check what is happening to the variables. Watch the variables change as you step into the for loop. First, the variable i (the iterator of the for loop) is added to the list and takes the value 30(from the age variable). This is exactly what you should expect. See Figure 6.13.
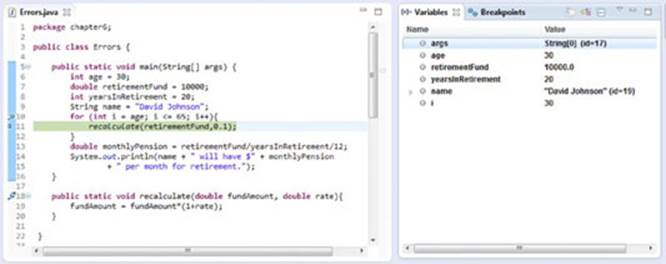
Figure 6.13
Next, the program steps into the recalculate method and the variables associated with the method are displayed: fundAmount = 10000 and rate = 0.1. See Figure 6.14.
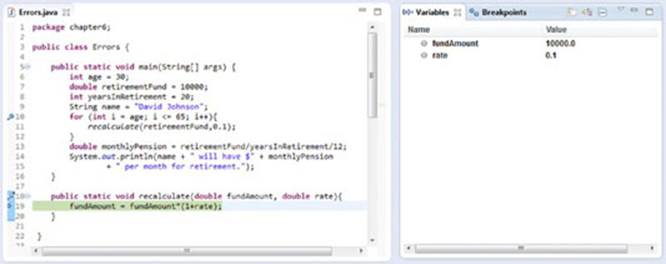
Figure 6.14
Notice in Figure 6.15 how a variable is highlighted in yellow when its value changes. After the method body is executed, the result is fundAmount = 11000, just as you would expect for a 10% increase.
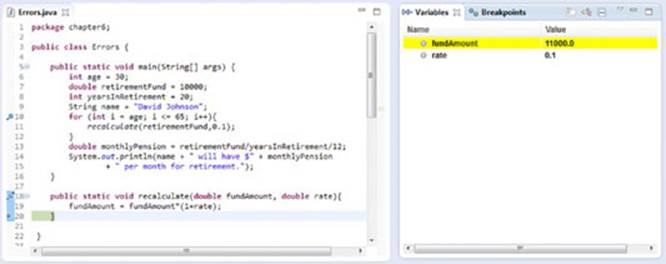
Figure 6.15
Next, the program returns to the for loop and you can watch the iterator i increase to 31. See Figure 6.16.
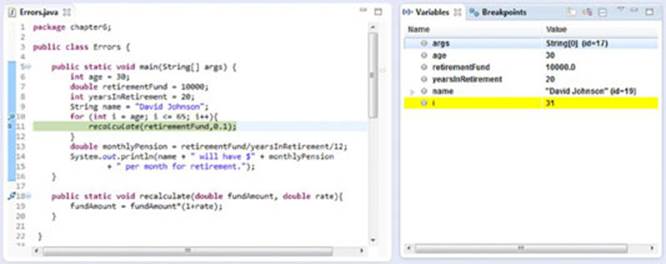
Figure 6.16
When you step into the recalculate method again, fundAmount is back to its original 10000, as shown in Figure 6.17.
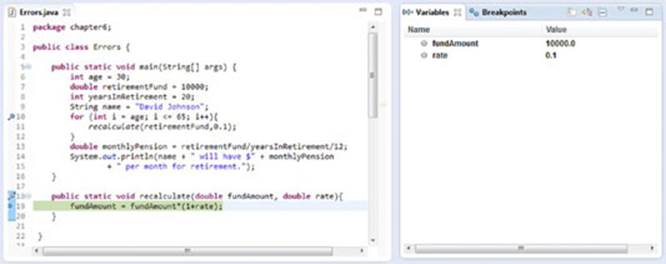
Figure 6.17
So now you can see that the newly calculated fundAmount is not being stored anywhere after the recalculate method is exited. This leads to the same conclusion as before, that the method should return a value, and the main method should reuse the returned value.
Using a Logging API
An alternative approach to debugging is using a logger to create log messages about the execution of your program. There is a built-in logging API in the java.util.logging package, which you will see here, but there are also several popular external APIs built for logging that you can try on your own. Logging allows you to check what’s happening while you’re developing, but it also offers a way to continue to monitor a program that’s in use. You can configure your logger to log on different levels, to output to places other than the console, and to customize the output to whatever is most useful for the application.
There are eight predefined logging levels: Off, Finest, Finer, Fine, Config, Info, Warning, and Severe. As the name suggests, the Off level indicates no logging at all. The Finest level is designed for development and testing and logs the most messages. This is not appropriate for live applications, as the speed slows considerably with this amount of logging. As you move up through the levels, fewer and fewer messages are logged. The Finer and Fine levels offer less detailed messages. Info logs messages that give information about what is happening in the program, including connections and messages. The Warning level logs messages that indicate problems, while the Severe level only logs those most concerning problems that indicate a failure. The benefit of all these levels is that you can set up logging and then adjust the level depending on the types of messages you need or want to see, without making any changes to your program. The levels are organized numerically and messages are similarly scored numerically. In this way, a message with an importance value of 3 will be logged in any level 3 or higher.
There are two main components to a logging system: a logger and a handler. The logger picks up messages and checks the level of the message against the logging level in place. If the message seems to fit the level (or above), the logger will use a filter to determine for sure if the message should be logged. If it passes this more strict filter, the message is sent to the handler. The handler may also use a filter to check the message and a formatter to format the record as it should be written.
The process of logging is designed to offer flexibility, and for that reason, there are a lot of possibilities in how you set up and use your logger. This section only begins to scratch the surface, so that you can add a basic logger to your program and access the log messages. To begin logging, you should create a logger instance, using the getLogger() method, in each class you wish to log. Typically, this should be static and final, indicating that one single logger will be used for all instances of the class and it will remain unchanged. The logger will automatically include a default console handler that will print messages to the console. You can create additional handlers yourself. If you want your log files to be saved to a text file somewhere, you can create your own file handler.
Once your logger and handlers are created, you should create a special method that will essentially set them up for use. In the example, this is called method logIt(), but you can change the name. Inside this method, you should instantiate the file handlers with the path and name of the file where you would like to save the log messages. Because IOExceptions are checked exceptions, you need to put these in a try/catch block to handle the error. Next, you can set the formatter and level for each handler, attach the handlers to the logger, and set the level of the logger. Both the logger and the handlers can be independently set to their own level. However, if the logger is higher than the handler level, the handler level will effectively be at the logger’s level, because no lower level messages will be generated by the logger. In the example, you see two handlers for the same logger. This allows more messages to be output to one file while fewer (more important) messages are output to another file.
Now you are ready to use the logger in your main and other methods. You can call methods from the Logger class to log the information you’re interested in. The entire list of methods can be found in the Logger class documentation, but some of the methods you will see are listed here. Each method also has several parameter choices you can make that impact the results of the log.
· entering(): Log a method entry.
· exiting(): Log a method return.
· log(): Log a custom message.
The example is based on the retirement fund program you’ve been working with. There are now log messages indicating when the recalculate method is entered and exited, as well as the value of the fundAmount variable each time it is calculated. Finally, a log message is created if the value is extremely low, indicating something is wrong with the calculation. And at the end of the main method, several messages are logged at each level to demonstrate which ones are written by each handler.
import java.io.IOException;
import java.util.logging.*;
public class LoggerExample {
// create a Logger instance
private final static Logger logger =
Logger.getLogger(LoggerExample.class.getName());
// create a file handler for fine messages and above
private static FileHandler finerhandler = null;
// create a file handler only for config messages and above
private static FileHandler warninghandler = null;
public static void logIt() {
try {
finerhandler = new FileHandler("src/loggerExample_finer.log", false);
warninghandler = new FileHandler("src/loggerExample_config.log",false);
} catch (SecurityException | IOException e) {
e.printStackTrace();
}
// attach a basic formatter and set the level
finerhandler.setFormatter(new SimpleFormatter());
//this handler will print all messages to its log
finerhandler.setLevel(Level.FINER);
// attach a basic formatter and set the level
warninghandler.setFormatter(new SimpleFormatter());
//this handler will only print warning and severe messages to its log
warninghandler.setLevel(Level.CONFIG);
// attach the handler
logger.addHandler(finerhandler);
logger.addHandler(warninghandler);
// set the level to FINEST
// (log ALL messages)
logger.setLevel(Level.FINER);
}
public static void main(String[] args) {
// set up the logger using the logIt() static method above
// without this, only the default console handler will log
// with this, the handlers created above will log
LoggerExample.logIt();
int age = 60;
double retirementFund = 10000;
int yearsInRetirement = 20;
String name = "David Johnson";
for (int i = age; i <= 65; i++) {
recalculate(retirementFund, 0.1);
}
double monthlyPension = retirementFund / yearsInRetirement / 12;
System.out.println(name + " will have $" + monthlyPension
+ " per month for retirement.");
if (monthlyPension < 100) {
// create a log entry (level: SEVERE) indicating a
// problem with the calculation
logger.log(Level.SEVERE, "monthlyPension is too low.");
}
// create a series of log entries to show which
// levels are printed to which handler's log
logger.log(Level.FINEST, "finest detailed message");
logger.log(Level.FINER, "finer detailed message");
logger.log(Level.FINE, "fine detailed message");
logger.log(Level.CONFIG, "configuration message");
logger.log(Level.INFO, "informational message");
logger.log(Level.WARNING, "warning message");
logger.log(Level.SEVERE, "severe message");
}
public static void recalculate(double fundAmount, double rate) {
// create a log entry (level: FINER) indicating the method entry
logger.entering("LoggerExample","recalculate");
fundAmount = fundAmount * (1 + rate);
// create a log entry (level: INFO) indicating
// the current value of fundAmount
logger.log(Level.INFO, "fundAmount = " + fundAmount);
// create a log entry (level: FINER) indicating the method return
logger.exiting("LoggerExample", "recalculate");
}
}
The contents of the finer log file look like this:
Aug 12, 2014 5:54:43 PM LoggerExample recalculate
FINER: ENTRY
Aug 12, 2014 5:54:43 PM chapter6.LoggerExample recalculate
INFO: fundAmount = 11000.0
Aug 12, 2014 5:54:43 PM LoggerExample recalculate
FINER: RETURN
Aug 12, 2014 5:54:43 PM LoggerExample recalculate
FINER: ENTRY
Aug 12, 2014 5:54:43 PM chapter6.LoggerExample recalculate
INFO: fundAmount = 11000.0
Aug 12, 2014 5:54:43 PM LoggerExample recalculate
FINER: RETURN
Aug 12, 2014 5:54:43 PM LoggerExample recalculate
FINER: ENTRY
Aug 12, 2014 5:54:43 PM chapter6.LoggerExample recalculate
INFO: fundAmount = 11000.0
Aug 12, 2014 5:54:43 PM LoggerExample recalculate
FINER: RETURN
Aug 12, 2014 5:54:43 PM LoggerExample recalculate
FINER: ENTRY
Aug 12, 2014 5:54:43 PM chapter6.LoggerExample recalculate
INFO: fundAmount = 11000.0
Aug 12, 2014 5:54:43 PM LoggerExample recalculate
FINER: RETURN
Aug 12, 2014 5:54:43 PM LoggerExample recalculate
FINER: ENTRY
Aug 12, 2014 5:54:43 PM chapter6.LoggerExample recalculate
INFO: fundAmount = 11000.0
Aug 12, 2014 5:54:43 PM LoggerExample recalculate
FINER: RETURN
Aug 12, 2014 5:54:43 PM LoggerExample recalculate
FINER: ENTRY
Aug 12, 2014 5:54:43 PM chapter6.LoggerExample recalculate
INFO: fundAmount = 11000.0
Aug 12, 2014 5:54:43 PM LoggerExample recalculate
FINER: RETURN
Aug 12, 2014 5:54:43 PM chapter6.LoggerExample main
SEVERE: monthlyPension is too low.
Aug 12, 2014 5:54:43 PM chapter6.LoggerExample main
FINER: finer detailed message
Aug 12, 2014 5:54:43 PM chapter6.LoggerExample main
FINE: fine detailed message
Aug 12, 2014 5:54:43 PM chapter6.LoggerExample main
CONFIG: configuration message
Aug 12, 2014 5:54:43 PM chapter6.LoggerExample main
INFO: informational message
Aug 12, 2014 5:54:43 PM chapter6.LoggerExample main
WARNING: warning message
Aug 12, 2014 5:54:43 PM chapter6.LoggerExample main
SEVERE: severe message
The contents of the config log file look like this:
Aug 12, 2014 5:54:43 PM chapter6.LoggerExample recalculate
INFO: fundAmount = 11000.0
Aug 12, 2014 5:54:43 PM chapter6.LoggerExample recalculate
INFO: fundAmount = 11000.0
Aug 12, 2014 5:54:43 PM chapter6.LoggerExample recalculate
INFO: fundAmount = 11000.0
Aug 12, 2014 5:54:43 PM chapter6.LoggerExample recalculate
INFO: fundAmount = 11000.0
Aug 12, 2014 5:54:43 PM chapter6.LoggerExample recalculate
INFO: fundAmount = 11000.0
Aug 12, 2014 5:54:43 PM chapter6.LoggerExample recalculate
INFO: fundAmount = 11000.0
Aug 12, 2014 5:54:43 PM chapter6.LoggerExample main
SEVERE: monthlyPension is too low.
Aug 12, 2014 5:54:43 PM chapter6.LoggerExample main
CONFIG: configuration message
Aug 12, 2014 5:54:43 PM chapter6.LoggerExample main
INFO: informational message
Aug 12, 2014 5:54:43 PM chapter6.LoggerExample main
WARNING: warning message
Aug 12, 2014 5:54:43 PM chapter6.LoggerExample main
SEVERE: severe message
Naturally, there are many more messages in the finer log file, because it includes more levels (particularly, the entering and exiting messages, which are defined as finer level messages). Also, note that neither log contains the “finest detailed message” from the mainmethod. This is too low level for the finer logger to log. You can see again here that the fundAmount is 11000 every time the method is called, again suggesting that the value is not being stored and used in future calculations. But you can see for sure that the method is being entered and exited as expected. This leads to the same conclusion (and fix) as before, but logging allows ongoing monitoring of live applications. Simply by increasing the level of the logger, you can control how many and what types of messages are logged.
So far, you’ve only seen the built-in logger, but Log4j is a popular alternative logger. The Log4j utility has been in use for 15 years, but Apache Log4j 2 was released in 2014. It offers high performance, flexibility, and usability, and is well worth your consideration when deciding on a logging utility. You can download Log4j 2 at http://logging.apache.org/log4j/2.x/index.html.
Log4j has different levels defined than the ones used by the built-in logger. TRACE is the most detailed level, followed by DEBUG, INFO, WARN, ERROR, and FATAL, which is the least detailed level. There is also OFF to turn off logging. The methods differ from the built-in logger as well. In the previous example, you saw:
logger.log(Level.INFO, "informational message");
With Log4j, you would write:
logger.info("informational message");
To demonstrate the use of Log4j and compare it to the built-in logger, this next Try It Out repeats the previous example.
TRY IT OUT Logging with Apache Log4j 2
In this exercise, you’ll set up logging in a small program using Apache’s Log4j 2 logging utility.
1. Download the Apache Log4j 2 from the Apache website.
2. Attach two .jar files to the build path of the project you’re working in: log4j-api-2.0.1.jar and log4j-core-2.0.1.jar.
3. Create a new class called ApacheLogging.
4. Import the logger and LogManager from Log4j and create a new logger object for the class.
5. import org.apache.logging.log4j.Logger;
6. import org.apache.logging.log4j.LogManager;
7.
8. public class ApacheLogging {
9.
10. static final Logger log = LogManager.getLogger(ApacheLogging.class.getName());
11.
}
12. Add two methods, main and recalculate, similar to the previous example, but without the logging for now.
13. public static void main(String[] args) {
14. int age = 60;
15. double retirementFund = 10000;
16. int yearsInRetirement = 20;
17. String name = "David Johnson";
18. for (int i = age; i <= 65; i++) {
19. recalculate(retirementFund, 0.1);
20. }
21. double monthlyPension = retirementFund / yearsInRetirement / 12;
22. System.out.println(name + " will have $" + monthlyPension
23. + " per month for retirement.");
24. if (monthlyPension < 100) {
25. System.out.println("monthlyPension is too low.");
26. }
27. }
28.
29. public static void recalculate(double fundAmount, double rate) {
30. fundAmount = fundAmount * (1 + rate);
}
31.Now, replace the System.out.println() statement with a log message: logger.fatal("monthlyPension is too low.");
32. Next, add some messages to test the different levels of the logger at the end of the main method.
33. log.trace("finely detailed TRACE message");
34. log.debug("detailed DEBUG message");
35. log.info("informational message");
36. log.warn("warning message");
37. log.error("error message");
log.fatal("fatal message");
38. Finally, add log messages to the recalculate() method.
39. log.entry();
40. fundAmount = fundAmount * (1 + rate);
41. log.info("fundAmount = " + fundAmount);
log.exit();
42. Your class should now look like this:
43. import org.apache.logging.log4j.Logger;
44. import org.apache.logging.log4j.LogManager;
45.
46. public class ApacheLogging {
47.
48. static final Logger log = LogManager.getLogger(ApacheLogging.class.getName());
49.
50. public static void main(String[] args) {
51. int age = 60;
52. double retirementFund = 10000;
53. int yearsInRetirement = 20;
54. String name = "David Johnson";
55. for (int i = age; i <= 65; i++) {
56. recalculate(retirementFund, 0.1);
57. }
58. double monthlyPension = retirementFund / yearsInRetirement / 12;
59. System.out.println(name + " will have $" + monthlyPension
60. + " per month for retirement.");
61. if (monthlyPension < 100) {
62. log.fatal("monthlyPension is too low");
63. }
64.
65. // create a series of log entries to show which
66. // levels are printed to which handler's log
67. log.trace("finely detailed TRACE message");
68. log.debug("detailed DEBUG message");
69. log.info("informational message");
70. log.warn("warning message");
71. log.error("error message");
72. log.fatal("fatal message");
73. }
74.
75. public static void recalculate(double fundAmount, double rate) {
76. log.entry();
77. fundAmount = fundAmount * (1 + rate);
78. log.info("fundAmount = " + fundAmount);
79. log.exit();
80. }
}
81. Run your program. Your output should look like this:
82. David Johnson will have $41.666666666666664 per month for retirement.
83. 13:39:10.511 [main] FATAL chapter6.ApacheLogging - monthlyPension is too low
84. 13:39:10.514 [main] ERROR chapter6.ApacheLogging - error message
13:39:10.514 [main] FATAL chapter6.ApacheLogging - fatal message
85.You only see these log messages because the default log level is set to Error. You can of course adjust this, and many other settings. In Log4j, this is done using an .xml configuration file.
86. Create your configuration file by opening a new text file and copying the following .xml code into it:
87. <?xml version="1.0" encoding="UTF-8"?>
88. <Configuration status="WARN">
89. <Appenders>
90. <Console name="Console" target="SYSTEM_OUT">
91. <PatternLayout pattern="%d{HH:mm:ss.SSS} [%t] %-5level %logger{36} - %msg%n"/>
92. </Console>
93. </Appenders>
94. <Loggers>
95. <Root level="error">
96. <AppenderRef ref="Console"/>
97. </Root>
98. </Loggers>
</Configuration>
99.This code essentially sets the configuration file according to the default configuration. Save the file as :Log4j2.xml and place it in the src folder for your project. Here you can change the root level and output destination.
100. First, change <Root level="error"> to <Root level="trace">. Run your program and you’ll see all the error messages output to the console.
101. 14:18:30.719 [main] TRACE chapter6.ApacheLogging - entry
102. 14:18:30.720 [main] INFO chapter6.ApacheLogging - fundAmount = 11000.0
103. 14:18:30.720 [main] TRACE chapter6.ApacheLogging - exit
104. 14:18:30.720 [main] TRACE chapter6.ApacheLogging - entry
105. 14:18:30.720 [main] INFO chapter6.ApacheLogging - fundAmount = 11000.0
106. 14:18:30.720 [main] TRACE chapter6.ApacheLogging - exit
107. 14:18:30.720 [main] TRACE chapter6.ApacheLogging - entry
108. 14:18:30.720 [main] INFO chapter6.ApacheLogging - fundAmount = 11000.0
109. 14:18:30.720 [main] TRACE chapter6.ApacheLogging - exit
110. 14:18:30.720 [main] TRACE chapter6.ApacheLogging - entry
111. 14:18:30.720 [main] INFO chapter6.ApacheLogging - fundAmount = 11000.0
112. 14:18:30.720 [main] TRACE chapter6.ApacheLogging - exit
113. 14:18:30.720 [main] TRACE chapter6.ApacheLogging - entry
114. 14:18:30.720 [main] INFO chapter6.ApacheLogging - fundAmount = 11000.0
115. 14:18:30.720 [main] TRACE chapter6.ApacheLogging - exit
116. 14:18:30.720 [main] TRACE chapter6.ApacheLogging - entry
117. 14:18:30.720 [main] INFO chapter6.ApacheLogging - fundAmount = 11000.0
118. 14:18:30.720 [main] TRACE chapter6.ApacheLogging - exit
119. David Johnson will have $41.666666666666664 per month for retirement.
120. 14:18:30.720 [main] FATAL chapter6.ApacheLogging - monthlyPension is too low
121. 14:18:30.720 [main] TRACE chapter6.ApacheLogging - finely detailed TRACE message
122. 14:18:30.721 [main] DEBUG chapter6.ApacheLogging - detailed DEBUG message
123. 14:18:30.721 [main] INFO chapter6.ApacheLogging - informational message
124. 14:18:30.721 [main] WARN chapter6.ApacheLogging - warning message
125. 14:18:30.721 [main] ERROR chapter6.ApacheLogging - error message
14:18:30.721 [main] FATAL chapter6.ApacheLogging - fatal message
126. Remember how you set up file handlers at different levels and with different output files in the previous example? You can do the same thing here, in the configuration file, by adding and editing appenders, files, and loggers. In the configuration file, under </Console>, add two new files to the appenders section. In the code here, ApacheLog-Warn is stored at c:/users/n12063/ApacheLogging_Warn.log. Make sure you use a filename that indicates a usable location on your own computer.
127. <Appenders>
128. <Console name="Console" target="SYSTEM_OUT">
129. <PatternLayout pattern="%d{HH:mm:ss.SSS} [%t] %-5level %logger{36}
130. - %msg%n"/>
131. </Console>
132. <File name="ApacheLog-Info" filename=
133. "c:/users/n12063/ApacheLogging_Info.log">
134. <PatternLayout>
135. <pattern>[%-5level] %d{yyyy-MM-dd HH:mm:ss.SSS} [%t] %c{1}
136. - %msg%n</pattern>
137. </PatternLayout>
138. </File>
139. <File name="ApacheLog-Warn" filename="src/ApacheLogging_Warn.log">
140. <PatternLayout>
141. <pattern>[%-5level] %d{yyyy-MM-dd HH:mm:ss.SSS} [%t] %c{1}
142. - %msg%n</pattern>
143. </PatternLayout>
144. </File>
</Appenders>
145. Next, adjust the loggers section to add these new appenders to the root logger.
146. <Loggers>
147. <Root level="debug">
148. <AppenderRef ref="Console" level="fatal"/>
149. <AppenderRef ref="ApacheLog-Info" level="info"/>
150. <AppenderRef ref="ApacheLog-Warn" level="warn"/>
151. </Root>
</Loggers>
152. The full configuration file should resemble this:
153. <?xml version="1.0" encoding="UTF-8"?>
154. <Configuration status="WARN">
155. <Properties>
156. <Property name="log-path">logs</Property>
157. </Properties>
158. <Appenders>
159. <Console name="Console" target="SYSTEM_OUT">
160. <PatternLayout pattern="%d{HH:mm:ss.SSS} [%t] %-5level %logger{36}
161. - %msg%n"/>
162. </Console>
163. <File name="ApacheLog-Info" filename=
164. "c:/users/n12063/ApacheLogging_Info.log">
165. <PatternLayout>
166. <pattern>[%-5level] %d{yyyy-MM-dd HH:mm:ss.SSS} [%t] %c{1}
167. - %msg%n</pattern>
168. </PatternLayout>
169. </File>
170. <File name="ApacheLog-Warn" filename="src/ApacheLogging_Warn.log">
171. <PatternLayout>
172. <pattern>[%-5level] %d{yyyy-MM-dd HH:mm:ss.SSS} [%t] %c{1}
173. - %msg%n</pattern>
174. </PatternLayout>
175. </File>
176. </Appenders>
177. <Loggers>
178. <Root level="debug">
179. <AppenderRef ref="Console" level="fatal"/>
180. <AppenderRef ref="ApacheLog-Info" level="info"/>
181. <AppenderRef ref="ApacheLog-Warn" level="warn"/>
182. </Root>
183. </Loggers>
</Configuration>
184. Now, you can run your program again. This time you should get a console output like this:
185. David Johnson will have $41.666666666666664 per month for retirement.
186. 15:59:15.846 [main] FATAL chapter6.ApacheLogging - monthlyPension is too low
15:59:15.847 [main] FATAL chapter6.ApacheLogging - fatal message
187. Your log files should be stored in the designated folders on your computer. If you cannot locate them, try searching for the names ApacheLogging_Info and ApacheLogging_Warn using your computer’s search function. You’ll notice that files created in thesrc folder don’t automatically show up in Eclipse. If you place the file there in Eclipse yourself, your program will write to it during execution and you’ll be able to view it from Eclipse.
How It Works
Here’s how it works:
1. By attaching and importing the Log4j 2 API, you’re allowing your program to use these resources.
2. Very similarly to the example using the built-in logger, you created a single static logger object for use in this class.
3. Using the methods included in Log4j 2, you can create log messages of various importance levels.
4. Without creating any configuration file, there is a default logger that prints messages at the Error level or higher to the console.
5. By editing this configuration file, you can control which level of messages get printed and where they will be printed.
6. In the appenders section, you added two files. These create log files in which log messages can be written. Files require name and filename fields. In the filename file, you should include the path to the file. They should also be given a PatternLayout, which specifies how the messages will be formatted. In this exercise, they are named according to the level they will be assigned. One of the log files is stored in the src folder of the project you are working in. The other will be stored on the hard drive of the machine, as indicated in the filename.
7. In the loggers section, you can add new loggers or you can attach appenders to the root logger. This is similar to the approach with the built-in logger, where handlers were added to the logger.
8. You can control the level of the logger separately from the level of the appenders. Both of these are set in the loggers section. Here, you have to set the root level to debug, meaning that all log messages will be accepted by the logger. However, the three appender levels are set to fatal, info, and warn, so only those set to info and above will be used in the output. Only fatal messages will be printed to the console. Info level and above will be printed to the ApacheLog_Info.log file, and warn level and above will be printed to the ApacheLog_Warn.log file.
You’ve seen two types of logging utilities, a built-in version from Java and an open source API from Apache. Although they function similarly, there may be reasons to choose one over the other. Many developers are choosing Log4j over the built-in tool, not only because of its functionality, but because there are some criticisms of the implementation of the built-in logger. There are also several other well-known loggers that you may want to investigate further. Hopefully, the examples in this section have provided you with a foundation to begin logging your programs, as well as a basic understanding from which you can investigate other tools and the other options within the two tools presented here.
TESTING YOUR APPLICATIONS
Unit testing is another way you can ensure the completeness and correctness of your applications. It allows you to develop small test scenarios to check each aspect of your program. This offers some benefits over debugging from the main method. First, you can begin testing even when only small parts of your application are written. In fact, some development styles start from test cases and then write code that will satisfy the test. Compared to debugging from the main method, you can start testing much earlier in the process and may be able to find and fix problems early and before they impact many other areas of the development. Once your test cases are prepared, then any changes you make to the program later can be checked quickly by running the tests again to see if you’ve accidentally introduced new errors. Also, professional developers are not usually creating an entire program; they are working on pieces that will be integrated later. In this case, a main method doesn’t really make much sense, but test units can provide confidence that the units themselves are functioning properly before trying to fit them together in the end. JUnit is a commonly used testing framework, which is also included in Eclipse.
To begin, you can create a JUnit test case the same way you create a new class. Eventually, you will create a test case for a class you’ve already developed, but practice with a standalone test case first. You create a new JUnit test case under File New JUnit Test Case or by right-clicking in the Navigator and selecting New JUnit Test Case. Name your test case JUnitTest. There are checkboxes next to several methods; select setUpBeforClass(), setUp(), tearDownAfterClass(), and tearDown() to create auto stubs. Finally, make sure the “Class Under Test” field is blank, since you are not testing a class right now. Press Finish to create your test case. You should have a class that looks like this:
import static org.junit.Assert.*;
import org.junit.Before;
import org.junit.BeforeClass;
import org.junit.Test;
public class JUnitTest {
@BeforeClass
public static void setUpBeforeClass() throws Exception {
}
@AfterClass
public static void tearDownAfterClass() throws Exception {
}
@Before
public void setUp() throws Exception {
}
@After
public void tearDown() throws Exception {
}
@Test
public void test() {
fail("Not yet implemented");
}
}
The text beginning with the @ symbol are called annotations, and these indicate the purpose of specific methods. You will see more annotations as you move through later chapters in the book. The difference between comments and annotations is that annotations can be processed during compilation. Therefore, you should be careful to use the annotations correctly. There are five annotations you will see in JUnit tests: @Test, @BeforeClass, @AfterClass, @Before, and @After. The first, @Test, annotates each test method. There is no universally accepted naming convention for test methods, but it makes sense to name them in a way that makes it clear what you are testing and under what conditions.
The other four annotations allow you to prepare some objects and resources for use before your tests begin and to close out things appropriately after your tests are finished. The two setup methods, annotated @BeforeClass and @Before, are used to create necessary objects for testing. The first type, @BeforeClass, is run once before anything else, and the results will be shared by all the tests. This is helpful for timely processes like logging into a database. The second type, annotated @Before, runs once before each test, so multiple times in a series of tests. Annotating computationally expensive processes as @Before will slow your overall testing down. The tear-down methods actually function similarly to the finally block of a try-catch-finally statement. If you allocate resources using a @Beforemethod, you will need to release them using an @After method. If you allocate resources using a @BeforeClass method, you need to release them using an @AfterClass method. Just as the @BeforeClass runs once before everything else starts, @AfterClass runs exactly once after everything else finishes. Similarly, @After methods will run after each test. These @After and @AfterClass methods will run even if there is an exception thrown, just like the finally block.
Assertions are the main component you will use in your JUnit tests. There are several assert methods that allow you to state what you expect and the tests will check if it’s correct. Any incorrect assert statement will result in a test failure. Here is a list of some assertmethods you might find useful in your tests:
· assertEquals(a, b): Expect a and b to be equal.
· assertArrayEquals(arrayA, arrayB): Expect all elements in A and B to be equal.
· assertTrue(a): Expect a to be true.
· assertFalse(b): Expect b to be false.
· assertNull(a): Expect a to be null.
· assertNotNull(b): Expect b to not be null.
· assertSame(a,b): Expect a and b to reference the same object.
· assertNotSame(a,b): Expect a and b not to reference the same object.
NOTE The assertEquals() method is slightly different for different data types. As you have seen previously, some number types like doubles are not precise due to rounding. To accommodate these shortcomings, the assertEquals() method for doubles or floats has an additional parameter, called epsilon, which allows you to choose how different two doubles can be and still be considered equal values. The format is then: assertEquals(double a, double b, double epsilon) or assertEquals(1.51, 1.52, 0.01), for example.
With these concepts, you’re ready to start testing. You can start by declaring some objects that you will use for the tests. A static Scanner object is used just to symbolize the resources that you might need for your tests; it is initialized in the setUpBeforeClass() method and closed in the tearDownAfterClass() method. Some integers, an array, and an object are also added to compare values using the assert methods. The ints are initialized in the setup() method. Then using these (and the other variables created in the test methods), each of the assert methods is demonstrated. The entire test class looks like this:
import static org.junit.Assert.*;
import java.util.Scanner;
import org.junit.After;
import org.junit.AfterClass;
import org.junit.Before;
import org.junit.BeforeClass;
import org.junit.Test;
public class JUnitTest {
static Scanner scan;
int myIntA, myIntB, myIntC;
int[] myArrayA = {0,1,2};
Object myObject;
@BeforeClass
public static void setUpBeforeClass() throws Exception {
// access resources for use in the tests
scan = new Scanner(System.in);
}
@AfterClass
public static void tearDownAfterClass() throws Exception {
// close resources after all tests complete
scan.close();
}
@Before
public void setUp() throws Exception {
// assign some values to the variables
// before beginning each test
myIntA = 5;
myIntB = 6;
myIntC = 7;
}
@After
public void tearDown() throws Exception {
//nothing needs to be torn down
}
@Test
public void testAssertEquals() {
// (5 + 1) equals 6
assertEquals((myIntA + 1), myIntB);
}
@Test
public void testAssertArrayEquals() {
int[] myNewArray = {0,1,2};
// the elements in both arrays are 0, 1, and 2
// order matters: {0,1,2} != {0,2,1}
assertArrayEquals(myArrayA, myNewArray);
}
@Test
public void testAssertTrue() {
// 7 > 5
assertTrue(myIntC > myIntA);
}
@Test
public void testAssertFalse() {
// myArrayA.length == 3, 3 != 4
assertFalse(myArrayA.length == 4);
}
@Test
public void testAssertNull() {
// myObject has not been intialized
assertNull(myObject);
}
@Test
public void testAssertNotNull() {
String newString = "Hello";
// newString is intialized
assertNotNull(newString);
}
@Test
public void testAssertSame() {
myObject = new Object();
Object pointerA = myObject;
Object pointerB = myObject;
// both pointerA and pointerB reference myObject
assertSame(pointerA,pointerB);
}
@Test
public void testAssertNotSame() {
myObject = new Object();
Object pointerA = new Object();
Object pointerB = myObject;
// pointerA is a new Object,
// pointerB references myObject
assertNotSame(pointerA,pointerB);
}
}
Once your test methods are written, you can run the test class the same way you run a normal program. You can also specify “Run as JUnit Test” if Eclipse does not automatically recognize it as a JUnit test and run it appropriately. The JUnit panel will take the place of the Navigator, and you will see a report of how many tests have been run, the number of errors, and the number of failures. If there is a failure, you can also see more information about the failure in the Failure Trace. In Figure 6.18, you can see a comparison of two runs: one with a failure and the other without any failures. In the failure case, the test method that resulted in failure—testAssertArrayEquals—is highlighted. Figure 6.18 also shows why it failed: element [1] in the first array was 1, but in the second array it was 2.
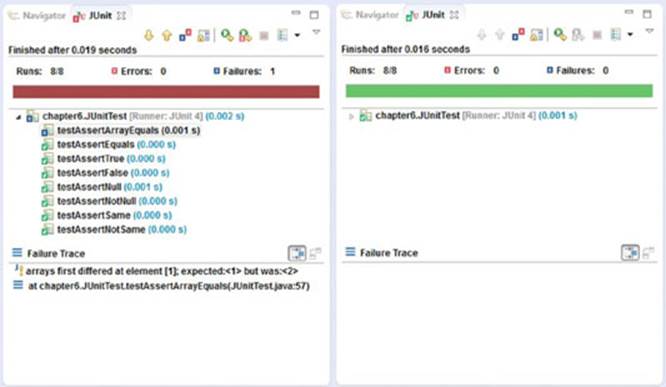
Figure 6.18
TRY IT OUT Testing Programs with JUnit Test Cases
In this exercise, you develop a JUnit test case for a small program. This will show you how you can use JUnit testing to ensure your programs are operating as intended.
1. If you do not already have a project in Eclipse for Chapter 6, create one now.
2. Create a new class by right-clicking on the src folder in your new project. Select New and then Class. Name the class DistanceConverter. Uncheck the box that creates the main method for you. Click Finish to create the class.
3. Include the following methods in the body of the DistanceConverter class. Notice that there is no main method in this class. Therefore, it is not possible to test the methods simply by running the program.
4. public static double convertFeettoMeters(double feet){
5. return feet * 0.3048;
6. }
7.
8. public static double convertMeterstoFeet(double meters){
9. return meters * 3.2808;
10. }
11.
12. public static double convertFeettoInches(double feet){
13. return feet * 12;
14. }
15.
16. public static double convertInchestoFeet(double inches){
17. return inches / 12;
18. }
19.
20. public static double convertCmtoFeet(double cm){
21. return convertMeterstoFeet(cm / 100);
22. }
23.
24. public static double convertFeettoCm(double feet){
25. return convertFeettoMeters(feet) * 100;
26. }
27.
28. public static double convertCmtoInches(double cm){
29. return convertFeettoInches(convertCmtoFeet(cm));
30. }
31.
32. public static double convertInchestoCm(double inches){
33. return convertFeettoCm(convertInchestoFeet(inches));
}
34.Now create a JUnit test case by right-clicking on the DistanceConverter.java file in the Navigator. Select New, then JUnit Test Case. The name should be DistanceConverterTest and the class under test field should be chapter6.DistanceConverter (chapter6is the package name; it may be different if you have used another package). You do not need any auto method stubs checked. Some of these fields may be filled in for you.
35.Click Next. If you place a check next to DistanceConverter, test method stubs will be created for all methods in the class. Click Finish.
36. Now you should have created a new testing class that looks like this:
37. import static org.junit.Assert.*;
38.
39. import org.junit.Test;
40.
41. public class DistanceConverterTest {
42.
43. @Test
44. public void testConvertFeettoMeters() {
45. fail("Not yet implemented");
46. }
47.
48. @Test
49. public void testConvertMeterstoFeet() {
50. fail("Not yet implemented");
51. }
52.
53. @Test
54. public void testConvertFeettoInches() {
55. fail("Not yet implemented");
56. }
57.
58. @Test
59. public void testConvertInchestoFeet() {
60. fail("Not yet implemented");
61. }
62.
63. @Test
64. public void testConvertCmtoFeet() {
65. fail("Not yet implemented");
66. }
67.
68. @Test
69. public void testConvertFeettoCm() {
70. fail("Not yet implemented");
71. }
72.
73. @Test
74. public void testConvertCmtoInches() {
75. fail("Not yet implemented");
76. }
77.
78. @Test
79. public void testConvertInchestoCm() {
80. fail("Not yet implemented");
81. }
82.
}
83.Add some class variables that you can use in the tests: double feet, meters, inches, and cm.
84. Fill in the body of your first test method, the testConvertFeettoMeters() method, like so:
85. @Test
86. public void testConvertFeettoMeters() {
87. feet = 1;
88. meters = DistanceConverter.convertFeettoMeters(feet);
89. assertEquals(meters, 0.3048,0.001);
}
To convert feet to meters, you should give a value for feet and the method will calculate the equivalent in meters. Therefore, in your test case, assign a value to the variable feet. Use the method to assign a value to the variable meters. Then calculate the equivalent in meters. Use the assertEquals() method to make sure the method calculation is equal to your own calculation. Because of the rounding issues with doubles, the assertEquals()method for doubles has an extra parameter, called epsilon, where you can indicate how close the two doubles should be to be considered equal. In this example, using 0.001 for epsilon, you are saying that if the calculated value for meters is within 0.001 of 0.3048, you should consider them equal.
90.Try to fill in the rest of the test methods in the same way. Give a value for the first variable. Use the method to calculate the second variable. Then compare the expected true conversion to the method’s return value.
91. Your test case should resemble this after you’ve filled in all the test methods:
92. import static org.junit.Assert.*;
93.
94. import org.junit.Test;
95.
96. public class DistanceConverterTest {
97. double feet, meters, inches, cm;
98.
99. @Test
100. public void testConvertFeettoMeters() {
101. feet = 1;
102. meters = DistanceConverter.convertFeettoMeters(feet);
103. assertEquals(meters, 0.3048,0.001);
104. }
105.
106. @Test
107. public void testConvertMeterstoFeet() {
108. meters = 1;
109. feet = DistanceConverter.convertMeterstoFeet(meters);
110. assertEquals(3.281,feet,0.001);
111. }
112.
113. @Test
114. public void testConvertFeettoInches() {
115. feet = 1;
116. inches = DistanceConverter.convertFeettoInches(feet);
117. assertEquals(12,inches,0.001);
118. }
119.
120. @Test
121. public void testConvertInchestoFeet() {
122. inches = 12;
123. feet = DistanceConverter.convertInchestoFeet(inches);
124. assertEquals(1,feet,0.001);
125. }
126.
127. @Test
128. public void testConvertCmtoFeet() {
129. cm = 10;
130. feet = DistanceConverter.convertCmtoFeet(cm);
131. assertEquals(0.3281,feet,0.001);
132. }
133.
134. @Test
135. public void testConvertFeettoCm() {
136. feet = 1;
137. cm = DistanceConverter.convertFeettoCm(feet);
138. assertEquals(30.48,cm,0.001);
139. }
140.
141. @Test
142. public void testConvertCmtoInches() {
143. cm = 10;
144. inches = DistanceConverter.convertCmtoInches(cm);
145. assertEquals(3.9371,inches,0.001);
146. }
147.
148. @Test
149. public void testConvertInchestoCm() {
150. inches = 10;
151. cm = DistanceConverter.convertInchestoCm(inches);
152. assertEquals(25.4,cm,0.001);
153. }
154.
}
155. Run the test case by clicking the green play icon or selecting Run, then Run. Ensure that no errors or failures occur.
How It Works
Here’s how it works:
1. For each test method, a new method is being tested.
2. You have supplied one value and the method calculates the second method.
3. You find the expected value and enter this as one of the parameters in the assertEquals() method.
4. As long as the number you calculated and the number the method calculated are very close (+/- epsilon), the assertEquals() method will pass.
5. If all eight tests pass, the testing is complete and all methods function as they are designed to.
6. If there is a failure, you can use the Trace to find what went wrong. Is there a mistake in your method or in your own calculation? This is up to you to figure out.
SUMMARY
This concludes the chapter on exceptions and debugging. The techniques you’ve seen in this chapter should help you program with fewer errors and produce applications that function as expected. Debugging, logging, and testing alone or in combination will not only help you accomplish this for yourself, but will also demonstrate the correctness to others. When developing professionally, it is not enough to know that your code works and why, but you need to be able to convince others (colleagues, clients, managers, and so on) that it works. As your programs get larger and more complex, you will find these techniques more and more valuable.
All materials on the site are licensed Creative Commons Attribution-Sharealike 3.0 Unported CC BY-SA 3.0 & GNU Free Documentation License (GFDL)
If you are the copyright holder of any material contained on our site and intend to remove it, please contact our site administrator for approval.
© 2016-2026 All site design rights belong to S.Y.A.