Beginning Java Programming: The Object-Oriented Approach (Programmer to Programmer) (2015)
7. Delving Further into Object-Oriented Concepts
WHAT YOU WILL LEARN IN THIS CHAPTER:
· What annotations are
· What overloaded methods are
· How to use the this keyword
· What information hiding or encapsulation is
· What class inheritance and polymorphism mean
· What interfaces are and what they do
· How to organize your classes into packages
· How garbage is collected in Java
WROX.COM CODE DOWNLOADS FOR THIS CHAPTER
The wrox.com code downloads for this chapter are found at www.wrox.com/go/beginningjavaprogramming on the Download Code tab. The code is in the Chapter 7 download and individually named according to the names throughout the chapter.
The first half of this book covered the basics of Java and Object-Oriented Programming. Some of the chapters provided the tools or techniques needed to start building more complex programs. Building on that foundation, you’re ready to move on to these more advanced concepts. This chapter expands on Chapter 4 to increase your knowledge of the principles of Object-Oriented Programming. The three main topics covered here are information hiding, inheritance, and interfaces. However, there are also several other ideas that are discussed, including method overloading, packages, garbage collection, and annotations. After completing this chapter, you will have the tools you need to create organized and advanced Java applications. The rest of the book helps you put object-oriented principles into practice with increasing functionality.
ANNOTATIONS
Annotations provide metadata about source code that’s not part of the program itself. Unlike comments, which are ignored by the compiler, annotations can provide information for the compiler and can be processed by some tools to generate code, documentation, or other files.
Annotations always begin with the @ symbol. The compiler knows to expect an annotation following the @ symbol. You may have already seen some examples of annotations, such as @Test, @Before, and @After, from the unit testing section in Chapter 6.
Some annotations can replace comments, by providing a more structured format for metadata. This metadata can then be used to automatically generate documentation for your code. These annotations can be custom-designed for use by the programmer or for consistency across a department or company.
Other annotations are predefined in java.lang to be used in specific circumstances, such as @Deprecated, @Override, and @SuppressWarnings. @Deprecated indicates that the element, such as a method or class, has been replaced by an improved alternative and should no longer be used. Whenever an element marked @Deprecated is used in a program, the compiler will give a warning so the programmer knows to use an alternative. @Override indicates that a subclass is overriding an element from its superclass. You will learn more about this later in this chapter. By using the @Override annotation when you intend to override an element, the compiler will warn you if the method does not properly override a superclass element. @SuppressWarnings instructs the compiler to suppress specific warnings that it would normally generate. You may have seen this suggested as a solution for warnings appearing in your projects in Eclipse. Java 8 introduced a new annotation @FunctionalInterface to indicate that the programmer intends to create a functional interface according to the Java Language Specification.
Another change in Java 8 is the flexibility to use annotations anywhere a type is used, instead of only applying to declarations as previous Java versions required. This new flexibility allows better type-checking analysis, although Java 8 does not provide this type-checking framework itself. One example of a type annotation is if you were to write a piece of code to ensure that a particular variable is never null. Then you could annotate that variable @NonNull to indicate to the compiler that this variable will never be assigned to null. The compiler can then check for any discrepancies and warn you if something remains to be addressed.
OVERLOADING METHODS
As mentioned in the introduction to the chapter, there are several small topics covered here, aside from the main concepts. This first section covers the concept of overloading methods. Overloading simply refers to using the same name for more than one method in the same class. Java, and many other languages, can determine which method you’re calling as long as the number or type of parameters is different in each method. This is illustrated with a few examples.
public class Book {
String title;
String author;
boolean isRead;
int numberOfReadings;
public void read(){
isRead = true;
}
public void read(){
numberOfReadings++;
}
}
If you try this first example in Eclipse, you’ll see there are errors indicating the read() method is duplicated. The problem is you have two methods with the same name and neither has any parameters. Try the following instead:
public class Book {
String title;
String author;
boolean isRead;
int numberOfReadings;
public void read(){
isRead = true;
numberOfReadings++;
}
public void read(int i){
isRead = true;
numberOfReadings += i;
}
}
Now you have one method with the name read() and no parameters and another method with the name read() and one int parameter. To Java, these are two completely different methods, so you won’t have any duplication errors. Of course, read(1) will have the same effect as read(), so you might not see much use for this concept. Alternatively, you could change the name of the methods to readOnce() and read(int i). You could easily avoid overloading methods at all in this example.
There is one type of method where overloading becomes very convenient: the constructor. This is because, as you learned in Chapter 4, the name of constructor methods is restricted to the class name. So if you want to create more than one constructor, you need to use the overloading principle. In the Book class, you would naturally want a constructor with two String parameters to set the title and author of the book.
public Book(String bookTitle, String authorName){
title = bookTitle;
author = authorName;
}
You might also need to create a book with an unknown author, perhaps for a publisher who has a particular book in mind but hasn’t hired an author to write it.
public Book(String bookTitle){
title = bookTitle;
author = "Unknown";
}
On the other hand, you might have a book proposal from a known author, but you aren’t yet sure what it will be named.
public Book(String authorName){
title = "Unknown";
author = authorName;
}
Now you have a problem. You have one kind of “method” called Book(), with one String parameter for the title, and another method called Book() with one String parameter for the author’s name. Java cannot distinguish between these, so it will be considered a duplicate method. You will have to remove one of these and use one of the remaining constructors, for example, Book myBook = new Book("Unknown", "Bart Baesens"); to construct a book with unknown title and known author using the two String parameter constructor.
You could also add a constructor with no parameters if neither the title nor the author is known. Or you could add constructors with even more parameters:
public Book(String bookTitle, String authorName, boolean hasBeenRead){
title = bookTitle;
author = authorName;
isRead = hasBeenRead;
}
public Book(String bTitle, String aName, boolean hasBeenRead, int read){
title = bTitle;
author = aName;
isRead = hasBeenRead;
numberOfReadings = read;
}
You might already notice quite a bit of repetition in these different constructors. You will see a way to reduce this in the next section by using the this keyword.
THE this KEYWORD
This section covers how and why to use the Java this keyword. The this keyword is placed inside an instance method or constructor in order to refer to the object whose method is being called. This is perhaps best explained with an example:
public class Person {
String name;
public Person(String personName){
this.name = personName;
}
}
In this simple Person class, each Person has a name, which is stored as a String variable. The constructor has a String parameter that’s assigned to the Person’s name variable when it is constructed. Here, you can read the constructor as “the name variable of this person object being constructed should be given the value of the personName String provided as a parameter.”
public void printName(){
System.out.println(this.name);
}
If you add an instance method to print the name of a Person object, you can use the this keyword to identify which name should be printed: “the value assigned to the name variable of thisPerson object whose method is being called.”
These examples should illustrate how the this keyword is used. You might be wondering why you would use it. After all, you could leave it out of the examples and they would function exactly the same way.
public class Person {
String name;
public Person(String personName){
name = personName;
}
public void printName(){
System.out.println(name);
}
}
As you can see, the use of the this keyword is optional in this situation. It is recommended that you use it to be explicit and avoid ambiguity, but you could leave it out without impacting your program. However, there are cases where you must use the this keyword. This is usually when a local variable and an instance variable have the same name. Consider the following example:
public class Person {
String name;
public Person(String name){
name = name;
}
public void printName(){
System.out.println(name);
}
}
If you try this in Eclipse, you’ll see a warning: The assignment to variable name has no effect. In this case, because name is a local variable for the constructor method, you will be referring to this local variable if you refer to name inside the method. Essentially, you are saying the local String name should be assigned the value it already has, and you have done nothing with the instance variable name of the Person object. You must use the this keyword inside the constructor to refer to the instance variable name. You are not required to use it in the printName() method, but it is recommended to avoid ambiguity.
public class Person {
String name;
public Person(String name){
this.name = name;
}
public void printName(){
System.out.println(name);
}
}
Another case where you may need to use the this keyword is when you have overloaded the constructor method and want to explicitly call one constructor from within another constructor. Imagine, for instance, that sometimes you need to construct a Person object but you do not know their name. You could create another constructor with no parameters and use the this keyword to call the one String parameter constructor with a default name.
public class Person {
String name;
public Person(){
this("Unknown");
}
public Person(String name){
this.name = name;
}
public void printName(){
System.out.println(name);
}
}
Again, you might think the this keyword is not necessary, as for this simple example, you could make a no-parameter constructor that assigns the name variable to "Unknown" itself, without using the this keyword. However, when your constructor is more complex, with several statements and perhaps some calculations, using the this keyword will limit redundancy, increase readability, and prevent discrepancies between what different constructors accomplish. The next exercise allows you to try method overloading using thethis keyword.
TRY IT OUT Method Overloading
In this exercise, you expand the Person class from the examples to demonstrate the use of method overloading and the this keyword.
1. If you do not already have a project in Eclipse for Chapter 7, create one now.
2. Create a new class by right-clicking on the src folder in your new project. Select New and then Class. Name the new class Person. Uncheck the box to create a main method. This class should look like this:
3. public class Person {
4.
}
5. Add the following instance variables to your class:
6. String name;
LocalDate birthdate;
7. In order to use LocalDate, you need to import the java.time package. Add the following statement above your class heading, or click the error notification and double-click the import suggestion.
8. Add a constructor method to set up new Person objects. Your constructor should accept the one String parameter for name and three int parameters for the year, month, and day of the birthdate. Include a statement inside the constructor to convert the ints to a LocalDate type. Assign the values to the instance variables. Your four-parameter constructor should look like this:
9. public Person (String name, int year, int month, int day){
10. LocalDate tempBD = LocalDate.of(year, month, day);
11. this.name = name;
12. this.birthdate = tempBD;
}
13.Overload the constructor by creating a second one with only name. Suppose this is used when you don’t know someone’s birthdate. Use the this keyword, with default values where needed.
14. Create a method to calculate someone’s age. LocalDate has a method called now() that returns the current date. To calculate the period between two dates, use the following statements:
15. Period p = Period.between(date1, date2);
int age = p.getYears();
16.Overload the calculateAge() method by adding another method with the same name, but with a LocalDate parameter to calculate a person’s age on a certain date. Make another one that accepts three ints for year, month, and day.
17. Your Person class should look something like this:
18. import java.time.*;
19.
20. public class Person {
21. String name;
22. LocalDate birthdate;
23.
24. public Person(String name, int year, int month, int day) {
25. this.name = name;
26. this.birthdate = LocalDate.of(year, month, day);
27. }
28.
29. public Person(String name) {
30. this(name, 1900, 1, 1);
31. }
32.
33. public int calculateAge() {
34. Period p = Period.between(this.birthdate, LocalDate.now());
35. return p.getYears();
36. }
37.
38. public int calculateAge(LocalDate date) {
39. Period p = Period.between(this.birthdate, date);
40. return p.getYears();
41. }
42.
43. public int calculateAge(int year, int month, int day) {
44. Period p = Period.between(this.birthdate,
45. LocalDate.of(year, month, day));
46. return p.getYears();
47. }
}
How It Works
Here’s how this example works:
1. In the first constructor method, you used the this keyword to initialize the variables of “this” object being created. You also used the LocalDate.of() method to assign a date variable from three int values.
2. In the second constructor, you used the this keyword to use the first constructor of “this” class, but you filled in default values for year, month, and day.
3. In the first calculateAge() method, you used the LocalDate.now() method to compare a person’s birthdate (using the this keyword) to the current date. Period and Period.getYears() handled the calculation for you, as they are defined as part of the date and time facilities added to Java 8.
4. In the second calculateAge() method, with a LocalDate parameter, you used a similar format to the first, but you used a specified date instead of the current date. You could change the first calculateAge() method to use this one in the following way:
5. public int calculateAge() {
6. return calculateAge(LocalDate.now());
}
7. In the third calculateAge() method, with three int parameters, you used a similar format to the other two, but this time you called the LocalDate.of() method to get the correct date from the integers specified. Again, you could use the secondcalculateAge() method to rewrite this one in a simpler and more robust way:
8. public int calculateAge(int year, int month, int day) {
9. return calculateAge(LocalDate.of(year, month, day));
}
10.Offering these three calculateAge() methods means that other classes using the Person class can calculate a person’s age based on the date the calculation occurs (how old is the person now?), based on a given LocalDate (how old was the person when they graduated high school?), and based on a given date, when the LocalDate class is not available to the other class or program (how old was the person on a certain year, month, and day?). This functionality may make it more reusable. By reusing one of the methods inside the others, you help improve maintainability.
INFORMATION HIDING
Information hiding, also referred to as encapsulation, is an object-oriented practice that hides the internal representation of objects. The main idea is to make member variables private, so they are not directly accessible from outside of the class. Accessor methods are created to grant access to view or modify the values of the variables. This gives the programmer control over how and when variables can be accessed.
Encapsulation offers several advantages that make it standard recommended practice for all your classes. First, as already mentioned, you can control the access to variables. For example, consider the following small program:
import java.math.BigDecimal;
public class Product {
String productName;
String productID;
BigDecimal productPrice;
public Product(String name, String id, String price) {
this.productName = name;
this.productID = id;
this.productPrice = new BigDecimal(price);
}
public String displayString() {
return "Product " + this.productID + ": " + this.productName
+ " costs " + this.productPrice;
}
}
public class ProductProgram {
public static void main(String[] args) {
Product myWidget = new Product("Widget","WID0001","11.50");
myWidget.productPrice = new BigDecimal("-5.00");
System.out.println(myWidget.displayString());
}
}
In this example, you can create a product with a certain name, ID, and price as expected. However, after the product is created, anyone can change the price, even to a price that doesn’t make any sense. It’s best to restrict these changes in some way to avoid these problems, such as negative prices.
Related to this idea of limiting access, you can use the accessor methods to check for validity before changing the variable’s value. If an invalid value is provided, the programmer can decide how to handle it, for example, by throwing an exception as you saw in the previous chapter. You can also add some notifications when a change occurs, so the program reacts accordingly.
On the other hand, when retrieving values from variables, you can manage this in different ways by using your accessor methods. You can provide “read-only” access to a value by providing methods to return a defensive copy but not change the value. In the Productprogram, lots of related classes might need to know what the price of a product is to calculate sales, tax, or profit figures, for example. However, only a few, such as a discounting application, should be able to modify it. You may also want to provide information that is collected or calculated from more than one variable. In the Product program, you might create an accessor method that adds a tax or fee to the price before returning the total price.
Finally, encapsulation can improve program maintenance by limiting the impact of changes in one class on other related classes. In the Product program, you might need to adapt the Product class later to accommodate more information about products or to change the representation in some way. However, as long your displayString() still returns a String, the other classes calling this method continue functioning as expected. If every related class printed the statements based on the instance variables directly, a change to theProduct class would require adaptations to every other class to ensure the printing methods still functioned properly.
Access Modifiers
The first step to restricting access to variables or methods is to adjust the access modifiers. These were introduced in Chapter 4, where the idea of encapsulation was mentioned but not explained in full detail. There are four access modifiers that can be applied to methods and variables in Java:
· public: Can be accessed by any class
· protected: Can be accessed by subclasses or classes in the same package
· no modifier: Can be accessed by classes in the same package
· private: Can be accessed only from within the same class
You can see the access levels in Figure 7.1.
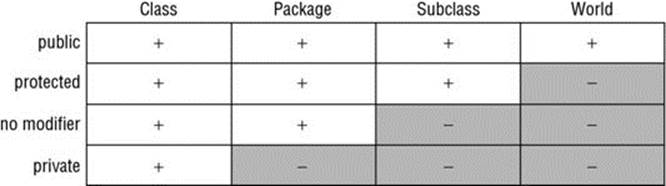
Figure 7.1
Unlike variables and methods, classes can only be given the public modifier or no modifier. Encapsulation calls for the member variables (class or instance) to be given only private access, meaning they are only directly accessible from within the same class. Then, the access modifiers of your accessor methods can be set according to the demands of the program. For example, you might make an employee’s date of birth readable to everyone with a public accessor method, but restrict changes to the Employee class with a private accessor method. The Product program might set price changes to package protected, so subtypes of the Product and a Discounter class in the same package can adjust the price.
By now you might be wondering what these accessor methods look like. They are commonly referred to as “getter” and “setter” methods, because they are used to get and set variable values. For this reason, they are given names like getName() or setPrice(). You’ll look at getters and setters in a bit more detail next.
Getters
Getters are used to access variables’ values for viewing only. You should create a getter method for every private variable. Depending on the access level you want to give to the variable, you can set the access modifier of its getter method. This is demonstrated with the Product class. The instance variables are set to private, and public getter methods are added for each one.
import java.math.BigDecimal;
public class Product {
private String productName;
private String productID;
private BigDecimal productPrice;
public Product(String name, String id, String price) {
this.productName = name;
this.productID = id;
this.productPrice = new BigDecimal(price);
}
public String getName(){
return this.productName;
}
public String getID(){
return this.productID;
}
public BigDecimal getPrice(){
return this.productPrice;
}
public String displayString() {
return "Product " + this.getID() + ": " + this.getName()
+ " costs " + this.getPrice();
}
}
If you tried this on your own, you might notice that this causes errors in the ProductProgram class. This is because once the variables are assigned private access modifiers, the ProductProgram class can no longer access the variable productPrice directly.
Setters
Setters are the methods you use to modify the values of variables. Just like with getters, you should create setters for every variable. Setters can replace the statements you used to use in the constructor method. The Product class with the setter methods added is shown in the next example.
import java.math.BigDecimal;
public class Product {
private String productName;
private String productID;
private BigDecimal productPrice;
public Product(String name, String id, String price) {
this.setName(name);
this.setID(id);
this.setPrice(price);
}
public String getName(){
return this.productName;
}
public void setName(String name){
this.productName = name;
}
public String getID(){
return this.productID;
}
public void setID(String id){
this.productID = id;
}
public BigDecimal getPrice(){
return this.productPrice;
}
public void setPrice(String price){
this.productPrice = new BigDecimal(price);
}
public String displayString() {
return "Product " + this.getID() + ": " + this.getName()
+ " costs " + this.getPrice();
}
}
The setters here are very simple; they don’t include any of the validity checks or access restrictions that were said to be the main advantages of information hiding. You might start by making setID() private. It seems logical that a Product’s ID number should not be changeable from outside the class. Remember, if you want to ensure that a Product’s ID number never changes, you can make that variable final as well. Now, to deal with the problem identified in the beginning: negative prices should not be allowed. You can add a check to see if the price is above 0, or you might store a minimum and maximum price to compare your price against. The second option is demonstrated in the next version of the Product class. First, two static variables have been added to indicate the absolute minimum and maximum prices any product can have. Then another method was added to compare any potential price to the minimum and maximum to see if it is a valid price. Finally, the setPrice() method uses the isValidPrice() method to check the price provided. If it is not valid, the method throws an IllegalArgumentException. Otherwise, the price is set to the provided price.
import java.math.BigDecimal;
public class Product {
private static BigDecimal minPrice = new BigDecimal("0.00");
private static BigDecimal maxPrice = new BigDecimal("999.99");
private String productName;
private String productID;
private BigDecimal productPrice;
public Product(String name, String id, String price) {
this.setName(name);
this.setID(id);
this.setPrice(price);
}
public String getName(){
return this.productName;
}
public void setName(String name){
this.productName = name;
}
public String getID(){
return this.productID;
}
private void setID(String id){
this.productID = id;
}
public BigDecimal getPrice(){
return this.productPrice;
}
public void setPrice(String price) throws IllegalArgumentException{
BigDecimal tempPrice = new BigDecimal(price);
if (!isValidPrice(tempPrice)){
throw new IllegalArgumentException(price);
}
this.productPrice = tempPrice;
}
public boolean isValidPrice(BigDecimal price){
if (price.compareTo(minPrice)<0){
return false;
}
if (price.compareTo(maxPrice)>0){
return false;
}
return true;
}
public String displayString() {
return "Product " + this.getID() + ": " + this.getName()
+ " costs " + this.getPrice();
}
}
Now, you just need to adapt your ProductProgram class to use these new methods. You will use the setPrice() method to change the price of myWidget. Because it can throw an exception, use the try-catch blocks you learned about in the previous chapter to handle the exception appropriately. One way you could do this is shown in the next code example.
public class ProductProgram {
public static void main(String[] args) {
Product myWidget = new Product("Widget","WID0001","11.50");
try {
myWidget.setPrice("-5.0");
} catch (IllegalArgumentException e){
System.out.println(e + " is an invalid price.");
}
System.out.println(myWidget.displayString());
}
}
Try running the program with different price values to see what happens. Or better yet, use unit testing from Chapter 6 to test all the possible cases. You might also have noticed that the ProductProgram class no longer uses the BigDecimal class because the setPrice()method takes a String as the parameter. This means that even if you decide later to use a different data type in the Product class, you would not have to change anything in the ProductProgram class.
TRY IT OUT Information Hiding or Encapsulation
In this exercise, you start with a simple Bank Account application and adapt it to apply the principles of information hiding.
1. If you do not already have a project in Eclipse for Chapter 7, create one now.
2. Create a new class by right-clicking on the src folder in your new project. Select New and then Class. Name the new class Account. Uncheck the box to create a main method. This class should look like this:
3. public class Account {
4.
}
5. Add two instance variables to the Account class:
6. String name;
BigDecimal amount;
7. Add a constructor method to set up new Account objects. Your constructor should accept two String parameters, one for the name and another for the starting amount of the account. Since the amount variable is a BigDecimal and represents currency, set the scale to two decimal points and ROUND_HALF_UP for the rounding mode. Your constructor should look like this:
8. public Account(String acctName, String startAmount) {
9. this.name = acctName;
10. this.amount = new BigDecimal(startAmount);
11. this.amount.setScale(2, BigDecimal.ROUND_HALF_UP);
}
12. Add another new class called AccountManager. This time, check the box that creates the main method for you (you can also write the main method yourself after creating the class). Click Finish to create the class. Your AccountManager class should look something like this:
13. public class AccountManager {
14.
15. public static void main(String[] args) {
16. // TODO Auto-generated method stub
17.
18. }
}
19.Remove the // TODO comment, and add a statement inside the main method that creates a new account with the name FirstAccount and amount 10.00.
20. Add print statements to your main method so the user is given information about the account that you created. Your main method should look like this:
21. public static void main(String[] args) {
22. Account myAccount = new Account("FirstAccount","10.00");
23. System.out.println("Account Created: " + myAccount.name);
24. System.out.println("Balance: " + myAccount.amount);
}
25. Now add another statement to change the amount in myAccount to -15.00. Print this new balance to the console. Your main method should look similar to this:
26. public static void main(String[] args) {
27. Account myAccount = new Account("FirstAccount","10.00");
28. System.out.println("Account Created: " + myAccount.name);
29. System.out.println("Balance: " + myAccount.amount);
30.
31. myAccount.amount = new BigDecimal("-15.00");
32. System.out.println("New Balance: " + myAccount.amount);
}
33. Run the program to see the output.
34. Account Created: FirstAccount
35. Balance: 10.00
New Balance: -15.00
36.Now, make both variables in the Account class private.
37. Did you notice that this created errors in the AccountManager class? If you hover over the red x, you can see what the problem is:
38. The field Account.name is not visible.
The field Account.amount is not visible.
39. Because these fields are now private, they cannot be accessed from outside the Account class. Create getter methods in the Account class to allow other classes to access their values.
40. public String getName(){
41. return this.name;
42. }
43.
44. public BigDecimal getAmount(){
45. return this.amount;
}
46. Getter methods allow you to read the values of the variables, but still you cannot modify the values. To be able to do this, you need to add setter methods to the Account class. A setter can be simple, for example:
47. public void setName(String newName){
48. this.name = newName;
}
Or you can add conditions to control what kinds of modifications can be made. For example:
public void setName(String newName) {
String pattern = "^[a-zA-Z0-9]*$";
if (newName.matches(pattern)) {
this.name = newName;
}
}
In the second example, the matches() method checks to make sure the String contains only letters and numbers without any symbols. This, or a similar pattern, might be a requirement for an account’s name. Add one of the getters for the name.
49. You need to create another setter for the amount. Remember when you directly changed the amount to -15.00 earlier in this exercise? With a bank account, you probably rarely make a direct modification like this, since all the banking transactions will need to be accounted as debits and credits. You might find that your program is more useful with a private setAmount() method only for use in the constructor and other public withdraw() and deposit() methods to add or subtract funds from the amount. Inside the methods, you can check for negative balances to make sure the account is not overdrawn. Add these three methods to your Account class.
50. private void setAmount(String newAmount){
51. this.amount = new BigDecimal(newAmount);
52. }
53.
54. public void withdraw(String withdrawal) throws IllegalArgumentException{
55. BigDecimal desiredAmount = new BigDecimal(withdrawal);
56.
57. //if desired amount is negative, throw an exception
58. if (desiredAmount.compareTo(BigDecimal.ZERO) < 0){
59. throw new IllegalArgumentException();
60. }
61.
62. //if the amount is less than the desired amount, throw an exception
63. if (amount.compareTo(desiredAmount) < 0){
64. throw new IllegalArgumentException();
65. }
66.
67. this.amount = this.amount.subtract(desiredAmount);
68. }
69.
70. public void deposit(String deposit) throws IllegalArgumentException{
71. BigDecimal desiredAmount = new BigDecimal(deposit);
72.
73. //if desired amount is negative, throw an exception
74. if (desiredAmount.compareTo(BigDecimal.ZER0) < 0){
75. throw new IllegalArgumentException();
76. }
77.
78. this.amount = this.amount.add(desiredAmount);
}
79. Once your setters are in place, rewrite your constructor to use them.
80. public Account(String acctName, String startAmount) {
81. setName(acctName);
82. setAmount(startAmount);
83. amount.setScale(2, BigDecimal.ROUND_HALF_UP);
}
84. Your complete Account class should look like this:
85. import java.math.BigDecimal;
86.
87. public class Account {
88. private String name;
89. private BigDecimal amount;
90.
91. public Account(String acctName, String startAmount) {
92. setName(acctName);
93. setAmount(startAmount);
94. amount.setScale(2, BigDecimal.ROUND_HALF_UP);
95. }
96.
97. public String getName() {
98. return this.name;
99. }
100.
101. public BigDecimal getAmount() {
102. return this.amount;
103. }
104.
105. public void setName(String newName) {
106. String pattern = "^[a-zA-Z0-9]*$";
107. if (newName.matches(pattern)) {
108. this.name = newName;
109. }
110. }
111.
112. private void setAmount(String newAmount){
113. this.amount = new BigDecimal(newAmount);
114. }
115.
116. public void withdraw(String withdrawal) throws IllegalArgumentException{
117. BigDecimal desiredAmount = new BigDecimal(withdrawal);
118.
119. //if desired amount is negative, throw an exception
120. if (desiredAmount.compareTo(BigDecimal.ZERO) < 0){
121. throw new IllegalArgumentException();
122. }
123.
124. //if the amount is less than the desired amount, throw an exception
125. if (amount.compareTo(desiredAmount) < 0){
126. throw new IllegalArgumentException();
127. }
128.
129. this.amount = this.amount.subtract(desiredAmount);
130. }
131.
132. public void deposit(String deposit) throws IllegalArgumentException{
133. BigDecimal desiredAmount = new BigDecimal(deposit);
134.
135. //if desired amount is negative, throw an exception
136. if (desiredAmount.compareTo(BigDecimal.ZERO) < 0){
137. throw new IllegalArgumentException();
138. }
139.
140. this.amount = this.amount.add(desiredAmount);
141. }
}
142. Now adapt your AccountManager class to use the getters and setters you’ve created. Notice how you cannot use the setAmount() method because it is also private. You need to use the withdraw() and deposit() methods to change the amount. Since these can throw exceptions, make sure you use a try-catch block to handle invalid values. Your AccountManager class might look like this:
143. public class AccountManager {
144.
145. public static void main(String[] args) {
146. Account myAccount = new Account("FirstAccount","10.00");
147. System.out.println("Account Created: " + myAccount.getName());
148. System.out.println("Balance: " + myAccount.getAmount());
149.
150. try {
151. myAccount.withdraw("20.00");
152. } catch (IllegalArgumentException e) {
153. System.out.println("Invalid Withdrawal");
154. } finally {
155. System.out.println("New Balance: " + myAccount.getAmount());
156. }
157. }
}
How It Works
Here’s how it works:
1. In the first part of the exercise, the variables in the Account class were public. This allowed you to read and change them from the AccountManager class.
2. Because the variables were public, they could be modified by any class without any checks or validations. Therefore, you were encouraged to change the variables to private, following the principle of information hiding.
3. After the variables were private, they could no longer be accessed by other classes for reading or writing. You noticed this when the errors appeared in your AccountManager class.
4. You created public getter methods for each of the variables in the Account class. This allows other classes to read their values, without being able to modify them.
5. Next, you created setter methods to modify the values of the variables in the Account class. Some were public and some were private.
6. By making private setter methods, you can still restrict the modifications to the same class. The benefit of using a setter in this case, rather than directly modifying the variable, is that you can add validations to the method to make sure the changes are allowed. For example, you might want to prevent an account’s balance from being set to a negative value. Generally these conditions will be checked with if statements. If the provided parameter is not acceptable, you can handle it in several ways. You might throw an exception when an invalid value is provided. You could also simply exit the method without modifying the variable. Finally, you might modify the variable but in a valid way. For example, if a String begins with white space, and this is not allowed, you could still use the part of the String after the white space.
7. By making public (or other non-private access modifiers) setter methods, you allow them to be called from any other class. You can still control what changes are allowed with the same types of validations mentioned for private setter methods.
8. Finally, you used the newly created getter and setter methods to read and modify the variables in a safer way.
CLASS INHERITANCE
Java classes are organized in a hierarchical inheritance structure. Subclasses are derived from superclasses. The class Object is the highest-level superclass; it has no parent class above it. All other classes are either subclasses of Object or subclasses of subclasses ofObject. This is illustrated in Figure 7.2.
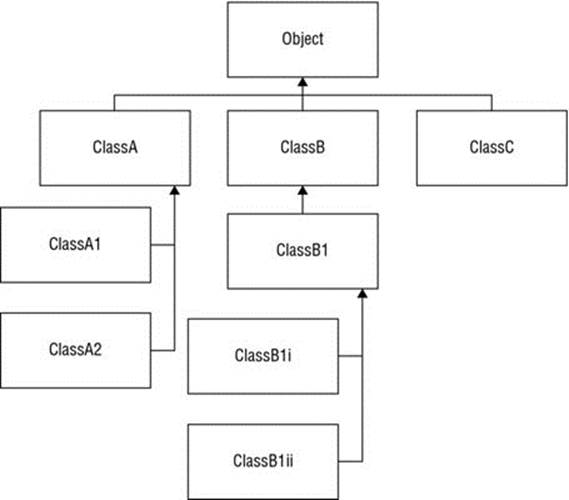
Figure 7.2
Inheritance represents “is a” relationship. For example, a Student is a Person, so the class Student could be a subclass of the Person class. An Employee is a Person, too, so Employee could be another subclass of Person. An undergraduate is a student and a graduate is a student, so you can create two additional subclasses of the class Student. Staff and Employee might be subclasses of the class Employee. A possible class hierarchy for this inheritance example is shown in Figure 7.3.
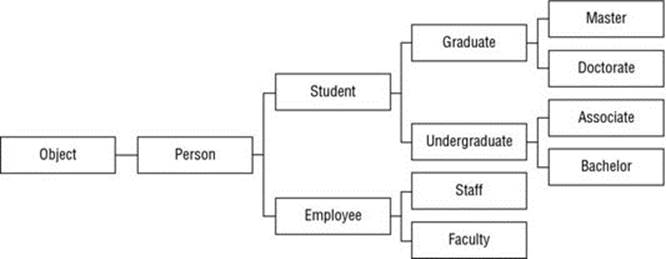
Figure 7.3
To indicate that a class is a subclass of another class, use the extends keyword in the class declaration, for example, public class Employee extends Person{ }. Variables and methods that are shared by all types of Persons can be placed in the Person class, and then each subclass can have specialized variables and methods that are only used by that type or its subclasses. For example, the Person class might have a String variable called name, which all Person objects will inherit whether they are graduate students or faculty employees. The Student class might have a double variable for their grade point average, which both graduate and undergraduate students inherit, but employees do not. A graduate student might have a String variable to store the title of their thesis. This would then be inherited by master and doctorate students. At the lowest level of the hierarchy, a Doctorate student might have a Faculty instance as their advisor, but with no subclasses, this will not be inherited by any other class.
The Keyword super
Another keyword introduced in this chapter is super. Super is a way of referring to the superclass. It’s not so different than the this keyword, covered earlier in this chapter. It is used in constructors to invoke the constructor of the superclass, like the this keyword was used to invoke another constructor of the same class. It is also used to access the variables and methods of the superclass, like the this keyword was used to access the variables of the instance calling the method.
Consider a possible implementation of two of the classes from the Person example: Person and Employee. Employee is the subclass of Person, and Person is the superclass of Employee.
public class Person {
private String name;
public Person(String name){
this.setName(name);
}
public String getName(){
return this.name;
}
public void setName(String name){
this.name = name;
}
}
Remember, your Employee class should extend this Person class. Also, the variables manager and employeeID are added to the Employee class, since not all Person instances will have a manager, but all Employee instances will.
public class Employee extends Person {
private Employee manager;
private int id;
public Employee(String name, Employee manager, int empID) {
super(name);
this.setManager(manager);
this.setEmployeeID(empID);
}
public Employee getManager() {
return manager;
}
public void setManager(Employee manager) {
this.manager = manager;
}
public int getEmployeeID() {
return id;
}
private void setEmployeeID(int employeeID) {
this.id = employeeID;
}
}
Notice how the super keyword is used in the first statement of the constructor. This means that the Employee should be constructed as a Person is constructed, then specialized with the manager and id.
Similar to specializing a subclass constructor by first calling the super constructor, you can also specialize methods by first calling a super method. Suppose you want to add a displayName() method to the Employee class that allows you to format their name badge.
public String displayName(){
return "Employee: " + super.getName();
}
In the displayName() method, you have a specialized method for Employee that calls the method of the superclass to get some of the necessary information.
You can also access superclass variables using the super keyword. Suppose in your Person class you have an int variable called id that you use to uniquely identify people in your database. But you still have the int variable id in the Employee class that you use to store their employee ID. You might use the following method to return a String with both id numbers:
public String displayIdentification() {
return "Person: " + super.id + " has EmployeeID " + this.id;
}
Of course, now that you know about information hiding, it would be better still to access the ID of the superclass using a getter.
Method Overriding
It was mentioned already that subclasses inherit methods from their superclass. This means that if the Student class has a calculateGPA() method, then Graduate and Undergraduate will have this method either implicitly or explicitly as well. The subclasses can, however, override the method with a new, specialized implementation. This is called method overriding. Note, this is not related to method overloading discussed earlier in this chapter.
Consider the calculateGPA() method from the Student class. The Student class has a double[] variable called grades that lists all the students’ grades. The calculateGPA()method then just calculates the average of these grades.
public double calculateGPA() {
double sum = 0;
int count = 0;
for (double grade : this.grades){
sum += grade;
count++;
}
return sum/count;
}
Now, suppose graduate students only get credit for grades above a certain minimum, for example only 80 percent and higher are accepted, and courses with a grade below 80 must be repeated. Then for the Graduate class, you might want to calculate the GPA based only on those higher grades. To do this, you can override the calculateGPA() method using the @Override annotation and change the implementation in the subclass.
@Override
public double calculateGPA(){
double sum = 0;
int count = 0;
for (double grade : this.getGrades()){
if (grade > minGrade){
sum += grade;
count++;
}
}
return sum/count;
}
Polymorphism
Polymorphism is a key concept in Object-Oriented Programming and is closely related to inheritance. Because inheritance models an “is a” relationship, one instance can take on the behaviors and attributes of more than one class. According to the class hierarchy of the Person example, a Master is a Graduate, a Graduate is a Student, and a Student is a Person, so depending on the particular functionality desired, Java might consider a particular Master instance as a Master, a Graduate, a Student, or a Person, because, after all, a Master is still a Person.
Static Binding
Static methods and variables have already been covered in earlier chapters. You know by now that they do not require or depend on instances of the class. Polymorphism applies to instances rather than to classes, so static methods can be bound to their implementations at compile time. This is referred to as static binding or compile-time binding. Java restricts static methods from being overridden; however, remember from earlier in this chapter that they can be overloaded. Overloaded methods differ only in the number and type of parameters, as the name is the same. To account for this possibility, the compiler will check the method signature and parameter types of static methods to find the appropriate implementation at compilation.
Dynamic Binding
Dynamic binding, also called virtual method invocation, is the binding used for instance methods to allow for polymorphism. When a method is overridden, there are multiple implementations that can be called, depending on the instance in question. Dynamic binding, as opposed to static binding, means that the binding of instance methods to the appropriate implementation is resolved at runtime, not at compile time, based on the instance and its type. During execution, the Java Virtual Machine will first check the class of the object that the reference object points to for the method implementation. If it doesn’t exist, the JVM will look to the superclass. It will check the superclass above that if it still doesn’t find a match, and so on throughout the class hierarchy. By searching from the bottom up, the most specific implementation, or the one from the class lowest in the hierarchy, will be the one used.
Consider again the example of the GPA calculation, which calculates the average of all grades for most Student instances and the average of grades above a threshold for graduate students. Suppose you create a PersonProgram class to run your main method:
public class PersonProgram {
public static void main(String[] args){
Student john = new Master("John Adams");
john.setGrades(0.75,0.82,0.91,0.69,0.79);
Student anne = new Associate("Anne Philips");
anne.setGrades(0.75,0.82,0.91,0.69,0.79);
System.out.println(john.getName() + ": " + john.calculateGPA());
System.out.println(anne.getName() + ": " + anne.calculateGPA());
}
}
You have two Student instances: John is a Master (subclass of Graduate) and Anne is an Associate (subclass of Undergraduate). To compare easily, assume they both have the same grades for five courses. When your main method reaches the print statements, it will first call the getName() method for each instance. For John, none of the Master class, the Graduate class, or the Student class contain a getName() method. Therefore, the Master instance inherits the getName() method directly from the Person class. Next, it will need to call thecalculateGPA() method for John. The Master class does not contain a calculateGPA() method, but the Graduate class, the superclass of Master, does. Dynamic binding looks at the type of instance that John is: a Master and, therefore, a Graduate. Therefore, thecalculateGPA() method from the Graduate class is called.
For Anne, the same decision process occurs. There is no getName() method in any of the subclasses, so the class hierarchy is considered to find that Anne is an Associate, which is an Undergraduate, which is a Student, which is a Person, and the getName() method from thePerson class is called. For her GPA, neither Associate nor Undergraduate has a calculcateGPA() method, so the Student version of the method is called for Anne.
Sure enough, the console output shows two different GPAs, despite having the same grades, because dynamic method invocation allows different versions of the method to be called depending on the instance calling it.
John Adams: 0.865
Anne Philips: 0.792
The Superclass Object
As mentioned in the introduction to inheritance, all classes in Java descend from the class Object. The Object class has several methods that are, therefore, inherited by every other class. You may choose to use them directly or override them in your own classes.
· protected Object clone(): Creates and returns a copy of this object
· public boolean equals(Object obj): Indicates whether some other object is “equal to” this one
· protected void finalize(): Called by the garbage collector on an object when garbage collection determines that there are no more references to the object
· public final Class getClass(): Returns the runtime class of an object
· public int hashCode(): Returns a hashcode value for the object
· public String toString(): Returns a string representation of the object
The clone()method can be used only if the class is Cloneable. If so, the default clone() method creates a new object of the same class as the original object and with the same values for its instance variables. If your original object references another object, the clone will reference the same object. You may want to override the clone() method to create clones of both objects instead of sharing the referenced object.
The equals() method was discussed in Chapter 5. It compares two objects for equality. To compare two objects, this method uses the == operator, which gives the correct answer for primitive data types. However, for objects, it returns true if the references are equal, meaning the two variables point to exactly the same object. In most cases, you are more interested if the instance variables’ values of both objects match. To accomplish this, you should override the equals() method according to the needs of your class or program. For example, you might consider two Person objects equal if their social security number is the same. Depending on the class, there might be different possible ways to check for equality, so the purposes of your program will help you determine an appropriate implementation. Two cars might be equal if they have the same vehicle identification number (the same exact car), or you might consider them equal if the make, model, and year are the same (the same kind of car).
The finalize() method is used as part of garbage collection. There is a brief section on this topic later in this chapter. It is worth noting that Object’s default finalize() method doesn’t do anything, but it can be overridden to clean up loose ends when an object becomes garbage. Oracle notes that when and even if the finalize() method is called is uncertain, so it should not be relied upon to close resources.
The getClass()method cannot be overridden. It will always return a Class object that you can use to get information about the class, such as the class name, the superclass, or any interfaces it implements. The Class class has dozens of methods you can use to learn more about a class.
The hashCode() method returns a value representing the object’s memory address by default. By definition, if two objects are equal, their hashcode must also be equal. Therefore, when you override the equals() method, you must also override the hashCode() method to maintain this relationship.
The toString() method returns a String representation of an object. The String representation depends on the object, so you should consider overriding this method in your own classes. The toString() method is the method called when you print an object, so if you properly override the toString() method, you can easily print objects in a format useful to you and your program.
Abstract Classes and Methods
Abstract classes cannot be instantiated. They are used as superclasses when you want all instances to belong to a subclass, but the subclasses share attributes or methods that are better defined in a superclass. For example, you might have an abstract class calledShape with several subclasses, like Rectangle, Circle, and Triangle. It might not make sense to be able to create a Shape without a more specific type, so you can make Shape abstract and create all shape objects as members of a subclass. The keyword abstract is used in the class declaration, like public abstract class Shape { }.
Abstract classes can also have implemented methods and abstract methods. Abstract methods are declared without an implementation. In the Shape example, you might declare a calculateArea() method in the Shape class, but allow each subclass to implement it in its own way, since each type of shape has a different area formula. All abstract methods must eventually be implemented in one of the subclasses. All classes that contain an abstract method must be abstract themselves. Abstract methods are declared using the abstractkeyword, but instead of opening curly brackets, the declaration is completed with a semicolon, like public abstract double calculateArea();. The classes for Shape and Circle are shown as examples for the abstract class and method syntax.
public abstract class Shape {
private String color;
public Shape(String color) {
this.setColor(color);
}
public String getColor() {
return this.color;
}
public void setColor(String color) {
this.color = color;
}
public abstract double calculateArea();
}
public class Circle extends Shape {
private double radius;
private final double PI = 3.14159;
public Circle(String color, double radius) {
super(color);
this.setRadius(radius);
}
public double getRadius() {
return this.radius;
}
private void setRadius(double radius) {
this.radius = radius;
}
@Override
public double calculateArea() {
return PI * this.getRadius() * this.getRadius();
}
}
The following exercise will help you practice some of the main concepts associated with inheritance.
TRY IT OUT Inheritance, Superclasses, and Subclasses
In this exercise, you continue with the Bank Account application from an earlier exercise and adapt it to apply the principles of inheritance.
1. Start from the Bank Account application from an earlier exercise. You may want to copy the files into a new package to keep both versions separate.
2. Create two new classes called SavingsAccount and CheckingAccount, which should be subclasses of the Account class.
3. Create a constructor in the SavingsAccount class that uses the superclass constructor. Assume when customers open a SavingsAccount, they receive a bonus of 10 dollars.
4. Add a private instance variable to the CheckingAccount class that indicates how many signatories are on the account. Add a getter and setter for it.
5. Create a constructor in the CheckingAccount class that also uses the superclass constructor and adds this instance variable initialization.
6. Make the Account class abstract, ensuring that all accounts are either SavingsAccounts or CheckingAccounts.
7. Override the withdraw() method in the CheckingAccount class to ensure a minimum balance is maintained in the account. Store the minimum balance required as a static variable. If the withdrawal is too large, throw an exception, otherwise use thesuper.withdraw() method.
8. Override the toString() method from the Object class to print information about Account instances in the Account class. Override the Account class toString() method to specialize it for the subclasses in SavingsAccount and CheckingAccount.
9. Adapt the AccountManager class to try out your new classes and methods. It should look something like this:
public class AccountManager {
public static void main(String[] args) {
Account mySavings = new SavingsAccount("Save001", "10.00");
try {
mySavings.withdraw("5.00");
} catch (IllegalArgumentException e) {
System.err.println("Invalid Withdrawal");
}
Account myChecking = new CheckingAccount("Check002", "10.00", 1);
try {
myChecking.withdraw("5.00");
} catch (IllegalArgumentException e) {
System.err.println("Invalid Withdrawal");
}
myChecking.deposit("500.00");
try {
myChecking.withdraw("5.00");
} catch (IllegalArgumentException e) {
System.err.println("Invalid Withdrawal");
}
}
}
Your Account, SavingsAccount, and CheckingAccount classes should resemble these:
import java.math.BigDecimal;
public abstract class Account {
private String name;
private BigDecimal amount;
public Account(String acctName, String startAmount) {
this.setName(acctName);
this.setAmount(startAmount);
this.amount.setScale(2, BigDecimal.ROUND_HALF_UP);
System.out.println("Account Created: " + this.getName());
}
public String getName() {
return this.name;
}
public BigDecimal getAmount() {
return this.amount;
}
public void setName(String newName) {
String pattern = "^[a-zA-Z0-9]*$";
if (newName.matches(pattern)) {
this.name = newName;
}
}
private void setAmount(String newAmount){
this.amount = new BigDecimal(newAmount);
}
public void withdraw(String withdrawal) throws IllegalArgumentException{
BigDecimal desiredAmount = new BigDecimal(withdrawal);
//if desired amount is negative, throw an exception
if (desiredAmount.compareTo(BigDecimal.ZERO) < 0){
throw new IllegalArgumentException();
}
//if the amount is less than the desired amount, throw an exception
if (this.getAmount().compareTo(desiredAmount) < 0){
throw new IllegalArgumentException();
}
this.setAmount(this.getAmount().subtract(desiredAmount).toString());
System.out.println("Withdrawal: " + this);
}
public void deposit(String deposit) throws IllegalArgumentException{
BigDecimal desiredAmount = new BigDecimal(deposit);
//if desired amount is negative, throw an exception
if (desiredAmount.compareTo(BigDecimal.ZERO) < 0){
throw new IllegalArgumentException();
}
this.setAmount(this.getAmount().add(desiredAmount).toString());
System.out.println("Deposit: " + this);
}
@Override
public String toString(){
return this.getName() + ": Balance = " + this.getAmount();
}
}
import java.math.BigDecimal;
public class CheckingAccount extends Account {
private int numberOfSigs;
private static final BigDecimal minBalance = new BigDecimal("100.00");
public CheckingAccount(String acctName, String startAmount, int sigs) {
super(acctName, startAmount);
this.setNumberOfSigs(sigs);
}
public int getNumberOfSigs() {
return numberOfSigs;
}
public void setNumberOfSigs(int sigs) {
this.numberOfSigs = sigs;
}
@Override
public void withdraw(String withdrawal){
BigDecimal desiredAmount = new BigDecimal(withdrawal);
// if withdrawal would put the balance below the minimum,
// throw an exception
if (this.getAmount().compareTo(desiredAmount.add(minBalance)) < 0){
throw new IllegalArgumentException();
} else {
super.withdraw(withdrawal);
}
}
@Override
public String toString(){
return "Checking Account " + super.toString();
}
}
public class SavingsAccount extends Account {
public SavingsAccount(String acctName, String startAmount) {
super(acctName, startAmount);
this.deposit("10.00");
}
@Override
public String toString() {
return "Savings Account " + super.toString();
}
}
How It Works
Here’s how it works:
1. The Account class was made abstract because all Account instances should belong to one of the subclasses, either SavingsAccount or CheckingAccount. It was also adapted to include information hiding and accessor methods. The rest of the Account class remained unchanged. The toString() method from the Object class was overridden to allow for convenient printing of account information.
2. The SavingsAccount class is very simple; most of the methods are inherited directly from the superclass. In the SavingsAccount constructor, the super constructor is called first. The super constructor must be the first statement in a subclass constructor method. Next, an additional 10 dollars is deposited into the account as a SavingsAccount bonus. You could also save this bonus amount as a static variable. The toString() method from the Account class is overridden again to add the title “Savings Account” in front of the super toString() result.
3. The CheckingAccount class is more specialized than the SavingsAccount class. The toString() method of the Account class is similarly overridden to add the title “Checking Account.” Additionally, two new variables were added: an instance variable to store the number of signatories (people who can withdraw from the account) and a static variable to store the minimum balance required in a CheckingAccount. Note that the constructor does not require a minimum balance to create the account. In order to do this, it would be better to move the minimum balance variable to the Account class and assign a different value for each subclass, so SavingsAccount minimum would be 0 and the CheckingAccount would be 100. This would allow the super constructor to check for the minimum balance while constructing an account instance. The withdraw() method is also overridden in the CheckingAccount class to check for the minimum balance. If the balance is sufficient, the super.withdraw() method is called.
4. The AccountManager class now creates two instances, one of SavingsAccount and one of CheckingAccount. The print statements are simplified since they can now use the toString() method. You can see how the withdrawal is rejected when the balance of the CheckingAccount is too low, but after a large deposit, the withdrawal becomes possible.
PACKAGES
Packages are a Java construct that function something like folders to organize your classes, but offer additional features like namespace and access control. Chapter 3 is about using Eclipse and other development environments. In that chapter, packages were discussed briefly. Indeed in your project directory, packages serve as an organizational tool to keep related classes together and less related classes separate.
You might even be organizing the exercises in this book into packages by chapter or individual exercise. If so, you may have already noticed that packages provide unique namespaces that allow several classes with the same name to exist without conflict as long as they are located in different packages. This is because the package helps to uniquely identify a specific class based on where it is located.
This same property allows you to import predefined classes and packages from other projects or even from other developers. The import statements you’ve used already in some of the exercises are an example of this. When you started using BigDecimal, instead of doubles, to provide more control over rounding of decimal point numbers, you used the following statement at the top of your class: import java.math.BigDecimal; to import the BigDecimal class from Java’s math package.
In order for a program to identify a package by name, the program should be executed from the directory that contains the package, or the CLASSPATH must include the path to the package. The CLASSPATH tells the Java Virtual Machine where to find classes and packages when needed.
INTERFACES
An interface defines a protocol, or contract, of behavior. It resembles something like a template for a class, as it specifies what a class must do, but not how to do it. Instead of a public class ClassName heading, you should use the public interface InterfaceNameheading. Interfaces contain headings for public methods without implementations. These are the same as abstract methods discussed earlier in the chapter, but because methods in interfaces are necessarily abstract, there is no need to use the abstract keyword in an interface. Comments should be provided with methods to make it clear what the method is intended for, especially since there is no implementation to read.
Interfaces must have either the public access modifier or no access modifier, indicating they are only accessible within the same package. An interface may have variables only if they are final, static, and initialized with a constant value.
Similar to a subclass extending a superclass, a class can implement an interface. If a class implements an interface, it must implement all methods defined in the interface. While a subclass can only extend one superclass, a single class can implement any number of interfaces. Because the methods in interfaces are unimplemented, there is no risk of ambiguity, and the class will have one single implementation for each method. Methods in an interface are implicitly assumed to be public, so the public access modifier is not necessary for interface methods.
Interfaces can extend one or more other interfaces. Any class implementing an interface must implement all methods in the interface itself, as well as any interfaces it extends.
Polymorphism applies to interfaces similar to superclasses. If the Shape class implements an interface Measurable, then you could have a variable of type Measurable referencing a Rectangle object or a variable of type Shape referencing a Circle object. Consider the following Measurable interface for an example of interface syntax.
/**
* An interface for measuring methods.
*/
public interface Measurable{
/** Returns the perimeter of an object */
double calculatePerimeter();
/** Returns the area of an object */
double calculateArea();
}
Then, if Shape implements Measurable, the subclasses of Shape would also implement Measurable.
public abstract class Shape implements Measurable {
private String color;
public Shape(String color) {
this.setColor(color);
}
public String getColor() {
return this.color;
}
public void setColor(String color) {
this.color = color;
}
}
public class Circle extends Shape {
private double radius;
private final double pi = 3.14159;
public Circle(String color, double radius) {
super(color);
this.setRadius(radius);
}
public double getRadius() {
return this.radius;
}
private void setRadius(double radius) {
this.radius = radius;
}
@Override
public double calculateArea() {
return pi * this.getRadius() * this.getRadius();
}
@Override
public double calculatePerimeter() {
return 2 * pi * this.getRadius();
}
}
The following exercise will give you an opportunity to try out interfaces for yourself. While you work through it, keep in mind the similarities and differences between inheritance and interfaces. As you gain experience, you’ll see how one or the other might be better suited to certain situations.
TRY IT OUT Implementing Interfaces
To compare and contrast with superclasses, this exercise demonstrates the implementation of interfaces using the Bank Account examples from earlier.
1. You may want to create a new package to keep your bank account classes separated from other account classes you’ve been working on already.
2. Create a new interface the same way you do a class, but by selecting New Interface instead of New Class. Name it Accountable.
3. Add four methods to the Accountable interface:
4. boolean isValidDeposit();
5. void deposit();
6. boolean isValidWithdrawal();
void withdraw();
7. Write meaningful comments for the interface and each method. If you type /** and press Enter, the multiple-line comment block will be generated for you. Your Accountable interface may look like this:
8. /**
9. * an interface to manage accounting behavior
10. */
11. public interface Accountable {
12.
13. /**
14. * Returns true if a specified String is a valid amount to deposit.
15. * @param deposit: the amount to be deposited
16. */
17. boolean isValidDeposit(String deposit);
18.
19. /**
20. * Adds the specified amount to the balance.
21. * @param deposit: the amount to be deposited
22. * @throws IllegalDeposit
23. */
24. void deposit(String deposit) throws IllegalDeposit;
25.
26. /**
27. * Returns true if a specified String is a valid amount to withdraw.
28. * @param withdrawal: the amount to be withdrawn
29. */
30. boolean isValidWithdrawal(String withdrawal);
31.
32. /**
33. * Subtracts the specified amount from the balance.
34. * @param withdrawal: the amount to be withdrawn
35. * @throws IllegalWithdrawal
36. */
37. void withdraw(String withdrawal) throws IllegalWithdrawal;
}
38.Create a new class SavingsAccount that implements the Accountable interface. You can add interfaces in the middle of the New Java Class window, or you can type implements Accountable yourself after the class is created. If you add it from the window, the necessary methods will automatically be created for you to implement.
39. The SavingsAccount class should have two instance variables: name and amount. Follow the principle of information hiding. Use the isValid methods to check if a String is numeric and if it can be represented as a BigDecimal. Before making a deposit or withdrawal, use the isValid methods to check if the transaction is valid. Override the toString() method to print information about your accounts. Your SavingsAccount class may look like this:
40. import java.math.BigDecimal;
41.
42. public class SavingsAccount implements Accountable {
43. private String name;
44. private BigDecimal amount;
45.
46. public SavingsAccount(String name, String amount) throws IllegalAccount {
47. if (isValidDeposit(amount)) {
48. this.setName(name);
49. this.setAmount(new BigDecimal(amount));
50. } else {
51. throw new IllegalAccount();
52. }
53. }
54.
55. @Override
56. public boolean isValidDeposit(String deposit) {
57. BigDecimal temp;
58. try {
59. temp = new BigDecimal(deposit);
60. } catch (Exception e) {
61. return false;
62. }
63. return temp.compareTo(BigDecimal.ZERO) > 0;
64. }
65.
66. @Override
67. public void deposit(String deposit) throws IllegalDeposit {
68. if (isValidDeposit(deposit)) {
69. this.setAmount(this.getAmount().add(new BigDecimal(deposit)));
70. } else {
71. throw new IllegalDeposit();
72. }
73. }
74.
75. @Override
76. public boolean isValidWithdrawal(String withdrawal) {
77. BigDecimal temp;
78. try {
79. temp = new BigDecimal(withdrawal);
80. } catch (Exception e) {
81. return false;
82. }
83. if (temp.compareTo(this.getAmount()) < 0) {
84. return true;
85. }
86. return false;
87. }
88.
89. @Override
90. public void withdraw(String withdrawal) throws IllegalWithdrawal {
91. if (isValidWithdrawal(withdrawal)) {
92. this.setAmount(this.getAmount()
93. .subtract(new BigDecimal(withdrawal)));
94. } else {
95. throw new IllegalWithdrawal();
96. }
97. }
98.
99. public String getName() {
100. return name;
101. }
102.
103. private void setName(String name) {
104. this.name = name;
105. }
106.
107. public BigDecimal getAmount() {
108. return amount;
109. }
110.
111. private void setAmount(BigDecimal amount) {
112. this.amount = amount;
113. }
114.
115. @Override
116. public String toString() {
117. return "SavingsAccount " + this.getName()
118. + ": Balance = " + this.getAmount();
119. }
}
120. Create another new class called CheckingAccount. Structure it similarly to the SavingsAccount class. This time add a minBalance static variable to maintain a minimum balance of 100 dollars in all checking accounts. Override the toString() method to print information about your accounts. Your CheckingAccount class may look like this:
121. import java.math.BigDecimal;
122.
123. public class CheckingAccount implements Accountable {
124. private String name;
125. private BigDecimal amount = new BigDecimal("0.00");
126. private static BigDecimal minBalance = new BigDecimal("100.00");
127.
128. public CheckingAccount(String name, String amount) throws IllegalAccount {
129. if (isValidDeposit(amount)) {
130. this.setName(name);
131. this.setAmount(new BigDecimal(amount));
132. } else {
133. throw new IllegalAccount();
134. }
135. }
136.
137. @Override
138. public boolean isValidDeposit(String deposit) {
139. BigDecimal temp;
140. try {
141. temp = new BigDecimal(deposit);
142. } catch (Exception e) {
143. return false;
144. }
145. if (temp.compareTo(new BigDecimal.ZERO) > 0) {
146. if (temp.add(this.getAmount()).compareTo(minBalance) > 0) {
147. return true;
148. }
149. }
150. return false;
151. }
152.
153. @Override
154. public void deposit(String deposit) throws IllegalDeposit {
155. if (isValidDeposit(deposit)) {
156. this.setAmount(this.getAmount().add(new BigDecimal(deposit)));
157. } else {
158. throw new IllegalDeposit();
159. }
160. }
161.
162. @Override
163. public boolean isValidWithdrawal(String withdrawal) {
164. BigDecimal temp;
165. try {
166. temp = new BigDecimal(withdrawal);
167. } catch (Exception e) {
168. return false;
169. }
170. if (temp.compareTo(this.getAmount().add(minBalance)) < 0) {
171. return true;
172. }
173. return false;
174. }
175.
176. @Override
177. public void withdraw(String withdrawal) throws IllegalWithdrawal {
178. if (isValidWithdrawal(withdrawal)) {
179. this.setAmount(this.getAmount()
180. .subtract(new BigDecimal(withdrawal)));
181. } else {
182. throw new IllegalWithdrawal();
183. }
184. }
185.
186. public String getName() {
187. return name;
188. }
189.
190. private void setName(String name) {
191. this.name = name;
192. }
193.
194. public BigDecimal getAmount() {
195. return amount;
196. }
197.
198. private void setAmount(BigDecimal amount) {
199. this.amount = amount;
200. }
201.
202. @Override
203. public String toString() {
204. return "CheckingAccount " + this.getName()
205. + ": Balance = " + this.getAmount();
206. }
207.
}
208. Create an AccountManager class to test your interface-based application. You can reuse parts of the AccountManager class from the earlier exercise. It may look different from the one here, but should function in mostly the same way:
209. public class AccountManager {
210.
211. public static void main(String[] args) {
212. Accountable mySavings, myChecking;
213. try {
214. mySavings = new SavingsAccount("Save001", "10.00");
215. System.out.println(mySavings);
216.
217. mySavings.withdraw("5.00");
218. System.out.println(mySavings);
219.
220. myChecking = new CheckingAccount("Check002", "10.00");
221. System.out.println(myChecking);
222.
223. myChecking = new CheckingAccount("Check002", "101.00");
224. System.out.println(myChecking);
225.
226. myChecking.withdraw("5.00");
227. System.out.println(myChecking);
228.
229. myChecking.deposit("500.00");
230. System.out.println(myChecking);
231.
232. myChecking.withdraw("5.00");
233. System.out.println(myChecking);
234. } catch (IllegalAccount a) {
235. System.out.println("Invalid Account Opening");
236. } catch (IllegalDeposit d){
237. System.out.println("Invalid Deposit");
238. } catch (IllegalWithdrawal d){
239. System.out.println("Invalid Withdrawal");
240. }
241. }
}
How It Works
Here’s how it works:
1. The Accountable interface prescribes the types of behavior an Accountable class should include, namely deposit and withdraw. Some new exception types were defined to differentiate between the problems that may occur. The commenting describes the purpose of each method and any parameters or exceptions.
2. The SavingsAccount class implements the methods laid out in the Accountable interface. It also includes getters and setters for the instance variables and a toString() method for printing.
3. The CheckingAccount class is very similar to the SavingsAccount class, with a few small changes to account for the different rules attached to checking accounts, the minimum balance in particular. It is easy to see how these classes could easily be merged with a minimum balance of 0 for savings accounts. However, if more differences are expected or more types of accounts might be added, an interface with implementing classes may be appropriate.
4. The AccountManager class was organized differently than the previous exercise simply to show an alternate approach. Here the entire method is inside a try block, with three catch blocks to alert the user to problems with account creation, depositing, or withdrawing.
GARBAGE COLLECTION
Garbage collection is a way to reclaim memory from objects once they are no longer in use. You saw in Chapter 6 the OutOfMemoryError that’s thrown when there is insufficient heap space for creating a new object. By removing unused objects from memory, more is available for new and existing objects. One difference between C++ and Java is that Java incorporates automatic garbage collection, so the programmer does not need to manage memory as much themselves.
An object is eligible for garbage collection when it is no longer accessible through any variable. However, if one object refers to another and that object in turn refers to the first in a cyclical dependency, they may both be eligible for garbage collection. Once an object is eligible for garbage collection, the garbage collector will eventually remove it from memory.
Recall how when a new object is created, the constructor method is called to initialize it. There is also a finalize method that’s invoked just before the object is destroyed. This method is built in to the Object superclass, but you can override it in your classes to perform special actions before an object is destroyed.
To illustrate what is happening with garbage collection, consider the following code snippet.
class PersonManager {
public static void main(String args[]) {
Person p1 = new Person("Adam");
Person p2 = new Person("Robert");
p1 = p2;
...//Rest of program
}
}
A Person variable p1 is declared and initialized to a newly created Person object with the name Adam. A second Person variable p2 is declared and initialized to another newly created Person object with the name Robert. See Figure 7.4.
Figure 7.4
In the next statement, the variable p1 is reassigned to the reference object of p2. See Figure 7.5.
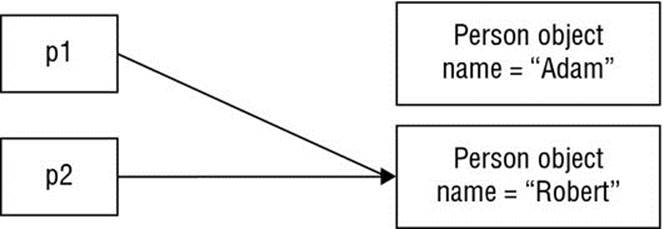
Figure 7.5
The Person object with name Adam no longer has any references pointing to it. So it becomes eligible for garbage collection. See Figure 7.6.
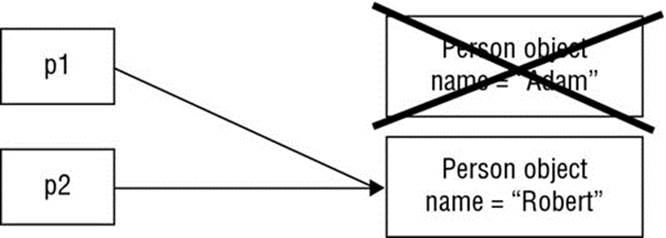
Figure 7.6
All materials on the site are licensed Creative Commons Attribution-Sharealike 3.0 Unported CC BY-SA 3.0 & GNU Free Documentation License (GFDL)
If you are the copyright holder of any material contained on our site and intend to remove it, please contact our site administrator for approval.
© 2016-2026 All site design rights belong to S.Y.A.