Mastering JavaScript Promises (2015)
Chapter 7. Promises in Angular.js
In the last chapter, we learned about Node.js and its implementations. We also saw how Node.js can be used to amplify the real-time web and how promises can be used to deliver more efficient apps.
In this chapter, we examine another side of promises implementation, promises in Angular.js.
As we go along, we will learn what is Angular.js, why it was created, what benefits it will give us, and lastly, how promises get implemented in Angular.js.
Let's get started with the introduction of Angular.js and how to set it up. Some sample code and working examples will be provided. We will then move to promises in Angular.js.
The evolution of Angular.js
Since the birth of single-page web applications, there have been a number of ways one can write code for such apps. The usage of single-page web apps has been increasing rapidly due to the fact that they are faster, platform independent, and lightweight for all types of devices and auto-adjust to all screen sizes. This is the main reason why engineers want to develop single-page web apps and are more interested in using libraries and frameworks that ease their routine work.
The inception of Angular.js was on the same concept. The core of Angular.js is that it employs the declarative programming concept that states user interfaces should be used to connect software services, while we can use imperative programming to define business logic.
Angular.js's framework extends classical HTML (HTML5) to couple the content together. It uses a two-way data binding technique that is helpful in the automatic synchronization of both model and views. With all these features, Angular.js is independent of DOM, which helps in increased performance and security standards of coupled modules.
The most notable nonfunctional property of Angular.js is the brain that maintains it—Google.
Google is the force behind the development, maintaining, and releasing of different versions of Angular.js.
Angular.js was first released in the year 2009 with the aim of providing client-side MVC (model view controller) implementation that can ease both development and testing of applications. Also, it provides a toolset embedded for creating rich Internet applications and tools for modern real-time web applications.
The structure of the Angular.js document
Angular.js uses the HTML file at the base document for its implementation. Its syntax is very simple and easy to remember. The structure of the page is a simple HTML file with ng at its start. This is called the Angular.js directive and it can be used with HTML or can be linked as a individual document.
To start using Angular.js, you need to add a few lines and it will be up and running. For using Angular.js, perform the following steps:
1. Add the ng directive; you only need to add this simple code to start using the Angular.js:
<html ng-app="opdsys">
2. Add the library to the file:
<script type="text/JavaScript" src="js/lib/angular.min.js"></script>
3. Now, define the variable within the HTML tag like this:
<tr ng-repeat= "reservations in reservation| archive" >
4. Finally, you can use it by calling out the variable:
<td> {{reservations.id}} < /td>
Getting started with Angular.js
To download Angular.js, go to https://angularjs.org/ and hit the Download button. The following dialog box will appear:

Select the stable and minified build and click on Download. This file is a compact one with all the whitespaces removed so that it loads faster. You need to save this file to your working directory as you will need it in the following sections of this chapter.
Creating your first Angular.js file
We will use the downloaded file to include it in our HTML. From there, it will show its magic on how Angular.js is a two-way banded framework and show the results in real time.
Step 1 – create the HTML 5 doc
Create a file like this:
<html>
<head>
<title></title>
</head>
<body>
</body>
</html>
Step 2 – add the JavaScript file to it
Create a JavaScript file with the following code:
<html>
<head>
<title> OPD System</title>
<script type="text/javascript" src='angular.min.js' ></script>
</head>
<body> </body>
Add the Angular.js directive in the preceding code:
<html ng-app >
<head>
<title>OPD System</title>
<script type="text/javascript" src='angular.min.js' ></script>
</head>
<body>
</body>
That's it; you now have a working Angular.js file for further use.
How to use Angular.js on your local machine
There are several ways you can sample Angular.js on your local machine. One way is to use your locally installed server. The XAMPP or Node.js server can be the best option to use for executing the Angular.js code.
You can download the XAMPP server from https://www.apachefriends.org/download.html and install it over your PC. Once you are done with installation, you can just drop your Angular.js files/folders in the htdocs folder and access these files by simply visitinghttp://localhost/source/, where source should be the folder name inside htdocs.
Using Node.js, simply paste the following code to a text file and save it as app.js:
//sample node server from official site at https://nodejs.org/
var http = require('http');
http.createServer(function (req, res) {
res.writeHead(200, {'Content-Type': 'text/plain'});
res.end('Hello World\n');
}).listen(1337, '127.0.0.1');
console.log('Server running at http://127.0.0.1:1337/');
Save this file to any folder on your drive. Now, open Command Prompt by typing cmd in the Run utility of your Windows machine and go to the folder where app.js is located.
Once you reach there, please type in the following lines and hit Enter:
> node app.js
You will see the response on screen like this:
Server running at http://127.0.0.1:1337/
Once you get this response, your server is ready to use. Drop your Angular.js files in the same folder where the app.js file is located and access it using a browser like this:
http://127.0.0.1:1337/source/
Here, source is the folder where app.js is located.
What would be your preference for the server?
You can use any of these servers as they both are open source and both have great adoptability for the Angular.js. It's completely up to you which one you can use. To make things more understandable for you, I chose Node.js as it's very handy and easy to maintain with more performance output.
Key elements of Angular.js
Before we get into how promises are implemented in Angular.js, we will first look at the key elements of Angular.js and how they work for us.
Within this section, you will learn the key elements of Angular.js. The skills acquired will be used in the forthcoming sections of this chapter. You will then be able to apply the concepts of promises in Angular.js and write your own custom-made promises in Angular.js as per your need.
The most common elements we will discuss are:
· Supplying scope data
· Filtering output
· Controlling scopes
· Routing views
Supplying scope data
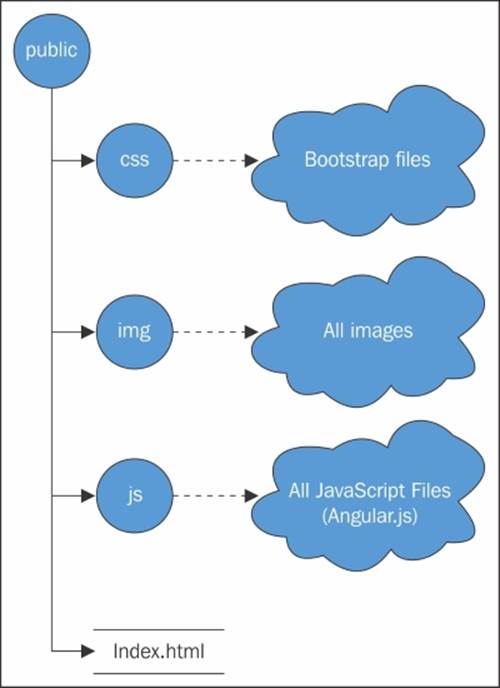
We will play around with the frontend HTML, CSS, and JavaScript to display the results in the browser. We will also get bootstrap from http://getbootstrap.com/getting-started/#download to give cosmetic touches in the code:
1. The folder structure must be as defined in the following image. To demonstrate how code works, we will be using the Node.js server. The folder name public needs to deploy at the folder where app.js is located. Once the server has started, navigate tohttp://127.0.0.1:3000 and you will see the app running there.
2. We will create an app for available services at a subway station. Let's call this station Stratford from where we will be looking at which subway service is available.
3. Create a file in the js/controller folder and name it app.js. Here is how this file will look like:
4. function AppCtrl ($scope) {
5. $scope.serviceName = {
6. "CRTL": {
7. "code": "CRTL",
8. "name": "Central Line Service",
9. "currentLocation": "Oxford Circus",
10.
11. },
12.
13. "JUBL": {
14. "code": "JUBL",
15. "name": "Jubblie Line Service",
16. "currentLocation": "westham",
17.
18. },
19.
20. "DLR": {
21. "code": "DLR",
22. "name": "Docland Ligt railway",
23. "currentLocation": " westham",
24.
25. },
26.
27. };
}
28. Now, at the root of the public folder create an HTML file, name it as index.html, and add the following code:
29.<html ng-app>
30.<head>
31. <title>Services listing </title>
32. <script type="text/javascript" src="js/lib/angular.min.js"></script>
33. <script type="text/javascript" src="js/controllers/app.js"></script>
34. <link rel="stylesheet" type="text/css" href="css/bootstrap.min.css">
35. <link rel="stylesheet" type="text/css" href="css/bootstrap-responsive.min.css">
36.</head>
37.<body>
38. < ul ng-repeat="services in services">
39. <li>{{serviceName.code}}</li>
40. <li>{{serviceName.name}}</li>
41. </ul> </body>
</html>
Now, when you hit refresh at the browser, it will show you which services are away from Stratford station. However, how can this be made possible?
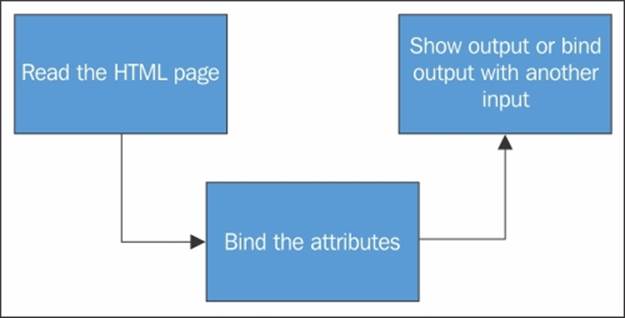
At the top of the HTML doc, there is an ng directive that will create the Angular.js app, and then we can include the JavaScript files; one from Angular.js's minified file and the other is our created JavaScript file that supplies scope to let HTML display it. This all happened due to one variable declaration, $scope.
$scope is responsible for binding data and providing output within the supplied scope. This helps Angular.js to maintain its uniqueness to perform the computation in an isolated or defined area of influence, that's all!
Filtering data
Sometimes, we need to have a specific format of data to display data from our app. Within Angular.js, it's as easy as simply supplying some operators to the element where we want to filter it.
The operator used for this purpose is the pipe, |. As soon as we add a pipe sign, Angular.js knows that we want to filter out something. Let's take a look at two of the most important filters of all:
To convert text in to uppercase at the page output, consider the following code:
<html ng-app>
<head>
<title>Services listing </title>
<script type="text/javascript" src="js/lib/angular.min.js"></script>
<script type="text/javascript" src="js/controllers/app.js"></script>
<link rel="stylesheet" type="text/css" href="css/bootstrap.min.css">
<link rel="stylesheet" type="text/css" href="css/bootstrap-responsive.min.css">
</head>
<body>
<div class="container" ng-controller="AppCtrl">
<h1>Services from Stratford station</h1>
<ul>
<li ng-repeat="service in service">{{serviceName.code}}
- {{serviceName.name | uppercase}}</li>
</ul>
</div>
</body>
</html>
The most helpful feature of filtering out data is to get an entire object as JSON. This will not only help in the debugging mode, but it's also used to validate the supplied data to see if the format is correct.
Consider the following code which will not only filter out data as a JSON object, but also validate it before displaying the output:
<html ng-app>
<head>
<title>Services listing </title>
<script type="text/javascript" src="js/lib/angular.min.js"></script>
<script type="text/javascript" src="js/controllers/app.js"></script>
<link rel="stylesheet" type="text/css" href="css/bootstrap.min.css">
<link rel="stylesheet" type="text/css" href="css/bootstrap-responsive.min.css">
</head>
<body>
<div class="container" ng-controller="AppCtrl">
<h1>Services from Stratford station</h1>
<ul>
<li ng-repeat="service in service">{{serviceName.code}}
- {{serviceName | json}}</li>
</ul>
</div>
</body>
</html>
This will return the entire JavaScript object as JSON. You can now validate data or get into the debugging mode by getting your hands dirty, digging the JavaScript code and adding alert().
Controlling scopes
We can also supply an entire function to a particular stream instead of a single variable; this will help us interlink the different parts of any app without much hassle. Consider the following JavaScript code which is displaying how we are supplying an entire function to a particular stream:
function AppCtrl ($scope) {
$scope.serviceName = {
"CRTL": {
"code": "CRTL",
"name": "Central Line Service",
"currentLocation": "Oxford Circus",
},
"JUBL": {
"code": "JUBL",
"name": "Jubblie Line Service",
"currentLocation": "westham",
},
"DLR": {
"code": "DLR",
"name": "Docland Ligt railway",
"currentLocation": " westham",
},
};
$scope.curretStation = null;
$scope.setAirport = function (code) {
$scope.curretStation = $scope.service[code];
};
}
In the last three lines, we added a function that will be fully passed on to the calling ng directive at the HTML output. The code of HTML will look like this:
<html ng-app>
<head>
<title>Services listing </title>
<script type="text/javascript" src="js/lib/angular.min.js"></script>
<script type="text/javascript" src="js/controllers/app.js"></script>
<link rel="stylesheet" type="text/css" href="css/bootstrap.min.css">
<link rel="stylesheet" type="text/css" href="css/bootstrap-responsive.min.css">
</head>
<body>
<div class="container" ng-controller="AppCtrl">
<h1>Services from Stratford station</h1>
<ul>
<li ng-repeat="Services in ServicesName">
<a href="" ng-click="setAirport(Services.code)">{{Services.code}} - {{Services.code}}</a>
</li>
</ul>
<p ng-show="currentStation">Current Services: {{currentStationname}}</p>
</div>
</body>
</html>
Notice that we are writing very neat code with very few updates. We can achieve many changes as desired in the last lines before the body tag is completed; you will notice how we have passed an entire function using Angular.js.
Routing views
Conventional websites were made up of many pages linked together via an href tag. Their content was hard to read and required more maintenance than ever. With the emergence of single page web apps, the information appeared on the browser instantly as the views can be routed from one link to another without hitting the server repeatedly, or without having to wait for the page to load.
From our examples, we will add another file as a module and place it under the root of the JS folder. The code will look like this:
angular.module('services', [])
.config(airlineRouter);
function airlineRouter ($routeProvider) {
$routeProvider
.when('/', {templateUrl: 'partials/destinations.html',
controller: 'DestinationsCtrl'})
.when('/Services/:airportCode', {
templateUrl: 'partials/stations.html',
controller: 'ServiceCtrl'
})
.when('/service', {
template: '<h3>Flights</h3> {{Services | json}}',
controller: 'FlightsCtrl'})
.when('/reservations', {
template: '<h3>Your Reservations</h3> {{Services | json}}',
controller: 'ReservationsCtrl'});
}
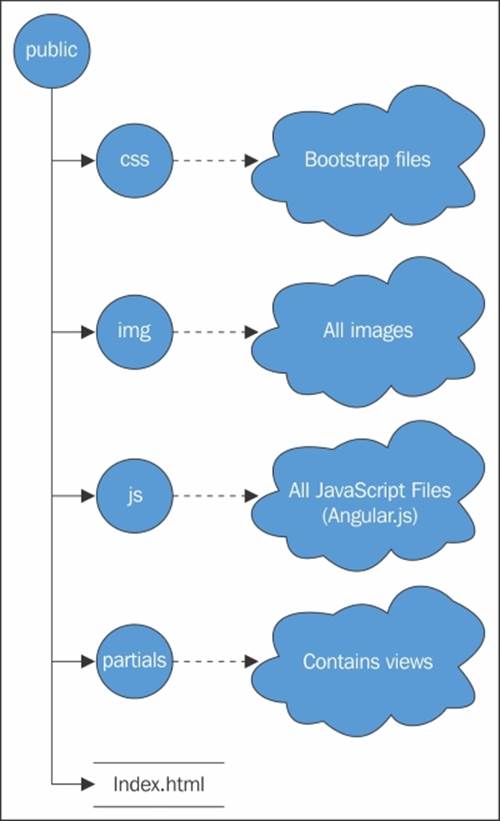
This will generate views dynamically on the fly at the browser without hitting the server. We need a couple of more files to add more dynamicity. We will add the partials folder in which we placed two more files named services and destination.
The destination.html file will look like this:
<div class="pull-left span6">
<h3>All Destinations</h3>
<ul>
<li ng-repeat="destinationin destinations">
<a href="" ng-click="setDestinations (service.code)">{{name.code}} - {{destination.name}}</a>
</li>
</ul>
</div>
<div class="span5" ng-include src="sidebarURL"></div>
The services.html file will look like this:
<div ng-show="CurrentServices">
<h3>{{CurrentServices.name}}</h3>
<h4>Destinations</h4>
<ul>
<li ng-repeat="destination in CurrentServices.destinations">
<a ng-href="#/airports/{{destination}}">{{destination}}</a>
</li>
</ul>
</div>
After editing the index.html file at the root of the public folder, the view will look like this:
<html ng-app="ServiceCtrl">
<head>
<title>Demo</title>
<script type="text/javascript" src="js/lib/angular.min.js"></script>
<script type="text/javascript" src="js/controllers/app.js"></script>
<script type="text/javascript" src="js/controllers/destinations.js"></script>
<script type="text/javascript" src="js/controllers/services.js"></script>
<script type="text/javascript" src="js/controllers/reservations.js"></script>
<script type="text/javascript" src="js/controllers/station.js"></script>
<script type="text/javascript" src="js/app.js"></script>
<link rel="stylesheet" type="text/css" href="css/bootstrap.min.css">
<link rel="stylesheet" type="text/css" href="css/bootstrap-responsive.min.css">
</head>
<body>
<div class="container" ng-controller="AppCtrl">
<h1>AngulAir</h1>
<ul class="nav nav-pills">
<li ng-class="destinationsActive">
<a href="#">Destinations</a>
</li>
<li ng-class="servicesActive">
<a href="#/services">services</a>
</li>
<li ng-class="reservationsActive">
<a href="#/reservations">Reservations</a>
</li>
</ul>
<div ng-view></div>
</div>
</body>
</html>
Implementing promises in Angular.js
Promise is all about how async behavior can be applied on a certain part of an application or on the whole. There is a list of many other JavaScript libraries where the concept of promises exists but in Angular.js, it's present in a much more efficient way than any other client-side applications.
Promises comes in two flavors in Angular.js, one is $q and the other is Q. What is the difference between them? We will explore it in detail in the following sections. For now, we will look at what promise means to Angular.js.
There are many possible ways to implement promises in Angular.js. The most common one is to use the $q parameter, which is inspired by Chris Kowal's Q library. Mainly, Angular.js uses this to provide asynchronous methods' implementations.
With Angular.js, the sequence of services is top to bottom starting with $q, which is considered as the top class; within it, many other subclasses are embedded, for example, $q.reject() or $q.resolve(). Everything that is related to promises in Angular.js must follow the $q parameters.
Starting with the $q.when() method, it seems like it creates a method immediately rather it only normalizes the value that may or may not create the promise object. The usage of $q.when() is based on the value supplied to it. If the value provided is a promise,$q.when() will do its job and if it's not, a promise value, $q.when() will create it.
The schematics of using promises in Angular.js
Since Chris Kowal's Q library is the global provider and inspiration of promises callback returns, Angular.js also uses it for its promise implementations. Many of Angular.js services are by nature promise oriented in return type by default. This includes $interval,$http, and $timeout. However, there is a proper mechanism of using promises in Angular.js. Look at the following code and see how promises maps itself within Angular.js:
var promise = AngularjsBackground();
promise.then(
function(response) {
// promise process
},
function(error) {
// error reporting
},
function(progress) {
// send progress
});
All of the mentioned services in Angular.js return a single object of promise. They might be different in taking parameters in, but in return all of them respond back in a single promise object with multiple keys. For example, $http.get returns a single object when you supply four parameters named data, status, header, and config.
$http.get('/api/tv/serials/sherlockHolmes ')
.success(function(data, status, headers, config) {
$scope.movieContent = data;
});
If we employ the promises concept here, the same code will be rewritten as:
var promise = $http.get('/api/tv/serials/sherlockHolmes ')
promise.then(
function(payload) {
$scope.serialContent = payload.data;
});
The preceding code is more concise and easier to maintain than the one before this, which makes the usage of Angular.js more adaptable to the engineers using it.
Promise as a handle for callback
The implementation of promise in Angular.js defines your use of promise as a callback handle. The implementations not only define how to use promise for Angular.js, but also what steps one should take to make the services as "promise-return". This states that you do something asynchronously, and once your said job is completed, you have to trigger the then() service to either conclude your task or to pass it to another then() method: /asynchronous _task.then().then().done().
In simpler form, you can do this to achieve the concept of promise as a handle for call backs:
angular.module('TVSerialApp', [])
.controller('GetSerialsCtrl',
function($log, $scope, TeleService) {
$scope.getserialListing = function(serial) {
var promise =
TeleService.getserial('SherlockHolmes');
promise.then(
function(payload) {
$scope.listingData = payload.data;
},
function(errorPayload) {
$log.error('failure loading serial', errorPayload);
});
};
})
.factory('TeleService', function($http) {
return {
getserial: function(id) {
return $http.get(''/api/tv/serials/sherlockHolmes' + id);
}
}
});
Blindly passing arguments and nested promises
Whatever service of promise you use, you must be very sure of what you are passing and how this can affect the overall working of your promise function. Blindly passing arguments can cause confusion for the controller as it has to deal with its own results too while handling other requests. Say we are dealing with the $http.get service and you blindly pass too much of load to it. Since it has to deal with its own results too in parallel, it might get confused, which may result in callback hell. However, if you want to post-process the result instead, you have to deal with an additional parameter called $http.error. In this way, the controller doesn't have to deal with its own result, and calls such as 404 and redirects will be saved.
You can also redo the preceding scenario by building your own promise and bringing back the result of your choice with the payload that you want with the following code:
factory('TVSerialApp', function($http, $log, $q) {
return {
getSerial: function(serial) {
var deferred = $q.defer();
$http.get('/api/tv/serials/sherlockHolmes' + serial)
.success(function(data) {
deferred.resolve({
title: data.title,
cost: data.price});
}).error(function(msg, code) {
deferred.reject(msg);
$log.error(msg, code);
});
return deferred.promise;
}
}
});
By building a custom promise, you have many advents. You can control inputs and output calls, log the error messages, transform the inputs into desired outputs, and share the status by using the deferred.notify(mesg) method.
Deferred objects or composed promises
Since custom promise in Angular.js can be hard to handle sometimes and can fall into malfunction in the worse case, the promise provides another way to implement itself. It asks you to transform your response within a then method and returns a transformed result to the calling method in an autonomous way. Considering the same code we used in the previous section:
this.getSerial = function(serial) {
return $http.get('/api/tv/serials/sherlockHolmes'+ serial)
.then(
function (response) {
return {
title: response.data.title,
cost: response.data.price
});
});
};
The output we yield from the preceding method will be a chained, promised, and transformed. You can again reuse the output for another output, chain it to another promise, or simply display the result.
The controller can then be transformed into the following lines of code:
$scope.getSerial = function(serial) {
service.getSerial(serial)
.then(function(serialData) {
$scope.serialData = serialData;
});
};
This has significantly reduced the lines of code. Also, this helps us in maintaining the service level since the automechanism of failsafe in then() will help it to be transformed into failed promise and will keep the rest of the code intact.
Dealing with the nested calls
While using internal return values in the success function, promise code can sense that you are missing one most obvious thing: the error controller. The missing error can cause your code to stand still or get into a catastrophe from which it might not recover. If you want to overcome this, simply throw the errors. How? See the following code:
this.getserial = function(serial) {
return $http.get('/api/tv/serials/sherlockHolmes' + serial)
.then(
function (response) {
return {
title: response.data.title,
cost: response.data.price
});
},
function (httpError) {
// translate the error
throw httpError.status + " : " +
httpError.data;
});
};
Now, whenever the code enters into an error-like situation, it will return a single string, not a bunch of $http statutes or config details. This can also save your entire code from going into a standstill mode and help you in debugging. Also, if you attached log services, you can pinpoint the location that causes the error.
Concurrency in Angular.js
We all want to achieve maximum output at a single slot of time by asking multiple services to invoke and get results from them. Angular.js provides this functionality via its $q.all service; you can invoke many services at a time and if you want to join all/any of them, you just need then() to get them together in the sequence you want.
Let's get the payload of the array first:
[
{ url: 'myUr1.html' },
{ url: 'myUr2.html' },
{ url: 'myUr3.html' }
]
And now this array will be used by the following code:
service('asyncService', function($http, $q) {
return {
getDataFrmUrls: function(urls) {
var deferred = $q.defer();
var collectCalls = [];
angular.forEach(urls, function(url) {
collectCalls.push($http.get(url.url));
});
$q.all(collectCalls)
.then(
function(results) {
deferred.resolve(
JSON.stringify(results))
},
function(errors) {
deferred.reject(errors);
},
function(updates) {
deferred.update(updates);
});
return deferred.promise;
}
};
});
A promise is created by executing $http.get for each URL and is added to an array. The $q.all function takes the input of an array of promises, which will then process all results into a single promise containing an object with each answer. This will get converted in JSON and passed on to the caller function.
The result might be like this:
[
promiseOneResultPayload,
promiseTwoResultPayload,
promiseThreeResultPayload
]
The combination of success and error
The $http returns a promise; you can define its success or error depending on this promise. Many think that these functions are a standard part of promise—but in reality, they are not as they seem to be.
Using promise means you are calling then(). It takes two parameters—a callback function for success and a callback function for failure.
Imagine this code:
$http.get("/api/tv/serials/sherlockHolmes")
.success(function(name) {
console.log("The tele serial name is : " + name);
})
.error(function(response, status) {
console.log("Request failed " + response + " status code: " + status);
};
This can be rewritten as:
$http.get("/api/tv/serials/sherlockHolmes")
.success(function(name) {
console.log("The tele serial name is : " + name);
})
.error(function(response, status) {
console.log("Request failed " + response + " status code: " + status);
};
$http.get("/api/tv/serials/sherlockHolmes")
.then(function(response) {
console.log("The tele serial name is :" + response.data);
}, function(result) {
console.log("Request failed : " + result);
};
One can use either the success or error function depending on the choice of a situation, but there is a benefit in using $http—it's convenient. The error function provides response and status, and the success function provides the response data.
This is not considered as a standard part of a promise. Anyone can add their own versions of these functions to promises, as shown in the following code:
//my own created promise of success function
promise.success = function(fn) {
promise.then(function(res) {
fn(res.data, res.status, res.headers, config);
});
return promise;
};
//my own created promise of error function
promise.error = function(fn) {
promise.then(null, function(res) {
fn(res.data, res.status, res.headers, config);
});
return promise;
};
The safe approach
So the real matter of discussion is what to use with $http? Success or error? Keep in mind that there is no standard way of writing promise; we have to look at many possibilities.
If you change your code so that your promise is not returned from $http, when we load data from a cache, your code will break if you expect success or error to be there.
So, the best way is to use then whenever possible. This will not only generalize the overall approach of writing promise, but also reduce the prediction element from your code.
Route your promise
Angular.js has the best feature to route your promise. This feature is helpful when you are dealing with more than one promise at a time. Here is how you can achieve routing through the following code:
$routeProvider
.when('/api/', {
templateUrl: 'index.php',
controller: 'IndexController'
})
.when('/video/', {
templateUrl: 'movies.php',
controller: 'moviesController'
})
As you can observe, we have two routes: the api route takes us to the index page, with IndexController, and the video route takes us to the movie's page.
app.controller('moviesController', function($scope, MovieService) {
$scope.name = null;
MovieService.getName().then(function(name) {
$scope.name = name;
});
});
There is a problem, until the MovieService class gets the name from the backend, the name is null. This means if our view binds to the name, first it's empty, then its set.
This is where router comes in. Router resolves the problem of setting the name as null. Here's how we can do it:
var getName = function(MovieService) {
return MovieService.getName();
};
$routeProvider
.when('/api/', {
templateUrl: 'index.php',
controller: 'IndexController'
})
.when('/video/', {
templateUrl: 'movies.php',
controller: 'moviesController'
})
After adding the resolve, we can revisit our code for a controller:
app.controller('MovieController', function($scope, getName) {
$scope.name = name;
});
You can also define multiple resolves for the route of your promises to get the best possible output:
$routeProvider
.when('/video', {
templateUrl: '/MovieService.php',
controller: 'MovieServiceController',
// adding one resole here
resolve: {
name: getName,
MovieService: getMovieService,
anythingElse: getSomeThing
}
// adding another resole here
resolve: {
name: getName,
MovieService: getMovieService,
someThing: getMoreSomeThing
}
})
Summary
In this chapter, we learned how promise is implemented in Angular.js, how it evolved, and how promises help in creating applications composed for real-time web apps. We also saw the functionality of the Q library and Angular.js implementation of promises using code and learned how to use them in our next application.
The specification of promise in Angular.js is very close to the proposed specification by ECMAScript 6, but there might be a change when Angular.js fully adopts promises as its own specification. It will define its own set of rules to use promise, which might not be the same as the specification itself.
In the next chapter, we will look at how promises are implemented in jQuery, what will be the mechanism, and what benefits it will bring.