Mastering JavaScript Promises (2015)
Chapter 6. Promises in Node.js
In the previous chapter, we learned about promises in WinRT and how they are implemented using the Microsoft platform. The promises concept has had wider coverage than other languages. This is one of the fastest growing concepts in open source technologies.
In this chapter, we will discuss an implementation of JavaScript that is dramatically changing the course of modern web development and enhancing our ways to real-time web. This amazing piece of technology is called Node.js, a platform written in JavaScript and based on the V8 Engine by Google. Promises in Node.js are far more interesting, evolving, and productive than any other platform or implementation can offer. Let's dive into the details and find out what promises in Node.js have to offer for real-time web.
The V8 engine – the mechanics
A term that was only known to Formula One racers and sports car manufacturers was brought into web browsers in 2008 when Google first launched its amazing web browser, Google Chrome.
Like many real-life products and their mechanisms were being copied and depicted in computing industry, the V8 engine is one the true examples of such modeling in recent times. Since the scope of this book is focused on promises, let's take a brief look at what the V8 engine is in reality.
The V8 engine is a nontraditional engine with eight cylinders mounted on a crankshaft to produce extra horsepower. This engine is smoother than a V6 (another V-shaped engine), and less expensive than a V12 engine.
The V8 engine in Google Chrome
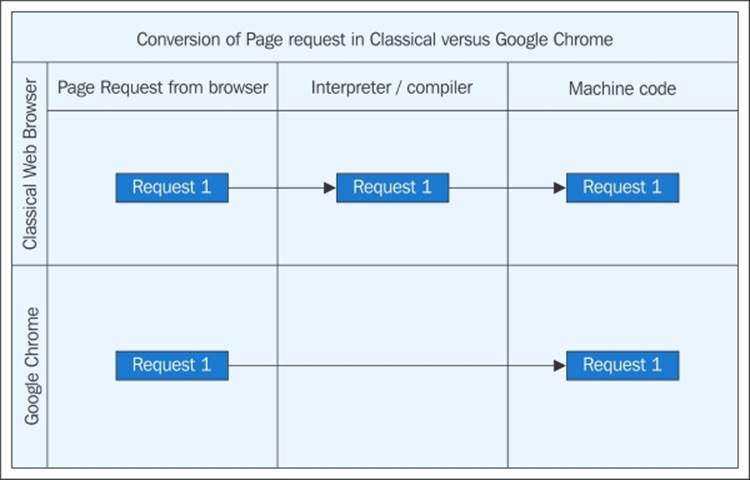
An open source project that makes Google number one in the web browser race is Google Chrome. Chrome is built on an exclusively designed JavaScript Engine called the V8. Based on V8, Chrome has gained popularity and attention from users all around the world in a very short space of time. It was first rolled out on September 2, 2008. However, what does this V8 JavaScript engine do which makes it faster and exceptional than any other program? It doesn't go into compiling the high-level language interpreter to machine code. It basically skips the middle part of code interpreting and converts the high-level code to machine code then and there. This is the reason why Chrome is much faster:
The evolution of Node.js
After the release of Google Chrome as an open source web browser, people started to take interest in it. There were two main reasons for this rapid interest. From a common user's perspective, it was much faster than any other web browser available, and from a developer's perspective, it was something that had revolutionized the browser technology by converting the high-level instructions into machine code instantly, removing a complete layer of middleware of compiler or interpreter.
Many developers started exploring the code base to find the possibilities of solutions they were involved in and to get the most out of this new amazing compilation of codebase.
Ryan Dahl was among those developers who wanted to give a shot to V8 JavaScript engine as he was busy trying to solve a problem while working at Joyent. The problem was making a browser know how much time is left for an upload process. Inspired by the recent release of V8 and Ruby's Mongrel web server, he drafted the codebase that later evolved into Node.js.
A brief introduction to Node.js
What Dahl had created was the first release of a brand new concept in the modern web app development, Node.js.
In plain words, its server-side JavaScript is built on Google's V8 engine. Node.js is an event-based and nonblocking I/O. It's lightweight, efficient, and best suited for data-intensive real-time web apps that run on distributed devices.
Download and install Node.js
You can download Node.js from its official website at http://nodejs.org/download.
Node.js is available for a variety of platforms. Select your operating system and the installer will guide you through the rest.
Node.js is also available on GitHub as an open source project at https://github.com/joyent/node for developers around the world to contribute to its evolution and development.
The installation instructions are quite simple and easy to understand, just follow the installers related to your operating systems. This is quite straightforward and the process gets completed without much hassle. All you need to do is just follow the onscreen instructions.
Node Package Manager – NPM
One of the best virtues of using Node.js is NPM or Node Package Manager. It's an effective way for developers to collaborate on ideas by sharing codebase in a much faster way. However, this is not it. The best use of NPM is to download and install a different simple directory of code called the package. It can be done easily by just typing in simple commands (such as npm install express) that will download and install the entire package on your machine. With every package, there is a .json file that has the metadata about the package. In Unix-based environments, Node Package Managers not only help in downloading and setting up other packages, but are also able to update Node.js itself.
NPM is also another reason why Node.js is getting popular in the community of JavaScript developers. Unlike other languages where uploading libraries and binaries are very time-consuming and permission-oriented. With NPM, it's a much faster and less-permission oriented model that fascinates developers to upload and share their work throughout the community.
For more information on NPM and to add your contributions, check out https://www.npmjs.com/.
In later sections, we will see how NPM will help us in installing and using packages of our choice and how much faster and sleeker it is to work with NPM.
Choice of environment
Node.js is platform independent in a way that it has all the installations, setups, and libraries available for all the major operating systems currently available. It's available for all Unix-based operating systems, as well as Mac and Windows platforms. Since our prime focus here is to make you understand what the link is between Node.js and promises, we will base our code examples on the Windows 7 (any edition) platform since it's widely available and Node.js is also available for Windows 7 in stable conditions. Plus, it's very simple and less time-consuming.
Tip
Please remember that using Windows-based systems won't make any difference to code and their outputs. This will remain the same for every operating system with no change of any kind. You can easily use the same codebase on any other operating system without any hesitation.
Setting up the environment for Node.js
Let's familiarize ourselves with the environment and how things are getting done using Node.js. First things first, we must know how to set up things to compile the code and run it over our machine.
If you are reading this section, it's assumed that you already have Node.js installed on your machine with the latest release; otherwise, please refer to the earlier section to download and install Node.js.
After you have set up Node.js, check which version of Node.js and NPM is available on your machine by typing in the following commands:
D:\> node –v
D:\> NPM –v
The output should be similar to the following screenshot:
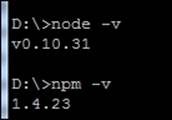
Checking versions of Node.js and NPM
Please note that the current version of Node.js is 0.10.31 and the current version of NPM is 1.4.23. Our examples will be based on these versions, not lesser than these versions.
A simple node server
Now, we have our environment ready to do some experiments, let's get the most obvious activity done by trying a simple node server. For this, you only need two pieces of software. One is your default text editor such as Notepad in Windows or Nano for Ubuntu and a web browser. For the web browser, we prefer to use Google Chrome as it's easily available for all platforms and is native to Node.js.
So, type the following code in your favorite text editor:
// simple server written in Nodejs
// This server would be running on default IP http://127.0.0.1
var http = require('http');
http.createServer(function (request, response)
{
response.writeHead(200, {'Content-Type': 'text/plain'}); // this defines the MIME type of content
response.end('Hello World\n'); // this is the browser's output.
}).listen(1337, '127.0.0.1'); // 1337 is the port number where the browser is listing to this request.
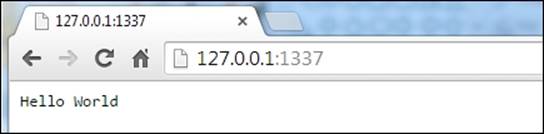
console.log('Server running at http://127.0.0.1:1337/'); //This line will show at command prompt
Save the file by any name with the .js extension. For our example, we use the name server_example.js. Save this file in a directory (such as Promises_in_Node) and open your terminal program. For Windows, it will be Command Prompt. Navigate to the directory where you have saved your file and type in the following command:

If the code has no errors, it will compile and show the following output on the screen:

Now, open Chrome and type http://127.0.0.1:1337/ in the address bar and hit Enter. This screen will show you the successful output from the Node.js server:
That's it! You are now ready to take a deep dive in to promises in Node.js.
Things we learned so far
Let's sum up what we have learned so far. We learned what V8 engine is and how it's developed by Google Chrome as a JavaScript engine, what Node.js is and how it was started as a problem-solving technique to a full-fledged application development platform. We learned about the Node Package Manager and how it can be used in the Node.js application development. We then learned about where to download Node.js, how to install it, and what dependencies we have to take in consideration while developing for Node.js, and finally, we learned to write a simple server using Node.js and seen its output in a browser. This is a check point and if you are still confused about Node.js, please read through again and then move on.
The following sections will let you understand more about Node.js and promises and how promises are gaining so much respect from Node.js developers.
Node.js with the Q library
In Chapter 2, The JavaScript Asynchronous Model, we discussed what callback hell is and how we are dealing with using promises. With every language, implementation also changes. The same case is with Node.js. promises in Node.js are implemented in a different way. In Node.js, promises are not only used for dealing with callback hell, instead if a function cannot return a value or throw an exception, it can easily pass on a promise. This is a little different from what we have seen in the previous chapters. From the perspective of Node.js, a promise is an object that represents the return value or that can throw an exception Furthermore, it can also be used as a proxy for a remote object to improve latency.
Let's have a look at the following code:
process_one(function (value1) {
process_two(value1, function(value2) {
process_three(value2, function(value3) {
process_four(value3, function(value4) {
// Do something with value4
});
});
});
});
Messy, isn't it? Not only is it messy, but also very confusing and hard to maintain. Now, look at the following code using promise:
Q.fcall(process_one)
.then(process_two)
.then(process_three)
.then(process_four)
.then(function (value4) {
// Do something with value4
})
.catch(function (error) {
// Error Handler
})
.done();
Now, this code is less confusing, more productive, and it has one additional quality, which is an implicit error propagation like we have try-catch and finally blocks in Java that catch any unwanted exception and save the program from crashing totally when encountered with an unexpected condition.
The callback approach is known as the inversion of control, a function that is capable of accepting a callback rather than returning a value. Such a mechanism can more easily be described as the phrase, Don't call me, I will call you.
Promises in Q have a very special tendency as it's clearly made independent the input arguments from control flow arguments. One can only be able to see its true benefits when using and creating APIs, particularly, variadic, rest, and spread arguments.
Moving ahead with Q
After a brief introduction to Node.js and Q, let's see how we can develop applications. First, we need to get the Q library to set up the modules for it.
Using the Node Package Manager, install the Q library as shown in the following screenshot:
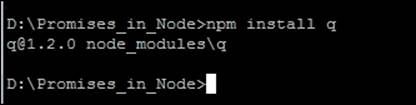
As you can see, the prompt says its q at version 1.2.0, which is stable and also backward compatible. We will use this release for all our examples in this chapter.
With this installation and past upgrades in our environment, we are now able to sample some of the common yet fruitful features that promises give us in Q.
Promises have a then method, which you can use to get the eventual return value (fulfillment) or throw an exception (rejection). By now, we all know it, after reading the previous chapters of this book.
iPromiseSomething() .then(function (value) { //your code }, function (reason) { //your code } );
Here is how the preceding line of code works:
· If iPromiseSomething returns a promise that gets fulfilled later with a return value, the first function (the fulfillment handler) will be called
· If the iPromiseSomething function gets rejected later by a thrown exception, the second function (the rejection handler) will be called with the exception
As you can see, the resolution of a promise is always asynchronous, which means the fulfillment or rejection handler will always be called in the next turn of the event loop (that is, process.nextTick in Node.js). This mechanism ensures that it will always return a value either before the fulfillment or rejection handlers are executed.
Propagation in Q
The then method always returns a promise that will either be handled or rejected.
In our example code, we assign the output to the reapPromise variable, which will hold the value:
var reapPromise = getInputPromise()
.then(function (input) {
}, function (reason) {
});
The reapPromise variable is the new promise for the return value of either handler. Only one handler will ever be called and it will be responsible for resolving reapPromise as a function, which can only either return a value (a future value) or throw an exception.
Whatever is the case, there will be the following possible outcomes:
· If you return a value in a handler, reapPromise will get fulfilled
· If an exception is thrown in a handler, reapPromise will get rejected
· If a promise is returned in a handler, reapPromise will become that promise
· As it will become a new promise, it will be useful for managing delays, combining results, or recovering from errors.
If the getInputPromise() promise gets rejected and you forget the rejection handler, the error will go to reapPromise:
var reapPromise = getInputPromise()
.then(function (value) {
});
If the input promise gets fulfilled and you fail the fulfillment handler, the value will go to reapPromise:
var reapPromise = getInputPromise()
.then(null, function (error) {
});
When you are only interested in handling the error, Q promises to provide a fail shorthand:
var reapPromise = getInputPromise()
.fail(function (error) {
});
If you are writing JavaScript for modern engines only or using CoffeeScript, you may use catch instead of fail.
Promises also provide a fin function that is like a finally clause. The final handler gets called, with no arguments, when the promise returned by getInputPromise() either returns a value or throws an error.
The value returned or error thrown by getInputPromise() passes directly to reapPromise unless the final handler fails, and may be delayed if the final handler returns a promise:
var reapPromise = getInputPromise()
.fin(function () {
});
In short:
· If the handler returns a value, the value is ignored
· If the handler throws an error, the error passes to reapPromise
· If the handler returns a promise, reapPromise gets postponed
The eventual value or error has the same effect as an immediate return value or thrown error; a value would be ignored, an error would be forwarded.
So when we are looking for propagation, we need to keep in mind what we want to see from our returning value. The then, fail, and fin functions are the keys to remember while using propagations in Q.
Tip
If you are writing JavaScript for modern engines, you may use finally instead of fin.
Chaining and nesting promises
Remember chaining in promises in Chapter 2, The JavaScript Asynchronous Model, where we learned all the things about chaining and callback hell handling? This is just same for Node.js using Q.
There are two ways you can chain a promise in Node.js using Q: one is you can chain a promise inside a handler and the other is outside of it.
Let's suppose we are doing multiple things at a time, we can set up the promise chain like this:
f1_promise()
.then(function() { return s1_promise(); })
.then(function() { return t1_promise(); })
...
.then(function() { return nth_promise(); });
So, we can say that the ANY_promise() function can contain some behavior, and this will return a promise object that leads to eventually return a result. As soon as the real result is returned, it will set off the next function in the chain.
This looks good now, what if you want to set off an asynchronous function and wait until we get a result before executing the behavior of the next promise in the chain?
Q has a solution for this. Using .defer() and deferred.resolve(), you can get it in a much more manageable and predictable manner.
Sequences in Q
Like chaining, sequences is another way to stage your result in the way you want. Sequence is the way you can use in a predefined manner to get the outcome of the situation as desired. To hold it more tightly and to generate the result, Q provides sequences in a unique way.
Suppose you have a number of promise-generating functions, all of them need to be run in a sequence. You can do it manually like this example:
return seq(startValue).then(secondValue).then(thirdValue);
You have to make sure that every then() must be in a sequence with another then(); to maintain the sequence. Failing to do so will break the sequence, and you will not be able to get another value later.
The other way is to instruct your sequence dynamically. This can be faster but needs more attention while executing the code as unpredictable code may harm the overall sequence.
Here is a snippet of how you can do it dynamically:
var funcs = [startValue, secondValue, thirdValue];
var result = Q(startValue);
funcs.forEach(function (f) {
result = result.then(f);
});
return result;
If this looks like you are using too many lines of code, use reduce:
return func.reduce(function (tillNow, f) {
return tillNow.then(f);
}, Q(startValue));
Combination in Q
With Q, you have a unique facility in Node.js to write cleaner and manageable code if you want to combine a list of array of promises. This can help you to write a more complex level of sequential data structure in a more manageable way. How can we get there? Use all. Consider the following example:
return Q.all([
eventAdd(2, 2),
eventAdd (10, 20)
]);
The Q.all([func1(), func2()]); function will be the generic form of the preceding code. You can also use spread to replace then. Can we replace another new thing with Q? Not really! The spread function spreads the values over the arguments of the fulfillmenthandler. For the rejection handler, it will get the first signal of failure. So, any of the promises destined to fail first will get it handled by a rejection handler:
function eventAdd (var1, var2) {
return Q.spread([var1, var2], function (var1, var2) {
return a + b;
})
}
Q.spread(). Call all initially
return getUsr() .then(function (userName) { return [username, getUser(userName)]; }) .spread(function (userName, user) {
});
When you call the function, it will return allSettled. Within this function, a promise will be returned as an array that holds the value. When this promise has been fulfilled, the array contains the fulfillment values of the original promise within the same sequence as those promises. The beauty is, if any promise is rejected, it will be rejected immediately, not waiting for the rest of others to come and share their statuses:
Q.allSettled(promises)
.then(function (results) {
results.forEach(function (result) {
if (result.state === "fulfilled") {
var value = result.value;
} else {
var reason = result.reason;
}
});
});
The any function takes in an array of promises to return a promise that is fulfilled by the first given promise to be fulfilled, or rejected, provided all the given promises were rejected:
Q.any(promises).then(function (firstPromise) {
// list of any of the promises that were fulfilled.
}, function (error) {
// All of the promises were rejected.
});
How to handle errors in Q in Node.js
There are times when rejection occurs with the promises creating errors. These errors are clever enough to dodge the handler assigned to take care of such errors. So, we need to take care of them explicitly.
Let's have a look at the following snippet and see how it can be handled:
return scenario().then(function (value) {
throw new Error("I am your error mesg here .");
}, function (error) {
// We only get here if scenario fails
});
Why is this case happening? Suppose the parallelism between promises and try/catch and while we are trying to execute scenario(), the error handler represents a catch for scenario(), while the fulfillment handler represents code that happens after the try/catchblock. Now, this code needs its own try/catch block.
The try/catch block is not a new concept for all of you who have written code for some major languages. Since Node.js is based on JavaScript and Q is handling it at the moment, the syntax might be a bit different but the functionality is more or less the same like the following code:
Q.
try(function()
{return scneario().then(function(value)throw new Error("im your thrown error");)} )
.catch({ function (error)
{console.error("i am catched",error)}
});
Simply put, in terms of promises, it means you are chaining your rejection handlers.
Making progress with promises
Unlike other libraries, a promise has a unique communication ability. It can update you on its progress if you want it to talk to you. Preferably, these are notifications programmed by developers in a way that it can notify them on specified intervals of time to tell them what is the progress. We can do it by using our favorite then() function:
return uploadFile()
.then(function () {
// Success uploading the file
}, function (err) {
// There was an error, and we get the reason for error
}, function (progress) {
// this is where I am reporting back my progress. executed
});
There are more than enough advantages of using Q. For this specific topic, it provides us a short call progress which minimizes our effort to only one line using *.progress();.
return uploadFile().progress(function (progress) {
// We get notified of the upload's progress
});
Getting to the end of a chain of promises
When we are talking about ending a promise chain, we have to make sure that any error doesn't get handled before the end, as it will get rethrown and reported.
This is a temporary solution. We are exploring ways to make unhandled errors visible without any explicit handling.
So, returned like the following code:
return hoo()
.then(function () {
return "foo";
});
Or we can do It like this:
hoo()
.then(function () {
return "bar";
})
.done();
Why are we doing this? Why do we need to invoke the mechanism like this? The answer is very simple, you have to end the chain or have to return it to another promise. This is due to the fact that since handlers catch errors, it's an unfortunate pattern that the exceptions can go unobserved.
Every once in a while, you will need to create a promise from scratch. This is quite normal; you can either create your own promise or get it from another chain. Whatever the case is, consider that it's a beginning. There are a number of ways in which you can create a new promise using Q. Here are some of them:
Q.fcall();
//Using this function fcall you can create and call other //functions, along with Promise functions. To do that simply //follow this syntax
return Q.fcall(function () {
return 10;
});
Not only this, fcall(); can also be used to get an exception-handled promise that looks like the following snippet:
return Q.fcall(function () {
throw new Error("I am an error");
});
Since fcall(); can call functions, or even promised functions, this uses the eventualAdd(); function to add two numbers:
return Q.fcall(eventualAdd, 2, 2);
Callback-based promises versus Q-based promises
Say you have to interlink with callback-based instead of promise-based, what would be your options? The answer is Q provides Q.nfcall() and friends();, but most of the time, we have to rely on deferred:
var deferred = Q.defer();
FS.readFile("hoo.txt", "utf-8", function (error, text) {
if (error) {
deferred.reject(new Error(error));
} else {
deferred.resolve(text);
}
});
return deferred.promise;
Normally, we can achieve it like this:
//normal way of handling rejected promises.
deferred.reject(new Error("Can't do it"));
//this is how we do it
var rejection = Q.fcall(function () {
throw new Error("Can't do it");
});
deferred.resolve(rejection);
A few words on delay, timeout, and notify
There are situations when we want to make the output of our functions a bit delayed or slower than normal. This is when we are waiting for a certain event to occur such as checking the password's strength at the strength indicator.
For all such needs, Q provides a collection of functions to give you this kind of control. These functions are:
· Q.delay()
· Q.notify()
· deferred.notify()
The preceding functions are not only able to create delays when required but also notify when the delay is likely to occur. If you want to defer the notification, deferred.notify() will serve the purpose.
Q.delay()
The following code is a simplified implementation of Q.delay:
function delay(ms) {
var deferred = Q.defer();
setTimeout(deferred.resolve, ms);
return deferred.promise;
}
Q.timeout()
A simple way to work with Q.timeout:
function timeout(promise, ms) {
var deferred = Q.defer();
Q.when(promise, deferred.resolve);
delay(ms).then(function () {
deferred.reject(new Error("Timed out"));
});
return deferred.promise;
}
deferred.notify()
Finally, you can send a progress notification to the promise with deferred.notify().
There is a wrapper for XML HTTP requests in the browser:
function requestOkText(url) {
var request = new XMLHttpRequest();
var deferred = Q.defer();
request.open("GET", url, true);
request.onload = onload;
request.onerror = onerror;
request.onprogress = onprogress;
request.send();
function onload() {
if (request.status === 200) {
deferred.resolve(request.responseText);
} else {
deferred.reject(new Error("Status code was " + request.status));
}
}
function onerror() {
deferred.reject(new Error("Can't XHR " + JSON.stringify(url)));
}
function onprogress(event) {
deferred.notify(event.loaded / event.total);
}
return deferred.promise;
}
Here is an example of how to use this requestOkText function:
requestOkText("http://localhost:5000")
.then(function (responseText) {
// If the HTTP response returns 200 OK, log the response text.
console.log(responseText);
}, function (error) {
// If there's an error or a non-200 status code, log the error.
console.error(error);
}, function (progress) {
// Log the progress as it comes in.
console.log("Request progress: " + Math.round(progress * 100) + "%");
});
Q.Promise() – another way to create promises
Q.Promise is an alternative promise-creation API that has the same power as the deferred concept, but without introducing another conceptual entity.
Let's rewrite the preceding requestOkText example using Q.Promise:
function requestOkText(url) {
return Q.Promise(function(resolve, reject, notify) {
var request = new XMLHttpRequest();
request.open("GET", url, true);
request.onload = onload;
request.onerror = onerror;
request.onprogress = onprogress;
request.send();
function onload() {
if (request.status === 200) {
resolve(request.responseText);
} else {
reject(new Error("Status code was " + request.status));
}
}
function onerror() {
reject(new Error("Can't XHR " + JSON.stringify(url)));
}
function onprogress(event) {
notify(event.loaded / event.total);
}
});
}
If requestOkText were to throw an exception, the returned promise will be rejected with this thrown exception as the reason for its rejection.
Static methods of Q
Typecasting of promises objects is a must and you must have to convert promises generated from different sources in Q type promises. This is because of the simple fact that not all promise libraries have the same warranties as Q and certainly don't provide all of the same methods.
//using when
return Q.when(AmIAvalueOrPromise, function (value) {
}, function (error) {
});
//The following are equivalent:
return Q.all([a, b]);
return Q.fcall(function () {
return [a, b];
})
.all();
Most libraries only provide a partially functional then method. Q, on the other hand, is quite different to others:
return Q($.ajax(...))
.then(function () {
});
If there is any way that the promise you have got is not a Q promise as provided by your library, you should wrap it using a Q function. You can even use Q.invoke(); as shorthand, as shown in the following code:
return Q.invoke($, 'ajax', ...)
.then(function () {
});
Promise as a proxy
One marvelous thing about a promise that distinguishes it from the rest is that it can act as a proxy for another object, not only for local objects but also for a remote object. There are methods that let you confidently employ properties or call functions. All of these exchanges return promises, so that they can be chained.
Here is list of functions you can use as proxies of a promise:
|
Direct manipulation |
Using a promise as a proxy |
|
value.foo |
promise.get("foo") |
|
value.foo = value |
promise.put("foo", value) |
|
delete value.foo |
promise.del("foo") |
|
value.foo(...args) |
promise.post("foo", [args]) |
|
value.foo(...args) |
promise.invoke("foo", ...args) |
|
value(...args) |
promise.fapply([args]) |
|
value(...args) |
promise.fcall(...args) |
You can trim round-trips by using these functions instead of then() if the promise is a proxy for a remote object.
Even in the case of local objects, these methods can be used as shorthand for particularly-simple gratification handlers. For example, you can replace:
return Q.fcall(function () {
return [{ foo: "bar" }, { foo: "baz" }];
})
.then(function (value) {
return value[0].foo;
});
With the following code:
return Q.fcall(function () {
return [{ foo: "bar" }, { foo: "baz" }];
})
.get(0)
.get("foo");
Familiarizing Node.js – the Q way
When you're working with functions that make use of the Node.js callback pattern, where callbacks are in the form of function(err, result), Q provides a few advantageous service functions for adapting between them. The two most important functions are: Q.nfcall()and Q.nfapply():
· Q.nfcall(): The Node.js function call
return Q.nfcall(FS.readFile, "foo.txt", "utf-8");
· Q.nfapply(): The Node.js function apply
return Q.nfapply(FS.readFile, ["foo.txt", "utf-8"]);
They are both used for calling functions with the same resemblance of Node.js so that they can generate promises.
Unbinds and its solution
When you are working with methods, instead of simple functions, it's highly likely that you can easily run into the common problems where passing a method to another function—such as Q.nfcall—unbinds the method from its owner. Q has to offer its services here too so that you can avoid this, by adopting any of these two ways:
· Use Function.prototype.bind()
· Use these methods provided by Q:
· return Q.ninvoke(redisClient, "get", "user:1:id"); // node invoke
return Q.npost(redisClient, "get", ["user:1:id"]); // node post
There is yet another way you can create reusable wrappers, using:
· Q.denodeify:
· //using Q.denodeify
· var readFile = Q.denodeify(FS.readFile);
return readFile("foo.txt", "utf-8");
· Q.nbind:
· // Q.nbind
· var redisClientGet = Q.nbind(redisClient.get, redisClient);
return redisClientGet("user:1:id");
Q support for tracing stacks
Q also extends its optional support for long stack traces; this helps developers to manage the stack property of an error by providing the entire reasons of errors and rejection reason rather to simply halt without any meaningful or readable error.
The following function is one such example where the error was not handled in a meaningful manner and when someone tried to execute this snippet, he/she experienced meaningless and untraceable errors:
function TheDepthOfMyCode() {
Q.delay(100).done(function explode() {
throw new Error("hello I am your error Stack!");
});
}
TheDepthOfMyCode ();
This will gives us a raw-looking unhelpful stack trace looking similar to this:
Error: hello I am your error Stack!
at explode (/path/to/test.js5:166)
at _fulfilled (/path/to/test.js:q:54)
at resolvedValue.promiseDispatch.done (/path/to/q.js:923:20)
at makePromise.promise.promiseDispatch (/path/to/q.js:400:23)
at pending (/path/to/q.js:397:39)
at process.startup.processNextTick.process._tickCallback (node.js:244:9)
However, if you turn this feature on by setting Q.longStackSupport = true, then this will give us a nice-looking helpful stack trace looking similar to this:
Error: hello I am your error Stack!
at explode (/path/to/test.js:3:11)
From previous event:
at theDepthsOfMyProgram (/path/to/test.js:2:16)
at Object.<anonymous> (/path/to/test.js:7:1)
Unlike most of the time, in JavaScript, we use breakpoints or use alert() to see where the error occurred, which is quite frustrating and time consuming. Q has not only given us an elegant way to get to a point where the error is happening, but also the entire trace can be read and analyzed to solve the problem.
Tip
In Node.js, this feature can also be enabled through the Q_DEBUG environment variable:
Q_DEBUG=1 node server.js
This will enable long stack support at every instance of Q.
Making promise-based actions
Starting off with Q, perform actions that return promises. Let's say, make Node.js action http.get as the promised action:
// using-promise.js
var httpGet = function (opts) {
var deferred = Q.defer();
http.get(opts, deferred.resolve);
return deferred.promise;
};
Later, you can use: httpGet(...).then(function (res) {...}); but you have to make sure that functions return promises. The first Q.defer() returns a set of an empty promise and operations for it. The deferred.promise is the empty promise which fixes a certain value:
// promise-resolve-then-flow.js
var deferred = Q.defer();
deferred.promise.then(function (obj) {
console.log(obj);
});
deferred.resolve("Hello World");
This prints Hello World to the console. In general, you can transform usual callback actions:
// promise-translate-action.js
action(arg1, arg2, function (result) {
doSomething(result);
});
To promise actions:
// promise-translate-action.js
var promiseAction = function (arg1, arg2) {
var deferred = Q.defer();
action(arg1, arg2, deferred.resolve);
return deferred.promise;
}
promiseAction(arg1, arg2).then(function (result) {
doSomething(result);
});
Object handling promises
We learned a great deal about how promises help object handling whether these are local objects or remote ones. As mentioned earlier, the then callback can use the result in any way. Also, each handling is decomposed primitives of property accesses or function calls, for example:
// object-unsued.js
httpGet(url.parse("http://abc.org")).then(function (response) {
return response.headers["location"].replace(/^http:/, "");
}).then(console.log);
Decomposition of primitive access
Q can decompose continuous actions of each primitive access. Let's have a look at the following code:
// object-decomposed.js
httpGet(url.parse("http://abc.org")).then(function (response) {
return response.headers;
}).then(function (handlers) {
return handlers["location"];
}).then(function (location) {
return location.replace(/^http:/, "");
}).then(console.log);
There is another good thing about promises of Q. They have a support method of primitive access as a promise.
By them, the decomposed actions also translate to:
// object.primitive.js
httpGet(url.parse("http://example.org"))
.get("handlers").get("location").post("replace", [/^http:/, ""])
.then(console.log);
View revisited
The view() method helps in mirroring all the values into Q-based promises without any distinction, either it comes from a value or any other function. There are two methods that can make this possible:
· promise.post(name)
· promise.send(name)
This converts a method of the promise value to a promise of the method result.
A result of view() has methods for all methods of the promise value. You can use view in the then callback of view(), for example:
// object-view.js
Q.resolve(new Date()).view().then(function (dateView) {
return dateView.toTimeString().then(function (str) {
return /\((.*)\)/.exec(str)[0]
});
}).then(console.log);
Aborting a promise
We saw how done(); is used earlier, but here it comes in with a total impression.
Using done();, we can conclude our promise and abort our program. I always have a way to chain the promises:
then().then().done();
If the promise is vetted (and did not catch the error before), the done() function forcibly spawns an uncatchable error (for example, setTimeout(function () {throw ex;}, 0)).
On Node.js REPL, run Q.reject("uncaught").done(), then exit with an error.
If the error reached to the done() function, you can think of it just a programming bug (not an exception state).
Q utilities for Node.js
In this chapter, we came to know that promises are getting more easy to use within Node.js. The following is the set of all major utilities offered by Q for using Node.js:
· Q.nfapply(fs.readFile, [filename, encoding]).then(console.log);
· Q.nfcall(fs.readFile, filename, encoding).then(console.log);
· Q.nfbind(fs.readFile)(filename, encoding).then(console.log);
· Q.npost(fs, "readFile", [filename, encoding]).then(console.log);
· Q.nsend(fs, "readFile", filename, encoding).then(console.log);
Q has more to offer, but the preceding ones are the best and most used and sensible use of these can help us write a more manageable, cleaner, and dynamically controlled mechanism.
Summary
This chapter was an amazing journey from start to finish, and it has taught us from the very beginning about Node.js. We didn't opt for explaining stuff in computer science terminology, instead we went to the mechanical part of the V8 engine, and from there we saw how real-world objects can be mapped into computing.
We learned what Node.js is, from where this most amazing library started, who built it, and why and how it's helping us create real-time web apps.
Then we moved to Q, the best way to offer promises to Node.js. We saw how we can install Q and then we saw different ways of using Q along with Node.js. We have also achieved our purpose of using Q as a promises implementation of Node.js.
This chapter will encourage you to start working on Node.js, especially on how to take advantage of Q as the library of promises for Node.js.
In the next chapter, we will be looking in-depth in the world of Angular.js and how it got promises implementation.