RaphaelJS: Graphics and Visualization on the Web (2014)
Chapter 7. Animations, Part Two
The animations we covered in Chapter 5 were basically ways of delaying our hard work. By feeding attributes through an animation, we instruct Raphael to take its sweet time altering the appearance of an object instead of changing it all at once. That suits us just fine a lot of the time, but it can get dull. When moving an object to a different point in space, for example, we’re currently only able to send it there in a straight line. And RaphaelJS takes a strong stance against that sort of unadventurous attitude.
Before we get too funky, however, I’d like to briefly touch upon the straightforward subject of how you can add your own functions and properties to Raphael, which will come in handy.
Extending Raphael
In Chapter 4, we ginned up a function called NGon to make regular polygons of any number of sides (of three or more). The function accepted coordinates for the center of the shape, the length of each side of the shape, and number of sides. It returned a path string which we were responsible for feeding to paper.path().
That worked fine, but it would be nice to be able to use NGon alongside circle, rect, and the rest of the beloved crew. You could add this function to the source code, but this is generally a horrible way to do things because it runs a high risk of messing something else up and gets overwritten every time we update Raphael. Fortunately, Raphael offers an object called Raphael.fn that allows us to extend its out-of-the-box functions.
Adding Functions
To add a function, assign a function to Raphael.fn as though it were an object (which it is):
Raphael.fn.NGon = function(x, y, N, side) {
var path = "", n, temp_x, temp_y, angle;
for (n = 0; n <= N; n += 1) {
console.log(n);
angle = n / N * 2 * Math.PI;
temp_x = x + Math.cos(angle) * side;
temp_y = y + Math.sin(angle) * side;
path += (n === 0 ? "M" : "L") + temp_x + "," + temp_y;
}
// "this" refers to the paper object that called the function
var shape = this.path(path);
// don't forget to return the shape so that you can access it later
return shape;
}
var paper = Raphael(0, 0, 500, 500);
paper.NGon(40, 40, 3, 30);
paper.NGon(100, 80, 7, 20);
It’s not a huge difference, but it’s significantly more elegant. And this trick will come in handy in just a moment.
Adding Attributes
Most of the attributes you can assign to an element in Raphael map directly to the SVG specifications. If you state thing.attr("fill", "#FF0000"), it makes that thing red. If you were to inspect the element in the DOM after that command is run, you would see fill="#FF0000" as an attribute of the element.
You can’t add anything to the SVG specification without petitioning the World Wide Web Consortium, which I would recommend against doing if you can help it. But if you want to invent an attribute that represents some combination of existing attributes, you can knock yourself out usingpaper.customAttributes. Whatever you add is a function that accepts a number and modifies the element accordingly:
var paper = Raphael(0, 0, 500, 500);
paper.customAttributes.redness = function (num) {
var val = 255 * (1 - num / 100);
// note that we do not directly operate on an object
// instead, we return the object of final attributes
return {fill: "rgb(255," + val + ", " + val + ")"};
};
paper.rect(10, 10, 50, 50).attr("redness", 50);
paper.circle(50, 50, 20).attr({
redness: 25,
'stroke-width': 3
});
Adding Methods
The third and final means of extending Raphael is to create methods that act on elements, the way toFront() rearranges an object in the DOM or remove() deletes it. Here’s a function that makes an element more red than it was before:
Raphael.el.redder = function() {
var rgb = Raphael.getRGB(this.attr("fill"));
rgb.r += 51;
this.attr("fill", "rgb(" + rgb.r + "," + rgb.g + "," + rgb.b + ")");
}
var paper = Raphael(0, 0, 500, 500);
// a sort of putrid olive color
var r1 = paper.rect(10, 10, 50, 50).attr("fill", "#999900");
// a putrid brown
var r2 = paper.rect(80, 10, 50, 50).attr("fill", "#999900").redder();
// a lovely orange
var r3 = paper.rect(150, 10, 50, 50).attr("fill", "#999900").redder().redder();
See this code live on jsFiddle.
You can think of these three means of extending Raphael as operating on three different planes: the global Raphael object (.fn), the paper object (.customAttributes), and the element (.el).
Animating Along a Path
The goal of this section is to create an animation that follows a track chosen by us, so we need a nice path. Conveniently, we could also use a little practice with custom shape types. Let’s multitask:
Raphael.fn.rosetta = function(x,y,rx,ry,N) {
if (N == 0) {
console.log("no dividing by zero, please"); return;
}
var angle = 360 / N; // negative values of N are fine
var path = "M" + x + "," + y;
for (var c = 0; c < N; c += 1) {
// need angle for each leaf of rosetta in radians
var theta = angle * c * Math.PI / 180;
// coords of farthest point from center for this leaf
var dx = x + 2 * rx * Math.cos(theta),
dy = y + 2 * rx * Math.sin(theta);
path += "A" + rx + "," + ry + " " + angle * c + " 1,1 " + dx + "," + dy;
path += "A" + rx + "," + ry + " " + angle * c + " 1,1 " + x + "," + y;
}
var rosetta = paper.path(path);
return rosetta;
}
By now, you should be able to somewhat imagine what this will look like. But let’s fire it off to be sure:
var paper = Raphael(0, 0, 500, 500);
var rose = paper.rosetta(120, 120, 55, 35, 6);
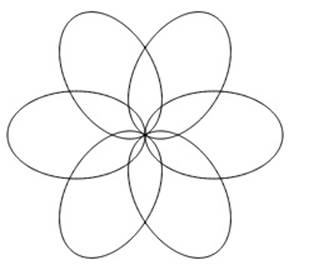
See this code live on jsFiddle.
It’s a thing of beauty! I’m not actually 100% sure this is technically a rosetta, but let’s run with it.
Our goal is to make a shape that animates along the path of our rosetta, starting at the center and ending at the center. For that, we’ll need a pair of extremely handy Raphael methods. The first is called .getTotalLength(), which returns the length in pixels of a path if it were to be unfurled into a straight line:
console.log(rose.getTotalLength());
// 1717.8...
If you check this mathematically by measuring the circumference of the ellipse and multiplying it by 6, which is a lot harder than I remember it being (the circumference, not the multiplication), you will see that it’s very close.
The second method is .getPointAtLength(), which returns the x and y coordinates of any point along a path, taking as an argument a given number of pixels along that path. Let’s try it will the point 800 pixels along the 1,717-pixel length of the rosetta:
var circle = paper.circle(0, 0, 10).attr("fill", "red");
var point = rosetta.getPointAtLength(800);
console.log(point);
// {x: 69.12, y: 139.84, alpha: 128.5 }
// don't worry about 'alpha' just yet
circle.attr({
cx: point.x,
cy: point.y
});
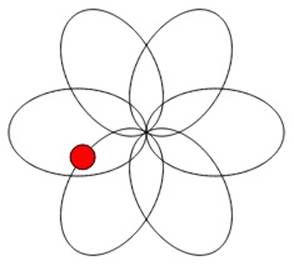
See this code live on jsFiddle.
As you see, the red dot landed neatly on the rosetta at the right point.
All that’s left is to animate it, though this is a tad trickier than it might seem. Remember that we have to animate properties like fill or transform. We could animate cx and cy, but this would mean the code we write will not work on anything other than a circle or an ellipse. So we’re going to make a custom attribute called progress that represents a shape’s progress through the path as a fraction from 0 to 1. It will return a transformation to move the animated shape to the correct point along the path.
But which path? Attributes typically operate on only the element to which they are applied, but in this case we need to supply a path as well. Since attributes don’t take arguments the way functions do, we’ll have to specify the path we’d like to automate along ahead of time:
circle.data("mypath", rose);
paper.customAttributes.progress = function (v) {
var path = this.data("mypath");
if (!path) {
return {
transform: "t0,0"
};
}
var len = path.getTotalLength();
var point = path.getPointAtLength(v * len);
return {
transform: "t" + point.x + "," + point.y
};
};
circle.attr("progress", 0.3);
See this code live on jsFiddle.
This successfully places the red dot 30% of the way along the complete path of six ellipses. (I originally tested it with 0.5, thought it didn’t work, then realized that the 50% point along the path is the dead center.)
Now that this is working, let’s give it a whirl with a nice long duration of 10 seconds.
circle.attr("progress", 0);
circle.animate({ progress: 1 }, 10000);
See this code live on jsFiddle.
I could watch that little red guy zip around the rosetta all day.
I mentioned that we shouldn’t worry about alpha just yet. Now we can worry about it. In fact, it’s quite an impressive feature; it returns the angle of the tangle line to the curve at the point specified. If you remember any calculus, it’s the derivative at that point. If we want to make a shape that appears to “drive” around the path and adjust its direction accordingly, we can simply add a rotation to the transformation that the progress attribute returns. (I got the idea for this from the gear example of the RaphaelJS website).
While we’re at it, I’d like to test the object being animated for the presence of width and height attributes, which would indicate it’s a shape whose coordinates refer to the upper-left corner instead of the center, and adjust accordingly to keep the shape’s center point along the path:
paper.customAttributes.progress = function (v) {
var path = this.data("mypath"),
attrs = this.attr(),
offset = { x: 0, y: 0 };
if (!path) {
return {
transform: "t0,0"
};
}
if (attrs.hasOwnProperty("width")) {
offset.x = -this.attr("width") / 2;
offset.y = -this.attr("height") / 2;
}
var len = path.getTotalLength();
var point = path.getPointAtLength(v * len);
return {
transform: "t" + (point.x + offset.x) + "," + (point.y + offset.y) + "r" + point.alpha
};
};
var shape = paper.rect(0, 0, 20, 10).attr("fill", "green");
shape.data("mypath", rose);
shape.attr("progress", 0);
shape.animate({ progress: 1 }, 10000);
As a final feature, perhaps we might like to draw the path as we go instead of mapping out the course of the path ahead of time. If you’re old enough to remember Logo, the old programming language for kids that ran on ancient Macs, this will look familiar.
To do so, we’ll use a third convenience method from Raphael, .getSubpath(), which takes beginning and end lengths and returns just the portion of a path between those points.
Let’s add this somewhere in the progress custom attribute:
var trail = this.data("mytrail");
if (trail) {
// set the trail's path to just the amount current trespassed:
trail.attr("path", path.getSubpath(0, v * len));
}
Here’s a screenshot of our animation about a third of the way through.
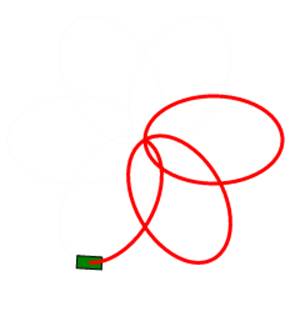
See this code live on jsFiddle.
This is a particularly fun feature to use when animating letters. With nothing more than an SVG of written letters, you could make code to write out words on the screen as though a ghost where etching the letters in thin air (like in Harry Potter)!
Pause for Commentary
This all may seem like a bit of a hack. Why doesn’t Raphael make it easier? In fact, there did used to be an .animateAlong() method that vanished in Raphael 2.0 for reasons I’m unclear on. But we don’t need it. This is not a hack; it’s merely a somewhat advanced usage of the many clever functions that Raphael offers out of the box. Rather than provide every possible tool, Raphael gives you just what you need to whet your imagination.
But you probably don’t want to write a lot of code for every project. If any function you write seems useful and elegant enough for wider use, by you or anyone else, the .fn, .el, and .customAttributes functions allow you to store them in a JavaScript file and summon them on demand.
Custom Easing Formulas
Back in Chapter 5, we touched on the different easing formulas that Raphael offers, like easeOut and backIn. They’re fun to play with, but eventually you may find yourself no longer entertained by the seven or eight options that come out of the box. Let’s learn how to make our own.
The first thing to know about easing formulas is that they have no ability to change the final result of an animation. No matter what, your object will end up where it was going and always in the alloted time. In other words, animations are strictly Calvinist. Their destiny is written at birth.
The default easing formula, linear, maps the progress of the timer that’s running over the course of the animation precisely to the progress of the shape in its journey to its destination. When the total time is 25% elapsed, the shape is 25% of the way to its final state. (I’m mainly thinking of animations through space here, but this applies to animations of any type.)
An easing formula is a function that excepts as an argument the progress of the animation in time as a fraction between 0 and 1 and returns the desired progress of the animation, also between 0 and 1. The default linear easing formula is just this:
function (n) {
return n;
}
(I copied that from the Raphael source code.)
The easeIn formula, also known by Raphael as ease-in or <, looks like this:
function (n) {
return pow(n, 1.7);
}
If you think this through a little, you’ll see this has a dampening effect; the progress of the animation will lag behind the progress of the timer until the absolute last second, when it catches up. If this seems impossible, consider that the speed of the object, if it’s moving through space, is the first derivative of the easing formula, and thus the shape lags in velocity at first and then speeds up to arrive on time.
If you’re more of a visual thinker, here’s a graph of the progress of the animation as a linear easing and an easeIn easing:

It’s not a law of nature that the easing formula must neatly end up at a value of one. If it doesn’t, however, you’ll see an awkward skip at the very end as it jumps to its destination. (Remember, Calvinism: it ends up at 1 no matter what.)
The value that an easing formula returns can be negative or greater than one at some point in its lifetime. This is exactly what happens in the backOut and backIn formulas, which either start by going backward or overshooting the target and then backing in.
To make your own easing formula, assign a function with one argument to the object Raphael.easing_formula. Here’s one I just made up:
var paper = Raphael(0, 0, 500, 500);
var square = paper.rect(20, 20, 30, 30).attr({ 'stroke-width': 0, fill: "red" });
Raphael.easing_formulas.swing = function(n) {
return n + Math.sin(n * Math.PI * 2) / 2;
};
square.animate({ transform: "t200,200" }, 2000, "swing");
Here’s the visual representation of my swing easing formula:
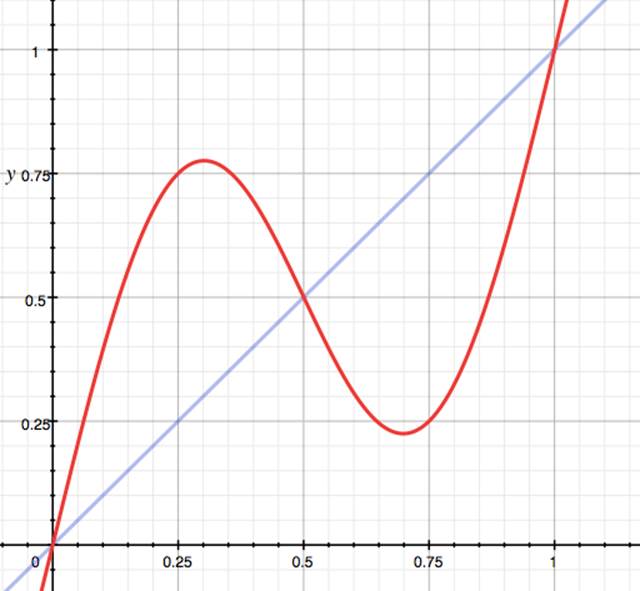
Give it a shot and you’ll see the red square zip most of the way to its destination, change its mind and backtrack, and then get with the program and speed up to reach the final point on time.
Here’s one that makes the square scatter around:
Raphael.easing_formulas.may_cause_seizures = function(n) {
return n + 0.2 * Math.random() - 0.1;
};
square.animate({ transform: "t200,200" }, 2000, "may_cause_seizures");
See this code live on jsFiddle.
You can see some more complex examples in the Raphael source code. Just look for the easing_formulas object.
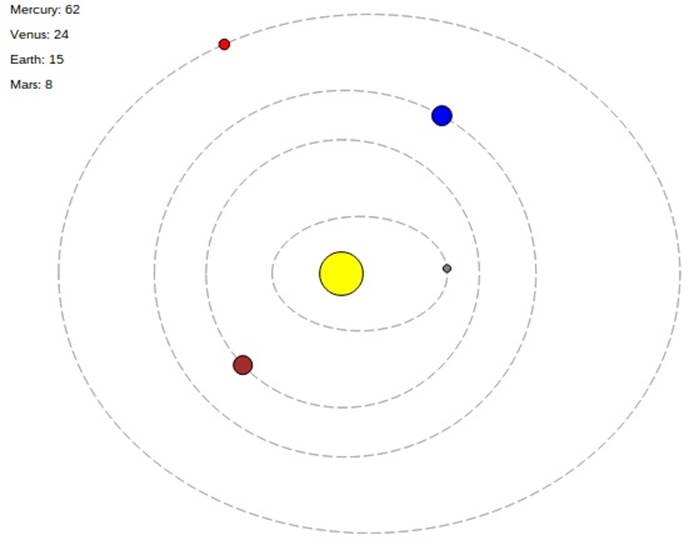
Code Example: The Animated Solar System
Let’s make a not-to-scale diorama of the first four planets in the solar system, and then animate the planets accordingly. The data we need is the average distance of each planet from the sun, the number of Earth days it takes to complete its orbit, and the eccentricity of the elliptical orbit—a geometric measure of how squashed it is. (An ellipse with an eccentricity of 1 is a circle; 0 would be a straight line.)
I found the dimensions for the orbits and the planets themselves and stuck them in a few objects for us.
var paper = Raphael(0, 0, 500, 450);
//http://nineplanets.org/data.html
var orbits = {
Mercury: { distance: 57910, period: 87.97, eccen: 0.21 },
Venus: { distance: 108200, period: 224.70, eccen: 0.01},
Earth: { distance: 149600, period: 365.26, eccen: 0.02},
Mars: { distance: 227940, period: 686.98, eccen: 0.09 }
};
//http://nineplanets.org/data1.html
var radii = {
Sun: 695000,
Mercury: 2440,
Venus: 6052,
Earth: 6378,
Mars: 3397,
};
//chosen haphazardly
var colors = {
Sun: "yellow",
Mercury: "gray",
Venus: "brown",
Earth: "blue",
Mars: "red"
}
We’re going to take several large liberties here, even beyond eliminating the four outer planets.
// chose some scales by trial and error to get the solar sysem on the screen
var ORBIT_SCALE = 1.0 / 1000,
PLANET_SCALE = 1.0 / 800;
//center at the middle of the canvas
var CENTER = {x: paper.width / 2, y: paper.height / 2};
// the sun needs extra scaling
var Sun = paper.circle(CENTER.x, CENTER.y, radii.Sun * PLANET_SCALE / 50)
.attr("fill", colors.Sun);
Next, let’s make a function to draw the planets and orbits and set up the animation. I won’t belabor you too much with the geometry and astronomy, but we’ll use the eccentricity to determine the distance between the center of the ellipse and the two foci of the ellipse. (This assumes you recognize Kepler, who tells us that the Sun is not at the center of the ellipitical orbit, but at one of the two foci. This is also not remotely proportional to the real orbits.)
var label_pos = 15;
function planet(name, data) {
// calculate the long and short arms of the elliptical orbit
// Also get focus from eccentricity of orbit
// http://nineplanets.org/help.html#semim
var perigee = data.distance * (1 - data.eccen) * ORBIT_SCALE,
apogee = data.distance * (1 + data.eccen) * ORBIT_SCALE,
focus = data.eccen * apogee,
x = CENTER.x + focus - apogee,
y = CENTER.y;
// label for upper-left corner, where we'll record years elapsed
var label = paper.text(10, label_pos, name + ": 0").attr("text-anchor", "start");
label_pos += 20;
// similar to rosetta leaf
var path = "M" + x + "," + y;
path += "a" + apogee + "," + perigee + " 0 1,1 " + apogee * 2 + ",0";
path += "A" + apogee + "," + perigee + " 0 1,1 " + x + "," + y;
var orbit = paper.path(path).attr({
stroke: "gray",
"stroke-dasharray": "--"
});
var body = paper.circle(0, 0, radii[name] * PLANET_SCALE).attr({
fill: colors[name]
});
// assumes the custom attribute "progress" is defined same as above
body.data("mypath", orbit);
body.attr("progress", 0);
var years_elapsed = 0;
var anim = Raphael.animation({ progress: 1 }, MS_PER_DAY * orbits[name].period,
function() {
years_elapsed += 1;
label.attr("text", name + ": " + years_elapsed);
}).repeat(Infinity);
body.animate(anim);
}
Now all that’s left is to loop through the objects and create the planets:
for (var name in orbits) {
planet(name, orbits[name]);
}
See this code live on jsFiddle.
And there you have it: your second grade art class homework is complete.
All materials on the site are licensed Creative Commons Attribution-Sharealike 3.0 Unported CC BY-SA 3.0 & GNU Free Documentation License (GFDL)
If you are the copyright holder of any material contained on our site and intend to remove it, please contact our site administrator for approval.
© 2016-2026 All site design rights belong to S.Y.A.