Sams Teach Yourself Java in 24 Hours, 7th Edition (2014)
Part IV: Programming a Graphical User Interface
Hour 16. Building a Complex User Interface
THIS HOUR’S TO-DO LIST:
![]() Accept a range of numeric input with sliders.
Accept a range of numeric input with sliders.
![]() Monitor user input on sliders.
Monitor user input on sliders.
![]() Create image icons and toolbars.
Create image icons and toolbars.
![]() Present data in tables of rows and cells.
Present data in tables of rows and cells.
Creating a graphical user interface (GUI) with Swing involves more than learning how to use the different interface components, layout managers, and event-handling methods. You also have to familiarize yourself with everything that Swing offers.
More than 400 different classes make Swing one of the most extensive class libraries in Java. Many of these classes can be implemented using the same techniques you have learned during the preceding three hours—Swing containers and components share superclasses with each other, which gives them common behavior.
During this hour, you learn about several additional components that you can use in your Swing programs.
Sliders
The easiest way to collect numeric input from a user is with a slider, a component that can be dragged from side to side or up and down. Sliders are represented in Swing by the JSlider class.
Sliders enable a number to be chosen between minimum and maximum values. These values can be displayed on a label that includes the minimum value, maximum value, and intermediate values. An example you create later in this hour is shown in Figure 16.1.
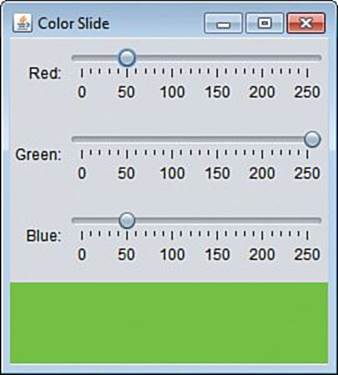
FIGURE 16.1 Choosing a color using three slider components.
You can create a horizontal slider with one of the following constructors:
![]() JSlider()—Create a slider with a minimum of 0, maximum of 100, and a starting value of 50.
JSlider()—Create a slider with a minimum of 0, maximum of 100, and a starting value of 50.
![]() JSlider(int, int)—Create a slider with the specified minimum and maximum values.
JSlider(int, int)—Create a slider with the specified minimum and maximum values.
![]() JSlider(int, int, int)—Create a slider with the specified minimum, maximum, and starting values.
JSlider(int, int, int)—Create a slider with the specified minimum, maximum, and starting values.
To create a vertical slider, use a constructor with an additional first argument: the orientation of the slider. This argument should be the class variable JSlider.VERTICAL or JSlider.HORIZONTAL.
The following statement creates a vertical slider for a number from 1 to 1,000:
JSlider guess = new JSlider(JSlider.VERTICAL, 1, 1000, 500);
This slider starts with the caret—the part of the component that selects a number—at the 500 position.
To display a label for a slider, you must set up the information the label will contain. Call the slider’s setMajorTickSpacing(int) and setMinorTickSpacing(int) methods to determine how often a tick mark is displayed on the label. Major ticks are displayed as a thicker line than minor ticks.
After you have set up how often tick marks appear, call the slider’s setPaintTicks(boolean) method with true as the argument. You also can display the numeric value of each major tick by calling the slider’s setPaintLabels(boolean) method with true.
Change Listeners
To monitor slider input, you must have a class that implements the ChangeListener interface in the javax.swing.event package. This interface includes only one method:
public void stateChanged(ChangeEvent event); {
// statements to handle the event
}
To register an object as a change listener, call the addChangeListener(Object) method of the container that holds the slider. When the slider is moved, the listening object’s stateChanged() method is called.
This method is called with a ChangeEvent object that can identify the slider component that changed in value. Call the object’s getSource() method and cast the object to a JSlider, as in the following statement:
JSlider changedSlider = (JSlider) event.getSource();
In this example, event is the ChangeEvent object that is an argument to the stateChanged() method.
Change events occur throughout a slider’s movement. They begin when the slider is first moved, and they don’t stop occurring until the slider has been released. For this reason, you might not want to do anything in the stateChanged() method until the slider has stopped moving.
To see if a slider is currently being moved around, call its getValueIsAdjusting() method. This method returns true while movement is taking place and false otherwise.
This technique is demonstrated in your next project, a Java application that uses three sliders to choose a color. Colors are created in Java by using the Color class in the java.awt package.
One way to create a Color object is to specify the amount of red, green, and blue in the color. Each of these can be an integer from 0 to 255 with 255 representing the maximum amount of that color.
The following statement creates a Color object that represents the color butterscotch:
Color butterscotch = new Color(255, 204, 128);
The red value used to create this Color object is 255, so it contains the maximum amount of red. It also contains a large amount of green and some blue.
Listing 16.1 contains the ColorSliders application, which has three sliders, three labels for the sliders, and a panel where the color is displayed. Create a new Empty Java File called ColorSliders, enter the text of the listing in the source editor, and save the file.
LISTING 16.1 The Full Text of ColorSliders.java
1: package com.java24hours;
2:
3: import javax.swing.*;
4: import javax.swing.event.*;
5: import java.awt.*;
6:
7: public class ColorSliders extends JFrame implements ChangeListener {
8: ColorPanel canvas;
9: JSlider red;
10: JSlider green;
11: JSlider blue;
12:
13: public ColorSliders() {
14: super("Color Slide");
15: setLookAndFeel();
16: setSize(270, 300);
17: setDefaultCloseOperation(JFrame.EXIT_ON_CLOSE);
18: setVisible(true);
19:
20: canvas = new ColorPanel();
21: red = new JSlider(0, 255, 255);
22: green = new JSlider(0, 255, 0);
23: blue = new JSlider(0, 255, 0);
24:
25: red.setMajorTickSpacing(50);
26: red.setMinorTickSpacing(10);
27: red.setPaintTicks(true);
28: red.setPaintLabels(true);
29: red.addChangeListener(this);
30:
31: green.setMajorTickSpacing(50);
32: green.setMinorTickSpacing(10);
33: green.setPaintTicks(true);
34: green.setPaintLabels(true);
35: green.addChangeListener(this);
36:
37: blue.setMajorTickSpacing(50);
38: blue.setMinorTickSpacing(10);
39: blue.setPaintTicks(true);
40: blue.setPaintLabels(true);
41: blue.addChangeListener(this);
42:
43: JLabel redLabel = new JLabel("Red: ");
44: JLabel greenLabel = new JLabel("Green: ");
45: JLabel blueLabel = new JLabel("Blue: ");
46: GridLayout grid = new GridLayout(4, 1);
47: FlowLayout right = new FlowLayout(FlowLayout.RIGHT);
48: setLayout(grid);
49:
50: JPanel redPanel = new JPanel();
51: redPanel.setLayout(right);
52: redPanel.add(redLabel);
53: redPanel.add(red);
54: add(redPanel);
55:
56: JPanel greenPanel = new JPanel();
57: greenPanel.setLayout(right);
58: greenPanel.add(greenLabel);
59: greenPanel.add(green);
60: add(greenPanel);
61:
62: JPanel bluePanel = new JPanel();
63: bluePanel.setLayout(right);
64: bluePanel.add(blueLabel);
65: bluePanel.add(blue);
66: add(bluePanel);
67: add(canvas);
68:
69: setVisible(true);
70: }
71:
72: public void stateChanged(ChangeEvent event) {
73: JSlider source = (JSlider) event.getSource();
74: if (source.getValueIsAdjusting() != true) {
75: Color current = new Color(red.getValue(), green.getValue(),
76: blue.getValue());
77: canvas.changeColor(current);
78: canvas.repaint();
79: }
80: }
81:
82: private void setLookAndFeel() {
83: try {
84: UIManager.setLookAndFeel(
85: "com.sun.java.swing.plaf.nimbus.NimbusLookAndFeel"
86: );
87: } catch (Exception exc) {
88: // ignore error
89: }
90: }
91:
92: public static void main(String[] arguments) {
93: ColorSliders cs = new ColorSliders();
94: }
95: }
96:
97: class ColorPanel extends JPanel {
98: Color background;
99:
100: ColorPanel() {
101: background = Color.red;
102: }
103:
104: public void paintComponent(Graphics comp) {
105: Graphics2D comp2D = (Graphics2D) comp;
106: comp2D.setColor(background);
107: comp2D.fillRect(0, 0, getSize().width, getSize().height);
108: }
109:
110: void changeColor(Color newBackground) {
111: background = newBackground;
112: }
113: }
Note
In Figure 16.1, the application is used to create North Texas Mean Green (red 50, green 250, and blue 50). This shade inspires alumni of the University of North Texas to leap to our feet at sporting events and make ferocious eagle-claw hand gestures that turn visiting teams yellow (red 255, green 255, orange 0).
When you run the application, as shown earlier in Figure 16.1, a frame contains three sliders that represent the amount of red, green, and blue in a panel along the bottom edge of the frame.
Adjust the values of each slider to change the color that is displayed.
Using Image Icons and Toolbars
One of the easiest ways to improve the visual appeal of a GUI is to use icons, small images used to identify buttons and other parts of an interface.
With many of the components in the Swing class library, you can label a component with an image instead of text by using the ImageIcon class in the javax.swing package.
You can create an ImageIcon from a file on your computer by calling the ImageIcon(String) constructor method. The argument to the method is either the name of the file or its location and name, as in these examples:
ImageIcon stopSign = new ImageIcon("stopsign.gif");
ImageIcon saveFile = new ImageIcon("images/savefile.gif");
The graphics file used to create the image icon must be in GIF, JPEG, or PNG format. Most are in GIF format, which is well suited to displaying small graphics with a limited number of colors.
Caution
Although some operating systems use the \ character to separate folders and filenames, the ImageIcon constructor requires the / character as a separator.
The ImageIcon constructor loads the entire image from the file immediately.
You can use image icons as labels and buttons by using the JLabel(ImageIcon) and JButton(ImageIcon) constructor methods, as in the following example:
ImageIcon siteLogo = new ImageIcon("siteLogo.gif");
JLabel logoLabel = new JLabel(siteLogo);
ImageIcon searchWeb = new ImageIcon("searchGraphic.gif");
JButton search = new JButton(searchWeb);
Several components can have an icon and a text label. The following statement creates a button with both:
JButton refresh = new JButton("Refresh",
"images/refreshIcon.gif");
Image icons often are used in toolbars, containers that group several components together into a row or column.
Toolbars, which are created by using the JToolBar class, can be designed so that a user can move them from one part of a GUI to another. This process is called docking, and these components are also called dockable toolbars.
You can create a toolbar with one of the following constructor methods:
![]() JToolBar()—Create a toolbar that lines up components in a horizontal direction
JToolBar()—Create a toolbar that lines up components in a horizontal direction
![]() JToolBar(int)—Create a toolbar that lines up components in the specified direction, which is either SwingConstants.HORIZONTAL or SwingConstants.VERTICAL.
JToolBar(int)—Create a toolbar that lines up components in the specified direction, which is either SwingConstants.HORIZONTAL or SwingConstants.VERTICAL.
Components are added to a toolbar in the same way they are added to other containers—the add(Component) method is called with the component to be added.
For a toolbar to be dockable, it must be placed in a container that uses BorderLayout as its layout manager. This layout arranges a container into north, south, east, west, and center areas. When you are using a dockable toolbar, however, the container only should use two of these: the center and one directional area.
The toolbar should be added to the directional area. The following statements create a vertical, dockable toolbar with three icon buttons:
JPanel pane = new JPanel();
BorderLayout border = new BorderLayout();
pane.setLayout(border);
JToolBar bar = new JToolBar(SwingConstants.VERTICAL);
ImageIcon play = new ImageIcon("play.gif");
JButton playButton = new JButton(play);
ImageIcon stop = new ImageIcon("stop.gif");
JButton stopButton = new JButton(stop);
ImageIcon pause = new ImageIcon("pause.gif");
JButton pauseButton = new JButton(pause);
bar.add(playButton);
bar.add(stopButton);
bar.add(pauseButton);
add(bar, BorderLayout.WEST);
The next project you undertake during this hour is Tool, a Java application that includes image icons and a dockable toolbar around. Create a Java file called Tool, enter Listing 16.2 in the file, and save the file.
LISTING 16.2 The Full Text of Tool.java
1: package com.java24hours;
2:
3: import java.awt.*;
4: import javax.swing.*;
5:
6: public class Tool extends JFrame {
7: public Tool() {
8: super("Tool");
9: setLookAndFeel();
10: setSize(370, 200);
11: setDefaultCloseOperation(JFrame.EXIT_ON_CLOSE);
12:
13: // build toolbar buttons
14: ImageIcon image1 = new ImageIcon("newfile.gif");
15: JButton button1 = new JButton(image1);
16: ImageIcon image2 = new ImageIcon("openfile.gif");
17: JButton button2 = new JButton(image2);
18: ImageIcon image3 = new ImageIcon("savefile.gif");
19: JButton button3 = new JButton(image3);
20:
21: // build toolbar
22: JToolBar bar = new JToolBar();
23: bar.add(button1);
24: bar.add(button2);
25: bar.add(button3);
26:
27: // build text area
28: JTextArea edit = new JTextArea(8, 40);
29: JScrollPane scroll = new JScrollPane(edit);
30:
31: // create frame
32: BorderLayout border = new BorderLayout();
33: setLayout(border);
34: add("North", bar);
35: add("Center", scroll);
36: setVisible(true);
37: }
38:
39: private void setLookAndFeel() {
40: try {
41: UIManager.setLookAndFeel(
42: "com.sun.java.swing.plaf.nimbus.NimbusLookAndFeel"
43: );
44: } catch (Exception exc) {
45: // ignore error
46: }
47: }
48:
49: public static void main(String[] arguments) {
50: Tool frame = new Tool();
51: }
52: }
The Tool application requires three graphics files that are used to create the icons on the toolbar: newfile.gif, openfile.gif, and savefile.gif. Download these files from the Hour 16 page on the book’s website at www.java24hours.com and save them in the Java24 project folder (or the folder you designated for your Java projects in NetBeans).
One way to import these files into the project is to use drag and drop:
1. In the Projects pane, click the Files tab to bring it to the front.
2. Drag the three graphics files, one at a time or as a group, into the Java24 folder.
3. NetBeans imports these files into the project in its top-level folder.
Note
Having trouble finding the NetBeans project folder? Start a new project in NetBeans: Choose File, New Project, category Java, project type Java application, and then click Next. The Project Location text field should contain the location of the folder where these icons should be saved.
Figure 16.2 and Figure 16.3 show two different screenshots of this application as it runs. The toolbar has been moved from its original location (Figure 16.2) to another edge of the interface (Figure 16.3).
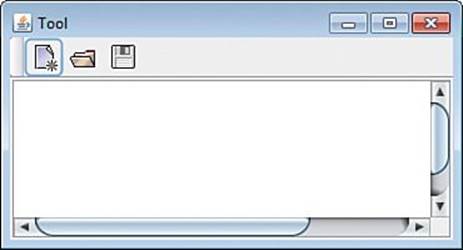
FIGURE 16.2 Using an application with a toolbar.
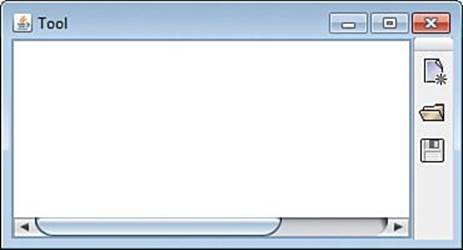
FIGURE 16.3 Docking a toolbar at a new location.
Note
You also can drag a dockable toolbar off an interface entirely. This causes a new window to be opened that contains the toolbar.
Run the application and try it out by moving the toolbar around. You can move a toolbar by clicking its handle and dragging the toolbar to a different edge of the text area. When you release the toolbar, it is placed along that edge and the text area moves over to make room for it.
Tables
The final user interface component introduced in this hour is the most sophisticated. The JTable class represents a table of information presented like a spreadsheet in rows and columns. The information in the cells of the table can be edited, columns can be rearranged, and columns can be resized to be wider or thinner. This sounds like a lot of work, but all of it is done for you. The functionality is built in to the class, which belongs to the javax.swing package.
An example of a JTable component is shown in Figure 16.4. You will be creating this table as the hour’s final project.
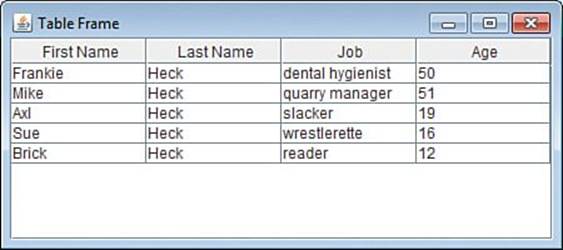
FIGURE 16.4 A table of personal information containing five rows and four columns.
The simplest way to use tables is to store the data directly in the table.
The first step when employing this technique is to create an array of strings with the name of each column, as in this code:
String[] columnLabels = { "First Name", "Last Name",
"Job", "Age" };
The cells of the table can have different data types or even objects in them. Each column must hold the same thing, however. In the project you will be creating, each row has three strings—a first name, last name, and job title—and an integer for the person’s age. So each row should have three strings and an integer in its cells, from left to right.
Note
Are you wondering how a number like 50 or 16 can be used to create an item in an array of objects? This code takes advantage of how Java performs boxing and unboxing to convert automatically between objects and the same value as a primitive data type. The integer literals are boxed into Integer objects that represent the same value.
The next step in filling out the table is to create a two-dimensional array of objects containing the data to store in it. The code to accomplish this looks like what you employed in Hour 9, “Storing Information with Arrays,” to declare an array and give it initial values defined by literals. ThecolumnLabels array was created in this manner.
Here’s the code to create the data for a table in an Object[][] array:
Object[][] tableData = {
{
"Frankie", "Heck", "dental hygienist", 50
},
{
"Mike", "Heck", "quarry manager", 51
},
{
"Axl", "Heck", "slacker", 19
},
{
"Sue", "Heck", "wrestlerette", 16
},
{
"Brick", "Heck", "reader", 12
}
};
In a single statement spread out over multiple lines, this code creates a two-dimensional array of objects organized into four columns and five rows. Each row defines information about a specific person: strings that hold a first name, last name, and job title followed by an integer for that person’s age.
There’s a lot of spacing and punctuation in the code, so take care to note where the opening { brackets, closing } brackets, and commas are placed. The spacing is unimportant, but the punctuation must be employed exactly as shown.
Each row of the array is assigned data as a comma-separated list surrounded by opening and closing brackets. Here’s one row with slightly different formatting:
{ "Sue", "Heck", "wrestlerette", 16 }
To give you a clearer picture of what this defines, it could be used in a statement to create a one-dimensional array of objects:
Object[] row1 = { "Sue", "Heck", "wrestlerette", 16 };
For the two-dimensional array, the blocks defining each row are separated by commas. So there’s a block for Frankie followed by a comma and the block for Mike, then a comma and a block for Axl, a comma and a block for Sue, and a comma and a block for Brick. As in any comma-separated list in Java code, no comma is needed after the final item.
Now that you have a string array of column names and an object array of data for the table, the JTable object can be created with the data and column names as the arguments to the constructor:
JTable table = new JTable(tableData, columnLabels);
Tables often contain more information than can be displayed in a graphical user interface, so they should be placed inside scroll panes to support scrolling.
They also can be set to take up all the height available to them within the interface by calling the table’s setFillsViewportHeight(boolean) method with an argument of true:
table.setFillsViewportHeight(true);
The TableFrame application you create next puts all this together. Create a new Empty Java File in NetBeans and fill it with Listing 16.3.
LISTING 16.3 The Full Text of TableFrame.java
1: package com.java24hours;
2:
3: import javax.swing.JFrame;
4: import javax.swing.JScrollPane;
5: import javax.swing.JTable;
6:
7: public class TableFrame extends JFrame {
8: public TableFrame() {
9: super("Table Frame");
10: String[] columnLabels = { "First Name", "Last Name",
11: "Job", "Age" };
12: Object[][] tableData = {
13: { // row 1
14: "Frankie", "Heck", "dental hygienist", 50
15: },
16: { // row 2
17: "Mike", "Heck", "quarry manager", 51
18: },
19: { // row 3
20: "Axl", "Heck", "slacker", 19
21: },
22: { // row 4
23: "Sue", "Heck", "wrestlerette", 16
24: },
25: { // row 5
26: "Brick", "Heck", "reader", 12
27: }
28: };
29: JTable table = new JTable(tableData, columnLabels);
30: JScrollPane scrollPane = new JScrollPane(table);
31: table.setFillsViewportHeight(true);
32: add(scrollPane);
33: setSize(450, 200);
34: setDefaultCloseOperation(JFrame.EXIT_ON_CLOSE);
35: setVisible(true);
36: }
37:
38: public static void main(String[] arguments) {
39: TableFrame frame = new TableFrame();
40: }
41: }
Run the application to see the table as depicted earlier in Figure 16.4. You should test out the built-in functionality of the table by doing these three things:
1. Double-click a cell in the table. A cursor appears in that cell enabling you to replace the existing value by typing in a new one.
2. Click a column label, drag it to the left or right, and drop it. The column order is rearranged, but the cells retain their values.
3. Hover the mouse over the line separating two column labels. The cursor changes to a left-right arrow. Use it to alter the width of the two columns by dragging the line to a new position.
Note
A disadvantage of putting data into a JTable component using an array is that it treats every cell like a string and permits users to edit all cells and replace the value with any string. One of the rows in the TableTest application used integers. These could be changed to non-integers and nonnumeric values.
To achieve more control over what values can be put in table cells, and prohibit some rows from being edited at all, you can use the TableModel interface in the javax.swing.table package. A table model is an object that provides information about the contents of a table and how they can be modified.
Summary
This is the last of four hours devoted to Swing, the part of the Java language that supports GUI software.
Although Swing is by far the largest part of the Java class library, most of the classes are used in similar ways. After you know how to create a component, add a component to a container, apply a layout manager to a container, and respond to user input, you can make use of many new Swing classes as you explore the language.
Workshop
Q&A
Q. How can I find out about the rest of the Swing classes in the Java class library?
A. On Oracle’s official Java site, the full documentation for the Java class library is published at http://docs.oracle.com/javase/8/docs/api. You can see the classes that are included in javax.swing, java.awt, and java.awt.event, the packages that are covered during the preceding four hours. All Swing classes and interfaces are documented, including their constructors, class variables, and instance variables.
Q. Why is a videogame about a barrel-tossing, princess-kidnapping ape and an Italian plumber called Donkey Kong?
A. Donkey Kong was named by Shigeru Miyamoto, who created the game for Nintendo as a coin-operated arcade game in 1981. Miyamoto had the mistaken impression that the word “donkey” meant “stupid” in English, but by the time Nintendo’s American division learned of it, the name had stuck.
Miyamoto’s gorilla/princess/plumber love triangle was inspired by Nintendo’s failed attempt to license Popeye for a videogame. Later videogames established that the original Donkey Kong has become Cranky Kong, an elderly bad-tempered ape who believes that an excessive amount of processing power is devoted to current games compared to his 8-bit heyday.
Quiz
No pane, no gain: Exercise some brain muscle by answering the following questions about scroll panes, image icons, and other Swing features.
1. What graphics file formats are supported by the ImageIcon class?
A. GIF
B. GIF and JPEG
C. GIF, PNG, and JPEG
2. What does a JSlider object’s getValueIsAdjusting() method accomplish?
A. It determines whether the slider has been changed from its original value.
B. It determines whether the slider is currently being changed in value.
C. Not a lot; this method is a major disappointment to its parent superclass.
3. The Swing library was named after a style of dance band jazz that was popularized in the 1930s and revived in the 1990s. Which of the following is not a real title of a song performed by a Swing musician?
A. “Cement Mixer (Put-ti, Put-ti)”
B. “Sussudio”
C. “Flat Foot Floogie (with the Floy Floy)”
Answers
1. C. PNG support in ImageIcon was added in Java 1.3.
2. B. The getValueIsAdjusting() method returns true while the slider is being moved and false otherwise.
3. B. “Sussudio,” a hit song by Phil Collins in 1985, was five decades too late for Swing. The other two songs are Swing hits by Slim Gaillard, whose gift for gibberish also was evident in the songs “Boot-Ta-La-Za,” “Ra-Da-Da-Da,” “Bingie-Bingie-Scootie,” and “Vout Oreenie.”
Activities
To see whether you have the swing of things, try the following activities:
![]() Add a toolbar to one of the Java applications created in the preceding three hours.
Add a toolbar to one of the Java applications created in the preceding three hours.
![]() Create a table that represents a stock’s high price, low price, volume, and the date for at least five days.
Create a table that represents a stock’s high price, low price, volume, and the date for at least five days.
To see Java programs that implement these activities, visit the book’s website at www.java24hours.com.