Hands-On Sencha Touch 2 (2014)
Part II. Building the FindACab App
Chapter 12. Forms
I have a love/hate relationship with forms. I love them, because they look so great. Some components feel really nice on a touch device. Thanks to HTML5, some fields are recognized by (mobile) browsers and therefore present a correct device keyboard. But I hate them too because I don’t want to enter a lot of data—especially not when I am traveling and need to look things up quickly. In general, people don’t like to write whole books on a mobile phone. The screen is too small and therefore hard to read. The keyboards on touch devices are often too small for your fingers, and the feedback for pressing the keys is often too poor. It’s just not like a physical keyboard, like on your desktop or laptop computer. That’s why I always try to limit textarea fields on mobile applications.
However, Sencha Touch does a really good job with form fields (see Figures 12-1 and 12-2). Some form fields really feel good on a touch device. Now it is up to you to choose the best form fields for your user input. Every form field in Sencha Touch extends from Ext.field.Field.
Ext.field.Field is the base class for all form fields used in Sencha Touch. It’s an input field and a label all in one key/value pair. Every form field should have a unique name (the key) and can have a value (the user input). It provides a lot of shared functionality to all field subclasses (simple validation, clearing, and tab index management), but is rarely used directly. See Table 12-1 for an overview of all form fields used by Sencha Touch.

Figure 12-1. The email keyboard that is shown when you are using an Email field in Sencha Touch

Figure 12-2. The number keyboard that will be shown when you are using a number field in Sencha Touch
Table 12-1. Sencha Touch form fields
|
Name |
xtype |
Description |
|
Ext.field.Text |
textfield |
Most basic field. Just a normal text input: <input type="text">. |
|
Ext.field.Number |
numberfield |
Creates an HTML5 number input. Most (mobile) browsers will show a specialized virtual numeric keyboard for this field. |
|
Ext.field.Spinner |
spinnerfield |
Like the numberfield but contains two little plus and minus buttons to increase steps. |
|
Ext.field.Email |
emailfield |
Creates an HTML5 email input. Most (mobile) browsers will show a specialized virtual keyboard for this field. |
|
Ext.field.Url |
urlfield |
Creates an HTML5 URL input. Most (mobile) browsers will show a specialized virtual keyboard for this field. |
|
Ext.field.Search |
searchfield |
Creates an HTML5 search input. The visual styling of this input is slightly different from normal text input controls (the corners are rounded). |
|
Ext.field.Password |
passwordfield |
Masks all the input. Under the hood, it’s an HTML password field too: <input type="password">. |
|
Ext.field.File |
filefield |
A file upload field. Under the hood, it’s an HTML file upload field too: <input type="file">. |
|
Ext.field.Checkbox |
checkboxfield |
A checkbox; multiple boxes can be selected from a group. Under the hood, it’s an HTML checkbox too: <input type="checkbox">. |
|
Ext.field.Radio |
radiofield |
A radiobox; only one radio item can be selected from a group. Under the hood, it’s an HTML radio too: <input type="radio">. Note, radiofield extends from checkboxfield. |
|
Ext.field.Datepicker |
datapicker |
A field specified for entering dates. Instead of a calendar widget, it has roller fields that pop up from the bottom of the screen on phones and float on tablets. |
|
Ext.field.Hidden |
hiddenfield |
Invisible in a form but will be sent while data is submitting. |
|
Ext.field.TextArea |
textareafield |
A field for entering multiple lines of text. Under the hood, it’s an HTML textarea too: <textarea>. |
|
Ext.field.Select |
selectfield |
A drop down/combo box from which to select a value. Under the hood, it is not a select <select> tag. |
|
Ext.field.Slider |
sliderfield |
Allows the user to select a value from a given numerical range. You might use it for choosing a percentage or combine two of them to get min and max values. |
In this chapter, you’ll learn how to:
§ Implement a form
§ Validate a form
§ Submit a form
§ Implement form handling
Implementing a Form
People used to think that creating a form in Sencha Touch simply meant adding a set of form fields into a container. Although you could take that approach, it might be better to add form fields to a formpanel (Ext.form.Panel).
I used to say that a formpanel is actually like an HTML <form> tag. Only, it is really not. No, in fact, under the hood, it’s just a <div> tag. What makes it behave more like a <form> tag is that a formpanel can contain a url—the action to post to when submitting a formpanel. And, yes, a formpanel is submittable.
You can generate forms from the command line with Sencha Cmd. You will have to specify a form name, which will be used as a view class name. This view class will extend from Ext.form.Panel. As a second argument, you can specify one string of form field names; when you use the colon character, you can even specify the field type. Be aware that you don’t enter any spaces; doing so will break the form because everything after the space will be seen as a third argument and thus ignored:
sencha generate form -name MyForm -fields field,field2:textfield
Implementing the FindACab App Form
Let’s start with generating the formpanel for the FindACab app from the CLI, with two new fields, city and country, both of which are text fields:
sencha generate form -name SettingsView -fields city:textfield,country:textfield
Yikes! Looks like you’ve got a merge error:
[ERR] MERGE CONFLICT - ../app/view/SettingsView.js
[ERR] Please resolve manually
If you followed all the steps of this book, you might see the previous error. Why is that? Remember when you created the SettingsView at the end of Chapter 11? You’ve got a conflict because you already have a copy of a SettingsView class in the view folder. So now what? Well, let’s resolve it manually, and merge both classes into one. This looks harder than it is. Open SettingsView.js , and you will see that it tried to merge your old file with the newly generated form class. Just remove the old version (the duplicate code and the strange >>> characters), and you’re good to go.
Apart from that, notice the items array with the nested textfields, and the extend, which is set to Ext.form.Panel. It’s really awesome that you don’t have to write the form view class by yourself.
Implementing a Fieldset
The previous Sencha Cmd command generated a basic formpanel with both fields and a button, but that is not totally what we want. We also want to add some user instructions. What you need is a fieldset, which groups the form fields and adds instructions (see Figure 12-3).
A fieldset in Sencha Touch is not the same as the HTML <fieldset> tag. Yes, a Sencha fieldset can visually separate form fields, but under the hood it’s just a set of <div> tags. Also, fieldsets in Sencha Touch can contain a title and an instructions help text underneath thefieldset.
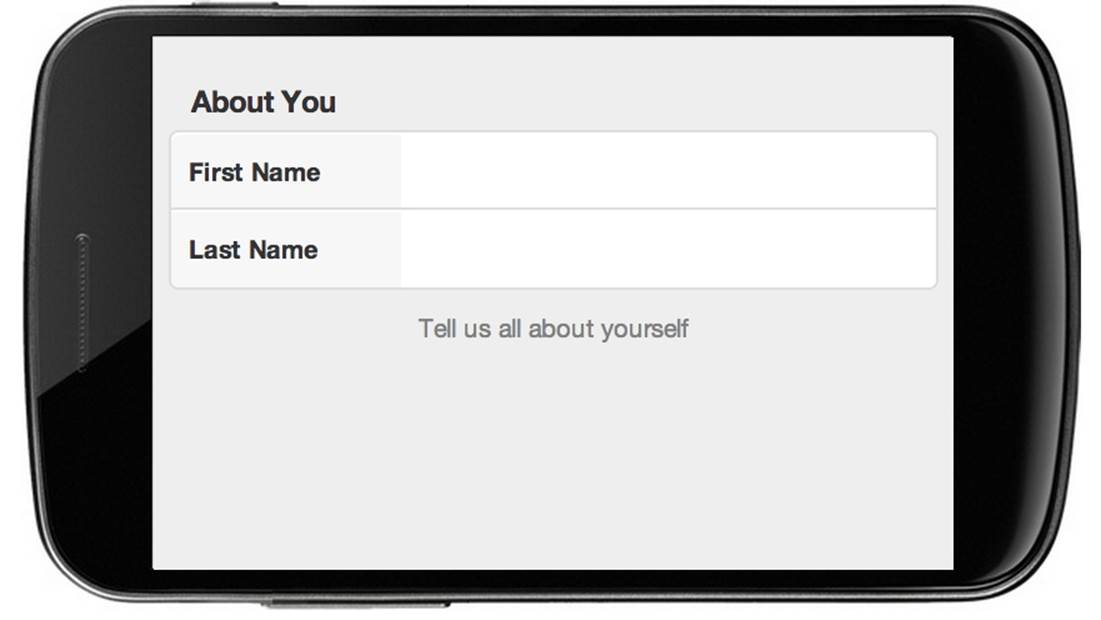
Figure 12-3. A fieldset with two form fields and a title
Let’s implement a fieldset for the FindACab app. You will wrap a fieldset around the two textfields. Also don’t forget to add the Ext.form.FieldSet to the requires array to add the fieldset class into the memory:
{
xtype: 'fieldset',
title: 'Your location',
instructions: "Please enter your city and country.
(For US addresses please provide city + statecode and country,
for example: Naperville IL, USA)",
items: [
//code with the two textfields here
]
}
Let’s also modify the Submit button. Give it an action:'submit' so later you can refer to it, and a margin:10 to make it look nicer:
{
xtype: 'button',
text: 'Submit',
action: 'submit',
margin: 10,
ui: 'confirm'
}
When everything is done, you can confirm that the code for view/SettingsView.js looks like this:
Ext.define('FindACab.view.SettingsView', {
extend: 'Ext.form.Panel',
xtype: 'settingsview',
requires: [
'Ext.TitleBar',
'Ext.form.FieldSet'
],
config: {
title: 'SettingsView',
items: [{
xtype: 'titlebar',
ui: 'light',
docked: 'top',
title: 'Settings',
items: [{
iconCls: 'delete',
itemId: 'close',
ui: 'decline',
align: 'right'
}
]
}, {
xtype: 'fieldset',
title: 'Your location',
instructions: "Please enter your city and country.
(For US addresses please provide city + statecode
and country, for example: Naperville IL, USA)",
items: [{
name: 'city',
xtype: 'textfield',
label: 'City'
}, {
name: 'country',
xtype: 'textfield',
label: 'Country'
}
]
},
{
xtype: 'button',
text: 'Submit',
action: 'submit',
margin: 10,
ui: 'confirm'
}
]
}
});
The implementation for the FindACab app form is finished (see Figure 12-4). However, this form doesn’t do anything. Eventually, you will want to validate or post this form. First things first: let’s talk about validating a Sencha Touch form!
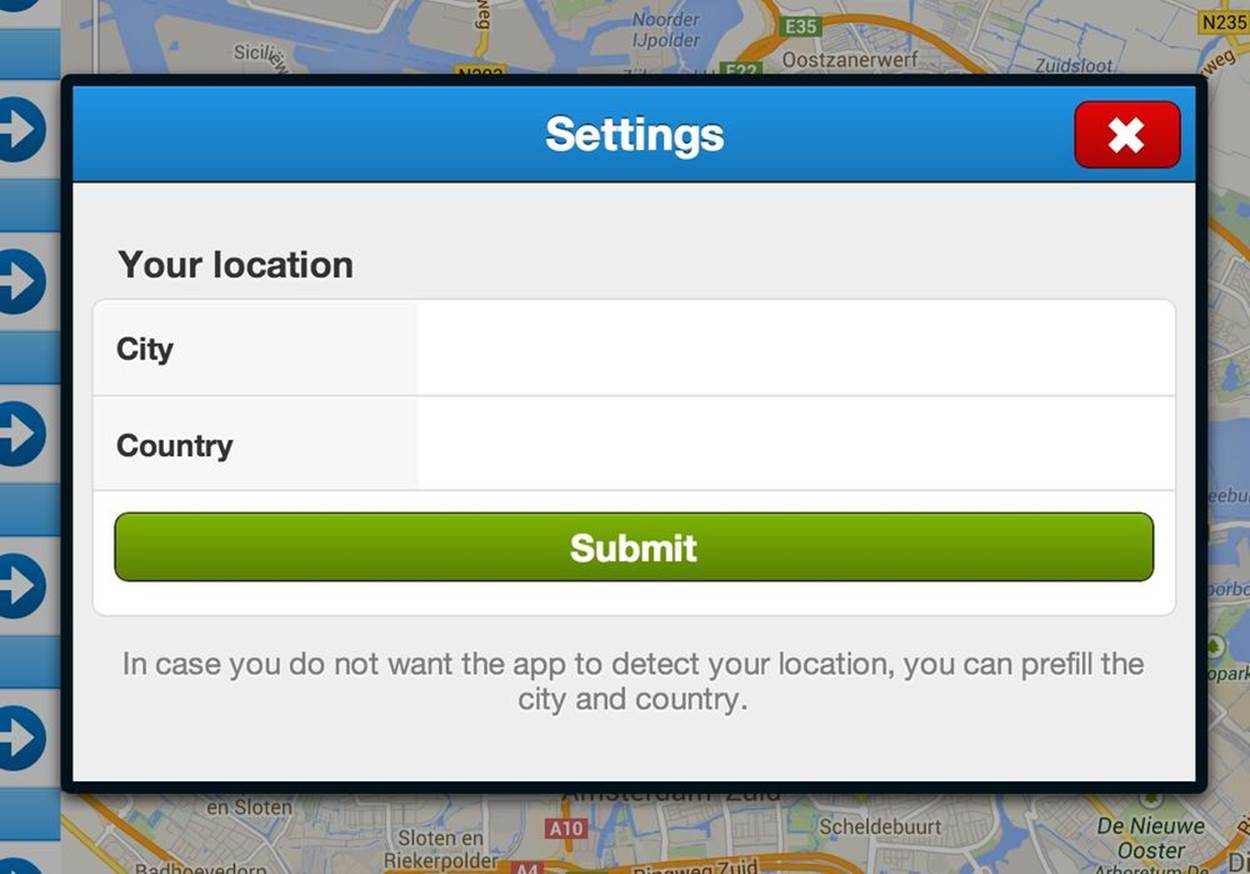
Figure 12-4. Your FindACab app form should look like this, after you’ve implemented the fieldset and button
Validating a Form
Form validation in Sencha Touch is pretty basic when you compare it to form validation with its big brother Ext JS. Whereas in Ext JS you have built-in form validation on every form field by default, in Sencha Touch you’ll have to build in the validation yourself.
All data that comes in your app, whether it’s user input or data from an external web service, comes in via the proxy through the model and store. We learned in Chapter 7 that models can be validated. When you want to validate a form, you will have to use the model instead.
Take a look at the following code snippet, which shows the flow of validation. First you will create a model instance, update it with the data that is in your form, and then validate the model:
var model = Ext.create("MyApp.model.MyModel");
myForm.updateRecord(model);
var validationObj = model.validate();
if (!validationObj.isValid()) {
validationObj.each(function(errorObj) {
//loop through all errors
}
} else {
//form is valid, now do something!
}
The idea is to update your model with the user input that is written in the form. That’s possible with the updateRecord(model) method, which you can call from a Ext.form.Panel. It persists the values in the form into the passed-in Ext.data.Model object (a record). Once the new data is in your model, you can run the validate() method on the model.
This will return an Ext.data.Errors object. The name is somewhat misleading, because you will also retrieve this object if there are no errors. That’s why I prefer to call it a validation object. When you run the isValid() method on it, it will return true if the form does not contain any errors, and false if the form is not valid. If that is the case, on the validation object you can loop through the collection of errors. It stores the model field name that contains the error, and the validation message (that’s set in the model). You can show these validation messages directly in form fields on the screen or in an Ext.MessageBox.
Do you want to highlight the form field in red when an error occurs? You have to implement this yourself, but it’s not that hard. First, implement an error style in the (Sass or CSS) stylesheet, /resources/css/app.css:
.error input {
border: 3px solid red;
}
Note that a form field in Sencha Touch is the label and the actual input. Under the hood, it’s wrapped by a <div> tag. This <div> element will get the error CSS class, and therefore if you want to add a red border around the input field, you’ll have to specify this in the stylesheet.
Then add the error CSS class to the form field that contains the error. For example:
Ext.ComponentQuery.query
("textfield[name=\'\+errorObj.getField()\+\']")[0]
.addCls("error");
Validating a Form in the FindACab App
The FindACab app should have the code for validating a form in the controller/SettingsController.js file. Let’s review it together.
Start with defining an event listener in the control object of the SettingsController. You will listen to the tap event of the Submit button. This will dispatch you to the onSubmitTap function:
'button[action=submit]': {
tap: 'onSubmitTap'
}
Next, create the onSubmitTap() function and loop through all textfields. While looping, remove every possible error CSS class. This is to reset the error states. If a form was invalid before and you fixed it, it at least should be shown as a valid field:
onSubmitTap: function() {
var t = Ext.ComponentQuery.query('textfield').length;
var i = 0;
for(i;i<t;i++){
Ext.ComponentQuery.query('textfield')[i].removeCls('error');
}
//TODO logics
}
You will implement more logic. Let’s throw a loading indicator on the viewport. This can take some time while saving valid data, so let the user know this. Of course, when it’s done, clear the loading indicator from the viewport:
Ext.Viewport.setMasked({
xtype: 'loadmask',
indicator: true,
message: 'Save Settings...'
});
//TODO validation logics
Ext.Viewport.unmask();
Now, prepare the form validation. Because form validation in Sencha Touch goes through the data model, make a reference to the Settings model. Also, create an empty errorstring, which you will use to display error messages:
var errorstring = "";
var model = Ext.create("FindACab.model.Setting", {});
You will run the updateRecord() method on the formpanel, which will make the connection between the settingsform and a data model (FindACab.model.Setting). As soon as you enter user input and press the Submit button, it will run the onSubmitTap function, which will update the FindACab.model.Setting model with the user input:
this.getSettingsView().updateRecord(model);
The next part is where the magic happens. Validate the data model (which is hooked up to the form):
var validationObj = model.validate();
Is the validation object not valid? Does the model contain any errors? When the validation object is not valid, let’s loop through every error and save the error messages to the errorstring, which you will display in an alert messagebox later. You also need to add the error CSS class to every form textfield that contains a validation error. If the form is valid, you can hide the settingsform.
Later in this book, you will implement some code that saves the user input to Local Storage and start running the application logic for displaying Cab information:
if (!validationObj.isValid()) {
validationObj.each(function(errorObj) {
errorstring += errorObj.getMessage() + "<br />";
Ext.ComponentQuery.query
('textfield[name='+errorObj.getField()+']')[0]
.addCls('error');
});
Ext.Msg.alert("Oops", errorstring);
} else {
//TODO save settings
this.getSettingsView().hide();
}
The complete code for the onSubmitTap() function looks like this (see Figure 12-5):
onSubmitTap: function() {
//reset cls
var t = Ext.ComponentQuery.query('textfield').length;
var i = 0;
for(i;i<t;i++){
Ext.ComponentQuery.query('textfield')[i].removeCls('error');
}
Ext.Viewport.setMasked({
xtype: 'loadmask',
indicator: true,
message: 'Save Settings...'
});
var errorstring = "";
var model = Ext.create("FindACab.model.Setting", {});
this.getSettingsView().updateRecord(model);
//start validating
var validationObj = model.validate();
if (!validationObj.isValid()) {
validationObj.each(function(errorObj) {
errorstring += errorObj.getMessage() + "<br />";
var field = Ext.ComponentQuery.query
('textfield[name='+errorObj.getField()+']')[0];
field.addCls('error');
});
Ext.Msg.alert("Oops", errorstring);
} else {
//TODO save settings
this.getSettingsView().hide();
}
Ext.Viewport.unmask();
}
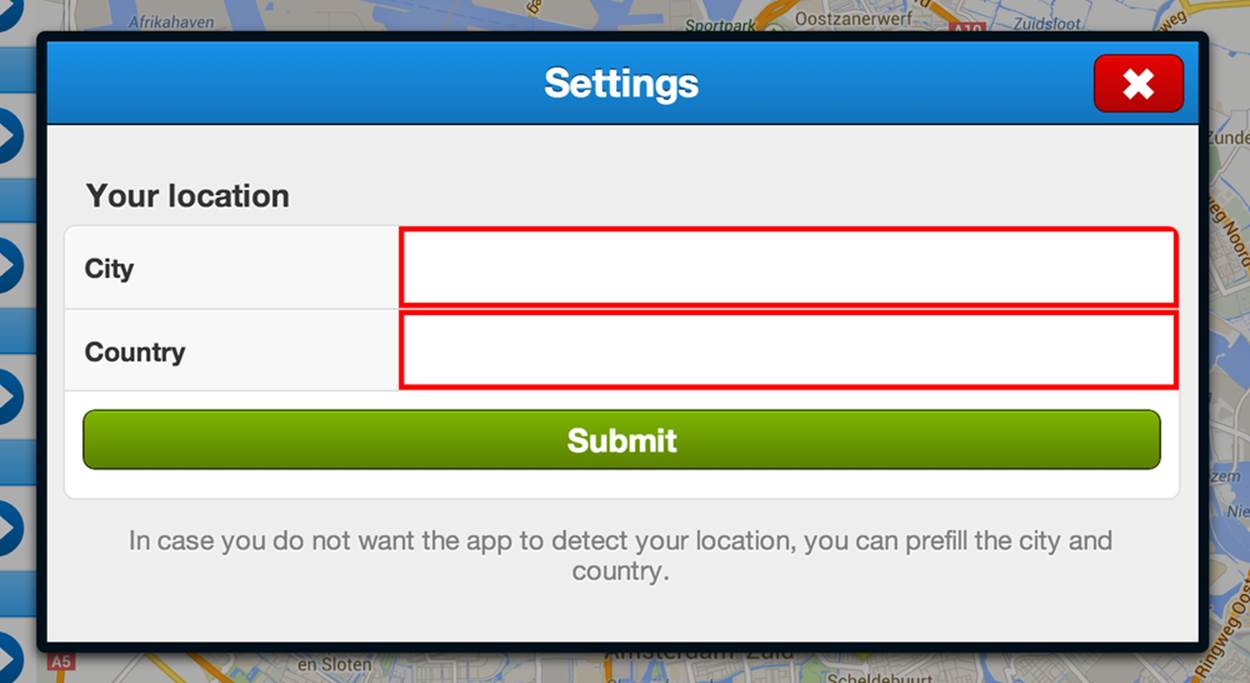
Figure 12-5. Oh no! Both form fields are invalid
Now that you know how to validate your form input (or actually the model), the FindACab app needs some logic for saving the data. You can save data in a form either with the form submit() method, or through the model or store. The next sections will show you both ways.
Submitting a Form
In the previous technique, you learned how to validate the model, to check if the user input in the form is valid. When it is valid, you might want to post it to a server:
myForm.submit();
form.submit() is the traditional way of sending data to a server. You might be familiar with this in HTML, where you can submit an HTML form.
Although in Sencha Touch a formpanel under the hood is not an HTML <form> tag, but rather just a plain old <div> tag, it behaves like a <form> tag. It will submit the form on AJAX-based key/value pairs (on the same domain) because every form field should have a name (the key) and a value (the user input).
It’s possible to pass in some settings for the form submit with the Ext.data.Connection object. See Table 12-2 for all the options to set.
Table 12-2. The Ext.data.Connection options for a form submit
|
Key |
Description |
|
url |
The URL for the action |
|
method |
For example, POST (or GET) |
|
params |
Arguments you want to send with (use Ext.urlEncode) |
|
headers |
The request headers to set for the action |
|
autoAbort |
true to abort pending AJAX request |
|
submitDisabled |
true to submit all fields regardless of disabled state |
|
waitMsg |
If specified, you will see a loading mask (indicator) with a message |
|
success |
The callback when the submit succeeds |
|
failure |
The callback when the submit fails |
|
scope |
The scope from which to call the callback |
Here’s an advanced example of the form submit that passes in the Ext.data.Connection object:
myForm.submit({
url: 'data.php',
method: 'post',
submitDisabled: true,
waitMsg: {
xtype: 'loadmask', message: 'Submitting Data...'
},
success: function (objForm,objResult) {
//success code
myForm.reset();
},
failure: function(objForm,objResult) {
Ext.Msg.alert('Oops',result.responseText);
}
})
The form submit will return either a success or failure callback. However, note that if there is some server-side failure—like the database doesn’t accept the data, or any other problem—then it won’t return a failure callback. A failure is when an HTTP error code occurred—for example, 404 for a Not Found Error or 500 for an Internal Server Error.
To determine whether everything went well on the server side, you can send a JSON message back. When you have a server in PHP, your response message could look like this:
<?php
header('Content-Type: application/json');
echo '{"success":true, "msg":'.json_encode('Thanks!').'}';
?>
WARNING
Always be aware of having your client-side and server-side validations in sync. You can end up with really crazy situations, when on the client side it accepts a max-length of 5 and on the server a min-length of 6. This may seem unlikely, but trust me, unfortunately I have seen implementations like this.
Because you cannot be sure what the server will send back to you, it’s not advisable to immediately sync your store locally after a model validation returns no errors. It could be that it passes all your client-side checks and the server has some database error. In that case, your app would be out of sync; there can be data on your device that’s not available on a server. In those cases, always let the server send a response, such as the previously shown PHP example.
The form submit method can be handy for posting AJAX data to a server (on the same domain). Instead of the form submit, you could also use the Ext.Ajax.request() call for posting data to a server. Typically, you would use the jsonData (or xmlData) objects for posting the key/value pairs. (Note that only the POST method will work.) Here is an example of how to post data through an AJAX call:
Ext.Ajax.request({
url: 'data.php',
jsonData : {city : "Amsterdam", country : "Netherlands"},
success: function(response) {
//success code
myForm.reset();
},
failure: function(response) {
Ext.Msg.alert('Oops',result.responseText);ΓÇ¿
}
});
There are more ways for posting (or syncing) data to a server. This could be through a model or a store. You would also use this technique when you want to sync your data with a client proxy, like saving into Local Storage. Interested? Check out the next technique.
Implementing Form Handling
You have a valid form, and you want to sync it either with a server-side script or an offline storage. For syncing user input to a server, you can use an AJAX request or a formpanel submit, but you can also choose to save your model or sync your store. The latter is also the option you would choose for syncing your data offline. So what do you need? A store with a proxy (and/or a model with a proxy). How does it work? By calling Model.save() or Store.sync(). Model.save() you can save data to a server. No store is required. The Store.sync() synchronizes the store with its proxy. This will ask the proxy to batch together any new, updated, and deleted records in the data store and update the store’s internal representation of the records as each operation completes. It is also possible to sync a store by adding autoSync to the store’s config. In that case, it will automatically sync every operation immediately on the fly. That’s easy, but it’s also a heavy performance hit because of multiple syncs.
Does this sound familiar? Yes, see Chapter 7’s coverage of the save() technique and Chapter 9’s discussion of the sync() method for more information about both concepts.
However, first I want to show you how to finalize the FindACab app. Now that you know everything about forms and syncing stores, it will probably also make much more sense. So the FindACab app will save all the user settings into the Local Storage, by setting a client proxy on the model of the Settings store.
Let’s take a look at the code of the controller/SettingsController.js. It shows the code solution for saving the user input to your Local Storage when the form is valid. First, try to get a reference to the previous saved user input (the city and the country fields) from the store:
} else {
var me = this;
var settingsStore = Ext.getStore('Settings');
try{
var oldLocation = Ext.getStore('Settings').getAt(0).get('city')
+ ' ' + Ext.getStore('Settings').getAt(0).get('country');
} catch(e){
var oldLocation = "";
}
//TODO logics here
});
Then, clear the user settings store and add the new user input data model into it. On a successful sync of the settings in the Local Storage, create a callback function as follows:
settingsStore.removeAll();
settingsStore.add(model.getData());
settingsStore.sync({
success: function(){
//
}
});
In this callback function, you will need to run the logic for clearing the Web SQL database. Therefore, you will code a removeOldData() function later. You will pass in two arguments, the old user input (to decide what to remove from the database) and a callback that will invoke the logic for removing old markers from the Google Map (the removeMarkers() function in the CabController) and to load new Cab data into the store (the loadLocal() function in the CabController):
this.getApplication().getController('CabController')
.removeOldData(oldLocation, function(){
me.getApplication().getController('CabController').removeMarkers();
me.getApplication().getController('CabController').loadLocal();
me.getSettingsView().hide();
});
Here is the complete solution that belongs in the else of the SettingsController:
var me = this;
//remove all current Settings and save new
var settingsStore = Ext.getStore('Settings');
try{
var oldLocation = Ext.getStore('Settings').getAt(0).get('city') + ' ' +
Ext.getStore('Settings').getAt(0).get('country');
} catch(e){
var oldLocation = "";
}
settingsStore.removeAll();
settingsStore.add(model.getData());
settingsStore.sync({
success: function(){
//remove all Cabs from store and database
me.getApplication().getController('CabController').removeOldData
(oldLocation, function(){
//remove all Markers from the map
me.getApplication().getController('CabController').removeMarkers();
//load new data
me.getApplication().getController('CabController').loadLocal();
//hide loading mask
me.getSettingsView().hide();
});
}
});
}
Ext.Viewport.unmask();
Are we there yet? Well, almost. The removeOldData() function needs to be coded into the CabController. This is one more function that removes old data when there is already data in the local Web SQL database. It takes the old user input as a first argument. It gets a reference to theCabs store, clears previous filters, and filters on the userinput model field that should match with the old user data. Then we’ll loop through all the matches and remove it from the store.
When you are done, you can remove the filter again and pass in the callback to the sync store method, to sync the removed items first and then run the callback to to load the new data into the store and add the new Google Map markers.
When there is no old user input saved in the Local Storage, we can assume the app is running for the first time. In that case, continue downloading data.
removeOldData: function(loc, callback){
if(loc == ""){
//this is the very first time you load data
//there is nothing to remove, just download
callback();
} else {
var store = Ext.getStore('Cabs');
store.clearFilter();
store.filter("userinput", loc);
store.load(function(records){
var i = 0,
t = records.length;
for(i; i<t; i++){
store.remove(records[i]);
}
store.clearFilter();
store.sync({
failure: function(){
console.error(arguments);
},
success: function(batch){
callback();
}
});
});
}
},
One more thing! You need to remember to remove the hardcoded LOCATION settings written in the downloadData() function in your CabController: location = Utils.Commons.LOCATION;. After uncommenting out or removing this line, you can start testing your FindACab app in your desktop browser.
NOTE
If you want to test the FindACab app with a U.S. address, enter the name of the city and the U.S. state code (e.g., “Naperville IL”) in the city field and as a country enter “USA.”
Summary
Awesome, the FindACab app is finally finished! See Figure 12-6. There are just some minor things left for us to do. For example, we want to make it look better, and finally, we want to create a production build. You’ll learn how to do that in the last couple of chapters.

Figure 12-6. Hooray! The code for the FindACab app is finished!
All materials on the site are licensed Creative Commons Attribution-Sharealike 3.0 Unported CC BY-SA 3.0 & GNU Free Documentation License (GFDL)
If you are the copyright holder of any material contained on our site and intend to remove it, please contact our site administrator for approval.
© 2016-2026 All site design rights belong to S.Y.A.