Hands-On Sencha Touch 2 (2014)
Part II. Building the FindACab App
Chapter 14. Builds
While developing the FindACab app, you might have noticed all the JavaScript classes that are loaded in the memory (see Figure 14-1). This is a mix of Sencha Touch framework classes and the custom classes you wrote yourself (i.e., everything that’s in the FindACab namespace). Obviously, this is not what you want for production environments, given that every JavaScript file is a separate network request and it can be a huge performance hit, especially on a mobile connection.
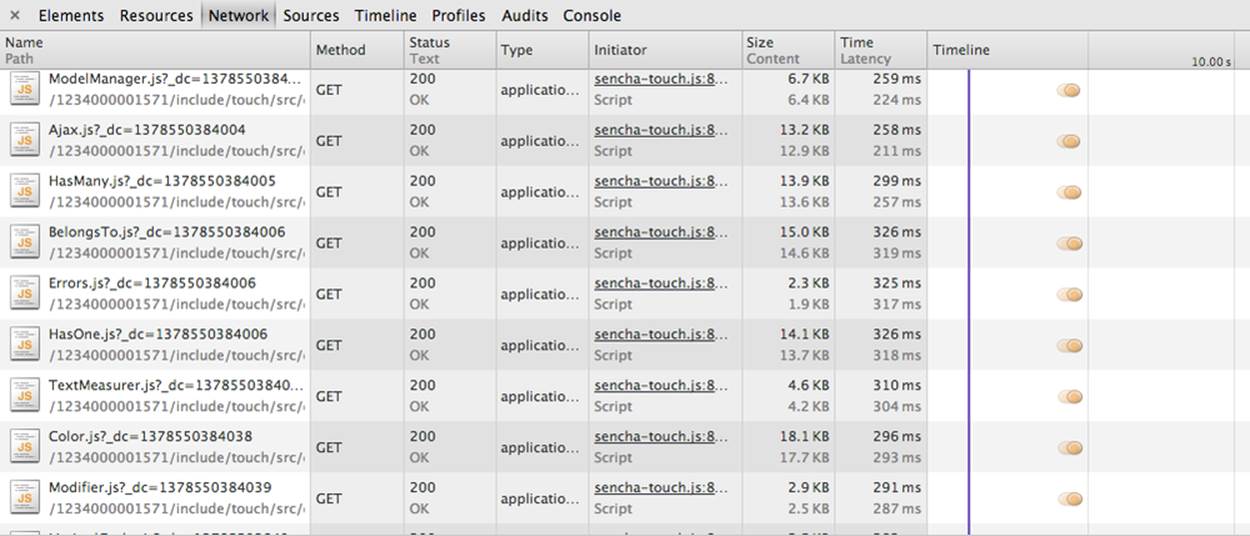
Figure 14-1. All the Sencha Touch JavaScript classes that are loaded in the memory during development
This is why you want to create a build package, a small package with only the absolutely necessary code for running your app. The package concatenates (joins) all the JavaScript classes that you use in the correct order, whether these are custom classes or Sencha Touch framework classes, and also minifies them to reduce the file size smaller. The creation of the build package is called the build process. You’ll use the Sencha Cmd tool for this. Remember the process for writing a Sencha Touch application with code? The last step in this process is to create a build with Sencha Cmd (see Figure 14-2). If you have used Sencha Cmd to generate your application, building the app is a piece of cake.

Figure 14-2. The process for writing a Sencha Touch application
TIP
You didn’t use Sencha Cmd to generate your folder structure? You might be missing metadata files for Sencha Cmd and therefore your builds can fail. Is this bad? No. Usually in this case, I generate a new folder structure with Sencha Cmd, but with the same namespace as the app that couldn’t build. After the folder structure is generated, I copy over the app folder (and sometimes also the app.js file, if there are no special changes made). Then I start running the build process again. It should work. This tip also works great when you have build errors and you have no idea what’s wrong or how to fix it. (It could be an error with your metadata…)
With Sencha Cmd, you can create different kind of build packages. You can create a build for test environments (all the files will be readable and debuggable), you can create a production build (typically you would use this when you want to host your application on some web server), or you can create a native package directly from Sencha Cmd. This can be a native package to upload to the app stores.
Going Native
Going native is also the path you would choose when you want to implement device API capabilities, such as the phone camera or contact list. Sencha Touch ships with device APIs. Version 2.3 even ships with Apache Cordova/Adobe PhoneGap support (see Table 14-1). This means you can build Cordova/PhoneGap packages from the command line with Sencha Cmd, and if you use the device APIs within Sencha, Sencha will use the Cordova/PhoneGap implementations when you create a build for Cordova or PhoneGap.
If you are interested in using those, see the API docs and check out the Ext.device package, or visit the Cordova website.
NOTE
Adobe PhoneGap is built on top of Apache Cordova, and both have access to the API. PhoneGap is commercial and Cordova is open source. PhoneGap and Cordova differ in how their packaging tools are implemented. PhoneGap provides a remote building interface that lets you package and emulate an app for a single platform in the cloud. Cordova packaging tools let you build simultaneously for multiple platforms on your own computer when the SDKs are installed. In addition, Cordova is constantly updated by the open source community, and offers lots of plug-ins for download, whereas PhoneGap updates are coordinated by Adobe.
Table 14-1. An overview of all the supported Sencha and Cordova device APIs
|
Name |
Description |
|
Ext.device.accelerometer. Cordova |
Sencha Touch wrapper for the device’s motion sensor device API |
|
Ext.device.Browser |
Sencha Touch wrapper with the Cordova InAppBrowser |
|
Ext.device.Camera |
Sencha Touch wrapper with the Cordova device camera device API |
|
Ext.device.Capture |
Sencha Touch wrapper with the Cordova capture media device APIs |
|
Ext.device.Compass |
Sencha Touch wrapper with the Cordova compass device API |
|
Ext.device.Connection |
Sencha Touch wrapper with the Cordova connection device API |
|
Ext.device.Contacts |
Sencha Touch wrapper with the Cordova contact list device API |
|
Ext.device.Device |
Sencha Touch wrapper with Cordova device and Cordova events |
|
Ext.device.FileSystem |
Sencha Touch wrapper with the Cordova filesystem |
|
Ext.device.Geolocation |
Sencha Touch wrapper with the Cordova geolocation device API |
|
Ext.device.Globalization |
Sencha Touch wrapper with the Cordova globalization device API |
|
Ext.device.Media |
Sencha Touch wrapper with the Cordova audio device API |
|
Ext.device.Notification |
Sencha Touch wrapper with the Cordova notification device API |
|
Ext.device.Orientation |
Sencha class that listens to the orientationchange event |
|
Ext.device.Push |
Sencha device API that provides a way to send push notifications to a device |
|
Ext.device.Purchases |
Sencha device that checks whether purchases were made |
|
Ext.device.Splashscreen |
Sencha Touch wrapper with the Cordova splash screen |
|
Ext.device.SQLite |
Sencha device API that provides an API for storing data in databases that can be queried using SQL |
NOTE
There’s a nice online Sencha Guide that explains how to implement native device APIs.
Build Resources
Whatever build option you choose, all the build packages will create a resources folder with icons, splash screens, and loading images (see Table 14-2). By default, these image resources display the Sencha logo. I know, you don’t want this. However, it is very handy to open these images in, for example, Adobe Photoshop and paste your own icon in it. Note that the icons and splash screens are hooked up to the app via the Ext.application.Application class in app.js. Extra icons or different icon dimensions can be changed in app.js.
The generated icons and images are very iOS-device oriented. Apple has special naming conventions for naming an icon or a startup splash screen. See, for example, in Table 14-2 the splash and loading screens. Also notice the dimensions; it takes the height of the device minus 20px of the status bar. For example, the size of an iPad is 768×1,024, so the size of the splash screen should be 768×1,004 in portrait mode.
TIP
There are some design guidelines you need to know with regards to the iOS icons: Apple trims 1 pixel off every icon border for shadows, and you don’t have to design the border radius for an icon. You can create your own glow, or have no icon glow at all. In the app.js file, when you set isIconPrecomposed to true, Apple will not add a glossy effect to the icon, so the icon will preserve its exact look.
Table 14-2. Stylesheets that are shipped with Sencha Touch out of the box
|
Filename |
Description |
|
startup/320x460.jpg |
Default iPhone splash screen |
|
startup/640x920.png |
Retina iPhone splash screen |
|
startup/748x1024.png |
iPad splash screen |
|
startup/768x1004.png |
iPad splash screen |
|
startup/1496x2048.png |
Retina iPad splash screen |
|
startup/1536x2008.png |
Retina iPad splash screen |
|
loading/Default-LandScape@2x~ipad.png |
2,048×1,496 iPad retina landscape loading screen |
|
loading/Default-LandScape~ipad.png |
1,024×748 iPad landscape loading landing screen |
|
loading/Default-LandScapeLeft~ipad.png |
1,024×748 iPad landscape loading landing screen |
|
loading/Default-LandScapeRight~ipad.png |
1,024×48 iPad landscape loading landing screen (different orientation) |
|
loading/Default-Portrait@2x~ipad.png |
1,536×2,008 retina iPad loading screen |
|
loading/Default-Portrait~ipad.png |
768×1,004 iPad loading screen |
|
loading/Default-PortraitUpsideDown~ipad.png |
768×1,004 iPad loading screen (different orientation) |
|
loading/Default.png |
320×480 iPad loading screen |
|
loading/Default@2x.png |
640×960 loading screen |
|
loading/Default~ipad.png |
768×1,004 iPad loading screen |
|
icons/icon-spot~ipad.png |
Search results on 50×50 iPad RBG icon |
|
icons/Icon.png |
Default iPhone 57×57 RGB icon |
|
icons/Icon@2x.png |
Retina iPhone 114×114 RGB icon |
|
not available |
Retina iPhone 120×120 RGB iOS 7 icon |
|
icons/Icon~ipad.png |
iPad 72×72 RGB icon |
|
not available |
iPad 76×76 RGB iOS 7 |
|
icons/Icon~ipad@2x.png |
Retina iPad 144×144 RGB icon |
|
not available |
Retina iPad 152×152 RGB iOS 7 icon |
|
icons/iTunesArtwork.png |
500×500 RGB icon used by App Store |
Adding Non-MVC Folders to Your Build Package
Sometimes you want to add extra (non-MVC) folders with JavaScript classes to your concatenated JavaScript build. Remember how we created a utils folder with a JavaScript class that contains statics? Sometimes you want to create additional JavaScript classes with logic or statics outside the Sencha MVC folder structure. When these JavaScript files are not within the app folder, Sencha Cmd doesn’t know they exist when it wants to build your app. Thus, there might be situations in which you want to let Sencha Cmd know about them, which is totally possible. There is an app and workspace classpath. The workspace.classpath matters when you have multiple applications and you want to share code (or a copy of the framework) between all apps; in all other situations, the app.classpath should be good enough.
For the FindACab app, I have added the utils folder to the app classpath in ./sencha/sencha.cfg:
app.classpath=${app.dir}/app.js,${app.dir}/app,${app.dir}/utils
Adding Extra Resources to Your Build Package
In other situations, you might want to include extra resources to your build package—for example, a folder with images or a folder with JSON data. There are two ways to include these in your build. I will explain both. First (the easy way, shown in Example 14-1), you can add the folder to the resources array in the app.json file. By default, Sencha Cmd already created a selection.
Example 14-1. Additional resources that need to be copied during the build process
/**
* Extra resources to be copied along when building
*/
"resources": [
"resources/images",
"resources/css",
"resources/icons",
"resources/startup"
],
TIP
Additional JavaScripts or stylesheets can be entered into the js or css arrays.
The other way of adding resources to your build is what I call the hardcore way, but it’s kinda cool so I want to mention it. Sencha Cmd has Apache Ant integration. You can modify the Ant build script build.xml totally to your own needs. See Example 14-2; this little Ant script copies a datafolder from the application root to the production build folder. Isn’t it awesome?
Example 14-2. Copying a folder to a different location
<target name="-after-build"/>
<target name="build"
depends="init,-before-build,-build,-after-build"
description="Builds the application"/>
<copy todir="${build.dir}/data" overwrite="true">
<fileset dir="${basedir}/data">
<include name="**/*" />
</fileset>
</copy>
Now that you know all the background information about build processes in Sencha Touch, let’s create some build packages with the next techniques.
In the next sections, you’ll learn how to:
§ Create a test build with Sencha Cmd
§ Create a production build with Sencha Cmd
§ Create a native build with Sencha Cmd and Adobe PhoneGap
Creating a Test Build with Sencha Cmd
With Sencha Cmd on the command line, you can generate a build package optimized for test environments. On the command line, navigate to the app folder and run the following:
sencha app build testing
The test build can be found in the <myapp>/build/testing/<appname> folder, which has the following structure (see Figure 14-3):
testing/<appname>/
§ app.js
§ app.json
§ index.html
§ resources
§ css/
§ app.css
§ images
§ loading
§ startup
When you create a build for a test environment, Sencha Cmd will concatenate all the used JavaScript class files to one single file, app.js. These are all your custom Sencha Touch classes and all framework classes that you use, listed in the correct order. However, this JavaScript file won’t be minified and is still readable. In addition, the (framework) comments will be present.
app.css is the CSS stylesheet compiled from the resources/sass/app.scss Sass file. In the test package, this file is not minified and still readable.
Another cool thing to know is that Sencha Cmd also verifies (lints) your JavaScript during the build process. If it finds a problem, it returns a warning message describing the problem.
When the build succeeds, you can test the package in your browser. For the FindACab app, the URL would look like http://localhost/findacab/build/testing/FindACab/.
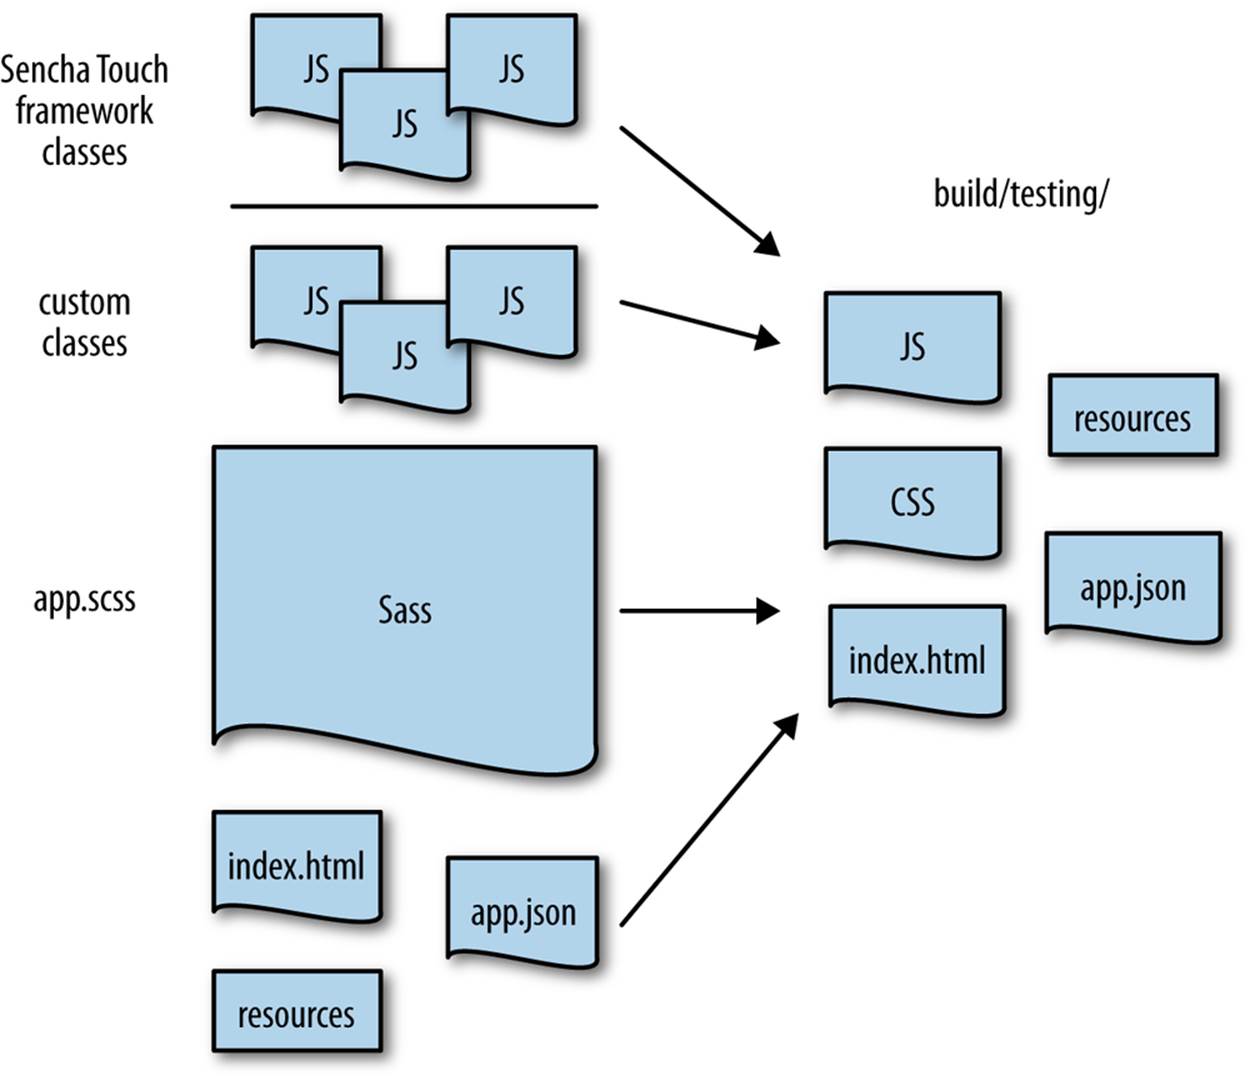
Figure 14-3. The Sencha Touch test build package
Now that you have completed your first test build, you are ready for production. Let’s create the first production build!
NOTE
I’m often asked which tools are good for testing a Sencha Touch application. For UI testing, Siesta is a good tool; for syntax testing, you could use JS Lint; and for unit testing, Jasmine is a popular testing tool. For more information, check out this great blog post, which contains all the links to the tools.
Creating a Production Build with Sencha Cmd
Production builds in Sencha Touch are little packages that you want to host on the Web. Usually such a build package can be uploaded to some server so users can browse with their mobile devices to the URL of the app. Once the app is loaded, the app can be bookmarked to the home screen of the user’s device. From that moment, visiting your app is no different than opening a native app. The user will see an icon and maybe a splash screen. Data can be available offline, with techniques such as AppCache, Local Storage, or local databases.
With Sencha Cmd on the command line, you can generate a build package optimized for production. On the command line, navigate to the app folder and run the following:
sencha app build
The production build can be found in the <myapp>/build/production/<appname> folder, which has the following structure (see Figure 14-4):
production/<appname>
§ app.js
§ app.json
§ index.html
§ cache.appcache
§ deltas
§ resources/
§ css/
§ app.css
§ images
§ loading
§ startup
When you create a build for production, Sencha Cmd will concatenate all the used JavaScript class files to one single file, app.js. These are all your custom Sencha Touch classes and all of the framework classes that you use, listed in the correct order. In production builds, the app.jsJavaScript file and the app.css stylesheet are both minified and comments are removed. This will make the file size nice and small, so it won’t take a lot of download time on a mobile network connection.
The bare minimum you will need to upload to your web server and show your app online are the index.html, the app.js, and the app.css files (and when you have images in the images folder you’ll need that folder, too). However, when you want to have offline capabilities (i.e., the app can be cached offline), you will need a cache.appcache file, the deltas folder, and assets like the icons and splash screens for when the app is bookmarked.
The deltas folder is an important folder that tracks the version differences every time you edit your application and create a production build. By collecting deltas, you ensure that your user sees a pop up when he opens the app and there is a newer version available. When the user chooses to get the latest version, he will not redownload the full app, only the differences. That’s really nice on a mobile network connection!

Figure 14-4. The Sencha Touch production build package
When the build succeeds, you can preview the package in your browser. For the FindACab app the URL, would look like http://localhost/findacab/build/production/FindACab. You can see the finalized FindACab app in Figure 14-5.
TIP
Let’s say you’re testing your application. You make a change to fix a bug and then create a build. Refresh the browser—oh no, the bug is not fixed. So again you make a change, create a build… Such processes can be exhausting. Luckily, Sencha Cmd 4 and newer have app watch. Sencha Cmd watches the app and every time you hit Save, it builds your app and compiles your Sass stylesheets. To see the details, you can look at .sencha/app/watch-impl.xml, which is imported by the master build script build.xml.
Well done! You’ve completed your first production build. This build is optimized for delivering your application on a web server. Now maybe you want to make some money with it by selling it in an app store. Let’s discuss native builds in the next section.
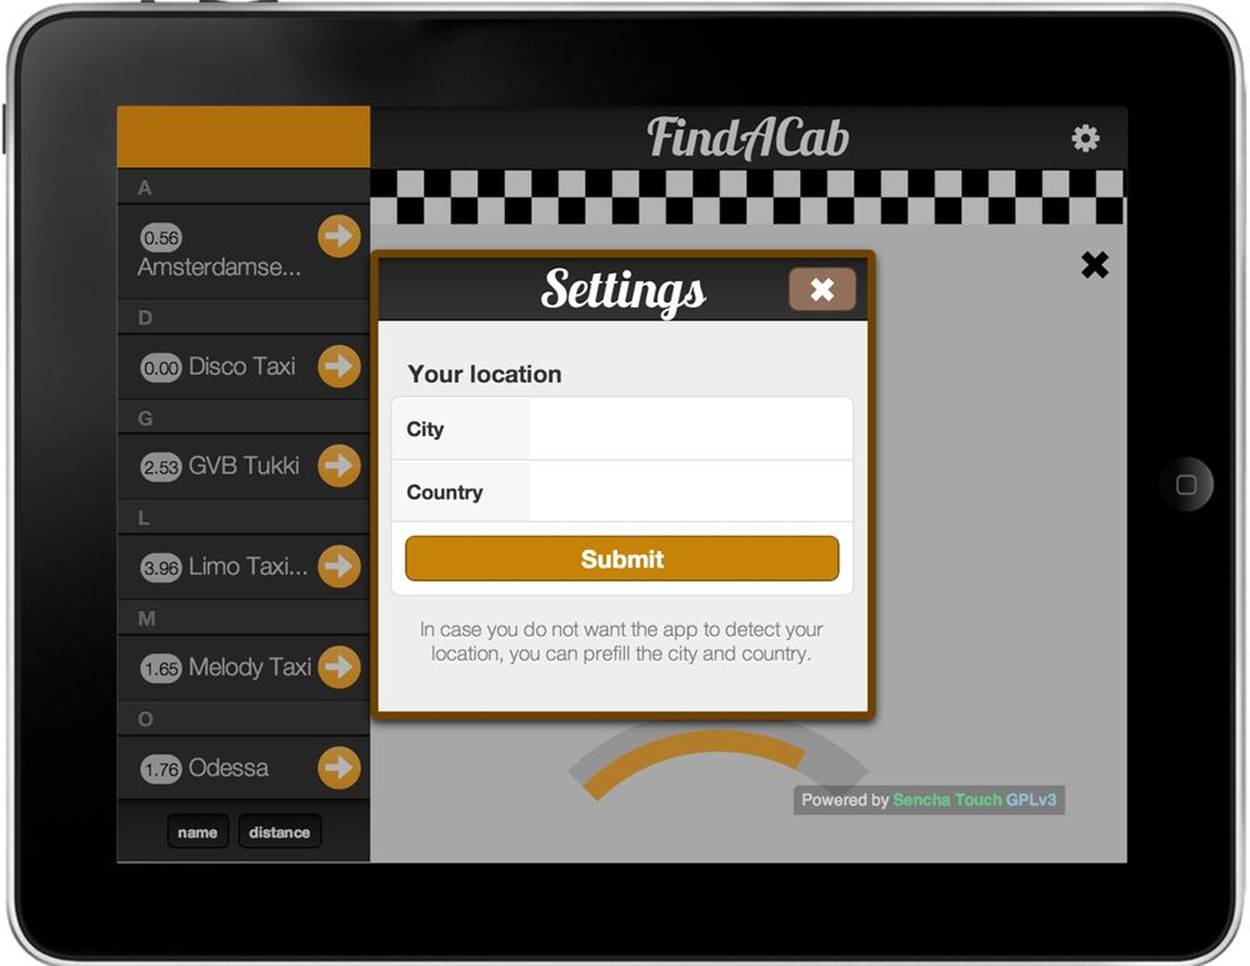
Figure 14-5. The finalized FindACab app
Creating a Native Build with Sencha Cmd and Adobe PhoneGap
You can also create a native package (a hybrid app) with Sencha Cmd to distribute it to various app stores. Currently, there are three products you can use to create a native app from a Sencha Touch code base:
§ Sencha Mobile Packager
§ Adobe PhoneGap
§ Apache Cordova
All products are supported by the Sencha Device API, which allows you to access hardware resources on devices.
Let’s go over the differences between these three solutions.
Sencha Mobile Packager
The Sencha Mobile Packager is an old solution and it’s included in Sencha Cmd. It uses the packager.json file to build iOS or Android build packages locally that can be distributed through the Android Marketplace or Apple App Store. It requires an installation of XCode (for iOS development) or Android Developer Tools (for Android development) to build the package. Because it supports only iOS and Android and getting it to work can be complicated, we won’t use this solution for the FindACab app. There are easier solutions supported by Sencha.
Apache Cordova
Apache Cordova is a top-level project within the Apache Software Foundation. Cordova is the free, open source, community-driven version of Adobe PhoneGap. Cordova lets you package apps locally and distribute them through the Android Marketplace, BlackBerry App World, Windows Phone Store, or Apple App Store. Building packages locally via the command line requires an installation of XCode (for iOS development), Android Developer Tools (for Android development), BlackBerry 10 SDK (for BlackBerry 10 development), Tizen SDK (for Tizen development), or Windows 8 Pro with Visual Studio (for Windows Phone development). Sencha Cmd has Apache Cordova integration in the Sencha Cmd build process. Although it’s a good solution, we won’t use it for the FindACab app, so we don’t have to deal with installing all the various SDKs on your machine.
Adobe PhoneGap
Adobe PhoneGap is a commercial solution. You can build locally (which requires the installation of the SDKs) or use the PhoneGap Build cloud service (see Figure 14-6) to remotely package your apps and distribute them through the Android Marketplace, BlackBerry App World, Windows Phone Store, or Apple App Store. It’s an easy solution, and you can test applications on your device by scanning a QR code. PhoneGap Build is a commercial service; the free version is limited to one private app. Paid users can access private GitHub repos or upload multiple zip packages.
With PhoneGap Build, you can build native apps to distribute for these platforms:
§ iOS
§ Android
§ Windows
§ BlackBerry
§ HP
§ Symbian
Building packages via PhoneGap Build requires a free Adobe PhoneGap Build account. To create a PhoneGap account, you will need an Adobe ID (account), and if you want to use the free services you will also need a GitHub account linked to your PhoneGap account.

Figure 14-6. The PhoneGap Build website
NOTE
We will use PhoneGap Build in this book. If you would rather use Cordova, you can use the same commands as you see in this chapter, but replace the word phonegap with cordova on the command line. In order to use PhoneGap/Cordova with Sencha Cmd, you will need to have NodeJS, Apache Cordova, or Adobe PhoneGap installed on your machine. See Appendix A for more details.
Initialize a PhoneGap Project
The first step in building a hybrid app is to issue the following command from your project’s directory to enable PhoneGap support:
sencha phonegap init <APP-ID> <APP-NAME>
§ The <App ID> follows this pattern: <REVERSED-DOMAIN>.<APPLICATION-NAME>.
§ The <APP-NAME> should be the same value as the name property that you specified in your Sencha Touch app.json file.
NOTE
If you want to port to an iOS app, you will need to make sure that the App ID is the same one that you registered in your Apple provisioning portal.
Here’s the command I used to enable PhoneGap support for the FindACab app:
sencha phonegap init com.ladysign-apps.findacab FindACab
NOTE
Mac OS X users might need to prefix with sudo to get administrative rights.
This generated the following structure/files:
§ phonegap folder structure
§ phonegap.local.properties
§ config.xml
The PhoneGap Folder Structure
MyApp/phonegap contains the full PhoneGap file structure. If you used Cordova to initialize a project, the folder will be named cordova. This folder structure contains the platforms subfolder. When you have a development SDK installed (such as XCode), it allows you to open the SDK project files to build it locally.
The phonegap.local.properties File
The phonegap.local.properties file contains the names of the platforms that you want to support when building locally. By default, it takes the local installed SDKs; for example:
phonegap.platforms=ios blackberry10
The following options are possible:
§ ios (iOS)
§ android (Android)
§ blackberry10 (BlackBerry 10)
§ wp (Windows Phone)
When you run the phonegap init command, the property file also gives you settings for the Adobe PhoneGap remote packager. When you have a PhoneGap Build account, you can set up these additional settings to support building remotely from the command line:
phonegap.build.remote=true
# Username for PhoneGap Build
phonegap.build.remote.username={username}
# Password for PhoneGap Build
phonegap.build.remote.password={password}
When you leave the phonegap.build.remote property as false, you need to have one of the SDKs (XCode, Android Developer Tools, BlackBerry 10 SDK, or Windows 8 Pro with Visual Studio) installed on your machine.
The config.xml Settings
The config.xml file contains references to the icons, splash images, and setups for device API features. The config.xml file for the FindACab app could look like Example 14-3.
Example 14-3. config.xml file for PhoneGap
<?xml version='1.0' encoding='utf-8'?>
<widget id="com.ladysign-apps.findacapp" version="1.0.0"
xmlns="http://www.w3.org/ns/widgets" xmlns:gap="http://phonegap.com/ns/1.0">
<name>FindACab</name>
<description>
Find nearby Taxi's
</description>
<author email="lee.boonstra@sencha.com" href="http://ladysign-apps.com">
Lee Boonstra
</author>
<feature name="http://api.phonegap.com/1.0/device" />
<preference name="permissions" value="none" />
<preference name="orientation" value="default" />
<preference name="target-device" value="tablet" />
<preference name="fullscreen" value="true" />
<preference name="webviewbounce" value="true" />
<preference name="prerendered-icon" value="true" />
<preference name="stay-in-webview" value="false" />
<preference name="ios-statusbarstyle" value="black-translucent" />
<preference name="detect-data-types" value="true" />
<preference name="exit-on-suspend" value="false" />
<preference name="show-splash-screen-spinner" value="true" />
<preference name="auto-hide-splash-screen" value="true" />
<preference name="disable-cursor" value="false" />
<preference name="android-minSdkVersion" value="7" />
<preference name="android-installLocation" value="auto" />
<icon src="resources/icons/Icon.png" />
<icon gap:platform="ios" height="57"
src="resources/icons/Icon.png" width="57" />
<icon gap:platform="ios" height="72"
src="resources/icons/Icon~ipad.png" width="72" />
<icon gap:platform="ios" height="114"
src="resources/icons/Icon@2x.png" width="114" />
<icon gap:platform="ios" height="144"
src="resources/icons/Icon~ipad@2x.png" width="144" />
<gap:splash gap:platform="ios" height="480"
src="resources/loading/Default.png" width="320" />
<gap:splash gap:platform="ios" height="960"
src="resources/loading/Default@2x.png" width="640" />
<gap:splash gap:platform="ios" height="1024"
src="resources/loading/Default-Portrait~ipad.png" width="768" />
<gap:splash gap:platform="ios" height="768"
src="resources/loading/Default-Landscape~ipad.png" width="1024" />
<access origin="*" />
</widget>
TIP
If you want to create apps for iOS 6 or iOS 7, you will need to include a splash screen for retina display with the correct size. The name should be Default-568h@2x.png, and the size in pixels should be 640×1,136. Only when you add this image to the resources and your config.xml file will the viewport automatically size for iPhone 5 (and up) screen heights.
Add a Default-568h@2x.png splash image to support larger screens as follows:
<gap:splash gap:platform="ios" height="1136"
src="resources/loading/Default-568h@2x.png" width="640" />+
Building the Native Build Package
After you’ve initialized your application with PhoneGap or Cordova, it’s time to create a native build.
Run the following from the command line:
sencha app build -run native
NOTE
The -run argument makes sure your app will be loaded in an emulator that’s installed on your machine. Again, Mac OS X users might need to prefix with sudo to get administrative rights.
When you’re building locally, PhoneGap will build the applications in the MyApp/phonegap (or MyApp/cordova) folder:
§ platforms/android/bin: Android .apk file
§ platforms/ios/build/: iOS .app file
§ platforms/blackberry10/build/simulator: BlackBerry 10 .bar file
§ platforms/wp8/Bin/Debug: Windows Phone .xap file
When building via the PhoneGap Build service, you will see the various build packages showing up on the PhoneGap Build website. Wow, it’s never been so easy!
TIP
When you want to delete an application from the PhoneGap Build website, click on the app. Click the Settings button. Scroll down to the bottom of the page and enter the Danger Zone. Click on the Delete button to remove the app.
When you build for iOS, you might run into a build error because you need to code sign the iOS app. With PhoneGap Build, you’ll need to upload the *.p12 certificate and the *.mobileprovisioning mobile provisioning profile. After you’ve uploaded these two keys, you can unlock the keys and rebuild.
If you’re building the app locally (PhoneGap remote=false or you use Cordova and the development SDKs), you can open platforms/ios/Dinmu.xcodeproj from the phonegap or cordova folder, and maintain the build settings to code sign the application. Your developer identity should be in the Code Signing Identity list (Figure 14-7). If it’s not, you probably need to go through the whole native provisioning process again.
NOTE
You could also upload a package to PhoneGap Build yourself. In that case, you could create a normal production build for the Web with Sencha Cmd and create a zip package from the <Workspace>/build/production/<MyApp> folder, without the deltas folder and the cache.appcache file.
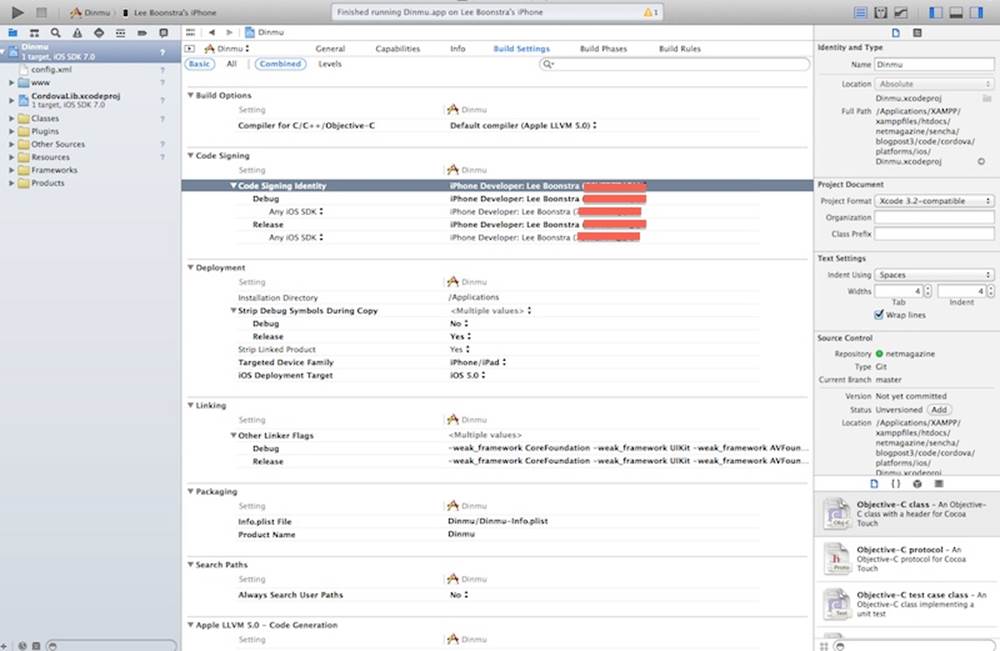
Figure 14-7. XCode users: note the developer identity in your Code Signing Identity list
Testing a Native Build
If you’re using PhoneGap Build, testing the application on Android devices will be very easy. Simply scan the QR code or download, drag, and drop the .apk file on the memory card of your phone.
For iOS and Windows Phone, you will need provisioning and code signing, which assures users that the app is from a known source and hasn’t been modified since it was last signed. iOS Windows Phone developers will need a (paid) developer account. After creating a signed build, you can scan the QR code or drag the .app or .xap file over. (iOS developers will need to install the app on their phones with iTunes.)
TIP
Once you have an iOS developer account, you’ll need to set up a certificate, an identifier, and a provisioning profile. You will need a Mac machine for this. See Appendix A to review how to make your phone ready for testing on iOS devices.
Previewing your app on your device works really well. Browse to http://build.phonegap.com and use a QR reader application to scan the QR code on your app build overview page. This will autoinstall your mobile PhoneGap apps on your device.
TIP
Want more information about porting your mobile web app to native? Get help for building iOS apps with PhoneGap in the documentation; find iOS developer resources at Apple Developer and read more about the config.xml file in the “Basics” section of the PhoneGap documentation.
Summary
Well done! By now, you can preview your app on your phone or tablet. Congratulations. Now you know all concepts for creating a real-world application with Sencha Touch. I talked about all the basics, like the layout system, events, and the class system. I discussed MVC, and you implemented models, stores, controllers, and views in your application. When you built the FindACab app, you made a remote JSONP connection to the Yelp web service and saved it locally with a client SQL proxy. I discussed several view components like panels, lists, and Google Maps. I showed how to create a custom theme using Sass and how to create both production and native builds.
This is where I will say goodbye. With this Sencha knowledge, you should have the skills to start creating your own awesome Sencha Touch apps! I’m looking forward to seeing those in the app stores!
All materials on the site are licensed Creative Commons Attribution-Sharealike 3.0 Unported CC BY-SA 3.0 & GNU Free Documentation License (GFDL)
If you are the copyright holder of any material contained on our site and intend to remove it, please contact our site administrator for approval.
© 2016-2026 All site design rights belong to S.Y.A.