Hands-On Sencha Touch 2 (2014)
Part II. Building the FindACab App
Chapter 8. Remote Connections (Server Proxies)
Models and stores can load and save data via a so-called proxy. Sencha Touch has two main types of proxies: client proxies and server proxies. Client proxies save and load their data locally. Server proxies interact with a remote server. You can read more about client proxies and saving data offline (with techniques such as Local Storage, Session Storage, Web SQL, and AppCache) in Chapter 10. In this chapter, I will talk about the different kinds of server proxies.
A server proxy communicates by sending requests to some remote server. There are four types of server proxies you can use out of the box:
Ext.data.proxy.Ajax
Sends a request to the server on the same domain by using—you guessed it—AJAX.
Ext.data.proxy.JsonP
Sends a request to a server on a different domain by using JSON with padding (JSONP).
Ext.data.proxy.Rest
A kind of AJAX proxy that automatically maps to four readable actions, the RESTful HTTP verbs: create, read, update, and destroy.
Ext.data.proxy.Direct
Uses the Ext.Direct technology (originally created for Ext JS) to remote server-side methods to the client side. Ext.Direct allows communication between the client side of a Sencha app and all popular server platforms.
Let’s implement the two most used server proxies for receiving data: the AJAX proxy and the JSONP proxy. We’ll also discuss how to communicate with a server without using a proxy, by making AJAX and JSONP requests.
For the FindACab app, you will implement a JSONP proxy to retrieve TaxiServices data for a certain location from an external web server (Yelp.com).
In this chapter, you’ll learn about:
§ Saving or retrieving data from the same domain with AJAX
§ How to implement AJAX proxies
§ How to implement an AJAX request
§ Retrieving data from an external domain with JSONP
§ How to implement JSONP proxies
§ How to implement a JSONP request
§ Saving or retrieving data from an external domain with AJAX
§ How to implement CORS
Saving or Retrieving Data from the Same Domain with AJAX
AJAX stands for Asynchronous JavaScript and XML. It is a common client-side remote scripting technique that operates through the browsers XMLHttpRequest (XHR) object. Despite the name, the use of XML is not required (it’s more common to use JSON), and the requests do not need to be asynchronous per se—although the exchange of data asynchronously, between browser and server, avoids page refreshes. With AJAX, the data to be retrieved, or the script to post to, generally is on the same domain as where the (mobile) web application is running from.
Implementing AJAX Proxies
When you want to save or retrieve data in a store from the same domain as the app, you can connect to your server via the proxy in your data store or model.
At the top of your model or store class, you will require Ext.data.proxy.Ajax, so the Ext.Loader knows to load the AJAX proxy framework class first. Next, you will create a proxy object:
config: {
//model or store configs here
proxy: {
type: 'ajax',
url: 'data/data.json'
}
}
The proxy object can be set into the config object from a store or a model. It contains a type that can be set to either a server-side proxy for requesting data from some source or a client-side proxy for storing data locally on your device. Beyond the type config, you will also have to set the url config. See Example 8-1.
CONNECT THE PROXY TO A MODEL OR A STORE?
In my Sencha Touch classrooms, I get this question regularly: which way is better—connect the proxy to a model or to a store? It depends. Originally, Sencha Touch first checks the store to try to find a proxy; if it doesn’t find one there, then it will check the model. There are some cases where you want to implement the proxy on the model and others where you want to implement it on the store.
Picture this: you have two data stores, both representing the same data structure and sharing the same model. If the data comes from one place, you don’t want to implement the proxy on both stores. That’s double code and might also result in double requests. Implementing the proxy on the model would be a good solution. It could also be the other way around. Say you have two data stores that share the same data model and it can be retrieved via multiple URLs. In that case, you might want to add the proxy to the store.
Apart from that, you can create models without stores (e.g., the data pool is on the server, like an online database) or stores without models (by using the fields object instead of hooking up a model, which is technically an inline model). When you want to save a record with your server side—for example, to save your record in an online database—you need to provide the proxy on a model. In this chapter, we will talk about record.save().
The URL can point to a web service URL, or it can just point to some file locally. In Example 8-1, an AJAX proxy was used to load the local file, /data/data.json, which is in the same web folder as the app folder.
You can set a proxy object and it will load the data. To let the proxy understand (read) the data, you can set a reader object (Ext.data.reader.Reader).
Here’s an example of a proxy with an Ext.data.reader.Reader:
proxy: {
type: 'ajax',
url: 'data/data.json',
reader: {
type: 'json',
rootProperty: 'results'
}
}
Note the steps to set up the reader object:
1. First, set up a type. There are two types of data responses that the reader can interpret: json and xml.
2. Define the rootProperty. It points to the root node of your data, from where it has to start reading the data.
There are more configs you can set in Ext.data.reader.Reader. The ones I use regularly are:
successProperty
Should point to the response property with a success attribute (by default, it points to the property name success).
messageProperty
Should point to the response property with a response message (this property is optional).
totalProperty
Should point to the response property with a total number of records in the dataset. This is required only while paging, when the whole dataset is not passed in one go, but is being paged from the remote server (by default, it points to the property name total).
Let’s take a look at the FindACab app in Example 8-1. Here I retrieve data from the same domain into the store by setting an AJAX proxy into the data store.
Example 8-1. Store with an AJAX proxy
Ext.define('FindACab.store.Cabs', {
extend: 'Ext.data.Store',
requires: ['Ext.data.proxy.Ajax'],
config: {
model: 'FindACab.model.Cab',
autoLoad: true,
proxy: {
type: "ajax",
url : "data/data.json",
reader: {
type: "json",
rootProperty: "businesses"
}
},
}
});
TIP
Do you need to make a simple mobile app for a customer that the customer can maintain but you don’t want to set up a whole server-side architecture? Working with JSON files is the trick! “That’s true, but my customer does not understand how to work with JSON files…” Why don’t you set up a nice Microsoft Excel worksheet? Luckily, there are great tools online that can convert your Excel sheet (*.csv data) to a JSON object, such as Mr. Data Converter.
As you can see in this example, I’ve declared a requires array that imports the Ext.data.proxy.Ajax class into the memory. The magic is in the proxy object. Notice the type that is set to ajax. The URL points to /data/data.json; this file is in the root of your application folder and could look like:
{
"message": {
"text": "OK",
"code": 0,
"version": "1.1.1"
},
"businesses": [
{
"rating_img_url": "stars/v1/stars_5.png",
"country_code": "NL",
"city": "Amsterdam",
"mobile_url": "http://m.yelp.nl/biz/taxi-klaas-amsterdam",
"review_count": 2,
"zip": "",
"state": "Noord-Holland",
"latitude": 52.3738007,
"rating_img_url_small": "stars/v1/stars_small_5.png",
"url": "http://www.yelp.nl/biz/taxi-klaas-amsterdam",
"country": "Netherlands",
"avg_rating": 5,
"longitude": 4.8909347,
"nearby_url": "http://www.yelp.nl/search",
},
{
"rating_img_url": "stars/v1/stars_5.png",
"country_code": "NL",
"city": "Amsterdam",
"mobile_url": "http://m.yelp.nl/biz/taxi-klaas-amsterdam",
"review_count": 2,
"zip": "",
"state": "Noord-Holland",
"latitude": 52.3738007,
"rating_img_url_small": "stars/v1/stars_small_5.png",
"url": "http://www.yelp.nl/biz/taxi-klaas-amsterdam",
"country": "Netherlands",
"avg_rating": 5,
"longitude": 4.8909347,
"nearby_url": "http://www.yelp.nl/search",
}
]
}
TIP
A great way to format your JSON response nicely is by using the jsonlint.com tool. Not only does it format your JSON, but it will also validate the JSON. If the JSON is invalid, the reader in your proxy can’t interpret the JSON response. It’s worth a shot to use this tool when you have strange proxy bugs.
The last step is to define the reader in the store proxy. The node that contains all the (child) items (the root property) is businesses, so it should be set in the reader object as a rootProperty. The type of the reader is json, which is actually also the default type for a reader, so you don’t have to set it.
Sometimes when you want to retrieve data from an external server, the response data is just not what you expected. For example, you want to reorder, cache, or rename properties, or you just want to add more data or maybe you don’t have control over the remote server to provide JSONP. In these cases, an AJAX proxy can be really handy. You can create an own “proxy” on the server side that connects to the external server and fetches the data. When it is retrieved on the server side, you modify the response. This custom proxy script is running on the same server as your app does, so you can hook it up with a Sencha Touch AJAX proxy back to the Sencha Touch data store. In PHP, such a scenario might look like this:
<?php
function URL_get_contents($URL) {
if (!function_exists('cURL_init')){
die('CURL is not installed!');
}
$ch = cURL_init();
cURL_setopt($ch, CURLOPT_URL, $URL);
cURL_setopt($ch, CURLOPT_RETURNTRANSFER, true);
$output = cURL_exec($ch);
$httpCode = cURL_getinfo($ch, CURLINFO_HTTP_CODE);
//get the code of request
cURL_close($ch);
if($httpCode == 400) return 'Bummer';
if($httpCode == 200) {
$data = json_decode($output);
// do some fancy stuff here
$data = json_encode($data);
header('Content-Type: application/json');
echo $data;
}
}
?>
Retrieving data through AJAX proxies can be handy. The data is directly in your store, which is great for the data-bind components that connect to a store, such as the Ext.List. Sometimes you don’t need to retrieve data through a proxy. Maybe you don’t want to display the data results into a data-aware component, or you just don’t need a model or a store. Other times, the proxy is already in use by a client proxy (you can set just one proxy per model or store). Although in such a scenario you could also switch proxies with setProxy on the model or store, you can also choose to make plain AJAX requests. I will discuss this option next.
Implementing an AJAX Request
In the previous section, we retrieved data in a store via an AJAX proxy. Sometimes you don’t need to save or retrieve data in a store, maybe because you are not displaying the data in a data-aware component, such a as an XTemplate. In that case, a simple Ext.Ajax request, with parameters to pass in, might be an easier solution for saving and retrieving data on the same domain than hooking up an AJAX proxy to a store.
At the top of your class you will require Ext.Ajax, so the Ext.Loader knows to load the AJAX framework class first. Next you will create the request:
Ext.Ajax.request({
URL: 'somescript.php',
params: {
location: 'Amsterdam NL'
},
success: function(response){
try {
var text = response.responseText;
var results = Ext.JSON.decode(text);
//process server response here
} catch (e) {
//you can never assume that data is the way you want.
console.error(e);
}
},
failure: function(response){
//fail scenario
}
});
Ext.Ajax is a singleton instance of an Ext.data.Connection, which is the class that is used to communicate with server-side code. Assuming that your app is on http://domain-x.com, the previous code sends a GET request to http://domain-x/script.php. Because AJAX calls are asynchronous, a callback function is called with the response argument as soon as the response comes back in a callback, success, or failure function.
It’s possible to change the method in an Ext.Ajax request. You can set it to GET, POST, PUT, or DELETE. By default, the GET method is used for sending headers, though the previous code has the POST method as well. Why is that? Well, the method will change to POST as soon as you send parameters with the request. See the configuration object we pass into Ext.Ajax.request() in Example 8-2.
Example 8-2. Ajax request
Ext.Ajax.request({
URL: 'somescript.php',
method: 'POST'
});
When you want to send parameters as a GET request instead, you should specify the method again (to method:'GET', in which case your params are automatically escaped and appended to the URL http://domain-x.com/script.php?dc=1421443375411&location=Amsterdam%20NL. Note that the dc parameter you see in the request URL is a disable caching timestamp to make sure none of the data sent back from the server is cached.
There are more handy configs you can set on the Ext.Ajax method—for example, the timeout config. By default, the timeout threshold is half a minute (30,000 ms). In Example 8-3, the timeout is set to a minute.
Example 8-3. Setting the Ajax headers
Ext.Ajax.request({
URL: 'somescript.php',
timeout: 60000,
headers: {
"Content-Type": "application/json"
}
});
Another config for customizing the request is headers config, which enables you to send a custom header to your server—for example, the Content-Type entity header: "Content-Type": "application/json". This field indicates the media type of the entity body sent to the recipient, which is handy when the web server returns different content based on these headers. For example, if your web server returns JSON or XML based on the header that is passed, you can request JSON like in Example 8-3.
You can inspect requests in the Chrome Developer Tools. You can see that the Content-Type header has been set to application/json or text/html. See Figure 8-1.
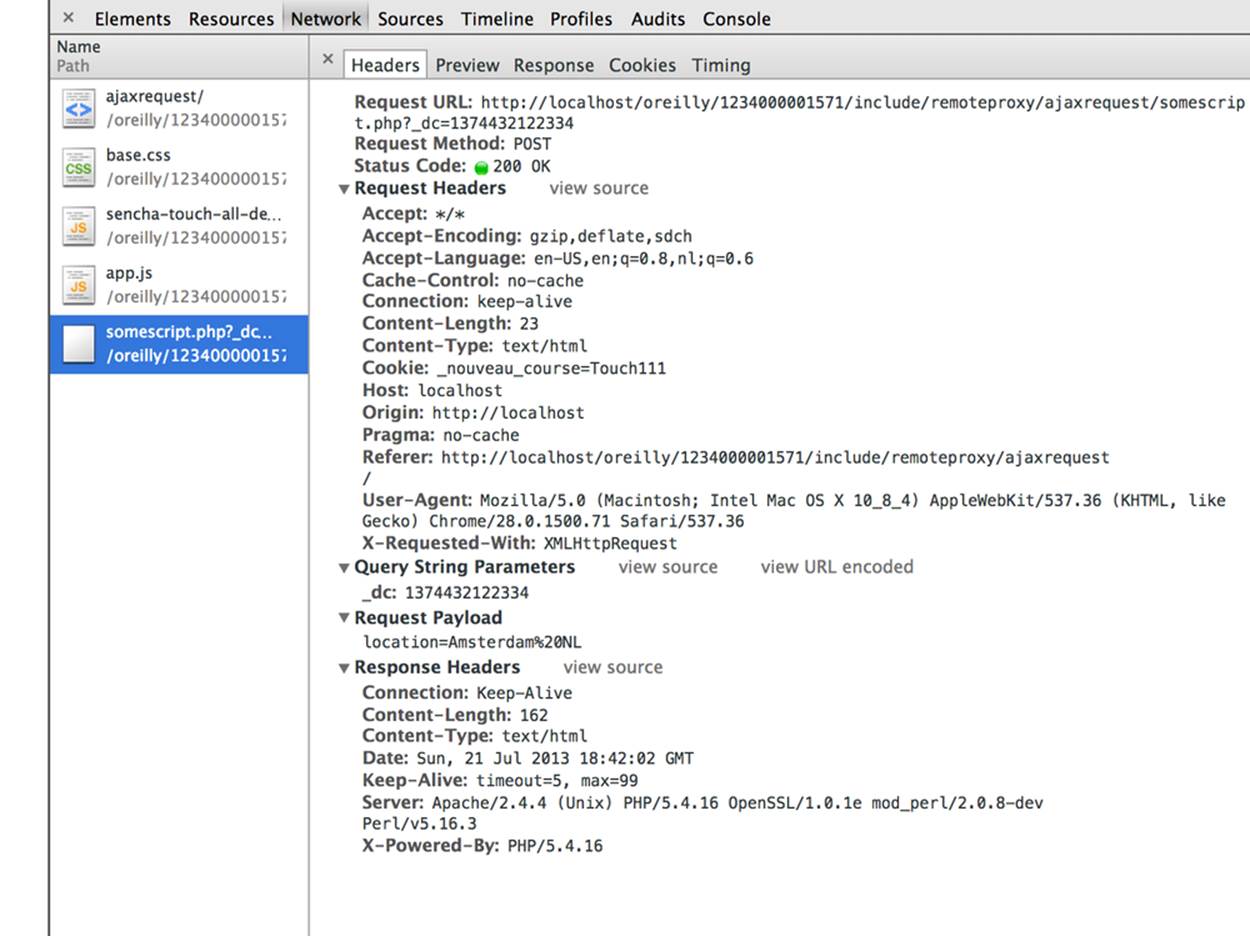
Figure 8-1. Check the Network → Headers tab in the Chrome Developer Tools to inspect the headers
XHR2, NEW IN SENCHA TOUCH 2.3
A new config setting, released in Sencha Touch 2.3, is to set up your AJAX request through the XHR2 (AJAX2) object. You will just need to enable the boolean property xhr2:true in the request object. XMLHttpRequest Level 2 is like XHR but with a huge makeover that allows you to do things like uploading progress events (Sencha Touch 2.3 also has a new progressbar component,Ext.ProgressIndicator!) and support for uploading/downloading binary data.
Check out “New Tricks in XMLHttpRequest2” and “XHR2 Uploads and Downloads” to get more information about XHR2.
Sometimes you don’t have access to the source—for example, because the script is hosted on an external website. In the case of the FindACab app, we want it to receive data from Yelp.com. The next part discusses the tricks to retrieve data from an external domain.
Retrieving Data from an External Domain with JSONP
While AJAX in general cannot send and retrieve data from an external domain because of the cross-domain policy, JSONP can send and retrieve data from an external domain. It only uses HTTP GET and therefore cannot use HTTP POST to post (large) data to an external domain. In other words, you can send data, but it’s sent in the query string rather than the request body. This limits the amount of data that can be stuffed into the request line (URL), and the limit is browser specific. It’s safest to use less than 2KB of parameters, although some servers can handle up to 64KB. Also, sending data through GET is less secure than over POST because the data that will be sent is part of the URL. So it’s visible in the browser history or in server logfiles.
As mentioned earlier, JSONP stands for “JSON with Padding.” It allows cross-domain requests. Let’s take a look at Figure 8-2 so we can compare both techniques. In general, AJAX asks (or sends) data from a service or script that is on the same domain as where your app is running from. It is impossible to request or send data to external domains because of the same-origin policy; the browser ignores any connection, assuming nobody else is allowed. JSONP works differently; it’s a little like a magic trick—one that is well known.
Under the hood, it works as follows (again, see Figure 8-2):
1. In the background, JSONP (proxy) injects a script tag into the DOM, when a request is made. The src attribute of the <script> tag points to the URL of the server you want to retrieve data from, with a callback function as a GET parameter. For example: <script src="http://domain-x.com/script.php?callback=someCallback"></script>.
2. When the server supports JSONP, it responds with the JSON object, wrapped in the name of the callback function with brackets—for example, someCallback(). The JSON data that’s requested is passed as an argument.
3. The browser thinks it’s just loading an external JavaScript file. But as soon as the file is loaded, it sees the brackets and thinks it’s a function, so let’s execute it!
4. When you have this callback function with the same name in your code base, the browser will run it and pass in the JSON data as function parameter. That’s how you will receive the data.
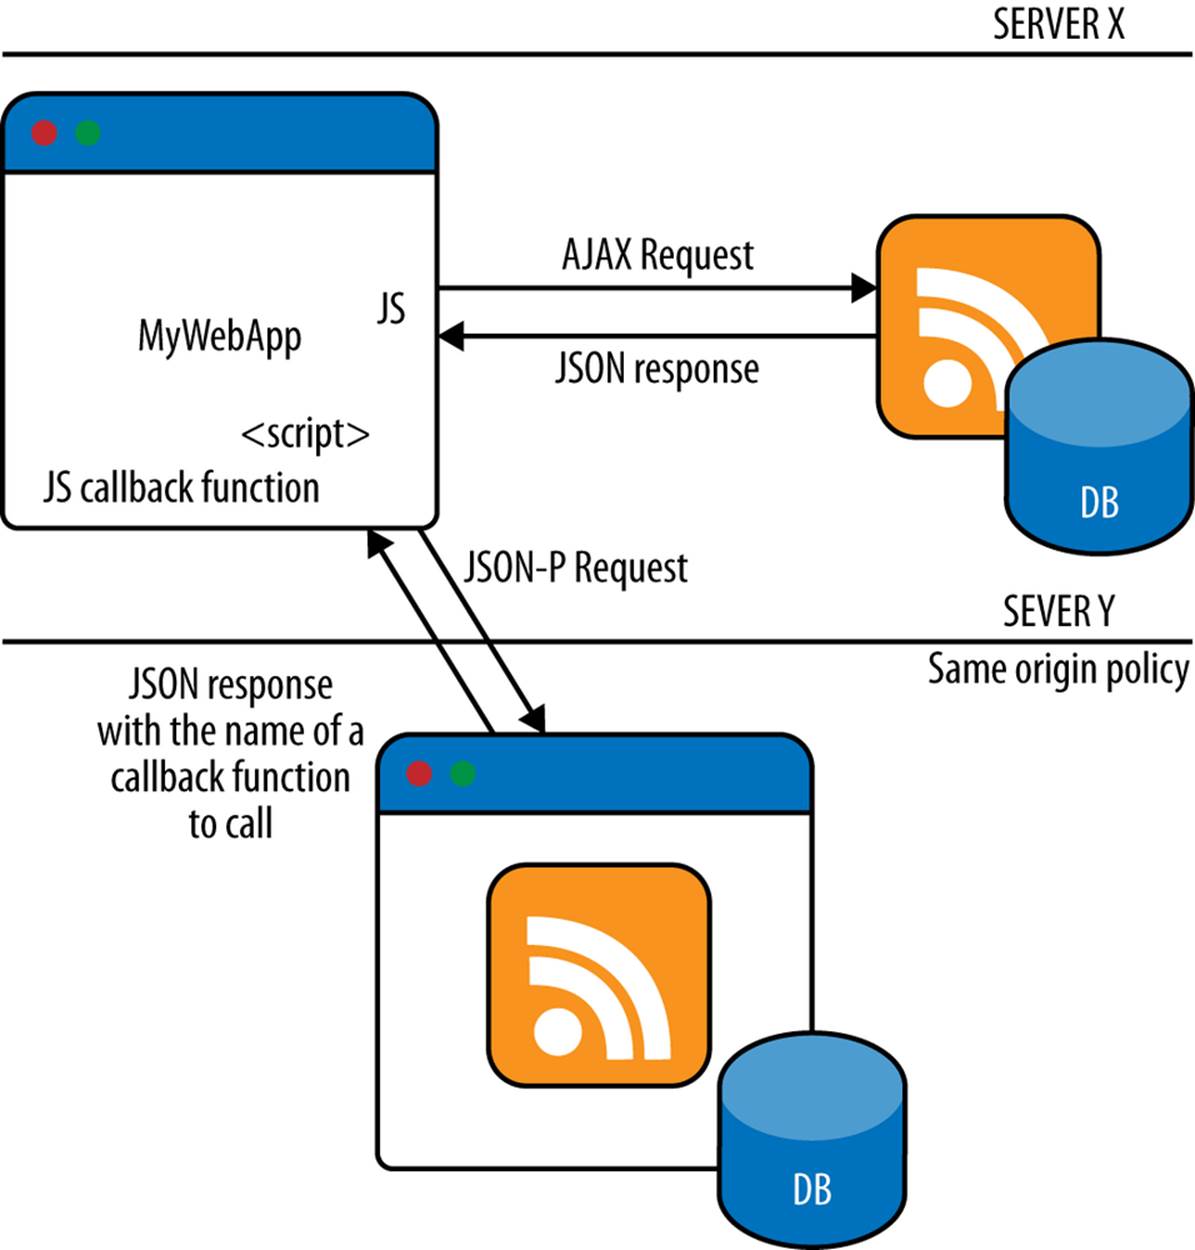
Figure 8-2. A comparison of how AJAX and JSONP work
Implementing JSONP Proxies
It looks like a major challenge to retrieve data in the store from an external domain. But you don’t need to worry about it: Sencha Touch arranges this all on your behalf. For you, it’s just another proxy to configure. Still, it’s handy to understand what is going on. Because of this trick, the JSONP proxy works only when the server supports JSONP or when you have control over the server. Also, this trick can only send and retrieve data via GET requests.
The setup of a JSONP proxy is almost the same as setting up an AJAX proxy. The only difference is the type property, which should be set to jsonp. Flip back to the AJAX proxy examples if you are not familiar with proxies in general.
At the top of your model or store class you will require Ext.data.proxy.JsonP, so the Ext.Loader knows to load the JSONP proxy framework class first. Next you will create a proxy object:
proxy: {
type: 'jsonp',
URL : 'http://externaldomain.com/users',
reader: {
type: 'json',
rootProperty: 'results'
}
}
Implementing the JSONP Proxy for the FindACab App
For the FindACab app, I have created a JSONP proxy on the Cabs store, shown in Example 8-5. All the different taxi services are retrieved via Yelp, an American company that offers a directory service for ratings and reviews.
To retrieve data from Yelp, you have to create a request to the business_review_search API and therefore it needs three parameters: ywid, the developers’ API key; term, which will be the search term to query for (in this case, “Taxi”); and a location, which we’ll set to “Amsterdam NL.”
To obtain the Yelp API key, register for a free developer’s account. Once you get the key, you can enter the URL in your browser; a correct request should return a JSON response with all the businesses in the businesses root property. If not, then you might have an error in your request. Are all the three parameters correct? Test it with the following URL in your browser: http://api.yelp.com/business_review_search?ywsid=yelp-key-here&term=Taxi&location=Amsterdam%20NL.
If the API call is successful, you should see the following:
{
"message": {
"text": "OK",
"code": 0,
"version": "1.1.1"
},
"businesses": [
..
]
}
Awesome, right? This is a great way to test if a web service or API call works. I do this all the time. Before I start diving into my own code, I like to know if the request just sends me a nice response back.
Did you notice that the fields of the business object in the previous JSON response have the same names as the fields from the Sencha FindACab.model.Cab model? These fields map to the model fields, so you can later use them in your code. What if the JSON response has a slightly different name than the name that is defined in the model? You can either change the model field name, or you can add a mapping property to the model field.
For example, when you have a complex data feed that looks like this (note the car:brand: notation):
{
results: [
car:brand: [{
name: "BMW",
series: 7
},{
name: "BMW",
series: 5
}]
...
}
You can add a mapping attribute to the field. In this case, brand maps to ["car:brand"][0].name:
Ext.define("MyApp.model.Car", {
extend: "Ext.data.Model",
config: {
fields: [
{
name: "brand"
mapping: "['car:brand'][0].name"
}
]}
});
Now that we know that the request to the external content is valid, let’s implement the proxy for the FindACab app to retrieve our data from Yelp. The Yelp information will be written in a new JavaScript class: utils/Commons.js (see Example 8-4). This class has a statics object with key/value pairs for the URL, search term, search location, and the API key. We can get access to these key/value pairs from everywhere in the application. (See Chapter 4.)
Example 8-4. utils/Commons.js
Ext.define('Utils.Commons', {
statics: {
YELP_API: 'http://api.yelp.com/business_review_search?',
YELP_KEY: '<API-KEY-HERE>',
YELP_TERM: 'Taxi',
LOCATION: 'Amsterdam NL'
}
});
Now let’s implement a jsonp proxy in the Cabs store. The values for the url and the URL parameters extraParams : (term, ywsid, and location) come from the static Utils.Commons class:
proxy: {
type: 'jsonp',
url: Utils.Commons.YELP_API,
extraParams: {
term: Utils.Commons.YELP_TERM,
ywsid: Utils.Commons.YELP_KEY,
location: Utils.Commons.LOCATION
},
noCache: false,
}
I have set the property noCache to false, which means it will cache all the responses. I did this because I don’t expect the data to change. By default, noCache is set to true, which will add a dc (disable caching) parameter into the request that contains a timestamp. You don’t have to set this property if you don’t want to cache responses. When you want to require “fresh data” to be pulled from the server, you shouldn’t change the default setting (true).
The next step is to implement a json reader, with the rootProperty set to the root node—in this case, businesses because I want to save only businesses to the store:
reader: {
type: 'json',
rootProperty: 'businesses',
}
Using the jsonp proxy requires Ext.data.proxy.JsonP, so you will need to add this class to the requires array:
requires: ['Ext.data.proxy.JsonP'],
This store also has the property autoLoad set to true. As soon as the application loads the Cabs.js store, it will start loading the external data. You can see this in Figure 8-3: the store proxy fires a successful request and returns JSON as a response.
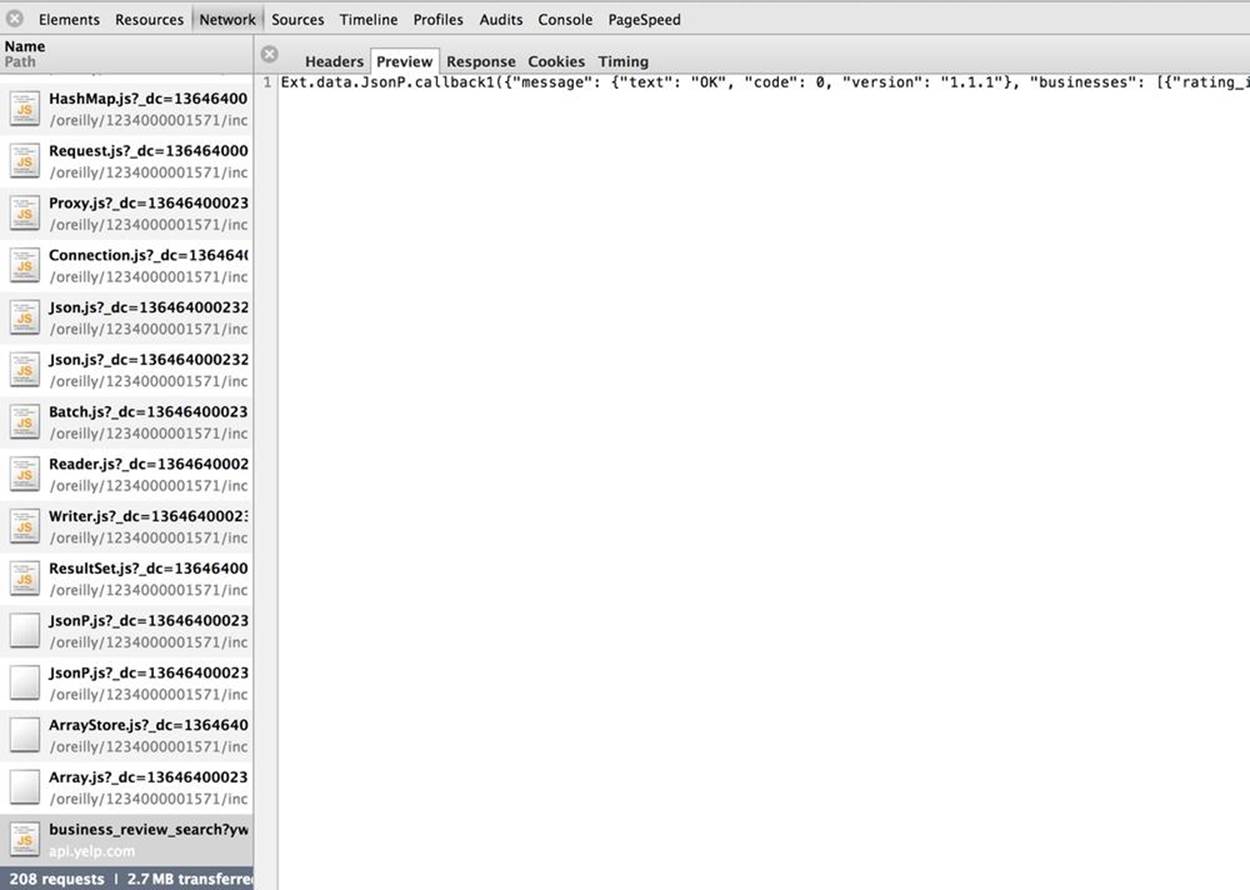
Figure 8-3. Successful load of a proxy
The reason why the store automatically loads is because the autoLoad config in the store is set to true. It’s also possible to disable the store from automatically loading by setting autoLoad: false (e.g., because you programmatically want to change the request parameters and load the store manually with the store.load() method). Instead of using the proxy for a JSONP request, you can also use the Ext.data.JsonP method, which you will do in the next section.
Example 8-5 shows the complete code.
Example 8-5. store/Cabs.js
Ext.define('FindACab.store.Cabs', {
extend: 'Ext.data.Store',
requires: ['Ext.data.proxy.JsonP'],
config: {
model: 'FindACab.model.Cab',
autoLoad: true,
proxy: {
type: 'jsonp',
noCache: false,
url: Utils.Commons.YELP_API,
extraParams: {
term: Utils.Commons.YELP_TERM,
ywsid: Utils.Commons.YELP_KEY,
location: Utils.Commons.LOCATION
},
reader: {
type: 'json',
rootProperty: 'businesses',
}
},
}
});
Implementing a JSONP Request
View components—like lists, dataviews, or charts—are data-aware. You need to hook up a data store to preview the view with data. The previous section explained how to retrieve external data from Yelp in a data store. Later, this data will be displayed in an Ext.dataview.List view component. When retrieving external data, sometimes you don’t need to retrieve data in a store—for example, when you’re displaying data in an Ext.XTemplate (or another component that isn’t data-aware)—because you want to have the control over the HTML and styling of the component. In that case, a simple Ext.JsonP request, with parameters to pass in, might be an easier solution for retrieving data from an external domain than retrieving it through a JSONP proxy.
At the top of your class, you will require Ext.data.JsonP, so the Ext.Loader knows to load the JSONP framework class first. Next, you will create the request:
Ext.data.JsonP.request({
URL: 'somescript.php',
callbackKey: 'callback',
params: {
location: "Amsterdam NL"
},
success: function(result, request) {
// execute if the request succeeds.
},
failure: function(){
//execute if the request fails.
}
});
In the background, the Ext.data.JsonP.request() does the same thing as what the JSONP proxy does: it allows cross-domain (GET) requests by inserting a <script> tag in the head of your page. If you are not familiar with this concept, flip back to the examples about JSONP proxies.
Ext.data.JsonP is a singleton, so you can directly run the request() method on top of it. The request method takes one argument, the options object, with the properties listed in Table 8-1.
Table 8-1. JSONP options
|
Key |
Value |
|
url |
String, the URL to the request. |
|
params |
Object (optional), an object containing a series of key/value pairs that will be sent along with the request. |
|
timeout |
Number (optional); sets the timeout for requests that are not completed within this time, in which case the failure callback will be fired. Defaults to 30ms. |
|
callbackKey |
String (optional); specifies the GET parameter that will be sent to the server containing the function name to be executed when the request completes. Defaults to be autogenerated: URL?callback=Ext.data.JsonP.callback1, URL?callback=Ext.data.JsonP.callback2… |
|
callbackName |
String (optional), see callbackKey. |
|
disableCaching |
Boolean (optional); adds a unique disable-caching timestamp parameter to the requests. |
|
disableCachingParam |
String (optional); changes the parameter that is sent when disabling caching. Defaults to _dc. |
|
success |
Function (optional); the function to execute if the request succeeds. |
|
failure |
Function (optional); the function to execute if the request fails. |
|
callback |
Function (optional); the function to execute when the request completes, whether it is a success or failure. |
|
scope |
Object (optional); the scope in which to execute the callbacks. Defaults to browser window object. |
You need to set up your backend, or use a web service that responds with correct JSONP syntax. The following code shows an example of a JSONP response written in PHP:
<?php
//Return response as JavaScript
header('Content-Type: application/javascript'); //![]()
//Retrieve the callbackKey from Ext.data.JsonP.request()
$callbackkey = filter_input(INPUT_GET, 'callback', FILTER_SANITIZE_ENCODED); //![]()
//Some array created for test purposes
$somearray = array(
'fullname' => 'Lee Boonstra',
'company' => 'Sencha'
);
//Encode php test array to json
$output = json_encode($somearray)
//Wrap it in the callback key
echo $callbackkey . '(' . $output . ');'; //![]()
?>
![]()
The trick is to set the headers to application/javascript.
![]()
Capture the callback key.
![]()
Wrap this as a function around the JSON output.
TIP
When you are using Google Chrome, try to install the JSONView extension. It formats your JSON response in a nice, readable way.
Saving or Retrieving Data from an External Domain with AJAX
Help! You want to post (or get) data from an external domain, but posting data is only possible with AJAX, not with JSONP. JSONP cannot send data with HTTP POST, and AJAX in general cannot retrieve and post data from external domains so you might run into a problem. What you actually want is an AJAX request to save and retrieve data to an external domain. Read on for the trick to this.
Implementing CORS
You will need to set up Access-Control-Allow HTTP headers on the web server to post (and retrieve) data with AJAX to an external URL.
Sencha Touch provides additional configuration. In an Ext.Ajax.request or AJAX proxy, you have to set the withCredentials boolean to true and set the useDefaultXhrHeader boolean to false to not send the default Xhr header with every request.
The Ext.Ajax() method (and also the model.save() and form.submit() methods) transmit through the XMLHttpRequest() object, and therefore you can run into security restrictions—cross-domain restrictions—when posting to a different domain. However, there is a way to post data to another server with AJAX; you need to set up your server so it’s possible to set up the HTTP headers (Access-Control-Allow headers) on the web server for that. This technique is called cross-origin resource sharing (CORS), and it enables you to override the default restrictions that prevent a web server from making AJAX requests to domains other than where the app is launched. CORS is supported by the modern browsers.
An example of such an HTTP header might look like:
Access-Control-Allow-Origin: *
Instead of the wildcard, you can also specify the URL of the allowed origin domain explicitly. When using the wildcard, you need to be aware that every domain can request this data when it has CORS set up, which can easily lead to CSRF (cross-side request forgery) attacks.
Sencha Touch provides support for CORS. Assuming your server is set up, the code for sending an AJAX request with CORS might look like this:
Ext.Ajax.request({
URL: 'http://www.externaldomain.com/script.php',
withCredentials: true,
useDefaultXhrHeader: false
});
The magic is the useDefaultXhrHeader config, which should be set to false to not send the default Xhr header (X-Requested-With) with every request.
Set the withCredentials config to true to include cookies as part of the request. (Note that these cookies also deal with the same-origin policies, so your JavaScript code can’t access the cookies with document.cookie or from the response headers. They can be controlled only by the remote domain.)
TIP
Do you want to read more about CORS? Check out the Monsur Hossain’s CORS tutorial or see an overview of supported browsers.
Summary
By now, you know everything you need to know about retrieving data. We discussed how to retrieve data from a resource on the same domain as the application with AJAX. We looked into AJAX proxies and the Ext.Ajax request. We discussed how to retrieve data from a resource on a different domain than where the app is hosted, JSONP proxies, and how to make a JSONP request. Last but not least, we looked into a relatively new technique, CORS, and how to retrieve data from a different domain by creating an Ext.Ajax request that bypasses the cross-domain restrictions.
The FindACab app has a JSONP proxy set; it loads data from Yelp into the data store. In the next chapter, you’ll find more in-depth information about stores.
All materials on the site are licensed Creative Commons Attribution-Sharealike 3.0 Unported CC BY-SA 3.0 & GNU Free Documentation License (GFDL)
If you are the copyright holder of any material contained on our site and intend to remove it, please contact our site administrator for approval.
© 2016-2026 All site design rights belong to S.Y.A.