Hands-On Sencha Touch 2 (2014)
Part II. Building the FindACab App
Chapter 7. Data Models
The model (Ext.data.Model) is a class that represents some object that your application manages. For example, you might define a model for users, products, cars, or any other real-world object that you want to model in the system.
The Ext.data.Model is part of the Sencha data package. As described in the preceding chapter, the Sencha architecture uses a pattern similar to MVC, but in the Sencha context the term model includes—besides the model itself (the structure of the data)—the layers record (the specific data) and store (a client-side cache of all records together). In this book, I will use the term model to refer to the Ext.data.Model.
A model contains fields to structure the data. For example, in the FindACab app, the CabService has three fields: name, address, and total number of cars. Each record (Ext.data.Record) is a specific CabService model object—for example, “Taxi Amsterdam,” which has a total of 14 cars. The Ext.data.Store is the whole data pool full of records, otherwise known as the client-side cache.
The fields in a model use the Ext.data.Field class. Every field can be given a data type (see Table 7-1 for an overview of all data types). Data assigned to the field will be autoconverted to the default type. For example, when a field is set to int and the data 4.8 is passed, then the data will be converted to 5. When no datatype is specified, the datatype will be set to auto, which means there is no datatype conversion at all. This might be a solution for complex datatypes such as objects.
Table 7-1. Overview field datatypes
|
Type |
Description |
Example |
|
auto |
Complex data |
name: { first: "Lee", last: "Boonstra"} |
|
string |
Text |
"Lee Boonstra" |
|
int |
Numbers |
30 |
|
float |
Floating points |
30.2 |
|
boolean |
Boolean values |
true |
|
date |
Date values; the data format can be specified |
16 June 2013 |
Models may contain (optional) validations and associations (relations to other models). Both models and stores can have a proxy to send and retrieve data in JSON, XML, or JavaScript array notation.
Take a look at Figure 7-1. This is an example of how to retrieve data from some server-side service into a Sencha Touch data store. Later, the FindACab app will take a similar approach. It will retrieve data from the Yelp web service and save it into a store. To save (JSON) data in the store, it goes via a proxy first into a model and then into a store. Every data field will be parsed through a model field. When a model has validation rules you can manually validate the model before adding and syncing the data to the store.
In the case of the FindACab app, you will need a model for Cab objects. This object contains all taxi business instances retrieved from some external source (Yelp). The FindACab app needs another model to save and validate the user settings. For searching nearby taxis you will need at least a location (a city and a country) provided by the user. To implement this, you can set some validation rules on the Setting model of the FindACab app stipulating that every search for nearby cabs needs a location, so the city and country fields cannot be blank. Let’s discuss this first: how to validate user input.
In this chapter, you’ll learn:
§ How to validate a model
§ How to save a model to the server
§ How to implement a model association
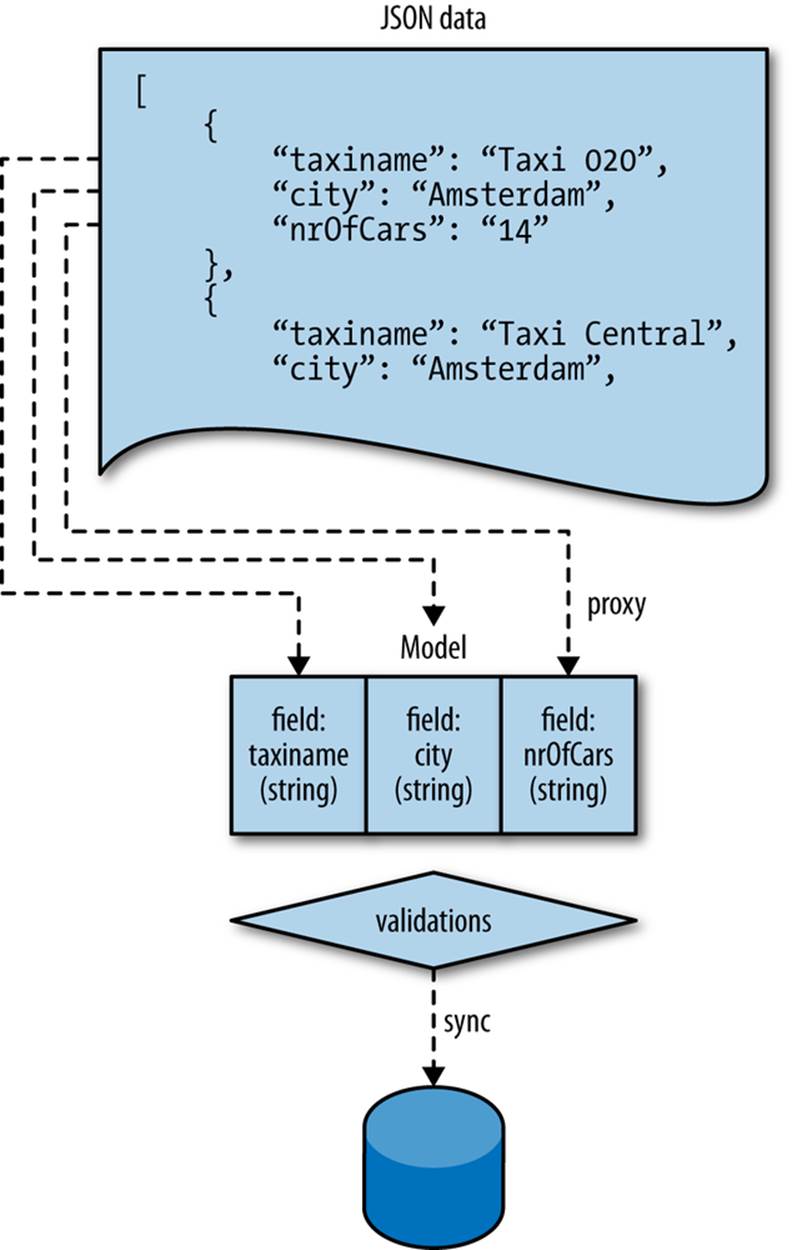
Figure 7-1. How to retrieve data from a web service into a model and store
Validating a Model
Before you want to save data to your store (e.g., user input), you might want to validate the data. For example, for the FindACab app, you will validate whether the user enters a city and a country when submitting a form.
In the model config object, you can set a validations array. This array contains validation objects:
validations: [
{type: 'presence', field: 'age'},
{type: 'length', field: 'name', min: 2},
{type: 'inclusion', field: 'gender', list: ['Male', 'Female']},
{type: 'exclusion', field: 'username', list: ['Admin', 'Operator']},
{type: 'format', field: 'username', matcher: /([a-z]+)[0-9]{2,3}/}
]
As you can see, there are different validation types. For example, you can validate fields on presence (if the data exists), on length (if a string has a min or max length of characters), inclusion (if the data string exists in a given list array), exclusion (if the data string does not exist in a given list array), and on format (if the data matches a regular expression, matcher).
Example 7-1 shows the validations in the Setting model for the FindACab app.
Example 7-1. model/Setting.js
Ext.define('FindACab.model.Setting', {
extend: 'Ext.data.Model',
requires: ['Ext.data.identifier.Uuid'],
config: {
idProperty: 'id',
identifier: 'uuid',
fields: [
{ name: 'id', type: 'auto' },
{ name: 'gps', type: 'boolean' },
{ name: 'city', type: 'string' },
{ name: 'country', type: 'string' }
],
validations: [{
type: 'presence',
field: 'city',
message: "Please provide a city."
},
{
type: 'presence',
field: 'country',
message: "Please provide a country."
}]
}
});
Yes, I gave it the model name Setting (without the s) on purpose. It’s a common naming convention to use singular names for models and plural names for stores. It’s just a simple model scaffolded by Sencha Cmd with the following command:
sencha generate model Setting id,gps:boolean,city:string,country:string
This generates a Setting model with the following fields: id, gps (a boolean, to enable or disable geolocation), and the two fields, city and country, that accepts string values. I have created a validations array with two rules that check for presence. When a city or a country is not entered by the user, the model throws an error message, defined by the message setting.
Let’s test this. Open the FindACab app in your modern browser. In your debug console, you can enter the code for creating a new model instance:
var setting = Ext.create('FindACab.model.Setting', { city: "Amsterdam"});
This creates a settings record, but it has a value only for city, not for country. Now you can validate your record with the following command in your console:
setting.validate();
Bam! After running the validate() method on the record, it will return an Ext.data.Errors object. Although the name is somewhat funny, it’s actually a validation object. You can run the isValid() method on the Ext.data.Errors response object, to detect whether the record passed the validation.
When it returns false, it contains an all array with all the false fields. It collects the field name as an error message (see Figure 7-2). In the case of the FindACab app, the country field with the message: Please provide a country. Let’s correct it; add the country code NL:
setting.set('country', 'NL');
Press Enter and run the setting.validate() again. You should notice that there are zero errors in the all error object. When you run settings.get("country"), you will see that the country is set to NL.
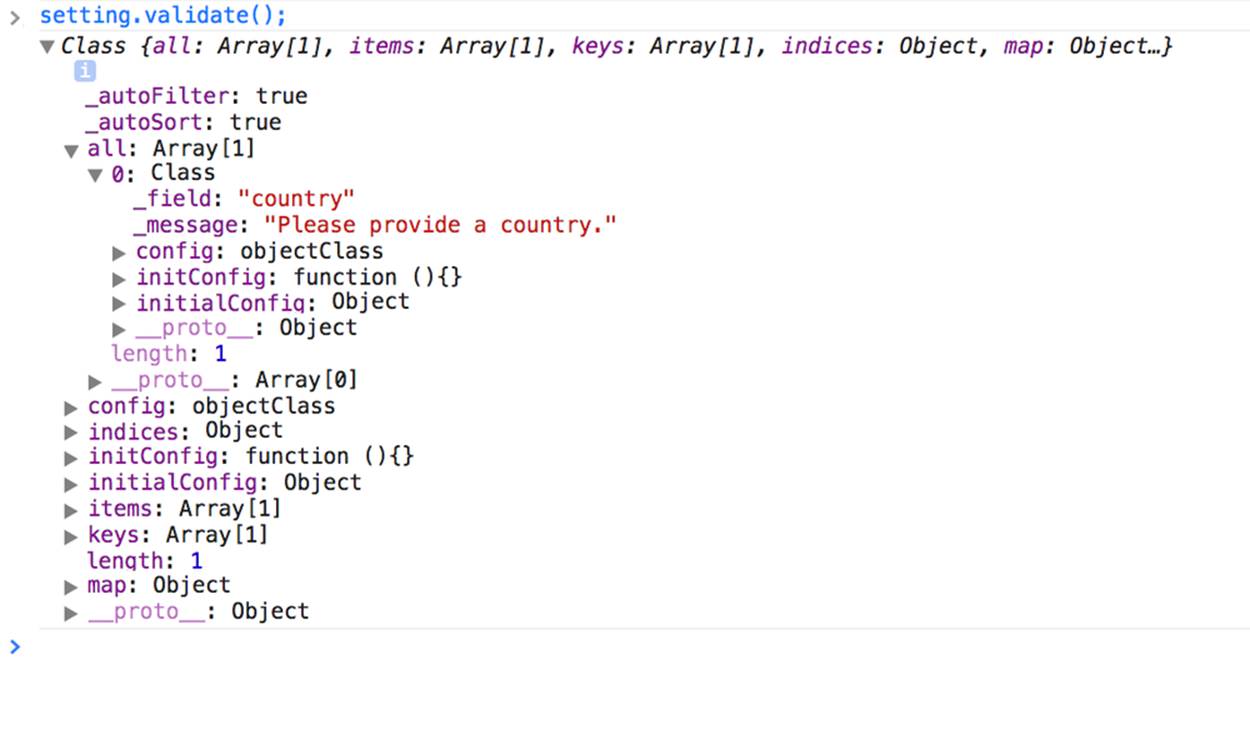
Figure 7-2. A model validation error logged in the developer’s console
After you have validated your model, you can send it to a server. The next examples will show you how to achieve this.
Saving a Model to the Server
You can save your data model server side by creating a reference to a model instance and running the save() method on it.
For this example, we can use the prototype I created in my GitHub account.
We will use a simple Car model that looks like this:
Ext.define('SaveTest.model.Car', {
extend: 'Ext.data.Model',
config: {
fields: [
{ name: 'id', type: 'int'},
{ name: 'brand'},
]
}
});
You will need a proxy object in the model. It should be set to type ajax or rest, and it should contain a server-side URL to post to. The following is an example of a rest proxy set on the model—the URL can be a nonexisting URL, because you will only be looking at the network traffic in the Network tab of your developer tools (such as the devtools of Google Chrome):
proxy: {
type: 'rest',
url : '/cars'
}
If you want to create readable rest URLs, you can edit the proxy as follows and use the api object. This allows you to differentiate data:
proxy: {
type: 'rest',
format: 'php', //![]()
api: { //![]()
create: 'cars/addcar', //![]()
update: 'cars/editcar', //![]()
read: 'cars/loadcar', //![]()
destroy: 'cars/deletecar' //![]()
}
}
![]()
Optionally, set the format to a URL extension.
![]()
Set the api object for readable URLs.
![]()
The create URL (e.g., addcar.php).
![]()
The update URL (e.g., editcar.php).
![]()
The read URL (e.g., loadcar.php).
![]()
The destroy URL (e.g., deletecar.php).
Now let’s play around! First, let’s create a car record. You can add this code to the app.js launch() method to prototype. Running this code in the Google Developers console would work too:
var car = Ext.create('SaveTest.model.Car', {
brand: 'Mercedes'
});
Once you’ve created a record, you can save it to the server side with record.save():
car.save({
success: function() {
console.log('The car record is saved');
},
failure: function(){
console.log('The car record could not be saved.');
}
});
This returns a callback because there is no server side implemented; in our case, it’s a failure callback. When you open the Network tab in your browser dev tools, you will see an HTTP POST call:
POST http://localhost/cars/addcar.php?_dc=1395177154251
404 (Not Found)
For the next step, let’s edit the car record with an id equal to 1. You can change the brand from mercedes to BMW with the record.set() method and then again, save the record with record.save() again:
car = Ext.create('SaveTest.model.Car', {
id: '1'
});
car.set('brand', 'BMW');
car.save({
success: function() {
console.log('The car record is edited');
},
failure: function(){
console.log('The car record could not be edited.');
}
});
Again, this returns a callback because there is no server side implemented; in our case, it’s a failure callback. When you open the Network tab in your browser dev tools, you will see an HTTP PUT call:
PUT http://localhost/cars/editcar.php?_dc=1395177154251
404 (Not Found)
In addition to saving data to the server, you can also remove data from the server. record.erase() will result in a DELETE call to the server. You can try this with the following code:
car.erase({
success: function() {
console.log('The car record is removed');
},
failure: function(){
console.log('The car record could not be removed.');
}
});
When you open the Network tab in your browser dev tools, you will see an HTTP DELETE call:
DELETE http://localhost/cars/deletecar.php?_dc=1395177154251
404 (Not Found)
Last but not least, in order to load data from the server side via the model, you can use record.load(id, callback). When there is no store available, the trick is to first request the model via the ModelManager:
Ext.ModelManager.getModel('SaveTest.model.Car').load(1, {
success: function(car) {
console.log("Load Car: " + car.getId());
},
failure: function(){
console.log("The car could not be loaded");
}
});
When you open the Network tab in your browser dev tools, you will see an HTTP GET call:
GET http://localhost/cars/loadcar.php?_dc=1395177154251
404 (Not Found)
NOTE
When you set the proxy type to ajax instead of rest, you can still use readable URLs. The only difference is the HTTP method. Adding, editing, and removing records will be an HTTP POST call. Loading records will be an HTTP GET call.
Cross-Domain Restrictions
The record.save() method (as well as the Ext.Ajax and form.submit() methods) transmit through the XMLHttpRequest() object, and therefore you might face security restrictions when posting to a different domain. These are known as cross-domain restrictions.
However, there is a way to save and post data to another server. It requires setting up special HTTP headers (Access-Control-Allow headers) on the web server. This technique is called CORS (cross-origin resource sharing), and it enables you to override the default restrictions that prevent a web server from making AJAX request to other domains. For more information, see Chapter 8 and the AJAX sections of this book, or check out the HTML5 Rocks website.
Models can also have relationships with other models. For example, a User model can have a relationship with multiple Order models, and one Order model can have just one relationship with one payment method. Sound confusing? The next examples will show you how model associations work.
Implementing a Model Association
Models can have relationships with one or more other models. The following model associations can request data through each other:
§ Ext.data.association.HasOne
§ Ext.data.association.HasMany
§ Ext.data.association.BelongsTo
You can create two or more models and connect these to each other with the hasMany, hasOne, and belongsTo configs:
Ext.define('TaxiService', {
extend: 'Ext.data.Model',
config: {
fields: ['id', 'name'],
hasMany : {
model: 'Car', name: 'cars'
}
}
});
Ext.define('Car', {
extend: 'Ext.data.Model',
config: {
fields: ['id', 'brand']
}
});
When you want to use associations, you have to add these to the requires array at the top of your model class:
requires: [
'Ext.data.association.HasOne',
'Ext.data.association.BelongsTo',
'Ext.data.association.HasMany'
]
Let’s check out how this works. See Examples 7-2 and 7-3, and Figure 7-3, the UML representation of these examples.
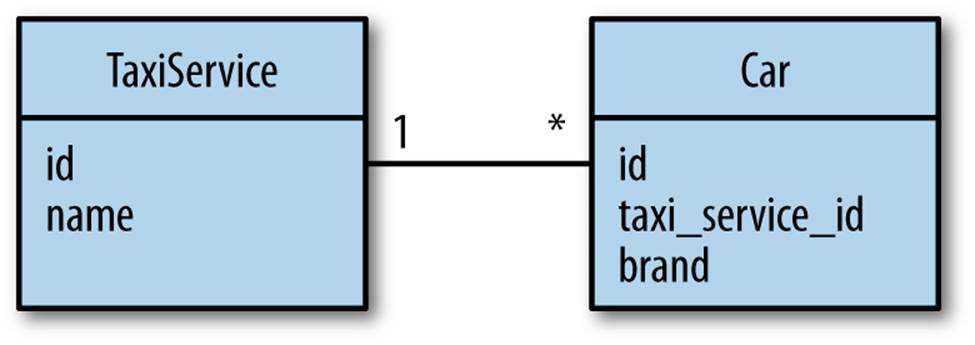
Figure 7-3. A TaxiService can have multiple Cars
When you want to display the different brands of Cars per TaxiService, you could express the relationships between both models. One TaxiService may contain many different types of Car records. You can define this relationship by specifying the hasMany property into theTaxiService model, so later you can request Car information via the TaxiService model.
You will need a foreignKey on the owner model that links to the associated model. By default, it takes the lowercase name of the owner model plus _id. For example, the TaxiService model would create taxiservice_id as the foreign key.
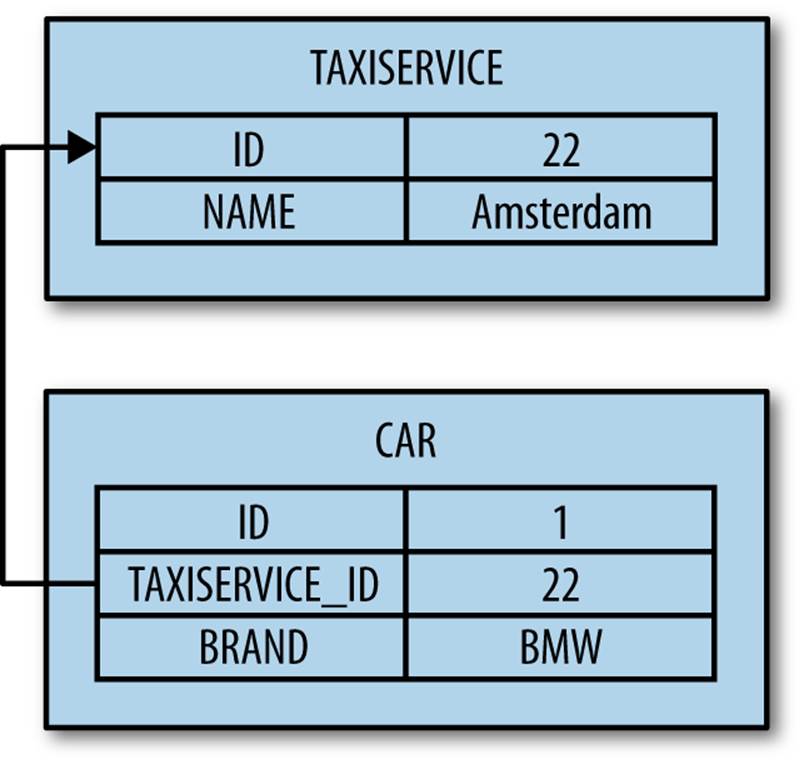
Figure 7-4. How the taxiservice_id field maps to the id field with a foreignKey
Example 7-2 shows how the hasMany association looks in the first model, TaxiService.js.
Example 7-2. model/TaxiService.js
Ext.define('AssociationsTest.model.TaxiService', {
extend: 'Ext.data.Model',
requires: ['Ext.data.association.HasMany'],
config: {
fields: ['id', 'name'],
hasMany : { //![]()
model: 'AssociationsTest.model.Car', //![]()
name: 'cars', //![]()
foreignKey: 'taxiservice_id' //![]()
}
}
});
![]()
Create the hasMany relationship.
![]()
One TaxiService model has many Car models, so hook up the Car model.
![]()
Set a name, which will be used to create a virtual store.
![]()
Assign a foreignKey that links the associated model to the owner model.
As with every relationship, their connection can be confirmed; the Car model answers its relationship by confirming it belongsTo the TaxiService model. This belongsTo association allows me to request the TaxiService information via the Car model.
Example 7-3 shows how the belongsTo association looks in the second model, Car.js.
Example 7-3. model/Car.js
Ext.define('AssociationsTest.model.Car', {
extend: 'Ext.data.Model',
requires: ['Ext.data.association.BelongsTo'],
config: {
fields: [{
name: 'id', //![]()
type: 'int'
}, {
name: 'brand'
}, {
name: 'taxiservice_id',
type: 'int' //![]()
}],
belongsTo: {
model: 'AssociationsTest.model.TaxiService'
},
proxy: {
type: 'ajax',
reader: {
rootProperty: 'cars'
},
url: 'app/data.php'
}
}
});
![]()
The id of the Car record.
![]()
The id of the TaxiService record.
And now comes the fancy stuff: requesting all the records that have a relationship through the parent model. As covered in Chapter 6, many records are saved in a store—the set of all records together. When specifying the hasMany association, you will point to the relating hasMany model and set a name (cars). The association will dynamically create a virtual store and the name that is set in the association will become the store name. You can call this store by running the cars() method on the TaxiService model. Remember, creating a store will not autoload the data, so you will need to load() the virtual store manually.
Let’s take a look at the next code snippets. First, create two TaxiService records, each of which will contain Car records. A TaxiService model has a hasMany relationship with the Car model:
var taxiAmsterdam = Ext.create('AssociationsTest.model.TaxiService', {
id: 1,
name: 'Taxi Amsterdam'
});
var yellowCab = Ext.create('AssociationsTest.model.TaxiService', {
id: 2,
name: 'Yellow Cab'
});
The Car records know that they belong to the TaxiService parent model (see previous code) because of the belongsTo relation (in Example 7-3). It has a property, model, that points (belongs) to the TaxiService model. The TaxiService model has a hasMany relationship to the Carmodel and it has a property: foreignKey (again, see Example 7-2).
Now let’s create some Car records:
var bmw = Ext.create('AssociationsTest.model.Car', {
id: 1,
brand: 'BMW'
});
var mercedes = Ext.create('AssociationsTest.model.Car', {
id: 2,
brand: 'Mercedes'
});
var vw = Ext.create('AssociationsTest.model.Car', {
id: 3,
brand: 'Volkswagen'
});
To get access to all the Car records from the TaxiService record, you can call the cars() method to create a virtual store:
var taxiAmsterdamStore = taxiAmsterdam.cars();
var yellowCabStore = yellowCab.cars();
The add() and sync() lines in the next piece of code just add the particular Car records to each TaxiService store. You will read more about stores in the next two chapters:
//add new cars to the Store
taxiAmsterdamStore.add(mercedes);
taxiAmsterdamStore.add(vw);
taxiAmsterdamStore.sync();
yellowCabStore.add(bmw);
yellowCabStore.sync();
After the sync, check both stores to see the data they contain (and to test the hasMany relation):
console.log("TaxiAmsterdam has the following Cars:",
taxiAmsterdamStore.getData());
console.log("YellowCab has the following Cars:",
yellowCabStore.getData());
To request the TaxiService data from a Car record (and to test the belongsTo relation), you can use the autogenerated getter getTaxiService(). Now, let’s request the TaxiService data for the first record in the taxiAmsterdamStore:
console.log(taxiAmsterdam.cars().first().getTaxiService());
Remote Associations
You can also request Car records from the server side. To do so, you would need to add a remote proxy to the Car model:
proxy: {
type: 'ajax',
reader: {
rootProperty: 'cars'
},
url: 'app/data.php'
}
After you add the records and sync the taxiAmsterdamStore and yellowCabStore, this proxy will POST the messages shown in Examples 7-4 and 7-5 to app/data.json.
Example 7-4. taxiAmsterdam
{cars: [{id:1, brand:BMW, taxiservice_id:1}, {id:2, brand:BMW, taxiservice_id:1}]}
Example 7-5. yellowCab
{cars: [{id:1, brand:BMW, taxiservice_id:2}]}
On your server side, you could code a script that takes these objects and adds them to a database.
When you want to load data from the remote, you can run the following command:
taxiAmsterdamStore.load(function(records){
console.log(records);
});
Here, you are loading data into the taxiAmsterdamStore, which has a model with associations hooked up. Therefore, it will fire a GET request, with the following parameters:
filter:[{"property":"taxiservice_id","value":1}]
TIP
When the remote store is loaded, the store is automatically filtered so that only records with a matching foreign key are included in the resulting child store. You can override this by specifying the filterProperty.
On your server side, you could code a script that filters for the taxiservice_id with the value set to 1. The data returned for this request from the server might look like the following example, which is written in PHP:
<?php
//Return response as JavaScript
header('Content-Type: application/javascript');
echo '{
"cars" : [
{
"id" : 1,
"brand" : "BMW",
"taxiservice_id" : 1
},
{
"id" : 2,
"brand" : "Mercedes",
"taxiservice_id" : 1
}
]
}';
?>
The FindACab app will not display the different brands of cars, which is why you won’t implement any model associations. That is because you will use the Yelp API to provide data about taxi businesses. It will not supply information about car brands like the previous examples did.
TIP
If you want to read more about associations, check out Rob Boerman’s great tutorial and MiamiCoder’s tutorial with PHP server-side code.
Summary
The Sencha data package contains the three key classes Ext.data.Model, Ext.data.Record, and Ext.data.Store. The model is the structure of the data; it needs data fields and they can be set to certain types. Optionally, you can set validations and associations (relationships with other models).
In this chapter, you have seen examples of how you can implement validations and associations into a model. Also, even though we didn’t implement real server-side code, I’ve discussed how you can set up your models to save data to a server. When you follow the FindACab app examples in this chapter, you will have validations implemented in your model. You will need this when coding the form view and logic later in this book.
Models are registered via the Ext.data.ModelManager, and are used by stores, which are in turn used by many of the data-bound components in Sencha. Before we can discuss stores, however, you need to have data in your FindACab app. The FindACab app will retrieve taxi data from the Yelp.com web service. Data from an (external) web service loads via a so-called server proxy. So let’s get our hands dirty!