Excel Bootcamp: Learn the Basics of Microsoft Excel (2016)
Chapter 5. How to Copy and Move Data
In some cases, you have to transfer information to a different part of a worksheet. Deleting and retyping your entries can be tedious, so it’s a good thing that Excel offers the“Copy/Move” feature. Basically, this feature allows you to copy or transfer data to different files or applications. That means you can copy your Excel entries and paste them onto a text file.
Microsoft programs (e.g. Notepad, PowerPoint, Excel, etc.) use the same functions when moving or copying items: paste, cut, and copy.
How to Move an Entry
1. Select the cell/s you need to work on.
2. Access HOME and click on the button that says“CUT.” This button has a scissor in it.
3. Excel will highlight the cell/s you selected.
4. Click on the cell/s where you want to transfer the data to.
5. Complete the process by pressing the Enter key or clicking on the PASTE button.
How to Copy an Entry
1. Highlight the cell/s you need to copy.
2. Go to HOME and hit the button that says COPY.
3. Click on the cell/s where you want to paste the copied data.
4. Click on the PASTE button (which is located at the HOME ribbon) or press the Enter key on your keyboard.
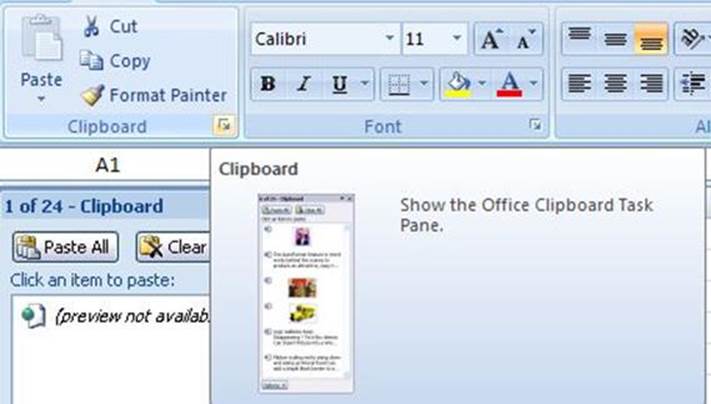
The Clipboard
Similar to other applications, Excel has a“clipboard” – a feature that stores items you have cut or copied. Basically, it allows you to save different pieces of information and paste them to other workbooks or Windows programs.
Almost all Microsoft applications have a clipboard. In Excel, this feature can hold up to 24 items (i.e. it deletes the oldest entry whenever a new item is cut or copied). You may clear the clipboard completely or delete certain items from it.
To access Excel’s clipboard, just access the HOME ribbon and hit the small arrow at the bottom-right corner of the first box. Here’s a screenshot:
The Drag-and-Drop Feature
Excel allows you to move or copy data just by dragging your mouse. This feature, called drag-and-drop, helps you to manipulate data without pressing anything on your keyboard. It is easy and simple, although you have to make sure that you have the right mouse pointer before dragging anything.
When you choose a cell, Excel highlights it with a black border. If you’ll place your mouse pointer over this border, you will see a black cross– this is the pointer that you need in order to use the drag-and-drop feature.
To move data, you should:
1. Choose the cells you want to work on.
2. Place your mouse over the cells’ border.
3. Once the black cross appears, drag your mouse towards your target location. You’ll see some blinking lines on the screen– they’ll show you where the cells will be placed once you release the mouse.
4. Once you have positioned the blinking lines correctly, you may release the left-button of your mouse.
To copy data, you must:
1. Highlight the cells you are working with.
2. Place your mouse on the border of those cells. The pointer should turn into a black cross.
3. Press down the CTRL key, left-click on the border, and drag the cells toward your target location. Excel will display a black“+” symbol beside the pointer. This symbol indicates that you are copying the data, not moving it.
4. Release the left-button of your mouse and the CTRL key once you have reached the right cells.