JavaScript: Academy: The Stress Free Way to Learning JavaScript Inside & Out (2016)
Chapter 6. The Conditional Statements
While using JavaScript, there will be situations that require you to choose one out of a predetermined set of choices. In these cases, you must use conditional statements. A conditional statement allows your program to make proper judgments and execute correct processes.
This programming language offers conditional statements that you can use on your codes. This chapter will discuss three of the most important conditional statements: (1) the“if” statement, (2) the“if… else” statement, and (3) the“if… else if…” statement.
Let’s discuss these statements in detail:
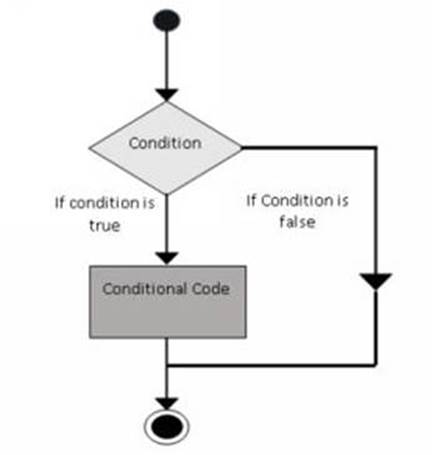
The Flow Chart of a Conditional Statement
The image below shows the basic flow chart of a conditional statement.
The if Statement
This statement serves as the basic conditional statement in JavaScript. It helps programs in making decisions and executing other statements.
The syntax of the“if” statement is:

The code given above evaluates JavaScript expressions. If the result of the evaluation is true, the assigned statement/s will be performed. If the result is false, however, none of the assigned statements will be performed. In most cases, you’ll be using comparison operators with this statement.
The if… else Statement
This statement is more complex than the previous one. That’s because the“if… else” statement offers better control in executing statements conditionally.
Here is the syntax of the“if… else” statement:
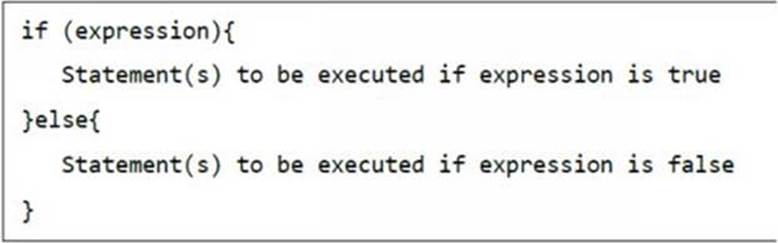
You can use the syntax given above to evaluate JavaScript expressions. If the result is true, the statement placed in the“if” section will be performed. If the result is false, on the other hand, the statement within the“else” section will be performed.
The“if… else if…” Statement
Basically, this is an enhanced form of the“if… else” statement. By providing multiple conditions, it helps your programs in making the right decisions and performing the correct actions.
Here is the syntax that you must use when creating an“if… else if…” statement:
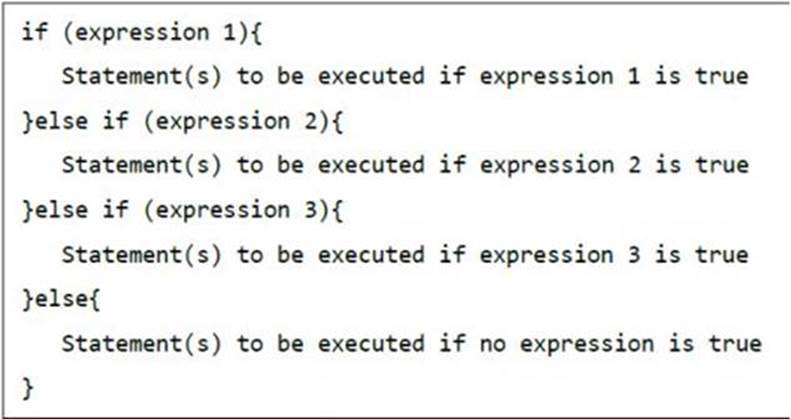
If you’ll think about it, the syntax given above is a basic one. It’s a simple collection of“if” statements where every“if” serves as a part of the preceding else statement’s else clause. This syntax executes statement/s depending on the result of the evaluation. If all of the given conditions are false, the system will run the“else” section of the code.
The Switch-Case Statements
You may use a series“if… else if” statements to execute a multi-path branch system. You’ve learned about this in the previous section of the book. However, this method isn’t always the ideal answer, particularly if all of the branches rely on the value of one variable.
Fortunately, JavaScript offers switch statements. A single switch statement is more effective than a group of“if… else if” statements when used in the situation described above.
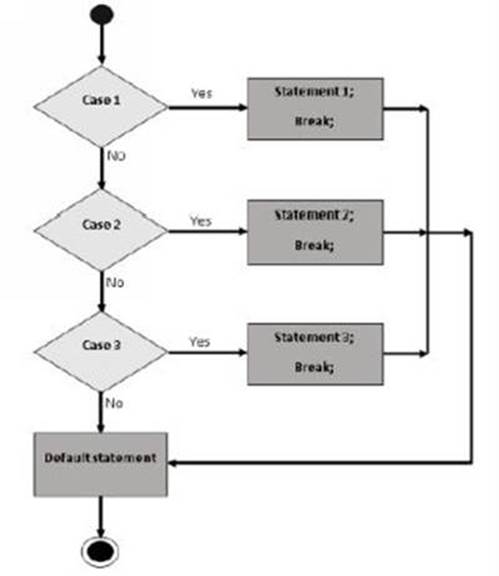
Here is the flowchart of a basic switch-case statement:
The Syntax
Switch statements are designed to do two things:
· Provide an expression that the program can evaluate
· Provide various statements that will run depending on the result of the evaluation.
JavaScript’s built-in interpreter compares each case with the expression’s value. This process will continue until the interpreter finds a match. If no match is found, the interpreter will run the default condition. The syntax of a switch statement is:
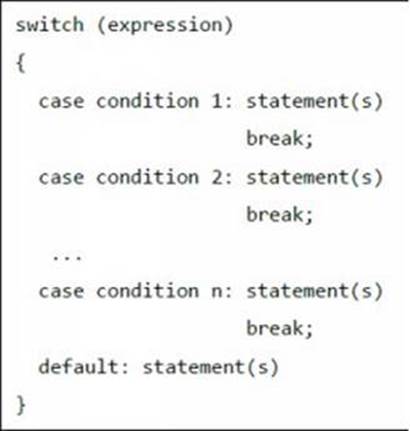
This syntax uses break statements to terminate each case. If you’ll remove these break statements, the JavaScript interpreter will execute all of the statements inside each case. You’ll learn about break statements in the next chapter.