Java Testing with Spock, Version 6 (2015)
PART 1: GETTING STARTED
Chapter 3. A tour of Spock functionality
In this chapter
· Understanding the given-when-then Spock syntax
· Testing data sets with data-driven tests
· Introducing mocks/stubs with Spock
· Examining mock behavior
With the Groovy basics out of the way (as explained in the previous chapter), we are now ready to focus on Spock syntax and see how it combines several aspects of unit testing in a single and cohesive package.
Different applications come with different testing needs, and it’s hard to predict what parts of Spock will be more useful to you beforehand. I will therefore cover a bit of all major Spock capabilities in this chapter to give you a bird's-eye view of how Spock works. I won't focus on all the details yet, because these will be explained in the coming chapters.
The purpose of this chapter is to act as a central hub for the whole book. You can read this chapter and then, according to your needs, decide which of the coming chapters is of special interest to you. If for example in your current application you have tests with lots of test data that span multiple input variables you can skip straight to the chapter that deals with data-driven tests (chapter 5).
In the coming sections I will briefly touch these three aspects of Spock:
· Core testing of Java code (More details in chapter 4)
· Parameterized tests (More details in chapter 5)
· Isolation of the class under test (More details in chapter 6)
To illustrate these concepts a series of increasingly complex semi-real scenarios will be used, because some of Spock features are not evident with trivial unit tests. For each scenario I will also compare the Spock unit test with a JUnit test (if applicable).
3.1 Introducing the behavior testing paradigm
Let's start with a full example of software testing. Imagine you work as a developer for a software company that creates programs for fire control systems as shown in figure 3.1 below.
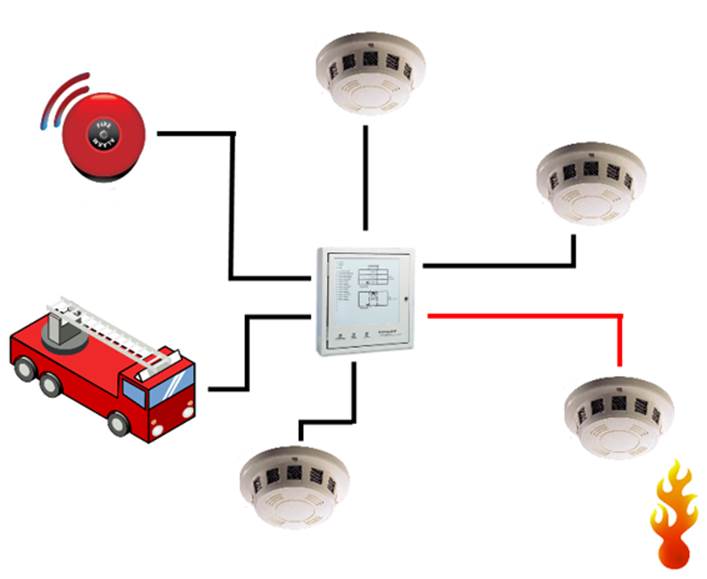
Figure 3.1 - A fire monitoring system controlling multiple detectors
The processing unit is connected to multiple fire sensors and polls them continuously for abnormal readings. Once a fire has been discovered, the alarm sounds. If the fire starts spreading and another detector is triggered, then the fire brigade is automatically called. Here are the complete requirements of the system:
1. If all sensors report nothing strange, the system is ok and no action is needed.
2. If one sensor is triggered, the alarm sounds (but this might be a false positive because of a careless smoker who could not resist a cigarette.)
3. If more than one sensor is triggered, the fire brigade is called (because it means that the fire has spread to more than one room.)
Your colleague has already implemented this system, and you are tasked with unit testing. The skeleton of the Java implementation is shown in listing 3.1.
How to use the code listings
You can find almost all code listings for this book at https://github.com/kkapelon/java-testing-with-spock.
For brevity reasons, the book sometimes will point you to the source code (especially for long listings). I tend to use the Eclipse IDE in my day-to-day work. If you did not already install Spock and Eclipse in chapter 2, you can find installation instructions in Appendix A.
This fire sensor is regularly injected with the data from the fire sensors and at any given time it can be queried for the status of the alarm.
Listing 3.1 A fire control system in Java
public class FireEarlyWarning { #A public void feedData(int triggeredFireSensors) #B { [...implementation here...] #C } public WarningStatus getCurrentStatus() #D { [...implementation here...] }} public class WarningStatus { #E public boolean isAlarmActive() { #F [...implementation here...] } public boolean isFireDepartmentNotified() { #G [...implementation here...] } }
#A the main class that implements monitoring
#B method called every second by sensor software
#C Redacted for brevity reasons – see source code for full code
#D status report getter method
#E Contents of status report (status class)
#F if true then the alarm sounds
#G if true then the fire department is called
The application uses two classes: the main class and the status class.
· The main class has all the intelligence and contains a getter that returns a status class with the present condition of the system.
· The status class is a simple object that holds the details[20].
Your colleague has finished the implementation code, and has even written[21] a JUnit test as a starting point for the test suite you are supposed to finish. You now have the full requirements of the system, the implementation code, and you are ready to start unit testing.
3.1.1 The setup-stimulate-assert structure of JUnit
You decide to take a look first at the existing JUnit test your colleague already wrote. The code is shown is listing 3.2:
Listing 3.2 A JUnit test for the fire control system
@Test #Apublic void fireAlarmScenario() { FireEarlyWarning fireEarlyWarning = new FireEarlyWarning(); #B int triggeredSensors = 1; #B fireEarlyWarning.feedData(triggeredSensors); #C WarningStatus status = fireEarlyWarning.getCurrentStatus(); assertTrue("Alarm sounds", status.isAlarmActive()); #D assertFalse("No notifications", status.isFireDepartmentNotified());#D}
#A JUnit testcase
#B setup needed for the test
#C create an event
#D examine results of the event
This unit test covers the case where a single sensor detects fire. According to the requirements, the alarm should sound, but the fire department is not yet contacted. If you closely examine the code you will discover a hidden structure between the lines. All good JUnit tests have three code segments:
1. The "setup" phase is where the class under test and all collaborators are created. All initialization stuff goes here.
2. The "stimulus" phase is where the class under test is tampered, triggered or otherwise passed a message/action. This phase should be as brief as possible.
3. The "assert" phase contains only read-only code (code with no side effects) where the expected behavior of the system is compared against the actual one.
Notice that this structure is implied with JUnit. It is never enforced by the framework and it might not be clearly visible in complex unit tests. Your colleague is a seasoned developer and he has clearly marked the three phases using the empty lines in listing 3.2.
· > The "setup" phase creates the FireEarlyWarning class and sets the number of triggered sensors that will be evaluated. (first two statements in listing 3.2)
· The "stimulus" phase passes the triggered sensors to the fire monitor and also asks it for the current status (middle two statements in listing 3.2)
· The "assert" phase that verifies the result of the test are the last two statements.
This is a very good advice to follow, but not all developers follow this technique (It’s also possible to demarcate the phases with comments).
Because JUnit does not clearly distinguish between the setup-stimulate-assert phases, it’s up to the developer to decide on the structure of the unit test. Understanding the structure of a JUnit test is not always easy when more complex testing is performed. For comparison purposes listing 3.3 shows a real-world result[22]:
Listing 3.3 JUnit test with complex structure (real example)
private static final String MASTER_NAME = "mymaster";private static HostAndPort sentinel = new HostAndPort("localhost",26379); @Testpublic void sentinelSet() { Jedis j = new Jedis(sentinel.getHost(), sentinel.getPort()); try { Map<String, String> parameterMap = new HashMap<String, String>(); parameterMap.put("down-after-milliseconds", String.valueOf(1234)); parameterMap.put("parallel-syncs", String.valueOf(3)); parameterMap.put("quorum", String.valueOf(2)); j.sentinelSet(MASTER_NAME, parameterMap); List<Map<String, String>> masters = j.sentinelMasters(); for (Map<String, String> master : masters) { if (master.get("name").equals(MASTER_NAME)) { assertEquals(1234, Integer.parseInt(master .get("down-after-milliseconds"))); assertEquals(3, Integer.parseInt(master.get("parallel-  . syncs"))); assertEquals(2, Integer.parseInt(master.get("quorum"))); } } parameterMap.put("quorum", String.valueOf(1)); j.sentinelSet(MASTER_NAME, parameterMap); } finally { j.close(); }}
Looking at the code, how long did it take you to understand its structure? Is it easy to understand which class is under test? Are the boundaries of the three phases really clear? Imagine that this unit test has just failed and you have to fix it immediately. Can you guess what has gone wrong simply by looking at the code?
Another problem with the lack of clear structure of a JUnit test is the fact that a developer can easily mix the phases in the wrong[23] order, or even write multiple tests into one. Returning to the fire-control system from Listing 3.2, the listing below shows a bad unit test that tests two things at once. The code is shown as an anti-pattern. Please do not this in your unit tests!
Listing 3.4 A JUnit test that tests two things - DO NOT DO THIS
@Testpublic void sensorsAreTriggered() { FireEarlyWarning fireEarlyWarning = new FireEarlyWarning(); #A fireEarlyWarning.feedData(1); #B WarningStatus status = fireEarlyWarning.getCurrentStatus(); assertTrue("Alarm sounds", status.isAlarmActive()); #C assertFalse("No notifications", status.isFireDepartmentNotified()); fireEarlyWarning.feedData(2); #D WarningStatus status2 = fireEarlyWarning.getCurrentStatus(); assertTrue("Alarm sounds", status2.isAlarmActive()); #E assertTrue("Fire Department is notified", status2.isFireDepartmentNotified());}
#A setup phase
#B stimulus phase
#C first assert phase
#D another stimulus phase - this is bad practice
#E second assert phase
This unit test asserts two different cases. If it breaks and the build server reports the result, you do not know which of the two scenarios has the problem.
Another common anti-pattern I see all too often is JUnit tests with no assert statements at all! JUnit is really powerful but as you can see it has its shortcomings. How would Spock handle this fire control system?
3.1.2 The given-when-then flow of Spock
Unlike JUnit, Spock has a clear test structure that is denoted with labels (blocks in Spock terminology) as you will see in chapter 4 where we will cover the lifecycle of a Spock test). Looking back at the requirements of the fire control system, you will see they can have a one-to-one mapping with Spock tests. Here are the requirements again:
1. If all sensors report nothing strange, the system is ok and no action is needed.
2. If one sensor is triggered, the alarm sounds (but this might be a false positive because of a careless smoker who could not resist a cigarette.).
3. If more than one sensors are triggered the fire brigade is called (because it means that the fire has spread to more than one room).
Spock can directly encode these sentences using full English text inside the source test of the code as shown in listing 3.5
Listing 3.5 The full Spock test for the fire control system
class FireSensorSpec extends spock.lang.Specification{ def "If all sensors are inactive everything is ok"() { #A given: "that all fire sensors are off" #B FireEarlyWarning fireEarlyWarning = new FireEarlyWarning() int triggeredSensors = 0 when: "we ask the status of fire control" #C fireEarlyWarning.feedData(triggeredSensors) WarningStatus status = fireEarlyWarning.getCurrentStatus() then: "no alarm/notification should be triggered" #D !status.alarmActive !status.fireDepartmentNotified} def "If one sensor is active the alarm should sound as a precaution"() { given: "that only one fire sensor is active" FireEarlyWarning fireEarlyWarning = new FireEarlyWarning() int triggeredSensors = 1 when: "we ask the status of fire control" fireEarlyWarning.feedData(triggeredSensors) WarningStatus status = fireEarlyWarning.getCurrentStatus() then: "only the alarm should be triggered" status.alarmActive !status.fireDepartmentNotified} def "If more than one sensors is active then we have a fire"() { given: "that two fire sensors are active" FireEarlyWarning fireEarlyWarning = new FireEarlyWarning() int triggeredSensors = 2 when: "we ask the status of fire control" fireEarlyWarning.feedData(triggeredSensors) WarningStatus status = fireEarlyWarning.getCurrentStatus() then: "alarm is triggered and the fire department is notified" status.alarmActive status.fireDepartmentNotified} }
#A Clear explanation of what this test does
#B setup phase
#C stimulus phase
#D assert phase
Spock follows a given-when-then structure that is enforced via labels inside the code. Each unit test can be described using plain English sentences, and even the labels themselves can be described with text descriptions.
This enforced structure pushes the developer to think well before writing the test, and also acts as a guide on where each statement goes. The beauty of the English descriptions (unlike JUnit comments) is they are used directly by reporting tools. A screenshot of Maven surefire report is shown in figure 3.2 with absolutely no modifications (Spock uses the JUnit runner.). This report can by created by running mvn surefire-report:report on the command line.

Figure 3.2 - Surefire report with Spock test description
The first column is the result of test (a green tick means that the test passes), the second column is the description of the test picked up from the source code and the third column is the execution time of each test (really small values are ignored). More specialized tools can also drill down in the labels of the blocks as well, as shown in figure 3.3. The example shown is from Spock reports (https://github.com/renatoathaydes/spock-reports)
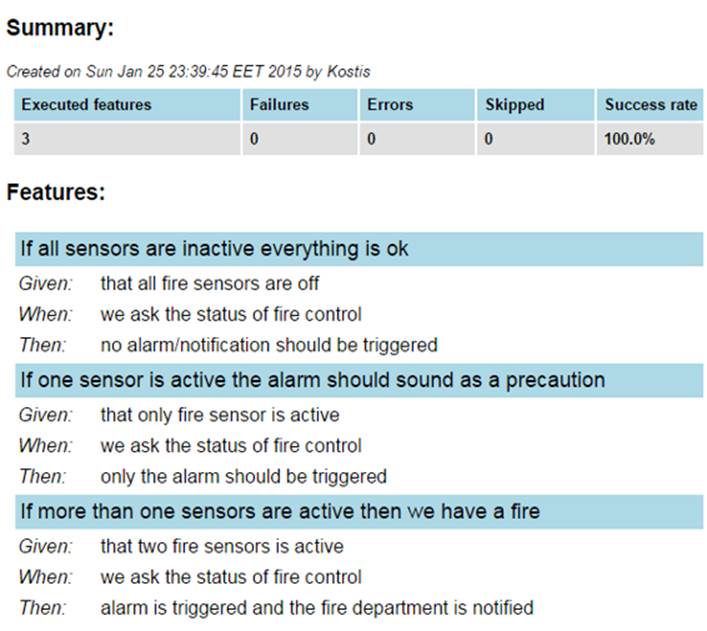
Figure 3.3 Spock report with all English sentences of the test
Spock is not a full Behavior-Driven Development tool[24], but is certainly pushes you into that direction. With some careful planning your Spock tests can act as a living business documentation (more details will be shown in chapter 7 where I will give a brief introduction to BDD).
We have seen how Spock handles basic testing. Let's see a more complex testing scenario where the number of input and output variables is much larger.
3.2 Handling tests with multiple input sets
With the fire control system in place, you are tasked with a more complex testing assignment. This time, the application under test is a monitor system for a nuclear reactor. It functions in a similar way to the fire monitor, but with more input sensors. The system[25] is shown in figure 3.4
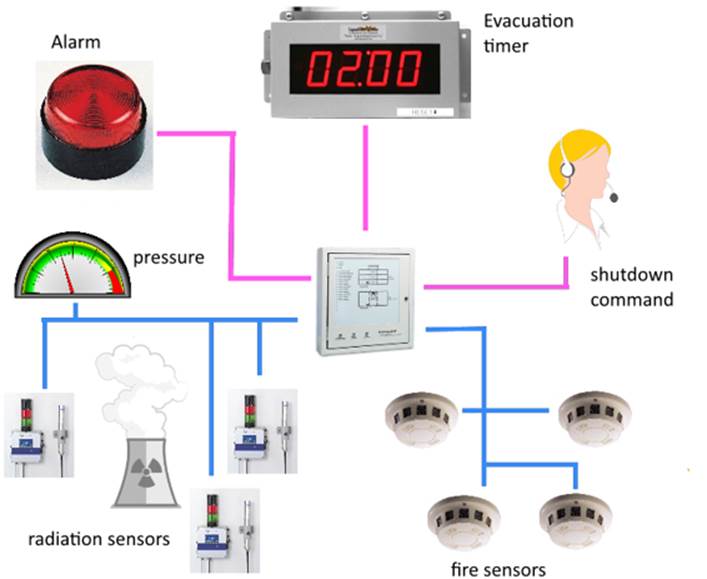
Figure 3.4 - A monitor system for a nuclear reactor
The components of the system are:
1. Multiple fire sensors (input)
2. Three radiation sensors in critical points (input)
3. Current pressure (input)
4. An alarm (output)
5. An evacuation command (output)
6. A notification to a human operator that the reactor should shut down (output)
The system is already implemented according to all safety requirements needed for nuclear reactors. It reads sensor data at regular intervals, and according to the readings it can alert or suggest corrective actions. Some of the requirements are:
1. If pressure goes above 150 bar, the alarm sounds.
2. If two or more fire alarms are triggered, the alarm sounds and the operator is notified that a shutdown is needed (as a precautionary measure).
3. If a radiation leak is detected (100+rad from any sensor), the alarm sounds, an announcement is made that the reactor should be evacuated within the next minute, and a notification is sent to the human operator that a shutdown is needed.
You speak with the technical experts of the nuclear reactor, and you jointly decide that a minimum of twelve test scenarios will be examined as shown in table 3.1 below.
Table 3.1 Scenarios that need testing for the nuclear reactor
|
Sample inputs |
Expected outputs |
||||
|
Current Pressure |
Fire sensors |
Radiation sensors |
Audible alarm |
A shutdown is needed. |
Evacuation within x minutes |
|
150 |
0 |
0, 0, 0 |
No |
No |
No |
|
150 |
1 |
0, 0, 0 |
Yes |
No |
No |
|
150 |
3 |
0, 0, 0 |
Yes |
Yes |
No |
|
150 |
0 |
110.4 ,0.3, 0.0 |
Yes |
Yes |
1 minute |
|
150 |
0 |
45.3 ,10.3, 47.7 |
No |
No |
No |
|
155 |
0 |
0, 0, 0 |
Yes |
No |
No |
|
170 |
0 |
0, 0, 0 |
Yes |
Yes |
3 minutes |
|
180 |
0 |
110.4 ,0.3, 0.0 |
Yes |
Yes |
1 minute |
|
500 |
0 |
110.4 ,300, 0.0 |
Yes |
Yes |
1 minute |
|
30 |
0 |
110.4 ,1000, 0.0 |
Yes |
Yes |
1 minute |
|
155 |
4 |
0, 0, 0 |
Yes |
Yes |
No |
|
170 |
1 |
45.3 ,10.f, 47.7 |
Yes |
Yes |
3 minutes |
The scenarios outlined in the table above are a classic example of parameterized tests. The test logic is always the same (Take these three inputs and expect these three outputs.), and test code only needs to handle different sets of variables for this single test logic.
In this particular example, we have 12 scenarios with 6 variables, but you can easily imagine cases where the test data is much larger. The naive way to handle testing for the nuclear reactor would be to write twelve individual tests. That would be problematic, not only because of code duplication, but also because of future maintenance. If a new variable is added in the system (e.g. a new sensor) then you would have to change all twelve tests at once.
A better approach is needed, preferably one that decouples the test code (that should be written once) from the sets of test data and expected output (that should be written for all scenarios). This kind of testing need a framework with explicit support for parameterized tests.
Spock comes with built-in support for parameterized tests with a friendly DSL[26] (Domain Specific Language) syntax specifically tailored to handle multiple inputs and outputs. But before I show you this expressive DSL, allow me to digress a bit into the current state of parameterized testing as supported in JUnit (and the alternative approaches). Several developers consider parameterized testing a challenging and complicated process. The truth is that the limitations of JUnit make parameterized testing a challenge and developers suffer because of inertia and their resistance to change their testing framework.
3.2.1 Existing approaches to multiple test input parameters
The requirements for the nuclear reactor monitor are clear; the software is already implemented, and you are ready to test it. What would be the solution if you follow the status quo?
The recent versions of JUnit advertise support for parameterized tests. The official way of implementing a parameterized test with JUnit is shown in listing 3.6. Here I assume that -1 in evacuation minutes means that no evacuation is needed.
Listing 3.6 Testing the nuclear reactor scenarios with JUnit
@RunWith(Parameterized.class) #Apublic class NuclearReactorTest {private final int triggeredFireSensors; #Bprivate final List<Float> radiationDataReadings; #Bprivate final int pressure; #B private final boolean expectedAlarmStatus; #Cprivate final boolean expectedShutdownCommand; #Cprivate final int expectedMinutesToEvacuate; #C public NuclearReactorTest(int pressure, int triggeredFireSensors, #D List<Float> radiationDataReadings, boolean expectedAlarmStatus, boolean expectedShutdownCommand, int expectedMinutesToEvacuate) { this.triggeredFireSensors = triggeredFireSensors; this.radiationDataReadings = radiationDataReadings; this.pressure = pressure; this.expectedAlarmStatus = expectedAlarmStatus; this.expectedShutdownCommand = expectedShutdownCommand; this.expectedMinutesToEvacuate = expectedMinutesToEvacuate; } @Testpublic void nuclearReactorScenario() { #E NuclearReactorMonitor nuclearReactorMonitor = new NuclearReactorMonitor(); nuclearReactorMonitor.feedFireSensorData(triggeredFireSensors); nuclearReactorMonitor.feedRadiationSensorData(radiationDataReadings); nuclearReactorMonitor.feedPressureInBar(pressure); NuclearReactorStatus status = nuclearReactorMonitor.getCurrentStatus(); assertEquals("Expected no alarm", expectedAlarmStatus, status.isAlarmActive()); assertEquals("No notifications", expectedShutdownCommand, status.isShutDownNeeded()); assertEquals("No notifications", expectedMinutesToEvacuate, status.getEvacuationMinutes()); } @Parameters #F public static Collection<Object[]> data() { #G return Arrays.asList(new Object[][] { { 150, 0, new ArrayList<Float>(), false, false, -1 }, { 150, 1, new ArrayList<Float>(), true, false, -1 }, { 150, 3, new ArrayList<Float>(), true, true, -1 }, { 150, 0, Arrays.asList(110.4f, 0.3f, 0.0f), true, true, 1 }, { 150, 0, Arrays.asList(45.3f, 10.3f, 47.7f), false, false, -1 }, { 155, 0, Arrays.asList(0.0f, 0.0f, 0.0f), true, false, -1 }, { 170, 0, Arrays.asList(0.0f, 0.0f, 0.0f), true, true, 3 }, { 180, 0, Arrays.asList(110.4f, 0.3f, 0.0f), true, true, 1 }, { 500, 0, Arrays.asList(110.4f, 300f, 0.0f), true, true, 1 }, { 30, 0, Arrays.asList(110.4f, 1000f, 0.0f), true, true, 1 }, { 155, 4, Arrays.asList(0.0f, 0.0f, 0.0f), true, true, -1 }, { 170, 1, Arrays.asList(45.3f, 10.3f, 47.7f), true, true, 3 }, }); } }
#A Specialized runner is needed for parameterized tests is created with @RunWith annotation
#B inputs become class fields
#C outputs become class fields
#D Special constructor with all inputs and ouputs
#E Unit test that will use parameters
#F Source of test data
#G Two dimensional array with test data
If you look at this code and feel it is too verbose, you are totally right! Listing 3.6 is a true testament to the limitations of JUnit. In order to accomplish parameterized testing the following constraints specific to JUnit need to be satisfied:
· The test class must be polluted with fields that represent inputs.
· The test class must be polluted with fields that represent outputs.
· A special constructors is needed for all inputs and outputs.
· Test data comes into a two-dimensional object array (which itself is converted to a list).
Notice also that because of these limitations it is impossible to add a second parameterized test in the same class. JUnit is so strict that it forces you to have a single class for each test when multiple parameters are involved. If you have a Java class that needs more than one parameterized tests and you use JUnit, you are out of luck[27].
The problems with JUnit parameterized tests are so well-known that several independent efforts have emerged to improve this aspect of unit testing. At the time of writing there are at least three external projects[28] that offer their own syntax on top of JUnit for a friendlier and less cluttered code.
Parameterized tests are also an area where TestNG (http://testng.org) has been advertized as a better replacement for JUnit. TestNG does away with all JUnit limitations and comes with extra annotations (@DataProvider) that truly decouple test data and test logic.
Despite these external efforts, Spock comes with an even better syntax for parameters (Groovy magic again!). Also the fact that all these improved efforts are external to JUnit, further supports my argument that Spock is a “batteries-included” framework providing everything you need for testing in a single package.
3.2.2 Tabular data input with Spock
You have seen the hideous code of JUnit when multiple parameters are involved. You might have also seen some improvements with TestNG or extra JUnit addons. All these solutions attempt to capture the values of the parameters using Java code or annotations.
Spock takes a step back, and focuses directly on the original test scenarios. Returning to the nuclear monitoring system, remember that what you really want to test is the scenarios listed in table 3.1 (written in a human readable format).
Spock allows you to do the unthinkable. You can directly embed this table as is inside your Groovy code as shown in listing 3.7. Again I assume that -1 in evacuation minutes means that no evacuation is needed.
Listing 3.7 - Testing the nuclear reactor scenarios with Spock
class NuclearReactorSpec extends spock.lang.Specification{ def "Complete test of all nuclear scenarios"() { #A given: "a nuclear reactor and sensor data" NuclearReactorMonitor nuclearReactorMonitor =new NuclearReactorMonitor() when: "we examine the sensor data" nuclearReactorMonitor.feedFireSensorData(fireSensors) #B nuclearReactorMonitor.feedRadiationSensorData(radiation) #B nuclearReactorMonitor.feedPressureInBar(pressure) #B NuclearReactorStatus status = nuclearReactorMonitor.getCurrentStatus() then: "we act according to safety requirements" status.alarmActive == alarm #C status.shutDownNeeded == shutDown #C status.evacuationMinutes == evacuation #C where: "possible nuclear incidents are:" #D pressure | fireSensors | radiation || alarm | shutDown | evacuation #E 150 | 0 | [] || false | false | -1 #F 150 | 1 | [] || true | false | -1 #F 150 | 3 | [] || true | true | -1 #F 150 | 0| [110.4f ,0.3f, 0.0f] || true | true | 1 #F 150 | 0| [45.3f ,10.3f, 47.7f]|| false | false | -1 #F 155 | 0| [0.0f ,0.0f, 0.0f] || true | false | -1 #F 170 | 0| [0.0f ,0.0f, 0.0f] || true | true | 3 #F 180 | 0| [110.4f ,0.3f, 0.0f] || true | true | 1 #F 500 | 0| [110.4f ,300f, 0.0f] || true | true | 1 #F 30 | 0|[110.4f ,1000f, 0.0f] || true | true | 1 #F 155 | 4| [0.0f ,0.0f, 0.0f] || true | true | -1 #F 170 | 1| [45.3f ,10.3f, 47.7f]|| true | true | 3 #F } }
#A Human readable test description
#B Usage of Test inputs
#C Usage of test outputs
#D Source of parameters
#E Definition of inputs and outputs
#F Tabular representation of all scenarios
Spock takes a different approach to parameters. Powered by Groovy capabilities, it offers a descriptive DSL for tabular data. The key point of this unit test is the where: label (in addition to the usual given-then-when labels) that holds a definition of all inputs/outputs used in the other blocks.
In the where: block of this Spock test, I just copied verbatim the scenarios of the nuclear reactor monitor from the table. The || notation is used to split the inputs from outputs. Reading this table is possible even by non-technical people. Your business analyst can look at this table and quickly locate missing scenarios.
Adding a new scenario is dead easy.
· One can append a new line at the end of the table with a new scenario and the test will pick them upon the next run. Also,
· the parameters are strictly contained inside the test method, unlike Junit. The test class has no need for special constructor or fields. This means that a single Spock class can hold an unlimited number of parameterized tests each one with its own tabular data.
The icing on the cake is the amount of code. The JUnit test has 82 lines of Java code, while the Spock test is 38 lines. In this particular example I gained 50% code reduction by using Spock, and kept the same functionality as before (continuing my promise from chapter 1 that Spock tests will cut down the amount of test code in your application).
I will show several other tricks for Spock parameterized tests in chapter 5, so feel free to jump there directly if your enterprise application is currently plagued by similar JUnit boilerplate code.
We will close our Spock tour with its mocking/stubbing capabilities.
3.3 Isolating the class under test
JUnit does support mocking (faking external object communication) out of the box, therefore I have chosen Mockito[29] as a representative framework for Java mocking.
If you have never used mocking before in your unit tests, fear not, because I will cover both theory and practice (with Spock) in this book. I strongly believe that mocking is one of the pillars of well-written unit tests and I am always puzzled when I see developers who neglect or loathe mocks and stubs.
The literature on mocking has not reached a single agreement on naming of the core concepts. There are multiple definitions such as:
· Mocks/Stubs
· Test doubles
· Fake collaborators
All these usually mean the same thing - dummy objects that are injected in the class under test replacing the real implementations
1. A stub is a fake class that comes with preprogrammed return values. It is injected in the class under test so that you have absolute control on what is being tested as input.
2. A mock is a fake[30] class that can be examined after the test is finished for its interactions with the class under test (e.g. you can ask it if a method was called or how many times is was called).
Things sometimes get more complicated because a mock can also function as a stub if that is needed[31]. For the rest of this book I will adopt the mock/stub naming convention simply because Spock follows closely this pattern as well. I will show you examples of both in the next examples.
3.3.1 The case of mocking/stubbing
After finishing with the nuclear reactor monitor module you are tasked with the testing the temperature sensors of the same reactor. Figure 3.4 below gives an overview of the system:
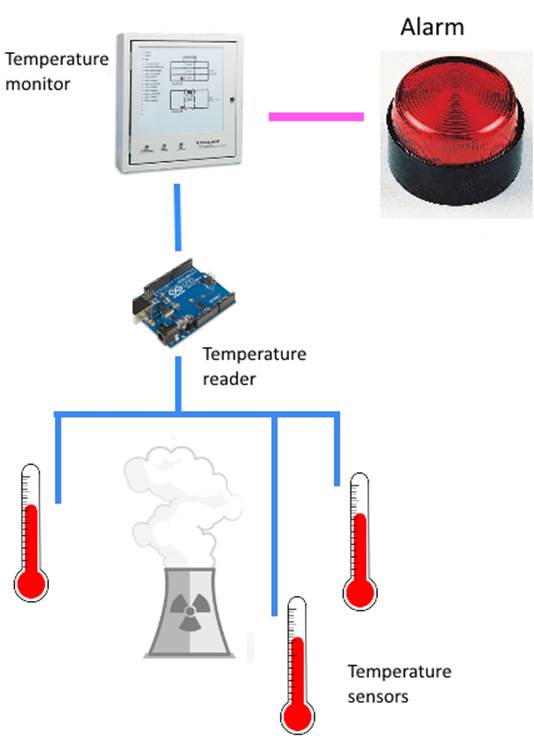
Figure 3.5 A monitor that gets temperatures via another system
Even though at first glance this temperature monitor is similar to the previous system, there are two big differences:
1. The system under test - the temperature monitor - does not directly communicate with the temperature sensors. It obtains the readings from another Java system - the temperature reader (implemented by a different software company than yours).
2. The requirements for the temperature monitor is that the alarm should sound if there is a difference in temperature readings (either up or down) that is greater than 20 degrees.
You need to write unit tests for the temperature monitor. The implementation code that needs to be tested is shown in listing 3.8
Listing 3.8 Java classes for the temperature monitor and reader
public class TemperatureReadings { #A private long sensor1Data; #B private long sensor2Data; private long sensor3Data; [...getters and setters here]} public interface TemperatureReader { #C TemperatureReadings getCurrentReadings(); #D} public class TemperatureMonitor { #E private final TemperatureReader reader; #F private TemperatureReadings lastReadings; #G private TemperatureReadings currentReadings; #H public TemperatureMonitor(final TemperatureReader reader) { this.reader = reader; #I } public boolean isTemperatureNormal() #J { [...implementation here that compares readings...] } public void readSensor() #K { lastReadings = currentReadings; #L currentReadings = reader.getCurrentReadings(); #L } }
#A Simple class that contains temperatures
#B current temperature
#C Interface implemented by the reader software
#D method called by the class under test
#E The class under test
#F Injected field of reader
#G previous temperature readings
#H latest temperature readings
#I constructor injection
#J method that needs unit tests
#K called automatically at regular intervals
#L communication with temperature reader
The specifications are based on temperature readings. Unlike the previous example where fixed values were used (e.g. if pressure is more than 150 do this), here we have to tests consecutive readings (do this only if temperature is higher compared to the previous reading).
Reading the specifications, it’s obvious you need to a way to "trick" the class under test to read temperature readings of your choosing. Unfortunately, the temperature monitor has no way of directly obtaining input. Instead, it calls another Java API from the reader software[32]. So how can you "trick" the TemperatureMonitor class to read different types of temperatures?
SOLUTIONS FOR FAKING INPUT FROM COLLABORATING CLASSES
A good start would be to contact the software company that writes the temperature reader software and ask them to provide a debug version of their module, that can be controlled to give any temperature you choose, instead of reading the real hardware sensors. This scenario might sound ideal, but in practice it is very difficult to achieve, either for political reasons (they will not provide what you ask), or technical reasons (the debug version has bugs of its own).
Another approach would be to write your own dummy implementation of TemperatureReader that does what you want. I have seen this technique too many times in enterprise projects, and I consider it an anti-pattern. This introduces a new class that is used exclusively for unit tests and must be kept in sync with the specifications. As soon as the specifications change (which happens a lot in enterprise projects), one must hunt down all those dummy classes and upgrade them accordingly to keep the stability of unit tests
The recommended approach is to use the built-in mocking capabilities of Spock. Spock allows you to create a replacement class (or interface implementation) on the spot and direct it to do your bidding while the class under test still thinks it talks to a real object.
3.3.2 Stubbing fake objects with Spock
To create a unit test for the temperature monitor system we need to:
1. Create an implementation of the TemperatureReader interface
2. Instruct this smart implementation to return fictional readings for the first call
3. Instruct this smart implementation to return other fictional readings for the second call
4. Connect the class under test with this smart implementation
5. Run the test, and see what the class under test does
In Spock parlance this "smart implementation" is called a stub which means a fake class with canned responses. Listing 3.9 shows stubbing in action as outlined above:
Listing 3.9 Stubbing with Spock
class CoolantSensorSpec extends spock.lang.Specification{ def "If current temperature difference is within limits everything is  .  . ok"() { given: "that temperature readings are within limits" TemperatureReadings prev = new #A TemperatureReadings(sensor1Data:20, sensor2Data:40,sensor3Data:80) TemperatureReadings current = new #A TemperatureReadings(sensor1Data:30, sensor2Data:45,sensor3Data:73); TemperatureReader reader = Stub(TemperatureReader) #B reader.getCurrentReadings() >>> [prev, current] #C TemperatureMonitor monitor = new TemperatureMonitor(reader) #D when: "we ask the status of temperature control" monitor.readSensor()#E monitor.readSensor()#E then: "everything should be ok" monitor.isTemperatureNormal() #F } def "If current temperature difference is more than 20 degrees the  .  . alarm should sound"() { given: "that temperature readings are not within limits" TemperatureReadings prev = new TemperatureReadings(sensor1Data:20, sensor2Data:40,sensor3Data:80) TemperatureReadings current = new TemperatureReadings(sensor1Data:30, sensor2Data:10,sensor3Data:73); TemperatureReader reader = Stub(TemperatureReader) reader.getCurrentReadings() >>> [prev,current] TemperatureMonitor monitor = new TemperatureMonitor(reader) when: "we ask the status of temperature control" monitor.readSensor() monitor.readSensor() then: "the alarm should sound" !monitor.isTemperatureNormal() }}
#A Premade temperature readings
#B Dummy interface implementation
#C Instructing the dummy interface to return premade readings
#D Class under test is injected with dummy interface
#E Class under test calls dummy interface twice
#F Assertion after two subsequence calls
The magic line is the Stub() call, shown below.
TemperatureReader reader = Stub(TemperatureReader)
Here Spock, behind the scenes, creates a dummy implementation of this interface. By default the implementation does nothing, and so it must be instructed how to react which is done with the second important line, the >>>operator:
reader.getCurrentReadings() >>> [prev, current]
This line means:
· "The first time the getCurrentReadings() method is called on the dummy interface, then return the instance named prev.”
· “The second time return the object named current".
The >>> operator is normally called "unsigned shift operator"[33] in Java, but Spock overloads it (Groovy supports operator overloading) to provide canned answers to a stub. Now the dummy interface is complete. The class under test is injected with the Spock Stub, and calls it without understanding that all its responses are pre-programmed. As far as the class under test is concerned, the Spock stub is a real implementation.
The final result: we’ve implemented the unit test for the temperature reader complying with the given requirements, even though the class under test never communicates with the temperature sensors themselves.
3.3.3 Mocking collaborators
For simplicity reasons, all the systems I used as examples so far only recommended the suggested action (e.g. the alarm should sound). I assumed silently that there is another external system that polls the various monitors presented here, and actually takes the action itself.
In the real world, systems are rarely this simple. Faking the input data is only half the effort needed to write effective unit tests. The other half is faking the output parameters. In this case we need to use mocking into the mix as well. To see how this works, have a look at the extended temperature monitor system shown in figure 3.6
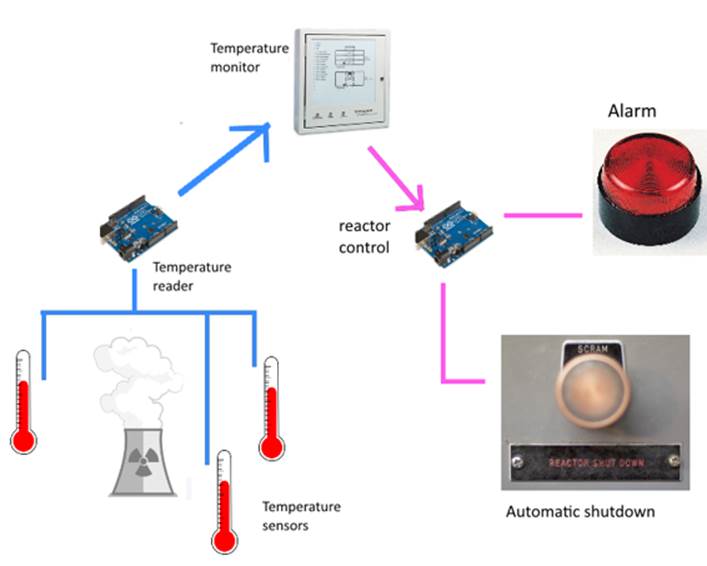
Figure 3.6 - A full system with input and output with side effects
Assume that for this scenario, business analysis has decided that the temperature control of the reactor is mission critical and must be completely automatic. Instead of just sounding an alarm and contacting a human operator, the system under test is fully autonomous, and will shut down the reactor on its own if the temperature difference is higher than 50 degrees. The alarm still sounds if the temperature difference is higher than 20 degrees (but the reactor does not shutdown in this case allowing for corrective actions by other systems).
Shutting down the reactor and sounding the alarm happens via an external Java library (for which you have no control whatsoever) that is offered as a simple API. The system under test is now injected with this external API as well as shown in listing 3.10
Listing 3.10 Java classes for the temperature monitor, reader and reactor control
public class TemperatureReadings { #A private long sensor1Data; #B private long sensor2Data; private long sensor3Data; [...getters and setters here]} public interface TemperatureReader { #C TemperatureReadings getCurrentReadings(); #D} public class ReactorControl { #E public void activateAlarm() { [...implementation here...] } public void shutdownReactor() { [...implementation here...] }} public class ImprovedTemperatureMonitor { #F private final TemperatureReader reader; #G private TemperatureReadings lastReadings; private TemperatureReadings currentReadings; private final ReactorControl reactorControl; #G public ImprovedTemperatureMonitor(final TemperatureReader reader, final ReactorControl reactorControl) { this.reactorControl = reactorControl; this.reader = reader; } private boolean isTemperatureDiffMoreThan(long degrees) { [...implementation here that compares readings...] } public void readSensor() { lastReadings = currentReadings; currentReadings = reader.getCurrentReadings(); [...sanity checks...] if(isTemperatureDiffMoreThan(20)) { reactorControl.activateAlarm(); #H } if(isTemperatureDiffMoreThan(50)) { reactorControl.shutdownReactor(); #H } } }
#A Simple class that contains temperatures
#B current temperature
#C Interface implemented by the reader software
#D method called by the class under test
#E Class with side effects
#F The class under test
#G Injected field of reader and reactor control
#H class under tests calls method with side effects
Again, you are tasked with the unit tests for this system. By using Spock stubs as demonstrated in the previous section, you already know how to handle the temperature reader. This time however, you cannot easily verify the reaction of the class under test – ImprovedTemperatureMonitor, because there is nothing you can assert.
The class does not have any method that returns its status. Instead it internally calls the Java API for the external library that handles the reactor. How can you test this?
OPTIONS FOR UNIT TESTING THIS MORE COMPLEX SYSTEM
As before you have three different options:
1. You can ask the company that produces the Java API of the reactor control to provide you with a "debug" version that does not actually shut down the reactor, but instead prints a warning or a log statement.
2. You can create your own implementation of ReactorControl, and use that to create your unit test. This is the same anti-pattern as Stubs, because it adds extra complexity and unneeded maintenance burden to sync this fake object whenever the Java API of the external library changes. Also notice that ReactorControl is a concrete class and not an interface, so additional refactoring effort is required before you even consider this route.
3. Finally you can use Mocks, which is the recommended approach.
Let's see how Spock handles this testing scenario.
3.3.4 Examining interactions of mocked objects
Similar to stubbing, Spock also offers built-in mocking support. A mock is another fake collaborator of the class under test. Spock allows you to examine mock objects for their interactions after the test is finished. You pass it as a dependency, and the class under test calls its methods without understanding that you intercept all those calls behind the scenes. As far as the class under test is concerned it still communicates with a real class
Unlike Stubs, mocks can fake input/output, and also be examined after the test is complete. This means that when the class under test calls your mock, the test framework (Spock in our case) notes down the characteristics of this call (such as number of times it was called or even the arguments that were passed for this call). You can examine these characteristics and decide if they are what you expect.
In the temperature monitor scenario, you saw how the temperature reader is stubbed. The reactor control is also mocked as shown in listing 3.11
Listing 3.11 Mocking and Stubbing with Spock
def "If current temperature difference is more than 20 degrees the alarm sounds"() { given: "that temperature readings are not within limits" TemperatureReadings prev = new TemperatureReadings(sensor1Data:20, sensor2Data:40,sensor3Data:80) TemperatureReadings current = new TemperatureReadings(sensor1Data:30, sensor2Data:10,sensor3Data:73); TemperatureReader reader = Stub(TemperatureReader) #A reader.getCurrentReadings() >>> [prev, current] ReactorControl control = Mock(ReactorControl) #B ImprovedTemperatureMonitor monitor = new ImprovedTemperatureMonitor(reader,control) #C when: "we ask the status of temperature control" monitor.readSensor() #D monitor.readSensor() #D then: "the alarm should sound" 0 * control.shutdownReactor() #E 1 * control.activateAlarm()#E} def "If current temperature difference is more than 50 degrees the reactor shuts down"() { given: "that temperature readings are not within limits" TemperatureReadings prev = new TemperatureReadings(sensor1Data:20, sensor2Data:40,sensor3Data:80) TemperatureReadings current = new TemperatureReadings(sensor1Data:30, sensor2Data:10,sensor3Data:160); TemperatureReader reader = Stub(TemperatureReader) reader.getCurrentReadings() >>> [prev, current] ReactorControl control = Mock(ReactorControl) ImprovedTemperatureMonitor monitor = new ImprovedTemperatureMonitor(reader,control) when: "we ask the status of temperature control" monitor.readSensor() monitor.readSensor() then: "the alarm should sound and the reactor should shut down" 1 * control.shutdownReactor() 1 * control.activateAlarm()}
#A Creating a Stub for an interface
#A Creating of Mock for a concrete class
#B class under test is injected with mock and stub
#C mock methods are called behind the scenes
#D Verification of mock calls
The code is similar to listing 3.9, but this time the class under test is injected with two fake objects (a stub and a mock). The mock line is:
ReactorControl control = Mock(ReactorControl)
Here Spock automatically creates a dummy class that has the exact signature of the ReactorControl class. All methods by default do nothing (and thus there is no need to do anything special).
We let the class under test run its way, and at the end of the test, instead of testing Spock assertions, we examine the interactions of the mock we just created:
0 * control.shutdownReactor()1 * control.activateAlarm()
· The first line says "after this test is finished I expect that the number of times the shutdownReactor() method was called is zero".
· The second line says "after this test is finished I expect that the number of times the activateAlarm() method was called is one".
This is equivalent to the business requirements that dictate what would happen depending on different temperature variations.
Using both Mocks and Stubs you have seen how it is possible to write a full test for the temperature system without actually shutting down the reactor each time your unit test runs! The reactor scenario might be extreme, but in your programming career you may already have seen Java modules with side effects that are hard/impossible to test without the use of mocking. Common examples are:
· Charging a credit card
· Sending an bill to a client via email
· Printing a report
· Booking a flight with an external system
Basically any Java API that has severe side effects is a natural candidate for mocking. I have only scratched the surface on what is possible with Spock mocks. In chapter 6 you will see many more advanced examples that also demonstrate how you can capture the arguments of mocked calls and use them for further assertions, or even how a stub can respond differently according to the argument passed.
Mocking with Mockito
For comparison purposes I have included in the Github source code the same test with JUnit/Mockito if you want to compare it with listing 3.11 and draw your own conclusions. Mockito was one of the inspirations for Spock, and you might find some similarities in the syntax. Mockito is a great mocking framework and much thought has been spent on its API. It sometimes has a strange syntax in more complex examples (because it is still limited by Java conventions). Ultimately however, it is Java verbosity that determines the expressiveness of a unit test, regardless of Mockito capabilities.
For example, if you need to create a lot of mocks that return Java maps, you have to create them manually and add their elements one-by-one before instructing Mockito to use them. Within Spock tests you can create maps in single statements (even in the same line that stubbing happens). Also if you need a parameterized test with mocks (as I will show you in the next section) you have to combine at least three libraries (JUnit plus Mockito plus JUnitParams) to achieve the required result.
3.3.5 Combining mocks and stubs in parameterized tests
As a grand finale of this Spock tour I will show you how we can combine easily parameterized tests with mocking/stubbing in Spock. I will use again the temperature scenario introduced with listing 3.10. Remember the requirements of this system:
1. If the temperature difference is larger than 20 degrees (higher or lower) the alarm sounds.
2. If the temperature difference is larger than 50 degrees (higher or lower) the alarm sounds and the reactor shuts down automatically
We have four cases as far as temperature is concerned, and three temperature sensors. Therefore a full coverage of all cases requires at least twelve unit tests. Spock can combine parameterized tests with mocks/stubs as shown in listing 3.12
Listing 3.12 Mocking/Stubbing in a Spock parameterized test
def "Testing of all 3 sensors with temperatures that rize and fall"() { given: "various temperature readings" TemperatureReadings prev = #A new TemperatureReadings(sensor1Data:previousTemp[0], sensor2Data:previousTemp[1], sensor3Data:previousTemp[2]) TemperatureReadings current = #A new TemperatureReadings(sensor1Data:currentTemp[0], sensor2Data:currentTemp[1], sensor3Data:currentTemp[2]); TemperatureReader reader = Stub(TemperatureReader) #B reader.getCurrentReadings() >>> [prev, current] #C ReactorControl control = Mock(ReactorControl) #D ImprovedTemperatureMonitor monitor = new #E ImprovedTemperatureMonitor(reader,control) when: "we ask the status of temperature control" monitor.readSensor() #F monitor.readSensor() then: "the alarm should sound and the reactor should shut down if  . needed" shutDown * control.shutdownReactor() #G alarm * control.activateAlarm() #G where: "possible temperatures are:" previousTemp | currentTemp || alarm | shutDown #H [20, 30, 40]| [25, 15, 43.2] || 0 | 0 [20, 30, 40]| [13.3, 37.8, 39.2] || 0 | 0 [20, 30, 40]| [50, 15, 43.2] || 1 | 0 [20, 30, 40]| [-20, 15, 43.2] || 1 | 0 [20, 30, 40]| [100, 15, 43.2] || 1 | 1 [20, 30, 40]| [-80, 15, 43.2] || 1 | 1 [20, 30, 40]| [20, 55, 43.2] || 1 | 0 [20, 30, 40]| [20, 8 , 43.2] || 1 | 0 [20, 30, 40]| [21, 100, 43.2] || 1 | 1 [20, 30, 40]| [22, -40, 43.2] || 1 | 1 [20, 30, 40]| [20, 35, 76] || 1 | 0 [20, 30, 40]| [20, 31 ,13.2] || 1 | 0 [20, 30, 40]| [21, 33, 97] || 1 | 1 [20, 30, 40]| [22, 39, -22] || 1 | 1}
#A Input temperature with parameters
#B Creation of dummy interface
#C Instrumenting return value of interface
#D Mocking of concrete class
#E Class under test is injected with mock and stub
#F Class under test calls stub and mock behind the scenes
#G Verification of mock using parameters
#H all parameter variations and expected results
This code combines everything you’ve learned in this chapter. It showcases:
· the expressiveness of Spock tests (clear separation of test phases),
· the easy tabular format of parameters (matching business requirements), and
· the capability to fake both input and output of the class under test.
As an exercise, try replicating this functionality using Java and JUnit in fewer lines of code (i.e. statements). As I promised you in the beginning of the book, Spock is a cohesive testing framework that contains everything you need for your unit tests all wrapped under friendly and concise Groovy syntax.
3.4 Summary
· Spock tests have a clear structure with explicit given-when-then blocks.
· Spock test can be named with full English sentences.
· JUnit reporting tools are compatible with Spock tests.
· Spock tests allow for parameterized test with the where: block.
· Parameters in Spock tests can be written directly in a tabular format (complete with header).
· Unlike JUnit, Spock can have an unlimited number of parameterized tests in the same class.
· A Stub is a fake class that can be programmed with custom behavior.
· A Mock is a fake class that can be examined (after the test is finished) for its interactions with the class under test (which methods were called, what was the arguments etc.)
· Spock can Stub classes/interfaces and instrument them to return whatever you want.
· The triple-right-shift/unsigned shift (>>>) operator allows a stub to return different results each time it is called.
· Spock can Mock classes/interfaces and automatically records all invocations.
· Spock can verify the number of times a method of a mock was called
· It is very easy to combine Stubs, Mocks and multiple parameters in the same Spock test.
[20] This is only the heart of the system. Code for actually contacting the fire brigade or triggering the alarm is outside the scope of this example.
[21] Following the Test Driven Development (TDD) principles of writing a unit test for a feature before the feature implementation.
[22] This unit test is from the jedis library found on Github. I mean no disrespect to the authors of this code. I actually congratulate them for offering their code to the public. Also the rest of the tests from jedis are well-written.
[23] Because "everything that can go wrong, will go wrong" you can imagine that I have seen too-many anti-patterns of JUnit tests that happen because of the lack of a clear structure.
[24] See JBehave (http://jbehave.org/ ) or Cucumber JVM (http://cukes.info/ ) for how business analysts, testers and developers can define the test scenarios of an enterprise application.
[25] The system is imaginary. I am in no way an expert on nuclear reactors. The benefits of the example will become evident in the mocking/stubbing section of the chapter.
[26] A DSL is a programming language targeted at a specific problem as opposed to a general programming language like Java. See more at http://en.wikipedia.org/wiki/Domain-specific_language
[27] There are ways to overcome this limitation but I consider them hacks that make the situation even more complicated
[28] https://code.google.com/p/fuzztester/wiki/FuzzTester; https://code.google.com/p/junitparams/; https://github.com/piotrturski/zohhak
[29] There are many mock frameworks for Java, but Mockito is the easiest and most logical in my opinion. Some of its ideas have also found their way into Spock itself. See https://code.google.com/p/mockito/
[30] Do not sweat on naming rules. In my day job I name all these classes as mocks and get on with my life.
[31] The two hardest problems in computer science are naming things and cache invalidation..
[32] Notice that in this case I used constructor injection but setter injection could also work.
[33] http://docs.oracle.com/javase/tutorial/java/nutsandbolts/op3.html
All materials on the site are licensed Creative Commons Attribution-Sharealike 3.0 Unported CC BY-SA 3.0 & GNU Free Documentation License (GFDL)
If you are the copyright holder of any material contained on our site and intend to remove it, please contact our site administrator for approval.
© 2016-2026 All site design rights belong to S.Y.A.