Java Testing with Spock, Version 6 (2015)
PART 2: CORE TESTING WITH SPOCK
Chapter 4. Writing unit tests with Spock
In this chapter
· Overview of all Spock blocks
· Understanding the lifecycle of a test
· Improving readability of Spock tests
· Re-usable JUnit features
So far all the Spock tests you’ve seen were presented to you as a finished unit test, with no explanation on how I reached that particular code structure. You probably are eager now to create your own Spock tests from scratch. In this chapter you will see all the building blocks that compose a Spock test, and how they fit together (there are various combinations).
Then, I’ll show you the lifecycle of a Spock test and how you can interact with its various phases. Finally, I offer some tricks on how to handle lengthy Spock tests and make them more readable (a very common issue in large Enterprise projects).
4.1 Spock from the ground up
At the lowest level, a Spock test method is highly characterized by its individual blocks. The term is used for the code labels inside a test method. You have already seen the given-when-then blocks multiple times in the previous chapters as shown in listing 4.1.
Listing 4.1 Spock blocks inside a test method
def "Adding two and three results in 5"() { #A given: "the integers two and three" #B int a = 3 int b = 2 when: "they are added" #C int result = a + b then: "the result is five" #D result == 5}
#A Spock test method
#B The given: block and its description
#C The when: block and its description
#D The then: block and its description
Apart from the given-when-then blocks, Spock offers several other blocks that express different test semantics. The full list is shown in table 4.1
Table 4.1 Available Spock blocks
|
Spock block |
Description |
Expected usage |
|
given: |
Creates initial conditions |
85% |
|
setup: |
An alternative name for given: |
0% (I use given:) |
|
when: |
Triggers the action that will be tested |
99% |
|
then: |
Examines results of test |
99% |
|
and: |
Cleaner expression of other blocks |
60% |
|
expect: |
Simpler version of then: |
20% |
|
where: |
Parameterized tests |
40% |
|
cleanup: |
Releases resources |
5% |
The last column shows what percentage of your unit tests should contain each block. This number is not scientific, and it is based only on my personal experience. Depending on your application your numbers will be different, but you can get an overall indication of the importance of each block.
4.1.1 A simple test scenario
I hope you enjoyed the nuclear reactor example of the previous chapter. For this chapter we will get down to earth with a more common[34] system that needs testing. The Java system we will test is an electronic shop that sells computer products via a web site, which I guess is more familiar to you than the internals of a nuclear reactor. You can see an overview of the system in figure 4.1
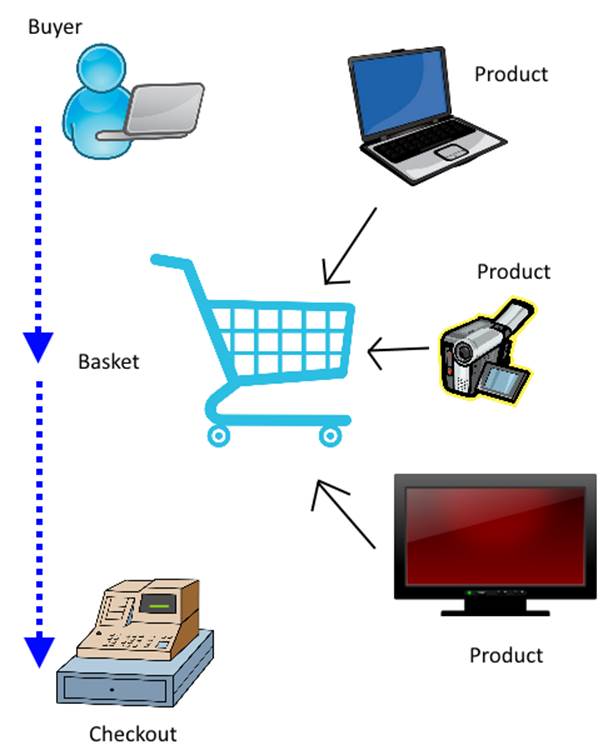
Figure 4.1 - Buying products in an electronic shop
I will show you most Spock blocks by testing the base scenario, where a user adds one or more products in an electronic baskets. The basket keeps the total weight (for shipping purposes) and price of all products selected by the user.
How to use the code listings
You can find almost all code listings for this book at https://github.com/kkapelon/java-testing-with-spock.
For brevity reasons, the book sometimes will point you to the source code (especially for long Java listings). I tend to use the Eclipse IDE in my day-to-day work. If you did not already install Spock and Eclipse in chapter 2, you can find installation instructions in Appendix A.
The class under test is the electronic basket. The collaborator class is the product as shown in listing 4.2
Listing 4.2 Java skeleton for an electronic basket
public class Product { #A private String name; private int price; private int weight; [...getters and setters here]} public class Basket { public void addProduct(Product product) #B { addProduct(product,1); } public void addProduct(Product product, int times) { [...code redacted for brevity] } public int getCurrentWeight() #C { [...code redacted for brevity] } public int getProductTypesCount() #D { [...code redacted for brevity] }}
#A All products sold are defined with this class
#B Triggered by the UI when the user selects a product
#C Needed for shipping calculations
#D Needed for sale analytics
Notice that this code is only used for illustration purposes. A production-ready eshop would be much different. Now let's see all Spock blocks that you can use in your unit tests!
4.1.2 The given: block
You have already seen the given: block multiple times in previous chapters of the book. The given: block should contain all initialization code that is needed in order to prepare your unit test. Listing 4.3 shows a unit test that deals with the weight of the basket once a product is selected by the user.
Listing 4.3 The given-when-then triad
def "A basket with one product has equal weight"() { given: "an empty basket and a TV" #A Product tv = new Product(name:"bravia",price:1200,weight:18) Basket basket = new Basket() when: "user wants to buy the TV" #B basket.addProduct(tv) then: "basket weight is equal to the TV" #C basket.currentWeight == tv.weight }
#A Prepare the unit test
#B Trigger the action that will be tested
#C Examine the results
The given: block sets up the scene for the test. Its function is to get everything ready just before the method(s) that will be tested is/are called. Sometimes it is very tempting to place this initialization code in the when: block instead, and skip completely the given: block. While it is possible to have Spock tests without a given: block, I consider this a bad practice[35] because it makes the test less readable.
Rewrite credit card billing example with a given: block
As a quick exercise, look at listing 1.8 from Chapter 1 (the example with credit card billing) and rewrite it correctly, by properly constructing a given: block.
Unfortunately, in large enterprise projects the code contained in the given: block can easily get out of hand. Complex tests require a lot of setup code, and you will find yourself a lot of times in front of a huge given: block that is hard to read and understand. We will see some techniques for managing that initialization code in a more manageable manner later in this chapter.
4.1.3 The setup: block
The setup: block is an alias for the given: block. It functions in exactly the same way. Listing 4.4 contains the same unit test for the basket weight.
Listing 4.4 Using the setup alias
def "A basket with one product has equal weight (alternative)"() { setup: "an empty basket and a TV" Product tv = new Product(name:"bravia",price:1200,weight:18) Basket basket = new Basket() when: "user wants to buy the TV" basket.addProduct(tv) then: "basket weight is equal to the TV" basket.currentWeight == tv.weight}
#A Prepare the unit test
#B Trigger the action that will be tested
#C Examine the results
Using setup: or given: is a semantic choice and makes absolutely no difference to the underlying code or how the Spock test will run. Choosing among setup: and given: for the initialization code is a pure personal preference.
I tend to use the given: block, because I believe that the sentence flow is better (given-when-then). Also the setup: block might be confusing with some of the lifecycle methods that you will see later in this chapter.
4.1.4 The when: block
The when: block is arguably the most important part of a Spock test. It contains the code that set things in motion by triggering actions in your class under test or its collaborators. Its code should be a short as possible, so that anybody can easily understand what is being tested. When I read an existing Spock test, I sometimes find myself focusing directly on the when: block, in order to understand the meaning of the test (bypassing completely thegiven: block).
The importance of the when: block
Every time you finish writing a Spock test, your first impulse should be to check the contents of the when: block. It should be as simple as possible. If you find that it contains too much code, or triggers too many actions you should consider refactoring its contents.
Put yourself in the shoes of the next developer who comes along and sees your Spock test. How long will it take to understand the actions performed by the when: block?
In listing 4.4 the when: block is a single statement, so it is dead easy to understand what is being tested. Even though the e-shop example is pretty basic, the same concept should apply to your when: blocks. The contents should be one "action." This action doesn't have to be a single statement, but it must capture a single concept on your unit test. To explain this idea better let's see a bad use of a when: block in listing 4.5
Listing 4.5 A non-trivial when: block - DO NOT DO THIS
def "Test index assign"() { setup: List<String> list = ["IDCODIGO", "descripcion", "field_1", "FAMILIA", "MARCA" ] ArticuloSunglassDescriptor.reset() when:#B Integer ix = 0 for (String tag in list) { for (ArticuloSunglassDescriptor descriptor in ArticuloSunglassDescriptor.values()) { if (descriptor.equals(tag)) { descriptor.index = ix break } } ix++ } then: ArticuloSunglassDescriptor.family.index == 3 }
#A when: block with no text description and unclear trigger code
The code comes from a Spock test I found in the wild[36]. How long does it take you to understand what this Spock test does? Is it easy to read the contents of the when: block?
What is the class under test here? Notice also that all three blocks (setup-when-then) have no text description (another practice that I find controversial). This makes understanding the test even harder.
We will see some techniques to refactor when: blocks later in this chapter. For now keep in mind that the code inside the when: block should be short and sweet as seen in listing 4.6
Listing 4.6 Descriptive when: blocks
def "A basket with two products weights as their sum"() { given: "an empty basket, a TV and a camera" Product tv = new Product(name:"bravia",price:1200,weight:18) Product camera = new Product(name:"panasonic",price:350,weight:2) Basket basket = new Basket() when: "user wants to buy the TV and the camera" #B basket.addProduct(tv) basket.addProduct(camera) then: "basket weight is equal to both camera and tv" basket.currentWeight == (tv.weight + camera.weight)}
#A when: block with text description and clear trigger code.
Even though the when: block is two statements here, they both express the same concept (adding a product to a basket). Understanding the when: block in this example is again very easy.
4.1.5 The then: block
The then: block is the last part of the given-when-then trinity. It contains one or more Groovy assertions (you have seen them in Chapter 2) to verify the correct behavior of you class under test. Again, you are not limited to a single statement, but all assertions should examine the same thing. If you have unrelated assertions that test different things, it means your Spock test should break up into smaller ones.
Note also that Spock has an automatic safeguard against Groovy asserts that are not really asserts (a very common mistake). Assume that I wrote my Spock test like this.
Listing 4.7 Invalid then: block
def "A basket with two products weights as their sum"() { given: "an empty basket, a TV and a camera" Product tv = new Product(name:"bravia",price:1200,weight:18) Product camera = new Product(name:"panasonic",price:350,weight:2) Basket basket = new Basket() when: "user wants to buy the TV and the camera" #B basket.addProduct(tv) basket.addProduct(camera) then: "basket weight is equal to both camera and tv" basket.currentWeight = (tv.weight + camera.weight) #A}
#A Mistake! It should be == instead of =
Running this test will print the following:
>mvn test> BasketWeightSpec.groovy: 45: Expected a condition, but found an assignment. Did you intend to write '==' ? @ line 45, column 3.[ERROR] basket.currentWeight = (tv.weight + camera.weight)
This is a nice touch of Spock, and although it is not bulletproof, it provides effective feedback when you start writing your first Spock tests.
4.1.6 The and: block
The and: block is a strange one indeed. It might seem like syntactic sugar at first sight because it has no meaning on its own and just extends other blocks, but it is important as far as semantics are concerned. It allows you to split all other Spock blocks into distinctive parts as shown in listing 4.8 making the code more understandable:
Listing 4.8 - Using and: to split the given: block
def "A basket with three products weights as their sum"() { given: "an empty basket" #A Basket basket = new Basket() and: "several products" #B Product tv = new Product(name:"bravia",price:1200,weight:18) Product camera = new Product(name:"panasonic",price:350,weight:2) Product hifi = new Product(name:"jvc",price:600,weight:5) when: "user wants to buy the TV and the camera and the hifi" basket.addProduct tv basket.addProduct camera basket.addProduct hifi then: "basket weight is equal to all product weight" basket.currentWeight == (tv.weight + camera.weight + hifi.weight)}
#A given: block deals only with the class under test
#B and: block creates the collaborators.
Here I have used the and: block to distinguish between the class under test (the Basket class) and the collaborators (the products). In larger Spock tests this is very helpful because as I said already the initialization code can quickly grow in size in a large enterprise application.
It is also possible to split the when: block as seen in listing 4.9
Listing 4.9 Using and: to split the when: block
def "A basket with three products weights as their sum (alternate)"() { given: "an empty basket, a TV,a camera and a hifi" Basket basket = new Basket() Product tv = new Product(name:"bravia",price:1200,weight:18) Product camera = new Product(name:"panasonic",price:350,weight:2) Product hifi = new Product(name:"jvc",price:600,weight:5) when: "user wants to buy the TV.." #A basket.addProduct tv and: "..the camera.." #B basket.addProduct camera and: "..and the wifi" #B basket.addProduct hifi then: "basket weight is equal to all product weight" basket.currentWeight == (tv.weight + camera.weight + hifi.weight)}
#A original when: block
#B extension of when: block
The example might be trivial, but it also showcases the fact that you can have more than one and: block. It is up to you to decide how many you need. In the case of the when: block, always keep in mind the rule outlined in the previous section. If your and: blocks that come after when: performs unrelated triggers, it means you need to simplify the when: block.
The most controversial usage of the and: block is when it comes after a then: block as seen in listing 4.10
Listing 4.10 Using and: as an extension to a then: block
def "A basket with three products has correct weight and count  . (controversial)"() { given: "an empty basket, a TV,a camera and a hifi" Basket basket = new Basket() Product tv = new Product(name:"bravia",price:1200,weight:18) Product camera = new Product(name:"panasonic",price:350,weight:2) Product hifi = new Product(name:"jvc",price:600,weight:5) when: "user wants to buy the TV and the camera and the hifi" basket.addProduct tv basket.addProduct camera basket.addProduct hifi then: "the basket weight is equal to all product weights" #A basket.currentWeight == (tv.weight + camera.weight + hifi.weight) and: "it contains 3 products" #B basket.productTypesCount == 3}
#A original then: block
#B extension of then: block
In this example I use the and: block to additionally verify the number of products inside the basket. Whether this check is related to the weight of the basket is under discussion. Obviously if the number of products inside the basket is wrong, then its weight will be wrong as well; therefore, one could say that they should be tested together.
Another approach would be to decide that basket weight and number of products are two separate things that need their own respective tests. There is no hard rule on what is correct and what is wrong here. It is up to you to decide when to use an and: block after a then: block. Keep in mind the golden rule of unit tests that they should check one thing[37]. My advice to you is to avoid using and: blocks after then: blocks, unless you are really sure on the meaning of the Spock test. The and: blocks are very easy to abuse if you are not careful.
4.1.7 The expect: block
The expect: block is a jack-of-all-trades in Spock tests. It can be used in many different semantic ways, and depending on this situation it might improve or worsen the expressiveness of a Spock test.
At its most basic role, the expect: block combines the meaning of given-when-then. It can contain assertions like the then: block and will fail the Spock test if any of them do not pass. It can be used for really simple tests that need no initialization code and their trigger can be tested right away as shown in listing 4.11.
Listing 4.11 Trivial tests with the expect: block
def "An empty basket has no weight"() { expect: "zero weight when nothing is added" #A new Basket().currentWeight == 0}
#A only expect: block is present
More realistically the expect: block should replace only the when-then blocks. This is my preferred usage of expect: block as seen in listing 4.12.
Listing 4.12 Expect block replaces when: and then:
def "An empty basket has no weight (alternative)"() { given: "an empty basket" Basket basket = new Basket() expect: "that the weight is 0" #A basket.currentWeight == 0}
#A expect: block performs the assertion of the test.
The fact that the expect: block accepts Groovy assertions means it can be used in other creative ways that distinguish it from the then: block that typically ends a Spock test. Listing 4.13 shows a given-expect-when-then test (as seen in the excellent presentation "Idiomatic Spock[38] found at https://github.com/robfletcher/idiomatic-spock)
Listing 4.13 Using expect: for pre-conditions
def "A basket with two products weights as their sum (precondition)"() { given: "an empty basket, a TV and a camera" Product tv = new Product(name:"bravia",price:1200,weight:18) Product camera = new Product(name:"panasonic",price:350,weight:2) Basket basket = new Basket() expect:"that nothing should be inside" #A basket.currentWeight == 0 basket.productTypesCount == 0 when: "user wants to buy the TV and the camera" basket.addProduct tv basket.addProduct camera then: "basket weight is equal to both camera and tv" #B basket.currentWeight == (tv.weight + camera.weight)}
#A expect: block performs intermediate assertions
#B then: block examines the final result
In this example I use the expect: block to verify the initial state of the basket before adding any product. This way the test fails faster if there is a problem with the basket.
4.1.8 The cleanup: block
The cleanup block should be seen as the "finally" code segment of a Spock test. The code it contains will run always at the end of the Spock test regardless of the result (i.e. even if the test fails). An example is shown in listing 4.14
Listing 4.14 Using cleanup: to release resources even if test fails
def "A basket with one product has equal weight"() { given: "an empty basket and a TV" Product tv = new Product(name:"bravia",price:1200,weight:18) Basket basket = new Basket() when: "user wants to buy the TV" basket.addProduct(tv) then: "basket weight is equal to the TV" basket.currentWeight == tv.weight cleanup: "refresh basket resources" #A basket.clearAllProducts() #B}
#A cleanup: block will run always even if then: fails
#B then: block examines the final result
Assume for a moment that the implementation of the basket also keeps temporary files for the current contents for reliability purposes (or sends analytics to another class, you get the idea). The basket comes with aclearAllProducts() method that empties the basket and also releases the resources (i.e. deletes temporary files) it holds. By placing this method in the cleanup: block I make sure that this method runs always, even if the code stops at the then: block because of failure.
The cleanup block concludes all possible Spock blocks. Continuing with the bottom up approach, let's see where these blocks go in your source code.
The where: block will be shown in Chapter 5
If you have been paying close attention you must have noticed that I haven't said anything about the where: block. The where: block is used exclusively for parameterized tests. There are so many things to discuss on parameterized Spock testing that they have their own chapter. Chapter 5 will deal with parameterized tests and the possible forms of the where: block so keep reading to get the full picture on all Spock blocks.
4.2 Converting requirements to Spock tests
Spock blocks embody the low level mechanics of unit tests. You should also pay equal attention to the methods and classes that contain them. In large enterprise projects, organization and naming of unit tests play a crucial role to easy maintenance and effortless refactoring.
Spock also offers several metadata that you can use to annotate your tests for extra clarity. The advantage they have over normal Java comments is that they can be extracted by reporting tools.
4.2.1 The feature tested
The unique characteristic of Spock test methods is the fact that you can name them using full English sentences. This is a huge advantage for Spock tests, because it makes reading tests so much easier (even by non technical colleagues)
I have used this technique since the first chapter and I consider it a groundbreaking feature of Spock compared to the status quo.
Listing 4.15 test method describes exactly what is being tested.
def "A basket with one product has equal weight"() { #A given: "an empty basket and a TV" Product tv = new Product(name:"bravia",price:1200,weight:18) Basket basket = new Basket() when: "user wants to buy the TV" basket.addProduct(tv) then: "basket weight is equal to the TV" basket.currentWeight == tv.weight}
#A full English text
It’s your job to make sure that this text is understandable (even out of context). Ideally, it should match the specifications given by business analysts. If you don't have detailed specifications (and you should), then the naming of the method should describe what is being tested in a non-technical way.
The names of Spock methods will appear in test results and coverage reports, so always assume that somebody will read this text without having direct access to the code of the implementation.
4.2.2 The class under test
In most unit tests, initialization code is preparing multiple classes and input data. The class that will be tested and evaluated has more importance than its collaborators, which are the classes that communicate with it, but not under test (either because they have their own tests or because they are assumed to be correct).
In order to distinguish this special class Spock offers a @Subject annotation, as shown is listing 4.16. In this example the class under test is the Basket class.
Listing 4.16 Marking the class under test
def "A basket with two products weights as their sum (better)"() { given: "an empty basket" @Subject #A Basket basket = new Basket() #A and: "several products" Product tv = new Product(name:"bravia",price:1200,weight:18) Product camera = new Product(name:"panasonic",price:350,weight:2) when: "user wants to buy the TV and the camera and the hifi" basket.addProduct tv basket.addProduct camera then: "basket weight is equal to all product weight" basket.currentWeight == (tv.weight + camera.weight)}
#A The subject of this test is the basket class
In this simple example it might be easy to understand that the basket class is the one being tested (especially by looking at the when: and then: blocks), but in larger unit tests the class under test might not be obvious.
At the time of writing, there is not yet a reporting tool that takes into account the @Subject annotation, but you should use it anyway for readability by other programmers. In current reporting tools you cannot see which is the class under test and you are forced to look at the source code to identify it. Hopefully this limitation will be amended soon by newer versions of test reporting tools.
4.2.3 The Specification
You now have multiple test methods (features in Spock terminology) and you want to group them in a Groovy class. In Spock terminology this is a Specification as seen in listing 4.17
Listing 4.17 Writing a Spock specification
@Title("Unit test for basket weight") #Aclass BasketWeightSpec extends spock.lang.Specification{ #B [...test methods here redacted for brevity...]}
#A Description in full English sentence
#B Groovy class extends Specification
The class that contains all the test methods is a Groovy class that must extend spock.lang.Specification. This makes it a Spock test. The name of the class can be anything, but it’s good practice to end the name in "Spec" (e.g. BasketWeightSpec). You can actually pick any ending you want as long as it is the same on all your Spock tests, because it makes is easier for the build system (i.e. Maven) to detect Spock tests.
For technical reasons Spock cannot allow you to name the class with full English text like the test methods. To remedy this limitation it instead offers a @Title annotation that you can use to give a human readable explanation of what features comprise this specification.
Naming .groovy files using the expected Java convention
Unlike Java, Groovy does not require the name of the class and the name of the file on the disk to be the same. It is possible to place the BasketWeightSpec class in a file called MyBasketWeightUnitTest.groovy if that is what you want. For simplicity purposes I still urge you to keep the Java convention because it makes navigating Spock tests much easier. Therefore the BasketWeightSpec class should be placed in a file named BasketWeightedSpec.groovy
As an extra bonus, Spock also offers a @Narrative annotation that can provide even more text that describes what the text does as shown in listing 4.18.
Listing 4.18 Writing a full Spock specification
@Narrative(""" A empty basket start with no #Aweight. Adding products to the basket #Bincreases its weight. The weight is #Bthen used for billing during shipping calculations. #BElectronic goods have always 0 zero weight. #B""") #B@Title("Unit test for basket weight") #C@Subject(Basket) #Dclass BasketWeightDetailedSpec extends spock.lang.Specification{ [...test methods here redacted for brevity...]}
#A Longer description of unit test
#B Groovy multi-line string
#C Single line description of test
#D Information on the class under test for all test methods
Here I used a Groovy multiline string that allows me to insert as many lines of text I want (a feature your business analysts might love). In Groovy multi-line Strings need triple quotes.
Listing 4.16 also shows the application of the @Subject annotation on the whole class. If you find that all your test methods focus on the same class (which is the usual case) you can apply the @Subject annotation on the top of the Spock test instead of placing it multiple times in the test methods. The class under test is then used as an argument (no need to add the .class extension).
Notice that for brevity reasons I omit the @Title and @Narrative annotations (and most times @Subject as well) in the examples of this book. You should always attempt to include them in your own Spock tests. I tend to look at@Title and @Subject as a compulsory requirement for a Spock test. @Narrative is good to have, but not really essential for all kinds of tests.
4.2.4 Visual overview of a Spock test
Because I started explaining Spock elements using a bottom-up approach, now that we have reached the top let's revise all parts of a Spock test as shown in figure 4.2
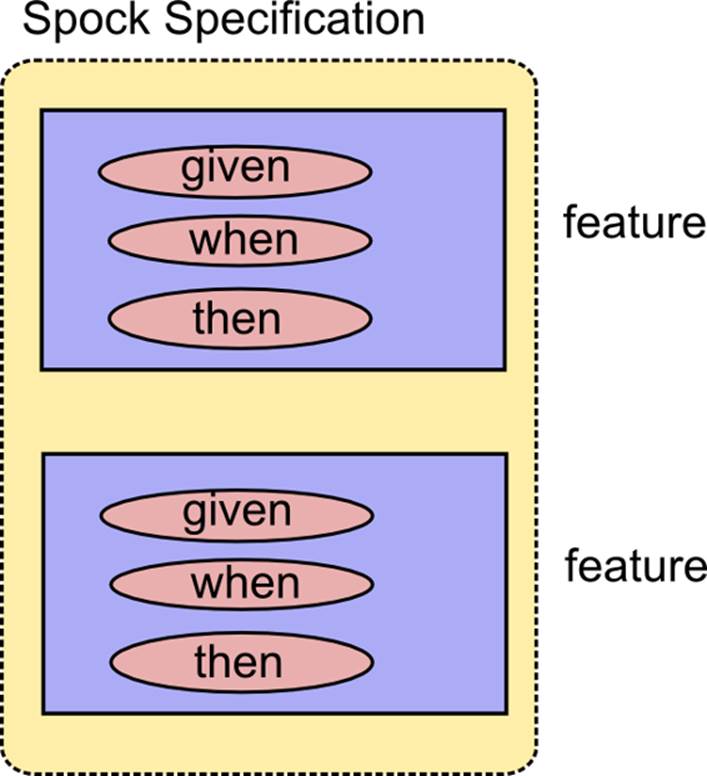
Figure 4.2 Blocks inside features (test methods) inside Specification (Groovy class)
A Spock test is a Groovy class that extends spock.lang.Specification. It should be marked with the @Title annotation to explain its purpose.
The Spock test contains one or more test methods (features in Spock terminology) that examine various aspects of the class under test. Test methods can be named directly with full English sentences. The class under test should be marked with the @Subject annotation either in each test method individually or in the top of the Specification.
Finally, each Spock feature (i.e. test method) is characterized by the Spock blocks it contains. The most basic structure is the given-when-then blocks that prepare the test, trigger the tested action and examine the results.
This diagram is very useful for our next topic: the lifecycle of a Spock specification.
4.3 Lifecycle of a Spock test
When you create a unit test to examine the behavior of a specific class, you will find yourself writing the same code over and over again in the given: block. This makes sense because several test methods either have the same initial state and only a different trigger (the when: block). Instead of copying and pasting this behavior (and thus violating the DRY[39] principle) Spock offers you several facilities to extract common preconditions and post-conditions of tests in their own methods.
4.3.1 Setup and cleanup of a feature
In the Spock test that examines our imaginary electronic basket I’ve duplicated multiple times the code that creates products. This code can be extracted as shown in listing 4.19.
Listing 4.19 Extracting common initialization code
class CommonSetupSpec extends spock.lang.Specification{ Product tv #A Product camera #A def setup() { #B tv = new Product(name:"bravia",price:1200,weight:18)#C camera = new Product(name:"panasonic",price:350,weight:2) } def "A basket with one product weights as that product"() { #D [...code redacted for brevity purposes...] } def "A basket with two products weights as their sum"() {#D [...code redacted for brevity purposes...] }}
#A Common classes are placed as fields
#B This method will run automatically before each test method
#C Initialization code is written once
#D Test methods that run after initialization code
Spock will detect a special method called setup(), and will run it automatically before each test method. In a similar manner Spock offers a cleanup() method that will run after each test method finishes. A full example is shown in listing 4.20.
Listing 4.20 Extracting common pre/post conditions
@Subject(Basket)class CommonCleanupSpec extends spock.lang.Specification{ Product tv #A Product camera #A Basket basket #A def setup() { #B tv = new Product(name:"bravia",price:1200,weight:18) camera = new Product(name:"panasonic",price:350,weight:2) basket = new Basket() } def "A basket with one product weights as that product"() { when: "user wants to buy the TV" basket.addProduct tv then: "basket weight is equal to all product weight" basket.currentWeight == tv.weight } def "A basket with two products weights as their sum"() { when: "user wants to buy the TV and the camera" basket.addProduct tv basket.addProduct camera then: "basket weight is equal to all product weight" basket.currentWeight == (tv.weight + camera.weight) } def cleanup() #C { basket.clearAllProducts() }}
#A Common classes are placed as fields
#B This method will run automatically before each test method
#C This method will run automatically after each test method
As with the cleanup: block, the cleanup() method will always run regardless of the result of the test. The cleanup() method will even run if an exception is thrown in a test method.
4.3.2 Setup and cleanup of a specification
The code you place inside the setup() and cleanup() methods will run once for each test method. If for example your Spock tests contains seven test methods, then the setup/cleanup code will run seven times as well. This is a good thing because it makes each test method independent. You can run only a subset of test methods knowing they will be correctly initialized and cleaned afterwards.
But sometimes you wish for the ability to have initialization code that runs truly once before any test method. This is the usual case when you have expensive objects that will slow down the test if they run multiple times. A typical case is a database connection that you use for integration tests, but any long-lived expensive object is a good candidate for running only once.
Spock supports this case as well as shown in listing 4.21.
Listing 4.21 All Spock lifecycle methods
class LifecycleSpec extends spock.lang.Specification{ def setupSpec() { #A println "Will run only once" } def setup() { #B println "Will run before EACH feature" } def "first feature being tested"() { #C expect: "trivial test" println "first feature runs" 2 == 1 +1 } def "second feature being tested"() { #C expect: "trivial test" println "second feature runs" 5 == 3 +2 } def cleanup() { #D println "Will run once after EACH feature" } def cleanupSpec() { #E println "Will run once at the end" } }
#A Initialization for expensive objects
#B Common code for all tests
#C Test methods
#D Common cleanup code for all tests
#E Finalization of expensive objects
If you run this unit test it will print the following:
Will run only onceWill run before EACH featurefirst feature runsWill run once after EACH featureWill run before EACH featuresecond feature runsWill run once after EACH featureWill run once at the end
Compatibility with JUnit lifecycle methods
If you are familiar with Junit, you’ll notice that the Spock lifecyle methods work exactly like the annotations @Before, @After, @BeforeClass and @AfterClass. Spock in fact honors these annotations as well, if for some reason you want to continue to use them.
Because setupSpec() and cleanupSpec() are destined to hold only long-lived objects that span all the test methods, Spock allows access in these methods only to static fields (not really recommended) and objects marked as@Shared, as we will see in the next section.
4.3.3 Long-lived objects with the @Shared annotation
You can indicate to Spock which objects you want to survive across all test methods by using the @Shared annotation. As an example assume that I augment my electronic basket with a credit card processor:
public class CreditCardProcessor { public void newDayStarted() { [...code redacted for brevity..] } public void charge(int price) { [...code redacted for brevity..] } public int getCurrentRevenue() { [...code redacted for brevity..] } public void shutDown() { [...code redacted for brevity..] }}
CreditCardProcessor is an expensive object. It connects to a bank backend and allows my basket to charge credit cards. Even though the bank has provided me with dummy credit card numbers for testing purposes, the initialization of the connection is very slow. It would be unrealistic to have each test method connect to the bank again. Listing 4.22 shows the solution to this problem.
Listing 4.22 Using the @Shared annotation
class SharedSpec extends spock.lang.Specification{ @Shared #A CreditCardProcessor creditCardProcessor; #A BillableBasket basket #B def setupSpec() { creditCardProcessor = new CreditCardProcessor() #C } def setup() { basket = new BillableBasket() #D creditCardProcessor.newDayStarted() E# basket.setCreditCardProcessor(creditCardProcessor) } def "user buys a single product"() { given: "an empty basket and a TV" Product tv = new Product(name:"bravia",price:1200,weight:18) and: "user wants to buy the TV" basket.addProduct(tv) when: "user checks out" basket.checkout() then: "revenue is the same as the price of TV" creditCardProcessor.currentRevenue == tv.price } def "user buys two products"() { given: "an empty basket and a camera" Product camera = new Product(name:"panasonic",price:350,weight:2) and: "user wants to two cameras" basket.addProduct(camera,2) when: "user checks out" basket.checkout() then: "revenue is the same as the price of both products" creditCardProcessor.currentRevenue == 2 * camera.price } def cleanup() { basket.clearAllProducts() #F } def cleanupSpec() { creditCardProcessor.shutDown() #G } }
#A Will be created only once
#B Will be created multiple times
#C Expensive/Slow initialization
#D Fast/Cheap initialization
#E Shared object can be used normally
#F Will run multiple times
#G Will run only once
Here I mark the expensive credit card processor with the @Shared annotation. This makes sure that Spock creates it only once. On the other hand the electronic basket itself is lightweight, and therefore it is created multiple times (one for each test method.) Notice also that the credit card processor is closed down once at the end of the test.
4.3.4 Using the old() method
The old() method of Spock is cool trick that I have yet to find a real example that makes it worthwhile. I mention it here for completeness purposes, and because if you don't know how it works you might think it breaks the Spock lifecycle principles. Basically, you use it when you want your test to capture the difference with the previous state instead of the absolute value, as shown in listing 4.23.
Listing 4.23 Asserting with the old() method
def "Adding a second product to the basket increases its weight"() { given: "an empty basket" Basket basket = new Basket() and: "a tv is already added to the basket" Product tv = new Product(name:"bravia",price:1200,weight:18) basket.addProduct(tv) #A when: "user gets a camera too" Product camera = new Product(name:"panasonic",price:350,weight:2) basket.addProduct(camera) #B then: "basket weight is updated accordingly" basket.currentWeight == old(basket.currentWeight) + camera.weight #C}
#A Product is added in given: block
#B second product is added in when: block
#C Checking the difference in weight
Here I have a unit test that checks the weight of the basket once a second product is added. I could check for absolute values in the then: block (i.e. assert that the basket weight is the sum of two products), but instead I use the old() method and say to Spock "I expect the weight to be the same as before the when: block plus the weight of the camera".
The difference in expression is subtle and if you find the old() method confusing, there is no need to use it at all.
4.4 Writing readable Spock tests
Despite all the cool facilities offered by Groovy, your ultimate target when writing Spock tests should be readability. Especially in large enterprise applications, the ease of refactoring is greatly affected by the quality of existing unit tests. Because unit tests also act as a live specification of the system, understanding Spock tests is crucial in cases where one has to read a unit test to deduce the expected behavior of the code.
Knowing the basic techniques (e.g. the Spock blocks) is only the first step to writing concise and understandable unit tests. The second step is to use the basic techniques effectively, avoiding the temptation of "sprinkling" unit test code with Groovy tricks that add no real purpose to the test other than showing off[40].
4.4.1 Structuring Spock tests
You saw all the Spock blocks in the beginning of the chapter. The given-when-then cycle should be your mantra when you start writing your first Spock unit tests. You might quickly discover that Spock does not have many restrictions in regard to the number and sequence of blocks inside a test method. But just because you can mix and match Spock blocks does not mean that you should do it.
As an example, it is possible to have multiple when-then blocks in a single test method as shown in listing 4.24.
Listing 4.24 Multiple when-then blocks
def "Adding products to a basket increases its weight"() { given: "an empty basket" Basket basket = new Basket() and: "a two products" Product tv = new Product(name:"bravia",price:1200,weight:18) Product camera = new Product(name:"panasonic",price:350,weight:2) when: "user gets the camera" #A basket.addProduct(camera) then: "basket weight is updated accordingly" #A basket.currentWeight == camera.weight when: "user gets the tv too" #B basket.addProduct(tv) then: "basket weight is updated accordingly" #B basket.currentWeight == camera.weight + tv.weight}
#A First pair of when-then
#B Second pair of when-then will be executed in sequence
This pattern must be used with care. It can be used correctly as a way to test a sequence of events (as I have demonstrated in listing 4.21 above). If used incorrectly it might also mean that you test is actually testing two things and should be broken.
Use common sense when you structure Spock tests. If you find that writing descriptions next to Spock blocks, is becoming harder and harder, it might mean that your test is doing complex things.
4.4.2 Self-documenting Specifications
I’ve already shown you the @Subject and @Title annotations and explained that the only reason they are not included in all examples of the book is to save space in the listings.
What I’ve always included however is the descriptions that follow each Spock block. Even though in Spock these are optional, and a unit test will run without them, you should consider them essential yourself and always include them in your unit tests. Take a look and at listing 4.25 for a real world anti-pattern of this technique.
Listing 4.25 Missing block descriptions - DO NOT DO THIS
def "Test toRegExp(Productos3.txt)" () { #A setup: #B String filePattern = 'PROD{MES}{DIA}_11.TXT' String regexp = FileFilterUtil.toRegExpLowerCase( filePattern ) Pattern pattern = Pattern.compile(regexp) expect: #B StringUtils.trimToEmpty(filename).toLowerCase().matches(pattern) == match where: #B filename << ['PROD.05-12.11.TXT', 'prod.03-21.11.txt', 'PROD051211.TXT', 'prod0512_11.txt' ] match << [false, false, false, true ]}
#A Unclear test method name
#B blocks without descriptions
This test lacks any kind of human readable text. It’s impossible to understand what this test does without reading the actual code. It is also impossible to read it if you are a non-technical person. In this particular example it is a pity that the name of the test method is not a plain English sentence (a feature offered natively by Spock). One could improve this test by changing the block labels as follows:
setup: "given a naming pattern for product files"expect: "that the file name matches regardless of spaces and capitalization"where: "some possible file names are"
Always include in your Spock tests at least the block descriptions and make sure that the test method name is human readable.
4.4.3 Modifying failure output
Readability should not be constrained in reading successful unit tests. Even more important is the readability of failed tests. In a large application with legacy code and a whole suit of existing unit tests, a single change can break unit tests that you didn't even know about their existence.
I have already explained how Groovy asserts work in Chapter 2 and how Spock gives you much more information when a test fails. Although Spock will automatically analyze simple types and collections, you have to provide some more hints when you assert your own classes. As an example in listing 4.26 I add twice one of the products in the basket.
Listing 4.26 Adding a product twice in the basket
def "Adding products to a basket increases its weight"() { given: "an empty basket" ProblematicBasket basket = new ProblematicBasket() and: "two different products" Product laptop = new Product(name:"toshiba",price:1200,weight:5) Product camera = new Product(name:"panasonic",price:350,weight:2) when: "user gets a laptop and two cameras" basket.addProduct(camera,2) #A basket.addProduct(laptop) then: "basket weight is updated accordingly" basket.currentWeight == (2 * camera.weight) + laptop.weight #B}
#A Two cameras are inserted
#B Checks the weight of three products
I have introduced a bug in the basket class. When the test fails you get the following:
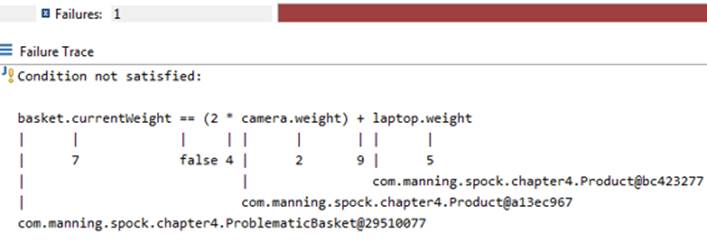
Figure 4.2 - Failed Spock test with custom class
Because Basket, is a class unknown to Spock, it cannot give you detailed information about what went wrong. According to this result, the total weight of the basket is now 7kg, even though all products weigh 9kg. To debug this unit test you would have to run it in a debugger and find the source of the mistake in the basket class.
To help Spock do its magic, you can override the toString() method in your own objects, because this is what Spock runs on failed tests. In listing 4.27 I have exposed the internal implementation of the Basket in thetoString() method.
Listing 4.27 Helping failure rendering in the toString() method
public class ProblematicBasket { protected Map<Product,Integer> contents = new HashMap<>(); #A [... rest of code is redacted for brevity purposes...] @Override public String toString() #B { StringBuilder builder = new StringBuilder("[ "); for (Entry<Product, Integer> entry:contents.entrySet()) { builder.append(entry.getValue()); #C builder.append(" x "); builder.append(entry.getKey().getName()); #D builder.append(", "); } builder.setLength(builder.length()-2); return builder.append(" ]").toString(); } }
#A key is product, value is how many times is in the basket
#B Custom implementation of toString()
#C prints number of times each product is in the basket
#D prints product name
Now when the test fails I get the following:
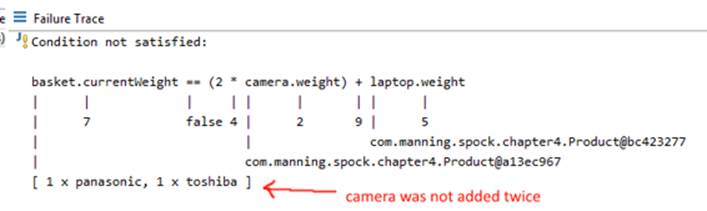
Figure 4.3 Spock failed test with custom toString() method
Seeing this result makes it much easier to understand what has gone wrong. Just by looking at the test result I see that even though I added two cameras in the basket, it kept only one. The bug I inserted is exactly at this place (it always adds one product on the basket regardless of what the user said).
This kind of detail is a lifesaver when multiple tests break and it is hard to understand if the test needs fixing or if the production code you changed, is against specifications. In a large enterprise application a single code change can break easily hundreds of existing unit tests. It is critical to understand which tests broke because your change is wrong and which tests broke because they are based in old business needs that are made obsolete by your change. In the former case you must revise your code change (so that tests pass) while in the latter case you really need to update the failing unit tests themselves so that they express the new requirement.
The beauty of this Spock feature is that the toString() is usually already implemented in domain objects for easy logging and reporting. You may be lucky to get this functionality for free without any changes in your Java code.
After you finish writing a Spock test, check to see if you need to implement custom toString() methods for the classes that are used in the final assertions.
4.4.4 Using Hamcrest matchers
Hamcrest matchers[41] are a third-party library commonly used in JUnit assert statements. They offer a pseudo-language that allows for expressiveness in what is being evaluated. You might have seen them already in JUnit tests.
Spock support Hamcrest matchers natively as shown in listing 4.28
Listing 4.28 Spock support for Hamcrest matchers
def "trivial test with Hamcrest"() { given: "a list of products" List<String> products= ["camera", "laptop","hifi"] #A expect: "camera should be one of them" products hasItem("camera") #B and: "hotdog is not one of them" products not(hasItem("hotdog")) #C}
#A Creation of a list
#B Checks that any item of the list is "camera"
#C chaining of two hamcrest matchers.
Here I have used the hasItem() matcher that accepts a list and returns true if any of the elements match the argument. Normally in Java, that check would require a loop, so this matcher is more brief and concise.
One of the important features of Hamcrest matchers is that they can be chained together to create more complicated expressions. In listing 4.27 I have also used the not() matcher, which takes an existing matcher and reverses its meaning. You can find more information about other Hamcrest matchers (and how to create your own) in the official webpage at http://hamcrest.org/.
Spock also supports an alternative syntax for Hamcrest matchers that makes the flow of reading a specification more natural as shown in listing 4.29.
Listing 4.29 Alternative Spock support for Hamcrest matchers
def "trivial test with Hamcrest (alt)"() { given: "an empty list" List<String> products= new ArrayList<String>() when: "it is filled with products" products.add("laptop") products.add("camera") products.add("hifi") then: "camera should be one of them" expect(products, hasItem("camera")) #A and: "hotdog is not one of them" that(products, not(hasItem("hotdog"))) #B}
#A expect() is useful for then: blocks
#B that() is useful for and: and expect: Spock block
The test is exactly the same as listing 4.27, but reads better because the matcher lines are coupled with the Spock blocks. The assertions are close to human text: "expect products has item (named) camera, and that products (does) not have item (named) hotdog." The expect() and that() methods are Spock syntactic sugar and have no effect on how the test runs.
Compatibility with JUnit
As you have seen, Spock allows you to reuse several existing JUnit facilities. I have already mentioned that JUnit lifecycle annotations (@Before, @After etc) are recognized by Spock. Now you have seen that integration with Hamcrest matchers is also supported. Spock even supports JUnit Rules out of the box. The transition to Spock is very easy because it does not force you to discard your existing knowledge. If your team has invested heavily in custom matchers or rules you can use them in your Spock tests too.
Even though Hamcrest matchers have their uses and they can be powerful if you create your own for your domain classes, most times that they can be replaced with Groovy code and more specifically with Groovy closures. Listing 4.30 shows the same trivial example without Hamcrest matchers.
Listing 4.30 Using Groovy closures in Spock assertions
def "trivial test with Groovy closure"() { given: "a list of products" List<String> products= ["camera", "laptop", "hifi"] expect: "camera should be one of them" products.any{ productName -> productName == "camera"} #A and: "hotdog is not one of them" products.every{ productName -> productName != "hotdog"} #B}
#A iterates over list and passes if any is named camera
#B iterates over list and checks all names of products
I consider Groovy closures more powerful, because they can be created on the spot for each unit test to match exactly what it being tested. But if you have existing Hamcrest matchers from your JUnit tests, it is very easy to use them in Spock tests as shown in listing 4.27 and 4.28.
4.4.5 Further grouping of test code
I mentioned at the beginning of the chapter that one of the first problems you encounter in large Enterprise projects is the length of unit tests. With Spock blocks you already have a basic structure in place, because the setup-trigger-evaluate cycles are clearly marked. Even then, you will find several times that your then: and given: blocks contain too many things making the test difficult to read.
To better illustrate this problem I will add in our running example a class that represents the warehouse of the eshop as shown in listing 4.31.
Listing 4.31 An imaginary warehouse
public class WarehouseInventory { public void preload(Product product, int times){ #A [...code redacted for brevity...] } public void subtract(String productName, Integer times){ #B [...code redacted for brevity...] } public int availableOfProduct(String productName){ #C [...code redacted for brevity...] } public boolean isEmpty(){ #D [...code redacted for brevity...] } public int getBoxesMovedToday(){ #E [...code redacted for brevity...] }}
#A Loads the warehouse
#B Called by the basket during checkout
#C Provides inventory status
#D return true if no products exists
#E keeps track of sales
I also will augment the electronic basket with more (imaginary) methods that define its behavior as shown in listing 4.32.
Listing 4.32 An enterprisy basket
public class EnterprisyBasket extends Basket{ public void enableAutoRefresh(){ #A [...code redacted for brevity...] } public void setNumberOfCaches(int number){ #A [...code redacted for brevity...] } public void setCustomerResolver(DefaultCustomerResolver defaultCustomerResolver){ #B [...code redacted for brevity...] } public void setWarehouseInventory(WarehouseInventory warehouseInventory){ #B [...code redacted for brevity...] } public void setLanguage(String language){ #A [...code redacted for brevity...] } public void checkout() { #C [...code redacted for brevity...] } }
#A Classic enterprise code
#B Setter Injection methods
#C removes products from inventory
Now assume that I want to write a unit test for the warehouse to verify that it works correctly when a customer checks out. The Spock test is shown in listing 4.33.
Listing 4.33 Assertions and setup on the same object
def "Buying products reduces the inventory availability"() { given: "an inventory with products" Product laptop = new Product(name:"toshiba",price:1200,weight:5) Product camera = new Product(name:"panasonic",price:350,weight:2) Product hifi = new Product(name:"jvc",price:600,weight:5) WarehouseInventory warehouseInventory = new WarehouseInventory() #A warehouseInventory.preload(laptop,3) #B warehouseInventory.preload(camera,5) #B warehouseInventory.preload(hifi,2) #B and: "an empty basket" EnterprisyBasket basket = new EnterprisyBasket() #A basket.setWarehouseInventory(warehouseInventory) #B basket.setCustomerResolver(new DefaultCustomerResolver()) #B basket.setLanguage("english") #B basket.setNumberOfCaches(3) #B basket.enableAutoRefresh() #B when: "user gets a laptop and two cameras" basket.addProduct(camera,2) basket.addProduct(laptop) and: "user completes the transaction" basket.checkout() then: "warehouse is updated accordingly" !warehouseInventory.isEmpty() #C warehouseInventory.getBoxesMovedToday() == 3 #C warehouseInventory.availableOfProduct("toshiba") == 2 #C warehouseInventory.availableOfProduct("panasonic") == 3 #C warehouseInventory.availableOfProduct("jvc") == 2 #C}
#A Object creation
#B Object parameters
#C Assertions on the same object
I’ve already split the given: and when: blocks with and: blocks, in order to make the test more readable. But it can be improved even more in two areas:
· The final assertions test multiple things but all on the same object.
· The given: block of the test has too many statements, which can be roughly split into two kinds: statements that create objects, and statements that set properties on existing objects.
In most cases (of large Spock tests) extra properties are secondary to the object creation. I have made several changes in the test as seen in listing 4.34.
Listing 4.34 Grouping similar code with Groovy and Spock
def "Buying products reduces the inventory availability (alt)"() { given: "an inventory with products" Product laptop = new Product(name:"toshiba",price:1200,weight:5) Product camera = new Product(name:"panasonic",price:350,weight:2) Product hifi = new Product(name:"jvc",price:600,weight:5) WarehouseInventory warehouseInventory = new WarehouseInventory() warehouseInventory.with{ #A preload laptop,3 #B preload camera,5 #B preload hifi,2 #B } and: "an empty basket" EnterprisyBasket basket = new EnterprisyBasket() basket.with #A { setWarehouseInventory(warehouseInventory) setCustomerResolver(new DefaultCustomerResolver()) setLanguage "english" setNumberOfCaches 3 enableAutoRefresh() } when: "user gets a laptop and two cameras" basket.with { #B addProduct camera,2 #B addProduct laptop #B } and: "user completes the transaction" basket.checkout() then: "warehouse is updated accordingly" with(warehouseInventory) #C { !isEmpty() getBoxesMovedToday() == 3 availableOfProduct("toshiba") == 2 availableOfProduct("panasonic") == 3 availableOfProduct("jvc") == 2 }}
#A Grouping object setup with Groovy object.with
#B Removal of parentheses
#C Grouping assertions with Spock Specification.with
First of all, I’ve grouped all assertions using the Spock with() construct. This feature is specific to Spock and allows you to show that multiple assertions affect a single object. It is much more clear now that in the end of this test, we specifically deal with the warehouse inventory.
The Spock with() construct is inspired from the Groovy with() construct that works on any Groovy code (even outside of Spock tests). I’ve used this feature in the given: and when: blocks to group all setup code that affect a single object. Now it’s more clear which code is creating new objects and which code is just setting parameters on existing objects (indentation also helps).
Notice that the two with() constructs may share the same name but are unrelated. One is a Groovy feature and the other is a Spock feature that works only in Spock asserts.
As an added bonus I’ve also used the Groovy convention demonstrated in chapter 2, where you can remove parentheses in method calls with at least one argument. This makes the test a little more DSL like. It is not much, but it certainly helps with readability. I will show more ways to deal with large Spock tests in chapter 7 .
4.5 Summary
· Spock contains several blocks/labels to mark the phases inside a unit test. They help readability of the test and in some cases enforce the code structure (i.e. Spock will reject assignments when an assertion was expected)
· The given: block creates the scene for the test, the when: block triggers the tested action and the then: block examines the result. The given-then-when structure is the suggested structure for Spock tests
· The and: block can be used on any other block as a semantic extension
· The expect: block is a combination of then: and when: and can be used for trivial tests or as an intermediate precondition in longer tests.
· The cleanup: block will run always at the end of a Spock tests regardless of the test result. It is used to release resources.
· Spock test methods can have full sentences as names and you should always exploit this feature to better describe what your method does.
· The @Subject annotation should be used to mark the class under test. You can use it individually in each test method, or at the class level if all test methods focus on a single class.
· The @Title annotation should be used to explain with full English text what your Spock test does.
· The @Narrative annotation can be used for a longer description of a Spock test.
· Spock methods setup() and cleanup() will run before and after each test method. They will run as many times as test methods exist.
· Spock methods setupSpec() and cleanupSpec() will run once before all test methods and once after they are finished.
· Spock supports and understands JUnit annotations such as @Before, @After, @BeforeClass and @AfterClass
· The @Shared annotation is used to mark long lived objects that span all test methods. The setupSpec() and cleanupSpec() methods will only work with objects that are either static or marked with the @Shared annotation.
· The old() method can be used in very specific cases to capture the relative change of the class state instead of comparing absolute values before and after the triggered action.
· A Spock test can have multiple then: blocks and they will be executed in the order they are mentioned.
· All Spock blocks should have an English description next to them for readability purposes.
· Spock will call the Java toString() method automatically on any involved class when a test fails. Overriding this method allows you to define what will be shown on failed tests.
· Spock supports natively Hamcrest matchers with three alternative syntax variations.
· Spock supports natively JUnit rules out of the box.
· The Groovy object.with construct can be used to group object parameterization inside Spock tests.
· The Spock Specification.with construct can be used to group assertions to a single object.
[34] ...and more boring. I know some of you were waiting for the software that tracks trajectories of nuclear missiles in order to launch countermeasures (as teased in chapter 1). Sorry to disappoint you.
[35] An exception to this rule is a really simple test with just the expect: block. That is why I have 85% in expected usage of the given: block
[36] Again I mean no disrespect to the author of the code. In fact if you are reading this, I need to thank you for providing me with a real Spock test available on the public internet for my example
[37] Alternatively, a unit test should fail for a single reason.
[38] The presentation is by Robert Fletcher but the specific example of expect is by Luke Daley (co-author of the Spock framework and creator of Geb)
[39] http://en.wikipedia.org/wiki/Don%27t_repeat_yourself
[40] If you really want to show off one-liners then Groovy is not for you. Learn Perl.
[41] http://hamcrest.org/ - "hamcrest" is an anagram of the word "matchers"
All materials on the site are licensed Creative Commons Attribution-Sharealike 3.0 Unported CC BY-SA 3.0 & GNU Free Documentation License (GFDL)
If you are the copyright holder of any material contained on our site and intend to remove it, please contact our site administrator for approval.
© 2016-2026 All site design rights belong to S.Y.A.