Spring in Action, 4th Edition: Covers Spring 4 (2015)
Part 3. Spring in the back end
Although the web pages served by a web application are all your users ever see, the real work happens behind the scenes on the back end server where data is processed and persisted. Part 3 will look at how Spring can help you work with data in the back end.
Relational databases have been the workhorse of enterprise applications for decades. In chapter 10, “Hitting the database with Spring and JDBC,” you’ll see how to use Spring’s JDBC abstraction to query relational databases in a way that is far simpler than native JDBC.
If JDBC is not your style, perhaps you’d rather work with an object-relational mapping (ORM) framework. Chapter 11, “Persisting data with object-relational mapping,” will show you how Spring integrates with ORM frameworks such as Hibernate and other implementations of the Java Persistence API (JPA). In addition, you’ll see how to work magic with Spring Data JPA, automatically generating repository implementations on the fly at runtime.
Relational databases aren’t always a perfect fit. Therefore, chapter 12, “Working with NoSQL databases,” looks at other Spring data projects useful for persisting data in a variety of nonrelational databases, including MongoDB, Neo4j, and Redis.
Chapter 13, “Caching data,” layers the previous persistence chapters with caching, to improve application performance by avoiding the database altogether if the data needed is readily available.
Security is an important aspect in the back end as well as the front end. In Chapter 14, “Securing methods,” you’ll see how to apply Spring Security in the back end, intercepting method calls and ensuring that the caller has been granted proper authority.
Chapter 10. Hitting the database with Spring and JDBC
This chapter covers
· Defining Spring’s data-access support
· Configuring database resources
· Working with Spring’s JDBC template
With the core of the Spring container now under your belt, it’s time to put it to work in real applications. A perfect place to start is with a requirement of nearly any enterprise application: persisting data. You have probably dealt with database access in an application in the past. In practice, you’ll know that data access has many pitfalls. You have to initialize your data-access framework, open connections, handle various exceptions, and close connections. If you get any of this wrong, you could potentially corrupt or delete valuable company data. In case you haven’t experienced the consequences of mishandled data access, it’s a Bad Thing.
Because we strive for Good Things, we turn to Spring. Spring comes with a family of data-access frameworks that integrate with a variety of data-access technologies. Whether you’re persisting your data via direct JDBC or an object-relational mapping (ORM) framework such as Hibernate, Spring removes the tedium of data access from your persistence code. Instead, you can lean on Spring to handle the low-level data-access work for you so that you can turn your attention to managing your application’s data.
As you develop the persistence layer of the Spittr application, you’re faced with some choices. You could use JDBC, Hibernate, the Java Persistence API (JPA), or any of a number of persistence frameworks. Or you might consider one of the new breed of NoSQL databases (or schemaless databases, as I prefer to call them) that are popular these days.
No matter what choice you make, it’s good to know that there’s probably support for it in Spring. In this chapter, we’ll focus on Spring’s support for JDBC. But first, let’s lay some groundwork by getting familiar with Spring’s persistence philosophy.
10.1. Learning Spring’s data-access philosophy
From the previous chapters, you know that one of Spring’s goals is to allow you to develop applications following the sound object-oriented (OO) principle of coding to interfaces. Spring’s data-access support is no exception.
Like many applications, your Spittr application needs to read data from and write data to some kind of database. To avoid scattering persistence logic across all components in the application, it’s good to factor database access into one or more components that are focused on that task. Such components are commonly called data-access objects (DAOs) or repositories.
To avoid coupling the application to any particular data-access strategy, properly written repositories should expose their functionality through interfaces. Figure 10.1 shows the proper approach to designing your data-access tier.
Figure 10.1. Service objects don’t handle their own data access. Instead, they delegate data access to repositories. The repository’s interface keeps it loosely coupled to the service object.
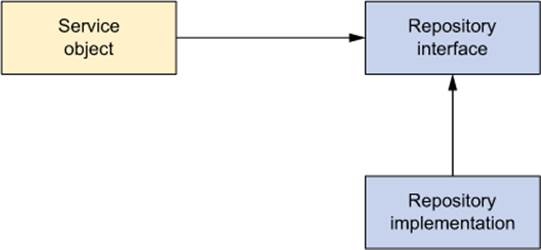
As you can see, the service objects access the repositories through interfaces. This has a couple of positive consequences. First, it makes your service objects easily testable, because they’re not coupled to a specific data-access implementation. In fact, you could create mock implementations of these data-access interfaces. That would allow you to test your service object without ever having to connect to the database, which would significantly speed up your unit tests and rule out the chance of a test failure due to inconsistent data.
In addition, the data-access tier is accessed in a persistence technology–agnostic manner. The chosen persistence approach is isolated to the repository, and only the relevant data-access methods are exposed through the interface. This makes for a flexible application design and allows the chosen persistence framework to be swapped out with minimal impact on the rest of the application. If the implementation details of the data-access tier were to leak into other parts of the application, the entire application would become coupled with the data-access tier, leading to a rigid application design.
Interfaces and Spring
If, after reading the last couple of paragraphs, you feel that I have a strong bias toward hiding the persistence layer behind interfaces, then I’m happy I was able to get that point across. I believe that interfaces are key to writing loosely coupled code and that they should be used at all layers of an application, not just at the data-access layer. That said, it’s also important to note that though Spring encourages the use of interfaces, Spring doesn’t require them—you’re welcome to use Spring to wire a bean (repository or otherwise) directly into a property of another bean without an interface between them.
One way Spring helps you insulate your data-access tier from the rest of your application is by providing a consistent exception hierarchy that’s used across all of its supported persistence options.
10.1.1. Getting to know Spring’s data-access exception hierarchy
There’s an old joke about a skydiver who’s blown off course and ends up landing in a tree, dangling above the ground. After a while, someone walks by, and the skydiver asks where he is. The passerby answers, “You’re about 20 feet off the ground.” The skydiver replies, “You must be a software analyst.” “You’re right. How did you know?” asks the passerby. “Because what you told me was 100% accurate but completely worthless.”
That story has been told several times, with the profession or nationality of the passerby different each time. But the story reminds me of JDBC’s SQLException. If you’ve ever written JDBC code (without Spring), you’re probably keenly aware that you can’t do anything with JDBC without being forced to catch SQLException. SQL-Exception means something went wrong while trying to access a database. But there’s little about that exception that tells you what went wrong or how to deal with it.
Some common problems that might cause a SQLException to be thrown include these:
· The application is unable to connect to the database.
· The query being performed has errors in its syntax.
· The tables and/or columns referred to in the query don’t exist.
· An attempt was made to insert or update values that violate a database constraint.
The big question surrounding SQLException is how it should be handled when it’s caught. As it turns out, many of the problems that trigger a SQLException can’t be remedied in a catch block. Most SQLExceptions that are thrown indicate a fatal condition. If the application can’t connect to the database, that usually means the application will be unable to continue. Likewise, if there are errors in the query, little can be done about it at runtime.
If nothing can be done to recover from a SQLException, why are you forced to catch it?
Even if you have a plan for dealing with some SQLExceptions, you’ll have to catch the SQLException and dig around in its properties for more information about the nature of the problem. That’s because SQLException is treated as a one-size-fits-all exception for problems related to data access. Rather than have a different exception type for each possible problem, SQLException is the exception that’s thrown for all data-access problems.
Some persistence frameworks offer a richer hierarchy of exceptions. Hibernate, for example, offers almost two dozen different exceptions, each targeting a specific data-access problem. This makes it possible to write catch blocks for the exceptions that you want to deal with.
Even so, Hibernate’s exceptions are specific to Hibernate. As stated before, we’d like to isolate the specifics of the persistence mechanism to the data-access layer. If Hibernate-specific exceptions are being thrown, then the fact that you’re dealing with Hibernate will leak into the rest of the application. Either that, or you’ll be forced to catch persistence platform exceptions and rethrow them as platform-agnostic exceptions.
On one hand, JDBC’s exception hierarchy is too generic—it’s not much of a hierarchy at all. On the other hand, Hibernate’s exception hierarchy is proprietary to Hibernate. What we need is a hierarchy of data-access exceptions that are descriptive but not directly associated with a specific persistence framework.
Spring’s persistence platform–agnostic exceptions
Spring JDBC provides a hierarchy of data-access exceptions that solve both problems. In contrast to JDBC, Spring provides several data-access exceptions, each descriptive of the problem for which they’re thrown. Table 10.1 shows some of Spring’s data-access exceptions lined up against the exceptions offered by JDBC.
Table 10.1. JDBC’s exception hierarchy versus Spring’s data-access exceptions
|
JDBC’s exceptions |
Spring’s data-access exceptions |
|
BatchUpdateException DataTruncation SQLException SQLWarning |
BadSqlGrammarException CannotAcquireLockException CannotSerializeTransactionException CannotGetJdbcConnectionException CleanupFailureDataAccessException ConcurrencyFailureException DataAccessException DataAccessResourceFailureException DataIntegrityViolationException DataRetrievalFailureException DataSourceLookupApiUsageException DeadlockLoserDataAccessException DuplicateKeyException EmptyResultDataAccessException IncorrectResultSizeDataAccessException IncorrectUpdateSemanticsDataAccessException InvalidDataAccessApiUsageException InvalidDataAccessResourceUsageException InvalidResultSetAccessException JdbcUpdateAffectedIncorrectNumberOfRowsException LobRetrievalFailureException NonTransientDataAccessResourceException OptimisticLockingFailureException PermissionDeniedDataAccessException PessimisticLockingFailureException QueryTimeoutException RecoverableDataAccessException SQLWarningException SqlXmlFeatureNotImplementedException TransientDataAccessException TransientDataAccessResourceException TypeMismatchDataAccessException UncategorizedDataAccessException UncategorizedSQLException |
As you can see, Spring has an exception for virtually anything that could go wrong when reading from or writing to a database. And the list of Spring’s data-access exceptions is more vast than what’s shown in table 10.1. (I would have listed them all, but I didn’t want JDBC to get an inferiority complex.)
Even though Spring’s exception hierarchy is far richer than JDBC’s simple SQL-Exception, it isn’t associated with any particular persistence solution. This means you can count on Spring to throw a consistent set of exceptions, regardless of which persistence provider you choose. This helps to keep your persistence choice confined to the data-access layer.
Look, Ma! No catch blocks!
What isn’t evident from table 10.1 is that all of those exceptions are rooted with DataAccessException. What makes DataAccessException special is that it’s an unchecked exception. In other words, you don’t have to catch any of the data-access exceptions thrown from Spring (although you’re welcome to if you’d like).
DataAccessException is just one example of Spring’s across-the-board philosophy of checked versus unchecked exceptions. Spring takes the stance that many exceptions are the result of problems that can’t be addressed in a catch block. Instead of forcing developers to write catchblocks (which are often left empty), Spring promotes the use of unchecked exceptions. This leaves the decision of whether or not to catch an exception in your hands.
To take advantage of Spring’s data-access exceptions, you must use one of Spring’s supported data-access templates. Let’s look at how Spring templates can greatly simplify data access.
10.1.2. Templating data access
You’ve probably traveled by plane before. If so, you’ll surely agree that one of the most important parts of traveling is getting your luggage from point A to point B. There are many steps to this process: When you arrive at the terminal, your first stop is at the counter to check your luggage. Next, security scans it to ensure the safety of the flight. Then it takes a ride on the luggage train on its way to being placed on the plane. If you need to catch a connecting flight, your luggage needs to be moved, as well. When you arrive at your final destination, the luggage has to be removed from the plane and placed on the carousel. Finally, you go down to the baggage claim area and pick it up.
Even though there are many steps to this process, you’re actively involved in only a couple of them. The carrier is responsible for driving the process. You’re involved only when you need to be; the rest is taken care of. This mirrors a powerful design pattern: the template method pattern.
A template method defines the skeleton of a process. In the example, the process is moving luggage from departure city to arrival city. The process itself is fixed; it never changes. The overall sequence of events for handling luggage occurs the same way every time: luggage is checked in, luggage is loaded onto the plane, and so forth. Some steps of the process are fixed as well—they happen the same way every time. When the plane arrives at its destination, every piece of luggage is unloaded one at a time and placed on a carousel to be taken to baggage claim.
At certain points, the process delegates its work to a subclass to fill in some implementation-specific details. This is the variable part of the process. For example, the handling of luggage starts with a passenger checking in the luggage at the counter. This part of the process always has to happen at the beginning, so its sequence in the process is fixed. Because each passenger’s luggage check-in is different, the implementation of this part of the process is determined by the passenger. In software terms, a template method delegates the implementation-specific portions of the process to an interface. Different implementations of this interface define specific implementations of this portion of the process.
This is the same pattern that Spring applies to data access. No matter what technology you’re using, certain data-access steps are required. For example, you always need to obtain a connection to your data store and clean up resources when you’re done. These are the fixed steps in a data-access process. But each data-access method you write is slightly different. You query for different objects and update the data in different ways. These are the variable steps in the data-access process.
Spring separates the fixed and variable parts of the data-access process into two distinct classes: templates and callbacks. Templates manage the fixed part of the process, whereas your custom data-access code is handled in callbacks. Figure 10.2 shows the responsibilities of both classes.
Figure 10.2. Spring’s data-access template classes take responsibility for common data-access duties. For application-specific tasks, it calls back into a custom callback object.
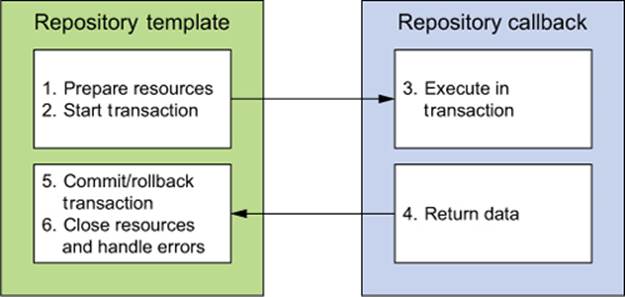
As you can see, Spring’s template classes handle the fixed parts of data access—controlling transactions, managing resources, and handling exceptions. Meanwhile, the specifics of data access as they pertain to your application—creating statements, binding parameters, and marshaling result sets—are handled in the callback implementation. In practice, this makes for an elegant framework, because all you have to worry about is your data-access logic.
Spring comes with several templates to choose from, depending on your persistence platform choice. If you’re using straight JDBC, then you’ll want to use Jdbc-Template. But if you favor one of the object-relational mapping frameworks, perhaps HibernateTemplate orJpaTemplate is more suitable. Table 10.2 lists all of Spring’s data-access templates and their purposes.
Table 10.2. Spring comes with several data-access templates, each suitable for a different persistence mechanism.
|
Template class (org.springframework.*) |
Used to template . . . |
|
jca.cci.core.CciTemplate |
JCA CCI connections |
|
jdbc.core.JdbcTemplate |
JDBC connections |
|
jdbc.core.namedparam.NamedParameterJdbcTemplate |
JDBC connections with support for named parameters |
|
jdbc.core.simple.SimpleJdbcTemplate |
JDBC connections, simplified with Java 5 constructs (deprecated in Spring 3.1) |
|
orm.hibernate3.HibernateTemplate |
Hibernate 3.x+ sessions |
|
orm.ibatis.SqlMapClientTemplate |
iBATIS SqlMap clients |
|
orm.jdo.JdoTemplate |
Java Data Object implementations |
|
orm.jpa.JpaTemplate |
Java Persistence API entity managers |
Spring provides support for several persistence frameworks, and there isn’t enough space to cover them all in this chapter. Therefore, I’m going to focus on what I believe are the most beneficial persistence options and the ones you’ll most likely be using.
We’ll start with basic JDBC access in this chapter, because it’s the simplest way to read data from and write data to a database. Then, in chapter 11, we’ll look at Hibernate and JPA, two of the most popular POJO-based ORM solutions. We’ll wrap up our exploration of Spring persistence inchapter 12 by looking at how the Spring Data project brings the world of schemaless data to Spring.
But first things first. Most of Spring’s persistence support options depend on a data source, so before you can get started with declaring templates and repositories, you need to configure Spring with a data source to be able to connect to the database.
10.2. Configuring a data source
Regardless of which form of Spring-supported data access you use, you’ll likely need to configure a reference to a data source. Spring offers several options for configuring data-source beans in your Spring application, including these:
· Data sources that are defined by a JDBC driver
· Data sources that are looked up by JNDI
· Data sources that pool connections
For production-ready applications, I recommend using a data source that draws its connections from a connection pool. When possible, I prefer to retrieve the pooled data source from an application server via JNDI. With that preference in mind, let’s start by looking at how to configure Spring to retrieve a data source from JNDI.
10.2.1. Using JNDI data sources
Spring applications are often deployed to run in a Java EE application server such as WebSphere or JBoss, or even a web container like Tomcat. These servers allow you to configure data sources to be retrieved via JNDI. The benefit of configuring data sources in this way is that they can be managed completely external to the application, allowing the application to ask for a data source when it’s ready to access the database. Moreover, data sources managed in an application server are often pooled for greater performance and can be hot-swapped by system administrators.
With Spring, you can configure a reference to a data source that’s kept in JNDI and wire it into the classes that need it as if it were just another Spring bean. The <jee:jndi-lookup> element from Spring’s jee namespace makes it possible to retrieve any object, including data sources, from JNDI and make it available as a Spring bean. For example, if your application’s data source were configured in JNDI, you might use <jee:jndi-lookup> like this to wire it into Spring:
<jee:jndi-lookup id="dataSource"
jndi-name="/jdbc/SpitterDS"
resource-ref="true" />
The jndi-name attribute is used to specify the name of the resource in JNDI. If only the jndi-name property is set, then the data source will be looked up using the name given as is. But if the application is running in a Java application server, you’ll want to set the resource-refproperty to true so that the value given in jndi-name will be prepended with java:comp/env/.
Alternatively, if you’re using Java configuration, you can use JndiObjectFactory-Bean to look up the DataSource from JNDI:
@Bean
public JndiObjectFactoryBean dataSource() {
JndiObjectFactoryBean jndiObjectFB = new JndiObjectFactoryBean();
jndiObjectFB.setJndiName("jdbc/SpittrDS");
jndiObjectFB.setResourceRef(true);
jndiObjectFB.setProxyInterface(javax.sql.DataSource.class);
return jndiObjectFB;
}
Clearly, the Java configuration for JNDI-fetched beans is more involved. Many times, Java configuration is simpler than XML configuration, but this is one time when you might write more code in Java. Even so, it’s easy to see how this Java configuration parallels the XML equivalent. And it isn’t that much more Java configuration.
10.2.2. Using a pooled data source
If you’re unable to retrieve a data source from JNDI, the next best thing is to configure a pooled data source directly in Spring. Although Spring doesn’t provide a pooled data source, plenty of suitable ones are available, including the following open source options:
· Apache Commons DBCP (http://jakarta.apache.org/commons/dbcp)
· c3p0 (http://sourceforge.net/projects/c3p0/)
· BoneCP (http://jolbox.com/)
Most of these connection pools can be configured as a data source in Spring in a way that resembles Spring’s own DriverManagerDataSource or SingleConnectionData-Source (which we’ll talk about next). For example, here’s how you might configure DBCP’sBasicDataSource:
<bean id="dataSource" class="org.apache.commons.dbcp.BasicDataSource"
p:driverClassName="org.h2.Driver"
p:url="jdbc:h2:tcp://localhost/~/spitter"
p:username="sa"
p:password=""
p:initialSize="5"
p:maxActive="10" />
Or, if you prefer Java configuration, the pooled DataSource bean can be declared like this:
@Bean
public BasicDataSource dataSource() {
BasicDataSource ds = new BasicDataSource();
ds.setDriverClassName("org.h2.Driver");
ds.setUrl("jdbc:h2:tcp://localhost/~/spitter");
ds.setUsername("sa");
ds.setPassword("");
ds.setInitialSize(5);
ds.setMaxActive(10);
return ds;
}
The first four properties are elemental to configuring a BasicDataSource. The driver-ClassName property specifies the fully qualified name of the JDBC driver class. Here you configure it with the JDBC driver for the H2 database. The url property is where you set the complete JDBC URL for the database. Finally, the username and password properties are used to authenticate when you’re connecting to the database.
Those four basic properties define connection information for BasicDataSource. In addition, you can use several properties to configure the data source pool. Table 10.3 lists a few of the most useful pool-configuration properties of DBCP’s BasicDataSource.
Table 10.3. BasicDataSource’s pool-configuration properties
|
Pool-configuration property |
What it specifies |
|
initialSize |
The number of connections created when the pool is started. |
|
maxActive |
The maximum number of connections that can be allocated from the pool at the same time. If 0, there’s no limit. |
|
maxIdle |
The maximum number of connections that can be idle in the pool without extras being released. If 0, there’s no limit. |
|
maxOpenPreparedStatements |
The maximum number of prepared statements that can be allocated from the statement pool at the same time. If 0, there’s no limit. |
|
maxWait |
How long the pool will wait for a connection to be returned to the pool (when there are no available connections) before an exception is thrown. If 1, wait indefinitely. |
|
minEvictableIdleTimeMillis |
How long a connection can remain idle in the pool before it’s eligible for eviction. |
|
minIdle |
The minimum number of connections that can remain idle in the pool without new connections being created. |
|
poolPreparedStatements |
Whether or not to pool prepared statements (Boolean). |
In this case, you’ve configured the pool to start with five connections. Should more connections be needed, BasicDataSource is allowed to create them, up to a maximum of 10 active connections.
10.2.3. Using JDBC driver-based data sources
The simplest data source you can configure in Spring is one that’s defined through a JDBC driver. Spring offers three such data-source classes to choose from (all in the org.springframework.jdbc.datasource package):
· DriverManagerDataSource —Returns a new connection every time a connection is requested. Unlike DBCP’s BasicDataSource, the connections provided by DriverManagerDataSource aren’t pooled.
· SimpleDriverDataSource —Works much the same as DriverManagerDataSource except that it works with the JDBC driver directly to overcome class loading issues that may arise in certain environments, such as in an OSGi container.
· SingleConnectionDataSource —Returns the same connection every time a connection is requested. Although SingleConnectionDataSource isn’t exactly a pooled data source, you can think of it as a data source with a pool of exactly one connection.
Configuring any of these data sources is similar to how you configured DBCP’s BasicDataSource. For example, here’s how you’d configure a DriverManagerDataSource bean:
@Bean
public DataSource dataSource() {
DriverManagerDataSource ds = new DriverManagerDataSource();
ds.setDriverClassName("org.h2.Driver");
ds.setUrl("jdbc:h2:tcp://localhost/~/spitter");
ds.setUsername("sa");
ds.setPassword("");
return ds;
}
In XML, the DriverManagerDataSource can be configured as follows:
<bean id="dataSource"
class="org.springframework.jdbc.datasource.DriverManagerDataSource"
p:driverClassName="org.h2.Driver"
p:url="jdbc:h2:tcp://localhost/~/spitter"
p:username="sa"
p:password="" />
The only significant difference with these data-source beans as compared to the pooling data-source beans is that because they don’t provide a connection pool, there are no pool configuration properties to set.
Although these data sources are great for small applications and running in development, you should seriously consider the implications of using them in a production application. Because SingleConnectionDataSource has one and only one database connection to work with, it doesn’t work well in multithreaded applications and is best limited to use in testing. At the same time, even though DriverManagerDataSource and SimpleDriverDataSource are both capable of supporting multiple threads, they incur a performance cost for creating a new connection each time a connection is requested. Because of these limitations, I strongly recommend using pooled data sources.
10.2.4. Using an embedded data source
There’s one more data source I want to tell you about: the embedded database. An embedded database runs as part of your application instead of as a separate database server that your application connects to. Although it’s not very useful in production settings, an embedded database is a perfect choice for development and testing purposes. That’s because it allows you to populate your database with test data that’s reset every time you restart your application or run your tests.
Spring’s jdbc namespace makes configuring an embedded database simple. For example, the following listing shows how to use the jdbc namespace to configure an embedded H2 database that’s preloaded with a set of test data.
Listing 10.1. Configuring an embedded database using the jdbc namespace
<?xml version="1.0" encoding="UTF-8"?> <beans xmlns="http://www.springframework.org/schema/beans"
xmlns:xsi="http://www.w3.org/2001/XMLSchema-instance"
xmlns:jdbc="http://www.springframework.org/schema/jdbc"
xmlns:c="http://www.springframework.org/schema/c"
xsi:schemaLocation="http://www.springframework.org/schema/jdbc
http://www.springframework.org/schema/jdbc/spring-jdbc-3.1.xsd
http://www.springframework.org/schema/beans
http://www.springframework.org/schema/beans/spring-beans.xsd">
...
<jdbc:embedded-
database id="dataSource" type="H2"> <jdbc:script location="com/habum
a/spitter/db/jdbc/schema.sql"/> <jdbc:script location="com/habuma/sp
itter/db/jdbc/test-data.sql"/> </jdbc:embedded-database>
...
</beans>
The <jdbc:embedded-database>’s type property is set to H2 to indicate that the embedded database should be an H2 database. (Be sure to have H2 in your application’s classpath.) Alternatively, you may set type to DERBY to use an embedded Apache Derby database.
In <jdbc:embedded-database>, you may configure zero or more <jdbc:script> elements to set up the database. Listing 10.1 includes two <jdbc:script> elements: the first references schema.sql, which contains SQL to create the tables in the database; the second references test-data.sql, to populate the database with test data.
In addition to setting up an embedded database, the <jdbc:embedded-database> element also exposes a data source that can be used like any of the other data-source beans you’ve seen. The id attribute is set to dataSource, which will be the ID of the exposed data-source bean. Therefore, anywhere you need a javax.sql.DataSource, you can inject the dataSource bean.
When you configure an embedded database in Java configuration, there isn’t the convenience of the jdbc namespace. Instead, you can use EmbeddedDatabaseBuilder to construct the DataSource:
@Bean
public DataSource dataSource() {
return new EmbeddedDatabaseBuilder()
.setType(EmbeddedDatabaseType.H2)
.addScript("classpath:schema.sql")
.addScript("classpath:test-data.sql")
.build();
}
As you can see, the setType() method is the equivalent to the <jdbc:embedded-database> element’s type attribute. And instead of using the <jdbc:script> element to specify initialization SQL, you can call addScript().
10.2.5. Using profiles to select a data source
You’ve seen a handful of different ways to configure data sources in Spring, and I’ll bet you’ve identified one or two of them that seem appropriate for your application. In fact, you probably see a need for one of those data-source beans in one environment and a different one in another environment.
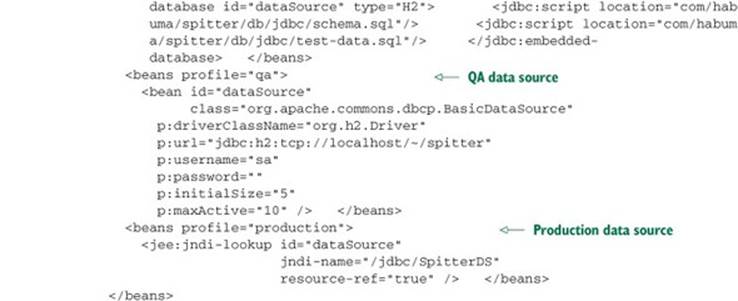
For example, the <jdbc:embedded-database> element is great for development time. But you may want to use DBCP’s BasicDataSource in your QA environment. And perhaps you need to use <jee:jndi-lookup> in your production deployment.
Spring’s bean-profiles feature that we discussed in chapter 3 is perfect here. All you need to do is configure each of these data sources in different profiles, as shown next.
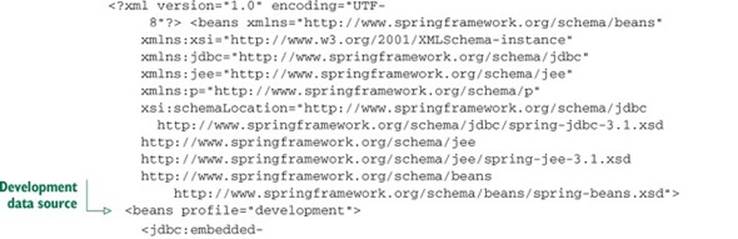
Listing 10.2. Spring profiles enabling selection of a data source at runtime
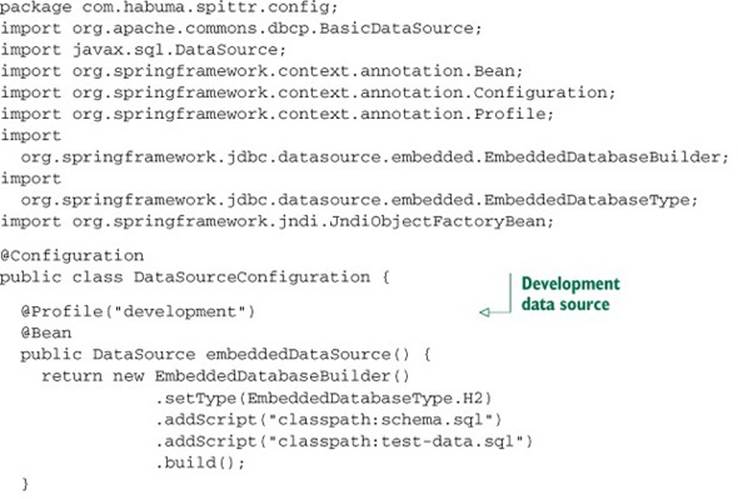
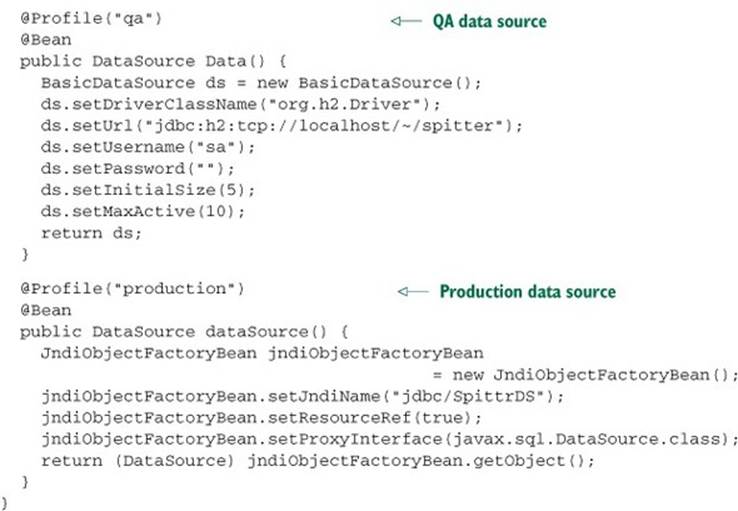
Using profiles, the data source is chosen at runtime, based on which profile is active. As configured in listing 10.2, the embedded database is created if and only if the development profile is active. Similarly, the DBCP BasicDataSource is created if and only if the qa profile is active. And the data source is retrieved from JNDI if and only if the production profile is active.
For the sake of completeness, the following listing shows the same profile-driven configuration using Spring XML configuration instead of Java configuration.
Listing 10.3. Configuring profile-selected data sources in XML
Now that you’ve established a connection to the database through a data source, you’re ready to access the database. As I’ve already mentioned, Spring affords you several options for working with relational databases, including JDBC, Hibernate, and the Java Persistence API (JPA). In the next section, you’ll see how to build the persistence layer of a Spring application using Spring’s support for JDBC. But if Hibernate or JPA is more your style, feel free to jump ahead to the next chapter where those are the topics.
10.3. Using JDBC with Spring
There are many persistence technologies. Hibernate, iBATIS, and JPA are just a few. Despite this, a good number of applications write Java objects to a database the old-fashioned way: they earn it. No, wait—that’s how people make money. The tried-and-true method for persisting data is with good old JDBC.
And why not? JDBC doesn’t require mastering another framework’s query language. It’s built on top of SQL, which is the data-access language. Plus, you can more finely tune the performance of your data access when you use JDBC than with practically any other technology. And JDBC allows you to take advantage of your database’s proprietary features, where other frameworks may discourage or flat-out prohibit this.
What’s more, JDBC lets you work with data at a much lower level than the persistence frameworks. You’re in full control of how your application reads and manipulates data. This includes allowing you to access and manipulate individual columns in a database. This fine-grained approach to data access comes in handy in applications, such as reporting applications, where it doesn’t make sense to organize the data into objects just to then unwind it back into raw data.
But all is not sunny in the world of JDBC. With its power, flexibility, and other niceties also come some not-so-niceties.
10.3.1. Tackling runaway JDBC code
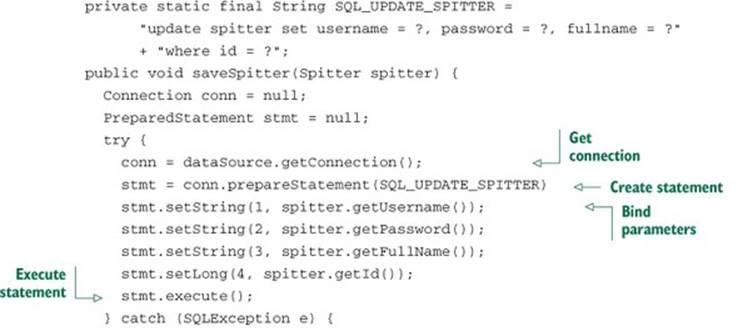
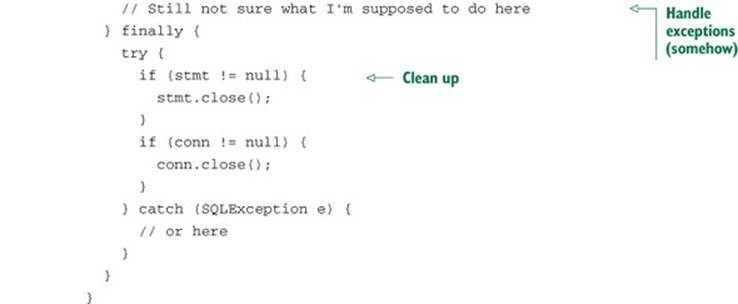
Although JDBC gives you an API that works closely with your database, you’re responsible for handling everything related to accessing the database. This includes managing database resources and handling exceptions. If you’ve ever written JDBC that inserts data into the database, the following code shouldn’t be too alien to you.
Listing 10.4. Using JDBC to insert a row into a database
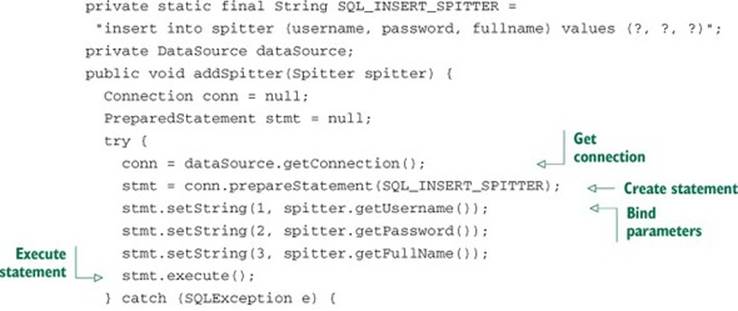
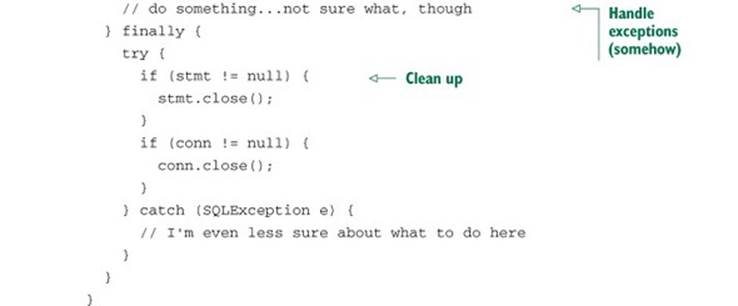
Holy runaway code, Batman! That’s more than 20 lines of code to insert an object into a database. As far as JDBC operations go, this is about as simple as it gets. So why does it take this many lines to do something so straightforward? Actually, it doesn’t. Only a handful of lines do the insert. But JDBC requires that you properly manage connections and statements and somehow handle the SQLException that may be thrown.
Speaking of that SQLException, not only is it not clear how you should handle it (because it’s not clear what went wrong), but you’re forced to catch it twice! You must catch it if something goes wrong while inserting a record, and you have to catch it again if something goes wrong when closing the statement and connection. Seems like a lot of work to handle something that usually can’t be handled programmatically.
Now look at the next listing, where you use traditional JDBC to update a row in the Spitter table in the database.
Listing 10.5. Using JDBC to update a row in a database
At first glance, listing 10.5 may appear to be identical to listing 10.4. In fact, disregarding the SQL String and the line where the statement is created, they’re identical. Again, that’s a lot of code to do something as simple as update a single row in a database. What’s more, that’s a lot of repeated code. Ideally, you’d only have to write the lines that are specific to the task at hand. After all, those are the only lines that distinguish listing 10.5 from listing 10.4. The rest is boilerplate code.
To round out our tour of conventional JDBC, let’s see how you might retrieve data from the database. As you can see here, that’s not pretty, either.
Listing 10.6. Using JDBC to query a row from a database
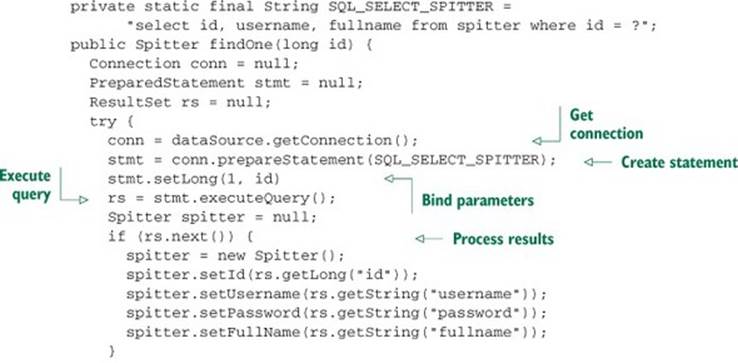
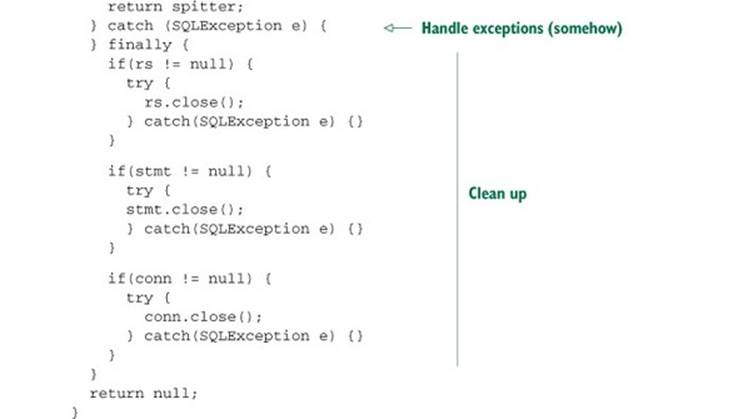
That’s almost as verbose as the insert and update examples—maybe more. It’s like the Pareto principle flipped on its head: 20% of the code is needed to query a row, whereas 80% is boilerplate.
By now you should see that much of JDBC code is boilerplate for creating connections and statements and handling exceptions. With my point made, I’ll end the torture and not make you look at any more of this nasty code.
The fact is that all that JDBC boilerplate code is important. Cleaning up resources and handling errors is what makes data access robust. Without it, errors would go undetected and resources would be left open, leading to unpredictable code and resource leaks. So not only do you need this code, but you also need to make sure it’s correct. This is all the more reason to let a framework deal with the boilerplate so you know that it’s written once and written right.
10.3.2. Working with JDBC templates
Spring’s JDBC framework will clean up your JDBC code by shouldering the burden of resource management and exception handling. This leaves you free to write only the code necessary to move data to and from the database.
As I explained in the previous section, Spring abstracts away the boilerplate data-access code behind template classes. For JDBC, Spring comes with three template classes to choose from:
· JdbcTemplate —The most basic of Spring’s JDBC templates, this class provides simple access to a database through JDBC and indexed-parameter queries.
· NamedParameterJdbcTemplate —This JDBC template class enables you to perform queries where values are bound to named parameters in SQL, rather than indexed parameters.
· SimpleJdbcTemplate —This version of the JDBC template takes advantage of Java 5 features such as autoboxing, generics, and variable parameter lists to simplify how a JDBC template is used.
At one time, you had to weigh your choice of JDBC template carefully. But starting with Spring 3.1, the decision became easier. SimpleJdbcTemplate has been deprecated and its Java 5 features have been rolled into JdbcTemplate. Moreover, you only needNamedParameterJdbcTemplate when you want to work with named parameters in queries. That leaves good ol’ JdbcTemplate as your go-to option for most JDBC work—that’s the option I’ll focus on in this section.
Inserting data using JdbcTemplate
All that a JdbcTemplate needs in order to do its work is a DataSource. This makes it easy enough to configure a JdbcTemplate bean in Spring with the following @Bean method:
@Bean
public JdbcTemplate jdbcTemplate(DataSource dataSource) {
return new JdbcTemplate(dataSource);
}
Here, the DataSource is injected via constructor injection. The dataSource bean being referenced can be any implementation of javax.sql.DataSource, including those you created in section 10.2.
Now you can wire the jdbcTemplate bean into your repository and use it to access the database. For example, suppose the Spitter repository is written to use JdbcTemplate:
@Repository
public class JdbcSpitterRepository implements SpitterRepository {
private JdbcOperations jdbcOperations;
@Inject
public JdbcSpitterRepository(JdbcOperations jdbcOperations) {
this.jdbcOperations = jdbcOperations;
}
...
}
Here JdbcSpitterRepository is annotated with @Repository, which qualifies it to be automatically created by component-scanning. And its constructor is annotated with @Inject so that when it’s created, it will be given a JdbcOperations object. Jdbc-Operations is an interface defining operations implemented by JdbcTemplate. By injecting a JdbcOperations instead of the concrete JdbcTemplate, JdbcSpitter-Repository is able to remain loosely coupled to JdbcTemplate via the Jdbc-Operations interface.
As an alternative to component-scanning and autowiring, you could explicitly declare JdbcSpitterRepository as a bean in Spring, like this:
@Bean
public SpitterRepository spitterRepository(JdbcTemplate jdbcTemplate) {
return new JdbcSpitterRepository(jdbcTemplate);
}
With a JdbcTemplate at your repository’s disposal, you can greatly simplify the addSpitter() method from listing 10.4. The new JdbcTemplate-based addSpitter() method is as follows.
Listing 10.7. JdbcTemplate-based addSpitter() method
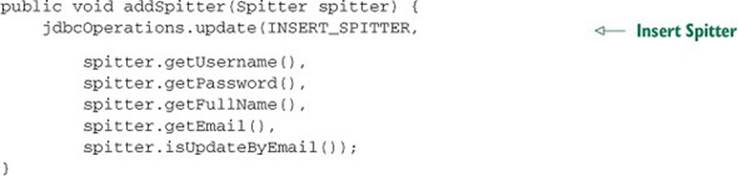
I think you’ll agree that this version of addSpitter() is significantly simpler. There’s no more connection or statement-creation code—and no more exception-handling code. There’s nothing but pure data-insertion goodness.
Just because you don’t see a lot of boilerplate code doesn’t mean it’s not there. It’s cleverly hidden in the JDBC template class. When the update() method is called, JdbcTemplate gets a connection, creates a statement, and executes the insert SQL.
What you also don’t see is how the SQLException is handled. Internally, Jdbc-Template catches any SQLExceptions that may be thrown. It then translates the generic SQLException into one of the more specific data-access exceptions from table 10.1 and rethrows it. Because Spring’s data-access exceptions are all runtime exceptions, you don’t have to catch them in the addSpitter() method.
Reading data with JdbcTemplate
Reading data is also simplified with JdbcTemplate. Listing 10.8 shows a new version of findOne() that uses JdbcTemplate callbacks to query for a Spitter by ID and map the result set to a Spitter object.
Listing 10.8. Querying for a Spitter using JdbcTemplate

This findOne() method uses JdbcTemplate’s queryForObject() method to query for a Spitter from the database. The queryForObject() method takes three parameters:
· A String containing the SQL to be used to select the data from the database
· A RowMapper object that extracts values from a ResultSet and constructs a domain object (in this case, a Spitter)
· A variable argument list of values to be bound to indexed parameters of the query
The real magic happens in the SpitterRowMapper object, which implements the RowMapper interface. For every row that results from the query, JdbcTemplate calls the mapRow() method of the RowMapper, passing in a ResultSet and an integer carrying the row number. InSpitterRowMapper’s mapRow() method is the code that creates a Spitter object and populates it with values from the ResultSet.
Just like addSpitter(), the findOne() method is free of JDBC boilerplate code. Unlike traditional JDBC, there’s no resource-management or exception-handling code. Methods that use JdbcTemplate are laser focused on retrieving a Spitter object from the database.
Using Java 8 lambdas with JdbcTemplate
Because the RowMapper interface only declares the addRow() method, it fits the bill for a functional interface. This means that if you’re developing your application using Java 8, you can express the RowMapper implementation with a lambda instead of with a concrete class implementation.
For example, the findOne() method in listing 10.8 can be rewritten using Java 8 lambdas like this:
public Spitter findOne(long id) {
return jdbcOperations.queryForObject(
SELECT_SPITTER_BY_ID,
(rs, rowNum) -> {
return new Spitter(
rs.getLong("id"),
rs.getString("username"),
rs.getString("password"),
rs.getString("fullName"),
rs.getString("email"),
rs.getBoolean("updateByEmail"));
},
id);
}
As you can see, the lambda is easier on the eyes than a full-blown RowMapper implementation, but it’s just as effective. Java coerces the lambda into a RowMapper for the sake of satisfying the parameter it’s being passed into.
Alternatively, you can use Java 8 method references to define the mapping in a separate method:
public Spitter findOne(long id) {
return jdbcOperations.queryForObject(
SELECT_SPITTER_BY_ID, this::mapSpitter, id);
}
private Spitter mapSpitter(ResultSet rs, int row) throws SQLException {
return new Spitter(
rs.getLong("id"),
rs.getString("username"),
rs.getString("password"),
rs.getString("fullName"),
rs.getString("email"),
rs.getBoolean("updateByEmail"));
}
In either event, you don’t have to explicitly implement the RowMapper interface. You must provide a lambda or method that takes the same parameters and returns the same type as if you had implemented RowMapper.
Using named parameters
The addSpitter() method in listing 10.7 uses indexed parameters. This means you have to notice the order of the parameters in the query and list the values in the correct order when passing them to the update() method. If you ever changed the SQL in such a way that the order of the parameters changed, you’d also need to change the order of the values.
Optionally, you could use named parameters. Named parameters let you give each parameter in the SQL an explicit name and refer to the parameter by that name when binding values to the statement. For example, suppose the SQL_INSERT_SPITTER query were defined as follows:
private static final String SQL_INSERT_SPITTER =
"insert into spitter (username, password, fullname) " +
"values (:username, :password, :fullname)";
With named-parameter queries, the order of the bound values isn’t important. You can bind each value by name. If the query changes and the order of the parameters is no longer the same, you won’t have to change the binding code.
Spring’s NamedParameterJdbcTemplate is a special JDBC template class that supports working with named parameters. NamedParameterJdbcTemplate can be declared in Spring in much the same way as the regular JdbcTemplate:
@Bean
public NamedParameterJdbcTemplate jdbcTemplate(DataSource dataSource) {
return new NamedParameterJdbcTemplate(dataSource);
}
Had you injected a NamedParameterJdbcOperations (the interface that Named-ParameterJdbcTemplate implements) into your repository instead of JdbcOperations, your addSpitter() method might look like this.
Listing 10.9. Using named parameters with Spring JDBC templates
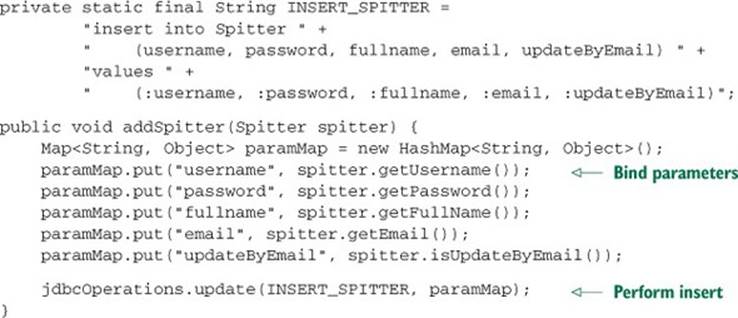
The first thing you’ll notice is that this version of addSpitter() is longer than the previous version. That’s because named parameters are bound through a java.util.Map. Nevertheless, every line is focused on the goal of inserting a Spitter object into the database. There’s still no resource-management or exception-handling code cluttering up the chief purpose of the method.
10.4. Summary
Data is the lifeblood of an application. Some of the data-centric among you may even contend that data is the application. With such significance placed on data, it’s important that you develop the data-access portion of your applications in a way that’s robust, simple, and clear.
JDBC is the most basic way to work with relational data in Java. But as defined in the specification, JDBC can be somewhat unwieldy. Spring takes much of the pain out of working with JDBC, eliminating boilerplate code and simplifying JDBC exception handling, leaving you little more to deal with than writing the SQL that should be performed.
In this chapter, we looked at Spring’s support for data persistence. We also looked at Spring’s template-based abstraction for JDBC, which greatly simplifies working with JDBC.
Coming up in the next chapter, we’ll continue our survey of Spring’s data-persistence support by looking at Spring’s facilities for the Java Persistence API.
All materials on the site are licensed Creative Commons Attribution-Sharealike 3.0 Unported CC BY-SA 3.0 & GNU Free Documentation License (GFDL)
If you are the copyright holder of any material contained on our site and intend to remove it, please contact our site administrator for approval.
© 2016-2026 All site design rights belong to S.Y.A.