Spring in Action, 4th Edition: Covers Spring 4 (2015)
Part 3. Spring in the back end
Chapter 13. Caching data
This chapter covers
· Enabling declarative caching
· Caching with Ehcache, Redis, and GemFire
· Annotation-oriented caching
Have you ever had someone ask you a question and then, moments after you reply, ask you the same thing again? Often, I’m asked this type of question by my children:
· “Can I have some candy?”
· “What time is it?”
· “Are we there yet?”
· “Can I have some candy?”
In many ways, the components of the applications we write are the same way. Stateless components tend to scale better, but they also tend to ask the same question over and over again. Because they’re stateless, they discard any answer they were given once their current task is complete, and they have to ask the question again the next time that same answer is needed.
Sometimes it takes a little while to fetch or calculate the answer to the question being asked. Maybe you must fetch data from the database, invoke a remote service, or perform a complex calculation. That’s time and resources spent arriving at the answer.
If that answer isn’t likely to change frequently (or at all), then it’s wasteful to go through the same channel to fetch it again. Moreover, doing so can and likely will have a negative impact on the performance of your application. Instead of asking the same question over and over, only to arrive at the same answer each time, it makes sense to ask once and remember that answer when it’s needed later.
Caching is a way to store frequently needed information so that it’s readily available when needed. In this chapter, we’ll look at Spring’s cache abstraction. Although Spring doesn’t implement a cache solution, it offers declarative support for caching that integrates with several popular caching implementations.
13.1. Enabling cache support
Spring’s cache abstraction comes in two forms:
· Annotation-driven caching
· XML-declared caching
The most common way to use Spring’s cache abstraction is to annotate methods with annotations like @Cacheable and @CacheEvict. You’ll spend most of this chapter working with that form of declarative caching. Then, in section 13.3, we’ll look at how to declare cache boundaries in XML.
Before you can start applying caching annotations in your beans, you must enable Spring’s support for annotation-driven caching. If you’re using Java configuration, you can enable annotation-driven caching by adding @EnableCaching to one of your configuration classes. The following listing shows the @EnableCaching annotation in action.
Listing 13.1. Enabling annotation-driven caching with @EnableCaching

If you’re configuring your application with XML, you can enable annotation-driven caching with the <cache:annotation-driven> element from Spring’s cache namespace.
Listing 13.2. Enabling annotation-driven caching with <cache:annotation-driven>
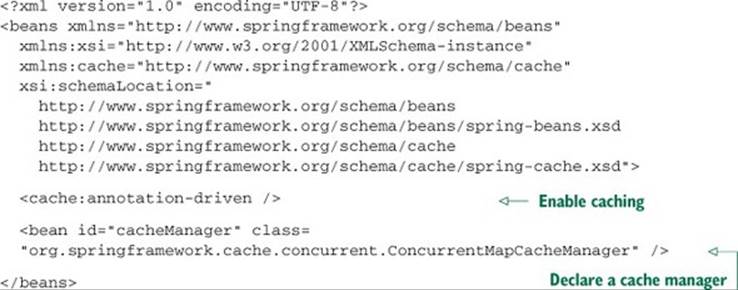
Under the covers, @EnableCaching and <cache:annotation-driven> work the same way. They create an aspect with pointcuts that trigger off of Spring’s caching annotations. Depending on the annotation used and the state of the cache, that aspect will fetch a value from the cache, add a value to the cache, or remove a value from the cache.
You’ve probably noticed that both listings 13.1 and 13.2 do more than enable annotation-driven caching. They also declare a cache-manager bean. Cache managers are the heart of Spring’s cache abstraction, enabling integration with one of several popular caching implementations.
In this case, a ConcurrentMapCacheManager is declared. This simple cache manager uses a java.util.concurrent.ConcurrentHashMap as its cache store. Its simplicity makes it a tempting choice for development, testing, or basic applications. But because its cache storage is memory-based and thus tied to the lifecycle of the application, it’s probably not an ideal choice for larger production applications.
Fortunately, several great cache-manager options are available. Let’s look at a few of the most commonly used cache managers.
13.1.1. Configuring a cache manager
Out of the box, Spring 3.1 comes with five cache-manager implementations:
· SimpleCacheManager
· NoOpCacheManager
· ConcurrentMapCacheManager
· CompositeCacheManager
· EhCacheCacheManager
Spring 3.2 introduced another cache manager for working with JCache (JSR-107) based cache providers. Outside of the core Spring Framework, Spring Data offers two more cache managers:
· RedisCacheManager (from Spring Data Redis)
· GemfireCacheManager (from Spring Data GemFire)
As you can see, you have plenty of choices when it comes to selecting a cache manager for Spring’s cache abstraction. Which one you select will depend on what underlying cache provider you want to use. Each will provide your application with a different flavor of caching, and some are more production-ready than others. Although the choice you make will have implications for how your data is cached, it will have no bearing on the way you declare caching rules in Spring.
You must select and configure a cache manager as a bean in your Spring application context. You’ve already seen how to configure a ConcurrentMapCacheManager and learned that it may not be the best choice for real-world applications. Now let’s see how to configure some of Spring’s other cache managers, starting with EhCacheCacheManager.
Caching with Ehcache
Ehcache is one of the most popular cache providers. The Ehcache website claims that it’s “Java’s most widely used cache.” Given its wide adoption, it would make sense for Spring to offer a cache manager that integrates with Ehcache. EhCacheCacheManager is it.
Once you get past the name, which seems to stutter over the word cache, you’ll find that EhCacheCacheManager is easily configured in Spring. The next listing shows how to configure it in Java.
Listing 13.3. Configuring EhCacheCacheManager in Java configuration
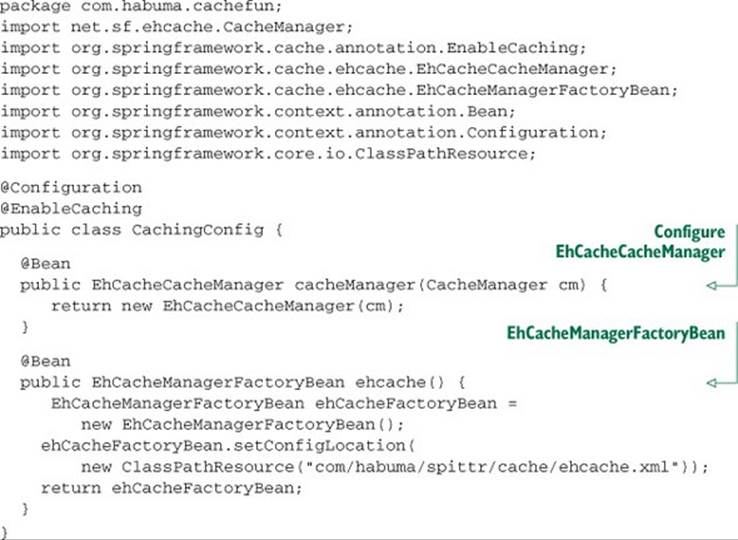
The cacheManager() method in listing 13.3 creates an instance of EhCacheCache-Manager by passing in an instance of an Ehcache CacheManager. This particular bit of injection can be confusing because both Spring and Ehcache define a CacheManager type. To be clear, Ehcache’sCacheManager is being injected into Spring’s EhCacheCacheManager (which implements Spring’s CacheManager implementation).
So that you’ll have an Ehcache CacheManager to inject, you must also declare a CacheManager bean. To make that easy, Spring provides an EhCacheManagerFactoryBean that generates an Ehcache CacheManager. The ehcache() method creates and returns an instance ofEhCacheManagerFactoryBean. Because it’s a factory bean (that is, it implements Spring’s FactoryBean interface), the bean that is registered in the Spring application context isn’t an instance of EhCacheManagerFactoryBean but rather is an instance of CacheManager, suitable for injection into EhCacheCacheManager.
There’s more to Ehcache configuration than the beans you’ll configure in Spring. Ehcache defines its own configuration schema for XML, and you’ll configure caching specifics in an XML file that adheres to that schema. In the course of creating the EhCacheManagerFactoryBean, you need to tell it where the Ehcache configuration XML is located. Here you call the setConfigLocation() method, passing a ClassPathResource to specify the location of the Ehcache XML configuration relative to the root of the classpath.
The contents of the ehcache.xml file vary from application to application, but you need to declare at least a minimal cache. For example, the following Ehcache configuration declares a cache named spittleCache with 50 MB of maximum heap storage and a time-to-live of 100 seconds.
<ehcache>
<cache name="spittleCache"
maxBytesLocalHeap="50m"
timeToLiveSeconds="100">
</cache>
</ehcache>
Clearly, this is a basic Ehcache configuration. In your applications, you’ll likely want to take advantage of the rich set of configuration options afforded by Ehcache. Consult Ehcache’s documentation at http://ehcache.org/documentation/configuration for details on how to fine-tune your Ehcache configuration.
Using Redis for caching
When you think about it, a cache entry is nothing more than a key-value pair where the key describes the operation and parameters from which the value was produced. Therefore, it isn’t surprising to learn that Redis, which is a key-value store, is perfectly suited to be a cache store.
So that Redis can be used to store cache entries for Spring’s caching abstraction, Spring Data Redis offers RedisCacheManager, an implementation of CacheManager. RedisCacheManager works with a Redis server via a RedisTemplate to store cache entries in Redis.
To use RedisCacheManager, you’ll need a RedisTemplate bean and a bean that’s an implementation of RedisConnectionFactory (such as JedisConnectionFactory). You saw how to configure those beans in chapter 12. With a RedisTemplate in place, it’s a snap to configure a RedisCacheManager, as shown next.
Listing 13.4. Configuring a cache manager that stores cache entries in a Redis server
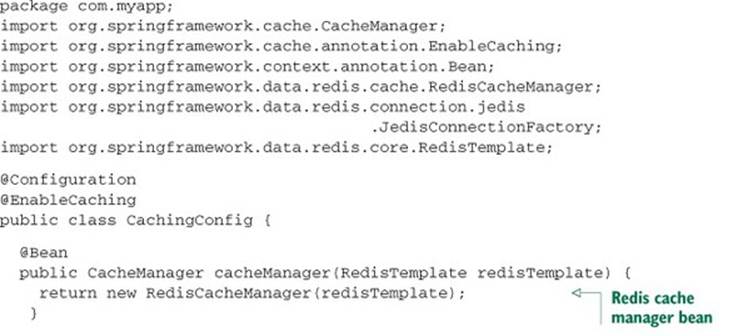
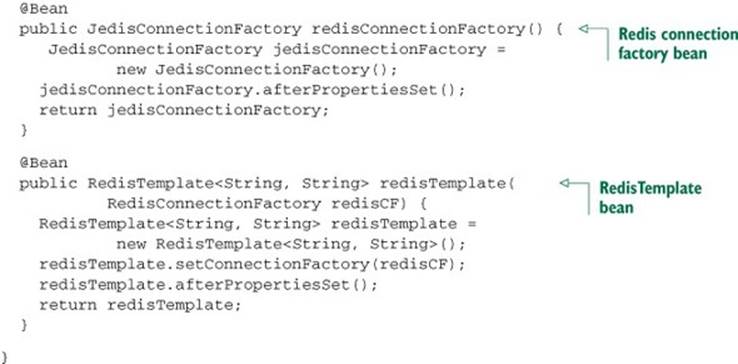
As you can see, you construct a RedisCacheManager by passing an instance of a RedisTemplate as an argument to its constructor.
Working with multiple cache managers
There’s no reason to think that you must choose one and only one cache manager. If you’re having trouble pinning down which cache manager to use, or if you have valid technical reasons for choosing more than one cache manager, you can try Spring’s CompositeCacheManager.
CompositeCacheManager is configured with one or more cache managers and iterates over them all as it tries to find a previously cached value. The following listing shows how to create a CompositeCacheManager bean that iterates over a JCacheCacheManager, anEhCacheCacheManager, and a RedisCacheManager.
Listing 13.5. CompositeCacheManager iterates over a list of cache managers
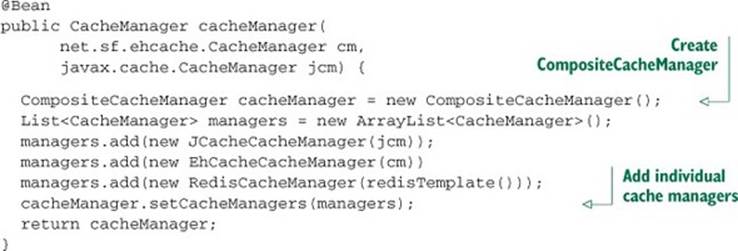
When it’s time to look for a cache entry, CompositeCacheManager starts with JCacheCacheManager to check the JCache implementation, then turns to Ehcache by checking with EhCacheCacheManager, and finally consults with RedisCacheManager to check Redis for the cache entry.
Now that you have a cache manager configured and caching enabled, you’re ready to start applying caching rules to your bean methods. Let’s see how to use Spring’s caching annotations to define cache boundaries.
13.2. Annotating methods for caching
As mentioned earlier, Spring’s caching abstraction is largely built around aspects. When you enable caching in Spring, an aspect is created that triggers off one or more of Spring’s caching annotations. Table 13.1 lists Spring’s caching annotations.
Table 13.1. Spring provides four annotations for declaring caching rules.
|
Annotation |
Description |
|
@Cacheable |
Indicates that Spring should look in a cache for the method’s return value before invoking the method. If the value is found, the cached value is returned. If not, then the method is invoked and the return value is put in the cache. |
|
@CachePut |
Indicates that Spring should put the method’s return value in a cache. The cache isn’t checked prior to method invocation, and the method is always invoked. |
|
@CacheEvict |
Indicates that Spring should evict one or more entries from a cache. |
|
@Caching |
A grouping annotation for applying multiples of the other caching annotations at once. |
All the annotations in table 13.1 can be placed either on a method or on a class. When placed on a single method, the caching behavior prescribed by the annotation applies only to that method. If the annotation is placed at the class level, however, the caching behavior is applied to all methods in that class.
13.2.1. Populating the cache
As you can see, the @Cacheable and @CachePut annotations can both populate a cache. They work in slightly different ways, though.
@Cacheable looks for an entry in the cache first, preempting the method invocation if a matching entry is found. If no matching entry is found, the method is invoked and the value returned is put in the cache. @CachePut, on the other hand, never checks for a matching value in the cache, always allows the target method to be invoked, and adds the returned value to the cache.
@Cacheable and @CachePut share a common set of attributes, which are listed in table 13.2.
Table 13.2. @Cacheable and @CachePut share a common set of attributes.
|
Attribute |
Type |
Description |
|
value |
String[] |
The name(s) of the cache(s) to use |
|
condition |
String |
A SpEL expression that, if it evaluates to false, results in caching not being applied to the method call |
|
key |
String |
A SpEL expression to calculate a custom cache key |
|
unless |
String |
A SpEL expression that, if it evaluates to true, prevents the return value from being put in the cache |
In their simplest form, the @Cacheable and @CachePut attributes only specify one or more caches with the value attribute. For example, consider the findOne() method from SpittleRepository. Once it’s initially saved, a Spittle isn’t likely to change. If any particular Spittleis popular and is requested frequently, it’s a waste of time and resources to fetch it from the database repeatedly. By annotating the findOne() method with @Cacheable, as shown in the following listing, you can make sure the Spittle is cached and avoid unnecessary trips to the database.
Listing 13.6. Using @Cacheable to store and fetch values in a cache
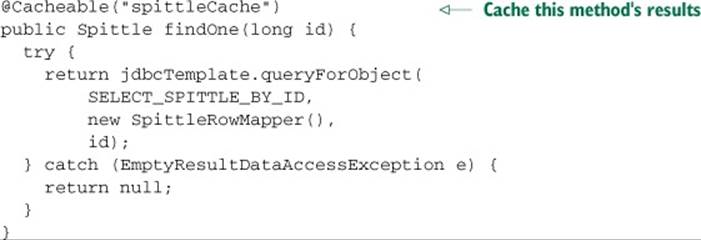
When findOne() is called, the caching aspect intercepts the call and looks for a previously returned value in the cache named spittleCache. The cache key is the id parameter passed to the findOne() method. If a value is found for that key, the found value will be returned and the method won’t be invoked. On the other hand, if no value is found, then the method will be invoked and the returned value will be put in the cache, ready for the next time findOne() is called.
In listing 13.6, the @Cacheable annotation is placed on the implementation of findOne() in JdbcSpittleRepository. That will work, but the caching is confined to only the JdbcSpittleRepository implementation. Any other implementation of SpittleRepository won’t have caching unless it’s also annotated with @Cacheable. Therefore, you might consider placing the annotation on the method declaration in SpittleRepository instead of the implementation:
@Cacheable("spittleCache")
Spittle findOne(long id);
When you annotate the interface method, the @Cacheable annotation will be inherited by all implementations of SpittleRepository, and the same caching rules will be applied.
Putting values in the cache
Whereas @Cacheable conditionally invokes a method, depending on whether the desired value is already in the cache, @CachePut applies a more linear flow to methods that it annotates. An @CachePut-annotated method is always invoked and its return value is placed in the cache. This offers a handy way to preload a cache before anyone comes asking.
For example, when a brand-new Spittle is saved via the save() method on SpittleRepository, there’s a high likelihood that it will soon be asked for. It makes sense to toss the Spittle into the cache when save() is called, so it’s ready to go when someone looks for it by callingfindOne(). To do that, you can annotate the save() method with @CachePut like this:
@CachePut("spittleCache")
Spittle save(Spittle spittle);
When save() is called, it does whatever it needs to do to save the Spittle. Then the returned Spittle is placed in the spittleCache cache.
There’s only one problem: the cache key. As I mentioned earlier, the default cache key is based on the parameters to the method. Because the only parameter to save() is a Spittle, it’s used as the cache key. Doesn’t it seem odd to place a Spittle in a cache where the key is the sameSpittle?
Clearly, the default cache key isn’t what you want in this case. You need the cache key to be the ID of the newly saved Spittle, not the Spittle itself. So, you need to specify a key other than the default key. Let’s see how you can customize the cache key.
Customizing the cache key
Both @Cacheable and @CachePut have a key attribute that lets you replace the default key with one derived from a SpEL expression. Any valid SpEL expression will work, but you’ll likely want to use an expression that evaluates to a key relevant to the value being stored in the cache.
For this particular case, you need the key to be the ID of the saved Spittle. The Spittle passed as a parameter to save() hasn’t been saved yet and therefore doesn’t have an ID. You need the id property of the Spittle that is returned from save().
Fortunately, Spring exposes several pieces of metadata that come in handy when you’re writing SpEL expressions for caching. Table 13.3 lists the caching metadata available in SpEL.
Table 13.3. Spring offers several SpEL extensions specifically for defining cache rules.
|
Expression |
Description |
|
#root.args |
The arguments passed in to the cached method, as an array |
|
#root.caches |
The caches this method is executed against, as an array |
|
#root.target |
The target object |
|
#root.targetClass |
The target object’s class; a shortcut for #root.target.class |
|
#root.method |
The cached method |
|
#root.methodName |
The cached method’s name; a shortcut for #root.method.name |
|
#result |
The return value from the method call (not available with @Cacheable) |
|
#Argument |
The name of any method argument (such as #argName) or argument index (such as #a0 or #p0) |
For the save() method, you need the key to be the id property from the Spittle that is returned. The #result expression will give you the returned Spittle. From that, you can reference the id property by setting the key attribute to #result.id:
@CachePut(value="spittleCache", key="#result.id")
Spittle save(Spittle spittle);
With @CachePut specified this way, the cache isn’t considered going into the save() method. But the Spittle that is returned will be put in the cache with a key equal to the Spittle’s id property.
Conditional caching
By annotating a method with one of Spring’s caching annotations, you indicate that you want Spring to create a caching aspect around that method. But there may be cases where you’d rather have caching turned off.
@Cacheable and @CachePut offer two attributes for conditional caching: unless and condition. Both are given a SpEL expression. If the unless attribute’s SpEL expression evaluates to true, then the data returned from the cached method isn’t placed in the cache. Similarly, if thecondition attribute’s SpEL expression evaluates to false, then caching is effectively disabled for the method.
On the surface, it may seem that unless and condition accomplish the same thing. There’s a subtle difference, though. The unless attribute can only prevent an object from being placed in the cache. But the cache is still searched when the method is called, and if a match is found, it’s returned. On the other hand, if condition’s expression evaluates to false, then caching is disabled for the duration of the method invocation. The cache isn’t searched, nor is the return value placed in the cache.
As an example (albeit a contrived one), suppose you don’t want to cache any Spittle objects whose message property contains the text “NoCache”. To prevent such Spittles from being cached, you can set the unless attribute like this:
@Cacheable(value="spittleCache"
unless="#result.message.contains('NoCache')")
Spittle findOne(long id);
The SpEL expression given to unless considers the message property of the returned Spittle (identified in the expression as #result). If it contains the text “NoCache”, then the expression evaluates to true and the Spittle isn’t placed in the cache. Otherwise, the expression evaluates to false, the unless clause isn’t satisfied, and the Spittle is cached.
The unless attribute prevents values from being written to the cache. But you may wish to disable caching altogether. That is, you may not want values added to the cache or fetched from the cache under certain conditions.
For instance, suppose you don’t want caching to be applied to any Spittle whose ID is less than 10. In this scenario, those Spittles are test entries you use for debugging purposes, and there’s no real value in caching them. To turn off caching when the Spittle ID is less than 10, you can use the condition attribute on @Cacheable like this:
@Cacheable(value="spittleCache"
unless="#result.message.contains('NoCache')"
condition="#id >= 10")
Spittle findOne(long id);
If findOne() is called with any value less than 10 as the parameter, the cache will not be searched, nor will the returned Spittle be placed in the cache. It will be as if there is no @Cacheable annotation on the method.
As you’ve seen in these examples, the unless attribute expression can refer to the return value by referring to #result. This is possible and useful because unless doesn’t start doing its job until a value is returned from the cached method. On the other hand, condition has the job of disabling caching on the method. Therefore, it can’t wait until the method has completed to decide if it needs to shut down caching. This means its expression must be evaluated on the way into the method and that you can’t refer to the return value with #result.
You’ve added stuff to the cache, but can that stuff be removed? Let’s see how to use the @CacheEvict annotation to tell cached data to hit the bricks.
13.2.2. Removing cache entries
@CacheEvict doesn’t add anything to the cache. On the contrary, if an @CacheEvict-annotated method is called, one or more entries are removed from the cache.
Under what circumstances might you want to remove something from the cache? Any time a cached value is no longer valid, you should make sure it’s removed from the cache so that future cache hits won’t return stale or otherwise nonexistent data. One such case is when data is deleted. This makes the remove() method of SpittleRepository a perfect candidate for @CacheEvict:
@CacheEvict("spittleCache")
void remove(long spittleId);
Note
Unlike @Cacheable and @CachePut, @CacheEvict can be used on void methods. @Cacheable and @CachePut require a non-void return value, which is the item to place in the cache. But because @CacheEvict is only removing items from the cache, it can be placed on any method, even a void one.
As shown here, a single entry is removed from the spittleCache cache when remove() is called. The entry to be removed is the one whose key is equal to the value passed in as the spittleId parameter.
@CacheEvict has several attributes, listed in table 13.4, that can influence its behavior beyond the defaults.
Table 13.4. The @CacheEvict annotation’s attributes specify which cache entries should be removed.
|
Attribute |
Type |
Description |
|
value |
String[] |
The name(s) of the cache(s) to use. |
|
key |
String |
A SpEL expression to calculate a custom cache key. |
|
condition |
String |
A SpEL expression that, if it evaluates to false, results in caching not being applied to the method call. |
|
allEntries |
boolean |
If true, all entries in the specified cache(s) should be removed. |
|
beforeInvocation |
boolean |
If true, the entries are removed from the cache before the method is invoked. If false (the default), the entries are removed after a successful method invocation. |
As you can see, @CacheEvict shares some of the same attributes as @Cacheable and @CachePut, along with a couple of new attributes. Unlike @Cacheable and @CachePut, @CacheEvict doesn’t offer an unless attribute.
Spring’s caching annotations offer an elegant way to specify caching rules in your application code. But Spring also offers an XML namespace for caching. To close out this discussion on caching, let’s take a quick look at how to configure caching rules in XML.
13.3. Declaring caching in XML
You may be wondering why you’d ever want to declare caching in XML. After all, the caching annotations we’ve looked at throughout this chapter are much more elegant.
I can think of two reasons:
· You don’t feel comfortable putting Spring-specific annotations in your source code.
· You want to apply caching to beans for which you don’t own the source code.
In either of those cases, it’s better (or necessary) to keep the caching configuration separate from the code whose data is being cached. Spring’s cache namespace offers a way to declare caching rules in XML as an alternative to annotation-oriented caching. Because caching is an aspect-oriented activity, the cache namespace is paired with Spring’s aop namespace for declaring the pointcuts where caching should be applied.
To get started with XML-declared caching, you’ll need to create a Spring configuration XML file that includes the cache and aop namespaces:
<?xml version="1.0" encoding="UTF-8"?>
<beans xmlns="http://www.springframework.org/schema/beans"
xmlns:xsi="http://www.w3.org/2001/XMLSchema-instance"
xmlns:cache="http://www.springframework.org/schema/cache"
xmlns:aop="http://www.springframework.org/schema/aop"
xsi:schemaLocation="http://www.springframework.org/schema/aop
http://www.springframework.org/schema/aop/spring-aop.xsd
http://www.springframework.org/schema/beans
http://www.springframework.org/schema/beans/spring-beans.xsd
http://www.springframework.org/schema/cache
http://www.springframework.org/schema/cache/spring-cache.xsd">
<!-- Caching configuration will go here -->
</beans>
The cache namespace defines the configuration elements for declaring caching in a Spring XML configuration file. Table 13.5 lists all the elements offered by the cache namespace.
Table 13.5. Spring’s cache namespace offers elements for configuring caching rules in XML.
|
Element |
Description |
|
<cache:annotation-driven> |
Enables annotation-driven caching. Equivalent to @EnableCaching in Java configuration. |
|
<cache:advice> |
Defines caching advice. Paired with <aop:advisor> to apply advice to a pointcut. |
|
<cache:caching> |
Defines a specific set of caching rules within the caching advice. |
|
<cache:cacheable> |
Designates a method as being cacheable. Equivalent to the @Cacheable annotation. |
|
<cache:cache-put> |
Designates a method as populating (but not considering) the cache. Equivalent to the @CachePut annotation. |
|
<cache:cache-evict> |
Designates a method as evicting one or more entries from the cache. Equivalent to the @CacheEvict annotation. |
The <cache:annotation-driven> element, much like its Java configuration counterpart @EnableCaching, turns on annotation-oriented caching. We’ve already discussed this style of caching, so there’s no need to dwell on it further.
The remaining elements in table 13.5 are for XML-based caching configuration. The next listing shows how to use these elements to configure caching around the SpittleRepository bean, equivalent to what you did earlier in this chapter using caching annotations.
Listing 13.7. Declaring caching rules around SpittleRepository using XML elements
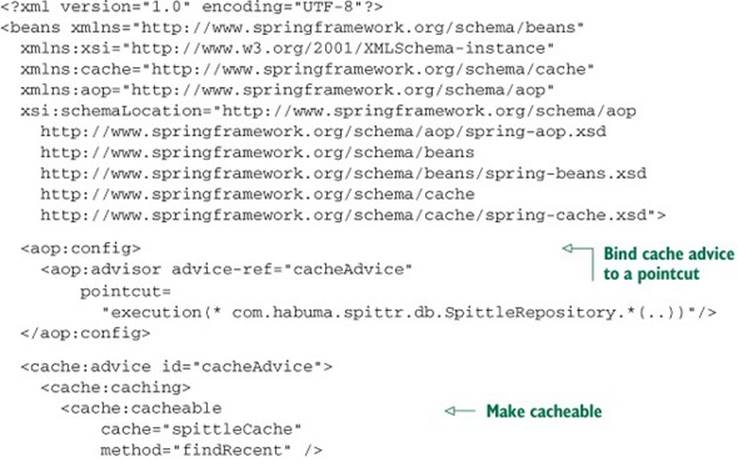
The first thing you see declared in listing 13.7 is an <aop:advisor> that references the advice whose ID is cacheAdvice. This element matches the advice with a pointcut, thus establishing a complete aspect. In this case, the aspect’s pointcut is triggered on the execution of any method of the SpittleRepository interface. If such a method is called on any bean in the Spring application context, the aspect’s advice will be invoked.
The advice is declared with the <cache:advice> element. In the <cache:advice> element, you can have as many <cache:caching> elements as you need to fully define your application’s caching rules. In this case, there’s only one <cache:caching> element. It contains three<cache:cacheable> elements and one <cache:cache-put> element.
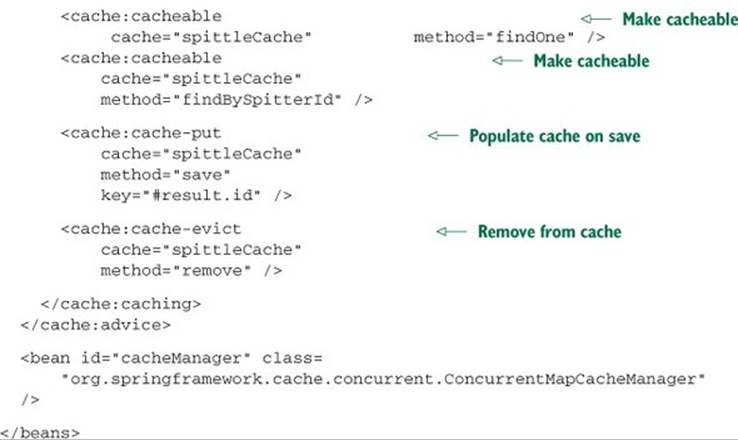
The <cache:cacheable> elements each declare a method from the pointcut as being cacheable. It’s the XML equivalent to the @Cacheable annotation. Specifically, the findRecent(), findOne(), and findBySpitterId() methods are all declared as cacheable, and their return values will be cached in the spittleCache cache.
<cache:cache-put> is Spring’s XML equivalent to the @CachePut annotation. It designates a method as one whose return value will populate a cache, but the method will never draw its return value from the cache. In this case, the save() method is used to populate the cache. And, as with annotation-oriented caching, you need to override the default key to be the id property of the returned Spittle object.
Finally, the <cache:cache-evict> element is Spring’s XML alternative to the @CacheEvict annotation. It removes an element from the cache so that it won’t be found the next time someone looks for it. Here, when you delete a Spittle from the cache by calling remove(), the entry whose key is the same as the ID passed in to remove() will be evicted from the cache.
It’s worth noting that the <cache:advice> element has a cache-manager attribute to specify the bean that serves as the cache manager. By default it’s cacheManager, which coincides with the <bean> declared at the end of listing 13.7, so there’s no need to explicitly set it. But if your cache manager bean has a different ID (as might be the case if you declared multiple cache managers), you can specify which cache manager to use by setting the cache-manager attribute.
Also notice that the <cache:cacheable>, <cache:cache-put>, and <cache:cache-evict> elements refer to the same cache named spittleCache. To remove that duplication, you can specify the cache name in the <cache:caching> annotation instead:
<cache:advice id="cacheAdvice">
<cache:caching cache="spittleCache">
<cache:cacheable method="findRecent" />
<cache:cacheable method="findOne" />
<cache:cacheable method="findBySpitterId" />
<cache:cache-put
method="save"
key="#result.id" />
<cache:cache-evict method="remove" />
</cache:caching>
</cache:advice>
<cache:caching> shares several attributes with <cache:cacheable>, <cache:cache-put>, and <cache:cache-evict>, including these:
· cache —Specifies the cache to store values in and retrieve values from.
· condition —A SpEL expression that, if it evaluates to false, disables caching for the method.
· key —A SpEL expression used to derive the cache key. (Defaults to the method’s parameters.)
· method —The name of the method to be cached.
In addition, <cache:cacheable> and <cache:cache-put> have an unless attribute. This optional attribute can be given a SpEL expression that, if it evaluates to true, prevents the return value from being cached.
The <cache:cache-evict> element offers a few unique attributes:
· all-entries —If true, all entries in the cache are removed. If false, only the entry matching the key is removed.
· before-invocation —If true, the cache entry (or entries) are removed before the method is invoked. If false, they’re removed after the method is invoked.
Both all-entries and before-invocation default to false. This means that using <cache:cache-evict> without either of them will result in only a single entry being removed from the cache after the method is invoked. The item to be removed is identified by the default key (based on the method’s parameter) or a key specified with a SpEL expression given to the key attribute.
13.4. Summary
Caching is a great way to keep your application code from having to derive, calculate, or retrieve the same answers over and over again for the same question. When a method is initially invoked with a given set of parameters, the return value can be stored in a cache and retrieved from that cache later when the same method is called with the same parameters. In many cases, looking up a value from a cache is a cheaper operation then looking it up otherwise (for example, performing a database query). Therefore, caching can have a positive impact on application performance.
In this chapter, you’ve seen how to declare caching in a Spring application. First you saw how to declare one or more of Spring’s cache managers. Then you applied caching to the Spittr application by adding annotations such as @Cacheable, @CachePut, and @CacheEvict to theSpittleRepository.
We also looked at how to configure caching rules separate from the application code in XML. The <cache:cacheable>, <cache:cache-put>, and <cache:cache-evict> elements mirror the annotations you used earlier in the chapter.
Along the way, we discussed the fact that caching is an aspect-oriented activity. In fact, Spring implements caching as an aspect. This became apparent when you declared caching rules in XML: you had to bind your caching advice to a pointcut.
Spring also uses aspects when applying security rules to methods. In the next chapter, you’ll see how to use Spring Security to enforce security on bean methods.
All materials on the site are licensed Creative Commons Attribution-Sharealike 3.0 Unported CC BY-SA 3.0 & GNU Free Documentation License (GFDL)
If you are the copyright holder of any material contained on our site and intend to remove it, please contact our site administrator for approval.
© 2016-2026 All site design rights belong to S.Y.A.