Spring in Action, 4th Edition: Covers Spring 4 (2015)
Part 3. Spring in the back end
Chapter 12. Working with NoSQL databases
This chapter covers
· Writing repositories backed by MongoDB and Neo4j
· Persisting data across multiple data stores
· Working with Spring and Redis
In his autobiography, Henry Ford is famous for having written “Any customer can have a car painted any color that he wants so long as it is black.”[1] Some say this statement was arrogant and bull-headed. Others may think he was showing a bit of humor. The reality, however, may be found in the fact that at the time his biography was published, he was cutting costs by using a quick-drying paint that was only available in black.
1 Henry Ford and Samuel Crowther, My Life and Work (Garden City, New York: Garden City Publishing Company, 1922).
Paraphrasing Ford’s famous quote and applying it to database choice, we’ve been told for years that we can have any database we want, as long as it’s a relational database. Relational databases have had a near-monopolistic hold on application development for a very long time.
But that hold is weakening now that some serious contenders have entered the database space. The so-called “NoSQL” databases are making inroads into production applications everywhere as we recognize that there’s no one-size-fits-all database. We now have a greater choice and can choose the best database for the problem we’re trying to solve.
Over the past couple of chapters, we’ve focused on relational databases, starting with Spring’s JDBC support and then object-relational mapping. In the previous chapter, specifically, we looked at Spring Data JPA, one of several projects under the Spring Data umbrella project. We saw how Spring Data JPA can make working with JPA more pleasant by automatically generating repository implementations at runtime.
Spring Data also supports several NoSQL databases, including MongoDB, Neo4j, and Redis. This not only includes support for automatic repositories, but also template-based data access and mapping annotations. In this chapter, we’re going to see how to write repositories that work with non-relational, NoSQL databases. We’ll start with Spring Data MongoDB to see how to write repositories that deal with document-based data.
12.1. Persisting documents with MongoDB
Some kinds of data are best represented as documents. That is, rather than spread the data across multiple tables, nodes, or entities, it may make more sense to collect the information into denormalized structures (known as documents). Although two or more of these documents may be related to each other, generally documents are standalone entities. Databases that are finely tuned to work with documents in this way are known as document databases.
For example, suppose that you’re writing an application that captures a college student’s transcript. You’ll need to be able to retrieve transcripts given a student’s name or perhaps search across the transcripts for some common properties. But each student is evaluated individually, so it isn’t necessary for any two transcripts to be related to each other. Although a relational database schema could be (and probably has been) designed to capture this transcript data, perhaps a document database is a better choice.
What document databases aren’t good for
Knowing when to use a document database is important. But it’s also important to know when document databases don’t make sense. Document databases aren’t general-purpose databases and they have a very narrow set of problems that they address well.
Document databases aren’t well-tuned for storing data where there’s any significant degree of relationships. A social network, for example, represents how different users of an application relate to each other and isn’t best kept in a document database. Even though it’s not impossible to store relation-rich data in a document database, you’ll find more challenge than benefit in doing so.
The domain of the Spittr application isn’t a good fit for a document database. In this chapter, we’ll look at MongoDB in the context of a purchase order system.
MongoDB is one of the most popular open source document databases available. Spring Data MongoDB brings MongoDB to Spring applications in three ways:
· Annotations for object-to-document mapping
· Template-based database access with MongoTemplate
· Automatic runtime repository generation
We’ve already looked at how Spring Data JPA enabled automatic repository generation for JPA-based data access. Spring Data MongoDB offers the same feature for MongoDB-based data access.
Unlike Spring Data JPA, however, Spring Data MongoDB also offers annotations to map Java objects to documents. (Spring Data JPA doesn’t need to offer such annotations for JPA because the JPA specification itself defines object-to-relational mapping annotations.) Moreover, Spring Data MongoDB provides for template-based MongoDB data access for several common document manipulation tasks.
Before we can use any of these features, however, we’ll need to configure Spring Data MongoDB.
12.1.1. Enabling MongoDB
In order to effectively work with Spring Data MongoDB, you’re going to need a few essential beans in your Spring configuration. First, you’ll need to configure a MongoClient bean to be able to access the MongoDB database. You’ll also need a Mongo-Template bean to be able to perform template-based data access against the database. Optionally, but desirably, you’ll want to enable Spring Data MongoDB’s automatic repository generation.
The following listing shows how to write a simple Spring Data MongoDB configuration class that addresses these needs.
Listing 12.1. An essential configuration for Spring Data MongoDB
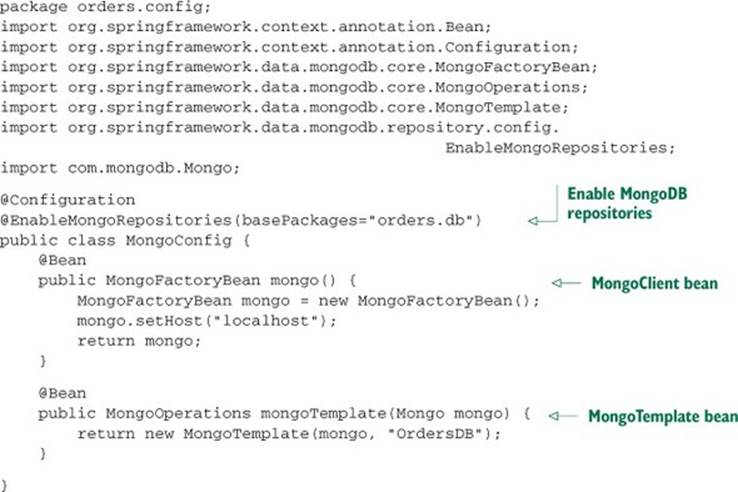
As you’ll recall from the previous chapter, you enabled Spring Data’s automatic JPA repository generation with the @EnableJpaRepositories annotation. Similarly, the @EnableMongoRepositories annotation does the same thing for MongoDB.
In addition to @EnableMongoRepositories, listing 12.1 also includes two @Bean methods. The first @Bean method uses MongoFactoryBean to declare a Mongo instance. This bean will bridge Spring Data MongoDB to the database itself (not unlike what a DataSource does when working with a relational database). Although you could create an instance of Mongo directly with MongoClient, you’d be forced to deal with the UnknownHostException that’s thrown from MongoClient’s constructor. It’s easier to use Spring Data MongoDB’s MongoFactoryBeanhere. As a factory bean, Mongo-FactoryBean will construct an instance of Mongo for you, without you needing to worry much about UnknownHostException.
The other @Bean method declares a MongoTemplate bean. It’s constructed giving it a reference to the Mongo instance created by the other bean method and the name of the database. In a moment, you’ll see how to use MongoTemplate to query the database. Even if you never useMongoTemplate directly, you’ll need this bean because the automatically generated repositories will use it under the covers.
Rather than declare those beans directly, the configuration class could extend AbstractMongoConfiguration and override its getDatabaseName() and mongo() methods. The following listing shows how.
Listing 12.2. Enabling Spring Data MongoDB with the @EnableMongoRepositories
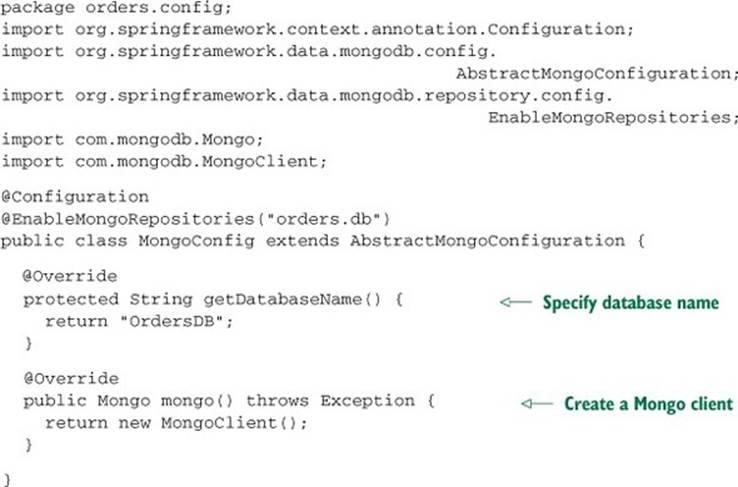
This new configuration class is equivalent to the one in listing 12.1, albeit marginally simpler. The most noticeable difference is that this configuration doesn’t directly declare a MongoTemplate bean, although one is implicitly created. Instead, you override getDatabaseName() to provide the name of the database. The mongo() method still creates an instance of MongoClient, but because it throws Exception, you can work with MongoClient directly without working with MongoFactoryBean.
As it stands, either listing 12.1 or 12.2 provide a working configuration for Spring Data MongoDB. That is, as long as the MongoDB server is running on localhost. If your MongoDB server is running on a different server, you can specify that when you create MongoClient:
public Mongo mongo() throws Exception {
return new MongoClient("mongodbserver");
}
It’s also possible that your MongoDB server is listening on a port other than the default (27017). In that case, you should also specify the port when creating MongoClient:
public Mongo mongo() throws Exception {
return new MongoClient("mongodbserver", 37017);
}
And if your MongoDB server is running in a production setting, I’d hope that you have authentication enabled. In that case, you’ll need to provide your application’s credentials in order to access the database. Accessing an authenticated MongoDB server is a bit more involved, as you can see in the next listing.
Listing 12.3. Creating a MongoClient to access an authenticated MongoDB server
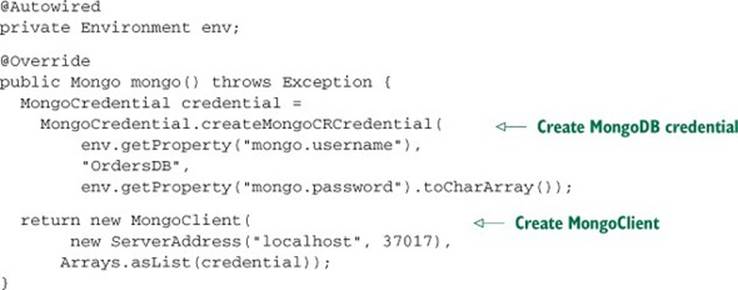
In order to access an authenticated MongoDB server, MongoClient must be instantiated with a list of MongoCredentials. In listing 12.3 a single MongoCredential is created for that purpose. In order to keep the credential details out of the configuration class, they’re resolved from the injected Environment.
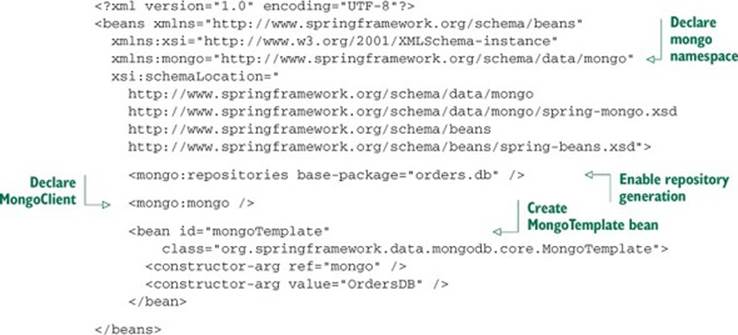
For what it’s worth, Spring Data MongoDB can also be configured in XML. As you should know by now, I favor the Java configuration option. But if you’ve got a fondness for XML configuration, the following listing gives an example of how to configure Spring Data MongoDB using themongo configuration namespace.
Listing 12.4. Spring Data MongoDB offers an XML configuration option
Now that Spring Data MongoDB has been configured, you’re almost ready to start using it to save and retrieve documents. But first, you’ll need to map your Java domain types for document persistence using Spring Data MongoDB’s object-to-document mapping annotations.
12.1.2. Annotating model types for MongoDB persistence
When working with JPA, you had to map your Java entity types to relational tables and columns. The JPA specification provides for several annotations to support object-to-relational mapping, and some JPA implementations, such as Hibernate, add their own mapping annotations as well.
MongoDB, however, doesn’t come with its own object-to-document mapping annotations. Spring Data MongoDB seized the opportunity to fill that gap with a handful of annotations that you can use to map your Java types to MongoDB documents. Table 12.1 describes these annotations.
Table 12.1. Spring Data MongoDB annotations for object-to-document mapping
|
Annotation |
Description |
|
@Document |
Identifies a domain object to be mapped to a MongoDB document |
|
@Id |
Indicates that a field is the ID field |
|
@DbRef |
Indicates that a field is intended to reference another document, possibly in another database |
|
@Field |
Defines custom metadata for a document field |
|
@Version |
Identifies a property to be used as a version field |
The @Document and @Id annotations are analogous to JPA’s @Entity and @Id annotations. You’ll use these two annotations often and on every Java type that will be stored as a document in the MongoDB database. For example, the next listing shows how you might annotate an Orderclass to be persisted in MongoDB.
Listing 12.5. Spring Data MongoDB annotations map Java types to documents.
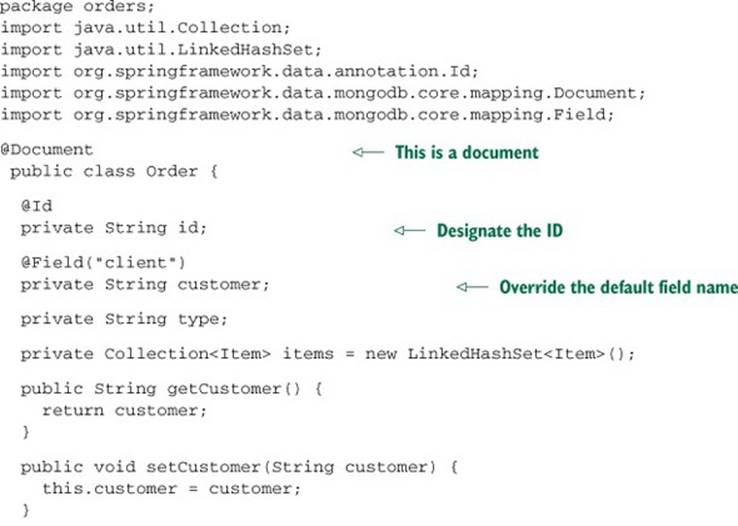
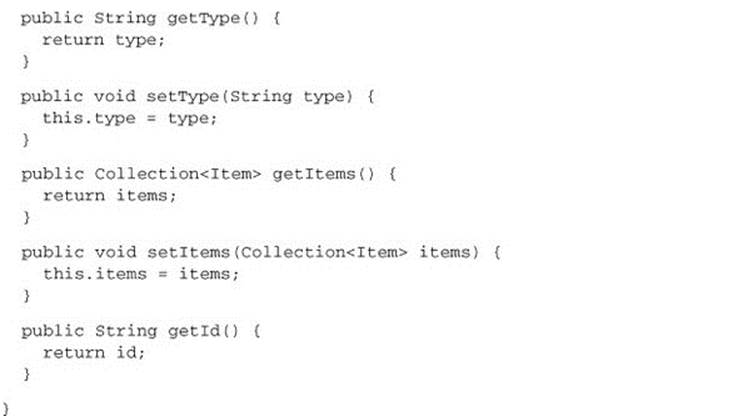
As you can see, Order is annotated with @Document, enabling it to be persisted using MongoTemplate, an automatically generated repository, or both. Its id property is annotated with @Id to designate it as the ID of the document. In addition, the customer property is annotated with@Field so that when the document is persisted, the customer property will be mapped to a field named client.
Notice that no other properties are annotated. Unless they’re marked as transient, all fields of the Java object will be persisted as fields of the document. And unless otherwise indicated with @Field, the document fields will have the same names as their Java property counterparts.
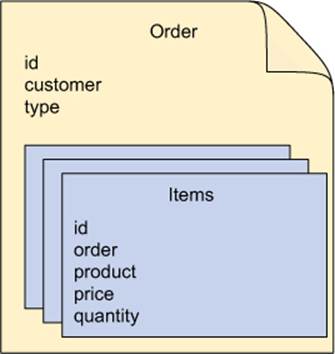
Also, take note of the items property. It’s clearly a collection of line items in this order. In a traditional relational database setting, those items would probably be kept in a separate database table, referenced with a foreign key, and the items field might be annotated for JPA with@OneToMany. But here that’s not the case.
As I said earlier, documents can be related to other documents, but that’s not what document databases are especially good at. In the case of the relationship between a purchase order and its line items, the line items are merely a nested part of the same order document (as shown in figure 12.1). Therefore, there’s no need for any annotations to designate the relationship. In fact, the Item class itself isn’t annotated at all:
Figure 12.1. Documents represent related but denormalized data. Related concepts (such as items of an order) are embedded in the top-level document.
package orders;
public class Item {
private Long id;
private Order order;
private String product;
private double price;
private int quantity;
public Order getOrder() {
return order;
}
public String getProduct() {
return product;
}
public void setProduct(String product) {
this.product = product;
}
public double getPrice() {
return price;
}
public void setPrice(double price) {
this.price = price;
}
public int getQuantity() {
return quantity;
}
public void setQuantity(int quantity) {
this.quantity = quantity;
}
public Long getId() {
return id;
}
}
It’s not necessary to annotate Item with @Document, nor is it necessary to annotate one of its fields with @Id. That’s because you’ll never persist an Item as an independent document. It will always be a member of the Order document’s Item list and a nested element in that document.
Of course, you could annotate one of Item’s properties with @Field if you wanted to dictate how that field should be stored in the document. It just wasn’t necessary to do so in this example.
Now we have a Java domain type annotated for MongoDB persistence. Let’s see how you can use MongoTemplate to store a few of them.
12.1.3. Accessing MongoDB with MongoTemplate
You’ve already configured a MongoTemplate bean, either explicitly or by extending AbstractMongoConfiguration in your configuration class. All you need to do is inject it wherever it will be used:
@Autowired
MongoOperations mongo;
Notice that here I’m injecting MongoTemplate into a property whose type is Mongo-Operations. MongoOperations is an interface that MongoTemplate implements, and it’s good form to not work with the concrete implementation directly, especially when it’s injected.
MongoOperations exposes several useful methods for working with a MongoDB document database. It’d be impossible for us to discuss all of them here, but we can take a look at a few of the most commonly used operations, such as counting how many documents are in a document collection. Using the injected MongoOperations, you get the order collection and then call count() to get a count:
long orderCount = mongo.getCollection("order").count();
Now let’s suppose you want to save a new order. To do that, you can call the save() method:
Order order = new Order();
... // set properties and add line items
mongo.save(order, "order");
The first parameter to save() is the newly created Order; the second is the name of the document store to save it to.
You can also look up an order by its ID by calling findById():
String orderId = ...;
Order order = mongo.findById(orderId, Order.class);
More advanced queries require that you construct a Query object and pass it to the find() method. For example, to find all orders whose client field is equal to “Chuck Wagon”, you can use this code:
List<Order> chucksOrders = mongo.find(Query.query(
Criteria.where("client").is("Chuck Wagon")), Order.class);
In this case, the Criteria used to construct the Query only checks one field. But it can also be used for even more interesting queries. Perhaps you want to get all of Chuck’s orders that were placed over the web:
List<Order> chucksWebOrders = mongo.find(Query.query(
Criteria.where("customer").is("Chuck Wagon")
.and("type").is("WEB")), Order.class);
And, should you wish to remove a document, the remove() method is what you’re looking for:
mongo.remove(order);
As I’ve said, MongoOperations has several methods for working with document data. I encourage you to examine the JavaDoc to discover what else you can do with MongoOperations.
Typically, you’d inject MongoOperations into a repository class of your own design and use its operations to implement the repository methods. But if you don’t want to bother writing the repository yourself, then Spring Data MongoDB can automatically generate a repository implementation for you at runtime. Let’s see how.
12.1.4. Writing a MongoDB repository
To understand how to create repositories with Spring Data MongoDB, let’s once again consider what you did in chapter 11 with Spring Data JPA. In listing 11.4, you created an interface named SpitterRepository that extends JpaRepository. In the same section, you also enabled Spring Data JPA repositories. As a result, Spring Data JPA was able to automatically create an implementation of that interface, including several built-in methods and any methods you added that followed a naming convention.
You’ve already enabled Spring Data MongoDB repositories with @EnableMongo-Repositories, so all that’s left is to create an interface that you can generate the repository implementation from. Instead of extending JpaRepository, however, you’ll need to extendMongoRepository. The OrderRepository interface in the following listing extends MongoRepository to provide basic CRUD operations for Order documents.
Listing 12.6. Spring Data MongoDB automatically implements repository interfaces
package orders.db;
import orders.Order;
import org.springframework.data.mongodb.repository.MongoRepository;
public interface OrderRepository
extends MongoRepository<Order, String> {
}
Because OrderRepository extends MongoRepository, it transitively extends the Repository marker interface. As you’ll recall from our exploration of Spring Data JPA, any interface that extends Repository will have an implementation automatically generated at runtime. In this case, however, instead of a JPA repository that interacts with a relational database, OrderRepository will be implemented to read and write data to a MongoDB document database.
The MongoRepository interface has two parameters. The first is the type of @Document-annotated object that this repository deals with. The second is the type of the @Idannotated property.
Even though OrderRepository doesn’t define any methods of its own, it inherits several methods, including several useful methods for CRUD operations on Order documents. Table 12.2 describes all of the methods that OrderRepository inherits.
Table 12.2. By extending MongoRepository, a repository interface inherits several CRUD operations that are automatically implemented by Spring Data MongoDB.
|
Method |
Description |
|
long count(); |
Returns a count of the documents for the repository type |
|
void delete(Iterable<? extends T); |
Deletes all documents associated with the given objects |
|
void delete(T); |
Deletes the document associated with the given object |
|
void delete(ID); |
Deletes a document by its ID |
|
void deleteAll(); |
Deletes all documents for the given repository type |
|
boolean exists(Object); |
Returns true if a document associated with the given object exists |
|
boolean exists(ID); |
Returns true if a document exists for the given ID |
|
List<T> findAll(); |
Returns all documents for the repository type |
|
List<T> findAll(Iterable<ID>); |
Returns all documents for the given document IDs |
|
List<T> findAll(Pageable); |
Returns a paged and sorted list of documents for the repository type |
|
List<T> findAll(Sort); |
Returns a sorted list of all documents for the given document ID |
|
T findOne(ID); |
Returns a single document for the given ID |
|
save(Iterable<S>); |
Saves all documents in the given Iterable |
|
save(S); |
Saves a single document for the given object |
The methods in table 12.2 refer to the generic types passed into and returned from the methods. Given that OrderRepository extends MongoRepository<Order, String>, this means that T maps to Order, ID maps to String, and S maps to any type that extends Order.
Adding custom query methods
The CRUD operations are generally useful, but you may need the repository to provide methods beyond what comes out of the box.
In section 11.3.1, you learned that Spring Data JPA supports a method-naming convention that helps Spring Data to automatically generate implementations for the methods that follow that convention. As it turns out, the very same convention works with Spring Data MongoDB. That means you can add custom methods to OrderRepository like this:
public interface OrderRepository
extends MongoRepository<Order, String> {
List<Order> findByCustomer(String c);
List<Order> findByCustomerLike(String c);
List<Order> findByCustomerAndType(String c, String t);
List<Order> findByCustomerLikeAndType(String c, String t);
}
Here you have four new methods, each one finding Order objects that match certain criteria. One method finds a list of Order where the customer property is equal to the value passed into the method. Another finds a list of Order where the customer property is like the value passed into the method. The next finds Order objects whose customer and type properties are equal to the values passed in. The final method is like the previous, except that the customer comparison is a like comparison instead of an equals comparison.
The find query verb is flexible. If you’d prefer, you can use get as the query verb:
List<Order> getByCustomer(String c);
Or if it suits you better, you can use read:
List<Order> readByCustomer(String c);
There’s also another special query verb for counting the objects that match:
int countByCustomer(String c);
As with Spring Data JPA, there’s a lot of flexibility in what can go in between the query verb and By. For example, you could state what it is you’re finding:
List<Order> findOrdersByCustomer(String c);
There’s nothing special about the word Orders, though. It has nothing to do with what is being fetched. You could name the method like this:
List<Order> findSomeStuffWeNeedByCustomer(String c);
You also don’t need to return a List<Order>. If all you want is a single Order, you can simply return Order:
Order findASingleOrderByCustomer(String c);
Here, the first Order that would’ve been found if it were a List is what will be returned. If there isn’t a match, the method will return null.
Specifying queries
As you saw in section 11.3.2, the @Query annotation can be used to specify a custom query for a repository method. @Query works equally well with MongoDB as it does with JPA. The only material difference is that for MongoDB, @Query takes a JSON query string instead of a JPA query.
For example, suppose you need a method that finds all orders of a given type for the customer whose name is “Chuck Wagon”. The following method declaration in OrderRepository will give you what you need:
@Query("{'customer': 'Chuck Wagon', 'type' : ?0}")
List<Order> findChucksOrders(String t);
The JSON given to @Query is matched up against all Order documents, and any document that matches will be returned. Notice that the type property is mapped to ?0. This indicates that the type property should be equal to the zeroth parameter to the query method. If there were more parameters, they could be referred to with ?1, ?2, and so forth.
Mixing in custom repository behavior
In section 11.3.3, you learned how to mix fully custom methods into an otherwise automatically generated repository. For JPA, that involved creating an intermediary interface that declares the custom method(s), an implementation class for those custom methods, and changing the automatic repository interface to extend the intermediary interface. The steps are the same for a Spring Data MongoDB repository.
Suppose that you need a method that finds all Order objects where the document’s type property matches a given value. You could easily create such a method by giving it a signature of List<Order> findByType(String t). But for the sake of this example, suppose that if the given type is NET, then it will query for Orders whose type is WEB. This would be hard to do, even with the @Query annotation. A mixin implementation, however, can make it work.
First, define the intermediary interface:
package orders.db;
import java.util.List;
import orders.Order;
public interface OrderOperations {
List<Order> findOrdersByType(String t);
}
That’s simple enough. Now you can write the mixin implementation. The following listing shows what the implementation might look like.
Listing 12.7. Mixing custom repository functionality into an automatic repository
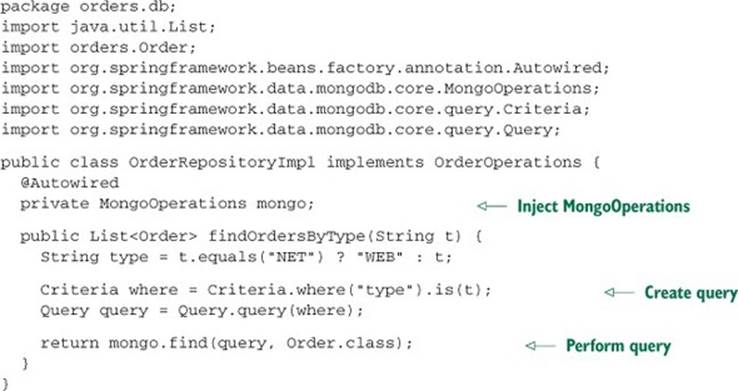
As you can see, the mixin implementation is injected with a MongoOperations (the interface that MongoTemplate implements). The findOrdersByType() method uses the MongoOperations to query the database for documents matching the constructed query.
All that’s left is to change OrderRepository to extend the intermediary Order-Operations interface:
public interface OrderRepository
extends MongoRepository<Order, String>, OrderOperations {
...
}
The thing that ties all of this together is the fact that the implementation class is named OrderRepositoryImpl. This is the same name as the OrderRepository interface, with an “Impl” suffix. When Spring Data MongoDB generates the repository implementation, it will look for this class and mix it into the automatically generated implementation.
If you don’t care for the “Impl” suffix, you can configure Spring Data MongoDB to look for a class with a different suffix in its name. All you need to do is set the repositoryImplementationPostfix attribute of @EnableMongoRepositories (in the Spring configuration class).
@Configuration
@EnableMongoRepositories(basePackages="orders.db",
repositoryImplementationPostfix="Stuff")
public class MongoConfig extends AbstractMongoConfiguration {
...
}
Or, if you’re using XML configuration, you can set the repository-impl-postfix attribute of <mongo:repositories>:
<mongo:repositories base-package="orders.db"
repository-impl-postfix="Stuff" />
Either way, if you configure Spring Data MongoDB this way, it will look for Order-RepositoryStuff instead of OrderRepositoryImpl.
Document databases such as MongoDB solve a certain class of problems. But just as relational databases aren’t a one-size-fits-all solution, neither is MongoDB. And there are certain problems that neither a relational database nor a document database is well-suited for. Fortunately, those aren’t the only two choices.
Let’s have a look at how Spring Data supports Neo4j, a popular graph database.
12.2. Working with graph data in Neo4j
Whereas document databases store data in coarse-grained documents, graph databases store data in several fine-grained nodes that are connected with each other through relationships. A node in a graph database typically represents a concept in the database, having properties that describe the state of the node. Relationships connect two nodes and may carry properties of their own.
At their simplest, graph databases are more general purpose than document databases, potentially being a schemaless alternative to relational databases. But because data is structured as a graph, it’s possible to traverse relationships to discover things about your data that would be difficult or even impossible with other kinds of databases.
Spring Data Neo4j offers many of the same capabilities as Spring Data JPA and Spring Data MongoDB, albeit targeting the Neo4j graph database. It provides annotations for mapping Java types to nodes and relationships, template-oriented Neo4j access, and automatic generation of repository implementations.
You’ll see how to use these features to work with Neo4j. But first, you must configure Spring Data Neo4j.
12.2.1. Configuring Spring Data Neo4j
The key to configuring Spring Data Neo4j is to declare a GraphDatabaseService bean and enable automatic Neo4j repository generation. The following listing shows the basic Java configuration needed for Spring Data Neo4j.
Listing 12.8. Configuring Spring Data Neo4j with @EnableNeo4jRepositories
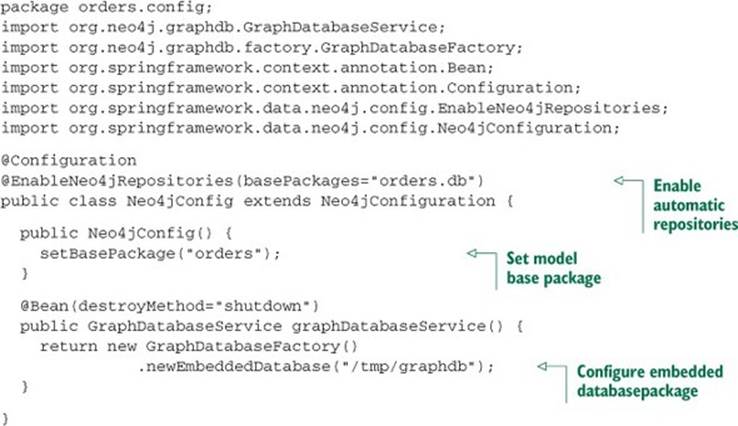
The @EnableNeo4jRepositories annotation enables Spring Data Neo4j to automatically generate Neo4j repository implementations. Its basePackages is set so that it scans the orders.db package for interfaces that extend (directly or indirectly) the marker Repository interface.
Neo4jConfig extends Neo4jConfiguration, which provides convenient methods for configuring Spring Data Neo4j. Among those methods is setBasePackage(), which is called from Neo4jConfig’s constructor to tell Spring Data Neo4j that it can find model classes in the orderspackage.
The final piece of the puzzle is to define a GraphDatabaseService bean. In this case, the graphDatabaseService() method uses GraphDatabaseFactory to create an embedded Neo4j database. With Neo4j, an embedded database shouldn’t be confused with an in-memory database. “Embedded” means that the database engine is running within the same JVM as a part of your application rather than as a separate server. The data is still persisted to the filesystem (at /tmp/graphdb in this case).
Alternatively, you might want to configure a GraphDatabaseService that references a remote Neo4j server. If you have the spring-data-neo4j-rest library in your application’s classpath, you can configure SpringRestGraphDatabase, which accesses a remote Neo4j database over a RESTful API:
@Bean(destroyMethod="shutdown")
public GraphDatabaseService graphDatabaseService() {
return new SpringRestGraphDatabase(
"http://graphdbserver:7474/db/data/");
}
As shown here, SpringRestGraphDatabase is configured to assume that the remote database doesn’t require authentication. In a production setting, however, it’s likely that you’ll want to secure the database server. In that case, you’ll want to provide your application’s credentials when creating the SpringRestGraphDatabase:
@Bean(destroyMethod="shutdown")
public GraphDatabaseService graphDatabaseService(Environment env) {
return new SpringRestGraphDatabase(
"http://graphdbserver:7474/db/data/",
env.getProperty("db.username"), env.getProperty("db.password"));
}
Here, the credentials are obtained via the injected Environment to avoid hard-coding them in the configuration class.
Spring Data Neo4j also offers an XML configuration namespace. If you’d rather configure Spring Data Neo4j in XML, you can use the <neo4j:config> and <neo4j:repositories> elements from that namespace. Listing 12.9 shows an XML configuration that’s equivalent to the Java configuration in listing 12.8.
Listing 12.9. Spring Data Neo4j can also be configured in XML.
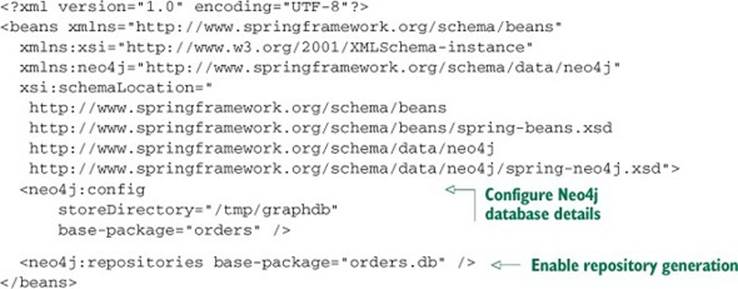
The <neo4j:config> element configures the details of how to access the database. In this case, it configures Spring Data Neo4j to work with an embedded database. Specifically, the storeDirectory attribute specifies the path in the filesystem where the data will be persisted. Thebase-package attribute sets the package where the model classes are defined.
As for <neo4j:repositories>, it enables Spring Data Neo4j to automatically generate repository implementations by scanning the orders.db package and looking for interfaces that extend the Repository interface.
To configure Spring Neo4j to access a remote Neo4j server, all you need to do is declare a SpringRestGraphDatabase bean and set <neo4j:config>’s graphDatabase-Service attribute:
<neo4j:config base-package="orders"
graphDatabaseService="graphDatabaseService" />
<bean id="graphDatabaseService" class=
"org.springframework.data.neo4j.rest.SpringRestGraphDatabase">
<constructor-arg value="http://graphdbserver:7474/db/data/" />
<constructor-arg value="db.username" />
<constructor-arg value="db.password" />
</bean>
Whether you configure Spring Data Neo4j using Java or XML, you’ll need to be sure that the domain types are under a package specified as a base package (@EnableNeo4jRepositories’s basePackages attribute or <neo4j:config>’s base-package attribute). They’ll also need to be annotated as either node entities or relationship entities. That’s what you’ll do next.
12.2.2. Annotating graph entities
Neo4j defines two kinds of entities: nodes and relationships. Node entities typically represent the things in your application, whereas relationship entities define how those things are related.
Spring Data Neo4j provides several annotations that you can apply to domain types and their fields for persistence in Neo4j. Table 12.3 describes these annotations.
Table 12.3. Spring Data Neo4j annotations you can use to map domain types to nodes and relationships in a graph
|
Annotation |
Description |
|
@NodeEntity |
Declares a Java type as a node entity |
|
@RelationshipEntity |
Declares a Java type as a relationship entity |
|
@StartNode |
Declares a property as the start node of a relationship entity |
|
@EndNode |
Declares a property as the end node of a relationship entity |
|
@Fetch |
Declares a property on an entity to be eagerly loaded |
|
@GraphId |
Declares a property as the ID field of an entity (the field must be a Long) |
|
@GraphProperty |
Explicitly declares a property |
|
@GraphTraversal |
Declares a property to automatically provide an iterable that’s built by following a graph traversal |
|
@Indexed |
Declares a property to be indexed |
|
@Labels |
Declares the labels for an @NodeEntity |
|
@Query |
Declares a property to automatically provide an iterable that’s built by executing a given Cypher query |
|
@QueryResult |
Declares a Java class or interface as being able to hold the results of a query |
|
@RelatedTo |
Declares a simple relationship between the current @NodeEntity and another @NodeEntity via a property |
|
@RelatedToVia |
Declares a field on an @NodeEntity as referencing an @RelationshipEntity that the node belongs to |
|
@RelationshipType |
Declares a field as the type of a relationship entity |
|
@ResultColumn |
Declares a property on an @QueryResult-annotated type to capture a specific field from a query result |
To see how a few of these annotations are used, let’s apply these annotations to our order/item example.
One way you can model the data is to designate an order as a node that’s related to one or more items. Figure 12.2 illustrates this model as a graph.
Figure 12.2. A simple relationship connects two nodes but carries no properties of its own.
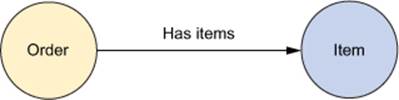
To designate orders as nodes, you’ll need to annotate the Order class with @Node-Entity. The next listing shows the Order class annotated with @NodeEntity, as well as a few other annotations from table 12.3.
Listing 12.10. Order is annotated to be a node in the graph database
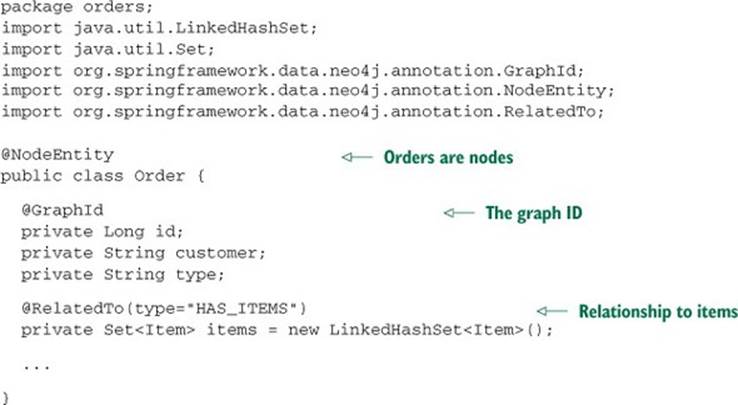
In addition to the @NodeEntity at the class level, notice that the id property is annotated with @GraphId. All entities in Neo4j must have a graph ID. This is roughly analogous to the @Id-annotated properties of a JPA @Entity or a MongoDB @Document. It’s required that the@GraphId-annotated property be a Long.
The customer and type properties remain annotation-free. Unless they are transient, they’ll be properties on the node in the database.
The items property is annotated with @RelatedTo, indicating that an Order is related to a Set of Item. The type attribute essentially labels the relationship. It can be given any value, but it’s commonly given human-readable text that briefly describes the nature of the relationship. Later you’ll use this label in queries to query across relationships.
As for the Item class itself, the following listing shows how it’s annotated for graph persistence.
Listing 12.11. Items are also represented as nodes in the graph database.
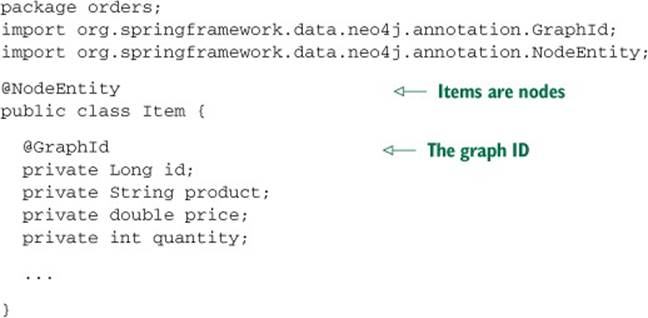
As with Order, Item is annotated as @NodeEntity to designate it as a node. It also has a Long property annotated to be the node’s graph ID with @GraphId. The product, price, and quantity properties will also be persisted as node properties in the graph database.
The relationship between Order and Item is simple in that it doesn’t carry any data of its own. Therefore, the @RelatedTo annotation is sufficient to define the relationship. But not all relationships are so simple.
Let’s reconsider how we’ve modeled this data to see how to work with more complex relationships. In the current data model, we’ve combined the concepts of a line item and a product into the Item class. When you think about it, however, an order is related to one or more products. The relationship between an order and a product constitutes a line item of the order. Figure 12.3 illustrates an alternative way to model the data in a graph.
Figure 12.3. A relationship entity is a relationship that has properties of its own.
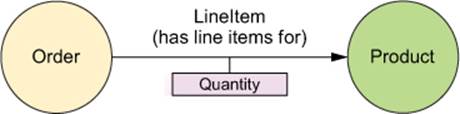
In this new model, the quantity of products in the order is a property of the line item, and a product is a different concept. As before, orders are nodes and so are products. Line items are relationships. But now that a line item must carry a quantity value, the relationship can’t be simple. You’re going to need to define a class that represents a line item, such as LineItem in the next listing.
Listing 12.12. A LineItem connects an Order node and a Product node.
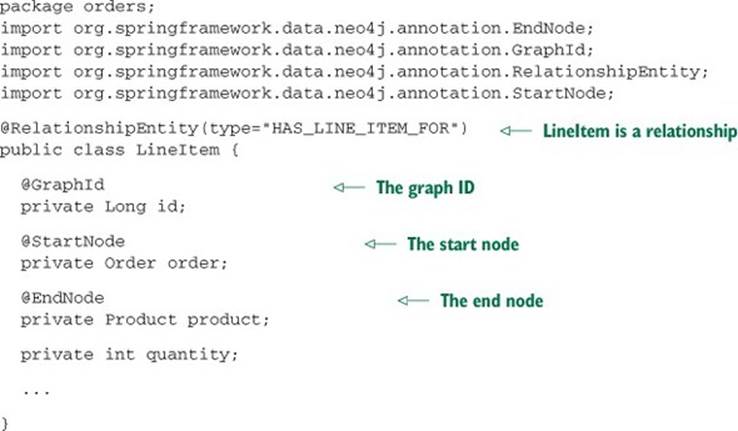
Whereas Order was annotated with @NodeEntity to designate it as a node, LineItem is annotated with @RelationshipEntity. LineItem also has an id property annotated with @GraphId. Again, all entities, both node entities and relationship entities, must have a graph ID and it must be of type Long.
What makes relationship entities special is that they connect two node entities. The @StartNode and @EndNode annotations are applied to properties that define each end of a relationship. In this case, the Order is the start node and the Product is the end node.
Finally, LineItem has a quantity property that will be persisted to the database when the relationship is created.
Now that the domain is annotated, you’re ready to start saving and reading nodes and relationships. We’ll start by looking at how you can use Spring Data Neo4j’s template-oriented data access with Neo4jTemplate.
12.2.3. Working with Neo4jTemplate
Just as Spring Data MongoDB provides MongoTemplate for template-based MongoDB persistence, Spring Data Neo4j brings Neo4jTemplate to the table to work with nodes and relationships in the Neo4j graph database. If you’ve configured Spring Data Neo4j as shown earlier, then there’s already a Neo4jTemplate bean in the Spring application context. All you need to do is inject it wherever you need it.
For example, you might autowire it directly into a bean property:
@Autowired
private Neo4jOperations neo4j;
Neo4jTemplate defines several dozen methods, including methods for saving nodes, deleting nodes, and creating relationships between nodes. There’s not enough space to cover all of them, but let’s have a look at a few of the most commonly used methods that Neo4jTemplate provides.
One of the first and most basic things you might want to do with Neo4jTemplate is to save an object as a node. Assuming that the object is annotated with @NodeEntity, you can use the save() method like this:
Order order = ...;
Order savedOrder = neo4j.save(order);
If you happen to know the object’s graph ID, you can fetch it using the findOne() method:
Order order = neo4j.findOne(42, Order.class);
If there is no node with the given ID, then findOne() will throw a NotFoundException.
If you’d like to retrieve all objects of a given type, you can use the findAll() method:
EndResult<Order> allOrders = neo4j.findAll(Order.class);
The EndResult returned here is an Iterable, enabling it to be used in for-each looping and anywhere else an Iterable may be used. If no such nodes exist, findAll() will return an empty Iterable.
If all you need to know is a count of how many objects of a given type are in the Neo4j database, you can call the count() method:
long orderCount = count(Order.class);
The delete() method can be used to delete an object:
neo4j.delete(order);
One of the most interesting methods provided by Neo4jTemplate is the create-RelationshipBetween() method. As you might guess, it creates a relationship between two nodes. For example, you could create a LineItem relationship between an Order node and a Product node:
Order order = ...;
Product prod = ...;
LineItem lineItem = neo4j.createRelationshipBetween(
order, prod, LineItem.class, "HAS_LINE_ITEM_FOR", false);
lineItem.setQuantity(5);
neo4j.save(lineItem);
The first two parameters to createRelationshipBetween() are the objects whose nodes will be at each end of the relationship. The next parameter specifies the @RelationshipEntity-annotated type that will represent the relationship. Next, you specify a String value that describes the nature of the relationship. The final parameter is a boolean that indicates whether or not duplicate relationships are allowed between the two node entities.
createRelationshipBetween() returns an instance of the relationship class. From there you can set any properties you’d like. The preceding example sets the quantity property. When you’re done, you call save() to save the relationship to the database.
The Neo4jTemplate offers a straightforward way to work with nodes and relationships in a Neo4j graph database. But it requires that you write your own repository implementations that delegate to Neo4jTemplate. Let’s see how Spring Data Neo4j can automatically generate repository implementations for you.
12.2.4. Creating automatic Neo4j repositories
One of the most awesome things that most Spring Data projects do is automatically generate implementations for a repository interface. You’ve already seen this with Spring Data JPA and Spring Data MongoDB. Not to be left out, Spring Data Neo4j also supports automatic repository generation.
You’ve already added @EnableNeo4jRepositories to your configuration, so Spring Data Neo4j is already set to generate repositories. All you need to do is write the interfaces. The following OrderRepository interface is a good start:
package orders.db;
import orders.Order;
import org.springframework.data.neo4j.repository.GraphRepository;
public interface OrderRepository extends GraphRepository<Order> {}
Just like the other Spring Data projects, Spring Data Neo4j triggers repository generation for interfaces that extend the Repository interface. In this case, OrderRepository extends GraphRepository, which indirectly extends Repository. Therefore, Spring Data Neo4j will generate an implementation for OrderRepository at runtime.
Notice that GraphRepository is parameterized with Order, the type of entity that the repository works with. Because Neo4j requires that graph IDs be of type Long, there’s no need to specify the ID type when extending GraphRepository.
Out of the box, you get several common CRUD operations, much like what JpaRepository and MongoRepository provide. Table 12.4 describes the methods you get by extending GraphRepository.
Table 12.4. By extending GraphRepository, a repository interface inherits several CRUD operations that are automatically implemented by Spring Data Neo4j.
|
Method |
Description |
|
long count(); |
Returns a count of how many entities of the target type are in the database |
|
void delete(Iterable<? extends T>); |
Deletes several entities |
|
void delete(Long id); |
Deletes a single entity given its ID |
|
void delete(T); |
Deletes a single entity |
|
void deleteAll(); |
Deletes all entities of the target type |
|
boolean exists(Long id); |
Checks for the existence of an entity given its ID |
|
EndResult<T> findAll(); |
Retrieves all entities of the target type |
|
Iterable<T> findAll(Iterable<Long>); |
Retrieves all entities of the target type for the given IDs |
|
Page<T> findAll(Pageable); |
Retrieves a paged and sorted list of all entities of the target type |
|
EndResult<T> findAll(Sort); |
Retrieves a sorted list of all entities of the target type |
|
EndResult<T> findAllBySchemaPropertyValue(String, Object); |
Retrieves all entities where a given property matches the given value |
|
Iterable<T> findAllByTraversal(N, TraversalDescription); |
Retrieves all entities obtained by following a graph traversal starting at a given node |
|
T findBySchemaPropertyValue(String, Object); |
Finds a single entity where a given property matches a given value |
|
T findOne(Long); |
Finds a single entity given its ID |
|
EndResult<T> query(String, Map<String,Object>); |
Finds all entities that match a given Cypher query |
|
Iterable<T> save(Iterable<T>); |
Saves several entities |
|
S save(S); |
Saves a single entity |
There’s not enough space to cover all of these methods, but there are a few methods that you’ll get a lot of use out of. For example, the following line saves a single Order entity:
Order savedOrder = orderRepository.save(order);
When the entity is saved, the save() method returns the saved entity, which now should have its @GraphId-annotated property populated if it was null before.
You can look up a single entity by calling the findOne() method. For example, this line will look up an Order whose graph ID is 4:
Order order = orderRepository.findOne(4L);
Or, you can look up all orders:
EndResult<Order> allOrders = orderRepository.findAll();
Of course, you may want to delete an entity. In that case, you can use the delete() method:
delete(order);
This will delete the given Order node from the database. If you only have the graph ID, you can pass it to delete() instead of the node type itself:
delete(orderId);
If you want to do custom queries, you could use the query() method to execute an arbitrary Cypher query against the graph. But that’s not much different than working with the query() method from Neo4jTemplate. Instead, you can add your own query methods to OrderRepository.
Adding query methods
You’ve already seen how to add query methods that follow a naming convention using Spring Data JPA and Spring Data MongoDB. It’d be awfully disappointing if Spring Data Neo4j didn’t offer the same capability.
As the next listing shows, there’s no need to be disappointed.
Listing 12.13. Defining query methods by following a naming convention.
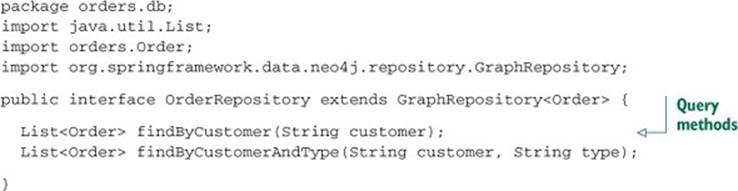
Here you add two query methods. One finds all Order nodes where the customer property is equal to the given String value. The other method is similar, but in addition to matching the customer property, the Order nodes must also have a type property equal to the given type.
We’ve already discussed the naming convention for query methods, so there’s no need to dwell on it any further. Refer to the previous chapter’s discussion of Spring Data JPA for a refresher on how to write these methods.
Specifying custom queries
When the naming convention doesn’t meet your needs, you also have the option of annotating a method with @Query to specify your own query. You’ve seen @Query before. With Spring Data JPA, you used it to specify a JPA query for a repository method. With Spring Data MongoDB, you used it to specify a JSON-matching query. When using Spring Data Neo4j, however, you must specify a Cypher query:
@Query("match (o:Order)-[:HAS_ITEMS]->(i:Item) " +
"where i.product='Spring in Action' return o")
List<Order> findSiAOrders();
Here, the findSiAOrders() is annotated with @Query and given a Cypher query to find all Order nodes that are related to an Item whose product property is equal to “Spring in Action”.
Mixing in custom repository behavior
When neither the naming convention nor the @Query methods meet your needs, you always have the option of mixing in custom repository logic.
For example, suppose that you want to write the implementation of findSiAOrders() yourself, instead of relying on the @Query annotation. You can start by defining an intermediary interface that carries the definition of the findSiAOrders() method:
package orders.db;
import java.util.List;
import orders.Order;
public interface OrderOperations {
List<Order> findSiAOrders();
}
Then you can change OrderRepository to extend OrderOperations in addition to GraphRepository:
public interface OrderRepository
extends GraphRepository<Order>, OrderOperations {
...
}
Finally, you need to write the implementation itself. As with Spring Data JPA and Spring Data MongoDB, Spring Data Neo4j will look for an implementation class whose name is the same as the repository interface with an “Impl” suffix. Therefore, you need to create anOrderRepositoryImpl class. The following listing shows OrderRepositoryImpl, which implements findSiAOrders().
Listing 12.14. Mixing custom functionality into OrderRepository
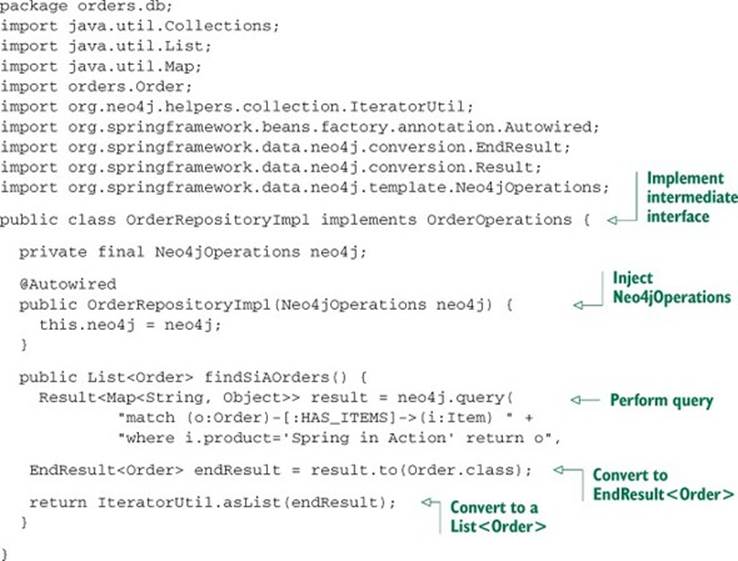
OrderRepositoryImpl is injected with Neo4jOperations (specifically, an instance of Neo4jTemplate), which it uses to query the database. Because the query() method returns a Result<Map<String, Object>>, you’ll need to convert it to a List<Order>. The first step is to call the to() method on the Result to produce an EndResult<Order>. Then you use Neo4j’s IteratorUtil.asList() to convert the EndResult<Order> to a List<Order>, which is then returned.
Graph databases such as Neo4j are wonderful for capturing data that’s represented well as nodes and relationships. When you consider that the world we live in is made up of all kinds of things that are related to each other, graph databases may be suitable for a wide range of domains. And, speaking personally, I’ll admit that I have a strong fondness for Neo4j.
But sometimes your data needs are simpler. Sometimes you only need to store a value somewhere and be able to retrieve it later with a key. Let’s see how Spring Data enables key-value data persistence using the Redis key-value store.
12.3. Working with key-value data in Redis
Redis is a special kind of database known as a key-value store. As the name implies, key-value stores keep key-value pairs. In fact, key-value stores share a lot in common with hash maps. To call them persistent hash maps would not be too great of an oversimplification.
When you think about it, there aren’t too many kinds of queries that you can perform against a hash map ... or a key-value store. You can store a value at a particular key, and you can fetch the value for a particular key. That’s about it. Consequently, Spring Data’s automatic repository support doesn’t make a lot of sense when applied to Redis. On the other hand, Spring Data’s other key feature, template-oriented data access, can come in handy when working with Redis.
Spring Data Redis comes with a couple of template implementations for storing data to and fetching it from a Redis database. You’ll see how to use them soon. But to create one of Spring Data Redis’s templates, you’ll need a Redis connection factory. Fortunately, Spring Data Redis offers four to choose from.
12.3.1. Connecting to Redis
A Redis connection factory produces connections to a Redis database server. Spring Data Redis comes with connection factories for four Redis client implementations:
· JedisConnectionFactory
· JredisConnectionFactory
· LettuceConnectionFactory
· SrpConnectionFactory
The choice is up to you. I encourage you to do your own testing and benchmarking to determine which Redis client and connection factory fits your needs best. From Spring Data Redis’s perspective, all of these connection factories are equally suitable.
Once you’ve made your choice, you can configure the connection factory as a bean in Spring. For example, here’s how you might configure the JedisConnectionFactory bean:
@Bean
public RedisConnectionFactory redisCF() {
return new JedisConnectionFactory();
}
Instantiating the connection factory via its default constructor results in a connection factory that creates its connections for localhost, port 6379, and with no password. If your Redis server is running on a different host or port, you can set those properties when you create the connection factory:
@Bean
public RedisConnectionFactory redisCF() {
JedisConnectionFactory cf = new JedisConnectionFactory();
cf.setHostName("redis-server");
cf.setPort(7379);
return cf;
}
Similarly, if your Redis server is configured to require authorization from clients, you can set the password by calling setPassword():
@Bean
public RedisConnectionFactory redisCF() {
JedisConnectionFactory cf = new JedisConnectionFactory();
cf.setHostName("redis-server");
cf.setPort(7379);
cf.setPassword("foobared");
return cf;
}
In all of these examples, I’ve been assuming the JedisConnectionFactory. If you’ve made a different choice, then any of the other connection factories can be a drop-in replacement. For example, if you’d rather use the LettuceConnectionFactory, you can configure it like this:
@Bean
public RedisConnectionFactory redisCF() {
JedisConnectionFactory cf = new LettuceConnectionFactory();
cf.setHostName("redis-server");
cf.setPort(7379);
cf.setPassword("foobared");
return cf;
}
All of the Redis connection factories have setHostName(), setPort(), and set-Password() methods. This makes them virtually identical in terms of configuration.
Now that you have a Redis connection factory, you’re ready to start working with Spring Data Redis’s templates.
12.3.2. Working with RedisTemplate
As their names suggest, the Redis connection factories produce connections (as RedisConnection) to a Redis key-value store. Using RedisConnection, you can store and read data. For example, you might obtain a connection and use it to store a greeting like this:
RedisConnectionFactory cf = ...;
RedisConnection conn = cf.getConnection();
conn.set("greeting".getBytes(), "Hello World".getBytes());
Likewise, you could retrieve that greeting value using a RedisConnection like this:
byte[] greetingBytes = conn.get("greeting".getBytes());
String greeting = new String(greetingBytes);
No doubt, this will work. But do you really like working with arrays of bytes?
As with other Spring Data projects, Spring Data Redis offers a higher-level data access option with templates. In fact, Spring Data Redis offers two templates:
· RedisTemplate
· StringRedisTemplate
RedisTemplate is a class that greatly simplifies Redis data access, enabling you to persist keys and values of any type, not just byte arrays. In recognition of the fact that keys and values are frequently Strings, StringRedisTemplate extends RedisTemplate to have a String focus.
Assuming you have a RedisConnectionFactory available, you can construct a RedisTemplate like this:
RedisConnectionFactory cf = ...;
RedisTemplate<String, Product> redis =
new RedisTemplate<String, Product>();
redis.setConnectionFactory(cf);
Note that RedisTemplate is parameterized with two types. The first type is that of the key, and the second is that of the value. In the RedisTemplate constructed here, Product objects will be stored as values assigned to String keys.
If you know that you’ll be working with both String values and String keys, then you should consider using StringRedisTemplate instead of RedisTemplate:
RedisConnectionFactory cf = ...;
StringRedisTemplate redis = new StringRedisTemplate(cf);
Notice that, unlike RedisTemplate, StringRedisTemplate has a constructor that accepts a RedisConnectionFactory. Therefore, there’s no need to call set-Connection-Factory() after construction.
Although it’s not required, if you’ll be using RedisTemplate or StringRedis-Template frequently, you might consider configuring them as beans to be injected where they’re needed. Here’s a simple @Bean method declaring a RedisTemplate bean:
@Bean
public RedisTemplate<String, Product>
redisTemplate(RedisConnectionFactory cf) {
RedisTemplate<String, Product> redis =
new RedisTemplate<String, Product>();
redis.setConnectionFactory(cf);
return redis;
}
And here’s a bean method to declare a StringRedisTemplate bean:
@Bean
public StringRedisTemplate
stringRedisTemplate(RedisConnectionFactory cf) {
return new StringRedisTemplate(cf);
}
Once you have a RedisTemplate (or StringRedisTemplate), you can start saving, fetching, and deleting key-value entries. Most of the operations provided by RedisTemplate are available via the sub-APIs listed in table 12.5.
Table 12.5. RedisTemplate offers much of its functionality via sub-APIs, which differentiate single values from collection values.
|
Method |
Sub-API interface |
Description |
|
opsForValue() |
ValueOperations<K, V> |
Operations for working with entries having simple values |
|
opsForList() |
ListOperations<K, V> |
Operations for working with entries having list values |
|
opsForSet() |
SetOperations<K, V> |
Operations for working with entries having set values |
|
opsForZSet() |
ZSetOperations<K, V> |
Operations for working with entries having ZSet (sorted set) values |
|
opsForHash() |
HashOperations<K, HK, HV> |
Operations for working with entries having hash values |
|
boundValueOps(K) |
BoundValueOperations<K,V> |
Operations for working with simple values bound to a given key |
|
boundListOps(K) |
BoundListOperations<K,V> |
Operations for working with list values bound to a given key |
|
boundSetOps(K) |
BoundSetOperations<K,V> |
Operations for working with set values bound to a given key |
|
boundZSet(K) |
BoundZSetOperations<K,V> |
Operations for working with ZSet (sorted set) values bound to a given key |
|
boundHashOps(K) |
BoundHashOperations<K,V> |
Operations for working with hash values bound to a given key |
As you can see, the sub-APIs in table 12.5 are available through methods on Redis-Template (and StringRedisTemplate). Each one provides operations that work with entries based on whether the value is a simple value or a collection of values.
Across all of these sub-APIs, there are several dozen methods for saving and fetching data in Redis. We don’t have space enough to cover them all, but we’ll look at a handful of the most common operations you’ll need.
Working with Simple Values
Suppose that you want to save a Product to a RedisTemplate<String, Product> where the key is the value of the sku property. The following snippet of code will do that via opsForValue():
redis.opsForValue().set(product.getSku(), product);
Similarly, if you wanted to fetch a product whose sku is 123456, you could use this snippet:
Product product = redis.opsForValue().get("123456");
If no entry can be found with the given key, null will be returned.
Working with Lists
Working with list values is similarly straightforward via opsForList(). For example, you can add a value to the end of a list entry like this:
redis.opsForList().rightPush("cart", product);
This adds a Product to the end of the list stored at the key cart. If a list doesn’t already exist at that key, one will be created.
Whereas the rightPush() method adds an element to the end of a list entry, leftPush() inserts a value at the beginning:
redis.opsForList().leftPush("cart", product);
There are a number of ways you can fetch an item from a list. You can pop an entry off of either end using leftPop() or rightPop():
Product first = redis.opsForList().leftPop("cart");
Product last = redis.opsForList().rightPop("cart");
Aside from fetching a value from the list, these two pop methods have the side effect of removing the popped items from the list. If you’d rather simply retrieve the value (perhaps even from the middle of the list), you can use the range() method:
List<Product> products = redis.opsForList().range("cart", 2, 12);
The range() method doesn’t remove any values from the list entry, but it does retrieve one or more values given the key and a range of indexes. The preceding example fetches as many as eleven entries starting with the entry at index 2 and going through index 12 (inclusive). If the range exceeds the bounds of the list, then only the entries within those indexes will be returned. If no entries fall within the indexes, an empty list will be returned.
Performing Operations on Sets
In addition to lists, you can also work with sets via the opsForSet() method. The most basic thing you can do is add an item to a set entry:
redis.opsForSet().add("cart", product);
Once you have a few set entries created and populated with values, you can perform interesting operations against those sets, including difference, intersection, and union.
List<Product> diff = redis.opsForSet().difference("cart1", "cart2");
List<Product> union = redis.opsForSet().union("cart1", "cart2");
List<Product> isect = redis.opsForSet().isect("cart1", "cart2");
Of course, you can also remove items:
redis.opsForSet().remove(product);
And you can even fetch a random element from the set:
Product random = redis.opsForSet().randomMember("cart");
As sets don’t have indexes or any implicit ordering, you can’t pinpoint and fetch a single item from the set.
Binding to a Key
Table 12.5 includes five sub-APIs for working with operations bound to a given key. These sub-APIs mirror the other sub-APIs, but focus on a given key.
As an example of how these are used, let’s consider the case where you’re storing Product objects in a list entry whose key is cart. In that scenario, suppose that you want to pop an item from the right end of the list and then add three new items to the end of the list. You can do that using the BoundListOperations returned from calling boundListOps():
BoundListOperations<String, Product> cart =
redis.boundListOps("cart");
Product popped = cart.rightPop();
cart.rightPush(product1);
cart.rightPush(product2);
cart.rightPush(product3);
Notice that the only time that the entry’s key is mentioned is when calling bound-ListOps(). All of the operations performed against the returned BoundList-Operations will be applied to that entry.
12.3.3. Setting key and value serializers
When an entry is saved to the Redis key-value store, both the key and the value are serialized using a Redis serializer. Spring Data Redis comes with several such serializers, including these:
· GenericToStringSerializer —Serializes using a Spring conversion service
· JacksonJsonRedisSerializer —Serializes objects to JSON using Jackson 1
· Jackson2JsonRedisSerializer —Serializes objects to JSON using Jackson 2
· JdkSerializationRedisSerializer —Uses Java serialization
· OxmSerializer —Serializes using marshalers and unmarshalers from Spring’s O/X mapping, for XML serialization
· StringRedisSerializer —Serializes String keys and values
All of these serializers implement the RedisSerializer interface, so if there’s not one to suit your needs, you can always create your own serializer.
RedisTemplate uses JdkSerializationRedisSerializer, which means that keys and values are serialized through Java. As you might expect, StringRedisTemplate uses StringRedisSerializer by default, essentially converting the String values to and from byte arrays. These defaults are suitable for many cases, but you may find it helpful to plug in a different serializer.
For example, suppose that when using RedisTemplate, you want to serialize Product values to JSON with String keys. The setKeySerializer() and setValue-Serializer() methods of RedisTemplate are what you need:
@Bean
public RedisTemplate<String, Product>
redisTemplate(RedisConnectionFactory cf) {
RedisTemplate<String, Product> redis =
new RedisTemplate<String, Product>();
redis.setConnectionFactory(cf);
redis.setKeySerializer(new StringRedisSerializer());
redis.setValueSerializer(
new Jackson2JsonRedisSerializer<Product>(Product.class));
return redis;
}
Here, you set RedisTemplate to always use StringRedisSerializer when serializing key values. You also specify that it should use Jackson2JsonRedisSerializer only when serializing Product values.
12.4. Summary
Gone are the days when the only choice for data persistence was a relational database. Now there are several different kinds of databases, each representing data in different forms and offering capabilities to suit a variety of domain models. The Spring Data project enables developers to use these databases in their Spring applications and to use abstractions that are reasonably consistent across the various database choices.
In this chapter, we built on what you learned about Spring Data in the previous chapter when using JPA, applying it to the MongoDB document database and the Neo4j graph database. Just like their JPA counterpart, the Spring Data MongoDB and Spring Data Neo4j projects both offer automatic generation of repositories based on interface definitions. Additionally, you saw how to use the annotations provided by the Spring Data projects to map domain types to documents, nodes, and relationships.
Spring Data also enables data to be persisted to the Redis key-value store. Key-value stores are significantly simpler and thus do not require support for automatic repositories or mapping annotations. Nevertheless, Spring Data Redis offers two different template classes for working with the Redis key-value store.
No matter what kind of database you choose, fetching data from the database is a costly operation. In fact, database queries are often the biggest performance bottlenecks in any application. Now that you’ve seen how to store and fetch data from a variety of data sources, let’s look at how to avoid that bottleneck. In the next chapter, you’ll see how to apply declarative caching to prevent unnecessary database fetches.
All materials on the site are licensed Creative Commons Attribution-Sharealike 3.0 Unported CC BY-SA 3.0 & GNU Free Documentation License (GFDL)
If you are the copyright holder of any material contained on our site and intend to remove it, please contact our site administrator for approval.
© 2016-2026 All site design rights belong to S.Y.A.