Spring in Action, 4th Edition: Covers Spring 4 (2015)
Part 4. Integrating Spring
Chapter 19. Sending email with Spring
This chapter covers
· Configuring Spring’s email abstraction
· Sending rich email messages
· Using templates to construct email messages
It’s no secret that email has become a common form of communication, displacing many traditional means of communication such as postal mail, telephone calls, and, to some degree, face-to-face communication. Email offers many of the same asynchronous benefits as the messaging options we discussed in chapter 17, only with humans as the senders and receivers. As soon as you click Send in your email client, you can move on to some other task, knowing that the recipient will eventually receive and (hopefully) read your email.
But humans aren’t always the senders of email. Frequently, email messages are sent by applications to users. Perhaps it’s an email confirmation of an order that a user placed on an eCommerce site, or maybe it’s an automated notification of an activity involving someone’s bank account. Whatever the subject, it’s likely that you’ll develop applications that need to send email messages. Fortunately, Spring is ready to help.
In chapter 17, you used Spring’s messaging support to asynchronously queue up jobs to send spittle alerts to other Spittr application users. But you left that task unfinished, because no email messages were sent. Let’s finish what you started by looking at how Spring abstracts the problem of sending email, and then use that abstraction to send spittle alert email messages.
19.1. Configuring Spring to send email
At the heart of Spring’s email abstraction is the MailSender interface. As its name implies, and as illustrated in figure 19.1, a MailSender implementation sends email by connecting with an email server.
Figure 19.1. Spring’s MailSender interface is the primary component of Spring’s email abstraction API. It sends email to a mail server for delivery.

Spring comes with one implementation of the MailSender interface, JavaMail-Sender-Impl, which uses the JavaMail API to send email. Before you can send email messages from your Spring application, you must wire JavaMailSenderImpl as a bean in the Spring application context.
19.1.1. Configuring a mail sender
In its simplest form, JavaMailSenderImpl can be configured as a bean with only a few lines in an @Bean method:
@Bean
public MailSender mailSender(Environment env) {
JavaMailSenderImpl mailSender = new JavaMailSenderImpl();
mailSender.setHost(env.getProperty("mailserver.host"));
return mailSender;
}
The host property is optional (it defaults to the host of the underlying JavaMail session), but you’ll probably want to set it. It specifies the hostname for the mail server that will be used to send the email. Here it’s configured by fetching the value from the injected Environment so that you can manage the mail-server configuration outside of Spring (for example, in a properties file).
By default, JavaMailSenderImpl assumes that the mail server is listening on port 25 (the standard SMTP port). If your mail server is listening on a different port, specify the correct port number using the port property. For example,
@Bean
public MailSender mailSender(Environment env) {
JavaMailSenderImpl mailSender = new JavaMailSenderImpl();
mailSender.setHost(env.getProperty("mailserver.host"));
mailSender.setPort(env.getProperty("mailserver.port"));
return mailSender;
}
Likewise, if the mail server requires authentication, you’ll want to set values for the username and password properties:
@Bean
public MailSender mailSender(Environment env) {
JavaMailSenderImpl mailSender = new JavaMailSenderImpl();
mailSender.setHost(env.getProperty("mailserver.host"));
mailSender.setPort(env.getProperty("mailserver.port"));
mailSender.setUsername(env.getProperty("mailserver.username"));
mailSender.setPassword(env.getProperty("mailserver.password"));
return mailSender;
}
Thus far, JavaMailSenderImpl has been configured to create its own mail session. But you may already have a javax.mail.MailSession configured in JNDI (or perhaps one was placed there by your application server). If so, it doesn’t make much sense to configureJavaMailSenderImpl with the full server details. Instead, you can configure it to use the MailSession you have ready to use from JNDI.
Using JndiObjectFactoryBean, you can configure a bean that looks up the Mail-Session from JNDI with the following @Bean method:
@Bean
public JndiObjectFactoryBean mailSession() {
JndiObjectFactoryBean jndi = new JndiObjectFactoryBean();
jndi.setJndiName("mail/Session");
jndi.setProxyInterface(MailSession.class);
jndi.setResourceRef(true);
return jndi;
}
You’ve also seen how to retrieve objects from JNDI using Spring’s <jee:jndi-lookup> element. You can use <jee:jndi-lookup> to create a bean that references a mail session in JNDI:
<jee:jndi-lookup id="mailSession"
jndi-name="mail/Session" resource-ref="true" />
With the mail session bean configured, you can now wire it into the mailSender bean like this:
@Bean
public MailSender mailSender(MailSession mailSession) {
JavaMailSenderImpl mailSender = new JavaMailSenderImpl();
mailSender.setSession(mailSession);
return mailSender;
}
By wiring the mail session into the session property of JavaMailSenderImpl, you replace the explicit server (and username/password) configuration from before. Now the mail session is completely configured and managed in JNDI. JavaMailSenderImpl can focus on sending email messages and not worry about the details of how to connect with the mail server.
19.1.2. Wiring and using the mail sender
With the mail sender configured, it’s time to wire it into the bean that will use it. In the Spittr application, the SpitterEmailServiceImpl class is the most appropriate place from which to send email. This class has a mailSender property that’s annotated with @Autowired:
@Autowired
JavaMailSender mailSender;
When Spring creates SpitterEmailServiceImpl as a bean, it will try to find a bean that implements MailSender that it can wire in to the mailSender property. It should find your mailSender bean and use that. With the mailSender bean wired in, you’re ready to construct and send email messages.
Because you want to send email to a Spitter user to alert them about new spittles that their friends may have written, you’ll need a method that, given an email address and a Spittle object, will send that email message. The following sendSimpleSpittle-Email() method uses the mail sender to do just that.
Listing 19.1. Sending email with Spring using a MailSender
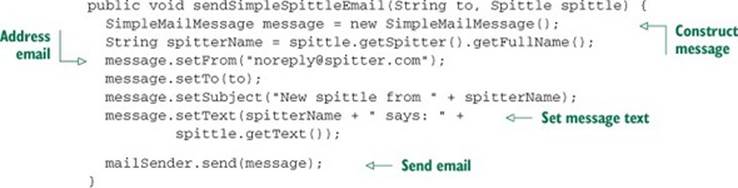
The first thing that sendSimpleSpittleEmail() does is construct an instance of Simple-MailMessage. This mail-message object, as its name implies, is perfect for sending no-nonsense email messages.
Next, the details of the message are set. The sender and recipient are specified via the setFrom() and setTo() methods on the email message. After you set the subject with setSubject(), the virtual “envelope” has been addressed. All that’s left is to call setText() to set the message’s content.
The last step is to pass the message to the mail sender’s send() method, and the email is on its way.
Now you’ve configured a mail sender and used it to send a simple email message. And as you’ve seen, working with Spring’s email abstraction is easy. We could call it good at this point and move on to the next chapter. But then you’d miss out on the fun stuff in Spring’s email abstraction. Let’s kick it up a notch and see how to add attachments and create rich email messages.
19.2. Constructing rich email messages
Plaintext email messages are fine for simple things like asking your friends over to watch the big game. But they’re less than ideal when you need to send photos or documents. And they’re ineffective for capturing the recipient’s attention, as in marketing email.
Fortunately, Spring’s email capabilities don’t end with plaintext email. You have the option of adding attachments and even dressing up the body of the message with HTML. Let’s start with the basic task of adding attachments. Then you’ll go a step further and make your email messages look good with HTML.
19.2.1. Adding attachments
The trick to sending email with attachments is to create multipart messages—email messages composed of multiple parts, one of which is the body and the other parts being the attachments.
The SimpleMailMessage class is too ... well ... simple for sending attachments. To send multipart email messages, you need to create a Multipurpose Internet Mail Extensions (MIME) message. The mail sender object’s createMimeMessage() method can get you started:
MimeMessage message = mailSender.createMimeMessage();
There you go. You now have a MIME message to work with. It seems that all you need to do is give it To and From addresses, a subject, some text, and an attachment. Although that’s true, it’s not as straightforward as you might think. The javax.mail.internet.MimeMessage class has an API that’s too cumbersome to use on its own. Fortunately, Spring provides MimeMessageHelper to lend a hand.
To use MimeMessageHelper, instantiate an instance of it, passing in the Mime-Message to its constructor:
MimeMessageHelper helper = new MimeMessageHelper(message, true);
The second parameter to the constructor, a Boolean true as shown here, indicates that this is to be a multipart message.
From the MimeMessageHelper instance, you’re ready to assemble your email message. The only major difference is that you’ll provide the email specifics through methods on the helper instead of on the message itself:
String spitterName = spittle.getSpitter().getFullName();
helper.setFrom("noreply@spitter.com");
helper.setTo(to);
helper.setSubject("New spittle from " + spitterName);
helper.setText(spitterName + " says: " + spittle.getText());
The only thing needed before you can send the message is to add the attachment: in this case, a coupon image. To do that, you’ll need to load the image as a resource and then pass that resource in as you call the helper’s addAttachment() method:
FileSystemResource couponImage =
new FileSystemResource("/collateral/coupon.png");
helper.addAttachment("Coupon.png", couponImage);
Here, you’re using Spring’s FileSystemResource to load coupon.png from within the application’s classpath. From there, you call addAttachment(). The first parameter is the name to be given to the attachment in the message. The second parameter is the image’s resource.
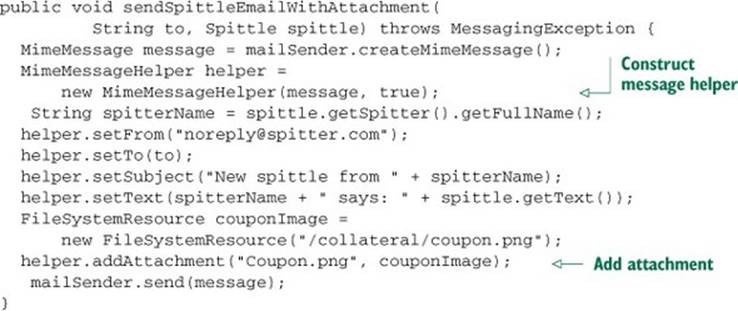
The multipart email message has been constructed, and you’re ready to send it. The complete sendSpittleEmailWithAttachment() method is shown next.
Listing 19.2. Sending email messages with attachments using MimeMessageHelper
Adding attachments is only one thing you can do with multipart email messages. In addition, by specifying that the body of the message is HTML, you can produce polished email messages that look much nicer than flat text. Let’s see how to send attractive-looking email using Spring’sMimeMessageHelper.
19.2.2. Sending email with rich content
Sending rich email isn’t much different than sending plaintext email messages. The key is to set the message’s text as HTML. Doing that is as simple as passing in an HTML string to the helper’s setText() method and true as the second parameter:
helper.setText("<html><body><img src='cid:spitterLogo'>" +
"<h4>" + spittle.getSpitter().getFullName() + " says...</h4>" +
"<i>" + spittle.getText() + "</i>" +
"</body></html>", true);
The second parameter indicates that the text passed in to the first parameter is HTML, so that the message part’s content type will be set accordingly.
Note that the HTML passed in has an <img> tag to display the Spittr application’s logo as part of the message. The src attribute could be set to a standard http: URL to pull the Spittr logo from the web. But here, you embed the logo image in the email message. The valuecid:spitterLogo indicates that there will be an image in one of the message’s parts identified as spitterLogo.
Adding the embedded image to the message is much like adding an attachment. Instead of calling the helper’s addAttachment() method, you call the addInline() method:
ClassPathResource image =
new ClassPathResource("spitter_logo_50.png");
helper.addInline("spitterLogo", image);
The first parameter to addInline specifies the identity of the inline image—which is the same as was specified by the <img>’s src attribute. The second parameter is the resource reference for the image, created here using Spring’s ClassPathResource to retrieve the image from the application’s classpath.
Aside from the slightly different call to setText() and the use of the addInline() method, sending email with rich content is much like sending a plaintext message with attachments. For sake of comparison, here’s the new sendRichSpitterEmail() method.
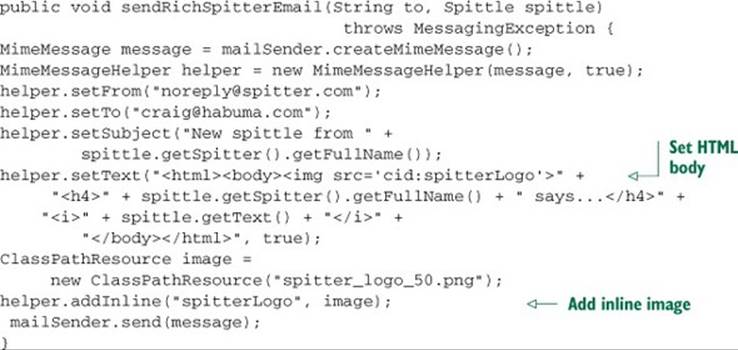
And now you’re sending email messages with rich content and embedded images! You could stop here and call your email code complete. But it bugs me that the email’s body is created by using string concatenation to construct an HTML message. Before we put the email topic to rest, let’s see how to replace that string-concatenated message with a template.
19.3. Generating email with templates
The problem with constructing an email message using string concatenation is that it’s not clear what the resulting message will look like. It’s hard enough to mentally parse HTML markup to imagine how it might appear when rendered. But mixing up that HTML in Java code compounds the issue. Moreover, it might be nice to extract the email layout into a template that a graphic designer (who probably has an aversion to Java code) can produce.
What you need is a way to express the email layout in something close to what the resulting HTML will look like, and then transform that template into a String to be passed into the setText() method on the message helper. When it comes to transforming templates into strings, there are several templating options to choose from, including Apache Velocity and Thymeleaf. Let’s look at how to create rich email messages using each of these options, starting with Velocity.
19.3.1. Constructing email messages with Velocity
Apache Velocity is a general-purpose templating engine from Apache. Velocity has been around for quite a while and has been used for all kinds of things, including code generation and as an alternative to JSP. It can also be used to format rich email messages, as you’ll do here.
To use Velocity to lay out your email messages, you’ll first need to wire a VelocityEngine into SpitterEmailServiceImpl. Spring provides a handy factory bean called VelocityEngineFactoryBean that produces a VelocityEngine in the Spring application context. The declaration for VelocityEngineFactoryBean looks like this:
@Bean
public VelocityEngineFactoryBean velocityEngine() {
VelocityEngineFactoryBean velocityEngine =
new VelocityEngineFactoryBean();
Properties props = new Properties();
props.setProperty("resource.loader", "class");
props.setProperty("class.resource.loader.class",
ClasspathResourceLoader.class.getName());
velocityEngine.setVelocityProperties(props);
return velocityEngine;
}
The only property that needs to be set on VelocityEngineFactoryBean is velocityProperties. In this case, you’re configuring it to load Velocity templates from the classpath (see the Velocity documentation for more details on how to configure Velocity).
Now you can wire the Velocity engine into SpitterEmailServiceImpl. Because SpitterEmailServiceImpl is automatically registered with the component scanner, you can use @Autowired to automatically wire a velocityEngine property:
@Autowired
VelocityEngine velocityEngine;
Next, you can use the velocityEngine property to transform a Velocity template into a String to send as your email text. To help with that, Spring comes with Velocity-EngineUtils to make simple work of merging a Velocity template and some model data into a String. Here’s how you might use it:
Map<String, String> model = new HashMap<String, String>();
model.put("spitterName", spitterName);
model.put("spittleText", spittle.getText());
String emailText = VelocityEngineUtils.mergeTemplateIntoString(
velocityEngine, "emailTemplate.vm", model );
In preparation for processing the template, you start by creating a Map to hold the model data used by the template. In the previous string-concatenated code, you needed the full name of the spitter and the text of their spittle, so you’ll need that here as well. To produce the merged email text, you then call VelocityEngineUtils’s mergeTemplateIntoString() method, passing in the Velocity engine, the path to the template (relative to the root of the classpath), and the model map.
All that’s left to be done in the Java code is to hand off the merged email text to the message helper’s setText() method:
helper.setText(emailText, true);
The template is sitting at the root of the classpath in a file called emailTemplate.vm, which looks like this:
<html>
<body>
<img src='cid:spitterLogo'>
<h4>${spitterName} says...</h4>
<i>${spittleText}</i>
</body>
</html>
As you can see, the template file is a lot easier to read than the string-concatenated version from before. Consequently, it’s also easier to maintain and edit. Figure 19.2 gives a sample of the kind of email message it might produce.
Figure 19.2. A Velocity template and some embedded images can dress up an otherwise ho-hum email message.
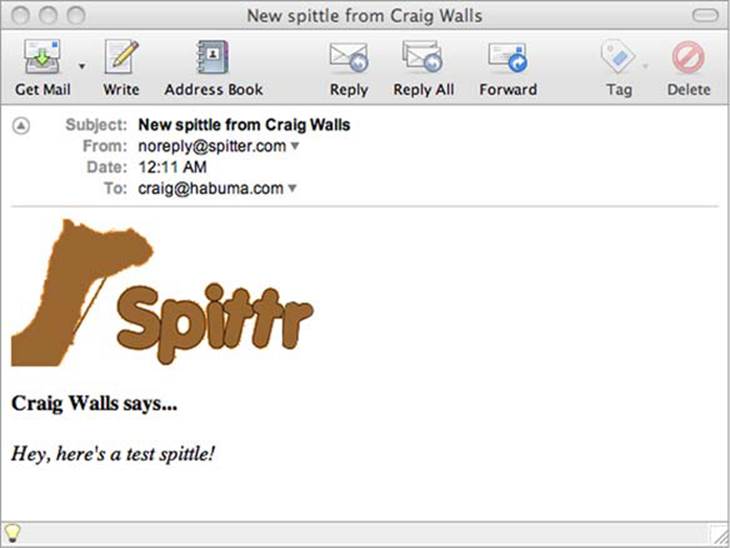
Looking at the figure, I see a lot of opportunity to dress up the template so the message looks much nicer. But, as they say, I’ll leave that as an exercise for the reader.
Velocity has been used for years as the templating engine of choice for many tasks. But as you saw in chapter 6, a new templating option is becoming popular. Let’s see how you can use Thymeleaf to construct spittle email messages.
19.3.2. Using Thymeleaf to create email messages
As we discussed in chapter 6, Thymeleaf is an attractive templating engine for HTML because it enables you to create WYSIWYG templates. Unlike JSP and Velocity, Thymeleaf templates don’t contain any special tag libraries or unusual markup. This makes it easy for template designers to use any HTML tools they like in their work without worrying about a tool’s inability to deal with special markup.
When you convert an email template to a Thymeleaf template, the WYSIWYG nature of Thymeleaf is apparent:
<!DOCTYPE html>
<html xmlns:th="http://www.thymeleaf.org">
<body>
<img src="spitterLogo.png" th:src='cid:spitterLogo'>
<h4><span th:text="${spitterName}">Craig Walls</span> says...</h4>
<i><span th:text="${spittleText}">Hello there!</span></i>
</body>
</html>
Notice that there are no custom tags (as you might see in JSP). And although model attributes are referenced with ${} notation, it’s confined to values of attributes instead of being out in the open as with Velocity. This template could easily be opened in a web browser and viewed in its complete form without relying on the Thymeleaf engine to process it.
Using Thymeleaf to generate and send HTML email messages is similar to what you did with Velocity:
Context ctx = new Context();
ctx.setVariable("spitterName", spitterName);
ctx.setVariable("spittleText", spittle.getText());
String emailText = thymeleaf.process("emailTemplate.html", ctx);
...
helper.setText(emailText, true);
mailSender.send(message);
The first thing to do is create a Thymeleaf Context instance and populate it with model data. This is analogous to populating a Map with model data, as you did with Velocity. Then you ask Thymeleaf to process your template, merging the model data in the context into the template by calling the process() method on the Thymeleaf engine. Finally, you set the resulting text on the message using the message helper and send the message using the mail sender.
That seems simple enough. But where does the Thymeleaf engine (represented by the thymeleaf variable) come from?
The Thymeleaf engine here is the same SpringTemplateEngine bean that you configured for constructing web views in chapter 6. But now you’re injecting it into Spitter-EmailServiceImpl via constructor injection:
@Autowired
private SpringTemplateEngine thymeleaf;
@Autowired
public SpitterEmailServiceImpl(SpringTemplateEngine thymeleaf) {
this.thymeleaf = thymeleaf;
}
You must make one small tweak to the SpringTemplateEngine bean, however. As you left it in chapter 6, it’s only configured to resolve templates from the servlet context. Your email templates will need to be resolved from the classpath. So in addition toServletContextTemplateResolver, you’ll also need a ClassLoaderTemplate-Resolver:
@Bean
public ClassLoaderTemplateResolver emailTemplateResolver() {
ClassLoaderTemplateResolver resolver =
new ClassLoaderTemplateResolver();
resolver.setPrefix("mail/");
resolver.setTemplateMode("HTML5");
resolver.setCharacterEncoding("UTF-8");
setOrder(1);
return resolver;
}
For the most part, you’ll configure the ClassLoaderTemplateResolver bean just as you did ServletContextTemplateResolver. Note, though, that the prefix property is set to mail/, indicating that it expects to find Thymeleaf templates in the mail directory rooted at the classpath root. Therefore, your email template file must be named emailTemplate.html and reside in the mail directory relative to the root of the classpath.
Also, because you’ll now have two template resolvers, you need to indicate which one takes precedence, using the order property. The ClassLoaderTemplateResolver bean has its order as 1. Tweak the ServletContextTemplateResolver configuration, setting its order to 2:
@Bean
public ServletContextTemplateResolver webTemplateResolver() {
ServletContextTemplateResolver resolver =
new ServletContextTemplateResolver();
resolver.setPrefix("/WEB-INF/templates/");
resolver.setTemplateMode("HTML5");
resolver.setCharacterEncoding("UTF-8");
setOrder(2);
return resolver;
}
All that’s left to do is change the SpringTemplateEngine bean’s configuration to use both of your template resolvers:
@Bean
public SpringTemplateEngine templateEngine(
Set<ITemplateResolver> resolvers) {
SpringTemplateEngine engine = new SpringTemplateEngine();
engine.setTemplateResolvers(resolvers);
return engine;
}
Before, you only had one template resolver, so you injected it into SpringTemplate-Engine’s templateResolver property. But now you have two template resolvers, so you must inject them as members of a Set into the templateResolvers (plural) property.
19.4. Summary
Email is an important form of human-to-human communication and frequently a crucial form of application-to-human communication as well. Spring builds on the email capabilities provided in Java, abstracting JavaMail for simpler use and configuration in a Spring application.
In this chapter, you’ve seen how to use Spring’s email abstraction to send simple email messages, and you’ve taken it further by sending rich messages that contain attachments and that are formatted with HTML. We also looked at using templating engines like Velocity and Thymeleaf to generate rich email text without resorting to creating HTML via string concatenation.
Coming up in the next chapter, you’ll see how to add management and notification capabilities to your Spring beans using Java Management Extensions (JMX).
All materials on the site are licensed Creative Commons Attribution-Sharealike 3.0 Unported CC BY-SA 3.0 & GNU Free Documentation License (GFDL)
If you are the copyright holder of any material contained on our site and intend to remove it, please contact our site administrator for approval.
© 2016-2026 All site design rights belong to S.Y.A.