Spring in Action, 4th Edition: Covers Spring 4 (2015)
Part 4. Integrating Spring
Chapter 18. Messaging with WebSocket and STOMP
This chapter covers
· Sending messages between the browser and the server
· Handling messages in Spring MVC controllers
· Sending user-targeted messages
In the previous chapter, you saw ways to send messages between applications using JMS and AMQP. Asynchronous messaging is a common form of communication between applications. But when one of those applications is running in a web browser, something a little different is needed.
WebSocket is a protocol providing full-duplex communication across a single socket. It enables, among other things, asynchronous messaging between a web browser and a server. Being full-duplex means that the server can send messages to the browser as well as the browser sending messages to the server.
Spring 4.0 introduced support for WebSocket communication, including
· A low-level API for sending and receiving messages
· A higher-level API for handling messages in Spring MVC controllers
· A messaging template for sending messages
· SockJS support to cope with the lack of WebSocket support in browsers, servers, and proxies
In this chapter, you’ll learn how to achieve asynchronous communication between a server and a browser-based application using Spring’s WebSocket features. We’ll start by looking at how to work with Spring’s low-level WebSocket API.
18.1. Working with Spring’s low-level WebSocket API
In its simplest form, a WebSocket is just a communication channel between two applications. An application on one end of the WebSocket sends a message, and the other end handles that message. Because it’s full-duplex, either end can send messages and either end can handle messages. This is illustrated in figure 18.1.
Figure 18.1. A WebSocket is a full-duplex communication channel between two applications.

WebSocket communication can be used between any kinds of applications, but the most common use of WebSocket is to facilitate communication between a server and a browser-based application. A JavaScript client in the browser opens a connection to the server, and the server sends updates to the browser on that connection. This is generally more efficient and more natural than the historically common alternative of polling the server for updates.
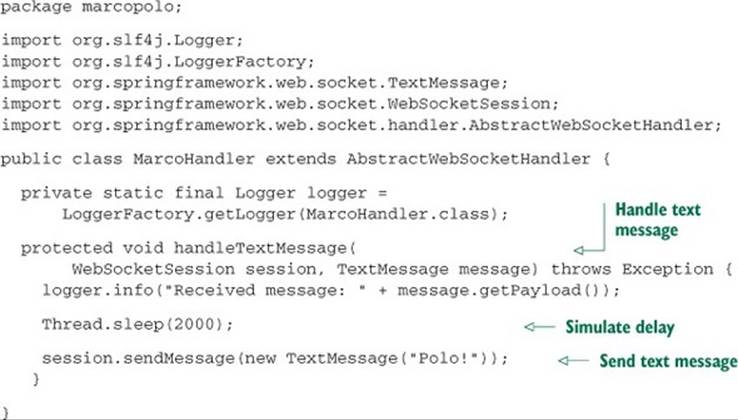
To demonstrate Spring’s low-level WebSocket API, let’s write a simple WebSocket example where a JavaScript-based client plays a never-ending game of Marco Polo with the server. The server-side application will handle a text message (“Marco!”) and will react by sending a text message (“Polo!”) back on the same connection. To handle messages in Spring with low-level WebSocket support, you must write a class that implements WebSocketHandler:
public interface WebSocketHandler {
void afterConnectionEstablished(WebSocketSession session)
throws Exception;
void handleMessage(WebSocketSession session,
WebSocketMessage<?> message) throws Exception;
void handleTransportError(WebSocketSession session,
Throwable exception) throws Exception;
void afterConnectionClosed(WebSocketSession session,
CloseStatus closeStatus) throws Exception;
boolean supportsPartialMessages();
}
As you can see, the WebSocketHandler interface requires that you implement five methods. Rather than implement WebSocketHandler directly, it’s easier to extend AbstractWebSocketHandler, an abstract implementation of WebSocketHandler. The following listing showsMarcoHandler, a subclass of AbstractWebSocketHandler that will handle messages on the server.
Listing 18.1. MarcoHandler handles text messages sent via a WebSocket.
Although it’s an abstract class, AbstractWebSocketHandler doesn’t require that you override any specific method. Instead, it leaves it up to you to decide which methods you want to override. In addition to the five methods defined in WebSocketHandler, you may also override three additional methods defined by AbstractWebSocket-Handler:
· handleBinaryMessage()
· handlePongMessage()
· handleTextMessage()
These three methods are merely specializations of the handleMessage() method, each tuned to a specific kind of message.
Because MarcoHandler will be handling the textual “Marco!” message, it makes sense for it to override handleTextMessage(). When a text message comes in, that message is logged and, after a simulated 2-second delay, another text message is sent back on the same connection.
All of the other methods that MarcoHandler doesn’t override are implemented by AbstractWebSocketHandler with no-op implementations. This means that MarcoHandler will also handle binary and pong messages, but will do nothing with those messages.
Alternatively, you could extend TextWebSocketHandler instead of AbstractWebSocketHandler:
public class MarcoHandler extends TextWebSocketHandler {
...
}
TextWebSocketHandler is a subclass of AbstractWebSocketHandler that refuses to handle binary messages. It overrides handleBinaryMessage() to close the WebSocket connection if a binary connection is received. In a similar way, Spring also offersBinaryWebSocketHandler, a subclass of AbstractWebSocketHandler that overrides handleTextMessage() to close the connection if a text message is received.
Regardless of whether you handle text messages, binary messages, or both, you might also be interested in handling the establishment and closing of connections. In that case, you can override afterConnectionEstablished() and afterConnectionClosed():
public void afterConnectionEstablished(WebSocketSession session)
throws Exception {
logger.info("Connection established");
}
@Override
public void afterConnectionClosed(
WebSocketSession session, CloseStatus status) throws Exception {
logger.info("Connection closed. Status: " + status);
}
Connections are bookended with the afterConnectionEstablished() and afterConnectionClosed() methods. When a new connection is established, the after-ConnectionEstablished() method is called. Likewise, afterConnectionClosed() will be called whenever a connection is closed. In this example, the connection events are only logged, but these methods could be useful for setup and teardown of any resources used during the life of the connection.
Notice that these methods both start with the word “after.” That means that these methods are only able to react to those events after the event occurs and can’t change the outcome.
Now that you have a message handler class, you must configure it so that Spring will dispatch messages to it. In Spring’s Java configuration, this involves annotating a configuration class with @EnableWebSocket and implementing the WebSocketConfigurer interface, as shown in the next listing.
Listing 18.2. Enabling WebSocket and mapping a message handler in Java configuration
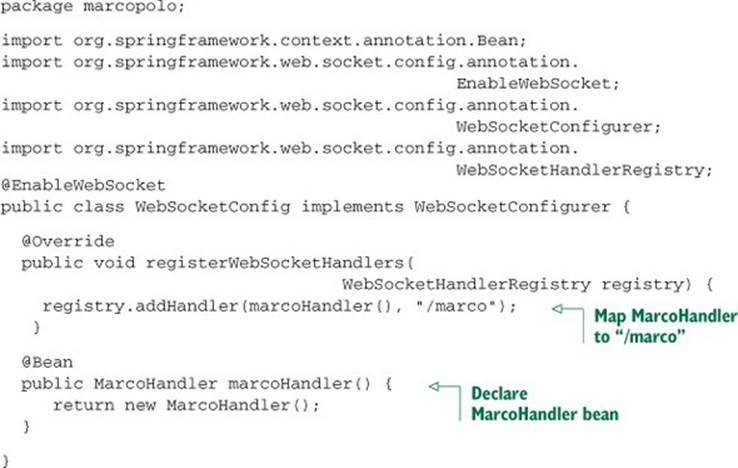
The registerWebSocketHandlers() method is the key to registering a message handler. By overriding it, you’re given a WebSocketHandlerRegistry through which you can call addHandler() to register a message handler. In this case, you register the MarcoHandler (declared as a bean) and associate it with the /marco path.
Alternatively, if you’d rather configure Spring in XML, you can take advantage of the websocket namespace, as follows.
Listing 18.3. The websocket namespace enables XML configuration for WebSockets.
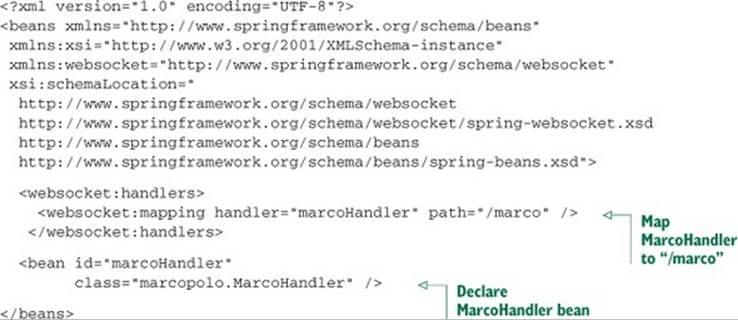
Whether you use Java or XML configuration, that’s the only configuration you’ll need.
Now we can turn our attention to the client that will send a “Marco!” text message to the server and listen for text messages coming from the server. The following listing shows some JavaScript that opens a native WebSocket and uses it to volley messages to the server.
Listing 18.4. A JavaScript client that connects to the “marco” websocket
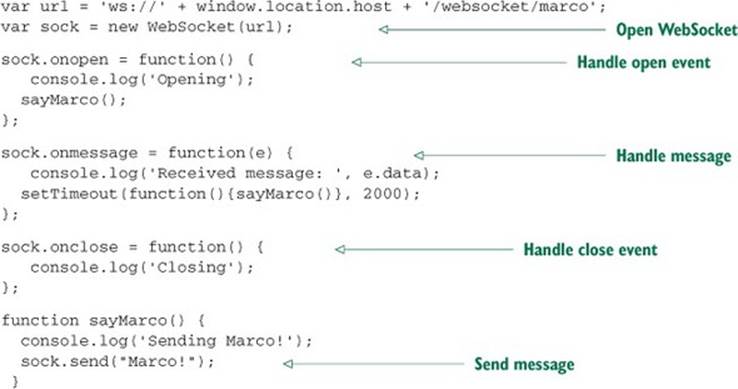
The first thing that the code in listing 18.4 does is create an instance of WebSocket. This type is native to browsers that support WebSocket. By creating a WebSocket instance, it effectively opens the WebSocket to the URL it’s given. In this case, the URL is prefixed with “ws://”, indicating a basic WebSocket connection. If it were a secure WebSocket connection, the protocol prefix would have been “wss://”.
Once the WebSocket instance is created, the next several lines set up the WebSocket with event-handling functions. Notice that the WebSocket’s onopen, onmessage, and onclose events mirror MarcoHandler’s afterConnectionEstablished(), handleTextMessage(), andafterConnectionClosed() methods. The onopen event is given a function that calls sayMarco() to send the “Marco!” message on the WebSocket. By sending “Marco!”, the never-ending game of Marco Polo begins, because MarcoHandler on the server will react by sending “Polo!” back. When the client receives the message from the server, the onmessage event will result in another “Marco!” message being sent to the server.
And it goes on and on like that until the connection is closed. It’s not shown in listing 18.4, but a call to sock.close() will put an end to the madness. The server could also close the connection, or the browser could navigate away from the page, and the connection will be closed. In any case, once the connection goes down, the onclose event will be fired. Here, that occasion will be marked with a simple message to the console log.
At this point, you’ve written everything that goes into enabling Spring’s low-level WebSocket support, including a handler class that receives and sends messages and a simple JavaScript client to do the same in the browser. If you were to build the code and deploy it to a servlet container, itmight even work.
Did you sense some pessimism in my choice of the word “might”? That’s because I can’t guarantee that it will work. In fact, there’s a really good chance that it won’t work. Even if we do everything correctly, the odds are stacked against us.
Let’s look at what will prevent WebSocket code from working and take steps to improve our chances.
18.2. Coping with a lack of WebSocket support
WebSocket is a relatively new specification. Even though it was standardized by the end of 2011, it still doesn’t have consistent support in web browsers and application servers. Firefox and Chrome have had full support for WebSocket for quite a while, but other browsers have only recently started to support WebSocket. Here’s a brief list of the minimum versions of several popular browsers that support WebSocket:
· Internet Explorer: 10.0
· Firefox: 4.0 (partial), 6.0 (full)
· Chrome: 4.0 (partial), 13.0 (full)
· Safari: 5.0 (partial), 6.0 (full)
· Opera: 11.0 (partial), 12.10 (full)
· iOS Safari: 4.2 (partial), 6.0 (full)
· Android Browser: 4.4
Unfortunately, many web surfers don’t recognize or understand the features of new web browsers and are slow to upgrade. Moreover, many corporations standardize on a specific version of a browser, making it hard (or impossible) for their employees to use anything newer. Given those circumstances, it’s very likely that your application’s audience will not be able to use your application if it employs WebSocket.
It’s the same song, second verse, when it comes to server-side support for WebSocket. GlassFish has had some form of WebSocket support for a couple of years, but many other application servers have only just started supporting WebSocket in their most recent versions. For example, I had to test the previous example using a release candidate build of Tomcat 8.
Even if the browser and application server versions align and WebSocket is supported on both ends, there might be trouble in the middle. Firewall proxies generally block anything but HTTP traffic. They’re not capable or not configured (yet) to allow WebSocket communication.
I realize that I’ve painted a rather bleak picture of the current WebSocket landscape. But don’t let a little thing like lack of support stop you from trying to use WebSocket. When it works, WebSocket is fantastic. When it doesn’t, all you need is a fallback plan.
Fortunately, WebSocket fallback is the specialty of SockJS. SockJS is a WebSocket emulator that mirrors the WebSocket API as closely as possible on the surface, but under the covers is clever enough to choose another form of communication when WebSocket isn’t available. SockJS will always favor WebSocket first, but if WebSocket isn’t an option, it will determine the best available option from the following:
· XHR streaming
· XDR streaming
· iFrame event source
· iFrame HTML file
· XHR polling
· XDR polling
· iFrame XHR polling
· JSONP polling
The good news is that you don’t need to fully understand all of those options to be able to use SockJS. SockJS lets you develop to a consistent programming model as if WebSocket support were ubiquitous, and it handles the fallback plans under the covers.
For example, to enable SockJS communication on the server side, you can simply ask for it in the Spring configuration. Revisiting the registerWebSocketHandlers() method from listing 18.2, you can enable WebSocket with a small addition:
@Override
public void registerWebSocketHandlers(
WebSocketHandlerRegistry registry) {
registry.addHandler(marcoHandler(), "/marco").withSockJS();
}
By simply calling withSockJS() on the WebSocketHandlerRegistration returned from the call to addHandler(), you’re saying that you want SockJS to be enabled, and for its fallbacks to go into effect if WebSocket can’t be used.
If you’re using XML to configure Spring, enabling SockJS is a simple matter of adding the <websocket:sockjs> element to the configuration:
<websocket:handlers>
<websocket:mapping handler="marcoHandler" path="/marco" />
<websocket:sockjs />
</websocket:handlers>
To use SockJS on the client, you’ll need to be sure to load the SockJS client library. The exact way you do that depends largely on whether you’re using a JavaScript module loader (such as require.js or curl.js) or are simply loading your JavaScript libraries with a <script> tag. The simplest way to load the SockJS client library is to load it from the SockJS CDN with a <script> tag like this:
<script src="http://cdn.sockjs.org/sockjs-0.3.min.js"></script>
Resolving web resources with WebJars
In my example code, I’m using WebJars to resolve JavaScript libraries as part of the project’s Maven or Gradle build, just like any other dependency. To support that, I’ve set up a resource handler in the Spring MVC configuration to resolve requests where the path starts with /webjars/** from the WebJars standard path:
@Override
public void addResourceHandlers(ResourceHandlerRegistry registry) {
registry.addResourceHandler("/webjars/**")
.addResourceLocations("classpath:/META-INF/resources/webjars/");
}
With that resource handler in effect, I can load the SockJS library in a web page with the following <script> tag:
<script th:src="@{/webjars/sockjs-client/0.3.4/sockjs.min.js}">
</script>
Notice that this particular <script> tag comes from a Thymeleaf template and takes advantage of the @{...} expression to calculate the full context-relative URL path for the JavaScript file.
Aside from loading the SockJS client library, there are only two lines from listing 18.4 that must be changed to use SockJS:
var url = 'marco';
var sock = new SockJS(url);
The first change you can make is to the URL. SockJS deals in URLs with the http:// or https:// scheme instead of ws:// and wss://. Even so, you can use relative URLs, keeping you from having to derive the fully qualified URL. In this case, if the page containing the JavaScript was at http://localhost:8080/websocket, the simple marco path given will result in a connection to http://localhost:8080/websocket/marco.
The key change you must make, however, is to create an instance of SockJS instead of WebSocket. Because SockJS mimics WebSocket as closely as possible, the rest of the code from listing 18.4 can remain the same. The same onopen, onmessage, and onclose event-handler functions will still respond to their respective events. And the same send() function will still send “Marco!” to the server.
You didn’t change too many lines of code, and yet you’ve made a huge difference in how the client-server messaging works. You can be reasonably confident that WebSocket-like communication will work between the browser and the server, even if WebSocket isn’t supported by the browser, server, or any proxy that sits in the middle.
WebSocket enables browser-server communication, and SockJS offers fallback communication when WebSocket isn’t supported. But in either case, this form of communication is too low-level for practical use. Let’s see how you can layer STOMP (Simple Text Oriented Messaging Protocol) on top of WebSocket to add proper messaging semantics to browser-server communication.
18.3. Working with STOMP messaging
If I were to suggest that you write a web application, you’d probably already have a good idea of the base technologies and frameworks you might use, even before we discussed requirements. Even for a simple Hello World web application, you might be thinking of writing a Spring MVC controller to handle a request and a JSP or Thymeleaf template for the response. At the very least, you might create a static HTML page and let the web server deal with serving it to any web browser that requests it. You’d probably not concern yourself with exactly how a browser would request the page or how the page would be delivered.
Now let’s suppose I suggested we pretend that HTTP doesn’t exist and that you write a web application using nothing but TCP sockets. You’d probably think I was out of my mind. Certainly, it would be possible to pull off this feat, but you’d need to devise your own wire protocol that both the client and server could agree upon to facilitate effective communication. In short, it’d be non-trivial.
Thankfully, the HTTP protocol addresses the minute details of how a web browser makes a request and how a web server responds to that request. As a result, most developers never write code that deals with low-level TCP socket communication.
Working directly with WebSocket (or SockJS) is a lot like developing a web application using only TCP sockets. Without a higher-level wire protocol, it’s up to you to define the semantics of the messages being sent between applications. And you’d need to be sure that both ends of the connection agreed on those semantics.
Fortunately, you don’t have to work with raw WebSocket connections. Just as HTTP layers a request-response model on top of TCP sockets, STOMP layers a frame-based wire format to define messaging semantics on top of WebSocket.
At a quick glance, STOMP message frames look very similar in structure to HTTP requests. Much like HTTP requests and responses, STOMP frames are comprised of a command, one or more headers, and a payload. For example, here’s a STOMP frame that sends data.
SEND
destination:/app/marco
content-length:20
{\"message\":\"Marco!\"}
In this simple example, the STOMP command is SEND, indicating that something is being sent. It’s followed by two headers: one indicates the destination where the message should be sent, and the other communicates the size of the payload. Following a blank line, the frame concludes with the payload; in this case, a JSON message.
The destination header is probably the most interesting thing about the STOMP frame. It’s a clue that STOMP is a messaging protocol, very much like JMS or AMQP. Messages are published to destinations that may, in fact, be backed by real message brokers. On the other end, message handlers can listen to those destinations to receive the messages sent.
In the context of WebSocket communication, a browser-based JavaScript application may publish a message to a destination that’s handled by a server-side component. And it works the other way around, too. A server-side component may publish a message to a destination to be received by the JavaScript client.
Spring provides for STOMP-based messaging with a programming model based on Spring MVC. As you’ll see, handling STOMP messages in a Spring MVC controller isn’t much different from handling HTTP requests. But first, you must configure Spring to enable STOMP-based messaging.
18.3.1. Enabling STOMP messaging
In a moment, you’ll see how to annotate controller methods with @MessageMapping to handle STOMP messages within Spring MVC in a way very similar to how @Request-Mapping-annotated methods handle HTTP requests. Unlike @RequestMapping, however, @MessageMappingisn’t enabled by the @EnableWebMvc annotation. Spring’s web messaging is built around a message broker, so there’s more to configure than just telling Spring that you’d like to handle messages. You must also configure a message broker and some basic destination details.
The following listing shows the basic Java configuration required to enable broker-based web messaging.
Listing 18.5. @EnableWebSocketMessageBroker enables STOMP over WebSocket.
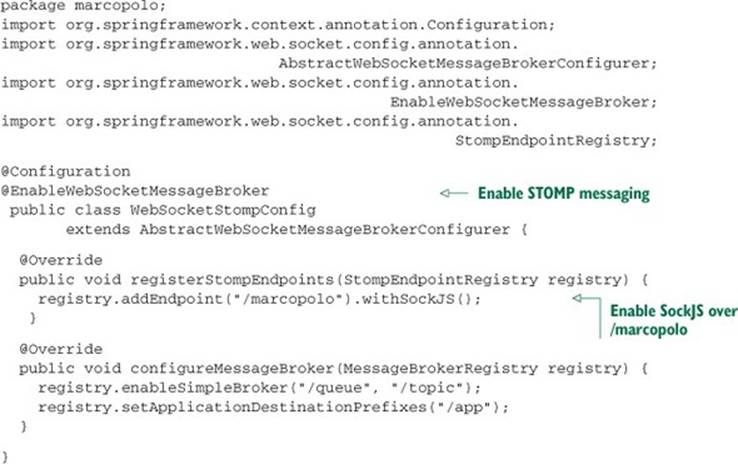
In contrast to the configuration class in listing 18.2, WebSocketStompConfig is annotated with @EnableWebSocketMessageBroker. This indicates that this configuration class is not only configuring WebSocket, but it’s configuring broker-based STOMP messaging. It overrides theregisterStompEndpoints() method to register /marcopolo as a STOMP endpoint. This path is distinct from any destination path that you might send or receive messages from. It’s the endpoint that a client would connect to before subscribing to or publishing to a destination path.
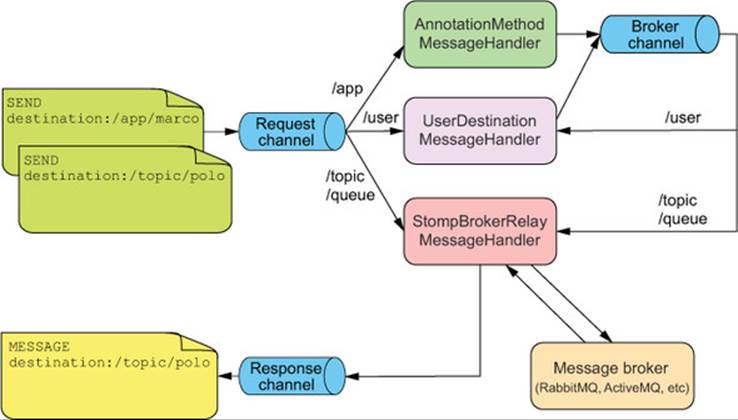
WebSocketStompConfig also configures a simple message broker by overriding the configureMessageBroker() method. This method is optional. If you don’t override it, you’ll get a simple in-memory message broker configured to handle messages prefixed with /topic. But in this example, you override it so that the message broker is responsible for messages prefixed with /topic and /queue. In addition, any messages destined for the application will be prefixed with /app. Figure 18.2 illustrates how messages flow in this setup.
Figure 18.2. Spring’s simple STOMP broker is an in-memory broker that mimics several STOMP broker functions.
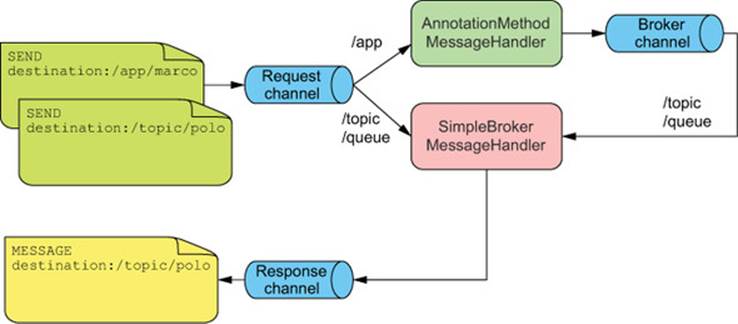
When a message arrives, the destination prefix will determine how the message is handled. In figure 18.2 the application destinations are prefixed with /app and the broker destinations are prefixed with either /topic or /queue. A message headed for an application destination is routed directly to an @MessageMapping-annotated controller method. Messages destined for the broker, including any messages resulting from values returned by @MessageMapping-annotated methods, are routed to the broker and are ultimately sent out to clients subscribed to those destinations.
Enabling a STOMP broker relay
The simple broker is great for getting started, but it has a few limitations. Although it mimics a STOMP message broker, it only supports a subset of STOMP commands. And because it’s memory-based, it’s not suitable for clusters where each node would be managing its own broker and set of messages.
For a production application, you’ll probably want to back your WebSocket messaging with a real STOMP-enabled broker, such as RabbitMQ or ActiveMQ. Such brokers will offer more scalable and robust messaging, not to mention the complete set of STOMP commands. You’ll need to be sure to set up your broker for STOMP according to their documentation. Once the broker is ready, you can replace the default in-memory broker with a STOMP broker relay by overriding the configureMessage-Broker() method like this:
@Override
public void configureMessageBroker(MessageBrokerRegistry registry) {
registry.enableStompBrokerRelay("/topic", "/queue");
registry.setApplicationDestinationPrefixes("/app");
}
The first line of configureMessageBroker() shown here enables the STOMP broker relay and sets its destination prefixes to /topic and /queue. This is a clue to Spring that any messages whose destination begins with /topic or /queue should go to the STOMP broker. Depending on which STOMP broker you choose, you may be limited in your choices for the destination prefix. RabbitMQ, for instance, only allows destinations of type /temp-queue, /exchange, /topic, /queue, /amq/queue, and /reply-queue/. Consult your broker’s documentation for supported destination types and their purposes.
In addition to the destination prefix, the second line in configureMessage-Broker() sets an application prefix to /app. Any messages whose destination begins with /app will be routed to an @MessageMapping method and not published to a broker queue or topic.
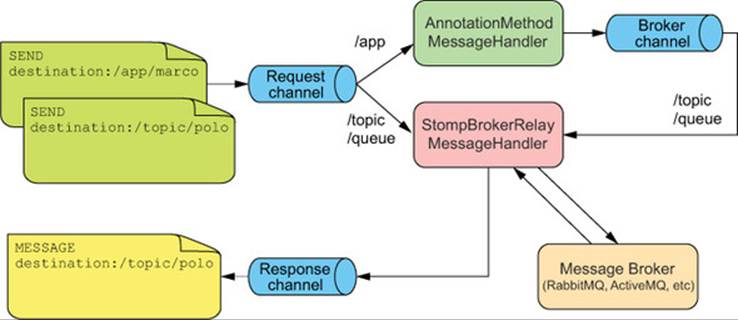
Figure 18.3 illustrates how the broker relay fits into Spring’s STOMP message handling. As you can see, the key difference is that rather than mimicking a STOMP broker’s functionality, the broker relay hands messages off to a real message broker for handling.
Figure 18.3. The STOMP broker relay delegates to a real message broker for handling STOMP messages.
Note that both enableStompBrokerRelay() and setApplicationDestination-Prefixes() accept a variable-length String argument, so you can configure multiple destination and application prefixes. For example:
@Override
public void configureMessageBroker(MessageBrokerRegistry registry) {
registry.enableStompBrokerRelay("/topic", "/queue");
registry.setApplicationDestinationPrefixes("/app", "/foo");
}
By default, the STOMP broker relay assumes that the broker is listening on port 61613 of localhost and that the client username and password are both “guest”. If your STOMP broker is on another server or is configured with different client credentials, you can configure those details when enabling the STOMP broker relay:
@Override
public void configureMessageBroker(MessageBrokerRegistry registry) {
registry.enableStompBrokerRelay("/topic", "/queue")
.setRelayHost("rabbit.someotherserver")
.setRelayPort(62623)
.setClientLogin("marcopolo")
.setClientPasscode("letmein01");
registry.setApplicationDestinationPrefixes("/app", "/foo");
}
This bit of configuration adjusts the server, port, and credentials. But it’s not necessary to configure them all. For instance, if you only need to change the relay host, you can call setRelayHost() and leave out the other setter methods in the configuration.
Now Spring is configured and ready to handle STOMP messages.
18.3.2. Handling STOMP messages from the client
As you learned in chapter 5, Spring MVC offers an annotation-oriented programming model for handling HTTP web requests. @RequestMapping, the star annotation in Spring MVC, maps HTTP requests to methods that will process those requests. That same programming model extends to serving RESTful resources as you saw in chapter 16.
STOMP and WebSocket are more about synchronous messaging as opposed to HTTP’s request-response approach. Nevertheless, Spring offers a programming model that’s very similar to Spring MVC for handling STOMP messages. It’s so similar, in fact, that the handler methods for STOMP are members of @Controller-annotated classes.
Spring 4.0 introduced @MessageMapping, STOMP messaging’s analog to Spring MVC’s @RequestMapping. A method annotated with @MessageMapping can handle messages as they arrive at a specified destination. For example, consider the simple controller class in the following listing.
Listing 18.6. @MessageMapping handles STOMP messages in a controller.
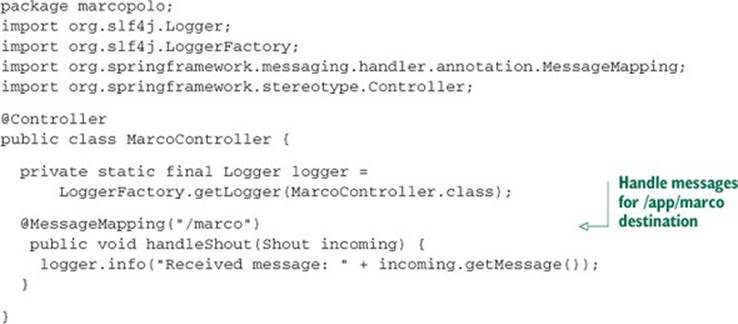
At first glance, this looks like any other Spring MVC controller class. It’s annotated with @Controller, so it will be picked up and registered as a bean by component-scanning. And it has a handler method, just like any @Controller class would have.
But the handler method is a little different than those we’ve looked at before. Instead of @RequestMapping, the handleShout() method is annotated with @MessageMapping. This signifies that handleShout() should handle any messages that arrive at the specified destination. In this case, the destination is /app/marco (the “/app” prefix is implied as it is the prefix we configured as the application destination prefix).
Because handleShout() accepts a Shout parameter, the payload of the STOMP message will be converted into a Shout using one of Spring’s message converters. The Shout class is just a simple one-property JavaBean that carries a message:
package marcopolo;
public class Shout {
private String message;
public String getMessage() {
return message;
}
public void setMessage(String message) {
this.message = message;
}
}
Since you’re not working with HTTP here, it won’t be one of Spring’s HttpMessageConverter implementations that handles the conversion to a Shout object. Instead, Spring 4.0 offers only a few message converters as part of its messaging API. Table 18.1 describes the message converters that might come into play when handling STOMP messages.
Table 18.1. Spring can convert message payloads to Java types using one of a few message converters.
|
Message converter |
Description |
|
ByteArrayMessageConverter |
Converts a message with a MIME type of application/octet-stream to and from byte[] |
|
MappingJackson2MessageConverter |
Converts a message with a MIME type of application/json to and from a Java object |
|
StringMessageConverter |
Converts a message with a MIME type of text/plain to and from String |
Assuming that the message handled by handleShout() has a content type of application/json (which is probably a safe guess given that Shout is neither a byte[] nor a String), the MappingJackson2MessageConverter will be tasked with converting the JSON message into aShout object. Just like its HTTP-oriented counterpart, MappingJackson2HttpMessageConverter, MappingJackson2MessageConverter delegates much of its work to the underlying Jackson 2 JSON processor. By default, Jackson will use reflection to map JSON properties to Java object properties. Although it’s unnecessary in this example, you can influence how the conversion takes place by annotating the Java type with Jackson annotations.
Processing subscriptions
In addition to the @MessagingMapping annotation, Spring also offers an @SubscribeMapping annotation. Any method that’s annotated with @SubscribeMapping will be invoked, much like @MessagingMapping methods, when a STOMP subscription message arrives.
It’s important to understand that just like @MessageMapping methods, @Subscribe-Mapping methods receive their messages via AnnotationMethodMessageHandler (as illustrated in Figures 18.2 and 18.3). Per the configuration in listing 18.5, that means that @SubscribeMappingmethods can only handle messages for destinations that are prefixed with /app.
This may seem odd, knowing that outgoing messages tend to go to broker destinations prefixed with /topic or /queue. Clients subscribe to those destinations and probably won’t subscribe to destinations prefixed with /app. If the clients are subscribing to /topic and /queue destinations, there’s no way that an @Subscribe-Mapping method can handle those subscriptions. And if that’s true, then what good is @SubscribeMapping?
The primary use case for @SubscribeMapping is to implement a request-reply pattern. In the request-reply pattern, the client subscribes to a destination expecting a one-time response at that destination.
For example, consider the following @SubscribeMapping-annotated method:
@SubscribeMapping({"/marco"})
public Shout handleSubscription() {
Shout outgoing = new Shout();
outgoing.setMessage("Polo!");
return outgoing;
}
As you can see, the handleSubscription() method is annotated with @SubscribeMapping to handle subscriptions to /app/marco. (As with @MessageMapping, the “/app” prefix is implied). When handling the subscription, handleSubscription() produces an outgoing Shoutobject and returns it. The Shout object is then converted into a message and sent back to the client at the same destination to which the client subscribed.
If you’re thinking that this request-reply pattern isn’t much different than an HTTP GET request-response pattern, then you’re mostly correct. The key difference, however, is that where an HTTP GET request is synchronous, a subscription request-reply is asynchronous, allowing the client to deal with the reply whenever it’s available and not have to wait for it.
Writing the JavaScript client
The handleShout() method is ready to process messages as they’re sent. Now all you need is a client to send those messages.
The following listing shows some JavaScript client code that might connect to the /marcopolo endpoint and send a “Marco!” message.
Listing 18.7. Messages can be sent from JavaScript using the STOMP library
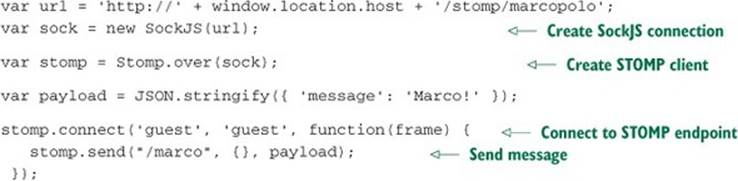
As with our previous JavaScript client example, this one starts by creating an instance of SockJS for a given URL. The URL in this case references the STOMP endpoint configured in listing 18.5 (not including the application’s context path, /stomp).
What’s different here, however, is that you never use SockJS directly. Instead you construct an instance of the STOMP client by calling Stomp.over(sock). This effectively wraps SockJS to send STOMP messages over the WebSocket connection.
Next, you use the STOMP client to connect to and, assuming that the connection succeeds, send a message with a JSON payload to the destination named /marco. The second parameter passed to send() is a map of headers to be included in the STOMP frame; although in this case you’re not contributing any headers and the map is empty.
Now you have a client that sends a message to the server, and a handler method on the server ready to process it. It’s a good start. But you may have noticed that it’s a bit one-sided. Let’s give the server a voice and see how to send messages to the client.
18.3.3. Sending messages to the client
So far, the client is doing all of the message sending and the server is forced to listen for those messages. While that’s a valid use of WebSocket and STOMP, it’s not the use case that you probably think of when you think of WebSocket. WebSocket is often viewed as a way that a server can send data to the browser without being in response to an HTTP request. How can you communicate with the browser-based client using Spring and WebSocket/STOMP?
Spring offers two ways to send data to a client:
· As a side-effect of handling a message or subscription
· Using a messaging template
You already know about some methods to handle messages and subscriptions, so we’ll first look at how to send messages to the client as a side-effect of those methods. Then we’ll look at Spring’s SimpMessagingTemplate for sending messages from anywhere in the application.
Sending a message after handling a message
The handleShout() method from listing 18.6 simply returns void. Its job is to simply handle a message, not reply to the client.
Even so, if you want to send a message in response to receiving a message, all you need to do is return something other than void. For example, if you want to send a “Polo!” message in reaction to a “Marco!” message, you could change the handleShout() message to look like this:
@MessageMapping("/marco")
public Shout handleShout(Shout incoming) {
logger.info("Received message: " + incoming.getMessage());
Shout outgoing = new Shout();
outgoing.setMessage("Polo!");
return outgoing;
}
In this new version of handleShout(), a new Shout object is returned. By simply returning an object, a handler method can also be a sender method. When an @Message-Mapping-annotated method has a return value, the returned object will be converted (via a message converter) and placed into the payload of a STOMP frame and published to the broker.
By default, the frame will be published to the same destination that triggered the handler method, but with /topic as the prefix. In the case of handleShout(), that means that the returned Shout object will be written to the payload of a STOMP frame and published to the /topic/marco destination. But you can override the destination by annotating the method with @SendTo:
@MessageMapping("/marco")
@SendTo("/topic/shout")
public Shout handleShout(Shout incoming) {
logger.info("Received message: " + incoming.getMessage());
Shout outgoing = new Shout();
outgoing.setMessage("Polo!");
return outgoing;
}
With this @SendTo annotation in place, the message will be published to /topic/shout. Any application that’s subscribed to that topic (such as the client), will receive that message.
The handleShout() method now sends a message in response to having received a message. In a similar way, an @SubscribeMapping-annotated method can send a message in reply to a subscription. For example, you could send a Shout message when the client subscribes by adding this method to the controller:
@SubscribeMapping("/marco")
public Shout handleSubscription() {
Shout outgoing = new Shout();
outgoing.setMessage("Polo!");
return outgoing;
}
The @SubscribeMapping annotation designates the handleSubscription() method to be invoked whenever a client subscribes to the /app/marco destination (with the /app application destination prefix). The Shout object it returns will be converted and sent back to the client.
What’s different with @SubscribeMapping is that the Shout message is sent directly to the client without going through the broker. If you annotate the method with @SendTo, the message will be sent to the destination specified, going through the broker.
Sending a message from anywhere
@MessageMapping and @SubscribeMapping offer a simple way to send messages as a consequence of receiving a message or handling a subscription. But Spring’s Simp-MessagingTemplate makes it possible to send messages from anywhere in an application, even without having received a message first.
The easiest way to use a SimpMessagingTemplate is to autowire it (or its interface, SimpMessageSendingOperations) into the object that needs it.
To put this into practice, let’s revisit the Spittr application’s home page to offer a live Spittle feed. As it is currently written, the controller handling the home page request fetches the most recent list of Spittles and places them into the model to be rendered into the user’s browser. Although this works fine, it doesn’t offer a live feed of Spittle updates. If the user wants to see an updated Spittle feed, they’ll have to refresh the page in their browser.
Rather than force the user to refresh the page, you can have the home page subscribe to a STOMP topic to receive a live feed of Spittle updates as they’re created. Within the home page, you need to add the following JavaScript chunk:
<script>
var sock = new SockJS('spittr');
var stomp = Stomp.over(sock);
stomp.connect('guest', 'guest', function(frame) {
console.log('Connected');
stomp.subscribe("/topic/spittlefeed", handleSpittle);
});
function handleSpittle(incoming) {
var spittle = JSON.parse(incoming.body);
console.log('Received: ', spittle);
var source = $("#spittle-template").html();
var template = Handlebars.compile(source);
var spittleHtml = template(spittle);
$('.spittleList').prepend(spittleHtml);
}
</script>
As in previous examples, you’re creating an instance of SockJS and then an instance of Stomp over that SockJS instance. After connecting to the STOMP broker, you subscribe to /topic/spittlefeed and designate the handleSpittle() function to handle the Spittle updates as they arrive. The handleSpittle() function parses the incoming message’s body into a proper JavaScript object and then uses the Handlebars library to render the Spittle data into HTML prepended to the list. The Handlebars template is defined in a separate <script> tag as follows:
<script id="spittle-template" type="text/x-handlebars-template">
<li id="preexist">
<div class="spittleMessage">{{message}}</div>
<div>
<span class="spittleTime">{{time}}</span>
<span class="spittleLocation">({{latitude}}, {{longitude}})</span>
</div>
</li>
</script>
On the server, you can use SimpMessagingTemplate to publish any newly created Spittle as a message to the /topic/spittlefeed topic. The following listing shows SpittleFeedServiceImpl, a simple service that does exactly that.
Listing 18.8. SimpMessagingTemplate publishes messages from anywhere
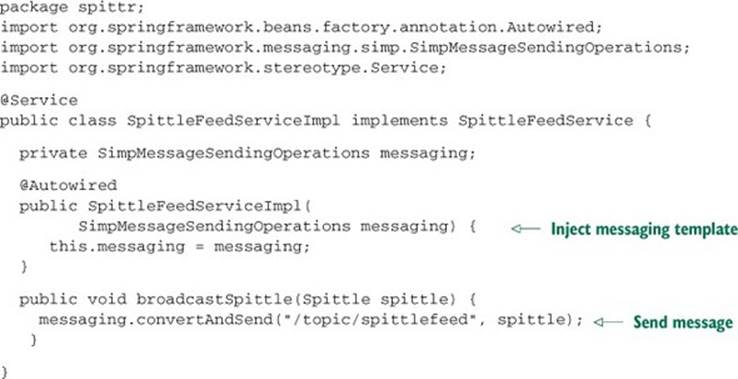
As a side-effect of configuring Spring’s STOMP support, there’s already a SimpMessage-Template bean in the Spring application context. Therefore, there’s no need to create a new instance here. Instead, the SpittleFeedServiceImpl constructor is annotated with @Autowired to inject the existing SimpMessagingTemplate (as SimpMessage-Sending-Operations) when SpittleFeedServiceImpl is created.
The broadcastSpittle() method is where the Spittle message is sent. It calls convertAndSend() on the injected SimpMessageSendingOperations to convert the Spittle into a message and send it to the /topic/spittlefeed topic. If the convertAndSend() method seems familiar, that’s because it mimics the methods of the same name offered by both JmsTemplate and RabbitTemplate.
When you publish a message to a STOMP topic with convertAndSend() or as a result of a handler method, any client subscribed to that topic will receive the message. For a situation where you want to keep all clients up to date with a live Spittle feed, that’s perfect. But sometimes you might want to send a message to a specific user and not to all clients.
18.4. Working with user-targeted messages
Up to this point, the messages you’ve sent and received were between a client (in a web browser) and the server. The user of that client hasn’t been taken into account. When an @MessageMapping-annotated method is invoked, you know that a message has been received, but not who it’s from. Similarly, if you don’t know who the user is, then any messages sent will go to all clients that have subscribed to the topic that the message is carried on; there’s no way to send that message to a specific user.
If you know who the user is, however, it becomes possible to deal with messages associated with a user, not just those associated with a client. The good news is that you already know how to identify the user. Using the same authentication mechanism applied in chapter 9, you can use Spring Security to authenticate the user and work with user-targeted messages.
There are three ways to take advantage of an authenticated user when messaging with Spring and STOMP:
· The @MessageMapping and @SubscribeMapping methods can receive a Principal for the authenticated user.
· Values returned from the @MessageMapping, @SubscribeMapping, and @Message-Exception methods can be sent as messages to the authenticated user.
· The SimpMessagingTemplate can send messages to a specific user.
Let’s start by looking at the first two ways, both of which enable a controller’s message-handling methods to work with user messages.
18.4.1. Working with user messages in a controller
As mentioned before, there are two ways that a controller’s @MessageMapping or @SubscribeMapping method can be user-aware in processing messages. By simply asking for a Principal as a parameter to a handler method, the handler method can know who the user is and use that information to focus its work on that user’s data. In addition, a handler method can be annotated with @SendToUser to indicate that its return value should be sent in a message to the authenticated user’s client (and to that client only).
To demonstrate, let’s write a controller method that creates a new Spittle object from an incoming message and sends a reply indicating that the Spittle has been saved. If this use-case sounds familiar, it’s because you already implemented this as a REST endpoint in chapter 16. Certainly, REST is one way of implementing that functionality. But REST requests are synchronous by nature, and the client must wait while the server processes them. By posting the Spittle as a STOMP message, you can take full advantage of the asynchronous nature of STOMP messaging.
Consider the following handleSpittle() method, which handles an incoming message and saves it as a Spittle:
@MessageMapping("/spittle")
@SendToUser("/queue/notifications")
public Notification handleSpittle(
Principal principal, SpittleForm form) {
Spittle spittle = new Spittle(
principal.getName(), form.getText(), new Date());
spittleRepo.save(spittle);
return new Notification("Saved Spittle");
}
As you can see, handleSpittle() accepts both a Principal object as well as a Spittle-Form object. It uses those to create an instance of Spittle and then uses the SpittleRepository to save it. Finally, it returns a new Notification indicating that the Spittle was saved.
Of course, what happens inside the method isn’t nearly as interesting as what’s going on outside. Because this method is annotated with @MessageMapping, it will be invoked whenever a message arrives on the /app/spittle destination. The SpittleForm will be created from that message and, assuming that the user is authenticated, the Principal will also be derived from headers in the STOMP frame.
The big thing to pay attention to, however, is where the returned Notification goes. The @SendToUser annotation specifies that the returned Notification should be sent as a message to the /queue/notifications destination. On the surface, /queue/notifications doesn’t appear to be specific to a given user. But because this is the @SendToUser annotation and not the @SendTo annotation, there’s more to the story.
To understand how Spring will publish the message, let’s step back a bit and see how a client would subscribe to the destination that this controller method publishes a Notification to. Consider this line of JavaScript that subscribes to a user-specific destination:
stomp.subscribe("/user/queue/notifications", handleNotifications);
Notice that the destination is prefixed with /user. Internally, destinations that are prefixed with /user are handled in a special way. Rather than flowing through Annotation-MethodMessageHandler (like an application message), or through Simple-BrokerMessageHandler orStompBrokerRelayMessageHandler (like a broker message), /user messages flow through UserDestinationMessageHandler, as illustrated in figure 18.4.
Figure 18.4. User messages flow through UserDestinationMessageHandler, which reroutes them to a destination that’s unique to a user.
UserDestinationMessageHandler’s primary job is to reroute user messages to a destination that’s unique to the user. In the case of a subscription, it derives the target destination by removing the /user prefix and adding a suffix that’s based on the user’s session. For instance, a subscription to /user/queue/notifications may end up being rerouted to a destination named /queue/notifications-user6hr83v6t.
In our example, handleSpittle() is annotated with @SendToUser("/queue/notifications"). This new destination is prefixed with /queue, which is one of the prefixes that your StompBrokerRelayMessageHandler (or SimpleBrokerMessage-Handler) is configured to handle, so the message will go there next. As it turns out, the client subscribed to that destination, so the client will receive the Notification message.
The @SendToUser annotation and a Principal parameter are very useful when working within a controller method. But in listing 18.8 you saw how to send messages from anywhere in an application using a messaging template. Let’s see how you can use SimpMessagingTemplate to send messages to a specific user.
18.4.2. Sending messages to a specific user
In addition to convertAndSend(), SimpMessagingTemplate also offers convertAndSendToUser(). As its name suggests, the convertAndSendToUser() method enables you to send messages that target a specific user.
To demonstrate, let’s add a feature to the Spittr application that notifies a user when some other user posts a Spittle that mentions them. For example, if the Spittle text includes “@jbauer”, then you should send a message to the client where a user with the username “jbauer” is logged in. The broadcastSpittle() method in the following listing uses convertAndSendToUser() to notify a user that they’re being talked about.
Listing 18.9. convertAndSendToUser() can send a message to a specific user
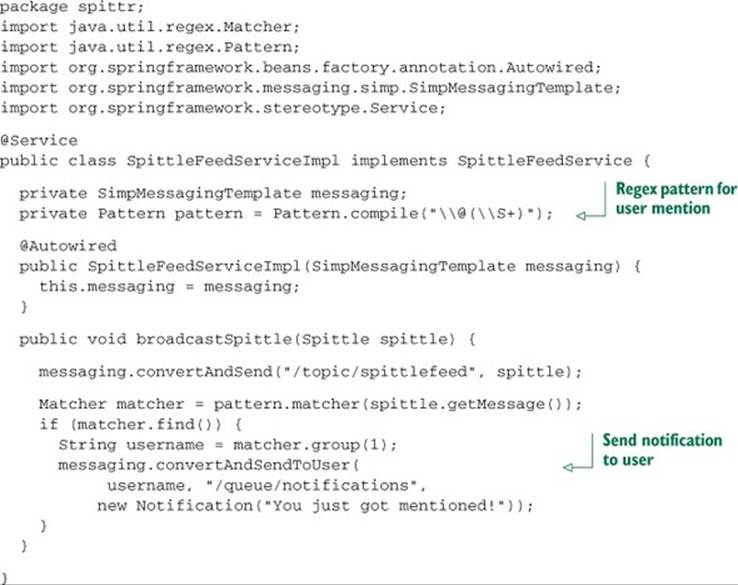
Within broadcastSpittle(), if the given Spittle object’s message contains what appears to be a username (that is, any text that begins with “@”), a new Notification will be sent to a destination named /queue/notifications. Therefore, if the Spittle has a message that contains “@jbauer”, the Notification will be published to the /user/jbauer/queue/notifications destination.
18.5. Handling message exceptions
Sometimes things don’t work out the way you expected. When handling a message, something could go wrong and an exception could be thrown. Due to the asynchronous nature of STOMP messaging, the sender may never know that anything went wrong. Aside from being logged by Spring, the exception could be lost with no recourse or opportunity to recover.
In Spring MVC, if an exception occurs during request handling, an @ExceptionHandler method will be given an opportunity to deal with the exception. Similarly, you can annotate a controller method with @MessageExceptionHandler to handle exceptions thrown in an@MessageMapping method.
For example, consider this method that handles exceptions thrown from message-handling methods:
@MessageExceptionHandler
public void handleExceptions(Throwable t) {
logger.error("Error handling message: " + t.getMessage());
}
In its simplest form, @MessageExceptionHandler will handle any exception thrown from a message-handling method. But you can declare a specific exception type that it should handle as a parameter:
@MessageExceptionHandler(SpittleException.class)
public void handleExceptions(Throwable t) {
logger.error("Error handling message: " + t.getMessage());
}
Or you can specify several exception types to be handled as an array parameter:
@MessageExceptionHandler(
{SpittleException.class, DatabaseException.class})
public void handleExceptions(Throwable t) {
logger.error("Error handling message: " + t.getMessage());
}
Although it only logs that an error occurred, this method could do much more. For instance, it could reply with an error:
@MessageExceptionHandler(SpittleException.class)
@SendToUser("/queue/errors")
public SpittleException handleExceptions(SpittleException e) {
logger.error("Error handling message: " + e.getMessage());
return e;
}
Here, if a SpittleException is thrown, that exception will be logged and then returned. As you learned in section 18.4.1, UserDestinationMessageHandler will reroute the message to a destination unique to the user.
18.6. Summary
WebSocket is an exciting way to send messages between applications, especially when one of those applications is running within a web browser. It’s critical for writing highly interactive web applications that seamlessly transfer data to and from the server.
Spring’s WebSocket support includes a low-level API that lets you work with raw WebSocket connections. Unfortunately, WebSocket support is not ubiquitous among web browsers, servers, and proxies. Therefore, Spring also supports SockJS, a protocol that falls back to alternative communication schemes when WebSocket doesn’t work.
Spring also offers a higher-level programming model for handling WebSocket messages using the STOMP wire-level protocol. In this higher-level model, STOMP messages are handled in Spring MVC controllers, similarly to how HTTP messages are handled.
In the past couple of chapters, you’ve seen a few ways to send messages asynchronously between applications. But there’s another kind of asynchronous messaging that Spring can do. In the next chapter, you’ll see how to use Spring to send emails.
All materials on the site are licensed Creative Commons Attribution-Sharealike 3.0 Unported CC BY-SA 3.0 & GNU Free Documentation License (GFDL)
If you are the copyright holder of any material contained on our site and intend to remove it, please contact our site administrator for approval.
© 2016-2026 All site design rights belong to S.Y.A.