Spring in Action, 4th Edition: Covers Spring 4 (2015)
Part 2. Spring on the web
Chapter 8. Working with Spring Web Flow
This chapter covers
· Creating conversational web applications
· Defining flow states and actions
· Securing web flows
One of the strangely wonderful things about the internet is that it’s so easy to get lost. There are so many things to see and read. The hyperlink is at the core of the internet’s power. But at the same time, it’s no wonder they call it the web. Just like webs built by spiders, it traps anyone who happens to crawl across it. I’ll confess: one reason it took me so long to write this book is because I once got lost in an endless path of Wikipedia links.
There are times when a web application must take control of a web surfer’s voyage, leading the user step by step through the application. The quintessential example of such an application is the checkout process on an e-commerce site. Starting with the shopping cart, the application leads you through a process of entering shipping details and billing information, and ultimately it displays an order confirmation.
Spring Web Flow is a web framework that enables the development of elements following a prescribed flow. In this chapter, we’ll explore Spring Web Flow and see how it fits into the Spring web framework landscape.
It’s possible to write a flowed application with any web framework. I’ve even seen a Struts application that had a certain flow built into it. But without a way to separate the flow from the implementation, you’ll find that the definition of the flow is scattered across the various elements that make up the flow. There’s no one place to go to fully understand the flow.
Spring Web Flow is an extension to Spring MVC that enables development of flow-based web applications. It does this by separating the definition of an application’s flow from the classes and views that implement the flow’s behavior.
As you get to know Spring Web Flow, you’ll take a break from the Spittr example and work on a new web application for taking pizza orders. You’ll use Spring Web Flow to define the order process.
The first step in working with Spring Web Flow is to install it in your project. Let’s start there.
8.1. Configuring Web Flow in Spring
Spring Web Flow is built on a foundation of Spring MVC. That means all requests to a flow first go through Spring MVC’s DispatcherServlet. From there, a handful of special beans in the Spring application context must be configured to handle the flow request and execute the flow.
At this time, there’s no support for configuring Spring Web Flow in Java, so you have no choice but to configure it in XML. Several of the web flow beans are declared using elements from Spring Web Flow’s Spring configuration XML namespace. Therefore, you’ll need to add the namespace declaration to the context definition XML file:
<?xml version="1.0" encoding="UTF-8"?>
<beans xmlns="http://www.springframework.org/schema/beans"
xmlns:xsi="http://www.w3.org/2001/XMLSchema-instance"
xmlns:flow="http://www.springframework.org/schema/webflow-config"
xsi:schemaLocation=
"http://www.springframework.org/schema/webflow-config
http://www.springframework.org/schema/webflow-config/[CA]
spring-webflow-config-2.3.xsd
http://www.springframework.org/schema/beans
http://www.springframework.org/schema/beans/spring-beans.xsd">
With the namespace declaration in place, you’re ready to start wiring up web flow beans, starting with the flow executor.
8.1.1. Wiring a flow executor
As its name implies, the flow executor drives the execution of a flow. When a user enters a flow, the flow executor creates and launches an instance of the flow execution for that user. When the flow pauses (such as when a view is presented to the user), the flow executor also resumes the flow once the user has taken some action.
The <flow:flow-executor> element creates a flow executor in Spring:
<flow:flow-executor id="flowExecutor" />
Although the flow executor is responsible for creating and executing flows, it’s not responsible for loading flow definitions. That responsibility falls to a flow registry, which you’ll create next.
8.1.2. Configuring a flow registry
A flow registry’s job is to load flow definitions and make them available to the flow executor. You can configure a flow registry in the Spring configuration with the <flow:flow-registry> element like this:
<flow:flow-registry id="flowRegistry" base-path="/WEB-INF/flows">
<flow:flow-location-pattern value="*-flow.xml" />
</flow:flow-registry>
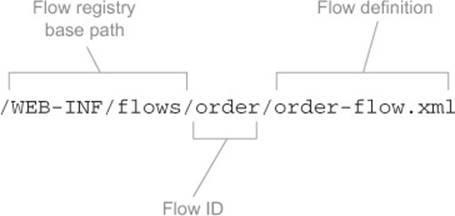
As declared here, the flow registry will look for flow definitions under the /WEB-INF/flows directory, as specified in the base-path attribute. Per the <flow: flow-location-pattern> element, any XML file whose name ends with -flow.xml will be considered a flow definition.
All flows are referred to by their IDs. Using <flow:flow-location-pattern> as you have, the flow ID is the directory path relative to the base-path—or the part of the path represented with the double asterisk. Figure 8.1 shows how the flow ID is calculated in this scenario.
Figure 8.1. When using a flow location pattern, the path to the flow definition file relative to the base path is used as the flow’s ID.
Alternatively, you can leave off the base-path attribute and explicitly identify the flow definition file’s location:
<flow:flow-registry id="flowRegistry">
<flow:flow-location path="/WEB-INF/flows/springpizza.xml" />
</flow:flow-registry>
Here, the <flow:flow-location> element is used instead of <flow:flow-location-pattern>. The path attribute directly points at the /WEB-INF/flows/springpizza.xml file as the flow definition. When configured this way, the flow’s ID is derived from the base name of the flow definition file, springpizza in this case.
If you’d like to be even more explicit about the flow’s ID, you can set it with the id attribute of the <flow:flow-location> element. For example, to specify pizza as the flow’s ID, configure <flow:flow-location> like this:
<flow:flow-registry id="flowRegistry">
<flow:flow-location id="pizza"
path="/WEB-INF/flows/springpizza.xml" />
</flow:flow-registry>
8.1.3. Handling flow requests
As you saw in the previous chapter, DispatcherServlet typically dispatches requests to controllers. But for flows, you need a FlowHandlerMapping to help DispatcherServlet know that it should send flow requests to Spring Web Flow. The FlowHandler-Mapping is configured in the Spring application context like this:
<bean class=
"org.springframework.webflow.mvc.servlet.FlowHandlerMapping">
<property name="flowRegistry" ref="flowRegistry" />
</bean>
As you can see, the FlowHandlerMapping is wired with a reference to the flow registry so it knows when a request’s URL maps to a flow. For example, if you have a flow whose ID is pizza, then FlowHandlerMapping will know to map a request to that flow if the request’s URL pattern (relative to the application context path) is /pizza.
Whereas the FlowHandlerMapping’s job is to direct flow requests to Spring Web Flow, it’s the job of a FlowHandlerAdapter to answer that call. A FlowHandlerAdapter is equivalent to a Spring MVC controller in that it handles requests coming in for a flow and processes those requests. The FlowHandlerAdapter is wired as a Spring bean like this:
<bean class=
"org.springframework.webflow.mvc.servlet.FlowHandlerAdapter">
<property name="flowExecutor" ref="flowExecutor" />
</bean>
This handler adapter is the bridge between DispatcherServlet and Spring Web Flow. It handles flow requests and manipulates the flow based on those requests. Here, it’s wired with a reference to the flow executor to execute the flows for which it handles requests.
You’ve configured all the beans and components that are needed for Spring Web Flow to work. What’s left is to define a flow. You’ll do that soon enough. But first, let’s get to know the elements that are put together to make up a flow.
8.2. The components of a flow
In Spring Web Flow, a flow is defined by three primary elements: states, transitions, and flow data. States are points in a flow where something happens. If you imagine a flow as being like a road trip, then states are the towns, truck stops, and scenic stops along the way. Instead of picking up a bag of Doritos and a Diet Coke, a state in a flow is where some logic is performed, some decision is made, or some page is presented to the user.
If flow states are like the points on a map where you might stop during a road trip, then transitions are the roads that connect those points. In a flow, you get from one state to another by way of a transition.
As you travel from town to town, you may pick up some souvenirs, memories, and empty snack bags along the way. Similarly, as a flow progresses, it collects some data: the current condition of the flow. I’m tempted to refer to it as the state of the flow, but the word state already has another meaning when talking about flows.
Let’s take a closer look at how these three elements are defined in Spring Web Flow.
8.2.1. States
Spring Web Flow defines five different kinds of state, as shown in table 8.1. This selection of states makes it possible to construct virtually any arrangement of functionality into a conversational web application. Although not all flows require all the states described in the table, you’ll probably end up using most of them at one time or another.
Table 8.1. Spring Web Flow’s selections of states
|
State type |
What it’s for |
|
Action |
Action states are where the logic of a flow takes place. |
|
Decision |
Decision states branch the flow in two directions, routing the flow based on the outcome of evaluating flow data. |
|
End |
The end state is the last stop for a flow. Once a flow has reached its end state, the flow is terminated. |
|
Subflow |
A subflow state starts a new flow in the context of a flow that is already underway. |
|
View |
A view state pauses the flow and invites the user to participate in the flow. |
In a moment, you’ll see how to piece these different kinds of states together to form a complete flow. But first, let’s get to know how these flow elements are manifested in a Spring Web Flow definition.
View states
View states are used to display information to the user and to offer the user an opportunity to play an active role in the flow. The actual view implementation could be any of the views supported by Spring MVC but is often implemented in JSP.
In the flow definition XML file, the <view-state> element is used to define a view state:
<view-state id="welcome" />
In this simple example, the id attribute serves a dual purpose. First, it identifies the state in the flow. Also, because no view has been specified otherwise, it specifies welcome as the logical name of the view to be rendered when the flow reaches this state.
If you’d rather explicitly identify another view name, then you can do so with the view attribute:
<view-state id="welcome" view="greeting" />
If a flow presents a form to the user, you may want to specify the object to which the form will be bound. To do that, set the model attribute:
<view-state id="takePayment" model="flowScope.paymentDetails"/>
Here you specify that the form in the takePayment view will be bound to the flow-scoped paymentDetails object. (We’ll talk more about flow scopes and data in a moment.)
Action states
Whereas view states involve the users of the application in the flow, action states are where the application itself goes to work. Action states typically invoke some method on a Spring-managed bean and then transition to another state depending on the outcome of the method call.
In the flow definition XML, action states are expressed with the <action-state> element. Here’s an example:
<action-state id="saveOrder">
<evaluate expression="pizzaFlowActions.saveOrder(order)" />
<transition to="thankYou" />
</action-state>
Although it’s not strictly required, <action-state> elements usually have an <evaluate> element as a child. The <evaluate> element gives an action state something to do. The expression attribute is given an expression that’s evaluated when the state is entered. In this case,expression is given a SpEL expression indicating that the saveOrder() method should be called on a bean whose ID is pizzaFlowActions.
Spring Web Flow and expression languages
Spring Web Flow has been fickle in its choice of expression languages over the years. In version 1.0, Spring Web Flow used the Object-Graph Navigation Language (OGNL). It then flirted with the Unified Expression Language (Unified EL) starting in version 2.0. Now, starting with version 2.1, Spring Web Flow’s loyalties are with SpEL.
Although it’s possible to configure Spring Web Flow to use any of these expression languages, SpEL is the default and recommended expression language. Therefore, I’ll focus on SpEL when defining flows and disregard the other options.
Decision states
It’s possible for a flow to be purely linear, stepping from one state to another without taking any alternate routes. But more often, a flow branches at one point or another, depending on the flow’s current circumstances.
Decision states enable a binary branch in a flow execution. A decision state evaluates a Boolean expression and takes one of two transitions, depending on whether the expression evaluates to true or false. In the XML flow definition, decision states are defined by the <decision-state> element. A typical example of a decision state might look like this:
<decision-state id="checkDeliveryArea">
<if test="pizzaFlowActions.checkDeliveryArea(customer.zipCode)"
then="addCustomer"
else="deliveryWarning" />
</decision-state>
As you can see, the <decision-state> element doesn’t work alone. The <if> element is the heart of a decision state. It’s where the expression is evaluated. If the expression evaluates to true, then the flow transitions to the state identified by the then attribute. But if it’s false, the flow transitions to the state named in the else attribute.
Subflow states
You probably wouldn’t write all of your application’s logic in a single method. Instead, you’ll break it up into multiple classes, methods, and other structures.
In the same way, it’s a good idea to break flows down into discrete parts. The <subflow-state> element lets you call another flow from within an executing flow. It’s analogous to calling a method from within another method.
A <subflow-state> might be declared as follows:
<subflow-state id="order" subflow="pizza/order">
<input name="order" value="order"/>
<transition on="orderCreated" to="payment" />
</subflow-state>
Here, the <input> element is used to pass the order object as input to the subflow. And if the subflow ends with an <end-state> whose ID is orderCreated, then the flow will transition to the state whose ID is payment.
But I’m getting ahead of myself. I haven’t talked about the <end-state> element or transitions yet. We’ll look at transitions soon, in section 8.2.2. As for end states, that’s what we’ll look at next.
End states
Eventually, all flows must come to an end. And that’s what they do when they transition to an end state. The <end-state> element designates the end of a flow and typically appears like this:
<end-state id="customerReady" />
When the flow reaches an <end-state>, the flow ends. What happens next depends on a few factors:
· If the flow that’s ending is a subflow, the calling flow will proceed from the <subflow-state>. The <end-state>’s ID will be used as an event to trigger the transition away from the <subflow-state>.
· If the <end-state> has its view attribute set, the specified view will be rendered. The view may be a flow-relative path to a view template, prefixed with externalRedirect: to redirect to some page external to the flow, or prefixed with flowRedirect: to redirect to another flow.
· If the ending flow isn’t a subflow and no view is specified, the flow ends. The browser lands on the flow’s base URL, and, with no current flow active, a new instance of the flow begins.
It’s important to realize that a flow may have more than one end state. Because the end state’s ID determines the event fired from a subflow, you may want to end the flow through multiple end states to trigger different events in the calling flow. Even in flows that aren’t subflows, there may be several landing pages that follow the completion of a flow, depending on the course that the flow took.
Now that we’ve looked at the various kinds of states in a flow, we should take a moment to examine how the flow travels between states. Let’s look at how you can pave some roads in a flow by defining transitions.
8.2.2. Transitions
As I’ve already mentioned, transitions connect the states within a flow. Every state in a flow, with the exception of end states, should have at least one transition so that the flow will know where to go once that state has completed. A state may have multiple transitions, each one representing a different path that could be taken on completion of the state.
A transition is defined by the <transition> element, a child of the various state elements (<action-state>, <view-state>, and <subflow-state>). In its simplest form, the <transition> element identifies the next state in the flow:
<transition to="customerReady" />
The to attribute is used to specify the next state in the flow. When <transition> is declared with only a to attribute, the transition is the default transition for that state and will be taken if no other transitions are applicable.
More commonly, transitions are defined to take place on some event being fired. In a view state, the event is usually an action taken by the user. In an action state, the event is the result of evaluating an expression. In the case of a subflow state, the event is determined by the ID of the subflow’s end state. In any event (no pun intended), you can specify the event to trigger the transition in the on attribute:
<transition on="phoneEntered" to="lookupCustomer"/>
In this example, the flow will transition to the state whose ID is lookupCustomer if a phoneEntered event is fired.
The flow can also transition to another state in response to some exception being thrown. For example, if a customer record can’t be found, you may want the flow to transition to a view state that presents a registration form. The following snippet shows that kind of transition:
<transition
on-exception=
"com.springinaction.pizza.service.CustomerNotFoundException"
to="registrationForm" />
The on-exception attribute is much like the on attribute, except that it specifies an exception to transition on instead of an event. In this case, a CustomerNotFound-Exception will cause the flow to transition to the registrationForm state.
Global transitions
After you’ve created a flow, you may find that several states share some common transitions. For example, I wouldn’t be surprised to find the following <transition> sprinkled all over a flow:
<transition on="cancel" to="endState" />
Rather than repeat common transitions in multiple states, you can define them as global transitions by placing the <transition> element as a child of a <global-transitions> element. For example,
<global-transitions>
<transition on="cancel" to="endState" />
</global-transitions>
With this global transition in place, all states in the flow will have an implicit cancel transition.
We’ve talked about states and transitions. Before we get busy writing flows, let’s look at flow data, the remaining member of the web flow triad.
8.2.3. Flow data
If you’ve ever played one of those old text-based adventure games, you know that as you move from location to location, you occasionally find objects lying around that you can pick up and carry with you. Sometimes you need an object right away. Other times, you may carry an object through the entire game without knowing what it’s for—until you get to that final puzzle and find that it’s useful after all.
In many ways, flows are like those adventure games. As the flow progresses from one state to another, it picks up data. Sometimes that data is only needed for a little while (maybe just long enough to display a page to the user). Other times, that data is carried through the entire flow and is ultimately used as the flow completes.
Declaring variables
Flow data is stored in variables that can be referenced at various points in the flow. It can be created and accumulated in several ways. The simplest way to create a variable in a flow is by using the <var> element:
<var name="customer" class="com.springinaction.pizza.domain.Customer"/>
Here, a new instance of a Customer object is created and placed into the variable whose name is customer. This variable is available to all states in a flow.
As part of an action state or on entry to a view state, you may also create variables using the <evaluate> element. For example,
<evaluate result="viewScope.toppingsList"
expression="T(com.springinaction.pizza.domain.Topping).asList()" />
In this case, the <evaluate> element evaluates an expression (a SpEL expression) and places the result in a variable named toppingsList that’s view-scoped. (We’ll talk more about scopes in a moment.)
Similarly, the <set> element can set a variable’s value:
<set name="flowScope.pizza"
value="new com.springinaction.pizza.domain.Pizza()" />
The <set> element works much the same as the <evaluate> element, setting a variable to the resulting value from an evaluated expression. Here, you’re setting a flow-scoped pizza variable to a new instance of a Pizza object.
You’ll see more specifics on how these elements are used in an actual flow when you get to section 8.3 and start building a real working web flow. But first, let’s see what it means for a variable to be flow-scoped, be view-scoped, or use some other scope.
Scoping flow data
The lifespan and visibility of data carried in a flow will vary depending on the scope of the variable it’s kept in. Spring Web Flow defines five scopes, as described in table 8.2.
Table 8.2. Spring Web Flow’s selections of scopes
|
Scope |
Lifespan and visibility |
|
Conversation |
Created when a top-level flow starts, and destroyed when the top-level flow ends. Shared by a top-level flow and all of its subflows. |
|
Flow |
Created when a flow starts, and destroyed when the flow ends. Only visible in the flow it was created by. |
|
Request |
Created when a request is made into a flow, and destroyed when the flow returns. |
|
Flash |
Created when a flow starts, and destroyed when the flow ends. It’s also cleared out after a view state renders. |
|
View |
Created when a view state is entered, and destroyed when the state exits. Visible only in the view state. |
When you declare a variable using the <var> element, the variable is always flow-scoped in the flow defining the variable. When you use <set> or <evaluate>, the scope is specified as a prefix for the name or result attribute. For example, here’s how you would assign a value to a flow-scoped variable named theAnswer:
<set name="flowScope.theAnswer" value="42"/>
Now that you’ve seen all the raw materials of a web flow, it’s time to piece them together into a full-blown, fully functional web flow. As you do, keep your eyes peeled for examples of how to store data in scoped variables.
8.3. Putting it all together: the pizza flow
As I mentioned earlier in this chapter, we’re taking a break from the Spittr application. Instead, you’ve been asked to build out an online pizza-ordering application where hungry web visitors can order their favorite Italian pie.
As it turns out, the process of ordering a pizza can be defined nicely in a flow. You’ll start by building a high-level flow that defines the overall process of ordering a pizza. Then you’ll break that flow down into subflows that define the details at a lower level.
8.3.1. Defining the base flow
A new pizza chain, Spizza, has decided to relieve the load on its stores’ telephones by allowing customers to place orders online. When a customer visits the Spizza website, they’ll identify themselves, select one or more pizzas to add to their order, provide payment information, and then submit the order and wait for their pizza to arrive, hot and fresh. Figure 8.2 illustrates this flow.
Figure 8.2. The process of ordering a pizza boils down to a simple flow.
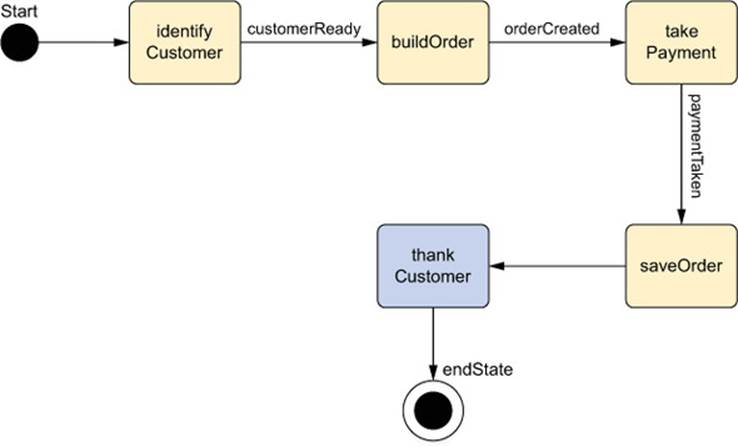
The boxes in the diagram represent states, and the arrows represent transitions. As you can see, the overall pizza flow is simple and linear. It should be easy to express this flow in Spring Web Flow. The only thing that makes it interesting is that the first three states can be more involved than suggested by a simple box.
The following listing shows the high-level pizza order flow as defined using Spring Web Flow’s XML-based flow definition.
Listing 8.1. Pizza order flow, defined as a Spring Web Flow
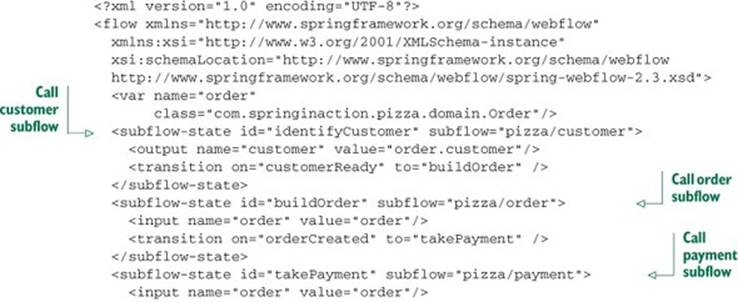
The first thing you see in the flow definition is the declaration of the order variable. Each time the flow starts, a new instance of Order is created. The Order class has properties for carrying all the information about an order, including the customer information, the list of pizzas ordered, and the payment details.
Listing 8.2. Order: carries all the details pertaining to a pizza order
package com.springinaction.pizza.domain;
import java.io.Serializable;
import java.util.ArrayList;
import java.util.List;
public class Order implements Serializable {
private static final long serialVersionUID = 1L;
private Customer customer;
private List<Pizza> pizzas;
private Payment payment;
public Order() {
pizzas = new ArrayList<Pizza>();
customer = new Customer();
}
public Customer getCustomer() {
return customer;
}
public void setCustomer(Customer customer) {
this.customer = customer;
}
public List<Pizza> getPizzas() {
return pizzas;
}
public void setPizzas(List<Pizza> pizzas) {
this.pizzas = pizzas;
}
public void addPizza(Pizza pizza) {
pizzas.add(pizza);
}
public float getTotal() {
return 0.0f;
}
public Payment getPayment() {
return payment;
}
public void setPayment(Payment payment) {
this.payment = payment;
}
}
The main portion of the flow definition is made up of the flow states. By default, the first state in the flow definition file is also the first state that will be visited in the flow. In this case, that’s the identifyCustomer state (a subflow state). But if you’d like, you can explicitly identify any state as the starting state by setting the start-state attribute in the <flow> element:
<?xml version="1.0" encoding="UTF-8"?>
<flow xmlns="http://www.springframework.org/schema/webflow"
xmlns:xsi="http://www.w3.org/2001/XMLSchema-instance"
xsi:schemaLocation="http://www.springframework.org/schema/webflow
http://www.springframework.org/schema/webflow/spring-webflow-2.3.xsd"
start-state="identifyCustomer">
...
</flow>
Identifying a customer, building a pizza order, and taking payment are activities that are too complex to be crammed into a single state. That’s why you’ll define them later in more detail as flows in their own right. But for the purposes of the high-level pizza flow, these activities are expressed with the <subflow-state> element.
The order flow variable will be populated by the first three states and then saved in the fourth state. The identifyCustomer subflow state uses the <output> element to populate the order’s customer property, setting it to the output received from calling the customer subflow. ThebuildOrder and takePayment states take a different approach, using <input> to pass the order flow variable as input so that those subflows can populate the order internally.
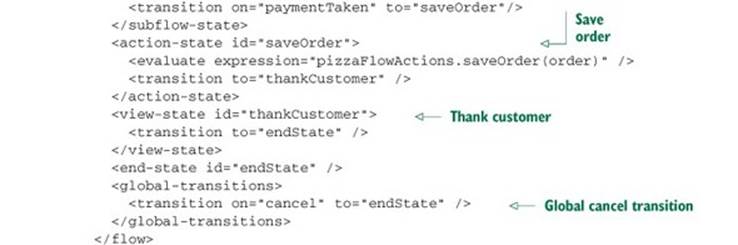
After the order has been given a customer, some pizzas, and payment details, it’s time to save it. The saveOrder state is an action state that handles that task. It uses <evaluate> to make a call to the saveOrder() method on the bean whose ID is pizza-FlowActions, passing in the order to be saved. When it’s finished saving the order, it transitions to thankCustomer.
The thankCustomer state is a simple view state, backed by the JSP file at /WEB-INF/flows/pizza/thankCustomer.jsp, as shown next.
Listing 8.3. JSP view that thanks the customer for their order
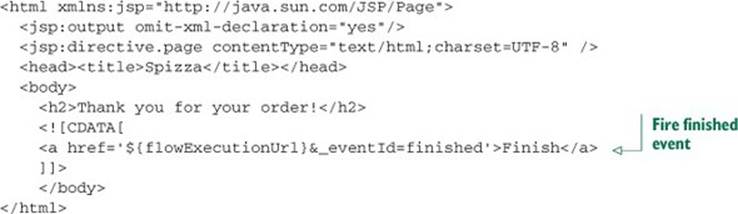
The “thank you” page thanks the customer for their order and gives a link for the customer to finish the flow. This link is the most interesting thing on the page, because it shows one way that a user can interact with the flow.
Spring Web Flow provides a flowExecutionUrl variable, which contains the URL for the flow, for use in the view. The Finish link attaches an _eventId parameter to the URL to fire a finished event back to the web flow. That event sends the flow to the end state.
At the end state, the flow ends. Because there are no further details on where to go after the flow ends, the flow will start over again at the identifyCustomer state, ready to take another pizza order.
That covers the general flow for ordering a pizza. But there’s more to the flow than what you see in listing 8.1. You still need to define the subflows for the identify-Customer, buildOrder, and takePayment states. Let’s build those flows next, starting with the one that identifies the customer.
8.3.2. Collecting customer information
If you’ve ordered a pizza before, you probably know the drill. The first thing you’re asked for is your phone number. Aside from giving the pizza shop a way to call you if the delivery driver can’t find your house, the phone number also serves as your identification. If you’re a repeat customer, the shop can use that phone number to look up your address so that it will know where to deliver your order.
For a new customer, the phone number won’t turn up any results, so the next information the shop will ask for is your address. At this point, the pizzeria knows who you are and where to deliver your pizzas. But before you’re asked what kind of pizza you want, the shop needs to check to make sure your address falls within its delivery area. If not, you’ll have to go pick up the pizza yourself.
The initial question-and-answer period that begins every pizza order can be illustrated with the flow diagram in figure 8.3.
Figure 8.3. The flow for identifying a customer has a few more twists than the pizza flow.
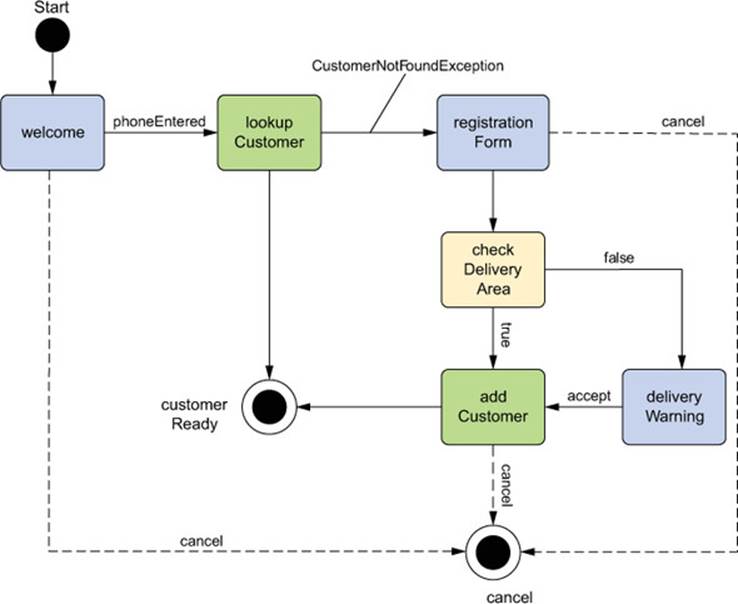
This flow is more interesting than the top-level pizza flow. It isn’t linear, and it branches in a couple of places depending on different conditions. For example, after looking up the customer, the flow could either end (if the customer was found) or transition to a registration form (if the customer was not found). Also, at the checkDeliveryArea state, the customer may or may not be warned that their address isn’t in the delivery area.
The following listing shows the flow definition for identifying the customer.
Listing 8.4. Identifying the hungry pizza customer with a web flow
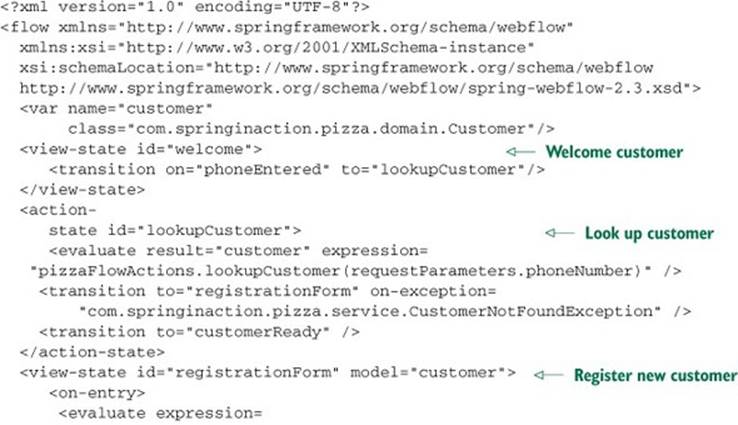
This flow introduces a few new tricks, including your first use of the <decision-state> element. Also, because it’s a subflow of the pizza flow, it expects to receive an Order object as input.
As before, let’s break down this flow definition state by state, starting with the welcome state.
Asking for a phone number
The welcome state is a fairly straightforward view state that welcomes the customer to the Spizza website and asks them to enter their phone number. The state itself isn’t particularly interesting. It has two transitions: one that directs the flow to the lookupCustomer state if aphoneEntered event is fired from the view, and another cancel transition, defined as a global transition, that reacts to a cancel event.
Where the welcome state gets interesting is in the view. The welcome view is defined in /WEB-INF/flows/pizza/customer/welcome.jspx, as shown next.
Listing 8.5. Welcoming the customer and asking for their phone number
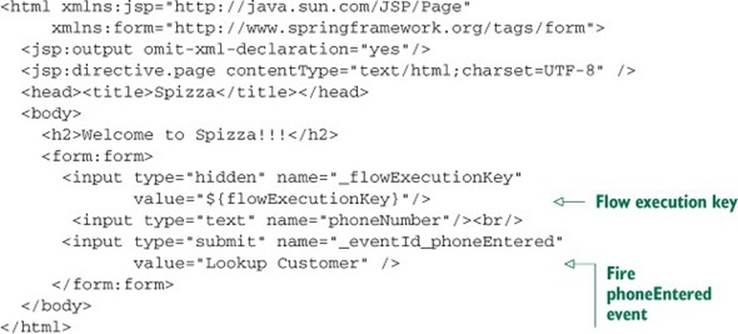
This simple form prompts the user to enter their phone number. But the form has two special ingredients that enable it to drive the flow.
First, note the hidden _flowExecutionKey field. When a view state is entered, the flow pauses and waits for the user to take some action. The flow execution key is given to the view as a sort of claim ticket for the flow. When the user submits the form, the flow execution key is sent along with it in the _flowExecutionKey field, and the flow resumes where it left off.
Also pay special attention to the submit button’s name. The _eventId_ portion of the button’s name is a clue to Spring Web Flow that what follows is an event that should be fired. When the form is submitted by clicking that button, a phoneEntered event is fired, triggering a transition tolookupCustomer.
Looking up the customer
After the welcome form has been submitted, the customer’s phone number is among the request parameters and is ready to be used to look up a customer. The lookup-Customer state’s <evaluate> element is where that happens. It pulls the phone number off the request parameters and passes it to the lookupCustomer() method on the pizzaFlowActions bean.
The implementation of lookupCustomer() isn’t important right now. It’s sufficient to know that it will either return a Customer object or throw a CustomerNotFound-Exception.
In the former case, the Customer object is assigned to the customer variable (per the result attribute) and the default transition takes the flow to the customerReady state. But if the customer can’t be found, then a CustomerNotFoundException will be thrown, and the flow will transition to the registrationForm state.
Registering a new customer
The registrationForm state is where the user is asked for their delivery address. Like other view states you’ve seen, it renders a JSP view. The JSP file is shown next.
Listing 8.6. Registering a new customer
<html xmlns:c="http://java.sun.com/jsp/jstl/core"
xmlns:jsp="http://java.sun.com/JSP/Page"
xmlns:spring="http://www.springframework.org/tags"
xmlns:form="http://www.springframework.org/tags/form">
<jsp:output omit-xml-declaration="yes"/>
<jsp:directive.page contentType="text/html;charset=UTF-8" />
<head><title>Spizza</title></head>
<body>
<h2>Customer Registration</h2>
<form:form commandName="customer">
<input type="hidden" name="_flowExecutionKey"
value="${flowExecutionKey}"/>
<b>Phone number: </b><form:input path="phoneNumber"/><br/>
<b>Name: </b><form:input path="name"/><br/>
<b>Address: </b><form:input path="address"/><br/>
<b>City: </b><form:input path="city"/><br/>
<b>State: </b><form:input path="state"/><br/>
<b>Zip Code: </b><form:input path="zipCode"/><br/>
<input type="submit" name="_eventId_submit"
value="Submit" />
<input type="submit" name="_eventId_cancel"
value="Cancel" />
</form:form>
</body>
</html>
This isn’t the first form you’ve seen in your flow. The welcome view state also displays a form to the customer. That form is simple and has only a single field. It’s easy enough to pull that field’s value from the request parameters. The registration form, on the other hand, is more involved.
Instead of dealing with the fields one at a time through the request parameters, it makes more sense to bind the form to a Customer object and let the framework do all the hard work.
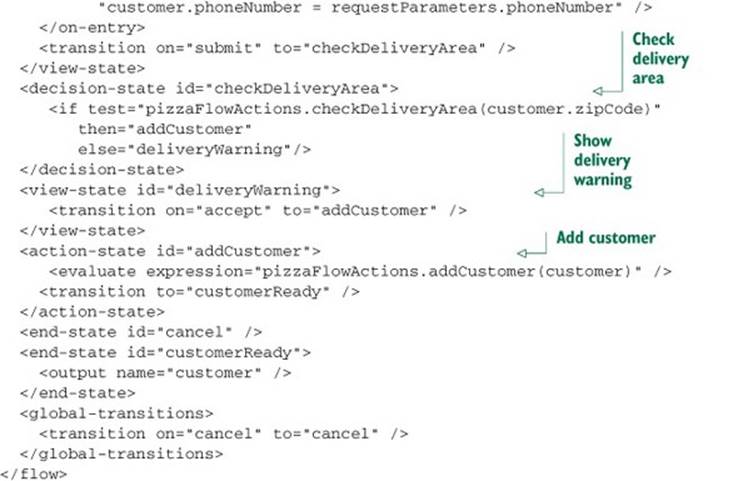
Checking the delivery area
After the customer has given their address, you need to be sure that they live in the delivery area. If Spizza can’t deliver to them, you should let them know and advise them that they’ll need to come in and pick up the pizzas themselves.
To make that decision, you use a decision state. The checkDeliveryArea decision state has an <if> element that passes the customer’s ZIP code in to the checkDelivery-Area() method on the pizzaFlowActions bean. That method returns a Boolean value: true if the customer is in the delivery area, and false otherwise.
If the customer is in the delivery area, the flow transitions to the addCustomer state. If not, the customer is taken to the deliveryWarning view state. The view behind the deliveryWarning is /WEB-INF/flows/pizza/customer/deliveryWarning.jspx, shown next.
Listing 8.7. Warning a customer that pizza can’t be delivered to their address
<html xmlns:jsp="http://java.sun.com/JSP/Page">
<jsp:output omit-xml-declaration="yes"/>
<jsp:directive.page contentType="text/html;charset=UTF-8" />
<head><title>Spizza</title></head>
<body>
<h2>Delivery Unavailable</h2>
<p>The address is outside of our delivery area. You may
still place the order, but you will need to pick it up
yourself.</p>
<![CDATA[
<a href="${flowExecutionUrl}&_eventId=accept">
Continue, I'll pick up the order</a> |
<a href="${flowExecutionUrl}&_eventId=cancel">Never mind</a>
]]>
</body>
</html>
The key flow-related items in deliveryWarning.jspx are the two links that offer the customer a chance to continue with the order or to cancel. Using the same flow-ExecutionUrl variable that you use in the welcome state, these links trigger either an accept event or a cancel event in the flow. If an accept event is sent, the flow will transition to the addCustomer state. Otherwise, the global cancel transition will be followed, and the subflow will transition to the cancel end state.
We’ll talk about the end states in a moment. First, let’s take a quick look at the addCustomer state.
Storing the customer data
By the time the flow arrives at the addCustomer state, the customer has entered their address. For future reference, that address needs to be stored (probably in a database). The addCustomer state has an <evaluate> element that calls the add-Customer() method on thepizzaFlowActions bean, passing in the customer flow variable.
Once the evaluation is complete, the default transition will be taken, and the flow will transition to the end state whose ID is customerReady.
Ending the flow
Normally, a flow’s end state isn’t that interesting. But in this flow, there’s not just one end state, but two. When a subflow ends, it fires a flow event that’s equivalent to its end state’s ID. If the flow only has one end state, then it always fires the same event. But with two or more end states, a flow can influence the direction of the calling flow.
When the customer flow goes down any of the normal paths, it ultimately lands on the end state whose ID is customerReady. When the calling pizza flow resumes, it receives a customerReady event, which results in a transition to the buildOrder state.
Note that the customerReady end state includes an <output> element. This element is a flow’s equivalent of Java’s return statement. It passes back some data from a subflow to the calling flow. In this case, <output> returns the customer flow variable so that theidentifyCustomer subflow state in the pizza flow can assign it to the order. On the other hand, if a cancel event is triggered at any time during the customer flow, it exits the flow through the end state whose ID is cancel. That triggers a cancel event in the pizza flow and results in a transition (via the global transition) to the pizza flow’s end state.
8.3.3. Building an order
After the customer has been identified, the next step in the main flow is to figure out what kind of pizzas they want. The order subflow, as illustrated in figure 8.4, is where the user is prompted to create pizzas and add them to the order.
Figure 8.4. Pizzas are added via the order subflow.
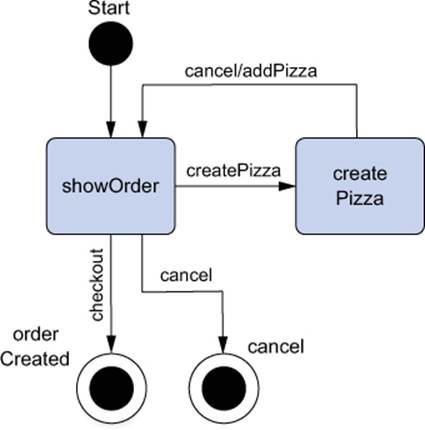
As you can see, the showOrder state is the centerpiece of the order subflow. It’s the first state the user sees on entering the flow, and it’s the state to which the user is sent after adding a new pizza to the order. It displays the current state of the order and offers the user a chance to add another pizza to the order.
When the user chooses to add a pizza to the order, the flow transitions to the createPizza state. This is another view state that gives the user a selection of pizza sizes and toppings with which to build a pizza. From here, the user may add a pizza or cancel. In either event, the flow transitions back to the showOrder state.
From the showOrder state, the user may choose to either submit the order or cancel the order. Either choice ends the order subflow, but the main flow will go down different paths depending on which choice is made.
The following listing shows how the diagram translates into a Spring Web Flow definition.
Listing 8.8. Order subflow view shows states to display the order and create a pizza
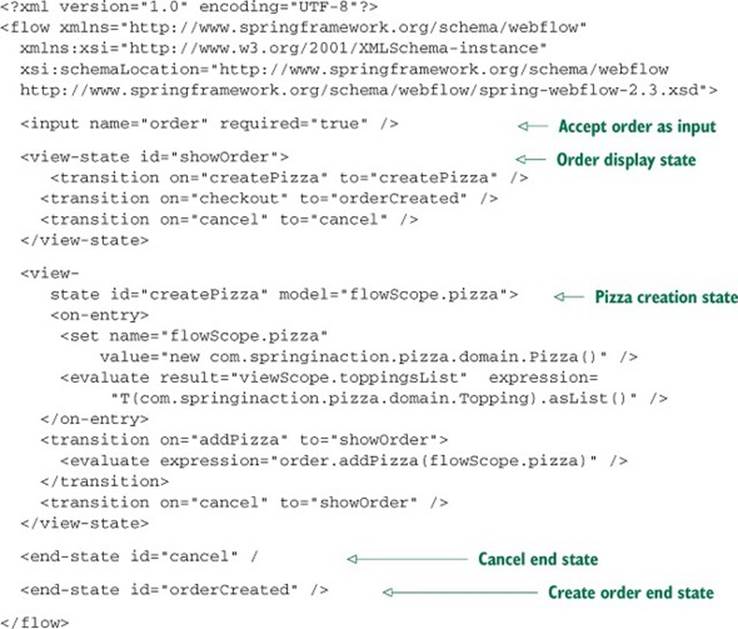
This subflow operates on the Order object created in the main flow. Therefore, you need a way of passing the Order from the main flow to the subflow. As you’ll recall from listing 8.1, you use the <input> element to pass the Order in to the flow. Here you’re using it to accept thatOrder object. If you think of this subflow as being analogous to a method in Java, the <input> element used here is effectively defining the subflow’s signature. This flow requires a single parameter called order.
Next you find the showOrder state, a basic view state with three different transitions: one for creating a pizza, one for submitting the order, and another to cancel the order.
The createPizza state is more interesting. Its view is a form that submits a new Pizza object to be added to the order. The <on-entry> element adds a new Pizza object to flow scope to be populated when the form is submitted. Note that the model of this view state references the same flow-scoped Pizza object. That Pizza object is bound to the Create Pizza form, shown next.
Listing 8.9. Adding pizzas with an HTML form bound to a flow-scoped object
<div xmlns:form="http://www.springframework.org/tags/form"
xmlns:jsp="http://java.sun.com/JSP/Page">
<jsp:output omit-xml-declaration="yes"/>
<jsp:directive.page contentType="text/html;charset=UTF-8" />
<h2>Create Pizza</h2>
<form:form commandName="pizza">
<input type="hidden" name="_flowExecutionKey"
value="${flowExecutionKey}"/>
<b>Size: </b><br/>
<form:radiobutton path="size"
label="Small (12-inch)" value="SMALL"/><br/>
<form:radiobutton path="size"
label="Medium (14-inch)" value="MEDIUM"/><br/>
<form:radiobutton path="size"
label="Large (16-inch)" value="LARGE"/><br/>
<form:radiobutton path="size"
label="Ginormous (20-inch)" value="GINORMOUS"/>
<br/>
<br/>
<b>Toppings: </b><br/>
<form:checkboxes path="toppings" items="${toppingsList}"
delimiter="<br/>"/><br/><br/>
<input type="submit" class="button"
name="_eventId_addPizza" value="Continue"/>
<input type="submit" class="button"
name="_eventId_cancel" value="Cancel"/>
</form:form>
</div>
When the form is submitted via the Continue button, the size and topping selections are bound to the Pizza object, and the addPizza transition is taken. The <evaluate> element associated with that transition indicates that the flow-scoped Pizza object should be passed in a call to the order’s addPizza() method before transitioning to the showOrder state.
There are two ways to end the flow. The user can either click the Cancel button on the showOrder view or click the Checkout button. Either way, the flow transitions to an <end-state>. But the id of the end state chosen determines the event triggered on the way out of this flow and ultimately determines the next step in the main flow. The main flow will either transition on cancel or transition on orderCreated. In the former case, the outer flow ends; in the latter case, it transitions to the takePayment subflow, which we’ll look at next.
8.3.4. Taking payment
It’s not common to get a free pizza, and the Spizza pizzeria wouldn’t stay in business long if it let customers order pizzas without providing some form of payment. As the pizza flow nears an end, the final subflow prompts the user to enter payment details. This simple flow is illustrated infigure 8.5.
Figure 8.5. The final step in placing a pizza order is to take payment from the customer through the payment subflow.
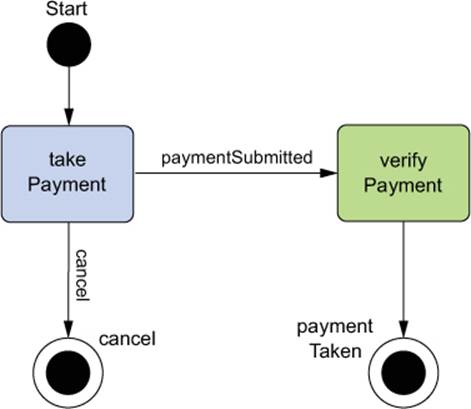
Like the order subflow, the payment subflow accepts an Order object as input using the <input> element.
As you can see, on entering the payment subflow, the user arrives at the take-Payment state. This is a view state where the user can indicate that they’ll pay by credit card, check, or cash. On submitting their payment information, they’re taken to the verifyPayment state, an action state that verifies that their payment information is acceptable.
The payment subflow is defined in XML as shown next.
Listing 8.10. Payment subflow, with one view state and one action state
<?xml version="1.0" encoding="UTF-8"?>
<flow xmlns="http://www.springframework.org/schema/webflow"
xmlns:xsi="http://www.w3.org/2001/XMLSchema-instance"
xsi:schemaLocation="http://www.springframework.org/schema/webflow
http://www.springframework.org/schema/webflow/spring-webflow-2.3.xsd">
<input name="order" required="true"/>
<view-state id="takePayment" model="flowScope.paymentDetails">
<on-entry>
<set name="flowScope.paymentDetails"
value="new com.springinaction.pizza.domain.PaymentDetails()" />
<evaluate result="viewScope.paymentTypeList" expression=
"T(com.springinaction.pizza.domain.PaymentType).asList()" />
</on-entry>
<transition on="paymentSubmitted" to="verifyPayment" />
<transition on="cancel" to="cancel" />
</view-state>
<action-state id="verifyPayment">
<evaluate result="order.payment" expression=
"pizzaFlowActions.verifyPayment(flowScope.paymentDetails)" />
<transition to="paymentTaken" />
</action-state>
<end-state id="cancel" />
<end-state id="paymentTaken" />
</flow>
As the flow enters the takePayment view state, the <on-entry> element sets up the payment form by first using a SpEL expression to create a new PaymentDetails instance in flow scope. This is effectively the backing object for the form. It also sets the view-scopedpaymentTypeList variable to a list containing the values of the PaymentType enum (shown in the next listing). SpEL’s T() operator is used to get the PaymentType class so that the static toList() method can be invoked.
Listing 8.11. PaymentType enumeration: defines customer choices for payment
package com.springinaction.pizza.domain;
import static org.apache.commons.lang.WordUtils.*;
import java.util.Arrays;
import java.util.List;
public enum PaymentType {
CASH, CHECK, CREDIT_CARD;
public static List<PaymentType> asList() {
PaymentType[] all = PaymentType.values();
return Arrays.asList(all);
}
@Override
public String toString() {
return capitalizeFully(name().replace('_', ' '));
}
}
On being presented with the payment form, the user may either submit a payment or cancel. Depending on the choice made, the payment subflow ends through either the paymentTaken <end-state> or the cancel <end-state>. As with other subflows, either <end-state> will end the subflow and return control to the main flow. But the id of the <end-state> taken determines the transition taken next in the main flow.
Now we’ve stepped all the way through the pizza flow and its subflows. You’ve seen a lot of what Spring Web Flow is capable of. Before we finish with the Web Flow topic, let’s take a quick look at what’s involved in securing access to a flow or any of its states.
8.4. Securing web flows
In the next chapter, you’ll see how to secure Spring web applications using Spring Security. But while we’re on the subject of Spring Web Flow, let’s quickly look at how it supports flow-level security when used along with Spring Security.
States, transitions, and entire flows can be secured in Spring Web Flow by using the <secured> element as a child of those elements. For example, to secure access to a view state, you might use <secured> like this:
<view-state id="restricted">
<secured attributes="ROLE_ADMIN" match="all"/>
</view-state>
As configured here, access to the view state will be restricted to only users who are granted ROLE_ADMIN access (per the attributes attribute). The attributes attribute takes a comma-separated list of authorities that the user must have to gain access to the state, transition, or flow. Thematch attribute can be set to either any or all. If it’s set to any, then the user must be granted at least one of the authorities listed in attributes. If it’s set to all, then the user must have been granted all the authorities. You may be wondering how a user is granted the authorities checked for by the <secured> element. For that matter, how does the user log in to the application in the first place? The answers to those questions will be addressed in the next chapter.
8.5. Summary
Not all web applications are freely navigable. Sometimes a user must be guided along, asked appropriate questions, and led to specific pages based on their responses. In these situations, an application feels less like a menu of options and more like a conversation between the application and the user.
In this chapter, we’ve explored Spring Web Flow, a web framework that enables development of conversational applications. Along the way, you built a flow-based application to take pizza orders. You started by defining the overall path the application should take, beginning with gathering customer information and concluding with the order being saved in the system.
A flow is made up of several states and transitions that define how the conversation traverses from state to state. The states themselves come in several varieties: action states that perform business logic, view states that involve the user in the flow, decision states that dynamically direct the flow, and end states that signify the end of a flow. In addition, there are subflow states, which are themselves defined by a flow.
Finally, you saw hints about how access to a flow, state, or transition can be restricted to users who are granted specific authorities. But we deferred conversation of how the user authenticates to the application and how the user is granted those authorities. That’s where Spring Security comes in, and Spring Security is what we’ll explore in the next chapter.
All materials on the site are licensed Creative Commons Attribution-Sharealike 3.0 Unported CC BY-SA 3.0 & GNU Free Documentation License (GFDL)
If you are the copyright holder of any material contained on our site and intend to remove it, please contact our site administrator for approval.
© 2016-2026 All site design rights belong to S.Y.A.