Spring in Action, 4th Edition: Covers Spring 4 (2015)
Part 2. Spring on the web
Chapter 7. Advanced Spring MVC
This chapter covers
· Alternate Spring MVC configuration options
· Handling file uploads
· Handling exceptions in controllers
· Working with flash attributes
But wait! There’s more!
You’ve probably heard those words before if you’ve ever seen one of those “as seen on TV” ads for some gizmo or gadget. Just about the time the ad has completely described the product and made initial claims about what it can do, you hear, “But wait! There’s more!” and the ad continues to tell you just how much more amazing the product can be.
In many ways, Spring MVC (and, indeed, every part of Spring) has that feel of “There’s more!” Just about the time you think you’ve got your head around what Spring MVC can do, you find out there’s even more that you can do with it.
In chapter 5, we looked at essential Spring MVC and how to write controllers to handle various kinds of requests. Then you built on that in chapter 6 to create the JSP and Thymeleaf views that present model data to the user. You might think you know everything about Spring MVC. But wait! There’s more!
In this chapter, we’ll continue with the Spring MVC topic by covering a handful of features that exceed the basics covered in chapters 5 and 6. We’ll look at how to write controllers that accept file uploads, how to handle exceptions thrown from controllers, and how to pass data around in the model such that it survives a redirect.
But first, I have a promise to keep. In chapter 5, I quickly showed you how to use AbstractAnnotationConfigDispatcherServletInitializer to set up Spring MVC, and I promised that I’d show you some alternate setup options. So before we look at file uploads and exception handling, let’s take a moment to explore some of the other ways you can set up DispatcherServlet and ContextLoaderListener.
7.1. Alternate Spring MVC configuration
In chapter 5, we took a quick path toward setting up Spring MVC by extending AbstractAnnotationConfigDispatcherServletInitializer. That convenient base class assumes that you want a basic DispatcherServlet and ContextLoaderListener setup and that your Spring configuration will be in Java instead of XML.
Although that is a safe assumption for many Spring applications, it may not always fit what you need. You may need servlets and filters in addition to DispatcherServlet. Maybe you need to do some additional configuration on DispatcherServlet itself. Or, if you’re deploying your application to a pre-Servlet 3.0 container, you may need to configure DispatcherServlet in a traditional web.xml file.
Fortunately, there are several ways that Spring returns some control to you when the garden-variety AbstractAnnotationConfigDispatcherServletInitializer configuration doesn’t fit your needs. Let’s start by looking at a few ways to customize how DispatcherServlet is configured.
7.1.1. Customizing DispatcherServlet configuration
It isn’t apparent from the looks of the class in listing 7.1, but there’s more to AbstractAnnotationConfigDispatcherServletInitializer than meets the eye. The three methods you wrote in SpittrWebAppInitializer were the only abstract ones you were required to override. But there are more methods that can be overridden to apply additional configuration.
One such method is customizeRegistration(). After AbstractAnnotation-ConfigDispatcherServletInitializer registers DispatcherServlet with the servlet container, it calls the customizeRegistration() method, passing in the Servlet-Registration.Dynamic that resulted from the servlet registration. By overriding customizeRegistration(), you can apply additional configuration to DispatcherServlet.
For instance, a little later in this chapter (in section 7.2) you’ll see how to handle multipart requests and file uploads with Spring MVC. If you plan to use Servlet 3.0 support for multipart configuration, you need to enable DispatcherServlet’s registration to enable multipart requests. You can override the customizeRegistration() method to set a MultipartConfigElement like this:
@Override
protected void customizeRegistration(Dynamic registration) {
registration.setMultipartConfig(
new MultipartConfigElement("/tmp/spittr/uploads"));
}
With the ServletRegistration.Dynamic that’s given to customizeRegistration(), you can do several things, including set the load-on-startup priority by calling set-LoadOnStartup(), set an initialization parameter by calling setInitParameter(), and callsetMultipartConfig() to configure Servlet 3.0 multipart support. In the preceding example, you’re setting up multipart support to temporarily store uploaded files at /tmp/spittr/uploads.
7.1.2. Adding additional servlets and filters
Given the way that AbstractAnnotationConfigDispatcherServletInitializer is defined, it will create a DispatcherServlet and a ContextLoaderListener. But what if you want to register additional servlets, filters, or listeners?
One of the nice things about working with a Java-based initializer is that (unlike with web.xml) you can define as many initializer classes as you want. Therefore, if you need to register any additional components into the web container, you need only create a new initializer class. The easiest way to do this is by implementing Spring’s WebApplicationInitializer interface.
For example, the following listing shows how to create an implementation of WebApplicationInitializer that registers a servlet.
Listing 7.1. Implementing WebApplicationInitializer to register a servlet
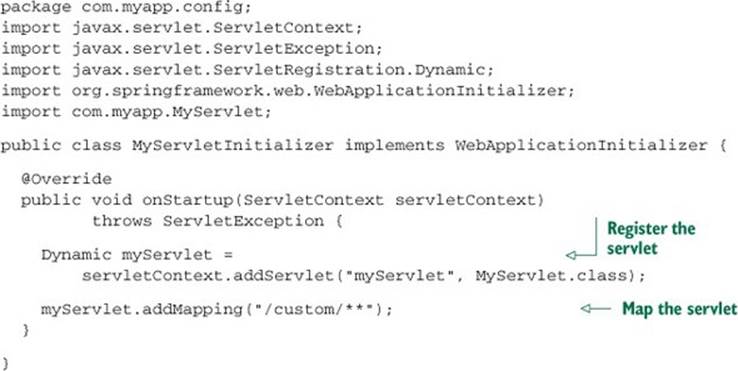
Listing 7.1 is a rather basic servlet-registering initializer class. It registers a servlet and maps it to a single path. You could use this approach to register DispatcherServlet manually. (But there’s no need, because AbstractAnnotationConfigDispatcher-ServletInitializerdoes a fine job without as much code.)
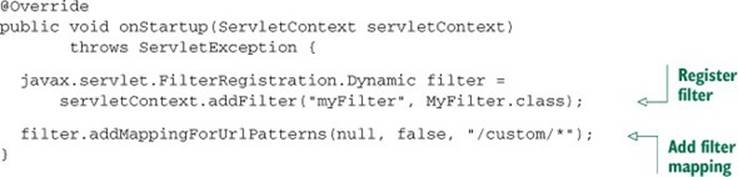
Similarly, you can register listeners and filters by creating a new implementation of WebApplicationInitializer. For example, the next listing shows how to register a filter.
Listing 7.2. A WebApplicationInitializer that can also register filters
WebApplicationInitializer is a fine general-purpose way of registering servlets, filters, and listeners in Java when deploying to a Servlet 3.0 container. But if you’re registering a filter and only need to map that filter to DispatcherServlet, then there’s a shortcut inAbstractAnnotationConfigDispatcherServletInitializer.
To register one or more filters and map them to DispatcherServlet, all you need to do is override the getServletFilters() method of AbstractAnnotationConfig-DispatcherServletInitializer. For example, the following getServletFilters() method overrides the one from AbstractAnnotationConfigDispatcherServlet-Initializer to register a filter:
@Override
protected Filter[] getServletFilters() {
return new Filter[] { new MyFilter() };
}
As you can see, this method returns an array of javax.servlet.Filter. Here it only returns a single filter, but it could return as many filters as you need. There’s no need to declare the mapping for the filters; any filter returned from getServletFilters() will automatically be mapped to DispatcherServlet.
When deploying to a Servlet 3.0 container, Spring offers several ways of registering servlets (including DispatcherServlet), filters, and listeners without creating a web.xml file. But you don’t have to use any of those if you don’t want to. If you aren’t deploying your application to a Servlet 3.0 container (or if you just like working with web.xml), then there’s no reason you can’t configure Spring MVC in a legacy manner with web.xml. Let’s see how.
7.1.3. Declaring DispatcherServlet in web.xml
In a typical Spring MVC application, you need a DispatcherServlet and a ContextLoaderListener. AbstractAnnotationConfigDispatcherServletInitializer will register these automatically for you, but if you’re registering them in web.xml, you’ll need to do all the work.
Here’s a basic web.xml file with a typical setup for DispatcherServlet and ContextLoaderListener.
Listing 7.3. Setting up Spring MVC in web.xml
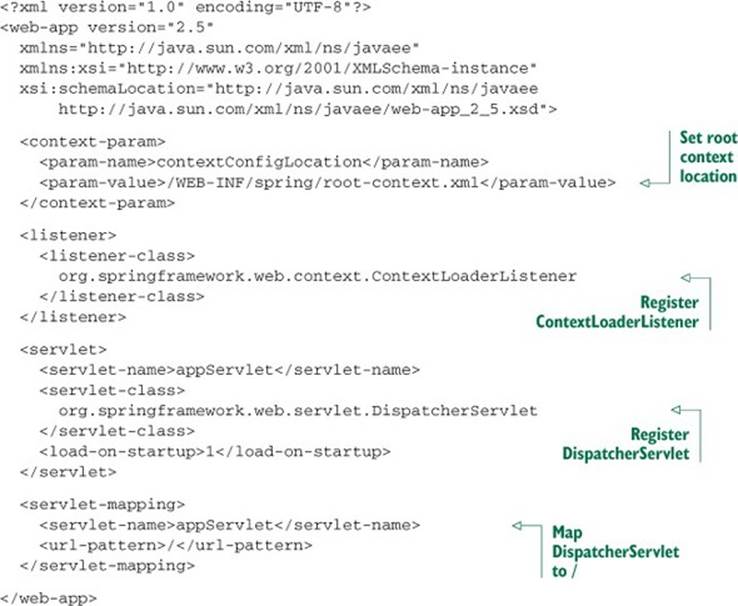
As I mentioned in chapter 5, ContextLoaderListener and DispatcherServlet each load a Spring application context. The contextConfigLocation context parameter specifies the location of the XML file that defines the root application context loaded byContextLoaderListener. As defined in listing 7.3, the root context is loaded with bean definitions in /WEB-INF/spring/root-context.xml.
DispatcherServlet loads its application context with beans defined in a file whose name is based on the servlet name. In listing 7.3, the servlet is named appServlet. Therefore, DispatcherServlet loads its application context from an XML file at / WEB-INF/appServlet-context.xml.
If you’d rather specify the location of the DispatcherServlet configuration file, you can set a contextConfigLocation initialization parameter on the servlet. For example, the following DispatcherServlet configuration has DispatcherServlet loading its beans from /WEB-INF/spring/appServlet/servlet-context.xml:
<servlet>
<servlet-name>appServlet</servlet-name>
<servlet-class>
org.springframework.web.servlet.DispatcherServlet
</servlet-class>
<init-param>
<param-name>contextConfigLocation</param-name>
<param-value>
/WEB-INF/spring/appServlet/servlet-context.xml
</param-value>
</init-param>
<load-on-startup>1</load-on-startup>
</servlet>
Of course, that’s how you’d have DispatcherServlet and ContextLoaderListener load their respective application contexts from XML. But throughout much of this book, we’ll favor Java configuration over XML configuration. Therefore you’ll need to set up Spring MVC to load the configuration from @Configuration-annotated classes.
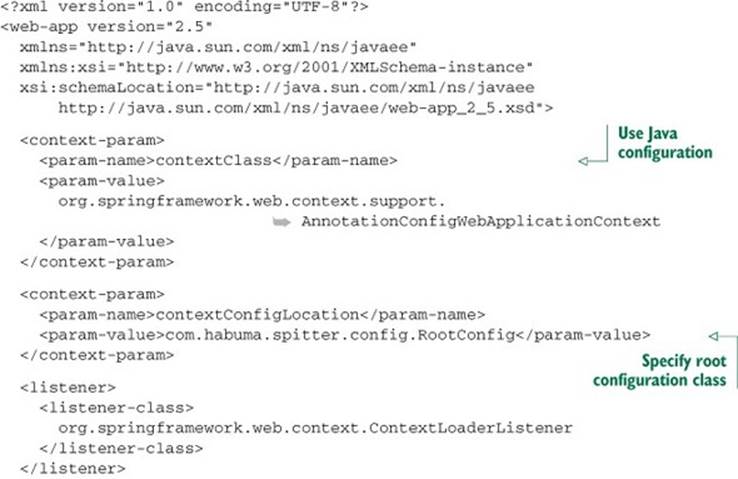
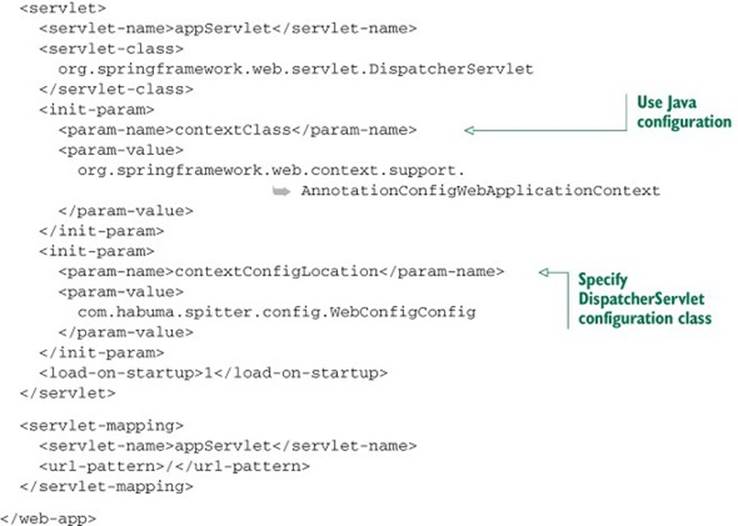
To use Java-based configuration in Spring MVC, you need to tell DispatcherServlet and ContextLoaderListener to use AnnotationConfigWebApplicationContext, an implementation of WebApplicationContext that loads Java configuration classes instead of XML. You can do that by setting the contextClass context parameter and initialization parameter for DispatcherServlet. The next listing shows a new web.xml file that sets up Spring MVC for Java-based Spring configuration.
Listing 7.4. Configuring web.xml to use Java configuration
Now that we’ve looked at a variety of ways to set up Spring MVC, let’s examine how to use Spring MVC to handle file uploads.
7.2. Processing multipart form data
It’s common for a web application to enable its users to upload content. On sites like Facebook and Flickr, it’s normal for users to upload photos and videos to share with their family and friends. There are also several services that allow users to upload photos to be printed on paper the old-fashioned way or to be applied to T-shirts and coffee mugs.
The Spittr application calls for file uploads in two places. When a new user registers with the application, you’d like them to be able to provide a picture to associate with their profile. And when a user posts a new Spittle, they may want to upload a photo to go along with their message.
The request resulting from a typical form submission is simple and takes the form of multiple name-value pairs separated by ampersands. For example, when submitting the registration form from the Spittr application, the request might look like this:
firstName=Charles&lastName=Xavier&email=professorx%40xmen.org
&username=professorx&password=letmein01
Although this encoding scheme is simple and sufficient for typical text-based form submissions, it isn’t robust enough to carry binary data such as an uploaded image. In contrast, multipart form data breaks a form into individual parts, with one part per field. Each part can have its own type. Typical form fields have textual data in their parts, but when something is being uploaded, the part can be binary, as shown in the following multipart request body:
------WebKitFormBoundaryqgkaBn8IHJCuNmiW
Content-Disposition: form-data; name="firstName"
Charles
------WebKitFormBoundaryqgkaBn8IHJCuNmiW
Content-Disposition: form-data; name="lastName"
Xavier
------WebKitFormBoundaryqgkaBn8IHJCuNmiW
Content-Disposition: form-data; name="email"
charles@xmen.com
------WebKitFormBoundaryqgkaBn8IHJCuNmiW
Content-Disposition: form-data; name="username"
professorx
------WebKitFormBoundaryqgkaBn8IHJCuNmiW
Content-Disposition: form-data; name="password"
letmein01
------WebKitFormBoundaryqgkaBn8IHJCuNmiW
Content-Disposition: form-data; name="profilePicture"; filename="me.jpg"
Content-Type: image/jpeg
[[ Binary image data goes here ]]
------WebKitFormBoundaryqgkaBn8IHJCuNmiW--
In this multipart request, the profilePicture part is noticeably different from the other parts. Among other things, it has its own Content-Type header indicating that it’s a JPEG image. And although it may not be obvious, the body of the profile-Picture part is binary data instead of simple text.
Even though multipart requests look complex, handling them in a Spring MVC controller is easy. But before you can write controller methods to handle file uploads, you must configure a multipart resolver to tell DispatcherServlet how to read multipart requests.
7.2.1. Configuring a multipart resolver
DispatcherServlet doesn’t implement any logic for parsing the data in a multipart request. Instead, it delegates to an implementation of Spring’s MultipartResolver strategy interface to resolve the content in a multipart request. Since Spring 3.1, Spring comes with two out-of-the-box implementations of MultipartResolver to choose from:
· CommonsMultipartResolver —Resolves multipart requests using Jakarta Commons FileUpload
· StandardServletMultipartResolver —Relies on Servlet 3.0 support for multipart requests (since Spring 3.1)
Generally speaking, StandardServletMultipartResolver should probably be your first choice of these two. It uses existing support in your servlet container and doesn’t require any additional project dependencies. But you might choose Commons-MultipartResolver if you’ll be deploying your application to a pre-Servlet 3.0 container or if you aren’t using Spring 3.1 or higher yet.
Resolving multipart requests with Servlet 3.0
The Servlet 3.0-compatible StandardServletMultipartResolver has no constructor arguments or properties to be set. This makes it extremely simple to declare as a bean in your Spring configuration, as shown here:
@Bean
public MultipartResolver multipartResolver() throws IOException {
return new StandardServletMultipartResolver();
}
As easy as that @Bean method is, you might be wondering how you can place constraints on the way StandardServletMultipartResolver works. What if you want to limit the maximum size of file that a user can upload? Or what if you’d like to specify the location where the uploaded files are temporarily written while they’re being uploaded? With no properties and no constructor arguments, StandardServletMultipartResolver seems limiting.
On the contrary, it’s possible to configure constraints on StandardServletMultipartResolver. But instead of configuring StandardServletMultipartResolver in your Spring configuration, you must specify multipart configuration in the servlet configuration. At the very least, you must specify the temporary file path where the file will be written during the upload. StandardServletMultipartResolver won’t work unless you configure this minimum detail. More specifically, you must configure multipart details as part of DispatcherServlet’s configuration in web.xml or in the servlet initializer class.
If you’re configuring DispatcherServlet in a servlet initializer class that implements WebApplicationInitializer, you can configure multipart details by calling setMultipartConfig() on the servlet registration, passing an instance of MultipartConfigElement. Here’s a minimal multipart configuration for DispatcherServlet that sets the temporary location to /tmp/spittr/uploads:
DispatcherServlet ds = new DispatcherServlet();
Dynamic registration = context.addServlet("appServlet", ds);
registration.addMapping("/");
registration.setMultipartConfig(
new MultipartConfigElement("/tmp/spittr/uploads"));
If you’ve configured DispatcherServlet in a servlet initializer class that extends AbstractAnnotationConfigDispatcherServletInitializer or AbstractDispatcherServletInitializer, you don’t create the instance of DispatcherServlet or register it with the servlet context directly. Consequently, there’s no handy reference to the Dynamic servlet registration to work with. But you can override the customize-Registration() method (which is given a Dynamic as a parameter) to configure multipart details:
@Override
protected void customizeRegistration(Dynamic registration) {
registration.setMultipartConfig(
new MultipartConfigElement("/tmp/spittr/uploads"));
}
The single-argument constructor for MultipartConfigElement that you’ve been using thus far takes the absolute path to a directory in the filesystem where the uploaded file will be written temporarily. But there’s another constructor that lets you set a few constraints on the size of the file being uploaded. In addition to the temporary location path, the other constructor accepts the following:
· The maximum size (in bytes) of any file uploaded. By default there is no limit.
· The maximum size (in bytes) of the entire multipart request, regardless of how many parts or how big any of the parts are. By default there is no limit.
· The maximum size (in bytes) of a file that can be uploaded without being written to the temporary location. The default is 0, meaning that all uploaded files will be written to disk.
For example, suppose you want to limit files to no more than 2 MB, to limit the entire request to no more than 4 MB, and to write all files to disk. The following use of MultipartConfigElement sets those thresholds:
@Override
protected void customizeRegistration(Dynamic registration) {
registration.setMultipartConfig(
new MultipartConfigElement("/tmp/spittr/uploads",
2097152, 4194304, 0));
}
If you’re configuring DispatcherServlet in a more traditional way in web.xml, you can specify multipart configuration using the <multipart-config> element in the <servlet> element, like this:
<servlet>
<servlet-name>appServlet</servlet-name>
<servlet-class>
org.springframework.web.servlet.DispatcherServlet
</servlet-class>
<load-on-startup>1</load-on-startup>
<multipart-config>
<location>/tmp/spittr/uploads</location>
<max-file-size>2097152</max-file-size>
<max-request-size>4194304</max-request-size>
</multipart-config>
</servlet>
The defaults for <multipart-config> are the same as for MultipartConfigElement. And just as with MultipartConfigElement, you must configure the <location>.
Configuring a Jakarta Commons FileUpload multipart resolver
StandardServletMultipartResolver is usually the best choice, but if you’re not deploying your application to a Servlet 3.0 container, you’ll need an alternative. You can write your own implementation of the MultipartResolver interface if you’d like. But unless you need to perform some special handling during multipart request handling, there’s no reason to do that. Spring offers CommonsMultipartResolver as an out-of-the-box alternative to StandardServletMultipartResolver.
The simplest way to declare CommonsMultipartResolver as a Spring bean is like this:
@Bean
public MultipartResolver multipartResolver() {
return new CommonsMultipartResolver();
}
Unlike StandardServletMultipartResolver, there’s no need to configure a temporary file location with CommonsMultipartResolver. By default, the location is the servlet container’s temporary directory. But you can specify a different location by setting the uploadTempDirproperty:
@Bean
public MultipartResolver multipartResolver() throws IOException {
CommonsMultipartResolver multipartResolver =
new CommonsMultipartResolver();
multipartResolver.setUploadTempDir(
new FileSystemResource("/tmp/spittr/uploads"));
return multipartResolver;
}
In fact, you can specify other multipart upload details directly in the Spring configuration in the same way, by setting properties on CommonsMultipartResolver. For example, the following configuration is roughly equivalent to how you configuredStandardServletMultipartResolver via MultipartConfigElement earlier:
@Bean
public MultipartResolver multipartResolver() throws IOException {
CommonsMultipartResolver multipartResolver =
new CommonsMultipartResolver();
multipartResolver.setUploadTempDir(
new FileSystemResource("/tmp/spittr/uploads"));
multipartResolver.setMaxUploadSize(2097152);
multipartResolver.setMaxInMemorySize(0);
return multipartResolver;
}
Here you’re setting the maximum file size to 2 MB and the maximum in-memory size to 0 bytes. These two properties directly correspond to MultipartConfigElement’s second and fourth constructor arguments, indicating that no files larger than 2 MB may be uploaded and that all files will be written to disk no matter what size. Unlike MultipartConfigElement, however, there’s no way to specify the maximum multipart request size.
7.2.2. Handling multipart requests
Now that you’ve configured multipart support in Spring (and perhaps in the servlet container), you’re ready to write controller methods to accept the uploaded files. The most common way of doing that is to annotate a controller method parameter with @RequestPart.
Suppose you want to offer people the opportunity to upload an image when they register as users of the Spittr application. You need to update the registration form so that the user can select a picture to be uploaded, and you need to tweak the processRegistration() method inSpitterController to accept the uploaded file. The following snippet from the Thymeleaf registration form view (registrationForm.html) highlights the necessary changes to the form:
<form method="POST" th:object="${spitter}"
enctype="multipart/form-data">
...
<label>Profile Picture</label>:
<input type="file"
name="profilePicture"
accept="image/jpeg,image/png,image/gif" /><br/>
...
</form>
The <form> tag now has its enctype attribute set to multipart/form-data. This tells the browser to submit the form as multipart data instead of form data. Each field has its own part in the multipart request.
In addition to all the existing fields on the registration form, you’ve added a new <input> field whose type is file. This lets the user select an image file to upload. The accept attribute is set to limit file types to JPEG, PNG, and GIF images. And according to its name attribute, the image data will be sent in the multipart request in the profilePicture part.
Now you just need to change the processRegistration() method to accept the uploaded image. One way to do that is to add a byte array parameter that’s annotated with @RequestPart. Here’s an example:
@RequestMapping(value="/register", method=POST)
public String processRegistration(
@RequestPart("profilePicture") byte[] profilePicture,
@Valid Spitter spitter,
Errors errors) {
...
}
When the registration form is submitted, the profilePicture attribute is given an array of byte containing the data from the request part (as specified by @RequestPart). If the user submits the form without selecting a file, then the array will be empty (but not null). With the image data in hand, all that’s left is for process-Registration() to save the file somewhere.
We’ll discuss how to save the image data more in a bit. But first, consider what you know about the image data that was submitted. Or, more important, what do you not know? Although you have the image data as an array of byte and from that you can derive the size of the image, there’s little else you know about it. You have no idea what type of file it is or even what the name of the original file was. And it’s up to you to figure out how to turn that byte array into a file you can save.
Receiving a MultipartFile
Working with the uploaded file’s raw bytes is simple but limiting. Therefore, Spring also offers MultipartFile as a way to get a richer object for processing multipart data. The following listing shows what the MultipartFile interface looks like.
Listing 7.5. Spring’s MultipartFile interface for working with uploaded files
package org.springframework.web.multipart;
import java.io.File;
import java.io.IOException;
import java.io.InputStream;
public interface MultipartFile {
String getName();
String getOriginalFilename();
String getContentType();
boolean isEmpty();
long getSize();
byte[] getBytes() throws IOException;
InputStream getInputStream() throws IOException;
void transferTo(File dest) throws IOException;
}
As you can see, MultipartFile offers a way to get at the bytes for the uploaded file. But it offers much more, including the original filename, size, and content type. It also offers an InputStream for reading the file data as a stream.
What’s more, MultipartFile offers a convenient transferTo() method to help you write the uploaded file to the filesystem. For example, you could add the following lines to processRegistration() to write the uploaded image file to the filesystem:
profilePicture.transferTo(
new File("/data/spittr/" + profilePicture.getOriginalFilename()));
Saving a file to the local filesystem like this is simple enough, but it leaves the management of the file up to you. You’re responsible for ensuring that there’s plenty of space. It’s up to you to make sure the file is backed up in case of a hardware failure. And it’s your job to deal with synchronizing the image files across multiple servers in a cluster.
Saving files to Amazon S3
Another option is to hand that responsibility off to someone else. With only a bit more code, you can save the images to the cloud. The following listing, for example, shows saveImage(), a method you can call from processRegistration() to save the uploaded image to Amazon S3.
Listing 7.6. Saving a MultipartFile to Amazon S3
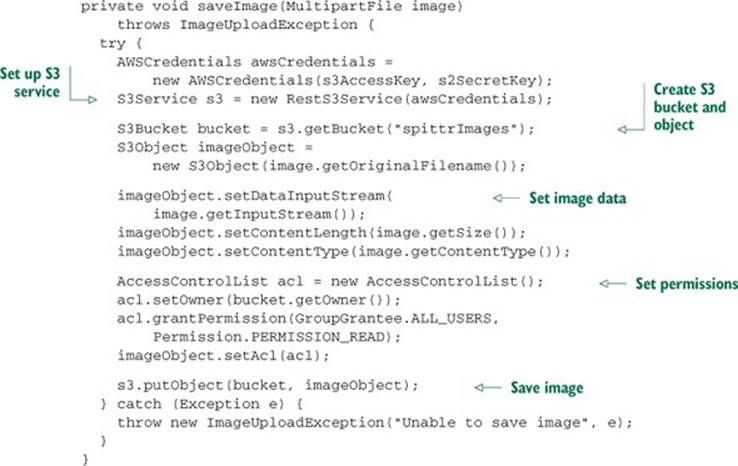
The first thing that saveImage() does is set up Amazon Web Service (AWS) credentials. For this, you’ll need an S3 access key and an S3 secret access key. These will be given to you by Amazon when you sign up for S3 service. They’re provided to SpitterController via value injection.
With the AWS credentials in hand, saveImage() creates an instance of JetS3t’s RestS3Service, through which it operates on the S3 filesystem. It gets a reference to the spitterImages bucket, creates an S3Object to contain the image, and then fills that S3Object with image data.
Just before calling the putObject() method to write the image data to S3, save-Image() sets the permissions on the S3Object to allow all users to view it. This is important—without it, the images wouldn’t be visible to your application’s users. Finally, if anything goes wrong, anImageUploadException will be thrown.
Receiving the uploaded file as a Part
If you’re deploying your application to a Servlet 3.0 container, you have an alternative to MultipartFile. Spring MVC will also accept a javax.servlet.http.Part as a controller method parameter. Using Part instead of MultipartFile leaves the processRegistration()method signature looking like this:
@RequestMapping(value="/register", method=POST)
public String processRegistration(
@RequestPart("profilePicture") Part profilePicture,
@Valid Spitter spitter,
Errors errors) {
...
}
For the most part (no pun intended), the Part interface isn’t much different from MultipartFile. As you can see in the next listing, the Part interface has several methods that mirror the methods in MultipartFile.
Listing 7.7. Part interface: an alternative to Spring’s MultipartFile
package javax.servlet.http;
import java.io.*;
import java.util.*;
public interface Part {
public InputStream getInputStream() throws IOException;
public String getContentType();
public String getName();
public String getSubmittedFileName();
public long getSize();
public void write(String fileName) throws IOException;
public void delete() throws IOException;
public String getHeader(String name);
public Collection<String> getHeaders(String name);
public Collection<String> getHeaderNames();
}
In many cases, the Part methods are named exactly the same as the MultipartFile methods. A few have similar but different names; getSubmittedFileName(), for example, corresponds to getOriginalFilename(). Likewise, write() corresponds to transferTo(), making it possible to write the uploaded file like this:
profilePicture.write("/data/spittr/" +
profilePicture.getOriginalFilename());
It’s worth noting that if you write your controller handler methods to accept file uploads via a Part parameter, then you don’t need to configure the StandardServletMultipartResolver bean. StandardServletMultipartResolver is required only when you’re working withMultipartFile.
7.3. Handling exceptions
Up to this point, we’ve been assuming that everything will always work in the Spittr application. But what if something goes wrong? What if, while handling a request, an exception is thrown? What response will be sent to the client when thing go awry?
No matter what happens, good or bad, the outcome of a servlet request is a servlet response. If an exception occurs during request processing, the outcome is still a servlet response. Somehow, the exception must be translated into a response.
Spring offers a handful of ways to translate exceptions to responses:
· Certain Spring exceptions are automatically mapped to specific HTTP status codes.
· An exception can be annotated with @ResponseStatus to map it to an HTTP status code.
· A method can be annotated with @ExceptionHandler to handle the exception.
The simplest way to handle an exception is to map it to the HTTP status code to be placed on the response. Let’s see how to map exceptions to HTTP status codes.
7.3.1. Mapping exceptions to HTTP status codes
Out of the box, Spring automatically maps a dozen of its own exceptions to appropriate status codes. Table 7.1 shows those mappings.
Table 7.1. Some Spring exceptions are mapped by default to HTTP status codes.
|
Spring exception |
HTTP status code |
|
BindException |
400 - Bad Request |
|
ConversionNotSupportedException |
500 - Internal Server Error |
|
HttpMediaTypeNotAcceptableException |
406 - Not Acceptable |
|
HttpMediaTypeNotSupportedException |
415 - Unsupported Media Type |
|
HttpMessageNotReadableException |
400 - Bad Request |
|
HttpMessageNotWritableException |
500 - Internal Server Error |
|
HttpRequestMethodNotSupportedException |
405 - Method Not Allowed |
|
MethodArgumentNotValidException |
400 - Bad Request |
|
MissingServletRequestParameterException |
400 - Bad Request |
|
MissingServletRequestPartException |
400 - Bad Request |
|
NoSuchRequestHandlingMethodException |
404 - Not Found |
|
TypeMismatchException |
400 - Bad Request |
The exceptions in table 7.1 are usually thrown by Spring itself as the result of something going wrong in DispatcherServlet or while performing validation. For example, if DispatcherServlet can’t find a controller method suitable to handle a request, aNoSuchRequestHandlingMethodException will be thrown, resulting in a response with a status code of 404 (Not Found).
Although these built-in mappings are helpful, they do no good for any application exceptions that may be thrown. Fortunately, Spring offers a way to map exceptions to HTTP status codes via the @ResponseStatus annotation.
To demonstrate, consider the following request-handling method from SpittleController that could result in an HTTP 404 status (but doesn’t):
@RequestMapping(value="/{spittleId}", method=RequestMethod.GET)
public String spittle(
@PathVariable("spittleId") long spittleId,
Model model) {
Spittle spittle = spittleRepository.findOne(spittleId);
if (spittle == null) {
throw new SpittleNotFoundException();
}
model.addAttribute(spittle);
return "spittle";
}
Here, a Spittle is retrieved by its ID from the SpittleRepository. If findOne() returns a Spittle object, that Spittle is put into the model, and the view whose name is spittle is tasked with rendering it in the response. But if findOne() returns null, then aSpittleNotFoundException is thrown. For now, SpittleNotFound-Exception is a simple unchecked exception that looks like this:
package spittr.web;
public class SpittleNotFoundException extends RuntimeException {
}
If the spittle() method is called on to handle a request, and the given ID comes up empty, the SpittleNotFoundException will (by default) result in a response with a 500 (Internal Server Error) status code. In fact, in the event of any exception that isn’t otherwise mapped, the response will always have a 500 status code. But you can change that by mapping SpittleNotFoundException otherwise.
When SpittleNotFoundException is thrown, it’s a situation where a requested resource isn’t found. The HTTP status code of 404 is precisely the appropriate response status code when a resource isn’t found. So, let’s use @ResponseStatus to map SpittleNotFoundException to HTTP status code 404.
Listing 7.8. @ResponseStatus annotation: maps exceptions to a specified status code

After introducing this @ResponseStatus annotation, if a SpittleNotFoundException were to be thrown from a controller method, the response would have a status code of 404 and a reason of Spittle Not Found.
7.3.2. Writing exception-handling methods
Mapping exceptions to status codes is simple and sufficient for many cases. But what if you want the response to carry more than just a status code that represents the error that occurred? Rather than treat the exception generically as some HTTP error, maybe you’d like to handle the exception the same way you might handle the request itself.
As an example, suppose that SpittleRepository’s save() method throws a DuplicateSpittleException if a user attempts to create a Spittle with text identical to one they’ve already created. That means the saveSpittle() method of Spittle-Controller might need to deal with that exception. As shown in the following listing, saveSpittle() could directly handle the exception.
Listing 7.9. Handling an exception directly in a request-handling method
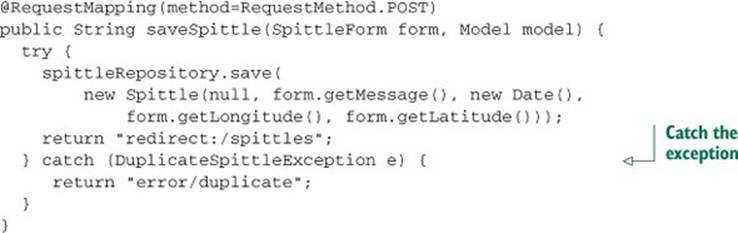
There’s nothing particularly outstanding about listing 7.9. It’s a basic example of Java exception handling. Nothing more.
It works fine, but the method is a bit complex. Two paths can be taken, each with a different outcome. It’d be simpler if saveSpittle() could focus on the happy path and let some other method deal with the exception.
First, let’s rip the exception-handling code out of saveSpittle():
@RequestMapping(method=RequestMethod.POST)
public String saveSpittle(SpittleForm form, Model model) {
spittleRepository.save(
new Spittle(null, form.getMessage(), new Date(),
form.getLongitude(), form.getLatitude()));
return "redirect:/spittles";
}
As you can see, saveSpittle() is now much simpler. Because it’s written to only be concerned with the successful saving of a Spittle, it has only one path and is easy to follow (and test).
Now let’s add a new method to SpittleController that will handle the case where DuplicateSpittleException is thrown:
@ExceptionHandler(DuplicateSpittleException.class)
public String handleDuplicateSpittle() {
return "error/duplicate";
}
The @ExceptionHandler annotation has been applied to the handleDuplicate-Spittle() method, designating it as the go-to method when a DuplicateSpittle-Exception is thrown. It returns a String, which, just as with the request-handling method, specifies the logical name of the view to render, telling the user that they attempted to create a duplicate entry.
What’s especially interesting about @ExceptionHandler methods is that they handle their exceptions from any handler method in the same controller. So although you created the handleDuplicateSpittle() method from the code extracted from saveSpittle(), it will handle aDuplicateSpittleException thrown from any method in SpittleController. Rather than duplicate exception-handling code in every method that has the potential for throwing a DuplicateSpittleException, this one method covers them all.
If @ExceptionHandler methods can handle exceptions thrown from any handler method in the same controller class, you might be wondering if there’s a way they can handle exceptions thrown from handler methods in any controller. As of Spring 3.2 they certainly can, but only if they’re defined in a controller advice class.
What’s a controller advice class? I’m glad you asked, because that’s what we’ll look at next.
7.4. Advising controllers
Certain aspects of controller classes might be handier if they could be applied broadly across all controllers in a given application. @ExceptionHandler methods, for instance, could prove useful in handling exceptions across multiple controllers. If a particular exception is thrown from multiple controller classes, you might find yourself duplicating the same @ExceptionHandler method in all of those controllers. Or, to avoid the duplication, you might create a base controller class that all of your controllers could extend to inherit the common @ExceptionHandlermethod.
Spring 3.2 brings another option to the table: controller advice. A controller advice is any class that’s annotated with @ControllerAdvice and has one or more of the following kinds of methods:
· @ExceptionHandler-annotated
· @InitBinder-annotated
· @ModelAttribute-annotated
Those methods in an @ControllerAdvice-annotated class are applied globally across all @RequestMapping-annotated methods on all controllers in an application.
The @ControllerAdvice annotation is itself annotated with @Component. Therefore, an @ControllerAdvice-annotated class will be picked up by component-scanning, just like an @Controller-annotated class.
One of the most practical uses for @ControllerAdvice is to gather all @ExceptionHandler methods in a single class so that exceptions from all controllers are handled consistently in one place. For example, suppose you want to apply the Duplicate-SpittleException-handling method across all controllers in your application. The next listing shows AppWideExceptionHandler, a @ControllerAdvice-annotated class that does just that.
Listing 7.10. Using @ControllerAdvice to handle exception for all controllers
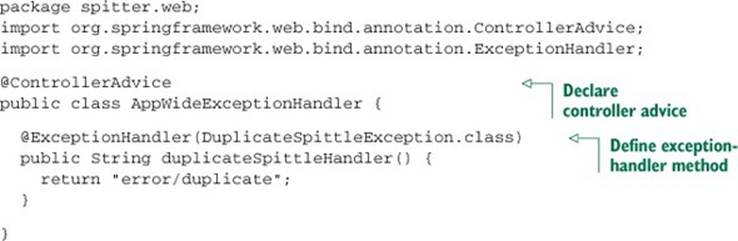
Now, if a DuplicateSpittleException is thrown from any controller method, no matter which controller it’s in, this duplicateSpittleHandler() method will be called to handle the exception. The @ExceptionHandler-annotated method can be written much like an@RequestMapping-annotated method. As shown in listing 7.10, it returns error/duplicate as the logical view name so that a friendly error page is displayed to the user.
7.5. Carrying data across redirect requests
As mentioned in section XREF _writing_a_form_handling_controller, it’s generally a good practice to perform a redirect after handling a POST request. Among other things, this prevents the client from reissuing a dangerous POST request if the user clicks the Refresh or back-arrow button in their browser.
In chapter 5, you used the power of the redirect: prefix in the view names returned from controller methods. When a controller method returns a String whose value starts with redirect:, that String isn’t used to look up a view, but is instead used as a path to redirect the browser to. Looking back at listing XREF ex_SpitterController_processRegistration_validation, you’ll see that the last line of the processRegistration() method returns a redirect:String like this:
return "redirect:/spitter/" + spitter.getUsername();
The redirect: prefix makes working with redirects plain and simple. You’d think there’s nothing more that Spring could do to make working with redirects any simpler. But wait: Spring has a bit more to offer to help with redirects.
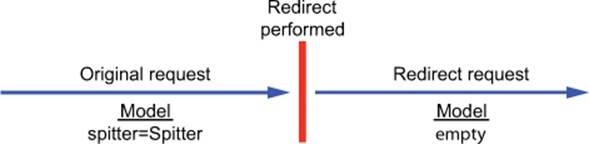
Specifically, how can a redirecting method send data to the method that handles the redirect? Typically, when a handler method completes, any model data specified in the method is copied into the request as request attributes, and the request is forwarded to the view for rendering. Because it’s the same request that’s handled by both the controller method and the view, the request attributes survive the forward.
But as illustrated in figure 7.1, when a controller method results in a redirect, the original request ends and a new HTTP GET request begins. Any model data carried in the original request dies with the request. The new request is devoid of any model data in its attributes and has to figure it out on its own.
Figure 7.1. Model attributes are carried in a request as request attributes and don’t survive a redirect.
Clearly, the model isn’t going to help you carry data across a redirect. But there are a couple of options to get the data from the redirecting method to the redirect-handling method:
· Passing data as path variables and/or query parameters using URL templates
· Sending data in flash attributes
First we’ll look at how Spring can help you send data in path variables and/or query parameters.
7.5.1. Redirecting with URL templates
Passing data in path variables and query parameters seems simple enough. In listing XREF ex_SpitterController_processRegistration_validation, for example, the newly created Spitter’s username is passed as a path variable. But as it’s currently written, the username value is concatenated to the redirect String. That works, but it’s far from bulletproof. String concatenation is dangerous business when constructing things like URLs and SQL queries.
Instead of concatenating your way to a redirect URL, Spring offers the option of using templates to define redirect URLs. For example, the last line of process-Registration() in listing XREF ex_SpitterController_processRegistration_validation could be written like this:
return "redirect:/spitter/{username}";
All you need to do is set the value in the model. To do that, the processRegistration() needs to be written to accept a Model as a parameter and populate it with the username. Here’s how it can set the username value in the model so that it can fill in the placeholder in the redirect path:
@RequestMapping(value="/register", method=POST)
public String processRegistration(
Spitter spitter, Model model) {
spitterRepository.save(spitter);
model.addAttribute("username", spitter.getUsername());
return "redirect:/spitter/{username}";
}
Because it’s filled into the placeholder in the URL template instead of concatenated into the redirect String, any unsafe characters in the username property are escaped. This is safer than allowing the user to type in whatever they want for the username and then appending it to the path.
What’s more, any other primitive values in the model are also added to the redirect URL as query parameters. Suppose, for the sake of example, that in addition to the username, the model also contained the newly created Spitter object’s id property. The processRegistration()method could be written like this:
@RequestMapping(value="/register", method=POST)
public String processRegistration(
Spitter spitter, Model model) {
spitterRepository.save(spitter);
model.addAttribute("username", spitter.getUsername());
model.addAttribute("spitterId", spitter.getId());
return "redirect:/spitter/{username}";
}
Not much has changed with regard to the redirect String being returned. But because the spitterId attribute from the model doesn’t map to any URL placeholders in the redirect, it’s tacked on to the redirect automatically as a query parameter.
If the username attribute is habuma and the spitterId attribute is 42, then the resulting redirect path will be /spitter/habuma?spitterId=42.
Sending data across a redirect via path variables and query parameters is easy and straightforward, but it’s also somewhat limiting. It’s only good for sending simple values, such as String and numeric values. There’s no good way to send anything more complex in a URL. But that’s where flash attributes come in to help.
7.5.2. Working with flash attributes
Let’s say that instead of sending a username or ID in the redirect, you want to send the actual Spitter object. If you send just the ID, then the method that handles the redirect has to turn around and look up the Spitter from the database. But before the redirect, you already have theSpitter object in hand. Why not send it to the redirect-handling method to display?
A Spitter object is a bit more complex than a String or an int. Therefore, it can’t easily be sent as a path variable or a query parameter. It can, however, be set as an attribute in the model.
But as we’ve already discussed, model attributes are ultimately copied into the request as request attributes and are lost when the redirect takes place. Therefore, you need to put the Spitter object somewhere that will survive the redirect.
One option is to put the Spitter into the session. A session is long-lasting, spanning multiple requests. So you could put the Spitter into the session before the redirect and then retrieve it from the session after the redirect. Of course, you’re also responsible for cleaning it up from the session after the redirect.
As it turns out, Spring agrees that putting data into the session is a great way to pass information that survives a redirect. But Spring doesn’t think you should be responsible for managing that data. Instead, Spring offers the capability of sending the data as flash attributes. Flash attributes, by definition, carry data until the next request; then they go away.
Spring offers a way to set flash attributes via RedirectAttributes, a sub-interface of Model added in Spring 3.1. RedirectAttributes offers everything that Model offers, plus a few methods for setting flash attributes.
Specifically, RedirectAttributes provides a couple of addFlashAttribute() methods for adding a flash attribute. Revisiting the processRegistration() method once more, you can use addFlashAttribute() to add the Spitter object to the model:
@RequestMapping(value="/register", method=POST)
public String processRegistration(
Spitter spitter, RedirectAttributes model) {
spitterRepository.save(spitter);
model.addAttribute("username", spitter.getUsername());
model.addFlashAttribute("spitter", spitter);
return "redirect:/spitter/{username}";
}
Here, you’re calling addFlashAttribute(), giving it spitter as the key and the Spitter object as a value. Optionally, you can leave the key parameter out and let the key be inferred from the value type:
model.addFlashAttribute(spitter);
Because you’re passing a Spitter object to addFlashAttribute(), the key is inferred to be spitter.
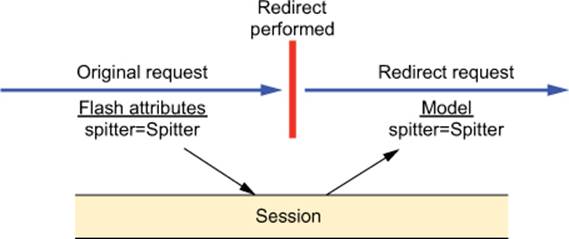
Before the redirect takes place, all flash attributes are copied into the session. After the redirect, the flash attributes stored in the session are moved out of the session and into the model. The method that handles the redirect request can then access the Spitter from the model, just like any other model object. Figure 7.2 illustrates how this works.
Figure 7.2. Flash attributes are stored in the session and then retrieved into the model, surviving a redirect.
To complete the flash attribute story, here’s a slightly updated version of show-SpitterProfile() that checks for a Spitter in the model before going to the trouble of looking it up from the database:
@RequestMapping(value="/{username}", method=GET)
public String showSpitterProfile(
@PathVariable String username, Model model) {
if (!model.containsAttribute("spitter")) {
model.addAttribute(
spitterRepository.findByUsername(username));
}
return "profile";
}
As you can see, the first thing showSpitterProfile() does is check to see if there’s a model attribute whose key is spitter. If the model contains a spitter attribute, then there’s nothing to do. The Spitter object contained therein will be carried forward to the view for rendering. But if the model doesn’t contain a spitter attribute, then showSpitterProfile() will look up the Spitter from the repository and store it in the model.
7.6. Summary
When it comes to Spring, there’s always more: more features, more choices, and more ways to achieve your development goals. Spring MVC has a lot of capabilities and many tricks up its sleeves.
Spring MVC setup is certainly one area where you have a lot of choices. In this chapter, we started by looking at various ways to set up Spring MVC’s DispatcherServlet and ContextLoaderListener. You saw how to tweak DispatcherServlet’s registration and how to register additional servlets and filters. And, in case you’re deploying your application to an older application server, we took a quick look at how to declare DispatcherServlet and ContextLoaderListener in web.xml.
Then we took a look at how to handle exceptions thrown from Spring MVC controllers. Although an @RequestMapping method could handle exceptions itself, your controller code is much cleaner when you extract the exception handling into a separate method.
To consistently handle common tasks, including exception handling, across all controllers in your application, Spring 3.2 introduced @ControllerAdvice to create classes that collect common controller behavior in one place.
Finally, we looked at how to carry data across redirects, including Spring’s support for flash attributes: model-like attributes that will survive a redirect. This enables you to properly respond to POST requests with a redirect, but to still carry model data obtained while handling a POST request and use it or display it after the redirect.
In case you’re wondering—yes, there’s more! We still haven’t discussed everything Spring MVC can do. We’ll pick up the discussion of Spring MVC again in chapter 16, when you see how to use it to create REST APIs.
But for now, we’ll set aside Spring MVC and look at Spring Web Flow, a flow framework built on top of Spring MVC for creating applications that walk a user through a series of guided steps.
All materials on the site are licensed Creative Commons Attribution-Sharealike 3.0 Unported CC BY-SA 3.0 & GNU Free Documentation License (GFDL)
If you are the copyright holder of any material contained on our site and intend to remove it, please contact our site administrator for approval.
© 2016-2026 All site design rights belong to S.Y.A.