JavaScript and jQuery for Data Analysis and Visualization (2015)
PART II Working with JavaScript for Analysis
· Chapter 4: Integrating Existing Data
· Chapter 5: Acquiring Data Interactively
· Chapter 6: Validating Your Data
· Chapter 7: Examining and Sorting Data Tables
· Chapter 8: Statistical Analysis on the Client Side
Chapter 4 Integrating Existing Data
What's in This Chapter
· The basics of working asynchronously
· Techniques for working with different data formats (CSV, XML and JSON)
· Shortcuts for styling structured data
· Example of rendering external JSON data as a chart
CODE DOWNLOAD The wrox.com code downloads for this chapter are found at www.wrox.com/go/javascriptandjqueryanalysis on the Download Code tab. The code is in the chapter 04 download and individually named according to the names throughout the chapter.
The lion's share of the data visualist's work involves rendering existing data. Data can be stored in many different formats—plain text, CSV, XML, JSON, and others—but as long as it is in a digital format, chances are there are JavaScript and other server-side routines to access the information for representation. Naturally, some circumstances, such as building a complex infographic, require that you incorporate data manually. However, wherever possible, it's a good idea to keep content (the data) separate from presentation (the charting) as demonstrated throughout this chapter. Not only does this methodology make it a breeze to make updates, but it also opens the door to enhanced accessibility and data transparency.
Reading Data from Standard Text Files
Data is often stored in a plain text file. To be clear, “plain” or “standard” text refers to files such as .txt files that contain no extraneous coding or meta information. This section examines techniques for reading plain text files one line at a time as well as importing and parsing the ubiquitous CSV format.
Working Asynchronously
There are numerous methods for reading data from a text file, but in the online world it's a good idea to handle this task asynchronously. Most JavaScript libraries incorporate some form of Ajax (Asynchronous JavaScript and XML). Using Ajax makes it possible for you to read text files without refreshing the page. Ajax not only provides performance benefits but also helps you to build single-page apps (SPAs).
Take a look at a basic text file (which is on the companion website as sample.txt), composed of several lines of data, like this:
Line one
Line two
Line three
Line four
After you've included the jQuery library, you can use the get() method to pull in the data. Following is some basic code that reads the text file and outputs what it finds in a JavaScript alert (shown in Figure 4.1):
jQuery.get('sample.txt', function(theData) {
alert(theData);
});
Figure 4.1 No additional parsing is needed when outputting the get() method to a console device, such as an alert dialog box.
The alert_data.html file is on the companion website.
The get() method is shorthand for the jQuery.ajax method and, as such, is fairly robust. Not only can the get() method pass a URL and a callback, you can also send additional data to the server, get the status of the request, and more. To learn more about the get()API, visit the jQuery docs: http://api.jquery.com/jquery.get/.
Reading CSV Files
Although it is possible to store and retrieve basic, unstructured data from a text file, it's far more common to work with CSV files. A CSV file consists of data where each line is a record and each record can contain a number of data columns. The values in each data column are, typically, separated by commas—hence the acronym for Comma Separated Values. The most basic CSV file looks like this:
one,two,three
four,five,six
The values in a CSV sometimes contain commas themselves, and when that's true, the values must be enclosed or delimited, usually with single or double quotes. The separator and delimiter characters are flexible, but must be taken into account when the file is parsed.
NOTE The standard for CSV files is maintained by the Internet Engineering Task Force (IETF). You can find it online at http://tools.ietf.org/html/rfc4180.
Parsing can be quite challenging, depending on the variables of the particular text file. Luckily, programmer Evan Plaice developed a code library that handles all the heavy lifting. The library, called jquery-csv, is available at https://code.google.com/p/jquery-csv.
The jquery-csv library offers a nice range of functionality, including a variety of methods to parse CSVs as well as settings for separators, delimiters, and so on. Using the library's toObjects() method you can parse CSV data and quickly present it as an HTML table. First include a reference to the library in your web page:
<script src="http://jquery-csv.googlecode.com/git/src/jquery.csv.js"></script>
Next, set up your HTML <body> with a table, specifying an ID that jQuery can work with:
<div class="result">
<table id="theResult" border="1"></table>
</div>
With jquery-csv's help, parsing the data is very straightforward. But before you get started, it's a good idea to establish the groundwork for building the table markup:
function createTable(data) {
var html = '';
if(data[0].constructor === Object) {
// build the table header
html += '<tr>\r\n';
for(var item in data[0]) {
html += '<th>' + item + '</th>\r\n';
}
html += '</tr>\r\n';
// build the table rows
for(var row in data) {
html += '<tr>\r\n';
for(var item in data[row]) {
html += '<td>' + data[row][item] + '</td>\r\n';
}
html += '</tr>\r\n';
}
}
return html;
}
This custom createTable() function first loops through the first row of data to pull the column names for the CSV and output those in the table. Next it loops through each row, building the rest of the table markup in the process. It uses for-in loops to keep the function flexible enough to work with any number of headers. Pay attention to the use of data[row][item]—it drills into the two-dimensional array to grab the current row and item.
With the createTable() function complete, you're ready to import and parse the CSV data using the jQuery get() method you saw earlier:
$( document ).ready(function() {
$.get('stores.csv', function(theData) {
var data = $.csv.toObjects(theData);
var theHtml = createTable(data);
$('#theResult').html(theHtml);
});
});
Here the csv.toObjects() method converts the CSV data to an object named data, which is then passed to the createTable() function. Then, that markup is injected into the DOM using jQuery's html() function. Figure 4.2 shows the unstyled table—with all the data dynamically inserted from a CSV file.
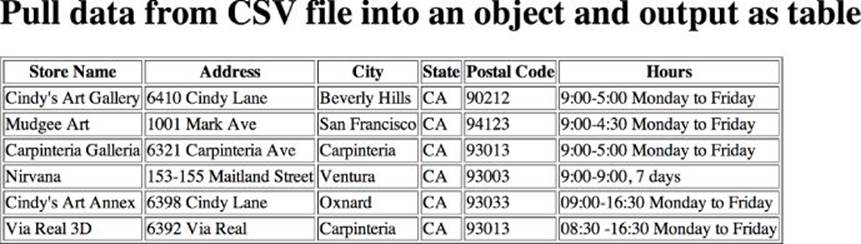
Figure 4.2 Data from CSV files are commonly presented in table format.
The full code for this example is in the read_csv_into_array.html file on the companion website.
Incorporating XML Data
NOTE The jquery-csv documentation also includes examples for importing CSV files to use the jQuery plotting library, Flot (http://jquery-csv.googlecode.com/git/examples/flot.html), and the Google Visualization API (http://jquery-csv.googlecode.com/git/examples/google-visualization.html).
XML, short for Extensible Markup Language, is often used for storing data of all kinds. This tag-based language is extremely flexible. In fact, there is only one set element, <?xml?>, and everything else is custom-fitted to the file needs.
Understanding the XML Format
XML relies on nested tags to create its structure. After the opening <?xml?> tag, typically a root node is established that encompasses all the other content. In the following examples, <sales> is the root node, followed by data for two regions:
<?xml version="1.0" encoding="UTF-8"?>
<sales>
<region>
<territory>Northeast</territory>
<employees>150</employees>
<year>
<date>2013</date>
<amount>115000</amount>
</year>
</region>
<region>
<territory>Southeast</territory>
<employees>125</employees>
<year>
<date>2013</date>
<amount>95000</amount>
</year>
</region>
</sales>
You can find the example_data.xml file on the companion website.
Notice that there's a strong resemblance to HTML. Both have a common ancestor, Standard General Markup Language (SGML), and there have been several XML-based versions for HTML. In general, XML is much stricter in terms of format, which makes working with the data it contains that much easier because XML follows a very tight set of rules.
XML elements can also contain attributes. For example, you could restructure the preceding example so that the <year> tag is an attribute of region:
<?xml version="1.0" encoding="UTF-8"?>
<sales>
<region year="2013">
<territory>Northeast</territory>
<employees>150</employees>
<amount>115,000</amount>
</region>
<region year="2013">
<territory>Southeast</territory>
<employees>125</employees>
<amount>95,000</amount>
</region>
</sales>
Getting XML Data
You can pull data from an XML file into an HTML page in a number of ways, and jQuery's built-in functionality makes the process very straightforward. With the ajax() method, you can get any XML file and send the data to a custom parser function:
$.ajax({
type: "GET",
url: "regional_sales.xml",
dataType: "xml",
success: xmlParser
});
To understand how to apply the parser function—here called xmlParser—you need to know the basic structure of the XML file. The file used in this example follows:
<?xml version="1.0" encoding="UTF-8"?>
<sales>
<region year="2013">
<territory>Northeast</territory>
<employees>150</employees>
<amount>115,000</amount>
</region>
<region year="2013">
<territory>Southeast</territory>
<employees>125</employees>
<amount>95,000</amount>
</region>
<region year="2013">
<territory>Midwest</territory>
<employees>225</employees>
<amount>195,000</amount>
</region>
<region year="2013">
<territory>West</territory>
<employees>325</employees>
<amount>265,000</amount>
</region>
</sales>
Given this data—to extract the territory, the number of employees, and the sales amount values—the custom parser needs to loop through each <region> node. First, target these nodes in the XML using jQuery's find() function:
$(xml).find('region').each(function () {
}
Within this each() loop, you can assign the values of the XML to variables, and use those variables to build the markup. Then, you can append that markup to the DOM, as shown in the complete xmlParser() function here:
function xmlParser(xml) {
$(xml).find('region').each(function () {
var theTerritory = $(this).find('territory').text();
var numEmployees = $(this).find('employees').text();
var theAmount = $(this).find('amount').text();
$('#sales').append('<tr><td>' + theTerritory + '</td><td>' + numEmployees + '</td><td>$' + theAmount + '</td></tr>');
});
}
You can find the import_xml.html file on the companion website.
After this particular example is executed, it outputs a table (see Figure 4.3).

Figure 4.3 jQuery includes a built-in XML engine for retrieving and parsing data files.
Styling with XSLT
After you import XML data, it can simply be styled with CSS. However, building up JavaScript strings may not be the most efficient way to incorporate XML, especially if you have a lot of data spread all over the page. One alternative is to use XSLT (Extensible Stylesheet Language Transformations). As you might suspect from the full name, XSLT does more than style content; it transforms it.
The workflow for incorporating XSLT methodology is somewhat different from what you might be used to:
1. Create an XML data file.
2. Add a link to the XSLT stylesheet in the XML data file.
3. Wrap HTML with XML and XSL tags.
4. Incorporate XSL tags in HTML.
5. Browse the XML file.
In essence, you're mapping the data to an HTML template. An example is provided here so you can see how it works. The example re-creates the table with XML data, but via XSLT.
Starting with a well-formed XML data file, insert an <?xml-stylesheet?> tag to link the XSLT file after the opening <?xml?> element:
<?xml version="1.0" encoding="UTF-8"?>
<?xml-stylesheet type="text/xsl" href="import_xml.xslt"?>
Then, open an HTML file that contains the page layout and insert the opening XML declaration:
<?xml version="1.0" encoding="UTF-8"?>
Wrap the balance of the code in an <xsl:stylesheet > tag pair with the proper XSL namespace:
<xsl:stylesheet version="1.0" xmlns:xsl="http://www.w3.org/1999/XSL/Transform">
...
</xsl:stylesheet>
Insert an <xsl:output > element that sets the doctype to HTML, which is all that's needed for an HTML5 document:
<xsl:output method="html" encoding="utf-8" indent="yes" />
Place an <xsl:template > tag pair around the rest of the HTML content and set the match attribute to the site root of the data:
<xsl:template match="/">
...
</xsl:template>
At this stage, the top of the document should look like this:
<?xml version="1.0" encoding="UTF-8"?>
<xsl:stylesheet version="1.0" xmlns:xsl="http://www.w3.org/1999/XSL/Transform">
<xsl:output method="html" encoding="utf-8" indent="yes" />
<xsl:template match="/">
<html>
and the closing should look like this:
</html>
</xsl:template>
</xsl:stylesheet>
Finally, save the file with an .xslt extension.
Now, you're ready to insert the necessary code for mapping the XML data to the page. The example scenario has a <table> element set up, complete with a header row. All data is contained in the table rows that follow. To loop through this data, use the <xsl:for-each>tag that targets the repeating node with the select attribute:
<xsl:for-each select="sales/region">
<tr>
...
</tr>
</xsl:for-each>
NOTE Note that the path to the desired node is given, not just the node name itself. This functionality is courtesy of a technology related to XSL called XPath. XPath, like XML and XSLT, is a W3C recommendation and well-supported in all modern browsers.
Within the <xsl:for-each> loop, the XML data values are called with a <xsl:value-of> tag, again using the select attribute. For example, to get the content of the XML <territory> node, the code would be
<xsl:value-of select="territory"/>
In this scenario, the entire table code, looping through all three XML data values, would be
<table id="sales">
<tr>
<th>Territory</th>
<th>Employees</th>
<th>Sales</th>
</tr>
<xsl:for-each select="sales/region">
<tr>
<td><xsl:value-of select="territory"/></td>
<td><xsl:value-of select="employees"/></td>
<td>$<xsl:value-of select="amount"/></td>
</tr>
</xsl:for-each>
</table>
You can find the import_xml_xslt.html and ch04_regional_sales_xslt.xml files on the companion website.
The resulting table, shown in Figure 4.4, is essentially the same as the table developed in the previous example by importing XML data directly via jQuery.
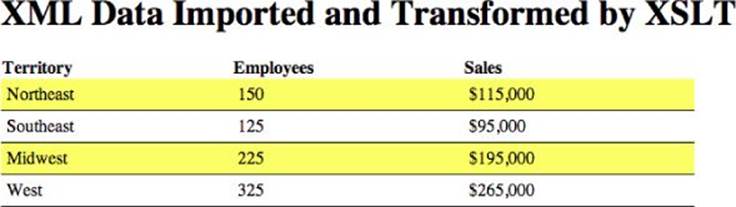
Figure 4.4 Use XSLT methodology when developing more complex documents with XML data.
Keep in mind that you need to send the XML file to the browser for viewing, not the XSLT file. It is the transformed XML data that is rendered.
Displaying JSON Content
XML is extremely flexible and quite functional, but it can be a bit heavy syntactically. Fortunately you have another option, JSON, which is designed to improve loading and processing time on the web. JSON is an abbreviation for JavaScript Object Notation and, although it is JavaScript-based, it is actually language- and platform-independent. That said, the JSON format is identical to that of JavaScript objects, which makes it quite easy to work with on the front end.
JSON enjoys widespread browser support and is frequently the primary, if not exclusive, data language option for visualization plug-ins. This section provides an overview of the JSON syntax and techniques for incorporating JSON data into your web pages.
Understanding JSON Syntax
JSON data is built on name/value pairs—a colon separates each key from its value, and commas separate each data pair. For example,
{
"region": "Northeast",
"employees":150,
"amount":"115,000"
}
Note that all keys and strings are enclosed in double quotes. All the data, which is collectively known as a JSON object, is contained within curly braces. You can also nest arrays and objects within the JSON values using square brackets or curly braces respectively. Here's an example that expresses the previous XML data as JSON:
{
"sales": {
"region": [
{
"territory": "Northeast",
"employees": "150",
"amount": "115,000"
},
{
"territory": "Southeast",
"employees": "125",
"amount": "95,000"
},
{
"territory": "West",
"employees": "325",
"amount": "265,000"
}
]
}
}
You can find the regional_sales.json file on the companion website.
NOTE If you're not sure whether your JSON data is properly structured, you can validate it online at http://jsonlint.com.
Reading JSON Data
Because JSON is formatted similarly to JavaScript, you can read it directly. For example, consider the data put into an object variable, as shown here:
var jsonObj = { "sales": [
{"region": "Northeast", "employees":150, "amount":"115,000"},
{"region": "Southeast", "employees":125, "amount":"95,000"},
{"region": "West", "employees":325, "amount":"265,000"}
]
};
You can now drill into any value you need in this object. For example, to display the sales amount of the Southeast in an alert, as shown in Figure 4.5, use the following code:
var theAmount = jsonObj.sales[1].amount;
alert(theAmount);
Figure 4.5 You can access JSON values directly if you know the structure and desired key.
You can find the json_eval.html file on the companion website.
NOTE jQuery includes a version of JSON.parse(): the parseJSON() function, which is useful for backwards compatibility. If incorporated into a jQuery script, parseJSON() is used only when the browser viewing the page does not support the native function; otherwise, the native JSON.parse() is used.
Another approach is to put the JSON data in a string and then put the parsed string into an object using the JSON.parse() method:
var jsonData = '{"regions":[' +
'{"territory":"Northeast","employees":"150","amount":"115,000" },' +
'{"territory":"Southeast","employees":"125","amount":"95,000" },' +
'{"territory":"Midwest","employees":"225","amount":"195,000" },' +
'{"territory":"West","employees":"325","amount":"265,000" }]}';
jsonObj = JSON.parse(jsonData);
This code produces the same jsonObj as the previous example.
Asynchronous JSON
Although you can include JSON inline on the page, it is more common to deal with external JSON resources that you access asynchronously. This process is a bit different—you can use jQuery's getJSON() function to automatically parse the data. The getJSON()function takes two parameters: the path to the file and a callback function.
$.getJSON("regional_sales.json", function(data) {
});
Next, you can use the jQuery each() function to loop through the data:
$.each(data.sales.region,function (k,v) {
});
Here the each() loop provides both the key (k) and value (v) from the JSON. To get the value of a key, JavaScript dot notation is applied:
var theTerritory = v.territory;
var numEmployees = v.employees;
var theAmount = v.amount;
After you have your content, you're ready to build the HTML and insert it in the page with the jQuery append() function. Here's the complete code block:
$.getJSON("regional_sales.json", function(data) {
$.each(data.sales.region,function (k,v) {
var theTerritory = v.territory;
var numEmployees = v.employees;
var theAmount = v.amount;
});
});
You can find the import_json.html file on the companion website.
This code displays a table of data (see Figure 4.6), but the data could easily be in any other configuration. For example, with a little bit of additional coding, courtesy of the HTML5 <canvas> tag, you could create a bar chart from the same data file, as shown in Figure 4.7.
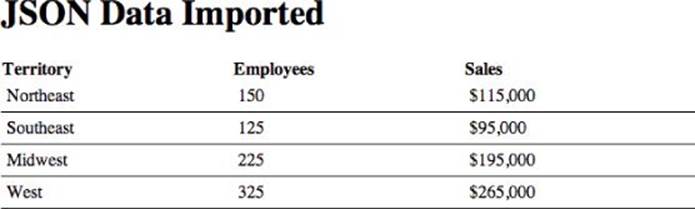
Figure 4.6 jQuery's getJSON() function reads JSON data from a file and automatically parses it.
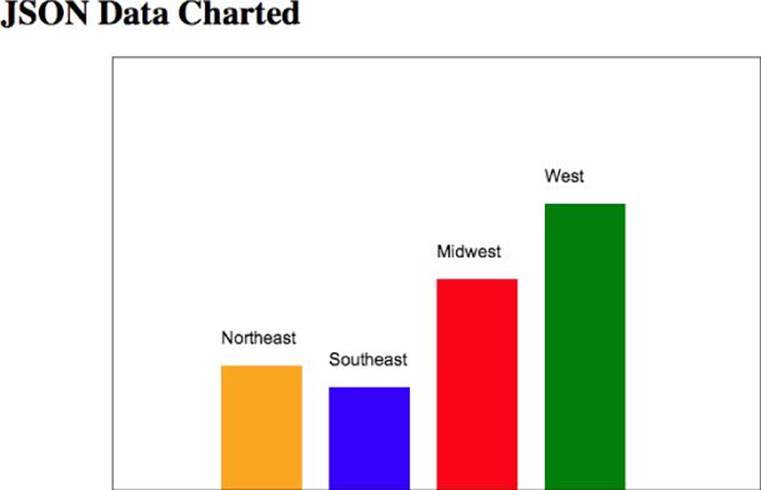
Figure 4.7 JSON and the JavaScript-driven graphics of the <canvas> tag are a natural fit.
You can find the ch04_import_json_chart.html file on the companion website.
The canvas representation of this data starts with a simple <canvas> element:
<canvas id="chart1" width="600" height="400"></canvas>
Next, the following JavaScript imports the data and draws the chart in canvas:
$( document ).ready(function() {
var theChart = document.getElementById('chart1');
var chartHeight = 400;
var theWidth = 75;
var theSpace = 100;
var theX = 0;
var theY = 0;
var theFills = ['orange','blue','red','green'];
var i = 0;
if (theChart.getContext){
var theContext = theChart.getContext('2d');
$.getJSON("regional_sales.json", function(data) {
$.each(data.sales.region,function (k,v) {
var theTerritory = v.territory;
var theHeight = parseInt(v.amount.replace(/,/g, ''))/1000;
theY = chartHeight - theHeight;
theX = theX + theSpace;
theContext.fillStyle = theFills[i];
theContext.fillRect(theX,theY,theWidth,theHeight);
theContext.fillStyle = 'black';
theContext.font = '12pt Arial';
theContext.fillText(theTerritory,theX, theY-20);
++i;
});
});
}
});
Later in the book you dive deeper into canvas and SVG representations, so this chapter doesn't include a detailed discussion of this example. Basically, the script starts by defining a few settings and setting the context for the canvas element. Next it pulls in the JSON data and uses that to construct the visualization in canvas. theContext.fillStyle sets the color for each bar, and the bars are then drawn using theContext.fillRect(). Finally, a label is applied to each bar in the chart using theContext.fillText().
Summary
After you've collected your data, you need techniques to retrieve it. There are a great many data formats, and the methodology for reading each vary wildly. Here are a few key thoughts to keep in mind when approaching this task:
· Ajax is frequently used in modern web apps to load data asynchronously. JavaScript libraries provide useful Ajax APIs—for instance jQuery's get().
· The jquery-csv library provides useful tools for parsing CSV files.
· XML is a highly structured format, widely used to store data for both online and offline businesses. You can use XSLT to transform the data into an HTML template and browse the data file itself.
· JSON is a lightweight format that pairs well with online processing. You can read data retrieved from a JSON file with the jQuery getJSON() function.
· Because JSON is JavaScript based, it works nicely with a variety of visualization options.
All materials on the site are licensed Creative Commons Attribution-Sharealike 3.0 Unported CC BY-SA 3.0 & GNU Free Documentation License (GFDL)
If you are the copyright holder of any material contained on our site and intend to remove it, please contact our site administrator for approval.
© 2016-2026 All site design rights belong to S.Y.A.