JavaScript and jQuery for Data Analysis and Visualization (2015)
PART II Working with JavaScript for Analysis
Chapter 6 Validating Your Data
What's In This Chapter
· Native HTML5 validation techniques
· jQuery Validation Engine
CODE DOWNLOAD The wrox.com code downloads for this chapter are found at www.wrox.com/go/javascriptandjqueryanalysis on the Download Code tab. The code is in the chapter 06 download and individually named according to the names throughout the chapter.
Form validation is especially important when using that form data for visualization. That's because malformed data can quickly derail a chart or table. For instance, if your chart shows aggregated data across different dates, this data formatting had better be consistent. If one user enters February 4, 1986 and the other enters 2-4-86, you had better figure out some way to align these values before displaying them. In general, the easiest way to do this is to validate the data before you ever store it.
In this chapter you explore the differences between server-side and client-side validation and then discover a variety of client-side techniques. You first look at native HTML5 validation approaches. Those leverage semantic tags to validate fields against various data types and validation rules.
Next, you learn about jQuery Validation Engine, which provides more feature-rich validation. You learn how to use its basic regex validators, as well as more complex rules for numbers and dates. Then you see how to set up intricate relationships between the various fields in your form.
By the end of this chapter, you'll have a robust toolkit for form validation and understand both lightweight and fully featured solutions to suit your needs.
Server-Side Versus Client-Side Validation
In the early days of the web, form validation was performed exclusively on the server side. That approach worked well until developers began to focus on how they could improve this flow—it turns out form optimization is extremely important for business goals. For example, an e-commerce company can see substantial returns by improving their checkout forms.
Eventually, client-side validation techniques gained popularity because they allow developers to streamline the error-handling process, providing meaningful cues to the user as he fills out the form.
Whereas server-side validation must be performed after form submission, client-side validation enables you to display errors the moment they occur. This approach typically produces higher conversion rates because it avoids bombarding the user with a number of errors after he submits the form to the server.
Additionally, the user doesn't have to track down the source of an error—it will always be the field she just entered. Finally, it avoids certain nuisances caused by security issues from the back end, for instance when the server makes you re-enter your password rather than injecting it in the markup.
To get an idea of how client-side validation works, take a look at the comparison in Figure 6.1.
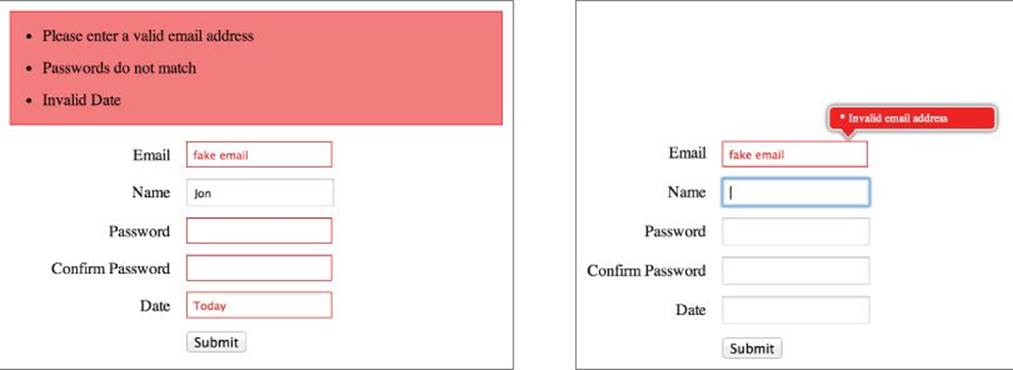
Figure 6.1 Compare the grouped error messages from the server (left) with the dynamic inline error messages from the client (right).
Client-side validation provides faster feedback to the user, which in turns allows him to fill out the form faster. Additionally, it provides the user with more confidence that the form is going to go through successfully. Both of these improvements lead to lower abandonment rates, which means more users are buying your product, signing up for your newsletter, or completing whatever action you want them to take.
However, client-side validation comes with some notable drawbacks. Namely, any validation done in the browser is incredibly insecure. A hacker can easily override client-side validation or simply disable JavaScript. So whenever you validate on the client, make sure to double-check any mission-critical fields on the server after the form is submitted.
Native HTML5 Validation
These days, there are a number of approaches to client-side validation. Prior to HTML5, developers relied exclusively on third-party plug-ins and extensions to handle validation. Typically built on top of a library like jQuery, these solutions use JavaScript to validate form content and display inline error messages as needed.
However, in recent years, this validation has gone native with HTML5. Although less customizable than its JavaScript counterparts, native validation provides a variety of advantages such as performance gains and accessibility improvements.
Native Versus JavaScript Validation
In general, it's a good idea to use native tools whenever possible—it just doesn't make sense to reinvent the wheel without a good reason. This wisdom also applies to HTML5 validation, which has certain advantages over alternatives such as jQuery plug-ins:
· Native validation is lightweight. Because it is implemented at the browser level, the user doesn't have to download external scripts to handle validation. That lightens page load and in turn improves performance.
· Native validation is consistent. Many sites use HTML5 validation, so the user is undoubtedly already familiar with the visual language of the validation user interface (UI). That's an affordance that allows users to more easily discern validation messages.
· Native validation is localized. With native validation, the browser automatically translates error messages into the user's language.
As you can see, native HTML5 validation is an attractive alternative to external scripts and plug-ins. However, JavaScript validation provides its own set of advantages:
· JavaScript validation is feature-rich. Although HTML5 handles the majority of validation situations with ease, it will never be as robust as a validation library. Depending on your needs, you might want something more.
· JavaScript validation is theme-able. Although HTML5 provides consistently themed messages that the user can recognize immediately, these might or might not work with the visual direction of your site. Styling native validation messages is limited at best, so if you need a distinctly different look and feel, you have to skip HTML5.
· JavaScript validation is compatible with older browsers. Although HTML5 validation works excellently in all modern browsers, some older browsers are left out, namely IE8 and older versions. If supporting these browsers is a priority, you have to turn to JavaScript solutions, either across the board, or as a polyfill for non-HTML5 browsers.
· JavaScript validation is customizable. HTML5 provides automated messages for errors that are localized to the user's region, but these messages are more difficult to customize. So if you're not happy with the generic error messages, you might be better off using JavaScript validation.
Getting Started with HTML5 Validation
Chapter 6 covers how to use HTML5 input types to provide richer form controls and a better mobile experience. It turns out that these special input types also have profound implications for form validation.
For example, let's say you have an email input:
<input type="email">
When the user submits this form, the browser automatically checks against the email data type for proper formatting (@ symbol). Any improperly formatted address triggers an error, as you can see in Figure 6.2.
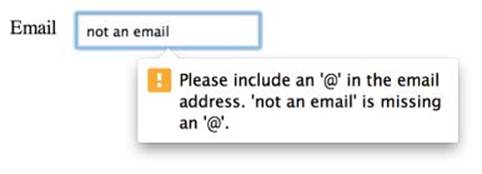
Figure 6.2 This email input has triggered an error in Chrome.
HTML5 validates data types other than email, too. For example, if you have a url input, the browser checks for a properly formatted URL.
HTML5 Validation for Numbers
Whereas email and url validation are pretty basic, the number and range inputs provide more intricate control over validation rules. Chapter 5 described how to use these numeric inputs with min, max, and step values:
<input type="number" min="0" max="10" step="0.5">
Here the number field is restricted between 0 and 10, with 0.5 in between each value. On the surface, these values affect the desktop UI: It starts at zero and then counts up by 0.5 until it hits 10. But HTML5 validation also leverages these attributes, as shown inFigure 6.3.
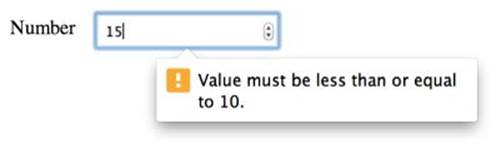
Figure 6.3 A value outside of the min and max bounds triggers an error for this number field.
Required Fields and Max Length
Beyond special input types, there are a number of additional validation options you can set directly in the markup. One particularly useful option is the required attribute:
<input type="text" required>
Here the required attribute indicates that the field must be filled. Failing to do so triggers the error shown in Figure 6.4.
NOTE Keep in mind that basic validation isn't enough to make a field required. For example, if a user leaves an email input blank, the form will still submit successfully. Blank fields are not matched against the given rule.
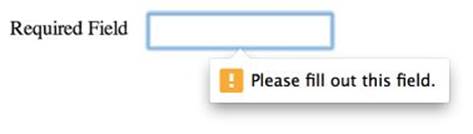
Figure 6.4 All required fields must be filled in order to submit this form.
Additionally you can set the max length for any field:
<input type="text" maxlength="5">
However, with maxlength, there isn't even an error message because most browsers don't let you type any extra characters.
Custom HTML5 Validation Rules
You can also set up custom HTML5 validation rules. These rules use regular expressions (regex) to validate content and then display any errors to the user.
To set up custom rules, simply insert regex directly in the markup:
<input type="text" pattern="[a-zA-Z]+">
When the user submits the form, this field is checked against the regex [a-zA-Z]+, which accepts letter values only (no numbers, no spaces, and so on). If the user enters invalid data, a generic error message is triggered, as shown in Figure 6.5.
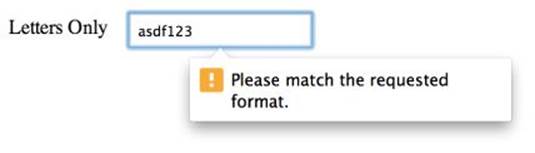
Figure 6.5 This generic error message displays if the string fails regex validation.
Custom HTML5 Validation Messages
If you're unhappy with the generic validation messages, either for custom regex rules or the standard fields, you can customize these as well. To do so, you need to leverage JavaScript and the setCustomValidity() application programing interface (API):
<input type="text" pattern="[a-zA-Z]+"
oninvalid="setCustomValidity('Please enter only letters.')">
On unsuccessful form submission, this field triggers the given error text, as shown in Figure 6.6.
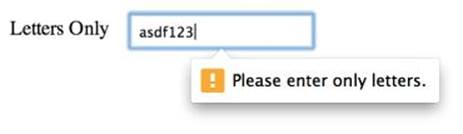
Figure 6.6 An error triggers a custom validation message in HTML5.
However, this solution is fairly hacky and leaves a lot to be desired. First off, the same error message displays regardless of the source of the error. For instance, if you use a pattern and a required, the same message displays for both issues.
Additionally, these hardcoded messages are not localized to the user's language. That might not seem like the biggest problem, but it is if you are mixing hardcoded messages with defaults. As you can see in Figure 6.7, that can lead to a very inconsistent experience. On the left of Figure 6.7, the browser translates the message according to the language setting (in this case Spanish). On the right, a hardcoded message in the same form appears in English.
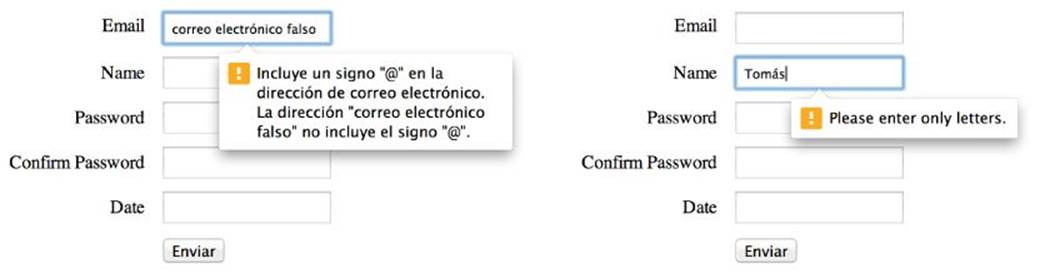
Figure 6.7 Custom validation messages don't mix well with localized content.
h5Validate Polyfill
Although HTML5 validation is an excellent option in most browsers, there are still a handful of users working with IE8 and other non-HTML5 browsers. You'll have to decide for yourself whether it's a priority to support client-side validation for these users. Fortunately, if you do decide to provide fallbacks, there are out-of-the-box solutions that bridge the gaps between older browsers and HTML5.
Namely, the h5Validate polyfill provides an easy path to supporting HTML5-style validation in all browsers. This polyfill attempts to mimic native functionality, leveraging the same attributes in the markup as HTML5. That way, you can effortlessly support these features without having to rewrite too much code.
To get started, download the code from github: https://github.com/dilvie/h5Validate/blob/master/jquery.h5validate.js. Using the polyfill is a piece of cake; simply include the script at the end of your document.
However, it's not a good idea to use this polyfill across the board. Most browsers support native validation, and there's no sense in reinventing the wheel—or even making these users download the script. You should take steps to ensure that this script loads only where it's needed.
One option is to use feature detection and a JavaScript loader to load the script only when it's needed. Alternatively, you can also use an IE conditional (although it's a bit sloppier):
<!--[if lt IE 9]>
<script src="js/jquery.h5validate.js"></script>
<![endif]-->
This conditional targets only IE8 and earlier versions, so it misses older versions of other browsers. That isn't a huge concern, though, because market shares for those older browsers are typically very tiny.
jQuery Validation Engine
A quick Internet search turns up a variety of plug-ins for form validation. As with any third-party offerings, these plug-ins can be hit or miss, so it's important to choose the right one. One of the best options available is jQuery Validation Engine, which is available athttps://github.com/posabsolute/jQuery-Validation-Engine.
jQuery Validation Engine is a robust validation suite that provides a more feature-rich alternative to native HTML5 validation. Depending on your use case, these features may justify the added weight of an extra script.
Getting Started with jQuery Validation Engine
Although it leverages different attributes than HTML5 validation, the jQuery Validation Engine is markup-driven:
<input type="text" data-validation-engine="validate[required,custom[email]]">
Here, data-validation-engine defines the functionality for this field. First, validate[] indicates that this field should be validated. Then the validation rules are defined in this array—this particular field is a required field that must validate against an email regex.
Finally, instantiate the validation engine on your form element:
$(".my-form").validationEngine();
Now, as you can see in Figure 6.8, malformed data trigger error messages.
NOTE Although the plug-in supports theming, there is only one official theme at this time.
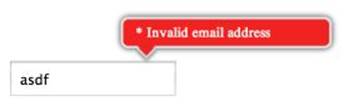
Figure 6.8 This error message was generated by the jQuery Validation Engine. (If you don't like the appearance, you can retheme the library.)
Validators
The main reason to use jQuery Validation Engine is the variety of validation rules that you can leverage right out of the box. Ranging from simple regex rules to validate an e-mail address to complex date ranges and conditionals, these validators provide more feature-rich controls than native alternatives. And if you need additional rules, the library provides tools to define your own.
Regex Validators
jQuery Validation Engine offers a number of predefined regex rules to cover a variety of common validation use cases. You saw one of these validators in the previous section: custom[email], which checks against an email regex. Following the same pattern, you can also set up URL validation:
<input type="text" data-validation-engine="validate[custom[url]]">
Or establish phone number validation:
<input type="text" data-validation-engine="validate[custom[phone]]">
Beyond these examples, you can also validate numbers, ISO dates, alphanumeric strings, and more. You can read about all the custom regexes jQuery Validation Engine supports in the documentation: http://posabsolute.github.io/jQuery-Validation-Engine/#custom-regex. And if you still need more, you can add your own regex rules to the translation file (for example, jquery.validationEngine-en.js).
WARNING Be careful when validating a phone number because this regex is “relaxed,” meaning it allows a variety of phone number formats. That's a pretty wide field with all the international formats, so you might need to add additional validation rules.
Number Validators
You already learned how to use regex validators such as custom[number] and custom[integer] to validate the data type of a field. But jQuery Validation Engine provides some additional non-regex validators such as min[] and max[]:
<input type="text"
data-validation-engine="validate[custom[number],min[0],max[10]]">
This example uses both the min[] and max[] validators, establishing a rule that the number must be between 0 and 10.
NOTE Beyond min[] and max[] there are a handful of tools you can use in more specific cases. For example, the creditCard validator verifies that an integer could theoretically be a credit card number. Of course, it doesn't verify with the bank that a particular card exists or that it has any available credit.
Date Validators
jQuery Validation Engine also provides some useful date validation rules. These complement the custom[date] regex you learned about earlier, which verifies that the string follows ISO date format: YYYY-MM-DD. For example, you can use these additional controls to verify that an ISO date is not only valid, but also in the past:
<input type="text" data-validation-engine="validate[custom[date],past[NOW]]">
Here the past[] validator takes the NOW parameter to check this field against the current date (as provided by the browser). As you can see in Figure 6.9, this field triggers an error if the date isn't in the past.
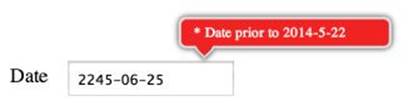
Figure 6.9 This field won't validate because the date isn't in the past.
Similarly, you can also check whether a date is in the future:
<input type="text" data-validation-engine="validate[custom[date],future[NOW]]">
Additionally, you can use your own ISO string with past[] and future[]. For instance, to check that a user was born before 1995, you could either ask them who MC Hammer is or use the following:
<input type="text" data-validation-engine=
"validate[custom[date],past[1995-01-01]]">
Additionally, if you'd like to use a date picker, you can use jQuery Validation Engine in conjunction with the HTML5 form element <input type="date">, which you learned about earlier. However, to avoid any collisions between HTML5 and jQuery validation, make sure to add the novalidate attribute to your form element:
<form novalidate>
<input type="date" data-validation-engine="validate[custom[date],past[NOW]]">
</form>
Conditional Validators
One of the most powerful use cases for jQuery Validation Engine is the variety of conditional validation rules. These validators don't just check a single field; rather, they allow you to establish more complex relationships between different fields in your form.
A simple example is validating that the Password and Confirm password fields match:
<input type="password" name="my-password">
<input type="password" name="confirm-password"
data-validation-engine="validate[equals[my-password]]">
As you can see, the second field uses the equals[] validator to match the field named my-password. Now if the two fields don't match, it throws the error message shown in Figure 6.10. (You find out how to customize the text of error messages later in this chapter.)
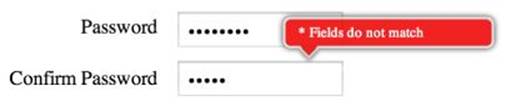
Figure 6.10 These passwords don't match.
Beyond simple matching, you can also compare dates across fields using the past[] and future[] validators with which you're already familiar. For example, let's say you want to validate the dates for a hotel booking. You want to make sure the end date falls after the start date:
<input type="text" name="start-date"
data-validation-engine="validate[future[NOW]]">
<input type="text" name="end-date"
data-validation-engine="validate[future[start-date]]">
Here, the script first checks that the start date is in the future (after all, you wouldn't want to book a hotel for yesterday). Then the end date validates against the start date, producing the error in Figure 6.11 if it isn't in the future.
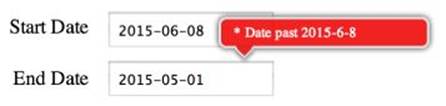
Figure 6.11 The end date is before the start date, which triggers an error.
Beyond these examples, there are also validators that set up required relationships between groups of fields, verify the number of checkboxes a user has checked, and more. Take a look at the documentation: http://posabsolute.github.io/jQuery-Validation-Engine/#validators.
Writing Custom Rules
You can also define your own validators for jQuery Validation Engine, both on the client side and even on the server.
Client Side
To create a validation rule on the client side, first create a function that returns an error message on failure:
function checkFruit(field, rules, i, options){
var fruits = ["apple", "banana", "pear", "orange"];
if (fruits.indexOf(field) == -1) {
return "Must be a piece of fruit";
}
}
This function checks if the field value is in an array of fruit names, returning an error message if it is not. Next, pass a reference to this function into your validation rules using funcCall[]:
<input type="text" data-validation-engine="validate[funcCall[checkFruit]]">
Now, if the user enters a value in this field that isn't in the fruit array, it produces the error shown in Figure 6.12.
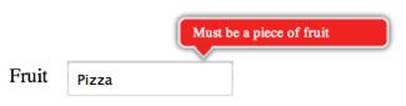
Figure 6.12 Pizza isn't a fruit.
Server Side
With jQuery Validation Engine, you can even establish validation rules that hit a restful API on the server. This ability can be extremely useful in a variety of situations—for example, checking if a username already exists on the system.
First, add an Ajax rule to the translation file (for example, jquery.validationEngine-en.js):
"ajaxUsername": {
"url": "my-api-url",
"extraDataDynamic": ['#my-username'],
"alertText": "* This username is already taken",
"alertTextOk": "All good!",
"alertTextLoad": "* Validating, please wait"
},
This rule defines a few parameters for the Ajax call, such as the URL for the API, the form data to pass in, and various messages. Pay careful attention to extraDataDynamic—that's a list of ID references for the fields you want to pass to your API.
Next, reference this rule as a validator in the markup:
<input type="text" id="my-username"
data-validation-engine="validate[ajax[ajaxUsername]]">
Now jQuery Validation Engine automatically checks this field against the server. This chapter doesn't get into any server-side code here, but your API should return JSON in the following format:
["my-username", false, "No dice"]
In this case, these values represent the following:
· "my-username" is the ID reference for the given field (which enables you to return a nested array if you are validating multiple fields).
· false is a Boolean value for whether the validation passes. In this case it fails.
· "No dice" is an optional error message that overwrites the messaging established in the translation file.
To learn more about the ajax[] validator, see this tutorial: www.position-absolute.com/articles/using-form-ajax-validation-with-the-jquery-validation-engine-plugin/.
NOTE Even though the ajax[] validator hits the server-side, that call is originally from the client, and as such you should have similar security concerns as with any client-side validation. Namely, make sure that you double check any crucial validation using traditional server-side techniques to thwart hackers and browser errors.
Error Messages
jQuery Validation Engine also provides a few ways to customize error messaging, from overwriting default messages to additional language packs. These tools provide significantly more control over error messaging than native HTML5 alternatives.
Modifying Error Messages
You can override the default messaging in jQuery Validation Engine by setting the data-errormessage attribute:
<input type="text" data-validation-engine="validate[required,custom[email]]"
data-errormessage="This is a custom error message">
You can see this custom message in Figure 6.13.

Figure 6.13 The default error message for this field has been overwritten.
Earlier, you learned how overwriting native HTML5 validation messages can be problematic because different errors trigger the same messaging. Fortunately, that isn't as much of a problem in jQuery Validation Engine because you can hook into a few additional error message attributes:
<input type="email" data-validation-engine="validate[required,custom[email]]"
data-errormessage-value-missing="Email is required!"
data-errormessage-custom-error="Let me give you a hint: someone@nowhere.com"
data-errormessage="This is the fall-back error message.">
Here, the script uses data-errormessage-value-missing for problems with the required validation, and data-errormessage-custom-error for problems with any custom regexes. Any other errors default to the message in data-errormessage.
Localization
HTML5 automatically translates error messages into the user's language for native validation. Fortunately, jQuery Validation Engine also provides some linguistic support—simply include the appropriate locale file on the page. For example, to use English, you'd write the following:
<script src="js/jquery.validationEngine-en.js"></script>
<script src="js/jquery.validationEngine.js"></script>
The multi-language support in jQuery Validation Engine is useful; however, localization in native validation is still better for two reasons:
· jQuery Validation Engine provides support for dozens of languages, but browsers support significantly more (two to three times as many depending on the browser).
· While jQuery Validation Engine allows the developer to hard-code a language, native validation localizes to the user's language automatically. However, hard-coding the language can also be a good thing if you're worried about consistency with the other copy on your site.
Summary
In this chapter, you learned a variety of form validation techniques. You first learned how to leverage native HTML5 validation to verify various data types, set the bounds for number values, and define your own regex rules.
Next, you learned how to use jQuery Validation Engine for more robust validation support. You explored the basic regex validators as well as simple validators to constrain number values and dates. Then you leveraged conditional validators to establish more complex relationships between the fields in your form. Finally, you learned how to create your own validators, both on the client and the server, as well as how to customize the messaging.