PROFESSIONAL JAVA FOR WEB APPLICATIONS (2014)
Part III Persisting Data with JPA and Hibernate ORM
Chapter 20 Mapping Entities to Tables with JPA Annotations
IN THIS CHAPTER
· Understanding and working with simple entities
· Designing and utilizing a persistence unit
· How to map complex data types
WROX.COM CODE DOWNLOADS FOR THIS CHAPTER
You can find the wrox.com code downloads for this chapter at http://www.wrox.com/go/projavaforwebapps on the Download Code tab. All the code for this chapter is contained within the following examples:
· Entity-Mappings Project
· Enums-Dates-Lobs Project
NEW MAVEN DEPENDENCIES FOR THIS CHAPTER
In addition to the Maven dependencies introduced in previous chapters, you also need the following Maven dependencies. The Hibernate persistence API and JBoss transaction API transient dependencies are excluded because they conflict with the standard dependencies already declared. The XML API dependency is excluded because it is already part of Java SE 7 and newer. Finally, JBoss Logging is excluded not out of necessity, but out of clarity, because a dependency on a newer version was declared in an earlier chapter.
<dependency>
<groupId>org.eclipse.persistence</groupId>
<artifactId>javax.persistence</artifactId>
<version>2.1.0</version>
<scope>compile</scope>
</dependency>
<dependency>
<groupId>javax.transaction</groupId>
<artifactId>javax.transaction-api</artifactId>
<version>1.2</version>
<scope>compile</scope>
</dependency>
<dependency>
<groupId>org.hibernate</groupId>
<artifactId>hibernate-entitymanager</artifactId>
<version>4.3.1.Final</version>
<scope>runtime</scope>
<exclusions>
<exclusion>
<groupId>org.hibernate.javax.persistence</groupId>
<artifactId>hibernate-jpa-2.1-api</artifactId>
</exclusion>
<exclusion>
<groupId>org.jboss.spec.javax.transaction</groupId>
<artifactId>jboss-transaction-api_1.2_spec</artifactId>
</exclusion>
<exclusion>
<groupId>xml-apis</groupId>
<artifactId>xml-apis</artifactId>
</exclusion>
<exclusion>
<groupId>org.jboss.logging</groupId>
<artifactId>jboss-logging</artifactId>
</exclusion>
</exclusions>
</dependency>
GETTING STARTED WITH SIMPLE ENTITIES
In this chapter, you learn how to map entities to relational database tables using JPA annotations. A vast number of both simple and complex mapping options are available to you, and this chapter attempts to cover most of them. To make understanding this process simpler, you do not use Spring Framework in this chapter. Instead, you use simple Servlets to execute JPA code and persist and list the entities you create. All the examples are contained within the Entity-Mappings project, available for download from the wrox.comcode download site.
ANNOTATION-BASED OR XML-BASED MAPPINGS?
You do not have to use annotations to map entities in your application. Instead, you can use the /META-INF/orm.xml file to create XML-based mappings similar to Hibernate ORM mappings. Showing you how to create both annotation-based and XML mappings would take twice as many pages and is simply not practical. Annotations are the easiest and preferred method for mapping JPA entities, so this book covers only that technique. If you are also interested in learning about XML mappings, the XML mapping elements and their attributes are essentially identical to the mapping annotations and their attributes. A good IDE, such as IntelliJ IDEA, can provide code hints based on the orm.xml XSD. To help you start with this, an empty orm.xml file looks like this:
<?xml version="1.0" encoding="UTF-8"?>
<entity-mappings xmlns="http://xmlns.jcp.org/xml/ns/persistence/orm"
xmlns:xsi="http://www.w3.org/2001/XMLSchema-instance"
xsi:schemaLocation="http://xmlns.jcp.org/xml/ns/persistence/orm
http://xmlns.jcp.org/xml/ns/persistence/orm_2_1.xsd"
version="2.1">
</entity-mappings>
Marking an Entity and Mapping It to a Table
The first two and most basic JPA mapping annotations are @javax.persistence.Entity and @javax.persistence.Table. @Entity marks a class to indicate that it is an entity. Every entity must have this annotation. By default, an entity name is equal to the unqualified entity class name, so the following com.wrox.site.entities.Author class has an entity name of Author.
@Entity
public class Author implements Serializable
{
...
}
You can customize the entity name by specifying the name attribute on the @Entity annotation as on the com.wrox.site.entities.Publisher class.
@Entity(name = "PublisherEntity")
public class Publisher implements Serializable
{
...
}
The table name to which an entity maps defaults is the entity name. So the default table name for Author is Author and the default table name for Publisher is PublisherEntity. You can change the table name using the name attribute of @Table.
@Entity
@Table(name = "Authors")
public class Author implements Serializable
{
...
}
@Entity(name = "PublisherEntity")
@Table(name = "Publishers")
public class Publisher implements Serializable
{
...
}
Now these two classes map to the tables Authors and Publishers, respectively. You have several other things you can do with this annotation as well. For example, you can use the schema attribute to override database connection’s user’s default schema (assuming the database you use supports schemas). You can also use the catalog attribute to indicate that the table exists in a catalog other than the catalog selected in the database connection. In JDBC and JPA, “catalog” is a generic term for a collection of database tables. Most relational database systems use the term “database” instead.
The com.wrox.site.entities.Book entity demonstrates the use of the uniqueConstraints attribute.
@Entity
@Table(name = "Books", uniqueConstraints = {
@UniqueConstraint(name = "Books_ISBN", columnNames = { "isbn" })
})
public class Book implements Serializable
{
...
}
uniqueConstraints is a special attribute used exclusively for schema generation. JPA providers can automatically generate database schema based off of your entities, and this attribute enables you to indicate that a particular column or columns should form a unique constraint. As of JPA 2.1, you can also use the indexes attribute to specify indexes that JPA should create when using schema generation.
@Entity
@Table(name = "Books", uniqueConstraints = {
@UniqueConstraint(name = "Books_ISBNs", columnNames = { "isbn" })
},
indexes = {
@Index(name = "Books_Titles", columnList = "title")
})
public class Book implements Serializable
{
...
}
@Entity
@Table(name = "Authors", indexes = {
@Index(name = "Authors_Names", columnList = "AuthorName")
})
public class Author implements Serializable
{
...
}
@Entity(name = "PublisherEntity")
@Table(name = "Publishers", indexes = {
@Index(name = "Publishers_Names", columnList = "PublisherName")
})
public class Publisher implements Serializable
{
...
}
Of course, because you use uniqueConstraints and indexes only when schema generation is enabled, you have no need to specify them if schema generation is disabled (the default).
WARNING Schema generation is a dangerous feature. Although it’s helpful for development purposes, it should never be used in a production environment. The schema generated by this process is not always pretty and is not guaranteed to be correct. As a best practice, this author never uses schema generation. The development process should also include development of the schema you use in production so that it is tested thoroughly through all stages of product maturity.
Indicating How JPA Uses Entity Fields
By default, JPA providers access the values of entity fields and map those fields to database columns using the entity’s JavaBean property accessor (getter) and mutator (setter) methods. As such, the names and types of the private fields in an entity do not matter to JPA. Instead, JPA looks at only the names and return types of the JavaBean property accessors. You can alter this using the @javax.persistence.Access annotation, which enables you to explicitly specify the access methodology that the JPA provider should employ.
@Entity
@Access(AccessType.FIELD)
public class SomeEntity implements Serializable
{
...
}
The available options for the AccessType enum are PROPERTY (the default) and FIELD. With PROPERTY, the provider gets and sets field values using the JavaBean property methods. FIELD makes the provider get and set field values using the instance fields. As a best practice, you should just stick to the default and use JavaBean properties unless you have a compelling reason to do otherwise.
The rest of the JPA annotations are mostly property annotations. You explore many of these, such as @Id, @Basic, @Temporal, and more, in the rest of this chapter. Technically speaking, you can put these property annotations on either the private fields or the public accessor methods. If you use AccessType.PROPERTY (default) and annotate the private fields instead of the JavaBean accessors, the field names must match the JavaBean property names. However, the names do not have to match if you annotate the JavaBean accessors. Likewise, if you use AccessType.FIELD and annotate the JavaBean accessors instead of the fields, the field names must also match the JavaBean property names. In this case, they do not have to match if you annotate the fields. It’s best to just be consistent and annotate the JavaBean accessors for AccessType.PROPERTY and the fields for AccessType.FIELD — this eliminates any source of confusion.
WARNING You should never mix JPA property annotations and JPA field annotations in the same entity. Doing so results in unspecified behavior and is very likely to cause errors.
Mapping Surrogate Keys
One of the first things you must do when mapping JPA entities is create surrogate keys, also called primary keys or IDs, for those entities. Every entity should have an ID, which can be one field (and thus a single column) or multiple fields (and thus multiple columns). As a result, you have many different approaches for mapping an ID.
Creating Simple IDs
First, you can mark any JavaBean property with @javax.persistence.Id. This annotation can go on the private field or the public accessor method and indicates that the property is the entity’s surrogate key. The property may be any Java primitive, primitive wrapper,String, java.util.Date, java.sql.Date, java.math.BigInteger, or java.math.BigDecimal. Some providers may also eventually support Java 8 Date and Time types for this field; however, at this time none do. (Even so, such use would not be portable.) JPA 2.2 will likely require support for these types.
If your entity class does not have an @Id property, the JPA provider looks for a property named id (with accessor getId and mutator setId) and uses it automatically. This property must also be a primitive, primitive wrapper, String, java.util.Date, java.sql.Date, BigInteger, or BigDecimal.
As a best practice, entity IDs (primary keys) should usually be ints, longs, Integers, Longs, or BigIntegers. Generally speaking, however, using an int or Integer limits the number of entities your table can hold to 2,147,483,647. BigIntegers are tricky to deal with and don’t automatically cast to primitives like wrappers do, and Strings are harder to index and look up than numbers. There are few cases in which a long or Long isn’t appropriate for an entity ID, so this book exclusively uses longs except when demonstrating other types of entity IDs. However you do it, if you have schema generation enabled, the JPA provider automatically creates a primary key constraint for ID columns. You do not need to specify a unique constraint in @Table.
You can, whenever you want, create an entity with an ID that is manually generated and assigned. However, this is rarely desired because it requires extra, repetitive, unnecessary work. Typically, you want your entity IDs to be automatically generated in some manner. You can accomplish this using the @javax.persistence.GeneratedValue annotation. @GeneratedValue enables you to specify a generation strategy and, if necessary, a generator name. For example, the Book and Author entity IDs usejavax.persistence.GenerationType.IDENTITY to indicate that the database column the ID is stored in can generate its own value automatically.
@Entity
...
public class Book implements Serializable
{
...
@Id
@GeneratedValue(strategy = GenerationType.IDENTITY)
public long getId()
{
return this.id;
}
...
}
@Entity
...
public class Author implements Serializable
{
...
@Id
@GeneratedValue(strategy = GenerationType.IDENTITY)
public long getId()
{
return this.id;
}
...
}
This is compatible with MySQL AUTO_INCREMENT columns, Microsoft SQL Server and Sybase IDENTITY columns, PostgreSQL SERIAL and DEFAULT NEXTVAL() columns, Oracle DEFAULT SYS_GUID() columns, and more. You cannot use GenerationType.IDENTITY with databases that do not support the auto-generation of column values, but all the most common relational databases support this.
At the very least, in any database that supports before-insert triggers you can use a trigger to generate a value for a column (a very common technique for Oracle databases using sequences), and that column becomes compatible with GenerationType.IDENTITY. However, you can use other generators so that you don’t have to employee triggers and trickery to accomplish this. Because many databases such as Oracle and PostgreSQL support sequences, you can use @GeneratedValue combined with@javax.persistence.SequenceGenerator to tell the JPA provider to generate the value using a sequence.
@Entity
public class SomeEntity implements Serializable
{
...
@Id
@GeneratedValue(strategy = GenerationType.SEQUENCE,
generator = "SomeEntityGenerator")
@SequenceGenerator(name = "SomeEntityGenerator",
sequenceName = "SomeEntitySequence")
public long getId()
{
return this.id;
}
...
}
The generator attribute of @GeneratedValue corresponds with the name attribute of @SequenceGenerator, and generator names are global. This means that you can create a single @SequenceGenerator on one entity and reuse it for multiple entities. (However, you may also use a separate sequence for each entity.)
@Entity
public class SomeEntity implements Serializable
{
...
@Id
@GeneratedValue(strategy = GenerationType.SEQUENCE,
generator = "GlobalGenerator")
@SequenceGenerator(name = "GlobalGenerator", sequenceName = "GlobalSequence",
allocationSize = 1)
public long getId()
{
return this.id;
}
...
}
@Entity
public class AnotherEntity implements Serializable
{
...
@Id
@GeneratedValue(strategy = GenerationType.SEQUENCE,
generator = "GlobalGenerator")
public long getId()
{
return this.id;
}
...
}
Alternatively, you can create a generator that multiple entities share using the <sequence-generator> element in orm.xml.
<?xml version="1.0" encoding="UTF-8"?>
<entity-mappings xmlns="http://xmlns.jcp.org/xml/ns/persistence/orm"
xmlns:xsi="http://www.w3.org/2001/XMLSchema-instance"
xsi:schemaLocation="http://xmlns.jcp.org/xml/ns/persistence/orm
http://xmlns.jcp.org/xml/ns/persistence/orm_2_1.xsd"
version="2.1">
<sequence-generator name="GlobalGenerator" sequence-name="GlobalSequence"
allocation-size="1" />
</entity-mappings>
@Entity
public class SomeEntity implements Serializable
{
...
@Id
@GeneratedValue(strategy = GenerationType.SEQUENCE,
generator = "GlobalGenerator")
public long getId()
{
return this.id;
}
...
}
@Entity
public class AnotherEntity implements Serializable
{
...
@Id
@GeneratedValue(strategy = GenerationType.SEQUENCE,
generator = "GlobalGenerator")
public long getId()
{
return this.id;
}
...
}
Using @SequenceGenerator (or <sequence-generator>), you can specify the schema and catalog attributes to specify which schema and database the sequence belongs to. If you enable JPA schema generation, you can also use initialValue (initial-value) and allocationSize(allocation-size) to indicate the sequence’s initial value and to specify how much it increases with each insert operation. initialValue defaults to 0, and allocationSize defaults to 50.
You can also use a @javax.persistence.TableGenerator, as demonstrated in Publisher, to use a separate table that acts as a database sequence. Like @SequenceGenerator, you can also create a @TableGenerator (or <table-generator>) that multiple entities share.@TableGenerator has the same name, schema, catalog, initialValue, and allocationSize attributes that @SequenceGenerator provides, with the same purposes and defaults. Its other attributes are as follows:
· table indicates the name of the generator database table.
· pkColumnName indicates the name of the primary key column for the generator table.
· pkColumnValue indicates the value of the primary key column for this generator.
· valueColumnName indicates the name of the value column.
Before inserting a record, the provider selects the value for the given pkColumnValue from the sequence table, increments the value for that record, and then uses the value as the primary key for the record being inserted.
...
public class Publisher implements Serializable
{
...
@Id
@GeneratedValue(strategy = GenerationType.TABLE,
generator = "PublisherGenerator")
@TableGenerator(name = "PublisherGenerator", table = "SurrogateKeys",
pkColumnName = "TableName", pkColumnValue = "Publishers",
valueColumnName = "KeyValue", initialValue = 11923,
allocationSize = 1)
public long getId()
{
return this.id;
}
...
}
The default values for table, pkColumnName, pkColumnValue, and valueColumnName are not mandated in the specification and may vary from one provider to the next. For example, if you omit pkColumnValue, Hibernate ORM uses the entity table name as the value, whereas EclipseLink uses the generator name. Relying on these default values is not portable. If you care about the name of the table, the name of its columns, and the values of its primary key column, you should specify a different @TableGenerator on every entity. If you don’t care, you can omit the @TableGenerator annotation completely and use @GeneratedValue(strategy = GenerationType.TABLE) only. This results in the provider creating a single table for all your GenerationType.TABLE entities and a separate row in the table for each entity.
The common use case for @TableGenerator is using JPA with an existing, legacy database. Usually, identity and sequence IDs are sufficient for all purposes. If you prefer, you may place @SequenceGenerator or @TableGenerator on an entity class as opposed to the property or field. However, you must always place @GeneratedValue on the property or field.
Creating Composite IDs
Composite IDs consisting of multiple fields and columns are more challenging to map than standard surrogate keys. You can take one of two different approaches to define composite IDs. The first technique involves using multiple @Id properties combined with@javax.persistence.IdClass. The separate class specified in the @IdClass annotation must contain properties that match all the @Id properties on the entity class.
public class JoinTableCompositeId implements Serializable
{
private long fooParentTableSk;
private long barParentTableSk;
public long getFooParentTableSk() { ... }
public void setFooParentTableSk(long fooParentTableSk) { ... }
public long getBarParentTableSk() { ... }
public void setBarParentTableSk(long barParentTableSk) { ... }
}
@Entity
@Table(name = "SomeJoinTable")
@IdClass(JoinTableCompositeId.class)
public class JoinTableEntity implements Serializable
{
private long fooParentTableSk;
private long barParentTableSk;
...
@Id
public long getFooParentTableSk() { ... }
public void setFooParentTableSk(long fooParentTableSk) { ... }
@Id
public long getBarParentTableSk() { ... }
public void setBarParentTableSk(long barParentTableSk) { ... }
...
}
Looking at this, you may immediately wonder what the point of the JoinTableCompositeId class is. After all, can’t the JPA provider just use the two @Id columns to persist entities without a class with redundant properties? Well, yes, but then how would you look up an entity by its ID? When looking up an entity by its ID, you use the find method on the javax.persistence.EntityManager:
JoinTableEntity entity = entityManager.find(JoinTableEntity.class, id);
The find method doesn’t accept multiple ID arguments. It accepts only one ID argument, so you must create a JoinTableCompositeId instance with which to locate the entity:
JoinTableCompositeId compositeId = new JoinTableCompositeId();
compositeId.setFooParentTableSk(id1);
compositeId.setBarParentTableSk(id2);
JoinTableEntity entity = entityManager.find(JoinTableEntity.class, compositeId);
The @IdClass solution might seem a bit clunky to you because of the duplicate properties on the classes, and indeed that’s a legitimate concern. The alternative to @Id and @IdClass is using @javax.persistence.EmbeddedId with @javax.persistence.Embedded to embed the composite ID class as the ID property.
@Embeddable
public class JoinTableCompositeId implements Serializable
{
private long fooParentTableSk;
private long barParentTableSk;
public long getFooParentTableSk() { ... }
public void setFooParentTableSk(long fooParentTableSk) { ... }
public long getBarParentTableSk() { ... }
public void setBarParentTableSk(long barParentTableSk) { ... }
}
@Entity
@Table(name = "SomeJoinTable")
public class JoinTableEntity implements Serializable
{
private JoinTableCompositeId id;
@EmbeddedId
public JoinTableCompositeId getId() { ... }
public void setId(JoinTableCompositeId id) { ... }
}
This solution may be a lot more palatable to you, and as such it is a much more common approach to composite IDs. Whichever technique you use, you should map the fooParentTableSk and barParentTableSk properties to the appropriate database columns using the mapping annotations you learn about throughout this chapter — such as @Column, @Basic, @Enumerated, @Temporal, and @Convert. You should place the mapping annotations on the composite ID class properties for the @Embeddable solution and on the entity class properties for the @IdClass solution. You learn more about @Embeddable and its other uses in Chapter 24.
Using Basic Data Types
To make your life easier, JPA automatically maps certain data types without any further instruction from you. If any properties are found on an entity (or fields if using AccessType.FIELD) with the following types, they are automatically mapped as basic properties to standard SQL data types. Some providers coerce these basic data types to other SQL data types as well.
· Properties of type short and Short are mapped to SMALLINT, INTEGER, BIGINT, or equivalent fields.
· int and Integer properties are mapped to INTEGER, BIGINT, or equivalent SQL data types.
· long, Long, and BigInteger properties are mapped to BIGINT or equivalent fields.
· Properties of type float, Float, double, Double, and BigDecimal are mapped to DECIMAL or equivalent SQL data types.
· byte and Byte properties are mapped to BINARY, SMALLINT, INTEGER, BIGINT, or equivalent fields.
· Properties of type char and Char are mapped to CHAR, VARCHAR, BINARY, SMALLINT, INTEGER, BIGINT, or equivalent fields.
· Properties of type boolean and Boolean are mapped to BOOLEAN, BIT, SMALLINT, INTEGER, BIGINT, CHAR, VARCHAR, or equivalent fields.
· byte[] and Byte[] properties are mapped to BINARY, VARBINARY, or equivalent SQL data types.
· char[], Character[], and String properties are mapped to CHAR, VARCHAR, BINARY, VARBINARY, or equivalent SQL data types.
· Properties of type java.util.Date and Calendar are mapped to DATE, DATETIME, or TIME fields, but you must supply additional instructions using @Temporal. In the “Mapping Complex Data Types” section, you learn about this and how to better control how these values are stored.
· Properties of type java.sql.Timestamp are always mapped to DATETIME fields.
· Properties of type java.sql.Date are always mapped to DATE fields.
· Properties of type java.sql.Time are always mapped to TIME fields.
· Enum properties are mapped to SMALLINT, INTEGER, BIGINT, CHAR, VARCHAR, or equivalent fields. By default enums are stored in their ordinal form, but you can alter this behavior using @Enumerated. You explore that more in the section “Mapping Complex Data Types.”
· Any other properties implementing Serializable are mapped to VARBINARY or equivalent SQL data types and converted using standard Java serialization and deserialization.
If you want to more explicitly indicate that a field is mapped, you can annotate it with @Basic. All the same data type restrictions and rules apply for @Basic properties and fields. You can also use the annotation’s fetch attribute to indicate whether a property’s value is retrieved from the database eagerly (javax.persistence.FetchType.EAGER, the default if not specified) or only when accessed (FetchType.LAZY).
Eager fetching means the field value is retrieved from the database at the same time the entity is retrieved from the database. This may or may not involve additional SQL statements, depending on whether the field value resides in a different table. Lazy fetching causes the provider to retrieve the value only when the field is accessed — it is not retrieved when the entity is initially retrieved. Not specifying the fetch attribute (or explicitly specifying FetchType.EAGER) is a requirement that the provider fetch the value eagerly. However, specifying FetchType.LAZY is only a hint to fetch the value lazily. The provider may not support lazy access and may fetch the value eagerly anyway. As such, you should consult your provider’s documentation before relying on this feature. You learn more about lazy fetching in Chapter 24.
Finally, you can use @Basic’s optional attribute to indicate that the property may be null. (This is only a hint and is useful for schema generation.) This is ignored for primitives, which may never be null. The completed Book entity in Listing 20-1 demonstrates the usage of @Basic.
LISTING 20-1: Book.java
@Entity
@Table(name = "Books", uniqueConstraints = {
@UniqueConstraint(name = "Books_ISBNs", columnNames = { "isbn" })
},
indexes = {
@Index(name = "Books_Titles", columnList = "title")
})
public class Book implements Serializable
{
private long id;
private String isbn;
private String title;
private String author;
private double price;
private String publisher;
@Id
@GeneratedValue(strategy = GenerationType.IDENTITY)
public long getId()
{
return this.id;
}
public void setId(long id)
{
this.id = id;
}
@Basic(optional = false)
public String getIsbn()
{
return this.isbn;
}
public void setIsbn(String isbn)
{
this.isbn = isbn;
}
@Basic(optional = false)
public String getTitle()
{
return this.title;
}
public void setTitle(String title)
{
this.title = title;
}
@Basic(optional = false)
public String getAuthor()
{
return this.author;
}
public void setAuthor(String author)
{
this.author = author;
}
@Basic
public double getPrice()
{
return this.price;
}
public void setPrice(double price)
{
this.price = price;
}
@Basic(optional = false)
public String getPublisher()
{
return this.publisher;
}
public void setPublisher(String publisher)
{
this.publisher = publisher;
}
}
Specifying Column Names and Other Details
By default, JPA maps entity properties to columns with the same name. Referring to the Book entity in Listing 20-1, the id, isbn, title, author, price, and publisher properties are automatically mapped to database columns named Id, Isbn, Title, Author, Price, and Publisher, respectively. However, this is not always wanted and sometimes the column names must be different for any number of reasons. Using the @javax.persistence.Column annotation you can customize the column name and more to fine-tune how the JPA provider persists values to that property’s column. @Column has many attributes that serve a variety of purposes, several of them related to JPA schema generation.
The name attribute indicates to which database column the property is mapped. It is closely related to the table attribute, which specifies the table that the column exists in, and defaults to the primary table for the entity. You use this when an entity is stored in multiple tables (something you explore more in Chapter 24). The boolean attributes insertable and updatable indicate whether the property value is persisted on insert and update, respectively. Both default to true. The rest of @Column’s attributes are for schema generation. nullable specifies whether the column should be NULL or NOT NULL and defaults to true (NULL). unique is a shortcut for the @UniqueConstraint annotation, useful when the unique constraint contains only one column and you don’t care what the constraint’s name is. It is false (non-unique) by default.
The length attribute, used only for VARBINARY and VARCHAR columns, indicates how long the column should be and defaults to 255. The scale and precision attributes both default to 0 and indicate the scale (number of digits before the decimal point) and precision (number of digits after the decimal point) for decimal columns. You must provide a nonzero value for precision for decimal columns if you use schema generation. Finally, columnDefinition provides a way to specify the actual SQL used to generate the column. If you use this, it will likely not be portable across different database systems.
The completed entity Author in Listing 20-2 demonstrates @Column for changing the default column name for its properties. Publisher in Listing 20-3 also demonstrates the schema generation attribute nullable, which is ignored unless schema generation is enabled.
LISTING 20-2: Author.java
@Entity
@Table(name = "Authors", indexes = {
@Index(name = "Authors_Names", columnList = "AuthorName")
})
public class Author implements Serializable
{
private long id;
private String name;
private String emailAddress;
@Id
@GeneratedValue(strategy = GenerationType.IDENTITY)
@Column(name = "AuthorId")
public long getId()
{
return this.id;
}
public void setId(long id)
{
this.id = id;
}
@Basic
@Column(name = "AuthorName")
public String getName()
{
return this.name;
}
public void setName(String name)
{
this.name = name;
}
@Basic
public String getEmailAddress()
{
return this.emailAddress;
}
public void setEmailAddress(String emailAddress)
{
this.emailAddress = emailAddress;
}
}
LISTING 20-3: Publisher.java
@Entity(name = "PublisherEntity")
@Table(name = "Publishers", indexes = {
@Index(name = "Publishers_Names", columnList = "PublisherName")
})
public class Publisher implements Serializable
{
private long id;
private String name;
private String address;
@Id
@GeneratedValue(strategy = GenerationType.TABLE,
generator = "PublisherGenerator")
@TableGenerator(name = "PublisherGenerator", table = "SurrogateKeys",
pkColumnName = "TableName", pkColumnValue = "Publishers",
valueColumnName = "KeyValue", initialValue = 11923,
allocationSize = 1)
@Column(name = "PublisherId")
public long getId()
{
return this.id;
}
public void setId(long id)
{
this.id = id;
}
@Basic
@Column(name = "PublisherName", nullable = false)
public String getName()
{
return this.name;
}
public void setName(String name)
{
this.name = name;
}
@Basic
@Column(nullable = false)
public String getAddress()
{
return this.address;
}
public void setAddress(String address)
{
this.address = address;
}
}
CREATING AND USING A PERSISTENCE UNIT
Now that you have created and mapped some entities, you are almost ready to use those entities. You still need to create the database tables and configure the JPA provider, and then you can write code that uses the persistence API to persist and retrieve your entities.
Designing the Database Tables
![]() For this exercise you need to use MySQL Workbench or your SQL data tool of choice to create a database and several tables. You can find the schema definition statements in this section in the create.sql file of the Entity-Mappings project you downloaded from the wrox.com code download site. Open Workbench and log in to your local server using the root user.
For this exercise you need to use MySQL Workbench or your SQL data tool of choice to create a database and several tables. You can find the schema definition statements in this section in the create.sql file of the Entity-Mappings project you downloaded from the wrox.com code download site. Open Workbench and log in to your local server using the root user.
![]() Create a database named EntityMappings by entering the following SQL statement in the query editor and clicking the execute icon.
Create a database named EntityMappings by entering the following SQL statement in the query editor and clicking the execute icon.
CREATE DATABASE EntityMappings DEFAULT CHARACTER SET 'utf8'
DEFAULT COLLATE 'utf8_unicode_ci';
This database uses the character set utf8 and the collation utf8_unicode_ci. You should use this in almost all circumstances. These values are the optimum values for correctly storing and retrieving character data from any language. If you need to override these values, you can set character sets and collations individually on tables and columns, but you’ll rarely need to use something other than these two. After you create the database, you then need to create the three tables for the Book, Author, and Publisher entities. Remember that you pluralized the table names using the @Table annotation.
USE EntityMappings;
CREATE TABLE Publishers (
PublisherId BIGINT UNSIGNED NOT NULL PRIMARY KEY,
PublisherName VARCHAR(100) NOT NULL,
Address VARCHAR(1024) NOT NULL,
INDEX Publishers_Names (PublisherName)
) ENGINE = InnoDB;
CREATE TABLE Authors (
AuthorId BIGINT UNSIGNED NOT NULL PRIMARY KEY AUTO_INCREMENT,
AuthorName VARCHAR(100) NOT NULL,
EmailAddress VARCHAR(255) NOT NULL,
INDEX Publishers_Names (AuthorName)
) ENGINE = InnoDB;
CREATE TABLE Books (
Id BIGINT UNSIGNED NOT NULL PRIMARY KEY AUTO_INCREMENT,
Isbn VARCHAR(13) NOT NULL,
Title VARCHAR(255) NOT NULL,
Author VARCHAR(100) NOT NULL,
Price DECIMAL(6,2) NOT NULL,
Publisher VARCHAR(100) NOT NULL,
UNIQUE KEY Books_ISBNs (Isbn),
INDEX Books_Titles (Title)
) ENGINE = InnoDB;
There is nothing special about these tables. They contain very simple columns that cleanly correlate to the entity property names and data types. The key here is that you write your code first and design a database that supports your code. This is the preferred approach when designing most types of applications because creating your database first can result in forcing your code to adhere to the database. What matters the most is that the application does what the user needs, and that happens in code. JPA makes it really simple to create entities and then create a database that merely supports those entities.
Finally, recall that you told JPA to use a table generator for the Publisher surrogate key, so you need to create the appropriate generator table to support this requirement.
USE EntityMappings;
CREATE TABLE SurrogateKeys (
TableName VARCHAR(64) NOT NULL PRIMARY KEY,
KeyValue BIGINT UNSIGNED NOT NULL,
INDEX SurrogateKeys_Table_Values (TableName, KeyValue)
) ENGINE = InnoDB;
That’s all there is to it. The database is created and ready to use for persisting your entities. You need only create a <Resource> in Tomcat’s conf/context.xml file (as a child element of the root <Context> element) to give you a way to access the database from a web application.
<Resource name="jdbc/EntityMappings" type="javax.sql.DataSource"
maxActive="20" maxIdle="5" maxWait="10000"
username="tomcatUser" password="password1234"
driverClassName="com.mysql.jdbc.Driver"
url="jdbc:mysql://localhost/EntityMappings" />
Understanding Persistence Unit Scope
A persistence unit is a configuration and a set of entity classes logically grouped together. This configuration controls the javax.persistence.EntityManager instances attached to the persistence unit, and an EntityManager in a particular persistence unit can manage onlythe entities defined in that persistence unit. For example, given two persistence units Foo and Bar, an EntityManager instantiated for persistence unit Foo can manage only the entities defined in persistence unit Foo. It cannot manage the entities defined only in Bar. However, it’s possible to define an entity in multiple persistence units. If an entity is defined in both Foo and Bar, an EntityManager instantiated for persistence unit Foo or Bar can access the entity.
You can define one or more persistence units within a file named persistence.xml. You must place this file (and orm.xml if you choose to map your entities with XML) in a META-INF directory. But in which META-INF directory should you place them? As you likely know, a web application can have many different META-INF directories, for example:
mappings.war!/META-INF
mappings.war!/WEB-INF/classes/META-INF
mappings.war!/WEB-INF/lib/something.jar!/META-INF
The first example is the web application META-INF directory. Unlike other META-INF directories, this directory is not on the classpath. You cannot access its contents using classpath resource location. This directory is exclusively for files that the Servlet container uses. For example, you can place a context.xml file in this directory and put Tomcat <Resource> definitions within it. (However, this works only for Tomcat, not for other containers.) You cannot, however, put orm.xml or persistence.xml in this directory because the JPA provider cannot find them there.
The JPA provider can find persistence files in the /WEB-INF/classes/META-INF directory and in the META-INF directories of any JAR files on the classpath. Where you place your persistence.xml file determines the persistence unit scope. The most important thing to understand about the persistence unit scope is that persistence.xml and orm.xml share the same scope, so you should always place them in the same META-INF directory if you use orm.xml.
The scope defines what code can access the persistence unit. A persistence unit is visible to the defining component and the components it defines. Generally speaking (though some providers are more lax), if you define a persistence unit in /WEB-INF/classes/META-INF/persistence.xml, it is visible to the application classes and to any components (JAR file classes) included in /WEB-INF/lib. If you define a persistence unit in META-INF/persistence.xml within a JAR file in /WEB-INF/lib, it is visible only to the code in that JAR file. Likewise, a persistence unit defined at the top level of an EAR file is visible to all components (WAR files, application JAR files, or EJB-JAR files) of that EAR, but persistence units defined within the components of that EAR are not visible to other components or to the EAR itself.
When defining a persistence unit in a WAR file, you typically want to place that persistence unit in /WEB-INF/classes/META-INF/persistence.xml. It is especially important to do this in a container that does not provide a JPA implementation, such as Tomcat (which is just a Servlet container and not a full Java EE application server). In these cases you have to provide your own JPA implementation (in this book you use Hibernate ORM, remember) and that implementation, embedded within a JAR of your application, acts more like a standalone application than a web application within a persistence container.
Creating the Persistence Configuration
To use the entities you create, you must define a persistence unit. Doing so is simple. Create a persistence.xml file not dissimilar from a deployment descriptor, but with far fewer options to worry about. The root element of a persistence configuration file is<persistence>. This element may contain one or more <persistence-unit> elements. No other elements are within <persistence>. <persistence-unit> has two attributes: name specifies the name of the persistence unit and transaction-type indicates whether this persistence unit uses Java Transaction API (JTA) transactions or standard local transactions.
You must specify a name, which is how you locate the persistence unit in code. If not specified, transaction-type defaults to JTA in a Java EE application server and RESOURCE_LOCAL in a Java SE environment or simple Servlet container. However, to prevent unexpected behavior it’s best to always set this value explicitly instead of relying on a default value.
NOTE The Java Transaction API, like JPA, is part of the Java EE stack. JTA is a transaction-processing monitor that coordinates transactions across multiple resources, such as a database and an application messaging system (JMS, AMQP, and so on). JTA is mentioned further in Chapters 21 and 22.
<persistence-unit> contains the following inner elements. None of them are required (so <persistence-unit> may be empty); however, you must specify whichever elements you use in the following order:
· <description> contains a useful description for this persistence unit. Although it makes reading the persistence file easier, it has no semantic value.
· <provider> specifies the fully qualified class name of the javax.persistence.spi.PersistenceProvider implementation used for this persistence unit. By default, when you look up the persistence unit, the API will use the first JPA provider on the classpath. You can include this element to mandate a specific JPA provider.
· You can use either <jta-data-source> or <non-jta-data-source> (but not both) to use a JNDI DataSource resource. You may use <jta-data-source> only if transaction-type is JTA; likewise you may use <non-jta-data-source> only if transaction-type is RESOURCE_LOCAL. Specifying a DataSource causes the persistence unit to use that DataSource for all entity operations.
· <mapping-file> specifies the classpath-relative path to an XML mapping file. If you don’t specify any <mapping-file>, the provider looks for orm.xml. You may specify multiple <mapping-file> elements to use multiple mapping files.
· You can use one or more <jar-file> elements to specify a JAR file or JAR files that the JPA provider should scan for mapping-annotated entities. Any @Entity, @Embeddable, @javax.persistence.MappedSuperclass, or @javax.persistence.Converter classes found are added to the persistence unit.
· You can use one or more <class> elements to indicate specific @Entity, @Embeddable, @MappedSuperclass, or @Converter classes that should be added to the persistence unit. You must annotate the class or classes with JPA annotations.
· Using <exclude-unlisted-classes /> or <exclude-unlisted-classes>true</exclude-unlisted-classes> indicates that the provider should ignore classes not specified with <jar-file> or <class>. Omitting <exclude-unlisted-classes> or using <exclude-unlisted-classes>false</exclude-unlisted-classes> causes the JPA provider to scan the classpath location of the persistence file for JPA-annotated classes. If persistence.xml is located in a JAR file, that JAR file (and only that JAR file) is scanned for classes. Ifpersistence.xml is located in a directory-based classpath location (such as /WEB-INF/classes), that directory (and only that directory) is scanned for classes. Prior to Hibernate 4.3.0 and Spring Framework 3.2.5, specifying this element with the value false was incorrectly interpreted as true.
· <shared-cache-mode> indicates how entities are cached in the persistence unit (if the JPA provider supports caching, which is optional). NONE disables caching, whereas ALL enables caching for all entities. ENABLE_SELECTIVE means that only entities annotated@javax.persistence.Cacheable or @Cacheable(true) (or marked as cacheable in orm.xml) are cached. DISABLE_SELECTIVE results in caching of all entities except those annotated @Cacheable(false) (or marked as non-cacheable in orm.xml). The default value, UNSPECIFIED, means that the JPA provider decides what the effective default is. Hibernate ORM defaults to ENABLE_SELECTIVE, but relying on this is not portable.
· <validation-mode> indicates if and how Bean Validation should be applied to entities. NONE means that Bean Validation is not enabled, whereas CALLBACK makes the provider validate all entities on insert, update, and delete. AUTO has an effective value of CALLBACK if a Bean Validation provider exists on the classpath and an effective value of NONE if no Bean Validation provider exists on the classpath. If you enable validation, the JPA provider configures a new Validator to validate your entities. If you have configured a special Spring Framework Validator with your custom localized error codes, the JPA provider ignores it. As such, it’s best to set the validation mode to NONE and use Bean Validation before your persistence layer is invoked.
· <properties> provides a way to specify other JPA properties, including standard JPA properties (such as JDBC connection string, username, and password, or schema generation settings) as well as provider-specific properties (such as Hibernate settings). You specify one or more properties using nested <property> elements, each with a name and value attribute.
The persistence.xml file in the Entity-Mappings project, shown next, mandates Hibernate ORM as the JPA provider, uses the DataSource resource you created in the Tomcat context.xml file, explicitly enables scanning of all classes in /WEB-INF/classes for entity annotations, enables caching only for annotated entities, and disables Bean Validation. It also contains a property to ensure that schema generation is disabled (just in case).
<?xml version="1.0" encoding="UTF-8"?>
<persistence xmlns="http://xmlns.jcp.org/xml/ns/persistence"
xmlns:xsi="http://www.w3.org/2001/XMLSchema-instance"
xsi:schemaLocation="http://xmlns.jcp.org/xml/ns/persistence
http://xmlns.jcp.org/xml/ns/persistence/persistence_2_1.xsd"
version="2.1">
<persistence-unit name="EntityMappings" transaction-type="RESOURCE_LOCAL">
<provider>org.hibernate.jpa.HibernatePersistenceProvider</provider>
<non-jta-data-source>
java:/comp/env/jdbc/EntityMappings
</non-jta-data-source>
<exclude-unlisted-classes>false</exclude-unlisted-classes>
<shared-cache-mode>ENABLE_SELECTIVE</shared-cache-mode>
<validation-mode>NONE</validation-mode>
<properties>
<property name="javax.persistence.schema-generation.database.action"
value="none" />
</properties>
</persistence-unit>
</persistence>
Using the Persistence API
Using the persistence API is quite easy. Most of the code is spent handling transactions and resources. Saving and retrieving entities is simple. The EntityServlet adds and displays entities using the persistence API. The first things you should look at are the init anddestroy methods, which, respectively, create a javax.persistence.EntityManagerFactory on startup and close it on shutdown.
@WebServlet(
name = "entityServlet",
urlPatterns = "/entities",
loadOnStartup = 1
)
public class EntityServlet extends HttpServlet
{
private final Random random;
private EntityManagerFactory factory;
public EntityServlet()
{
try
{
this.random = SecureRandom.getInstanceStrong();
}
catch(NoSuchAlgorithmException e)
{
throw new IllegalStateException(e);
}
}
@Override
public void init() throws ServletException
{
super.init();
this.factory = Persistence.createEntityManagerFactory("EntityMappings");
}
@Override
public void destroy()
{
super.destroy();
this.factory.close();
}
...
}
The createEntityManagerFactory method obtains the persistence unit named EntityMappings from the configuration in persistence.xml and creates a new EntityManagerFactory for that persistence unit. In a full Java EE application server, you wouldn’t have to perform these extra steps. Instead, you could do something like this:
public class EntityServlet extends HttpServlet
{
private final Random random;
@PersistenceContext("EntityMappings")
EntityManagerFactory factory;
...
}
This tells the container to create and inject the EntityManagerFactory for you. However, this won’t work unless the container provides JPA and dependency injection, which Tomcat does not. In the next chapter you learn how to simplify this using Spring Framework tools.
The EntityServlet responds to GET and POST requests. For GET requests, it queries entities and displays them using /WEB-INF/jsp/view/entities.jsp. First, it creates an EntityManager and starts a transaction through that manager. It then uses thejavax.persistence.criteria.CriteriaBuilder, javax.persistence.criteria.CriteriaQuery, and javax.persistence.TypedQuery to list all the Publishers, Authors, and Books, taking care to commit the transaction and close the manager when it’s through, and roll back the transaction if an error occurs.
@Override
public void doGet(HttpServletRequest request, HttpServletResponse response)
throws ServletException, IOException
{
EntityManager manager = null;
EntityTransaction transaction = null;
try
{
manager = this.factory.createEntityManager();
transaction = manager.getTransaction();
transaction.begin();
CriteriaBuilder builder = manager.getCriteriaBuilder();
CriteriaQuery<Publisher> q1 = builder.createQuery(Publisher.class);
request.setAttribute("publishers", manager.createQuery(
q1.select(q1.from(Publisher.class))
).getResultList());
CriteriaQuery<Author> q2 = builder.createQuery(Author.class);
request.setAttribute("authors", manager.createQuery(
q2.select(q2.from(Author.class))
).getResultList());
CriteriaQuery<Book> q3 = builder.createQuery(Book.class);
request.setAttribute("books", manager.createQuery(
q3.select(q3.from(Book.class))
).getResultList());
transaction.commit();
request.getRequestDispatcher("/WEB-INF/jsp/view/entities.jsp")
.forward(request, response);
}
catch(Exception e)
{
if(transaction != null && transaction.isActive())
transaction.rollback();
e.printStackTrace(response.getWriter());
}
finally
{
if(manager != null && manager.isOpen())
manager.close();
}
}
For POST requests, EntityServlet persists a new Publisher, a new Author, and a new Book. Of course, the values are all very mundane and repetitive because they aren’t based on user input, but the demonstration is clear: Using JPA is easy. As with doGet, doPost also starts, commits, and rolls back a transaction as necessary.
@Override
public void doPost(HttpServletRequest request, HttpServletResponse response)
throws ServletException, IOException
{
EntityManager manager = null;
EntityTransaction transaction = null;
try
{
manager = this.factory.createEntityManager();
transaction = manager.getTransaction();
transaction.begin();
Publisher publisher = new Publisher();
publisher.setName("John Wiley & Sons");
publisher.setAddress("1234 Baker Street");
manager.persist(publisher);
Author author = new Author();
author.setName("Nicholas S. Williams");
author.setEmailAddress("nick@example.com");
manager.persist(author);
Book book = new Book();
book.setIsbn("" + this.random.nextInt(Integer.MAX_VALUE));
book.setTitle("Professional Java for Web Applications");
book.setAuthor("Nicholas S. Williams");
book.setPublisher("John Wiley & Sons");
book.setPrice(59.99D);
manager.persist(book);
transaction.commit();
response.sendRedirect(request.getContextPath() + "/entities");
}
catch(Exception e)
{
if(transaction != null && transaction.isActive())
transaction.rollback();
e.printStackTrace(response.getWriter());
}
finally
{
if(manager != null && manager.isOpen())
manager.close();
}
}
To test the project, follow these steps:
1. Compile it and start Tomcat from your IDE. Go to http://localhost:8080/mappings/entities in your browser of choice, and click the Add More Entities button a few times.
2. Shut down Tomcat and start it back up.
3. Go back to http://localhost:8080/mappings/entities and the entities should still be there, persisted between instances of the virtual machine.
4. ![]()
![]() Now open MySQL Workbench and execute the following statements, as shown in Figure 20-1. Take a look at each result tab, and you can see the values that Hibernate ORM inserted into your database tables.
Now open MySQL Workbench and execute the following statements, as shown in Figure 20-1. Take a look at each result tab, and you can see the values that Hibernate ORM inserted into your database tables.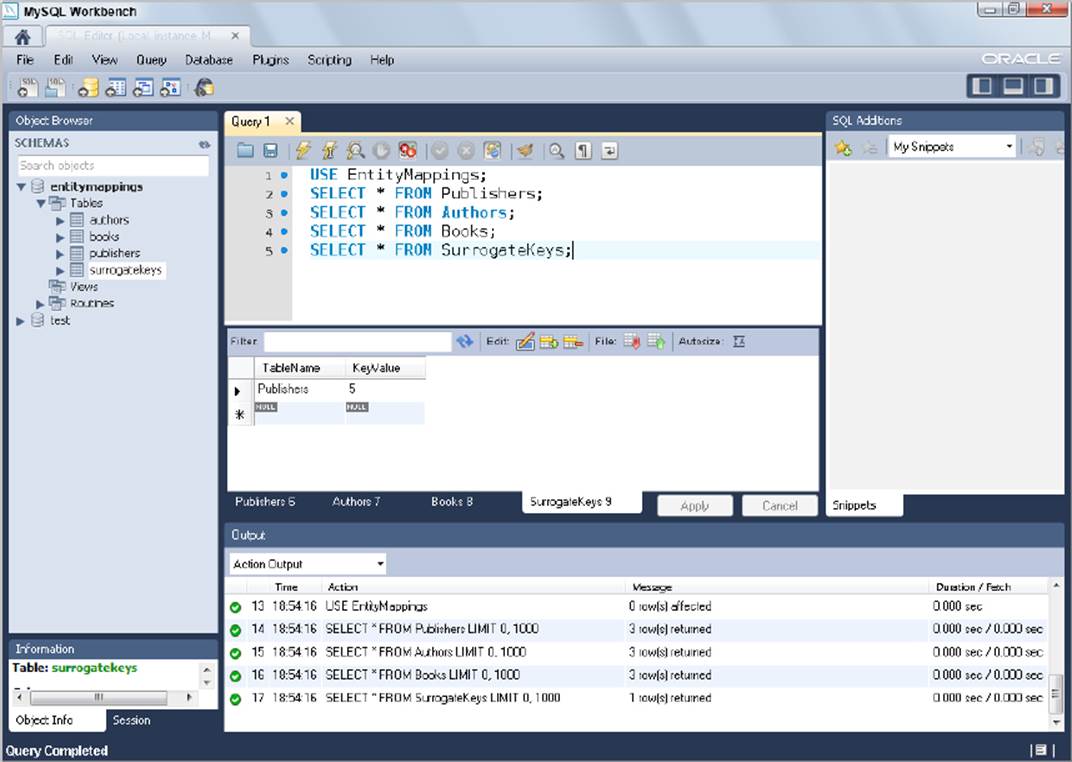
FIGURE 20-1
USE EntityMappings;
SELECT * FROM Publishers;
SELECT * FROM Authors;
SELECT * FROM Books;
SELECT * FROM SurrogateKeys;
MAPPING COMPLEX DATA TYPES
You should have a reasonable grasp on the basics of mapping entities by this point, but you still have some missing pieces. In this section, you learn how to properly map complex data types, such as enums, dates, times, and large objects. You explore even more advanced mapping tasks (such as inheritance, nested entities, and custom data types) in Chapter 24. For this section you use the Enums-Dates-Lobs project available for download from the wrox.com code download site. This project extends the Entity-Mappings project you worked on earlier in the chapter, and the code in this section represents additions to that project.
Using Enums as Entity Properties
As discussed earlier, a JPA provider can automatically persist entity properties that are enums without any special configuration. However, the standard way that enums are persisted may not be what you want. Consider the following Gender enum:
public enum Gender
{
MALE,
FEMALE,
UNSPECIFIED
}
The Author entity has a gender property of type Gender that indicates the author’s gender.
...
public class Author implements Serializable
{
...
private Gender gender;
...
public Gender getGender()
{
return this.gender;
}
public void setGender(Gender gender)
{
this.gender = gender;
}
}
Used like this, the JPA provider persists the enum using the integer ordinal value. So an Author with the gender MALE has a value 0 in the gender column in the database. Likewise, the persisted values for FEMALE and UNSPECIFIED are 1 and 2, respectively. This presents a couple of challenges.
· You can’t look at the database tables directly (such as through MySQL Workbench) and recognize the data automatically. You will see only 0s, 1s, and 2s in the gender column, not useful descriptions.
· If someone alters the enum and reorders the constants (for example, to alphabetize them), all previously persisted data is now corrupt — obviously a big problem.
This default behavior remains the same whether the database column is a numeric column (such as INT) or a string column (such as NVARCHAR). Fortunately, JPA provides the @javax.persistence.Enumerated annotation that enables you to change how this value is persisted. @Enumerated’s sole attribute is (ironically) an enum, javax.persistence.EnumType. The default behavior corresponds to EnumType.ORDINAL. Your other option is EnumType.STRING, which tells the JPA provider to persist the enum in its String format (the name of the constant). This is both refactor-safe (unless, of course, someone changes the constant names, but that’s a bigger problem) and easy to view directly in the database.
@Enumerated(EnumType.STRING)
public Gender getGender()
{
return this.gender;
}
When using EnumType.STRING, not only must your column be a string-type column (which is probably obvious), but it must also be a Unicode column (such as NVARCHAR, or VARCHAR with a UTF-8 or UTF-16 character set). (The exception to this rule is when the database vendor has support for native ENUM column types.) The reason for this is that Java enum constants may contain characters that won’t properly store in non-Unicode columns. Of course, you can always simply avoid using such characters; however, because Strings in Java are always Unicode, it’s usually best to make all your text columns Unicode so that character set translation doesn’t have to take place.
The new definition for the Authors table follows and uses the special MySQL ENUM data type to provide an additional layer of metadata and validation in the database and to consume less space when storing the data.
CREATE TABLE Authors (
AuthorId BIGINT UNSIGNED NOT NULL PRIMARY KEY AUTO_INCREMENT,
AuthorName VARCHAR(100) NOT NULL,
EmailAddress VARCHAR(255) NOT NULL,
Gender ENUM('MALE', 'FEMALE', 'UNSPECIFIED') NULL,
INDEX Publishers_Names (AuthorName)
) ENGINE = InnoDB;
Understanding How JPA Handles Dates and Times
Dates and times have been perhaps the biggest challenge to software developers since the beginning of software. Dealing with JDBC is no exception to that challenge. JPA makes it somewhat easier, but you still have challenges to consider. JDBC 4.2 (Java SE 8) contains significant improvements that make dealing with database dates and times simpler (due to the Java 8 Date and Time API), but JPA will likely not adapt to those changes until version 2.2 or 2.3. Most relational databases have three primary date-related data types: DATE, TIME, and DATETIME. Some databases also have TIMESTAMP data types, but these are largely the same as DATETIME, and you can consider them equivalent when you use JDBC (and, thus, JPA). You should always be cognizant of the purpose, features, and limitations of the different date-related data types that your database vendor supplies, and choose the one that best meets your needs for a given property.
In previous versions of JDBC, your only options for inserting a date, time, or date-time were the setDate, setTime, and setTimestamp methods of PreparedStatement. These methods require a java.sql.Date, a java.sql.Time, and a java.sql.Timestamp, respectively. Likewise,ResultSet’s getDate, getTime, and getTimestamp methods return a Date, a Time, and a Timestamp, and its updateDate, updateTime, and updateTimestamp methods function the same as the three PreparedStatement methods. These types are stored in the database as follows:
· A Date is stored as just the date (year, month, and day only).
· A Time is stored as just the time (hour, minute, and second only).
· A Timestamp is a combination of the two, always being stored as the year, month, day, hour, minute, and second.
JDBC 4.2 added the capability of inserting or retrieving any Object as a date, time, time-with-time-zone, date-time, or date-time-with-time-zone using the setObject(int, Object, java.sql.SQLType) method on PreparedStatement and the updateObject(int, Object, SQLType), updateObject(String, Object, SQLType), getObject(int, Class), and getObject(String, Class) methods on ResultSet. Of course, you can use these methods only with types the driver vendor supports, but all JDBC 4.2 vendors are expected to support the appropriate Java 8 Date and Time types in addition to java.util.Date, Calendar, java.sql.Date, Time, and Timestamp. The SQLTypes that correlate to date and time types follow:
· java.sql.JDBCType.DATE (stores date only)
· JDBCType.TIME (stores time only)
· JDBCType.TIME_WITH_TIMEZONE (stores time and time zone only)
· JDBCType.TIMESTAMP (stores date and time only)
· JDBCType.TIMESTAMP_WITH_TIMEZONE (stores date, time, and time zone)
Some database systems, such as Microsoft SQL Server, support time and date-time columns that store a time zone as well, in addition to the standard time and date-time columns that always match the server time zone. Other databases, such as MySQL, support time and date-time columns only in the server time zone. The TIME_WITH_TIMEZONE and TIMESTAMP_WITH_TIMEZONE constants are only valid for those vendors that support the combination time zone columns. You should use them sparingly, and only when supported. For the vast majority of cases, you should store times and date-times in the server time zone and convert them to other time zones only when necessary.
WARNING You should exercise caution whenever using the latest JDBC 4.1 and JDBC 4.2 features. Many drivers, such as those for MySQL and Microsoft SQL Server, have not even caught up to the JDBC 4.1 features added to Java 7 in July 2011. In fact, as of the time of this writing, PostgreSQL’s JDBC driver supports only the JDBC 3.0 features introduced in Java 4 in February 2002. PostgreSQL claims to have a partially complaint JDBC 4.0 driver that includes the Java 6 features released in December 2006, but that driver is far from complete and throws AbstractMethodErrors in many places. Oracle is the only major vendor that currently supports JDBC 4.1. You can expect this trend to continue, so it may be many years before you can use the new JDBC 4.2 features in MySQL, Microsoft SQL Server, and PostgreSQL.
Using JPA, properties of type java.sql.Date are stored only as dates (using PreparedStatement.setDate). Even if the database column is a DATETIME, the time of the column is given all zeroes. Likewise, Time properties are stored only as times (usingPreparedStatement.setTime), and the database columns must be TIME (or equivalent) columns only. Timestamp properties are automatically stored with both the date and time parts, and the corresponding database columns must be DATETIME (or equivalent). Where things can get tricky is if your entities contain java.util.Date or Calendar properties. For these you must use the @javax.persistence.Temporal annotation to tell the provider how to persist the type. The value attribute expects a javax.persistence.TemporalType, and its options follow:
· TemporalType.DATE (converts the Date or Calendar property to and from a java.sql.Date)
· TemporalType.TIME (converts the property to and from a Time)
· TemporalType.TIMESTAMP (converts the property to and from a Timestamp)
You may not use @Temporal on properties that are already java.sql.Date, Time, or Timestamp types. The Publisher entity’s dateFounded property uses a Calendar to store the date the Publisher was founded and stores the value in a DATE column.
...
public class Publisher implements Serializable
{
...
private Calendar dateFounded;
...
@Temporal(TemporalType.DATE)
public Calendar getDateFounded()
{
return dateFounded;
}
public void setDateFounded(Calendar dateFounded)
{
this.dateFounded = dateFounded;
}
}
CREATE TABLE Publishers (
PublisherId BIGINT UNSIGNED NOT NULL PRIMARY KEY,
PublisherName VARCHAR(100) NOT NULL,
Address VARCHAR(1024) NOT NULL,
DateFounded DATE NOT NULL,
INDEX Publishers_Names (PublisherName)
) ENGINE = InnoDB;
Of course, this isn’t really ideal. You don’t want to use a java.util.Date or Calendar to hold just a date, and the java.sql.Date is as much of a pain to work with as java.util.Date. (It even extends java.util.Date, which is just plain weird.) What you really want to do here is use the new java.time.LocalDate as the entity property, but the JPA provider won’t know what to do with that type. In Chapter 24 you learn how to write converters so that you can use the Java 8 Date and Time types.
Mapping Large Properties to CLOBs and BLOBs
Sometimes a CHAR, VARCHAR, NCHAR, or NVARCHAR column, usually restricted to a few thousand characters, just isn’t big enough. This is also the case for storing binary data in a BINARY or VARBINARY column. Most database systems provide a way to store Large Objects (LOBs) that can hold many millions or even billions of bytes. The text form of a LOB is a Character Large Object (CLOB), whereas the binary form is a Binary Large Object (BLOB).
JDBC provides different, optimized mechanisms for storing and retrieving LOBs that aren’t compatible with the standard setString and setBytes methods, so you have to tell JPA to store values you anticipate could be very large as LOBs instead of standard columns. You do this with the @javax.persistence.Lob annotation. String and char[] properties annotated with @Lob are persisted as CLOBs. All other types, such as byte[] and Serializable properties, are persisted as BLOBs. The Book entity uses a @Lob property to store a preview of the first few pages of the book in PDF form.
public class Book implements Serializable
{
...
private byte[] previewPdf;
...
@Lob
public byte[] getPreviewPdf()
{
return previewPdf;
}
public void setPreviewPdf(byte[] previewPdf)
{
this.previewPdf = previewPdf;
}
}
CREATE TABLE Books (
Id BIGINT UNSIGNED NOT NULL PRIMARY KEY AUTO_INCREMENT,
Isbn VARCHAR(13) NOT NULL,
Title VARCHAR(255) NOT NULL,
Author VARCHAR(100) NOT NULL,
Price DECIMAL(6,2) NOT NULL,
Publisher VARCHAR(100) NOT NULL,
PreviewPdf MEDIUMBLOB NULL,
UNIQUE KEY Books_ISBNs (Isbn),
INDEX Books_Titles (Title)
) ENGINE = InnoDB;
NOTE You may combine @Enumerated, @Temporal, and @Lob with @Basic to enable lazy loading or mark the property as optional. However, as with other basic types, you do not have to use @Basic if you do not want or need to.
Testing the Enums-Lobs-Dates project is essentially the same as testing the Entity-Mappings project:
1. ![]() Run the create.sql in MySQL Workbench to create the EnumsLobsDates database and its tables.
Run the create.sql in MySQL Workbench to create the EnumsLobsDates database and its tables.
2. Update Tomcat’s JNDI resources to point to the new database.
3. <Resource name="jdbc/EnumsDatesLobs" type="javax.sql.DataSource"
4. maxActive="20" maxIdle="5" maxWait="10000"
5. username="tomcatUser" password="password1234"
6. driverClassName="com.mysql.jdbc.Driver"
url="jdbc:mysql://localhost/EnumsDatesLobs" />
7. Go to http://localhost:8080/mappings/entities in your browser of choice, and click the Add More Entities button a few times. It should behave exactly as it did before, but with the addition of the author’s gender and the publisher’s foundation date (which is just today’s date for the example).
8. You can also query the tables using MySQL Workbench to see the data you inserted. You need to convert the PreviewPdf column to a hexadecimal string for display using MySQL’s hex function:
9. USE EnumsDatesLobs;
10. SELECT * FROM Publishers;
11. SELECT * FROM Authors;
12. SELECT Id, Isbn, Title, Author, Price, Publisher, hex(PreviewPdf) FROM Books;
SELECT * FROM SurrogateKeys;
SUMMARY
In this chapter, you explored the basics of mapping entities using JPA annotations and saw a brief example of XML mappings using orm.xml. You learned about persistence.xml, what purpose it serves, what a persistence unit is, and how persistence unit scope works. You created several tables in MySQL and experimented with using the persistence API to store data in and retrieve data from those tables. You also learned about some important steps and considerations involved when dealing with enums, dates, times, date-times, and LOBs.
You haven’t yet put the persistence API to full use, and there are many parts about finding, inserting, updating, and deleting entities that you still need to learn. In the next chapter you explore the persistence API more thoroughly, using Spring Framework to take care of the mundane work of injecting the persistence unit and managing transactions.
All materials on the site are licensed Creative Commons Attribution-Sharealike 3.0 Unported CC BY-SA 3.0 & GNU Free Documentation License (GFDL)
If you are the copyright holder of any material contained on our site and intend to remove it, please contact our site administrator for approval.
© 2016-2026 All site design rights belong to S.Y.A.