Wrox Press Beginning JavaScript 5th (2015)
Chapter 13. Data Storage
WHAT YOU WILL LEARN IN THIS CHAPTER:
· Storing data on the user’s computer is possible with cookies and web storage
· Creating cookies is relatively straightforward, but reading them is complex
· Using web storage is easy
WROX.COM CODE DOWNLOADS FOR THIS CHAPTER
You can find the wrox.com code downloads for this chapter at http://www.wiley.com/go/BeginningJavaScript5E on the Download Code tab. You can also view all of the examples and related files at http://beginningjs.com.
Our goal as website programmers should be to make the website experience as easy and pleasant for the user as possible. Clearly, well-designed pages with easily navigable layouts are central to this, but they’re not the whole story. You can go one step further by learning about your users and using information gained about them to personalize the website.
For example, imagine a user, whose name you asked on the first visit, returns to your website. You could welcome her back to the website by greeting her by name. Another good example is given by a website, such as Amazon’s, that incorporates the one-click purchasing system. By already knowing the user’s purchasing details, such as credit-card number and delivery address, you can allow the user to go from viewing a book to buying it in just one click, making the likelihood of the user purchasing it that much greater. Also, based on information, such as the previous purchases and browsing patterns of the user, it’s possible to make book suggestions.
Such personalization requires that information about users be stored somewhere in between their visits to the website. Accessing the user’s local filesystem from a web application is pretty much off limits because of security restrictions included in browsers. However, you, as a website developer, can store small amounts of information in a special place on the user’s local disk, using what is called a cookie, and in the browser using HTML5’s Web Storage.
BAKING YOUR FIRST COOKIE
The key to cookies is the document object’s cookie property. Using this property, you can create and retrieve cookie data from within your JavaScript code.
You can set a cookie by setting document.cookie to a cookie string. You’ll be looking in detail at how this cookie string is made up later in the chapter, but let’s first create a simple example of a cookie and see where the information is stored on the user’s computer.
A Fresh-Baked Cookie
The following code sets a cookie with the UserName set as Paul and an expiration date of 28 December, 2020:
<!DOCTYPE html>
<html lang="en">
<head>
<title>Fresh-Baked Cookie</title>
<script>
document.cookie =
"UserName=Paul;expires=Tue, 28 Dec 2020 00:00:00;";
</script>
</head>
<body>
<p>This page just created a cookie</p>
</body>
</html>
Save the page as freshbakedcookie.html. You’ll see how the code works as you learn the parts of a cookie string, but first let’s see what happens when a cookie is created.
How you view cookies without using code varies with the browser you are using.
Viewing Cookies in Internet Explorer
In this section, you see how to look at the cookies that are already stored by Internet Explorer (IE) on your computer. You then load the cookie-creating page you just created with the preceding code to see what effect this has. Follow these steps:
1. First, you need to open IE. The examples in this chapter use IE 11, so if you’re using an earlier version of IE you may find the screenshots and menus in slightly different places.
2. Before you view the cookies, first clear the temporary Internet file folder for the browser, because this will make it easier to view the cookies that your browser has stored. Click the Gear icon and choose the Internet Options menu item, which is shown in Figure 13.1.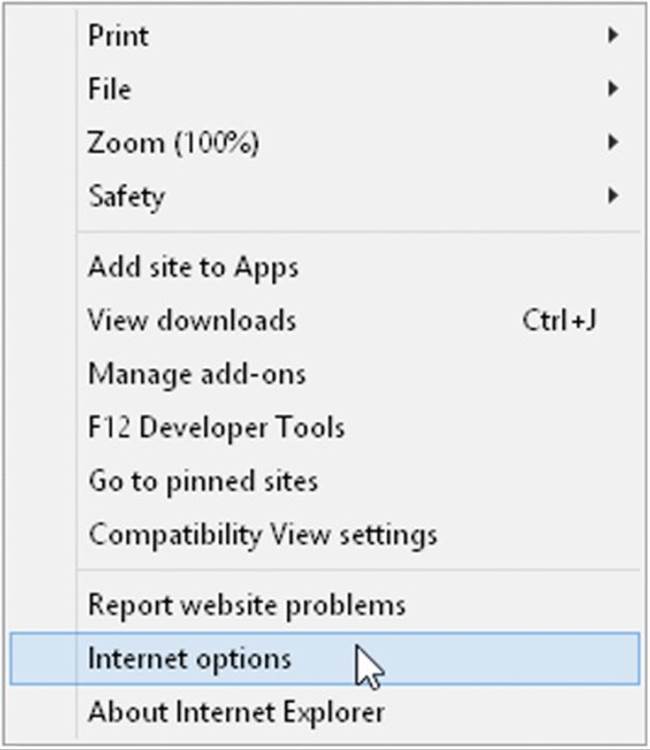
Figure 13.1
3. You are presented with the Internet Options dialog box shown in Figure 13.2.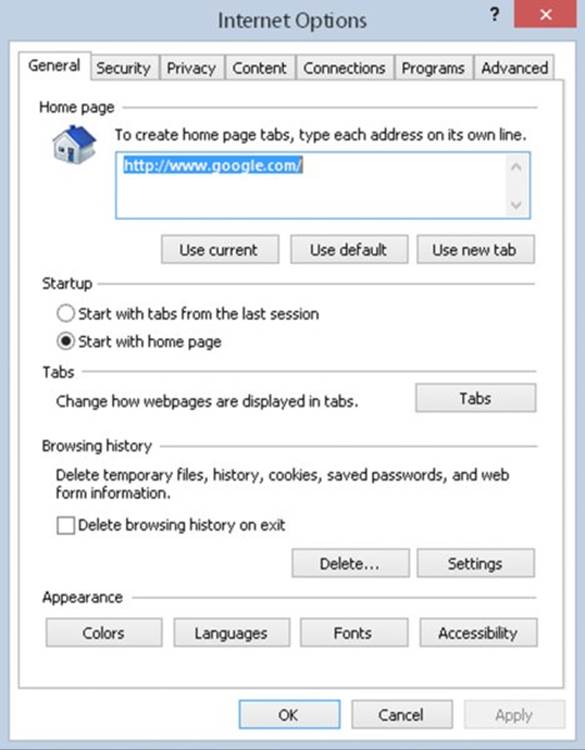
Figure 13.2
4. Click the Delete button under Browsing History. Another dialog box appears, as shown in Figure 13.3.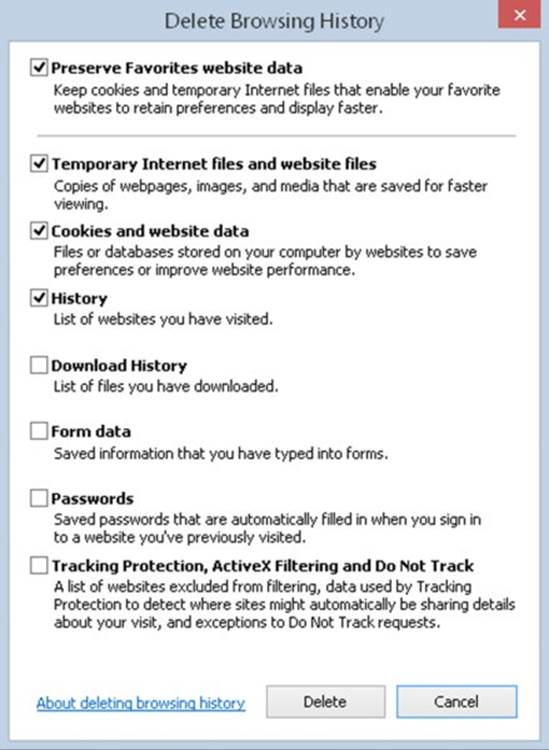
Figure 13.3
5. Make sure to select the tick boxes next to “Temporary Internet files and website files” and “Cookies and website data” and then click the Delete button. You now have a nice clean cache, which makes it easy to see when you create a cookie.
6. You can now close the dialog box and return to the main Internet Options dialog box.
Let’s have a look at the cookies you have currently residing on your machine.
7. From the Internet Options dialog box, click the Settings button next to the Delete button grouped under Browsing History. You should see the dialog box shown in Figure 13.4.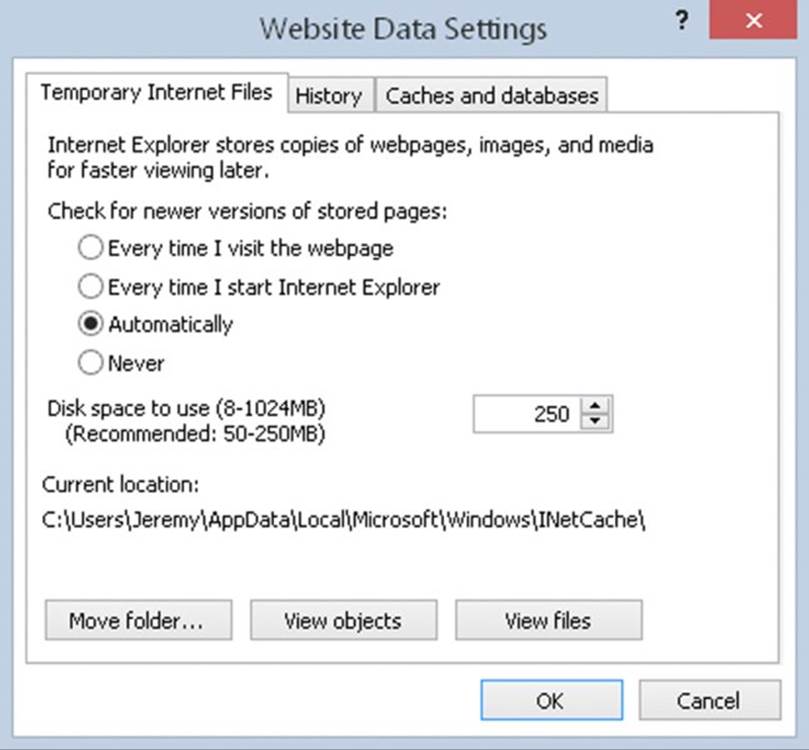
Figure 13.4
8. Now click the View Files button, and a list of all the temporary pages and cookie files on your computer is displayed. If you followed the previous instructions and deleted all temporary Internet files, there should be nothing listed, as shown in Figure 13.5.
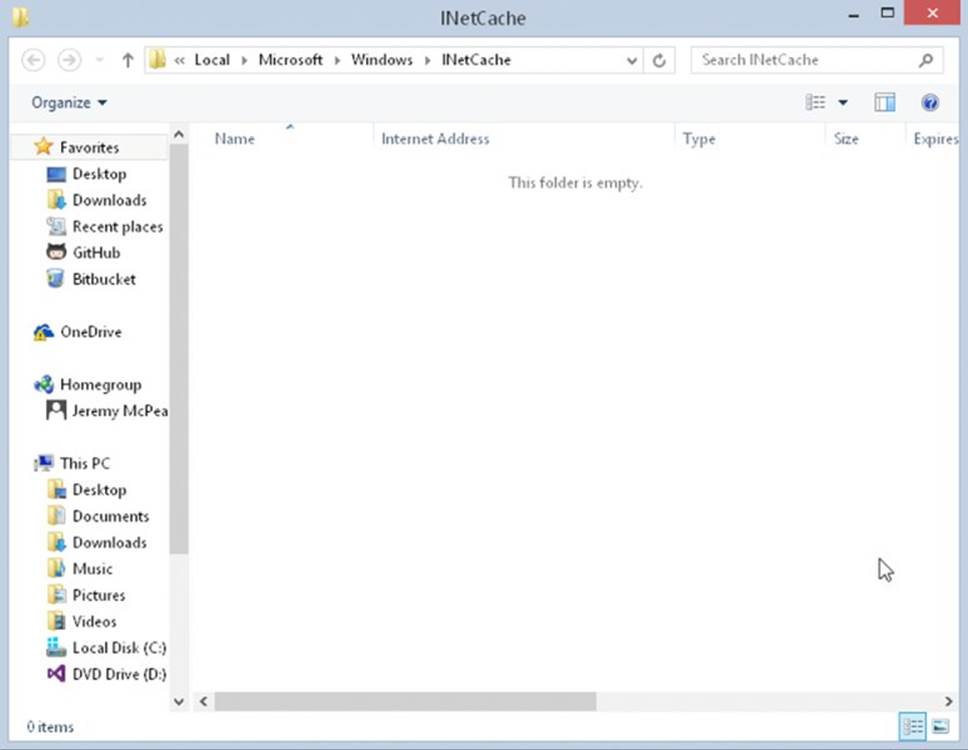
Figure 13.5
The actual cookies, their names, and their values may look slightly different depending on your computer’s operating system.
You can examine the contents of the cookies by double-clicking them. Note that you may get a warning about the potential security risk of opening a text file, although you are fairly safe with cookies because they are simply text files. In Figure 13.6 you can see the contents of the cookie file named google set by the search engine Google.
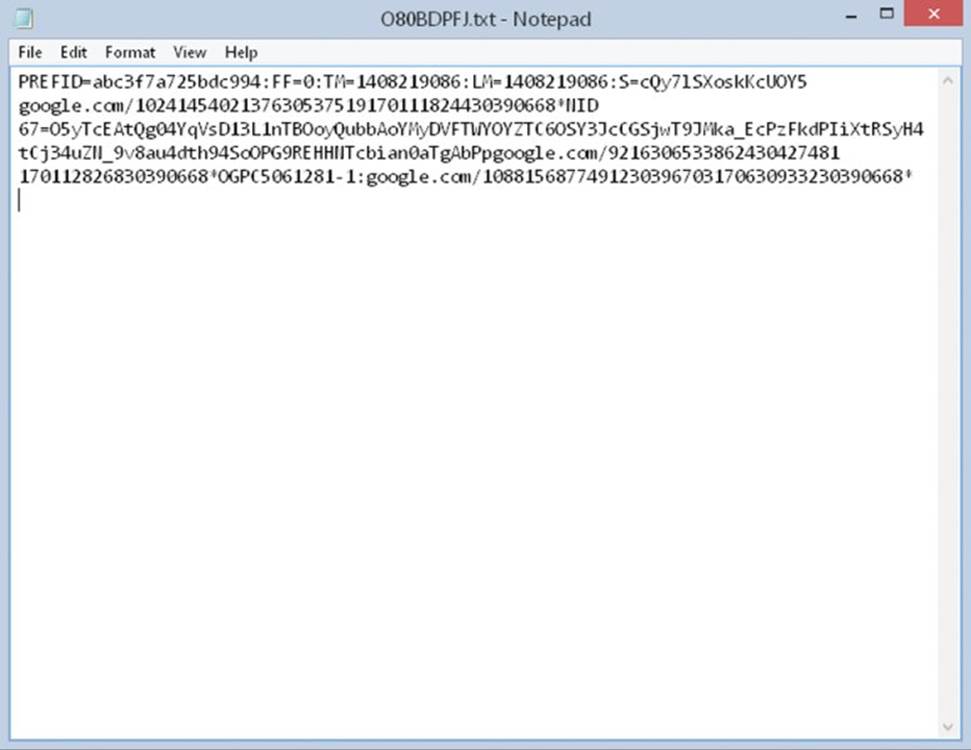
Figure 13.6
As you can see, a cookie is just a plain old text file. Each website, or domain name, has its own text file where all the cookies for that website are stored. In this case, there’s just one cookie currently stored for google.com. Domains like amazon.com will almost certainly have many cookies set.
In Figure 13.6, you can see the cookie’s details. Here, the name of the cookie is PREF; its value is a series of characters, which although indecipherable to you make sense to the Google website. It was set by the domain google.com, and it relates to the root directory /. The contents probably look like a mess of characters, but don’t worry. When you learn how to program cookies, you’ll see that you don’t need to worry about setting the details in this format.
After you have finished, close the cookie and click OK on the dialog boxes to return to the browser.
Now let’s load the freshbakedcookie.html page into your IE browser. This will set a cookie. Let’s see how it has changed things:
1. Return to the Internet Options dialog box (by choosing Tools ➪ Internet Options).
2. Click the Settings button.
3. Click View Files. Your computer now shows something like the information in Figure 13.7.
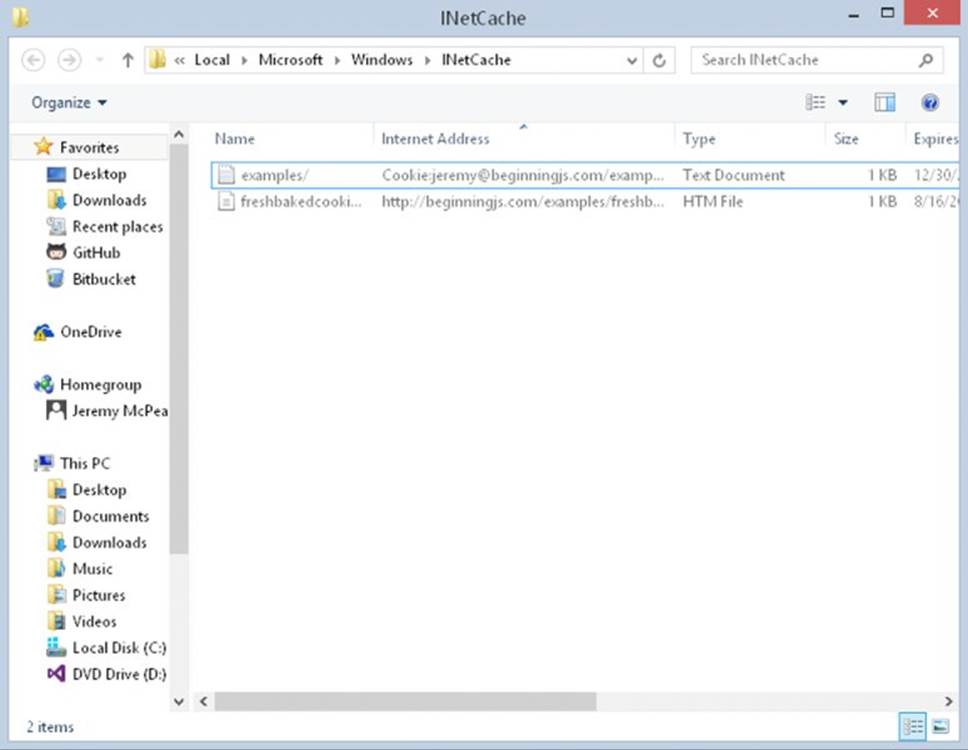
Figure 13.7
If you loaded the HTML file from your computer, you created a cookie from a web page stored on the local hard drive rather than a server. Thus, its domain name has been set to the name of the directory in which the web page is stored. Obviously, this is a little artificial. In reality, people will be loading your web pages from your website on the Internet and not off your local hard drive. The Internet address is based on the directory the freshbakedcookie.html file was in. You can also see that it expires on December 31, 2020, as you specified when you created the cookie. Double-click the cookie to view its contents, which look like those in Figure 13.8.
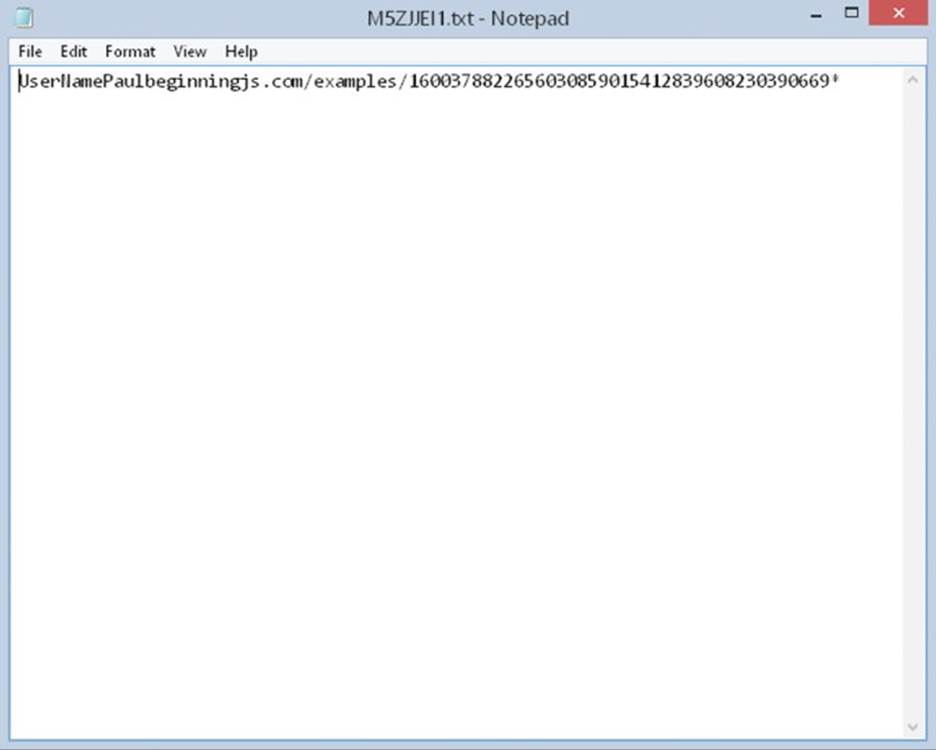
Figure 13.8
You can see the name you gave to the cookie at the left, UserName, its value, Paul, and also the directory it’s applicable to. The expiration date is there as well; it’s just not in an easily recognizable form. Note that you may sometimes need to close the browser and reopen it before you see the cookie file.
Viewing Cookies in Firefox
There is no sharing of cookies between browsers, so the cookies stored when you visited websites using IE won’t be available to Firefox and vice versa. The examples in this section use Firefox 31.
Firefox keeps its cookies in a totally different place from IE, and the contents are viewed by a different means. To view cookies in Firefox:
1. Click the “Hamburger” icon and choose Options as shown in Figure 13.9.
Figure 13.9
2. Select the Privacy option.
3. Click the “remove individual cookies” link and you should see the dialog box shown in Figure 13.10.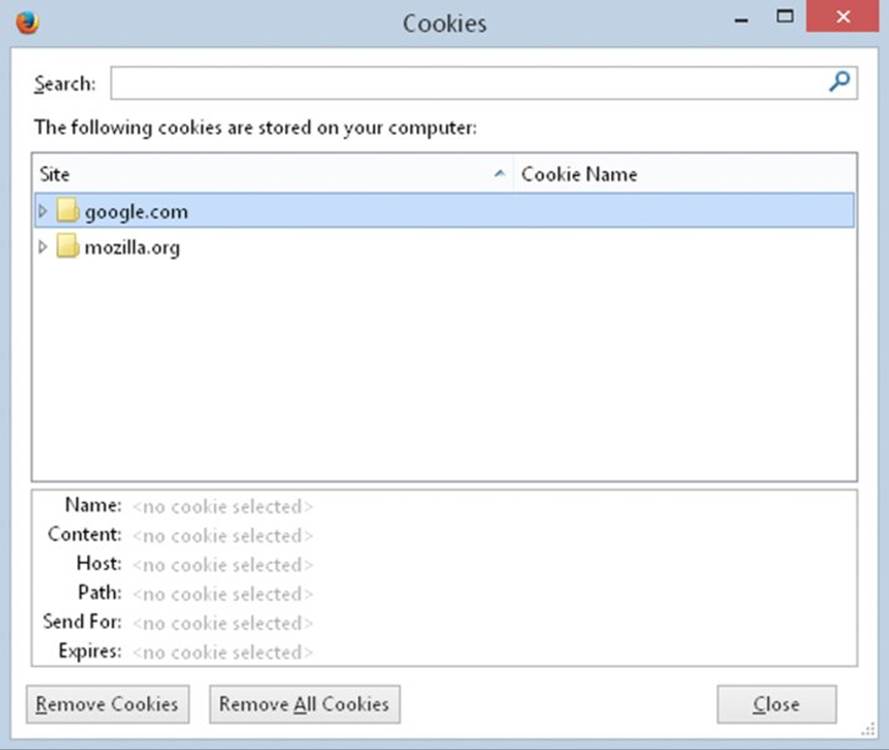
Figure 13.10
4. Click Close to get back to the browser, and load freshbakedcookie.html.
5. Repeat the process you followed previously to get to the Cookie Manager, and you should find that the UserName cookie has been added to the box. If loaded from your PC and not the Internet, the cookie will have a blank web address. The expanded cookie details are shown in Figure 13.11.
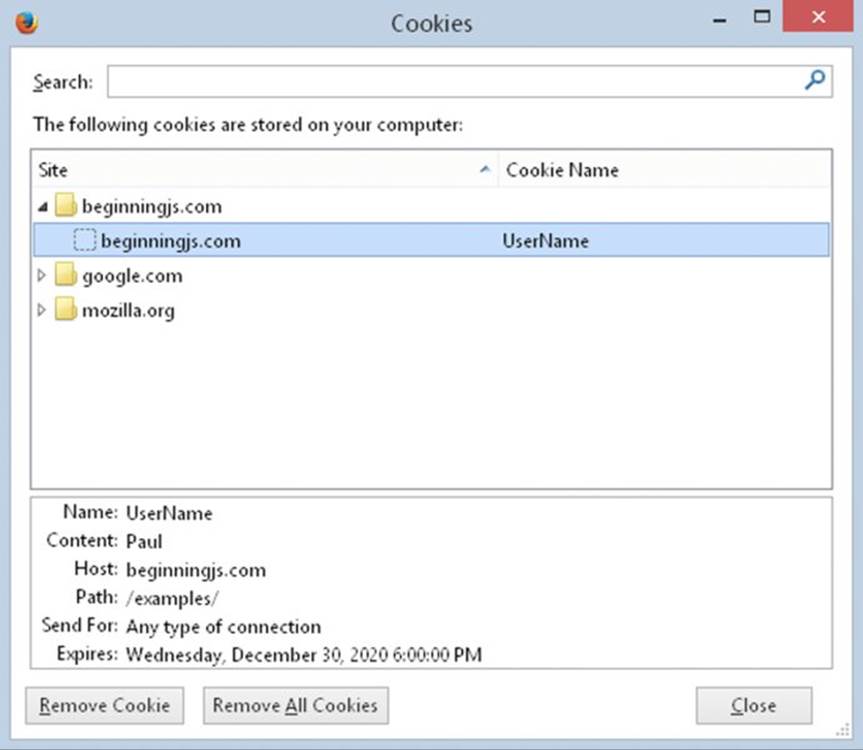
Figure 13.11
Note that buttons are provided at the bottom of the Cookie Manager to remove the selected cookie or all of the cookies that are stored.
Viewing Cookies in Chrome
When it comes to cookies, Chrome is somewhat similar to Firefox in that you view and manage them through the browser:
1. Click the “Hamburger” icon and choose Settings as shown in Figure 13.12.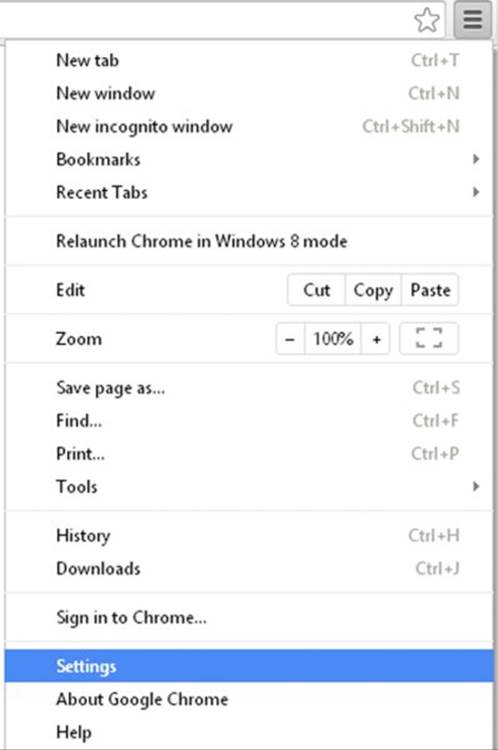
Figure 13.12
2. In the “Search settings” box, type cookies. You’ll see Chrome change the Settings page to look something like Figure 13.13. Click the “Content settings” button.
Figure 13.13
3. In the “Content settings” window, click the “All cookies and site data…” button. A new window pops up that lets you manage your cookies (Figure 13.14).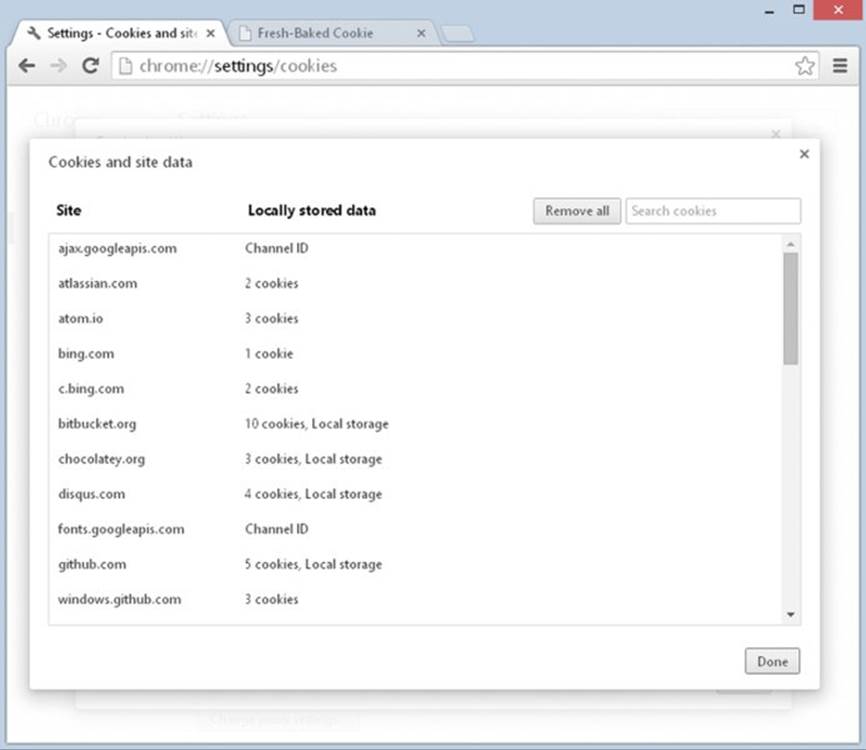
Figure 13.14
4. Load freshbakedcookie.html in a new tab or window.
5. Go back to the Settings page and click the Refresh icon. You’ll now see an entry for the new cookie as shown in Figure 13.15.
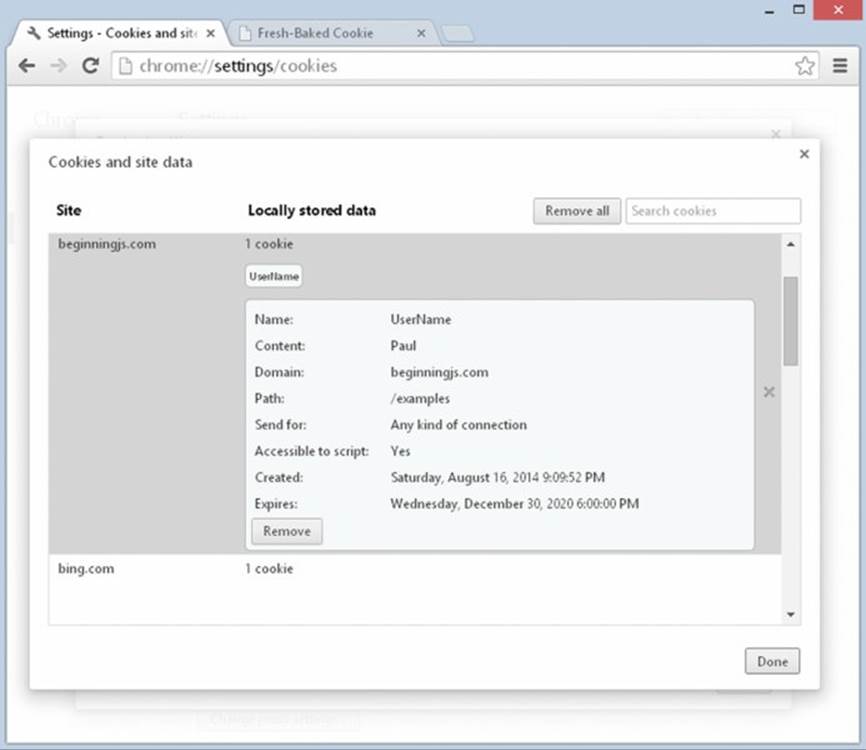
Figure 13.15
Now that you’ve seen how to view cookies manually, let’s look at how you create them and read them using code. You start by looking at each of the parts that make up a cookie string.
The Cookie String
When you are creating a cookie, you can set six parts: name, value, expires, path, domain, and secure, although the latter four of these are optional. You’ll now look at each of these in turn.
name and value
The first part of the cookie string consists of the name and value of the cookie. The name is used so that you can reference the cookie later, and the value is the information part of the cookie.
This name/value part of the cookie string is compulsory; it sort of defeats the point of the cookie if you don’t store a name or value, because storing information is what cookies are all about. You should make sure that this part comes first in the cookie string.
The value for the cookie is a primitive string, although the string can hold number characters if it is numerical data that you want to store. If you are storing text, certain characters, such as semicolons, cannot be used inside the value, unless you use a special encoding, which you’ll see later. In the case of semicolons, this is because they are used to separate the different parts of the cookie within the cookie string.
In the following line of code, you set a cookie with the name UserName and the value Paul:
document.cookie = "UserName=Paul;";
This cookie has a very limited lifespan, which is the length of time the information will continue to exist. If you don’t set an expiration date, a cookie will expire when the user closes the browser. The next time the user opens the browser the cookie will be gone. This is fine if you just want to store information for the life of a user session, which is a single visit by the user to your website. However, if you want to ensure that your cookie is available for longer, you must set its expiration date, which you look at next.
expires
If you want a cookie to exist for longer than just a single user session, you need to set an expiration date using the second part of the cookie string, expires, as follows:
document.cookie = "UserName=Paul;expires=Tue, 28 Dec 2020 00:00:00 GMT; ";
The cookie set by the previous line of code will remain available for future use right up until December 28, 2020.
NOTE The format of the expiration date is very important. It should be the same format the cookie is given by the toUTCString() method.
In practice, you’ll probably use the Date object to get the current date, and then set a cookie to expire three or six months after this date. Otherwise, you’re going to need to rewrite your pages on December 28, 2020.
For example, you could write the following:
var expire = new Date();
expire.setMonth(expire.getMonth() + 6);
document.cookie = "UserName=Paul;expires=" + expire.toUTCString() + ";";
This will create a new cookie called UserName with the value of Paul, which will expire six months from the current date. Note that other factors can cause a cookie to expire before its expiration date, such as the user deleting the cookie or the upper cookie limit being reached.
path
You’ll find that 99 percent of the time you will only need to set the name, value, and expires parts of a cookie. However, at times the other three parts, such as the path part that you are looking at in this section, need to be set. The final two parts, domain and secure, are for advanced use beyond the scope of a beginners’ book, but you’ll look at them briefly just for completeness.
You’re probably used to the idea of there being directories on your hard drive. Rather than storing everything on your computer in one place on the hard drive, you divide it into these directories. For example, you might keep your word-processing files in My Documents, your image files in My Images, and so on. You probably also subdivide your directories, so under My Images you might have subdirectories called My Family and My Holiday.
Well, web servers use the same principle. Rather than putting the whole website into one web directory, it’s common and indeed sensible to divide it into various different directories. For example, if you visit the Wrox website at www.wrox.com and then click one of the book categories, you’ll find that the path to the page navigated to is now www.wrox.com/Books/.
This is all very interesting, but why is it relevant to cookies?
The problem is that cookies are specific not only to a particular web domain, such as www.wrox.com, but also to a particular path on that domain. For example, if a page in www.wrox.com/Books/ sets a cookie, only pages in that directory or its subdirectories will be able to read and change the cookie. If a page in www.wrox.com/academic/ tried to read the cookie, it would fail. Why are cookies restricted like this?
Take the common example of free web space. A lot of companies on the web enable you to sign up for free web space. Usually everyone who signs up for this web space has a site at the same domain. For example, Bob’s website might be atwww.freespace.com/members/bob/. Belinda might have hers at www.freespace.com/members/belinda. If cookies could be retrieved and changed regardless of the path, then any cookies set on Bob’s website could be viewed by Belinda and vice versa. This is clearly something neither of them would be happy about. Not only is there a security problem, but if, unknown to each other, they both have a cookie named MyHotCookie, there would be problems with each of them setting and retrieving the same cookie. When you think how many users a free web space provider often has, you can see that there is potential for chaos.
Okay, so now you know that cookies are specific to a certain path, but what if you want to view your cookies from two different paths on your server? Say, for example, you have an online store at www.mywebsite.com/mystore/ but you subdivide the store into subdirectories, such as /Books and /Games. Now let’s imagine that your checkout is in the directory www.mywebsite.com/mystore/Checkout. Any cookies set in the /Books and /Games directories won’t be visible to each other or pages in the /Checkout directory. To get around this you can either set cookies only in the /mystore directory (because these can be read by that directory and any of its subdirectories), or you can use the path part of the cookie string to specify that the path of the cookie is /mystore even if it’s being set in the /Games or/Books or /Checkout subdirectories.
For example, you could do this like so:
document.cookie = "UserName=Paul;expires=Tue, 28 Dec 2020 00:00:00" +
";path=/mystore;";
Now, even if the cookie is set by a page in the directory /Books, it will still be accessible to files in the /mystore directory and its subdirectories, such as /Checkout and /Games.
If you want to specify that the cookie is available to all subdirectories of the domain it is set in, you can specify a path of the root directory using the / character:
document.cookie = "UserName=Paul;expires=Tue, 28 Dec 2020 00:00:00;path=/;";
Now, the cookie will be available to all directories on the domain it is set from. If the website is just one of many at that domain, it’s best not to do this because everyone else will also have access to your cookie information.
It’s important to note that although Windows computers don’t have case-sensitive directory names, many other operating systems do. For example, if your website is on a Unix- or Linux-based server, the path property will be case-sensitive.
domain
The fourth part of the cookie string is the domain. An example of a domain is wrox.com or beginningjs.com. Like the path part of the cookie string, the domain part is optional and it’s unlikely that you’ll find yourself using it very often.
By default, cookies are available only to pages in the domain in which they were set. For example, if you have your first website running on a server with the domain mypersonalwebsite.mydomain.com and you have a second website running undermybusinesswebsite.mydomain.com, a cookie set in one website will not be available to pages accessed under the other domain name, and vice versa. Most of the time, this is exactly what you want, but if it is not, you can use the domain part of the cookie string to specify that a cookie is available to all subdomains of the specified domain. For example, the following sets a cookie that can be shared across both subdomains:
document.cookie = "UserName=Paul;expires=Tue, 28 Dec 2020 00:00:00;path=/" +
";domain=mydomain.com;";
Note that the domain must be the same. You can’t share www.someoneelsesdomain.com with www.mydomain.com.
secure
The final part of the cookie string is the secure part. This is simply a boolean value; if it’s set to true the cookie will be sent only to a web server that tries to retrieve it using a secure channel. The default value, which is false, means the cookie will always be sent, regardless of the security. This is only applicable where you have set up a server with SSL (Secure Sockets Layer).
CREATING A COOKIE
To make life easier for yourself, you’ll write a function that enables you to create a new cookie and set certain of its attributes with more ease. This is the first of a number of useful functions you’ll create and add to a separate .js file so you can easily reuse the code in your future projects. You’ll look at the code first and create an example using it shortly. First create a file called cookiefunctions.js and add the following to it:
function setCookie(name, value, path, expires) {
value = escape(value);
if (!expires) {
var now = new Date();
now.setMonth(now.getMonth() + 6);
expires = now.toUTCString();
}
if (path) {
path = ";Path=" + path;
}
document.cookie = name + "=" + value + ";expires=" + expires + path;
}
The secure and domain parts of the cookie string are unlikely to be needed, so you allow just the name, value, expires, and path parts of a cookie to be set by the function. If you don’t want to set a path or expiration date, you can omit them or pass empty strings for those parameters. If no path is specified, the current directory and its subdirectories will be the path. If no expiration date is set, you just assume a date six months from now.
The first line of the function introduces the escape() function, which you’ve not seen before:
value = escape(value);
When we talked about setting the value of a cookie, we mentioned that certain characters cannot be used directly, such as a semicolon. (This also applies to the name of the cookie.) To get around this problem, you can use the built-in escape() and unescape()functions. The escape() function converts characters that are not text or numbers into the hexadecimal equivalent of their character in the Latin-1 character set, preceded by a % character.
For example, a space has the hexadecimal value 20, and the semicolon the value 3B. So the following code produces the output shown in Figure 13.16:
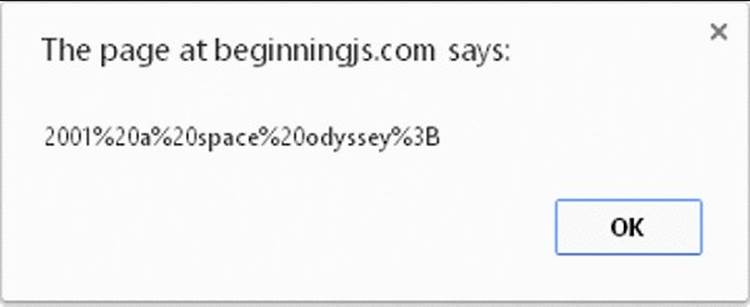
Figure 13.16
alert(escape("2001 a space odyssey;"));
You can see that each space has been converted to %20, the % indicating that it represents an escape or special character rather than an actual character, and that 20 is the ASCII value of the actual character. The semicolon has been converted to %3B, as you’d expect.
As you see later, when retrieving cookie values you can use the unescape() function to convert from the encoded version to plaintext.
Back to your function; next you have an if statement:
if (!expires) {
var now = new Date();
now.setMonth(now.getMonth() + 6);
expires = now.toUTCString();
}
This deals with the situation in which the expires parameter does not contain a usable value (either by omitting it or passing an empty string ""). Because most of the time you want a cookie to last longer than the session it’s created in, you set a default value forexpires that is six months after the current date.
Next, if a value has been passed to the function for the path parameter, you need to add that value when you create the cookie. You simply put "path=" in front of any value that has been passed in the path parameter:
if (path) {
path = ";Path=" + path;
}
Finally, on the last line you actually create the cookie, putting together the name, cvalue, expires, and path parts of the string:
document.cookie = name + "=" + value + ";expires=" + expires + path;
You’ll be using the setCookie() function whenever you want to create a new cookie because it makes setting a cookie easier than having to remember all the parts you want to set. More important, it can be used to set the expiration date to a date six months ahead of the current date.
For example, to use the function and set a cookie with default values for expires and path, you just type the following:
setCookie("cookieName","cookieValue");
TRY IT OUT Using setCookie()
You now put all this together in a simple example in which you use your setCookie() function to set three cookies named Name, Age, and FirstVisit. You then display what is in the document.cookie property to see how it has been affected.
Open your text editor and type the following:
<!DOCTYPE html>
<html lang="en">
<head>
<title>Chapter 13: Example 1</title>
</head>
<body>
<script src="cookiefunctions.js"></script>
<script>
setCookie("Name", "Bob");
setCookie("Age", "101");
setCookie("FirstVisit", "10 May 2007");
alert(document.cookie);
</script>
</body>
</html>
Save the example as ch13_example1.html and load it into a web browser.
You’ll see the alert box shown in Figure 13.17. Note that all three cookies are displayed as name/value pairs separated from the others by semicolons, and also that the expiration date is not displayed. If you had set the path parameter, this also would not have been displayed. The UserName cookie from a previous example is also displayed.
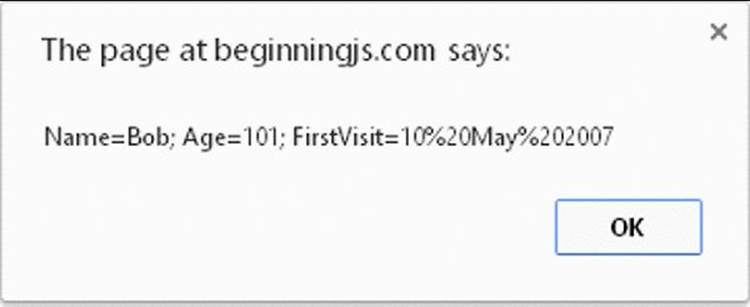
Figure 13.17
You already know how the setCookie() function works, so let’s look at the three lines that use the function to create three new cookies:
setCookie("Name", "Bob");
setCookie("Age", "101");
setCookie("FirstVisit", "10 May 2007");
It is all fairly simple. The first parameter is the name that you’ll give the cookie. (You see shortly how you can retrieve a value of a cookie based on the name you gave it.) It’s important that the names you use be only alphanumeric characters, with no spaces, punctuation, or special characters. Although you can use cookie names with these characters, doing so is more complex and best avoided. Next you have the value you want to give the cookie. The third parameter is the path, and the fourth parameter is the date on which you want the cookie to expire.
For example, take the first line where you use the setCookie() function. Here you are setting a cookie that will be named Name and have the value Bob. You don’t want to set the path or expires parts, so you omit those parameters.
The remaining two lines in the previous code snippet set the cookies named Age and FirstVisit and set their values to 101 and 10 May 2007, respectively.
If you did want to set the path and the expiration date, how might you change your code?
Well, imagine that you want the path to be /MyStore and the expiration date to be one year in the future. Then you can use the setCookie() function in the following way:
var expires = new Date();
expires.setMonth(expires.getMonth() + 12);
setCookie("Name","Bob","/MyStore", expires.toUTCString());
First, you create a new Date object, and by passing no parameter to its constructor, you let it initialize itself to the current date. In the next line, you add 12 months to that date. When setting the cookie using setCookie() you pass "/MyStore" as the path andexpires.toUTCString() as the expires parameter.
What about the situation in which you’ve created your cookie, say, one named Name with a value of Bob, and you want to change its value? To do this, you can simply set the same cookie again, but with the new value. To change the cookie named Name from a value of Bob to a value of Bobby, you’d need the following code:
setCookie("Name","Bobby");
What if you want to delete an existing cookie? Well, that’s easy. Just make it expire by changing its value and setting its expiration date to a date in the past, as in the following example:
setCookie("Name","","","Mon, 1 Jan 1990 00:00:00");
GETTING A COOKIE’S VALUE
In the preceding example, you used document.cookie to retrieve a string containing information about the cookies that have been set. However, this string has two limitations:
· The cookies are retrieved in name/value pairs, with each individual cookie separated by a semicolon. The expires, path, domain, and secure parts of the cookie are not available to you and cannot be retrieved.
· The cookie property enables you to retrieve only all the cookies set for a particular path and, when they are hosted on a web server, that web server. So, for example, there’s no simple way of just getting the value of a cookie with the name Age. To do this you’ll have to use the string manipulation techniques you learned in previous chapters to cut the information you want out of the returned string.
A lot of different ways exist to get the value of an individual cookie, but the way you’ll use has the advantage of working with all cookie-enabled browsers. You use the following function, which you need to add to your cookiefunctions.js file:
function getCookieValue(name) {
var value = document.cookie;
var cookieStartsAt = value.indexOf(" " + name + "=");
if (cookieStartsAt == -1) {
cookieStartsAt = value.indexOf(name + "=");
}
if (cookieStartsAt == -1) {
value = null;
} else {
cookieStartsAt = value.indexOf("=", cookieStartsAt) + 1;
var cookieEndsAt = value.indexOf(";", cookieStartsAt);
if (cookieEndsAt == -1) {
cookieEndsAt = value.length;
}
value = unescape(value.substring(cookieStartsAt,
cookieEndsAt));
}
return value;
}
The first task of the function is to get the document.cookie string and store it in the value variable:
var value = document.cookie;
Next, you need to find out where the cookie with the name passed as a parameter to the function is within the value string. You use the indexOf() method of the String object to find this information, as shown in the following line:
var cookieStartsAt = value.indexOf(" " + name + "=");
The method will return either the character position where the individual cookie is found or -1 if no such name, and therefore no such cookie, exists. You search on " " + name + "=" so that you don’t inadvertently find cookie names or values containing the name that you require. For example, if you have xFoo, Foo, and yFoo as cookie names, a search for Foo without a space in front would match xFoo first, which is not what you want!
If cookieStartsAt is -1, the cookie either does not exist or it’s at the very beginning of the cookie string so there is no space in front of its name. To see which of these is true, you do another search, this time with no space:
if (cookieStartsAt == -1) {
cookieStartsAt = value.indexOf(name + "=");
}
In the next if statement, you check to see whether the cookie has been found. If it hasn’t, you set the value variable to null:
if (cookieStartsAt == -1) {
value = null;
}
If the cookie has been found, you get the value of the cookie you want from the document.cookie string in an else statement. You do this by finding the start and the end of the value part of that cookie. The start will be immediately after the equals sign following the name. So in the following line, you find the equals sign following the name of the cookie in the string by starting the indexOf() search for an equals sign from the character at which the cookie name/value pair starts:
else {
cookieStartsAt = value.indexOf("=", cookieStartsAt) + 1;
You then add one to this value to move past the equals sign.
The end of the cookie value will either be at the next semicolon or at the end of the string, whichever comes first. You do a search for a semicolon, starting from the cookieStartsAt index, in the next line:
var cookieEndsAt = value.indexOf(";", cookieStartsAt);
If the cookie you are after is the last one in the string, there will be no semicolon and the cookieEndsAt variable will be -1 for no match. In this case you know the end of the cookie value must be the end of the string, so you set the variable cookieEndsAt to the length of the string:
if (cookieEndsAt == -1) {
cookieEndsAt = value.length;
}
You then get the cookie’s value using the substring() method to cut the value that you want out of the main string. Because you have encoded the string with the escape() function, you need to unescape it to get the real value, hence the use of the unescape() function:
value = unescape(value.substring(cookieStartsAt,
cookieEndsAt));
Finally, you return the value of the cookie to the calling function:
return value;
TRY IT OUT What’s New?
Now you know how to create and retrieve cookies. Let’s use this knowledge in an example in which you check to see if any changes have been made to a website since the user last visited it.
You’ll be creating two pages for this example. The first is the main page for a website; the second is the page with details of new additions and changes to the website. A link to the second page will appear on the first page only if the user has visited the page before (that is, if a cookie exists) but has not visited since the page was last updated.
Let’s create the first page:
<!DOCTYPE html>
<html lang="en">
<head>
<title>Chapter 13: Example 2a</title>
</head>
<body>
<h1>Welcome to Example 2a</h1>
<div id="whatsNew"></div>
<script src="cookiefunctions.js"></script>
<script>
var lastUpdated = new Date("Tue, 28 Dec 2020");
var lastVisit = getCookieValue("LastVisit");
if (lastVisit) {
lastVisit = new Date(lastVisit);
if (lastVisit < lastUpdated) {
document.getElementById("whatsNew").innerHTML =
"<a href='ch13_example2b.html'>What's New?</a>";
}
}
var now = new Date();
setCookie("LastVisit", now.toUTCString());
</script>
</body>
</html>
Save this page as ch13_example2a.html. Note that it uses the two functions, setCookie() and getCookieValue(), that you created earlier.
Next, you just create a simple page to link to for the What’s New? details:
<!DOCTYPE html>
<html lang="en">
<head>
<title>Chapter 13: Example 2b</title>
</head>
<body>
<h1>Welcome to Example 2b</h1>
<h3>Here's what's new!</h3>
</body>
</html>
Save this page as ch13_example2b.html.
Load ch13_example2a.html into a browser. The first time you go to the main page, there will be nothing but a heading saying “Welcome to Example 2a.” Obviously, if this were a real website, it would have a bit more than that, but it suffices for this example. However, refresh the page and suddenly you’ll see the page shown in Figure 13.18.
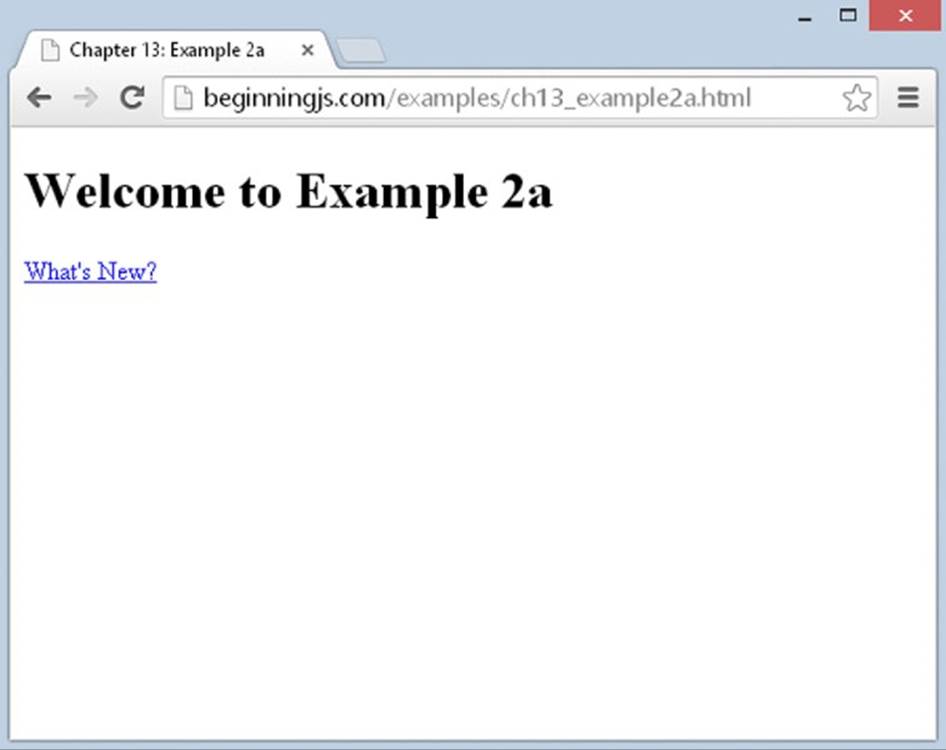
Figure 13.18
If you click the link, you’re taken to the ch13_example2b.html page detailing all the things added to the website since you last visited. Obviously, nothing has actually changed in your example website between you loading the page and then refreshing it. You got around this for testing purposes by setting the date when the website last changed, stored in variable lastUpdated, to a date in the future (here, December 28, 2020).
The ch13_example2b.html page is just a simple HTML page with no script, so you will confine your attention to ch13_example2a.html. In the script block, you declare the variable lastUpdated:
var lastUpdated = new Date("Tue, 28 Dec 2020");
Whenever you make a change to the website, this variable needs to be changed. It’s currently set to Tue, 28 Dec 2020, just to make sure you see the What’s New? link when you refresh the page. A better alternative for live pages would be thedocument.lastModified property, which returns the date on which the page was last changed.
Next, you get the date of the user’s last visit from the LastVisit cookie using the getCookieValue() function:
var lastVisit = getCookieValue("LastVisit");
If it’s falsy, the user has either never been here before, or it has been six or more months since the last visit and the cookie has expired. Either way, you won’t put the What’s New? link up because everything is new if the user is a first-time visitor, and a lot has probably changed in the last six months—more than what your What’s New? page will detail.
If lastVisit has a value, you need to check whether the user visited the site before it was last updated, and if so to direct the user to a page that shows what is new. You do this within the if statement:
if (lastVisit) {
lastVisit = new Date(lastVisit);
if (lastVisit < lastUpdated) {
document.getElementById("whatsNew").innerHTML =
"<a href='ch13_example2b.html'>What's New?</a>";
}
}
You first create a new Date object based on the value of lastVisit and store that back into the lastVisit variable. Then, in the condition of the inner if statement, you compare the date of the user’s last visit with the date on which you last updated the website. If things have changed since the user’s last visit, you write the What’s New? link to the page, so the user can click it and find out what’s new. Finally, at the end of the script you reset the LastVisit cookie to today’s date and time using thesetCookie() function:
var now = new Date();
setCookie("LastVisit", nowDate.toUTCString());
COOKIE LIMITATIONS
You should be aware of a number of limitations when using cookies.
A User May Disable Cookies
The first limitation is that although all modern browsers support cookies, the user may have disabled them. In Firefox you can do this by selecting the Options menu, followed by the Privacy tab and the Cookies tab. In IE you select Internet Options on the gear menu. Select the Privacy tab and you can change the level with the scroll control. And in Chrome, choose the Settings option from the gear menu, search for cookies, and click “Content settings.” Most users have session cookies enabled by default. Session cookies are cookies that last for as long as the user is browsing your website. After he’s closed the browser the cookie will be cleared. More permanent cookies are also normally enabled by default. However, third-party cookies, those from a third-party site, are usually disabled. These are the cookies used for tracking people from site to site and hence the ones that raise the most privacy concerns.
Both the functions that you’ve made for creating and getting cookies will cause no errors when cookies are disabled, but of course the value of any cookie set will be null and you need to make sure your code can cope with this.
You could set a default action for when cookies are disabled. In the previous example, if cookies are disabled, the What’s New? link will never appear.
Alternatively, you can let the user know that your website needs cookies to function by putting a message to that effect in the web page.
Another tactic is to actively check to see whether cookies are enabled and, if not, to take some action to cope with this, such as by directing the user to a page with less functionality that does not need cookies. How do you check to see if cookies are enabled?
In the following script, you set a test cookie and then read back its value. If the value is null, you know cookies are disabled:
setCookie("TestCookie","Yes");
if (!getCookieValue("TestCookie")) {
alert("This website requires cookies to function");
}
Number and Information Limitation
A second limitation is on the number of cookies you can set on the user’s computer for your website and how much information can be stored in each. In older browsers, for each domain, it was common that you could store only up to 20 cookies, and each cookie pair—that is, the name and value of the cookie combined—must not be more than 4,096 characters (4KB) in size. It’s also important to be aware that all browsers do set some upper limit for the number of cookies stored. When that limit is reached, older cookies, regardless of expiration date, are often deleted. Some modern browsers have a 50-cookie limit, though this may vary.
To get around the cookie limits, you can store more than one piece of information per cookie. This example uses multiple cookies:
setCookie("Name", "Karen")
setCookie("Age", "44");
setCookie("LastVisit", "10 Jan 2001");
You could combine this information into one cookie, with each detail separated by a semicolon:
setCookie("UserDetails", "Karen;44;10 Jan 2001");
Because the setCookie() function escapes the value of the cookie, there is no confusion between the semicolons separating pieces of data in the value of the cookie, and the semicolons separating the parts of the cookie. When you get the cookie value back usinggetCookieValue(), you just split it into its constituent parts; however, you must remember the order you stored it in:
var cookieValues = getCookieValue("UserDetails");
cookieValues = cookieValues.split(";");
alert("Name = " + cookieValues[0]);
alert("Age = " + cookieValues[1]);
alert("Last Visit = " + cookieValues[2]);
Now you have acquired three pieces of information and still have 19 cookies left in the jar. This approach, however, is less than ideal, and you learn how to store data using newer technologies later in this chapter.
COOKIE SECURITY AND IE
IE6 introduced a new security policy for cookies based on the P3P an initiative set up by the World Wide Web Consortium (W3C). The general aim of P3P is to reassure users who are worried that cookies are being used to obtain personal information about their browsing habits. In IE you can select the Gear menu ➪ Internet Options and click the Privacy tab to see where you can set the level of privacy with regards to cookies (see Figure 13.19). You have to strike a balance between setting it so high that no website will work and so low that your browsing habits and potentially personal data may be recorded.
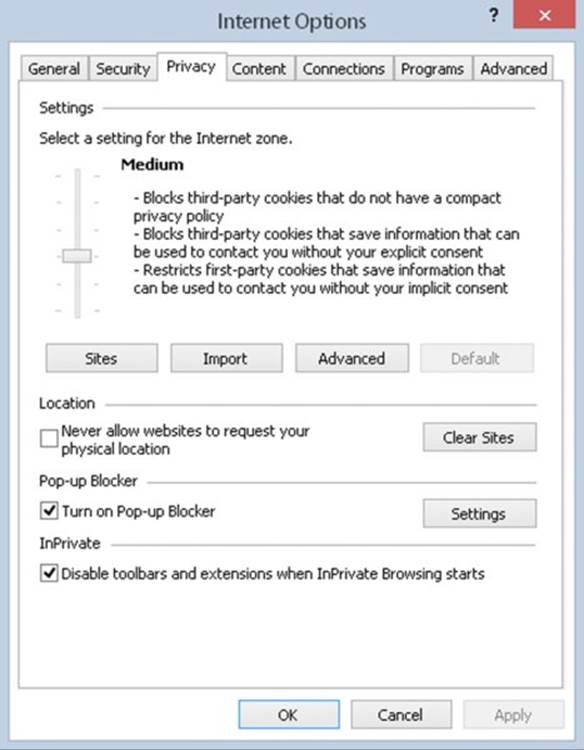
Figure 13.19
Generally, by default session cookies—cookies that last for only as long as the user is browsing your website—are allowed. As soon as the user closes the browser, the session ends. However, if you want cookies to outlast the user’s visit to your website, you need to create a privacy policy in line with the P3P recommendations. This sounds a little complex, and certainly the fine details of the policy can be. Because of this complexity, very few implementations of P3P exist. But many groups are working to make it easier for people to use.
WEB STORAGE
Cookies are a useful tool that web developers can take advantage of to store data on the user’s computer. But cookies are a tool designed for a different time, and thus, a different Web. Although they served a specific purpose (and did so reasonably well), their limitations are not ideal for modern JavaScript development:
· The first issue is the application programming interface (API). To write and read cookies, you use the document.cookie property. Writing a cookie is relatively straightforward, but reading a specific cookie requires a lot of code. You wrote two helper functions to make writing and reading cookies easier, but ideally, you shouldn’t have to.
· Cookies are not a browser feature, but a feature of HTTP. As such, the browser sends them to the server on every request. This is useful for applications that live on the server, but it’s unnecessary for JavaScript that runs in the browser.
· The browser limits the amount of cookies it stores and the size they can be. As mentioned earlier, this can be anywhere from 20 to 50 cookies for each domain, and each cookie cannot exceed 4KB.
· Cookies are shared between both the browser and the server. If your server application needs 30 cookies (120KB) to function, that at best leaves you with 20 cookies (80KB). You’re out of luck if you need more.
· They can expire. Although you can control this by setting and maintaining an expiration date, it’s simpler to not have one.
HTML5 introduced a new feature called web storage, and it solves each of cookies’ aforementioned problems. Since its introduction, web storage has been moved out of the HTML5 specification and into its own (which is named Web Storage). It consists of two components: session storage and local storage. As you may have guessed, session storage is temporary storage that is cleared when the user closes the browser (like a cookie without an expiration date). But in most cases, you want to store data that persists between visits, and that is local storage’s purpose. Other noteworthy features of web storage are:
· It stays within the browser and is not transmitted to the server. It is storage for JavaScript developers.
· It provides significantly more storage space. Chrome and Firefox support 5MB per domain. IE supports 10MB.
· The data stored in local storage never expires; it remains until you or the user deletes it.
NOTE This section focuses on local storage, but you can apply the same concepts to session storage.
The data stored in web storage is associated with a unique name. In technical terms, we refer to this name as a key, and the data associated with a key is referred to as the value. Together, we refer to the key and its value as a key/value pair.
You access local storage using the localStorage object (session storage is accessed through sessionStorage), and it makes it easy to set, get, and remove data.
Setting Data
The localStorage object exposes a method called setItem(), and its purpose is to set a value associated with a given key. It’s very simple to use, as shown here:
localStorage.setItem("userName", "Paul");
The first argument passed to setItem() is the key; the second is the value associated with that key. In the case of this code, the value of Paul is stored in local storage and is associated with the key of userName.
You can also set data using the more traditional object.propertyName syntax, like so:
localStorage.userName = "Paul";
The result of this code is identical to the previous setItem() example; the value of Paul is set for the key of userName.
If the results are identical, why use setItem()? The answer is that you don’t have to unless your key is an invalid JavaScript identifier. For example, let’s say you want to use the key user name. That’s impossible to use as a property name:
localStorage.user name = "Paul"; // invalid!
But you can use "user name" as a key with the setItem() method:
localStorage.setItem("user name", "Paul");
In most cases, you won’t use setItem(), but it is there to use if and when you need to.
Getting Data
Retrieving data from local storage is just as straightforward as setting it. With the getItem() method, you supply the key for which you want the value of:
var name = localStorage.getItem("userName");
This code uses the getItem() method to retrieve the value associated with the "userName" key and assigns that value to the name variable. In the case of the example from the previous section, name would contain "Paul".
You can also use the key as localStorage’s property if it is a valid identifier:
var name = localStorage.userName;
This code also gets the value of Paul and assigns it to the name variable.
A word of note: Keys are case-sensitive. That may seem obvious if you are using object.propertyName syntax, but the rule applies to setItem() and getItem(). For example:
localStorage.setItem("userName", "Paul");
var name = localStorage.getItem("UserName"); // null
This code set a key of userName with a value of Paul. It then tries to retrieve a value with the key of UserName. Because of the uppercase U, UserName and userName are two different keys. We haven’t set a value with UserName, so getItem() returns null.
Removing Data
Eventually, you will want to remove some data that you stored in local storage, and you can do that with the removeItem() method. Simply provide the key you want to remove, and the key/value pair will be deleted from local storage. For example:
localStorage.removeItem("userName");
This code deletes the userName/Paul key/value pair from local storage. If the key is a valid JavaScript identifier, you can also use object.propertyName syntax to do the same thing, like so:
localStorage.userName = null;
Here, you assign the value of null to the userName key/property, thus removing the key/value pair from local storage.
If your goal is to remove all keys and values from local storage, you can use the clear() method, like this:
localStorage.clear(); // no more key/value pairs
Storing Data as Strings
It’s important to note that web storage is a string-only data store. This means that keys and their values can only be strings. If you try to store some other type of value (like a number) or object, it is converted to a string and stored as a string. For example, let’s say you want to store the user’s age in local storage. You can easily do so like this:
localStorage.age = 35;
As you rightly suspect, this creates a key/value pair of age/35. But 35 was converted to a string before it was stored in local storage. Therefore, when you retrieve the value associated with the age key, you have the string of 35:
var age = localStorage.age;
alert(typeof age); // string
This means that to use age in any mathematic calculations, you need to convert it to a number. That’s easy enough to fix:
var age = parseInt(localStorage.age, 10);
But what about more complex objects? Consider the following object as an example:
var johnDoe = {
firstName: "John",
lastName: "Doe",
age: 35
};
This johnDoe object represents an individual person named John Doe, and he is 35 years old. We want to save this object in local storage, so we assign it as the value to the person key, like this:
localStorage.person = johnDoe;
But there’s a problem here: The person object cannot be reasonably converted into a string.
When you assign a value or object to a key, its toString() method is automatically called to convert it to a string. For primitive types like Number and Boolean, we get the string representation of that value. But by default, an object’s toString() method returns "[object Object]". Therefore in the preceding example, the string "[object Object]" is stored in localStorage.person:
var savedPerson = localStorage.person;
alert(typeof savedPerson); // string
alert(savedPerson); "[object Object]"
This sounds like a huge limitation (and it is!), but we can serialize objects into JSON and parse them back into actual objects. Therefore, we can write this:
localStorage.person = JSON.stringify(johnDoe);
var savedPerson = JSON.parse(localStorage.person);
This code serializes the johnDoe object and stores the resulting JSON with the person key. Then, when you need to retrieve and use that information, you deserialize the JSON using JSON.parse() and assign the resulting object to the savedPerson variable. Now we can store just about anything we need to in local storage, and we have a ton of space to store it in!
TRY IT OUT What’s New? Now with Local Storage
Let’s rewrite Example 2 using local storage. Feel free to copy and paste the contents of ch13_example2a.html and ch13_example2b.html as the basis for the new files.
Let’s create the first page:
<!DOCTYPE html>
<html lang="en">
<head>
<title>Chapter 13: Example 3a</title>
</head>
<body>
<h1>Welcome to Example 3a</h1>
<div id="whatsNew"></div>
<script>
var lastUpdated = new Date("Tue, 28 Dec 2020");
var lastVisit = localStorage.lastVisit;
if (lastVisit) {
lastVisit = new Date(lastVisit);
if (lastVisit < lastUpdated) {
document.getElementById("whatsNew").innerHTML =
"<a href='ch13_example3b.html'>What's New?</a>";
}
}
localStorage.lastVisit = new Date();
</script>
</body>
</html>
Save this page as ch13_example3a.html. Next, create a simple page to link to for the What’s New? details:
<!DOCTYPE html>
<html lang="en">
<head>
<title>Chapter 13: Example 3b</title>
</head>
<body>
<h1>Welcome to Example 3b</h1>
<h3>Here's what's new!</h3>
</body>
</html>
Save this page as ch13_example3b.html.
Load ch13_example3a.html into a browser. This page behaves exactly like Example 2a. The first time you go to the main page, there will be nothing but a heading saying “Welcome to Example 3a.” Refreshing the page displays the “What’s New?” link in the page. Clicking this link takes you to ch13_example3b.html.
As before, we’ll focus on the JavaScript contained within ch13_example3b.html.
First, you declare the lastUpdated variable:
var lastUpdated = new Date("Tue, 28 Dec 2020");
Next, you get the date of the user’s last visit from local storage with the lastVisit key:
var lastVisit = localStorage.lastVisit;
This assigns one of two values to the lastVisit variable. If this is the user’s first visit to the page, the localStorage.lastVisit key won’t exist and returns null to lastVisit. In which case, you won’t display the What’s New? link in the document.
The second possible value of lastVisit is a string representation of the date the user last visited the page. In this situation, you need to check whether the user visited the site before it was last updated and direct the user to the What’s New? page if so:
if (lastVisit) {
lastVisit = new Date(lastVisit);
if (lastVisit < lastUpdated) {
document.getElementById("whatsNew").innerHTML =
"<a href='ch13_example3b.html'>What's New?</a>";
}
}
Remember that the data stored in local storage is strings; so, you create a new Date object based on the value of lastVisit and store it in the lastVisit variable. Then, if lastVisit is less than lastUpdated, you display the What’s New? link in the document.
In the final line of code, you reset the value of the localState.lastVisit key:
localStorage.lastVisit = new Date();
Viewing Web Storage Content
Like cookies, you can also view the data stored in web storage, but doing so requires you to use the features found in each browser’s development tools. You learn about the development tools found in Internet Explorer, Chrome, and Firefox in Chapter 18, but viewing the web storage content in Chrome is straightforward. Simply press F12 to bring up the development tools and click the Resources tab. Figure 13.20 shows you the local storage for the beginningjs.com domain.
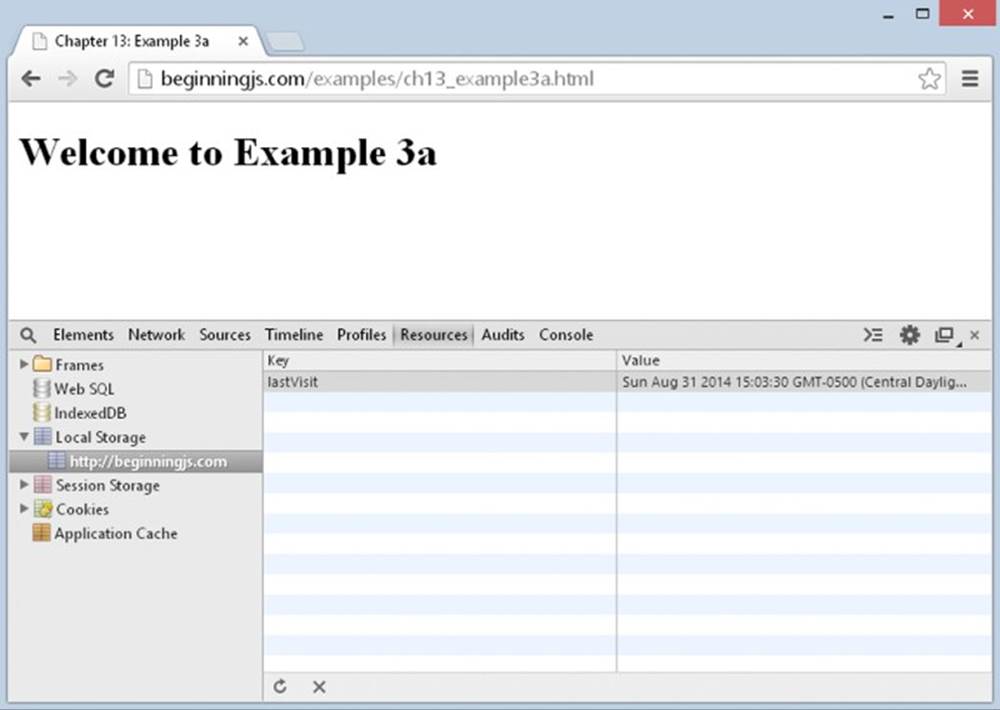
Figure 13.20
You can only view the web storage of the domain of the page currently loaded in a given tab; you cannot view one domain’s web storage from another domain.
SUMMARY
In this chapter, you looked at how you can store information on the user’s computer and use this information to personalize the website. In particular, you found the following:
· The key to cookies is the document object’s cookie property.
· Creating a cookie simply involves setting the document.cookie property. Cookies have six different parts you can set. These are the name, the value, when it expires, the path it is available on, the domain it’s available on, and finally whether it should be sent only over secure connections.
· Although setting a new cookie is fairly easy, you found that retrieving its value actually gets all the cookies for that domain and path, and that you need to split up the cookie name/value pairs to get a specific cookie using String object methods.
· Cookies have a number of limitations. First, the user can set the browser to disable cookies; and second, you are limited to 50 cookies per domain in IE7+ and Firefox and a maximum of 4,096 characters per cookie name/value pair.
· Web storage is a new key/value pair data store that replaces the need for cookies for JavaScript developers. Though it was originally introduced with HTML5, it is now its own specification.
· Setting, getting, and removing data from web storage is simple. You can either use localStorage’s getItem(), setItem(), and removeItem() methods, or you can assign and use properties on localStorage itself.
· The data stored in web storage is converted to strings. So, you have to convert the data back into its appropriate data type in order to effectively use it. This is easily done thanks to various functions like parseInt(), Date’s constructor, and JSON.parse().
EXERCISES
You can find suggested solutions to these questions in Appendix A.
1. Using local storage, create a page that keeps track of how many times the page has been visited by the user in the last month.
2. Use local storage to load a different advertisement every time a user visits a web page.
All materials on the site are licensed Creative Commons Attribution-Sharealike 3.0 Unported CC BY-SA 3.0 & GNU Free Documentation License (GFDL)
If you are the copyright holder of any material contained on our site and intend to remove it, please contact our site administrator for approval.
© 2016-2026 All site design rights belong to S.Y.A.