Wrox Press Beginning JavaScript 5th (2015)
Chapter 15. HTML5 Media
WHAT YOU WILL LEARN IN THIS CHAPTER:
· Playing audio and video natively in modern web browsers
· Writing a custom control UI for media playback
· Synchronizing your UI with the browser’s native controls
· Parsing JSON back into actual objects and values you can use in your pages
WROX.COM CODE DOWNLOADS FOR THIS CHAPTER
You can find the wrox.com code downloads for this chapter at http://www.wiley.com/go/BeginningJavaScript5E on the Download Code tab. You can also view all of the examples and related files at http://beginningjs.com.
At its inception, the Internet was a text delivery system. Whereas the first HTML specification described the <img> tag for embedding images within a document, HTTP and HTML were designed primarily for transmitting and displaying text (hence, Hyper-Text).
In the late 1990s, personal computers were finding their way into more households, and ordinary people were able to access the web. Naturally, people wanted more from the web, and browser makers accommodated this by designing their browsers to use plug-ins, third-party applications that were designed to do things browsers normally didn’t, such as playing video and audio.Plug-ins solved a particular problem, but they weren’t without their faults—the largest being the need for so many of them. A wide variety of music and video formats were available, and certain plug-ins would only play certain formats. Stability was also an issue because a malfunctioning plug-in could crash the browser.
Then in 2005, some enterprising folks created YouTube, a video-sharing website. Instead of relying on QuickTime or Windows Media Player, YouTube’s videos were served to users as Macromedia/Adobe Flash files. This was advantageous because of Flash’s ubiquity; Macromedia/Adobe had Flash plug-ins for every major browser and operating system. Soon thereafter, websites started using Flash for delivering their video and audio content to users, and everything was right in the world. Or was it?
Many people believe the browser should have the built-in capability for playing video and audio. So the people developing the HTML5 specification included two new tags, <video> and <audio>, for that express purpose. And although it’s wonderful that, after so many years, browsers finally have the built-in capability of playing media, issues still exist that we developers have to deal with. But first, let’s take a brief look at these new tags and how they work within the browser.
A PRIMER
Before we begin, the video used in this chapter is called Big Buck Bunny, and it is Creative Commons-licensed as an open movie. Because of its size, you will not find the video in the code download. You can, however, download Big Buck Bunny in a variety of formats at http://www.bigbuckbunny.org.
It’s also worth noting that video and audio are very similar; in fact, the primary difference between the two elements is that <audio/> elements have no playback area for visual content. Although this discussion focuses primarily on video, the same concepts can be applied to audio.
Before HTML5, embedding video within a web page was cumbersome because it required you to use no less than three elements for the video to work in all browsers. With HTML5, however, all you need is the <video/> element:
<video src="bbb.mp4"></video>
The <video/> element’s src attribute contains the location of the video file. In this case, the browser will attempt to load the bbb.mp4 file that is in the same directory as the page.
Of course, older browsers do not support the <video/> element, and as such, they will simply ignore the <video/> element. You can, however, add some content inside the <video/> element like this:
<video src="bbb.mp4">
<a href="bbb.mp4">Download this video.</a>
</video>
Browsers that support native video will not display the link, but browsers that do not support native video will, as shown in Figure 15.1.
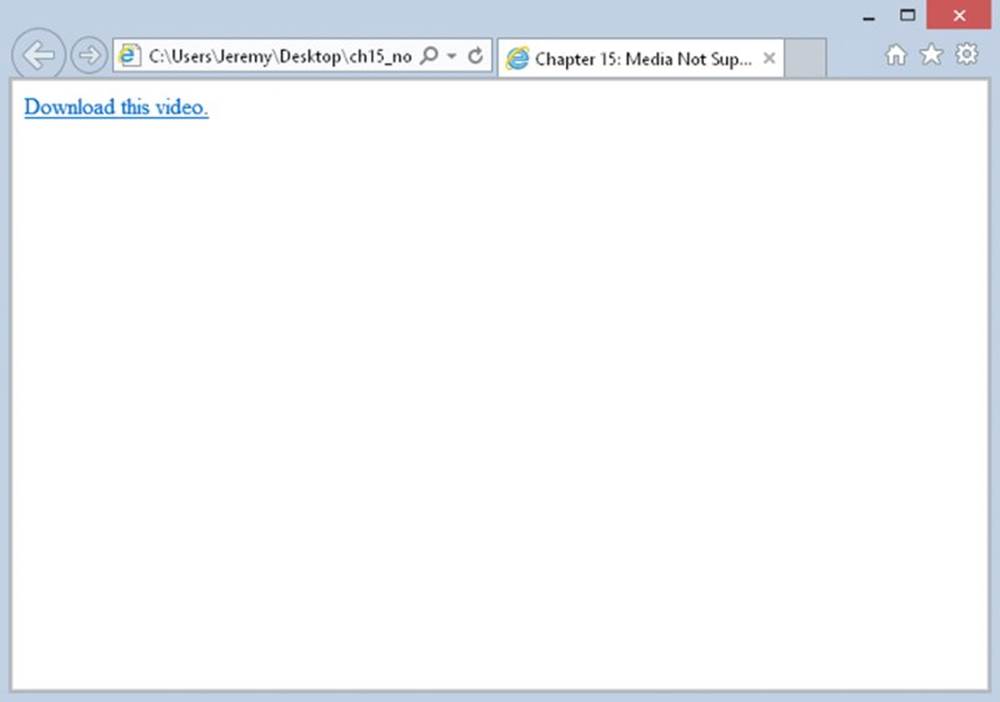
Figure 15.1
In most cases, you won’t use the src attribute in your HTML. Instead, you’ll define a <source/> element inside <video/>, like this:
<video>
<source src="bbb.mp4" />
<a href="bbb.mp4">Download this video.</a>
</video>
The reason is fairly simple: Different browsers support different formats. This is the primary issue we face with native video support. For example, Figure 15.2 shows IE11 with a page that contains the previous code.
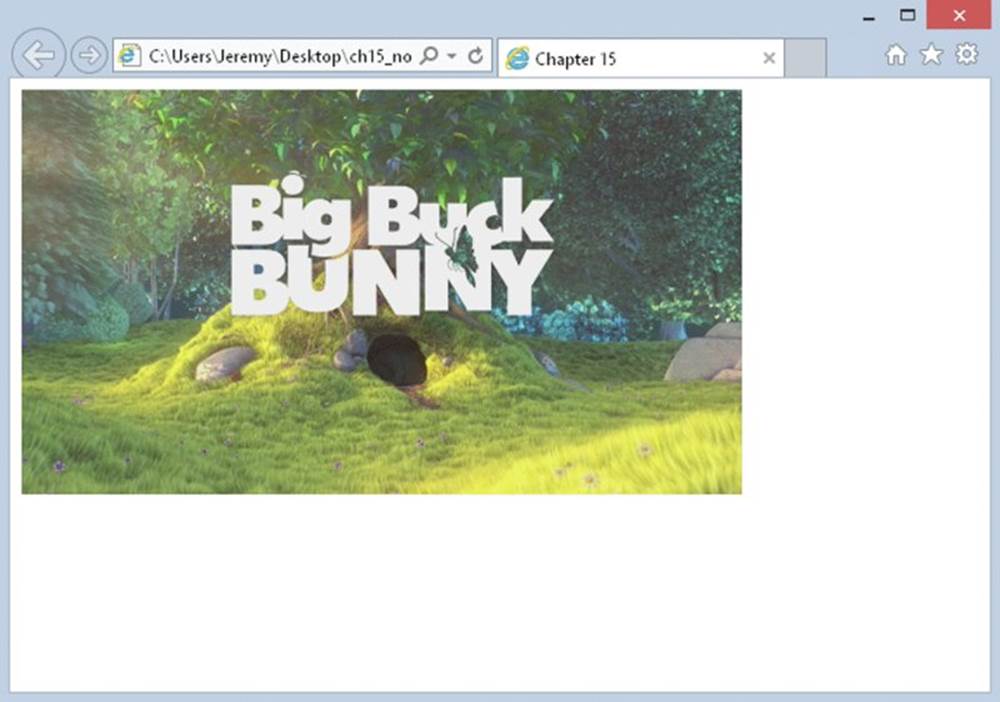
Figure 15.2
The video is in H.264 format, which is supported by IE11 and Chrome. Firefox, at the time of this writing, has partial support, and viewing the same page gives you Figure 15.3.
Figure 15.3
Bupkis. But you can skirt around this issue by providing the same video in different formats. Firefox has complete support for WebM, and you can accommodate other WebM-supporting browsers by adding another <source/> element, like this:
<video>
<source src="bbb.mp4" />
<source src="bbb.webm" />
<a href="bbb.mp4">Download this video.</a>
</video>
Browsers will read each source in the order in which it appears in the HTML. They download the video’s metadata to determine which video to load, and they load the first video that it supports. Chrome supports both H.264 and WebM; so, if Chrome were to load a page with this code, it would load the .mp4 file.
You can prevent the browser from downloading a video’s metadata by providing the MIME type for each <source/> element. You do this with the type attribute, as shown here:
<video>
<source src="bbb.mp4" type="video/mp4" />
<source src="bbb.webm" type="video/webm" />
<a href="bbb.mp4">Download this video.</a>
</video>
You can also provide the codec information in the type attribute to allow the browser to make more intelligent decisions like this:
<video>
<source src="bbb.mp4"
type='video/mp4; codecs="avc1.4D401E, mp4a.40.2"' />
<source src="bbb.webm" type'video/webm; codecs="vp8.0, vorbis"' />
<a href="bbb.mp4">Download this video.</a>
</video>
NOTE It’s beyond the scope of this book to provide an in-depth discussion on the various codecs used and the browsers that support them. So for the sake of simplicity, this chapter omits the type attribute altogether—along with the text-based fallback.
By default, videos do not display controls, but you can easily add the default controls by adding the controls attribute to the <video/> element:
<video controls>
You don’t have to set controls to any value; its presence is enough to turn on the browser’s default controls for the video.
You can also tell the browser to preload the video with the preload attribute:
<video controls preload>
This tells the browser to immediately start loading the video. Like the controls attribute, you don’t have to set a value for preload.
By default, the browser uses the first frame of the video as the poster of the video, the initial visual representation of the video. You can use the poster attribute to display a custom image for the video’s poster:
<video controls preload poster="bbb.jpg">
The poster attribute, as you might imagine, is specifically for <video/> elements, but you can add a few other attributes to the <video/> and <audio/> elements. Probably the most important, from a JavaScript perspective, is the id attribute. It is, after all, how you find specific media in the page so that you can script them.
SCRIPTING MEDIA
In the DOM, <video/> and <audio/> elements are HTMLMediaElement objects, and the HTML5 specification defines an API for working with these objects. But naturally, before you can use any of the methods, properties, or events of a media object, you need to first obtain one. You can retrieve an existing <video/> or <audio/> element in the page using any of the various methods for finding elements. For the sake of simplicity, assume there’s a <video id="bbbVideo"> tag in the page. You could get it with the following code:
var video = document.getElementById("bbbVideo");
Or you can create one dynamically using document.createElement(), like this:
var video = document.createElement("video");
And once you have an HTMLMediaElement object, you can begin to program it with its robust API.
Methods
Media objects have just a handful of methods, and they’re primarily used for controlling media playback, as shown in the following table.
|
METHOD NAME |
DESCRIPTION |
|
canPlayType(mimeType) |
Determines the likelihood that the browser can play media of the provided MIME type and/or codec |
|
load() |
Begins to load the media from the server |
|
pause() |
Pauses the media playback |
|
play() |
Begins or continues the playback of the media |
These are the methods defined by the HTML5 specification, but be aware that the various browsers can also implement their own methods in addition to these four. For example, Firefox adds many more methods to HTMLMediaElement objects. This book, however, does not cover them.
The pause() and play() methods are straightforward; you use them to pause and play the media, respectively:
video.play();
video.pause();
The other two methods are used when you want to load media dynamically. The load() method, obviously, tells the browser to load the specified media. The canPlayType() method, however, is a bit more involved because it doesn’t return true or false. Instead, it returns a variety of values indicating the likelihood that the browser supports the given type. The possible values returned by canPlayType() are:
· "probably": Indicates that the type appears to be playable
· "maybe": It’s impossible to tell if the type is playable without actually playing it.
· "": The media definitely cannot be played.
The canPlayType() and load() methods are only needed if you plan to load a video dynamically. Here’s an example of how that code could look:
if (video.canPlayType("video/webm") == "probably") {
video.src = "bbb.webm";
} else {
video.src = "bbb.mp4";
}
video.load();
video.play();
This code uses the canPlayType() method to determine if the browser supports the WebM format. If it does, the video’s src property (which you learn more about in the next section) is set to the WebM version of the video. If WebM isn’t supported, the browser’s src is set to the MP4 version. Then, after the video is loaded with the load() method, the play() method plays the video.
TRY IT OUT Controlling Media Playback
Let’s apply some of this newfound knowledge with a simple example. You write a web page that plays and pauses a video. Note that this example assumes you have two videos: bbb.mp4 and bbb.webm. Open your text editor and type the following:
<!DOCTYPE html>
<html lang="en">
<head>
<title>Chapter 15: Example 1</title>
</head>
<body>
<div>
<button id="playbackController">Play</button>
</div>
<video id="bbbVideo">
<source src="bbb.mp4" />
<source src="bbb.webm" />
</video>
<script>
function playbackClick(e) {
var target = e.target;
var video = document.getElementById("bbbVideo");
if (target.innerHTML == "Play") {
video.play();
target.innerHTML = "Pause";
} else {
video.pause();
target.innerHTML = "Play";
}
}
document.getElementById("playbackController")
.addEventListener("click", playbackClick);
</script>
</body>
</html>
Save this file as ch15_example1.html and open it in your browser. You should see a button with the text Play and a video directly beneath it as shown in Figure 15.4.
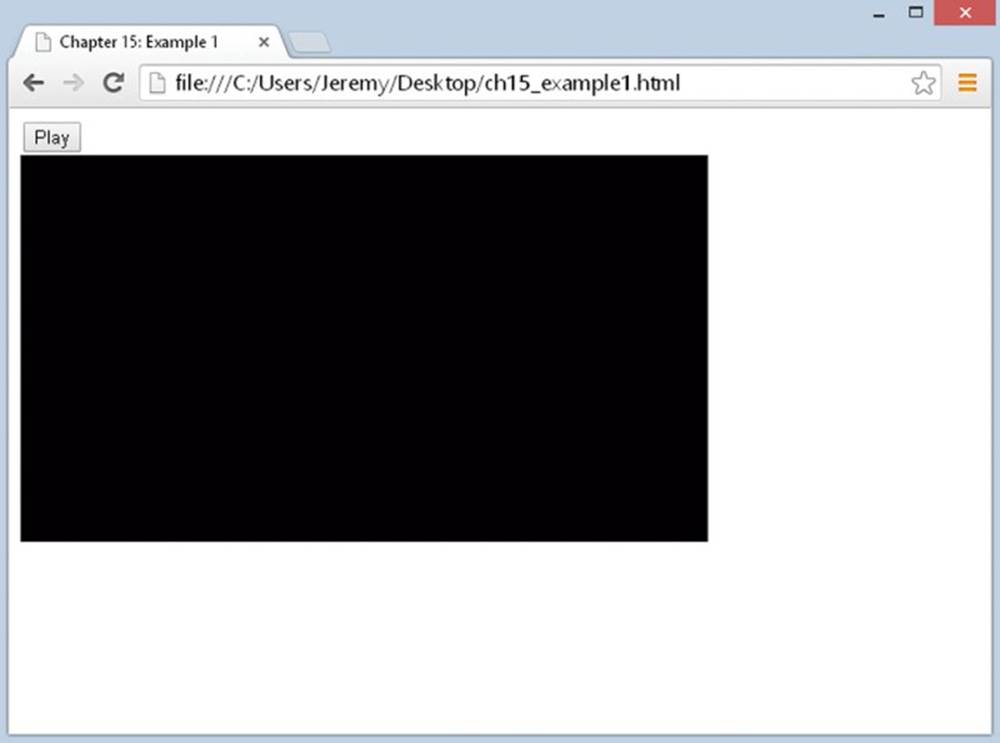
Figure 15.4
Clicking the button changes its text to Pause and starts playing the video. Clicking the button again changes the text back to Play and pauses the video.
In the body of the page, you have a <button/> element with the id of playbackController. As its ID implies, it is used for controlling the playback of the media, a video embedded with the <video/> element:
<video id="bbbVideo">
<source src="bbb.mp4" />
<source src="bbb.webm" />
</video>
The main portion of the JavaScript code is a function called playbackClick(), an event handler for the <button/>’s click event. The first two statements of this function create two variables called target and video:
function playbackClick(e) {
var target = e.target;
var video = document.getElementById("bbbVideo");
The target variable is the event target (the button), and video contains a reference to the <video/> element object.
Next you determine whether you need to play or pause the video, and you do that by checking the text of the <button/> element:
if (target.innerHTML == "Play") {
video.play();
target.innerHTML = "Pause";
}
If it’s Play, you want to play the video. You do so by using the HTMLMediaElement object’s play() method, and you change the button’s text to read Pause.
If the result of this if statement is false, you can assume that you want to pause the video:
else {
video.pause();
target.innerHTML = "Play";
}
}
So, in the else statement, you use the media object’s pause() method and change the button’s text back to Play.
Of course, this function won’t execute itself, so you register a click event listener on the <button/> object:
document.getElementById("playbackController")
.addEventListener("click", playbackClick);
This example works, but it’s not an ideal solution for controlling media. Specifically, you shouldn’t rely upon the text of an element to determine if you should play or pause. You can better control media by incorporating some of the many properties defined by the HTML5 specification.
Properties
Although the HTML5 specification defines just a few methods for media objects, it defines a lot of properties. You won’t find a complete list of properties in this section, but Appendix C lists all of them.
Most of the HTMLMediaElement’s properties are for querying and/or modifying the state of the media; others, like controls and poster (the latter for video) are cosmetic.
The following table lists a few of the properties and their descriptions.
|
PROPERTY NAME |
DESCRIPTION |
|
autoplay |
Gets or sets the autoplay HTML attribute, indicating whether playback should automatically begin as soon as enough media is available |
|
controls |
Reflects the controls HTML attribute |
|
currentTime |
Gets the current playback time. Setting this property seeks the media to the new time. |
|
duration |
Gets the length of the media in seconds; zero if no media is available. Returns NaN if the duration cannot be determined |
|
ended |
Indicates whether the media element has ended playback |
|
loop |
Reflects the loop HTML attribute. Indicates whether the media element should start over when playback reaches the end |
|
muted |
Gets or sets whether the audio is muted |
|
paused |
Indicates whether the media is paused |
|
playbackRate |
Gets or sets the playback rate. 1.0 is normal speed. |
|
poster |
Gets or sets the poster HTML attribute |
|
preload |
Reflects the preload HTML element attribute |
|
src |
Gets or sets the src HTML attribute |
|
volume |
The audio volume. Valid values range from 0.0 (silent) to 1.0 (loudest). |
Like the methods from the previous section, these properties are defined by the HTML5 specification, but some browser makers also implement their own proprietary properties. Also like the aforementioned methods, the majority of these properties are straightforward; their names do a pretty good job of describing what they’re used for.
For example, the aptly named paused property can tell you if the media is paused, like this:
if (video.paused) {
video.play();
} else {
video.pause();
}
It’s important to know that the default state of any media is paused. The browser only plays media when it’s told to do so—either explicitly with the play() method or via the built-in controls, or implicitly with the autoplay property/HTML attribute.
You can use the muted property to not only tell you if the audio is muted, but to also mute the audio. For example:
if (video.muted) {
video.muted = false;
} else {
video.muted = true;
}
Or to write it in a more simplified manner:
video.muted = !video.muted;
This code achieves the same results as the previous example; it sets video.muted to the opposite of its current value.
The src property, however, is a bit different. It’s clear that it sets the media of a <video/> or <audio/> element, but when you set the src of a media object, you have to load it explicitly with the load() method. Otherwise, whatever media is currently loaded by the browser will play when you call the play() method. Therefore, the following code does not correctly change and play the media of a media object:
// incorrect
video.src = "new_media.mp4";
video.play();
This code sets the src property, but it doesn’t load the new media with the load() method. Therefore, when the video plays again, it still plays the media currently loaded by the browser. To fix this, you have to call load() before you call play(), like this:
video.src = "new_media.mp4";
video.load();
video.play();
TRY IT OUT Controlling Media Playback II
Let’s revisit Example 1 and improve it by taking advantage of some of the HTMLMediaElement object’s properties. Open your text editor and type the following:
<!DOCTYPE html>
<html lang="en">
<head>
<title>Chapter 15: Example 2</title>
</head>
<body>
<div>
<button id="playbackController">Play</button>
<button id="muteController">Mute</button>
</div>
<video id="bbbVideo">
<source src="bbb.mp4" />
<source src="bbb.webm" />
</video>
<script>
function playbackClick(e) {
var target = e.target;
var video = document.getElementById("bbbVideo");
if (video.paused) {
video.play();
target.innerHTML = "Pause";
} else {
video.pause();
target.innerHTML = "Resume";
}
}
function muteClick(e) {
var target = e.target;
var video = document.getElementById("bbbVideo");
if (video.muted) {
video.muted = false;
target.innerHTML = "Mute";
} else {
video.muted = true;
target.innerHTML = "Unmute";
}
}
document.getElementById("playbackController")
.addEventListener("click", playbackClick);
document.getElementById("muteController")
.addEventListener("click", muteClick);
</script>
</body>
</html>
Save this as ch15_example2.html and open it in your browser. You should now see two buttons: Play and Mute. Directly beneath these buttons is the video, as shown in Figure 15.5.
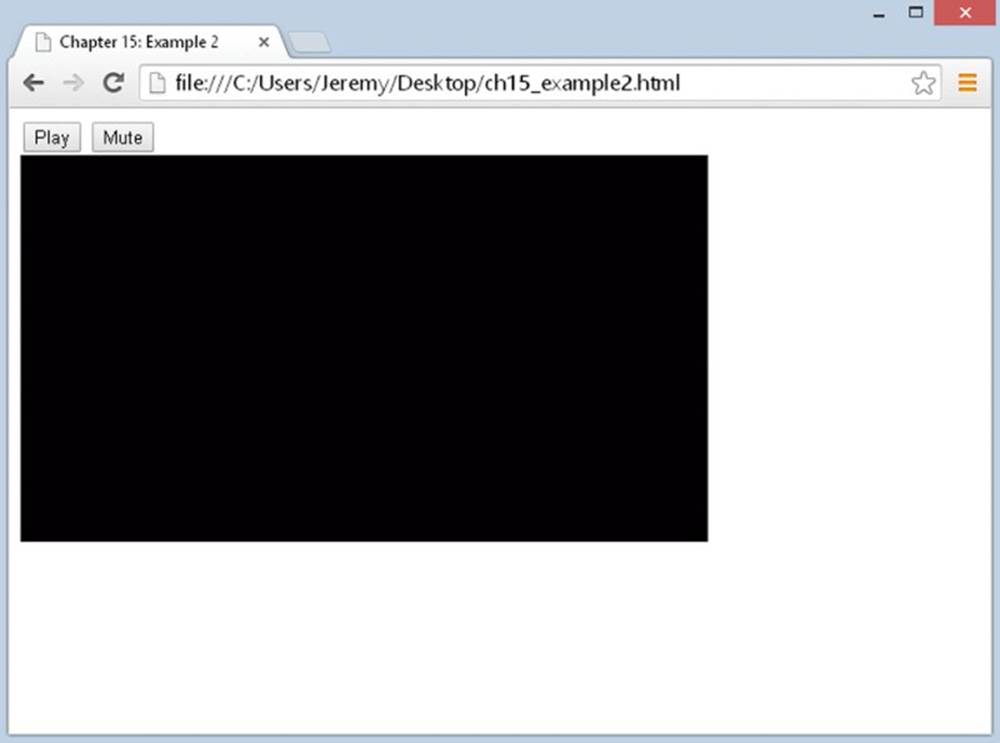
Figure 15.5
Start playing the video and click the Mute button. You’ll notice that the audio is now muted and the button’s text reads Unmute. Click the button again to unmute the audio.
Now click the Pause button. You’ll notice that the video pauses and the button’s text changes to Resume. Clicking the button again resumes the video.
This example is quite different from Example 1. Starting with the HTML, you added a new <button/> element:
<div>
<button id="playbackController">Play</button>
<button id="muteController">Mute</button>
</div>
It has an id of muteController and the text of Mute. As you already know, it’s used for muting and unmuting the audio. You register the click event listener at the bottom of the code:
document.getElementById("muteController")
.addEventListener("click", muteClick);
The function used to handle this event is called muteClick(). Its first two lines create the target and video variables—the former containing a reference to the <button/> element object, and the latter referencing the HTMLMediaElement object:
function muteClick(e) {
var target = e.target;
var video = document.getElementById("bbbVideo");
This function toggles the muted property of the media object, so you first need to check its current value with an if statement:
if (video.muted) {
video.muted = false;
target.innerHTML = "Mute";
}
If it’s true, the audio is currently muted. So, you set video.muted to false and change the text of the button to Mute, thus unmuting the video.
But if muted is false, the else statement executes, muting the video:
else {
video.muted = true;
target.innerHTML = "Unmute";
}
}
You set the video’s muted property to true to mute it, and then you change the button’s text to Unmute.
The playbackClick() function is logically identical to muteClick(). After you set the target and video, you then determine whether you need to play or pause the video. You can accomplish this easily with the media object’s paused property:
function playbackClick(e) {
var target = e.target;
var video = document.getElementById("bbbVideo");
if (video.paused) {
video.play();
target.innerHTML = "Pause";
}
If it’s true, you call the play() method to either start or resume playback. If paused is false, you want to pause playback:
else {
video.pause();
target.innerHTML = "Resume";
}
}
You do so with the pause() method, and you change the button’s text to Resume. The word "resume" was chosen to enhance the user’s experience; people expect to resume from a paused state. You could have implemented something similar in Example 1, but because the video’s state was determined by the text of a button, it would’ve required extra code to make it work.
Now, this example is a marked improvement over Example 1, but it still has an issue: Users can control the video through the context menu (Figure 15.6).
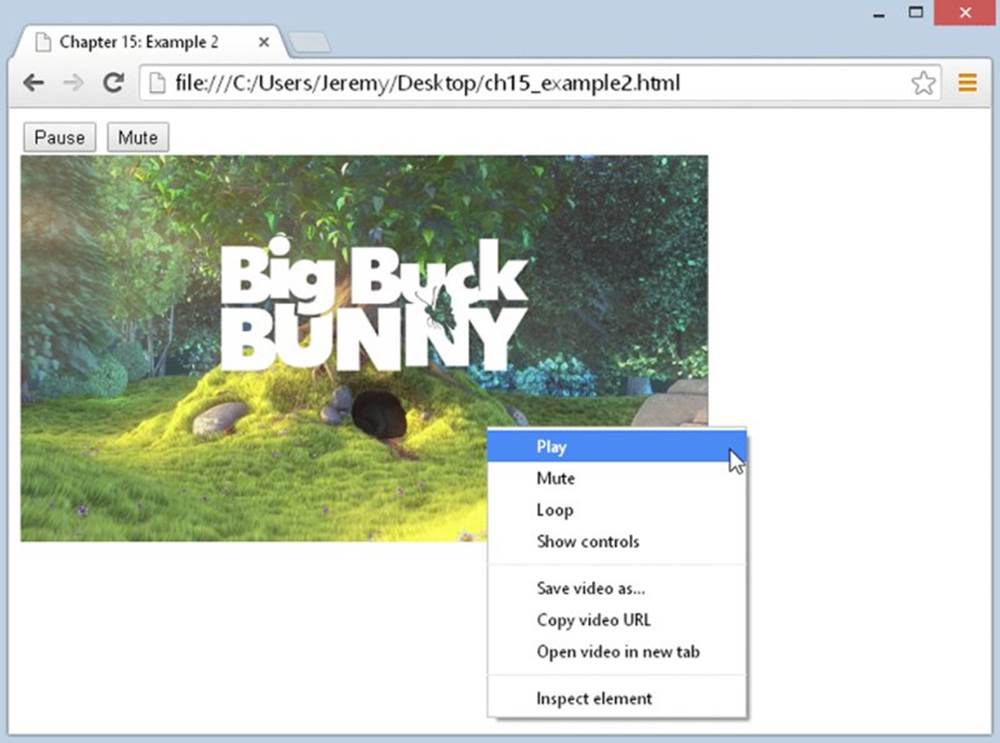
Figure 15.6
This in and of itself isn’t exactly a problem; after all, the best user interfaces have redundancies. It becomes problem when your custom UI doesn’t accurately portray the actual state of the media. Refer back to Figure 15.6. The context menu says Play whereas the custom Play/Pause button says Pause. Ideally, both the context menu and the custom UI should be in sync, and you can do that by listening for certain events.
Events
Events are the lifeblood of graphical applications, and media-based events are no exception. The folks behind the HTML5 specification did a very thorough job of defining the events web developers need to write robust media-driven pages and applications.
As you might suspect, there are a lot of events, and you can view the complete list in Appendix C. The following table, however, lists just a few.
|
EVENT NAME |
DESCRIPTION |
|
abort |
Fires when playback is aborted |
|
canplay |
Sent when enough data is available to play the media |
|
canplaythrough |
Indicates that the entire media can be played through without interruption |
|
durationchange |
The media’s metadata has changed, indicating a change in the media’s duration. |
|
ended |
Fires when playback completes |
|
error |
Sent when an error occurs |
|
loadstart |
Downloading has begun. |
|
pause |
Fires when playback is paused |
|
playing |
Sent when the media starts or resumes playing |
|
progress |
Downloading is in progress. |
|
ratechange |
Fires when the playback speed changes |
|
seeked |
Seeking has ended. |
|
seeking |
Fires when playback is moved to a new position |
|
timeupdate |
The currentTime property has changed. |
|
volumechange |
Either the volume property or muted property has changed. |
You register listeners for these events exactly like you would any other standard event: with addEventListener(). For example, you can execute code when the media is paused by listening for the pause event, like this:
function mediaPaused(e) {
alert("You paused the video!");
}
video.addEventListener("pause", mediaPaused);
And just like any other type of event, you can register different event listeners using the same handler function:
function mediaPausedPlaying(e) {
if (e.type == "pause") {
alert("You paused the video!");
} else {
alert("You're playing the video!");
}
}
video.addEventListener("pause", mediaPausedPlaying);
video.addEventListener("playing", mediaPausedPlaying);
This is advantageous if you need to execute the same or similar code for both events. In many (and perhaps most) cases, however, you’ll more than likely want to define and use different functions for different events.
Listening for these “state change” events is ideal when coding your own custom controller UI. You want your UI to accurately reflect the state of the media, and the "state change" events fire only when the media’s state changes. This, of course, makes them ideal for keeping a custom UI in sync with the built-in UI of the browser, as you see in the next example.
TRY IT OUT Controlling Media Playback III
Let’s use some of the events in the previous table to rewrite Example 2. The following code contains substantial changes, so you can use Example 2 as a starting point or type it all from scratch:
<!DOCTYPE html>
<html lang="en">
<head>
<title>Chapter 15: Example 3</title>
</head>
<body>
<div>
<button id="playbackController">Play</button>
<button id="muteController">Mute</button>
</div>
<video id="bbbVideo">
<source src="bbb.mp4" />
<source src="bbb.webm" />
</video>
<script>
function pauseHandler(e) {
playButton.innerHTML = "Resume";
}
function playingHandler(e) {
playButton.innerHTML = "Pause";
}
function volumechangeHandler(e) {
muteButton.innerHTML = video.muted ? "Unmute" : "Mute";
}
function playbackClick(e) {
video.paused ? video.play() : video.pause();
}
function muteClick(e) {
video.muted = !video.muted;
}
var video = document.getElementById("bbbVideo");
var playButton = document.getElementById("playbackController");
var muteButton = document.getElementById("muteController");
video.addEventListener("pause", pauseHandler);
video.addEventListener("playing", playingHandler);
video.addEventListener("volumechange", volumechangeHandler);
playButton.addEventListener("click", playbackClick);
muteButton.addEventListener("click", muteClick);
</script>
</body>
</html>
Save this as ch15_example3.html and open it in your browser. It will look exactly like Example 2. Each time you play, pause, mute, or unmute the video, be sure to open the media’s context menu. Both the custom UI and the control options in the context menu will be in sync, as shown in Figure 15.7.
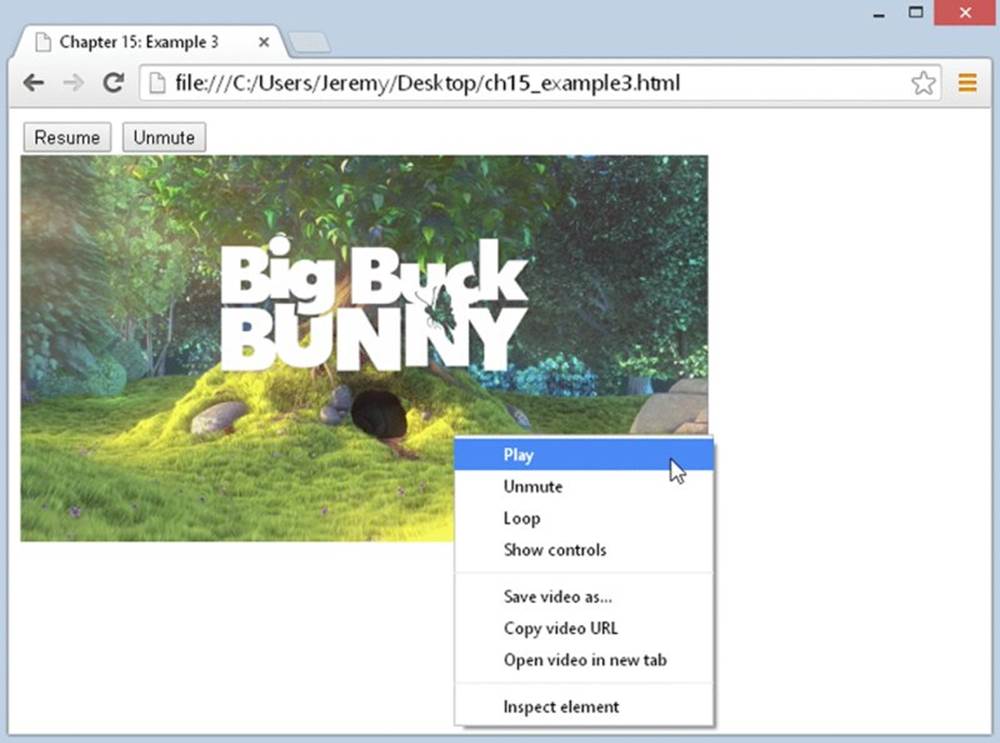
Figure 15.7
The HTML in this example is untouched from Example 2, so let’s jump right to the code. Outside of any function, you define three variables for referencing the <video/> and two <button/> elements:
var video = document.getElementById("bbbVideo");
var playButton = document.getElementById("playbackController");
var muteButton = document.getElementById("muteController");
You’ll use these variables throughout the various functions, but first, you register the event listeners.
For the <video/> element, you register pause, playing, and volumechange event listeners:
video.addEventListener("pause", pauseHandler);
video.addEventListener("playing", playingHandler);
video.addEventListener("volumechange", volumechangeHandler);
Each event listener uses a unique function—the pauseHandler() function handles the pause event, playingHandler() handles the playing event, and volumechangeHandler() handles the volumechange event. You could make the argument that the playing andpause event code is similar enough to use a single function, but keep it simple! Simple functions are happy functions.
And once again, the two <button/> elements register click events using the playbackClick() and muteClick() functions:
playButton.addEventListener("click", playbackClick);
muteButton.addEventListener("click", muteClick);
Each of the five functions in this example is reduced to a single responsibility. This is a good thing because it makes your code easier to manage and maintain (as well as find and fix errors if they occur). The first function is the pauseHandler() function, which as you know, handles the media’s pause event:
function pauseHandler(e) {
playButton.innerHTML = "Resume";
}
Its job is simple; change the text of the Play/Pause button to Resume when the pause event fires. This way, the button’s text changes as the state of the video changes.
The next function is playingHandler(), the counterpart to the pauseHandler() function:
function playingHandler(e) {
playButton.innerHTML = "Pause";
}
When the media plays, this function changes the Play/Pause button’s text to Pause.
The volumechangeHandler() function is slightly more complicated because it fires for two types of events—when the volume changes and when the media is muted:
function volumechangeHandler(e) {
muteButton.innerHTML = video.muted ? "Unmute" : "Mute";
}
Like the other media event handlers, volumechangeHandler() is responsible for changing the text of buttons in the UI. But to know which text value to use, you have to check the value of video.muted. You use the ternary operator here to reduce the code to a single line. You could use if...else if you wanted to:
if (video.muted) {
muteButton.innerHTML = "Unmute";
} else {
muteButton.innerHTML = "Mute";
}
This approach would be ideal if you needed to execute more code within the if...else statement, but in this case, the ternary approach might be better.
Next is the playbackClick() function, and it has changed significantly. Because the pause and playing event handlers are responsible for updating the UI, the playbackClick() function is only responsible for playing and pausing the media:
function playbackClick(e) {
video.paused ? video.play() : video.pause();
}
Once again, you use the ternary operator to determine which method to execute. If video.paused is true, you call the play() method. Otherwise, you call pause().
The muteClick() function has also been simplified because it is no longer responsible for updating the UI. It is solely responsible for muting and unmuting the media:
function muteClick(e) {
video.muted = !video.muted;
}
You set the muted property to the opposite value. Therefore, if muted is true, it’s set to false, and vice versa.
Native media is a feature that web developers have clamored for, for many years, and the first implementation (as specified by HTML5) is very robust and feature-filled. We unfortunately, however, still have to battle with the different browsers and the codecs they support. Hopefully, the web development community will see a unified set of codecs that are supported by all browsers.
Naturally, we’ve only scratched the surface of the native media API and what you can do with it. As with everything, experiment! The sky’s the limit with such a robust and capable API.
SUMMARY
This chapter introduced you to the HTML5 video and audio API.
· You learned that HTML5 brings two new media elements: <video/> and <audio/>. It also defines a <source/> element to describe a media source.
· Unsurprisingly, different browsers support different video and audio formats and codecs, but you can address this issue by providing multiple sources. The browser is smart enough to know which one to load.
· Video and audio are programmatically identical—except video has a poster property. Both types of media are represented as HTMLMediaElement objects in the DOM.
· You learned how to play and pause media.
· You learned how to mute media and query the state of playback using the paused property.
· You learned how to register event listeners for the many media-based events, which allowed you to simplify your custom UI’s code.
EXERCISES
You can find suggested solutions for these questions in Appendix A.
1. Being able to control playback is cool, but your custom UI needs to also control volume. Add an <input type="range" /> element to Example 3 to control the volume. Remember that the range of volume supported by media elements is 0.0 to 1.0. Look back at Chapter 11 if you need a refresher of the range input type. This unfortunately will not work in IE.
2. Add another range form control to Question 1’s answer, and program it to seek the media. It should also update as the media plays. Use the durationchange event to set the slider’s max value, and the timeupdate event to update the slider’s value.