Wrox Press Beginning JavaScript 5th (2015)
Chapter 8. Programming the Browser
WHAT YOU WILL LEARN IN THIS CHAPTER:
· Working with the browser’s native window object
· Sending the browser to a URL
· Manipulating images after they are loaded in the page
· Retrieving the browser’s current geographical position
· Detecting the user’s browser
WROX.COM CODE DOWNLOADS FOR THIS CHAPTER
You can find the wrox.com code downloads for this chapter at http://www.wiley.com/go/BeginningJavaScript5E on the Download Code tab. You can also view all of the examples and related files at http://beginningjs.com.
Over the past few chapters, you’ve examined the core JavaScript language. You’ve seen how to work with variables and data, perform operations on that data, make decisions in your code, loop repeatedly over the same section of code, and even how to write your own functions. You moved on to learn how JavaScript is an object-based language, and you saw how to work with the native JavaScript objects. However, you are not interested only in the language itself; you want to find out how to write scripts for the web browser. Using this ability, you can start to create more impressive web pages.
Not only is JavaScript object-based, but the browser is also made up of objects. When JavaScript is running in the browser, you can access the browser’s objects in exactly the same way that you used JavaScript’s native objects. But what kinds of objects does the browser provide?
The browser makes available a remarkable number of objects. For example, there is a window object corresponding to the window of the browser. You have already been using two methods of this object, namely the alert() and prompt() methods. For simplicity, we previously referred to these as functions, but they are, in fact, methods of the browser’s window object.
Another object made available by the browser is the page itself, represented by the document object. Again, you have already used methods and properties of this object. Recall from previous chapters that you used the document object’s write() method to write information to the page.
A variety of other objects exist, representative of the HTML you write in the page. For example, there is an img object for each <img/> element that you use to insert an image into your document.
The collection of objects that the browser makes available to you for use with JavaScript is generally called the browser object model (BOM).
NOTE You will often see this termed the document object model (DOM); it is incorrect to do so. Throughout this book, we’ll use the term DOM to refer to the W3C’s standard document object model, which is discussed in the next chapter.
All this added functionality of JavaScript comes with a potential downside: There is no standard BOM implementation (although some attempt is being made with the HTML5 specification). Which collections of objects are made available to you is highly dependent on the brand and version of the browser that you are using. Some objects are made available in some browsers and not in others, whereas other objects have different properties and methods in different browsers. The good news is that browser makers typically do not change much of their browser’s BOM, because doing so would create a rift in interoperability. This means if you stick to the core functionality of the BOM (the common objects in all browsers), your code is more likely to work between the different browsers and versions. This chapter’s focus is the BOM core functionality. You can achieve a lot in JavaScript by just sticking to the core.
INTRODUCTION TO THE BROWSER’S OBJECTS
This section introduces the objects of the BOM that are common to all browsers.
In Chapter 5, you saw that JavaScript has a number of native objects that you can access and use. Most of the objects are those that you need to create yourself, such as the String and Date objects. Others, such as the Math object, exist without you needing to create them and are ready for use immediately when the page starts loading.
When JavaScript is running in a web page, it has access to a large number of other objects made available by the web browser. Like the Math object, these are created for you rather than your needing to create them explicitly. As mentioned, the objects, their methods, properties, and events are all mapped out in the BOM.
The BOM is very large and potentially overwhelming at first. However, you’ll find that initially you won’t be using more than 10 percent of the available objects, methods, and properties in the BOM. You start in this chapter by looking at the more commonly used parts of the BOM, as shown in Figure 8.1. These parts of the BOM are, to a certain extent, common across all browsers. Later chapters build on this so that by the end of the book you’ll be able to really make the BOM work for you.
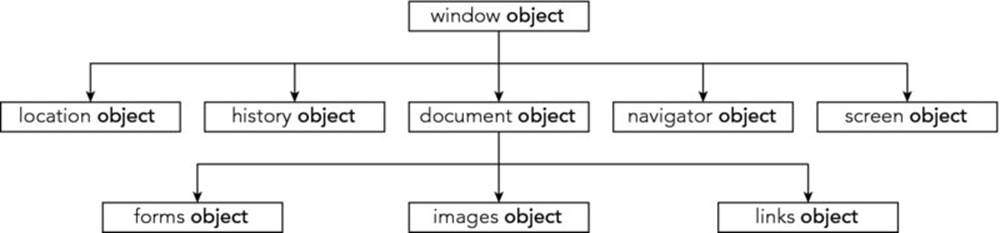
Figure 8.1
The BOM has a hierarchy. At the very top of this hierarchy is the window object. You can think of this as representing the frame of the browser and everything associated with it, such as the scrollbars, navigator bar icons, and so on.
Contained inside the window frame is the page. The page is represented in the BOM by the document object. You can see these two objects represented in Figure 8.2.
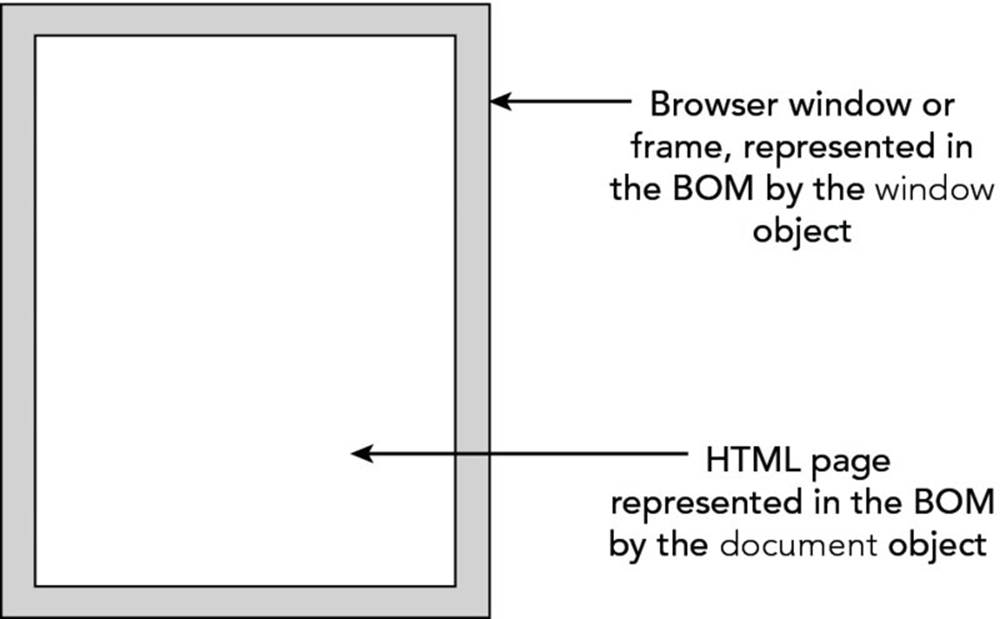
Figure 8.2
Now let’s look at each of these objects in more detail.
The window Object
The window object represents the browser’s frame or window, in which your web page is contained. To some extent, it also represents the browser itself and includes a number of properties that are there simply because they don’t fit anywhere else. For example, via the properties of the window object, you can find out what browser is running, the pages the user has visited, the size of the browser window, the size of the user’s screen, and much more. You can also use the window object to access and change the text in the browser’s status bar, change the page that is loaded, and even open new windows.
The window object is a global object, which means you don’t need to use its name to access its properties and methods. In fact, the global functions and variables (the ones accessible for you to script anywhere in a page) are all created as properties of the global object. For example, the alert() function you have been using since the beginning of the book is, in fact, the alert() method of the window object. Although you have been using this simply as this:
alert("Hello!");
You could write this with the same, exact results:
window.alert("Hello!");
However, because the window object is the global object, it is perfectly correct to use the first version.
Some of the properties of the window object are themselves objects. Those common to all browsers include the document, navigator, history, screen, and location objects. The document object represents your page, the history object contains the history of pages visited by the user, the navigator object holds information about the browser, the screen object contains information about the display capabilities of the client, and the location object contains details on the current page’s location. You look at these important objects individually later in the chapter.
At this point it’s worth highlighting the fact that, within a web page, you shouldn’t use names for your functions or variables that conflict with names of BOM objects or their properties and methods. If you do, you may not get an error, but instead get unexpected results. For example, the following code declares a variable named history, and tries to use the history property of the window object to go back to the previous page. This, however, won’t work because history has been changed to hold a different value:
var history = "Hello, BOM!";
window.history.back(); // error; string objects don't have a back() method
In this situation you need to use a different variable name. This happens because any function or variable you define within the global scope actually gets appended to the window object. Look at this code as an example:
var myVariable = "Hello, World!";
alert(window.myVariable);
If you were to execute this code in a browser, the alert window would display the message “Hello, World.”
As with all the BOM objects, you can look at lots of properties and methods for the window object. However, in this chapter you concentrate on the history, location, navigator, screen, and document properties. All five of these properties contain objects (the history,location, navigator, screen, and document objects), each with its own properties and methods. In the next few pages, you look at each of these objects in turn and find out how they can help you make full use of the BOM.
The history Object
The history object keeps track of each page that the user visits. This list of pages is commonly called the history stack for the browser. It enables the user to click the browser’s Back and Forward buttons to revisit pages. You have access to this object via the windowobject’s history property.
Like the native JavaScript Array type, the history object has a length property. You can use this to find out how many pages are in the history stack.
As you might expect, the history object has the back() and forward() methods. When they are called, the location of the page currently loaded in the browser is changed to the previous or next page that the user has visited.
The history object also has the go() method. This takes one parameter that specifies how far forward or backward in the history stack you want to go. For example, if you wanted to return the user to the page before the previous page, you’d write this:
history.go(-2);
To go forward three pages, you’d write this:
history.go(3);.
Note that go(-1) and back() are equivalent, as are go(1) and forward().
The location Object
The location object contains lots of potentially useful information about the current page’s location. Not only does it contain the uniform resource locator (URL) for the page, but also the server hosting the page, the port number of the server connection, and the protocol used. This information is made available through the location object’s href, hostname, port, and protocol properties. However, many of these values are only really relevant when you are loading the page from a server and not, as you are doing in the present examples, loading the page directly from a local hard drive.
In addition to retrieving the current page’s location, you can use the methods of the location object to change the location and refresh the current page.
You can navigate to another page in two ways. You can either set the location object’s href property to point to another page, or you can use the location object’s replace() method. The effect of the two is the same; the page changes location. However, they differ in that the replace() method removes the current page from the history stack and replaces it with the new page you are moving to, whereas using the href property simply adds the new page to the top of the history stack. This means that if the replace() method has been used and the user clicks the Back button in the browser, the user can’t go back to the original page loaded. If the href property has been used, the user can use the Back button as normal.
For example, to replace the current page with a new page called myPage.html, you’d use the replace() method and write the following:
location.replace("myPage.html");
This loads myPage.html and replaces any occurrence of the current page in the history stack with myPage.html.
To load the same page and to add it to the history of pages navigated to, you use the href property:
location.href = "myPage.html";
This adds the currently loaded page to the history. In both of the preceding cases, window is in front of the expression, but because the window object is global throughout the page, you could have written one of the following:
location.replace("myPage.html");
location.href = "myPage.html";
The navigator Object
The navigator object is another object that is a property of window and is available in all browsers. Its name is more historical than descriptive. Perhaps a better name would be the “browser object,” because the navigator object contains lots of information about the browser and the operating system in which it’s running.
Historically, the most common use of the navigator object is for handling browser differences. Using its properties, you can find out which browser, version, and operating system the user has. You can then act on that information and make sure your code works only in browsers that support it. This is referred to as browser sniffing, and though it has its uses, it does have limitations.
A better alternative to browser sniffing is feature detection, the act of determining if a browser supports a particular feature. We won’t go into these subjects here; later sections of this chapter are devoted to browser sniffing and feature detection.
The geolocation Object
The HTML5 specification adds the geolocation property to navigator. Its purpose is simple: to enable developers to obtain and use the position of the device or computer. That sounds like a scary proposition, but users must give permission for that information to be retrieved and used.
At the heart of the geolocation object is its getCurrentPosition() method. When you call this method, you must pass it a callback function, which is a function that executes when getCurrentPosition() successfully completes its work. In Chapter 4, you learned that functions are values. You can assign them to variables and pass them to other functions, and the latter is what you do with the getCurrentPosition() method. For example:
function success(position) {
alert("I have you now!");
}
navigator.geolocation.getCurrentPosition(success);
In this code, success() is the callback function that executes when navigator.geolocation.getCurrentPosition() determines the computer’s or device’s location. The parameter, position, is an object that contains the Earthly position and altitude of the computer or device, and you can retrieve these pieces of information through its coords property, like this:
function success(position) {
var latitude = position.coords.latitude;
var longitude = position.coords.longitude;
var altitude = position.coords.altitude;
var speed = position.coords.speed;
}
The latitude, longitude, and altitude properties are self-explanatory; they are simply numeric values representing the latitude, longitude, and altitude of the device or computer, respectively. The speed property retrieves the speed, or rather the velocity, of the device/computer in meters per second.
If you need to retrieve more than one of these values, it makes sense to assign position.coords to a variable and then use the variable to retrieve the positional values. For example:
function success(position) {
var crds = position.coords;
var latitude = crds.latitude;
var longitude = crds.longitude;
var altitude = crds.altitude;
var speed = crds.speed;
}
This reduces the amount of code you have to type. It also has the advantage of reducing the size of your code, resulting in a slightly faster download time.
The getCurrentPosition() method accepts a second parameter, another callback function that executes when an error occurs:
function geoError(errorObj) {
alert("Uh oh, something went wrong");
}
navigator.geolocation.getCurrentPosition(success, geoError);
The error callback function has a single parameter that represents the reason for getCurrentPosition()’s failure. It is an object containing two properties. The first, code, is a numeric value indicating the reason of failure. The following table lists the possible values and their meanings:
|
VALUE |
DESCRIPTION |
|
1 |
Failure occurred because the page did not have permission to acquire the position of the device/computer. |
|
2 |
An internal error occurred. |
|
3 |
The time allowed to retrieve the device’s/computer’s position was reached before the position was obtained. |
The second property is called message; it’s a human-readable message that describes the error.
TRY IT OUT Using Geolocation
In this example, you use the geolocation object to retrieve the latitude and longitude of the device/computer:
<!DOCTYPE html>
<html lang="en">
<head>
<title>Chapter 8, Example 1</title>
</head>
<body>
<script>
function geoSuccess(position) {
var coords = position.coords;
var latitude = coords.latitude;
var longitude = coords.longitude;
var message = "You're at " + latitude + ", " + longitude
alert(message);
}
function geoError(errorObj) {
alert(errorObj.message);
}
navigator.geolocation.getCurrentPosition(geoSuccess, geoError);
</script>
</body>
</html>
Save the page as ch8_example1.html and load it into your browser.
The page requires the user’s consent in order to retrieve his or her geographical position. So the first thing you will see is a prompt asking you to allow or deny the page permission to retrieve that information. Every browser displays this request differently; Figure 8.3 is Chrome’s request.
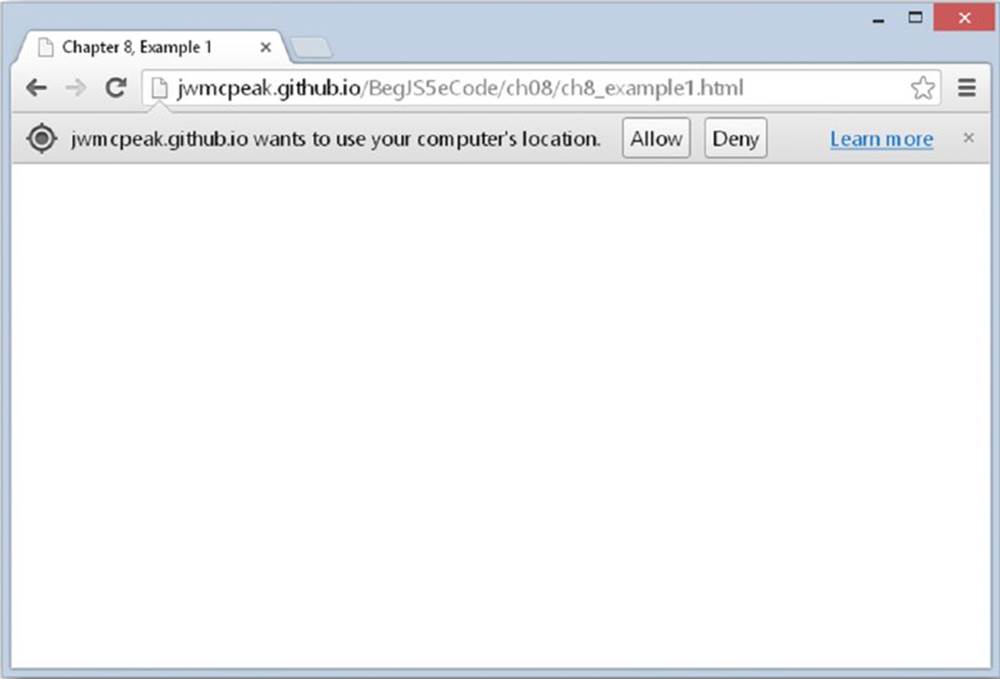
Figure 8.3
If you allow the page to access your position, you’ll see the latitude and longitude of your device or computer displayed in an alert box. If you choose to deny access, you’ll see a message similar to that shown in Figure 8.4.
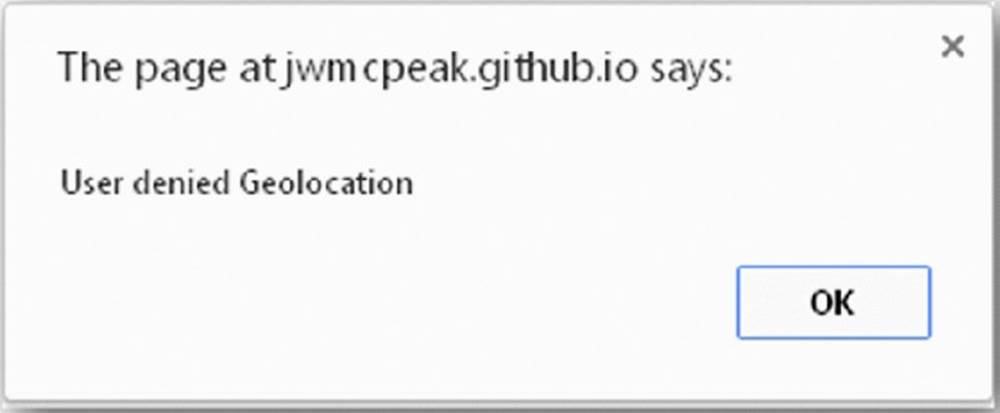
Figure 8.4
Two functions in this page are responsible for the aforementioned behavior. The first function, geoSuccess(), is the callback function that executes when the browser can successfully retrieve your device’s/computer’s position:
function geoSuccess(position) {
var coords = position.coords;
var latitude = coords.latitude;
var longitude = coords.longitude;
The first statement in this function stores position.coords in the coords variable to access the positional information with fewer keystrokes. The second and third statements retrieve the latitude and longitude, respectively.
Now that you have the latitude and longitude, you assemble a message that contains this information and display it to the user:
var message = "You're at " + latitude + ", " + longitude
alert(message);
}
If you denied the page access to your position, or if the browser cannot obtain your position, the geoError() callback function executes:
function geoError(errorObj) {
alert(errorObj.message);
}
This simple function simply uses the error object’s message property to tell the user why getCurrentPosition() failed.
The screen Object
The screen object property of the window object contains a lot of information about the display capabilities of the client machine. Its properties include the height and width properties, which indicate the vertical and horizontal range of the screen, respectively, in pixels.
Another property of the screen object, which you use in an example later, is the colorDepth property. This tells you the number of bits used for colors on the client’s screen.
The document Object
Along with the window object, the document object is probably one of the most important and commonly used objects in the BOM. Via this object you can gain access to the HTML elements, their properties, and their methods inside your page.
This chapter concentrates on the basic properties and methods that are common to all browsers. More advanced manipulation of the document object is covered in Chapter 9.
The document object has a number of properties associated with it, which are also array-like structures called collections. The main collections are the forms, images, and links collections. Internet Explorer supports a number of other collection properties, such as theall collection property, which is an array of all the elements represented by objects in the page. However, you’ll concentrate on using objects that have standard cross-browser support, so that you are not limiting your web pages to just one browser.
You look at the images and links collections shortly. A third collection, the forms collection, is one of the topics of Chapter 11 when you look at forms in web browsers. First, though, you look at a nice, simple example of how to use the document object’s methods and properties.
Using the document Object
You’ve already come across some of the document object’s properties and methods—for example, the write() method and the bgColor property.
TRY IT OUT Setting Colors According to the User’s Screen Color Depth
In this example, you set the background color of the page according to how many colors the user’s screen supports. This is termed screen color depth. If the user has a display that supports just two colors (black and white), there’s no point in you setting the background color to bright red. You accommodate different depths by using JavaScript to set a color the user can actually see.
<!DOCTYPE html>
<html lang="en">
<head>
<title>Chapter 8, Example 2</title>
</head>
<body>
<script>
var colorDepth = window.screen.colorDepth;
switch (colorDepth) {
case 1:
case 4:
document.bgColor = "white";
break;
case 8:
case 15:
case 16:
document.bgColor = "blue";
break;
case 24:
case 32:
document.bgColor = "skyblue";
break;
default:
document.bgColor = "white";
}
document.write("Your screen supports " + colorDepth +
"bit color");
</script>
</body>
</html>
Save the page as ch8_example2.html. When you load it into your browser, the background color of the page will be determined by your current screen color depth. Also, a message in the page will tell you what the color depth currently is.
You can test that the code is working properly by changing the colors supported by your screen. By refreshing the browser, you can see what difference this makes to the color of the page.
NOTE In Firefox, Safari, and Chrome browsers, it’s necessary to shut down and restart the browser to observe any effect.
As you saw earlier, the window object has the screen object property. One of the properties of this object is the colorDepth property, which returns a value of 1, 4, 8, 15, 16, 24, or 32. This represents the number of bits assigned to each pixel on your screen. (Apixel is just one of the many dots that make up your screen.) To work out how many colors you have, you just calculate the value of 2 to the power of the colorDepth property. For example, a colorDepth of 1 means that two colors are available, a colorDepthof 8 means that 256 colors are available, and so on. Currently, most people have a screen color depth of at least 8, but usually 24 or 32.
The first task of the script block is to set the color of the background of the page based on the number of colors the user can actually see. You do this in a big switch statement. The condition that is checked for in the switch statement is the value of thecolorDepth variable, which is set to window.screen.colorDepth:
var colorDepth = window.screen.colorDepth;
switch (colorDepth) {
You don’t need to set a different color for each colorDepth possible, because many of them are similar when it comes to general web use. Instead, you set the same background color for different, but similar, colorDepth values. For a colorDepth of 1 or 4, you set the background to white. You do this by declaring the case 1: statement, but you don’t give it any code. If the colorDepth matches this case statement, it will fall through to the case 4: statement below it, where you do set the background color to white. You then call a break statement, so that the case matching will not fall any further through the switch statement:
case 1:
case 4:
document.bgColor = "white";
break;
You do the same with colorDepth values of 8, 15, and 16, setting the background color to blue as follows:
case 8:
case 15:
case 16:
document.bgColor = "blue";
break;
Finally, you do the same for colorDepth values of 24 and 32, setting the background color to sky blue:
case 24:
case 32:
document.bgColor = "skyblue";
break;
You end the switch statement with a default case, just in case the other case statements did not match. In this default case, you again set the background color to white:
default:
document.bgColor = "white";
}
In the next bit of script, you use the document object’s write() method, something you’ve been using in these examples for a while now. You use it to write to the document—that is, the page—the number of bits at which the color depth is currently set, as follows:
document.write("Your screen supports " + colorDepth +
"bit color")
You’ve already been using the document object in the examples throughout the book. You used its bgColor property in Chapter 1 to change the background color of the page, and you’ve also made good use of its write() method in the examples to write HTML and text out to the page.
Now let’s look at some of the slightly more complex properties of the document object. These properties have in common the fact that they all contain collections. The first one you look at is a collection containing an object for each image in the page.
The images Collection
As you know, you can insert an image into an HTML page using the following tag:
<img alt="USA" name="myImage" src="usa.gif" />
The browser makes this image available for you to manipulate with JavaScript by creating an img object for it with the name myImage. In fact, each image on your page has an img object created for it.
Each of the img objects in a page is stored in the images collection, which is a property of the document object. You use this, and other collections, as you would an array. The first image on the page is found in the element document.images[0], the second indocument.images[1], and so on.
If you want to, you can assign a variable to reference an img object in the images collection. It can make code easier to type and read. For example, the following code assigns a reference to the img object at index position 1 to the myImage2 variable:
var myImage2 = document.images[1];
Now you can write myImage2 instead of document.images[1] in your code, with exactly the same effect.
Because the document.images property is a collection, it has properties similar to the native JavaScript Array type, such as the length property. For example, if you want to know how many images are on the page, the code document.images.length will tell you.
TRY IT OUT Image Selection
The img object itself has a number of useful properties. The most important of these is its src property. By changing this, you can change the image that’s loaded. This example demonstrates this:
<!DOCTYPE html>
<html lang="en">
<head>
<title>Chapter 8, Example 3</title>
</head>
<body>
<img src="" width="200" height="150" alt="My Image" />
<script>
var myImages = [
"usa.gif",
"canada.gif",
"jamaica.gif",
"mexico.gif"
];
var imgIndex = prompt("Enter a number from 0 to 3", "");
document.images[0].src = myImages[imgIndex];
</script>
</body>
</html>
Save this as ch8_example3.html. You will also need four image files, called usa.gif, canada.gif, jamaica.gif, and mexico.gif. You can create these images yourself or obtain the ones provided with the code download for the book.
A prompt box asks you to enter a number from 0 to 3 when this page loads into the browser. A different image is displayed depending on the number you enter.
At the top of the page you have your HTML <img/> element. Notice that the src attribute is left empty:
<img src="" width="200" height="150" alt="My Image" />
Next you come to the script block where the image to be displayed is decided. On the first line, you define an array containing a list of image sources. In this example, the images are in the same directory as the HTML file, so a path is not specified. If yours are not, make sure you enter the full path (for example, C:\myImages\mexico.gif).
Then you ask the user for a number from 0 to 3, which will be used as the array index to access the image source in the myImages array:
var imgIndex = prompt("Enter a number from 0 to 3","");
Finally, you set the src property of the img object to the source text inside the myImages array element with the index number provided by the user:
document.images[0].src = myImages[imgIndex];
Don’t forget that when you write document.images[0], you are accessing the img object stored in the images collection. It’s an index position of 0, because it’s the first (and only) image on this page.
The links Collection
For each hyperlink element <a/> defined with an href attribute, the browser creates an a object. The most important property of the a object is the href property, corresponding to the href attribute of the tag. Using this, you can find out where the link points to, and you can change this even after the page has loaded.
The collection of all a objects in a page is contained within the links collection, much as the img objects are contained in the images collection, as you saw earlier.
DETERMINING THE USER’S BROWSER
Many browsers, versions of those browsers, and operating systems are out there on the Internet, each with its own version of the BOM, its own set of features, and its own particular quirks. It’s therefore important that you make sure your pages will work correctly on all browsers, or at least degrade gracefully, such as by displaying a message suggesting that the user upgrade his or her browser.
You have two ways to test if the browser can execute your code: feature detection and browser sniffing. They share a similar end goal (to execute code for a given browser), but they are used for different purposes.
Feature Detection
Not all browsers support the same features (although today’s modern browsers do a very good job of it). When we say “feature,” we’re not referring to tabbed browsing, download managers, and so on. We mean features that we, as JavaScript developers, can access and use in our code.
Feature detection is the process of determining if a browser supports a given feature, and it is the preferred method of browser detection. It requires little maintenance, and it is used to execute code across all browsers that implement (or don’t implement) a specific feature.
For example, all modern browsers support navigator.geolocation. You can use it in your page, and visitors using those browsers will not experience any issues. However, visitors using Internet Explorer 8 would experience script errors because IE8 does not support geolocation.
This is a common problem because even the latest versions of browsers don’t always support the same features, but you can avoid these types of issues with feature detection. The pattern is simple: Check if the feature exists, and only use the feature if it does. Therefore, all you need is an if statement, like this:
if (navigator.geolocation) {
// use geolocation
}
Whoa! Wait a minute! This code uses navigator.geolocation as the if statement’s condition! Isn’t the if statement supposed to work on true or false values? Yes, but JavaScript can treat any value as true or false. We call these truthy and falsey. They aren’t true boolean values, but they evaluate to true and false when used in a conditional statement.
Here’s how this works; the following values are falsey:
· 0
· "" (an empty string)
· null
· undefined
· [] (an empty array)
· false
Just about everything else is truthy.
In browsers that don’t support geolocation, navigator.geolocation is undefined and is therefore falsey.
We know that this can be confusing, and it can add some ambiguity to your code. So many JavaScript developers like to avoid using truthy/falsey statements, and opt for a clearer comparison by using the typeof operator, like this:
if (typeof navigator.geolocation != "undefined") {
// use geolocation
}
The typeof operator returns a string that tells you the type of a value or object. In this code, the typeof operator is used on navigator.geolocation. In browsers that support geolocation, the type is "object"; in browsers that don’t, it’s "undefined".
You can use the typeof operator on any object or value. Refer to the following table for the possible values returned by typeof:
|
STATEMENT |
RESULT |
|
typeof 1 |
number |
|
typeof "hello" |
string |
|
typeof true |
boolean |
|
typeof [] (or any array) |
object |
|
typeof {} (or any object) |
object |
|
typeof undefined |
undefined |
|
typeof null |
object |
TRY IT OUT Using Feature Detection
In this example, you modify ch8_example1.html and ensure that the page works in browsers that do not support geolocation.
<!DOCTYPE html>
<html lang="en">
<head>
<title>Chapter 8, Example 4</title>
</head>
<body>
<script>
function geoSuccess(position) {
var coords = position.coords;
var latitude = coords.latitude;
var longitude = coords.longitude;
var message = "You're at " + latitude + ", " + longitude
alert(message);
}
function geoError(errorObj) {
alert(errorObj.message);
}
if (typeof navigator.geolocation != "undefined") {
navigator.geolocation.getCurrentPosition(geoSuccess, geoError);
} else {
alert("This page uses geolocation, and your " +
"browser doesn't support it.");
}
</script>
</body>
</html>
Save this example as ch8_example4.html.
The key difference in this example is the if ... else statement at the bottom of the JavaScript code:
if (typeof navigator.geolocation != "undefined") {
navigator.geolocation.getCurrentPosition(geoSuccess, geoError);
} else {
alert("This page uses geolocation, and your " +
"browser doesn't support it.");
}
Here, you use the typeof operator on navigator.geolocation to determine if the browser supports that feature. If it does, the getCurrentPosition() method is called.
If the browser doesn’t support geolocation, the code displays a message to the user stating that his or her browser doesn’t support the necessary feature. If you had attempted to use geolocation without ensuring that the browser supports it, the browser would throw an error.
Feature detection is extremely useful, and it enables you to isolate browsers based on the features they do or don’t support. But browser makers are not perfect, and they sometimes release a version of a browser that exhibits unique and quirky behavior. In these cases, you need to isolate an individual browser, and feature detection rarely gives you that fine level of control.
Browser Sniffing
First, let us reiterate this point: Most of the time, you want to use feature detection. Browser sniffing has many drawbacks, one of which is that some less common browsers may falsely identify themselves as a more common browser. Another problem is that browser sniffing relies on the browser’s user-agent string, which is a string that identifies the browser, and browser makers can drastically change the user-agent string between different versions (you see an example of this later). You should use the techniques contained in this section only when you need to target a single browser for its own quirky behavior.
The navigator object exposes two properties that are useful in identifying a browser: appName and userAgent. The appName property returns the model of the browser, such as “Microsoft Internet Explorer” for IE or “Netscape” for Firefox, Chrome, and Safari.
The userAgent property returns a string containing various bits of information, such as the browser version, operating system, and browser model. However, the value returned by this property varies from browser to browser, so you have to be very, very careful when using it. For example, the browser’s version is embedded in different locations of the string.
TRY IT OUT Checking for and Dealing with Different Browsers
In this example, you create a page that uses the aforementioned properties to discover the client’s browser and browser version. The page can then take action based on the client’s specifications.
<!DOCTYPE html>
<html lang="en">
<head>
<title>Chapter 8, Example 5</title>
</head>
<body>
<script>
function getBrowserName() {
var lsBrowser = navigator.userAgent;
if (lsBrowser.indexOf("MSIE") >= 0) {
return "MSIE";
} else if (lsBrowser.indexOf("Firefox") >= 0) {
return "Firefox";
} else if (lsBrowser.indexOf("Chrome") >= 0) {
return "Chrome";
} else if (lsBrowser.indexOf("Safari") >= 0) {
return "Safari";
} else if (lsBrowser.indexOf("Opera") >= 0) {
return "Opera";
} else {
return "UNKNOWN";
}
}
function getBrowserVersion() {
var ua = navigator.userAgent;
var browser = getBrowserName();
var findIndex = ua.indexOf(browser) + browser.length + 1;
var browserVersion = parseFloat(
ua.substring(findIndex, findIndex + 3));
return browserVersion;
}
var browserName = getBrowserName();
var browserVersion = getBrowserVersion();
if (browserName == "MSIE") {
if (browserVersion < 9) {
document.write("Your version of IE is too old");
} else {
document.write("Your version of IE is fully supported");
}
} else if (browserName == "Firefox") {
document.write("Firefox is fully supported");
} else if (browserName == "Safari") {
document.write("Safari is fully supported");
} else if (browserName == "Chrome") {
document.write("Chrome is fully supported");
} else if (browserName == "Opera") {
document.write("Opera is fully supported");
} else {
document.write("Sorry this browser version is not supported");
}
</script>
</body>
</html>
Save this file as ch8_example5.html.
If the browser is Firefox, IE9 or 10, Safari, Chrome, or Opera, a message appears telling users that the browser is supported. If it’s an earlier version of IE, the user sees a message telling him or her the version of that browser is not supported.
If it’s not one of those browsers (including IE11+), the user sees a message saying the browser is unsupported.
At the top of the script block are two important functions. The getBrowserName() function finds out the name of the browser and the getBrowserVersion() function finds out the browser version.
The key to the browser-checking code is the value returned by the navigator.userAgent property. Here are a few example user-agent strings from current browsers:
1. Mozilla/5.0 (Windows NT 6.3; WOW64; Trident/7.0; .NET4.0E; .NET4.0C; .NET CLR 3.5.30729; .NET CLR 2.0.50727; .NET CLR 3.0.30729; rv:11.0) like Gecko
2. Mozilla/5.0 (compatible; MSIE 10.0; Windows NT 6.3; WOW64; Trident/7.0; .NET4.0E; .NET4.0C; .NET CLR 3.5.30729; .NET CLR 2.0.50727; .NET CLR 3.0.30729)
3. Mozilla/5.0 (Windows NT 6.3; WOW64) AppleWebKit/537.36 (KHTML, like Gecko) Chrome/34.0.1847.131 Safari/537.36
4. Mozilla/5.0 (Windows NT 6.3; WOW64; rv:32.0) Gecko/20100101 Firefox/32.0
Here each line of the userAgent strings has been numbered. Looking closely at each line, it’s not hard to guess which browser each agent string relates to. In order:
1. Microsoft IE11
2. Microsoft IE10
3. Chrome 34.0.1847.131
4. Firefox 32
Using this information, let’s start on the first function, getBrowserName(). First you get the name of the browser, as found in navigator.userAgent, and store it in the variable lsBrowser:
function getBrowserName() {
var lsBrowser = navigator.userAgent;
The string returned by this property tends to be quite long and does vary. However, by checking for the existence of certain keywords, such as MSIE or Firefox, you can usually determine the browser name. Start with the following lines:
if (lsBrowser.indexOf("MSIE") >= 0) {
return "MSIE";
}
These lines search the lsBrowser string for MSIE. If the indexOf value of this substring is 0 or greater, you know you have found it, and so you set the return value to MSIE.
The following else if statement does the same, except that it is modified for Firefox:
else if (lsBrowser.indexOf("Firefox") >= 0) {
return "Firefox";
}
This principle carries on for another three if statements, in which you also check for Chrome, Safari, and Opera. If you have a browser you want to check for, this is the place to add its if statement. Just view the string it returns in navigator.userAgentand look for its name or something that uniquely identifies it.
If none of the if statements match, you return UNKNOWN as the browser name:
else {
return "UNKNOWN";
}
Now turn to the final function, getBrowserVersion().
The browser version details often appear in the userAgent string right after the name of the browser. For these reasons, your first task in the function is to find out which browser you are dealing with. You declare and initialize the browser variable to the name of the browser, using the getBrowserName() function you just wrote:
function getBrowserVersion() {
var ua = navigator.userAgent;
var browser = getBrowserName();
If the browser is MSIE (Internet Explorer), you need to use the userAgent property again. Under IE, the userAgent property always contains MSIE followed by the browser version. So what you need to do is search for MSIE, and then get the number following that.
You set findIndex to the character position of the browser name plus the length of the name, plus one. Doing this ensures you to get the character after the name and just before the version number. browserVersion is set to the floating-point value of that number, which you obtain using the substring() method. This selects the characters starting at findIndex and ending with the one before findIndex, plus three. This ensures that you just select three characters for the version number:
var findIndex = ua.indexOf(browser) + browser.length + 1;
var browserVersion = parseFloat(ua.substring(findIndex, findIndex + 3));
If you look back to the userAgent strings, you see that IE10's is similar to this:
Mozilla/5.0 (compatible; MSIE 10.0; Windows NT 6.3; WOW64; Trident/7.0)
So findIndex will be set to the character index of the number 10 following the browser name. browserVersion will be set to three characters from and including the 10, giving the version number as 10.0.
At the end of the function, you return browserVersion to the calling code, as shown here:
return browserVersion;
}
You’ve seen the supporting functions, but how do you make use of them? Well, in the following code you obtain two bits of information—browser name and version—and use these to filter which browser the user is running:
var browserName = getBrowserName();
var browserVersion = getBrowserVersion();
if (browserName == "MSIE") {
if (browserVersion < 9) {
document.write("Your version of Internet Explorer is too old");
} else {
document.write("Your version of Internet Explorer is fully supported");
}
}
The first of the if statements is shown in the preceding code and checks to see if the user has IE. If true, it then checks to see if the version is lower than 9. If it is, the user sees the message stating his or her browser is too old. If it is 9 or 10, the message tells the user that his or her browser is fully supported. Something goes wrong with this code with IE11, and you’ll find out what that is shortly.
You do this again for Firefox, Chrome, Safari, and Opera. The versions of these browsers aren’t checked in this example, but you can do so if you want to:
else if (browserName == "Firefox") {
document.write("Firefox is fully supported");
} else if (browserName == "Safari") {
document.write("Safari is fully supported");
} else if (browserName == "Chrome") {
document.write("Chrome is fully supported");
} else if (browserName == "Opera") {
document.write("Opera is fully supported");
} else {
document.write("Sorry this browser version is not supported.");
}
On the final part of the if statements is the else statement that covers all other browsers and tells the user the browser is not supported.
If you run this page in IE11, you’ll see the message “Sorry this browser version is not supported.” At first glance, this appears to be an error, but look at IE11’s user-agent string:
Mozilla/5.0 (Windows NT 6.3; WOW64; Trident/7.0; rv:11.0) like Gecko
There is no mention of MSIE anywhere, but for those versed in the browser maker’s code words, we know that Trident is Microsoft’s rendering engine and the version is 11.0. Microsoft had very good reasons for changing its user-agent string with version 11, but this just drives the point home: You cannot rely on browser sniffing beyond targeting a single browser.
SUMMARY
You’ve covered a lot in this chapter, but now you have all the grounding you need to move on to more useful things, such as interacting with the page and forms and handling user input.
· You turned your attention to the browser, the environment in which JavaScript exists. Just as JavaScript has native objects, so do web browsers. The objects within the web browser, and the hierarchy in which they are organized, are described by something called the browser object model (BOM). This is essentially a map of a browser’s objects. Using it, you can navigate your way around each of the objects made available by the browser, together with their properties, methods, and events.
· The first of the main objects you looked at was the window object. This sits at the very top of the BOM’s hierarchy. The window object contains a number of important sub-objects, including the location object, the navigator object, the history object, the screen object, and the document object.
· The location object contains information about the current page’s location, such as its filename, the server hosting the page, and the protocol used. Each of these is a property of the location object. Some properties are read-only, but others, such as the hrefproperty, not only enable you to find the location of the page, but can be changed so that you can navigate the page to a new location.
· The history object is a record of all the pages the user has visited since opening his or her browser. Sometimes pages are not noted (for example, when the location object’s replace() method is used for navigation). You can move the browser forward and backward in the history stack and discover what pages the user has visited.
· The navigator object represents the browser itself and contains useful details of what type of browser, version, and operating system the user has. These details enable you to write pages dealing with various types of browsers, even where they may be incompatible.
· The screen object contains information about the display capabilities of the user’s computer.
· The document object is one of the most important objects. It’s an object representation of your page and contains all the elements, also represented by objects, within that page. The differences between the various browsers are particularly prominent here, but similarities exist between the browsers that enable you to write cross-browser code.
· The document object contains three properties that are actually collections. These are the links, images, and forms collections. Each contains all the objects created by the <a/>, <img/>, and <form/> elements on the page, and it’s a way of accessing those elements.
· The images collection contains an img object for each <img/> element on the page. You found that even after the page has loaded, you can change the properties of images. For example, you can make the image change when clicked. The same principles for using theimages collection apply to the links collection.
· Finally, you looked at how you can check what type of browser the user has, thereby giving you the power to use new features without causing errors in older browsers. You also learned how to sniff the browser with the navigator object’s appName and userAgentproperties, and how unreliable that information can be.
That’s it for this chapter. In the next chapter, you move on to the more exciting document object model, where you can access and manipulate the elements in your page.
EXERCISES
You can find suggested solutions to these questions in Appendix A.
1. Create two pages, one called legacy.html and the other called modern.html. Each page should have a heading telling you what page is loaded. For example:
<h2>Welcome to the Legacy page. You need to upgrade!</h2>
Using feature detection and the location object, send browsers that do not support geolocation to legacy.html; send browsers that do support geolocation to modern.html.
2. Modify Example 3 from the “Image Selection” Try It Out to display one of the four images randomly. Hint: refer to Chapter 5 and the Math.random() method.
All materials on the site are licensed Creative Commons Attribution-Sharealike 3.0 Unported CC BY-SA 3.0 & GNU Free Documentation License (GFDL)
If you are the copyright holder of any material contained on our site and intend to remove it, please contact our site administrator for approval.
© 2016-2026 All site design rights belong to S.Y.A.