Wrox Press Java Programming 24-Hour Trainer 2nd (2015)
Lesson 1. Introducing Java
During the last two decades Java has maintained its status as one of the most popular programming languages for everything from programming games to creating mission-critical applications, such as those for trading on Wall Street or controlling Mars rovers. For the current popularity chart see the Tiobe Index at http://www.tiobe.com/index.php/content/paperinfo/tpci/index.html. In this lesson you are introduced to some of the very basic Java terms. You also download and install the Java Development Kit (JDK) and compile your first program.
Why Learn Java?
The Java programming language was originally created in 1995 by James Gosling from Sun Microsystems (acquired by Oracle Corporation in 2010). The goal was to provide a simpler and platform-independent alternative to C++. Java programs run inside the Java Virtual Machine (JVM), which is the same on every platform from the application programmer’s perspective. You find out what platform independence means a little later, in the section “The Life Cycle of a Java Program”. For now, let’s look at some of the reasons why Java can be your language of choice.
Java is a general-purpose programming language that’s used in all industries for almost any type of application. If you master it, your chances of getting employed as a software developer will be higher than if you specialize in some domain-specific programming languages.
There are more than nine million professional Java developers in the world, and the majority of them are ready to share their knowledge by posting blogs and articles or simply answering technical questions online. If you get stuck solving some problem in Java, the chances are very high that you’ll find the solution on the Internet.
Because the pool of Java developers is huge, project managers of large and small corporations like to use Java for the development of new projects—if you decide to leave the project for whatever reason, it’s not too difficult to find another Java programmer to replace you. This would not be the case if the project were being developed in a powerful, but less popular language, such as Scala. At this point you may ask, “Does that also mean that my Java skills will be easily replaceable?” It depends on you. To improve your value and employability, you need to master not only the syntax of the language but also the right set of Java-related technologies that are in demand (you learn them in this book in the Java EE section).
Not only is Java open-source, but there are thousands and thousands of open-source projects being developed in Java. Joining one of these projects is the best way to get familiar with the process of project development and secure your very first job without having any prior real-world experience as a programmer.
The Java language is object-oriented (OO), which enables you to easily relate program constructs to objects from the real world (more on this in Chapter 3-Chapter 7). On the other hand, recently added lambda expressions (see Chapter 14) allow you to program in Java in a functional style.
The IT world is changing and people often use more than one language in the same project. Java is not the only language that runs in JVM. Such languages as Scala, Groovy, Clojure, JavaScript and others also run on JVM. So being familiar with the JVM opens the doors to being a polyglot programmer within the same operating environment.
The server-side applications that are deployed in the JVM scale well. The processing of thousands of users requests can be arranged in parallel by splitting the job between rather inexpensive servers in a cluster.
Java as a development platform has many advantages over other environments, which makes it the right choice for many projects, and you’ll have a chance to see this for yourself while reading this book, watching the screencasts from the accompanying DVD, and deploying all code samples from the book on your computer.
Setting the Goals
The goal of this rather slim tutorial is to give you just enough information about most of the Java language elements, techniques, and technologies that are currently being used in the real world. The first 25 lessons of the book are about the Java Standard Edition, whereas the remaining part is about Java Enterprise Edition—it covers server-side Java technologies, and this is where Java shines in the enterprise world.
The brevity of some of the lessons may make you wonder if it’s even possible to explain a subject in just 10 pages when there are whole books devoted for the same topic. My approach is to cover just enough for you to understand the concept, important terms, and best practices. Prerecorded screencasts on the DVD help you to repeat the techniques explained in the lesson on your own.
There are plenty of additional materials online that help you to study any specific topic more deeply. But you’ll get a working and practical knowledge about Java just by using the materials included with this book.
The goal of this book is not just to get you familiar with the syntax of the Java language, but to give you practical Java skills that will enable you to develop business applications either on your own or by working as a team member in a larger-scale project.
The Life Cycle of a Java Program
There are different types of programming languages. In some of them you write the text of the program (aka the source code) and can execute this program right away. These are interpreted languages (for example, JavaScript).
But Java requires the source code of your program to be compiled first. It gets converted to a bytecode that is run by Java Virtual Machine, which may turn some of it into a platform-specific machine code using the so-called Just-In-Time (JIT) compiler.
Not only will the program be checked for syntax errors by a Java compiler, but other libraries of Java code can be added (linked) to your program after the compilation is complete (deployment stage). There are plenty of readily available libraries of reusable components, and a vast majority of them are free of charge.
In this lesson you start with writing a very basic Java program that outputs the words “Hello World” on your computer’s monitor.
Technically you can write the source code of your Java program in any plain text editor that you prefer (Notepad, TextEdit, Sublime Text, vi, and so on), but to compile your program you need additional tools and code libraries that are included in the Java Development Kit (JDK).
JDK and JRE
If you are planning to use a specific computer to develop Java programs, you need to download and install JDK. If you are planning to use this computer only to run Java programs that were compiled somewhere else, you just need the Java Runtime Environment (JRE).
If you have JDK installed on your machine, it includes JRE.
Java’s platform independence comes from the fact that your Java program doesn’t know under which operating system (OS) or on which hardware it’s being executed. It operates inside the pre-installed JRE.
You need to get familiar with two more terms: Java SE (Standard Edition) and Java EE (Enterprise Edition). The latter includes the server-side tools and libraries that you get familiar with starting in Chapter 25.
Downloading and Installing Java SE
Start with downloading the latest version of the JDK SE Development Kit, which at the time of this writing is Java SE 8. Download and install JDK for your platform from Oracle’s Java SE Downloads site: http://goo.gl/X68FzJ. In some literature you see references like JDK 1.8, which is the same as JDK 8. The number 8 is followed by the letter u and a number. For example, JDK 8u5 means that Oracle has released an update number 5 for JDK 8.
Installing JDK 8 for MAC OS
Download the dmg file marked as MAC OS X x64. Running this program on a Mac OS X computer installs Java in /Library/Java/JavaVirtualMachines/jdk1.8.0.jdk. MAC OS X is my platform of choice, but Java works practically the same on all platforms, and all the book examples work under Windows and Linux as well.
Open the Terminal window and enter java –version. You should see an output similar to this one:
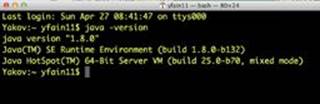
Figure 1-1: Checking the Java version in MAC OS
Installing JDK 8 in Windows
Select and download the Windows x86 executable file, which is a Java version for 32-bit computers. This version is perfectly fine to start working with Java. Run this file, click the Next button two or three times, and then click Close. In about a minute the installation is complete. By default JDK is installed in the directory named something like c:\Program Files\Java\jdk1.8.0_05. This is the place where both JDK and JRE are installed.
Now you need to add the bin folder from your java installation directory to the environment variable PATH of your Windows OS. Click Start, Control Panel and search for the environment variables. Click the Edit the System Environment Variables link and press the Environment Variables button. Edit the system variable PATH (if you don’t have one, create it) to include the path to c:\Program Files\Java\jdk1.8.0_05\bin unless you have it in a different location. Don’t forget to add a semicolon as a separator as in Figure 1-2.
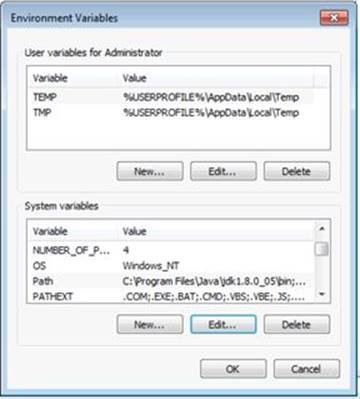
Figure 1-2: Java location is added to the Path variable in Windows
If you have previous versions of the JDK installed on your computer, each of them is located in its own directory, and they don’t conflict with each other.
To ensure that you’ll be working with the freshly installed Java, open a command window (in Windows 7 just click the Start button and in the search box enter command cmd) and enter java -version in the command window. Figure 1-3 shows the confirmation that I have Java 1.8.0_05.
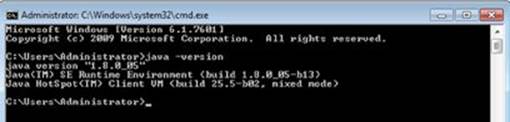
Figure 1-3: Checking the Java version in Windows
If you still don’t see the proper version, reopen the command window. Congratulations! Your JDK and JRE are installed.
Your First Java Program: Hello World
Historically, the first program you write while learning a new programming language is the program Hello World. If you can write a program that outputs Hello World on your monitor, it proves that you have properly installed the compiler and the run time environment, and your program doesn’t have syntax errors.
To start writing a Java program you could use any plain text editor, such as Notepad, TextEdit, or Sublime Text . The file that contains the Java code must be saved in a file with its name ending in .java.
Enter the following code in the text editor.
Listing 1-1: HelloWorld.java
public class HelloWorld {
public static void main(String[] args){
System.out.println("Hello World!!!!!");
}
}
Create a directory, c:\PracticalJava\Lesson1, and save the program you just created in the file HelloWorld.java (if you use Notepad, select All Files in the Save as Type drop-down to avoid auto-attachment of the .txt suffix).
Keep in mind that Java is a case-sensitive language, which means that if you named the program HelloWorld with a capital H and a capital W, don’t try to start the program helloworld. Your first dozen syntax errors will probably be caused by improper capitalization.
What follows is a really short explanation of some of the terms and language elements used in the HelloWorld program. You’ll get more comfortable with them after mastering the first several lessons in this book.
The first program contains a class, HelloWorld. Give the Java class and its file the same name. (There could be exceptions to this rule, but not in this simple program.) While writing Java programs, you create classes, which often represent objects from real life. You learn more about classes in Chapter 3.
The class HelloWorld contains a method, main(). Methods in Java classes represent functions (actions) that a class could perform. A Java class may have several methods, but if one of them is called main() and has the same method signature (the declaration line) as in our class, this makes this Java class executable. If a class doesn’t have a method main(), it can be used from other classes, but you can’t run it as a program. Here is the method signature (similar to a title) of the method main():
public static void main(String[] args)
This method signature includes the access level (public), instructions on usage (static), return value type (void), name of the method (main), and argument list (String[] args).
· The keyword public means that the method main() can be accessed by any other Java class.
· The keyword static means that you don’t have to create an instance of this class to use this method.
· The keyword void means that the method main() doesn’t return any value to the calling program.
· The keyword String[] args tells you that this method will receive an array of strings as the argument (you can pass external data to this method from a command line).
The main() method is the starting point of your program. You can write a program in Java SE that consists of more than one class, but at least one of them has the method main. A Java class can have more than one method. For example, a class Employee can have the methodsupdateAddress(), raiseSalary(), changeName(), and so on.
The body of the method main() contains the following line:
System.out.println("Hello World!!!!!");
The preceding println() method is used to print data on the system console (command window). Java’s method names are always followed by parentheses.
System here represents another Java class.
The dot notation, as in System.out, means that the variable out is defined inside the class System.
out.println() tells you that there is an object represented by a variable called out and it has a method called println().
You will be using this dot notation to refer to class methods or variables.
All these explanations may sound too short and inadequate, and they really are. Bear with me; I go into greater detail in subsequent chapters.
Compiling and Running Hello World
The program HelloWorld is written, and now you need to compile this program. Java compiler is a program that will convert your source code into so-called bytecode that JRE understands. The javac compiler is a part of the JDK, so open a command window on your PC or Terminal on MAC, change the current directory to c:\PracticalJava\Lesson1, and try to compile the following program:
cd PracticalJava\Lesson1
javac HelloWorld.java
Even though there is no program javac in the Chapter 1 directory, your OS found it in the bin directory of your Java install. MAC OS knows where the bin directory is located. In Windows OS you’ve added it to the PATH environment variable.
You won’t see any confirmation of a successful compilation; just type dir on Windows (or ls on MAC OS) to confirm that a new file named HelloWorld.class has been created. This proves that your program has been successfully compiled.
If the program has syntax errors, the compiler prints error messages. In this case, fix the errors, and recompile the program again. You may need to do it more than once until the file HelloWorld.class is successfully created.
Now run the program by typing the following command:
java HelloWorld
Note that this time you didn’t use the javac program, but java, which starts the Java run time and loads the HelloWorld program into the Java Virtual Machine (JVM). The words “Hello World” are displayed in the command window. Figure 1-4 is a screenshot that shows how in MAC OS looks the compilation command (javac HelloWorld.java), the content of the Chapter 1 folder (ls) after the compilation—the dir in Windows is an equivalent to ls, how to run the program (java HelloWorld), and the output of the HelloWorld program (Hello World!!!!!).
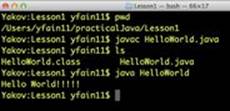
Figure 1-4: Compiling and running HelloWorld
Try It
In this lesson your goal is to write your first Java program that outputs the words “Hello World.” After this goal is achieved, add more lines to this program to print your address.
Lesson Requirements
For this lesson download and install the current version of JDK as explained in the section Downloading and Installing Java SE.
Step-by-Step
1. Open a plain text editor of your choice and enter the text of the Hello World program. Keep in mind that Java is case sensitive.
2. Save the program in the file HelloWorld.java.
3. Compile the program in the command window using the command javac HelloWorld.java.
4. Run the program by using the command java HelloWorld.
TIP Please select the videos for Lesson 1 online at www.wrox.com/go/javaprog24hr2e. You will also be able to download the code and resources for this lesson from the website.
All materials on the site are licensed Creative Commons Attribution-Sharealike 3.0 Unported CC BY-SA 3.0 & GNU Free Documentation License (GFDL)
If you are the copyright holder of any material contained on our site and intend to remove it, please contact our site administrator for approval.
© 2016-2026 All site design rights belong to S.Y.A.